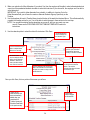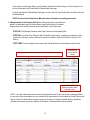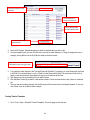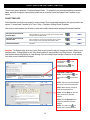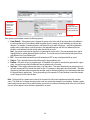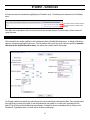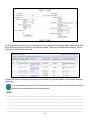
1
Interfase Schedules Manual TRADEMARKS & REGISTERED PRODUCTS The following products are registered and/or trademarked to the listed companies: Microsoft is a registered trademark, and Internet Information Server, Internet Explorer, Windows and Windows NT are trademarks of Microsoft Corporation. Netscape is a trademark of Netscape, Inc. All other names are registered trademarks of their respective companies. CONVENTIONS The following conventions are used in this manual: CSO represents CSO Research, Inc. WWW represents the World Wide Web URLs and email addresses are printed in blue and underlined. LICENSING With your signed contract, you are granted an annually renewable, nonexclusive, non transferable license to use the Interfase software. Refer to your purchase agreement for more details SUPPORT Every attempt has been made to make this documentation complete. If questions or problems do arise, you can get technical support from CSO Research, Inc. CSO Research, Inc. P.O. Box 340819 Austin, TX 78734 (866) 705-4201 (toll free); Press 1 for Support [email protected] (Copyright © CSO Research, Inc. ) 1 CSO Research, Inc. Support Information For complete information on available support services please visit http://www.csoresearch.com/support. There are three main options for obtaining support for Interfase. The CSO Research services team is available Monday through Friday from 8am to 6pm CT LIVE CHAT: To access the Live Chat service, please visit http://www.csoresearch.com/support, go to the Live Chat section and click the Live Chat button EMAIL: [email protected] PHONE: 1-866-705-4201 (Toll Free). Press “1” for support. Support Help Menu As an Administrator you will have access to the Help menu option. You will find the Help menu in the main menu of your Interfase system. Clicking on this menu will load the CSO Support website and display the Support Information. All support options are listed there for your convenience. 2 TABLE OF CONTENTS TABLE OF CONTENTS ....................................................................................................................... 3 SCHEDULES DATABASE .................................................................................................................. 5 TYPES OF INTERVIEW SCHEDULES ............................................................................................................... 5 SCHEDULES SEARCH AND SEARCH RESULTS ............................................................................................. 6 SCHEDULE PROFILE ......................................................................................................................................... 8 CREATING A NEW SCHEDULE ......................................................................................................................... 9 CREATING AN OPEN SCHEDULE.................................................................................................................... 16 MANAGING THE WAITING LIST .......................................................................................................... 18 CREATING A PRESELECT SCHEDULE ........................................................................................................... 19 PRESELECT SCHEDULES – MANAGING PRESELECT ACTIVITY .................................................... 22 CREATING A PRESELECT CONTINUOUS SCHEDULE .................................................................................. 28 PRESELECT SCHEDULES – MANAGING PRESELECT ACTIVITY .................................................... 22 CREATING A RESUME COLLECTION SCHEDULE ......................................................................................... 32 ACCESSING PENDING SCHEDULES .............................................................................................................. 34 APPROVING PENDING SHCEUDLES .............................................................................................................. 35 SCHEDULE CALENDAR.................................................................................................................................... 37 ACCESSING AND MODIFYING AN INTERVIEW SESSION ............................................................................. 40 DELETING AN INTERVIEW SESSION .............................................................................................................. 44 DELETING AN INFORMATION SESSION ......................................................................................................... 44 DELETING A SCHEDULE .................................................................................................................................. 45 SCHEDULES TOOLS AND SETUP .................................................................................................... 47 TIMESLOT AND TIMELINE TEMPLATES ......................................................................................................... 47 PACKET AND SYSTEM EVENT (EMAIL) TEMPLATES .................................................................................... 58 ADVANCED OPTIONS....................................................................................................................................... 61 SYSTEM REPORTS........................................................................................................................................... 62 STUDENT – SCHEDULES .................................................................................................................. 63 QUALIFIED SCHEDULES .................................................................................................................................. 63 VIEWING AND APPLYING FOR QUALIFIED SCHEDULES.............................................................................. 64 FUTURE SCHEDULES ...................................................................................................................................... 67 ACCESSING SCHEDULES THROUGH A JOB SEARCH.................................................................................. 69 3 EMPLOYER – SCHEDULES ............................................................................................................... 70 SCHEDULE LIST................................................................................................................................................ 70 CREATING A NEW SCHEDULE REQUEST ...................................................................................................... 72 MANAGING A PRESELECT LIST FOR A PRESELECT SCHEDULE ............................................................... 73 ACCESSING AN INTERVIEW SESSION ........................................................................................................... 75 4 SCHEDULES DATABASE What is a schedule? A schedule is an Interfase component that allows administrators to manage on-campus interviews. In this section of the manual, we will cover the different types of schedules, as well as go through examples of how to create each type. TYPES OF INTERVIEW SCHEDULES Currently, an admin can create four Schedule Types in Interfase, and each type has a coordinating timeline. These types and their coordinating timelines will automate how and when the students/employers view/perform action on the schedule. 1. OPEN – Involves a system screening process ONLY. Students who meet the requirements can sign up for an interview timeslot. 2. PRESELECT – Involves a system AND Employer screening process. Students who meet the requirements of the job that is linked to the schedule can submit an interview request. Once the deadline is reached, employers review interview requests and make decisions on all interview candidates. Alternate interview candidates may be selected. Accepted candidates must wait to sign up for an interview until the sign-up date is reached. Alternate candidates must wait to sign up for an interview until the alternate sign-up date is reached. 3. PRESELECT CONTINUOUS – Involves a system AND employer screening process. Students who meet the requirements can submit an interview request. The employer reviews interview requests and makes interview decisions on an ongoing basis. Alternate interview candidates may NOT be selected. Students can sign up as soon as an interview decision has been made for their interview request. 4. RESUME COLLECTION – This type of schedule does not have an interview date. It is only used to collect resumes for employers. This is often used when employers will handle the interview scheduling on their own. It can also be used to see what type of interest students might have in the job posting. If enough resumes are collected, the employer might decide to go ahead and come on campus to conduct interviews. If this happens, the schedule can easily be changed to a Preselect schedule. To access the Schedules database as an administrator, highlight the Schedules menu under Databases. The submenus are Search, Pending, New, and Schedule Calendar (see image below). Search for existing records in the Schedules database View schedule records that are awaiting administrator approval Create a new schedule record View the schedule calendar 5 SCHEDULES SEARCH AND SEARCH RESULTS To search the Schedules database, go to Databases > Schedules > Search on the administrator menu bar. On the next page, you can enter criteria to use in your schedule search, such as Organization Name, Classification, and Majors. To make multiple selections for one field, hold down the Ctrl key as you click each value. Schedules Search Criteria: Once you have chosen your criteria, click Search to see the results. You can also click Search without entering any criteria to see all schedules in your site. Schedule Search Results: CHANGE SEARCH CRITERIA: Click the [Change Criteria] link to change the search criteria. SAVE SEARCH CRITERIA: Click the [Save Search] link to save the search criteria. 6 When Admins or Employers view the Schedules list, they will be able to see how far along the picks are. These flags will only show next to the Schedule ID for Preselect or Preselect Continuous Schedules during the preselection period. The progress is divided up among the following: 1. Picks Not Started - Shown on a Preselect or Preselect Continuous when the employer/admin has not yet begun making picks. 2. Picks Started/Not Complete - Shown when employers/admins have begun picks, but not completed them, on a Preselect or Preselect Continuous schedule. 3. Picks Submitted - Shown when employers/admins have submitted final picks. This applies only to Preselect schedules, not Preselect Continuous schedules. Another way to access schedules is via the jobs database. When you go to Databases > Jobs > Search, this is a portion of the screen that you will see: The Related Schedule Search Criteria section is at the bottom of the Job Search Criteria page, and allows you to search for jobs that are linked to schedules. Here, you can search by Schedule Type or Interview Date as well as specify that you only want to search for jobs that are linked to schedules. Once you specify your criteria and click Search, you will be taken to the job search results page: On this results page, any jobs that are linked to schedules will have a blue icon next to them. Clicking on this icon will expand the job listing and information about the linked schedule will display. You can then click on the or the Schedule ID to access the linked schedule. 7 SCHEDULE PROFILE Access an existing Schedule Profile by clicking on the Schedule ID in the search results page. Page Functions in the schedule profile: These are the jobs that are linked to this schedule View Activity – click on this button to see the activity associated with this schedule, including placements, observations, and audits. Delete – click here to delete this schedule. IMPORTANT: you will lose all activity associate with a schedule if you delete it. This schedule has an info session (Career Event) linked to it. Sessions section: shows all interview sessions assigned to this schedule. Timeline section: contains important schedule dates as well as all of the scheduled timeline changes that will automatically take place as the schedule progresses Document Categories section: allows for the selection of which documents a student must submit when applying for a schedule, and for the selection of documents they can submit 8 Employer Interview Request Information section: if you allow employers to submit schedule requests through Interfase, they will fill out this section. The schedule must have an active status for students to see it The Qualifiers section is only viewable to Administrators. This is a way to tag schedules for easier searching and reporting. The Stats section provides a handy “at a glance” view of student activity and statuses on this schedule. CREATING A NEW SCHEDULE To create a schedule, go to Databases > Schedules > New Create a new schedule record NOTE: STEPS ONE through SEVEN will be the same regardless of the schedule type you are creating (with the exception of a Resume Collection). STEP ONE: Search for an Employer or Contact to link the schedule to. or 9 STEP TWO: Choose whether to link this new schedule to a contact person or only to the employer. Click on Add Schedule to make your selection. Link to Contact: Only the contact linked to the schedule will be able to access the schedule profile and only this contact will receive system event (automatic) emails. Link to Employer: All contacts associated with that employer will be able to access the schedule profile and manage interview candidates. No system event (automatic) emails will be sent if the schedule is only linked to the employer. Link to both Employer & Contact Link only to Employer STEP THREE: Complete the Posting Information section Place a check mark here to select all jobs Or select individual jobs by clicking that job’s box 1. To link job(s) to the new schedule, you can: Place a check in the box to the left of the Job ID column header, which will select all available jobs Select individual jobs by placing a check mark next to each job you want to link to the schedule, or Click [Add New Job] to create a job that will then be linked to the schedule NOTE: As an administrator, you always have the option to link a job(s) to the new schedule or not. However. if Employer - Schedules - Require Job on Schedule Request is set to True under Tools > Setup > Settings, then employers will have to link a job(s) before they can continue with their schedule request. 10 STEP FOUR: Complete the Document Categories Section NOTE: All of the Employment Related documents that you have in your site under Tools > Setup > Document Categories will appear in this section. 1. In the right column (Document Categories Require Selection) of this section, choose which document(s) will be required of students when they apply for this schedule. Each time you make a selection in this column, the corresponding document will automatically be selected in the Document Categories Allow Selection column. 2. In the left column (Document Categories Allow Selection), choose which document(s) students will be able to select when applying for this schedule. This option is available because, for example, some employers may want to require resumes and cover letters but also allow for the submission of letters of recommendation and transcripts. 3. Click Save and Continue at the bottom of the page or complete the Interview Request Preferences section (optional). All checked documents in this column CAN BE selected by students when they apply for this schedule All checked documents in this column MUST BE selected by students when they apply for this schedule STEP FIVE: (OPTIONAL) Complete the Interview Request Preferences Section This section is normally only used by employers when they request an on campus interview. However, if you would like to use this section to record their preferences, this is acceptable as well. This section does not exert any control on the schedule. It is ONLY for request purposes. If you fill out this section, click Save and Continue when you are done. STEP SIX: Create the Interview Session. The Interview Session is where the date, room, and interview timeslots are stored. A Schedule can have more than one Interview Session or can share an Interview Session with another schedule. NOTE: If the employer (Patty’s Boutique) had multiple recruiters coming to interview for this position, you would add an interview session for each room. Simply repeat these steps for each Interview Session that needs to be created. 1. In the Add Session Options section, choose how you want to add the new session: a. Create New Session – with this option you are creating a new session that will not be linked to an existing session (complete steps 2a, 3a, and 4 below). b. Link to Existing Session – you would select this option when you want to link your new session to one that already exists in the system (complete steps 2b and 3b below). One example of this is that only one recruiter is coming on campus, and she is interviewing for more than one job. When you link sessions together, there will be a shared set of timeslots that students can sign up for. This prevents students from double booking the timeslots. 11 2. Complete the Future Sessions section (if applicable) a. If you leave Create New Session selected, you can proceed to the Session Information section (Step 3a below). b. If you choose to Link to Existing Section, the page will reload and you will now see the Future Sessions section. Only future sessions with an Active status will appear in the Future Sessions section. Under the Link to Schedule column, click Add Session next to the session you want to link this new session to. You will be taken back to the schedule profile. NOTE: If you choose the Link to Existing Session option, there is no need to configure the timeslots. This has already been done on the existing session, and will be copied over to the new session. 3. Complete the Session Information section a. Under the Session Information section, use the calendar picker to select the Interview Date. You can also use the Room Calendar icon to choose the Interview Room, provide more location details in the Interview Location field, and specify other important information in the Session Information field. You also need to give the session a Status. Remember, only schedules with Active sessions can be seen by students. b. Click Edit next to the Session Information section to specify the Interview Duration, Interview Location, and Room Assignment. 4. Create the timeslots IMPORTANT: This step only needs to be completed if you chose to Create New Session in Step 1 above. There are two different options you can follow to create the Timeslots for an Interview Session: Option 1 – Configure timeslots without a template Option 2 – Configure timeslots with an existing template (Recommended option) 12 OPTION 1: Configure your Timeslots without a template Complete the Configure Timeslots section Interview Duration - Enter numbers only. This is the length of each interview. Timeslot Break Period – Enter numbers only. This will insert a break after EACH interview timeslot. First Timeslot Start Time – Enter a time only. For example, 9:00 or 4:30. This will be the when the first interview timeslot starts. Last Timeslot Start Time – Enter a time only. For example, 9:00 or 4:30. This will be the when the last interview timeslot starts. Click Save & Continue, and you will see the Timeline screen next Only use this field if you want a break after each timeslot Times must be entered in a format like 9:00 or 4:30 Be sure to choose PM if the last timeslot will start in the afternoon. Here is the schedule so far: The Session Information section was completed in STEP SIX By default, the system will fill in the Contact person’s name that is linked to this schedule. Click the [Edit] to change the Recruiter or to add additional Recruiters for this interview session. The Timeline section will be completed in the next step(s) 13 Here is an interview session with the timeslots added. You will need to add in a lunch break and/or any reserved breaks, if necessary. Don’t forget to add your reserved timeslots for lunch, etc. The Timeslot Template we selected was customized this way. You can modify this Interview Session’s timeslots. It will not affect the default Template that was used to create this interview session. OPTION 2: Automatically add Timeslots with a Timeslot Template Complete the Import Timeslots section Click the Timeslot Template dropdown Select the timeslot template that best fits the interview session’s schedule (you can make adjustments later if necessary) Click Save & Continue and you will see the Timeline screen next NOTE: You may want to create your own timeslot templates for use in your site. Please see the CREATING & EDITING TIMESLOT TEMPLATES section for further instructions. These are the timeslot templates that have been created in the site STEP SEVEN: (Optional) Link or add an Info Session If the employer will give an information session in conjunction with the on campus interview, you can create an info session as a career event. You can then link the existing info session to the schedule or add a new info session that will automatically be linked upon its creation. 14 Click the chain link to link an existing info session to this schedule Click Add Info Session to create a new info session that will then automatically be linked to this schedule. a. Link an existing info session to this schedule i. Click the chain link next to Linked Info Session under the Posting Information section. ii. A new dialog box will open: Or, you can search for the info session by completing the Career Event Name box and clicking Search If you know the event ID of the info session to link to this schedule, input it in the Quick Assign to Record box and click Link. iii. If you already know the event ID of the information session, you can type it in the Quick Assign to Record box and click Link. Then click Close Window to return to the schedule profile. iv. You can also search for the info session by entering search terms in the Career Event Name box and clicking Search. In the search results, click Link under the Action column next to the correct info session. Then click Close Window to return to the schedule profile. b. Create a new info session i. Click Add Info Session next to Linked Info Session. ii. Create the Info Session as a Career Event. Please see the Interfase User’s manual for instructions on creating Career Events. iii. Once you create the info session, it will automatically be linked to the schedule. In the next pages we will walk you through the remaining steps for creating your schedule. Please see the appropriate section according to the type of schedule you are creating: 1. 2. 3. 4. Open Schedule - refer to the “CREATING AN OPEN SCHEDULE” section Preselect Schedule - refer to the “CREATING A PRESELECT SCHEDULE” section Preselect Continuous Schedule - refer to the “CREATING A PRESELECT CONTINUOUS SCHEDULE” section Resume Collection Schedule - refer to the “CREATING A RESUME COLLECTION SCHEDULE” section 15 CREATING AN OPEN SCHEDULE An Open Schedule involves a system screening process ONLY. Students who meet the requirements can sign up for an interview. In creating an Open Schedule, you control the different periods of time when things will happen: 1. Sign-up Open -- This is the first day students who meet the Requirements can sign-up for an interview timeslot. Students can start signing up at 12:05 AM (Central Time). 2. Sign-up Closed – This is the last day students can sign-up for an interview timeslot. Students can sign-up until 11:59 PM (Central Time). Example: The employer (Patty’s Boutique) will have 1 recruiter come on campus to interview for their Retail Management Trainee position. Note that this example will be the same if more than one recruiter will be coming to interview for this position. Refer to the “CREATE A NEW SCHEDULE” section for STEPS ONE through SEVEN of this process. STEP EIGHT: Complete the Timeline section. The Timeline controls the progress of the schedule and is determined by the type of Schedule you are creating. 1. Under Schedule Type, use the dropdown to select the type of schedule you are creating. In this example, we are creating an Open Schedule. 2. If you choose to, you can complete the Freeze Date/Time and Current Signup Method at this point. However, it is recommended that you wait until the next step to do so. This way, you can view all of the scheduled timeline changes and decide on the dates for these fields. 3. Make your selection for Allow Waiting List. The waiting list will take effect once all timeslots on this schedule are filled. If you select Yes, then students will be able to sign up on the waiting list. If you select No, there will be no waiting list. 4. The Allow Alternates field is NOT for use with Open schedules. 5. Use the dropdown list next to Timeline Name to select the day of the week the interview falls on. This will automatically populate the timeline entries for you. You will be able to make changes to these entries in the next step. NOTE: You can edit the existing timeline templates as you see fit, and you can create your own as well. Please see the CREATING & EDITING TIMELINE TEMPLATES section for instructions. 6. Use the calendar picker to select the date of the Interview. Click Save. Use the dropdown to select Open as the Schedule Type Allow Waiting List– if you want students to be able to sign up on a waiting list once all interview timeslots are filled, choose Yes. The Waiting List is ONLY used for Open Schedules. It is recommended that you wait to complete these fields in the next step Allow Alternates is ONLY used for Preselect Schedules and will be described in the CREATING A PRESELECT SCHEDULE section Use the calendar picker to select the date of the interview. If this schedule will span more than one day, enter the earliest date first. 16 Here you choose the day of the week that the interview falls on. This and the Schedule Date field will create the timeline for you. Once you click Save, this is a portion of the screen you will see: These are the 2 entries that were automatically added when you completed the Timeline Name and Schedule Date fields in the previous step. Click Edit to make changes to this section STEP NINE: Edit the Timeline section. 1. Click Edit next to the Timeline section. This is the screen you will see next: Preselections Due Date should NOT be filled out for an Open schedule Complete the Freeze Date/Time field if applicable. See notes below. These are the timeline changes that were automatically added. Click Edit if you would like to change them. Current Signup Method Choose Sign-up Open if this schedule sign-up period should open today Leave blank if this schedule’s sign-up period will open tomorrow or on another future date 2. Preselections Due Date should not be completed for an Open Schedule 3. The Freeze Date/Time (optional) is the last day and time that a student on a timeslot can move or cancel their interview. It only affects students who are already on a timeslot. This means that if a student is not on a timeslot and the Freeze Date/Time passes, the student can still sign up for a timeslot. However, once the student signs up for a timeslot, they are now “frozen” to their timeslot and cannot cancel or change it. This field is used so that students won’t make last minute changes right before the interview date(s). If you use this field, the date/time chosen needs to be before the Sign-up Closed date. 4. The Current Signup Method is used to override the Scheduled Timeline Changes. In the above instance, for example, let’s say that today is 7/13/2009. If I created this schedule today, then the Sign-up Open entry will not take affect until tomorrow since all Open signup methods begin at ≈12:05am CST. If I want students to be able to sign up on a timeslot now, I would change the Current Signup Method to be Sign-up Open. If you want the first Scheduled Timeline Change to take place like it’s schedule to, leave this field blank. 17 5. Scheduled Timeline Changes – these are automatically populated based on the selections you made in the Timeline Name and Schedule Date fields in STEP SEVEN. However, you can edit them if you wish. Click Edit next to the entry you want to modify, make the changes, and click Update. You can also click Remove to delete the entry. 6. Click Save once you have made all changes, and you will be taken back to the schedule profile. Here is the completed timeline for an open schedule: STEP TEN: Complete the Control Information section. Schedules MUST be active for students to see them Will automatically change to Yes when all slots are filled; can also be manually set 1. Click Edit in the Control Information section. 2. Schedule Filled – This field will automatically set to Yes once all timeslots have been filled. This will prevent other students from signing up for timeslots and will activate the waiting list (if in use). You can also manually set this to Yes if necessary. For example, if an employer decides that there are enough students on the schedule and would like to interview only those students, then you could set this to Yes. 3. Status – should be set to Active once the schedule is ready IMPORTANT: Schedules must be Active for students to see them 4. Created – this field reflects the date and time that the schedule was originally created, and it cannot be edited. 5. Modified - this field shows the date and time that the schedule was last modified, and it cannot be edited. 6. Click Save once you have made all changes. OPEN SCHEDULES - MANAGING THE WAITING LIST STEP ELEVEN (OPTIONAL): Managing the Waiting List If you decided to turn on the Waiting List in STEP EIGHT, then the Waiting List function is activated for this schedule. This means that once all timeslots are filled on the Interview Session, any students who wish to sign-up will instead be asked if they want to be added to the waiting list. The waiting list must be managed manually by an Administrator. There is a system event (automatic) email that can be emailed to an Administrator when a student cancels. SITUATION #1: A TIMESLOT BECOMES AVAILABLE BECAUSE A STUDENT CANCELS: You must decide how you will manage the waiting list once a student cancels their interview timeslot. There are two methods that are typically used when a timeslot opens up because of a cancellation: 1. You email the first student in the waiting list that signed up (see the Signup Date column below). You would either wait until you hear from that student or wait a certain amount of time (i.e. 2 hours). 18 2. You email all students in the waiting list. The first one that logs in and signs up will fill the open interview timeslot. SITUATION #2: THE EMPLOYER DECIDES TO SET UP ANOTHER INTERVIEW ROOM BECAUSE A SIGNIFICANT NUMBER OF STUDENTS ARE ON THE WAITING LIST. In this situation you would need to setup another Interview Session and then mass email all students in the waiting list. CREATING A PRESELECT SCHEDULE A Preselect Schedule involves a system AND Employer screening process. Students who meet the job requirements can request an interview, but the employer ultimately chooses which students can sign-up for an interview timeslot. In creating a Preselect Schedule, you control the different periods of time when things will happen: 1. Request Period Open -- This is the first day students who meet the job requirements can request an interview. They will need to submit their resume and any other required documents. The request period opens at 12:05 AM (Central Time). 2. Request Period Closed -- This is the last day students can request an interview. Once this deadline is reached, employers review interview requests and make decisions on all interview candidates. The request period closes at 11:59 PM (Central Time). 3. Accepted Students Sign-up Open – This is the first day that Accepted students can sign-up for an interview timeslot. Accepted students can start signing up at 12:05 AM (Central). 4. Alternate Students Sign-up Open (optional) – This is the first day that Alternate students can sign-up for an interview timeslot. Alternate students can start signing up at 12:05 AM (Central Time). 5. Sign-up Closed – This is the last day Accepted and Alternate students can sign-up for an interview timeslot. Students can sign-up until 11:59 PM (Central Time). EXAMPLE: The employer (Patty’s Boutique) will have 1 recruiter come on-campus to interview for their Retail Management Trainee position. Note that this example would be the same if more than one recruiter will be coming to interview for this position. Refer to the “CREATE A NEW SCHEDULE” section for STEPS ONE through SEVEN of this process. STEP EIGHT: Complete the Timeline section. The Timeline controls the progress of the schedule and is determined by the type of Schedule you are creating. 1. Under Schedule Type, use the dropdown to select the type of schedule you are creating. In this example, we are creating a Preselect Schedule. 2. If you choose to, you can complete the Preselections Due Date, Freeze Date/Time, and Current Signup Method at this point. However, it is recommended that you wait until the next step to do so. This way, you can view all of the scheduled timeline changes and decide on the dates for these fields. 3. The Allow Waiting List is NOT for use with Preselect schedules. 19 4. Make your selection for Allow Alternates. If you select Yes, then the employer will be able to select alternate students in case one of the preselected students is unable to make their interview. If you choose No, the employer won’t be able to select alternates. IMPORTANT: If you wish to allow alternates for a schedule, in addition to choosing Yes in the Allow Alternates field, you will need to create an Alternate Students Sign-up Open entry on the Timeline. 5. Use the dropdown list next to Timeline Name to select the day of the week the interview falls on. This will automatically populate the timeline entries for you. You will be able to make changes to these entries in the next step. NOTE: You can edit the existing timeline templates as you see fit, and you can create your own as well. Please see the CREATING & EDITING TIMELINE TEMPLATES section for instructions. 6. Use the calendar picker to select the date of the Interview. Click Save. Use the dropdown to choose Preselect as the Schedule Type It is recommended that you wait to complete these fields in the next step Allow Waiting List is only used for Open Schedules. Disregard this field when creating a Preselect schedule. Allow Alternates – if set to Yes, the employer will be able to choose alternate students to interview in case a preselect student can’t make the interview. Use the calendar picker to select the date of the interview. If this schedule will span more than one day, enter the earliest date first. Here you choose the day of the week that the interview falls on. This and the Schedule Date field will create the timeline for you. Once you click Save, this is a portion of the screen you will see: These are the timeline entries that were automatically added when you completed the Timeline Name and Schedule Date fields in the previous step. Click Edit to make changes to this section 20 STEP NINE: Edit the Timeline section. 1. Click Edit next to the Timeline section. This is the screen you will see next: Preselections Due Date (optional) – this is the date by which the employer should have made their preselect choices. Tip: most admin set this date 1 to 2 days before the Accepted Student Sign-up Open date. Complete the Freeze Date/Time field if applicable. See notes below. These are the timeline changes that were automatically added. Click Edit if you would like to change them. Current Signup Method Choose Request Period Open if this schedule’s request period should open today Leave blank if this schedule’s request period will open tomorrow or on another future date 2. Preselections Due Date – this is the date by which the employer should have made their preselect picks. Though this field has no control within the schedule, it will send out a reminder email to the employer if the email is enabled in your site. 3. The Freeze Date/Time (optional) is the last day and time that a student on a timeslot can move or cancel their interview. It only affects students who are already on a timeslot. This means that if a student is not on a timeslot and the Freeze Date/Time passes, the student can still sign up for a timeslot. However, once the student signs up for a timeslot, they are now “Frozen” to their timeslot and cannot cancel or change it. This field is used so that students won’t make last minute changes right before the interview date(s). If you use this field, the date/time chosen needs to be before the Sign-up Closed date. 4. The Current Signup Method is used to override the Scheduled Timeline Changes. In the above instance, for example, let’s say that today is 8/31/2009. If I created this schedule today, then the Request Period Open entry will not take affect until tomorrow since all Open signup methods begin at ≈12:05am CST. If I want students to be able to request an interview now, I would change the Current Signup Method to be Request Period Open. If you want the first Scheduled Timeline Change to take place like it is scheduled to, leave this field blank. 5. Scheduled Timeline Changes – these are automatically populated based on the selections you made in the Timeline Name and Schedule Date fields in STEP SEVEN. However, you can edit them if you wish. Click Edit next to the entry you want to modify, make the changes, and click Update. You can also click Remove to delete the entry. 6. If you chose Yes to Allow Alternates, remember to add an entry to the Timeline for Alternate Students Sign-up Open. To do this, click Edit in the Timeline section, then click Add Event next to Scheduled Timeline Changes. Under Add New Event, choose the date you want to allow alternate students to be able to sign up for a timeslot, choose Alternate Students Sign-up Open, and Click Add Event. 7. Click Save once you have made all changes, and you will be taken back to the schedule profile. Here is the completed timeline for a Preselect schedule (without Alternates): 21 STEP TEN: Complete the Control Information section. Schedules MUST be active for students to see them Will automatically change to Yes when all slots are filled; can also be manually set 1. Click Edit in the Control Information section. 2. Schedule Filled – This field will automatically set to Yes once all timeslots have been filled. This will prevent other students from signing up for timeslots and will activate the waiting list (if in use). You can also manually set this to Yes if necessary. For example, if an employer decides that there are enough students on the schedule and would like to interview only those students, then you could set this to Yes. 3. Status – should be set to Active once the schedule is ready IMPORTANT: Schedules must be Active for students to see them 4. Created – this field reflects the date and time that the schedule was originally created, and it cannot be edited. 5. Modified - this field shows the date and time that the schedule was last modified, and it cannot be edited. 6. Click Save once you have made all changes. PRESELECT SCHEDULES - MANAGING PRESELECT ACTIVITY An Administrator will be able to manage the preselect activity section for any schedule. There are several tasks that the administrator may wish to do from time to time: 1. Make the Preselect Selections – Although this task is intended for the employer, an administrator may find that they need to perform this task for the employer. Below you would choose which students are Accepted or Not Accepted (if you are viewing a Preselect schedule with Alternates there will be a third option of Alternate). You can also choose Student Declined if necessary. STEP ONE: Click Manage Preselects under Page Functions in the schedule profile. 22 Click Manage Preselects to view the students who have submitted their resume to this schedule STEP TWO: Next to each student select Accepted, Not Accepted, or Alternate (if available). Student Declined– this option is for the student to decline an Accepted status. It is not viewable to employers during the selection process. Accept All – toggles the Accepted status for each student Save Picks – click this once you’re done making selections STEP THREE: Click Save Picks. Below is the next screen you will see. Submit Picks – finalizes the selections 23 Return – takes you back to the previous screen if you would like to make more selections STEP FOUR: Either click Submit Picks or Return (see below for details). 1. If you click Submit Picks: If any students are still marked as Requested, they will be changed to Not Accepted, if you click OK on the below message: After clicking on the OK button, the system returns back to the Manage Preselect Activity list and this message will show: Preselects picks have been submitted for this schedule. This indicates that final picks are complete. 2. If you click Return: This will save any selections/decisions that were made, and the system will return to the Manage Preselect Activity list. The system also notifies the employer/admin that: Selection has begun for this schedule. This indicates that picks have been started, but are not complete. 2. Mass Email students in the Preselect list: STEP ONE: Click Manage Preselects under Page Functions in the schedule profile. STEP TWO: Next to the Mass Email To button, choose which group of students you wish to mass email STEP THREE: Click the Mass Email To: button. Use the dropdown to select the group of preselect students to email Once you choose the group of students to email, click the Mass Email To button STEP FIVE: On the next screen you will see the list of students to be emailed. You can exclude any student by placing a check mark next to the student’s name(s). Once you have verified the list click Continue. You will then be able to choose an email template to use (if you have created them) as well as decide if you want to include merge fields. Make your selections and click Proceed. 24 If you chose to include merge fields, you will be able to decide which fields to merge on the next screen. If not, you will be directed to the Create Email for Student Mass Email page. On the Create Email for Student Mass Email page, you will need to fill in the Email Subject and Body, then click Send Mass Email. NOTE: Please see the Interfase Users’ Manual for more information on sending mass emails. 3. Adding Students to the Preselect Activity list - Although this task is intended for the student, an administrator may find that they need to perform this task for the student. Simply search for the student’s name and click “Add Student” next to their name. STEP ONE: Click Manage Preselects under Page Functions in the schedule profile. STEP TWO: In the Search for Student to add to Preselect Activity section, complete any combination of the User Name, First Name, and/or Last Name to search for students to add to the Preselect Activity list. Click Search STEP THREE: From the student search results, click Add Student Next to each student you want to add. Use these fields to search for students to add to the preselect activity list Click Search to see the student results Click Add Student for each student you want to add to Preselect Activity NOTE: If you add a student who does not meet the requirements set in the job, you will see a message similar to the one below. As an administrator you can override the job requirements of any schedule by clicking Continue with Sign Up. Note: If the student does not have a resume in the system, it is highly advisable that they upload one; otherwise their resume cannot be included in the Preselect or Interview Session resume packets. 25 4. Creating and sending preselection resume packets- as an administrator you can generate preselection packets to view on the screen, or you can email the packet to yourself and/or the employer. STEP ONE: Click Manage Preselects under Page Functions in the schedule profile. STEP TWO: To generate the packet for viewing in another window, leave the “none” radio button selected. Then choose the student(s) whose resumes you would like to view. There are two ways to select the students: 1. Choose all of the preselect students in the schedule – click the checkbox to the left of the User Name column header. 2. Choose students individually – click the checkbox to the left of the student(s) whose resumes you would like to view. Use this checkbox to select all students on the schedule After making the student selections on the left side, use the radio buttons to choose whether to email the resumes or just display them. Choosing one of these will send the resumes to the selected user(s). Choosing this radio button will not send the resumes: it will open a new window and display them. Use these checkboxes to select individual student(s) Once you choose the student(s) and the applicable radio button, click Create Packet 26 3. Click Create Packet, and the resume packet will open in Adobe Reader. 4. The first page that you see is the summary page. On the left of this page is a list of the students who submitted a resume. Below that there are two buttons: a. Download All – This will allow you to download the summary page and the individual resumes to your computer in PDF format for individual viewing and/or printing. b. Print/View All – Clicking this button will open the summary page and all of the resumes in one continuous form so that you can easily scroll down and view all of the resumes. You can also print all of the resumes from this screen. Download All – lets you quickly download all of the resumes to your computer in PDF format Print/View All – opens all of the resumes in one form for easy printing of all documents STEP THREE: To email the packet to yourself and/or the employer: 1. Choose the radio button that applies (self, employer, or employer & self). 2. Follow 1 or 2 in STEP TWO above to choose the students whose resumes you want to email. 3. Click Create Packet. This is the screen you will see next: 27 4. The To: field is automatically populated with the contact’s email address, but you can manually change it, along with the From, Subject, and body of the email if you would like. 5. Click Send when you are ready to send the email. You will then see a message letting you know that the email has been sent. 5. General administrator tasks – in the Preselect Activity section, administrators can also view submitted documents, change submitted documents, and remove students from the schedule. For each of the below tasks, you would first click Manage Preselects under Page Functions in the schedule profile. View submitted documents – click the PDF icon in the Submitted Documents column next to the student(s) whose document(s) you wish to see. This will open an Adobe Reader and display the document(s) submitted to this schedule. Change submitted documents – click the icon in the Change Documents column next to the student(s) whose documents you wish to change. This will open a new window where you will easily be able to change any documents this student submitted. Remove student(s) – click Remove in the Action column next to the student(s) you wish to remove from preselect activity. NOTE: If you remove a student from the Preselect Activity section of a schedule, this will be reflected in the student’s schedule activity section as well. CREATING A PRESELECT CONTINUOUS SCHEDULE A Preselect Continuous Schedule involves a system AND Employer screening process. Students who meet the requirements can request an interview, but the employer ultimately chooses which students can sign-up for an interview timeslot. With Preselect Continuous Schedules, the employer needs to be aware that they must continuously make decisions on students. In creating a Preselect Continuous Schedule, you control the different periods of time when things will happen. This schedule is different from the Preselect Schedule because some periods are combined: 28 1. Preselect Continuous Open To Requests -- This is the first day students who meet the requirements can request an interview. They will need to submit their resume and any other required documents. The request period opens at 12:05 AM (Central Time). 2. Preselect Continuous Closed To Requests -- This is the last day students can request an interview. The request period closes at 11:59 PM (Central Time). 3. Sign-up Closed – This is the last day Accepted students can sign-up for an interview timeslot. Students can signup until 11:59 PM (Central Time). IMPORTANT: During ANY of the periods of time, the Employer can review interview requests and makes interview decisions on an ongoing basis. Alternate interview candidates may NOT be selected. After the Sign-up Closed date is reached, the employer will no longer be able to make interview decisions. EXAMPLE: The employer (Patty’s Boutique) will have 1 recruiter come on-campus to interview for their Retail Management Trainee position. Note that this example would be the same if more than one recruiter will be coming to interview for this position. Refer to the “CREATE A NEW SCHEDULE” section for STEPS ONE through SEVEN of this process. STEP EIGHT: Complete the Timeline section. The Timeline controls the progress of the schedule and is determined by the type of Schedule you are creating. 1. Under Schedule Type, use the dropdown to select the type of schedule you are creating. In this example, we are creating a Preselect Continuous schedule. 2. If you choose to, you can complete the Preselections Due Date, Freeze Date/Time, and Current Signup Method at this point. However, it is recommended that you wait until the next step to do so. This way, you can view all of the scheduled timeline changes and decide on the dates for these fields. 3. The Allow Waiting List is NOT for use with Preselect Continuous schedules. 4. Allow Alternates is not used with Preselect Continuous schedules. 5. Use the dropdown list next to Timeline Name to select the day of the week the interview falls on. This will automatically populate the timeline entries for you. You will be able to make changes to these entries in the next step. NOTE: You can edit the existing timeline templates as you see fit, and you can create your own as well. Please see the CREATING & EDITING TIMELINE TEMPLATES section for instructions. 6. Use the calendar picker to select the date of the Interview. Click Save. Use the dropdown to choose Preselect Continuous as the Schedule Type Allow Waiting List is only used for Open Schedules. Disregard this field when creating a Preselect schedule. It is recommended that you wait to complete these fields in the next step Allow Alternates – this field is not used for Preselect Continuous schedules. Use the calendar picker to select the date of the interview. If this schedule 29 will span more than one day, enter the earliest date first. Here you choose the day of the week that the interview falls on. This and the Schedule Date field will create the timeline for you. Once you click Save, this is a portion of the screen you will see: These are the timeline entries that were automatically added when you completed the Timeline Name and Schedule Date fields in the previous step. Click Edit to make changes to this section STEP NINE: Edit the Timeline section. 1. Click Edit next to the Timeline section. This is the screen you will see next: Preselections Due Date (optional) – this is the date by which the employer should have made their preselect choices. These are the timeline changes that were automatically added. Click Edit if you would like to change them. Complete the Freeze Date/Time field if applicable. See notes below. Current Signup Method Choose Preselect Continuous Open to Requests if this schedule’s request period should open today Leave blank if this schedule’s request period will open tomorrow or on another future date 2. Preselections Due Date – this is the date by which the employer should have made their preselect picks. Though this field has no control within the schedule, it will send out a reminder email to the employer if the email is enabled in your site. 3. The Freeze Date/Time (optional) is the last day and time that a student on a timeslot can move or cancel their interview. It only affects students who are already on a timeslot. This means that if a student is not on a timeslot and the Freeze Date/Time passes, the student can still sign up for a timeslot. However, once the student signs up for a timeslot, they are now “Frozen” to their timeslot and cannot cancel or change it. This field is used so that students won’t make last 30 minute changes right before the interview date(s). If you use this field, the date/time chosen needs to be before the Sign-up Closed date. 4. The Current Signup Method is used to override the Scheduled Timeline Changes. In the above instance, for example, let’s say that today is 8/31/2009. If I created this schedule today, then the Preselect Continuous Open to Requests entry will not take affect until tomorrow since all Open signup methods begin at ≈12:05am CST. If I want students to be able to request an interview now, I would change the Current Signup Method to be Preselect Continuous Open to Requests. If you want the first Scheduled Timeline Change to take place like it is scheduled to, leave this field blank. 5. Scheduled Timeline Changes – these are automatically populated based on the selections you made in the Timeline Name and Schedule Date fields in STEP SEVEN. However, you can edit them if you wish. Click Edit next to the entry you want to modify, make the changes, and click Update. You can also click Remove to delete the entry. 6. Click Save once you have made all changes, and you will be taken back to the schedule profile. Here is the completed timeline for a Preselect Continuous schedule: STEP TEN: Complete the Control Information section. Will automatically change to Yes when all slots are filled; can also be manually set Schedules MUST be active for students to see them 1. Click Edit in the Control Information section. 2. Schedule Filled – This field will automatically set to Yes once all timeslots have been filled. This will prevent other students from signing up for timeslots and will activate the waiting list (if in use). You can also manually set this to Yes if necessary. For example, if an employer decides that there are enough students on the schedule and would like to interview only those students, then you could set this to Yes. 3. Status – should be set to Active once the schedule is ready IMPORTANT: Schedules must be Active for students to see them 4. Created – this field reflects the date and time that the schedule was originally created, and it cannot be edited. 5. Modified - this field shows the date and time that the schedule was last modified, and it cannott be edited. 6. Click Save once you’ve made all changes. 31 PRESELECT CONTINUOUS SCHEDULES - MANAGING PRESELECT ACTIVITY Please see Page 22. Steps to managing preselect activity are the same for both Preselect and Preselect Continuous Schedules. CREATING A RESUME COLLECTION SCHEDULE A Resume Collection schedule is quite unique as compared to the other types since it does not have an interview date. There are no interviews with a resume collection schedule; this type of schedule is used to collect resumes for employers who might handle the interview scheduling external to Interfase. It can also be used just to see how much interest students have in a job. If there is a lot of interest, the Resume Collection can be turned into a Preselect schedule. Refer to the “CREATE A NEW SCHEDULE” section for STEPS ONE through THREE of this process. STEP FOUR: Complete the Document Categories Section NOTE: All of the Employment Related documents that you have in your site under Tools > Setup > Document Categories will appear in this section. 1. In the right column (Document Categories Require Selection) of this section, choose which document(s) will be required of students when they apply for this schedule. Each time you make a selection in this column, the corresponding document will automatically be selected in the Document Categories Allow Selection column. 2. In the left column (Document Categories Allow Selection), choose which document(s) students will be able to select when applying for this schedule. This option is available because, for example, some employers may want to require resumes and cover letters but also allow for the submission of letters of recommendation and transcripts. 3. Click Save and Close at the bottom of the page or complete the Interview Request Preferences section (optional). All checked documents in this column CAN BE selected by students when they apply for this schedule All checked documents in this column MUST BE selected by students when they apply for this schedule STEP FIVE: (OPTIONAL) Complete the Interview Request Preferences Section This section is normally only used by employers when they request an on campus interview. However, if you would like to use this section to record their preferences, this is acceptable as well. This section does not exert any control on the schedule. It is ONLY for request purposes. If you fill out this section, click Save and Close when you are done. STEP SIX: Complete the Timeline section 32 1. Click Edit next to the Timeline section. The following screen will appear. Use the dropdown to choose Resume Collection as the Schedule Type These fields are not used for a Resume Collection Click Add Event to manually add each of the timeline entries. Click Import Events if you have created a timeline template for Resume Collections 2. Use the dropdown next to select the type of schedule you are creating. In this example, we are creating a Resume Collection. 3. Disregard the following fields: Preselections Due Date, Freeze Date/Time, Allow Waiting List, and Allow Alternates. These fields are not used with Resume Collections. 4. If you choose to, you can complete the Current Signup Method at this point. However, it is recommended that you wait until the next step to do so. This way, you can view all of the scheduled timeline changes and decide on the dates for these fields. 5. The next step is to add the timeline entries. There are 2 ways to do this: Add each timeline entry manually Click Add Event in the Scheduled Timeline Changes section. Under the Add New Event section, use the Signup Method dropdown to choose Request Period Open. Use the calendar picker to choose the Activation Date for this entry. Repeat the above steps to add the entry for Request Period Closed. Import the timeline from a predefined template Click Import Events in the Scheduled Timeline Changes section. Under the Add New Event section, use the Timeline Name dropdown to choose the template you want to use. Use the calendar picker to choose the Schedule Date. While there is no interview for this schedule type, there must be a date in this field for the template to work. Please see the CREATING & EDITING TIMELINE TEMPLATES section for more information. Click Add Timeline. If the Request Period should open today, use the dropdown for Current Signup Method to choose Request Period Open. If the Request Period should open tomorrow or on another future date, leave it blank. Click Save in the Timeline section. You will be returned to the schedule profile. NOTE: You can edit the existing timeline templates as you see fit, and you can create your own as well. Please see the CREATING & EDITING TIMELINE TEMPLATES section for instructions. 33 Here is the completed timeline for a Resume Collection schedule: STEP NINE: Complete the Control Information section. Schedule Filled – does not apply to Resume Collection schedules Schedules MUST be active for students to see them 1. Click Edit in the Control Information section. 2. Schedule Filled – does not apply to Resume Collection schedules 3. Status – should be set to Active once the schedule is ready IMPORTANT: Schedules must be Active for students to see them 4. Created – this field reflects the date and time that the schedule was originally created, and it cannot be edited. 5. Modified - this field shows the date and time that the schedule was last modified, and it cannot be edited. 6. Click Save once you’ve made all changes. ACCESSING PENDING SCHEDULES The schedule records that are pending administrator approval can be accessed in two ways: 1. Administrator Home Page – Pending 34 2. Databases > Schedules > Pending Pending Schedule List: Which schedules are included in the Pending list? The Pending list includes schedule records that an employer created. Once an employer completes a schedule request, it appears in the Pending list for administrator approval APPROVING PENDING SCHEDULES In the Pending Schedules list, click the Schedule ID, Organization Name, or Linked Jobs link to view the schedule profile. All of these links will take you to the schedule profile. Once the schedule profile is open, scroll down to and review the Employer Interview Request Information section: 35 These fields determine the Interview Session(s) that need to be set up. Determines the Type of Schedule this will be. The Timeline will be completed according to this. These 2 fields will let you know if the employer is requesting an info session Remember that this section has NO control over the schedule. This is only the schedule that the employer has requested. You can use this section as a guide in approving the schedule. Approving the Schedule STEP ONE: Edit the Timeline section. a. Click Edit next to the Timeline section b. See one of the following sections of this manual (depending upon the type of schedule you are approving) for instructions on creating the timeline: CREATING AN OPEN SCHEDULE CREATING A PRESELECT SCHEDULE CREATING A PRESELECT CONTINUOUS SCHEDULE CREATING A RESUME COLLECTION SCHEDULE STEP TWO: Add the desired Interview Session(s). a. Click Add Session under Page Functions on the left side of the page. b. Please see STEP SIX on page 10 for instructions on creating the Interview Session(s). STEP THREE: Make sure that you change the schedule status from Pending to Active when finished. Schedules MUST be Active for students to see them. STEP FOUR: (Optional) Link an existing info session or add a new info session to the schedule. Please see STEP SEVEN on page 10 for instructions on linking and adding info sessions to schedules. STEP FIVE: (Optional) Link existing jobs to the schedule or add new jobs that will be linked to the schedule. Please see STEP THREE on page 9 for instructions on linking jobs to schedules. 36 SCHEDULE CALENDAR All events related to Schedules are located on their own calendar, the Schedule Calendar. This calendar can be accessed in two ways: 1. Databases – Schedules – Schedule Calendar. 2. Administrator Home Page – Schedule Calendar link Schedule Calendar: The Schedule Calendar can be viewed in month, week, and day view. It will give Administrators a glimpse of any Schedulerelated activity for a given period. Yellow Purple KEY – These are the four types of events that will display on the Schedule Calendar. Green Orange 37 MONTH VIEW You can use these 3 buttons to toggle between views. Click on the number to open that day’s schedule activities. Clicking on a day’s number in month view will open that day in the day view (see below). All schedule activity for that day will be displayed. WEEK VIEW Use these buttons to move between days, weeks, or months, depending on the view you are in. 38 DAY VIEW This button takes you to today if you are in day view, or to the week or month today is in if you are in week or month view. The Sign-up period for this schedule will end tonight. You can use the calendar picker to quickly jump to a specific day, week, or month depending on the view you are in. To open an event in the calendar, double-click the event. Double-clicking an Interview Session will take you directly to the schedule that the session is linked to, unless there are multiple schedules linked to the session. In this case, you will see a window that lets you click on the schedule you would like to go to. Double-clicking an Information Session will take you to the info session profile. Double-clicking a Scheduled Timeline Change will take you to the day view and you will see a clickable link to the schedule as well as the specific timeline change that will take place on that day. Double-clicking a Schedules Preselects Due entry will take you to the day view with a clickable link to the schedule. 39 ACCESSING AND MODIFYING AN INTERVIEW SESSION To access an Interview Session in the Schedule Profile, click the Session’s interview date link under the Interview Date column. The Session Information, Recruiters, Timeline and Timeslots sections are displayed. To edit the Session Information, Recruiters, or Timeline sections, click the Edit link. Click Edit to make any changes to these 3 sections 40 Place a check in the box next to the timeslot(s) you wish to delete and click Remove Selected Timeslots. Click an interview time link to change a timeslot An Admin can Mass Email students on the interview timeslots. To add a timeslot to a session: 1. Click the Add Timeslot link. 2. The Timeslot Information screen appears. 3. In the Interview Time field, enter the interview time that you would like to add 4. Click the Save button. . To remove a timeslot from a session: 1. Click the check box next to the timeslot(s) that you would like to remove. 2. Click the Remove Selected Timeslots button. To change a timeslot: 1. Click the interview time link. The Timeslot Information screen appears. 2. In the Interview Time field, change the interview time. 3. Click the Change Time/Reserved button. Enter the new interview time and click Change Time/Reserved 41 To reserve a timeslot: 1. Click the interview time link. The Timeslot Information screen appears. 2. Enter the name of the reserved slot (that is, Reserved or Break) in the Reserved Slot field. 3. Click the Change Time/Reserved button. Enter the name of the Reserved Slot and click Change Time/Reserved Adding a student to a timeslot After you click on the appropriate timeslot, these are the buttons you can use to add students to the timeslot. There are 4 ways you can add students to timeslots, though only three of them are usually recommended. The recommended ways to add a student are: 1. Adding a student who is on the Waiting List to a timeslot: Click the interview time link for the slot you want to add the student to. The Timeslot Information screen appears. Under Page Functions, click Add Student From Wait List. Click the Add Student link under the Action column. 42 2. Adding a student who is on the Preselect Activity List to a timeslot Click the interview time link for the slot you want to add the student to. The Timeslot Information screen appears. Under Page Functions, click Add Student From Preselect Activity. Click the Add Student link under the Action column. 3. Adding a student from the Student Database to a timeslot Click the interview time link for the slot you want to add the student to. The Timeslot Information screen appears. Under Page Functions, click Add Student From Student Search. Enter search terms in the User Name, First Name, and/or Last Name to find the student to add to the timeslot. From the search results, click Sign Up under the Action column next to the correct student. Enter student search terms in these fields Then click Search Click Sign Up next to the student to add to the timeslot. There is a fourth way to add a student to a timeslot, though this method is not generally recommended. This is because adding the student with this method does NOT add the student’s resume. Here are the procedures: Click the interview time link for the slot you want to add the student to. The Timeslot Information screen appears. In the Reserved Slot field, type the name of the student to add to the timeslot. Click Change Time/Reserved. NOTE: You can use this method as a “placeholder” if you wish. If you later want to add a student using one of the 3 recommended methods, you would need to delete the student’s name from the Reserved Slot field and click Change Time/Reserved. You can then use the Page Functions described above to add the student. 43 DELETING AN INTERVIEW SESSION To delete an Interview Session in the Schedule Profile, click the check box next to the Session’s interview date, then click the Delete Selected Sessions button. NOTE: Instead of deleting a session, most schools change the status to Inactive or Cancelled. STEP ONE: Check the session(s) you wish to delete. STEP TWO: Click the Delete Selected Session button WARNING: BEFORE deleting an interview session, verify that you have moved all students on timeslots. When you delete an interview session it will delete the timeslots. However, removing an Interview Session will NOT remove the Preselect Activity associated with the Schedule. DELETING AN INFORMATION SESSION An administrator has the ability to delete an Information Session. STEP ONE: Click on the Information Session from within the Schedule profile. Click on the info session name STEP TWO: Click on the Delete link under Page Functions. You will be prompted: 44 If you select OK, you will be prompted a second time: Clicking OK the second time will remove the Info Session, as well as any student RSVPs. DELETING A SCHEDULE An administrator has the ability to delete a Schedule. This will delete the Schedule, the Interview Session(s), and ALL activity associated with that schedule. To delete a Schedule, click Delete under Page Functions in the schedule profile. You will be presented with two options: 45 No, delete schedule, do not delete any job linked to the schedule – this will ONLY delete the schedule, not any job(s) that are linked to it Yes, delete schedule and all jobs linked to the schedule – this will delete the schedule AND all job(s) linked to it. Click the radio button for the choice you want and then click Delete. You will then see a confirmation message that will display what was deleted. NOTE: If there is an information session linked to the schedule, it will not be deleted along with the schedule. Also, if this schedule is linked to a Shared Interview Session, that Interview Session will not be deleted. 46 SCHEDULE TOOLS AND SETUP In this section of the manual, we will cover important tools and setup options. These tools and setup options are fundamental to creating and running successful schedules in Interfase. TIMESLOT & TIMELINE TEMPLATES Timeslot templates are predefined sets of interview times that you can apply to your schedules instead of manually creating each interview time for a schedule’s session. Timeline templates are predefined sets of scheduled changes that will take place over the course of the schedule’s life cycle. You can use them instead of manually adding each timeline change. It is highly recommended that you create timeslot and timeline templates that can be used in the creation of your on campus interviews. This will greatly reduce the amount of work and time involved with the schedules database, and will also reduce the chance that timeslot and timeline entries will be accidentally omitted. Below are descriptions of the default templates as well as procedures for editing and creating timeslot and timeline templates. TIMESLOT TEMPLATES When your Interfase site was created, some timeslot templates were preloaded into it. You can use these templates as they are or edit them if you need to. You can also delete them and/or create new templates. Please see the Default Timeslot Templates section below for more information on the preloaded templates. Default Timeslot Templates By default, your site most likely came with these 3 timeslot templates: 30 MIN: 9:00-4:00PM 45 MIN: 9:00-3:45PM 60 MIN: 9:00-4:00PM We recommend using the naming method that you see here. The first part of the timeslot name is the length of time that each interview will take. The second part of the timeslot name includes the start time of the first interview as well as the start time of the last interview. This naming method will help you to quickly and identify the correct timeslot template to apply when you are creating interview sessions. To see how the default templates are configured, go to Tools > Setup > Schedule Timeslot Templates. Use the Edit Timeslot Template dropdown to choose the template that you would like to view. As mentioned before, you can use the templates as they are, or you can edit them to fit your recruiting needs. Please see the Editing Timeslot Templates and Creating Timeslot Templates sections below for more information. Editing Timeslot Templates To edit a timeslot template, you would: 1. Go to Tools > Setup > Schedule Timeslot Templates. This is the screen you will see next: 47 Choose the template you want to edit here. Use the Edit button to change a timeslot entry. Use the Remove button to delete a timeslot entry. Choose this button to add another timeslot. 2. Use the Edit Timeslot Template dropdown to select the template that you wish to edit. 3. Once the template loads, you can click Edit next to an entry to make changes to it. Using the image above as an example, clicking Edit next to the 9:00 AM slot would produce this screen: After you click Edit, these fields will be in Edit mode so that you can type in them. 4. You could then make changes to the Time and Reserved Slot fields. For example, you could change this slot’s time to 9:05 AM. You could also type “Lunch” or “Break” into the Reserved Slot field. This would reserve the slot for a break or lunch and would not allow students to sign up for an interview at this time. 5. Click Remove next to any timeslot(s) that you wish to delete. 6. Click Add New Timeslot if you want to insert another timeslot. Follow the instructions in step 4 above to create the slot. 7. Once you are done making changes, click Update and you will be taken back to the timeslot template. Or you can click Cancel if you do not wish to make changes. Creating Timeslot Templates 1. Go to Tools > Setup > Schedule Timeslot Templates. This is the page you will see next: 48 Enter the name for the new template. Click Create Timeslot Break Period (optional) – use this to specify the length of the break after each interview, if applicable Interview Duration is the length of each interview. 2. In the New Timeslot Template field, enter the name of the template and click Create. You will now see the name you created in the Edit Timeslot Template field. 3. Fill in the Interview Duration field. This is the length of time of each interview slot. 4. Complete the Timeslot Break Period field (optional) – if you would like a break after each interview, enter the duration of the break here. 5. First Timeslot Start Time – this is the time that the first interview for this template will start. Be sure to change the radio button to PM if the first interview for this template starts in the afternoon. 6. Last Timeslot Start Time – this is the time that the last interview for this template will start. Be sure to change the radio button to PM if the last interview for this template starts in the afternoon. IMPORTANT: You must enter the First and Last Timeslot Start Times as hh:mm or the template won’t be created. 7. Click Add Timeslot. Your timeslots are now created: Click Edit next to any timeslot to change the time or to reserve that timeslot. Click Remove to delete a timeslot. 8. You can also reserve timeslots if you would like. For example, to add a noon lunch period to the above timeslots, click Edit next to 12:00 PM, type “Lunch” in the Reserved Slot field, and click Update. 9. To remove any timeslot, click Remove next to that slot. 49 TIMELINE TEMPLATES When your Interfase site was created, some timeline templates were preloaded into it. You can use these templates as they are or edit them if you need to. You can also delete them and/or create new templates. Please see the Default Timeline Templates section below for more information on the preloaded templates. Default Timeline Templates By default, your site most likely came with sets of timeline templates for these 3 schedule types: Open – these templates are fully completed (with all scheduled timeline changes), though you can edit them as you see fit. Preselect – these templates are also fully completed and can be edited to meet your needs. Preselect with Alternates – these templates contain all of the scheduled timeline changes except the entry for Alternate Sign-up Begins. This is the day that students who were selected as alternates can sign up for timeslots if any are available. Please see the Editing Timeline Templates section below for instructions on adding this or any other entry. We have created calendars to visually demonstrate how the default timelines are configured. Here are some tips to help you interpret them: Week 0 is the week in which the interview takes place Week 1 is the week before the interview, Week 2 is two weeks before the interview, and so on All times on the calendar are Central Standard Time Opening entries (Sign-up Open, Request Period Open, etc) occur at roughly 12:05am CST Closing entries (Sign-up Closed, Request Period Closed, etc) occur at roughly 11:59pm CST HINT: You can also use these calendars to assist you in the creation/editing of your own templates if you would like. 50 OPEN SCHEDULES Monday Interview-Open Sun Mon Tue 1 Wed Thu Fri Sat 2 3 4 5 6 SIGN-UP OPEN 12:05AM Week 4 7 8 9 10 11 12 13 14 15 16 17 18 19 20 21 22 23 24 25 26 27 Week 3 Week 2 SIGN-UP CLOSED 11:59PM Week 1 28 29 30 31 INTERVIEW Week 0 These are the timeline entries for the default OpenMonday Interview timeline template. Tuesday Interview-Open Sun Mon 1 Tue Wed 2 Thu Fri Sat 3 4 5 6 SIGN-UP OPEN 12:05AM Week 4 7 8 9 10 11 12 13 14 15 16 17 18 19 20 21 22 23 24 25 26 27 28 29 30 31 Week 3 Week 2 Week 1 Week 0 SIGN-UP CLOSED 11:59PM INTERVIEW 51 Wednesday Interview-Open Sun Mon Tue 1 2 Wed Thu 3 Fri Sat 4 5 6 SIGN-UP OPEN 12:05AM Week 4 7 8 9 10 11 12 13 14 15 16 17 18 19 20 21 22 23 24 25 26 27 28 29 30 31 Week 3 Week 2 Week 1 INTERVIEW SIGN-UP CLOSED 11:59PM Week 0 Thursday Interview-Open Sun Mon 1 Tue 2 Wed 3 Thu 4 Fri Sat 5 6 SIGN-UP OPEN 12:05AM Week 4 7 8 9 10 11 12 13 14 15 16 17 18 19 20 21 22 23 24 25 26 27 28 29 30 31 1 2 3 Week 3 Week 2 Week 1 Week 0 SIGN-UP CLOSED 11:59PM INTERVIEW 52 Friday Interview-Open Sun Mon 1 Tue 2 Wed 3 Thu 4 Fri 5 Sat 6 SIGN-UP OPEN 12:05AM Week 4 7 8 9 10 11 12 13 14 15 16 17 18 19 20 21 22 23 24 25 26 27 28 29 30 31 1 2 3 Week 3 Week 2 Week 1 SIGN-UP CLOSED 11:59PM Week 0 INTERVIEW PRESELECT SCHEDULES Monday Interview-Preselect Sun Week 4 Week 3 7 14 Week 2 21 Week 1 28 Week 0 Mon Tue Wed Thu Fri Sat 1 REQUEST PERIOD OPEN 12:05AM 8 2 3 4 5 6 9 10 11 12 13 15 REQUEST PERIOD CLOSED 11:59 PM 22 ACCEPTED STUDENTS SIGN-UP OPEN 12:05 AM 29 16 17 18 19 20 23 24 25 26 27 SIGN-UP CLOSED 11:59PM 30 31 1 2 3 INTERVIEW 53 Tuesday Interview-Preselect Sun Mon Tue Wed Thu Fri Sat 1 2 REQUEST PERIOD OPEN 12:05AM 3 4 5 6 7 8 9 10 11 12 13 14 15 16 REQUEST PERIOD CLOSED 11:59 PM 17 18 19 20 21 22 23 ACCEPTED STUDENTS SIGN-UP OPEN 12:05 AM 24 25 26 27 28 SIGN-UP CLOSED 11:59PM 29 30 31 1 2 3 Week 4 Week 3 Week 2 Week 1 Week 0 INTERVIEW Wednesday Interview-Preselect Sun Mon Tue Wed Thu Fri Sat 1 2 3 REQUEST PERIOD OPEN 12:05AM 4 5 6 7 8 9 10 11 12 13 14 15 16 17 REQUEST PERIOD CLOSED 11:59 PM 18 19 20 21 22 23 24 ACCEPTED STUDENTS SIGN-UP OPEN 12:05 AM 25 26 27 28 29 SIGN-UP CLOSED 11:59PM 30 31 1 2 3 Week 4 Week 3 Week 2 Week 1 Week 0 INTERVIEW 54 Thursday Interview-Preselect Sun Mon Tue Wed 1 2 3 7 8 9 10 14 15 16 17 21 22 23 24 28 29 30 SIGN-UP CLOSED 11:59PM 31 Week 4 Thu Fri Sat 4 REQUEST PERIOD OPEN 12:05AM 11 5 6 12 13 18 REQUEST PERIOD CLOSED 11:59 PM 25 ACCEPTED STUDENTS SIGN-UP OPEN 12:05 AM 1 19 20 26 27 2 3 Week 3 Week 2 Week 1 Week 0 INTERVIEW Friday Interview-Preselect Sun Mon Tue Wed Thu 1 2 3 4 7 8 9 10 11 14 15 16 17 18 21 22 23 24 25 28 29 30 31 SIGN-UP CLOSED 11:59PM 1 Week 4 Fri Sat 5 REQUEST PERIOD OPEN 12:05AM 12 6 19 REQUEST PERIOD CLOSED 11:59 PM 26 ACCEPTED STUDENTS SIGN-UP OPEN 12:05 AM 2 20 13 Week 3 Week 2 Week 1 Week 0 55 INTERVIEW 27 3 Editing Timeline Templates You can edit any of the default timeline templates so that they fit your on campus interview schedules better. If you are going to allow the option of alternates with your Preselect Schedules, you will need to add the Alternate Sign-up Begins entry to each of the Preselect Alternate Templates (10:Preselect Alternate - Monday Interview, 11:Preselect Alternate Tuesday Interview, etc). In general, most schools will make Alternate Sign Up 1-2 days before Sign-up Closed so accepted students have ample time to sign up for slots. Edit Timeline – use this dropdown to choose the timeline template you want to edit. Remove Timeline – use this button to delete timelines that you will not use. Timeline Name – type the new name of the timeline template here You can edit the schedule type here You can also remove entries. 1. Go to Tools > Setup > Schedule Timelines Templates 2. Use the Edit Timeline dropdown to choose the template you wish to edit (see screenshot above). The template will load. 3. To edit the name of the timeline template, type the new name in the Timeline Name field. 4. You can also use the dropdown to change the Schedule Type. 5. To change any of the Signup Methods, click Edit next to it. For example, in the above screenshot, I can click Edit next to Request Period Open if I want to change the Target Day to Sunday. This is what I would see next: You can change the Signup Method, Weeks Before and Target Day for any of the entries in the timeline templates. Click Add to create another entry for this template. 6. Click Save once you have made all changes to the template. 56 Click Update once you have made all changes. Creating Timeline Templates 1. Go to Tools > Setup > Schedule Timelines Templates. This is the page you will see next: 2. Highlight and delete the contents of the Timeline Name field. Type the name of the new timeline template in this field. 3. Using the Schedule Type dropdown, select whether this will be an Open, Preselect, Preselect Continuous, or Resume Collection schedule. 4. Click Create as New. 5. You will now see timeline entries (signup methods) in the lower part of the screen. Make any changes to the Signup Methods (see Editing Timeline Templates above). 57 PACKET AND SYSTEM EVENT (EMAIL) TEMPLATES There are two types of templates - Packet and System Events. To ensure that your automated schedule processes for admin, student and employers runs smoothly you will want to review the Packet and System Event Templates in your system. PACKET TEMPLATES Packet templates include the cover pages for resume packets. There is a separate template for each type of packet in the system. To access these Templates go to Tools > Setup > Templates > Manage Packet Templates. Here are the packet templates you will want to review and possibly customize when working with Interview Schedules. Interview Session Packet Schedule Data Interview Session Packet Timeslot Data Preselection Packet - A resume packet of students signed up on a session. This template is for the first page of the packet which contains the schedule data. A resume packet of students signed up on a session. This template is for the second page of the packet which contains the timeslots and student data. A resume packet of student requests on a preselect schedule [Edit] [Edit] [Edit] Important: The Refresh button at the top of every Setup screen is used to apply any changes you make in Setup to your Interfase system. Clicking Refresh on any Setup screen applies all changes made in any Setup function. All examples listed below include clicking Refresh as a step although if you are making multiple changes in Setup this is only required once when you are finished with all changes. Click the Word icon to view the template. Click the Excel icon to view the data source fields. CUSTOMIZE A TEMPLATE: STEP 1: Click the Word icon and then the Excel icon and save them both. STEP 2: Open the saved Word template and connect it to the Excel data source. STEP 3: Make necessary changes to the Word template AND save. STEP 4: Click the [Edit] link under the Action column for the applicable template. STEP 5: Click the [Upload] link and upload the saved Word document template. STEP 6: The custom icon now appears next to the template name. 58 Note: If you have uploaded a custom template, you can use the [Clear] function in template to remove it. Once remove the template will revert to using the default Word doc. Each packet template contains the following options: From (Default) – If a packet is e-mailed by an administrator or employer the e-mail will sent using the e-mail address in the administrator’s or employer’s profile as the From address unless the profile does not contain an email address then it will use this address. Subject – This is the default subject that will be used if a packet is e-mailed. Body – This is the default text that will be used in body of the e-mail if a packet is e-mailed. You can used the HTML editor controls to add formatting such as bold and italics, bulleted lists, or inserting web links. SYSTEM EVENTS (EMAILS) The events listed in the Manage System Events section are system emails. Each event listed is an email that is sent by the system based on when that event occurs and certain options in that event. To access these Templates go to Tools > Setup > Templates > Manage System Events. Here are the system event (email) templates you will want to review, possibly customize and enable when working with Interview Schedules. ADMIN - Employer Submitted Schedule Preselect Picks Occurs when an employer submits preselection picks. [Edit] ADMIN - Preselects Incomplete (nightly) Occurs if preselect picks have not been completed. It is sent when the preselect due date is the number of lag days away. [Edit] ADMIN - Schedule Full Occurs once all sessions for a schedule are full. [Edit] ADMIN - Student Cancelled Infosession RSVP ADMIN - Student Cancelled Interview ADMIN - Student Changed Interview Time Occurs when a student cancels an information session RSVP. Occurs when a student cancels off an interview timeslot. EMPLOYER - Preselects Incomplete (nightly) EMPLOYER - Schedule Approaching PRS Closed (nightly) EMPLOYER - Schedule Approaching PRS Pick Date (nightly) EMPLOYER - Schedule Approved EMPLOYER - Schedule Full Occurs when a student changes an interview timeslot. Occurs if preselect picks have not been completed. It is sent when the preselect due date is the number of lag days away. Occurs to notify an employer that a preselect schedule is about to close to allow pick submission. It is sent when the closed period is the number of lag days away. Occurs to remind an employer when preselect picks are due on a schedule. It is sent when the due date is the number of lag days away. Occurs when a schedule is changed from a pending to active status. Occurs once all sessions for a schedule are full. Occurs to remind a student of an upcoming interview. STUDENT - Schedule It is sent when the interview is the number of lag days Approaching Interview (nightly) away. Occurs to remind an accepted student that the FCFS STUDENT - Schedule sign-up period for a schedule is approaching. It is sent Approaching Sign up for FCFS when the sign-up period is the number of lag days (nightly) away. Occurs to remind an alternate student that the FCFS Alt STUDENT - Schedule sign-up period for a schedule is approaching. It is sent Approaching Sign up for FCFS when the sign-up period is the number of lag days Alt (nightly) away. STUDENT - Schedule Picks Occurs when preselect picks are submitted. It is sent to Submitted - Alternate those students that are accepted as alternates. STUDENT - Schedule Picks Occurs when preselect picks are submitted. It is sent to Submitted - Approved those students that are accepted. STUDENT - Schedule Picks Occurs when preselect picks are submitted. It is sent to Submitted – Not Accepted those students that are rejected. 59 [Edit] [Edit] [Edit] [Edit] [Edit] [Edit] [Edit] [Edit] [Edit] [Edit] [Edit] [Edit] [Edit] [Edit] An asterisk appears next to the event name to indicate that the system email is enabled. To turn on a system event email, check the box next to the Enabled field. Each system event template contains the following options: From (Default) – If the system event is triggered by a user action the e-mail will sent using the e-mail address in the user’s profile as the From address unless the profile does not contain an e-mail address then it will use this address. For example, if a student submits a Job Referral for a job and the Employer – Job Referral Submitted system event is active then a e-mail will be sent to the applicable employer and the From address will be the student’s e-mail address from their profile unless they do not have one. Note: Any system event noted as (nightly) is not generated by a user action. They are generated every night at midnight based on certain dates that relate to the event. The e-mails sent for these events will always use the email address in the From (Default) field. BCC – Any e-mail address entered here will be entered as a BCC on any e-mail generated for an event. Subject – This is the default subject that will be used for the generated e-mail. Enabled – Check this to turn on a system event. If Enabled is not checked no e-mail will be generated for a given event. Any system event that is Enabled will have an asterisk next to it’s name. Lag Days – Some nightly system events have a Lag Days option. This option determines how many days prior to an event occurring will the e-mail for this event be sent. For example, in the graphic above the Student – Schedule Approaching Interview system event sends a reminder e-mail to students signed up on an interview schedule when the interview date is approaching. The lag days setting (in this example it’s 2) tells Interfase to send this reminder e-mail 2 days prior to the interview date. Note: The body text for a system event e-mail is the contents of the Word doc template associated with a system event. This Word doc is a merge document as the e-mail can contain data merged in from Interfase. However, system event e-mails are sent as text only e-mails therefore you should not include any formatting (bold, italics, etc) in the Word doc as it will not appear in the e-mail that is generated for an event. 60 ADVANCED OPTIONS With the recent changes to the way schedules relate to jobs, there have also been some changes in the settings that control these relationships. Following are some scenarios that you will want to consider, as well as instructions for implementing those scenarios in your site. Please call us if you need any assistance with this process. NOTE: If a schedule is NOT Active, then the job linked to it will NOT appear to students. This is regardless of the scenario that you are using. SCENARIO 1 You would like for your students to be able to see all jobs (including jobs with schedules), but only be able apply to ones they meet the requirements on (are qualified for). Settings: Go to Tools > Setup > Settings, and ensure that the following settings are configured as shown. Student – Jobs – Screen Jobs Upon Job Search = false (existing setting) Student – Jobs – Screen Schedules Upon Job Search = false (new setting) SCENARIO 2 You would like all students to see all jobs but NOT the schedules part of jobs they are not qualified for. Settings: Go to Tools > Setup > Settings, and ensure that the following settings are configured as shown. Student – Jobs – Screen Jobs Upon Job Search = false (existing setting) Student – Jobs – Screen Schedules Upon Job Search = true (new setting) SCENARIO 3 You would like all students to ONLY see jobs they meet the requirements on (are qualified for). Settings: Go to Tools > Setup > Settings, and ensure that the following setting is configured as shown. Student – Jobs – Screen Jobs Upon Job Search = true (existing setting) Should they ONLY see jobs with schedules they meet the requirements on (are qualified for)? If so, ensure that Student – Jobs – Screen Schedules Upon Job Search is set to true. ADDITIONAL RECOMMENDATIONS FOR ALL SCENARIOS Regardless of the scenario you choose above, there are some further recommendations below. Turn off the schedules menu (now students can search jobs and schedules in one place!) Rename the Job Search menu to “Jobs and Interview Schedules” Turn the Linked Interview Schedule – View ON for students (see note). NOTE: If you would like to keep the Schedules menu ON to students and you do NOT want Jobs with Schedules to appear in the Job Search results, then you will need to turn OFF the students’ permissions for Linked Schedules in the job search. This way they won’t see any jobs linked to schedules. Go to Tools Setup > Permissions. Then click the + next to Searches, the + next to Search Results, and then click on Job. Locate Linked Interview Schedule – View and uncheck all student roles that should not see linked interview schedules. Click Update and then Refresh. You should also decide if you would you like all students to see all linked events upon performing a job search. If YES, ensure that Student – Jobs – Screen Events Upon Job Search is set to true 61 If NO, ensure that Student – Jobs – Screen Events Upon Job Search is set to false SYSTEM REPORTS There are four schedules related custom reports that have been created in your Interfase site. These are historically some of the most common reports that schools have generated where schedules are concerned, so we created them to run with one click for convenience and ease. To generate any of the reports, go to Tools > Reports > System Reports. You will then see this screen: Click the icon in the Action column to instantaneously generate one of these reports. The custom report will open in a new window, and you can then export the results to, among others, a PDF or Excel spreadsheet. 62 STUDENT – SCHEDULES A student can search for schedules by highlighting the Schedules menu. The following is the submenu for the Schedules menu. View & apply to schedules a student qualifies for View all future schedules: Qualifying and NonQualifying Note: Main menu and submenu items can and may have been renamed; however, the functionality for these menus will remain the same. QUALIFIED SCHEDULES Only schedules that a student qualifies for will be displayed under the Qualified Schedules menu. A student will be able to sign-up or request an interview from this menu. Once the student clicks on the Sign-up for interview I qualify for (hereafter referred to as the Qualified Schedules menu), they will see the schedule search criteria page: On this page, students can specify any criteria they wish to use in searching for interview schedules. They could also leave this page blank (not specify any criteria) to see all schedules that they qualify for. In either case, the student will click Search. This will bring up the schedule search results page. A student can access a schedule profile by clicking on the Schedule ID, Organization Name, or Linked Jobs in the search results page. 63 The clickable column headers can be used to sort the search results. A schedule ID with a black arrow next to it indicates that the student has performed an action on the schedule. Students can view their Schedule Activity by going to My Account >My Activity: Schedule Activity tab REVIEW: When creating a schedule, the administrator defines the schedule’s requirements and whether any of those requirements are also screening requirements. If an administrator checks any of the screening options, the student is REQUIRED to meet those in order to be able to sign up for the interview. NOTES: ________________________________________________________________________________________________ ________________________________________________________________________________________________ ________________________________________________________________________________________________ ________________________________________________________________________________________________ ________________________________________________________________________________________________ ________________________________________________________________________________________________ VIEWING AND APPLYING FOR A QUALIFIED SCHEDULE A student can access a schedule profile by clicking on the schedule ID or the job title in the search results page. A student must have a resume in order to apply for an interview schedule. If a student does not have a resume on file, the following message is displayed at the top of the schedule profile. You cannot perform activity on this schedule as you do not currently have all the required documents on file. Upload documents for the following categories: Resume 64 In addition, students must also have any of the document types that are checked as Document Categories Require Selection in the Document Categories section of the schedule. If not, the above message could include References, Cover Letters, Transcripts, etc. If a student has all of the required documents on file, the application procedures will depend on the schedule type. The following are the procedures a student should follow for Open, Preselect, and Preselect Continuous schedules. OPEN SCHEDULES – Signing up for an Interview STEP ONE: To access the interview sessions that are available for that schedule, a student must click one of the three Sign Up buttons located in the schedule profile. The buttons are located at the top and bottom of the schedule profile, as well as on the left under Page Functions. There is another button like this at the bottom of the schedule profile Students can utilize any of the 3 Sign Up buttons in the schedule proflle STEP TWO: When a student clicks on one of the Sign Up buttons, they are taken to a list of available timeslots. If the interviews are held on more than one day, the results will be grouped by each date, as seen here. STEP THREE: From this list, the student would need to click Sign-up next to the slot that they want to sign up for. STEP FOUR: When the Sign-up link is clicked, the student will be able to select the documents to submit. A student will be able to do this in the Document Selection window (see below). Once document selections are made, the student clicks Save. 65 The student then receives a confirmation message: You successfully signed up for the requested timeslot. PRESELECT & PRESELECT CONTINUOUS SCHEDULES – Requesting an interview STEP ONE: If a student would like to submit a resume (and other documents, if applicable) for interview consideration, he/she must click the one of the 3 Request Interview buttons located in the schedule profile. There is another button like this at the bottom of the schedule profile Students can utilize any of the 3 Sign Up buttons in the schedule proflle STEP TWO: When the Request Interview button is clicked, the student will see this window: After clicking the OK button, the student will see the Document Selection window (see below) and be able to select the documents to submit. 66 Once a student has selected the documents, he/she should click the Save button to submit the information. The student then receives a confirmation message: You have successfully submitted a request to interview. PRESELECT & PRESELECT CONTINUOUS SCHEDULES – Accepted & Alternate Candidates Signup When a student is accepted to interview, he/she must follow the same sign-up procedures as an Open schedule. In other words, they will need to sign-up for an interview timeslot. Students will not need to choose documents to submit, however, they may change the documents that they submitted when they requested to be interviewed. NOTE: If in your system, you have the system event (automatic) emails enabled for the preselect process, then students will receive an email once the employer makes their decisions (chooses students as Accepted, Not Accepted, or Alternates). NOTES: ________________________________________________________________________________________________ ________________________________________________________________________________________________ ________________________________________________________________________________________________ ________________________________________________________________________________________________ ________________________________________________________________________________________________ ________________________________________________________________________________________________ ________________________________________________________________________________________________ ________________________ FUTURE SCHEDULES Students will be able to see all future schedules under this menu, whether or not they qualify for the schedule. However, they will not be able to sign-up or request an interview from this menu. To access all future schedules, the student would click on VIEW ALL Upcoming Schedules under the On campus Interview Schedules menu. They would then see the Future Schedules search page: 67 On this page, students can specify any criteria they wish to use in searching for interview schedules. They could also leave this page blank (not specify any criteria) to see all future schedules. In either case, the student will click Search. This will bring up the schedule search results page. A student can access a schedule profile by clicking on the Schedule ID, Organization Name, or Linked Jobs in the search results page. Do you want students to be able to view all active schedules with past and future interview sessions? By default, students only see schedules with future interview sessions. NOTES: _________________________________________________________________________________________________ _________________________________________________________________________________________________ _________________________________________________________________________________________________ _________________________________________________________________________________________________ _________________________________________________________________________________________________ _________________________________________________________________________________________________ 68 ACCESSING SCHEDULES THROUGH A JOB SEARCH If you have it enabled in your site, students can also access schedules through the job search function. This is especially advantageous if you have turned off the Schedules menu to students (see the Advanced Options section of this manual). When students click on Job Search, they will then see the Job Search criteria screen and the Related Schedule Search Criteria screen (if turned on to students in Permissions). From this screen, students can search for jobs linked to schedules based upon the schedule type or interview date. They can also specify to ONLY see jobs that are linked to interview schedules. Once students have made their criteria selections, they should click Search. They will then see the job search results page: The icon next to a Job ID indicates that the job is linked to a schedule. In the job search results screen, any jobs that are linked to a schedule will have a blue icon expands the job listing as shown here: next to the Job ID. Clicking on this To access the schedule this job is linked to, the student can click on either the or the Schedule ID. Either of these actions will take the student to the schedule profile. From here, they can take action on the schedule as described in the previous sections. 69 EMPLOYER – SCHEDULES An employer can view an existing schedule or create a new Schedule request from the Schedules menu. View & manage existing schedules Create a new schedule request SCHEDULE LIST Clicking on Schedule List under the My Interview Schedules menu will lead to the schedule search results page: NOTE: Employer contacts will ONLY see schedules that are linked to them or to their organization. When Admins or Employers view the Schedules list, they will be able to see how far along the picks are. These flags will only show for Preselect or Preselect Continuous Schedules during the preselection period. The progress is divided up among: 1. Picks Not Started - Shown on a Preselect or Preselect Continuous when the employer/admin has not yet begun making picks. 2. Picks Started/Not Complete - Shown when employers/admins have begun picks, but not completed them, on a Preselect or Preselect Continuous schedule. 3. Picks Submitted - Shown when employers/admins have submitted final picks. This applies only to Preselect schedules, not Preselect Continuous schedules. To access an interview schedule profile, an employer must click on the Schedule ID or Linked Jobs from the search results page. 70 Depending on how your system is set up, you may or may not allow employers to edit a schedule. If you do allow employers to edit their schedules, they can click Edit next to any sections that they have permissions to change. NOTE: Employers can now also access their existing schedules through the My Jobs menu button (if they have any jobs that are linked to schedules): 71 In the job search results, any jobs that are linked to schedules will have a blue icon next to them. Clicking on this icon will expand the job listing and information about the linked schedule will display. Employers can then click on the or the Schedule ID to access the linked schedule. CREATING A NEW SCHEDULE REQUEST If enabled in your site, employer contacts can submit a new schedule request by clicking on New Schedule Request under My Interview Schedules on the menu bar. You can require employer contacts to link a job to this new schedule request. Document Categories- some schools choose to leave this section off to employers so admins can choose the appropriate documents. Interview Request Preferencesthis section has no control on the schedule…it is ONLY used to capture information on how the employer would like the schedule to look. Employers click Save to submit this new Schedule Request. An Administrator must approve and finalize this schedule before students will see it. 72 This function allows employer contacts to complete and submit basic information: Posting Information, Document Categories (some schools choose to leave this section off to employers so the admin can decide which documents are necessary), and Interview Request Preferences. These requests have a Pending status and need to be approved and finalized by an Admin. (See section: APPROVING PENDING SCHEDULES) If you want to require employers to link a job to their new schedule request, go to Tools > Setup > Settings. Make sure that Employer - Schedules - Require Job on Schedule Request is set to true. Otherwise, it should be set to false. MANAGING A PRESELECT LIST FOR A PRESELECT SCHEDULE An employer can begin making interview decisions (Accepted, Alternate or Not Accepted) the day after the Request Period Closed date. Make the Preselect Selections STEP ONE: From the Schedules List page, click on the desired schedule. STEP TWO: Once inside the schedule profile, click Manage Preselects on the left side of the page under Page Functions. This takes the employer to the Preselect Activity list. STEP TWO: Likely the employer would like to view the resumes and other submitted documents before making their selections. They may view each student’s documents individually by clicking the PDF icon under the Submitted Documents column. Alternately, they may wish to view all resumes at once, by clicking the Create Packet button. Then next to each student select Accepted, Not Accepted, or Alternate (if available). Click Save Picks. Employers can click on any of these PDF icons to view individual student’s submitted documents. Or they can click Create Packet to have a packet of all documents emailed to them. Employers can use these columns to make selections. Or, if they are accepting all students, they can click Accept All under Page Functions. By default, an Employer can NOT mass email students in the Preselect Activity List. However, you may wish to turn this option on to your employers. 73 If the employer wants to accept all of the students in the preselect activity list, they can click Accept All on the left side of the page under Page Functions. The employer would still need to click Save Picks. Accept All – toggles the Accepted status for each student. The next prompts will depend on whether this is a Preselect or a Preselect Continuous Schedule. Preselect Schedule – Preselection Process: 1. After making status selections and clicking Save Picks, the following page will appear: 2. On this page, the employer will need to confirm the selections that were made. If the Employer clicks Return, then they will see the Manage Preselect Activity screen. (They have saved, but not submitted their selections.) If the Employer clicks Submit Picks, then they will get this prompt: WARNING: If a student is not assigned a status, the system will default the student’s status selection to Not Accepted. 3. After clicking OK, they have saved and submitted their selections. 74 Preselect Continuous Schedule – Preselection Process: 1. After making your status selections and clicking Save Picks, you will see the following: 2. After clicking OK, they will get another prompt to verify this. Now their selections have been saved. The employer will still need to continuously make selections through the time period of this schedule. ACCESSING AN INTERVIEW SESSION To view the students on an interview session and to create the Interview Session Packet, click the Session ID or Interview Date link in the Sessions section of the schedule profile. 75 The interview session information and the timeslots will be displayed. By default, an Employer can NOT mass email students on the Interview Session. However, you may wish to turn this option on to your employers. Employers can create their Interview Session packet or email the packet. An Interview Session Packet contains the interview session cover page and the student resumes (of those signed up for a timeslot on the interview session). 76