1
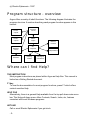
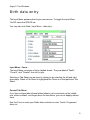
Argus 3.1 for Windows
ARGUS 3.1.... for Windows
Introduction
‘Argus’ is the nickname for PCA for Windows.
You may well ask what is ‘PCA’_? PCA is an abbreviation for ‘Personal Computer
Astrology’. Hence the nickname ‘Argus’.
The first version of PCA appeared in 1986 and ran under the CP/M operating
system. This was the PCA v1.x series, famous at the time for producing the first
true graphic ChartWheel to both screen and printer.
In January 1987 the first MS-DOS version appeared. This was the PCA v2.x
series. During this phase EE were first to produce their own colour drivers, unique
graphic transit/progression charts, XLI programming language, etc.
The PCA v3.x series is written for the Windows operating system. This represents
a new generation of astro programming which will continue to see EE’s innovative
style combined with ease of use.
License and copyright
Copies of Argus are only permitted to the licensee for his/her individual use and
program security.
Giving away, lending or selling copies of Argus is illegal.
Hardware specification
Argus requires the following minimum hardware specification:
386 processor
Windows 95,98,ME,NT,2000 or XP
16 Megabytes of RAM
15 Mbytes of free Hard disk space
1
(c) Electric Ephemeris - 1997
Program structure - overview
Argus offers a variety of inbuilt functions. The following diagram illustrates the
program structure. A section describing each program function appears in this
manual.
Screen
outputs
Printeroutputs
Birthdataarchive
Gazetteer
Windows
menus
Macroengine
External
modules
XLI
intepreter
Interpretations
Drawing
routines
Astrological
calculations
Where can I find Help?
THIS INSTRUCTION
Most program instructions are placed within Argus as Help files. This manual is
limited as a Getting Started document.
F1 key
To view the documentation for most program functions, press F1 which offers
context sensitive Help.
HELP FILE
Alternatively, there is a general Help available from the top pull-down main menu
bar. This Help pull-down menu offers Contents, Search, Index, etc, features
consistent with most Windows programs.
HOTLINE
Call or email Electric Ephemeris if you get stuck.
- 2-
Argus 3.1 for Windows
PROGRAM INSTALLATION
You can install the program from a distribution CD-ROM or from the internet. You
will also need a personal registration info to unlock the program from demo to full
version.
From CD-ROM
Insert the CD-ROM
If it does not start automatically, run SETUP.EXE on the CD-ROM.
Follow the instructions on the screen.
ARGUS creates a directory called ARGUS on the hard disk. If you have an earlier
version of PCA v2.x installed, the Windows installation will leave the original Dos
installation intact. See Namefile
From the Internet
The files on the CDROM are also available for download on our website
www.electric-ephemeris.com.
Just go to the DOWNLOAD page and follow the instructions to download the
ARGUS trial version. You will also need a registration code if you wish to make
the turn the trial version into a full program.
If Argus already is installed
If you install Argus “op top of” an already installed Argus, you may see, that the
installation program stops and asks you if you wish to overwrite PCA.NFI (the
namefile) or PCA.CFG (your preferences).
You should normally answer NO to overwrite PCA.NFI and YES to overwrite
PCA.CFG. Overwriting PCA.CFG can clean up settings to default, if the existing
version has run into problems due to strange settings. Because PCA.CFG also
holds your registration data, you will need to reinsert these and reestablish your
preferences if you choose to overwrite.
REGISTERING YOUR PROGRAM
The registration is essential to make your program fully functional. To enter the
registration:
When first installed, the program is limited to horoscopes for year 2000 until you
3
(c) Electric Ephemeris - 1997
enter your personal registration info. If you paid in advance, these will have been
delivered together with the program, or else you well get them per mail, fax, phone
or email when payment is received. This is true no matter which installation, you
use: CDROM or download from internet.
§
§
§
§
§
§
§
- 4-
Start ARGUS
Click HELP
Click ABOUT
Enter the five lines of data in their fields
Click the APPLY button
Click OK
Terminate and restart ARGUS
Argus 3.1 for Windows
Installing interpretations and modules:
To install interpretations and modules, the Argus program itself must be installed
first as shown above. If Argus is not registered yet, i.e. it is limited to year 2000
charts, the interpretations will run as well. If Argus IS registered, each
interpretation will ask for a password first time you try to run it. This only applies
to the interpretations you must buy. The smaller free modules will run at any time
without password.
Interpretations and modules must be installed one at a time.
Start Argus
Insert the diskette or CD-ROM with the interpretation
Click INTERPRETATIONS (for modules, click FILE, then XLI)
Click SETUP
In the XLI-module setup window, click INSTALL
In the file menu, select the diskette or CD-ROM drive
In the file menu, select the path to the module.
In the file menu, doubleclick the appropriate .DEF file, (e.g.TXT.DEF)
When ready, you will see the module name appear in the setup window.
CLick OK
5
(c) Electric Ephemeris - 1997
GETTING STARTED
IMPORTANT - ESSENTIAL KEYSTROKES IN ARGUS
ENTER - cascades between text and graphics open Windows
SPACE - toggles the Input Menu between ON/OFF
DEL – clears the current output window
OUTPUT WINDOWS
The output from Argus are in two flavours, which are written to different windows.
When the program starts, you will see the text windows, but as soon as you create
a chartwheel, it will be drawn in a graphics window.
Text window
Obvious text output using glyphs or abbreviations etc
So called Graphic Transits/Progressions
Move through Text mode by SCROLLING up and down.
Graphics window
ChartWheels and also the Aspect Grid
Multiple Windows
A unique feature of Argus is its capability to display and operate in Multiple
Windows. There is only one text window in Argus, but you may have several
graphics windows open simultaneously.
In simple terms this means you could have ChartWheels etc for Radix-1,
Progressed, Transit, Graphic Transits, Radix-2 etc, open on one screen.
Opening extra Graphic Windows
Calculate required chart, e.g. ‘R - Radix-1', ‘T-Radix-2', etc
Select Window | Add new from the top pull-down menu.
Select ‘V - ChartWheel’, ‘W - Bi-Wheel’, etc
- 6-
Argus 3.1 for Windows
Viewing Multiple Windows
Select Window | Cascade
Select Window | Tile
Use mouse drag & drop etc to resize & relocate
7
(c) Electric Ephemeris - 1997
Backup
With any computer program it is recommended to backup your data files on a
regular basis.
The program files are rarely a problem, because they can be re-installed or
replaced without great expense. However, your personal data files may be
irreplaceable.
ARGUS offers the option to make backup of the Namefile(s) and the program
configuration file (PCA.CFG).
Backup procedure
Insert a blank diskette in drive A and select File | Backup | Save. All Namefiles
and the PCA configuration file are saved to the diskette.
Re-instating lost data
Should it transpire that your data is lost, or if you happen to crash the
configuration file, you may restore your data:
Insert the backup diskette in drive ‘A’ and select File | Backup | Restore.
This will offer a list of files on the diskette.......
PCA.CFG is the configuration file.
PCA.NFI is the default Namefile.
If you have created more than one Namefile, they should all have an *.NFI
extension. Choose the file, you want to restore and select OK.
Beware of overwriting a newer file with an older backup. This will delete you
newer data.
- 8-
Argus 3.1 for Windows
Birth data entry
The Input Menu appears when Argus commences. To toggle the Input Menu
‘On/Off’ select the SPACE bar.
You may also click Data | Input Menu - data entry.
Input Menu - Focus
The Input Menu comprises of three tabbed sheets. They are labeled “Radix”,
“Current”, and “Present” from left to right.
Selecting a Tab Sheet can be done by clicking or by selecting the left and right
arrow keys. When a Tab Sheet is highlighted the Focus is on that particular Tab
Sheet.
Current Tab Sheet
If you feel confused about these tabbed sheets, just concentrate on the middle
one, which is default, and forget about the two others, you can do happily without
them.
Use this Focus to enter your Radix data, and also to enter Transit, Progressed
data, etc.
9
(c) Electric Ephemeris - 1997
Radix Tab Sheet
When a Radix chart is calculated, the data entered in the “Current” Tab Sheet
automatically is copied to the “Radix" Tab Sheet.
If you are working on a particular chart, and require it’s original Radix data, it will
remain in the “Radix” Tab Sheet.
Present Tab Sheet
The "Present" data sheet has a ‘data clock’ which displays the computer’s date
and time. This can be used for horary astrology.
Note that the data in “Present” cannot be changed/edited by the user.
Furthermore, if the Focus is on the Present Tab Sheet, data cannot be Fetched
from the Namefile.
Data Entry
Entering data is straightforward. Within reason, the data entry fields are flexible to
differing formats.
To select a data field try the following options:
1. Select a numeric key appropriate to the field number (e.g. ‘3 - Zone’)
2. Click in the appropriate data field using the mouse
3. Use the UP or DOWN Arrow-Keys to navigate from one data field to the
next/previous
0 - Name
The Name is what is used to identify a chart. It can hold up to 30 characters.
1 - Date
To enter a date, the Day, Month and Year are separated by spaces. For example:
9 12 1955
You may omit the ‘19' and enter the above example as:
9 12 55
In which case Argus will add the 1900 automatically.
- 10-
Argus 3.1 for Windows
The ‘5th April 1904' can be entered as:
5 4 1904
or
544
Date entry - first century AD.
To enter the year for the first century AD. leading zeros should bu used.
For example:
The 9th December in the year 55 AD. is entered as:
9 12 0055.
BC data entry
BC charts are entered by stating BC after the year.
For example, to enter data for on the 8th October in the year 7 BC......
8 10 7 BC
2 - Time
Time is entered in 24 hour clock time.
Do NOT use AM or PM
Birth time is entered as hours, minutes and seconds separated by Spaces.
If Seconds or Minutes are zero, they may be omitted.
3 - Zone
The time-zone indicates the standard time used in a country in question.
If daylight saving time is used, it must be included.
In the United Kingdom, ‘3 -Zone’ is usually set to ‘0' in winter and ‘1 E’ in summer.
In fact, using Argus means that you need not worry about time zones. If the
geographic data is fetched from Argus’s internal gazetteer the correct zone and
daylight saving will automatically be taken into account and inserted in the zone
11
(c) Electric Ephemeris - 1997
field..
4 - City / Latitude
5 - City / Longitude
Argus’s inbuilt atlas/gazetteer automatically manages latitude, longitude, time
zones and daylight saving times.
There are about 120,000 cities covering most places in the world.
To extract a city / place from the gazetteer observe the following:
Choose either the field 4 - Latitude/City or 5 - Longitude/City.
Enter the name of the required city for the chart to be calculated and select the
ENTER key or click outside the data field.
If the search for the city / place is successful the 3 - Zone, 4 - Latitude and 5 Longitude are inserted in the Input Menu.
City ‘not found’
If the city is not found, or if there is more that one city having the same name, a
list of cities will be displayed for manual selection. You may Page Up and Page
Down in order to find the city you are searching for.
If you find the appropriate entry in the listing provided you may either double-click
the City entry or select the ENTER key.
If the city / place is not listed and cannot be found, you may of course enter the
latitude, longitude and zone manually.
Sex
This data field entry is not mandatory, but it may be practical to provide the
appropriate information.
The data is saved in the Namefile. It may be used for sex dependant
interpretations, research, etc.
- 12-
Argus 3.1 for Windows
CALCULATING THE CHART
Positions
R - Radix - calculation of the birth chart
The birth chart is calculated by selecting ‘R’ or by clicking Positions | Radix.
The Radix output indicates Planetary Zodiacal position and House position.
Under Preferences | Astrological options | Abbreviations you may choose whether
you require output to display astrological glyphs or use abbreviations.
There is also an option whether Chiron should be included or not.
The ChartWheel
To display a ChartWheel, select ‘V’ or click (Charts | ChartWheel).
Under (Preferences) there are different options for the following:
Chart style
Orientation
Aspect style
Glyph size
Positions size
Line width
Positions
These options allow the user to choose how the glyphs and aspects are drawn,
how large the glyphs should be, if positions are printed with rounded degrees or
with degrees and minutes, etc, etc.
There are also four different chart styles to select from.
Aspect calculation
Under the Methods pull-down menu two aspect tables are available:
A - Aspects (internal)
OA - Aspects (cross)
13
(c) Electric Ephemeris - 1997
For each aspect displayed, you will notice two sets of figures, the second set
prefixed by a ‘+’ (plus) or ‘-’ (minus) symbol:
The orb value displayed in degrees minutes
‘+’ if applying; ‘-’ if separating
Daily aspect orb change
The Orb speed is especially interesting for Progressed charts, so that you can see
if the aspect is slow or acute.
Aspect Grid
Note that an Aspect Grid for I-Aspects is available. Select Charts | Aspect Grid.
Chart calculation ......... continued
Once the Radix is calculated you may want to calculate another chart, e.g...
transit, progressed, synastry, etc.
Select SPACE to evoke the Input Menu and enter the appropriate data using the
“Current” tab sheet.
Then go to Positions or Methods to run the required non-Radix chart.
Now if you want to know which aspects are formed in/from the other chart, click
(Methods | Internal aspects) or (Methods | Cross-aspects). The internal aspects
are mutual aspects between positions in one chart only, while the cross aspects
connect positions between two charts.
Orb definition
When calculating aspects, you are able to choose which aspects to display and
what orbs they use.
Furthermore, you have an option to configure four different sets of aspect
definition. This means that you can use different aspect requirements for differing
chart types, e.g. Radix, Progressed, Synastry, etc.
For instance, in a Radix chart you may allow up to 8-10 degrees for a Sun
opposition Uranus (I-aspect), while in Synastry you may allow three degrees (xaspect), etc.
To determine the orb limit, select Data | Orb definition. The orb menu has a field
called "Master orb", which you may use for this purpose.
- 14-
Argus 3.1 for Windows
In the Orb Definition menu choose one of four orb schemes: R, P, S or C.
These schemes determine: individual orb rules for:
Individual orbs for each planet
How to combine two planetary orbs
Individual orbs for each aspect
To edit these orb definitions choose a scheme by clicking the Configure button.
The orb scheme "None" means, that only the master orb and no scheme is active.
Bi-Wheel
Having calculated both a Radix and one other chart type, selecting ‘W’ or clicking
Charts | Bi-Wheel produces a ChartWheel with two circles of positions:
An inner circle holding the Radix positions
An outer circle holding the other chart.
This chart type has a fixed aspect style, planet size and no degrees and minutes,
due to lack of space.
15
(c) Electric Ephemeris - 1997
Managing your birthdata collection
Namefile
When entering new birth data in the Input Menu, it normally would be advisable to
save the data to the Namefile. This facilitates later access, thus not having to
enter the same data twice.
To call the Namefile Window select Namefile from the Input Menu.
To save your birth data from the Input Menu to the Namefile, move the cursor to
where you want the data stored and select Save. Normally you will use the END
key to move to the end of the file and then save the data.
However, you may save the data and insert it anywhere in the Namefile. In that
case the new data is inserted between existing entries, therefore nothing is
overwritten.
The following are a few Namefile options:
Namefile - Search
Namefile - Sort (alpha, numeric, anniversary)
Namefile - Create new
Namefile - Import Dos format
Namefile - Add / Edit notes
NAMEFILE - importing from DOS
ARGUS creates a directory called ARGUS on the hard disk. If you have an earlier
version of PCA v2.x installed, the Windows installation will leave the original Dos
installation intact.
The file which held the collection of charts in your Dos version of PCA is called
‘NAMEFILE.DAT’.
Normally, this (old format) file was installed to a directory on your hard disk called
EEZ.
Before you do anything with this file, it is recommended to back the file up to a
diskette etc using the Dos COPY command, or Windows Explorer, Windows File
Manager, etc.
Then, make a copy to the Argus directory on the disk drive you have installed it
- 16-
Argus 3.1 for Windows
on, e.g. ‘C’, ‘D’, etc.
Then, to transfer the birth data from the old (DOS) format, you will find a function
for this under:
Data | Input Menu | Namefile | File | Import Dos Namefile.
The default Namefile in Argus is called PCA.NFI
Namefiles - Appending
If you have the default Namefile open ‘PCA.NFI’ and choose to IMPORT a
Namefile, the Namefile you import will APPEND to your current open Namefile_!
Importing multiple Namefiles - to new multiple Namefiles
If you have several Namefiles in Dos format which you wish to convert to PCA
Windows format do the following:
Data | Input Menu | Namefile | File | New
Data | Input Menu | Namefile | File | Import Dos Namefile
17
(c) Electric Ephemeris - 1997
USING THE PRINTER
Printer output
IMPORTANT: Argus’ way of printing is different from the way other windows
programs print. Please read the instructions carefully.
In other windows programs you start writing your output to screen. Then you
activate the printout to transfer the screen (or window) contents to the printer.
In Argus you must start the printjob BEFORE calling radix, chartwheel, aspects
etc. , and you must terminate the printjob when you finished your output to make
sure, you get the last page printed.
In order to activate the printer you may select either of the following:
§ Click File | Printer | Start printing
§ Select ‘99'
Activating the printer changes the status indicator at the bottom of the screen
showing when the printer is active.
Now try to calculate a Radix or select a ChartWheel as explained previously. In
this case the output goes both to the Screen and Printer.
However, at this point the printer may not seem physically activated. This is
because the Windows Print Manager buffers (spools) the printer output in order
that it does not interfere with print jobs from other programs.
To spool the processed printer output and physically activate the printer choose:
Click File | Printer | Terminate printing
Select ‘9X’
You must always terminate your printing this way. If you don’t, the last page of
your printout will be missing, still waiting in the printing queue.
There are print layout options by selecting Preferences | Print page options.
The Printer Menu has a number of options apart from Commence Printing and
Terminate Printing:
- 18-
Argus 3.1 for Windows
Print Abort - 9z
Abort print procedure. Any partially printed last page will be discarded.
Print Suspend - 9o
Temporarily suspends output to the printer. This allows you to output to screen
only (to experiment) for a moment without having to terminate the print job.
Print Resume - 9i
Resumes the temporarily suspended printing.
Form feed - 9f
Page eject, even if the current page is only partially written.
Line feed - 9l
Insert one blank line.
19
(c) Electric Ephemeris - 1997
Keyboard shortcuts
Most Windows users prefer to use the mouse wherever possible. In that case the
mouse seems easy to use and the keyboard is relegated as a text input device.
However, if you use the keyboard, you may find that it executes certain functions
more speedily. This is true especially if the program offers one-key presses.
Of course, it may take a bit of effort to learn appropriate key selections.
Argus has a number of one-key commands, mainly inherited from the Dos
version. The appropriate key stroke is displayed at each menu option.
Argus has a couple of commands, you may activate just pressing one letter key,
most of them are inherited from the DOS version. The letter you need to press is
shown next to said functions in the menus, when you use the mouse. Some of the
commands need two succedent keypresses, e.g. XY to get the dynamic transit
output for one year. When you find a mouse clicking procedure tedious, you
should note, if there is a keypress equivalent shown, then memorize this and use
keypresses next time.
The Input Menu offers numeric key selections, numeric keys ‘0-6'. This allows the
user to select and edit a data field.
You may complete the editing of the appropriate field by selecting the ENTER key.
Alternatively, you may navigate the Input Menu using TAB, SHIFT-TAB, Arrow
keys and the other navigators on the keyboard.
When the input menu is visible:
CTRL-N
CTRL-A
Open the namefile box
Open the gazetteer
When the namefile window is open and focused (coloured title bar), you can use
the following keys:
HOME
Select first name
END
Select end of file
PG-UP
Move one page of names up
PG-DOWN Move one page of names down
CTRL-I
Open new namefile
CTRL-D
Delete namefile entry
CTRL-E
Search the namefile
- 20-
Argus 3.1 for Windows
CTRL-N
Add notes to namefile entry
CTRL-O Sort the namefile
CTRL-F
Get the current name and data into the input menu
21
(c) Electric Ephemeris - 1997
Macros
Macro - definition
In earlier Dos versions of PCA a Macro was sometimes referred to as a
"commandline" or "commandqueue". However, most programs use the word
MACRO.
A Macro is a series of program commands, which become assigned to a single
key selection and are executed by that single key press. The macro string
consists of a sequence of letters, number and symbols most of which a re the
same as the keyboard shortcuts you would use for each command.
So if you for example often clicks the mouse to calculate radix, then aspects and
then a chartweheel, you would as the first step look in the menus when you click,
and see, that the keyboard shortcuts for these commands are R A and V. You
would then try to press R, A and V instead of using the mouse. As a next step,
you could create a macro: RAV and this macro would do the whole thing in one
go. Macros can be up to 255 characters long.
The need for a Macro arises when the same sequence of commands are required
several times.
Macros - example
You may require printed output consisting of Radix positions plus ChartWheel for
a series of charts. These chart entries may be in the Namefile and are each to be
printed on one page.
Do the following:
§ Go to the first Namefile entry of the ten charts to be processed making sure
that the Namefile pointer highlights that first chart entry.
§ Select Fetch to insert Namefile entry in Input Menu.
§ Select ‘C - Macro’ or click on the MACRO part of the status line at the
bottom of the screen.
§ (....also see Help | Macro).
§ Now enter this macro: ‘99RV9X’ followed by ENTER or click OK.
99rv9x Means the following:
- 22-
Argus 3.1 for Windows
99 start print process
r
print Radix positions
v
print ChartWheel
9x
terminate printer
If you then select ‘C - Macro’ again, the macro dialogue box shows the latest
executed macro as default.
If you Fetch the next Namefile entry then select ‘C - Macro’ and simply press
ENTER or click OK to repeat the sequence. An ‘=’ (equal sign) extracts the
Namefile entry into the Input Menu. E.g.., =99rv9x
To repeat (loop) a macro terminate it with ‘C’. Such a macro will continue infinitely
and the Status Bar will indicate the macro engaged. To abort select ESC. E.g.
=99rv9xc. (The macro will also abort if it comes to the end of the namefile or to a
blank name).
Macros - data input
Some commands require data. In that case you may insert data into a Macro. To
do so, you must terminate by using a full-stop.
For example, entering the date 13th Feb, 1922. The macro would look like this:
1 13 2 1922.
Please note:
1) The ‘1' means open Input Menu field ‘1 - Date’.
2) The terminating full stop which means ENTER.
Accessories: Interpretations and modules
Argus has a capability of two types of add-ons. These are available as optional
extras.
23
(c) Electric Ephemeris - 1997
PRINTING TO FILE
Argus is not born with the facility to export its output to other programs. You will
need to outsmart the program if you wish to export data:
Text and numbers:
There is a macro, which sends the program output to file named argus.prn in the
Argus installaion folder. You cannot change this filename, so you will need to
move or rename the file after you finished output to make sure, that is is not
overwritten next time. The output is filtered, so you will get pure text, no symbols,
fonts, layout, or anything fancy. It may still be useful for interpretations, if you
reformat the output to your needs, using a wordprocessor.
To open the file output, press key C or click the MACRO field on the status line at
the bottom of the ARGUS program window. Now enter this macro:
$65 9 PSTAT
click OK
Now activate the interpretation or whatever you need to send to the file. When
finished, close the output using another macro:
$1 9 PSTAT
click OK
PDF output
It is possible to get or buy a virtual printer driver, which will turn all printer output
into a PDF file. The driver looks like an ordinary printer, but the output will collect
in a special program window, which will let you inspect or save the PDF, or send it
by e-mail to other people.
The ADOBE Acrobat (not the free acrobat reader, but the full program) has such a
driver, but a cheeper solution is to use the very good shareware PDFfactory,
which you may download from www.fineprint.com. You can use it for free, or you
may register it to avoid having the word fineprint appearing on the bottom line of
each printed page.
You need the free acrobat reader to read a PDF, but most computers these days
have the reader installed, and if they have not, it can be downloaded for free from
www.adobe.com.
- 24-
Argus 3.1 for Windows
INTERPRETATIONS
There are two flavours of accessories to Argus, which may be installed
immediately or at a later state as needed.
Interpretations. ARGUS is not provided with interpretation texts. The basic
version only provides the necessary calculations, positions, tables and
chartwheels. Different interpretation texts are available for ARGUS which you can
buy as optional extras. Mainly, you should also be able to run interpretations
which are written for the DOS version, even if you will a few adjustments due to
the different way DOS and Windows handle text. Anyone, who learns the XLI
scripting language can write interpretations for Argus.
Please enquire for further details or look into our website www.electricephemeris.com
XLI - modules XLI is Argus’s dedicated programming language which is used for
the writing of astrological interpretations, research, program customisation, etc,
etc. which are not included in the basic program. Such modules may for example
fulfil special needs, which is only shared by a small fraction of users.
You may already have XLI modules and interpretations on your hard disk, e.g.
from the DOS version of PCA.
You may create new pull-down menu for these items. (Up to 15 interpretations
and 15 XLI modules.)
A few modules are installed as standard with the basic program. You can find
these by clicking FILE > XLI > XLI-Menu. This will show all modules available, and
you can just doubleclick one to see what it does.
XLI - Programming
Argus has a complete inbuilt scripting language - XLI. What this means, is that
with XLI programming knowledge, it is possible to write your own interpretations
and modules.
XLI is particularly useful for complex interpretation structures and research /
search modules.
For the DOS version of PCA, there was a programming manual. You could use
25
(c) Electric Ephemeris - 1997
this, but some modules written for DOS will not run properly in Argus, du to the
differences in DOS and WINDOWS. A revised XLI programming manual is
available for download on our website.
An XLI programming manual is available for download from our website.. The
functions in the Dos programming manual also apply to a large extent to ARGUS.
A number of free sample XLI modules are also available as free download from
our website:
www.electric-ephemeris.com.
However, for further details please enquire.....
XLI command in macros
Finally, you may enter XLI-commands in the macro-input line, if you start it with a
$-sign. Try for instance to enter this macro:
$GRON 0 64 FOR 153 1 CNT 1024 MUL 2000 0 0 DRSYM NEXT
Preferences
ARGUS offers a variety of user definable options. Clicking Preferences will display
the options available. Most of them are self-explanatory.
Astrological options
Under Astrological Options you'll find a number of astrological techniques, that
may not be familiar to you. Unless you know what you are doing, you should leave
these options on their defaults. Please note however, that different schools of
astrology may use differing methods, for example house systems or progression
methods, which may mean, that the program produces results differing from what
you expect. In that case, you should make sure, if it is just a question of changing
preferences adequately.
Windows Colour Schemes
Part of an appeal of any astrological software is its aesthetic layout. Therefore the
way in which Windows uses colours may require some thought and redesign.
Argus has its own Colour Setup Menu which is appropriate to Chart colours,
foreground, text etc. (See Preferences). However, the actual Windows colour
- 26-
Argus 3.1 for Windows
environment is setup in Windows itself.
Selecting Fonts
Argus uses it’s own font PCA.TTF. Normally, it is not installed to the system, but if
you want to use the glyphs in other programs, you may install the font using
windows control panel. You will find the Argus font in the Argus installation folder.
You can change the screen and printer font setup under Preferences | Font |
Screen font or Preferences | Font | Printer font.
There are two factors to consider regarding the use of fonts which are
configurable when Argus is installed. They are font appearance and font size. We
recommend the following.
Screen font appearance - recommended
ARIAL - Regular
Screen font size - recommended
VGA - 640 x 480
10 point
Super VGA - 800 x 600
12 point
Super VGA - 1024 x 768
12 point or above
Note:
To test whether you have the optimum font size and appearance open one text
window and one graphic window. Then select Window | Tile to see how it looks.
See Multiple Windows, next section.
Edit system variables
This will let you get your fingers dirty and directly edit the configuration file. This is
a very powerful feature, but also dangerous. You should be very careful using this
feature, and in any case, you should make sure, you have a valid backup of your
PCA.CFG file, before using this feature.
Save to disk
The menu option Save to Disk means, that the current settings will be saved, so
that they are the defaults next time you use the program.
If you just are experimenting with different settings, or if you realize, that you may
27
(c) Electric Ephemeris - 1997
have made a mistake which you don’t know how to restore, then don't select Save
to Disk, but quit the program and restart. Then the original settings will reappear.
Save to disk also saves the orb definitions, which you can define in Data | Orb
limit | Configure.
Your preferences are saved in a file called PCA.CFG. This file also holds your
registration info, the language and a couple of other things.
This concludes the getting-started manual. For more in-depth explanations, use
the Help pulldown on the programs main menu.
ELECTRIC EPHEMERIS
Laurids Pedersen
Stubberupvej 14
DK-4880 Nysted
Denmark
Tel +45 7020 2501
Fax +45 7020 1502
Email: [email protected]
Website: www.electric-ephemeris.com
- 28-