1
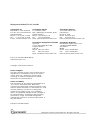
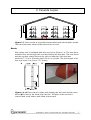
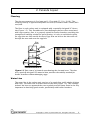
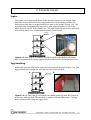
Management Manual VERANDA Broiler Breeder Guide 29-10-2002 Management Manual for the Veranda Vencomatic bv Meerheide 5, 5521 DZ Eersel P.O. Box 160, 5520 AD Eersel The Netherlands Phone: ++31 (0) 497 517380 Fax: ++31 (0) 497 517364 E-mail: [email protected] Vencomatic GB Ltd. 10, St. Mellion Way NG17 8NN Kirkby in Ashfield, Notts United Kingdom Phone: +44 1623551118 Fax: +44 1623552988 email: [email protected] Vencomatic USA Inc. 253 Center Street, #143 Lake Geneva WI 53147-1982 Phone: 877-934-3972 Fax: 877-934-3971 Email: [email protected] Vencomatic Equipment of Canada Suite 324, 11245 Valley Ridge Drive NW Calgary, Alberta T3B 5V4 Phone: (403) 241-7692 Fax: (403) 241-7694 Email: [email protected] Vencomatic do Brasil Rua Maestro Angelo Lamari, 336 13930000 SERRA NEGRA SAO PAULO BRASIL Phone: 0055 1938927889 Fax: 0055 1938927881 Email: [email protected] Find us on the World Wide Web at: www.vencomatic.com Copyright © 2002 Vencomatic bv Notice of Rights All rights reserved. No part of this manual may be reproduced or transmitted in any form or by any means, electronic, mechanical, photocopying, recording, or otherwise, without prior written permission from Vencomatic bv Notice of Liability The information in this manual is distributed on an “As is” basis, without warranty. While every precaution has been taken in the preparation of this manual, neither the author nor Vencomatic Inc. shall have any liability to any person or entity with respect to any liability, injury, loss, incidental and/or consequential damage caused or alleged to be caused directly or indirectly by the furnishing, performance, usage, associated management material and instructions of the Veranda system, or any part thereof. Printed in The Netherlands Copyright © 2002 by Vencomatic bv. All rights reserved 29-10-2002 Table of Contents 1. Introduction 1 2. Veranda Layout 2 3. Rearing 9 4. Placement in the Breeder House 12 5. Feed Management 18 6. Production 24 7. Male Management 30 Appendix A: Veranda Maintenance Guide 33 Copyright 2001 by Vencomatic Inc. All rights reserved. 29-10-2002 1. Introduction This manual contains recommendations to help the producer manage birds with their Vencomatic Veranda system. This is to be used as a guide only and in no way is meant to replace the management guide that is provided by the primary breeder company. This manual was created to help our customers achieve the best possible results with our system. As an equipment manufacturer, Vencomatic realizes that our equipment will not enhance or detract fertile egg production. However, Vencomatic can give customers the benefit of years of experience as to what has worked and not worked. Information on body weight and body weight uniformity was included in this manual to reinforce the importance of these factors in good production and flock management. In addition, we have provided comments about production and general management, which reflect our view of the best practices being put forward by our customers. There can be a lot of strain to strain variation in how a bird responds to lighting, feeding, and laying eggs. In the end, the technical service representative of a breeder company is the most knowledgeable person on how to properly manage a particular strain of bird. If problems arise while the hens are in production it is important to consult a tech service representative. However if there are questions concerning the Veranda or other related equipment do not hesitate to contact Vencomatic for their input. If you have any comments about this manual or suggestions for improvement please contact: Vencomatic bv Meerheide 5, 5521 DZ Eersel P.O. Box 160, 5520 AD Eersel The Netherlands (Phone: ++31 (0) 497 517380) Copyright © 2002 by Vencomatic bv. All rights reserved 29-10-2002 1 2. Veranda Layout When you purchase the Veranda system the placement of the feed, water, nest, lights, and manure belts is pre-determined. The layout of the feed and water lines provides what Vencomatic feels is the most efficient use of the space while at the same time encouraging movement throughout the unit and towards the nest. In addition, perforated egg belts, rubber nest pads, a selfcleaning floor system, and a durable and stable plastic slat give the birds the most optimal environment to live. While much of the guess work is taken care of, success with this system is really about using a different management technique as it is not the same as a floor system. The following recommendations are applicable to heavy breeders and have been made to help the flock manager work with this unique system. House Layout The Veranda is designed for those that want to house over 10.000 female breeders. The Veranda consists of small colony-type units each containing a water line, feed trough, light, and four nest boxes (Figure 1.2). The units are placed on top of each other to form multiple levels or tiers and side by side to form rows. The system is most economically viable when at least three tiers are used (Figure 1.3). A single Veranda unit, including nest space and egg belt, measures 4,6 m long and 1,86 m wide (15,1 ft [ 10 ft). Figure 1.2 Drawing of a colony unit, with the slatted floor, feed trough, four nest boxes, and a water line. Copyright 2001 by Vencomatic Inc. All rights reserved. 29-10-2002 2 2. Veranda Layout 5 14 Figure 1.3 Cross section of a possible breeder house with the Veranda system. There are four rows, each row has three levels or tiers. Nests Each colony unit is equipped with four nest boxes (Figure 1.4). The nest has a movable floor and the egg belt is located behind the nest box. The nest boxes and the egg belt extend out into the aisle or walk-way. Each nest box measures 1,15 m (3,8 ft) long and 0,36 m (14 in) wide. The total length of all four nest boxes is 4,6 m or 15,1 ft long. A B Figure 1.4 (A) Top view of a colony unit showing the slat area and four nest boxes. (B) Picture of the inside of a nest box. The floor in the nest box is covered with a soft rubber pad called a Venco-mat. Copyright 2001 by Vencomatic Inc. All rights reserved. 29-10-2002 3 2. Veranda Layout Flooring The slat area measures 4,6 m long and 1,15 m wide (15,1 ft × 3,8 ft). The stocking density is approximately with 66 birds (60 females and 6 males) 840 cm2/bird. The floor in each colony unit is equipped with a specially designed 2C Vencoslat (Figure 1.5). This slat addresses two challenges that are often associated with cage systems. One, it is properly suited for broiler breeders providing the strength and stability needed for good footing. It is also a cushioned surface for eggs that are laid outside the nest. Eggs that are laid on the slats will roll through the nest and onto the egg belt. Slat Nest 4.6° Figure 1.5 Side view of a Veranda row showing the slat and nests. The slats are a specially designed 2C material that provides the stability needed for broiler breeders without damaging eggs. Water Line The water line in the colony unit consists of a supply line and 8 nipple drinkers with cups. The water line is located next to the nest (Figure 1.6). This strongly induces the hens to approach the nest regularly and has been found to be very important in obtaining good results, particularly with broiler breeders. Copyright 2001 by Vencomatic Inc. All rights reserved. 29-10-2002 4 2. Veranda Layout Water line Figure 1.6 Side view of a Veranda row showing the water line. There are eight nipple drinkers and with drip cups in each colony unit. Feeder Lines The feed line is a drag auger with an exclusion grill (Figure 1.7). Every two tiers per row has one hopper. The feed is delivered automatically to each hopper and runs on a charged line. Feed line Figure 1.7 Side view of a Veranda row showing the feeder line. The feeder is intended for both males and females. Large gaps between the grills allow the roosters to eat. Copyright 2001 by Vencomatic Inc. All rights reserved. 29-10-2002 5 2. Veranda Layout Lights The lights are an important factor in the breeder house as day length helps stimulate sexual maturation and egg production. Each colony unit has one fluorescent light that is located behind the unit in the center (Figure 1.8). The light intensity throughout the unit varies, with approximately 50 lux at the water line and 30 lux at the feeder line. The light intensity can not be adjusted and usually there is no supplemental lighting in the house. Lamp Figure 1.8 Side view of a Veranda row showing the light bulb. Each colony unit is equipped with a single light bulb that remains at a fixed light intensity. Egg Handling Almost all eggs are laid in the nests and roll onto the egg belt (Figure 1.9). Slat eggs should roll through the nest and also onto the egg belt. A Egg belt B Figure 1.9 (A) Side view of a Veranda row showing the egg belt. (B) Picture of a nest box and egg belt. The nest box is usually covered with plastic. The egg belt is perforated to keep the eggs clean. Copyright 2001 by Vencomatic Inc. All rights reserved. 29-10-2002 6 2. Veranda Layout An egg elevator at the end of each row collects the eggs from each tier (Figure 1.10). The eggs can then be taken to an individual collection table in front of each elevator. To simplify the egg collection process a cross conveyor can be fitted into the house that will take the eggs from every elevator to a central collection point (Figure 1.11). Figure 1.10 Picture of an egg elevator. This elevator will collect the eggs from each level. Figure 1.11 Picture of a conveyor that can transport the eggs to a single collection point. The cross conveyor can be modified to transport eggs from multiple houses to a central point. In addition, if you have a high volume of eggs (greater than 10.000 per day) then an automated packing system for placing eggs on setter trays can be installed as a time-saving measure. Various packers are available from Vencomatic. Copyright 2001 by Vencomatic Inc. All rights reserved. 29-10-2002 7 2. Veranda Layout Ventilation and Manure Handling Ventilation is another critical factor in obtaining optimal results with any Vencomatic system. Manure will fall through the slats onto a plastic belt under the unit (Figure 1.12). The belt is as long as the Veranda row and there is a belt under each tier. Air channels Manure belt Figure 1.12 Side view of Veranda row showing the manure belt and air channels. The manure belt ensures that the colony unit stays relatively manurefree and provides a nicer environment for the birds. There is an air channel located on either side of every manure belt. Air (0,8 m3/bird/hour) is brought to each colony unit 24 hours a day through a special air channel (Figure 1.12). This not only provides fresh air for the birds but it also aerates the manure on the belt. Studies in Holland have shown that with this system the manure stays dry (approximately 55 to 65% dry matter) and that there is a reduction in the ammonia level in the house (80-85%). The manure belts can be turned over once every 5 or 6 days. A concrete pit at the end of the house is fitted with a single belt that runs across all of the rows (Figure 1.13). The manure from each tier is dumped onto this belt, which can then be taken out of the building. Heat Exchanger Unit Manure cross conveyor Figure 1.13 Cross section of the breeder house showing the manure crossconveyor, which is used to remove manure from the building. The heat exchanger is located above the Veranda units. Copyright 2001 by Vencomatic Inc. All rights reserved. 29-10-2002 8 3. Rearing Maximizing productivity in the breeder house begins in the rearing house. A flock that is uniform in body weight throughout rearing will respond to light stimulation as a synchronous group. As a result the number of days between lighting and onset of lay will be reduced, while peak, persistency of production and livability will be higher. For this to happen, an accurate determination of the average body weight and uniformity of the flock must be made on a weekly basis. Body Weight And Uniformity Males and females should be reared separately to control feed intake, thereby controlling body weight. Most breeder companies recommend that the first weighing take place at either one or two weeks of age. Depending on the breeder company, chicks will be full fed from the time they are placed in the house until they have achieved a specific critical body weight. While the birds are on full feed, they can be group weighed. However, once feed restriction begins, individual weights are more desirable. General points: • Scales should be regularly checked for accuracy. • Body weights should be taken in the same area of the house at the same time of day, preferably, before feeding or on a non-feed day. • Determining the appropriate number of birds to be weighed should be based on the size of the population. Breeder companies recommend that at least 4% of the flock should be weighed. • Record body weights and calculate the average body weight and the uniformity in body weight. One common method to calculate flock uniformity is the coefficient of variation or CV. Some breeder management guides will give you a method to calculate the CV. Another common method is the calculation of the number of birds that weigh within ± 10% (or 15%) of the average body weight should suffice (See Table 2.1). • Allocate feed based on how close the average body weight of the flock is to the target body weight as recommended by the breeder management guide. The birds should not lose weight at any time during the rearing phase Copyright © 2002 by Vencomatic bv. All rights reserved 29-10-2002 9 3. Rearing . Table 2.1 Calculation of flock uniformity using the ± 10% method. Flock uniformity measures how many birds in a flock are at a similar body weight. Record the body weight of each individual. Example calculations: Calculate the average body weight by taking the sum of all the individual body weights and dividing it by the number of birds weighed. Total weight: 150 kg Number of birds weighed: 125 Average body weight: 150 kg ÷ 125 = 1,2 kg Multiply the average bird weight by 0.9 to calculate the lower range (−10%). 1,2 kg × 0,9 = 1,08 kg Multiply the average bird weight by 1.1 to calculate the upper range (+10%). 1,2 kg × 1,1 = 1.32 kg You now have the range of body weights that are within ± 10% of the average. 1,08 kg to 1,32 kg Count the number of birds who weigh within this range. Divide this number by the total number of birds weighed. 104 ÷ 125 = 0,832 Multiply this number by 100. 0,832 × 100 = 83,2% So 83% of the flock weighs within ± 10% of the average body weight. If flock uniformity is low it should immediately be corrected. This may involve: • Isolating birds based on weight category and tailoring the feed allocation to each group’s needs. • Changing the rate of feed increases each week or the absolute amount of feed allocated. • Reducing bird density (square meters/footage per bird). • Increasing the number and/or changing the spacing of the feeders and drinkers. • Checking the accuracy of the feed weighing equipment and the rate of feed distribution. • Discussing options such nutrient dilution with feed supplier. Copyright 2001 by Vencomatic Inc. All rights reserved. 29-10-2002 10 3. Rearing Preparation For Breeder House • Electric wire placed over the water lines will help train the birds not to perch on the lines. The goal is to get the birds off the water line not to discourage them from jumping in general. Jumping strengthens the leg muscles, which results in fewer leg problems in production. It is preferable to use the shock wire only when it is absolutely necessary. • The pullet house should be light tight. The day length should not increase during rearing and it should not decrease during production. Therefore, if natural day light enters the house then this may affect the lighting program in the breeder house. • Carrying over procedures from the pullet house into the breeder house will greatly benefit the flock by easing the transition into their new environment. The birds will have to use an auger-type feeder and nipple drinker during production, therefore they should also be used during rearing. Copyright 2001 by Vencomatic Inc. All rights reserved. 29-10-2002 11 4. Placement in the Breeder House Before Placement • Structural layout for the Veranda has already been discussed in Section 1.0. • All inside house construction, assembly and/or desinfection should be completed by now. • Label each unit with the row, tier, and unit number, before you place the birds. This will make identification of each unit much easier. Ensure that the labels are large enough to see from approximately 10 m away. The most common method is to number each row beginning from the left of the house to the right. Each tier (within a row) is labeled alphabetically with the lowest tier given the letter A. The units are numbered beginning at 1 and going from the left end of the row to the right. 1A1 = first row, bottom tier, first unit 3C12 = third row, third tier, twelfth unit • The house should be cleaned and disinfected before placement. For details on cleaning and preparation of the system prior to bird placement, review Appendix A >> Veranda Maintenance Guide. • Recommendations for the house prior to placement are outlined in Table 4.1. Copyright © 2002 by Vencomatic bv. All rights reserved 29-10-2002 12 4. Placement in the Breeder House Table 3.1 Check list for breeder house prior to placement. Program ventilation and temperature for the house, including the alarm settings. ° ⇐ Minimum 18 C House temperature ⇐ Lighting ⇐ Feeding system ⇐ Water ⇐ Nests ⇐ Should stay closed until light stimulation. Manure belt aeration ⇐ Turn on the air supply to the manure belts. Set timers for appropriate day length and check to maker sure they work. ⇐ Light bulbs for all units should be functioning properly. ⇐ Supplemental lighting can be used during placement. Fill hoppers with the desired amount of feed. Adjust the lines so that they are parallel with the floor. o Keep the line low enough for the birds to recognize it. This will help them find water more easily ⇐ Check the water pressure. o Should be reduced for the first few days after placement to allow the birds to get water easily. o Adjust the level of water in the bleeder to 5 to 8-cm (2 to 3-in). ⇐ Check if the water level is the same in all of the bleeders at the end of the lines. ⇐ Spot check the availability of water in the nipples of the different lines, if there is a leak move the pin in the nipple back and forth. If this does not work then replace the nipple. At Placement It will take approximately a few days for the birds to adjust to their new environment. The following recommendations will help ease the transition from the pullet house to the breeder house. • The best age to transport birds is when they are between 18 and 20 weeks old. At this time they are approaching maturity, they have had their vaccinations, and any possible reactions to the vaccines should already have occurred. • All moving should begin in the early morning so that all of the birds can be transported in a single day. This also gives the birds enough time to adjust to each other and to their new home. Copyright 2001 by Vencomatic Inc. All rights reserved. 29-10-2002 13 4. Placement in the Breeder House • The males should be placed in the breeder house 1 or 2 days before the females. The number of males at the time of placement will be equal to 10% of the female population. Sort males by body weight. Put heavier males together in units and lighter males together in other units. Make sure that the same number of males is placed in every unit. • The same number of females should be put into the crates used for moving. Counting crates is easier than counting birds. This prevents an unequal number of hens per unit. As with the males, the females should be crated together based on body weights and put in the same units where they can fairly compete with each other. In order to keep uniformity high, females that are too small or too large should not be placed in the breeder house. Figure 3.1 Placement of the birds Copyright 2001 by Vencomatic Inc. All rights reserved. 29-10-2002 14 4. Placement in the Breeder House Immediately After Placement 1. It is essential that the birds recognize their water source right away. a. If the birds are not accustomed to using a nipple drinker then at placement, train some of the birds within each unit to drink from the nipple. 2. Feed the birds. a. On the first day, give only 50% of the daily feed allocation. For the following two days, feed 125% of the daily feed allocation. You can resume feeding 100% of the daily feed allocation on the fourth day. b. Feed level in the trough should be at its maximum. Once birds have acclimatized to the feeding system, the feed level can be lowered (see 4.0 Feed Management >> Body weight management for more information). c. Check each tier in the house during feeding for proper distribution of feed and water. Check the water line again later in the day. d. Pay attention to water and feed intake for the whole house, not just individual e. A good indicator of whether a bird is getting enough feed and water, is to feel its crop shortly after they have eaten. The function of the crop is to store food before digestion. After feeding, the crop will be quite visible (it will look like the bird has a bulge on the side of its neck). The crop should be feel full and kneadable. f. Birds that are not drinking or eating must be separated or removed from the house. 3. Remove any equipment that was used to place the birds from the house. 4. Clean the aisles if necessary. 5. After the birds have been fed, the aisles have been cleaned, and you’re sure they have found the nipple drinkers, leave the birds alone for the rest of the first day to adjust. 6. On that first day, the lights should be left on through the night as some birds may have difficulty adjusting right away. The next day, go back to a regular day length. Copyright 2001 by Vencomatic Inc. All rights reserved. 29-10-2002 15 4. Placement in the Breeder House Routine Checks • Problems can arise that may not become obvious right away. Each colony unit should be inspected daily for mortality, feed distribution, general behavior, and mating activity. • Adjust the level of the water column to 0,25 m (10 in). • Adjust the height of the water line so that the birds are standing straight (they are not hunched over or squatting to get water). The birds should have to turn their heads upward to drink. Typically, the distance from the top of the slat to the nipple is 0,5 m (19,5 in). • The amount of space given to the males can be adjusted. Each male should have approximately 0,15 m of feeder space (this is equivalent to 0,075 m of trough, as they can eat from both sides). This is only an approximation, as different strains have different feeder space requirements. • Mortality should be recorded everyday. Females should not be replaced, but males should (at least during the first week in the house). Mortality may need to be entered into the feeding program to facilitate feed allocation. • Make sure the nests stay closed at placement. Opening the nest, prior to the production of the first egg, will only encourage the pullets to roost in the nest. • For a detailed description of daily, weekly, and monthly maintenance activities, refer to Appendix A. Copyright 2001 by Vencomatic Inc. All rights reserved. 29-10-2002 16 4. Placement in the Breeder House Water Restriction (if applied): Time spent drinking water should be minimized to allow the less dominant birds to have access to the water and the nest. If birds are spending too much time at the water line, you may want to control their water intake. Before employing any method of water restriction, do the following: 1. Ensure that the flow rate on the water line is at least 90 ml/min. 2. Feel the crop of several birds, to make sure that it is kneadable. If it is, then you know that the birds are consuming enough water. 3. Speak to a Vencomatic representative about water restriction. One method of water restriction: • Under normal temperatures (20 to 25°C or 68 to 77°F) the birds will drink 1,75 to 2 times as much water as the feed consumed. • Full access to water must be provided in the morning and up to 3,5 hours after feeding. • The birds can be given water again at the end of the day, just before the lights go off. The increased movement throughout the colony unit may potentially increase mating activity. • Feel the crops on several birds, to make sure that you are not restricting the water too much and observe the bird’s behavior. Copyright 2001 by Vencomatic Inc. All rights reserved. 29-10-2002 17 5. Feed Management The goal of the Veranda feeding system is that all of the birds in the house receive the same amount of feed at the same time. This system is unique as both males and females must eat from the same feeder. Although this is not a practice that breeder companies would recommend, by using the techniques outlined in this section as well as careful management, the body weights of the males and females can be controlled separately. Before Placement General points: • make sure no materials or objects have been left in the trough • make sure all regulators are in the right position • check whether all bolts and nuts have been fastened correctly • check the time clock and the regulator, which controls both the feed amount and the number of runs, for proper functioning • check the feed weighing machine remove the feed in the machine first and adjust the machine with standard weights This system transports feed at a speed of 30 m/minute, using a drag-type spiral auger. Before placing the first flock determine the running time of the spiral auger. Mark a point on the auger and determine the time needed for that point to make a complete loop. This is considered one run. Set this time into your control panel (eg. 5 minutes and 45 seconds). 30 m/min Figure 4.1 Feed circuit Copyright © 2002 by Vencomatic bv. All rights reserved 29-10-2002 18 5. Feed Management System Operation Basic principles: • The first few times that you start the feeding system, it will shake slightly. Afterwards, it should run smoothly. • The hopper contains only the amount of feed to be allocated that day. • One hopper is allocated for every 2 tiers or levels. • The feeding system operates on a loop. Each tier is one-half of the loop. • One run is defined as the length of time needed for the system to complete a single loop. This time is fixed and can not be changed. In order to divide the feed in the hopper evenly among both tiers, the system will need to make more than one run. The number of runs will depend on the level of feed in the trough, the feed form, the amount of feed per bird, clean-up time, and body weight. • After the first run, the system will pause to allow the birds to eat the newly distributed feed before starting again. This time between runs is known as an interval. The length of the interval can be altered. • When the feed system begins the next run, it will move in the opposite direction of the previous loop. For example: if the first run moved in a clockwise direction, the second run will move in a counter-clockwise direction. The feed system will always reverse directions after each run. Feeding time (minutes) Figure 4.2 Feed run Copyright 2001 by Vencomatic Inc. All rights reserved. 29-10-2002 19 5. Feed Management Feed Allocation 1. Calculate feed allocation for each hopper (see below). Note: The hoppers must be filled for 2 tiers and males are fed with the same system. Determine the amount of feed to be given each day to every bird based on breeder company recommendations. Each colony unit will have 60 females (♀) and 6 males (♂). Calculate the amount of feed to be allocated to each colony unit (males and females combined). Per bird: Females (♀) = 155 g/day Males (♂) = 140 g/day Per unit: 60♀ × 155g/day = 9300 g/day 6♂ × 140g/day = 840 g/day 9300 + 840 = 10140 g/day Calculate the amount of feed to be allocated to each tier or level. In this example there are 15 units/tier. Per tier: 15 units/tier × 10140 g/day = 152100 g/day Calculate the amount of feed to be filled into each hopper, remembering that there is one hopper for every two tiers. Per hopper: 2 tiers/hopper × 152100 g/day = 304200 g/day Convert the amount from grams to kilograms. 304200 g/day ÷ 1000 g/kg = 304,2 kg/day The hopper must be filled with 304 kg of feed per day. 2. Fill the hoppers with the required amount of feed. 3. Determine the number of runs that are needed to deliver this feed. • You can control the number of runs by changing the level of feed in the trough. • Often, the amount of feed to be transported can not be evenly divided by the number of runs. The result is that the last run of the day transports less feed than the previous runs. • To correct this discrepancy there should always be an uneven number of runs. On the first run of the day the feed system will move in the opposite direction of the first run from the previous day. This ensures that the feed from the last run is not given to the same tier every time. Copyright 2001 by Vencomatic Inc. All rights reserved. 29-10-2002 20 5. Feed Management Body Weight Management 1. It is preferable to re-fill the hoppers immediately after feeding. • The sound of the turning augers from the silo will not cause any stress to the birds. • The hoppers can be checked to make sure they are filled correctly. This way if there are any problems you will have time to solve it before the next day’s feeding. 2. Fix the required feeding times. • Some customers have not fed the birds until 6 to 8 hours after lightson. They have found this successful because most hens will lay their eggs in the morning, leaving the afternoon for feeding and mating. In addition, having some feed left in the digestive tract after the lights-off has led to improved egg shell quality. This has lead to improved hatchability. Note: Speak to a Vencomatic representative before employing this method. 3. Determine the length of the interval between runs using one of two methods discussed below. Regardless of the method you choose, you can control the body weight of the flock by changing the length of the interval. Because males receive feed from the same trough as the females, controlling male body weight is critical. Fixed Interval. • This is the most simple and common method used. • Set one time for the interval length and continually repeat this time between runs. • The length of the interval will depend on the body weights of the males. • If the males are underweight ⇒ shorten the interval • This increases the frequency of the runs, increasing the amount of feed available to the males. • If the males are overweight⇒ lengthen the interval • This decreases the frequency between runs, decreasing the amount of feed available to the males. 4. Set the feed level in the trough. • With every Veranda installation, Vencomatic will supply a set of 8 metal plates that vary between 5 to 12 mm in thickness. • The plates can be used in both pre-production and production. • Typically, during pre-production the 5 to 8 mm plates are used and during production the 9 to 12 mm plates are used. Never use anything Copyright 2001 by Vencomatic Inc. All rights reserved. 29-10-2002 21 5. Feed Management less than the 9 mm plate during production, otherwise the feed level will be too low and the males will not be able to reach the feed. Figure 4.3 Plates for adjusting the intake boot • The plate is placed inside the feed intake boot to adjust the opening of the feed intake gate. The thicker the plate the higher the feed level in the trough therefore, the more feed available to the males. Figure 4.4 Feed intake boot • The feed level should be at its maximum for the first few days after placement. This will help the birds find the feed and adjust to their new environment. Copyright 2001 by Vencomatic Inc. All rights reserved. 29-10-2002 22 5. Feed Management • At a maximum level you can expect some feed wastage to occur. Therefore, once the birds have become accustomed to their environment the feed level can be lowered. Figure 4.5 Feed level in auger • At a feed level of approximately 75% full, the feed is better protected between the spiral coils of the auger. Males, because of their wider heads, can not easily reach the feed so their body weights can be better controlled without affecting the feed intake of the females. Figure 4.6 Difference between feed level for male and female 5. Check after every feeding to make sure that all of the feed has been distributed from each hopper. If there are differences in feed distribution between the hoppers, try to determine the cause. If you have any concerns do not hesitate to contact your Vencomatic representative. Copyright 2001 by Vencomatic Inc. All rights reserved. 29-10-2002 23 6. Production The change from a pullet to adult body weight occurs within a two week period. Therefore, this transition is considered one of most critical periods in the life of the flock. During this time, a pullet undergoes rapid body weight gain, particularly in terms of fat deposition, as she prepares for sexual maturation. Sex steroid production increases and the ovary and the oviduct begin to develop. Fortunately this is where controlling body weight and maintaining flock uniformity throughout rearing pay off. Body Weight Weigh both males and females on a weekly basis, especially from placement to peak egg production. They can be weighed on a bi-weekly basis after peak, however a greater understanding of body weight will come with a weekly weighing through the entire production cycle. • The number of birds to be weighed should adequately represent the population. Select minimal 1 unit per row. From the first row select f.e. a unit of the lowest tier in the beginning of the house. From the second row a unit from the 2nd tier at 1/3 of the building; from the third row a unit 3rd tier at 2/3 of the building; and from the fourth row a unit from the 4th tier at the end. All males from each of these units and minimal 20% of the females should be weighed accurately. Each unit should contain minimal 4 males. • The same colony units should be weighed each week to produce comparable data. • Additionally each week, an additional unit should be chosen at random and weighed. By doing so, you can determine if the other units are at similar body weights to the units that you weigh regularly. • Every bird in the unit must be weighed. Generally, you will find that the smallest birds are weighed last. So, if you only weigh a limited number of birds per unit, it will almost always be the heaviest birds. This can have serious implications on your body weight management. • To make weighing birds proceed more smoothly, a partition (made out of styrofoam, plastic, or thick cardboard) can be used to keep all of the birds on one side of the unit. As each bird is weighed, it can be moved over to other side of the unit. Copyright © 2002 by Vencomatic bv. All rights reserved 29-10-2002 24 6. Production Flock Uniformity When uniformity is high: • The distribution of body weights will look like the solid line in Figure 5.1A. The shape of the curve is narrow and tall because there was very little variability between body weights. The majority of the birds (90% of the flock) weigh within ± 10% of the average body weight of the flock. This is the type of curve that you should aim for. • This shape indicates that the birds are at a similar stage of development, therefore, they can respond to the light stimulation as a synchronous group. That is, the pullets will mature at the same rate and will commence egg production at a similar time. • The result is that the peak and persistency of egg production will be high (solid line in Figure 5.1B). When uniformity is low: • The distribution of body weights will look like the dashed line in Figure 5.1A. The shape of the curve is short and more flat because there is a lot of variability in body weight. The body weights are not clustered together, rather only 50% of the flock weigh within ± 10% of the average body weight. • If uniformity is low before lay the pullets will mature at different ages when light stimulated. This will result in birds reaching peak egg production at different ages. The egg production curve will look like the dashed line in Figure 5.1B. The increase in egg production before peak is not as high as for a uniform flock and peak egg production is low. • Feed allocation for a non-uniform flock will be difficult as the birds are at different stages of production so their nutrient requirements will differ. • It is very difficult to regain uniformity once a flock has started laying. The most common recommendation is to delay light stimulation. This gives the underweight birds more time to catch up to the heavier birds without having to use large increases in feed allocation. Copyright © 2002 by Vencomatic bv. All rights reserved 29-10-2002 25 6. Production A B Flock uniformity of body weight at the onset of lay Egg production curve throughout lay. 90 20 80 Egg production (%) 1 6 Number of birds 70 60 1 2 50 40 8 30 20 4 10 0 0 Body weight Age Figure 5.1 The effect of variation in body weight on egg production. (A) Body weight uniformity for two flocks. Each line represents the distribution of body weights within a flock. Solid line: Highly uniform flock. Dashed line: A low uniform flock. (B) Solid line: Egg production of the highly uniform flock. Dashed line: Egg production of a low uniform flock. Preparation For Lay (from placement to light stimulation) Pullets are not subjected to light stimulation until they have achieved a target body weight and a critical body composition. For example, heavy breeders are required to have a certain percentage of body fat and lean body tissue before they begin sexual maturation. If the flock is underweight before light stimulation: Underweight birds will probably take longer to come into sexual maturity, they will produce smaller eggs, and have a poor rate of egg production. ‘Underweight’ is a relative term, consult the breeder management guide for what is considered underweight and follow the breeder company’s recommendations. General points: • Do not encourage rapid body weight gain in an attempt to get back on the target curve. Instead, the curve could be re-drawn. • Light stimulation may have to be delayed until the body weights are back on track. • Examine the nutrient composition of the diet. • Use a pre-breeder ration with additional crude protein or leave them on the grower for a longer time (consult a feed representative for the best advice). Copyright © 2002 by Vencomatic bv. All rights reserved 29-10-2002 26 6. Production If the flock is overweight before light stimulation: Although overweight birds will begin laying early, they will have a larger amount of fat, defective egg production, and in general, poor health. Follow the breeder company guide for what is considered ‘overweight.’ General points: • Do not take away feed or encourage weight loss. • Re-draw the body weight curve according to breeder management guide recommendations. • If the weight difference is detected before 20 weeks of age, the birds can be brought back on the original curve eventually. • If it happens later (after 20 weeks of age), it may be necessary to re-draw the curve for the entire production cycle. • The goal is to feed to achieve consistent body weight gains. Light Stimulation And The Onset Of Lay • Determining the age to light stimulate is going to depend on a number of factors including: strain age body weight the amount of fleshing flock uniformity body composition • The appropriate lighting program will be outlined in the management guide provided by the primary breeder company. • As a rule of thumb the day length should never decrease during production. If the birds were reared in a curtain-walled house and were exposed to long natural day lengths, the day length in production should be even longer. Copyright © 2002 by Vencomatic bv. All rights reserved 29-10-2002 27 6. Production • Once the pullets have been light stimulated the nests should be left open for a few hours each day. As they begin to mature, the hens will begin looking for a suitable nesting place. They will be drawn to areas that are peaceful (less traffic) and comfortable. The females need at least two weeks before egg production begins to find the nest. Clearly the goal is to make the nest the most attractive place for the hen to lay her egg. Early Lay Production • Record the appearance of the first egg and continue to record daily egg production thereafter. A file with egg production data should include records of the number of settable or hatching eggs, the number of small eggs, and the number of defective eggs. • After the first egg, the nest should opened for the whole day. • In the Veranda system, open the nests immediately after the lights come on. This way you give the hens an opportunity to move away from the nest floor before it opens. • The nests should be closed 30 minutes before lights-off. • During the night, the nests should remain closed, this practice should be continued to the end of the production cycle. • Review Appendix A >> Daily Maintenance. • Eggs should be stored as soon as possible after collection. The eggs are stored in a room that is cooled to an optimum temperature and air humidity, thus increasing hatchability. Speak to your hatchery representative about the appropriate temperature and humidity for your storage room. • Continually monitor the behavior of the males and females throughout this period. If signs of over aggression or inactivity appear, it may be necessary to reduce the number of males in each colony unit (see 6.0 Male Management >> Male to female ratio for more details). Copyright © 2002 by Vencomatic bv. All rights reserved 29-10-2002 28 6. Production Post-Peak Production • At this point unless there are any major problems concerning the flock, continue the management practices that were used before peak production. • Body weight, egg production, and fertility should be closely monitored. • Egg weight increases as the body weight of the hen increases. Begin weighing a sample of eggs each week. As long as egg weight is increasing, you can reduce the amount for the females. With decreasing feed amount the interval between runs will have to be shortened to prevent the males from getting underweight. • Continue to monitor the behavior of the birds, particularly the males. • It may be necessary to count the number of females that are left within a colony unit and adjust the male to female ratio. • At around 32 to 35 weeks, some time after peak egg production, check the nest pads and determine whether they need to be cleaned. A dirty nest will be difficult to clean at the end of the production cycle. The best method with a tip-up floor is to brush the nest pads while the nest is open. When the nest is closed at the end of the day the debris will fall off the pad. Cleaning should be performed late in the day so as to minimize the disturbance to the hens. Repeat this procedure at 45 weeks or when necessary. • At approximately 42 to 45 weeks, clean the covers on all of the light bulbs so that light intensity is not decreased. Copyright © 2002 by Vencomatic bv. All rights reserved 29-10-2002 29 7. Male Management The best sources of information on the rearing of males are the breeder management guide and the tech service representative. There are, however, some recommendations that are specific to the Veranda system and this section will attempt to address this. Rearing General points: • Male chicks (cockerels) should not have their combs dubbed. The full size of the comb at maturity is needed to prevent the males from fitting their heads between the grills on the feeder. • The back toe should be clipped and the beak tipped shortly after hatching. • Males and females must be reared separately. The body weight of the males is difficult to control when they are reared together with females. If there are problems with male body weight during rearing, it will be difficult to correct once the birds are placed in the Veranda. Male Condition At Housing Males should be ready for light stimulation at the time of housing and should have the following characteristics: • high body weight uniformity • straight beak (no cross-beaks, under bites, or over bites) • strong legs • tall stance • development of secondary sexual characteristics (e.g. the comb and wattles will begin to show significant growth) will begin at around 21 to 22 weeks of age. At 16 weeks of age (before placement) the males should be separated based on their body weights. Lightweight males should be placed in a separate pen to avoid competition from the larger, more dominant males. Likewise, heavy males should be isolated. If, at the time of placement, there are still males that are under or overweight they should be removed from the flock so that uniformity of the male population remains high. The males must be placed in the house at least 1 or 2 days before the females. There are several reasons for doing this: 1. The males typically need more time to adjust to their new environment than the females. 2. It is easier to evaluate body condition when there are no females present. Copyright © 2002 by Vencomatic bv. All rights reserved 29-10-2002 30 7. Male Management 3. Males that are similar in body weight and size are put together within the same colony unit, placing the males before the females in the house makes this easier to facilitate. 4. It helps to ensure that there is the same number of males in every unit. Replacement or surplus males can be placed together within one or two colony units. A unit can house 30 males when there are no females present. Some of the grills will have to be removed to provide enough feeder space for these males. Male To Female Ratio Depending on the breeder management guide, the appropriate male to female ratio can range between 6 and 10 males for every 100 females. The optimum level of males in the house will depend on actual flock performance, determined mostly by mating activity and the percentage of fertile eggs. The Vencomatic Veranda divides the population into smaller units. Therefore the maintaining the appropriate number of males in each unit is critical. The loss of one male in a unit at the wrong time can significantly affect the fertility of that unit. At the time of placement, there should be 6 males for every 60 females. This gives the flock manager an opportunity to observe the males with females and to remove those males that are not fit for mating. It is important to keep a record on the number of males per unit. Until 25 to 26 weeks of age, maintain this ratio using the surplus males. By 25 to 26 weeks of age you can reduce the male population to 5 males for every 60 females. Males that are underweight, overweight, or inactive must be removed. This will help maintain a high degree of uniformity (± 75%) in male body weight. If during production, you notice that there are males that are overly aggressive then reduce the number of males to 5 per 60 females, if you have not already done so. The number of males can be reduced to 4 males per 60 females, if necessary. If reducing the population to only 4 males, then it is important that these males are similar in body weight, they have excellent body condition, and are actively moving throughout the unit. Spiking • In certain cases it will be necessary to add new males to the flock mid-way through a production cycle. If you have been keeping replacement males in separate colony units up to this point spiking will be easier as these males will already be familiar with the Veranda system. Copyright © 2002 by Vencomatic bv. All rights reserved 29-10-2002 31 7. Male Management • If you have not, then the new males must be given 2 weeks by themselves in colony unit(s) to adjust to the Veranda system. • Do not mix new males with older ones. New males should be put into those units where there are no other males present. • Add new males to the colony units just before the lights are turned off to prevent aggression between the hens and the new males. Figure 6.1 Male eating between the grills Copyright © 2002 by Vencomatic bv. All rights reserved 29-10-2002 32 Appendix A – Veranda Maintenance Guide Veranda Maintenance Guide This maintenance guide is designed to help Vencomatic’s valued customers take proper care of their Vencomatic Veranda. This guide is divided into daily, weekly, monthly, and “after each flock” sections. In addition a set of charts has been included with this manual to help track your maintenance activities. Check them off or have the farm manager initial them as maintenance is completed. Please make copies of the charts as needed. If you do not have these maintenance charts, speak to your Vencomatic representative. Before performing any maintenance or cleaning of any part of the system, shut off and lock out all power sources for the Vencomatic Veranda system. Daily Maintenance General points: 1. Check for any dead or trapped birds in each of the units, remove, or free them. 2. Check the height of the water line and the water pressure. 3. Inspect cross conveyors, elevators, and egg packer (if using one) for obstacles. Remove them before egg collection begins. 4. Eggs must be distributed evenly over the conveyor during transport from the egg belts to the collection table, otherwise you run the risk of damaged or cracked eggs. If you are using an automated egg packing machine, the flow of eggs to the packer should match its packing capacity. Frequent starting and stopping of the egg belts will increase the risk of damaged or cracked eggs. You can adjust the speed of the egg belts using the frequency collection. 5. If there is an unusually high number of dirty eggs there is probably an obstruction on the egg belts or on the elevators. 6. Inspect joints in the egg belts for any wear or damage. It is helpful to mark the belts with a very visible color a few feet before the joint so that you have enough time to stop the belts for inspection. 7. Check the tension on the cross-conveyor chain. If there is too little tension, the chain can slip off the corners. 8. Check the tension springs on the egg belts. When the tension is too low, they can block in the drive rolls. Copyright © 2002 by Vencomatic bv. All rights reserved 29-10-2002 33 Appendix A – Veranda Maintenance Guide 9. After collecting eggs at a table, wipe down the collection surface and table cover with a mild soap solution. Also clean the transitions between the egg belts, elevators, and trash boxes. 10. Check for proper operation of the nest close out mechanism. Because the nests close half an hour before the lights go out, the nest floors can be checked in this period to see if no nests stay open because of a mechanical failure or blockage. Weekly Maintenance 1. Check the barred rollers in the return stations for build-up of debris and other material inside and below their housings. Clean out any material, always making sure that the electric power to the belt drives is locked out. 2. Check the tension on the cross-conveyor chain. If there is too little tension, the chain can slip off the corners. 3. Check for proper egg belt slack adjustment. When there is not enough tension in the egg belt, the tension springs in the belt guides must be repositioned. This usually applies when there has been a change in temperature. Check tension spring adjustment at each egg belt drive point. After any adjustments, make sure that the springs are adjusted evenly for good belt tracking. 4. Check the following on the egg elevators: The dosator grill, the bar for the belts, and the white discs should be free of dirt and feathers otherwise the belts could break. Make sure that the drive roller and the tension roller in the drive unit are free of dirt and manure. Check the tension and lubrication of the drive chains. Check the tension roller in the drive unit. Make sure the egg belts can not slip over the drive roller. 5. Check the carriers in the elevators, and clean them if necessary. Take off the guards. 6. Check the white wire mesh on the egg guides in between the carriers. They can be removed to be cleaned, if necessary. Copyright © 2002 by Vencomatic bv. All rights reserved 29-10-2002 34 Appendix A – Veranda Maintenance Guide Manure belts Check the following during manure collection: 1. If the manure belt runs against a belt guiding plate on one side (or runs a little upwards), the belt should push itself back by it’s own stiffness. 2. If the manure belt shifts to one side while running, it must be adjusted. For example, if the belt shifts to the right, increase the tension on this side of the belt (both at the drive and return ends of the belt), or reduce the tension on the left hand side. Refer to the Veranda User Manual >> 4.4 Manure belts, for more detailed information. 3. If the belt runs upward to the point that it can be permanently deformed or damaged, you must stop manure removal immediately. If necessary, release the tension roll and/or the pressure roll, so that you can push the belt back to the center of the roll. 4. Release and clean the belt scrapers after removing the manure from the house. 5. Check the drive roller, the drive roller scraper, and the pinch rollers for debris and clean if necessary. 6. Check the scraper on the return roll and clean it if necessary. 7. Ensure the manure belts can not slip over the drive rollers. 8. Clean the manure removal unit after each manure removal, so that ther is no manure on the parts. 9. The bearings, pinions, chains, shafts, etc. must be well treated with a preservative (supplied by Vencomatic). All the chains should be well greased and stretched. 10. Cover the pit completely after each manure removal. Copyright © 2002 by Vencomatic bv. All rights reserved 29-10-2002 35 Appendix A – Veranda Maintenance Guide Monthly Maintenance Perform a general inspection of the equipment for any misalignment, obstructions, or damage. Heat Exchanger 1. The manometer is used as indicator of negative pressure in the heat exchanger. The scale on the manometer column is in millimeters: Example. If the manometer level is at 0,5, this is equivalent to 5 mm Pressure = 5 mm × 10 = 50 Pascal. 2. When the air filters are clean, mark the value on the manometer with a ‘zero’. When the level in the manometer drops below this marking, it is an indication that the negative pressure has increased and that you may need to clean the filters. 3. If the filters are clean, check to make sure that the level in the manometer is still where you had marked it. If it isn’t, you may need to loosen both small bars from the manometer and adjust. Other options are to recalibrate the manometer (mark the new spot with a ‘zero’) or to add more manometer liquid. 4. The higher the negative pressure in the air intake manifold, the less air will be blown over the manure belts. So we recommend that you clean the filters regularly. Egg belts 1. There is an initial period where the egg belts will stretch, then they will stabilize. 2. Regularly clean the rolls in the return station. 3. After doing anything to the roll in the return station ensure that the roll is straight after tightening it, this prevent the egg belt from rubbing against the sides. After Each Flock Clean the units and building as soon as possible after the flock is removed to allow enough time to perform maintenance and any necessary repairs. This also reduces or eliminates potentially harmful microorganisms left over from the previous flock. Be sure to order any spare parts that you may need well in advance of the end of the flock so that they will be at your farm when needed. Once everything has been done, be sure to power up the control panels and test all of the systems for correct operation. This will eliminate many problems, and assure that your systems will be ready when the birds arrive. Copyright © 2002 by Vencomatic bv. All rights reserved 29-10-2002 36 Appendix A – Veranda Maintenance Guide General Points: 1. Remove the feed in the hoppers and feed troughs and clean out all manure and debris from the manure belts, egg belt covers, and return stations. High pressure water is acceptable to clean the Veranda system, but should not be used on any electric motors, control panels, bearings, or gearboxes. Cover all motors with plastic while pressure washing the units and building. To clean motors, first use compressed air to remove dust and loose particles, then a damp cloth for final cleaning. 2. Loosen tension on all egg and manure belts before cleaning, so the belt can shrink rather than stretch. 3. After clean-out is complete, remove the limit switch cover on the closeout gearboxes (black plastic cover, fastened with 4 Philips screws) to allow any moisture to evaporate, preventing switch gear corrosion. Replace cover once all moisture has dried out, making sure the gasket is in good condition and properly aligned. 4. Repair any tears or damage to the egg belts. Check the egg belt drive rollers for wear and cleanliness, replace and clean as needed. 5. Apply grease to the bearing’s grease fittings on each side of the drive roller until you see a small amount of grease escaping from the bearing’s seals. Notes: a) The control panels are maintenance free. It is a good idea to turn off the power to the panels if the systems are to remain idle for more than a few days. This reduces the risk of a lightning strike damaging the inverter and/or motor, and also prevents any inadvertent switching on of the conveyor while maintenance or cleaning may be in progress. b) If your systems are not so equipped, lightning arrestors are available from your Vencomatic dealer or distributor. These devices further reduce the risk that lightning could damage belt drive inverters. These arrestors are maintenance free and are rated to protect against an unlimited number of strikes. c) The electric motors and gearboxes supplied with your systems are completely maintenance free and lubricated for life. No care other than a gentle cleaning is ever needed. Copyright © 2002 by Vencomatic bv. All rights reserved 29-10-2002 37 Appendix A – Veranda Maintenance Guide Specific Points: Egg belt drive If an egg belt is slipping on the drive roller, the pressure roller spring tension needs to be increased. The pressure roller is pressed against the large drive roller by a spring on each side of the roller. Use a 13-mm wrench to adjust the hex nut at each side of the roller, thereby increasing the tension on the spring. The rule of thumb on adjustment is to use the minimum amount of spring tension which will drive the belt with no slippage, and to adjust both springs to the same tension. Be sure that the spring still has some room to compress - this will allow belt splices to pass through smoothly without binding. Egg elevators 1. The elevators can be cleaned with high-pressure water. Loosen the pressure roller tension springs at the belt inlet of the elevators. First spray everything so that all parts can soak. Then you can easily spray all of the parts clean. 2. Let all parts dry well, and place any removed parts back in the elevator. Tension the egg belt again, and make sure the belts run straight over the barred rollers in the return stations. Repair any possible damages. 3. The bearings and motors on the elevators do not need to be lubricated. 4. Check the transition of eggs from the belt on the carriers. The eggs should be placed right into the carriers. If you are there are two or more tiers that are feeding into the same elevator, the eggs from one tier should not be placed in the same carriers as eggs from another tier, but after each other. If this is not the case, you should adjust the timing of the dosator grill cam. 5. Refer to the Veranda User Manual >> Section 4.6 Elevators, for full instructions on egg elevator adjustment. Nests and Units 1. Remove all the nest pads. 2. Vencomatic recommends that the slats should also be removed and cleaned separately. 3. Clean and disinfect the nest pads. Copyright © 2002 by Vencomatic bv. All rights reserved 29-10-2002 38 Appendix A – Veranda Maintenance Guide Water Supply 1. The drinking lines must be thoroughly cleaned after each flock. • First set the bleeders in ‘rinsing’ position: lift the support 5 cm and turn the transparent tube 90° to the right. Remove the plugs from the bleeders. • Then set the regulator in ‘rinsing’ position: turn the longest finger of the opening valve 180° up. • Now flush the lines one after another by opening the water taps. Do not forget to put the parts (first the regulator, then the bleeders) back into their original position when finished. Attention: The water pressure must not be higher than 3 BAR (40 PSI) when flushing the lines. If it is higher, the connectors can split open. • During the flock you can proceed the same way (if necessary) after administering vaccines or medication. In this situation, fix a water hose to the bleeders BEFORE flushing the lines, so the water flows out of the house. • After thorough cleaning of the inside of the lines, you can put disinfectants in the water. Always follow the instructions from the disinfectant supplier and never exceed the recommended dosage. 2. Some poultry farms have water with a high calcium and/or iron content. This is usually not a problem during the production cycle. But between flocks the water supply is usually shut off. During this time sediments can build up in the lines and within the nipple drinkers themselves. When the water supply is turned on again at the arrival of the new flock you may notice the some of the nipple drinkers that are leaking. To solve this problem: • Flush the lines with low concentration cleaner during the flock. Ask your supplier if this is possible. Read the instructions for using the cleaner. Never exceed the recommended dose. • Move each leaking nipple back and forth. Replace the nipple if necessary. Copyright © 2002 by Vencomatic bv. All rights reserved 29-10-2002 39 Appendix A – Veranda Maintenance Guide To prevent this problem in the future: • Thoroughly flush the lines after each flock with disinfectants that contain non-aggressive acids (eg. Acetic acid). • Leave the water pressure on the lines between flocks. Regularly check the water quality and the water pressure to obtain the maximum performance of the system and prolong the life of the system. Have the water checked by a renowned control company in your area. You may have to treat or filter the water. Use Table A.1 as a guideline for checking your water quality. Table A.1 Common problems with water quality and their treatment. Problem: Problem level: Treatment: Hardness Over 12 DH (German degrees) Use a water softener (Calcium) (equivalent to 2,14 mmol CaO per liter of water) PH Under 6,5 Use a neutralizing filter Iron Over 0,5 ppm Mechanical filtering system Chlorinate the water Water pressure in the lines should be between 0,3 BAR (4 PSI) and 3 BAR (40 PSI). The feeding system 1. When cleaning the troughs, the outlet of the feed system in the rear is opened, so that water can run directly out of the feed system. 2. After cleaning, remove remaining water to prevent corrosion. 3. Run some feed through the system once every other day to prevent the spiral auger from getting stuck. Manure belts 1. After putting in a new flock, stretch the belts when the house temperature drops. 2. In the case of extreme heat stretch the belts before removing the manure and release the tension afterwards. You should remove the manure in the morning. 3. If the belt does not lay horizontally after coming off the pressure roller, increase the tension on the belt at the return station end. 4. If the belt slips on the drive roll, you must tighten the pressure roll more. 5. Take care that the tumbler is equally stretched both to the right and to the left. Copyright © 2002 by Vencomatic bv. All rights reserved 29-10-2002 40 Appendix A – Veranda Maintenance Guide Air Inlets 1. There is a rope in the tubes that can be used to pull a brush through. The brush will shake off any dust within the tube and by turning the ventilator on the dust can be blown out. 2. This should be done before any major washing is done to the slats or the manure belts. Copyright © 2002 by Vencomatic bv. All rights reserved 29-10-2002 41