1
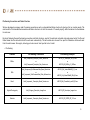
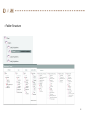
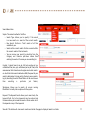
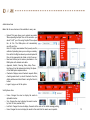
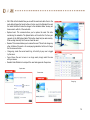
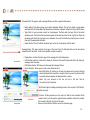
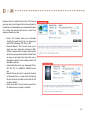
My Guide to The
System
Table Of Contents
Welcome . . . . . . . . . . . . . . . . . . . . . . . . . . . . . . . . . . . . . . . . . . . . . . . . . . . . . . . . . . . . . . . . . . . . . . . . . . . . . . . . . . . . . . . . . . . . . . . . .1
DAM Terminology . . . . . . . . . . . . . . . . . . . . . . . . . . . . . . . . . . . . . . . . . . . . . . . . . . . . . . . . . . . . . . . . . . . . . . . . . . . . . . . . . . . . . . . . . . . .2
File Naming Conventions . . . . . . . . . . . . . . . . . . . . . . . . . . . . . . . . . . . . . . . . . . . . . . . . . . . . . . . . . . . . . . . . . . . . . . . . . . . . . . . . . . . . . . .3
Folder Structure . . . . . . . . . . . . . . . . . . . . . . . . . . . . . . . . . . . . . . . . . . . . . . . . . . . . . . . . . . . . . . . . . . . . . . . . . . . . . . . . . . . . . . . . . . . .4
Workflow . . . . . . . . . . . . . . . . . . . . . . . . . . . . . . . . . . . . . . . . . . . . . . . . . . . . . . . . . . . . . . . . . . . . . . . . . . . . . . . . . . . . . . . . . . . . . . . . .5-7
Welcome Page . . . . . . . . . . . . . . . . . . . . . . . . . . . . . . . . . . . . . . . . . . . . . . . . . . . . . . . . . . . . . . . . . . . . . . . . . . . . . . . . . . . . . . . . . . . . .8
Login Page . . . . . . . . . . . . . . . . . . . . . . . . . . . . . . . . . . . . . . . . . . . . . . . . . . . . . . . . . . . . . . . . . . . . . . . . . . . . . . . . . . . . . . . . . . . . . . . .9
Menu Bar . . . . . . . . . . . . . . . . . . . . . . . . . . . . . . . . . . . . . . . . . . . . . . . . . . . . . . . . . . . . . . . . . . . . . . . . . . . . . . . . . . . . . . . . . . . . . . . . .9
View . . . . . . . . . . . . . . . . . . . . . . . . . . . . . . . . . . . . . . . . . . . . . . . . . . . . . . . . . . . . . . . . . . . . . . . . . . . . . . . . . . . . . . . . . . . . . . . . . . . .10
Selection . . . . . . . . . . . . . . . . . . . . . . . . . . . . . . . . . . . . . . . . . . . . . . . . . . . . . . . . . . . . . . . . . . . . . . . . . . . . . . . . . . . . . . . . . . . . . . . . .11
Search . . . . . . . . . . . . . . . . . . . . . . . . . . . . . . . . . . . . . . . . . . . . . . . . . . . . . . . . . . . . . . . . . . . . . . . . . . . . . . . . . . . . . . . . . . . . . . . . . . .12
Admin . . . . . . . . . . . . . . . . . . . . . . . . . . . . . . . . . . . . . . . . . . . . . . . . . . . . . . . . . . . . . . . . . . . . . . . . . . . . . . . . . . . . . . . . . . . . . . . . . . .13
Sort By . . . . . . . . . . . . . . . . . . . . . . . . . . . . . . . . . . . . . . . . . . . . . . . . . . . . . . . . . . . . . . . . . . . . . . . . . . . . . . . . . . . . . . . . . . . . . . . . . .13
Browser Overview . . . . . . . . . . . . . . . . . . . . . . . . . . . . . . . . . . . . . . . . . . . . . . . . . . . . . . . . . . . . . . . . . . . . . . . . . . . . . . . . . . . . . . . . . . .14
Extended View . . . . . . . . . . . . . . . . . . . . . . . . . . . . . . . . . . . . . . . . . . . . . . . . . . . . . . . . . . . . . . . . . . . . . . . . . . . . . . . . . . . . . . . . . . . . .14
Discussions . . . . . . . . . . . . . . . . . . . . . . . . . . . . . . . . . . . . . . . . . . . . . . . . . . . . . . . . . . . . . . . . . . . . . . . . . . . . . . . . . . . . . . . . . . . . . . . .15
Download . . . . . . . . . . . . . . . . . . . . . . . . . . . . . . . . . . . . . . . . . . . . . . . . . . . . . . . . . . . . . . . . . . . . . . . . . . . . . . . . . . . . . . . . . . . . . . . . .16
Loading Dock . . . . . . . . . . . . . . . . . . . . . . . . . . . . . . . . . . . . . . . . . . . . . . . . . . . . . . . . . . . . . . . . . . . . . . . . . . . . . . . . . . . . . . . . . . . . . .17
Save Selection . . . . . . . . . . . . . . . . . . . . . . . . . . . . . . . . . . . . . . . . . . . . . . . . . . . . . . . . . . . . . . . . . . . . . . . . . . . . . . . . . . . . . . . . . . . . .18
Load . . . . . . . . . . . . . . . . . . . . . . . . . . . . . . . . . . . . . . . . . . . . . . . . . . . . . . . . . . . . . . . . . . . . . . . . . . . . . . . . . . . . . . . . . . . . . . . . . . . .18
PDF Catalog . . . . . . . . . . . . . . . . . . . . . . . . . . . . . . . . . . . . . . . . . . . . . . . . . . . . . . . . . . . . . . . . . . . . . . . . . . . . . . . . . . . . . . . . . . . . . . .19
Job Manager . . . . . . . . . . . . . . . . . . . . . . . . . . . . . . . . . . . . . . . . . . . . . . . . . . . . . . . . . . . . . . . . . . . . . . . . . . . . . . . . . . . . . . . . . . . . . . .20
Quark XPress Preview . . . . . . . . . . . . . . . . . . . . . . . . . . . . . . . . . . . . . . . . . . . . . . . . . . . . . . . . . . . . . . . . . . . . . . . . . . . . . . . . . . . . . . . . .21
Addendum A- Component Types/Abbreviations . . . . . . . . . . . . . . . . . . . . . . . . . . . . . . . . . . . . . . . . . . . . . . . . . . . . . . . . . . . . . . . . . . . . . . . .22
Addendum B- Extracted Meta-Data . . . . . . . . . . . . . . . . . . . . . . . . . . . . . . . . . . . . . . . . . . . . . . . . . . . . . . . . . . . . . . . . . . . . . . . . . . . . . . . .20
The Digital Asset Project Team welcomes you to the DAM System
What is The Dam System, what does it mean to you, and why should you give a Dam?
The Dam System is an organized repository for storing, archiving, and accessing your files. It will
decrease the coordination of assets therefore allowing you more time to do what you love to do
– create! The benefits are multiple; individuals will benefit from faster location, transfer, and
formatting of assets. The Studio and other team members will benefit from electronic job
distribution, fewer bottlenecks, fewer queues for asset formatting, distribution of reusable
assets to clients and vendors and more. Overall the enterprise will benefit from faster production cycles, greater quality
management, and easy gathering of assets for pitch and pr presentation.
First step was organization. We created a folder structure and naming conventions that can be replicated across teams for
consistency and ease. Secondly, we overlaid The Dam System on top of our new structure to monitor and index and meta
tag our assets – all of which enables searching, finding, and retrieving assets quickly and efficiently. These two objectives
together with numerous secondary objectives will create efficiencies within creative and across the organization.
The Dam System enables you to:
•
•
•
•
•
•
•
•
•
•
•
Search for your files
Search for archived files (that’s right, no more submitting a request and waiting hours, sometimes days)
Repurpose your files in a wide variety of formats and styles
Remotely upload new files into the system
Version files through the web browser
Download files in high or low-resolution, or in a different file format than the original
Create PDF catalogs of your files without any software
Preview and collaborate on Quark XPress files through the browser- no Quark needed
Distribute assets to third party vendors
Manage audio/video files
Manage PowerPoint files
1
What are these DAM terms?
Creative Digital Asset- logos, photos, graphics, fonts, quark layouts, audio, video, flash files, web
presentation layers, creative showcase kits….any digital unit of work created by our professionals (that’s you)
and used at least once but most likely reused or repurposed multiple times
DAM- Digital Asset Management
Keyword- Searchable words that are used to describe the content of an image
R3volution- The software that we are now calling the DAM system
Meta-Data- Pieces of information that are attached (or tagged) to individual assets. This meta-data allows
you to easily search for and retrieve assets
2
File Naming Conventions and Folder Structure
We have developed a company-wide file naming convention as well as a standardized folder structure for storing all of our creative assets. The
main benefit of this standardized convention and folder structure is to limit the amount of “manually keying” data information into the database
for each user.
By simply following the specified naming convention and folder structure, most of the pertinent meta-data is already parsed out of the file and
folder names into the meta-data fields for each asset automatically. This will enable users to search for specific information within each asset
from the web browser. Once again, allowing you to do more of what you like to do- Create!
> File Naming-
Channel
Offline
File Naming Convention
File Naming Example
Job#_Component_Descriptor_Status_Round.xxx
ABC123_PC_Descriptor_WIP_R2.xxx
or
ABC123_AD_SAVOnly_S1_WIP.xxx
or
Job#_Component_Descriptor_Size_Version.xxx
ABC123_OLA_Yahoo180x600_R1_S.xxx
or
Job#_Component_SitePlacementSize_Round_Sound.xxx
or
Job#_Component_SitePlacementSize_KSize_NoSound.xxx
ABC123_OLA_Yahoo180x600_30k_NS.xxx
Email
Job#_Component_ Descriptor_Round_Version.xxx
ABC123_EML_TexasHotel_over50_R2.xxx
Original Photography
Job#_Category_Descriptor_Image#.xxx
ABC123_OP_Descriptor_Image#.xxx
Websites
Job#_Component_ Descriptor_Round_Version.xxx
ABC123_WF_INTREV_R1_V12.xxx
OLA
3
>Folder Structure
4
THE DAM SYSTEM WORKFLOW
Illustrated below are some simple steps to show where and how The DAM System will support our workflow. This supports the training sessions
and in no way covers all functions of the system.
CREATE FOLDER STRUCTURE
After Project Kick-Off the delivery manager activates/creates the job folders using the template and renames the template with the
appropriate job # and project name.
USE NAMING CONVENTIONS
Once the project is initiated the team works on their assets, naming them using the prescribed Naming Conventions, and saving them into the
project folders. During the project, it is imperative that users name their assets accurately and save them to the correct folders. Metadata is
pulled directly from the file and folder names to the appropriate fields which will enable you to use the system’s search functions.
SAVE FILES BACK TO SERVER - DAILY
Please save files back to the server at least twice a day (say, at lunch and at the end of the workday) and each new day use the search
capability to search for project files using the search function and the reveal app. All files and associated assets will be at your finger tips
within seconds.
PASS FILES VIA THE ASSETS_INBOX
During the project – all team members should use the Assets_Inbox to pass assets to each other. Each project folder structure has an Assets_Inbox
just for this purpose. No more emails, no more posting, no more dropping in the user folders. All transmission of assets will be via the
Assets_Inbox located within each project folder.
5
SUPPORTING DOCS GO ON TEAM SITES
All supporting project documentation will live on the Team Sites. Examples of supporting documentation are Schedules, Budgets, Scopes, Briefs,
Action Needed Forms, and Spec Sheets, etc. There is a link on each Team Site allowing for easy movement to and from The DAM System.
COLLECTING FILES FOR THE STUDIO
If your project is offline and ready for the studio – simply collect your files and rename the folder using the project number and component type
(i.e. ABC123_letterone; ABC123_envelope; ABC123_insert). Each component must be saved in its own folder and dropped into the
Studio_Drop_Box for pickup by the Studio person assigned to your project.
JOB MANAGER DAILY ASSIGNMENTS
The DAM System is integrated with our Job Manager system allowing Studio Production Designers to access their daily projects via an electronic
job sheet. This alleviates the “to Bob” folders and allows the smooth and accurate transition of work from one Studio person to another.
PASSING FILES BACK TO ART DIRECTORS
If for some reason the Studio has to return the file to an Art Director – they will use the same method in reverse and notify the Art Director that
the folder is ready for pickup in the Studio_Drop_Box. Retouched artwork will travel via CD directly to the Production Dept and Released Projects
will travel by CD or FTP or BOTH directly to Production or to a vendor.
BURNING FILES TO DISC
The DAM System has a disc burning device (Rimage) which will be centrally located in The DAM Library (12th floor in Boston) but accessed via all
user’s desktops. Once installed, users will be trained in its functions.
ONLINE PROJECTS
For projects other than offline – the process is similar in that the folder structures are set up after kickoff and the team uses the prescribed
naming conventions and folder structure for saving assets. Each channel has its own set of folders that are unique to its workflow and assets.
All channels have an Assets_Inbox or AV_Drop_Box for passing assets. In addition, the OLA channel has a folder called For_Traffic used for
collecting the assets to be trafficked to the final destinations and a Final_From_Vendor folder used for collecting final assets.
6
The EMAIL and SITELET channels have For_Development folders used to collect files heading into development. And the DETAILED WEB DESIGN
channel has a folder for Final_Build_Assets. Please study the folder structures for each channel and use them appropriately.
USER FOLDERS
Yes, we are retaining User Folders however they are to be used strictly for one purpose – storing your personal assets! All Digitas work must be
saved on The DAM System. Please remember that all project folders have an Assets_Inbox and a folder for delivering assets to another
department or capability so you will not use your individual user folders for this purpose anymore. Also, remember that it is now easier to archive
and to pull your work from archive – no more saving Digitas work in your
User Folder. All User folders will be monitored for adherence to this new process.
PITCH WORK
So where do you put your pitch concepts and work – in the newly established Pitch Folder! The folder is called 07Pitch_Work on the bosdam51
server. Pitch work files should be organized by Client and Job Number.
LOGOS & FONTS
What about Logos and Client specific fonts? All logos will be retained in the Client_Logos folder on the Studio area. This area is accessible only
via the web browser. This folder is accessible to all users regardless of channel. Fonts are licensed items and should not be stored on the DAM.
If any team member receives a font or logo directly from another source, he or she must send it directly to the studio for addition to the client
folder.
MORE DAM STUFF
There are many other features offered in The DAM System. We’ll take this slow – once a team has their files clean and migrated and begins
working comfortably and accurately within the system we will offer advanced training for other features. Or you can be adventurous and seek
out advanced features via the Web Browser.
DAM CONTACT
As always – please call our very own DAM Guys, Michael Hollitscher in NY at x5411, andJeff Beauregard in Boston x1941 for anything regarding
The DAM System.
7
The Login Page:
The Login page will show you only the team and personal folders that
you have access to. This is managed by Active Directory, which also
manages your login username and password, so your DAM password will
be the same as your Digitas network password. Therefore, as you
change your network password you will need to remember that your
DAM System password will automatically change with it.
Once again, the system is permission based. So, when you login the
system will know who you are and only give you access to the files and
functions your position requires.
The Menu Bar:
Folder Transparency
>
>
When turned on you will be able to see all files in all folders
below their current folder. Files will appear as if they were in a
single folder.
When folder transparency is turned off you will see only the
files that are within the specified folder.
Note: Folder transparency must be turned on for global
searches to work correctly.
Folder Transparency
Col and Row Buttons (these buttons work when in Tile view)
>
>
The col buttons (-/+) allow you to add or remove
columns when in Tile view.
The row buttons (-/+) allow you to add or remove rows
on the Tile view.
Col and Row
8
The Menu Bar (cont.)
Jump Button
>
>
The Jump button allows you to move around in the file
browser quicker. If folder transparency is turned on you
can jump to any point below your root browse
directory. If folder transparency is turned off you can
only jump inside the current folder.
Clicking on Jump will open a new graphic that will allow
you to type in what page number you want to jump to.
Jump Button
View Menu Item
> Tile- This view features a small version of the asset
(typically referred to as a "thumbnail") and the file
name only.
> Single Col- This view presents the thumbnails in a
single column on the left side of the browser
window with select metadata fields.
> Text View- A text only view is the fastest loading view
of assets in the DAM System. It presents selected
metadata in a tabular format.
> Preview- A view that displays a larger version of the
asset and select meta-data.
> Slide Show- This view is specifically designed to
present assets in a linear fashion similar to a
presentation. Use the Prev and Next buttons
to move back and forth between assets.
Tile View
9
Selection Menu Item
> View- By selecting this option, the Browser only shows the
selected files. This is useful for refining a search, or
reviewing your selections.
> Select All- This selects all files in the entire
list (not just those displayed on the page).
> Clear- This deselects all the selected items.
> Load- Loads a previously saved selection of files.
> Save- Saves the current selection of files as a
private or public selection. Others on the DAM System can
view your selections (unless you save as private selection).
Saving selections makes it easy to pass files between users.
> Move- Only available to system Administrators.
> Copy- Only available to system Administrators.
> Delete- Only available to system Administrators.
> Edit- Using this option, you can change relevant
information about this file. Different users of the
system may have different edit levels, so not all options
may be open to you.
> Checkout- Allows you to check out an asset or selection of
assets. Upon submitting a checkout request, the user will
need to name the request and specify if there will be a
new version of the assets. Checked out items still appear
on the web browser, but cannot be modified or downloaded
> New Version- Makes a new version of an asset or selection
of assets. The DAM has the ability to keep track of separate
versions.
> Download- This option helps you retrieve/share files. There are a number of options that you can specify for your downloaded files,
such as size, format and quality.
> PDF Catalog- By selecting this option, you can create a PDF that visually represents all the selected files in a
10
customized PDF Catalog.
Search Menu Item
Simple- The easiest method to find files.
> Search Type- Allows you to specify if the search
is a new search or a search of the current results.
> New Search- Perform a "fresh" search of all files
available to you.
> Search within current results- Perform a search within
the current results of the last search.
> You can narrow your search by selecting from the
Category and Contains pull-down menus then
entering the word or file name you are searching for.
Content_ Content Search can do full text searches of any
unflattened files (doc, qxd, unflattened psd or pdf files)in the
same manner that internet search engines can do text searches. As with all other search methods on DAM, the speed of your
search is determined in large part by the level you are searching at.(Searching the entire Team Folder will be much slower
than
searching
a
particular
job
folder.)
Workgroup- Allows you to search all servers running
R3volution. Currently not an option with the system.
Keyword- The Keyword Search allows you to search only the
keyword field. Up to four keywords may be entered and
the menu allows you to make the search criteria contain all of
the keywords or any of the keywords.
Show All- This button will clear search results and refresh the page to display all assets in a folder.
11
Admin Menu Item
Note: Not all menu choices will be available to every user.
> Upload- This page allows you to upload new assets.
When uploading multiple files via this selection you
should “stuff” your files using DropStuff then upload
the .sit file. The DAM system will automatically
un-stuff your files.
Note: It is highly recommended that you only use this
method of uploading when you are doing so remotely.
From within the Digitas network you should upload all
files via the appropriate job folder on the file server.
> New Asset- Allows you to create a placeholder in the
DAM System with minimal meta-data.
> Approvals, Contact, View Log, Video, Setup- These
functions will not be implemented during this phase
of the DAM System implementation.
> Checkouts- Displays current checkout requests. When
checking assets back in, select Checkouts from the
Admin pulldown and check them in using the Check in
button.
> Logout- Logs you out of the system.
Sort By Menu Item
>
>
>
>
Name- Changes the view to display the assets in
alphabetical order.
Size- Changes the view to display the assets in order
by their file size (smallest first).
Last Post- Changes the view to display the assets in the order of the latest message posting.
None- Changes the view to display the assets in the order that the assets were imported.
12
Common Functionality in Detail
DAM System Browser- The most common way to view the assets within the DAM System is in
what’s called the Tile view. In this view you can increase or decrease the number of columns
and rows to suit your needs.
> Folder NavigationThis allows you to navigate the assets folder by folder. If you know the file name of the
file you are looking for and would rather not navigate by folder simply type it in the
QuickSearch field and hit enter.
> QuickSearch- This searches thirteen specific meta-data fields. See Addendum B for list
of these fields.
Extended View- Displays the asset in its largest form along with all of its accompanying
metadata. The Extended View is usually accessed by clicking on a thumbnail which opens the
asset in its own browser window. While in this view you can edit meta-data, edit image, start
a discussion, respond to a discussion, download and view the change log.
> Quick Download- Drops image on the loading dock without any changes.
> Convert- Opens the Download Request window where users can convert files to
different formats.
> Crop- Allows you to crop an image before download. The image will first appear in the
crop interface. The first click will create the top left area to be cropped. The second
click creates the bottom right hand area to be cropped. Crop and download adds the
cropped image to the loading dock. Start over starts the cropping process over, and cancel takes the user back to the Extended View.
> View Original- This opens a new window where one can view the original asset. For files
such as pdfs, the system substitutes View Original for View PDF.
13
> Edit- While in the Extended View you can edit the assets meta-data. Once in the
meta-data edit page the Cancel button will return you to the Extended View and
the Submit button will make the changes to the metadata. Note: You may not
have access to edit all of the meta-data.
> Replace Asset- This command allows you to replace the asset file while
maintaining the metadata. The Upload button will transfer the file from your
computer to the DAM System. Note: This function should only be used remotely.
When working internally the file server should be used.
> Rename- This command allows you to rename the asset. This will not change any
other attribute of the asset or its accompanying metadata. Confirm will change
the file name and return.
> Change Log- Loads the current asset’s log. All activity by any user is logged
by the server.
> Zoom- Allows the user to zoom in on large assets, simply select the area
with your mouse.
> Resubmit- Asks R3volution to reimport the asset and regenerate the preview.
Crop & Download
Replace Asset
Rename Asset
Change Log
14
Discussion Edit- This page is used to manage Stickies and their respective Discussions.
> Delete button- This button allows you to delete individual stickies. This will not delete any discussions
associated with the Sticky. Note: Past discussions will become "orphaned" without a sticky to identify them.
> Topic field- For you to provide a topic for the discussion. The field under the topic field is the actual
discussion post. The Stickies that have been applied to the asset are listed on the right of the Topic and
discussion post fields. You may apply a new discussion to one of the Stickies by selecting one or more of
them with the associated check box.
> Submit button- This will add the discussion topic to the list of discussions with the asset.
Message Board- This page contains the image of the asset from the Extended View and all discussions
associated with that asset. It will also be possible to send an email to
Discussion Edit
> Display Menu- Controls the date range of the messages that will be displayed.
> Hide Stickies check box- Controls the display of stickies on the asset but does not affect the display of
messages under the asset.
> Edit Stickies button- Will take you to the page that manages Stickies.
> New Post button- Allows you to create a new discussion topic.
> Send Notification To- Allows you to have the system send an email notifying
select individuals that a selection is ready for them to access. To add more than
one email address separate the addresses with a comma.
> Notes- Any text entered in this box will be in the text field of
the email sent by the system.
Edit Stickies- Page for adding and deletng stickies. Click on yellow “Edit Stickies”
button to access.
Edit Stickies
Message Board
> Stickies- Clicking anywhere on the asset will add the next available Sticky
number (which is not always the highest number available). Each sticky number
that is used is listed to the right of the asset.
> Done and Cancel button- Returns you to the discussion page.
15
Download (from the Selection action item)- This function
gives you many format changes that can be performed on
the asset prior to downloading. You can download the asset
as is, change the colorspace and format, or select from
numerous resolution pre-sets.
> Format- This function allows you to automate
changing the assets format. You can change your
asset to JPG, Photoshop, TIFF, PNG, or EPS.
> Download Request- This function allows you to
rotate your asset, change the colorspace to RGB,
CMYK or numerous other colorspace options and to
select from various preset resolutions. Note: There
are many pre-set options that will enable you to
download to a specific size for adding assets to the
AwardWorks web site.
> Scale- Reduce the size of your downloaded file by
25%, 50%, 75%, or to 640x480 or 1280x1024 screen
size.
> Remove Directory Hierarchy- Leaving this checked
will download files to a single folder. Unchecking
this box will mimic the folder structure that the file
currently resides in.
> Notify me by email- You will receive an email from
the system once your request is complete.
16
The Loading Dock- Contains all of the files that you have
requested to download. This page allows you to
determine if you would like to download each asset
individually, burn all selected assets to a CD, Deliver assets
via FTP or download all of the assets in the loading dock as
a stuffed file.
> Download Individually- This function allows you to
download assets one at a time.
> Burn All To CD- This function allows you to enter
appropriate information about the files and will
burn all files on a CD with the information you
entered printed directly on it. The CD burner will be
located in the Creative Asset Library.
> FTP Delivery- This function allows you to FTP all
files to a server from the list of FTP servers or from
a custom entered server. You will have the ability to
auto-email the recipient with the FTP information.
> Download all- This function stuffs all files into a .sit
file and downloads to your desktop. For Macintosh
users files will automatically unstuff and be placed
in a folder on your desktop.
> Back To MediaBeacon- This button takes you back to
the main browser window.
17
Save Selection (under the Selection action item)- This function gives you
an opportunity to allow third party individuals access to assets for review,
to pass files to another individual or to save a group of files in a private
selection for you to review later.
> Selection Name- Allows you to name your selection.
> Public Selection- Unchecking this box will make your selection
private and only viewable by you. Checking it will make it
viewable by anybody that has access to the DAM System.
> Send Notification To- Allows you to have the system send an email
notifying select individuals that a selection is ready for them to
access. To add more than one email address separate the
addresses with a comma.
> Notes- Any text entered in this box will be in the text field of
the email sent by the system.
Load (under the Selection action item)- Allows you to access your private
selections or all public selections.
> Selection- Once the Public or Private selection window opens,
click on the link for the selection you wish to access. You will then
be able to view your selection in the main browser
window.
18
PDF Catalog- Allows you to create catalogs in Adobe Acrobat format. This page
controls the content display and layout of the PDF catalog as well as the content on
the cover page. Images generated in the PDF are linked directly to their associated
asset on the DAM System.
> Summary- Creates a PDF layout with thumbnail views and two meta-data
fields of your selected assets. The creator can chose which meta-data fields
to include in the PDF.
> Detail- Does not offer any options. All meta-data for each asset will be
included.
> Coverpage Title and Coverpage Description- Enter your desired title of the PDF
and a description of what is included in the PDF and both will display on the
coverpage of the generated PDF.
> Create- Will create the PDF and automatically save it to your desktop.
19
Studio Daily Assignments- The DAM System has been integrated
with the Job Manager system used in the Creative Studio making
it easy for Studio users to easily access the jobs assigned to them
for the day.
Daily Assignment Link
> To access- Click on the “Daily Assignments” link in the
upper right hand corner of the menu bar. A seperate
window will open asking for your username. Once you
enter your name an HTML version of your daily assignment
sheet will automatically open..
> If you wish to maintain a printed copy go to “File/Print”
in your browser menu bar.
> To access your jobs you have two options:
- Click on the job number link and it will take you
directly to the asset within the DAM System browser.
Note: The asset it takes you to may not be the exact
document you need. Limitations within the system
cause it to go to the first asset it sees with that job
number.
- Drag the job number link over the Reveal app. This will
take you to the asset on the file server. Note: For this
to work you must be logged into the file server. This is
the recommended workflow. If you need the entire
folder that the asset resides in make sure your window
is in “column view” and navigate back one level.
Reveal Application- Helps you easily access the assets you need
within the file system. Once you’ve completed your search and
found the asset you are looking for simply drag it over the Reveal
app and it will take you directly to the asset on the file server.
20
Addendum A- Component Types and Abbreviations
Component
OFFLINE
Answer Card
Application
Banner
Belly Band
Billboards
Box
Brochure
Buckslip
Business Reply Card
Business Reply Envelope
Card
Catalog
CD Cover
CD Label
CD Sleeve
Cerificate
Concept
Coupon
Copy Deck
Door Hanger
Floor Cling
Folder
Folio
Form
Hero Card
Insert
Invoice
Label
Logo
Letter
Newsletter
Outer Envelope
Packaging
Component Abbr
AC
APP
BAN
BND
BB
BX
BR
BS
BRC
BRE
CRD
CAT
CDC
CDL
CDS
CRT
CON
COU
CPD
DH
FLC
FLD
FOL
FRM
HC
INS
INV
LBL
LG
LTR
NL
OE
PG
Point of Purchase
Postcard
Poster
Print Ad
Self Mailer
Sleeve
Specifications
Style Guide
Second Sheet
Sticker
Stock Photography
T_C
Take One
Variable Text
Wrap
ONLINE
Online Ad
E-Booklet
EMAIL
Email
WEBSITES
Comps
Final Comp
Final Template
Flash Specifications
Functional Specifications
Inventory Asset Tracker
Moderators Guide
Protptype
Research Plan
Site Map
POP
PC
POS
PA
SLF
SLV
SPC
STG
SS
STK
STP
TC
TO
VT
WRP
OLA
EB
EML
COM
FC
FT
FLS
FS
IAT
MDG
PT
RP
SM
Technical Specifications
Usability Findings
Usability Objectives
Wireframe
TSP
UF
UO
WF
ORIGINAL PHOTOGRAPHY
Original Photography
OP
SHOWCASE KITS
Brand Guidelines
Photography
Powerpoint
Results
Showcase Kits
Story
BG
PH
PP
RS
SC
STR
AUDIO / VIDEO
AudioVideo
AVI Movie
Motion Graphics
Mpeg Movie
OMF Audio List
Original Music
Quicktime Movie
Sound Effects
Still Graphics
Stock Music
Title Cards
Transcript
Voiceover
Windows Media Movie
AV
AVM
MG
MPM
OAL
OM
QTM
SFX
SG
STM
TCD
TSC
VO
WMM
21