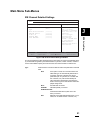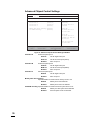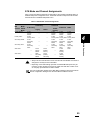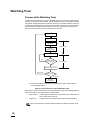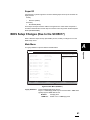
1
Plug-N-Run™ E1 Computer-On-Module Series
COM Express Compliant
Plug-N-Run E1
BIOS Manual
Version 1.1
March 2009
PS-E1PR-BM-011
THIS PAGE IS INTENTIONALLY LEFT BLANK.
Introduction
Thank you for basing your system on our COM Express compliant Plug-N-Run E1 ComputerOn-Module, also known as System-On-Module. We are confident that it will help you in getting your product to market quickly while reducing overall development cost.
This document, the "Plug-N-Run E1 BIOS Manual", describes the BIOS that configures and
manages the Plug-N-Run E1’s hardware environment. Specifically, it describes the layout
and usage of the BIOS Setup Program screens.
A thorough understanding of this manual will be of particular help in the following situations:
•
When testing different Plug-N-Run E1 setups using the Development Board
•
When developing Plug-N-Run E1 based embedded systems
We hope you find this manual to be of use, and look forward to any comments or suggestions
you may have.
PFU Systems, Inc.
March 2009
THE INFORMATION IN THIS DOCUMENT IS PROVIDED IN CONNECTION WITH PFU
SYSTEMS PRODUCTS. NO LICENSE, EXPRESS OR IMPLIED, BY ESTOPPEL OR OTHERWISE, TO ANY INTELLECTUAL PROPERTY RIGHTS IS GRANTED BY THIS DOCUMENT. EXCEPT AS PROVIDED IN PFU SYSTEMS’S TERMS AND CONDITIONS OF
SALES FOR SUCH PRODUCTS, PFU SYSTEMS ASSUMES NO LIABILITY WHATSOEVER, AND PFU SYSTEMS DISCLAIMS ANY EXPRESS OR IMPLIED WARRANTY,
RELATING TO SALE AND/OR USE OF PFU SYSTEMS PRODUCTS INCLUDING LIABILITY OR WARRANTIES RELATING TO FITNESS FOR A PARTICULAR PURPOSE, MERCHANTABILITY, OR INFRINGEMENT OF ANY PATENT, COPYRIGHT OR OTHER
INTELLECTUAL PROPERTY RIGHT. PFU SYSTEMS, INC. DOES NOT WARRANT ITS
PRODUCTS FOR USE IN APPLICATIONS WHICH MAY INVOLVE DANGERS TO HUMAN
HEALTH OR SAFETY, INCLUDING BUT NOT LIMITED TO MEDICAL LIFE SUPPORT,
SURGERY, AIRCRAFT FLIGHT CONTROL, AIR TRAFFIC CONTROL, MASS TRANSPORTATION CONTROL, MISSILE LAUNCH AND OR GUIDANCE CONTROL, ENVIRONMENTAL CONTROL, OR THE PLANNING CONSTRUCTION, MAINTENANCE, AND
OPERATION OF A NUCLEAR FACILITY.
Trademarks:
PFU Systems, and Plug-N-Run are trademarks of PFU Systems, Inc.
Intel, Pentium, and SpeedStep are registered trademarks of Intel Corporation and its
subsidiary in the United States and/or in other countries.
Microsoft, Windows, and Windows Vista are registered trademarks of Microsoft Corporation in the United States and/or in other countries.
The Phoenix logo is a registered trademark of Phoenix Technologies Ltd.
Other company names & product names are registered trademarks or trademarks of
their respective owners.
All Rights Reserved, Copyright © 1985–2009 Phoenix Technologies Ltd.
All Rights Reserved, Copyright © PFU LIMITED 2009
All Rights Reserved, Copyright © PFU Systems, Inc. 2009
i
Related Documentation
Please consult the following documents for additional information on the Plug-N-Run E1.
• Plug-N-Run E1 Hardware Reference Manual
(PS-E1PR-RM-xxx)
• Plug-N-Run E1 Design Guide
Hardware Design Considerations *
(PS-E1PR-DGHW-xxx)
Thermal Design Considerations *
(PS-E1PR-DGTH-xxx)
• Plug-N-Run G5 Development Board User Manual
(PS-5PR-DEV-UM-xxx)
• Plug-N-Run G5 Development Board Design Guide *
(PS-5PR-DEV-DG-xxx)
* Due to the confidential nature of the material in this document a Non Disclosure Agreement
between the customer and PFU Systems must be executed. Please refer to your sales support person for details.
The latest versions of these documents are available from your PFU sales representative or
from the PFU Systems’ web site at www.pfusystems.com.
In addition, the user may wish to reference the following publications.
• The Programmer’s PC Source Book, Thom Hogan
• The Phoenix Technical Reference Series - System BIOS for IBM-PC/XT/AT Computers
and Compatibles, Addison Wesley
• System BIOS for IBM PCs, Compatibles, and EISA Computer Second Edition,
Phoenix Technologies, Addison Wesley
Note
This list is provided purely for reference purposes.
Any information regarding component functionality does not necessarily reflect the
actual features implemented in the Plug-N-Run E1.
Applicable Plug-N-Run E1 Models
This manual is specifically for use with the following Plug-N-Run E1 models:
• 2.16GHz Plug-N-Run E1 Extended module
(PSE1PR216X2)
• 1.50GHz Plug-N-Run E1 Extended module
ii
(PSE1PR150X2)
Plug-N-Run E1 Software Utilities and Drivers
PFU Systems provides the following software utilities for use with the Plug-N-Run E1.
Plug-N-Run E1 BIOS Tool Kit zip file (PSE1BTKxxx.zip)
•
•
•
•
•
System & Video BIOS Binary Files
BIOS Modification Utilities (BCU.BAT, etc.)
Flash-ROM Update Utility (PHLASH16.EXE)
BIOS Configuration User Manual (MANUAL.PDF)
Read Me File
Plug-N-Run E1 Drivers Support Package zip file (PSE1DSPxxx.zip)
•
•
•
•
•
Refer
Windows® 2000/XP Display Driver
Windows® 2000/XP Network Driver
Windows® 2000/XP Audio Driver
Windows® 2000/XP AHCI Driver
Windows® 2000/XP Intel® Chipset Driver
• The User Guide in the Plug-N-Run E1 BIOS Tool Kit zip file describes the BIOS
Modification Utilities (BIOS disk and BIOS Rescue disk)
• Appendix A Cautions & Limitations describes how to install the Windows® 2000/
XP drivers
iii
Layout Of This Manual
Chapter 1 BIOS Overview
Presents a brief overview of the BIOS firmware used for the PFU Systems Plug-N-Run E1.
Chapter 2 Using BIOS Setup
Presents the BIOS Setup Program.
Chapter 3 BIOS Setup Menus
Explains the various menus and configuration options in the BIOS Setup Program.
Chapter 4 BIOS Functions
Explains the details of a variety of BIOS functions.
Symbols Used In This Manual
The following symbols are used in this manual:
Note
!
Caution
Refer
iv
Explains supplementary details.
Read as necessary.
Draws attention to a precaution that should be observed.
Alternately warns of an unacceptable or dangerous practice.
Should always be read!
References related information in a different area of this manual,
or in another manual.
Contents
Introduction .................................................................................i
Related Documentation ............................................................. ii
Applicable Plug-N-Run E1 Models ............................................ ii
Plug-N-Run E1 Software Utilities and Drivers .......................... iii
Layout Of This Manual.............................................................. iv
Symbols Used In This Manual .................................................. iv
Contents ....................................................................................v
List of Figures ........................................................................... ix
List of Tables ............................................................................ xi
Chapter 1
BIOS Overview ............................................... 1
BIOS Features ...........................................................................1
Start-up Process Flow ...............................................................3
BIOS Messages.........................................................................4
Beep & Diagnostic Codes..........................................................6
BIOS Image File ......................................................................10
BIOS Image File for the Plug-N-Run E1.........................10
Memory Map............................................................................11
I/O Map ....................................................................................12
DMA Channels.........................................................................13
System Interrupts.....................................................................13
Chapter 2
Using BIOS Setup ........................................ 15
What is BIOS Setup?...............................................................15
When should BIOS Setup be Run? .........................................15
How do You Use the BIOS Setup Program? ...........................15
Starting BIOS Setup .......................................................16
Operating BIOS Setup....................................................16
BIOS Setup Usable Keys ...............................................16
Changed BIOS Setup Settings .......................................17
Exiting the BIOS Setup Program ....................................18
Chapter 3
BIOS Setup Menus....................................... 19
BIOS Setup Program Menus ...................................................19
Main Menu ...............................................................................20
Main Menu Sub-Menus............................................................21
IDE Channel Detailed Settings .......................................21
ATA Configuration Settings ............................................23
Advanced Menu.......................................................................25
v
Advanced Menu Sub-Menus ...................................................27
Processor Configuration Settings ...................................27
PCI Configuration Settings .............................................28
PCI Device, Slot Settings ...............................................29
Advanced Chipset Control Settings................................30
Internal Device Configuration Settings ...........................31
Event Logging Settings...................................................33
Security Menu..........................................................................35
Power Menu.............................................................................36
Power Menu Sub-Menus .........................................................38
Advanced CPU Configuration Settings...........................38
Boot Menu ...............................................................................40
Boot Menu Sub-Menus ............................................................41
Boot Device Priority ........................................................41
Exit Menu.................................................................................43
Chapter 4
BIOS Functions ............................................ 45
Booting from any Device..........................................................45
Power Management Functions ................................................45
Sleep States ...................................................................45
Hibernation .....................................................................46
Wake Up.........................................................................46
CPU Power Saving Functions ........................................46
Thermal Monitoring Functions .................................................46
Event Log Function..................................................................47
How the Event Log Function Works ...............................47
Event Log Area...............................................................49
Event Log BIOS Runtime Routines ................................50
Password Function ..................................................................52
Setting a password .........................................................52
Changing the password..................................................52
Deleting the password ....................................................53
Accessing BIOS Setup after a password is set ..............53
Entering the wrong password .........................................53
Serial ATA Interface.................................................................53
SATA Features ...............................................................53
ATA Mode.......................................................................54
ATA Mode and Channel Assignments............................55
Watchdog Timer ......................................................................56
Purpose of the Watchdog Timer.....................................56
Using the Watchdog Timer .............................................57
Reloading the Counter....................................................57
Appendix A Cautions & Limitations................................ 59
Outline .....................................................................................59
Installing Drivers ......................................................................59
vi
Notes on Using Peripheral devices Made
by Other Companies............................................................59
Appendix B Use of Legacy Devices ................................ 60
Which Legacy Devices? ..........................................................60
BIOS Type ......................................................................60
Super I/O ........................................................................61
BIOS Setup Changes (Due to the SCH5017)..........................61
Main Menu......................................................................61
Advanced Menu..............................................................62
I/O Device Configuration 1 Settings ...............................63
Internal Device Configuration Settings ...........................65
Console Redirection Settings .........................................66
BIOS Setup Changes (Due to SIO10N268).............................67
Advanced Menu..............................................................67
I/O Device Configuration 2 Settings ...............................68
Console Redirection ................................................................69
Required Terminal Environment.....................................69
Required Serial Cable ....................................................69
INDEX
....................................................................... 71
vii
THIS PAGE IS INTENTIONALLY LEFT BLANK.
viii
List of Figures
Figure 1
Figure 2
Figure 3
Figure 4
Figure 5
Figure 6
Figure 7
Figure 8
Figure 9
Figure 10
Figure 11
Figure 12
Figure 13
Figure 14
Figure 15
Figure 16
Figure 17
Figure 18
Figure 19
Figure 20
Figure 21
Figure 22
Figure 23
Figure 24
Figure 25
Figure 26
Figure 27
Figure 28
Figure 29
Figure 30
Loading the BIOS Image File for the Plug-N-Run E1.......10
Memory Map ....................................................................11
I/O Map.............................................................................12
BIOS Setup Menu ............................................................16
Main Menu........................................................................20
IDE Channel Detailed Settings Sub-Menu .......................21
ATA Configuration Settings Sub-Menu ............................23
Advanced Menu ...............................................................25
Processor Configuration Settings Sub-Menu ...................27
PCI Configuration Settings Sub-Menu .............................28
PCI Device Slot Settings Sub-Menu.................................29
Advanced Chipset Control Settings Sub-Menu ................30
Internal Device Configuration Settings Sub-Menu ...........31
Event Logging Settings Sub-Menu...................................33
Security Menu ..................................................................35
Power Menu .....................................................................36
Advanced CPU Configuration Settings Sub-Menu...........38
Boot Menu ........................................................................40
Boot Device Priority Settings Sub-Menu ..........................41
Exit Menu .........................................................................43
Event Log Area & Record Format ....................................49
Hang-up Detection with the Watchdog Timer...................56
Main Menu (SCH5017).....................................................61
Advanced Menu (SCH5017) ............................................62
I/O Device Configuration 1 Settings Menu .......................63
Internal Device Configuration Settings Menu
(SCH5017) ....................................................................65
Console Redirection Settings Menu .................................66
Advanced Menu (SIO10N268) .........................................67
I/O Device Configuration 2 Settings Menu .......................68
Serial Cable Wiring Diagram ............................................69
ix
THIS PAGE IS INTENTIONALLY LEFT BLANK.
x
List of Tables
Table 1
Table 2
Table
Table
Table
Table
Table
Table
Table
3
4
5
6
7
8
9
POST Phase BIOS Messages ...........................................4
Phoenix TrustedCore™ Port 80h Diagnostic Codes
& Beep Codes.................................................................6
DMA Channels .................................................................13
IRQ Assignment ...............................................................13
List of Event Log Message ...............................................48
POST Error Status Bitmap ...............................................50
ATA Mode & Channel Assignments .................................55
Legacy Devices Conditions ..............................................60
Special Key and Escape Sequence Codes......................69
xi
THIS PAGE IS INTENTIONALLY LEFT BLANK.
xii
Chapter 1 BIOS Overview
1
BIOS Overview
This chapter gives a brief overview of the BIOS firmware used in with the Plug-N-Run E1.
BIOS Features
Each Plug-N-Run E1 has a copy of Phoenix Technologies’ Phoenix TrustedCore™ preinstalled in the onboard Flash-ROM. This BIOS is adapted to provide extensive control over
the Plug-N-Run E1 for power management configurations, boot options, event logging and
other features that are important for embedded applications.
Currently supported features include:
1
POST (Power On Self Test)
Executed by the BIOS POST (Power On Self Test) routines after power ON or system reset. Diagnostic results are reported by on-screen messages, buzzer codes
and signals output to I/O Port 80h.
The BIOS version may differ from model to model, and the level of functionality supported will differ from version to version. The BIOS version number is also shown on
the screen at POST time.
2
Power Management
ACPI-ready OSes are able to use this ACPI 2.0 compliant power management interface.
Enhanced Intel SpeedStep® Technology, CPU clock throttling, memory frequency
selection and graphics processor display core frequency selection are also supported, allowing CPU performance and power consumption to be optimized. Also
supported are selective enable/disable of integrated sub functions, such as the
graphics processor unit, LVDS transmitters, serial ports, parallel ports, IDE controllers, USB controller, FDD controller, etc.
Note
3
Future versions of the BIOS will further add support for memory bandwidth throttling
as well to further expand power management capabilities of the Plug-N-Run E1.
PnP (Plug and Play)
The PnP BIOS 1.0A specification is supported for Plug and Play functionality.
4
QuietBoot
By using Phoenix QuietBoot, you can suppress the diagnostic information and other
messages that are displayed during the POST phase. During this period, graphical
illustrations will appear on the screen until the OS is loaded.
5
ROM-BIOS Functions
Two interfaces are supported: the IBM PC/AT compatible ROM-BIOS interface
(INT10h – INT1Ah) and the IBM PC/AT compatible Extended ROM-BIOS interface.
6
BIOS Setup
If the <F2> key is pressed immediately after power ON or system reset, the BIOS
Setup Program in BIOS ROM is executed. The operating hardware environment settings and the BIOS environment settings can be changed in BIOS Setup.
1
7
BIOS Modification
You can modify the following BIOS functions in Flash-ROM by using the BIOS Modification Utilities:
•
Modifying the Default values in Setup
When using a dedicated system, a user may find it difficult to change the BIOS
Setup values. Using the BCU.BAT utility, the user may store to Flash-ROM new
default values along with the BIOS, eliminating the need to access BIOS Setup
when making changes such as swapping Plug-N-Run E1 modules.
See the BIOS Configuration User Manual for more details
Refer
8
MultiBoot
The Plug-N-Run E1 may be booted from any connected bootable device, with the
boot priority being determined in BIOS Setup.
Refer
9
See Booting from any Device in Chapter 4 BIOS Functions and Boot Menu
/ Boot Menu Sub-Menus in Chapter 3 BIOS Setup Menus for more details
of the MultiBoot feature.
Password Security
A password may be set to restrict access to BIOS Setup.
10
Event Log
Details of POST errors can be stored in the Flash memory, and then checked via
BIOS Setup.
See also Event Log Function in Chapter 4 BIOS Functions
Refer
11
ATAPI Removable Device
The Plug-N-Run E1 can boot from ATAPI Removable devices such as LS-120
Super FDD and IOMEGA Zip Drive.
12
QuickBoot
Faster boot by omitting POST phase for FDD and DRAM, and suppressing PC
beeps.
13
Legacy Mode USB Support
Support for USB keyboard and mouse for legacy operating systems and in BIOS
setup mode.
14
Serial ATA
In addition to the legacy parallel ATA (hereafter P-ATA) IDE interface, the newer
serial ATA (hereafter SATA) IDE interface is also supported.
15
SMBIOS
System Management BIOS (SMBIOS) version 2.3.3 is supported.
16
Super I/O
This BIOS supports the following Super I/O chips:
Primary
• SCH5017 (SMSC)
Secondary
•
2
SIO10N268 (SMSC)
Refer to Appendix B Use of Legacy Devices for details of the BIOS functions available
to the system when one of the above Super I/O chips is used.
The SCH5017 chip (SMSC) may be used interchangeably in place of the
Caution DME1737 chip (SMSC).
!
BIOS Overview
Start-up Process Flow
After Power On or System Reset, the BIOS proceeds through the following 4 phases:
1 Initialization
The Plug-N-Run E1 module's internal controllers and other hardware components are
initialized according to the BIOS Setup settings. Among the various controllers that
may be targeted for initialization are:
•
•
•
•
•
•
•
•
•
•
•
•
•
•
•
•
•
CPU
DRAM Controller
Cache memory
Interrupt (IRQ) Controller
Interval Timers
Graphics Controller
DMA Controller
Real-Time Clock (RTC)
Parallel/Serial Ports (*1)
Expansion Serial Ports (*2)
Keyboard Controller (*1)
Floppy Disk Controller (*2)
PCI-IDE Controller
LAN Controller
Sound Controller
USB Controller
Serial ATA Controller
*1 Only initialized when a SCH5017 Super I/O chip is used.
Keyboard Controller is only initialized by PS/2 compliant BIOSes.
*2 Only initialized when a SIO10N268 Super I/O chip is used.
2 POST (Power On Self Test)
The various system components are checked.
3 Boot Load
The operating system is loaded.
4 Service Routines
The BIOS also handles OS or application program calls to service routines that use
IBM-PC compatible ROM-BIOS functions INT 10h – INT 1Ah.
!
Caution
1
Avoid powering off or reset when the BIOS is processing POST or initialization.
If this occurs, for the next boot the CPU cache will be disabled and the following
message will be displayed:
0280: Previous boot incomplete - Default configuration used
Refer to Table 1 as well.
3
BIOS Messages
After System Reset and Initialization, the BIOS enters the POST (Power On Self Test) phase.
POST is a self-diagnostic process in which the system checks itself for problems.
During the POST phase, Phoenix TrustedCore™ displays a variety of the following diagnostic
messages on the screen. These include both progress messages and error messages that
only appear if a problem is discovered. Table 1 shows the BIOS messages that may occur
during the POST phase and their meanings.
Table 1 POST Phase BIOS Messages
BIOS Message
Meaning
0200: Failure Fixed Disk
A problem has been detected with the hard disk
0210: Stuck Key
A problem has been detected with the keyboard operation
(Stuck key)
0211: Keyboard error
A problem has been detected with the keyboard connection
0212: Keyboard Controller Failed
A problem has been detected with the keyboard controller
0213: Keyboard locked - Unlock key switch The keyboard is locked - Release the key switch
0220: Monitor type does not match CMOS Run SETUP
BIOS settings do not match actual monitor - Fix with BIOS
Setup
0230: System RAM Failed at offset: nnnn
A problem has occurred with the System RAM memory
0231: Shadow Ram Failed at offset: nnnn
A problem has occurred with the Shadow RAM memory
0232: Extended RAM Failed at address line: A problem has occurred with the Extended RAM memory
nnnn
0250: System battery is dead - Replace and The backup battery is dead - Replace it and run the BIOS
run SETUP
Setup Program again
0251: System CMOS checksum bad Default configuration used
A problem has been detected with the CMOS RAM data Default values have been used for some settings.
0260: System timer error
A problem has been detected with the system timer
0270: Real time clock error
A problem has been detected with the RTC
0271: Check date and time settings
Date and time settings have not been done
0280: Previous boot incomplete - Default
configuration used
The last boot did not finish normally - Default values have been
used for some settings
0281: Memory Size found by POST differed
from EISA CMOS
Memory size detected by POST did not match the contents of
EISA CMOS
02B0: Diskette drive A error
A problem has been detected with floppy drive A
02B2: Incorrect Drive A type - run SETUP
Floppy drive A needs to be redefined in BIOS Setup
02D0: System cache error - Cache disabled A problem has been detected with the system cache - Cache is
not useable
4
xxxx Address Conflict
Conflict has been detected between internal & external I/O
addresses
Allocation Error for xxxx
An allocation error has occurred in the resource with the device
displayed in xxxx
CD ROM Drive
CD ROM drive has been detected
Entering SETUP ...
Starting the BIOS Setup utility
Failing Bits: xxxx
An error has occurred during the memory test at the address
displayed in xxxx
Fixed Disk n:
Hard disk number n (0 – 3) has been detected
Invalid System Configuration Data
The system configuration values are not correct
IO device IRQ conflict
Conflict has been detected between I/O IRQs
Keyboard Detected
The keyboard has been detected
Mouse initialized
The mouse has been initialized
nnnnM Extended RAM Passed
Extended RAM testing has finished
nnnn Cache SRAM Passed
Cache SRAM testing has finished
nnnn KB Shadow RAM Passed
Shadow RAM testing has finished
Table 1 POST Phase BIOS Messages
Meaning
nnnn KB System RAM Passed
System RAM testing has finished
Operating system not found
A device containing a bootable OS cannot be found - Check
that the drive setup is correct
Parity Check 1 nnnn
A parity error has occurred in the system bus nnnn
Parity Check 2 nnnn
A parity error has occurred in the I/O bus nnnn
1
BIOS Overview
BIOS Message
Press <F1> to resume, <F2> to Setup, <F3> Displayed at the end of the POST phase if an error has
for previous
occurred - Press <F1> to load the OS, <F2> to activate BIOS
Setup, <F3> to activate Setup Utility of the extended BIOS
Press <F1> to resume, <F2> to Setup
Displayed at the end of the POST phase if an error has
occurred - Press <F1> to load the OS, <F2> to activate BIOS
Setup
Press <F1> to resume, <F3> for previous
Displayed at the end of the POST phase if an error has
occurred - Press <F1> to load the OS, <F3> to activate Setup
Utility of the extended BIOS
Press <F1> to resume
Press <F1> to load the OS
Press <F2> to enter Setup
Press <F2> to activate the BIOS Setup
System BIOS shadowed
The system BIOS is being shadowed
Video BIOS shadowed
The video BIOS is being shadowed
PC re-booted due to Watch Dog timeout.
The system has been forced to reset or re-boot by the
Watchdog Timer timing out.
5
Beep & Diagnostic Codes
As the BIOS proceeds with the POST phase, as well as displaying messages to the screen, it
also outputs a variety of diagnostic codes to I/O port 80h. If a speaker is connected, the port
80h value can be understood from the number of beeps. The beep codes correspond to the
port 80h diagnostic codes described previously, expressed as (base4 + 1) numbers. For
example, in the case of an interrupt test error (58h) the following beeps are emitted:
Beep-beep, pause, Beep-beep, pause, Beep-beep-beep, pause, Beep
1 Subtract one from each number of beeps:
2-2-3-1 → 1-1-2-0
2 Convert each number to binary:
1-1-2-0 → 01-01-10-00
3 Concatenate the 1st & 2nd numbers, and the 3rd & 4th:
01-01-10-00 → 0101-1000
4 Convert the numbers to hexadecimal:
0101-1000 → 5-8
Giving the 58h code that we were looking for.
Table 2 lists these codes that may output during the POST phase and their meanings.
• When using a "Plug-N-Run G5 Development Board" (PS5PRDEVBDR), the diagnostic code will be displayed by a dual 7-segment display with LEDL as the least
significant digit and LEDH as the most significant digit.
Refer
Table 2 Phoenix TrustedCore™ Port 80h Diagnostic Codes & Beep Codes
Diagnostic Beep
Code
Code
02h
Verify processor mode
03h
Disable Non-Maskable Interrupt (NMI)
04h
Get CPU type
06h
Initialize system hardware
07h
Disable shadow and execute code from the ROM.
08h
Initialize chipset with initial POST values
09h
Set IN POST flag
0Ah
Initialize CPU registers
0Bh
Enable CPU cache
0Ch
Initialize caches to initial POST values
0Eh
Initialize I/O components
0Fh
Initialize the local bus IDE
10h
Initialize Power Management
11h
Load alternate registers with initial POST values
12h
Restore CPU control word during warm boot
13h
Initialize PCI Bus Mastering devices
14h
16h
Initialize keyboard controller
1-2-2-3
BIOS ROM checksum
17h
Initialize cache before memory autosize
18h
8254 timer initialization
1Ah
8237 DMA controller initialization
1Ch
Reset Programmable Interrupt Controller
20h
1- 3- 1- 1
Test DRAM refresh
22h
1- 3- 1- 3
Test 8742 Keyboard Controller
24h
6
Meaning
Set ES segment register to 4 GB
Table 2 Phoenix TrustedCore™ Port 80h Diagnostic Codes & Beep Codes
Diagnostic Beep
Code
Code
28h
1- 3- 3- 1
Autosize DRAM*1
Initialize POST Memory Manager
2Ah
Clear 512 KB base RAM
2Ch
1- 3- 4- 1
RAM failure on address line xxxx
2Eh
1- 3- 4- 3
RAM failure on data bits xxxx of low byte of memory bus
2Fh
Enable cache before system BIOS shadow
32h
Calculate CPU speed
33h
Initialize POST Dispatch Manager
34h
Test CMOS RAM and RTC
36h
Initialize shut down victor for warm start
38h
Shadow system BIOS ROM
3Ah
Autosize cache
3Ch
Advanced configuration of chipset registers
3Dh
Load alternate registers with CMOS values
41h
Initialize extended memory for RomPilot
42h
Initialize interrupt vectors
45h
46h
POST device initialization
2- 1- 2- 3
Check ROM copyright notice
47h
Initialize I2O support
48h
Check video configuration against CMOS
49h
Initialize PCI bus and devices
4Ah
Initialize all video adapters in system
4Bh
QuietBoot start
4Ch
Shadow video BIOS ROM
4Eh
Display BIOS copyright notice
4Fh
Initialize MultiBoot
50h
Display CPU type and speed
51h
Initialize EISA board
52h
Test keyboard
54h
Set key click if enabled
55h
58h
BIOS Overview
29h
1
Meaning
Enable USB devices
2- 2- 3- 1
Test for unexpected interrupts
59h
Initialize POST display service
5Ah
Display prompt "Press F2 to enter SETUP"
5Bh
Disable CPU cache
5Ch
Test RAM between 512 and 640 KB
60h
Test extended memory
62h
Test extended memory address lines
64h
Jump to UserPatch1
66h
Configure advanced cache registers
67h
Initialize Multi Processor APIC
68h
Enable external and CPU caches
69h
Setup System Management Mode (SMM) area
6Ah
Display external L2 cache size
6Bh
Load custom defaults
6Ch
Display shadow-area message
6Eh
Display possible high address for UMB recovery
70h
Display error messages
72h
Check for configuration errors
76h
Check for keyboard errors
7
Table 2 Phoenix TrustedCore™ Port 80h Diagnostic Codes & Beep Codes
Diagnostic Beep
Code
Code
7Ch
Set up hardware interrupt vectors
7Dh
Initialize Intelligent System Monitoring
7Eh
Initialize coprocessor if present
80h
Disable onboard Super I/O ports and IRQs
81h
Late POST device initialization
82h
Detect and install external RS232 ports
83h
Configure non-MCD IDE controllers
84h
Detect and install external parallel ports
85h
Checking for PnP ISA devices
86h
Re-initialize onboard I/O ports
87h
Configure Motherboard Configurable Devices
88h
Initialize BIOS Data Area
89h
Enable Non-Maskable Interrupts (NMIs)
8Ah
Initialize Extended BIOS Data Area
8Bh
Test and initialize PS/2 mouse
8Ch
Initialize floppy controller
8Fh
Determine number of ATA drives
90h
Initialize hard-disk controllers
91h
Initialize local-bus hard-disk controllers
92h
Jump to UserPatch2
93h
Build MPTABLE for multi-processor boards
95h
Install CD ROM for boot
96h
Clear huge ES segment register
97h
98h
Fixup Multi Processor table
1- 2
Search for option ROMs. One long, two short beeps on checksum failure
99h
Check for SMART Drive
9Ch
Set up Power Management
9Dh
Initialize security engine
9Eh
Enable hardware interrupts
9Fh
Determine number of ATA and SCSI drives
A0h
Test Real Time Clock interrupt
A2h
Check key lock
A4h
Initialize Typematic rate
A8h
Erase F2 prompt
AAh
Scan for F2 key stroke
ACh
Enter SETUP
AEh
Clear Boot flag
B0h
Check for errors
B1h
Inform RomPilot about the end of POST.
B2h
B4h
8
Meaning
POST done - prepare to boot operating system
1
One short beep before boot
B5h
Terminate QuietBoot
B6h
Check password
B7h
Initialize ACPI-BIOS
B9h
Clear Screen
BAh
Initialize SMBIOS
BCh
Clear parity checkers
BDh
Display MultiBoot menu
BEh
Clear screen
BFh
Check virus and backup reminders
Table 2 Phoenix TrustedCore™ Port 80h Diagnostic Codes & Beep Codes
Diagnostic Beep
Code
Code
Try to boot with INT 19
C1h
Initialize POST Error Manager (PEM)
C2h
Initialize error logging
C3h
Initialize error display function
C4h
Initialize system error handler
C5h
PnP dual CMOS
C6h
Initialize note dock
C7h
Initialize note dock rate
C8h
Force check
C9h
Extended checksum
CBh
Redirect Int 13h to Memory Technologies Devices such as ROM, RAM,
PCMCIA, and serial disk
CCh
Redirect Int 10h to enable remote serial video
CDh
Redirect Int 15h to enable remote keyboard
CEh
Initialize digitizer and display message
E0h
*1
BIOS Overview
C0h
D2h
1
Meaning
Unknown interrupt
1- 3- 3- 1
Check memory mounting
When this diagnostic/beep code is output, error details code is output via Port 80h.
9
BIOS Image File
BIOS Image File for the Plug-N-Run E1
During BIOS initialization the System BIOS is mapped to the 000E0000h - 000FFFFFh
region, while the PXE BIOS are mapped to the region starting at 000C0000h.
Figure 1 shows the BIOS image file for the Plug-N-Run E1.
000FFFFFh
System BIOS
(Including Power
Management BIOS)
System BIOS
000E0000h
(*1)
PXE BIOS
(000Cxxxxh)
PXE BIOS (6KB) (*3)
000Cxxxxh
Video BIOS (*2)
000C0000h
BIOS Image File (640KB)
Memory Image
Figure 1 Loading the BIOS Image File for the Plug-N-Run E1
10
*1
This region can be used to access memory on PCI Slot devices. Extension ROM-BIOS may also
use this region. After the System has booted, segments not being used to access memory may be
used as a UMB/EMM page frame.
*2
When the Video BIOS is added, it is mapped to this region.
*3
The PXE BIOS is only mapped if both the "LAN Controller" and "PXE OPROM" options are
"Enabled" in the BIOS Setup Internal Device Configuration menu (which is a sub-menu of the
Advanced menu).
Memory Map
1
The Plug-N-Run E1 memory map is shown in Figure 2.
00000000h
BIOS Overview
RAM area
(640KB)
000A0000h
Video RAM (VGA)
(128KB)
000C0000h
System BIOS area (*1)
(256KB)
00100000h
RAM area
Last Address
*1 It depends on the BIOS features.
Figure 2 Memory Map
• The actual top address will vary according to the amount of memory installed.
Note
256MB:
0FFFFFFFh
512MB:
1FFFFFFFh
1GB:
3FFFFFFFh
2GB:
7FFFFFFFh
• A custom BIOS may have a different memory mapping.
• The system allocates memory to internal and external PCI devices from the
unused areas.
11
I/O Map
0CF9
Reset
04D0~04D1
System Controller
03F8~03FF
Serial port 1 (COM1)
03F7
FDC / Primary IDE
03F6
IDE/SATA
03F0~03F5
FDC
03E8~03EF
Serial port 3 (COM3)
03E0~03E7
Unused I/O
03D0~03DF
CGA
03C0~03CF
VGA/EGA
03BC~03BF
Parallel port 1 (LPT1)
03B0~03BB
MDA
0380~03AF
Unused I/O
0378~037F
Parallel port 2 (LPT2)
0377
0376
Unused I/O
IDE/SATA
0300~0375
Unused I/O
02F8~02FF
Serial port 2 (COM2)
02F0~02F7
Unused I/O
02E8~02EF
Serial port 4 (COM4)
0280~02E7
Unused I/O
0278~027F
Parallel port 3 (LPT3)
01F8~0277
Unused I/O
01F0~01F7
Primary IDE
0178~01EF
Unused I/O
0170~0177
IDE/SATA
0102~016F
Unused I/O
0100~0101
LPC (SIO10N268 Configuration)
00F1~00FF
FPU
F0
PIC
00E0~00EF
(Reserved)
00C0~00DF
DMAC 2
00A0~00BF
PIC
0080~009F
DMAC and LPC or PCI
0070~007F
RTC
0060~006F
KBC
0050~005F
Timer
004E~004F
(Reserved)
0040~004D
Timer
0030~003F
PIC
002E~002F
LPC (SCH5017 Configuration)
0020~002D
PIC
0000~001F
DMAC
0100~03FF
I/O channels
0000~00FF
I/O channels
Reserved for
System Use
Figure 3 I/O Map
Note
• The area from 0000h – 0100h is reserved for System use and is not available to
the user.
• The system allocates memory to internal and external PCI devices from the
unused areas.
12
DMA Channels
1
Table 3 shows the assignment of the DMA Channels
Table 3 DMA Channels
DMA1
0
Use
Unused
1
2
FDC
3
DMA2
Note
BIOS Overview
Internal Controller Channel
4
(Cascade of DMA1)
5
Unused
6
Unused
7
Unused
Channels 1 – 3 used by
Parallel and Floppy
devices.
• Channels 0 – 3 are reserved for 8-bit DMA use
Note
• Channels 4 – 7 are reserved for 16-bit DMA use
• Channels 1 – 3 are not used if a SCH5017 Super I/O chip is not mounted.
System Interrupts
Table 4 shows the assignment of the IRQ Interrupts
Table 4 IRQ Assignment
IRQ #
Interrupt Origin
IRQ 0
Interval Timer
IRQ 1
Keyboard
IRQ 2
(Cascade)
IRQ 3
Note
Interrupts 3 – 7 used by Parallel, Serial, and Floppy
devices.
IRQ 4
IRQ 5
IRQ 6
Floppy Disk
IRQ 7
IRQ 8
RTC
IRQ 9
IRQ 10
IRQ 11
IRQ 12
Mouse
IRQ 13
FPU (*1)
IRQ 14
Hard Disk (IDE)
IRQ 15
*1 Floating point Unit
Note
• IRQ1, IRQ3 – IRQ7, IRQ12 are not used if a SCH5017 or SIO10N268 Super I/O
chip is not mounted.
13
THIS PAGE IS INTENTIONALLY LEFT BLANK.
14
Chapter 2 Using BIOS Setup
2
This chapter outlines usage of the BIOS Setup Program.
BIOS Setup is a program that enables you to reconfigure your hardware environment and
BIOS operation settings. The Plug-N-Run E1's default BIOS settings have been chosen for
the purpose of developing Plug-N-Run E1 target device embedded systems, which means
that often there will be no need to use the BIOS Setup Program to alter these settings.
Refer
See the BIOS Configuration User Manual for details on other ways to change the
BIOS
When should BIOS Setup be Run?
The BIOS Setup Program is likely to be run in a variety of situations, for example:
•
When changing the boot device priority order
•
When the POST displays a BIOS Setup related error message
Note
Values set by the BIOS Setup Program are stored in the Plug-N-Run E1's onboard
CMOS RAM. To maintain its contents when the Plug-N-Run E1 is turned off, this
CMOS RAM requires an external backup battery, or some other power source.
How do You Use the BIOS Setup Program?
The BIOS Setup Program may be started, operated and exited as follows:
15
Using BIOS Setup
What is BIOS Setup?
Starting BIOS Setup
The BIOS Setup Program may be launched during the POST phase by pressing the <F2>
key while the message "Press <F2> to enter SETUP" or "Press F2 for System Utilities." is displayed in the lower left of the screen.
After the BIOS Setup Program starts, the Main Setup menu will be displayed:
Menu Bar Shows the 6 top-level menus
(Main, Advanced, Security, Power, Boot & Exit)
Main
Help Field Explains the function of the
field under the cursor
Phoenix TrustedCore(tm) Setup Utility
Power
Boot
Advanced
Security
Exit
Item Specific Help
System Time:
System Date:
[00:00:00]
[01/01/2007]
Primary Master
Primary Slave
Secondary Master
Secondary Slave
SATA Port 0
SATA Port 1
ATA Configuration
[None]
[None]
None
None
[None]
[None]
System Memory:
Extended Memory:
BIOS Revision:
633 KB
522752 KB
KJ:1.00
F1
ESC
Help
Exit
↑ ↓
←→
Select Item
Select Menu
Change Values
-/+
Enter Select Sub-Menu
<Tab>, <Shift-Tab>, or
<Enter> selects field.
Cursor
The position of the
cursor is shown by
the field text being
reverse highlighted
Option Fields
Each menu has a
number of options,
some configurable
A to the left of the
option name indicates
a linked sub-menu
Settable fields are
shown by enclosing
brackets: [xxxxx]
F9 Setup Defaults
F10 Save and Exit
Key List
List of keys usable
in BIOS Setup
Figure 4 BIOS Setup Menu
Operating BIOS Setup
BIOS Setup has six top level menus (Main, Advanced, Security, Power, Boot and Exit), each
of which contains a number of configurable fields. Some of the fields have a
mark next to
them, indicating a sub-menu is associated with that field. Sub-menus allow further settings.
See Chapter 3 BIOS Setup Menus for details of the individual menus
Refer
BIOS Setup Usable Keys
The BIOS Setup Program displays a list of usable keys at the bottom of the screen:
F1 (Alt+H) Calls the BIOS Setup Program’s on-line Help function.
In Help, <PgDn> displays the next page, <PgUp> the previous page.
16
Esc
If the current menu is a sub-menu display jumps to the parent menu.
If the current menu is a parent menu display jumps to the Exit menu.
← →
Used to cycle the screen through the top level (parent) menus.
↑↓
Used to move the cursor between fields within a menu.
–/+
Change the value of a field.
F9
Used to revert all settings to their default values.
F10
Used to save all the current settings to CMOS RAM and exit the BIOS Setup.
Enter
Jumps the screen to the associated sub-menu if the current field has one (shown
by a
mark).
Changed BIOS Setup Settings
The BIOS Setup Program is operated using the keyboard.
If settings are changed, the new values must be either saved or discarded before the BIOS
Setup Program is exited.
2
Reverting all settings to their default values at once
Follow the procedures below.
1 Bring up the Exit menu
2 Select "Load Setup Defaults" option
4 Select "Yes" and press the <Enter> key - all settings are returned to their default values
Step 2 may be directly accessed from any menu by pressing the <F9> key.
Note
Reverting all settings to their saved values at once
Follow the procedures below.
1 Bring up the Exit menu
2 Select "Discard Changes" option
3 Press the <Enter> key - the message "Load previous configuration now? Yes/No" will
be displayed
4 Select "Yes" and press the <Enter> key - all settings have been reverted to their saved
values
Note
Settings cannot be reverted after changes are saved using the "Save
Changes" option in the Exit menu.
Saving changed settings to CMOS RAM
Changed settings may be saved at any time from the Exit menu:
1 Bring up the Exit menu
2 Select the "Save Changes" option
3 Press the <Enter> key - the message "Save configuration changes now? Yes/No" will
be displayed
4 Select "Yes" and press the <Enter> key. This saves all the BIOS Setup Program settings to CMOS RAM. BIOS Setup remains open, and further changes can be made.
17
Using BIOS Setup
3 Press the <Enter> key - the message "Load default configuration now? Yes/No" will be
displayed
Exiting the BIOS Setup Program
When exiting the BIOS Setup Program any unsaved changes must be either saved or discarded:
Saving changes and exiting the BIOS Setup Program
1 Press the <Esc> key (twice if from a sub-menu) to bring up the Exit menu
2 Select "Exit Saving Changes" option
3 Press the <Enter> key - the message "Save configuration changes and exit now? Yes/
No" will be displayed
4 Select "Yes" and press the <Enter> key
Note
You can also exit the BIOS Setup Program directly from any menu by pressing the <F10> key.
This will bring you straight to the step 3 message.
Select "Yes" and press the <Enter> key.
Exiting the BIOS Setup Program without saving changes
1 Press the <Esc> key (twice if from a sub-menu) to bring up the Exit menu
2 Select "Exit Discarding Changes" option
3 Press the <Enter> key - the message "Configuration has not been saved! Save before
exiting? Yes/No" will be displayed
Note
If no changes have been made to the settings the BIOS Setup Program will
exit immediately, with no message being shown.
4 Press the < → > cursor key to select "No" and press the <Enter> key
If you select "Yes", the changed settings will be saved to CMOS RAM.
18
Chapter 3 BIOS Setup Menus
This chapter explains the various menus and (configurable) fields of the BIOS Setup Program.
3
BIOS Setup Program Menus
The following top level menus are available from the upper menu bar:
Use
See:
Main
Basic System Configuration Settings
page 20
Advanced
Chipset Related Advanced Settings
page 25
Security
BIOS Setup Access Password Settings
page 35
Power
Power Management Settings
page 36
Boot
System Startup Related Settings
page 40
Exit
Saving Changes & Exiting the BIOS Setup Program
page 43
BIOS Setup Menus
Menu
These menus contain a number of (configurable) fields. Some of these fields have a
mark
next to them. This indicates that there is a sub-menu associated with that field. These submenus allow further settings.
Refer
See Chapter 2 Using BIOS Setup for more details on how to use the BIOS Setup
Program
19
Main Menu
Phoenix TrustedCore(tm) Setup Utility
Power
Boot
Advanced
Security
Exit
Main
Item Specific Help
System Time:
System Date:
[00:00:00]
[01/01/2007]
Primary Master
Primary Slave
Secondary Master
Secondary Slave
SATA Port 0
SATA Port 1
ATA Configuration
[None]
[None]
None
None
[None]
[None]
System Memory:
Extended Memory:
BIOS Revision:
633 KB
522752 KB
KJ:1.00
F1
ESC
Help
Exit
↑ ↓
←→
Select Item
Select Menu
Change Values
-/+
Enter Select Sub-Menu
<Tab>, <Shift-Tab>, or
<Enter> selects field.
F9 Setup Defaults
F10 Save and Exit
Figure 5 Main Menu
System Time
Hour:Minute:Second fields. Directly input the desired value, using
<Tab> or <Enter> to move between the fields.
System Date
Month/Day/Year fields. Directly input the desired value, using <Tab>
or <Enter> to move between the fields.
Primary Master
Sets the IDE channel parameters.
Primary Slave
Secondary Master
Secondary Slave
SATA Port 0
SATA Port 1
ATA Configuration
Sets the SATA and P-ATA parameters.
See Main Menu Sub-Menus
Refer
20
System Memory
Displays the amount of conventional memory.
This value is automatically determined during the POST phase and
cannot be changed.
Extended Memory
Displays the amount of extended memory.
This value is automatically determined during the POST phase and
cannot be changed.
BIOS Revision
Shows the current BIOS version number. This value cannot be
changed.
Main Menu Sub-Menus
IDE Channel Detailed Settings
Phoenix
TrustedCore(tm)
Setup
Utility
Main
Primary Master [None]
Item Specific Help
[Auto]
Multi-Sector Transfers:
LBA Mode Control:
32 Bit I/O:
Transfer Mode:
Ultra DMA Mode:
[Disabled]
[Disabled]
[Disabled]
[Disabled]
[Disabled]
F1
ESC
Help
Exit
↑ ↓
←→
Select Item
Select Menu
Change Values
-/+
Enter Select Sub-Menu
3
User = you enter
parameters of hard-disk
drive installed at this
connection.
Auto = autotypes
hard-disk drive
installed here.
CD-ROM = a CD-ROM drive
is installed here.
ATAPI Removable =
removable disk drive is
installed here.
BIOS Setup Menus
Type:
F9 Setup Defaults
F10 Save and Exit
Figure 6 IDE Channel Detailed Settings Sub-Menu
This screen displays the LBA derived figures for total number of sectors and available capacity of hard disks recognized by the BIOS. Number of cylinders, number of heads, number of
sectors and available capacity are all shown if the size of the hard disk is 8.4GB or less.
Type
Determines the connection status as well as the parameters of the IDE
Disk:
Auto
If this option is used, the connection status and
Hard Disk Type are automatically determined. If
connection has been confirmed, the various
parameters (No. of Cylinders, No. of Heads and
No. of Sectors, etc.) will be automatically set
using information obtained from the hard drive
itself. The drive type and manufacturer will be displayed during POST.
None
No Hard Disk connected
CD-ROM
CD-ROM (ATAPI) connected
ATAPI Removable
ATAPI Removable Device (other than a CDDrive) connected
User
Manually enter Hard Disk parameters (No. of Cylinders, No. of Heads and No. of Sectors, etc.)
21
Multi-Sector Transfers
Determines how many sectors of data each transfer contains. These
settings are available if the "Type" option is set to "CD-ROM", “ATAPI
Removable“ or "User":
Disabled
Transfer in 1 sector units
2 Sectors – 16 Sectors
Select the number of sectors per transfer
A higher number gives faster transfer rates, but
the Drive Cache size may limit the effect
LBA Mode Control
32 Bit I/O
Transfer Mode
Determines whether Logical Block Addressing is used or not. These
settings are available if the "Type" option is set to "CD-ROM", “ATAPI
Removable“ or "User":
Disabled
Don’t use LBA Mode
Enabled
Use LBA Mode (this setting requires that the Drive
be LBA capable)
Determines whether 32-Bit I/O is used or not between the CPU and
internal IDE controllers. These settings are available if the "Type"
option is set to "CD-ROM", “ATAPI Removable“ or "User":
Disabled
Don’t use 32-Bit I/O
Enabled
Use 32-Bit I/O
Determines the transfer mode. These settings are available if the
"Type" option is set to "CD-ROM", “ATAPI Removable“ or "User".
A higher number gives a faster transfer rate, but the Drive must support the selected transfer mode.
Standard
Set PIO Mode to 0
Fast PIO 1 – 4 Selects Fast PIO Mode 1 through 4
FPIO 3/DMA 1 Uses either Fast PIO Mode 3 or DMA Mode 1
FPIO 4/DMA 2 Uses either Fast PIO Mode 4 or DMA Mode 2
Ultra DMA Mode
22
Determines whether Ultra DMA Transfer mode (as defined by the ATA
4 standard) is used or not. These settings are available if the "Type"
option is set to "CD-ROM", “ATAPI Removable“ or "User":
Disabled
Don’t use Ultra DMA mode
Mode 0 – 5
Select Ultra DMA Transfer mode (To set Ultra
DMA mode the Drive must support Ultra DMA)
ATA Configuration Settings
Phoenix
TrustedCore(tm)
Setup
Utility
Main
ATA Configuration
Item Specific Help
[Enhanced]
ATA Mode:
Primary P-ATA Cable: [Auto Detect]
3
Help
Exit
↑ ↓
←→
Select Item
Select Menu
Change Values
-/+
Enter Select Sub-Menu
BIOS Setup Menus
F1
ESC
F9 Setup Defaults
F10 Save and Exit
Figure 7 ATA Configuration Settings Sub-Menu
ATA Mode
Determines whether parallel ATA (P-ATA) and/or serial ATA (SATA)
may be used.
Disabled
ATA is not used.
P-ATA Only
Only P-ATA may be used.
S-ATA Only
Only SATA may be used.
Combined
Both P-ATA and SATA may be used.
Enhanced
Both P-ATA and SATA may be used.
SATA runs in native mode.
RAID
Use the serial ATA RAID function.
!
Caution
Use the “RAID” setting when booting the OS from a serial
ATA RAID hard disk. Note that the 6300 ESB RAID option is
also necessary to boot the OS. Contact one of our company
representatives for further details.
Primary P-ATA Cable
Selects the type of P-ATA cable.
Auto
Cable type is auto-detected.
80-Wire
80-pin cable is used.
40-Wire
40-pin cable is used.
23
!
Caution
• For some IDE devices, the IDE cable type (40-Wire or 80Wire) may not be auto detected. In this case, set the type
of cable (80-Wire or 40-Wire).
• If the IDE Disk Details menu's Type option is set to "Auto",
then the Ultra DMA Mode will be automatically set to the
fastest value the connected device is capable of (the
Plug-N-Run E1 must be rebooted first). If the auto-set
Ultra DMA mode seems to be slower than it should be, try
setting the P-ATA Cable option to match the cable type
actually being used.
S-ATA Mode
Sets the serial ATA mode used when the ATA mode is set to "S-ATA
Only".
Legacy
Operates as Legacy serial ATA.
Native
Operates as Native serial ATA.
See ATA Mode in the Serial ATA Interface section
Refer
24
Advanced Menu
Main
Phoenix TrustedCore(tm)
Security
Power
Advanced
Setup
Boot
Utility
Exit
Item Specific Help
Legacy USB Support:
Memory Cache:
[Enabled]
[Enabled]
Enable support for
Legacy Universal Serial
Bus
Processor Configuration
PCI Configuration
Advanced Chipset Control
Internal Device Configuration
Reset Configuration Data:
3
[No]
Event Logging
F1
ESC
Help
Exit
↑ ↓
←→
BIOS Setup Menus
Watchdog Timer:
[Disabled]
Select Item
Select Menu
Change Values
-/+
Enter Select Sub-Menu
F9 Setup Defaults
F10 Save and Exit
Figure 8 Advanced Menu
Legacy USB Support
Allows USB keyboards and USB mouses to be used by OSes that do
not support USB.
Enabled
Legacy USB support is turned on
Disabled
Legacy USB support is turned off
!
Caution
Memory Cache
Irrespective of what OS is being used, this option must be
"Enabled" if a USB storage device (USB connected Floppy
drive or CD-ROM drive) is to be recognized as a potential
boot device.
Selects whether to use secondary caching (L2-Cache) or not.
Disabled
Don't use L2-Cache
Enabled
Use L2-Cache
Processor Configuration
Adjusts various processor related settings.
PCI Configuration
Assigns the resources for the external PCI slots.
Refer
See PCI Device, Slot Settings in the Advanced Menu SubMenus section
Advanced Chipset Control
Sets up the various Chipsets.
Refer
See Advanced Chipset Control Settings in the Advanced
Menu Sub-Menus section
25
Internal Device Configuration
Sets up various internal devices.
Refer
See Internal Device Configuration Settings in the Advanced
Menu Sub-Menus section
Reset Configuration Data
Rebooting the system after setting this to "Yes" will cause the
Extended System Configuration Data (ESCD) to be reset. This can be
useful in solving PCI card (etc.) conflict related startup errors (Invalid
System Configuration Data).
!
Caution
Event Logging
Sets the parameters for Event Logging.
Refer
Watchdog Timer
See Event Logging Settings in the Advanced Menu SubMenus section
Selects whether to use a watchdog timer or not.
Disabled
Don’t use Watchdog Timer.
Enabled
Use Watchdog Timer. The Watchdog Timer is
started once the selected Enable Delay period
has elapsed following the end of the POST phase.
!
Caution
Output Option
After the ESCD has been reset, this switch is automatically
set back to "No".
If the “Watchdog Timer” is disabled, the “Output Option”,
“Enabled Delay”, and “Timeout Delay” settings will not be
shown.
Determines what happens when the Watchdog Timer times out.
System Reset A Watchdog Timeout causes the system to be
reset. A POST error is also recorded in the event
log.
Output Only
Refer
A Watchdog Timeout causes the WDT signal to
be asserted (HIGH).
See the Plug-N-Run E1 Hardware Reference Manual for
details of the WDT signal.
Enable Delay
Sets the delay imposed between the end of the POST phase and the
start of the watchdog timer:
Timeout Delay
Sets length of the watchdog timer (from start to timeout occurring):
3 Seconds, 15 Seconds, 30 Seconds, 38 Seconds
3 Seconds, 15 Seconds, 30 Seconds, 38 Seconds
See Watchdog Timer for more details.
Refer
26
Advanced Menu Sub-Menus
Processor Configuration Settings
Phoenix
Advanced
TrustedCore(tm)
Setup
Utility
Processor Configurarion
Core Multi-Processing: [Enabled]
Item Specific Help
3
Determines whether the
2nd core is enabled.
Disabled = 2nd core
is disabled.
BIOS Setup Menus
Enabled = 2nd core
is enabled.
F1
ESC
Help
Exit
↑ ↓
←→
Select Item
Select Menu
Change Values
-/+
Enter Select Sub-Menu
F9 Setup Defaults
F10 Save and Exit
Figure 9 Processor Configuration Settings Sub-Menu
Core multi-Processing
Selects how the dual core processor is used.
Enabled
Enable the second core and use both cores.
Disabled
Disable the second core and use only one core.
27
PCI Configuration Settings
Phoenix
Advanced
TrustedCore(tm)
Setup
Utility
PCI Configuration
PCI
PCI
PCI
PCI
F1
ESC
Device,
Device,
Device,
Device,
Help
Exit
Slot
Slot
Slot
Slot
↑ ↓
←→
Item Specific Help
Setup items for
configuring the
specific PCI device
#1
#2
#3
#4
Select Item
Select Menu
Change Values
-/+
Enter Select Sub-Menu
F9 Setup Defaults
F10 Save and Exit
Figure 10 PCI Configuration Settings Sub-Menu
PCI Device, Slot #n Configures PCI slots #1 through #4.
!
Caution
Slot # corresponds to the Development Board slot # as
shown in the following table.
Slot #
IDSEL
Device #
1
PCI_AD20
4
2
PCI_AD21
5
3
PCI_AD22
6
4
PCI_AD23
7
See also Plug-N-Run E1 Hardware Reference Manual for
details.
See PCI Device, Slot Settings
Refer
28
PCI Device, Slot Settings
Phoenix
Advanced
TrustedCore(tm)
Setup
Utility
PCI Device, Slot #n
Option ROM Scan:
Enable Master:
Latency Timer:
[Enabled]
[Enabled]
[Default]
Item Specific Help
Initialize device
expansion ROM
3
Help
Exit
↑ ↓
←→
Select Item
Select Menu
Change Values
-/+
Enter Select Sub-Menu
BIOS Setup Menus
F1
ESC
F9 Setup Defaults
F10 Save and Exit
Figure 11 PCI Device Slot Settings Sub-Menu
Option ROM Scan
Enable Master
Latency Timer
Defines whether or not the option ROM mounted on the PCI device is
scanned.
Enabled
Scan the optional ROM
Disabled
Do not scan the optional ROM
Defines whether or not to use the connected device as a PCI bus master device.
Enabled
Use as a bus master device
Disabled
Do not use as a bus master device
Defines the usage priority of the PCI bus when the connected device is
used as a PCI bus master device.
Default
Standard priority
0020h – 00E0h
Define priority based on the value of the PCI bus
clock. For a high speed device, better performance is realized with higher values.
29
Advanced Chipset Control Settings
Phoenix
Advanced
TrustedCore(tm)
Setup
Utility
Advanced Chipset Control
PCI-E Port A:
PCI-E Port B:
PCI-E Port C:
[PortA x8]
[PortB x8]
[Enabled]
Memory ECC Error Checking: [Enabled]
PCI SERR Checking:
[Enabled]
Item Specific Help
[Disabled]
The PCI-E Port A is
Disabled.
[PortA x8]
The PCI-E Port A is
x8 link width.
[A0/A1 x4]
The PCI-E Port A is
Divided into Port A0
And Port A1.
Port A0 and A1 are
x4 link width.
F1
ESC
Help
Exit
↑ ↓
←→
Select Item
Select Menu
Change Values
-/+
Enter Select Sub-Menu
F9 Setup Defaults
F10 Save and Exit
Figure 12 Advanced Chipset Control Settings Sub-Menu
PCI-E Port A
PCI-E Port B
PCI-E Port C
Sets PCI Express port A.
PortA x8
Use as single 8-lane port.
A0/A1 x4
Use as two 4-lane ports (A0/A1).
Disabled
Don't use port A
Sets PCI Express port B.
PortB x8
Use as single 8-lane port.
B0/B1 x4
Use as two 4-lane ports (B0/B1).
Disabled
Don't use port B
Sets PCI Express port C.
Enabled
Use as single 4-lane port.
Disabled
Don't use port C
Memory ECC Error Checking
Specifies whether to check for ECC memory errors or not.
Enabled
Memory ECC errors detected.
Disabled
Memory ECC errors not detected.
PCI SERR Checking Specifies whether to check for PCI bus system errors or not.
30
Enabled
Memory PCI bus system errors detected.
Disabled
PCI bus system errors not detected.
Internal Device Configuration Settings
Phoenix
Advanced
TrustedCore(tm)
Setup
Utility
Item Specific Help
Internal Device Configuration
[Enabled]
[Enabled]
[Disabled]
[All]
[Enabled]
[Enabled]
[Disabled]
Audio Controller:
LAN Controller:
PXE OPROM:
USB Controller:
USB 2.0 Function:
Hardware Monitor:
Spread Spectrum:
Help
Exit
↑ ↓
←→
Select Item
Select Menu
[Disabled]
Floppy disk controller
is Disabled.
Change Values
-/+
Enter Select Sub-Menu
3
BIOS Setup Menus
F1
ESC
[Enabled]
Floppy disk controller
is Enabled.
F9 Setup Defaults
F10 Save and Exit
Figure 13 Internal Device Configuration Settings Sub-Menu
Audio Controller
Specifies whether to use the AC'97 sound controller or not.
Enabled
Use the AC'97 sound controller.
Disabled
Don't use the AC'97 sound controller.
!
Caution
LAN Controller
Determines whether the onboard LAN controller is used or not.
Enabled
Onboard LAN controller is used.
Disabled
Onboard LAN controller is not used
!
Caution
PXE OPROM
USB Controller
As the Plug-N-Run E1 does not possess an AC’97 codec
chip, setting the audio controller to “Enabled“ will have no
effect.
If the “LAN Controller” is disabled, the “PXE OPROM” setting
will not be shown.
Determines whether the onboard PXE option ROM function is used or
not.
Enabled
PXE option ROM function is used
Disabled
PXE option ROM function is not used
Determines whether the onboard USB controllers is used.
All
All of the USB ports (#0 - #7) are usable
2 Port
Only two USB ports (#0 - #1) are usable
Disabled
None of the USB ports are usable
!
Caution
Refer
If the “USB Controller” is disabled, the “USB 2.0 Function”
settings will not be shown.
Also see the Plug-N-Run E1 Design Guide Hardware Design
Considerations.
31
USB 2.0 Function
Determines whether the USB 2.0 or USB 1.1 functions are used.
Enabled
USB 2.0 functions are used
Disabled
USB 1.1 functions are used
!
Caution
Hardware Monitor
Spread Spectrum
Determines whether Hardware Monitoring is used or not.
Enabled
Hardware Monitoring is used
Disabled
Hardware Monitoring is not used
Determines whether the spread spectrum function is activated or not.
!
Enabled
Spread spectrum is used
Disabled
Spread spectrum is not used
Caution
32
An OS (or driver) that supports USB 2.0 will be required to
use these functions.
Turning on the spread spectrum function reduces the EM
noise output, albeit at the expense of making the system
potentially less stable. Accordingly, spread spectrum should
not be used if EM noise is not a problem, and otherwise only
used after system stability has been evaluated.
Event Logging Settings
Phoenix
Advanced
TrustedCore(tm)
Setup
Utility
Item Specific Help
Event Logging
Space
Valid
View Event Log:
[Enter]
Clear All Event Logs:
[No]
Event Logging:
ECC Error Logging:
PCI Error Logging:
POST Error Logging:
[Enabled]
[Enabled]
[Enabled]
[Enabled]
F1
ESC
Help
Exit
↑ ↓
←→
Select Item
Select Menu
Available
Change Values
-/+
Enter Select Sub-Menu
View the contents of
the event log.
3
BIOS Setup Menus
Event Log Capacity:
Event Log Validity:
F9 Setup Defaults
F10 Save and Exit
Figure 14 Event Logging Settings Sub-Menu
Event Log Capacity
Indicates the state of the Event Log area. This value cannot be
changed.
Space Available
Event Log area still has room to save new events
Full
!
Caution
Event Log Validity
View Event Log
Event Log area has no room left to store new
events
The overall size of the Event Log area is fixed, and a maximum of 127 events may be recorded.
To record new events that may occur after the "Event log
capacity" option is indicated as being "Full", it is necessary
to first erase the old log data by setting the "Clear all event
logs" option to "Yes".
Indicates whether the contents of the current Event Log are valid or
not. This value cannot be changed.
Valid
Current Event Log area contains valid data
Invalid
Current Event Log area does not contain valid
data
Displays the contents of the Event Log area. Press the <Enter> key to
check the collected Event Log records.
Note
See also Event Log Function in Chapter 4 BIOS Functions.
33
Clear All Event Logs
Used to erase the contents of the Event Log area.
Event Logging
No
Retains the current contents of the Event Log
area.
Yes
Deletes the existing Event Log records. The
Event Log will be cleared when the System
reboots after BIOS Setup is exited. This option will
then be reset to "No".
Determines whether Event Log function is used or not.
Disabled
Event Log function is not used.
Enabled
Event Log function is used.
!
Caution
ECC Error Logging
PCI Error Logging
When this item is "Disabled", the ECC error logging, PCI
error logging and POST error logging options described
below will not be displayed.
Determines whether ECC error logs are collected or not.
Disabled
ECC error logs are not taken.
Enabled
ECC error logs are taken.
Determines whether PCI Error Logs are collected or not.
Disabled
PCI Error Logs are not taken.
Enabled
PCI Error Logs are taken.
POST Error Logging Determines whether POST Error Logs are collected or not.
34
Disabled
POST Error Logs are not collected.
Enabled
POST Error Logs are collected.
Security Menu
Main
Phoenix TrustedCore(tm)
Power
Advanced Security
Setup
Boot
Utility
Exit
Item Specific Help
Supervisor Password Is:
Clear
Set Supervisor Password:
[Enter]
Supervisor Password
controls access to the
setup utility.
3
Help
Exit
↑ ↓
←→
Select Item
Select Menu
Change Values
-/+
Enter Select Sub-Menu
BIOS Setup Menus
F1
ESC
F9 Setup Defaults
F10 Save and Exit
Figure 15 Security Menu
Supervisor Password Is
Displays the current state of the password that is required to start the
BIOS Setup utility.
Clear
A password is not required to start the BIOS
Setup utility.
Set
A password is required to start the BIOS Setup
utility.
Set Supervisor Password
Sets the password that is required to start the BIOS Setup utility.
!
Caution
The password must comply with the following rules:
• Number of characters must be between 1 and 8
• Only alphanumeric characters (letters and numbers) may be used
• Upper and lower case letters are indistinguishable
35
Power Menu
Main
Phoenix TrustedCore(tm)
Power
Advanced
Security
Setup Utility
Boot
Exit
Item Specific Help
Wake up on USB from S3:
[Disabled]
Wake up on LAN:
Wake up on PCI PME:
Wake up on Time:
[Disabled]
[Disabled]
[Disabled]
After Power Failure:
[Power On]
These items control
various CPU parameters.
Advanced CPU Configuration
F1
ESC
Help
Exit
↑ ↓
←→
Select Item
Select Menu
Change Values
-/+
Enter Select Sub-Menu
F9 Setup Defaults
F10 Save and Exit
Figure 16 Power Menu
Wake up on USB from S3
Determines whether USB keyboard or mouse activity is listened for,
and used to wake the system from the Standby (S3) state.
Enabled
System wakes upon detection of USB keyboard
or mouse activity
Disabled
USB keyboard or mouse activity does not cause
the system to wake
!
Caution
The wake function requires proper hardware implementation
on the carrier board to function correctly.
If the standby voltage is not used for power for the device
then wake functions will not work. Please refer to the Plug-NRun E1 Development Board Design Guide.
Wake up on LAN
Determines whether a special packet is listened for on the network
connection, and used to wake the system from the Soft-off or ACPI S5
state.
!
Enabled
System wakes upon receipt of the special packet
Disabled
Special packet does not cause the system to
wake
Caution
The wake function requires proper hardware implementation
on the carrier board to function correctly.
If the standby voltage is not used for power for the device
then wake functions will not work. Please refer to the Plug-NRun E1 Development Board Design Guide.
36
Wake up on PCI PME
Determines whether a PME signal is listened for on the PCI bus, and
used to wake the system from the Soft-off or ACPI S5 state.
Enabled
System wakes upon receipt of a PME signal
Disabled
PME signal does not cause the system to wake
!
Caution
The wake function requires proper hardware implementation
on the carrier board to function correctly.
If the standby voltage is not used for power for the device
then wake functions will not work. Please refer to the Plug-NRun E1 Development Board Design Guide.
Wake up on Time
Determines whether and when the system is woken from the Soft-off
or ACPI S5 state
System wakes at the specified time
Disabled
System does not wake
!
Caution
Wake up Time
If the “Wake up on Time” is disabled, the “Wake up Time”
settings will not be shown.
Sets the system waking time. <Tab> and <Enter> keys are used to
move between the time fields and enter time values.
After Power Failure Determines whether or not the system is automatically rebooted after
a power failure.
Power On
System is rebooted after the power supply
resumes.
Stay Off
System stays down even after the power supply
resumes.
System may be manually rebooted with the power
switch (PWRSW.)
Last State
System returns to whichever state (On or Off) was
in effect at the time of the power failure.
Advanced CPU Configuration
Sets the CPU's power saving modes.
See Power Menu Sub-Menus
Refer
37
3
BIOS Setup Menus
Enabled
Power Menu Sub-Menus
Advanced CPU Configuration Settings
Phoenix
Advanced
F1
ESC
TrustedCore(tm) Setup
Power
CPU
Configuration
SpeedStep(R) Technology:
Enable at 2.16GHz:
Enable at 1.66GHz:
Enable at 1.33GHz:
Enable at 1.00GHz:
Initial State:
[Enabled]
[Yes]
[Yes]
[Yes]
[Yes]
[2.16GHz]
On-demand duty:
Initial On-demand duty:
[50.0%]
[Disabled]
Thermal Control Circuit:
[TM2]
Help
Exit
↑ ↓
←→
Select Item
Select Menu
Utility
Change Values
-/+
Enter Select Sub-Menu
Item Specific Help
This item controls
the Enhanced Intel(R)
SpeedStep(R) Technology.
F9 Setup Defaults
F10 Save and Exit
Figure 17 Advanced CPU Configuration Settings Sub-Menu
SpeedStep (R) Technology
Determines whether the CPU's Enhanced Intel SpeedStep® Technology is used or not.
Enable at...
Enabled
Enhanced Intel SpeedStep® Technology is on
Disabled
Enhanced Intel SpeedStep® Technology is off
Specifies which internal clock speeds can be used by the Enhanced
Intel SpeedStep® Technology.
Yes
Makes this CPU speed accessible to the operating system.
No
Makes this CPU speed inaccessible to the operating system.
!
Caution
The clock speed specified as the "Initial state" cannot be set
to "No".
Initial state
Sets the internal clock speed used when the system is started up.
On-demand duty
Sets the CPU clock throttle ratio the Plug-N-Run E1 can be initialized
with.
Initial On-demand duty
Enables or disables the throttle ratio selected in the "On-demand duty"
field.
38
Enabled
System starts with the CPU running at the throttle
ratio specified by the "On demand duty" value
Disabled
System starts with the CPU running without throttling
Thermal Control Circuit
Determines what happens when the CPU temperature exceeds a preset threshold for the junction temperature.
TM1
Thermal Monitor 1 (run CPU at 50% duty ratio)
TM2
Thermal Monitor 2 (run CPU at specified
Enhanced Intel SpeedStep® clock speed)
Disabled
Thermal Control Circuit is ignored.
3
BIOS Setup Menus
39
Boot Menu
Main
Phoenix TrustedCore(tm)
Advanced
Security Power
Setup
Boot
Utility
Exit
Item Specific Help
[Enabled]
QuickBoot Mode:
Display the diagnostic
screen during boot.
Boot Device Priority
F1
ESC
Help
Exit
↑ ↓
←→
Select Item
Select Menu
Change Values
-/+
Enter Select Sub-Menu
F9 Setup Defaults
F10 Save and Exit
Figure 18 Boot Menu
QuickBoot Mode
Selects whether to use QuickBoot or not:
Enabled
Shortens time needed for POST checking by skipping/reducing the memory tests, etc.
Disabled
Performs normal POST checking
!
Caution
• QuickBoot is not used if a CMOS checksum error occurs at
startup:
------------------------------------------------------------------------System CMOS checksum bad - Default configuration used
------------------------------------------------------------------------• QuickBoot will not be used from the next startup if a POST
error other than a CMOS checksum error occurs
• QuickBoot will be used again from the next startup when a
startup completes without any errors occurring
Boot Device Priority
Defines the order to use in deciding which boot device to use as the
start-up device
See Boot Menu Sub-Menus
Refer
40
Boot Menu Sub-Menus
Boot Device Priority
This list defines the order in which the different available drives are checked for use as the
start-up device. The order of devices on the list and boot enabled/disabled setting may be
changed as follows:
Key
Function
+
Moves the device under the cursor up the list.
Moves the device under the cursor down the list.
Shift + 1
Toggles the boot enabled/disabled setting of the device under the cursor.
x key
Switches the entry between the "Boot priority order" and "Excluded from boot:"
lists.
r key
If the entry has an <R/F> notation, causes the floppy disk drive (A:) letter to be
assigned at startup.
f key
Causes the hard disk drive (C:) letter to be assigned at startup.
Phoenix
Boot
TrustedCore(tm)
Device
Setup
Boot
Utility
Priority
Help
Exit
↑ ↓
←→
Select Item
Select Menu
Item Specific Help
Keys used to view or
configure devices:
Up and Down arrows
select a device.
<+> and <-> moves
the device up or down.
<f> and <r> specifies
the device fixed or
removable.
<x> exclude or include
the device to boot.
<Shift + 1> enables or
disables a device.
<1 - 4> loads default
boot sequence.
Boot priority order:
1: USB FDD:
2: IDE 0:
3: IDE 1:
4: IDE 4:
5: IDE 5:
6: USB KEY:
7:
8:
Excluded from boot order:
: IDE 2:
: IDE 3:
: USB HDD:
: USB CD-ROM:
: PCI SCSI:
F1
ESC
3
BIOS Setup Menus
-
Change Values
-/+
Enter Select Sub-Menu
F9 Setup Defaults
F10 Save and Exit
Figure 19 Boot Device Priority Settings Sub-Menu
Legacy Floppy Drives
Boots from a floppy disk drive connected to the FDD connector.
USB FDD
Boots from a floppy disk drive connected to the USB port.
IDE 0
Boots from a storage device connected to the indicated IDE or SATA
connector.
IDE 1
IDE 2
IDE 3
IDE 4
IDE 5
USB KEY
Boots from a flash memory (etc.) storage device connected to the USB
port.
41
USB HDD
Boots from a hard disk connected to the USB port.
USB CD-ROM
Boots from a CD-ROM/DVD-ROM connected to the USB port.
PCI SCSI
Boots from a storage device connected via a PCI card or PCI Express
card.
PCI BEV/Legacy Network Card
Boots from a network device connected via the onboard LAN controller, PCI card, or the network connected via the PCI Express card.
42
Exit Menu
Main
Phoenix TrustedCore(tm) Setup Utility
Power
Boot
Advanced
Security
Exit
Item Specific Help
Exit Saving Changes
Exit Discarding Changes
Load Setup Defaults
Discard Changes
Save Changes
Exit System Setup and
save your changes to
CMOS.
3
Help
Exit
↑ ↓
←→
Select Item
Select Menu
Change Values
-/+
Enter Select Sub-Menu
BIOS Setup Menus
F1
ESC
F9 Setup Defaults
F10 Save and Exit
Figure 20 Exit Menu
Exit Saving Changes
Saves the settings to CMOS RAM before exiting BIOS Setup Program
Exit Discarding Changes
Exits BIOS Setup without saving any changes
Load Setup Defaults
Returns all settings to their factory default values
Discard Changes
Returns all settings to the values stored in CMOS RAM
Save Changes
Saves the current settings to CMOS RAM
43
THIS PAGE IS INTENTIONALLY LEFT BLANK.
44
Chapter 4 BIOS Functions
This chapter explains the details of a variety of BIOS functions.
Booting from any Device
The Plug-N-Run E1 may be booted from any connected bootable device, including floppy
disks, hard disks, and CD-ROM disks, etc.
The boot priority applied is freely changeable in BIOS Setup.
See Boot Menu Sub-Menus
Power Management Functions
Plug-N-Run E1 modules provide both ACPI 2.0 and Enhanced Intel SpeedStep® Technology
power management functions to provide the following power saving features when used with
Windows® XP and Windows Vista™:
Note
• ACPI is a set of power management related conventions implemented by Intel,
Microsoft, Phoenix, etc.
• Enhanced Intel SpeedStep® Technology is an Intel Core™ 2 Duo Processor
function that allows the CPU core voltage and speed to be adjusted on the fly.
Sleep States
Sleep states save power by cutting the power supply to a number of the Plug-N-Run E1 module's (non-vital) component devices. Only the ACPI "S3" low-power state (Device states are
saved to memory and then power is cut to the CPU and other non-memory devices) is supported.
The Plug-N-Run E1 module wakes up faster from a Sleep State than from the Hibernation, so
its use is recommended when the System is not going to be used for a short time only.
See Power Menu
Refer
45
BIOS Functions
Refer
4
Hibernation
Otherwise known as the ACPI "S4" low-power state, when Hibernation is requested all memory contents and device states are saved to a special file on the hard disk and the Plug-NRun E1 module's power is the cut. When the System is woken up, the memory contents and
device states are returned to the condition they were in before the move to Hibernation was
initiated.
The Plug-N-Run E1 module consumes less power in the Hibernation than in a Sleep State,
so its use is recommended when the System is not going to be used for a long time.
Wake Up
The Plug-N-Run E1 may be woken up from a low power state by use of any of the following:
•
Pressing the Power Button
•
Real Time Clock Alarm
•
Wake on LAN via the onboard LAN Controller
•
PME signal from PCI Slot #1 - #4
•
PCI Express slot PME signal
The Plug-N-Run E1 may also be woken up from the ACPI S1 Sleep State by a USB Keyboard or USB Mouse event.
CPU Power Saving Functions
Support for Enhanced Intel SpeedStep® Technology is natively supported in Windows® XP
and Windows Vista™.
BIOS Setup with Enhanced Intel SpeedStep® Technology may be used to control the following Plug-N-Run E1 CPU power saving functions:
•
Whether the Enhanced Intel SpeedStep® Technology is available or not
•
Setting the Enhanced Intel SpeedStep® Technology CPU speeds accessible to the
operating system.
•
CPU speed used after Plug-N-Run E1 startup
•
CPU clock throttle ratios
•
CPU clock throttle ratio used after Plug-N-Run E1 startup
Thermal Monitoring Functions
Thermal monitoring is achieved by means of a Thermal Control Circuit that is built into the
Plug-N-Run E1's Intel Core™ 2 Duo processor.
Note
The Thermal Control Circuit is a safety feature that is designed to prevent the CPU
from being damaged when its temperature rises above the normal operating range.
BIOS Setup may be used to control the following Plug-N-Run E1 thermal monitoring functions:
•
46
Thermal Control Circuit operating mode
Event Log Function
How the Event Log Function Works
Outline
1
The BIOS is able to write to an Event Log area in the GPNV (General Purpose Non-Volatile)
memory if any of the following errors occur. Event Log records can be read with "View event
log" function of BIOS Setup Menu and/or BIOS runtime routine.
•
ECC Errors
Both correctable errors and uncorrectable errors are detected for and recorded in the
log.
Correctable errors are automatically corrected, and a log entry is recorded, but have
no further effect on operation.
•
POST Errors
Any errors that occur during the POST phase are recorded. In principle, most errors
that are displayed on the POST screen as "XXXX:YYYYYYYY" (where XXXX is a 4digit number) will be recorded.
•
PCI Errors
Any errors from PCI devices (SERR#) are recorded. The applicable PCI bus number,
device number and function number will be recorded for each error.
Event Log Messages
2
When the BIOS Setup "View event log" function is used, the Event Log records are displayed
using the following format.
•
Message Format
Event Log entries record the time/date the log was taken and an event type message:
Date
Time
Description
01/01/2007 14:58:36 Pre-Boot Error: CMOS Configuration Error
Note
Date and time are provided by the system clock. If the system is run without
a CMOS battery, this date and time may be meaningless.
47
4
BIOS Functions
Uncorrectable errors are not automatically corrected, and after the BIOS has collected
the log information, an NMI is generated. If the OS has altered the memory vector, the
OS then assumes responsibility for handling the NMI. If the memory vector has not
been altered, the system simply halts.
•
Message List
Table 5 List of Event Log Message
Message
Description
Correctable ECC Error:Channel A or
Correctable ECC Error:Channel B
Correctable ECC Error in Channel A or Channel B
Uncorrectable ECC Error:Channel A or
Uncorrectable ECC Error:Channel B
Uncorrectable ECC Error in Channel A or Channel B
Pre-Boot Error:Channel 2 Timer
Not Functional
System timer error
Pre-Boot Error:CMOS Battery Failure
Drained backup battery
Replace the battery & rerun BIOS Setup
Pre-Boot Error:CMOS Checksum Error
Invalid CMOS RAM data
Default values used for some settings
Pre-Boot Error:CMOS Configuration Error Last startup failed
Default values used for some settings
•
Pre-Boot Error:Keyboard Locked
Keyboard is in a locked state
Pre-Boot Error:Keyboard Not Functional
Keyboard non-operational error
Pre-Boot Error:Keyboard Controller
Not Functional
Keyboard controller error
Pre-Boot Error:Cache Memory Error
System cache error
Pre-Boot Error:Floppy Drive A Error
Floppy disk (drive A:) error
Pre-Boot Error:CMOS Time Not Set
Indeterminate Time/Date setting
Pre-boot Error:WatchDog timeout
Timeout by the Watchdog Timer caused the system
to be reset
PCI System Error (xxxxh, yyyyh, zzzzh)
PCI system error (SERR#)
No event log records found
Event Log Area is empty
PCI Error Details
•
xxxxh shows the applicable PCI bus number, device number and function number for the PCI System Error (SERR#), using the following bit structure:
Bits
•
•
48
Contain
15 – 8
Bus number
7–3
Device number
2–0
Function number
yyyyh shows the value (offset = 06h) of the status register of the device that
raised the PCI System Error (SERR#).
zzzzh shows the value (offset = 1Eh) of the secondary status register of the
PCI-PCI bridge that raised the PCI System Error (SERR#). If the device is not a
PCI-PCI bridge, the value FFFFh is inserted.
Event Log Area
Figure 21 shows the structure of the Event Log, including the format of an Event Log record.
Event Log Control Header Area
31
1 Record
(16 bytes)
16 bytes
0
Month
Year
Length
Type
00h
Second
Minute
Hour
Day
04h
08h
Status
Secondary Status
Reserved
0Ch
4
2048 bytes
2032 bytes
BIOS Functions
Event Log Record Area
(16 bytes × 127 records)
Figure 21 Event Log Area & Record Format
•
Type
Indicates the log type. May assume the following values, depending on the error type:
01h :
•
Correctable ECC Error
02h :
Uncorrectable ECC Error
08h :
POST error
0Ah :
PCI error
Length
Indicates the record length. For the Plug-N-Run E1, this is fixed at 16 bytes.
•
Year
Indicates the year the log was taken (using BCD format).
80h - 99h indicate the years 1980 - 1999, while 00h - 79h indicate the years 2000 2079.
•
Month
Indicates the month the log was taken (using BCD format).
•
Day
Indicates the day the log was taken (using BCD format).
•
Hour
Indicates the hour the log was taken (using BCD format).
49
•
Minute
Indicates the minute the log was taken (using BCD format).
•
Second
Indicates the second the log was taken (using BCD format).
•
Status
Type dependent detail value:
•
ECC Memory Errors
Indicates the channel number of the memory area where the error occurred.
•
POST Errors
A bit indicates that the following error has occurred. Multiple errors during the
POST phase will therefore result in multiple bits being set.
Table 6 POST Error Status Bitmap
Bit Position
•
Meanings
0
TIMER FAIL
3
CMOS BATTERY
5
CHECK SUM ERROR
6
CMOS CONFIG FAIL
8
KBD LOCKED
9
KBD FAIL
10
KBD CONTROLLER FAIL
13
CACHE FAIL
14
FLOPPY FAIL
18
RTC INVALID DATE TIME
28
WATCHDOG TIMEOUT
Reserved
Reserved for future use.
Event Log BIOS Runtime Routines
The Event Log function provides the following runtime routines as additions to the normal
PnP runtime services:
Refer
50
See the "Plug and Play BIOS Specification Version 1.0A" for more details of the PnP
BIOS specification (available for download from the Microsoft Web-site). See also
the "System Management BIOS Reference Specification Version 2.3.1" for more
details (available for download from the Intel Web-site).
Read GPNV Data Function
1
•
Synopsis
short Far(*entryPoint)(Function, Handle, GPNVBuffer, GPNVLock, GPNVSelect,
BiosSelector);
short Function;
unsigned short Handle;
unsigned char far *GPNVBuffer;
short far *GPNVLock;
unsigned short GPNVSelect;
unsigned int BiosSelector;
•
Function :
0056h (fixed)
Handle :
0 (fixed)
GPNVBuffer :
Address of the buffer for the GPNV data. A 2048-byte buffer
size is required.
GPNVLock :
FFFFh (fixed)
GPNVSelect :
Selector value for the area to which GPNV is mapped (enabled
when 16-bit Protect Mode is used)
BiosSelector :
Arbitrary value (has no meaning for this particular function)
Description
Transfers the GPNV (General Purpose Non Volatile) data area (equivalent to the
GPNV handle) to the specified buffer address.
!
This is only usable when running in real mode.
Caution
•
Returns
The following two return codes are explicit to this function. See the PnP BIOS specification for other return codes.
0000h :
Successful
0083h :
Invalid handle designated
Clear Event Log
2
•
Synopsis
short Far(*entryPoint)(Function, BiosSelector);
short Function;
unsigned short BiosSelector;
•
Parameters
Function :
8000h (fixed)
BiosSelector :
Arbitrary value (has no meaning for this particular function)
51
4
BIOS Functions
•
Parameters
•
Description
Clears the Event Log area.
Calling this function writes a Clear Event Log request to the GPNV. This is only usable
when running in real mode. The actual timing of the Event Log area being cleared is
as follows:
•
the next time the System is started up or rebooted
•
when a new event occurs after the Clear Event Log has been issued
!
This is only usable when running in real mode.
Caution
•
Returns
The following return code is explicit to this function. See the PnP BIOS specification
for other return codes.
0000h :
Successful
Password Function
A password may be set to prevent BIOS Setup from being accessed by unauthorized users.
Once set, users who do not know the correct password will not be able to use BIOS Setup.
!
Caution
The password must comply with the following rules:
• Number of characters must be between 1 and 8
• Only alphanumeric characters (letters and numbers) may be used
• Upper and lower case letters are indistinguishable
Setting a password
In the BIOS Setup Security menu, move the cursor to the "Set Supervisor Password" field,
and press the <Enter> key.
If a password is not currently set, the following password entry window appears:
Set Supervisor Password
Enter New Password [
]
Confirm New Password [
]
Enter the password that you wish to set in both the "Enter New Password" field and the "Confirm New Password" field, then press the <Enter> key.
Changing the password
In the BIOS Setup Security menu, move the cursor to the "Set Supervisor Password" field,
and press the <Enter> key.
If a password is currently set, the following password entry window appears:
Set Supervisor Password
52
Enter Current Password [
]
Enter New Password [
]
Confirm New Password [
]
Enter the old password in the "Enter Current Password" field, and press the <Enter> key,
then enter the new password that you wish to set in both the "Enter New Password" field and
the "Confirm New Password" field, and press the <Enter> key again.
Deleting the password
In the BIOS Setup Security menu, move the cursor to the "Set Supervisor Password" field,
and press the <Enter> key.
If a password is currently set, the following password entry window appears:
Set Supervisor Password
Enter Current Password [
]
Enter New Password [
]
Confirm New Password [
]
Enter the old password in the "Enter Current Password" field, and press the <Enter> key,
then press the <Enter> key again without entering a new password in either the "Enter New
Password" field or the "Confirm New Password" field.
If a password has been set, then when BIOS Setup is started, the following password entry
window appears:
Enter Password
[
]
Enter the current password in the "Enter Password" field, then press the <Enter> key.
Entering the wrong password
If the wrong password is entered three times in a row when BIOS Setup is started with a
password set, or when changing the current password, the System beeps once, then the following message is displayed, and the System is locked:
System Disabled
If this message appears, you will need to press the "Reset" button, or cut the power, then
enter the correct (current) password after restarting the system.
Serial ATA Interface
SATA Features
Faster Transfer Rates
SATA allows data transfers of up to 150MB/s, a 50% improvement on the maximum 100MB/s
of the older parallel ATA (P-ATA) IDE interface.
Improved Cabling
SATA uses a 7-conductor cable, which are much thinner and more flexible than the old 40/
80-conductor P-ATA cables, so wiring the cabinet is easier. The connectors have also been
improved to reduce the potential for trouble when attaching/removing the cables.
No Jumpers
Each SATA cable is only used to connect a single device. As a result SATA devices have no
need for the master/slave ID jumpers required by P-ATA devices.
53
BIOS Functions
Accessing BIOS Setup after a password is set
4
Easy Software Migration
SATA provides a parallel ATA emulation mode to maintain software compatibility. As this
allows continued use of most PATA software and drivers, the migration to SATA is eased.
ATA Mode
ATA supports the following five modes:
P-ATA Only
Only parallel ATA devices may be used.
Both the primary port and secondary port are available.
Serial ATA cannot be used.
S-ATA Only
Only serial ATA devices may be used.
Divided into two sub-modes.
•
Legacy mode
SATA devices operate as a the primary master and secondary master, and
standard resources are used.
•
Native mode
SATA devices operate in a different mode to the primary port and secondary
port and arbitrarily assigned resources may be used as per other PCI devices.
Interrupts become PCI interrupts, so the individual port interrupts (IRQ14, 15)
are released.
Combined
This mode emphasizes standard compatibility for use of both parallel ATA and serial
ATA devices.
This mode operates as follows:
•
P-ATA Primary
The parallel ATA primary port and the serial ATA secondary port are available.
The parallel ATA secondary port cannot be used.
Enhanced
This mode allows use of both parallel ATA and serial ATA devices, such that the maximum configuration can be connected. The parallel ATA uses both the primary port
and secondary port may both be used. The serial ATA operates in Native mode.
RAID
Uses two internal serial ATA drives to construct a RAID drive. The parallel ATA, primary port and secondary port can still be used.
54
ATA Mode and Channel Assignments
Table 7 shows how different channels are assigned for each possible ATA Mode setting of
the BIOS Setup ATA Configuration menu. These IDE channels correspond to the four IDE
Channels shown on the BIOS Setup Main menu.
Table 7 ATA Mode & Channel Assignments
ATA
Mode
IDE
Channel S-ATA
Mode
Primary Master
Primary Slave
Secondary Master
Combined
P-ATA
Primary
Master
P-ATA
Primary Slave
P-ATA
Secondary
Master
P-ATA
Secondary
Slave
SATA Port 1
—
SATA Port 2
—
!
Caution
Refer
Legacy
Native
—
—
—
—
—
—
—
—
S-ATA
Primary
Master
SATA
Secondary
Master
S-ATA
(Native)
Primary
S-ATA
(Native)
Secondary
P-ATA
Primary
P-ATA
Primary
Master
P-ATA
Primary Slave
S-ATA
Secondary
Master
S-ATA
Secondary
Slave
—
—
Enhanced
RAID
P-ATA
Primary
Master
P-ATA
Primary Slave
P-ATA
Secondary
Master
P-ATA
Secondary
Slave
S-ATA
(Native)
Primary
S-ATA
(Native)
Primary
P-ATA
Primary
Master
P-ATA
Primary Slave
P-ATA
Secondary
Master
P-ATA
Secondary
Slave
RAID
4
BIOS Functions
Secondary Slave
S-ATA Only
P-ATA Only
• Always use the mode that was in force when the OS was installed. If the mode is
changed, the OS may become unbootable.
• Depending on the RAID settings purchase of a 6300 ESB RAID option may be
necessary to allow the OS to boot from the serial ATA hard disk. Contact one of
our company representatives for further details.
See ATA Configuration Settings in the Main Menu Sub-Menus section and Internal
Device Configuration Settings in the Advanced Menu Sub-Menus section.
55
Watchdog Timer
Purpose of the Watchdog Timer
In certain worst-case situations, an OS or application problem can cause the system to hang,
rendering it unresponsive and unusable. The watchdog timer function is provided to deal with
this problem, allowing the system to be forcibly reset if a hang-up state is detected. As shown
in Figure 22, the Watchdog Timer mechanism requires that a counter be constantly reloaded,
each time before the Watchdog Timer expires. If a hang-up state prevents the timer from
being reset, then a timeout occurs and the system can be reset.
System Reset
POST phase
Boot the OS
Enable Delay (*1)
Start the
Reloader Program
Start the Watchdog Timer
yes
Counter reloaded
Before Timeout?
Timeout Delay (*1)
no
Watchdog Timeout Occurs
System Reset
Output Option (*1)
Output Only
WDT signal
asserted HIGH
*1 See Advanced Menu for details of the Output Option, Enable Delay and Timeout Delay BIOS settings.
Figure 22 Hang-up Detection with the Watchdog Timer
What happens when a Watchdog timeout occurs depends on which of the following settings
has been assigned to the Output Option in the BIOS Setup:
•
System Reset
A Watchdog timeout causes the system to be reset. A POST error is
also recorded in the event log.
•
Output Only
A Watchdog timeout causes the WDT signal is asserted (HIGH).
See the Plug-N-Run E1 Hardware Reference Manual for details of the WDT signal.
Refer
56
Using the Watchdog Timer
To use the watchdog timer, the following steps are necessary:
•
Setup the Watchdog Timer in the BIOS Setup Advanced menu.
•
Prepare a program that is able to regularly reload the Watchdog Timer counter.
•
Set the reloader program to automatically be run after the OS has booted.
Reloading the Counter
After watchdog timer has been started, its counter may be reloaded by writing (any value) to
the TC01_RLD register (at offset 1060h), using a scheme such as the following:
mov
out
dx, 1060h
dx, al
4
; Write TCO1_RLD regs.
!
Caution
Remember that the reloader program must be set to keep reloading the counter
before the previously reloaded Timeout Delay interval can expire.
57
BIOS Functions
This will cause the Watchdog Timer's counter to be reset to the Timeout Delay value from the
BIOS Setup.
THIS PAGE IS INTENTIONALLY LEFT BLANK.
58
Appendix A Cautions & Limitations
This appendix contains cautions and limitations pertaining to the use of various operating
systems on the Plug-N-Run E1.
In this chapter Microsoft® Windows® XP Professional Operating System is abbreviated to
Windows® XP, and Microsoft® Windows Vista™ operating system is abbreviated to Windows Vista™.
Outline
The Plug-N-Run E1 is compatible with the following operating systems:
•
Windows® XP
•
A
Windows Vista™
Drivers may be required to be installed, depending on the OS to be installed.
Also, when using Plug-N-Run G5 Development Board (model name: PS5PRDEVBRD), additional installation of drivers may be required to use peripheral devices.
Contact your sales representative to obtain these drivers.
Refer to the README attached with the driver for how to install the driver.
Notes on Using Peripheral devices Made by Other
Companies
!
Caution
Check the following to use peripheral devices made by other companies.
• Plug-N-Run E1 satisfies hardware requirements of the peripheral devices to be
used.
• When the peripheral devices requires drivers, the newest version of the driver is
installed.
• When the peripheral devices requires drivers, the newest version of the driver is
installed.
• The peripheral devices supports the power management (suspend resume) function.
-
Some problems may occur if connecting the peripheral devices that do
not support power management function and shifting to suspend mode.
• Plug-N-Run E1 satisfies other requirements of the peripheral devices to be used.
-
Some failures may occur in certain combination of the peripheral
devices,even if the peripherals operate with no failures independently.
59
Appendix
Installing Drivers
Appendix B Use of Legacy Devices
This appendix details how legacy devices may be used with the Plug-N-Run E1.
Note that the following types of devices are considered legacy devices:
•
PS/2 keyboards, PS/2 mouses
•
Floppy drives (excluding USB connectables)
•
Parallel port connectables
•
Serial port connectables
Which Legacy Devices?
The BIOS type/version and type(s) of Super I/O chip(s) mounted determine which legacy
devices are available for use. Table 8 shows the resulting availability matrix:
Table 8 Legacy Devices Conditions
System Configuration
BIOS Type
Standard BIOS
(COM Express
Compatible)
BIOS
Version
KL: 1.00 or
later
Devices Usable
Super I/O chip?
Primary
SCH5017
Not Present
PS/2 KB/
Secondary
MS
SIO10N268
FDD
A, B
C, D, E, F
NG
Not Present
NG
NG
NG
NG
Present
NG
NG
NG
NG
OK
Present
Not Present
NG
OK
OK
OK
NG
NG
OK
OK
OK
OK
Not Present
Not Present
Present
PS/2 BIOS (PS/2 KJ: 1.00 or
Compatible)
later
Serial port
Parallel
port
Present
Present
BIOS startup error. The PS/2 BIOS mandates the presence of
the SCH5017 chip.
Not Present
OK
OK
OK
OK
NG
Present
OK
OK
OK
OK
OK
BIOS Type
Either of the following two BIOS types may be used with the Plug-N-Run E1:
•
Standard BIOS
The BIOS that is normally found in a Plug-N-Run E1. This BIOS does not require that
a Super I/O chip be present for the system to function, but on the other hand, also
does not allow the use of a PS/2 keyboard and mouse.
•
PS/2 BIOS
A special BIOS that is PS/2 compatible. This BIOS allows the use of a PS/2 keyboard
and/or mouse, but also requires the use of the SCH5017 Super I/O chip from SMSC.
Contact your sales representative to obtain a PS/2 compatible BIOS.
60
Super I/O
Plug-N-Run E1 systems support the use of the following Super I/O chips as controllers for
legacy devices:
Primary
•
SCH5017 (SMSC)
Secondary
•
SIO10N268 (SMSC)
These Super I/O chips should be added to a Plug-N-Run E1 carrier board as required. It
should be noted that both of these chips are mounted on the Plug-N-Run G5 Development
Board (PS5PRDEVBRD).
BIOS Setup Changes (Due to the SCH5017)
When a SCH5017 Super I/O chip (from SMSC) is used, a variety of changes occur in the
BIOS Setup menus.
A
Main Menu
A "Legacy Diskette A" option is added to the Main Menu:
PhoenixBIOS Setup
Power
Security
Advanced
Utility
Boot
Exit
Appendix
Main
Item Specific Help
System Time:
System Date:
[00:00:00]
[01/01/2006]
Legacy Diskette A:
[Disabled]
IDE
IDE
IDE
IDE
[None]
[None]
[None]
[None]
Channel
Channel
Channel
Channel
0
0
1
1
Master
Slave
Master
Slave
En/Disable Floppy
disk.
ATA Configuration
System Memory:
Extended Memory:
Memory Mode:
640 KB
514048 KB
Single Channel
BIOS Revision:
UZ:1.00
F1
ESC
Help
Exit
↑ ↓
←→
Select Item
Select Menu
Change Values
-/+
Enter Select Sub-Menu
F9 Setup Defaults
F10 Save and Exit
Figure 23 Main Menu (SCH5017)
Legacy Diskette A
Used to disable/enable floppy drive A.
Only 3.5" 1.44MB floppy drives may be used. Note that 1.44MB drives
typically support 720KB disks as well.
Disabled
No floppy drive
1.44MB 3½"
Enable a 3.5" 1.44MB floppy drive
61
Advanced Menu
Both “I/O Device Configuration 1” and “Console Redirection” sub-menus are added to the
Advanced Menu:
Main
Phoenix TrustedCore(tm)
Security
Power
Advanced
Setup
Boot
Utility
Exit
Item Specific Help
Legacy USB Support:
Memory Cache:
[Enabled]
[Enabled]
Enable support for
Legacy Universal Serial
Bus
Processor Configuration
PCI Configuration
I/O Device Configuration
Advanced Chipset Control
Internal Device Configuration
Reset Configuration Data:
[No]
Event Logging
Console Redirection
Watchdog Timer:
F1
ESC
Help
Exit
↑ ↓
←→
[Disabled]
Select Item
Select Menu
Change Values
-/+
Enter Select Sub-Menu
F9 Setup Defaults
F10 Save and Exit
Figure 24 Advanced Menu (SCH5017)
I/O Device Configuration 1
Sets the serial ports (A and B) and parallel port.
Console Redirection
Defines the Console Redirection settings.
62
I/O Device Configuration 1 Settings
The following settings menu is added.
PhoenixBIOS
Setup
Utility
Advanced
I/O Device Configuration
Item Specific Help
Serial port A:
Base I/O address:
Interrupt:
[Enabled]
[3F8]
[IRQ 4]
Serial port B:
Base I/O address:
Interrupt:
[Enabled]
[2F8]
[IRQ 3]
Parallel port:
Mode:
Base I/O address:
Interrupt:
[Disabled]
[Bi-directional]
[378]
[IRQ 7]
F1
ESC
Help
Exit
↑ ↓
←→
Select Item
Select Menu
Configure serial port A
using options:
[Disabled]
No configuration
[Enabled]
User configuration
[Auto]
BIOS or OS chooses
configuration
Change Values
-/+
Enter Select Sub-Menu
A
F9 Setup Defaults
F10 Save and Exit
Serial port A
Defines the I/O port address and IRQ (interrupt level) for serial port A
and serial port B.
Serial port B
Enabled
Internal serial port A (or B) is used. The following
options appear when "Enabled" is selected:
Base I/O Address
Any of the following four I/O addresses may be
selected:
3F8, 2F8, 3E8, 2E8
Interrupt Either of the following two interrupt levels may be
selected:
IRQ 4, IRQ 3
Parallel port
Auto
Internal serial port A (or B) is used. When "Auto"
is selected, the I/O address and interrupt level
settings are made automatically.
Disabled
Internal serial port A (or B) not used
Defines the operation mode, I/O port address and IRQ (interrupt level)
for the parallel port.
Enabled
Mode
Internal parallel port is used. The following
options appear when Enabled is selected:
Selects the operating mode of the internal parallel
port.
Bi-directional
Operates in bi-directional mode
ECP
Operates in ECP mode
EPP
Operates in EPP mode (EPP 1.9)
63
Appendix
Figure 25 I/O Device Configuration 1 Settings Menu
Output Only
Operates in unidirectional mode
Base I/O Address
Either of the following two I/O addresses may be
selected:
278, 378
Interrupt Either of the following two interrupt levels may be
selected:
IRQ 5, IRQ 7
DMA Channel
Selects the DMA channel. DMA channel options
are activated only when ECP mode has been
selected in the Mode section.
DMA 1 DMA channel 1 used
DMA 3 DMA channel 3 used
Auto
Mode
Internal parallel port is used. When Auto is
selected, only the operating Mode is settable, with
the I/O address, interrupt level and DMA channel
settings being made automatically.
Same options as found in the Enabled mode.
Bi-directional
Operates in bi-directional mode
ECP
Operates in ECP mode
EPP
Operates in EPP mode (EPP 1.9)
Output Only
Operates in unidirectional mode
Disabled
!
Caution
The internal parallel port is not used.
When the serial port and parallel port options are set to
[Auto], PCI device resources (I/O port address and IRQ) are
preferentially assigned.
As a result, if the resources available to be assigned to the
serial port and parallel port are insufficient, some of the ports
may become disabled.
Therefore, to give preference to a serial port or the parallel
port, set it to [Enabled] instead of [Auto].
64
Internal Device Configuration Settings
A “Floppy Disk Controller” option is added to the Internal Device Configuration Settings:
PhoenixBIOS
Setup
Utility
Advanced
Item Specific Help
Internal Device Configuration
Floppy Disk Controller:
Video Controller:
Dual Display:
Video Output:
LCD Panel Type:
TV Standard
Audio Controller:
LAN Controller:
PXE OPROM:
USB Controller:
USB 2.0 Function:
Hardware Monitor:
F1
ESC
Help
Exit
↑ ↓
←→
Select Item
Select Menu
[Enabled]
[Enabled]
[Enabled]
[VBIOS Default]
[VBIOS Default]
[Auto]
[Enabled]
[Enabled]
[Disabled]
[All]
[Enabled]
[Enabled]
[Enabled]
Floppy Disk controller
is Enabled.
[Disabled]
Floppy Disk controller
is Disabled.
Change Values
-/+
Enter Select Sub-Menu
A
F9 Setup Defaults
F10 Save and Exit
Floppy Disk Controller
Determines whether the onboard floppy disk controller is used or not.
Enabled
Onboard floppy disk controller is used
Disabled
Onboard floppy disk controller is not used
65
Appendix
Figure 26 Internal Device Configuration Settings Menu (SCH5017)
Console Redirection Settings
The following settings menu is added:
PhoenixBIOS
Setup Utility
Advanced
Console Redirection
Item Specific Help
Com Port Address
[Disabled]
Baud Rate
Console Type
Flow Control
Continue C.R. after Post:
[19.2K]
[PC ANSI]
[CTS/RTS]
[Off]
F1
ESC
Help
Exit
↑ ↓
←→
Select Item
Select Menu
If enabled, it will
use a port on the
motherboard.
Change Values
-/+
Enter Select Sub-Menu
F9 Setup Defaults
F10 Save and Exit
Figure 27 Console Redirection Settings Menu
Com Port Address
Determines whether Console Redirection is used or not. Set the com
port address when Console Redirection is used:
Disabled
Console Redirection is not used.
COM Port A
Console Redirection is used via COM Port A.
COM Port B
Console Redirection is used via COM Port B.
!
Caution
When Console Redirection is used, it is impossible to display
a logo screen, and also the setting of Boot-time Diagnostics
Screen option cannot be changed.
Baud Rate
Determines the BAUD rate of the port used for console redirection.
May be set to between 300bps and 115.2kps.
Console Type
Determines the console type for client applications.
Flow Control
PC ANSI
PC ANSI is used.
VT100
VT100 is used.
Determines the flow control on the com port:
None
Flow control is not used.
XON/XOFF
Flow control is used by software.
CTS/RTS
Flow control is used by hardware.
Continue C.R. after Post
Determines whether Console Redirection is used or not after the
POST phase:
Off
Console Redirection is not used.
On
Console Redirection is used.
See Console Redirection.
Refer
66
BIOS Setup Changes (Due to SIO10N268)
When a SIO10N268 Super I/O chip (from SMSC) is used, a variety of changes occur in the
BIOS Setup menus.
Advanced Menu
A "I/O Device Configuration 2" sub-menu is added to the Advanced Menu:
Main
Phoenix TrustedCore(tm)
Security
Power
Advanced
Setup
Boot
Utility
Exit
Item Specific Help
Legacy USB Support:
Memory Cache:
[Enabled]
[Enabled]
Enable support for
Legacy Universal Serial
Bus
Processor Configuration
PCI Configuration
I/O Device Configuration 2
Advanced Chipset Control
Internal Device Configuration
Reset Configuration Data:
A
[No]
Event Logging
Console Redirection
Watchdog Timer:
Help
Exit
↑ ↓
←→
Select Item
Select Menu
Change Values
-/+
Enter Select Sub-Menu
Appendix
F1
ESC
[Disabled]
F9 Setup Defaults
F10 Save and Exit
Figure 28 Advanced Menu (SIO10N268)
I/O Device Configuration 2
Sets the serial ports (C, D, E, and F).
67
I/O Device Configuration 2 Settings
The following settings menu is added:
PhoenixBIOS
Setup
Utility
Advanced
I/O Device Configuration 2
Serial port C:
Base I/O address:
Interrupt:
[Enabled]
[240]
[IRQ 10]
Serial port D:
Base I/O address:
Interrupt:
[Enabled]
[248]
[IRQ 11]
Serial port E:
Base I/O address:
Interrupt:
[Enabled]
[250]
[IRQ 5]
Serial port F:
Base I/O address:
Interrupt:
[Enabled]
[258]
[IRQ 7]
F1
ESC
Help
Exit
↑ ↓
←→
Select Item
Select Menu
Item Specific Help
Configure serial port C
using options:
[Disabled]
No configuration
[Enabled]
User configuration
[Auto]
BIOS or OS chooses
configuration
Change Values
-/+
Enter Select Sub-Menu
F9 Setup Defaults
F10 Save and Exit
Figure 29 I/O Device Configuration 2 Settings Menu
Serial port C
Defines the I/O port address and IRQ (interrupt level) for serial port C,
serial port D, serial port E, and serial port F.
Serial port D
Serial port E
Serial port F
Enabled
Internal serial port C (, D, E or F) is used. The following options appear when "Enabled" is
selected:
Base I/O Address
Set the following I/O address:
240 (for serial port C)
248 (for serial port D)
250 (for serial port E)
258 (for serial port F)
Interrupt Either of the following eight interrupt levels may
be selected:
IRQ 3, IRQ 4, IRQ 5, IRQ 6, IRQ 7, IRQ 10,
IRQ 11, IRQ 12
68
Auto
Internal serial port C (, D, E or F) is used. When
"Auto" is selected, the I/O address and interrupt
level settings are made automatically.
Disabled
Internal serial port C (, D, E or F) is not used.
Console Redirection
This BIOS version includes the Console Redirection function which makes it possible to
access the BIOS SETUP and a command line based OS environment from a VT100 or ANSI
terminal via one of the available serial ports on the Plug-N-Run E1 modules.
!
Caution
Console Redirection is only available on systems equipped with a SCH5017 Super
I/O chip from SMSC.
Required Terminal Environment
The following is required for Console Redirection access:
•
A system equipped with either a VT100 or ANSI terminal, or with a terminal emulator
that supports the VT100 or ANSI standard and is capable of displaying at least 26
lines.
Since the use of special keys (such as function keys) may be required in a client application,
the following escape sequence codes must be supported. Refer to the documentation for the
terminal emulator being used to set escape sequence codes.
Table 9 Special Key and Escape Sequence Codes
Escape Sequence
Special Key
Escape Sequence
F1
F2
F3
F4
F3
F4
F5
F6
F7
F8
F9
F10
Esc O P
Esc O Q
Esc O R
Esc O S
Esc O w
Esc O x
Esc O t
Esc O u
Esc O qs
Esc O r
Esc [ 2 0 ~
Esc O p
Insert
Up arrow
Down arrow
Right arrow
Left arrow
Home
End
Page Down
Page Up
Shift Tab
Print Screen
Esc [ @
Esc [ A
Esc [ B
Esc [ C
Esc [ D
Esc [ H
Esc [ K
Esc [ U
Esc [ V
Esc [ Z
Esc [ i
Appendix
Special Key
Required Serial Cable
The serial cable that connects the Plug-N-Run E1 with a terminal must have a DB-9 serial
connector wired as follows:
D-Sub 9 - D-Sub 9
DCD
DSR
DTR
Rx
Tx
RTS
CTS
SGnd
Ring
1
6
4
2
3
7
8
5
9
A
4 DTR
1 DCD
6 DSR
3 Tx
2 Rx
8 CTS
7 RTS
5 SGnd
9 Ring
Figure 30 Serial Cable Wiring Diagram
69
THIS PAGE IS INTENTIONALLY LEFT BLANK.
70
INDEX
A
ACHI Mode ..............................................................25
Advanced Chipset Control .......................................25
Advanced Chipset Control Settings .........................30
Advanced CPU Configuration ..................................37
Advanced Menu .......................................................25
Event Logging Settings ....................................33
Internal Device Configuration Settings .............31
PCI Configuration Settings ...............................28
PCI Device, Slot Settings .................................29
Sub-Menus .......................................................27
After Power Failure ..................................................37
ATA
Mode ................................................................54
ATA Configuration ...................................................20
ATA Mode ................................................................23
ATAPI Removable Device .........................................2
Audio Controller .......................................................31
B
C
Clear All Event Logs ................................................ 34
Com Port Address ................................................... 66
Console Type .......................................................... 66
Core multi-Processing ............................................. 27
D
Diagnostic Codes ...................................................... 6
Discard Changes ..................................................... 43
DMA Channel ....................................................13, 64
E
ECC Error Logging .................................................. 34
Enable Delay ........................................................... 26
Enable Master ......................................................... 29
Event Log .................................................................. 2
Event Log Capacity ................................................. 33
Event Log Validity .................................................... 33
Event Logging ...................................................26, 34
Exit Discarding Changes ......................................... 43
Exit Menu ................................................................ 43
Exit Saving Changes ............................................... 43
Extended Memory ................................................... 20
F
Floppy Disk Controller ............................................. 65
Flow Control ............................................................ 66
H
Hardware Monitor .................................................... 32
I
IDE 0 ....................................................................... 41
IDE 1 ....................................................................... 41
IDE 2 ....................................................................... 41
IDE 3 ....................................................................... 41
IDE 4 ....................................................................... 41
IDE 5 ....................................................................... 41
Initial On-demand duty ............................................ 38
Internal Device Configuration .................................. 26
Interrupt .......................................................63, 64, 68
71
INDEX
Base I/O Address ....................................... 63, 64, 68
Baud Rate ................................................................66
Beep Codes ...............................................................6
BIOS Features ...........................................................1
BIOS Functions .......................................................45
BIOS Image File ......................................................10
BIOS Messages .........................................................4
BIOS Modification ......................................................2
BIOS Overview ..........................................................1
BIOS Revision .........................................................20
BIOS Setup ................................................................1
Changed Settings .............................................17
Exiting ...............................................................18
Exiting without Saving ......................................18
Menus ...............................................................19
Operating ..........................................................16
Saving ..............................................................17
Saving and Exiting ............................................18
Starting .............................................................16
Usable Keys .....................................................16
BIOS Setup Menus ..................................................19
Boot Device Priority .................................................40
Boot Menu ...............................................................40
Boot Device Priority ..........................................41
Sub-Menus .......................................................41
Booting
Any Device ....................................................... 45
Boot-time Diagnostic Screen ................................... 40
I/O Device Configuration 1 ......................................62
I/O Device Configuration 2 ......................................67
L
LAN Controller .........................................................31
Latency Timer ..........................................................29
LBA Mode Control ...................................................22
Legacy Diskette A ....................................................61
Legacy Floppy Drives ..............................................41
Legacy Mode USB Support .......................................2
Legacy USB Support ...............................................25
Load Setup Defaults ................................................43
M
Main Menu ...............................................................20
ATA Configuration Settings ..............................23
IDE Channel Detailed Settings .........................21
Sub-Menus .......................................................21
Memory Cache ........................................................25
Memory ECC Error Checking ..................................30
Mode ........................................................................63
MultiBoot ....................................................................2
Multi-Sector Transfers .............................................22
O
On-demand duty ......................................................38
Option ROM Scan ...................................................29
Output Option ..........................................................26
P
Parallel port .............................................................63
Password Security .....................................................2
PCI BEV/Legacy Network Card ...............................42
PCI Configuration ....................................................25
PCI Device, Slot #n .................................................28
PCI Error Logging ....................................................34
PCI SCSI .................................................................42
PCI SERR Checking ................................................30
PCI-E Port A ............................................................30
PCI-E Port B ............................................................30
PCI-E Port C ............................................................30
Plug and Play ............................................................1
PnP ............................................................................1
POST .........................................................................1
POST Error Logging ................................................34
Power Management ..................................................1
Power Management Functions ................................45
Power Menu ............................................................36
Advanced CPU Configuration Settings ............38
Sub-Menus .......................................................38
Power On Self Test ...................................................1
Primary Master ........................................................20
Primary P-ATA Cable ..............................................23
72
Primary Slave .......................................................... 20
Processor Configuration .......................................... 25
Processor Configuration Settings ............................ 27
PXE OPROM ........................................................... 31
Q
QuickBoot .................................................................. 2
QuickBoot Mode ...................................................... 40
QuietBoot .................................................................. 1
R
Reset Configuration Data ........................................ 26
ROM-BIOS Functions ................................................ 1
S
SATA
Features ........................................................... 53
SATA Port 0 ............................................................ 20
SATA Port 1 ............................................................ 20
Save Changes ......................................................... 43
Secondary Master ................................................... 20
Secondary Slave ..................................................... 20
Security Menu ......................................................... 35
Serial ATA ................................................................. 2
Features ........................................................... 53
Modes .............................................................. 54
Serial ATA Interface ................................................ 53
Serial port A ............................................................. 63
Serial port B ............................................................. 63
Serial port C ............................................................ 68
Serial port D ............................................................ 68
Serial port E ............................................................. 68
Serial port F ............................................................. 68
Set Supervisor Password ........................................ 35
SMBIOS .................................................................... 2
SpeedStep (R) Technology ..................................... 38
Spread Spectrum .................................................... 32
Start-up Process Flow ............................................... 3
Super I/O ................................................................... 2
Supervisor Password Is ........................................... 35
System Date ............................................................ 20
System Interrupts .................................................... 13
System Memory ...................................................... 20
System Time ........................................................... 20
S-ATA Mode ............................................................ 24
T
Thermal Control Circuit ........................................... 39
Timeout Delay ......................................................... 26
Transfer Mode ......................................................... 22
Type ........................................................................ 21
U
Ultra DMA Mode ......................................................22
USB CD-ROM .........................................................42
USB Controller .........................................................31
USB FDD .................................................................41
USB HDD ................................................................42
USB KEY .................................................................41
USB 2.0 Function ....................................................32
Using BIOS Setup ...................................................15
V
View Event Log ........................................................33
W
Wake up on LAN from S5 ........................................36
Wake up on PCI PME from S5 ................................37
Wake up on USB from S3 .......................................36
Wake up Time .........................................................37
Wake up Time from S5 ............................................37
Watchdog Timer ......................................................26
Numeric
32 Bit I/O ..................................................................22
INDEX
73
THIS PAGE IS INTENTIONALLY LEFT BLANK.
74
Plug-N-Run E1 BIOS Manual
PS-E1PR-BM-011
2009.03
PFU Systems, Inc.
Printed In U.S.A.
The information in this document is subject to change without notice. PFU Systems, Inc.
reserves the right to make changes to its products at any time without notice. PFU Systems
makes no warranty, express, statutory, implied or by description, regarding the information
set forth herein and assumes no responsibility for any errors which may appear in this document. The products described in this document are intended for commercial use only.
PFU Systems products are not authorized for use as critical components in life support
devices or systems. PFU Systems, Inc. does not warrant its products for use in applications
which may involve dangers to human health or safety, including but not limited to medical
life support, surgery, aircraft flight control, air traffic control, mass transportation control,
missile launch and or guidance control, environmental control, or the planning construction,
maintenance, and operation of a nuclear facility.