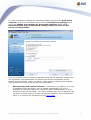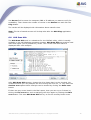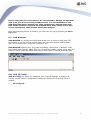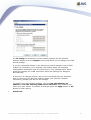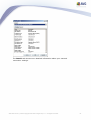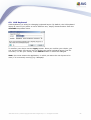
1
AVG Rescue CD for Windows
User Manual
Document revision 85.2 (7.4.2009)
Copyright AVG Technologies CZ, s.r.o. All rights reserved.
All other trademarks are the property of their respective owners.
This product contains Windows software licensed from Microsoft Corporation and/or MS Affiliate(s). The Microsoft
Windows Preinstallation Environment software included with this software may be used for boot, diagnostic, setup,
restoration, installation, configuration, test or disaster recovery purposes only. This software contains a security feature
that will cause end user's system to reboot without prior notification to the end user after 24 hours of continuous use.
This product uses RSA Data Security, Inc. MD5 Message-Digest Algorithm, Copyright (c) 1991-2, RSA Data Security,
Inc. Created 1991.
This product uses code from C-SaCzech library, Copyright (c) 1996-2001 Jaromir Dolecek ([email protected]).
This product uses compression library libbzip2, Copyright (c) 1996-2002 Julian R. Seward.
This product uses compression library zlib, Copyright (c) 1995-2002 Jean-loup Gailly and Mark Adler.
This product contains freeCommander software, Copyright (c) 2004 Marek Jasinski.
AVG Rescue CD © 2009 Copyright AVG Technologies CZ, s.r.o. All rights reserved.
1
Contents
........................................................................................................................ 4
1. Introduction
.....................................................................................................................
4
1.1 Notice
to users
.....................................................................................................................
4
1.2 Basic
description of the AVG Rescue CD
.....................................................................................................................
4
1.3 AVG
Rescue CD key features
.....................................................................................................................
5
1.4 Minimum
requirements – operating systems supported
.....................................................................................................................
6
1.5 Minimum
hardware requirements
........................................................................................................................
7
2. Installation
and Startup
.....................................................................................................................
7
2.1 How
to obtain the AVG Rescue CD and license file
.....................................................................................................................
8
2.2 Differences
between downloadable and standalone AVG Rescue CD
.....................................................................................................................
8
2.3 How
to download and create the AVG Rescue CD
.....................................................................................................................
18
2.4 How
to create the AVG Rescue CD - burning ISO image
.....................................................................................................................
31
2.5 When
should the AVG Rescue CD be used
.....................................................................................................................
31
2.6 Before
installation
.....................................................................................................................
33
2.7 AVG
Rescue CD startup and installation
.....................................................................................................................
34
2.8 AVG
Rescue CD Update Wizard
.....................................................................................................................
37
2.9 How
to recognize network adapter drivers
........................................................................................................................
43
3. After
Startup
........................................................................................................................
45
4. AVG
Rescue CD – Main Screen
.....................................................................................................................
46
4.1 Menu
File
.....................................................................................................................
46
4.2 Menu
Components
.....................................................................................................................
47
4.3 Menu
History
..........................................................................................................
47
4.3.1 Scan
Results
..........................................................................................................
47
4.3.2 Virus
Vault
..........................................................................................................
47
4.3.3 Event
history log
.....................................................................................................................
48
4.4 Menu
Tools
.....................................................................................................................
49
4.5 Menu
Help
........................................................................................................................
50
5. Scans
Overview
.....................................................................................................................
51
5.1 Scan
Whole Computer
.....................................................................................................................
54
5.2 Scan
Specific FIles or Folders
.....................................................................................................................
56
5.3 Scan
Results
.....................................................................................................................
57
5.4 Scan
Results Details
..........................................................................................................
57
5.4.1 Results
Overview Tab
AVG Rescue CD © 2009 Copyright AVG Technologies CZ, s.r.o. All rights reserved.
2
..........................................................................................................
57
5.4.2 Infections
Tab
..........................................................................................................
57
5.4.3 Spyware
Tab
..........................................................................................................
57
5.4.4 Warnings
Tab
..........................................................................................................
57
5.4.5 Information
Tab
........................................................................................................................
63
6. AVG
Rescue CD Tools
.....................................................................................................................
63
6.1 AVG
Command line
..................................................................................................................... 71
6.2 freeCommander
.....................................................................................................................
74
6.3 Map
network drive
.....................................................................................................................
75
6.4 AVG
Registry editor
.....................................................................................................................
77
6.5 AVG
Ping
.....................................................................................................................
78
6.6 AVG
Scan disk
.....................................................................................................................
79
6.7 AVG
Notepad
.....................................................................................................................
79
6.8 AVG
IP Config
.....................................................................................................................
82
6.9 AVG
Keyboard
........................................................................................................................
83
7. FAQ
and Technical Support
AVG Rescue CD © 2009 Copyright AVG Technologies CZ, s.r.o. All rights reserved.
3
1.
Introduction
This User Manual provides complete overview of the usage and features provided
by the AVG Rescue CD for Windows.
1.1. Notice to users
We strongly recommend that only well experienced computer users with advanced
computer knowledge use the AVG Rescue CD. The AVG Rescue CD is distributed
as a bootable device that allows you to access operating system settings and all
computer data. Incorrect manipulation of the operating system or its resources may
result in partial or even complete loss of system stability and functionality or
important data loss.
If you decide to use the AVG Rescue CD, first, backup all your valuable data that
resides inside your computer. Ideally use some portable device for storing backups,
like CD/DVD disk(s), diskette(s), USB Flash disk or similar external device.
1.2. Basic description of the AVG Rescue CD
The AVG Rescue CD is basically a portable variant of AVG based on the Windows
PE platform. It is distributed as a bootable CD intended for operating system
recovery in such an event where the system cannot be loaded in the regular way –
for example due to substantial virus infection. Initially the AVG Rescue CD will
load the temporary operating system Windows PE edition and run AVG, which can
be then used in the usual way for virus detection and removal.
In addition, administration tools are available for advanced users. The complete list
of features can be found below.
1.3. AVG Rescue CD key features
The AVG Rescue CD offers the following key features:
·
Running of AVG from an alternative Windows environment.
·
Detection of threats located on drives and in the Windows system registry.
·
Possibility of updating AVG virus base from a local AVG installation, hard
drive, directly through Internet-enabled LAN, or an external source (flash
drive etc.).
·
AVG Command Line utility to execute various system operations.
·
freeCommander is an alternative to the standard windows file manager
AVG Rescue CD © 2009 Copyright AVG Technologies CZ, s.r.o. All rights reserved.
4
intended for more IT-experienced users.
·
Map network drive utility to quickly and easily map a network drive.
·
AVG Registry editor tool for system registry processing.
·
AVG IP Config tool for managing network settings.
·
AVG Ping utility for testing the availability of network resources (servers,
domains, IP addresses)
·
AVG Scan Disk tool for analyzing and testing hard disk integrity with optional
automatic error correction.
·
Simple AVG Notepad utility for saving notes, editing system files etc.
·
Direct screen resolution change.
1.4. Minimum requirements – operating systems supported
The AVG Rescue CD can be used for recovering the following operating systems:
·
MS Windows 2000 SP4 + Update Rollup pack 1
·
MS Windows XP
·
MS Windows XP Pro x64 Edition
·
MS Windows 2000 Server
·
MS Windows 2003 Server
·
MS Windows 2003 Server x64 Edition
Also, it is necessary that the computer’s BIOS will allow direct booting from the CD/
DVD, (for correct CD/DVD startup) and that the computer has at least 256 MB of
RAM memory installed. Finally, a CD-ROM/DVD-ROM or compatible device must be
installed in the computer.
AVG Rescue CD © 2009 Copyright AVG Technologies CZ, s.r.o. All rights reserved.
5
1.5. Minimum hardware requirements
Minimum hardware requirements are as follows:
·
Intel Pentium CPU 1,2 GHz
·
550 MB of free hard drive space (for ISO creation)
·
256 MB of RAM memory
·
60 MB free hard drive space for temporary files.
AVG Rescue CD © 2009 Copyright AVG Technologies CZ, s.r.o. All rights reserved.
6
2.
Installation and Startup
2.1. How to obtain the AVG Rescue CD and license file
You can acquire the AVG Rescue CD either from your local AVG software
distributor, or by downloading it as a RAR archive, creating an ISO image
afterwards and then burning it to CD yourself.
Note: If you have obtained a regular AVG Rescue CD from your local AVG
distributor (or any other way), you may want to check AVG website for potential
updates.
The distributed AVG Rescue CD does not contain a license number. To obtain the
license number, contact your AVG distributor or use the contact information/
registration form available on the www.avg.com website.
After the registration process, you will receive your license file by e-mail (avgelc.
dat). Then you have two options how to proceed:
a)
Create a brand new AVG Rescue CD by using the AVG Rescue CD Creator
utility, and using the new license file (see chapter 2.3 How to download and
create the AVG Rescue CD).
b)
If you already have the AVG Rescue CD, and you do not want to create a
new one, put the avgelc.dat file onto some (removable) device such as a
floppy disk, USB flash disk, hard drive etc., restart the computer you are
going to repair and boot from the AVG Rescue CD.
Note: Make sure, that the drive you will put the avgelc.dat file on, will be
accessible from the computer on which you are booting with the AVG Rescue
CD.
Once the AVG Rescue CD has started, a notification dialog will be displayed
asking for the path to the avgelc.dat license file.
Note: If you store the license file on a USB Flash disk or another USB
compatible device, it is essential that this device is already inserted and
switched on before you start the AVG Rescue CD (ideally even before you
start the computer).
If you decide to download the RAR archive and burn the CD yourself, visit this
website address www.avg.com/ww.download?prd=rcd to download the current
version. For specific instructions on how to proceed in this particular case, see
AVG Rescue CD © 2009 Copyright AVG Technologies CZ, s.r.o. All rights reserved.
7
chapter 2.3. If you wish to learn more about standalone versus downloadable AVG
Rescue CD versions, please see chapter 2.2.
2.2. Differences between downloadable and standalone AVG Rescue CD
To ensure maximum compatibility with target computers, AVG Rescue CD is
distributed in two different variations.
·
Standalone AVG Rescue CD
This CD can be obtained from your local AVG distributor or any other way.
Basically it means, that AVG Rescue CD will (after boot-up) need to create a
temporary AVG_Rescue_Temp folder, with approximately 60 MB, on the
hard drive (once you manage to repair your system and boot it up, you can
delete this temporary folder).
·
Downloadable version of AVG Rescue CD
This version can be created as the standalone version mentioned above
simply from a downloaded archive with the advantage of several possible
customizations (see below).
Note: If you have only standalone AVG Rescue CD, you can still create an
optimized version with larger RAM disk. On each AVG Rescue CD is also distributed
the RAR archive and AVG Rescue CD creator utility (located in the
subdirectory \PROGRAMS\MAKECD\MakeCD.exe), so you can easily proceed to
create an additional AVG Rescue CD by following the steps in chapter 2.3.
2.3. How to download and create the AVG Rescue CD
To successfully create the AVG Rescue CD, you will need to follow the steps
below.
a)
If you have not done so yet, buy a license for AVG Rescue CD from www.
avg.com or from your local AVG distributor. You should receive the license
file (avgelc.dat) via e-mail.
b)
Download the RAR archive with the AVG Rescue CD file structure available
from www.avg.com/ww.download?prd=rcd URL.
You can skip this step, if you prefer to use AVG Rescue CD Creator for RAR
archive download (see below).
AVG Rescue CD © 2009 Copyright AVG Technologies CZ, s.r.o. All rights reserved.
8
c)
Download the AVG Rescue CD creator (MakeCD.exe) utility to be able to
create a proper ISO image file from the downloaded RAR archive. This utility
can also be obtained from URL mentioned above website.
d)
Run the AVG Rescue CD creator utility and follow these simple steps below:
(i)
You can either use your downloaded RAR archive (by clicking the first
button and selecting the appropriate file), or simply download the
latest one directly from the AVG Rescue CD creator utility. We always
recommend downloading the newest image, if available.
To download the latest RAR archive, or to check whether your previously
downloaded archive or AVG Rescue CD creator is up-to-date, press
the
button. A new dialog will come up. If your version of AVG
AVG Rescue CD © 2009 Copyright AVG Technologies CZ, s.r.o. All rights reserved.
9
Rescue CD creator utility is old and a newer version is available, you
may see this dialog instead:
By clicking the underlined link, you will open your default Internet
browser window and be able to download the updated application. By
clicking the
button you can view version history list of the AVG
Rescue CD creator utility. We always recommend to download the
latest version.
If the application is up to date, you will see this dialog:
The dialog contains list of available images to download.
To download the image file, double click it, or press the Download
AVG Rescue CD © 2009 Copyright AVG Technologies CZ, s.r.o. All rights reserved.
10
button. The download process will begin immediately after you confirm
the download location.
Check the Close when downloaded checkbox, if you prefer this dialog
to be closed once the download process is finished.
Note: If you experience any trouble with displaying the available AVG
Rescue CD images, make sure that your internet connection is currently
available, and that your firewall application does not block network
access for the AVG Rescue CD creator. If there is no Internet
connection available, or your firewall is blocking the network
communication, you may experience an error dialog.
-
CRC Checksum Field
Once the RAR archive is opened or downloaded (in AVG Rescue CD
Creator), you will see a code in the CRC Checksum section. This
checksum serves for a verification of the downloaded RAR archive.
Checksum of a RAR archive downloaded using the AVG Rescue CD
Creator is checked automatically and if everything is correct, you
will experience this icon:
. In case of any other result, we
recommend that you repeat the download process.
If you opened some previously downloaded RAR archive, then you
should verify the displayed CRC code with the one, that is displayed
in the list of available images (when clicking
button) before you
start the ISO creation. Alternatively you can find the code on the
AVG website (AVG Rescue CD product pages/Crc File hyperlink).
The CRC Checksum will not be checked automatically if the file is
opened manually.
The CRC Checksum will be different for every new RAR file version!
(ii)
Click the second
dat).
button to select the obtained license file (avgelc.
(iii) Click the third
button to select an output folder where the ISO
image file will be created.
Note: Make sure, that this folder is empty, before continuing to the next
step! Also, you will need at least 550 MB of free space on your hard drive
AVG Rescue CD © 2009 Copyright AVG Technologies CZ, s.r.o. All rights reserved.
11
before you can create the AVG Rescue CD ISO file!
(iv) To specify additional settings, click the
appear:
-
button. A new dialog will
RAM disk used for online updates section.
Here you can check use RAM disk field, that will allow you to
choose between 144 to 1024 MB of RAM disk. Use the slider to
AVG Rescue CD © 2009 Copyright AVG Technologies CZ, s.r.o. All rights reserved.
12
choose the preferred amount.
Note: If you decide to use the RAM disk feature, it is necessary that
the target computer on which the AVG Rescue CD will be used
contains at least 256 MB of RAM memory + the size of your chosen
RAM disk.
The RAM disk is used after AVG Rescue CD boot to store temporary
files. For more information on differences between possible versions,
please navigate to chapter 2.2.
-
External drivers section
As the Windows version on which AVG Rescue CD is built may not
contain all network adapter drivers (or their most current versions),
you may use this dialog to add your own network adapters drivers.
You can also add any other device type drivers, if needed.
Warning: As AVG Rescue CD is built on the 32bit Windows XP SP2
US version, make sure you always use the appropriate 32bit (x86)
drivers when adding new ones! Otherwise AVG Rescue CD may
become unstable!
If you experience any difficulties starting AVG Rescue CD with
custom drivers included, try to re-create the ISO (CD) without these
drivers and boot again. If the problems persist and you cannot boot
AVG Rescue CD the regular way, please contact AVG technical
support.
To find out how to recognize and add your Windows network drivers
see chapter 2.9. Alternatively you can use the
button, that will
automatically try to find network drivers on your local computer and
add them.
Note: Only plug and play enabled devices are supported! Also keep in
mind, that adding the drivers does not guarantee that the hardware
will work in the AVG Rescue CD environment.
Use the
and
buttons to add and remove files. To remove or
insert multiple files simply select them by using the mouse and
pressing the appropriate button. You can use DEL and INS keyboard
buttons as well for deleting or adding files in the individual dialog
fields.
AVG Rescue CD © 2009 Copyright AVG Technologies CZ, s.r.o. All rights reserved.
13
Files can also be dragged directly to the appropriate fields by using
drag & drop Windows functionality, for example from the Windows
Explorer dialog window.
In the first field insert only .inf network driver files (located in the C:
\WINDOWS\inf folder). The inserted .inf files will be on the ISO
renamed to oem0.inf, oem1.inf etc. Once the files are inserted, you
can view the driver details by placing your mouse cursor over the file
name. The displayed list of file names is only suggested one. For
more information on finding out the correct driver files, please see
chapter 2.9.
To view the selected .inf file content directly from the AVG Rescue
CD Creator click this icon
.
In the second field insert the network driver files, that reside in the
C:\WINDOWS\System32\Drivers folder.
In the third field insert the network driver files, that reside in the C:
\WINDOWS\System32\ folder (if applicable).
All selected files will be included in the appropriate system folders
during the ISO creation process.
-
Adding SCSI, RAID or SATA drivers
Should you require to add any RAID, SCSI or SATA drivers, that are
not part of the standard MS Windows XP 32bit edition (i.e. are not
recognized during AVG Rescue CD startup), follow this procedure:
First, you need to download the appropriate driver from your
hardware manufacturer's website (or get it from some other source).
You will need drivers, that are compatible with MS Windows XP 32bit
(x86). Once you have the drivers, extract them to a local folder on
your hard drive. The file structure must not be changed! An example
of such archive:
C:\ADAPTEC\TXTSETUP.OEM
C:\ADAPTEC\WINXP32\ADPU320.SYS
C:\ADAPTEC\WINXP32\ADPU320.INF
C:\ADAPTEC\WINXP32\ADPU320.CAT
AVG Rescue CD © 2009 Copyright AVG Technologies CZ, s.r.o. All rights reserved.
14
C:\ADAPTEC\WINXP64\ADPU640.SYS
C:\ADAPTEC\WINXP64\ADPU640.INF
C:\ADAPTEC\WINXP64\ADPU640.CAT
C:\ADAPTEC\WINXP64\ADP64U.DLL
C:\ADAPTEC\WIN2000\ADPU320W2.INF
C:\ADAPTEC\WIN2000\ADPU320W2.SYS
C:\ADAPTEC\WIN2000\ADPU320W2.CAT
The most important file is TXTSETUP.OEM, that is part of any SCSI,
RAID or SATA driver. It contains all important information about the
driver and will be needed for correct AVG Rescue CD boot with the
new driver.
If you are unsure about the device name, you can simply navigate to
the Windows Device Manager and find it there.
Note: This procedure applies only if you are operating on a MS
Windows XP 32bit system and if you are are going to use AVG
Rescue CD on the same computer!
To open Windows Device Manager, click the Windows Start, rightclick My Computer and select Manage. In the new dialog select
Device Manager from the System Tools branch.
In the right part of the screen navigate to the SCSI and RAID
controllers item. Here you will find a list of available SCSI
compatible adapters.
AVG Rescue CD © 2009 Copyright AVG Technologies CZ, s.r.o. All rights reserved.
15
Once you have the correct drivers, you need to add them to the ISO
image. To do so, click on this button
and choose the TXTSETUP.
OEM file of the requested driver. If the TXTSETUP.OEM file is shared
for more operating systems, you may see a dialog asking for OS
selection. See the sample below:
If so, always select Windows XP (x86/32bit) drivers and press the
OK button. Once the driver files are inserted, you can view the driver
details by placing your mouse cursor over the file name. You can use
this feature to check, if the drivers were inserted properly.
AVG Rescue CD © 2009 Copyright AVG Technologies CZ, s.r.o. All rights reserved.
16
Also, you can use the
and
buttons to add and remove files,
if necessary. To remove or insert multiple files simply select them by
using the mouse and pressing the appropriate button. You can use
DEL and INS keyboard buttons as well for deleting or adding files in
the individual dialog fields.
Files can also be dragged directly to the appropriate fields by using
drag & drop Windows functionality, for example from the Windows
Explorer dialog window.
-
External directory structure section
If you need to use your own tools, utilities or some third-party
software during the recovery process, you can include them on the
ISO (CD) as well. Simply click this button
and choose the
folder, where your tools reside. All files and sub-folders from the
selected directory will be placed into /External directory on the CD.
Please keep in mind the size of the media that you will use for
burning the ISO image later. You will require adequate disk space for
the ISO creation, if you add some space-consuming applications. If
the size of the created ISO file is bigger than 700 MB (CD-R), you
can burn AVG Rescue CD to DVD-R disc (4,7 GB capacity or more).
Note: Due to security and stability reasons, Windows system registry
functionality is partly limited within the AVG Rescue CD environment
(for example .reg file importing). Therefore, some applications that
need to use the system registry during their operation might not be
working properly in the AVG Rescue CD environment. Generally we
do not recommend changing the system registry.
-
Include AVG Rescue CD compressed (*.rar) file to ISO
checkbox
Check this checkbox if you prefer to store the compressed RAR
archive to the ISO (CD) as well. This file can be used anytime later
for creating another AVG Rescue CD without repeating the download
process again.
(v)
e)
Once all options are set, click the Create ISO button. The ISO file
with AVG Rescue CD should be created in a short time.
Once you have successfully created the AVG Rescue CD ISO image file,
proceed to chapter 2.4 for instructions on burning a CD from the ISO image
AVG Rescue CD © 2009 Copyright AVG Technologies CZ, s.r.o. All rights reserved.
17
file.
2.4. How to create the AVG Rescue CD - burning ISO image
If you have already obtained a copy of the AVG Rescue CD, then you can skip this
chapter and proceed to chapter 2.5. To create an AVG Rescue CD, you need to
create an ISO image first! For more information, see chapter 2.3.
To complete this step, you will need a CD/DVD burning drive, (either CD-RW or
DVD-RW compatible drive with ability to burn CD-R/DVD-R disks). Additionally you
will need burning software, that allows you to create a CD from the ISO image file
and one CD-R/DVD-R or compatible disc.
To successfully burn the ISO image file you can use your favorite burning software
or download a free one (for example CDBurnerXP Pro www.cdburnerxp.se, but
several other choices also exist including free trial versions of most famous
commercial burning software). Below, you will find more detailed information on
how to use different software products to burn the ISO image.
a)
Ahead Nero burning ROM
Nero Burning ROM is a commercial burning tool that can be used for burning
ISO images.
More information about this program can be found on the Ahead Software Web
site at: http://www.nero.com.
Steps to create a CD from the ISO image:
(i)
Insert a blank CD in your CD-RW drive.
(ii)
Start Nero Burning ROM from the Nero program folder in the start
menu.
(iii) New Compilation wizard should start. If not, select File/New from the
upper menu.
(iv) Select CD-ROM (ISO) (should be marked as default) and click Open
button located on the bottom of the dialog.
AVG Rescue CD © 2009 Copyright AVG Technologies CZ, s.r.o. All rights reserved.
18
In the Open dialog box, select the AVG Rescue CD ISO file, and then
click Open.
New dialog Burn compilation should come up:
You can choose additional properties before burning, we recommend to
tick the Finalize CD checkbox to assure maximum compatibility (but
AVG Rescue CD © 2009 Copyright AVG Technologies CZ, s.r.o. All rights reserved.
19
then you will not be able to burn any additional data to the disk). Click
Burn to start the burning process.
b)
Roxio Easy Media Creator 8
Formerly known also as WinonCD or Easy CD creator. For more information
about the software visit the Roxio web site (http://www.roxio.com).
Steps to create a CD from the ISO image:
(i)
Insert a blank CD in your CD-RW drive.
(ii)
Start Creator Classic from its usual location at
Start Menu/Programs/Roxio Easy Media Creator/Data/Creator Classic.
From the left menu select the option Burn From Disc Image File.
(iii) Locate the ISO file and click Open. A new dialog will show up:
AVG Rescue CD © 2009 Copyright AVG Technologies CZ, s.r.o. All rights reserved.
20
(iv) Click Burn Options if you want to choose additional burning options,
and then click OK to start the burning process.
c)
WinOnCD 6.0
Originally a commercial software. Nowadays distributed as a free edition also.
For more information about the software visit the Roxio web site (http://www.
roxio.com).
Steps to create a CD from the ISO image:
(i)
Insert a blank CD in your CD-RW drive.
(ii)
Start WinOnCd 6.0 from its usual location at:
Start Menu/Programs/ Roxio/WinOnCD 6 Power Edition/
WinOnCD 6 Power Edition. From the Wizard menu select the option
Load file.
AVG Rescue CD © 2009 Copyright AVG Technologies CZ, s.r.o. All rights reserved.
21
(iii) Locate the ISO file and click Open. A new dialog will show up:
AVG Rescue CD © 2009 Copyright AVG Technologies CZ, s.r.o. All rights reserved.
22
(iv) Click Record tab where you can choose also additional burning options,
and then click the yellow Record (fire icon) button located at the right
bottom corner to start the burning process.
AVG Rescue CD © 2009 Copyright AVG Technologies CZ, s.r.o. All rights reserved.
23
d)
Alcohol 120%
A commercial burning tool that can be used for burning ISO images.
More information about this program can be found on the Alcohol Software
web site at: http://www.alcohol-soft.com/.
Steps to create a CD from the ISO image:
(i)
Insert a blank CD in your CD-RW drive.
(ii)
Start Alcohol 120% from its usual location under
Start Menu/Programs/Alcohol 120%/Alcohol 120%
(iii) From the left Main menu select Image Burning Wizard.
AVG Rescue CD © 2009 Copyright AVG Technologies CZ, s.r.o. All rights reserved.
24
(iv) New dialog Image Burning Wizard should show up. Click Browse
button and locate the AVG Rescue CD image file. Click the Next
button.
AVG Rescue CD © 2009 Copyright AVG Technologies CZ, s.r.o. All rights reserved.
25
(v)
In this dialog you can choose additional parameters before burning
(usually none are needed). Click Start to begin the burning process.
AVG Rescue CD © 2009 Copyright AVG Technologies CZ, s.r.o. All rights reserved.
26
e)
CDBurnerXP Pro
A freeware tool for burning CD/DVD discs. For more information visit program
web site (http://www.cdburnerxp.se/).
Steps to create a CD from the ISO image:
(i)
Insert a blank CD in your CD-RW drive.
(ii)
Start CDBurner XP Pro from its usual location at
Start Menu/Programs/CDBurnerXP Pro 3/CDBurnerXP Pro 3
(iii) New compilation dialog should come up. Choose the first option as
indicated on the screenshot below:
AVG Rescue CD © 2009 Copyright AVG Technologies CZ, s.r.o. All rights reserved.
27
(iv) From the upper menu select File/Write Disc Image from ISO File.
(v)
In the new Write ISO Image dialog click
Rescue CD iso file and select Open.
button, locate the AVG
AVG Rescue CD © 2009 Copyright AVG Technologies CZ, s.r.o. All rights reserved.
28
(vi) Click Write Disc button to start the burning process.
f)
CDBurn.exe - ISO CD-ROM burner tool
You can also create an AVG Rescue CD by using the version of CDBurn.exe
that is included in the Windows Server 2003 Resource Kit Tools (downloadable
also from the following location: http://www.microsoft.com/downloads/
details.aspx?FamilyID=9d467a69-57ff-4ae7-96eeb18c4790cffd&displaylang=en). Although it is intended for MS Windows
Server 2003, it can also be installed on MS Windows XP systems.
ISO CD-ROM Burner Tool (CDBurn) is a simple command-line tool that
allows the user to burn CDs from ISO image files. Intended mainly for
advanced users.
CDBurn can be started from its usual location under
Start menu/Windows Resource Kit Tools/Command Shell.
To burn a CD from the image file AvgRescueCD.iso located at c:\RescueCD
when the drive letter d: is assigned to your CD burner, type the following at
AVG Rescue CD © 2009 Copyright AVG Technologies CZ, s.r.o. All rights reserved.
29
the command line:
cdburn.exe d: c:\RescueCD\AvgRescueCD.iso
Press ENTER. Output similar to the following will be displayed:
Wait until the burning process reaches 100%.
g)
Magic ISO Maker
If you want to use this application for burning the ISO image, feel free to visit
the URL below for a suitable guide regarding ISO image burning: http://www.
magiciso.com/tutorials/miso-burnwin.htm
If none of the above mentioned guides will help you with burning the ISO image,
you can either consult your burning software user manual, or visit the appropriate
software manufacturer’s web site for more information. We include a list of
common burning software developers and their web site URLs and links to support
pages.
Company
Software
Company web site
Support
Ahead
Nero Burning Rom
http://www.ahead.de
Click here
Roxio
Easy Media Creator
http://www.roxio.com
Click here
Roxio
WinOnCD
http://www.roxio.com
Click here
Alcohol software Alcohol 120%
http://www.alcohol-soft.
com/
Click here
MagicISO, Inc.
http://www.magiciso.com/
Click here
MagicISO Maker
AVG Rescue CD © 2009 Copyright AVG Technologies CZ, s.r.o. All rights reserved.
30
2.5. When should the AVG Rescue CD be used
The AVG Rescue CD should only be used in cases where the user suspects that the
computer is not working correctly, i.e. the computer repeatedly shows certain nonstandard behavior or displays various error messages. This includes (but is not
limited to) for example:
·
The computer cannot start (boot up) in the normal way.
·
The computer can be started, but a viral infection or similar threat was not
removable (even after system restart).
·
The computer repeatedly shows non standard behavior (freezes, self restarts,
etc.)
Of course the AVG Rescue CD is not a universal solution for all software issues
that may occur. Also note that a number of problems may be caused by a failing
hardware component, overheating of different components inside the computer and
so on.
Therefore please use the AVG Rescue CD wisely and if you do not understand its
functions properly, ask an advanced person with proper computer skills to assist
you.
2.6. Before installation
Before you start using the AVG Rescue CD, we recommend that you back-up all
your valuable data stored on your computer, (using removable backup media such
as floppy disks, CDs or DVDs, USB Flash disks etc.). The backup will prove very
useful in cases where it is not possible to recover the operating system. In such
cases it may be necessary to reinstall the OS completely or change some hardware
components, (as hardware failure is also a common reason for computer problems).
The AVG distributed with the AVG Rescue CD may not be completely up to date.
Therefore it is recommended to prepare AVG update files before you start working
with the AVG Rescue CD. Use one of the suggested update options below.
Updating is necessary to ensure the most current virus base and optimal
functionality of AVG.
·
Computer is connected to Internet
If the computer, on which you are going to use the AVG Rescue CD, is
connected to the Internet by LAN or certain types of CATV (cable Internet), i.
e. is able to automatically receive network settings from the DHCP server, or
you know the settings, then you do not have to follow the guidelines for
AVG Rescue CD © 2009 Copyright AVG Technologies CZ, s.r.o. All rights reserved.
31
downloading offline update files. In such cases, updating is possible directly
from the Internet after the AVG Rescue CD has been started.
Windows PE is based on MS Windows XP SP2 operating system and may not
support most current drivers of the newest network cards. If you own a
network card, that is not supported by MS Windows XP SP2, it is most likely
that a network connection will not be possible to setup.
If you are not sure, if your Internet connection will be available, we
recommend that you prepare the offline update files by following the simple
steps below.
·
Offline preparation of update files
Update files can be downloaded separately from the AVG website, section
Support/Download.
The update files will be available for the most current ISO file as well as for
some recent versions. We always recommend using the latest version of the
ISO file as well the latest update files.
Nevertheless, if you cannot create or obtain the newest ISO file, download
only updates, that reflects your AVG Rescue CD version. Individual versions
can be distinguished by the specific CD (DVD) label, or by their checksum (in
case of downloadable .RAR archives). The checksum can be calculated in the
AVG Rescue CD creator application (see chapter 2.3 for more details).
Tip: The media label can be found by inserting the CD (DVD) with AVG
Rescue CD to your drive and then navigating to the Windows Start/My
Computer and right-clicking on the CD-ROM (DVD-RAM, DVD-ROM or similar
drive) letter and selecting Properties from the context menu.
You can store the downloaded files on a portable removable medium, such as
an external USB Flash disk or an external hard disk, CD, floppy disk etc. It
can then be used for AVG update. If you store the update files on a USB Flash
disk or another USB compatible device, it is essential that this device is
already inserted and switched on before you start the AVG Rescue CD
(ideally even before you start the computer).
·
Update from the local machine settings
The AVG Rescue CD also allows updating from the original operating system
settings of the computer that you are going to use the Rescue CD on. If you
are sure, that AVG was installed on the original system and was regularly
updated, then you can use this option for updating purposes (it will be
AVG Rescue CD © 2009 Copyright AVG Technologies CZ, s.r.o. All rights reserved.
32
accessible to the update wizard that is able to search for all local installations
of AVG and offer a list of all AVG installations found including details about
the installed components).
Note: This software contains a security feature that will cause end user's system to
reboot without prior notification to the end user after 24 hours of continuous use.
2.7. AVG Rescue CD startup and installation
In order to successfully start the AVG Rescue CD, it is necessary, that the
computer’s BIOS is able to correctly detect the boot CD in the CD-ROM device. In
most cases it is enough to insert the CD into the CD-ROM device, turn on (or
restart) the computer and wait until a message appears asking for confirmation
about starting the system from CD. In reality either of the following situations may
occur (a) or (b):
a)
System was successfully started from the CD
If you successfully started the AVG Rescue CD, AVG Rescue CD Update
Wizard (see chapter below) will be displayed to guide you through the
updating process.
b)
System was not possible to start from the CD
If no message is displayed, asking for confirmation to boot the system from
the CD, it is likely that the BIOS (the internal computer system) is not
correctly configured.
o
Newer motherboards allow users to directly select a device, which they
want the system to load from. Usually it is called a boot menu and can
be accessed by pressing a keyboard button or a shortcut key.
Information on how to access this menu may be displayed on the screen
during your computer startup. For more information please consult the
user manual to your motherboard.
o
Another option is to access your computer BIOS directly and change the
settings to allow booting from CD. This operation is strictly intended
for advanced users only! Never try to change any BIOS settings,
unless you completely understand their meaning. Always consult the
user manual to your motherboard before changing any BIOS settings.
Note: We are unfortunately unable to cover every single eventuality that may
occur and how to solve it. Mainly because so many different motherboards and
BIOS manufacturers exist. Therefore please always consult your motherboard
user manual first, where you can find more information about how to boot
AVG Rescue CD © 2009 Copyright AVG Technologies CZ, s.r.o. All rights reserved.
33
operating system from a portable device (CD).
2.8. AVG Rescue CD Update Wizard
The Update Wizard will guide you through the AVG updating process and setting for
network access.
a)
Welcome
In the first dialog choose your language and click the Next button.
AVG Rescue CD © 2009 Copyright AVG Technologies CZ, s.r.o. All rights reserved.
34
b)
AVG Rescue CD update selection
From the list of options choose your preferred method for updating.
o
Update from a folder or a removable media
If you have already downloaded the offline update files (.bin) from the
AVG web site and saved them to some external device, (which is already
connected or inserted) or to a local folder, then you can use this option.
More information about preparation of update files can be found in the
section 2.6 Before installation.
Note: If you plan to update AVG from a USB Flash drive, then it is
necessary to connect the device before you start your computer and run
the AVG Rescue CD.
o
Update from Internet
If your computer is connected to the Internet by LAN (local area
network), or by a cable modem and AVG Rescue CD was able to detect
your network interface card, you can try to use this option to download
update files directly from the Internet.
AVG Rescue CD © 2009 Copyright AVG Technologies CZ, s.r.o. All rights reserved.
35
In the next step you can choose additional proxy settings (if your
Internet provider requires them for connection).
The AVG Rescue CD will try to search your computer for existing proxy
settings. In any are found they will be listed in the box of predefined
settings.
If none of the listed settings are correct, you can manually enter the
address and port number of your desired proxy server.
For example:
-
192.168.5.45:80
Or
-
Username:[email protected]:80 (if username and
password are needed for logging to the Proxy server)
If it is not necessary to set up a proxy server for successful connection,
then keep to the default settings and press the Next button.
Note: If some DHCP service is necessary for a dynamic assignment of an
IP address, the communication with DHCP server may take some time to
process the request (even tens of seconds). Potential error dialog may
AVG Rescue CD © 2009 Copyright AVG Technologies CZ, s.r.o. All rights reserved.
36
not necessarily mean, that your network interface card was not found,
but only that there was not enough time to receive a response from the
DHCP server. Therefore, try to repeat the Update from Internet option
directly from the main AVG Rescue CD dialog that will come up
immediately after the Wizard is finished.
You can check your network connection also by using IP Config
application (available from the main dialog), or alternatively change the
network settings. For more information, see chapters 6.5 AVG Ping and
6.8 AVG IP Config.
o
Update from Local Machine AVG Settings
The AVG Rescue CD allows updating from the original AVG that was
installed on the computer. If you are sure that AVG was installed on the
original system and was regularly updated, then use this option for
updating purposes. Update wizard is able to search for all local
installations of AVG and choose the most current one.
Note: If you own only a basic version of the AVG, i.e. without antispyware component, the update process will include only regular AVG
components and anti-virus database. Anti-spyware database will not be
updated. Therefore, the detection of newer spyware/malware threats will
not be possible during scanning process. In such case, we recommend to
update AVG Rescue CD from a removable media or the Internet, if
available.
o
Do not update
If you select this option, AVG will not be updated at all. However we do
not recommend this option.
After you have successfully finished the Update Wizard, the AVG Rescue CD will
attempt to update AVG and then launch the AVG program itself.
Note: As the AVG Rescue CD is loaded within a temporary operating system, the
updating process must be repeated every time the AVG Rescue CD is started.
2.9. How to recognize network adapter drivers
Note: You can skip this chapter if you do not plan to add your custom network
adapter drivers to AVG Rescue CD or if AVG Rescue CD can successfully detect
your network connection.
Warning: As the AVG Rescue CD is built on the 32bit Windows XP SP2 US version,
AVG Rescue CD © 2009 Copyright AVG Technologies CZ, s.r.o. All rights reserved.
37
make sure you always use the appropriate 32bit (x86) drivers when adding new
drivers! Otherwise AVG Rescue CD may become unstable!
You can add your custom network adapter drivers to AVG Rescue CD using the
AVG Rescue CD Creator utility. The process of adding the files is described in
chapter 2.3. To find out, which specific driver files you should add, follow the steps
below.
This procedure applies only to cases, when you are going to use AVG Rescue CD
on the same computer (identical hardware), from which you are using the network
adapter drivers. If you plan to use AVG Rescue CD on a computer with different
hardware equipment, the added drivers will most likely not work properly.
a)
First navigate to the Windows Device Manager.
Click the Windows Start, right-click My Computer and select Manage. In
the new dialog select Device Manager from the System Tools branch.
b)
In the right part of the screen navigate to the Network adapters item. Here
you will find a list of available network adapters. If there are multiple items
listed, look for the adapter you use for Internet connection (if you are
connecting via LAN/WAN network, look for names like Ethernet NIC, LAN
CARD, LAN Adapter, Ethernet Controller etc.).
If you cannot recognize your network adapter from multiple choices, repeat
the steps c) to d) for all the available network cards.
AVG Rescue CD © 2009 Copyright AVG Technologies CZ, s.r.o. All rights reserved.
38
c)
Right-click the chosen network adapter and select Properties. A new dialog,
similar to the sample one, will appear:
AVG Rescue CD © 2009 Copyright AVG Technologies CZ, s.r.o. All rights reserved.
39
Select the Driver tab and click the Driver Details button. In the Driver files
section you will see a list of files and their locations.
Navigate to the mentioned locations and copy all files to a separate folder or
just note down the file name and location.
d)
Now you need the .inf file. You can find it in the c:\Windows\Inf location,
AVG Rescue CD © 2009 Copyright AVG Technologies CZ, s.r.o. All rights reserved.
40
where c:\ is your system drive, and \Windows is your Windows installation
directory. There are several .inf files in this directory, so you need to find the
one, that contains the driver file name that you found in the previous step (in
our case Rtnicxp.sys).
The easiest way to search for the .inf file is to press the Windows Start
button, select Run and type in:
c:\windows\inf
Assuming that this is your windows location and system drive. Confirm your
choice by pressing Enter.
A new dialog will appear, press F3 to open the search panel and if asked,
select All files and folder. There should be two fields All or part of the file
name and A word or phrase in the file. To the first one type in *.inf and to
the second one type in the file name of your driver. Once ready, press the
Search button. You should experience some results:
AVG Rescue CD © 2009 Copyright AVG Technologies CZ, s.r.o. All rights reserved.
41
From the result dialog box select all files found and copy them to a separate
directory (different from the one you placed the previous driver file into), or
just note down the name of the file.
Note: If there are no results listed, make sure you typed in the name of the
driver file correctly, or try to use only part of the driver name.
e)
You can repeat the process for all other files that you found via the Driver
file details dialog, if necessary, but usually one driver uses only one .inf file.
f)
Once you have finished searching for the appropriate files, go back to the
AVG Rescue CD creator application and continue with the ISO file
compilation. More can be found in the chapter 2.3.
AVG Rescue CD © 2009 Copyright AVG Technologies CZ, s.r.o. All rights reserved.
42
3.
After Startup
After successful startup of the AVG Rescue CD, AVG should be automatically
started.
As AVG Rescue CD is built on a specific Windows platform, a low screen resolution
is used by default to avoid graphics adapters compatibility issues. If you experience
difficulties using application with the default screen resolution, you may change it
by navigating to the upper menu File and selecting Utilities on CD/Screen item.
A new dialog will appear:
The Current section shows the actual screen resolution, the Available section
allows you to choose from modes supported by your graphics adapter. Although you
may be able to select a very high resolution as well, we strongly recommend, that
you stick to regular 800x600 or 1024x768 screen resolutions.
Warning: We strongly recommend that you consult your monitor user guide and
check, whether your monitor is able to handle the chosen screen resolution! The
main reason is, that in case of some older monitor types, selecting a very high
screen resolution may cause a device malfunction (in rare cases).
If you accidentally select a resolution, that is higher than your VGA adapter can
handle and the display will become corrupted or unreadable, simply wait five
seconds, AVG Rescue CD will automatically change the resolution back to the
default value.
To confirm your change click the Apply button. The screen resolution will then
change and button name will change to OK. If the screen looks according to your
needs, press the OK button to finally confirm your change and close the dialog by
selecting Cancel button..
Note: If you choose a very high screen resolution, you may experience slower
responses from the user interface. Therefore we strongly recommend using lower
AVG Rescue CD © 2009 Copyright AVG Technologies CZ, s.r.o. All rights reserved.
43
screen resolutions, if possible.
As a next step, we recommend to virus scan the computer by using the standard
predefined test settings. You can find more information about testing in the 5.
Scans overview chapter.
There are several additional tools that can also be useful during the system
recovery process. However their usage is intended for advanced users only. You can
find a more detailed description in chapter 6 – AVG Rescue CD tools.
Note: Depending upon your version of AVG Rescue CD, there might be a
temporary folder AVG_Rescue_Temp created during AVG Rescue CD startup.
Once you finish working with the AVG Rescue CD (i.e. when you successfully boot
up your repaired operating system), you can freely delete this temporary folder and
all its content.
AVG Rescue CD uses virtual (RAM) disk Z to access the temporary folder. Do not
change any content of the temporary folder or the Z drive! This drive and folder
must remain untouched otherwise AVG Rescue CD may not work properly.
AVG Rescue CD © 2009 Copyright AVG Technologies CZ, s.r.o. All rights reserved.
44
4.
AVG Rescue CD – Main Screen
The version of AVG that is distributed on the AVG Rescue CD offers a limited
number of functions, compared to the full standalone Professional version for
regular operating systems. You can only use the basic testing interface, which
allows access to updates, computer system testing for viruses or malware and
elementary configuration. AVG is able to look for threats on various drives and in
the registry entries as well.
Also you can run additional AVG Rescue CD tools (chapter 6) from this interface
(AVG Command Line, freeCommander, Map Network Drive, AVG Ping, AVG Registry
Editor, AVG IP Config, AVG Scan Disk and AVG Notepad).
Note: When you close the main AVG Rescue CD dialog window, your computer will
be restarted!
The main interface offers the following main buttons:
·
Overview - contains list of all available components.
AVG Rescue CD © 2009 Copyright AVG Technologies CZ, s.r.o. All rights reserved.
45
·
Computer scanner – will run a complete computer test.
·
Update now – will allow you to update the AVG virus definitions.
·
Utilities on CD - will open the list of all available utilities and tools.
4.1. Menu File
This menu contains the following items:
·
Utilities on CD - contains list of available tools. For more information see
chapter 6.
·
Reboot computer - Quits the application and restarts the computer.
Alternatively you can use Alt+F4 keyboard shortcut to execute this action.
4.2. Menu Components
This menu contains the following items:
·
System overview - contains the basic overview of security components.
·
Anti-Virus - opens the Anti-Virus component properties (state, database
version etc.).
·
Anti-Spyware - opens the Anti-Spyware component properties (state,
database version etc.).
·
License - opens the License component overview (license number/type/
expiration date etc.).
·
Update Manager
Opens the Update Manager component overview (with statistics and update
status).
Use the bottom Update now button to launch an automatic update. To start
the automatic Update wizard instead, which will guide you through the
update process, use the Update now link located in the left menu.
For further information on update possibilities refer to chapter AVG Rescue CD
Update Wizard.
AVG Rescue CD © 2009 Copyright AVG Technologies CZ, s.r.o. All rights reserved.
46
4.3. Menu History
This menu contains the following items:
·
Scan results
·
Virus Vault
·
Event history log
4.3.1. Scan Results
The Scan results overview dialog is accessible from the menu History via the
Scan results item. The dialog provides a list of of all previously launched scans
and information of their results. More information about this topic can be found in
the Scan Overview/Scan Results chapter.
4.3.2. Virus Vault
Available through upper menu History/Virus Vault.
Virus Vault is a safe environment for the management of suspect/infected objects
detected during AVG tests. Once an infected object is detected during scanning, and
AVG is not able to heal it automatically, you are asked to decide what is to be done
with the suspect object. The recommended solution is to move the object to the
Virus Vault for further treatment.
The Virus vault interface opens in a separate window and offers an overview of
information on quarantined infected objects:
·
Infection type - distinguishes finding types based on their infective level (all
listed objects can be positively or potentially infected)
·
Virus Name - specifies the name of the detected infection according to the
Virus encyclopedia (online)
·
Path to file - full path to the original location of the detected infectious file
·
Original object name - all detected objects listed in the chart have been
labeled with the standard name given by AVG during the scanning process. In
case the object had a specific original name that is known (e.g. a name of an
e-mail attachment that does not respond to the actual content of the
attachment), it will be provided in this column.
AVG Rescue CD © 2009 Copyright AVG Technologies CZ, s.r.o. All rights reserved.
47
·
Date of storage - date and time the suspected file was detected and
removed to the Virus Vault
The following control buttons are accessible from the Virus Vault interface:
·
Restore - removes the infected file back to its original location on your disk
·
Restore As - in case you decide to move the detected infectious object from
the Virus Vault to a selected folder, use this button The suspicious and
detected object will be saved with its original name. If the original name is
not known, the standard name will be used.
·
Delete - removes the infected file from the Virus Vault completely
·
Send to analysis - sends the suspected file for deep analysis to the AVG
virus labs
·
Empty Vault - deletes all stored virus samples.
4.3.3. Event history log
Accessible through the upper menu History/Event History Log.
Within this section you can find a summary of important events that occurred
during AVG operation.
Event History Log records the following types of events:
·
Information about updates of AVG
·
Test start, end or stop (including automatically performed tests)
·
Events connected with virus detection (by scanning) including occurrence
location
·
Other important events
Pressing the Empty list button will allow you to delete the history log. To view the
most up to date records, use the Refresh list button.
4.4. Menu Tools
This menu contains the following items:
·
Scan Computer - starts the complete scan of your computer. For more
information refer to chapter Scans Overview.
AVG Rescue CD © 2009 Copyright AVG Technologies CZ, s.r.o. All rights reserved.
48
·
Scan selected folder - allows to choose a specific folder for scanning. For
more information refer to chapter Scans Overview.
·
Scan file - allows to choose a specific file for scanning. For more information
refer to chapter Scans Overview.
·
Update - starts the Update wizard.
·
Update from directory - starts the update based on existing update files
placed in an directory.
4.5. Menu Help
The Contents menu item launches new window with structured quick help for the
AVG Rescue CD.
The About AVG menu item launches a new dialog window containing the current
AVG Program information (contact information). The information is divided onto
several tabs, where you can find information about program version, your system
information, license agreement and contact details.
AVG Rescue CD © 2009 Copyright AVG Technologies CZ, s.r.o. All rights reserved.
49
5.
Scans Overview
In the AVG edition for AVG Rescue CD, the following tests are available:
·
Scan whole computer
·
Scan specific files or folders
The tests can be started either from the upper menu Tools or by choosing
Computer scanner quick link in the left menu of the main screen
You can change the test configuration according to your own needs. However, for
less experienced computer users it is recommended to use the default test
configuration.
Control buttons available within the scanning interface are the following:
AVG Rescue CD © 2009 Copyright AVG Technologies CZ, s.r.o. All rights reserved.
50
·
Scan history - displays the Scan results overview dialog with the entire
history of scanning
·
View Virus Vault - opens a new window with the Virus Vault - a space where
detected infections are quarantined
5.1. Scan Whole Computer
Scan whole computer - scans your entire computer for possible infections and/or
potentially unwanted programs. This test will scan all hard drives of your computer,
will detect and heal any virus found, or remove the detected infection to the Virus
Vault.
The Scan whole computer can be launched directly from the main interface by
clicking on the scan's icon. No further specific settings have to be configured for
this type of scan, the scanning will start immediately within the Scan is running
dialog (see screenshot). The scanning can be temporarily interrupted (Pause) or
canceled (Cancel) if needed.
AVG Rescue CD © 2009 Copyright AVG Technologies CZ, s.r.o. All rights reserved.
51
You have the option of editing the predefined default settings of the Scan whole
computer. In the list of available scans press the Change scan settings link to
get to the Change scan settings for Scan whole computer dialog. It is
recommended to keep to the default settings unless you have a valid
reason to change them!
Here you will find a list of scanning parameters that can be optionally switched on/
off. By default, most parameters are switched on and the functionality will be
applied during scanning. Unless you have a valid reason to change these settings
we recommend to keep to the pre-defined configuration:
·
Automatically heal/remove infection - (switched on, by default): if a virus
is identified during scanning it can be healed automatically if a cure is
available. In case the infected file cannot be healed automatically, or if you
decide to switch off this option, you will be notified upon a virus detection and
will have to decide what to do with the detected infection. The recommended
action is to remove the infected file to the Virus Vault.
AVG Rescue CD © 2009 Copyright AVG Technologies CZ, s.r.o. All rights reserved.
52
·
Scan Potentially Unwanted Programs and Spyware threats - (switched
on, by default): this parameter controls the Anti-Virus functionality that
allows detection of potentially unwanted programs (executable files that can
run as spyware or adware) and these can then be blocked, or removed;
·
Scan for Tracking Cookies - (switched on, by default): this parameter of the
Anti-Spyware component defines that cookies should be detected during
scanning (HTTP cookies are used for authenticating, tracking, and maintaining
specific information about users, such as site preferences or the contents of
their electronic shopping carts) ;
·
Scan inside archives - (switched on, by default): this parameters defines
that the scanning should check all files even if these are packed inside some
type of archive, e.g. ZIP, RAR, ...
·
Use Heuristics - (switched on, by default): heuristic analysis (dynamic
emulation of the scanned object’s instructions in a virtual computer
environment) will be one of the methods used for virus detection during
scanning;
·
Scan system environment - (switched on, by default): scanning will also
check the system areas of your computer;
·
Scan infectable files only - with this option switched on, files that cannot
get infected will not be scanned. These can be for instance some plain text
files, or some other non-executable files.
·
Scan media files - check to scan media files (Video, Audio etc.). If you leave
this box unchecked, it will reduce the scanning time even more, because
these files are often quite large and are not too likely to be infected by a
virus.
Within the Scan process priority section you can further specify the desired
scanning speed dependent on system resource usage. By default, this option value
is set to the medium level of automatic resource usage. If you want the scanning to
run faster, it will take less time but system resources usage will increase
significantly during its run, and will slow down your other activities on the PC (this
option can be used when your computer is switched on but nobody is currently
working on it). On the other hand, you can decrease system resources usage by
extending the scanning duration.
Note: By default, the scanning configuration is set up for optimum performance.
Unless you have a valid reason to change the scanning settings it is highly
recommended to stick to the predefined configuration. Any configuration changes
AVG Rescue CD © 2009 Copyright AVG Technologies CZ, s.r.o. All rights reserved.
53
should be performed by experienced users only.
·
Set additional scan reports - the link opens a new Scan Reports dialog
where you can select what types of possible findings should be reported:
5.2. Scan Specific FIles or Folders
The editing interface for Scan specific files or folders is identical to the Scan
Whole Computer editing dialog. All configuration options are the same; however,
the default settings are more strict for the Scan whole computer:
AVG Rescue CD © 2009 Copyright AVG Technologies CZ, s.r.o. All rights reserved.
54
All parameters set up in this configuration dialog apply only to the areas selected
for scanning with the Scan of specific files or folders!
Note: For a description of specific parameters please consult the chapter Scans
Overview / Scan Whole Computer.
AVG Rescue CD © 2009 Copyright AVG Technologies CZ, s.r.o. All rights reserved.
55
5.3. Scan Results
The Scan results overview dialog will appear once each scan is completed and is
also accessible from the menu History via the Scan results item. The dialog
provides a list of of all previously launched scans and information of their results:
·
Name - scan designation; it can either be the name of one of the predefined
scans, or a name you have given to your own scheduled scan. Every name
includes an icon indicating the scan result:
- green icon informs there was no infection detected during the scan
- blue icon announces there was an infection detected during the scan but
the infected object was removed automatically
- red icon warns there was an infection detected during the scan and it
could not be removed!
Each icon can either be solid or cut in half - the solid icons stands for a scan
AVG Rescue CD © 2009 Copyright AVG Technologies CZ, s.r.o. All rights reserved.
56
that was completed and finished properly; the cut-in-half icon means the scan
was canceled or interrupted.
Note: For detailed information on each scan please see the Scan Results
dialog accessible via the View details button (in the bottom part of this
dialog).
·
Start time - date and time when the scan was launched
·
End time - date and time when the scan ended
·
Tested objects - number of objects that were checked during scanning
·
Infections - number of virus infections detected / removed
·
Spyware - number of spyware detected / removed
·
Scan log information - information relating to the scanning course and
result (typically on its finalization or interruption)
The control buttons for the Scan results overview dialog are:
·
View details - this button is only active if a specific scan is selected in the
above overview; press it to switch to the Scan results dialog to view detailed
data on the selected scan
·
Delete result - this button is only active if a specific scan is selected in the
above overview; press it to remove the selected item from the scan results
overview
·
Back - switches back to the default dialog of the AVG scanning interface.
5.4. Scan Results Details
If in the Scan Results Overview dialog a specific scan is selected, you can then
click the View details button to switch to the Scan Results dialog providing
detailed data on the course and result of the selected scan.
The dialog is further divided into several tabs:
·
Results Overview - this tab is displayed at all times and provides statistical
data describing the scan progress
·
Infections - this tab is displayed only if a virus infection was detected during
AVG Rescue CD © 2009 Copyright AVG Technologies CZ, s.r.o. All rights reserved.
57
scanning
·
Spyware - this tab is displayed only if spyware was detected during scanning
·
Warnings - this tab is displayed only if some objects unable to be scanned
were detected during scanning
·
Information - this tab is displayed only if some potential threats were
detected but these cannot be classified as any of the above categories; then
the tab provides a warning message on the finding
5.4.1. Results Overview Tab
On the Scan results tab you can find detailed statistics with information on:
·
detected virus infections / spyware
AVG Rescue CD © 2009 Copyright AVG Technologies CZ, s.r.o. All rights reserved.
58
·
removed virus infections / spyware
·
the number of virus infections / spyware that cannot be removed or healed
In addition you will find information on the date and exact time of the scan launch,
on the total number of scanned objects, on the scanning duration and the number
of errors that have occurred during scanning.
If there were infections found during the test that were not deleted, you will
experience the Remove all unhealed infections button, that can be used to
delete all infections that could not be healed.
The Back button returns to the Scan results overview dialog.
5.4.2. Infections Tab
The Infections tab is only displayed in the Scan results dialog if a virus infection
was detected during scanning. The tab is divided into three sections providing the
AVG Rescue CD © 2009 Copyright AVG Technologies CZ, s.r.o. All rights reserved.
59
following information:
·
File - full path to the original location of the infected object
·
Infections - name of the detected virus (for details on specific viruses please
consult the Virus Encyclopedia online)
·
Result - defines the current status of the infected object that was detected
during scanning:
o
Infected - the infected object was detected and left in its original
location (for instance if you have switched off the automatic healing
option in a specific scan settings)
o
Healed - the infected object was healed automatically and left in its
original location
o
Moved to Virus Vault - the infected object was moved to the Virus
Vault quarantine
o
Deleted - the infected object was deleted
o
Locked file - not tested - the respective object is locked and AVG is
therefore unable to scan it
o
Potentially dangerous object - the object was detected as potentially
dangerous but not infected (it can contain macros, for instance); the
information should be taken as a warning only
There are three control buttons available in this dialog:
·
View details - the button opens a new dialog window named Detailed scan
result information:
In this dialog you can find information on the location of the detected
infectious object (Property name). Using the Previous / Next buttons you
can view information on specific findings. Use the Close button to close this
dialog.
·
Remove selected infections - use the button to move the selected finding
to the Virus Vault
·
Remove all unhealed infections - this button deletes all findings that
cannot be healed or moved to the Virus Vault
AVG Rescue CD © 2009 Copyright AVG Technologies CZ, s.r.o. All rights reserved.
60
·
Close results - terminates the detailed information overview and returns to
the Scan results overview dialog
5.4.3. Spyware Tab
The Spyware tab is only displayed in the Scan results dialog in if spyware was
detected during scanning. The tab is divided into three sections providing the
following information:
·
File - full path to the original location of the infected object
·
Infections - name of the detected spyware (for details on specific viruses
please consult the Virus Encyclopedia online)
·
Result - defines the current status of the object that was detected during
scanning:
o
Infected - the infected object was detected and left in its original
location (for instance if you have switched off the automatic healing
option in a specific scan settings)
o
Healed - the infected object was healed automatically and left in its
original location
o
Moved to Virus Vault - the infected object was moved to the Virus
Vault quarantine
o
Deleted - the infected object was deleted
o
Locked file - not tested - the respective object is locked and AVG is
therefore unable to scan it
o
Potentially dangerous object - the object was detected as potentially
dangerous but not infected (it can contain macros, for instance); the
information is a warning only
There are three control buttons available in this dialog:
·
View details - the button opens a new dialog window named Detailed scan
result information:
In this dialog you can find information on the location of the detected
infectious object (Property name). Using the Previous / Next buttons you
can view information on specific findings. Use the Close button to leave this
AVG Rescue CD © 2009 Copyright AVG Technologies CZ, s.r.o. All rights reserved.
61
dialog.
·
Remove selected infections - use the button to move the selected finding
to the Virus Vault
·
Remove all unhealed infections - this button deletes all findings that
cannot be healed or moved to the Virus Vault
·
Close results - terminates the detailed information overview and returns to
the Scan results overview dialog
5.4.4. Warnings Tab
The Warnings tab displays information on "suspected" objects (typically files)
detected during scanning. Typical examples of this kind of findings are: hidden
files, cookies, suspicious registry keys, password protected documents or archives,
etc.
5.4.5. Information Tab
The Information tab contains data on such "findings" that cannot be categorized
as infections, spyware, etc. They can neither be positively labeled as dangerous but
they are still worth your attention. All data on this tab is merely informative.
AVG Rescue CD © 2009 Copyright AVG Technologies CZ, s.r.o. All rights reserved.
62
6.
AVG Rescue CD Tools
The AVG Rescue CD contains several tools for advanced users that can be used for
analyzing, managing and changing operating system settings.
The tools offered are as follows:
·
AVG Command Line
·
freeCommander
·
Map network drive
·
AVG Registry Editor
·
AVG Ping
·
AVG Scan Disk
·
AVG Notepad
·
AVG IP Config
·
AVG Keyboard
·
Screen
6.1. AVG Command line
This utility represents most of the standard MS Windows XP/2000 command line
functions. Commands available within the AVG Command Line are almost
identical to the MS Windows command line version.
You can run the AVG Command Line by clicking the Command line button
located in the left menu of the basic AVG Rescue CD test interface. A new window
where you can enter the commands will appear.
The following table contains a list of all commands available from within the AVG
AVG Rescue CD © 2009 Copyright AVG Technologies CZ, s.r.o. All rights reserved.
63
Command Line. We recommend using these commands only for advanced users,
who are well experienced in using the standard command line. The list contains a
short description of each command and usually one or more usage examples. To
display a complete list of individual commands’ parameters please use the Help
command or /? parameter (like attrib /?).
Command Description
HELP
Provides list of commands with a short description. To display help
information on a specific command use Help <command name>, for
example:
Help Attrib
ATTRIB
Will show help for the Attrib command.
Displays or changes file or directory attributes. Possible attributes
are: read only, Archive, System and Hidden. If used without a
parameter, command will display attributes of all files in the current
directory.
Attrib file.exe
Displays attribute for the file named file.
exe.
Attrib +R file.exe
Will set attribute for the file named file.
exe to Read only.
Attrib –R c:\directory\*. Will remove Read only attribute from all
*
files located in the c:\directory directory.
CALL
Can be used within a batch file to execute commands from another
batch file. When the batch file exits, control returns to the file which
called it.
CALL batch.bat
If used in a batch file, will run file called
batch.bat and execute all commands that
this file contains and then continue to
process the original batch file.
CD
Displays or changes the name of the current directory.
CHDIR
CD c:\
Changes to C drive (C:\)
AVG Rescue CD © 2009 Copyright AVG Technologies CZ, s.r.o. All rights reserved.
64
CD..
Changes to upper directory level (if any
available)
CD Directory
Will change the directory to \directory.
CHDIR Directory
Will change the directory to \directory.
CHDIR C:\
Changes to C drive (C:\)
CLS
Clears the console screen.
COPY
Copies one or more files to another location.
copy c:\*.* c:\temp
Copies all files from the root drive c: to the
Temp directory located on the C drive.
Copy help.txt c:\temp\ Copies file help.txt to the Temp directory
located on the C drive.
DATE
Displays or sets the date. Without parameters will display the current
date setting and prompt for a change.
DEL
Deletes one or more files.
ERASE
del c:\temp\*.*
Deletes all files located in the C:\TEMP
directory.
Erase file.txt
Erases file named file.txt
DIR
Displays a list of files and subdirectories in a directory.
Dir /P
Pauses after each screen full of information.
Dir /S
Displays files in specified directory and all
subdirectories.
Dir /W
Uses wide list format.
AVG Rescue CD © 2009 Copyright AVG Technologies CZ, s.r.o. All rights reserved.
65
Dir /B
ECHO
Uses bare format (no heading information or summary).
Enables or disables displaying of text on the current terminal device.
Echo on
Causes all subsequent commands in a
batch file to be displayed on the terminal
device before they are executed.
Echo off
Reverses the effect of a previous ECHO ON
(ECHO is OFF by default). The ECHO OFF
command can be prevented from displaying
by preceding it with an @ sign.
Echo message
Displays „message“ in the current window.
EXIT
Terminates the current command line session.
FOR
Runs a specified command for each file in a set of files.
To display content of all TXT or DOC files located in the current
directory, use this syntax:
for %f in (*.doc *.txt) do type %f
GOTO
Transfers execution to another statement within a batch file.
The label which is the target of a GOTO may be up to 255 characters
long but may not include spaces (this is different from other
operating systems). If two or more identical labels exist in a batch
file the first one will always be executed. Attempting to GOTO a
nonexistent label terminates the batch file execution.
GOTO has no effect when used interactively.
Goto Reference
IF
Transfers to a line marked within a batch
file as :Reference.
Conditionally executes a command.
if not
If string1 equals string2, file.txt will be
AVG Rescue CD © 2009 Copyright AVG Technologies CZ, s.r.o. All rights reserved.
66
IPCONFIG
“string1”==”string2”
del file.txt
deleted. Comparison is case insensitive.
If not errorlevel 1 del
file.txt
File.txt will be deleted if variable Errorlevel
returns error code other than 1.
This command displays all current TCP/IP network configuration
values. Used without parameter, it displays current IP address/
Subnet Mask and Default Gateway for all network interfaces.
IPCONFIG /ALL
Displays complete TCP/IP network
configuration for all network interfaces.
LABEL
Sets a disk volume label.
MD
Creates a directory or a subdirectory.
MKDIR
MD C:\directory
Creates directory named Directory on the C
drive.
MKDIR example
Creates a directory named “example”
MORE
Displays output divided into more screens.
Dir |more
MOVE
Lists files or directories and enables a pause
between displaying each screen.
Moves one or more files to another location.
move \docs\*.doc \admin\documents
Moves all files with .DOC extension from the \Docs directory to the
\admin\documents directory.
PATH
Displays or changes the AVG Rescue CD CMI search path. Entering
PATH will display the current PATH setting (initially this is the value
given in your wine.conf file). To change the setting, follow the PATH
command with the new value.
PATH=C:\Program Files\Far;C:\WINDOWS\system32;C:\WINDOWS;
AVG Rescue CD © 2009 Copyright AVG Technologies CZ, s.r.o. All rights reserved.
67
PAUSE
PAUSE displays a message on the screen Press Return key to
continue and waits for the user to press the Return key. It is mainly
useful in batch files to allow the user to read the output of a previous
command before it scrolls off the screen.
PING
This utility serves for verifying your Internet connection or for
verifying the availability of a remote server/station. It is basically a
diagnostic utility based on TCP/IP which sends so called ICMP
packets to a given IP address or a domain name.
Used without parameter, it displays help.
Possible commands:
Ping www.avg.com
Verifies availability/response of the
www.avg.com server
Ping -t www.avg.com
Continually keeps sending request
messages to the server until
interrupted by user (using
CTRL+PAUSE/BREAK or CTRL+C)
Ping -n 2 www.avg.com
Specifies the number of requests to
be sent to the given server.
Default value is 4.
Ping -w 200 www.avg.com
Specifies the time limit to wait for
the server reply. Indicated in
milliseconds.
Default value is 4000 (4 seconds)
PROMPT
PROMPT sets the command-line prompt. The string following the
PROMPT command (and the space immediately after) appears at the
beginning of the line when AVG Rescue CD CMI is waiting for input.
PROMPT $q
Sets the command line to equals sign (=).
AVG Rescue CD © 2009 Copyright AVG Technologies CZ, s.r.o. All rights reserved.
68
PUSHD
Enables you to store the name of a directory for use by the POPD
command and immediately changes to the specified directory.
PUSHD c:\somedirectory
POPD
Switches to the directory stored by the PUSHD command.
REM
A command line beginning REM (followed by a space) performs no
action, and can therefore be used as a comment in a batch file.
REM This is a note in the batch file and will not be displayed
RENAME
Renames a file or files.
REN
Ren dok.txt dok.doc
Rename dok.txt dok.doc
RMDIR
Removes (deletes) an empty directory.
RD
Rmdir c:\directory
RD c:\directory
SET
Displays or changes the AVG Rescue CD CMI environment variables.
Set windir=c:\win
Renames file dok.txt in the current
directory to file called dok.doc.
Deletes a directory directory on the C drive.
Sets the variable Windir to c:\win value.
SHIFT
Used in a batch file to remove one parameter from the head of the
list, so parameter 2 becomes parameter 1 and so on. It has no effect
if called from the command line.
START
Starts a separate window to run a specified program or command.
start mybatch.bat
AVGSUBST Enables you to assign a path to a drive letter and to create a virtual
drive.
avgsubst h: c:\folder
Creates a virtual disk h, that will contain
all files and folders located under c:\folder
AVG Rescue CD © 2009 Copyright AVG Technologies CZ, s.r.o. All rights reserved.
69
avgsubst h: /d
Removes the virtual drive h
SYSINFO
Used without parameter, the command displays current computer
system information about the CPU and Memory.
TIME
Displays or sets the system time.
TITLE
Sets the window title for the AVG Rescue CD CMI window.
TITLE This is a changed title
TYPE
Copies file content to the console device (or elsewhere if redirected).
No check is made that the file is readable text.
Type file.txt
VER
Displays file.txt content.
Displays file information (usually version, copyright, language, etc.),
if available. Works mostly with .exe, .dll file types.
Used without parameter displays the version of the AVG Rescue CD
CMI that you are running.
Ver notepad.exe
Displays notepad.exe file information.
VOL
Displays the disk volume label and serial number, if they exist.
XCOPY
Copies files and complete directory trees.
Examples of usage:
To update files in the \web directory by using files located in the
\source directory that were changed since 20-2-2006, enter the
following syntax:
xcopy \source \web /d: 20-02-06
To update files in the \web directory ignoring the date, use this
syntax:
xcopy \source \web /u
AVG Rescue CD © 2009 Copyright AVG Technologies CZ, s.r.o. All rights reserved.
70
General advice - instead of putting a specific file name as a parameter, you can use
(in most cases) standard substitutional characters called wildcards (? or *) and
apply command to more files.
Batch file example
@echo off
REM This is a simple batch file example
REM Creates a directory named Soubory on c:\ disk
If not exist c:\soubory md c:\soubory
REM Removes attribute settings "read-only" for all .txt files in the current directory
attrib -R *.txt
REM Copies all .txt files to the c:\soubory folder
copy *.txt c:\soubory\
The batch commands need to be placed within the text file with .bat extension (like
batch.bat for example). Once you execute the batch file, all entered commands will
be processed.
%ERRORLEVEL% is a system variable type that returns an error code of last
command used. Any non-zero value usually indicates an error.
It is also possible to use an existing batch (.bat or .cmd), but keep in mind that it
may not be 100% compatible with AVG Command Line. Therefore please always
verify before running, that all commands (and their parameters) used in the batch
are supported by AVG Command Line.
6.2. freeCommander
We recommend that only well experienced computer users with advanced
computer knowledge use this program!
freeCommander is a dual-panel file explorer similar to programs such as Total
Commander. It is slightly different from the standard Windows Explorer although it
offers the same functions plus many additional features.
AVG Rescue CD © 2009 Copyright AVG Technologies CZ, s.r.o. All rights reserved.
71
a)
Basic usage
Selecting files or directories is almost the same as in Windows Explorer. The
only main difference is, that you have two panels, where each can display
different content (drive/directory) for convenient actions.
To select a drive, click on the appropriate dropdown top menu either in the
left or right panel. freeCommander allows you to browse through My network
places as well, if network connection is available.
You can easily scan one or more folders for viruses directly from the
freeCommander user interface. Simply select the folders/files to be scanned,
right-click with your mouse and select Scan with AVG. A new dialog will pop
up and the selected content will be scanned.
b)
Menu File
o
View (F3) - will use built-in viewer to view text files, images or
possibly other content as well.
AVG Rescue CD © 2009 Copyright AVG Technologies CZ, s.r.o. All rights reserved.
72
o
Edit (F4) - built-in editor for editing text files.
o
Copy (F5) - this will open a dialog box where you can type the target
path for copying files/directories. As a default, the path of the target
window will be presented.
o
Move (F6) - this will open a Move dialog box where you can select the
target path for moving files or directories. As a default, the path of the
target window will be presented.
o
Delete (F8) - to move files or directories to Windows Recycle bin,
select them and press F8. If you prefer to completely remove your files
or directories from a drive, use Shift-F8 instead.
o
Wipe (Shift+Ctrl+F8) - alternative deletion method. Enables you to
wipe selected files or directories. Wiping is a term used to describe the
process of shredding the contents of a file (and its disk space). It is
impossible to restore any data that has been properly wiped. Useful for
removing files with sensitive/private content.
You can choose the number of overwrite runs (the more runs, the more
securely the chosen content will be removed but also the more time it
will take to complete).
c)
o
Rename (F2) - will rename the current file or directory.
o
Pack (Alt+F5) - in special cases, you may need to archive some files to
a single pack. freeCommander uses an integrated Zip system to pack
your files. Simply select the files or directories you want to archive, and
press Alt+F5.
o
Unpack (Alt+F6) - use this function to unpack a compatible .zip file.
o
Search (Alt+F7) - opens a comprehensive search dialog box, where
you can select several options for searching for files or file contents.
Menu Folder
Contains a list of functions related to folders. You can create new (F7), set
filter (Ctrl+F), count folder size (Alt+F9), sort folders, compare etc.
d)
Menu View
You can optionally customize viewing options here for both columns (panels).
e)
Menu Extras
Contains shortcuts to settings dialogs and several useful tools:
AVG Rescue CD © 2009 Copyright AVG Technologies CZ, s.r.o. All rights reserved.
73
o
Favorite tools - contains links to all AVG Rescue CD tools.
o
Connect network drive (F11) - use this to map a network drive. More
information can be found in the chapter 6.3 Map network drive
o
Disconnect network drive (F12) - use this to unmap a network drive.
More information can be found in the chapter 6.3 Map network drive
o
Run - equivalent to Windows Start/Run function.
o
DOS box (CTRL+D) -will start the AVG Command Line (See chapter
6.1).
o
Take Desktop Snapshot - allows you to enable and configure the
screenshot capturing feature. Default screen capture hotkey is
Shift+Ctrl+F10 (pressed at the same time).
If you decide to save the snapshot(s) to a file (default setting), you will
find the saved files (by default) in the z:\freeCommander folder. You can
use this function for example to make a screenshot of some important
screen and send it to the AVG technical support in case of some specific
problems.
6.3. Map network drive
You can use this tool to easily connect or disconnect a network drive.
You can mount a drive letter to any shared resource on a network. After that, you
can quickly access the resource(s) by using either the freeCommander or AVG
Command Line. Additionally you can test the mounted drive for viruses or malware
with AVG.
·
Drive - select a drive letter to which you want the shared resource to be
mounted or select a drive letter you want to dismount.
AVG Rescue CD © 2009 Copyright AVG Technologies CZ, s.r.o. All rights reserved.
74
·
Folder - type full path to the shared resource (folder)
Also in some cases, authentication may be needed for access, in that case fill in
the Username and Password fields.
Note: In case your network is domain-based, you may need to specify the
username in the following format:
Yourdomain\YourUserName
Working buttons:
·
Clear - click this button to clear the content of all fields.
·
Mount/Unmount - click this button to process the selected choice and
assign/unassign a drive letter of the shared resource.
·
Cancel - closes the dialog.
6.4. AVG Registry editor
AVG Registry Editor is an advanced tool for viewing and changing settings in your
system registry that contains sensitive information about how the computer runs.
The registry can be defined as a database of windows configuration information
organized in a tree format. The tool is intended mainly for advanced users who are
able not only to edit, but also safely restore the registry in case of accidental
misuse.
We strongly suggest not to edit the registry unless it is absolutely
necessary. By changing the registry in an incorrect way, your computer
may not function properly.
During the AVG Rescue CD startup, chosen registry entries of all local systems are
loaded into temporary storage and then made available by using the AVG Registry
Editor tool. Therefore the user can review the original system settings.
AVG Rescue CD © 2009 Copyright AVG Technologies CZ, s.r.o. All rights reserved.
75
In the left part of the interface, a tree with chosen registry hives is displayed. On
the sample screenshot you can see a registry tree that belongs to an operating
system found on the C drive in the Windows directory. If the drive is labeled, the
label name is showed within the square brackets as indicated on the sample
screenshot.
Located In the right part, are values corresponding to the selected key. These
values can be changed by double clicking on the selected value (or by selecting
Edit/Change from the upper menu). Values can be deleted by pressing the DEL
button or by clicking the Edit/Delete upper menu item.
Adding values or keys is possible through the Edit/New upper menu item followed
by choosing the requested value type or key. If you want to copy the name of the
selected key to the clipboard, you can do so by choosing Edit/Copy key name
from the upper menu.
If for some reason you need to add an existing registry hive (registry database)
located in different part of the hard drive, you can do so by clicking on User
Loaded Registry Files and then selecting the File/Load Hive from the upper
menu. The requested registry hive file will be loaded. You can load more hives by
repeating the whole process. You can only import complete hive files; importing .
reg or similar export files is not supported.
Successfully loaded hives can be viewed and edited in the same way as any other
registry entry. Note, that every change done will be immediately saved to the
particular hive file! To unload the hive file choose the database and from the File
menu select Unload Hive item.
AVG Rescue CD © 2009 Copyright AVG Technologies CZ, s.r.o. All rights reserved.
76
Example screenshot – loaded software registry hive (from a different hard drive
location).
To export a selected branch to a .reg file, click File menu and select Export,
choose a file name and confirm your choice by pressing Save button. Registry files
are saved with .reg extension.
6.5. AVG Ping
AVG Ping is a utility for verifying your Internet connection, directly from the AVG
Rescue CD environment, or for verifying the availability of a remote server/
station. It is basically a diagnostic utility based on TCP/IP which sends so called
ICMP packets to a given IP address or domain name.
It can also lookup a DNS name and display it as an IP address.
AVG Rescue CD © 2009 Copyright AVG Technologies CZ, s.r.o. All rights reserved.
77
Use Server field to enter the computer DNS or IP address you want to verify for
availability. Then choose the number of retries in the Retries box and click the
Ping button.
The results will be displayed with information about transfer time.
Note: The list of tested servers will be kept also after the AVG Ping application
restart.
6.6. AVG Scan disk
The AVG Scan Disk tool is a substitute for the ChkDsk utility, which is usually
available in the MS Windows operating systems. AVG Scan Disk can analyze hard
disks and report (and if possible fix) errors. The current hard disk status is
displayed after each analysis.
After AVG Scan Disk startup, choose the drive letter that is to be checked. We
recommend that you only analyze the drive during the first run, i.e. only have the
Surface scan option ticked. Analysis can be started by clicking the Start scan
button.
If there are any errors listed in the final report, then you can try to fix them by
ticking the Fix errors box and re-analyzing the drive again by clicking the Start
scan button. This time AVG Scan Disk will try to fix the recently found errors.
AVG Rescue CD © 2009 Copyright AVG Technologies CZ, s.r.o. All rights reserved.
78
Before using the Fix errors feature, we recommend to backup all important
data from your drive to some portable device. It is recommended to run
AVG Scan Disk before starting any other applications, because AVG Scan
Disk needs exclusive access to the scanned drive when fixing errors. Also
do not perform any other actions during the analysis.
Once the checking process is finished, you can save the log by pressing the Save
log button.
6.7. AVG Notepad
AVG Notepad is a simple text editor that allows you to create or edit plain TXT
documents. It can be used to quickly open and edit some system configuration
files, like autoexec.bat, config.sys, system.ini etc.
AVG Notepad supports only very basic formatting. Saving files is possible under
text format with Unicode, ANSI, UTF-8 or Unicode big endian coding. Using different
kinds of coding might be useful when saving documents in special character sets.
6.8. AVG IP Config
AVG IP Config is a utility for managing your network settings. It displays all
current TCP/IP network configuration values and allows you to change them if
needed.
·
IP Config tab
AVG Rescue CD © 2009 Copyright AVG Technologies CZ, s.r.o. All rights reserved.
79
The IP Config tab shows the current network settings for the selected
network adapter (see the Adapter menu) and allows you to change your DNS
and IP settings.
If you are connected directly to the Internet by LAN or another kind of CATV
(Cable TV) connection, your computer will usually obtain all necessary
configuration information from the DHCP server. The example figure above
shows the settings for a LAN connection where the settings are assigned
automatically.
If there are no settings present, and you are convinced that you should be
able to connect to the Internet, please contact your Internet (network
connection) provider and ask for the settings.
To specify your own network settings, click the Use the following IP
address or Use the following DNS server addresses radio buttons and
insert your own values. To confirm all changes press the Apply button or OK
button to finish editing.
·
Details tab
AVG Rescue CD © 2009 Copyright AVG Technologies CZ, s.r.o. All rights reserved.
80
The Details tab shows more detailed information about your network
connection settings.
AVG Rescue CD © 2009 Copyright AVG Technologies CZ, s.r.o. All rights reserved.
81
6.9. AVG Keyboard
AVG Keyboard is a utility for changing keyboard layout. By default, the US keyboard
layout is used. If you prefer to use a different one, simply choose another from the
Available drop down menu.
To confirm your choice use the Apply button. Once you confirm your choice, you
can use the lower left corner icon to display the actual keyboard layout (just for
overview, if it fits your needs). Press Cancel button to close the dialogue.
Note: You must restart the application, in which you want the new layout to be
used, if it is currently running (e.g. Notepad).
AVG Rescue CD © 2009 Copyright AVG Technologies CZ, s.r.o. All rights reserved.
82
7.
FAQ and Technical Support
Should you have any problems with your AVG Rescue CD or AVG, either business
or technical, please refer to the FAQ section of the AVG website at www.avg.com.
If you do not succeed in finding help this way, contact the technical support
department at [email protected]. Be sure to include your AVG License number in
the body of the e-mail.
Should you experience any serious difficulties with your copy of AVG Rescue CD,
you may consult the technical support team using the following telephone number:
+420 533 338 923 (standard telephone tariff applies to local and national calls).
Please prepare your valid Communication Key that you received with your AVG
Rescue CD license number.
AVG Rescue CD © 2009 Copyright AVG Technologies CZ, s.r.o. All rights reserved.
83