1
USER MANUAL
Table of Contents
Welcome......................................................................................................................... 1
Our Goals .................................................................................................................................... 1
Our Process ................................................................................................................................. 1
So It’s All Done Now? .................................................................................................................. 2
Frequently Asked Questions ........................................................................................... 3
Can I print a label directly onto a CD? Where can I get label paper? ......................................... 3
How can I import my own graphics and put them on labels? ...................................................... 3
I imported my own graphic for a label background and the art looks squished (or stretched).... 4
I printed and nothing happened................................................................................................... 4
How can I import the song titles from the CD I burned so I don't have to type them all in?........ 4
Getting Around in ImageMixer Label Maker .................................................................... 5
Hiding the Tools Window ............................................................................................................. 5
Making the Tools Window Bigger or Smaller............................................................................... 5
The Label Tabs............................................................................................................................ 6
The “Display Tracks” Button ........................................................................................................ 6
Backgrounds................................................................................................................... 7
Editing Background Images......................................................................................................... 7
More Backgrounds....................................................................................................................... 7
Layouts ........................................................................................................................... 8
Creating Your Own Layouts ........................................................................................................ 8
Adding your own images to labels................................................................................... 9
Finding Images to Add to a Label................................................................................................ 9
Using an Image You’ve Found as a Label Background .............................................................. 9
Adding an Image You’ve Found as Clip Art............................................................................... 10
Clip Art .......................................................................................................................... 11
Clip Art Search........................................................................................................................... 11
Clip Art Explore.......................................................................................................................... 11
Stuff You Can Do with Clip Art .................................................................................................. 12
Text............................................................................................................................... 15
Displaying Text .......................................................................................................................... 15
The Text Properties Dialog ........................................................................................................ 18
The "Font" Page ........................................................................................................................ 19
The Columns Page .................................................................................................................... 29
The "Paragraph" Page............................................................................................................... 31
The Fields Page......................................................................................................................... 31
i
Working with CD Tracks................................................................................................ 35
The Tracks Window ................................................................................................................... 35
Tracks Formatting Dialog........................................................................................................... 36
Choose a CD Drive.................................................................................................................... 38
"Choose a Disc ID" Dialog ......................................................................................................... 38
Playlist Search Dialog................................................................................................................ 38
Colored Shapes ............................................................................................................ 39
Printing ......................................................................................................................... 40
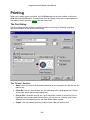
The Print Dialog ......................................................................................................................... 40
The Insert-Paper Dialog:............................................................................................................ 42
Printing for the First Time: ......................................................................................................... 42
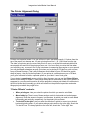
The Printer Alignment Dialog..................................................................................................... 43
The Your-Label's-Too-Darn-Big Dialog ..................................................................................... 44
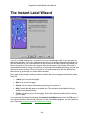
The Instant-Label Wizard .............................................................................................. 46
The "Choose Label Type" Page ................................................................................................ 47
The "Choose Theme" Page ....................................................................................................... 47
The "Tracks" Page..................................................................................................................... 47
The "Additional Text Fields" Page ............................................................................................. 48
The "Finish" Page ...................................................................................................................... 48
The Preferences Dialog ................................................................................................ 49
The "Miscellaneous" Page......................................................................................................... 49
The "Main Toolbar" Page........................................................................................................... 50
The "Auto-Run Options" Page ................................................................................................... 50
The "Printer Alignment" Page .................................................................................................... 52
The "Stretch Labels" Page......................................................................................................... 53
The "Printing Fold Lines" Page.................................................................................................. 53
Other Useful Dialogs..................................................................................................... 55
Save as Theme.......................................................................................................................... 55
Stuff to Save: ............................................................................................................................. 55
Tiled Background Settings......................................................................................................... 55
New File ..................................................................................................................................... 56
Registration, Purchase, & Support ................................................................................ 57
Why Register? ........................................................................................................................... 57
Purchase.................................................................................................................................... 57
Support ...................................................................................................................................... 57
Credits .......................................................................................................................... 58
Website:........................................................................................................................ 58
ii
Imagemixer Label Maker User Manual
Welcome
This section is more or less a philosophical overview of the ImageMixer Label Maker. If you’re
leaning forward in your chair right now, pupils dilated, mouse in a deathgrip, all because of
something you haven’t been able to figure out how to do – see the . If you’re reclining peacefully,
with a comforting beverage beside you and perhaps one hand thoughtfully stroking your chin –
read on.
Our Goals
The ImageMixer LabelMaker’s mission is to be fun, quality, easy to use software. We want to be
a program that never makes you want to swear at your computer or throw your monitor out the
window. We want to help you get your labels made quickly and enjoy doing it. And we want to
help you bring out your creative side, even if you don’t think you have one.
One of the first things we realized is that if you want to be able to get where you need to go and
try all the things you want to try, you need to have your tools handy. You don’t want to have to
weed through menus and nested subdialogs and hieroglyphic-laden, randomly arranged
toolbars to get at the image or tool you’re looking for. When you were four years old and you set
out to color a picture, you set your paper in front of you and dumped all your crayons out beside
it. Everything you needed was in easy reach. You didn’t put all your red crayons in one of the
kitchen drawers, your blue crayons in a box in the attic, and your green crayons under the bed
at your friend’s house across town. That would have been stupid. That would have been the sort
of thing – and I blush to say so, because I belong to this category – that a programmer would do.
We’ve tried to avoid the programmer’s way and, instead, keep all your tools just a click away so
the program doesn’t get in the way when you’re in a creative trance (you’re in those all the time,
right?). For more details on our approach to tools and general program layout, see Getting
Around in the CD Label Maker.
Our Process
“The best way to have a good idea is to have lots of ideas.”
--Linus Pauling
My colleagues loved it when I brought in a new version of the program with some important new
feature. They seemed to think it was one of those carnival booths where you throw darts at the
rows of balloons until you pop the one with the prize behind it. “I don’t think this is clear,” one of
them might say. (Pop!) “It’s too hard to find this button,” might say another. (Pop!) “You need to
be a techie to figure this out,” a third might add. (Pop! Pop! Pop!) Eventually, having reduced the
program to rubble, we’d agree on what seemed to be the clearest, simplest way to access
whatever feature we were adding, and I’d head back to my code editor. I soon figured that I
could shorten this process by making us all argue over how to add a feature before I wrote a
version to try. This would be like having my Acousticohorts help set up the booth, so that they
knew beforehand which balloon hid the prize. Surely this would reduce the carnage. But you
know what? It didn’t change a thing. The same people who swore oaths over the best way to
arrange the tabs in the print dialog would violently disagree as soon as they saw it in action.
Some things, it would seem, like program interfaces and living room paint colors, just have to be
tried out before you know what works.
-1-
Imagemixer Label Maker User Manual
And so, at least partly because of this, it’s taken more than a year to bring this program to you.
Not that I’m complaining. The painstaking process we’ve gone through has helped us create a
program that, I think, makes it easier, quicker, and more fun than it’s ever been for you to create
labels you like. Without the feedback and ideas I received throughout the process, the program
would be nowhere near what it is today. So thanks, Joseph, Ronnie, Lois, Brian, Donda, and the
beta team. Please ask your nearest neighbor to pat you on the back.
So It’s All Done Now?
Think back to all the bestselling novels you’ve written. Once they hit the bookshelves, you were
done with them. Perhaps you received fan mail that said, “I just adored your book. I’d mow your
lawn with tweezers if I could only have a tithe of your talent. And by the way, if Kermit the Pirate
had a peg leg in chapter three, shouldn’t he have succumbed to the pack of rabid unicycle
beavers in chapter eleven?” And you’d think, “Hey, that’s right!” But there was nothing you could
do about it now. It was out of your hands.
We don’t have that problem. We can keep releasing new versions as long as enough of our
users register the software that we can afford to keep doing so. If one of our users – you, for
instance – find a bug or have a great idea, we can improve the program. As long as you tell us,
that is. If you notice a way to make the program simpler, or there’s a feature you really, really,
really want, let us know. Your suggestion might find its way into the program. That sort of thing
doesn’t happen in many places. No matter how many touching letters you write to William
Shakespeare, he won’t change Romeo & Juliet to let the poor kids wake up in time and get
married after all. No matter how much you threaten Leonardo Da Vinci, he won’t add a
moustache to the Mona Lisa. With us, you have a chance. We make no guarantees, but we do
listen to our users, and we like to hear from them. Without them, after all, we wouldn’t be here.
Enjoy the program; we hope it helps you find your inner CD label making artist.
Russ Cary
-2-
Imagemixer Label Maker User Manual
Frequently Asked Questions
Can I print a label directly onto a CD? Where can I get label paper?
There are a few printers available that can print directly onto a CD. Imagemixer LabelMaker
currently supports the Epson Stylus Photo 900, the Epson Stylus Photo 960, and the Primera
Signature series. For direct-to-CD printing, you can’t use regular CDs; you need to buy printable
CDs instead. These are usually labeled as printable CDs and have a white surface.
Several companies make CD label paper; you can find it at most large electronics stores and
some large discount stores. If you're just starting out printing CD labels, we also recommend
you buy a CD label applicator. It's a little plastic device, usually selling for a few dollars, that
makes it much easier for you to get your labels aligned correctly on your CD.
If you don't want to print jewel case labels on plain paper, you can buy premade jewel case
label stock at the same places you find CD label paper. It's usually perforated and is thicker
than typical printer paper.
How can I import my own graphics and put them on labels?
Imagemixer LabelMaker provides two ways to find images on your computer that you can add to
your labels:
1. Click on the "Art Search" tab, enter some text that's in the file or folder names of the art
you're looking for, and click the "Search" button. Thumbnails of all supported image files
matching your search terms will appear in the window underneath the search button. We
support jpg, bmp, png, and pcx graphics types.
2. Click on the "Art Explore" tab, and parse through the explorer tree to see thumbnails of
all the supported image files in a particular folder.
If you've found an image you want to make your background, you can do it one of these ways:
1. Double-left-click on the image's thumbnail to make it the background
or
2. Ctrl + double-click the thumbnail to make it a tiled background
or
3. Right-click on the image's thumbnail and select one of the "Set as background" options.
If the image you've selected doesn't have the same aspect ratio as the label you're putting it on,
it may appear stretched or squished. It that's the case, you can left-click the image's thumbnail,
drag it onto the label and release the mouse button, then click on the sizing bars to make it big
enough to overlap the label without altering its aspect ratio, and click on its title bar or the image
itself to position it where you want it.
If you’ve found an image you want to add to your label as a piece of clip art (rather than as the
label background), just left-click on its thumbnail, drag it onto your label, and release the mouse
button. The program will place the image where you dropped it. As soon as you drop it, it should
be in “selected” mode, with sizing bars and a toolbar. You can click on the image’s sizing bars to
resize the image; you can click on the image’s title bar or the image itself to move it. You can
also right-click on the image to pop up a menu with a variety of editing options.
You can also drag image files from Windows Explorer and drop them onto your label.
-3-
Imagemixer Label Maker User Manual
I imported my own graphic for a label background and the art looks
squished (or stretched).
Your background graphic may look squished or stretched if it has a dramatically different aspect
ratio from the label you're putting it on. When you insert a picture as a label background, it will
get either stretched or compressed to fit the dimensions of the label you're putting it on. If your
image is twice as wide as it is high, for instance, and you try to make it the background for the
jewel case front, which is square, your image may appear squished.
To avoid this, you can either use images that are roughly the same shape (and aspect ratio) as
the labels you want to put them on, or you can add them to the label as regular clip art rather
than as backgrounds, so you can resize them however you like. You can do this by just clicking
on the image's thumbnail and dragging it onto the label. You can then move & resize it so that it
covers the entire label. It will keep its original aspect ratio unless you right-click on it and
uncheck the "maintain aspect ratio" option. You can click the "send to back" button on its toolbar
to make sure it appears behind everything else.
I printed and nothing happened.
If nothing came out of the printer, it's likely that you selected a different printer than the one you
expected to print on. Click the "Print" toolbar button to launch the Print dialog, then check to see
what printer is listed at the top of the dialog in the "name" field. Is this the printer you meant to
print on? If not, set it to the correct one.
If you got a blank page from the printer, you probably either tried to print a blank label – one you
hadn't added any images, shapes, or text to – or your hard disk is nearly full. If your hard disk
doesn't have at least 200 megabytes of free space, your printer driver is likely to have trouble
creating the temporary files it needs to print with.
How can I import the song titles from the CD I burned so I don't have
to type them all in?
If you burned an audio CD, the Imagemixer Label Maker can usually import your song
information from the playlist file you created with your CD Burner program. When you burned
the CD, your CD burning software should have created a file storing the names of all the song
files that you were burning onto the CD. If you didn't save this list, please do so from now on -- it
will save you lots of typing.
If you click the "Tracks" button on the Imagemixer Label Maker's toolbar to launch the CD
Contents dialog and then click the "Import" button on that dialog, the Label Maker will pop up a
dialog that lets you find & select the playlist file you used to create your CD. Once you select the
file, the Label Maker will scan the playlist file, load your song information from it, and display it in
the CD Contents dialog.
-4-
Imagemixer Label Maker User Manual
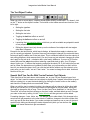
Getting Around in ImageMixer Label Maker
We've split the program's main window into two pieces: on the left, tools or ingredients; on the
right, your actual labels (or, if you like the ingredients metaphor, "stew"). It’s set up this way
because it’s hard to concentrate when the tools you need aren’t handy. When we want to try out
a new background on my label, we don’t want to launch a file-open dialog, search for the right
directory, select an image, and close the dialog. That’s way too much work to repeat for every
single background we might want to look at. We want our backgrounds and clip art and so forth
available all the time, so we can try out new ones without having to organize a search party.
Consequently, there’s a row of tabs along the top-left side of the program, labeled, respectively,
“layouts”, “backgrounds”, “art search”, and “art explore”. Clicking on one of the tabs brings up
one of the categories of stuff you can add to your label. Clicking on “backgrounds,” for instance,
brings up a list of little thumbnailed images of all the built-in backgrounds you can add to your
currently selected label. Click on a background, and it becomes your label’s background. Click
on another one (or use the arrow keys to select another one), and now it becomes your label’s
new background. We think that’s pretty straightforward.
Hiding the Tools Window
Of course, you may be the type who can’t abide distractions. “How can I concentrate on
perfecting the elements I’ve already chosen for my label,” you may say, “if I’ve got all these
other backgrounds and clip arts tempting me?” I know I tend to be this way in chocolate shops.
So if you want the tools window to go away altogether, you can click on the left arrow button
at the bottom of the window. This will make the labels window take up the entire screen. Once
you do this, the left arrow button will turn into a right arrow button; clicking on it will bring the
tools window back again.
Making the Tools Window Bigger or Smaller
Perhaps you want, like me, to have your tools window visible, but you find the cosmic balance
between the yin of tools and the yang of labels (or vice versa) is a little off, and you’d like a little
more or less of the tools window. This is easily solved. When you want your tools window to be
bigger or smaller, you can click on the border between the tools and labels windows and drag it
to size things however you want them. The mouse cursor will change into a little horizontal
resizing arrow whenever it's over the border.
-5-
Imagemixer Label Maker User Manual
The Label Tabs
If you’ve ever wondered, “How do I edit all the different labels that a CD has?” or “What’s that
row of tabs along the upper right hand side of the window for?”, then you’ve come to the right
paragraph. The row of tabs above the labels window corresponds to the different label faces
you can design. Clicking on a tab will bring its respective label to the foreground so you can play
with it. Clicking on a label tab will also change the tools/ingredients windows to display the
available backgrounds and layouts for the new foreground label.
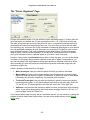
The “Display Tracks” Button
We presume that your CD or DVD has something on it. Not many people make labels for blank
CDs – although if that’s what you’re doing, we certainly have no objections. And not many
people want to type in their tracks list once to display on their disc label, and once again for the
front of their jewel case, and once again for – well, you get the idea. We’ve created a special
Tracks list so that you can just type in your tracks list once (or let the program import it for you, if
you’ve got a playlist file), and then display it on whichever labels you like. If you click the Show
Tracks button, the program will display your tracks list on the current label. If you click it again,
the program will hide your tracks information. For more information, see the Displaying Text
section.
-6-
Imagemixer Label Maker User Manual
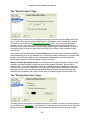
Backgrounds
Click on the Backgrounds tab along the top-left side of the program’s main window, and you’ll
see thumbnails of all the pre-built background images that we ship with the program. Click on
any one of the thumbnails, and it will become your label’s background image.
If you want to edit your background image or, heaven forbid, remove it altogether, you’ll need to
escort your mouse over to the label window and right-click on the background image, which will
popup a menu with various options for taking care of your background-editing needs. If you’re
not a right-clicker, you can, alternatively, select the Label option on the main menu.
Editing Background Images
Selecting the Edit Background Image option from the Label menu will bring up a list of things
you can do to your background image. Here’s the lot:
90 degrees clockwise: Rotate the background image 90 degrees clockwise.
90 degrees counterclockwise: Rotate the background image 90 degrees
counterclockwise.
180 degrees: Rotate the background 180 degrees.
Flip vertical: Flip the image vertically.
Flip horizontal: Flip the image horizontally (make a mirror image of it).
Convert to black and white: Technically, we should describe this as "convert to
grayscale."
Invert (make a negative): Reverse the color of every pixel in the background image (if
this doesn’t make sense to you, just try it).
Make brighter: Make the background image a little bit brighter.
Make darker: Make the background image a little bit darker.
Reload: Reload the background image in its original form, discarding any of the editing
options in the above list that you may have performed.
Of course, if you try any of these edits and you don’t like them, you can always click on
the "Undo" button to get rid of them.
More Backgrounds
We’ve got lots more background art than we could fit into our download file. Open the Help
menu and click on the Check for new art option, and we’ll launch your browser with the URL of
our extra-art page. If there isn’t any art there (which is the case at the time of writing this help
file, because we haven’t gotten around to making an install program for all our extra art yet),
check back later.
-7-
Imagemixer Label Maker User Manual
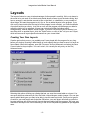
Layouts
The layouts feature is a way to take advantage of other people’s creativity. We’re not always in
the mood to lay out each of our labels, and decide where we want to put the tracks listing, and
how to arrange it, and whether we want a title on the label, or a dedication, or any number of
other things. We want the program to do it for us. So we added layouts to the program. If you
click on the Layouts tab (near the top left of the program’s main window), you’ll see thumbnails
of pre-built layouts you can try. Just click on one, and the program will rearrange your label to
match the layout you’ve selected. A layout can include text fields (including tracks
arrangements), colored shapes, and/or images. If you don’t like a layout you’ve selected, you
can either click on another layout, click the "Undo" button, or click on the "roll your own" layout,
which will remove all layout-specific elements from your current label.
Creating Your Own Layouts
Creative genius that you are, you probably won’t have played with the program for very long
before you wind up inventing a label design of such majesty that you want to save it to reuse on
future labels. When this happens, open the File menu, click on Advanced, and select the Save
Current Label as Layout option. You can’t miss it; it’s currently the only entry on the File |
Advanced menu.
Selecting this option will bring up a dialog that lets you save the current label as a layout. You
can save whichever elements you like: text fields, colored shapes, and/or images. You can also
specify which label types you want to be able to use this new layout with. Once you’ve typed in
a name for your new layout and clicked the OK button, your new layout will show up under the
Layouts tab along with all the pre-built layouts that we supplied with the program. We hope your
marvelous new layout won’t mind slumming it with all our comparatively pedestrian pre-supplied
ones.
-8-
Imagemixer Label Maker User Manual
Adding your own images to labels
Finding Images to Add to a Label
Imagemixer Label Maker provides two ways to find images on your computer that you can add
to your labels:
1. Click on the "Art Search" tab, enter some text that's in the file or folder names of the art
you're looking for, and click the "Search" button. Thumbnails of all supported image files
matching your search terms will appear in the window underneath the search button. We
support jpg, bmp, png, and pcx graphics types.
2. Click on the "Art Explore" tab, and parse through the explorer tree to see thumbnails of
all the supported image files in a particular folder.
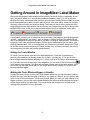
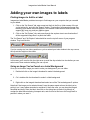
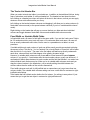
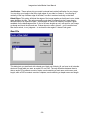
The "Art Search" and "Art Explore" tabs should be near the top left corner of your program
window. They look like this:
If you’re running at a low video resolution or you’ve resized your tools window to be very narrow,
the clip art tabs might not be visible:
In this case, you’ll need to click the right arrow to scroll the clip art tabs into view before you can
select one of them and start adding your own clip art.
Using an Image You’ve Found as a Label Background
Once you've found an image you want to make your background, you can either:
1. Double-left-click on the image's thumbnail to make it the background
or
2. Ctrl + double-click the thumbnail to make it a tiled background
or
3. Right-click on the image's thumbnail and select one of the "Set as background" options.
Note that if the image you've selected doesn't have the same aspect ratio as the label you're
putting it on, it may appear stretched or squished. It that's the case, you can drag the image's
thumbnail and drop it onto the label, then click on the sizing bars to make it big enough to
overlap the label without altering its aspect ratio, and click on its title bar or the image itself to
position it where you want it.
-9-
Imagemixer Label Maker User Manual
Adding an Image You’ve Found as Clip Art
Once you’ve found an image you want to add to your label, just left-click on its thumbnail, drag it
onto your label, and release the mouse button. The program will place the image where you
dropped it. As soon as you drop it, it should be in “selected” mode, with sizing bars and a
toolbar. You can click on the image’s sizing bars to resize the image; you can click on the
image’s title bar or the image itself to move it. You can also right-click on the image to pop up a
menu with a variety of editing options.
You can also drag image files from Windows Explorer and drop them onto your label.
For more details on using your own images, see the Clip Art topic.
- 10 -
Imagemixer Label Maker User Manual
Clip Art
Clip Art Search
If you want to search for clip art images on your computer’s hard drive(s), click on the Art
Search tab near the top of the program’s main window. Then follow these steps:
Type something to search for into the “Search for:” field. The search will find any file names
containing the text string you’ve entered here. If a directory name contains the string you’ve
typed in, the search will find any images in that directory and its subdirectories. If you leave the
“Search for:” field blank, the search will find all images in all directories.
Choose the image types that you want to search through, in the “File types:” combo box. If you
select “All”, the search will find any image types that the program supports. Currently this
includes file extension types .bmp, .dib, .jpg, .jpeg, .png, and .pcx.
Click the “Search” button. The button will change into a “Stop” button. Clicking on it again will
stop the search. Once the search has finished, it will revert back to a “Search” button.
Any images that the search finds will show up in the thumbnails list. The search will only find
files on your computer’s fixed drives -- it will skip floppy drives, CD-ROM drives, Zip drives, etc.
If you need to search on a removable drive, you’ll have to click on the Clip Art Explore tab and
use our explorer control to find the clip art you’re looking for.
Clip Art Explore
If you want to use the traditional Windows-Explorer style interface for finding clip art on your
computer, click on the Art Explore tab near the top of the program’s main window. This will
bring up our explorer-tree clip art window. Instead of a list of file names, though, our explore tab
displays thumbnails of all the images in whatever folder is currently selected. Call us crazy, but
we think it’s easier to find the pictures you want by looking at the actual pictures than by
deciphering their file names.
The Art Explore tab pane contains two windows. The top window is a Windows Explorer tree.
Use it to find the folders where your clip art resides. Click on the + sign beside a folder or drive
you want to dive into, and the tree will expand to show the subdirectories that the folder or drive
contains. Click on the name of a folder or drive, and the Art Explore pane’s lower window will
fill with the images that are in that folder (not including the images in any subdirectories it may
have), should it have any.
Changing the Explorer Tree & Thumbnail Window Sizes
You can change the amount of space devoted to the explorer tree window vs. the thumbnails
window by clicking on the border between them and dragging it up or down. The mouse cursor
will change into a little vertical resizing arrow when it’s over the resizing border.
About the Clip Art Cache
The program caches the thumbnails of any clip art images it finds. Or, translated into English:
the first time the program displays the thumbnail of a clip art image, it will take longer to display
than it will any time from then on. That’s because the first time through, it has to create the
thumbnail that gets displayed. But it saves the thumbnail in a special cache, so anytime the
program displays that thumbnail from then on, it can retrieve the thumbnail from the cache
instead of creating it, so it will be much faster.
- 11 -
Imagemixer Label Maker User Manual
Note: the program bases the thumbnail size on your current video resolution, so that thumbnails
will occupy roughly the same amount of your available screen space no matter what resolution
you’re running in. If you change your screen’s resolution (such as from 800 by 600 to 1,024 by
768), the absolute thumbnail sizes will change, so the program will have to create new
thumbnails for any clip art that it displays.
Stuff You Can Do with Clip Art
When you see a clip art image in this program, you will be looking either at a hopeful thumbnail
under the Art Search or Art Explore tabs, or a proud, happy clip art image that you have added
to one of your labels. The actions you can take differ depending on which of these two situations
you’re facing. We’ll start with:
Stuff You Can Do with a Clip Art Thumbnail in the Art Search or Art Explore Tabs
You can drag your mouse cursor over it and just let it sit there. This will cause a tooltip to pop up
and tell you the clip art image’s name, folder location, size, and date and time when it was last
modified.
You can left-click on it and drag it onto your label.
You can double-click it. This will make it your label’s background image.
You can right-click it, which will pop up a menu with these options:
Set as Background: this will bring up a submenu with these options:
1. Centered (overlap): make the selected clip art image your background image, and
center it on the label. This will cover the entire label with the selected image while
preserving the image’s aspect ratio. If the image’s aspect ratio differs from the label’s
aspect ratio, a portion of the image will get clipped.
2. Centered (underlap): Like the centered overlap option, except that if the image and
label aspect ratios are different, the image will underlap the label instead of overlapping
(cropping) it. This means that if the image & label aspect ratios aren’t the same, a
portion of the label won’t be covered by the background image.
3. Stretched: make the selected clip art image your background image, and stretch it to
cover the entire label. This will make the selected image cover the label exactly, but it
could change the image’s aspect ratio. If the image’s aspect ratio is dramatically different
from the label’s aspect ratio, this option could make the image appear stretched or
scrunched.
4. Tiled: make the selected clip art image your background image, but instead of stretching
it, tile it to cover the label.
Add to Label: add a copy of the clip art image to your label’s foreground. This has the same
effect as clicking on a clip art thumbnail and dragging it onto a label.
Show Full Size: pop up a window that displays the selected clip art image at its actual size.
You can’t edit the image or take any other useful actions with this window. It’s just there so you
can take a closer look at it.
- 12 -
Imagemixer Label Maker User Manual
Set as Wallpaper: Lets you set the selected clip art image as your Windows desktop wallpaper.
It has nothing to do with creating labels. It pops up a submenu with these four options:
1. Tiled: Sets the clip art image as tiled wallpaper.
2. Centered: Sets the clip art image as centered wallpaper.
3. Stretched: Sets the clip art image as stretched wallpaper.
4. Stretched without Changing Aspect Ratio: Sets the clip art image as stretched
wallpaper without changing the image’s aspect ratio. This means that the image won’t
get funhouse mirrorified if it’s not the same aspect ratio as your Windows desktop, but it
may leave a blank vertical or horizontal band on the desktop.
If you try to set as your Windows wallpaper an image of a type that Windows can’t automatically
set as wallpaper, or it needs to be stretched in some way that Windows can’t handle
automatically, the program will save the image in the correct size and format as a file called
wallpaper.bmp in your computer’s Windows directory, and tell Windows to set this new file as
your wallpaper.
Remove from list: Removes the selected clip art image from the thumbnails list. It doesn’t
delete or modify the actual clip art image’s file in any way.
Rename file: Lets you change the clip art image’s file name. This will affect any other programs
that expect to find the image under its old file name.
Delete file: Deletes the actual clip art image file. Use this option with caution!
Stuff You Can Do to a Clip Art Image That You’ve Added to a Label:
(We’re assuming you didn’t add your clip art image to a label as the label background. If that’s
what you’ve done, check out Editing Background Images in the Backgrounds section instead.)
You can click on it. This will “select” it, so that you can move or resize it. Once you’ve selected
a clip art image, you can:
Move it. Do this by left-clicking on the image or its title bar, dragging it to where you want it, and
releasing the mouse button.
Resize it. Do this by clicking on one of the red resize squares located around the image’s
border, dragging to whatever size you want, and releasing the mouse button.
Click on one of its toolbar buttons: When you click on a clip art image and select it, a toolbar
will appear underneath it. (You can hide or show the toolbar by clicking the little “T” button on
the image’s title bar.) The toolbar has buttons that let you move the image to the front or back of
all the other objects you’ve put on your label, or rotate it 90 degrees clockwise or
counterclockwise.
Right-click it: This will pop up a menu with these options:
Bring to Front: Display the image on top of all other objects you’ve added to your label.
Send to Back: Display the image behind all other objects you’ve added to your label except the
background image.
- 13 -
Imagemixer Label Maker User Manual
Rotate/Flip Image: Pops up a submenu with these five options:
1. 90 degrees clockwise: Rotate the image 90 degrees clockwise.
2. 90 degrees counterclockwise: Rotate the image 90 degrees counterclockwise.
3. 180 degrees: Rotate the image 180 degrees.
4. Flip Vertical: Flip the image vertically.
5. Flip Horizontal: Flip the image horizontally (make a mirror image of it).
Edit Image: Pops up a submenu with these four options:
1. Convert to Black & White: Technically, we should describe this as “convert to
grayscale.”
2. Invert (make a negative): Reverse the color of every pixel in the background image (if
this doesn’t make sense to you, just try it).
3. Make Brighter: Make the image a little bit brighter.
4. Make Darker: Make the image a little bit darker.
Reload: Reloads the image from its original file, discarding any edits you may have done to it.
Top-left pixel is transparent color: If you’ve checked this option, the program will treat the
color in the image’s top left pixel as the “transparent” color. Any pixels in the image with this
color will be transparent. Lots of clip art images are designed to be displayed with a transparent
background; this option lets you do so. Note: this setting usually has little effect on JPEG files,
because the JPEG compression algorithm will change background pixels to colors that are
similar to, but not quite the same as, the designated transparent color.
Remove: Removes the image from the label.
Cut Image: Removes the image from the label, but puts it on the clipboard, so you can paste it
back onto the label, or onto any other label, if you wish.
Copy Image: Copies the image to the clipboard without removing it from the label.
Maintain aspect ratio: If you’ve checked this option, you can resize the image without getting
the dreaded funhouse mirror effect. If you uncheck it, you can streeeetch or scrunch the image
as much as you like.
Hide/Show Toolbar: Hides or shows the little image toolbar that normally displays just
underneath the image whenever you select the image.
Any of these changes that you make to a clip art image will change the way the Label Maker
displays the image, but will not affect the clip art image’s original file in any way.
If you apply any of these changes to an image and decide you don’t like them, you can click the
“Undo” button to retract them.
- 14 -
Imagemixer Label Maker User Manual
Text
Displaying Text
To display text on a label, create a text object. You can do this by clicking the “new text” button
on the toolbar or selecting the “Create a new text object” item from the Text menu.
One of the biggest quandaries we faced when we were designing the text object control was
how to tell whether you clicked on the text control because you wanted to edit the text or
because you wanted to move the whole blooming object somewhere. It’s a sticky issue. We
didn’t want to make you go through a series of contortions to switch between object-moving and
text-editing modes. We wanted text editing and object moving and resizing to be available at the
same time. Here’s how we dealt with it:
When you left-click on an unselected text object, it will select the object. The object will grow a
title bar, a frame, and a set of resizing bars. If you only wanted to move the object, don’t release
the mouse button – you can drag the object anywhere you like until you release the mouse
button. Once you release the mouse button, the program will insert a text editing caret next to
the text you clicked on.
Once a text object is selected (it’s got the title bar and resize bars), clicking on the text will no
longer let you move the object; instead, it will place the text-editing caret next to the text you
clicked on. If you want to move the object once it’s selected, you can do so by clicking on the
text object’s title bar and dragging it around.
Clicking on a text object’s title bar will not just let you move it; it will also cause the object to go
into “object mode.” The editing caret will disappear, and any keystrokes you make will apply to
the object itself instead of the text inside it. If you press the Delete key while you’re in object
mode, the entire text object will disappear. If you press Ctrl-x or Ctrl-c, the object will get cut or
copied, respectively. Pressing the arrow keys will move the object. Clicking anywhere inside the
text object will take you out of object mode and back into the normal text-editing mode.
Regardless of what mode a text object’s in, once it’s selected, you can resize it by clicking on
any of the little red resize bars scattered around its border and then dragging them.
- 15 -
Imagemixer Label Maker User Manual
The Text Object Toolbar
When you click on a text object, a toolbar should appear directly underneath it. If it doesn’t, click
on the “T” button on the object’s toolbar. The buttons on the toolbar serve these functions, from
left to right:
Setting the typeface
Setting the font size
Setting the text color
Toggling the bold text effect on and off.
Toggling the italics text effect on and off.
Launching the text properties dialog, which lets you edit a veritable encyclopedia’s worth
of text properties.
Editing the object’s text (only shows up on the toolbars of text objects with text angles
other than 0 degrees).
Except for the last two buttons, which launch dialogs, all these buttons apply to whatever text
you’ve currently got selected. If you don’t have any text selected, changes you make with these
buttons will apply to all the text in the text object. This is a different behavior from the majority of
text editing programs, which assume that if you don’t have any text selected, changes you make
don’t apply to any text at all – a behavior that, quite frankly, baffles us. If you put a CD into the
stereo and press the play button without selecting a particular track to play, your CD player
doesn’t ignore you – it starts at the beginning and plays the whole CD. If you walk into a bar and
ask for a beer, the bartender won’t pretend he didn’t hear you just because you didn’t tell him
how full you wanted the glass. And if you click the bold button without any text selected, we’re
pretty sure you don’t mean, “act as if I don’t exist.” You mean to change text to bold. And that’s
what we do for you.
Special Stuff You Can Do With Tracks/Contents Text Objects
Track lists (lists of the track names, artist names, etc. on your CD) are a special type of text
object. You don’t need to create new text objects to display them. Instead, either select a layout
that has a tracks list, or open the tracks dialog (by clicking the “tracks” button on the toolbar)
and check the “Display tracks on current label” button.
When you edit the text in a tracks list object, the changes will get relayed to all the other label
faces in your current file. So if you’ve got tracks list text objects on all your labels, editing the
disc label to change the title of song 1 from “Let the Good Times Ambulate” to “Let the Good
Times Roll” will cause the title to change on the front, inside, and back labels as well. Changes
you make to the text by editing it in the Tracks Window will also get sent to all the labels.
Formatting changes – fonts, italics, etc. – will not get sent to other labels. Only changes to the
actual text will get passed on to the other labels. In addition, changes to the track number field
won’t get sent to the other labels. If you make a mistake and mess up one or more of the track
number fields, hiding and showing the tracks objects field (which you can do from the Tracks
Window) will cause the tracks to get renumbered.
- 16 -
Imagemixer Label Maker User Manual
The Tracks List Header Bar
When you select a tracks text object, you should see, in addition to the traditional title bar, sizing
frame, resize bars, and toolbar, a columns header bar. The header bar has these functions:
Left-clicking on a header bar column will select all the text in that column, so that you can apply
whatever column-wide effects strike your fancy.
Left-clicking on the border between columns and dragging it will allow you to resize columns (in
fixed-width columns mode) or the space between columns (if you’re in variable-width columns
mode).
Right-clicking on the header bar will pop up a menu that lets you hide and show individual
columns and toggle between fixed-width columns and variable-width columns modes.
Fixed Width vs. Variable Width Fields
In fixed-width mode, all rows of a field will be the same width. If you set the “track name” field to
be 2.5 centimeters wide, every track will have a 2.5-centimeter-wide track name. All rows will
line up exactly underneath each other, like the rows in a spreadsheet or a table in a word
processor.
If variable-width mode, each column of each row will be exactly as wide as required to display
the amount of text. The title for “You’ve Certainly Got a Lovely Bunch of Coconuts” will be wider
than the title for “Louie Louie.” The rows in the text object will not line up directly underneath
each other, unless all their text fields happen to be exactly the same length.
However, in variable-width columns mode, there will be a fixed amount of space between
columns. If you specify 1.2 centimeters after the track number column, every row will have 1.2
centimeters of blank space between its track number and the field that follows it, no matter how
wide individual track numbers may be. When you’re in variable-width columns mode and you
drag the column borders in the header bar, you’re actually editing the width between the
columns rather than the widths of the columns themselves.
Fixed width columns work well for left-justified text or cases where you’ve got more than two
columns visible. The variable width columns setting can have a nice effect on centered or rightjustified tracks listings.
If the header bar has a blank section before the first column, it’s nothing to worry about. It just
means that you’ve got the text object in centered or right-justified mode.
- 17 -
Imagemixer Label Maker User Manual
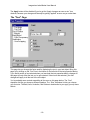
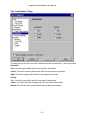
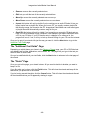
The Text Properties Dialog
You can do a surprising number of things to the text in a text object, and, aside from editing the
text itself, you can do them all from the text properties dialog. You can access the text
properties dialog by right-clicking on a text object and selecting Properties or by clicking the
properties button (the one with the three little dots on it) on a text object’s toolbar.
This dialog consists of a series of pages for editing different aspects of a text object. Clicking on
different lines in the list on the left side of the dialog will select different pages.
If you check the “Apply changes as soon as I make them” checkbox, any changes you make will
be reflected in the text object as soon as you make them. This is not completely conventional
behavior for dialog windows, which normally require you to press the “OK” button before
showing you your changes. But we hate the blundering around we have to do when we make
changes in a dialog but we can’t really tell what we’ve done until we close the dialog – and then
we have to relaunch the dialog if it turns out it wasn’t what we wanted. It’s like flying an airplane
by instruments alone: it takes a lot of expertise to do it well, and most people, including us,
don’t have that kind of expertise. So we added the Apply changes checkbox. We think you’ll
like it.
If you don’t have the “Apply changes as soon as I make them” checkbox checked, changes you
make won’t take effect until you click the OK or Apply buttons.
Clicking the Cancel button will close the dialog and reverse any changes you’ve made, unless
you’ve clicked the Apply button; in that case, clicking the Cancel button will still close the dialog,
but it will only reverse changes you’ve made since the last time you clicked the Apply button.
- 18 -
Imagemixer Label Maker User Manual
The Apply button will be disabled if you’ve got the “Apply changes as soon as etc.” box
checked, because your changes will already be getting “applied” as soon as you make them.
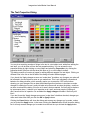
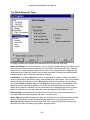
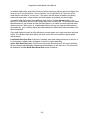
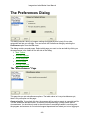
The "Font" Page
This page lets you change the fonts used for displaying the text in your text object. Bring this
page up by clicking on the “Font” line in the listbox on the left side of the text properties dialog.
If you had a section of text selected when you launched the text properties dialog, changes on
this page will only affect the text you’ve got selected. If there’s no text selected, your font
changes will apply to all the text in the text object.
You’ve probably seen controls resembling all the ones on this page before. The “Font”
dropdown list lets you choose a different typeface. The “Size” dropdown list lets you choose
your font size. The Bold, Italic, Underline, and Strikeout checkboxes let you apply (or not) these
effects.
- 19 -
Imagemixer Label Maker User Manual
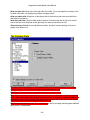
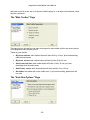
Text Properties "Text Angle" Page
This page lets you change the angle at which your text displays. Bring this page up by clicking
on the “Text Angle” line of the listbox on the left side of the text properties dialog.
If you click the 0 degrees (normal) checkbox, your text will display in normal, right-side-up
fashion, just like you’re used to seeing it.
If you click the 90 degrees (straight up) checkbox, your text will climb straight up the label.
If you click the 270 degrees (straight down) checkbox, your text will climb straight down the
label.
If you click the 180 degrees (upside down) checkbox, your text will display upside down,
starting at the bottom of your text object.
If you’re having a hard time picturing any of this, check the “Apply changes as soon as I make
them” box, and then start checking the different boxes described above. You’ll catch on in no
time.
If you set your text to any angle other than 0 degrees (normal, right-side-up text), you won’t be
able to edit the text by just clicking on the text object. Instead, its toolbar will grow a new button
that opens a text editing window. For more information, see The "Edit Text" Window for
Angled Text.
- 20 -
Imagemixer Label Maker User Manual
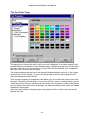
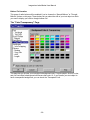
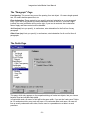
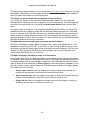
The Text Color" Page
This page lets you change the color in which your text is displayed. If you had a section of text
selected when you launched the Text Properties dialog, changes you make here will only affect
the color of the text you’ve got selected. If you didn’t have any text selected, your changes will
affect the color of all text in the text object.
The program displays selected text in the standard Windows selection colors so, if you change
the text color of a text selection, you won’t actually be able to see the color change until you
close the dialog and unselect the text.
In the current incarnation of Imagemixer Label Maker, you can’t create new custom colors from
this page. This ability will be arriving in a not-too-far-off future version. In the meantime, you can
create new custom colors by clicking on the color button on a text object’s toolbar. Although you
can’t yet create new custom colors in this page, you can use existing custom colors you created
elsewhere in the program.
Aside from these caveats, using this page is pretty simple. Click on a color, and your text will
become that color.
- 21 -
Imagemixer Label Maker User Manual
Text Size & Position Page
This page lets you change the size and position of your text object. This is probably easier to do
outside the text properties dialog, simply by clicking on a text object’s title bar and dragging it to
move the object, or by dragging one of the text object’s red resize bars to resize it.
However, if you’re the punctilious sort, or you believe that the dimensions of all elements in your
labels must be factors of the Fibonacci sequence, or of the lotto numbers that made you a
millionaire, then this page will be just your pace. In that case, you can just type your favored
location and width and height into the provided fields.
Note: “distance from label top” and “distance from label left” refer to distance from the top and
left of your label’s bounding rectangle. So if you’re editing the position of a text object on a CD
label, which you have probably noticed is circular, the left and top distances measure from the
spot you would get if you made an imaginary rectangle completely enclosing the label.
- 22 -
Imagemixer Label Maker User Manual
The "Margins" Page
This page lets you change your text object’s horizontal and vertical margins. Setting these fields
lets you increase or decrease the amount of space between your text object’s borders and
where the text will be allowed to print. Setting a left margin of 1 centimeter, for instance, means
that text will start printing 1 centimeter to the right of the text object’s left border, not 1
centimeter to the right of the label’s border.
The “Curving” Page
This page lets you make your text curved (or not), and lets you set various properties for how
curved text should behave.
Text Curving:
Straight: With this setting, your text will display in a straight line. Since most of the other options
on this page all relate to curved text, they’ll be disabled if you’ve selected the straight-text
setting.
Curved: With this setting, your text will display in a circle (or an ellipse, to be more exact).
Spiral: With this setting, you text will display in a spiral.
Fit Curve to Label: If you check this box, the ellipse that your curve follows will automatically
be centered on the label and will have the same aspect ratio as the label. It’s the default option.
Check this box if you want your text to curve around the edges of the label. If you uncheck this
box, your text will fit itself to the bounding rectangle of your text object, and you can resize the
text object to change the dimensions of the ellipse that your text follows.
- 23 -
Imagemixer Label Maker User Manual
Curve Direction:
Clockwise: Curved text will circle your label in a clockwise direction.
Anti-Clockwise: Curved text will circle your label in an anti-clockwise direction.
Auto Choose: Curved text will circle in a clockwise direction if it’s primarily on the top half of the
label, and anti-clockwise if it’s primarily on the bottom half. For spiral text, it will always go
clockwise. If you have the Fit Curve to Label option checked, your text object will be centered
on the label, so it will usually go clockwise.
Starting Angle:
Use Horizontal Orientation: The software will use your horizontal-orientation setting to
determine where the text should start. If you’ve chosen left orientation, the text will start at the
leftmost edge of your text object. If you’ve chosen right orientation, it will end at the rightmost
edge of your text object. If you’ve chosen centered orientation, the text should both start and
finish an equal distance from the center of your text object. Note that if your text is in spiral
mode and it fills more than one complete revolution, the text will be treated as if it’s left justified,
regardless of your horizontal orientation setting.
Fixed Angle: The text will begin at the angle you choose. 0 degrees is directly to the right (3
o’clock). The angle increases in a counterclockwise direction, so 12 o’clock is 90 degrees, 9
o’clock is 180 degrees, and 6 o’clock is 270 degrees. If you’ve got the Fixed Angle setting
checked, you can click on the circle to the right of the “Fixed Angle” radio button to choose a
start angle, or you can use the spin control on the edit box underneath the “Fixed Angle” radio
button to adjust your start angle by one degree at a time.
- 24 -
Imagemixer Label Maker User Manual
The "Background" Page
This page lets you choose the shape of your text object. You can select from these categories:
Shape: Rectangle or Round
Choose rectangle, and your text object will have a rectangular background. Choose round, and
its background will be roundish (to be precise, it will be an ellipse).
Speech Balloon
This feature lets you make your text object into a speech or thought balloon, such as you have
probably seen thousands of times in the newspaper comics pages, or in comic books, or on
billboards, or, perhaps, in an imaginative moment, in the clouds. Select Speech Balloon, and
your text object will have a triangular tail that you can drag around and resize until it points
wherever you wish. Select Thought Balloon, and your text object will trail a series of little
thought balloonlets, which you can likewise drag and resize. Select None for a traditional,
balloon-free text object.
You can’t resize or move your thought or chat balloons from inside the Text Properties dialog.
To resize or move your chat/thought balloons, you need to exit the dialog and click on your text
object’s chat tail or one of its little thought balloonlets. This will cause three size markers to
appear. You can drag these about to move or resize your text object’s chat or thought tail. If you
want to move the chat or thought tail to another side of your text object altogether, direct your
attention to:
- 25 -
Imagemixer Label Maker User Manual
Balloon Tail Location
This group of radio buttons will be enabled if you’ve chosen the “Speech Balloon” or “Thought
Balloon” options on this page. These buttons let you select the side of your text object on which
you want to display your chat or thought balloon tail.
The "Color/Transparency" Page
This page lets you choose your text object’s background color. It’s quite simple: click on a color,
and your text object’s background will become that color. Or, if you’d prefer your text object to
have a transparent background, you can check the “Transparent” box.
- 26 -
Imagemixer Label Maker User Manual
The "Justification" Page
This page lets you choose your text’s horizontal and vertical justification. It works as follows:
Horizontal
Left: Text will be left-justified within the text object’s boundaries.
Center: Text will be centered horizontally within the text object’s boundaries.
Right: Text will be right-justified within the text object’s boundaries.
Vertical
Top: Text will be top-justified within the text object’s boundaries.
Center: Text will be centered vertically within the text object’s boundaries.
Bottom: Text will be bottom-justified within the text object’s boundaries.
- 27 -
Imagemixer Label Maker User Manual
The "Word Wrapping" Page
This page contains some esoteric stuff that affects how your text will word-wrap.
Ignore Label Edges: If you check this box, you can drag a text object partially off a label, and it
won’t affect how the text object word-wraps. The result will be that some of the text in the text
object won’t be visible, because it will be off the label. If you uncheck this box, dragging a text
object partially off a label will cause the text to word-wrap when it reaches the label boundary
instead of waiting until it reaches the text object’s margin.
Line Breaks: If you select Best fit, text will try to word-wrap on spaces. If this isn’t possible, it
will try to word-wrap at punctuation marks, such as dashes and semicolons. If this isn’t possible,
the text will word-wrap wherever it can. Best fit is the default and is best for most situations.
If you select Break on spaces only, text will only word-wrap at spaces. The drawback of this
approach is that if there are no spaces in a line, the text can’t word-wrap, so the text won’t
display at all. However, this setting can be useful when you’re displaying text near the circular
border of a CD label, and you don’t want the text to get wrapped in the middle of a word.
Hole Handling: These options let you choose how you want your text to word-wrap when it
encounters the hole in the middle of a CD label. Your choices are:
Ignore Holes: The default. Pretends the hole isn’t even there. If you select this option, text that
crosses the hole will be invisible, because the text object won’t try to wrap around it at all.
Wrap on left side: Wrap text to the left side of the hole. If your text object lies entirely to the
right side of the hole, this setting may produce unhappy results.
- 28 -
Imagemixer Label Maker User Manual
Wrap on right side: Wrap text to the right side of the hole. If your text object lies entirely to the
left side of the hole, this setting may produce unhappy results.
Wrap on widest side: Wrap text on whichever side of the hole has the most room within the
text object’s boundaries.
Wrap on both sides: Wrap on both sides of the hole. Print as much text as will fit on the left
side of the hole, then skip over to the right side of it and print text there as well.
Skip to bottom of hole: Go around the hole entirely, and don’t resume printing until you’ve
gotten to the bottom of it.
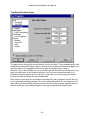
The Columns Page
This page, which only appears on the properties dialogs of tracks text objects, gives you the
option to display your CD tracks in multiple newspaper-style columns.
How Many: This control lets you specify how many columns you want.
Style: This control lets you specify how you want your text split between columns. In balanced
mode, each column will contain an equal number of tracks (or as close to equal as possible). In
front-loaded mode, the first column will hold as many tracks as will fit, then the second column
will hold as many of the remaining tracks as it can fit, etc.
Margin between columns (cm): This control lets you specify a margin that will appear between
each column, in centimeters.
- 29 -
Imagemixer Label Maker User Manual
The other controls on this page apply to particular columns. They’ll be disabled unless you’ve
set the how-many-columns control to be 2 or more.
Column Number: specifies which column the Horizontal Orientation and Hole Wrapping
controls apply to.
Horizontal Orientation: specifes the horizontal orientation for text in the currently selected
column.
Hole Wrapping: specifies the hole wrapping mode (what to do when the text encounters the
CD hole) for the currently selected column.
- 30 -
Imagemixer Label Maker User Manual
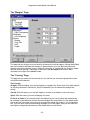
The "Paragraph" Page
Line Spacing: This control lets you set line spacing for a text object. 1.0 means single-spaced
text; 2.0 means double-spaced text, etc.
Extra Indentation: These controls let you specify extra text indentation on a per-paragraph
level. If your text is left-justified, the extra indentation will be on the left; if your text is rightjustified, the extra justification will be on the right; if your text is centered, extra indentation
doesn’t apply and these controls will be disabled.
1st Line (cm): Lets you specify, in centimeters, extra indentation for the first line of every
paragraph.
Other Lines (cm): Lets you specify, in centimeters, extra indentation for all non-first lines of
paragraphs.
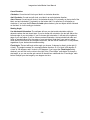
The Fields Page
This page, which only appears on the properties dialogs of tracks text objects, lets you choose
between fixed and variable field widths.
In fixed-width mode, all rows of a field will be the same width. If you set the “track name” field to
be 2.5 centimeters wide, every track will have a 2.5-centimeter-wide track name. All rows will
line up exactly underneath each other, like the rows in a spreadsheet or a table in a word
processor.
- 31 -
Imagemixer Label Maker User Manual
In variable-width mode, each field of each row will be exactly as wide as required to display the
amount of text. The title field for “You’ve Certainly Got a Lovely Bunch of Coconuts” will be
wider than the title field for “Louie Louie.” The rows in the text object will not line up directly
underneath each other, unless all their text fields happen to be exactly the same length.
In variable-width fields mode, there will be a fixed amount of space between fields. If you
specify 1.2 centimeters after the track number field, every row will have 1.2 centimeters of blank
space between its row number and the field that follows it, no matter how wide individual track
numbers may be. When you’re in variable-width fields mode and you drag the field borders in
the header bar, you’re actually editing the width between the fields rather than the widths of the
fields themselves.
Fixed width fields work well for left-justified text or cases where you’ve got more than two fields
visible. The variable width fields setting can have a nice effect on centered or right-justified
tracks listings.
Line Break After Each Row: If this box is checked, each track listing will start on a new line. If
it’s unchecked, multiple tracks will appear on each line, space permitting.
Space After Each Row (cm): If there’s not a line break after each track, this control specifies
how much space should appear between tracks that display on the same line. This control will
be disabled if the Line Break After Each Row control is checked.
- 32 -
Imagemixer Label Maker User Manual
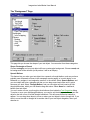
The “Individual Field” Pages
When you launch the text properties dialog for a tracks text object, you’ll see one of these pages
for each field in the text object. For an audio CD, they’ll be labeled Number, Song Title, Artist,
and Length, respectively. This page lets you edit properties of whichever tracks field you’ve
selected.
If you check the Field is visible checkbox, the field will be displayed on the label. Uncheck it to
hide the field.
The Field width edit control lets you decide how wide you want the field to be, provided you’ve
got the text object in fixed-width fields mode (you can set this on the fields page). If you’re not a
numbers-oriented sort of person, you can also do this outside the text properties dialog by
clicking on the text object to select it and then dragging the field boundaries in the header bar to
resize them.
The Space after field lets you decide how much blank space you want between this field and
the next one, provided you’ve got the text object in variable-width fields mode (you can set this
on the fields page). You can also do this outside the text properties dialog by clicking on the text
object to select it and then dragging the column boundaries in the header bar to resize the
spaces between them.
For an explanation of fixed vs. variable width fields modes, check out the fields page.
The Text Properties Dialog
- 33 -
Imagemixer Label Maker User Manual
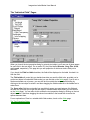
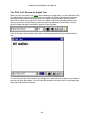
The "Edit Text" Window for Angled Text
When you set a text object to an angle that’s sideways or upside down, you won’t be able to edit
it by just clicking on the text object, the way you normally do. While I was writing the program, I
tried editing text sideways and upside down, but I had a roaring headache within a minute. I
don’t wish to cause pain to any of our users, so I added a right-side-up editing window to use
when your text isn’t upright. When you set your text to be sideways or upside down, the text
object’s toolbar will grow a new button, away off to the right side:
Click on the {bmct edit text button.bmp} button and the program will launch a window like this
one:
{
You can edit your text in this window. Any changes you make will show up back on your label as
soon as you close the window. (You can close the window by clicking on the X in the upper right
hand side of the window’s title bar.)
- 34 -
Imagemixer Label Maker User Manual
Working with CD Tracks
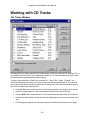
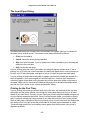
The Tracks Window
This dialog lets you type in and edit your tracks listing – either your song list, for an audio CD, or
your chapter list, for a DVD. If you’re editing an audio CD, you can also import your tracks from
a playlist and save yourself all that tedious typing.
To type in the contents for a field in the contents list – “Song Title”, “Artist”, “Chapter”, etc. –
click on the field and start typing. Once the contents list has the keyboard focus, you can also
move from field to field by using the arrow keys or the tab key. There are several other ways to
get a field into edit mode. Here’s the lot:
press the Enter key: selects the text in the field and puts the caret at the end of the text
press F2: selects the text in the field and puts the caret at the end of the text
click the Edit button: selects the text in the field and puts the caret at the end of the text
double-click the text field: selects the text in the field and puts the caret at the end of the
text
just start typing: replaces the existing contents of the field with whatever you’re typing
- 35 -
Imagemixer Label Maker User Manual
If the contents of a field are too wide to fit in the available space in the tracks list, you’ll see a
row of periods, like so: … at the end of the field. If you drag the mouse cursor over the field and
let it sit there, a tooltip will pop up that displays the unabbreviated contents of the field.
You can adjust the widths of the different columns in the tracks list by clicking on the borders
between the columns and dragging them. This doesn’t affect how wide the columns will be on
any actual labels.
Like many another dialog, this one has a bunch of buttons. Here’s what they all mean:
Add Row: adds a new row to the end of the list.
Remove: removes the currently selected row.
Edit: lets you edit the text of the currently selected item.
Move Up: moves the currently selected row one row up.
Move Down: moves the currently selected row one row down.
Import: this button will only be visible if you’re working on an audio CD label. It lets you
import tracks from a playlist file. When you burn a CD, you usually create a playlist file
that lists the songs you burned to the CD. Imagemixer Label Maker can read most types
of playlist files and will automatically create a song list for you.
Read CD: this button will only be visible if you’re working on an audio CD label and you
have a CD drive attached to your computer. It will attempt to get tracks information from
a CD in your CD drive. If your CD has an entry in cdplayer.ini or cdburner.ini, the
program will use it; if not, it will try to look up a tracks listing for your CD over the Internet.
Done: closes the window.
Display tracks on current label: If you check this box, your tracks will be displayed on
whichever label you’ve got currently visible. If you uncheck it, they’ll be hidden.
Tracks Formatting Dialog
The Tracks Formatting dialog lets you quickly set the formatting, including visibility, font, color,
and layout, for your various tracks fields. It also lets you save your favorite combinations as
presets that you can access later with just a click or two. Changes you make in this dialog apply
only to the current foreground label, so you can edit the formatting of your disc label without
affecting the jewel case inserts, etc.
Here’s what all the controls on this dialog do:
Presets: This combo box contains all the system presets (the ones that ship with the
software) and user presets (presets you saved yourself) for quick access. Selecting a
preset will cause the software to format your tracks text with all the font properties (and
optionally, the layout information from the “Arrangement” combo box) stored in that
preset.
To create presets of your own, click the “save” button. It’s directly adjacent to the
Presets combo box and has a little picture of a disk on it. This will launch a file-save
dialog in which you can choose a name for your preset and decide whether you want
your preset to store just font information or both font and layout information. (If you
choose to save layout information, the preset will save the layout information from the
“Arrangement” option you currently have selected.)
- 36 -
Imagemixer Label Maker User Manual
Changed your mind about a preset you’ve created? To delete it, select it, then click on
the Delete button. This one is next to the Save button & has a picture of a pair of
scissors on it. (It will be disabled unless you’ve selected a user-created preset.) Before
deleting your preset, the software will prompt you so it can make sure you didn’t click the
Delete button by accident.
Arrangement: This combo box contains a list of quick-layout options for the current
label. (It contains the same options as the auto-format combo box that appears on the
tracks object’s toolbar after you select it.) Selecting an option from the Arrangement
combo box will cause the software to format the layout of your tracks text to match the
option you’ve selected.
Fields: This list box contains a list of all your tracks fields. To edit the font formatting,
visiblity, and text color for a particular field, select it in this list box, and the dialog will
update itself to display the current font/color/visiblity settings for that field.
You can use the up and down buttons next to the Fields list box to change the order in
which fields display. If you want the Artist field to display before the Song Title field, for
instance, select the Artist field, then click the Up button.
Field is Visible: Check or uncheck this box to hide or show the currently selected field.
Font: The font/typeface combo box lists the font in which the currently selected field will
display.
Size: Use this combo box to change the font size in which the currently selected field will
display.
Bold: Check or uncheck this box to make the currently selected field display with either
bold or normal weighting.
Italic: Check or uncheck this box to toggle the currently selected field between italicized
and non-italicized display.
Underline: Check or uncheck this box to turn underlining on and off for the currently
selected field.
Text Color: This pair of controls lets you control the color in which the text for the
currently selected field gets drawn. The text color button displays the current text color.
Click on it to change the color.
The which-tracks combo box lets you set the text color for all tracks or just for odd- or evennumbered tracks. If you select the “even-numbered tracks” option and then click on the text
color button, for instance, the text color you choose will apply only to the current field in evennumbered tracks.
If you’ve chosen different colors for odd- and even-numbered tracks and you select the “All
Tracks” option, the text color button will display the odd-tracks color on the left side of the button
and the even-tracks color on the right side. (Selecting a color when the “All Tracks” option is
chosen will set the color for both odd- and even-numbered tracks.)
Using different colors for odd- and even-numbered tracks can make the tracks listing easier to
read when it contains a large number of tracks. Make sure that both colors show up well against
your chosen background art, though.
- 37 -
Imagemixer Label Maker User Manual
Choose a CD Drive
The Imagemixer Label Maker wants to know which of your many CD drives holds the CD that
you’re trying to read track information from. Your job is to tell it. Just click on the drive letter of
the drive that holds your CD and then, once it’s selected, click the “OK” button. If you’re energyconscious and you’re trying to conserve mouse mileage, you can double-click on the drive letter
instead.
If you don’t remember which drive holds the CD (but you’re sure one of them does), you won’t
do any terrible damage by picking the wrong drive. The program will either import tracks for the
wrong CD or display an error message indicating that there’s no CD in the drive you picked. In
either case, you can just click the “Import” button on the Tracks dialog again to rerun the
process and select the right drive this time.
"Choose a Disc ID" Dialog
If FreeDB finds multiple potential matches for your CD, they’ll all be displayed here. Choose the
one that looks right to you. If it turns out to be wrong, click the “Import” button on the Tracks
Dialog again and repeat the process and choose another one.
When FreeDB finds multiple matches, they’re usually multiple copies of nearly identical playlists,
with slight variations in genre, year, or other fields that Imagemixer Label Maker doesn’t really
care about. As long as the artist and album names are correct, you probably won’t go wrong.
Playlist Search Dialog
If you’ve got a playlist file that you want to import song names from, but you can’t remember
where the file is, then this dialog is for you. It will automatically search your hard drive and
display a list of all the files it finds that appear to be playlists. You can just scroll through, click
on the one you want, and click “OK”, and the label maker will automatically import that playlist
for you.
Here’s what all the buttons on this dialog mean:
OK: close the dialog and import tracks from the playlist file you’ve selected
Cancel: close the dialog without importing any tracks
Help: Given your presence here, we suspect you already know what this button does.
Stop: tells the program to stop searching for playlist files. Once the search is complete,
this button will become disabled.
Replace Existing Files: If you check this box before importing a playlist file from this
dialog, the tracks that get imported from that playlist will replace any existing track
information. If this box isn’t checked, tracks you import here will get appended to the end
of your existing track information.
- 38 -
Imagemixer Label Maker User Manual
Colored Shapes
In case clip art, background images, and text objects aren’t enough to satisfy your creative
needs, we offer a small assortment of colored shapes that you can plaster all over your labels.
Click on the “Shapes” button on the main toolbar, and a dialog will pop up that will let you add a
rectangle, ellipse (a round thingy), or diamond to your label. You can move and resize these
shapes just like any other objects: move them by clicking on their title bars or the shapes
themselves and then dragging them; resize them by clicking on and dragging any of the little red
resize bars scattered around the shape’s borders. (These borders, I should add, are only visible
when the shape is in a “selected” state, meaning that you’ve clicked on it and haven’t clicked on
anything else in the meantime.)
Once you click on a shape that you’ve added to a label, you should see a little shape-editing
toolbar appear beneath it. If there’s no toolbar, click on the little “T” button in the shape’s titlebar.
These buttons, taken from left to right, let you:
change its shape
change the shape’s background color
move the shape in front of all other objects on the label
move the shape behind everything else on the label (except the background image, if
any)
One of our favorite ways to waste time with shape objects is to drag them around the screen a
little bit at a time, as if we were creating slow motion pong games or sunsets, and then play
them back like movies by holding down the Ctrl-Z (undo) key until everything comes to a stop,
then playing them back in the other direction by holding down the Ctrl-Y (redo) key. This
accomplishes absolutely nothing, and will not help you create labels. But you might enjoy that
sort of thing.
- 39 -
Imagemixer Label Maker User Manual
Printing
When you’re ready to print your label, click the Print button on the main toolbar or select the
Print item from the File menu. This will launch the Print dialog, unless you’ve used up all your
free labels. If that’s the case, register and then come back.
The Print Dialog
The Print dialog consists of printer-specific information, at the top of the dialog, and labelspecific information, at the bottom of the dialog.
The “Printer” Section:
Name: Gives you a list of all the printers attached to your computer. Choose the one you
want to use.
Paper Bin: Lets you choose which bin you want the printer to grab paper from, should
your chosen printer have multiple paper bins.
Print to File: If checked, printing won’t go to the printer; instead, it will go to a file in a
format that your chosen printer can recognize, so that you can, in theory, print it later –
although you could always just run the Label Maker again, instead.
Copies: Lets you choose how many copies of each label you want to print.
- 40 -
Imagemixer Label Maker User Manual
Properties: Launches a dialog that lets you set options – print quality, for instance -specific to the printer you’ve chosen. Since your printer manufacturer supplies this dialog,
we can’t predict precisely what will be on it or give you detailed help with it.
Alignment: Launches the Printer Alignment Dialog, which lets you set printer offsets
and label stretch amounts in case your printer, like most printers, doesn’t print at
precisely the locations it’s supposed to.
The Labels Section:
The row of tabs: Clicking on these lets you bring up a tab for choosing paper type and
sundry other options for particular labels. If you’ve chosen to print a label, it will have a
little printer icon in its tab.
Paper Type: Lets you choose the type of paper you want to print on. Whenever you
choose a different paper type from this list, the thumbnail underneath the Click on
labels to use heading will display the layout of the paper you’ve chosen.
Print a border around label: If you check this box, the program will print a thin black
border around the label. This can be handy if you’re printing on plain paper and your
background has lots of white in it.
Print fold lines: If you check this box, the program will print fold lines to help you fold
your labels. You don’t need to check this box unless you’re printing on plain paper; most
stock paper forms have folds built into the paper. If you check this box for the jewel case
back, the program will print lines indicating where to fold the two spines. If you check this
box for the jewel case front/inside, the program will print a line indicating where to fold
the front/inside booklet in half. (The box will be disabled for the front/inside label if you’re
not printing on a paper type that prints both the front and inside labels on the same side
of the paper.) This checkbox will always be disabled for the CD disc label.
You can set a variety of options for fold lines in the Preferences Dialog. You can decide whether
you want your fold lines to be solid or dashed lines, whether you want them to be inside or
outside the label, and what color you want them to be.
Click on labels to use: If you’ve chosen a paper type that can print more than one label
of the type you’re printing, you can click on the the labels on the thumbnail to choose
which of the paper’s labels you want to print on.
Sheets required: Tells you how many sheets you’ll need of the paper you’ve selected,
based on how many copies you’re printing and how many of your selected paper type’s
labels you’ve chosen to use.
That black arrow pointing leftwards: Indicates which edge of the paper displayed in
the thumbnail image you should feed into the printer first.
Print Disc / Print Front/Inside / Print Back: These checkboxes let you choose which
labels you want to print. If you check the box for a label, it will print. If not, it won’t.
Once you’ve selected what you want to print and what you want to print it on, click the Print
button to proceed. The next thing you see will be:
- 41 -
Imagemixer Label Maker User Manual
The Insert-Paper Dialog:
This dialog will prompt you to insert one or more sheets of the paper types you’ve chosen for
the labels you’ve chosen to print. The buttons on the dialog will behave as follows:
Print: print the label(s)
Cancel: cancel the entire printing operation.
Skip: don’t print this label; if you’ve selected more than one label to print, the dialog will
advance to the next label.
Help: launch this help page.
If you’re printing more than one of your labels, the dialog will appear multiple times. If you’re
printing, say, a CD disc and a jewel case back, the dialog will appear twice, once to prompt you
to insert your CD disc label paper, and again to tell you to insert the jewel case back paper.
If you’re printing the jewel case front/inside on a paper type that has a single face instead of a
book arrangement, you’ll get prompted to insert the paper for it, and then you’ll be asked to
reinsert the paper upside-down so the program can print the jewel case inside on the back of
the paper. Make sure the fronts have finished printing and you’ve reinserted the labels before
you click the “Print” button on the “reinsert upside-down” dialog.
Printing for the First Time:
If you’re printing with a new type of label stock for the first time, we recommend that you feed
plain paper into the printer instead, even though the insert-paper dialog has told you to insert
sheets of your label stock. This way you can check your printer’s alignment before using up any
of your relatively expensive label stock. Once it’s printed on plain paper, you should be able to
see if it’s aligned correctly by putting a sheet of your label stock on top of your freshly printed
sheet of plain paper, making sure they line up exactly on top of each other, and then holding the
two sheets in front of a light so that the printed label on the plain paper underneath is visible.
This should help prevent you from wasting custom paper stock tracking down your printer’s
alignment problems.
- 42 -
Imagemixer Label Maker User Manual
The Printer Alignment Dialog
Printers are imprecise beasts. You can tell them to print something exactly 1.2 inches from the
top of the paper, but chances are, it’ll end up being more like 1.1 or 1.28 inches from the top.
The older your printer gets, the more likely this is to occur, as all the little mechanical bits that
escort paper into and out of the printer get worn out. You’re not likely to notice this flaw when
you’re printing, say, a resumé. And if your interviewer is measuring the margins on your resumé,
you may be happier elsewhere anyway. But when you’re printing a CD label on a pre-cut form,
every millimeter matters. (That’s why millimeters would rather be on a CD label than a plain
sheet of paper – they like to feel important.) If your printer is a millimeter awry on a CD label,
you’ll get a millimeter of white, unprinted space on your label. It won’t look good.
If your printer is consistently wrong, which is often the case, you can use the Printer Offsets
section of this dialog to correct it. If the printer always prints a millimeter to the right of where it’s
supposed to, you can use this section to tell the program to always print labels one millimeter to
the left of where they’d normally go, which will cancel out the printer’s imprecision and make
things print just where they ought to be.
“Printer Offsets” controls:
When printing on: Lets you select the printer for which you want to set offsets.
Move labels by: There’s one of these sections each for horizontal and vertical paper
alignment. Enter the amount of space, in millimeters, by which you need to move labels
horizontally and vertically, respectively, for the printer you’ve chosen.
To the left/To the right: Lets you select the direction in which to correct your printer’s
horizontal printing errors. If your printer always prints stuff too far to the right, check the
“To the left” box. If it always prints too far to the left, check the “To the right” box.
- 43 -
Imagemixer Label Maker User Manual
Up/Down: Lets you select the direction in which to correct your printer’s vertical printing
errors. If your printer always prints stuff too far down the page, check the “Up” box. If if
prints too high, check the “Down” box.
The “Stretch Labels” section:
If your printer doesn’t align correctly, but isn’t consistent about it, you can correct it by using the
brute force method of stretching all the labels by a millimeter or two, which will result in the label
being slightly larger in every direction. So even if your printer prints too high one pass, and too
low the next, or likes to feint left and print right, you’ll be set.
We generally recommend setting the stretch labels amount at one to two millimeters. We also
recommend that you don’t put important stuff, such as text, within a millimeter or so of your label
borders or the CD hole unless you have a fabulously reliable printer, because otherwise it
stands a good chance of getting chopped off when you print it.
But don’t stretch plain-paper labels: This checkbox lets you specify whether or not
you want to apply your stretch settings to labels you print on plain paper. By default, this
box will be checked, which is our recommendation. The stretch labels settings are
designed to overcome problems with your printer’s alignment so that you can fit labels
onto premade forms. But since plain paper doesn’t have any pre-perforated labels that
you need to line your labels up with, stretching isn’t necessary, and in fact will only make
your labels bigger than they need to be.
The Your-Label's-Too-Darn-Big Dialog
If you’re printing a label on plain paper and it’s so big that it overlaps your printer’s unprintable
area or even the edges of the paper itself, you’ll get to spend some time with this dialog.
You can’t print your label full size in all its glory, but the Label Maker will help you make the best
of things. Here are your options:
Scale the entire label down to fit: This will make the entire label smaller so that it will
fit on your paper. If you’ve got a DVD movie box label that’s 10 millimeters too wide, this
option will shrink the entire label to make it 10 millimeters narrower. The advantage is
that everything you put on your label will still print, if at a slightly smaller size. The
disadvantages are that the label will get shrunk both horizontally and vertically, even
though the paper was too small in only one of those directions, and because the label is
getting rescaled, any fold lines that get printed might be slightly off. This option is
probably the best available, though.
Chop some millimeters off each side: If your label is 10 millimeters too wide, the
program will chop 5 millimeters off each side. This is good because your label will still be
symmetrical, and it will only get chopped in one direction (i.e., horizontal or vertical, but
not both). But it’s bad because it chops off some of the label you worked so hard to
create. It’s a good option if you don’t have any interesting content near your label edges.
Ignore the overlap: You can always pretend the overlap doesn’t exist. If your label is
10 millimeters too wide and you choose this option, the rightmost 10 millimeters will get
chopped off. We don’t think this is your best choice, but you may have your reasons. We
won’t pry.
If you check the “Always print this way; don’t ask me again” box before clicking the “OK”
button, the program will use your choice to handle printer overlap from now on without
asking you, so you’ll never see this dialog box again.
- 44 -
Imagemixer Label Maker User Manual
OK: click this button when you’ve made your choice and you’re ready to move on.
Cancel: click this button if you’ve decided you don’t want to print this label after all.
Help: we suspect you’ve already got some experience with this button. But if you enjoy
this help page, feel free to click it whenever you want.
What else? If you’ve got more than one printer, try ‘em all. You might find that another of your
printers has a small enough unprintable margin that the entire label will print on it without being
shrunk.
- 45 -
Imagemixer Label Maker User Manual
The Instant-Label Wizard
If you’re in a label-making race, or you don’t trust your label design skills, or you just can’t be
bothered to plunge in up to your elbows among the muck of backgrounds and text and clip art,
then the wizard is for you. We’ve done all we can to remove as many choices as possible, so
that all you have to do is make a few mouse clicks and proceed to the printing. We couldn’t
remove all the choices, owing to the difficulty of licensing mind-reading technology, but the ones
that remain aren’t too hard. Those of us who’ve had some experience with the wizard have
been known to get through it in under fifteen seconds.
Every page of the wizard contains a series of buttons that let you navigate through the wizard.
They are:
< Back: go to the previous page
Next >: go to the next page
Cancel: exit the wizard, discarding everything you’ve done in it
Help: launch this help page or a related one. The evidence would indicate that you
already know about this one.
Finish: only shows up on the last page. Closes the wizard and retains all the choices
you’ve made.
You can launch the wizard by choosing the Instant-Label Wizard option from the File menu. If
you want the wizard to launch every time you run the Label Maker program, you can specify as
much from the Auto-Run Page of the Preferences Dialog.
- 46 -
Imagemixer Label Maker User Manual
The "Choose Label Type" Page
Choose whether you want to make your labels for an audio CD or a DVD. The only difference
between them is that an audio CD’s contents consist of tracks, each containing a track name,
artist name, and length, while a DVD’s contents consist of chapters, each containing a chapter
name and length.
Once you’ve chosen your label type, click tne Next button to go to the Choose a Theme page.
The Instant-Label Wizard
Help Contents
The "Choose Theme" Page
Just by clicking on a theme in this list, you’ll choose the background image, text fields, fonts,
tracks format, and general all-around layout of all the labels for your CD or DVD. We think that,
for efficiency and far-reaching power, this mouse click ranks right up there with the “self-destruct
this entire vast underground complex” buttons that the villains are always pressing in James
Bond movies.
Each of the themes in the list on this page displays three pictures representing approximately
what your labels will look like if you choose that particular theme. The first picture, starting from
the left, will be your disc label; the second will be your jewel case front booklet; and the third will
be your jewel case back.
Once you’ve chosen your theme, click the Next button to go to the Label Contents page.
The "Tracks" Page
If you’ve gotten this far, you’re rapidly getting the hang of this “wizard” business. This page lets
you type in your tracks listing – either your song list, for an audio CD, or your chapter list, for a
DVD. If you’re running the audio CD wizard, you can also import your tracks from a playlist, if
you have one, which will save you all that tedious typing.
To type in the contents for a field in the contents list – i.e., “Song Title”, “Artist”, “Chapter”, etc. –
click on the field and just start typing. Once the contents list has the keyboard focus, you can
also move from field to field by using the arrow keys or the tab key. There are several other
ways to get a field into edit mode. Here’s the lot:
press the Enter key: selects the text in the field and puts the caret at the end of the text
press F2: selects the text in the field and puts the caret at the end of the text
click the Edit button: selects the text in the field and puts the caret at the end of the text
double-click the text field: selects the text in the field and puts the caret at the end of the
text
just start typing: replaces the contents of the field with whatever you’re typing
You can’t edit the contents of the “number” field. We couldn’t see the value of identifying song 3
as “7” or “12” or “bx”, but if you think you can convince us otherwise, send us an e-mail. If you
want to change a track’s position in the list, you can click the “Move Up” or “Move Down”
buttons or just click on the song and drag it up or down.
This page has several buttons along the right side of the window:
Add Row: adds a new row to the end of the list.
- 47 -
Imagemixer Label Maker User Manual
Remove: remove the currently selected row.
Edit: lets you edit the text of the currently selected item.
Move Up: moves the currently selected row one row up.
Move Down: moves the currently selected row one row down.
Import: this button will only be visible if you’re working on an audio CD label. It lets you
import tracks from a playlist file. When you burn a CD, you usually create a playlist file
that lists the songs you burned to the CD. Imagemixer Label Maker can read most types
of playlist files and automatically create a song list for you.
Read CD: this button will only be visible if you’re working on an audio CD label and you
have a CD drive attached to your computer. It will attempt to get tracks information from
a CD in your CD drive. If your CD has an entry in cdplayer.ini or cdburner.ini, the
program will use it; if not, it will try to look up a tracks listing for your CD over the Internet.
Once you’ve got all your tracks info just the way you want it, click the Next button to go to the
Additional Text Fields page.
The "Additional Text Fields" Page
Depending on which theme you chose in the Choose a Theme page, your CD or DVD label set
may display text for titles, dedications, artist names, etc. This page lets you type in the text you
want for each of these fields.
One you’re satisfied with all your text fields, click the Next button to advance to the last page of
the wizard.
The "Finish" Page
Once you get to this page, your wizard is done. All you need to decide is whether you want to
keep it or not.
If you like what you’ve done, click the Finish button. This will close the wizard and keep all the
label décor you picked out in the wizard.
If you’re having second thoughts, click the Cancel button. This will close the wizard and discard
all the wizard decisions you’re apparently starting to regret.
- 48 -
Imagemixer Label Maker User Manual
The Preferences Dialog
This dialog collects a bunch of program settings that generally don’t nicely fit into other
categories and lets you edit them. You can launch the Preferences dialog by selecting the
Preferences option from the File menu.
The dialog contains several pages. Select which page you want to view and edit by clicking on
the page names in the listbox on the left side of the dialog.
Main Toolbar
Auto-Run Options
Printer Alignment
Stretch Labels
Printing Fold Lines
The "Miscellaneous" Page
This page lets you set miscellaneous options. The label maker isn’t very miscellaneous yet;
there’s only one option on this page:
Create a log file: If you check this box, the program will log various events to a special text file.
This will slow down the label maker, so we don’t recommend using it except under special
circumstances. You should only need to check this box if something freakish is occurring with
the program and someone in our technical support department has asked you to turn logging on
- 49 -
Imagemixer Label Maker User Manual
and send us the file so we can try to figure out what’s going on. In all other circumstances, leave
this box unchecked.
The "Main Toolbar" Page
This page lets you choose how you want the program’s main toolbar (which runs across the top
of the program’s main window) to look.
These are your options:
Big icons with text: each toolbar button will have a 32 by 32 icon, plus text describing
what the button does.
Big icons, no text: each toolbar button will have just the 32 by 32 icon.
Small icons with text: each toolbar button will have a 16 by 16 icon, plus text
describing what the button does.
Small icons, no text: each toolbar button will have just the 16 by 16 icon.
No toolbar: the toolbar will not be visible at all. If you use this setting, please don’t tell
our artist.
The "Auto-Run Options" Page
- 50 -
Imagemixer Label Maker User Manual
This page lets you decide whether or not to launch the the new-label wizard every time you start
the program, and whether or not the program should automatically change the text justification
when you switch a text object to a round background.
The Always run the new-label wizard at program startup checkbox:
If you check the “Always run the new-label wizard at program startup” box, the wizard will
automatically run whenever you start the program. If you uncheck the box, the wizard will never
run unless you explicitly tell it to by choosing the Instant-Label Wizard option from the File
menu.
Of course, there’s an exception. If you launch the program by double-clicking on a label file in
Windows Explorer or by dragging a label file onto the Label Maker’s program icon, the wizard
won’t run at startup even if you have the always-run checkbox checked. Our logic was that the
wizard is used for creating a brand-new label, and if you’re launching the program by doubleclicking a label file, you don’t want a new label, you want to edit the one you just double-clicked.
We hope we have not erred in this assumption.
The Remember last-used project type at program startup checkbox:
By default, the software creates a blank CD project when it starts. If you check this box, it will
remember the project type (CD, DVD, or mini-CD) you were working on the last time you used
the software and create a blank project of that type when you start the program. So if you were
working on a DVD project the last time you ran the software, the next time it launches it will
create a blank DVD project for you to work on.
The When changing a text object’s shape to round buttons:
Lots of people think that if you display text within a round shape, the text will look goofy unless
it’s centered. Others say that non-centered text within a round shape can add dash and spice to
an ordinary design, and can rouse people to rethink their placid assumptions about the natural
order of things, much like Stravinsky’s Rites of Spring or the shower scene in Psycho. For our
part, we’ve tried to remain agnostic about this. To accommodate all sides of this raging debate,
we’ve added this set of buttons:
Always center the text: when you change a text object to have a round shape, the
program will automatically convert the text to centered justification.
Never center the text: when you change a text object to have a round shape, we’ll just
pretend it never happened, at least from a text justification point of view.
Always ask me: when you change a text object to have a round shape, we’ll ask you
whether or not you want us to center the text for you.
- 51 -
Imagemixer Label Maker User Manual
The "Printer Alignment" Page
Printers are imprecise beasts. You can tell them to print something exactly 1.2 inches from the
top of the paper, but chances are, it’ll end up being more like 1.1 or 1.28 inches from the top.
The older your printer gets, the more likely this is to occur, as all the little mechanical bits that
escort paper into and out of the printer get worn out. You’re not likely to notice this flaw when
you’re printing, say, a resumé. And if your interviewer is measuring the margins on your resumé,
you may be happier elsewhere anyway. But when you’re printing a CD label on a pre-cut form,
every millimeter matters. (That’s why millimeters would rather be on a CD label than a plain
sheet of paper – they like to feel important.) If your printer is a millimeter awry on a CD label,
you’ll get a millimeter of white, unprinted space on your label. It won’t look good.
However, if your printer is consistently wrong, which is often the case, you can use this dialog
to correct it. If the printer always prints a millimeter to the right of where it’s supposed to, you
can use this dialog to tell the program to always print labels one millimeter to the left of where
they’d normally go, which will cancel out the printer’s imprecision and make things print just
where they ought to be.
Here’s a summary of the controls on this page:
When printing on: Lets you select the printer for which you want to set offsets.
Move labels by: There’s one of these sections each for horizontal and vertical paper
alignment. Enter the amount of space, in millimeters, by which you need to move labels
horizontally and vertically, respectively, for the printer you’ve chosen.
To the left/To the right: Lets you select the direction in which to correct your printer’s
horizontal printing errors. If your printer always prints stuff too far to the right, check the
“To the left” box. If it always prints too far to the left, check the “To the right” box.
Up/Down: Lets you select the direction in which to correct your printer’s vertical printing
errors. If your printer always prints stuff too far down the page, check the “Up” box. If if
prints too high, check the “Down” box.
If your printer doesn’t align correctly, but isn’t consistent about it, you can correct it by telling the
program to stretch labels when it prints them. You can set the stretch amount on the Stretch
Labels page.
- 52 -
Imagemixer Label Maker User Manual
The "Stretch Labels" Page
This dialog lets you account for printer alignment errors by stretching all your labels when they
print. If your printer doesn’t print precisely where it’s supposed to, but it’s always off in exactly
the same way, you can use the printer alignment dialog to fix it. If it’s not wrong consistently
enough, however, you’ll need to use the brute force method of stretching all the labels by a
millimeter or two, which will result in the label being slightly larger in every direction. So even if
your printer prints too high one pass, and too low the next, or likes to feint left and print right,
you’ll be set.
We generally recommend setting the stretch labels amount at one to two millimeters. We also
recommend that you don’t put important stuff, such as text, within a millimeter or so of your label
borders or the CD hole unless you have a fabulously reliable printer, because otherwise it
stands a good chance of getting chopped off when you print it.
But don’t stretch plain-paper labels: This checkbox lets you specify whether or not you want
to apply your stretch settings to labels you print on plain paper. By default, this box will be
checked, which is our recommendation. The stretch labels settings are designed to overcome
problems with your printer’s alignment so that you can fit labels onto premade forms. But since
plain paper doesn’t have any pre-perforated labels that you need to line your labels up with,
stretching isn’t necessary, and in fact will only make your labels bigger than they need to be.
The "Printing Fold Lines" Page
This page lets you set options for printing fold lines on your labels. You can turn fold line printing
on and off from the Print Dialog. If you turn them on, the program will print lines on your labels to
help you fold them correctly. You don’t need to check this box unless you’re printing on plain
- 53 -
Imagemixer Label Maker User Manual
paper; most stock paper forms have folds already built into the paper. If you check this box for
the jewel case back, the program will print lines indicating where to fold the two spines. If you
check this box for the jewel case front/inside, the program will print a line indicating where to
fold the front/inside booklet in half. (The box will be disabled for the front/inside label if you’re
not printing on a paper type that prints both the front and inside labels on the same side of the
paper.) You won’t be able to check this box for the CD disc label, because there’s nothing to
fold on a disc label.
The Fold Line Options:
Solid Lines: If you check this radio button, the program will print solid fold lines.
Dashed Lines: If you you check this radio button, the program will print dashed fold
lines.
Print lines outside the label only: If you don’t check this box, the program will print fold
lines on your labels to indicate where you need to fold them. If you check this box, the
program won’t print fold lines on your labels; it will print short lines just outside your label
boundaries to indicate where you should fold your labels. If you use this option, there
won’t be lines on your label, but you’ll have to eyeball things a bit to get your fold lines
right.
Color: This option lets you choose what color you want your fold lines to be. The colored
rectangle to the right of the “color” text will display your currently chosen fold line color.
You can click on this rectangle or the “Change Color” button to choose a new color.
- 54 -
Imagemixer Label Maker User Manual
Other Useful Dialogs
Save as Theme
This dialog lets you save your current project as a theme that will show up in the Instant-Label
Wizard.
New Theme Name: Enter a name for your new theme here. It will appear under this name in
the Instant-Label Wizard after you’ve saved it.
Stuff to Save:
Text Objects: If you check this box, any text objects on the labels in your project will get saved
in the theme.
Images: If you check this box, any images in your project, both foreground and background, will
get saved in your theme.
Colored Shapes: If you check this box, any shapes you’ve added to your project will get saved
in your theme.
Background Color: If you check this box, the background colors you’ve selected for the labels
in your project will get saved in your theme.
Tiled Background Settings
This dialog lets you set an image from your computer as a tiled label background and control a
variety of settings for how the image gets tiled. Here’s what all the controls do:
Real-Time Preview: If you check this box, any changes you make will display on the label
immediately, so you can see how well they work. If you uncheck it, you won’t be able to see
your changes until you click the OK button to exit the dialog.
150 DPI: This option will tile the image at 150 dots per inch. It’s the default option for bitmapbased images. (For vector-based images, such as WMF files, dots per inch effectively has no
meaning, so you’ll have to set custom rows and columns.) If you tile at resolutions lower than
150 DPI, there’s a good chance the image could begin to look grainy or distorted when you print
it.
300 DPI: This option will tile the image at 300 dots per inch.
Custom DPI: This option will let you tile the image at the dots-per-inch resolution of your choice.
Custom Rows/Columns: This option will let you choose your tiling resolution in rows &
columns instead of dots per inch.
Keep Aspect Ratio: This option only applies to the Custom Rows/Columns tiling mode. If it’s
checked, the image will always maintain its original aspect ratio, so if you change the number of
rows, the number of columns will automatically change to keep the aspect ratio constant, and
vice versa. If you uncheck this option, you can set both rows and columns precisely, but if you
change the aspect ratio, the image could appear stretched or squished.
Cropping Controls: The cropping options let you crop the image so that portions of it don’t get
displayed. The cropping amounts you specify in these controls are measured in pixels. The
default is 0 pixels (no cropping at all).
- 55 -
Imagemixer Label Maker User Manual
Justification: These options let you control horizontal and vertical justification for your image.
You can align your image to the left or right edges of your label, or center it. You can align it
vertically to the top of bottom edge of the label, or make it centered vertically on the label.
Blend Edges: This option will blend the edges of the image together so that there’s not a visible
seam between the tiles. This option generally works best on images that don’t have sharply
defined contours or objects on them – a photograph of clouds, for instance, would be a good
candidate for the blend-edges effect. If you’re not sure whether or not it will work for your image,
go ahead and check the box and see. It takes almost no effort, after all – you’ll consume less
than half a calorie, in our judgment – to uncheck the box again if it doesn’t look good.
New File
This dialog lets you start fresh with a brand new, blank set of labels. All you have to do is decide
what sort of new label you want: an audio CD or a DVD. The only difference between them is
that an audio CD’s contents consist of tracks, each containing a track name, artist name, and
length, while a DVD’s contents consist of chapters, each containing a chapter name and length.
- 56 -
Imagemixer Label Maker User Manual
Registration, Purchase, & Support
With the trial version of Imagemixer Label Maker, the program will be fully functional until your
trial expires. Once your trial expires, you won’t be allowed to print labels again until you register
your software.
Why Register?
you can print as many labels as you want
tech support
free art! If you’re registered you get access to more than 700 free backgrounds and 100
themes, all designed exclusively for Imagemixer Label Maker.
with your support, we can afford to add new features and make more high-quality, easyto-use software
it’s easy
Purchase
You can buy a registration code now over the Internet and receive the code via e-mail within
minutes. Just click the “Buy” button on the Label Maker’s main toolbar or select the “Buy now
and register” item from the Label Maker’s Help menu.
If you’re not running Imagemixer Label Maker right now, you can go directly to our website and
purchase a code. Just click on this link:
BUY NOW!
And thanks for registering! We’ll be proud to have you as a customer.
Support
If you need additional support for the CD Label Maker, please visit our support Web site.
See the FAQ page on our Web site for answers to other frequently asked questions.
- 57 -
Imagemixer Label Maker User Manual
Credits
Imagemixer Label Maker is sold under license from Acoustica, Inc. Copyright © 2001-2005
Acoustica Inc. All Rights Reserved.
Programming and design by Russ Cary, Joseph Clarke, and Brian Hughes.
Featuring art by Rich Powell, Tim Ibbotson, Ramona Clarke, & Ronnie Nijmeh.
Extra thanks to Ronnie Nijmeh, Lois Clarke, Donda Bird, Greg Birkel, and the Beta Team.
Avery and all Avery brands, product names and codes are trademarks of Avery Dennison
Corporation. For more information on Avery(r) products, call (800) 462-8379 in the U.S. or (888)
462-8379 in Canada, or visit www.avery.com.
Lorenz Bell and all Lorenz Bell ® products, product names and codes are trademarks of Lorenz
Bell, Ltd. For more information about the products, visit www.lorenzbell.com.
Website:
www.pixela-1.com
About Imagemixer Label Maker
- 58 -