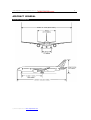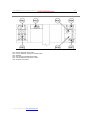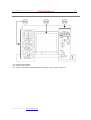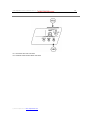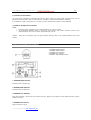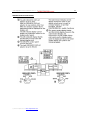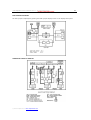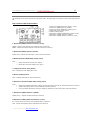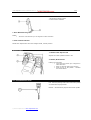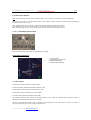
1
‘777 Captain’ FLIGHT MANUAL Part II – Aircraft and Systems DO NOT USE FOR FLIGHT FLIGHT MANUAL PART II – Aircraft and Systems Captain Sim is not affiliated with any entity mentioned or pictured in this document. All trademarks are the property of their respective owners. © 2014 Captain Sim www.captainsim.com 1 ‘777 Captain’ FLIGHT MANUAL Part II – Aircraft and Systems DO NOT USE FOR FLIGHT 2 ABOUT THIS MANUAL VERSION: 24 APRIL, 2014 WARNING: THIS MANUAL IS FOR MS FSX® EXPANSION ONLY. DO NOT USE FOR FLIGHT. The ‘777 Captain’ FLIGHT MANUAL is organized into two Parts. Each Part is provided as a separate Acrobat® PDF document: • Part I – User’s Manual The User’s Manual describes the ‘777 Captain’ product as a software title. • Part II – Aircraft and Systems - this document. The Manuals are available free of charge online. THIS MANUAL IS SUPPLEMENTAL TO THE ‘777 CAPTAIN’ WEB SITE WHICH WE HIGHLY RECOMMEND TO READ BEFORE USING THIS MANUAL. © 2014 Captain Sim www.captainsim.com ‘777 Captain’ FLIGHT MANUAL Part II – Aircraft and Systems DO NOT USE FOR FLIGHT 777 Captain FLIGHT MANUAL CONTENTS 6 SYSTEMS DESCRIPTION 7 AIRCRAFT GENERAL 7 8 9 9 10 10 11 12 12 13 14 15 16 17 17 18 19 PRINCIPAL DIMENSIONS CARGO COMPARTMENTS INSTRUMENT PANELS FLIGHT DECK PANELS INSTRUMENT PANELS, OVERHEAD OVERHEAD PANEL OVERHEAD MAINTENANCE PANEL INSTRUMENT PANELS, FORWARD LEFT FORWARD PANEL RIGHT FORWARD PANEL GLARESHIELD PANEL CENTER FORWARD PANEL FORWARD AISLE STAND INSTRUMENT PANELS, AFT AND SIDE CONTROL STAND AFT AISLE STAND LEFT AND RIGHT SIDEWALL PANELS 20 20 21 22 PASSENGER SIGNS AND LIGHTING O08. PASSENGER SIGNS AND LIGHTING O14. LIGHTING PANEL MISCELLANIOUS LIGHTING CONTROLS 23 O05. PASSENGER OXYGEN SWITCH 24 ANTI-ICE SYSTEM 24 24 24 O13. ANTI-ICE PANEL O06. WINDOW HEAT PANEL O04, O18. WIPER PANEL 25 AUTO FLIGHT SYSTEM 25 31 33 34 G04. MODE CONTROL PANEL (MCP) P01, P03. CDU CDU KEYBOARD CONTROL P09. TO/GA AND AUTOTHROTTLE DISCONNECT SWITCHES 35 COMMUINICATIONS SYSTEM 35 36 P19, P22, P29, S01. AUDIO CONTROL PANEL (ACP) P18, P21, P28. RADIO TUNING PANEL 38 ELECTRICAL SYSTEM 38 O03. ELECTRICAL PANEL (and AUXILIARY POWER UNIT (APU) 40 ENGINES & APU 40 40 41 42 42 43 EICAS DISPLAY MODE INDICATIONS N1 INDICATIONS (ALL MODES) EGT INDICATIONS ANTI-ICE INDICATIONS SECONDARY ENGINE INDICATIONS © 2014 Captain Sim www.captainsim.com 3 ‘777 Captain’ FLIGHT MANUAL Part II – Aircraft and Systems DO NOT USE FOR FLIGHT 4 47 47 47 48 P09. ENGINE CONTROLS THRUST LEVERS P14. FUEL CONTROL SWITCHES O10. ENGINE CONTROL PANEL 49 49 AUXILIARY POWER UNIT (APU) O03. APU CONTROLS 50 FIRE PROTECTION 50 50 51 ENGINE FIRE PROTECTION P24. ENGINE AND APU FIRE PANEL O09. APU AND CARGO FIRE PANEL 52 FLIGHT CONTROL 52 52 53 54 O02. THRUST ASYMMETRY COMPENSATION AND PRIMARY FLIGHT COMPUTERS CONTROLS PITCH AND STABILIZER TRIM SYSTEMS AILERON AND RUDDER TRIM CONTROLS FLAP SYSTEM 56 FLIGHT INSTRUMENTS 56 56 62 SYSTEM DESCRIPTION DISPLAY SYSTEM CONTROLS DISPLAY SYSTEM INFORMATION SOURCE 63 63 65 PRIMARY FLIGHT DISPLAY (PFD) PFD INFORMATION TYPICAL PFD DISPLAYS 68 68 NAVIGATION DISPLAY (ND) ND MODES 71 72 74 75 76 77 ELECTRONIC FLIGHT BAG MAIN MENU MODE SPLIT MODE DEFAULT SETUP AND CONTENT USERS' CUSTOMIZATION ELECTRONIC CHECKLIST (ECL) 81 81 82 89 91 92 104 CONTROLS AND INDICATORS INBOARD DISPLAYS AND HEADING REFERENCE G05. DISPLAY SELECT PANEL G03, G06. EFIS CONTROL PANELS DISPLAY BRIGHTNESS CONTROLS PRIMARY FLIGHT DISPLAY (PFD) STANDBY FLIGHT INSTRUMENTS / CLOCK 108 FLIGHT MANAGEMENT, NAVIGATION 108 R05. FMC SELECTOR 109 FUEL 109 110 O12. FUEL SYSTEM O11. FUEL JETTISON SYSTEM 111 HYDRAULICS 111 112 112 O07. HYDRAULIC PANEL MISCELLANEOUS HYDRAULIC SYSTEM CONTROLS M02. FLIGHT CONTROL HYDRAULIC POWER SWITCHES © 2014 Captain Sim www.captainsim.com ‘777 Captain’ FLIGHT MANUAL Part II – Aircraft and Systems DO NOT USE FOR FLIGHT 113 LANDING GEAR 113 114 114 114 115 C03. LANDING GEAR PANEL NOSE WHEEL STEERING TILLER BRAKE SYSTEM P12. PARKING BRAKE LEVER L04. BRAKE ACCUMULATOR PRESSURE INDICATOR 116 WARNING SYSTEMS 116 117 119 SYSTEM WARNINGS TRAFFIC ALERT AND COLLISION AVOIDANCE SYSTEM (TCAS) G05. DISPLAY SELECT PANEL 121 AIR SYSTEMS 121 122 123 AIR CONDITIONING SYSTEM PRESSURIZATION SYSTEM O16. BLEED AIR SYSTEM 124 WEATHER RADAR 124 125 THEORY OF OPERATION CONTROLS AND INDICATORS 127 CUSTOMER CARE © 2014 Captain Sim www.captainsim.com 5 ‘777 Captain’ FLIGHT MANUAL Part II – Aircraft and Systems DO NOT USE FOR FLIGHT 6 SYSTEMS DESCRIPTION The '777 Captain' is one of the most advanced, complete and accurate airliner expansions for MSFS. But the '777 Captain’ (same as MSFS itself and any MSFS expansion) is a flight simulation software game. Therefore this product should not be used as flight training device (FTD) and/or simulator for flight training purposes. All items should work as described in this manual. If something is not described as functional (therefore it does not work or does not exist in the model) it is not a system 'bug' but a reasonable simplification. © 2014 Captain Sim www.captainsim.com ‘777 Captain’ FLIGHT MANUAL Part II – Aircraft and Systems DO NOT USE FOR FLIGHT AIRCRAFT GENERAL PRINCIPAL DIMENSIONS © 2014 Captain Sim www.captainsim.com 7 ‘777 Captain’ FLIGHT MANUAL Part II – Aircraft and Systems DO NOT USE FOR FLIGHT 8 CARGO COMPARTMENTS The B777 has three cargo compartments; forward, aft and bulk. Each compartment is accessed through its respective door. The aft and bulk cargo compartments are separated only by a curtain. The cargo compartments are administratively subdivided into five bins. The forward and aft sections of the forward cargo compartment are bin 1 and bin 2 respectively. Bin 3 and bin 4 are the forward and aft sections of the aft cargo compartment, and the bulk compartment is bin 5. © 2014 Captain Sim www.captainsim.com ‘777 Captain’ FLIGHT MANUAL Part II – Aircraft and Systems DO NOT USE FOR FLIGHT INSTRUMENT PANELS FLIGHT DECK PANELS © 2014 Captain Sim www.captainsim.com 9 ‘777 Captain’ FLIGHT MANUAL Part II – Aircraft and Systems DO NOT USE FOR FLIGHT 10 INSTRUMENT PANELS, OVERHEAD OVERHEAD PANEL O01. AIR DATA INERTIAL REFERENCE UNIT (ADIRU) O02. THRUST ASYMMETRY COMPENSATION AND PRIMARY FLIGHT COMPUTERS CONTROLS O03. ELECTRICAL/APU PANEL O04, O18. WIPER PANEL O05. PASSENGER OXYGEN AND WINDOW HEAT PANEL O07. HYDRAULIC PANEL O08. PASSENGER SIGNS AND LIGHTING O09. APU AND CARGO FIRE PANEL © 2014 Captain Sim www.captainsim.com O10. O11. O12. O13. O14. O15. O16. O17. ENGINE CONTROL PANEL FUEL JETTISON SYSTEM FUEL SYSTEM ANTI-ICE PANEL LIGHTING PANEL AIR CONDITIONING PANEL BLEED AIR SYSTEM PANEL PRESSURIZATION PANEL ‘777 Captain’ FLIGHT MANUAL Part II – Aircraft and Systems DO NOT USE FOR FLIGHT OVERHEAD MAINTENANCE PANEL M01. M02. M03. M04. M05. M06. BACKUP WINDOW HEAT PANEL FLIGHT CONTROL HYDRAULIC POWER PANEL SPEAKER APU AND EEC MAINTENANCE PANEL CARGO TEMPERATURE SELECT PANEL GROUND TEST PANEL © 2014 Captain Sim www.captainsim.com 11 ‘777 Captain’ FLIGHT MANUAL Part II – Aircraft and Systems DO NOT USE FOR FLIGHT INSTRUMENT PANELS, FORWARD LEFT FORWARD PANEL L01. L02. L03. L04. L05. L06. INSTRUMENT SOURCE SELECT PANEL CLOCK LEFT OUTBOARD DISPLAY BRAKE ACCUMULATOR PRESSURE INDICATOR LEFT INBOARD DISPLAY INBOARD DISPLAY SELECTOR/HEADING REFERENCE SWITCH © 2014 Captain Sim www.captainsim.com 12 ‘777 Captain’ FLIGHT MANUAL Part II – Aircraft and Systems DO NOT USE FOR FLIGHT RIGHT FORWARD PANEL R01. R02. R03. R04. R05. RIGHT INBOARD DISPLAY INSTRUMENT SOURCE SELECT PANEL RIGHT OUTBOARD DISPLAY CLOCK INBOARD DISPLAY SELECTOR/HEADING REFERENCE SWITCH © 2014 Captain Sim www.captainsim.com 13 ‘777 Captain’ FLIGHT MANUAL Part II – Aircraft and Systems DO NOT USE FOR FLIGHT GLARESHIELD PANEL G01, G02, G03, G04. G05. G08. MAP LIGHT CONTROL G07. MASTER WARNING / CAUTION RESET SWITCHES AND LIGHTS G06. EFIS CONTROL PANELS MODE CONTROL PANEL (MCP) DISPLAY SELECT PANEL © 2014 Captain Sim www.captainsim.com 14 ‘777 Captain’ FLIGHT MANUAL Part II – Aircraft and Systems DO NOT USE FOR FLIGHT CENTER FORWARD PANEL C01. STANDBY INSTRUMENTS C02. UPPER CENTER DISPLAY C03. LANDING GEAR PANEL/GROUND PROXIMITY WARNING SYSTEM (GPWS) CONTROLS © 2014 Captain Sim www.captainsim.com 15 ‘777 Captain’ FLIGHT MANUAL Part II – Aircraft and Systems DO NOT USE FOR FLIGHT FORWARD AISLE STAND P01, P03, P25. CDU PANEL P02. LOWER CENTER DISPLAY P04. CENTER PANEL BRIGHTNESS CONTROLS © 2014 Captain Sim www.captainsim.com 16 ‘777 Captain’ FLIGHT MANUAL Part II – Aircraft and Systems DO NOT USE FOR FLIGHT INSTRUMENT PANELS, AFT AND SIDE CONTROL STAND P08, P10, P12. P14. P09. ENGINE CONTROLS P15. FLAPS CONTROLS ELEVATOR TRIM INDICATOR AND PARKING BRAKE LEVER FUEL CONTROL SWITCHES © 2014 Captain Sim www.captainsim.com 17 ‘777 Captain’ FLIGHT MANUAL Part II – Aircraft and Systems DO NOT USE FOR FLIGHT AFT AISLE STAND P18, P19, P20. P24. P26. P30. P32. P21, P28. RADIO TUNING PANEL P22, P29, S01 AUDIO CONTROL PANEL (ACP) WEATHER RADAR PANEL ENGINE AND APU FIRE PANEL AILERON AND RUDDER TRIM CONTROLS TRANSPONDER PANEL LIGHTING CONTROLS © 2014 Captain Sim www.captainsim.com 18 ‘777 Captain’ FLIGHT MANUAL Part II – Aircraft and Systems DO NOT USE FOR FLIGHT LEFT AND RIGHT SIDEWALL PANELS V01. SHOULDER AND FOOT HEATERS V02. FORWARD PANEL BRIGHTNESS CONTROLS © 2014 Captain Sim www.captainsim.com 19 ‘777 Captain’ FLIGHT MANUAL Part II – Aircraft and Systems DO NOT USE FOR FLIGHT 20 PASSENGER SIGNS AND LIGHTING O08. PASSENGER SIGNS AND LIGHTING 1. 2. 3. 4. Dome Light Control Master Switch Glareshield Light Control (outer) Landing Light Switches 1. DOME Light Control Controls overhead dome light brightness. 2. MASTER Switch (Shift+L) A black ring on the side of the inner switch is visible when the switch is out (OFF). Push ON (in) – FSX 'panel light’ is on. Push OFF (out) - FSX 'panel light’ is off. 3. GLARESHIELD Light Control (outer) Rotate - controls glareshield panel light. 4. LANDING Light Switches OFF - The landing light is not illuminated. ON - The landing light is illuminated. Note: The nose gear landing lights cannot illuminate when the nose landing gear is not down and locked. © 2014 Captain Sim www.captainsim.com ‘777 Captain’ FLIGHT MANUAL Part II – Aircraft and Systems DO NOT USE FOR FLIGHT 21 O14. LIGHTING PANEL 1. 2. 3. 4. 5. 6. 7. Beacon Light Switch Navigation (NAV) Light Switch Wing Light Switch Indicator Lights (IND LTS) Switch Runway Turnoff Light Switches Taxi Light Switch Strobe Light Switch 1. BEACON Light Switch ON - the red anti-collision beacon lights on the top and bottom of the fuselage operate. 2. Navigation (NAV) Light Switch ON - The red, green, and white navigation position lights are illuminated. 3. WING Light Switch ON - The wing leading edge illumination lights are illuminated. 4. Indicator Lights (IND LTS) Switch TEST (spring-loaded): Illuminates all annunciator lights to full brightness for 10 seconds to check the bulbs, then dims the lights as long as the switch is held Causes test patterns to display on the stabilizer position indicators, rudder trim indicator, and radio tuning panel displays. BRT - sets all illuminated annunciator lights to full brightness. DIM - sets all illuminated annunciator lights to low brightness. 5. RUNWAY TURNOFF Light Switches OFF - The runway turnoff light is extinguished. ON - The runway turnoff light is illuminated. 6. TAXI Light Switch OFF - The taxi lights are extinguished. ON - The taxi lights are illuminated. Note: The taxi lights do not illuminate when the nose landing gear is not down and locked. 7. STROBE Light Switch OFF - The white anticollision strobe lights on the tips of each wing and the tail cone are off. ON - The strobe lights operate. © 2014 Captain Sim www.captainsim.com ‘777 Captain’ FLIGHT MANUAL Part II – Aircraft and Systems DO NOT USE FOR FLIGHT 22 MISCELLANIOUS LIGHTING CONTROLS G01, G08. MAP LIGHT CONTROL Rotate – map light ON-OFF. Independent controls for Captain's and F/O lights. V02. FORWARD PANEL BRIGHTNESS CONTROLS 1. Outboard Display Light Control 2. Inboard Displays Lights Control 3. Forward Panel Flood Light Control 1. Outboard Display Light Control Rotate - Controls outboard display light. 2. Inboard Displays Lights Control Rotate - Controls inboard displays lights. 3. FORWARD PANEL FLOOD Light Control The captain's and first officer's forward panel brightness controls have controls for their outboard and inboard display units. These controls are on the sidewall panels. There is a single control for the outboard display units. There is a dual control knob for the inboard display units. The outer knob controls display brightness and the inner knob controls WXR brightness. DISPLAYS CONTROL VIA 2D POP-UPS All 2D pop-up displays have the following 3 control areas: 1. Close 2D display, left mouse click. 2. Brightness adjustment. Mouse wheel DOWN (towards, reduce brightness) or mouse wheel UP (outwards, increase brightness). 3. 2D display drag area. © 2014 Captain Sim www.captainsim.com ‘777 Captain’ FLIGHT MANUAL Part II – Aircraft and Systems DO NOT USE FOR FLIGHT O05. PASSENGER OXYGEN SWITCH 1. Passenger Oxygen Switch 2. Passenger Oxygen ON Light 2. Passenger Oxygen ON Light Illuminated (amber) - The passenger oxygen system is operating and the masks have dropped. © 2014 Captain Sim www.captainsim.com 23 ‘777 Captain’ FLIGHT MANUAL Part II – Aircraft and Systems DO NOT USE FOR FLIGHT 24 ANTI-ICE SYSTEM O13. ANTI-ICE PANEL 1. Wing Anti-Ice Selector 2. Engine Anti-Ice Selectors 1. WING ANTI-ICE Selector OFF - Both wing anti-ice valves are commanded closed. AUTO - In flight, both wing anti-ice valves are commanded opened or closed automatically by the ice detection system. ON - In flight, both wing anti-ice valves are commanded open. 2. ENGINE ANTI-ICE Selectors OFF - The engine anti-ice valve is commanded closed. AUTO - In flight, the engine anti-ice valve is opened or closed automatically by the ice detection system. ON - The engine anti-ice valve is commanded open. Note: If the ENG ANTI-ICE selector is in AUTO and the anti-ice valve is commanded open, or if the selector is in ON, then approach idle is selected by the EEC. O06. WINDOW HEAT PANEL ON - Window heat is applied to the selected windows. INOP (inoperative) illuminated (amber) · The switch is OFF, · An overheat is detected, or · A system fault has occurred. O04, O18. WIPER PANEL OFF - The wiper is stowed at the base of the window. INT (intermittent) intermittently. - The wiper LOW - The wiper operates at low speed. HIGH - The wiper operates at high speed. © 2014 Captain Sim www.captainsim.com operates ‘777 Captain’ FLIGHT MANUAL Part II – Aircraft and Systems DO NOT USE FOR FLIGHT 25 AUTO FLIGHT SYSTEM G04. MODE CONTROL PANEL (MCP) Please note many MCP switches and buttons can be controlled using hotkeys. The events for assignment are listed near each control’s name in bold slanted font. Any key combinations can be assigned for these controls, using default FSX key assignment menu: Options > Settings > Controls > Button/Keys > Autopilot MCP operations like heading select, sample: - press Ctrl+Shift+H, release, - using ‘+’ or ‘-‘ on keyboard spin the knob; - press any key or left mouse click to cancel selected option. Known issues: - Ctrl+Shift+K cannot be selected (see p.32) - Hotkeys can be used only when the MCP 2D panel is on screen or when you are in VC. 1,9. Autopilot (A/P) Engage Switches 2,3. Autothrottle (A/T) ARM Switches 4. IAS / MACH Window - IAS/MACH Reference Switch 5. Lateral Navigation (LNAV) Switch 6. Heading / Track (HDG/TRK) Reference Switch - Heading / Track Window 7. Vertical Speed / Flight Path Angle (V/S - FPA) Window - V/S - FPA Reference Switch 8. Altitude Window 10,25. Flight Director (F/D) Switches 11. Climb/Continuous (CLB/CON) Thrust Switch 12. Autothrottle (A/T) Engage Switch 13. IAS / MACH Selector 14. Vertical Navigation (VNAV) Switch 15. Flight Level Change (FLCH SPD) Switch 16. Autopilot (A/P) Disengage Bar 17. BANK LIMIT Selector (outer)/- Heading / Track Selector (middle)/Heading / Track Select (SEL) Switch (inner) 18. Heading / Track Hold (HOLD) Switch 19. V/S - FPA Selector 20. V/S - FPA Switch/Light 21. Altitude Selector 22. Altitude Hold Switch 23. Localizer (LOC) Switch 24. Approach (APP) Switch 1,9. Autopilot (A/P) Engage Switches (Autopilot master (on/off), default key: Z) Push (either switch can engage the autopilot) If either flight director switch is ON, the autopilot engages in the selected flight director mode(s). If both flight director switches are OFF, the autopilot engages in default modes: Vertical speed (V/S) or flight path angle (FPA) as the pitch mode. Attitude hold (ATT) heading or track hold (HDG HLD/TRK HLD) as the roll mode. © 2014 Captain Sim www.captainsim.com ‘777 Captain’ FLIGHT MANUAL Part II – Aircraft and Systems DO NOT USE FOR FLIGHT 26 2,3. Autothrottle (A/T) ARM Switches The left autothrottle arm switch controls the left engine autothrottle. The right autothrottle arm switch controls the right engine autothrottle. L and/or R - Arms the selected autothrottle for mode engagement. The selected autothrottle engages automatically when an AFDS mode (VNAV, FLCH, or TO/GA) is selected. OFF Disconnects the selected autothrottle, and Prevents selected autothrottle engagement. 4. IAS / MACH Window Displays the speed selected by the IAS / MACH selector. Blank when the FMC controls the speed. When changing from TO/GA to V/S, FPA, or ALT, the window automatically displays: 250 knots (flaps up), or A speed value entered in the IAS / MACH window The display range is: 100 - 399 KIAS 0.40 - 0.95 MACH. The selected speed is displayed as the PFD selected speed. Displays 200 knots when power is first applied. During climb, automatically changes from IAS to MACH at 0.84 MACH. During descent, automatically changes from MACH to IAS at 310 KIAS. IAS/MACH Reference Switch (Ctrl+M) Push Alternately changes the IAS / MACH window between IAS and MACH displays (MACH must be 0.4 or greater to switch from IAS to MACH). Inoperative when the IAS / MACH window is blank. 5. Lateral Navigation (LNAV) Switch (Autopilot NAV1 Hold, default key: Ctrl+N) Push Arms, disarms or engages, LNAV as the roll mode. Displays LNAV in white (armed) on the PFD roll flight mode annunciator when armed. The previous roll mode remains active. LNAV engages if the airplane is above 50 feet radio altitude and: Within 2.5 NM of the active leg If not within 2.5 NM of the active leg and on an intercept heading to the active leg, remains armed then engages when approaching the active leg When engaged, displays LNAV in green on the PFD roll flight mode annunciator. Selection of LNAV when an active FMC route is not available displays NO ACTIVE ROUTE in the CDU scratchpad. LNAV maintains current heading when: Passing the last active route waypoint Passing the last waypoint prior to a route discontinuity Passing the last route offset waypoint Activating the inactive route or activating an airway intercept and not within LNAV engagement criteria. LNAV (green) is disengaged: By selecting heading hold (HDG HOLD) or track hold (TRK HOLD) By selecting heading select (HDG SEL) or track select (TRK SEL) When the localizer captures If there is a dual FMC failure LNAV (white) can be disarmed by pushing the LNAV switch a second time, or by arming LOC or APP. © 2014 Captain Sim www.captainsim.com ‘777 Captain’ FLIGHT MANUAL Part II – Aircraft and Systems DO NOT USE FOR FLIGHT 27 6. Heading / Track (HDG/TRK) Reference Switch Push - Alternately changes the heading / track window, PFD, and ND selected heading / track references between heading and track. Also changes the PFD roll flight mode annunciator, if the HDG or TRK mode is engaged. Heading / Track Window (Heading bug (select)) Displays the selected heading or track. The selected heading or track is displayed on the PFD and ND. If approach (APP) or localizer (LOC) is armed, the heading / track in the MCP window automatically changes to the selected front course heading at LOC capture. Displays 360 degrees when power is first applied. 7. Vertical Speed / Flight Path Angle (V/S - FPA) Window - V/S - FPA Reference Switch Vertical Speed / Flight Path Angle (V/S - FPA) Window Displays the selected vertical speed in 100 fpm increments or the selected flight path angle in 0.1 degree increments. The display range is: V/S: -8000 to +6000 fpm FPA: -9.9 to +9.9 degrees. Blank when the vertical speed (V/S) or flight path angle (FPA) pitch mode is not engaged. The selected vertical speed is displayed on the PFD vertical speed indication. The selected flight path angle is displayed on the PFD attitude indicator. V/S - FPA Reference Switch Push - Alternately changes the vertical speed / flight path angle window and PFD references between vertical speed and flight path angle. Also changes the PFD pitch flight mode annunciator, if the V/S or FPA mode is engaged. 8. Altitude Window (Altitude bug (select)) Displays the selected altitude. The displayed altitude is the reference altitude for altitude alerting and level off. The altitude range is 0 to 50,000 feet. Displays 10,000 feet when power is first applied. 10,25. Flight Director (F/D) Switches (Flight director (on/off), default key: Ctrl+F) The left flight director switch activates the flight director steering indications (Pitch and Roll Bars) on the left PFD. The right flight director switch activates the flight director steering indications on the right PFD. ON On the ground with both flight director switches OFF, the first flight director switch positioned ON arms the flight director in the takeoff (TO/GA) roll and pitch modes, and displays the flight direction steering indications on that PFD. The flight mode annunciation (TO/GA)appears on both PFDs. Positioning the second switch ON displays the flight direction steering indications on the second PFD. In flight, with the autopilot disengaged and both flight director switches OFF, the first flight director switch positioned to ON engages the flight director in default modes: Vertical speed (V/S) or flight path angle (FPA) as the pitch mode. Attitude hold (ATT), heading or track hold (HDG/TRK HLD) as the roll mode. In flight, with the autopilot engaged and both flight director switches OFF, the first flight director switch positioned to ON engages the flight director in the currently selected autopilot mode(s). OFF The flight director steering indications are not displayed on the PFD. The flight director steering indications are displayed on the PFD if a TO/GA switch is pushed when airspeed is greater than 80 knots on takeoff, or on a go-around with the leading edge slats extended. © 2014 Captain Sim www.captainsim.com ‘777 Captain’ FLIGHT MANUAL Part II – Aircraft and Systems DO NOT USE FOR FLIGHT 28 11. Climb/Continuous (CLB/CON) Thrust Switch On the ground and below 400 feet AGL during takeoff, the switch is inoperative. Push With two engines operating, changes the engine thrust limit to the FMC selected climb thrust With only one engine operating, changes the thrust limit to maximum continuous (CON). 12. Autothrottle (A/T) Engage Switch (Autothrottle arm, default key: Shift+R) Push - Above 400 feet AGL, with the autothrottle armed, engages the appropriate autothrottle mode for the selected AFDS pitch mode, or if no pitch mode, in the speed (SPD) mode. 13. IAS / MACH Selector When not in VNAV, the IAS/MACH window shows the current target airspeed. Turn the IAS/MACH selector to change the target airspeed. In VNAV, the IAS/MACH window is normally blank. If you push the selector, the window unblanks to show the current FMC target airspeed. You can then turn the IAS/MACH selector to change the target airspeed. This is speed intervention. 14. Vertical Navigation (VNAV) Switch Push Arms, disarms or engages VNAV as the pitch mode. Displays VNAV in white (armed) on the PFD pitch flight mode annunciator below 400 feet above runway elevation. VNAV engages 400 feet above runway elevation. If VNAV is selected and the FMC has insufficient data to provide VNAV guidance. VNAV SPD, VNAV PTH or VNAV ALT pitch mode is displayed in green (engaged) on the PFD pitch flight mode annunciator. In the VNAV PTH pitch mode, the AFDS commands pitch to maintain FMC target altitude or the VNAV path. The autothrottle maintains speed. In the VNAV ALT pitch mode, the AFDS commands pitch to maintain the MCP selected altitude when that altitude is lower than the VNAV commanded altitude in climb or higher than the VNAV commanded altitude in descent. If VNAV is selected and VNAV commands a descent with the MCP altitude window above the current airplane altitude, the autopilot maintains the altitude at which VNAV was selected. When on a VNAV approach, selecting the missed approach altitude does not interfere with the VNAV descent. If VNAV is selected and VNAV commands a climb with the MCP altitude window below the current airplane altitude, the autopilot maintains the altitude at which VNAV is selected. With the VNAV PTH pitch mode engaged, the autothrottle operates in the following modes: For climb or cruise - Operates in the speed (SPD) mode For descent - Operates in the IDLE, HOLD, or speed (SPD) mode. VNAV pitch guidance is available with one engine inoperative. VNAV (green) is disengaged: By engaging TO/GA, FLCH SPD, V/S, FPA or ALT pitch mode If there is a dual FMC failure. VNAV (white) can be disarmed by: Pushing the VNAV switch a second time, or Arming APP. 15. Flight Level Change (FLCH SPD) Switch Push FLCH SPD is displayed on the PFD pitch flight mode annunciator as the pitch mode. If the IAS / MACH window is blank, the IAS / MACH window opens to the FMC target speed, if valid. If not valid, the IAS / MACH window opens to the current speed. © 2014 Captain Sim www.captainsim.com ‘777 Captain’ FLIGHT MANUAL Part II – Aircraft and Systems DO NOT USE FOR FLIGHT 29 16. Autopilot (A/P) Disengage Bar (default key: Z) Pull down Prevents autopilot engagement Generates EICAS advisory message NO AUTOLAND Disables bank angle protection Exposes the amber and black stripes If an autopilot is engaged: It disconnects Displays the EICAS warning message AUTOPILOT DISC Sounds an aural warning Illuminates the master warning lights. Lift up Permits autopilot engagement Hides the amber and black stripes. 17. Bank Limit Selector (outer) - BANK LIMIT Selector (outer) Rotate - Sets the AFDS commanded bank limit when in the heading select (HDG SEL) or track select (TRK SEL) roll mode as follows: AUTO - Varies between 15 - 25 degrees, depending on TAS 5, 10, 15, 20 or 25 - The selected value is the maximum, regardless of airspeed. - Heading / Track Selector (middle) Rotate - Sets heading or track in the heading / track window and on the PFDs and NDs. - Heading / Track Select (SEL) Switch (inner) Push Selects heading select (HDG SEL) or track select (TRK SEL) as the roll mode Displays HDG SEL or TRK SEL on the PFD roll flight mode annunciator The AFDS controls roll to fly the selected heading or track Bank is limited by the bank limit selector. 18. Heading / Track Hold (HOLD) Switch (Autopilot heading hold on/off) Push Selects heading hold (HDG HOLD) or track hold (TRK HOLD) as the roll mode Displays HDG HOLD or TRK HOLD on the PFD roll flight mode annunciator The AFDS commands wings level and holds the heading or track established when wings level is established. 19. V/S - FPA Selector (VSI bug (select)) UP or DOWN - Sets the vertical speed or flight path angle in the vertical speed / flight path angle window and on the PFDs. 20. V/S - FPA Switch/Light (Autopilot vertical speed hold (on/off)) V/S - FPA Switch Push Engages Vertical Speed (V/S) or Flight Path Angle (FPA) as the pitch mode. Displays V/S or FPA on the PFD pitch flight mode annunciator. Displays the current vertical speed or flight path angle in the vertical speed / flight path angle window. When the selected altitude is reached, the pitch mode changes to altitude (ALT). AFDS commands pitch to maintain the vertical speed or flight path angle displayed in the vertical speed or flight path angle window. If vertical speed or flight path angle is selected while in FLCH or VNAV, the autothrottle automatically engages in the speed (SPD) mode, if engaged. © 2014 Captain Sim www.captainsim.com ‘777 Captain’ FLIGHT MANUAL Part II – Aircraft and Systems DO NOT USE FOR FLIGHT 30 V/S - FPA Light (green) Illuminated - The vertical speed or flight path angle mode is engaged. 21. Altitude Selector Rotate - Sets the altitude in the altitude window and on the PFD altitude indication display. Push During climb or descent with altitude constraints, each push deletes he next waypoint altitude constraint between the airplane altitude and the altitude window. During climb with no altitude constraints, and the altitude window set above the FMC cruise altitude, the FMC cruise altitude is changed to the altitude window value. During cruise: - With the altitude window set above or below FMC cruise altitude, the FMC cruise altitude resets to the altitude window altitude. - Within 50 NM of the top-of-descent (T/D) point, with the altitude window set below cruise altitude, the airplane initiates the descend now (DES NOW) feature. 22. Altitude Hold Switch (Autopilot altitude hold (on/off), default key: Ctrl+Z) Push Engages altitude (ALT) as the pitch mode ALT is displayed on the PFD pitch flight mode annunciator The AFDS commands pitch to maintain the altitude when the switch was pushed. 23. Localizer (LOC) Switch (Autopilot localizer hold (on/off), default key: Ctrl+O) The localizer mode can be disengaged after localizer capture by: Selecting another roll mode Pushing a TO/GA switch Disengaging the autopilot and turning both flight director switches off, or Pushing the localizer switch a second time above 1,500 feet radio altitude (reverts to the default roll mode). The localizer mode can be disengaged after localizer capture by: Selecting another roll mode Pushing a TO/GA switch Disengaging the autopilot and turning both flight director switches off, or Pushing the localizer switch a second time above 1,500 feet radio altitude (reverts to the default roll mode). 24. Approach (APP) Switch (Autopilot approach mode (on/off), default key: Ctrl+A) Push Arms, disarms, engages, or disengages localizer (LOC) as the roll mode and glideslope (G/S) as the pitch mode Displays LOC and G/S in white (armed) on the PFD roll and pitch flight mode annunciators prior to localizer and glideslope capture Displays LOC and G/S in green (engaged) on the PFD roll and pitch flight mode annunciators after each one is captured The AFDS captures and tracks the localizer in the localizer (LOC) mode and captures the glideslope in the glideslope (G/S) mode upon interception (glideslope capture is inhibited until the localizer is captured) Localizer captures when the intercept track angle is within 120 degrees of the localizer course Glideslope captures when the intercept track angle is within 80 degrees of the localizer course and the localizer is captured. The approach mode can be disarmed before localizer or glideslope capture by selecting APP, LOC, LNAV, or VNAV. The approach mode disengages: With localizer captured and glideslope armed, by selecting another roll mode including the localizer mode (becomes a localizer approach). After localizer and glideslope are captured, by engaging the TO/GA mode. © 2014 Captain Sim www.captainsim.com ‘777 Captain’ FLIGHT MANUAL Part II – Aircraft and Systems DO NOT USE FOR FLIGHT 31 Disengaging the autopilot and turning both flight director switches OFF. After localizer and/or glideslope are captured, by pushing the approach switch a second time above 1,500 feet radio altitude (AFDS reverts to default pitch and roll modes). P01, P03. CDU 0-9. Numeric Keys 11-40. Alpha Keys 41. Numeric Key 42. Numeric Key 51-64. Mode and Function Keys 66. Brightness Control 67. Execute Key 68. FAIL Light 69. MSG Light 70. OFST Light 71-82. Line Select Keys 0-9. Numeric Keys 11-40. Alpha Keys 41. Numeric Key 42. Numeric Key 51-64. CDU Function Keys Push – INT REF – shows page for data initialization or for reference data RTE – shows page to input or change origin, destination, or route DEP ARR – shows page to input or change departure and arrival procedures VNAV – shows page to view or change vertical navigation path data FIX – shows page to create reference points on ND map LEGS – o Shows page to evaluate or modify lateral and vertical route data o Show page to control ND PLAN mode display HOLD – shows page to create holding patterns and show holding pattern data PROG – shows page to view dynamic flight and navigation data, including waypoint and destination ETAs, fuel remaining, and arrival estimates NAV RAD – shows page to monitor or control navigation radio tuning PREV PAGE – shows previous page of related pages (for example, LEGS pages) NEXT PAGE – shows next page of related pages © 2014 Captain Sim www.captainsim.com ‘777 Captain’ FLIGHT MANUAL Part II – Aircraft and Systems DO NOT USE FOR FLIGHT 32 66. Brightness Control Rotate – controls display brightness On some aircraft: Push – “+” increases brightness “-” decreases brightness 67. Execute Key Push – Makes data modification(s) active Extinguishes execute light 68. Display Light Illuminated (white) – when RTE page 3 or greater, RTE LEGS page 2 or greater, RTE DATA page 2 or greater is shown when airplane is not in holding pattern shown on HOLD page when modification is in progress, and any RTE, RTE LEGS, RTE DATA, HOLD, or VNAV page is shown 69. MSG Light Illuminated (white) – scratchpad displays message pushing CLEAR key extinguishes light and clears message 70. OFST Light Illuminated (white) – LNAV gives guidance for lateral route offset 71-82. Line Select Keys Push – moves data from scratchpad to selected line moves data from selected line to scratchpad selects page, procedure, or performance mode as applicable deletes data from selected line when DELETE is shown in scratchpad Conventions – scratchpad must be blank for line select transfer data cannot be transferred to a blank line a blank scratchpad cannot be transferred to a line · not all data can be modified message displays if inappropriate entries attempted © 2014 Captain Sim www.captainsim.com ‘777 Captain’ FLIGHT MANUAL Part II – Aircraft and Systems DO NOT USE FOR FLIGHT 33 CDU KEYBOARD CONTROL All CDU keys can be controlled using a keyboard. To activate CDU keyboard control press Ctrl+Shift+K To deactivate CDU keyboard control press ` Note: if activated, the CDU keyboard control temporarily overrides those FSX FMC management keys listed below. CDU FUNCTION KEYS Ctrl+I – INIT REF Ctrl+R – RTE Ctrl+D – DEP APR Ctrl+A – ALTN Ctrl+V – VNAV Ctrl+F – FIX Ctrl+L – LEGS Ctrl+H – HOLD Ctrl+C – FMC COMM Ctrl+P – PROG Ctrl+M – MENU Ctrl+N – NAV RAD Ctrl+E - EXEC © 2014 Captain Sim www.captainsim.com ‘777 Captain’ FLIGHT MANUAL Part II – Aircraft and Systems DO NOT USE FOR FLIGHT 34 P09. TO/GA AND AUTOTHROTTLE DISCONNECT SWITCHES 1. Takeoff / Go-Around (TO/GA) Switches 2. Autothrottle Disconnect Switches 1. Takeoff / Go-Around (TO/GA) Switches , default key: Ctrl+Shift+G When TO/GA is armed: On the ground (autothrottles armed and leading edge slats extended) - · First push (either switch) below 50 knots - engages the autothrottle in THR REF mode The autothrottle will not engage between 50 knots and 400 feet AGL Pushing either switch above 80 knots disarms LNAV and VNAV. 2. Autothrottle Disconnect Switches Push (either switch) Disconnects the autothrottle (both left and right) © 2014 Captain Sim www.captainsim.com ‘777 Captain’ FLIGHT MANUAL Part II – Aircraft and Systems DO NOT USE FOR FLIGHT 35 COMMUINICATIONS SYSTEM P19, P22, P29, S01. AUDIO CONTROL PANEL (ACP) 1. Transmitter Select Switches/MIC Lights 2. MIC/Interphone Switch 3. VOR/ADF Receiver Selector 4. Receiver Lights 5. Receiver Volume Controls 6. Approach (APR) Receiver Selector Lights/CALL 1. Transmitter Select Switches/MIC Lights/CALL Lights Transmitter Select Switches Push The MIC light illuminates The MIC light for any other transmitter extinguishes Selects the respective transmitter (radio or intercommunications) for transmission from this crew station (only one can be selected at a time for each crew station) Selects the receiver audio on, if not already manually selected on Pushing the CAB transmitter select switch twice within one second places a priority call to Door 1 Left. Second push Deselects the transmitter Deselects receiver audio MIC Lights Illuminated - Indicates the transmitter is selected. CALL Lights Illuminated Resets when the respective transmitter select switch is pushed or, if already pushed, by pressing a MIC/INTERPHONE switch Resets when the respective transmitter select switch is pushed or, if already pushed, by pressing a MIC/INTERPHONE switch (the SATCOM CALL light remains illuminated until the call ends) PA does not have a CALL light. 2. MIC/Interphone Switch MIC - Keys the boom microphone or oxygen mask on the selected radio transmitter or other system. Center - Off position (spring-loaded to center). INT - Keys the boom microphone or oxygen mask on the flight interphone. 3. VOR/ADF Receiver Selector Selects the VOR or ADF receiver to be monitored: VOR L - Left VOR VOR R - Right VOR ADF L - Left ADF ADF R - Right ADF. 4. Receiver Lights Illuminated - Indicates the respective receiver volume control is manually selected on. © 2014 Captain Sim www.captainsim.com ‘777 Captain’ FLIGHT MANUAL Part II – Aircraft and Systems DO NOT USE FOR FLIGHT 36 5. Receiver Volume Controls Push - Turns the respective receiver audio on or off. 6. Approach (APR) Receiver Selector Selects the approach receiver to be monitored: APP L - Left ILS APP C - Center ILS APP R - Right ILS MKR - Marker beacon. P18, P21, P28. RADIO TUNING PANEL 1. 2. 3. 5. 6. 7. 8. 9. Radio Tuning Panel OFF Light/Button Radio Tuning Panel (PNL) OFF Switch ACTIVE Frequency Window Frequency Transfer Switch STANDBY Frequency Window Frequency Selector Radio Tuning Switches Radio Tuning Lights 1. Radio Tuning Panel OFF Light/Button Illuminated - The radio tuning panel is off. 2. Radio Tuning Panel (PNL) OFF Switch Push - Disconnects the panel from the communication radios. 3. ACTIVE Frequency Window Displays the tuned frequency of the selected radio. Displays data if the selected radio is in the DATA mode (not applicable for VHF L). 5. Frequency Transfer Switch Push Transfers the STANDBY window frequency to the ACTIVE window and tunes the selected radio to the new active frequency Transfers the ACTIVE window frequency to the STANDBY window. 6. STANDBY Frequency Window Displays the preselected or previously tuned frequency of the selected radio. With data link installed, displays data when selection of the frequency transfer switch would reconfigure the selected radio to the DATA mode (not applicable for VHF L). 7. Frequency Selector Rotate Outer knob - Selects the portion of the STANDBY frequency to the left of the decimal point Inner knob - Selects the portion of the STANDBY frequency to the right of the decimal point © 2014 Captain Sim www.captainsim.com ‘777 Captain’ FLIGHT MANUAL Part II – Aircraft and Systems DO NOT USE FOR FLIGHT 8. Radio Tuning Switches Push Selects the radio to be tuned The tuned frequency is displayed in the ACTIVE frequency window The standby frequency is displayed in the STANDBY frequency window. 9. Radio Tuning Lights Illuminated - Indicates the selected radio. © 2014 Captain Sim www.captainsim.com 37 ‘777 Captain’ FLIGHT MANUAL Part II – Aircraft and Systems DO NOT USE FOR FLIGHT 38 ELECTRICAL SYSTEM O03. ELECTRICAL PANEL (and AUXILIARY POWER UNIT (APU)) 1. BATTERY Switch 2. Battery OFF Light 3. APU Generator (APU GEN) Switch 4. APU Generator OFF Light 5. BUS TIE Switches 6. Bus Isolation (ISLN) Lights 7. Generator Control (GEN CTRL) Switches 8. Generator OFF Lights 9. Drive Disconnect Switches 10. Generator DRIVE Lights 11. External Power (EXT PWR) Switches 12. External Power ON Lights 13. External Power AVAIL Lights 14. Backup Generator (BACKUP GEN) Switches 15. Backup Generator OFF Lights 1. BATTERY Switch ON Unpowered airplane on the ground: A few switch annunciator lights illuminate Allows the APU to be started No displays are powered. Powered airplane in flight or on the ground when AC power is removed or lost: The standby buses and emergency lighting are powered The left inboard, outboard, and upper center displays, and the left CDU are powered. OFF - turns battery power off. In flight, the EICAS message ELEC BATTERY OFF displays. 2. Battery OFF Light Illuminated (amber) - The battery switch is OFF. 3. APU Generator (APU GEN) Switch ON - Arms APU generator breaker to automatically close. OFF - Opens APU generator breaker. 4. APU Generator OFF Light Illuminated (with the APU running) (amber) The APU generator breaker is open because of a fault, or The APU GENERATOR switch is selected OFF. 5. BUS TIE Switches AUTO - Arms automatic AC bus tie circuits. ISLN (isolation) (AUTO not visible) - Commands the bus tie open. © 2014 Captain Sim www.captainsim.com ‘777 Captain’ FLIGHT MANUAL Part II – Aircraft and Systems DO NOT USE FOR FLIGHT 6. Bus Isolation (ISLN) Lights Illuminated (amber) Bus tie breaker is locked open (ISLN selected with bus tie switch), or A fault has occurred, automatically opening the bus tie breaker. 7. Generator Control (GEN CTRL) Switches ON - Arms the generator breaker to close automatically when generator power is available. OFF Opens field and generator breakers Resets fault trip circuitry. 8. Generator OFF Lights Illuminated (amber) - The generator breaker is open. 9. Drive Disconnect Switches Push - Disconnects the integrated drive generator (IDG) input from the engine Requires maintenance action on the ground to reconnect the IDG. 10. Generator DRIVE Lights Illuminated (amber) - IDG oil pressure is low. 11. External Power (EXT PWR) Switches Push - If AVAIL light is illuminated, closes external power contactor. Subsequent action opens external power contactor. ON - External power is connected to the bus(ses). OFF (ON not visible) - External power is disconnected from the bus(ses). 12. External Power ON Lights Illuminated - external power is powering the busses. 13. External Power AVAIL Lights Illuminated External power is plugged in and power quality is acceptable Extinguishes when the ON light illuminates. See Manual Part I for External Power Control details. 14. Backup Generator (BACKUP GEN) Switches ON - Backup generator operation is armed. OFF Opens the backup generator control relay Resets the fault circuitry. 15. Backup Generator OFF Lights Illuminated (amber) The backup generator has failed, or A circuit fault has been detected, or Backup generator switch selected off, or Both OFF lights illuminated - backup system (converter) has failed. © 2014 Captain Sim www.captainsim.com 39 ‘777 Captain’ FLIGHT MANUAL Part II – Aircraft and Systems DO NOT USE FOR FLIGHT 40 ENGINES & APU EICAS DISPLAY GE engine RR ang PW engines MODE INDICATIONS 1. 2. 3. 4. Total Air Temperature (TAT) Thrust Reference Mode Assumed Temperature Thrust Reverser Indication 1. Total Air Temperature (TAT) Displayed (white) - TAT (degrees C). 2. Thrust Reference Mode Displayed (green) - Selected FMS thrust reference mode: TO - Maximum rated takeoff thrust D-TO - Assumed temperature derated takeoff thrust CLB - Maximum rated climb thrust CLB 1 - Derate one climb thrust CLB 2 - Derate two climb thrust CON - Maximum rated continuous thrust CRZ - Maximum rated cruise thrust G/A - Maximum go-around thrust. 3. Assumed Temperature Displayed (green) - Selected assumed temperature (degrees C) for reduced thrust takeoff. 4. Thrust Reverser Indication Displayed REV (amber) - Reverser in transit. Displayed REV (green) - Reverser fully deployed. © 2014 Captain Sim www.captainsim.com ‘777 Captain’ FLIGHT MANUAL Part II – Aircraft and Systems DO NOT USE FOR FLIGHT N1 INDICATIONS (ALL MODES) Note: When reverse thrust is activated, the following indications are not displayed: Maximum N1 line Commanded N1 Reference/target N1 Reference N1. 1. 2. 3. 4. 5. 6. 7. 8. N1 Red Line Reference/Target N1 Commanded N1 Commanded N1 Sector Maximum N1 Line Reference N1 N1 N1 Indication 1. N1 Red Line Displayed (red) - N1 RPM operating limit. 2. Reference/Target N1 Displayed (green) - Reference N1 limit. Displayed (magenta) - Target FMC commanded N1 when VNAV is engaged and: The autothrottle is engaged in THR or THR REF mode, or The autothrottle is not engaged. 3. Commanded N1 Displayed (white). 4. Commanded N1 Sector Displays momentary difference between engine N1 and N1 commanded by thrust lever position. 5. Maximum N1 Line Displayed (amber). 6. Reference N1 Displayed (digital, green). 7. N1 Digital N1% RPM, displayed: (White) - Normal operating range (Red) - Operating limit reached. 8. N1 Indication N1 RPM, displayed: (White) - Normal operating range (Red) - Operating limit reached. © 2014 Captain Sim www.captainsim.com 41 ‘777 Captain’ FLIGHT MANUAL Part II – Aircraft and Systems DO NOT USE FOR FLIGHT EGT INDICATIONS 1. 2. 3. 4. 5. EGT EGT EGT EGT EGT Red Line Amber Band Start Limit Line Indication 1. EGT Red Line Displayed (red) - Maximum takeoff EGT limit. 2. EGT Amber Band Displayed (amber) - Maximum continuous EGT limit. 3. EGT Start Limit Line Displayed (red): With the FUEL CONTROL switch in CUTOFF, or With the N2 RPM below idle. 4. EGT EGT (degrees C) displayed: (White) - Normal operating range (Amber) - Maximum continuous limit reached (Red) - Maximum start or takeoff limit reached. 5. EGT Indication Displayed: (White) - Normal operating range (Amber) - Maximum continuous limit reached (Red) - Maximum start or takeoff limit reached. ANTI-ICE INDICATIONS 1. Engine Anti-ice Indication 2. Wing Anti-Ice Indication 1. Engine Anti-ice Indication Displayed (green) - Engine anti-ice is on. 2. Wing Anti-Ice Indication Displayed (green) - Wing anti-ice is on. © 2014 Captain Sim www.captainsim.com 42 ‘777 Captain’ FLIGHT MANUAL Part II – Aircraft and Systems DO NOT USE FOR FLIGHT 43 SECONDARY ENGINE INDICATIONS SECONDARY ENGINE DISPLAY RR engine GE and PW engines 1. Secondary Engine Display Displays: N2 RPM Fuel Flow (FF) Oil pressure Oil temperature Oil quantity Vibration. N2 INDICATIONS 1. N2 2. N2 Red Line 3. N2 Indication 1. N2 N2 RPM (%), displayed: (White) - Normal operating range (Red) - Operating limit reached. 2. N2 Red Line N2 RPM operating limit, displayed (red). 3. N2 Indication N2 RPM, displayed: (White) - Normal operating range (Red) - Operating limit reached. © 2014 Captain Sim www.captainsim.com ‘777 Captain’ FLIGHT MANUAL Part II – Aircraft and Systems DO NOT USE FOR FLIGHT FUEL FLOW INDICATIONS 1. Fuel Flow 1. Fuel Flow Displayed (White) - Fuel flow to the engine (pounds per hour x 1000). OIL PRESSURE INDICATIONS 1. 2. 3. 4. Oil Oil Oil Oil Pressure Pressure Pointer Pressure Red Line Pressure Amber Band 1. 2. 3. 4. Oil Oil Oil Oil Temperature Temperature Pointer Temperature Red Line Temperature Amber Band 1. Oil Pressure Engine oil pressure (psi), displayed: (White) - Normal operating range (Amber) - Caution range reached (Red) - Operating limit reached. 2. Oil Pressure Pointer Engine oil pressure, displayed: (White) - Normal operating range (Amber) - Caution range reached (Red) - Operating limit reached. 3. Oil Pressure Red Line Displayed (red) - Oil pressure operating limit. 4. Oil Pressure Amber Band Displayed (amber) - Oil pressure caution range. OIL TEMPERATURE INDICATIONS 1. Oil Temperature Engine oil temperature (°C), displayed: (White) - Normal operating range (Amber) - Caution range reached (Red) - Operating limit reached. © 2014 Captain Sim www.captainsim.com 44 ‘777 Captain’ FLIGHT MANUAL Part II – Aircraft and Systems DO NOT USE FOR FLIGHT 45 2. Oil Temperature Pointer Engine oil temperature, displayed: (White) - Normal operating range (Amber) - Caution range reached (Red) - Operating limit reached. 3. Oil Temperature Red Line Displayed (red) - Oil temperature operating limit. 4. Oil Temperature Amber Band Displayed (amber) - Oil temperature caution range. OIL QUANTITY INDICATIONS 1. Oil Quantity 1. Oil Quantity Usable oil quantity (quarts). Displayed: (White) - Normal quantity (Reverses the display to show black numbers on white background) - Low quantity. Note: LO - Displayed (white) when quantity is low. ENGINE VIBRATION INDICATIONS 1. 2. 3. 4. Engine Vibration Engine Vibration High Band Vibration Source Engine Vibration Pointer 1. Engine Vibration Engine vibration, displayed: (White) - Normal operating range (Black numbers, white background) - High vibration. 2. Engine Vibration High Band Displayed (white) - Vibration level at which automatic display of secondary engine indications occurs. 3. Vibration Source Identifies the vibration source being displayed. Displayed (white) - Vibration source with the highest vibration: N1 rotor vibration N2 rotor vibration. If the vibration source BB (broad band vibration) is displayed, the source is unknown and average vibration is displayed. © 2014 Captain Sim www.captainsim.com ‘777 Captain’ FLIGHT MANUAL Part II – Aircraft and Systems DO NOT USE FOR FLIGHT 46 4. Engine Vibration Pointer Displayed (white) - Engine vibration. COMPACT ENGINE INDICATIONS 1. Compact Engine Indications 2. Crossbleed Start Indication 1. Compact Engine Indications The following changes to EICAS and the normal secondary engine display occur: N2 changes from round dial displays to a digital display. An amber or red box frames the digital display if limits are exceeded. FF, OIL PRESS, OIL TEMP are displayed as digital readouts only. The digital displays turn amber or red if limits are exceeded. OIL QTY and VIB are displayed as digital readouts only. Low oil quantity and high vibrations are displayed the same as in the normal format. 2. Crossbleed Start Indication Displayed (magenta). © 2014 Captain Sim www.captainsim.com ‘777 Captain’ FLIGHT MANUAL Part II – Aircraft and Systems DO NOT USE FOR FLIGHT 47 P09. ENGINE CONTROLS THRUST LEVERS 1. Reverse Thrust Levers Control engine reverse thrust. Reverse thrust can only be selected when the forward thrust levers are closed. Actuates automatic speedbrakes. 2. Forward Thrust Levers Controls engine forward thrust. The thrust levers can only be advanced if the reverse thrust levers are down. P14. FUEL CONTROL SWITCHES 1. FUEL CONTROL Switch RUN (AUTOSTART ON) Opens the spar fuel valve Arms the engine fuel valve (the EEC opens the valve when required) Arms the selected ignitors(s) (the EEC turns the ignitors on when required). RUN (AUTOSTART OFF) Opens the spar fuel valve Opens the engine fuel valve Turns ignitors on. CUTOFF Closes the fuel valves Removes ignitor power Unlocks the engine fire switch. © 2014 Captain Sim www.captainsim.com ‘777 Captain’ FLIGHT MANUAL Part II – Aircraft and Systems DO NOT USE FOR FLIGHT 48 O10. ENGINE CONTROL PANEL 1. START/IGNITION Selector 2. AUTOSTART Switch 3. AUTOSTART OFF Light 1. START/IGNITION Selector START Initiates engine start by opening the start valve Releases to NORM at start valve cutout. NORM The start valve closes Automatic ignition is provided for both ignitors (if the FUEL CONTROL switch is in RUN). CON – This position has no function on CAL GE – equipped aircraft. (Both ignitors operate continuously only when the respective FUEL CONTROL switch is in RUN and the PS3 compressor discharge pressure drops below a preset level, regardless of switch position.) 2. AUTOSTART Switch ON - Arms the autostart system. OFF The autostart system is disabled The start is manually controlled. 3. AUTOSTART OFF Light Illuminated (amber) - The AUTOSTART switch is OFF. © 2014 Captain Sim www.captainsim.com ‘777 Captain’ FLIGHT MANUAL Part II – Aircraft and Systems DO NOT USE FOR FLIGHT AUXILIARY POWER UNIT (APU) O03. APU CONTROLS 1. APU Selector 2. APU FAULT Light 1. APU Selector OFF Closes the APU bleed air isolation valve Initiates normal shutdown Resets auto shutdown fault logic. ON - (APU operating position) Opens the APU fuel valve and inlet door Activates AC or DC fuel pump Powers the APU controller. START - (momentary position, spring-loaded to ON) - Initiates automatic start sequence. 2. APU FAULT Light Illuminated (amber): APU fault and/or fire is detected APU shutdown due to fault and/or fire Momentarily during APU controller self-test. © 2014 Captain Sim www.captainsim.com 49 ‘777 Captain’ FLIGHT MANUAL Part II – Aircraft and Systems DO NOT USE FOR FLIGHT 50 FIRE PROTECTION ENGINE FIRE PROTECTION P24. ENGINE AND APU FIRE PANEL 1. 2. 3. 4. Engine Engine Engine Engine Fire Switches Fire Warning Lights Bottle Discharged (ENG BTL DISCH) Lights and APU Fire Override Switches 1. Engine Fire Switches In (normal position, mechanically locked) - unlocks automatically for a fire warning. Out Arms both engine fire extinguishers Closes the associated engine and spar fuel valves Closes the associated engine bleed air valves Trips the associated engine generator field and generator breaker Shuts off hydraulic fluid to the associated engine-driven hydraulic pump Depressurizes the associated engine-driven hydraulic pump Removes power from the thrust reverser isolation valve. Rotate to position 1 or 2 - discharges the selected fire extinguisher into the engine. 2. Engine Fire Warning Lights Illuminated (red) An engine fire is detected, or 3. Engine Bottle Discharged (ENG BTL DISCH) Lights Illuminated (amber) - The extinguisher bottle is discharged or has low pressure. 4. Engine and APU Fire Override Switches Push - Unlocks the fire switch. © 2014 Captain Sim www.captainsim.com ‘777 Captain’ FLIGHT MANUAL Part II – Aircraft and Systems DO NOT USE FOR FLIGHT 51 O09. APU AND CARGO FIRE PANEL 1. 2. 3. 4. 5. APU Bottle Discharge (APU BTL DISCH) Light APU Fire Switch/Override Switch APU Fire Warning Light CARGO FIRE Warning Lights CARGO FIRE Discharge (DISCH) Switch 1. APU Bottle Discharge (APU BTL DISCH) Light Illuminated (amber) - The extinguisher bottle is discharged or has low pressure. 2. APU Fire Switch/Override Switch In - Normal position, mechanically locked; unlocks automatically for a fire warning. Out Arms the APU fire extinguisher bottle Closes the APU fuel valve Closes the APU bleed air valves Closes the APU air inlet door Trips the APU generator field and generator breaker Shuts down the APU (if automatic shutdown does not occur). Rotate - Either direction discharges the APU fire extinguisher into the APU compartment. 3. APU Fire Warning Light Illuminated (red) An APU fire is detected, or The APU automatically shuts down for a detected fire. 4. CARGO FIRE Warning Lights Illuminated (red) Associated cargo compartment smoke is detected, or 5. CARGO FIRE Discharge (DISCH) Switch Push - discharges the fire extinguisher bottles into the ARMED cargo compartment. © 2014 Captain Sim www.captainsim.com ‘777 Captain’ FLIGHT MANUAL Part II – Aircraft and Systems DO NOT USE FOR FLIGHT 52 FLIGHT CONTROL O02. THRUST ASYMMETRY COMPENSATION AND PRIMARY FLIGHT COMPUTERS CONTROLS SLAT LOAD RELIEF 1. Primary Flight Computers Disconnect Switch 1. Primary Flight Computers Disconnect Switch DISC AUTO Disconnects the Primary Flight Computers (PFCs) from the flight control system Puts the flight control system in the direct mode AUTO can be reselected to attempt restoration of secondary or normal mode operation. The flight control system operates in the normal mode System faults automatically cause the system to switch to the secondary or direct modes. PITCH AND STABILIZER TRIM SYSTEMS STABILIZER TRIM SYSTEM 1. 2. 3. 4. Alternate (ALTN) PITCH TRIM Levers Stabilizer (STAB) Position Indicator Takeoff Trim Green Band Stabilizer (STAB) Cutout Switches 1. Alternate (ALTN) PITCH TRIM Levers Spring-loaded to the neutral position. Push/pull (both levers) In the normal mode, changes trim reference airspeed and moves the stabilizer directly In the secondary and direct modes, moves the stabilizer directly. 2. Stabilizer (STAB) Position Indicator Indicates stabilizer position in units of trim. © 2014 Captain Sim www.captainsim.com ‘777 Captain’ FLIGHT MANUAL Part II – Aircraft and Systems DO NOT USE FOR FLIGHT 53 3. Takeoff Trim Green Band The green band indicates the allowable takeoff trim range, based on gross weight, takeoff thrust, and CG information from the FMC. When no information is available, the green band defaults to midrange. If the stabilizer signal is not present or is invalid, the green band and the pointer are not displayed. 4. Stabilizer (STAB) Cutout Switches NORM Hydraulic power is supplied to the related stabilizer trim control module If unscheduled stabilizer motion is detected, center and/or right system hydraulic power to the related stabilizer trim control module is automatically shut off. CUTOUT - shuts off the respective center or right hydraulic system power to the related stabilizer trim control module. AILERON AND RUDDER TRIM CONTROLS P26. AILERON AND RUDDER TRIM CONTROLS 1. 2. 3. 4. 5. AILERON TRIM Indicator RUDDER TRIM Indicator AILERON Trim Switches RUDDER Trim Selector MANUAL TRIM CANCEL Switch 1. AILERON TRIM Indicator Indicates units of aileron trim. 2. RUDDER TRIM Indicator Indicates units of rudder trim. 3. AILERON Trim Switches Push (both switches) - Moves the control wheel, ailerons, flaperons, and spoilers in the desired direction (springloaded to neutral). 4. RUDDER Trim Selector Spring-loaded to neutral. © 2014 Captain Sim www.captainsim.com ‘777 Captain’ FLIGHT MANUAL Part II – Aircraft and Systems DO NOT USE FOR FLIGHT Rotate 54 Trims the rudder in the desired direction The trim runs at high speed with the knob rotated past the first left or right detent The rudder pedals move with rudder trim operation. 5. MANUAL TRIM CANCEL Switch Push - Cancels manual rudder at high rate. RUDDER/BRAKE PEDALS 1. Rudder Pedals Push - Deflects the rudder in the desired direction. FLAP SYSTEM P10, P15. FLAP CONTROLS 1. 2. 3. 4. Flap Lever Flap Gates Alternate Flaps Arm (ALTN FLAPS ARM) Switch Alternate Flaps Selector 1. Flap Lever Primary mode - Positions the slats and flaps hydraulically. Secondary mode - Positions the slats and/or flaps electrically if hydraulic operation fails. 3. Alternate Flaps Arm (ALTN FLAPS ARM) Switch Push (ALTN displayed) Arms the alternate flap control mode Arms the alternate flaps selector Disables primary and secondary flap/slat mode operation © 2014 Captain Sim www.captainsim.com ‘777 Captain’ FLIGHT MANUAL Part II – Aircraft and Systems DO NOT USE FOR FLIGHT 55 Asymmetry/skew and uncommanded motion protection, autoslat, and flap/slat load relief are not available The flap lever is inoperative. 4. Alternate Flaps Selector RET - The slats and flaps are electrically retracted. OFF - Alternate flaps are deactivated. EXT The slats and flaps are electrically extended Maximum extension is flaps 20, with the slats at the midrange (sealed) position. C03. FLAP LIMIT PLACARD and GROUND PROXIMITY WARNING SYSTEM (GPWS) CONTROLS 1. Flap Limit Placard Flaps extended speed limits. © 2014 Captain Sim www.captainsim.com ‘777 Captain’ FLIGHT MANUAL Part II – Aircraft and Systems DO NOT USE FOR FLIGHT 56 FLIGHT INSTRUMENTS SYSTEM DESCRIPTION INTRODUCTION The flight instruments and displays supply information to the flight crew on six flat panel liquid crystal display units. The units display four primary groups of information: The Primary Flight Display (PFD) The Navigation Display (ND) The Engine Indication And Crew Alerting System (EICAS) The Multifunction Display (MFD). Detailed information on the following subjects is found in other parts of this section: PFD ND Electronic Checklist DISPLAY SYSTEM CONTROLS GENERAL During normal operations: The inboard display selectors are set to MFD PFDs are displayed on the two outboard display units NDs are displayed on the two inboard display units EICAS is displayed on the upper center display unit The lower center display unit defaults to the secondary engine display at power-up. All Display Select Panel (DSP) functions may be displayed on the lower center display unit. (The flight crew should keep the secondary engine display selected if no other display is being used; i.e., status, checklist, etc.) INBOARD DISPLAY SELECTORS The inboard display selectors are used to select PFD, ND (NAV position), MFD, or EICAS displays on the inboard display units. The normal position is MFD. With MFD selected, ND information is displayed on the inboard display units if NAV is selected on the display select panel (refer to Display Select Panel in this section). In the ND, PFD, and EICAS positions, only the selected displays can appear on the inboard display units. With MFD selected on the inboard display selector, the following ND and EFIS control logic applies: If both pilots have an ND on the inboard displays, then each EFIS control panel controls its corresponding ND display If there is an ND display on one inboard display unit and on the lower center display unit, then the pilot who does not have an ND on the inboard display unit controls the ND on the lower center display unit If neither pilot has an ND display on the inboard display unit, and there is an ND display on the lower center display unit, then the left EFIS control panel controls the lower center display unit If both pilots have an ND display on the inboard display unit, and there is an ND on the lower center display unit, then the left EFIS control panel controls the left inboard display unit and the lower center display unit. The ND on the left inboard and the lower center display units are identical. When an inboard display selector is in the ND or PFD position, new displays selected from the display select panel to that inboard display are inhibited. The annunciator light above the associated display select panel switch is also inhibited. When an inboard display selector is in the EICAS position, only the ENG, AIR, and FUEL switches can affect the display. Pushing one of those switches causes the display of the respective compacted blocks of information on the EICAS display. The cancel/recall switch operates normally. Refer to these chapters for more information on compact EICAS displays: The inboard display selectors have no effect on the inboard displays if an outboard display unit fails; the PFD automatically moves to the inboard display unit regardless of the position of the inboard display selector. Upper center display unit failure automatically switches the EICAS display to the lower center display unit. A © 2014 Captain Sim www.captainsim.com ‘777 Captain’ FLIGHT MANUAL Part II – Aircraft and Systems DO NOT USE FOR FLIGHT 57 subsequent EICAS selection on either of the inboard display selectors brings the EICAS display to that inboard display unit, and assuming no latched condition exists, the lower center display unit initially displays secondary engine instruments. Following this initial display configuration, the lower center display unit can be used in its usual MFD mode. DISPLAY SELECT PANEL The display select panel controls the MFD format on the left and right inboard display units and the lower center display unit. The selected display is indicated by the illuminated annunciator light on the display select panel (L INBD, R INBD, LWR CTR). After a display unit is selected, the appropriate display is selected (ENG, STAT, ELEC, HYD, FUEL, AIR, DOOR, GEAR, FCTL, CHKL, COMM or NAV). A new display selection automatically replaces the previous one. A second selection of the same display for the lower center display unit blanks the display. A second selection of the same display on either inboard display causes display of the ND. If there is more than one page of status messages, pushing STAT pages through the messages. When used as an MFD, the lower center display unit and the two inboard display units can display the following displays: ND (NAV switch) Status page (STAT switch) Secondary engine EICAS (ENG switch) System synoptics (ELEC, HYD, FUEL AIR, DOOR, GEAR, FCTL switches) Electronic checklist (CHKL switch). EFIS CONTROL PANELS The EFIS control panels control display options, mode, and range for the respective PFDs and NDs. Refer to the PFD and ND parts of this section. If an EFIS control panel fails, the displays can be controlled through the related CDU. This CDU capability is available at all times, but inhibits inputs from the respective EFIS control panel. © 2014 Captain Sim www.captainsim.com ‘777 Captain’ FLIGHT MANUAL Part II – Aircraft and Systems DO NOT USE FOR FLIGHT NORMAL DISPLAY CONFIGURATION © 2014 Captain Sim www.captainsim.com 58 ‘777 Captain’ FLIGHT MANUAL Part II – Aircraft and Systems DO NOT USE FOR FLIGHT INBOARD DISPLAY SWITCHING © 2014 Captain Sim www.captainsim.com 59 ‘777 Captain’ FLIGHT MANUAL Part II – Aircraft and Systems DO NOT USE FOR FLIGHT DISPLAY SELECT PANEL MFD SELECTION © 2014 Captain Sim www.captainsim.com 60 ‘777 Captain’ FLIGHT MANUAL Part II – Aircraft and Systems DO NOT USE FOR FLIGHT EFIS CONTROL PANEL MULTIPLE ND CONTROL © 2014 Captain Sim www.captainsim.com 61 ‘777 Captain’ FLIGHT MANUAL Part II – Aircraft and Systems DO NOT USE FOR FLIGHT 62 DISPLAY SYSTEM INFORMATION SOURCE AIR DATA INERTIAL REFERENCE SYSTEM (ADIRS) The ADIRS provides: Primary, secondary and standby air data Inertial reference information. The major components of the ADIRS are: One Air Data Inertial Reference Unit (ADIRU) One Secondary Attitude Air Data Reference Unit (SAARU) Eight air data modules Six static ports Three pitot probes Two angle-of-attack vanes One total air temperature probe. AIR DATA INERTIAL REFERENCE UNIT (ADIRU) The ADIRU is the primary source for speed, altitude, attitude and inertial navigation position information. The ADIRU processes information measured by its internal gyros and accelerometers, and from air data module inputs, angle-of-attack vanes and other systems. SECONDARY ATTITUDE AIR DATA REFERENCE UNIT (SAARU) The SAARU is the secondary source for speed, altitude, and attitude information. The SAARU processes information measured by its internal gyros and accelerometers, and from air data module inputs, angle-ofattack vanes, and other systems. The SAARU also transmits roll and pitch attitude information to the standby attitude display. AIR DATA Three static ports are located on the left side of the airplane and three static ports are located on the right side of the airplane. Left and right static ports are paired through pneumatic tubing to each of the left, center and right air data modules. The air data modules convert static air pressure to a digital output for use by other systems. The center static ports are also connected to an independent air data module to provide static pressure to the standby airspeed indicator and the standby altimeter. Two pitot probes (right and center) are mounted on the right forward section of the airplane. One pitot probe (left) is mounted on the left forward section of the airplane. An air data module is connected to each pitot probe. These air data modules convert dynamic air pressure to a digital output for use by other systems. The center pitot probe also provides dynamic pressure to the standby air data module. ANGLE-OF-ATTACK There are two angle-of-attack vanes, one located on each side of the forward fuselage. The vanes measure airplane angle-of-attack relative to the air mass. TOTAL AIR TEMPERATURE A total air temperature probe is mounted outside the airplane to sense air mass temperature. The temperature sensed by the probe is used by the ADIRU and the SAARU to compute total air temperature. STATIC AIR TEMPERATURE Static air temperature, displayed on the CDU PROGRESS page, comes from the ADIRU, using total air temperature probe information. In the event the ADIRU value is invalid, the SAARU computed value is displayed. © 2014 Captain Sim www.captainsim.com ‘777 Captain’ FLIGHT MANUAL Part II – Aircraft and Systems DO NOT USE FOR FLIGHT 63 NAVIGATION DISPLAY (ND) INTRODUCTION The NDs provide a mode-selectable color flight progress display. The modes are: MAP VOR APP (approach) PLN (plan) The MAP, VOR, and APP modes can be switched between an expanded mode with a partial compass rose and a centered mode with a full compass rose. ND MODES MAP MODE The MAP mode is recommended for most phases of flight. Presented track up, this mode shows airplane position relative to the route of flight against a moving map background. Displayed information can include: Selected and current track Selected and current heading Position trend vector Range to selected altitude Map range scale Ground speed True airspeed Wind direction and speed Next waypoint distance Waypoint estimated time of arrival Selected navigation data points. Additional Navigation Facility (STA), Waypoint (WPT), Airport (ARPT), Route Progress (DATA) and Position (POS) data are available for display on the ND in both the expanded and center map modes. VOR AND APPROACH MODES The VOR and APP modes are presented heading up. The VOR and APP modes display track, heading, and wind speed and direction with VOR navigation or ILS approach information. PLAN MODE The PLN mode is presented true north up. The active route may be viewed using the STEP prompt on the CDU LEGS pages. ND SYMBOLOGY The following symbols can be displayed on each ND, depending on EFIS control panel switch selections. Colors indicate the following: W (white) - Present status, range scales G (green) - Dynamic conditions M (magenta or pink) – Command information, pointers, symbols, fly-to condition B (blue or cyan) – Non-active or background information A (amber or yellow) – Cautions, faults, flags R (red) – Warnings © 2014 Captain Sim www.captainsim.com ‘777 Captain’ FLIGHT MANUAL Part II – Aircraft and Systems DO NOT USE FOR FLIGHT 64 GENERAL Symbol Name Remarks Track-up ND. Track orientation (G), current track (W), and track reference (G) Shows track in MAP, MAP CTR Displays TRK as the orientation, the current track, and MAG or TRU as the reference, and points to the heading on the compass rose. Heading-up ND. Heading orientation (G), current heading (W), heading reference (G), and heading pointer (W) Grid heading (W) Shows HDG (heading) in VOR, VOR CTR, APP, APP CTR Displays HDG as the display orientation, current heading, MAG or TRU as the heading reference, and points to the heading on the compass rose. MAP, MAP CTR, PLAN Displays above 70 degrees latitude. Selected heading bug (M) All except PLAN Selected track bug (M) All except PLAN Displays the MCP-selected heading. A dashed line (M) may extend from the marker to the airplane symbol. In the MAP mode with LNAV, LOC, or ROLLOUT engaged, the dashed line is removed 10 seconds after the selected heading bug is moved. Displays the MCP-selected track. A dashed line (M) may extend from the marker to the airplane symbol. Track line and range scale (W) MAP, MAP CTR, VOR, VOR CTR, APP, APP CTR Indicates current track. Number indicates half the range (VOR CTR and APP CTR do not display range). Heading/track reference (G) box (W) in TRU, box (A) if TRU displayed in descent All except PLAN Indicates heading/track is referenced to magnetic north or true north. Switching from TRU to MAG displays a box around MAG for 10 seconds. Expanded compass (W) GS310 ND Mode MAP, APP, VOR Displays 90 degrees of compass rose. Current heading pointer (W) MAP, MAP CTR Points to current heading on the compass rose. Groundspeed (W) All Current ground speed. © 2014 Captain Sim www.captainsim.com ‘777 Captain’ FLIGHT MANUAL Part II – Aircraft and Systems DO NOT USE FOR FLIGHT True airspeed (W) All Wind direction/ speed and wind arrow (W) All 65 Current true airspeed displayed above 100 knots. TAS312 Indicates wind bearing, speed, and direction, with respect to display orientation and heading/track reference. Arrow not displayed in the PLAN map mode. RADIO NAVIGATION Symbol Name ND Mode Remarks VOR L, R ILS L, C, R Reference receiver (G) VOR, VOR CTR, APP, APP CTR Indicates the selected receiver as the display reference. 116.80 OR SEA ILS (W)/VOR (W) Reference receiver frequency or identifier display VOR, VOR CTR, APP, APP CTR Frequency displayed before the identifier is decoded. The decoded identifier replaces the frequency. Medium size characters for VOR, small size characters for DME only. DME 24.6 DME distance (W) VOR, VOR CTR, APP, APP CTR Indicates DME distance to the reference navaid. CRS135 Reference ILS or VOR course (W) VOR, VOR CTR, APP, APP CTR Indicates the VOR course or ILS localizer course. All except PLAN Indicates bearing to (head) or from (tail) the tuned station, if selected on the respective EFIS control panel. Left VOR (G) or ADF (B) pointer head and tail Right VOR (G) or ADF (B) pointer head and tail ILS localizer or VOR course deviation indication (M) and scale (W) VOR, VOR CTR, APP, APP CTR Displays LOC or VOR course deviation. Deviation indicator points in direction of VOR or ILS selected course. For ILS deviation, indicator fills (M) when less than 2 1/2 dots from center. Selected course pointer (W) and line (M) VOR, VOR CTR, APP, APP CTR Displays CDU-selected course. © 2014 Captain Sim www.captainsim.com ‘777 Captain’ FLIGHT MANUAL Part II – Aircraft and Systems DO NOT USE FOR FLIGHT TO FROM Glide slope pointer (M) and scale (W) APP, APP CTR Displays glideslope position and deviation. Deviation indicator fills (M) when less than 2 1/2 dots from center. To/from indication (W) VOR CTR Located near airplane symbol. Displays VOR TO/FROM indication. To/from indication (W) VOR (B, G), DME/TACAN (B, G), VORTAC (B, G) Displays VOR to/from indication. VOR, VOR CTR MAP, MAP CTR VOR/DME raw data radial and distance (G) VOR L, R ADF L, R 116.80 OR SEA OR 520 OR BF When the EFIS control panel STA map switch is selected on, appropriate navaids are displayed (B). Tuned VHF navaids are displayed in green, regardless of switch selection. When a navaid is manually tuned, the selected course and reciprocal are displayed. When the POS map switch is selected on, the station radial extends to the airplane. VOR (G) or ADF (B) selection MAP, MAP CTR, VOR, VOR CTR, APP, APP CTR Located lower left or right corner. Represents positions of the EFIS control panel VOR/ADF switches. VOR frequency or identifier (G), ADF frequency or identifier (B) MAP, MAP CTR, VOR, VOR CTR, APP, APP CTR Frequency is displayed before identifier is decoded. Decoded identifier replaces the frequency. For VORs, small size characters indicate only DME information is being received. DME distance (G) DME 24.6 © 2014 Captain Sim www.captainsim.com MAP, MAP CTR, VOR, VOR CTR, APP, APP CTR Indicates DME distance to the referenced navaid. 66 ‘777 Captain’ FLIGHT MANUAL Part II – Aircraft and Systems DO NOT USE FOR FLIGHT 67 MAP Symbol Name ND Mode Remarks Airplane symbol (W) MAP, MAP CTR, VOR, APP Current airplane position is at the apex of the triangle. Airplane symbol (W) VOR CTR, APP CTR Current airplane position is at the center of the symbol. Position trend vector (W) (dashed line) MAP, MAP CTR Predicts position at the end of 30, 60, and 90 second intervals. Each segment represents 30 seconds. Based on bank angle and ground speed. Selected range determines the number of segments displayed. For range: · greater than 20 NM, 3 segments · = 20 NM, 2 segments · = 10 NM, 1 segment. Airplane symbol (W) PLAN Indicates actual position and track along the flight plan route in plan mode only. Inhibited north of 82°N latitude and south of 82°S latitude. ABCDE Active waypoint identifier (M) MAP, MAP CTR, PLAN Indicates the active flight plan waypoint, the next waypoint on the route of flight. 124 NM Active waypoint distance (W) MAP, MAP CTR, PLAN Distance to the active waypoint. 0835.4Z Active waypoint ETA (W) MAP, MAP CTR, PLAN Indicates ETA at the active waypoint. Time is based on distance to go and ground speed. It does not consider FMC performance predictions and may differ from other FMC ETAs that do. Waypoint: active (M), inactive (W) MAP, MAP CTR, PLAN Active - represents the waypoint the airplane is currently navigating to. Inactive - represents the waypoints on the active route. © 2014 Captain Sim www.captainsim.com ‘777 Captain’ FLIGHT MANUAL Part II – Aircraft and Systems DO NOT USE FOR FLIGHT ∆ MLF Off route waypoint (B) MAP, MAP CTR When the EFIS control panel WPT map switch is selected on, waypoints not on the selected route are displayed, in ND ranges of 10, 20, or 40. Flight plan route: active (M), modified (W), inactive (B) MAP, MAP CTR, PLAN The active route is displayed with a continuous line (M) between waypoints. Active route modifications are displayed with short dashes (W) between waypoints. Inactive routes are displayed with long dashes (B) between waypoints. Route data: active waypoint (M), inactive waypoint (W) MAP, MAP CTR When the EFIS control panel DATA map switch is selected on, entered or procedural altitude and ETAs for route waypoints are displayed. Selected reference point and bearing distance information (G) MAP, MAP CTR AND PLAN Shows the reference point selected on the FMCS-CDU fix page. bearing and/or distance from the fix show with green dashes. Altitude profile point and identifier (G) MAP, MAP CTR Indicates the approximate map position of the FMCcalculated T/C (top-ofclimb), T/D (top-of-descent), S/C (step climb), and E/D (end of descent) points. Predicted altitude/ETA points entered on the FIX page display the altitude / ETA along with the profile point. Deceleration points have no identifier. VNAV path pointer (M) and deviation scale (W) © 2014 Captain Sim www.captainsim.com MAP, MAP CTR Displays vertical deviation from selected VNAV PATH during descent only. Scale indicates ± 400 feet deviation. Digital display is provided when the pointer indicates more than ± 400 feet. 68 ‘777 Captain’ FLIGHT MANUAL Part II – Aircraft and Systems DO NOT USE FOR FLIGHT STA WPT ARPT CDU L, C, R Airport and runway (W) MAP, MAP CTR, PLAN The origin or airport shows when the nd range is 10, 20, OR 40 NM. Runway dashes extend 14.2 NM. Airport identifier and runway (W) MAP, MAP CTR, PLAN Displayed when selected as the origin or destination and ND range is 80, 160, 320, or 640 NM. Airport (B) MAP, MAP CTR, PLAN Displayed if the EFIS control panel ARPT map switch is selected on. Origin and destination airports are always displayed, regardless of map switch selection. Airport and runway (W) MAP, MAP CTR, PLAN Displayed when selected as the origin or destination and ND range is 10, 20, or 40 NM. Dashed runway centerlines extend 14.2 NM. Selected map options (B) MAP, MAP CTR Displays EFIS control panel selected map options. Map source annunciation (G) MAP, MAP CTR Displays ND source if: · CDU is selected on respective navigation source select switch · Both FMCs fail, or · A manually selected FMC fails. North up arrow (G) PLAN Indicates map background is oriented and referenced to true north. Weather radar returns (R, A, G, M) MAP, MAP CTR, VOR, APP Weather radar returns show when the WXR switch of the EFIS control panel is on. Intense WXR returns show in red (r). Medium intensity show in amber (a). Low intensity show in green (g).s Turbulence shows in magenta. RA pitch commands show on the PFD. See note below. TCAS resolution advisory (RA) or relative altitude (R) TCAS traffic advisory or TA (A) relative altitude © 2014 Captain Sim www.captainsim.com MAP, MAP CTR APP, VOR See note below. 69 ‘777 Captain’ FLIGHT MANUAL Part II – Aircraft and Systems DO NOT USE FOR FLIGHT TCAS proximate traffic (W) relative altitude See note below. TCAS other traffic (W)relative altitude See note below. TCAS TA absolute altitude See note below. The TCAS symbols above the arrow show that the traffic is climbing or descending; no arrow indicates altitude of traffic in hundreds of feet relative to airplane position. For absolute altitude symbols, the numerics show altitude of traffic in hundreds and thousands of feet. Relative versus absolute altitude display is selected by a switch on the TCAS control panel. for both relative and absolute altitude, the numeric shows below the traffic symbol when the traffic is below the airplane and above the traffic symbol when the traffic is above the airplane. no numerics in both cases show altitude is unknown. TCAS data shows when traffic (TFC) is selected on the EFIS CP. TRAFFIC OFFSCALE TFC TCAS traffic alert message (RA-R, TA-A) TCAS offscale message (RA-R, TA-A) ALL Shows TCAS RA or TA is active with or without the TFC switch selected. MAP, MAP CTR APP, VOR TCAS mode (B) TA ONLY TCAS TEST Shows when TCAS computer is not computing RAS. TCAS mode (B) ALL TCAS OFF TCAS FAIL Shows RA or TA traffic is outside the traffic area of the ND range. TFC switch needs to be on. Shows traffic mode is on. TCAS computer is operating in the test mode. TFC is on (EFIS CP). Shows a TCAS condition exists when TFC is on from the EFIS CP. TCAS mode (A) © 2014 Captain Sim www.captainsim.com MAP, MAP CTR APP, VOR Shows a fault is present in TCAS data when TFC is on from the EFIS CP. 70 ‘777 Captain’ FLIGHT MANUAL Part II – Aircraft and Systems DO NOT USE FOR FLIGHT 71 ELECTRONIC FLIGHT BAG The Electronic Flight Bag (EFB) is a major step toward e-enabling the air transport system. Through its integrated applications, the EFB brings a new level of digital information delivery and management to the flight deck. That results in flight operations cost savings, improved safety, and enhanced document accessibility and configuration control. Captain Sim EFB is flexible and easily customizable application which can be loaded with unlimited data in bmp, jpg, jpeg, gif, png, tif, ico formats. Two independently controlled EFBs are installed on the Captain's and F/O's side shelves. For better usability 2D version is also included. It is synchronized with Captain's EFB. © 2014 Captain Sim www.captainsim.com ‘777 Captain’ FLIGHT MANUAL Part II – Aircraft and Systems DO NOT USE FOR FLIGHT MAIN MENU MODE 0-15 — User customizable function keys 16 — Brightness control switch 17 — Power ON-OFF button 18 — Index menu 19 — User customizable function boxes Other buttons are INOP in the Main Menu mode. © 2014 Captain Sim www.captainsim.com 72 ‘777 Captain’ FLIGHT MANUAL Part II – Aircraft and Systems DO NOT USE FOR FLIGHT INDEX MENU DETAILS 20 21 22 23 24 25 26 — — — — — — — Flight number (loads from aircraft.cfg atc_flight_number=) Current FSX date Aircraft type (loads from aircraft.cfg ui_type=) User customizable logo (located ...[FSX]\Captain Sim\EFB) Current FSX time Current EFB version Aircraft engine type (loads from aircraft.cfg engine_type=) © 2014 Captain Sim www.captainsim.com 73 ‘777 Captain’ FLIGHT MANUAL Part II – Aircraft and Systems DO NOT USE FOR FLIGHT 74 SPLIT MODE While in the Main Menu if you click any function key the EFB will open the selected function box (folder) in the Split Mode. 27 28 29 30 31 32 33 34 — — — — — — — — Return to the Main Menu Function box (folder) name Page Up key. Cycle the folder content up. Runway index (see content files naming section) Page Down key. Cycle the folder content down. Airport ICAO code (see content files naming section) Current fine number/total number of files in the selected folder. ENTER key. Resizes the selected image fullscreen. © 2014 Captain Sim www.captainsim.com ‘777 Captain’ FLIGHT MANUAL Part II – Aircraft and Systems DO NOT USE FOR FLIGHT 35 36 37 38 39 40 41 42 43 — — — — — — — — — 75 Cycle the folder content. ZOOM IN key. Zoom the selected image in. ZOOM OUT key. Zoom the selected image out. Scroll the selected image up. Zoom must be IN enough for scrolling. SPLIT MODE indicator Scroll the selected image down. Zoom must be IN enough for scrolling. Scroll the selected image left. Zoom must be IN enough for scrolling. Scroll the selected image right. Zoom must be IN enough for scrolling. Return to the Main Menu DEFAULT SETUP AND CONTENT For educational purposes the EFB is setup and loaded with demo content. DEFAULT SETUP Key 1 — Enroute Key 2 — SID Key 3 — STAR Key 4 — Approach Key 5 — Airport Key 6 — RNK Key 9 — Setup Key 10 — Whatever Key 14 — Cameras Keys 7,11,12,13,15 — Blank. The default setup can be easily edited. See USER CUSTOMIZABLE FUNCTION KEYS AND BOXES section. DEFAULT CONTENT All content is provided for educational purposes only. DO NOT USE FOR FLIGHT. Captain Sim is not affiliated with any entity mentioned or pictured. All trademarks are the property of their respective owners. Enroute Jeppesen EA7 H/L enroute chart fragment (Moscow) Jeppesen EA9 H/L enroute chart fragment (St Petersburg) SID Complete set of Jeppesen SID for UUDD (Domodedovo, Moscow) STAR Complete set of Jeppesen STAR for UUDD Approach Complete set of Jeppesen approach charts for UUDD Airport Complete set of Jeppesen airport charts for UUDD RNK R-4A enroute chart Setup Test pattern image Whatever Four movie posters Cameras Exterior cameras still image © 2014 Captain Sim www.captainsim.com ‘777 Captain’ FLIGHT MANUAL Part II – Aircraft and Systems DO NOT USE FOR FLIGHT 76 USERS' CUSTOMIZATION USER CUSTOMIZABLE FUNCTION KEYS AND BOXES To make changes in the function keys/boxes default setup: 1. Оpen ...[FSX]\Captain Sim\EFB\cs_efb.xml file with any text editor.All you need is the <modes> section: 1 — function key number from 1 to 15. (DO NOT use #0 and #8) 2 — function box name. Whatever you want. Any reasonable length. 3 — folder name you wish to use with the key. The folder name must match the key name. The folder must be created in ...[FSX]\SimObjects\Airplanes\CS_B777-200\EFB\ Copy to the folder unlimited number of files in bmp, jpg, jpeg, gif, png, tif, ico formats. Repeat for other keys/folders you wish to edit. Done. CONTENT FILES NAMING For airport specific content four fist characters of the image file name must be the airport ICAO code: © 2014 Captain Sim www.captainsim.com ‘777 Captain’ FLIGHT MANUAL Part II – Aircraft and Systems DO NOT USE FOR FLIGHT 77 ELECTRONIC CHECKLIST (ECL) Electronic checklists (ECL) support the following keys: Alt+Up/Left/Right/Dn - to navigate the ECL interface items. Enter - to set/reset a checklist item or to click the ELC interface button. INTRODUCTION Normal electronic checklists can be displayed on any selected Multifunction Display (MFD). The electronic checklist system is not required for dispatch; a printed checklist must be available on the flight deck. Electronic checklists can be displayed on any MFD by pushing the checklist display switch on the display select panel. The checklists are controlled using either one of the two cursor control devices. Cursor control devices (CCD) and MFD selection are described in the Display System Controls paragraph of this section. © 2014 Captain Sim www.captainsim.com ‘777 Captain’ FLIGHT MANUAL Part II – Aircraft and Systems DO NOT USE FOR FLIGHT 78 ELECTRONIC CHECKLIST OPERATION GENERAL Pushing the checklist display switch on the display select panel displays the proper checklist. Only one checklist is displayed at a time. As each normal checklist is finished, pushing the checklist display switch displays the next sequential normal checklist. Some checklist steps must be checked-off by the pilot. Other checklist steps are automatically checked-off from sensed flight deck control positions, aircraft system status, or EICAS messages. The CHECKLIST COMPLETE indicator is displayed at the bottom of all pages of the checklist when all of the line items are either complete, inactive, or overridden, and every page has been displayed. If the flight crew chooses not to perform a particular line item, the line item can be overridden by selecting the ITEM OVRD key at the bottom of the page. When a line item is overridden, the text changes color from white to cyan and the current line item box moves down to the next incomplete line item. If the flight crew chooses to not perform an entire checklist, the checklist can be overridden by selecting the CHKL OVRD key at the bottom of the page. When a checklist is overridden, the text of the entire checklist changes color from white to cyan, and the CHECKLIST OVERRIDDEN indicator is displayed at the bottom of all pages. CHECKLIST STEPS Each step in a checklist is referred to as a line item. After selecting a checklist, a current line item box automatically encloses the text of the first incomplete line item. When the cursor is on a line item, a cursor selection box encloses the current line item box and the open loop indicator. When line items are complete, the cursor, cursor selection box, and current line item box move to the next incomplete line item. Incomplete checklist line items appear as white text. Completed line items appear as green text with a green check mark to the left. Overridden and inactive line items are displayed in cyan. CHECKLIST OPEN LOOP AND CLOSED LOOP STEPS Open loop (not sensed) steps are checklist steps that require crew confirmation. Open loop steps display a gray box (open loop indicator), in the left margin. The CCD cursor select switch is used to confirm completed open loop steps. When the cursor is positioned within the current line item box or open loop indicator, and the CCD cursor select switch is pressed, the checklist line item text color changes from white to green and a green check mark is displayed on the open loop indicator. Closed loop (sensed) steps are checklist steps that can automatically be completed by system inputs. Closed loop steps display check marks with no gray boxes. CHECKLIST PAGES The checklist is displayed on one or more pages. Page keys are located on the right side of each checklist containing more than one page. Page keys are not shown on checklists containing only one page. When a checklist is complete, the cursor automatically moves to the NORMAL checklist key in the lower left corner of the display. Pressing the cursor select switch causes the next appropriate checklist to appear. When a checklist has more than one page, and the checklist steps on the current page are complete, the cursor automatically moves to the checklist page key corresponding to the next page. CONTINUED is displayed on the bottom of the page. Pressing the cursor select switch advances to the next checklist page. When the last page is complete, the cursor moves to the NORMAL checklist key as described above. © 2014 Captain Sim www.captainsim.com ‘777 Captain’ FLIGHT MANUAL Part II – Aircraft and Systems DO NOT USE FOR FLIGHT 79 CHECKLIST MENU OPERATION An alternate means of operating the checklist is through the use of menus. The normal, resets menus can be selected by the keys at the top of the checklist page, using the cursor control device. An EXIT MENU key is located in the lower right corner of all menu displays. This exits the menu page to allow access to the NORMAL checklist keys. CHECKLIST RESETS MENU Selecting RESETS displays miscellaneous information (such as checklist database part number and revision information) and the following selectable resets: RESET NORMAL RESET ALL – Selecting the resets menu and then the reset key labeled RESET ALL resets all normal and non-normal checklists. The flight crew is prompted to re-accomplish all annunciated non-normal checklists that were previously completed. Use of the RESET ALL function in flight is not recommended. This provides a way to reset multiple checklists. CHECKLIST RESETS If a checklist is partially complete or complete and the pilot wishes to begin the checklist again, the checklist must be reset. Selecting the CHKL RESET key at the bottom of the page, while the checklist is displayed, resets the checklist and allows the checklist to be accomplished again. For certain conditions, resets are required to prepare the checklist for the next phase of flight. There are automatic resets and manual resets. CHECKLIST OVERRIDE Entire checklists can be overridden. By pressing the CHKL OVRD key, the displayed checklist turns to cyan, indicating that it is overridden. The message CHECKLIST OVERRIDDEN is displayed at the bottom of the page. Normal checklist sequence is then resumed. This allows for rapid skipping of checklists. All associated operational notes and deferred line items are removed from their respective target areas, and conditional statements within a checklist are overridden. ITEM OVERRIDE Item override is used by the flight crew when an item in a checklist will not be accomplished or an item has been accomplished but the closed-loop sensing is not functioning correctly. Overridding an item when required allows the checklist to be completed. The line item override function is available on all checklists. Selection of the ITEM OVRD key turns the highlighted step to cyan, indicating the step is not applicable and has been overridden. Both closed loop and open loop steps can be overridden. Conditional statements (both closed and open loop) cannot be overridden. Individual steps within conditional statements can be overridden. © 2014 Captain Sim www.captainsim.com ‘777 Captain’ FLIGHT MANUAL Part II – Aircraft and Systems DO NOT USE FOR FLIGHT 80 NORMAL CHECKLISTS Normal electronic checklist use follows the same philosophy as used with paper checklists. The normal procedures are done from memory, then the checklist is read to confirm the actions. NORMAL CHECKLIST MENU Normal checklists are arranged in the menu by phase of flight. If a normal checklist is selected out of sequence, the original normal sequence can be resumed using the NORMAL MENU key or the checklist display switch. NORMAL CHECKLIST ACCESS Normal checklist selection sequence follows progressive phases of flight. Phases of flight are distinguished by completion of the previous phase checklist and not by air/ground logic. The checklist is automatically reset after completing the last checklist, at power down, or following a manual reset of all normal checklists. The checklist order is: BEFORE START BEFORE PUSHBACK BEFORE TAKEOFF AFTER TAKEOFF APPROACH DESCENT FINAL DESCENT PARKING As each normal checklist is completed, the next unfinished normal checklist is displayed. Any normal checklist can be accessed using the NORMAL MENU. NORMAL CHECKLIST, COMPLETING OR LEAVING At the completion of each checklist (all steps are complete or overridden), the appropriate message appears at the bottom of the page: CHECKLIST COMPLETE (white text on green background) CHECKLIST OVERRIDDEN (white text on cyan background). After the checklist is complete, but still displayed, a change to the position of a closed loop sensed switch results in the checklist no longer showing CHECKLIST COMPLETE. If a pilot attempts to leave an incomplete checklist, the text in the NORMAL checklist key changes color to amber to indicate that one or more unfinished normal checklists items exist. Activating the amber NORMAL checklist key returns the display to the first unfinished step in the first unfinished normal checklist. © 2014 Captain Sim www.captainsim.com ‘777 Captain’ FLIGHT MANUAL Part II – Aircraft and Systems DO NOT USE FOR FLIGHT 81 CONTROLS AND INDICATORS INBOARD DISPLAYS AND HEADING REFERENCE L06, R05. INBOARD DISPLAY SELECTORS Selects what is displayed on each inboard display unit. PFD - Displays the PFD, blanks the PFD on the outboard display unit, and inhibits selections made from the display select panel. NAV - Displays the ND and inhibits selections made from the display select panel. MFD - displays the selection made on the display select panel. EICAS Displays EICAS Inhibits most selections made from the display select panel (limited ENG, FUEL, and AIR displays can be selected) Blanks the upper center display unit. Note: The PFD automatically appears on an inboard display unit if the adjacent outboard display unit fails, regardless of switch position. L06. HEADING REFERENCE SWITCH Pushing alternately selects the heading reference for the PFDs, NDs, AFDS, and FMCs. NORM · Normally references magnetic north · Automatically references true north when north of 82°N or south of 82°S latitude or within the vicinity of the magnetic poles (PFDs, NDs, and FMCs) · Provides no reference for AFDS roll modes other than LNAV when north of 82°N or south of 82°S latitude or in the vicinity of the magnetic poles. TRUE - References true north regardless of latitude. © 2014 Captain Sim www.captainsim.com ‘777 Captain’ FLIGHT MANUAL Part II – Aircraft and Systems DO NOT USE FOR FLIGHT 82 G05. DISPLAY SELECT PANEL 1. 2. 3. 4. 5. Display Lights Display Switches Multifunction Display (MFD) Switches Synoptic Switches Cancel/Recall (CANC/RCL) Switch 1. Display Lights Illuminates to show the display unit the display select panel controls. 2. Display Switches Pushing the switch displays the associated display. Pushing the same switch a second time blanks the display or (left and right inboard display units) redisplays the ND if there is only one page of messages. If there are more than one page of messages, pushing STAT pages through the messages. ENG - Secondary engine EICAS. STAT - Status page: Hydraulic system indications APU indications Oxygen system indications Status messages for dispatch determination CHKL - Checklist NAV - Navigation display (this section). 3. Multifunction Display (MFD) Switches Selects the active MFD (left inboard, lower center, or right inboard display unit) for display selection. The appropriate left or right INBOARD DISPLAY selector must be in the MFD or EICAS position. The other display select panel switches determine what is displayed on the selected MFD. 4. Synoptic Switches Pushing the switch displays the associated synoptic. Synoptics present a simplified view of system status as an aid for crew situational awareness. Pushing the same switch a second time blanks the display or (left and right inboard display units) redisplays the ND. ELEC - Electrical System. HYD - Hydraulic System FUEL - Fuel System AIR - Air Systems DOOR - Doors GEAR - Landing Gear and Brake Systems FCTL - Flight Control System © 2014 Captain Sim www.captainsim.com ‘777 Captain’ FLIGHT MANUAL Part II – Aircraft and Systems DO NOT USE FOR FLIGHT 83 SYNOPTIC DISPLAYS FLIGHT CONTROL SYNOPTIC DISPLAYS The flight control synoptic is displayed by pushing the FCTL synoptic display switch on the display select panel. NORMAL FLIGHT CONTROL SYNOPTIC The following display depicts the proper indication for full control wheel deflection (left). © 2014 Captain Sim www.captainsim.com ‘777 Captain’ FLIGHT MANUAL Part II – Aircraft and Systems DO NOT USE FOR FLIGHT FUEL SYNOPTIC DISPLAY The fuel synoptic is displayed by pushing the FUEL synoptic display switch on the display select panel. HYDRAULIC SYNOPTIC DISPLAY © 2014 Captain Sim www.captainsim.com 84 ‘777 Captain’ FLIGHT MANUAL Part II – Aircraft and Systems DO NOT USE FOR FLIGHT 85 GEAR SYNOPTIC DISPLAY 1. 2. 3. 4. 5. Brake Temperature Brake Symbol Gear Door Status Fault Indication (amber) Tire Pressure Indication The landing gear synoptic is displayed by pushing the GEAR synoptic display switch on the display select panel. 1. Brake Temperature Indicates a relative value of wheel brake temperature: Values range from 0.0 to 9.9 White - normal range Amber - high range. 2. Brake Symbol Blank box indicates any brake less than 3.0. Solid white box indicates hottest brake on each main gear within range of 3.0 to 4.9. Solid amber box indicates brake overheat condition on each wheel within range of 5.0 to 9.9. 3. Gear Door Status Crosshatched - The door is not closed. CLOSED (white) - The door is closed. Empty box(es) (white) - The associated landing gear door position indicators are inoperative. 4. Fault Indication (amber) BRAKE - Indicates brake deactivation on the associated wheel. ASKID - Indicates antiskid fault on the associated wheel. 5. Tire Pressure Indication Displays individual tire pressures: White - normal range Amber - abnormal high or low range. © 2014 Captain Sim www.captainsim.com ‘777 Captain’ FLIGHT MANUAL Part II – Aircraft and Systems DO NOT USE FOR FLIGHT 86 AIR SYNOPTIC DISPLAY The air systems synoptic is displayed by pushing the AIR synoptic display switch on the display select panel. 1. Selected Temperatures (magenta) 2. Actual Temperatures (white) 1. Selected Temperatures (magenta) Selected by the FLT DECK TEMP and the CABIN TEMP controls. 2. Actual Temperatures (white) Actual temperature sensed on the flight deck or the passenger zone. © 2014 Captain Sim www.captainsim.com ‘777 Captain’ FLIGHT MANUAL Part II – Aircraft and Systems DO NOT USE FOR FLIGHT 87 DOOR SYNOPTIC DISPLAY A (green) – Door mode is armed M (white) – Door mode is manual. (blank) – Door mode is not available A/M can appear inside door symbol. O (amber) – passenger door open (blank) – passenger door closed O (white) – door status is not available □ (amber) – cargo/access door open (blank) – cargo/access door closed □ (white) – door status is not available The doors synoptic is displayed by pushing the DOOR synoptic display switch on the display select panel. © 2014 Captain Sim www.captainsim.com ‘777 Captain’ FLIGHT MANUAL Part II – Aircraft and Systems DO NOT USE FOR FLIGHT 88 ELECTRICAL SYNOPTIC DISPLAY The electrical synoptic is displayed by pushing the ELEC synoptic display switch on the display select panel. © 2014 Captain Sim www.captainsim.com ‘777 Captain’ FLIGHT MANUAL Part II – Aircraft and Systems DO NOT USE FOR FLIGHT 89 G03, G06. EFIS CONTROL PANELS The left EFIS control panel controls the left PFD and ND. The right EFIS control panel controls the right PFD and ND. EFIS CONTROL PANEL PFD CONTROLS 1. 2. 3. 4. 5. 6. 7. 8. Minimums (MINS) Reference Selector (outer) Minimums (MINS) Selector (middle) Minimums Reset (MINS RST) Switch (inner) Flight Path Vector (FPV) Switch Meters (MTRS) Switch Barometric Standard (BARO STD) Switch (inner) Barometric (BARO) Selector (middle) Barometric (BARO) Reference Selector (outer) 1. Minimums (MINS) Reference Selector (outer) RADIO - Selects radio altitude as the PFD minimums reference. BARO - Selects barometric altitude as the PFD minimums reference. 2. Minimums (MINS) Selector (middle) Rotate (slew)- Adjusts the PFD radio or baro minimums altitude. 3. Minimums Reset (MINS RST) Switch (inner) Push Resets the PFD minimums alert display Blanks the minimums display when green. 4. Flight Path Vector (FPV) Switch Push - Displays the PFD flight path vector. 5. Meters (MTRS) Switch Push - Displays PFD altitude meters indications. 6. Barometric Standard (BARO STD) Switch (inner) Push Selects the standard barometric setting (29.92 inches Hg/1013 HPA) for the PFD barometric reference If STD is displayed, selects the preselected barometric setting If no preselected barometric setting is displayed, displays the last value before STD was selected. 7. Barometric (BARO) Selector (middle) Rotate (slew) - Adjusts the PFD barometric reference. 8. Barometric (BARO) Reference Selector (outer) IN - selects inches of mercury as the PFD barometric reference. HPA - selects Hectopascals as the PFD barometric reference. © 2014 Captain Sim www.captainsim.com ‘777 Captain’ FLIGHT MANUAL Part II – Aircraft and Systems DO NOT USE FOR FLIGHT 90 EFIS CONTROL PANEL ND CONTROLS 1. 2. 3. 4. 5. 6. ND Mode Selector (outer) ND Center (CTR) Switch (inner) VOR/ADF Switches Map Switches ND Range Selector (outer) ND Traffic (TFC) Switch (inner) 1. ND Mode Selector (outer) Selects the desired ND map display. APP Displays localizer and glideslope information in heading-up format · Displays reference ILS receiver, ILS frequency or identification, course, and DME Weather radar and TCAS are not displayed in CTR APP mode. VOR - Displays VOR navigation information in heading-up format Displays reference VOR receiver, VOR frequency or identification, course, DME, and TO/FROM indication Weather radar and TCAS are not displayed in CTR VOR mode. Displays FMC-generated route and map information, airplane position, heading, and track Displays waypoints, including the active waypoint, within the selected range Displays VNAV path deviation. Displays a nonmoving, true north-up, route depiction The airplane symbol represents actual airplane position Allows route step-through using the CDU legs page Weather radar and TCAS are not displayed in PLN mode. MAP - PLN - 2. ND Center (CTR) Switch (inner) Push Displays the full compass rose (centered) for APP, VOR, and MAP modes Subsequent pushes alternate between expanded and centered displays. 3. VOR/ADF Switches Displays VOR or ADF information on the respective ND. VOR - Displays the VOR pointer, VOR frequency or identification and associated DME information in all modes except PLAN. OFF - Removes VOR and ADF displays. ADF - Displays the ADF pointer and ADF frequency or identification in all modes except PLAN. 4. Map Switches The map switches: Select detailed ND information displays Displays can be selected simultaneously Second push removes the information. © 2014 Captain Sim www.captainsim.com ‘777 Captain’ FLIGHT MANUAL Part II – Aircraft and Systems DO NOT USE FOR FLIGHT 91 WXR - Weather radar returns show when the WXR switch of the EFIS control panel is on. Intense WXR returns show in red. Medium intensity show in amber. Low intensity show in green. Turbulence shows in magenta. STA (station) Displays high and low altitude navigation aids, if the ND range selector is in the 10, 20 or 40 NM range Displays high altitude navigation aids, if the ND range selector is in the 80, 160, 320, or 640 NM range. WPT (waypoint) - Displays waypoints, if the ND range selector is in the 10, 20 or 40 NM range. APRT (airport) - Displays airports on all ranges. DATA - Displays the FMC estimated time of arrival, altitude at each waypoint, and altitude constraints at each waypoint. TERR Map - When you push the TERR map switch on the EFIS control panel, terrain data shows on the on-side ND. Push the TERR map switch again to remove the display. Use the ND mode selector to select an ND mode. The ND modes that show terrain data are: - Expanded APP (approach) mode - Expanded VOR mode - Expanded MAP mode - Centered MAP mode. If the mode selector is not in a correct mode when you push the TERR map switch, the terrain display arms. When armed, the terrain display shows as soon as you change the ND selector to a correct mode. The terrain display stays armed even if you push the TERR map switch again. Push the WXR map switch to disarm the terrain display and arm the weather display. 5. ND Range Selector (outer) The EFIS control panel has a 7 position range selector. The range selections are 10, 20, 40, 80, 160, 320 and 640 NM. The terrain awareness display on the NDs uses dots to show terrain ahead of the airplane. Dot color and dot pattern density compare terrain altitude with airplane altitude. These are the dot colors and patterns the terrain display uses: - red - Terrain more than 2,000 feet above airplane altitude. - yellow - Terrain 500 feet below to 2,000 feet above airplane altitude. Gear down changes the 500 feet to 250 feet. - green - Terrain 500 feet below to 2,000 feet below airplane altitude. Gear down changes the 500 feet to 250 feet.. - Black - Terrain more than 2,000 feet below airplane altitude. - Magenta - Unknown terrain. 6. ND Traffic (TFC) Switch (inner) Push - displays TCAS ND information. DISPLAY BRIGHTNESS CONTROLS P04. CENTER PANEL BRIGHTNESS CONTROLS 1. Upper Display (UPR DSPL) Brightness Control 2. Lower Display (LWR DSPL) Brightness Control (outer) 1. Upper Display (UPR DSPL) Brightness Control Rotate - Adjusts the brightness of the upper center display unit. © 2014 Captain Sim www.captainsim.com ‘777 Captain’ FLIGHT MANUAL Part II – Aircraft and Systems DO NOT USE FOR FLIGHT 92 2. Lower Display (LWR DSPL) Brightness Control (outer) Rotate - Adjusts the brightness of the lower center display unit. PRIMARY FLIGHT DISPLAY (PFD) PFD INDICATIONS 1. 2. 3. 4. 5. 6. 7. Flight Mode Annunciations Airspeed/Mach Indications Attitude, Steering, and Miscellaneous Indications Autopilot, Flight Director System Status Altitude Indications Vertical Speed Indication Heading and Track Indications Flight Mode Annunciations 2. Airspeed/Mach Indications Displays Air Data Inertial Reference System (ADIRS) airspeed information and other airspeed related information. 3. Attitude, Steering, and Miscellaneous Indications Displays ADIRS attitude information. 4. Autopilot, Flight Director System Status Refer to Automatic Flight. 5. Altitude Indications Displays ADIRS altitude and other altitude-related information. 6. Vertical Speed Indication Displays ADIRS vertical speed and other vertical speed information. 7. Heading and Track Indications Displays current ADIRS heading, track and other heading information. © 2014 Captain Sim www.captainsim.com ‘777 Captain’ FLIGHT MANUAL Part II – Aircraft and Systems DO NOT USE FOR FLIGHT 93 PFD AIRSPEED INDICATIONS 1. 2. 3. 4. Selected Speed Speed Trend Vector Current Airspeed Current Mach 1. Selected Speed Displays the airspeed/Mach selected in the mode control panel MCP IAS/MACH window. Displays the FMCcomputed airspeed/Mach when the MCP IAS/MACH window is blank. 2. Speed Trend Vector Indicates predicted airspeed in ten seconds based on current acceleration or deceleration. 3. Current Airspeed Indicates current ADIRS airspeed. The box around the current airspeed indication turns amber when airspeed is below minimum maneuvering speed. 4. Current Mach Displays current ADIRS Mach. 5. Maximum Speed Indicates maximum permissible airspeed as limited by the lowest of the following: Vmo/Mmo Landing gear placard speed, or Flap placard speed. 6. Maximum Maneuvering Speed When displayed, indicates maneuver margin to buffet. May be displayed when operating at high altitude at relatively high gross weights. 7. Speed Bug Points to the airspeed/Mach selected in the MCP IAS/MACH window. Indicates FMC-computed airspeed when the MCP IAS/MACH window is blank. The bug is five knots in height. © 2014 Captain Sim www.captainsim.com ‘777 Captain’ FLIGHT MANUAL Part II – Aircraft and Systems DO NOT USE FOR FLIGHT 94 When the selected speed is off scale, the bug is parked at the top or bottom of the tape, with only one half the bug visible. PFD REFERENCE SPEEDS 1. 2. 3. 4. 5. Takeoff Reference Speeds Flap Maneuvering Speeds Landing Reference Speed Minimum Maneuvering Speed Minimum Speed 1. Takeoff Reference Speeds Displays the takeoff reference speeds V1, VR (displays R if VR is within 4 knots of V1 or V2), and V2, selected on the CDU: Displayed for takeoff NO V SPD is displayed if V speeds are not selected on the CDU V1 is displayed at the top of the airspeed indication when selected and if the value is off the scale V1 and VR are removed at lift-off V2 is removed on climb-out: When flap retraction begins, or After 10 minutes have passed without flap lever movement, or After VREF has been selected (for a turn-back). 2. Flap Maneuvering Speeds Indicates flap maneuvering speed for flap retraction or extension. Not displayed above approximately 20,000 feet altitude. 3. Landing Reference Speed Displays the VREF speed as selected on the CDU VREF speed is displayed at the bottom of the airspeed indication when the value is off the scale. 4. Minimum Maneuvering Speed Indicates maneuver speed margin to stick shaker or low speed buffet. 5. Minimum Speed Indicates the airspeed where stick shaker activates. © 2014 Captain Sim www.captainsim.com ‘777 Captain’ FLIGHT MANUAL Part II – Aircraft and Systems DO NOT USE FOR FLIGHT 95 PFD ALTITUDE INDICATIONS 1. 2. 3. 4. 5. Selected Altitude Bug Selected Altitude - Meters Selected Altitude Current Altitude - Meters Current Altitude 1. Selected Altitude Bug Indicates the altitude set in the MCP altitude window. When the selected altitude is off scale, the bug is parked at the top or bottom of the tape, with only one half the bug visible. 2. Selected Altitude - Meters Displayed when MTRS is selected on the EFIS control panel MTRS switch. Indicates selected altitude in meters (selected in feet in the MCP altitude window). Displays in 10 meter increments. 3. Selected Altitude Displays the altitude set in the MCP altitude window. The selected altitude box is highlighted in white between 900 feet and 200 feet prior to reaching the selected altitude. 4. Current Altitude - Meters Displayed when MTRS is selected on the EFIS control panel MTRS switch. Displays altitude in meters. 5. Current Altitude Indicates current ADIRS altitude. © 2014 Captain Sim www.captainsim.com ‘777 Captain’ FLIGHT MANUAL Part II – Aircraft and Systems DO NOT USE FOR FLIGHT 96 PFD BAROMETRIC INDICATIONS 1. 2. 3. 4. 5. 6. Barometric Setting Barometric Reference QFE Altitude Reference Autopilot/Flight Director Barometric Source Preselected Barometric Setting QFE 1. Barometric Setting Indicates the barometric setting selected on the EFIS control panel barometric selector. STD is displayed when STD is selected on the EFIS control panel barometric STD switch. The display is boxed and changes to amber if a barometric setting is set and altitude climbs above the transition altitude, or if STD is set and altitude descends below the transition flight level. 2. Barometric Reference Indicates the barometric setting units selected on the EFIS control panel barometric reference selector: IN is inches of mercury HPA is Hectopascals. 3. QFE Altitude Reference Indicates QFE altitude reference selected on the CDU APPROACH REF page. When selected, QFE is boxed for 10 seconds. The altitude tape is shaded green during QFE operation. When QNH is selected, the green shading is removed; QNH is displayed for 10 seconds, then blanks. 4. Autopilot/Flight Director Barometric Source L or R indicates that the left or right EFIS control panel is the barometric setting reference for the autopilot or flight director (the same indication is displayed on both PFDs). Displayed when F/D F/D A/P - a flight director switch is ON or the autopilot is engaged. One turned on and one not on determines L or R Both on - L is displayed First one pushed on determines L or R. 5. Preselected Barometric Setting A barometric setting can be preselected when STD is displayed. The preset barometric setting is selected on the EFIS control panel barometric selector and is displayed below STD. © 2014 Captain Sim www.captainsim.com ‘777 Captain’ FLIGHT MANUAL Part II – Aircraft and Systems DO NOT USE FOR FLIGHT 97 6. QFE When STD is selected, a small QFE appears when QFE is selected. PFD VERTICAL SPEED INDICATIONS 1. Vertical Speed Pointer 2. Selected Vertical Speed Bug 3. Vertical Speed 1. Vertical Speed Pointer Indicates current vertical speed. 2. Selected Vertical Speed Bug Indicates the speed selected in the MCP vertical speed window with the V/S pitch mode engaged. 3. Vertical Speed Displays vertical speed when greater than 400 feet per minute. The display is located above the vertical speed indication when climbing and below when descending. PFD ATTITUDE INDICATIONS 1. 2. 3. 4. 5. 6. Bank Pointer Slip/Skid Indication Pitch Limit Indication Horizon Line and Pitch Scale Bank Scale Airplane Symbol 1. Bank Pointer Indicates ADIRS bank in reference to the bank scale. Fills and turns amber if bank angle is 35 degrees or more. 2. Slip/Skid Indication Displaces beneath the bank pointer to indicate slip or skid. Fills white at full scale deflection. Turns amber if bank angle is 35 degrees or more; fills amber if the slip/skid indication is also at full deflection. © 2014 Captain Sim www.captainsim.com ‘777 Captain’ FLIGHT MANUAL Part II – Aircraft and Systems DO NOT USE FOR FLIGHT 98 3. Pitch Limit Indication Indicates pitch limit (stick shaker activation point for the existing flight conditions). Displayed when the flaps are not up, or at slow speeds with the flaps up. 4. Horizon Line and Pitch Scale Indicates the ADIRS horizon relative to the airplane symbol. Pitch scale is in 2.5 degree increments. 5. Bank Scale Fixed reference for the bank pointer. Scale marks are at 0, 10, 20, 30, 45, and 60 degrees. 6. Airplane Symbol Indicates airplane attitude with reference to the ADIRS horizon. PFD RADIO ALTITUDE INDICATIONS 1. Radio Altitude Displays radio altitude below 2500 feet AGL. The display box is highlighted in white for 10 seconds when passing below 2500 feet. Turns amber when below radio altitude minimums. © 2014 Captain Sim www.captainsim.com ‘777 Captain’ FLIGHT MANUAL Part II – Aircraft and Systems DO NOT USE FOR FLIGHT 99 PFD INSTRUMENT LANDING SYSTEM INDICATIONS 1. 2. 3. 4. Approach Reference Localizer Pointer and Scale Marker Beacon Indication Glideslope Pointer and Scale 1. Approach Reference Displays the selected ILS identifier or frequency, approach front course, and ILS DME distance. If the tuned ILS frequencies disagree, the frequency turns amber with an amber horizontal line through it. If the approach courses in the ILS receivers disagree, the course turns amber with an amber horizontal line through it. 2. Localizer Pointer and Scale The localizer pointer: Indicates localizer position relative to the airplane Is in view when the localizer signal is received Fills in solid when within 2 1/2 dots from the center. The scale is in view after the frequency is tuned. At low radio altitudes, with the autopilot or flight director engaged, the scale turns amber and the pointer flashes to indicate excessive localizer deviation. At low altitudes, with LNAV engaged and LOC armed, the localizer scale turns amber and the pointer flashes if the localizer is not captured. 3. Marker Beacon Indication The marker beacon indication appears flashing when over one of the marker beacon transmitters: IM - An airway or inner marker beacon MM - A middle marker beacon OM - An outer marker beacon. The indication flashes in cadence with the beacon identifier. 4. Glideslope Pointer and Scale The glideslope pointer: Indicates glideslope position relative to the airplane, and: Is in view when the glideslope signal is received Fills in solid when within 2 1/2 dots from the scale center. The scale is in view after the frequency is tuned. At low radio altitudes, with the autopilot or flight director engaged, the scale turns amber and the pointer flashes to indicate excessive glideslope deviation. © 2014 Captain Sim www.captainsim.com ‘777 Captain’ FLIGHT MANUAL Part II – Aircraft and Systems DO NOT USE FOR FLIGHT 100 PFD LANDING ALTITUDE/MINIMUMS INDICATIONS 1. 2. 3. 4. 5. BARO Minimums Pointer Landing Altitude Indication Minimums Reference Minimums Landing Altitude Reference Bar 1. BARO Minimums Pointer When BARO minimums are displayed, the number is also represented as a pointer and line on the altitude scale. Turns steady amber when the airplane descends below baro minimums. 2. Landing Altitude Indication The crosshatched area indicates the FMC landing altitude for the destination runway or airport. Indicates the landing altitude for the departure runway or airport until 400 NM or one-half the distance to the destination, whichever occurs first. 3. Minimums Reference Displays BARO when the EFIS control panel MINS reference selector is set to BARO. Displays RADIO when the EFIS control panel MINS reference selector is set to RADIO (no corresponding pointer or line on the altitude scale). Turns amber and flashes for 3 seconds when the airplane descends below selected minimum altitude. 4. Minimums Displays the approach minimums altitude set using the EFIS control panel MINS selector: BARO minimums are feet MSL RADIO minimums are radio altitude feet AGL. Turns amber and flashes for 3 seconds when the airplane descends below selected minimum altitude. 5. Landing Altitude Reference Bar Indicates the height above touchdown. White bar - 500 to 1000 feet above landing altitude. Amber bar - 0 to 500 feet above landing altitude. © 2014 Captain Sim www.captainsim.com ‘777 Captain’ FLIGHT MANUAL Part II – Aircraft and Systems DO NOT USE FOR FLIGHT 101 PFD EXPANDED LOCALIZER INDICATIONS 1. Expanded Localizer Scale Displays when the autopilot or flight director is in LOC mode and the airplane is close to the runway center line. Provides a more sensitive display. A rectangle equals 1/2 dot deviation. PFD RISING RUNWAY INDICATIONS 1. Rising Runway Displayed below 2500 feet radio altitude when the localizer pointer is in view for both front and back courses. Moves toward the airplane symbol below 200 feet radio altitude. The stem of the rising runway symbol flashes when localizer deviations cause the diamond to flash. PFD HEADING/TRACK INDICATIONS Note: The selected track bug and selected heading bug are not displayed at the same time. 1. Current Heading Pointer 2. Selected Track Bug (MCP Selection) 3. Track Line 4. Selected Heading/Track (MCP Selection) 5. Selected Heading/Track Reference Selection) 6. Selected Heading Bug (MCP Selection) 7. Heading/Track Reference (MCP 1. Current Heading Pointer Indicates current heading. 2. Selected Track Bug (MCP Selection) The selected track bug is displayed on the inside of the compass rose. If selected track exceeds display range, the bug parks on the side of the compass rose in the direction of the shorter turn to the track. 3. Track Line Indicates the current track. 4. Selected Heading/Track (MCP Selection) Digital display of the selected heading or track bug. 5. Selected Heading/Track Reference (MCP Selection) When HDG (heading) is selected, an H is displayed. When TRK (track) is selected, a T is displayed. © 2014 Captain Sim www.captainsim.com ‘777 Captain’ FLIGHT MANUAL Part II – Aircraft and Systems DO NOT USE FOR FLIGHT 102 6. Selected Heading Bug (MCP Selection) The selected heading bug is displayed on the outside of the compass rose. If selected heading exceeds display range, the bug parks on the side of the compass rose in the direction of the shorter turn to the heading. 7. Heading/Track Reference Displays the automatic or manually selected heading/track reference: MAG (magnetic north) TRU (true north). © 2014 Captain Sim www.captainsim.com ‘777 Captain’ FLIGHT MANUAL Part II – Aircraft and Systems DO NOT USE FOR FLIGHT ELECTRONIC CHECKLIST DISPLAYS NORMAL CHECKLIST 1. Cursor and Selection Box Highlights cursor selection area. 2. Open Loop Indicator Indicates line item is an open loop action item. Requires crew confirmation to become complete. 3. Complete Indicator Indicates line item is complete. 4. Normal Checklist (NORMAL) Key Select Displays next incomplete normal checklist Displays normal checklists menu page when all normal checklists are complete. Displayed (white) - Incomplete normal checklist has not been displayed. Displayed (amber) - Incomplete normal checklist has been displayed but is not currently displayed. 5. Line Item Override (ITEM OVRD) Key Select - Overrides action item in current line item box. Item is displayed cyan. 6. Checklist Line Item Displayed (white) When action is required, line item is incomplete When action is not required, line item remains white and is complete. © 2014 Captain Sim www.captainsim.com 103 ‘777 Captain’ FLIGHT MANUAL Part II – Aircraft and Systems DO NOT USE FOR FLIGHT 104 Displayed (green) - Line item is complete. Displayed (cyan) - Line item is inactive or overridden. 7. Current Line Item Box Highlights current incomplete line item. 8. Checklist Reset (CHKL RESET) Key Select - resets displayed checklist. All open loop line items become incomplete and current line item box, cursor selection box, and cursor move to first incomplete line item. STANDBY FLIGHT INSTRUMENTS / CLOCK STANDBY MAGNETIC COMPASS 1. Standby Magnetic Compass 2. Standby Magnetic Compass Correction Card 1. Standby Magnetic Compass Displays magnetic heading. 2. Standby Magnetic Compass Correction Card Provides appropriate heading corrections. © 2014 Captain Sim www.captainsim.com ‘777 Captain’ FLIGHT MANUAL Part II – Aircraft and Systems DO NOT USE FOR FLIGHT C01. STANDBY INSTRUMENTS DISPLAYS Standby Altitude Indicator 1. Bank Pointer 2. Airplane Symbol 3. Bank Scale 4. Horizon Line and Pitch Scale Standby Airspeed Indicator 5. Speed Bug Set 6. Speed Bug Set On/Off Standby Altitude Indicator 7. Altimeter Pressure Set 8. Altimeter STD Pressure Button Standby Altitude Indicator 1. Bank Pointer Indicates airplane bank. 2. Airplane Symbol Indicates airplane attitude with reference to the SAARU horizon. 3. Bank Scale Fixed reference for the bank pointer. Scale marks are at 0, 10, 20, 30, 45, and 60 degrees. 4. Horizon Line and Pitch Scale Indicates the SAARU horizon relative to the airplane symbol. Pitch scale is in 2.5 degree increments. Standby Airspeed Indicator 5. Speed Bug Set 6. Speed Bug Set On/Off Rotate (outer) - Adjusts the standby airspeed bug. Push (inner) - Turns the standby airspeed display bug off and on. Standby Altitude Indicator 7. Altimeter Pressure Set 8. Altimeter STD Pressure Button © 2014 Captain Sim www.captainsim.com 105 ‘777 Captain’ FLIGHT MANUAL Part II – Aircraft and Systems DO NOT USE FOR FLIGHT 106 Rotate (outer) - Adjusts the altimeter barometric reference. Push (inner) - Switches between standard and the last selected barometric reference. L02, R04. CLOCK 1. 2. 3. 4. 5. 6. 7. Chronograph (CHR or CLOCK) Switch Chronograph Pointer Elapsed Time (ET) Selector Time/Date Selector Time/Date Window Elapsed Time (ET)/Chronograph (CHR) Window Clock Set Selector 1. Chronograph (CHR or CLOCK) Switch Push - Subsequent pushing starts, stops, resets the chronograph. 2. Chronograph Pointer Indicates chronograph seconds. 3. Elapsed Time (ET) Selector Controls the elapsed time function. RESET - Blanks ET display (spring loaded to HLD). HLD (hold) - Stops the elapsed time display. RUN - Starts the elapsed time display. 4. Time/Date Selector MAN (Manual) - The clock is manually set to a time and date. UTC - The clock is automatically set to the UTC date and time. Push Alternately displays the day-month, then year in the time/date window Subsequent selection displays only the time in the time/date window. 5. Time/Date Window Displays time (hours, minutes) when time is selected on the time/date selector. Alternately displays day-month and year when date is selected on the time/date selector. 6. Elapsed Time (ET)/Chronograph (CHR) Window Displays elapsed time (hours, minutes) or chronograph minutes. The chronograph display replaces the elapsed time display. Elapsed time continues to run in the background and will be displayed after the chronograph is reset. 7. Clock Set Selector Sets the time and date when the time/date selector is set to manual. HD (Hours, Day) Advances hours when time is selected on the time/date selector Advances days when date is selected on the time/date selector. © 2014 Captain Sim www.captainsim.com ‘777 Captain’ FLIGHT MANUAL Part II – Aircraft and Systems DO NOT USE FOR FLIGHT 107 MM (Minutes, Month) Advances minutes when time is selected on the time/date selector Advances months when date is selected on the time/date selector. HLDY (Hold, Year) Stops the time indicator and sets the seconds to zero when time is selected on the time/date selector Advances years when date is selected on the time/date selector. RUN - Starts the time indicator. © 2014 Captain Sim www.captainsim.com ‘777 Captain’ FLIGHT MANUAL Part II – Aircraft and Systems DO NOT USE FOR FLIGHT 108 FLIGHT MANAGEMENT, NAVIGATION R05. FMC SELECTOR L – selects left FMC to provide guidance commands AUTO – automatically selects other FMC if one FMC fails R – selects right FMC to provide guidance commands © 2014 Captain Sim www.captainsim.com ‘777 Captain’ FLIGHT MANUAL Part II – Aircraft and Systems DO NOT USE FOR FLIGHT 109 FUEL O12. FUEL SYSTEM 1. 2. 3. 4. 5. Fuel Pump Switches Forward and Aft Fuel Pump Pressure (PRESS) Lights Center Fuel Pump Pressure (PRESS) Lights CROSSFEED Switches Crossfeed VALVE Lights 1. Fuel Pump Switches ON - The fuel pump is selected ON. Off (ON not visible) - The fuel pump is selected off. 2. Forward and Aft Fuel Pump Pressure (PRESS) Lights Illuminated (amber) - Fuel pump output pressure is low. 3. Center Fuel Pump Pressure (PRESS) Lights Illuminated (amber) Fuel pump output pressure is low with the pump selected ON Illumination is inhibited when the center tank fuel pump switch is selected off. 4. CROSSFEED Switches On (bar visible) - The crossfeed valve is selected open. Off (bar not visible) - The crossfeed valve is selected closed. 5. Crossfeed VALVE Lights Illuminated (amber) - The crossfeed valve is not in the selected position. © 2014 Captain Sim www.captainsim.com ‘777 Captain’ FLIGHT MANUAL Part II – Aircraft and Systems DO NOT USE FOR FLIGHT 110 O11. FUEL JETTISON SYSTEM 1,2. Fuel Jettison NOZZLE Switches/Fuel Jettison Nozzle VALVE Lights 3. FUEL TO REMAIN Selector 4. Fuel Jettison ARM Switch/ Fuel Jettison FAULT Light 5. FUEL TO REMAIN Selector 1. Fuel Jettison NOZZLE Switches ON The jettison nozzle valve is selected open in flight If in flight and jettison is armed, turns on both main tank jettison pumps and opens both center tank jettison isolation valves. Off (ON not visible) - The jettison nozzle valve is selected closed. 2. Fuel Jettison Nozzle VALVE Lights Illuminated (amber) - The jettison nozzle valve is not in the selected position. 3. Fuel Jettison ARM Switch ARMED Arms the jettison system Initializes fuel-to-remain at the MLW fuel quantity. Off (ARMED not visible) - Disarms the jettison system. 4. Fuel Jettison FAULT Light Illuminated (amber) A system fault has occurred Fuel jettison is inoperative. 5. FUEL TO REMAIN Selector PULL ON- changes the mode from MLW (maximum landing weight) to MAN (manual). Rotate Rotate CW to increase, CCW to decrease the MANUAL fuel-to remain quantity Sets the manual (MAN) fuel-to-remain quantity selection at the slow rate (first detent) or fast rate (second detent). Push - automatically selects the MLW fuel-to-remain quantity. © 2014 Captain Sim www.captainsim.com ‘777 Captain’ FLIGHT MANUAL Part II – Aircraft and Systems DO NOT USE FOR FLIGHT 111 HYDRAULICS O07. HYDRAULIC PANEL 1. Ram Air Turbine Switch 2,5. Left/Right Engine (L/R ENG) Primary Pump Switches 3,4. C1/C2 Electrical (C1/C2 ELEC) Primary Pump Switches 6-9. Demand Pump Selectors 10-13. Demand Pump Fault Lights 1. Ram Air Turbine Switch Push - Deploys the RAT. 2,5. Left/Right Engine (L/R ENG) Primary Pump Switches ON - The engine-driven hydraulic pump pressurizes the related left or right hydraulic system when the engine rotates. Off (ON not visible) - The engine-driven hydraulic pump is turned off and depressurized. 3,4. C1/C2 Electrical (C1/C2 ELEC) Primary Pump Switches ON The electric motor-driven hydraulic pump operates Pressurizes the center hydraulic system. Off (ON not visible) - The electric motor-driven hydraulic pump off is turned off. 6-9. Demand Pump Selectors ON - the pump runs continuously. AUTO - the pump operates when system and/or primary pump(s) pressure is low, or when control logic anticipates a large system demand. OFF - the pump is off. Note: If both air-driven pumps are selected to ON, only air-driven pump C1 operates; the two air-driven pumps cannot operate simultaneously when both are selected ON. 10-13. Demand Pump Fault Lights Illuminated (amber) Low demand pump output pressure Excessive demand pump fluid temperature, or Demand pump is selected OFF. © 2014 Captain Sim www.captainsim.com ‘777 Captain’ FLIGHT MANUAL Part II – Aircraft and Systems DO NOT USE FOR FLIGHT 112 MISCELLANEOUS HYDRAULIC SYSTEM CONTROLS P24. ENGINE FIRE PANEL 1. Engine Fire Switches Pull Closes the engine-driven pump hydraulic supply shutoff valve Depressurizes the engine-driven pump. M02. FLIGHT CONTROL HYDRAULIC POWER SWITCHES Note: No flight crew normal or non-normal procedures require operation of the flight control shutoff switches. These switches are for ground maintenance use only. 1. Flight Switches Control Hydraulic Power Shutoff NORM - Hydraulic system power is available to the flight control actuators. SHUT OFF - Hydraulic system power to the flight control actuators is shut off. Note: In flight, the center system flight control shut off valves are isolated from electrical power and cannot be closed. 2. Flight Control CLOSED Lights Hydraulic Power VALVE Illuminated (amber) - The related valve is closed. © 2014 Captain Sim www.captainsim.com ‘777 Captain’ FLIGHT MANUAL Part II – Aircraft and Systems DO NOT USE FOR FLIGHT 113 LANDING GEAR C03. LANDING GEAR PANEL 1. Landing Gear Lever 2. Autobrake Selector 3. Alternate Gear (ALTN GEAR) Switch 4. Landing Gear Lever Lock Override (LOCK OVRD) Switch 1. Landing Gear Lever UP - The landing gear retracts. DN - The landing gear extends. 2. AUTOBRAKE Selector OFF - Deactivates and resets the autobrake system. DISARM Disengages the autobrake system Releases brake pressure. 1, 2, 3, 4, MAX AUTO - Selects the desired deceleration rate. RTO - Automatically applies maximum brake pressure when the thrust levers are retarded to idle above 85 knots. 3. Alternate Gear (ALTN GEAR) Switch NORM - the landing gear lever operates normally. DOWN - the landing gear extends by the alternate extension system. Note: Alternate extension may be selected with the landing gear lever in any position. 4. Landing Gear Lever Lock Override (LOCK OVRD) Switch Push - releases the landing gear lever lock. © 2014 Captain Sim www.captainsim.com ‘777 Captain’ FLIGHT MANUAL Part II – Aircraft and Systems DO NOT USE FOR FLIGHT 114 NOSE WHEEL STEERING TILLER 1. Nose Wheel Steering Tiller 2. Tiller Position Indicator 1. Nose Wheel Steering Tiller Rotate Turns the nose wheels up to 70 degrees in either direction 2. Tiller Position Indicator Shows tiller displacement from the straight-ahead, neutral position. BRAKE SYSTEM 1. Rudder Pedal Adjust Crank Adjusts the rudder pedals forward or aft. 2. Rudder/Brake Pedals Pushing the full pedal: Turns the nose wheel up to 7 degrees in either direction Does not activate main gear steering Push the top of the pedals - actuates the wheel brakes. P12. PARKING BRAKE LEVER Pull - Sets the parking brake when both brake pedals are simultaneously depressed. Release - Simultaneously depress both brake pedals. © 2014 Captain Sim www.captainsim.com ‘777 Captain’ FLIGHT MANUAL Part II – Aircraft and Systems DO NOT USE FOR FLIGHT 115 L04. BRAKE ACCUMULATOR PRESSURE INDICATOR 1. Brake Source Light Illuminated (amber) - Both active brake hydraulic sources (right and center/reserve hydraulic systems) have low pressure. 2. BRAKE ACCUMULATOR PRESSURE Indicator Indicates brake accumulator pressure. © 2014 Captain Sim www.captainsim.com ‘777 Captain’ FLIGHT MANUAL Part II – Aircraft and Systems DO NOT USE FOR FLIGHT 116 WARNING SYSTEMS SYSTEM WARNINGS MASTER WARNING / CAUTION RESET SWITCHES AND LIGHTS 1. Master WARNING/CAUTION Reset Switch 2. Master Warning Light 3. Master Caution Light 1. Master WARNING/CAUTION Reset Switch Push Extinguishes the master WARNING lights Extinguishes the master CAUTION lights Silences most associated aural alerts (for exceptions, see Master Warning/Caution Reset Switches and Lights). . 2. Master WARNING Light Illuminated (red) - A time critical warning or warning condition exists. 3. Master CAUTION Light Illuminated (amber) - A caution condition exists. C03. GROUND PROXIMITY WARNING SYSTEM (GPWS) CONTROLS 1. Ground Proximity FLAP Override Switch 2. Ground Proximity (GND PROX) Glideslope (G/S) Inhibit Switch 3. Ground Proximity Light 4. Ground Proximity GEAR Override Switch 5. Ground Proximity Terrain (TERR) Override Switch © 2014 Captain Sim www.captainsim.com ‘777 Captain’ FLIGHT MANUAL Part II – Aircraft and Systems DO NOT USE FOR FLIGHT 117 TRAFFIC ALERT AND COLLISION AVOIDANCE SYSTEM (TCAS) P30. TCAS CONTROLS AND TRANSPONDER PANEL 1. 2. 3. 4. 5. 6. 7. 8. Transponder (XPNDR) Selector Altitude (ALT) SOURCE Selector Transponder Code Selectors Transponder Code Window Transponder Mode Selector TCAS Controls TCAS Test Switch Absolute/Relative (ABS/REL) Altitude Selector TCAS Airspace Selector 1. Transponder (XPNDR) Selector L or R – selects desired transponder. 2. Altitude (ALT) SOURCE Selector NORM (normal) – selects ADIRU as source of transponder altitude reporting. ALTN (alternate) – selects SAARU as source for transponder altitude reporting. 3. Transponder Code Selectors Rotate – Sets transponder code in transponder. 4. Transponder Code Window Shows transponder code. Shows operating transponder (L or R). 5. Transponder Mode Selector STBY (standby) – does not transmit. ALT RPTG (altitude reporting) OFF – transponder operates without altitude reporting. XPNDR (transponder) – activates transponder with altitude reporting when airplane is in flight. TA ONLY - Allows the display of traffic advisory (TA) targets. TA/RA - Allows the display of traffic advisory (TA) targets and resolution advisory (RA) targets with resolution advisory aurals and PFD vertical guidance pitch command and vertical speed command. 6. Test Switch The test switch allows you to perform a TCAS test. The test results are shown on the NDs. 7. Absolute/Relative (ABS/REL) Altitude Selector Note: The left selector controls the left TCAS display; the right selector controls the right TCAS display. ABS (absolute) - Displays absolute altitude on the TCAS traffic display. REL (relative) - Displays relative altitude (relative to own aircraft) on the TCAS traffic display. © 2014 Captain Sim www.captainsim.com ‘777 Captain’ FLIGHT MANUAL Part II – Aircraft and Systems DO NOT USE FOR FLIGHT 118 8. TCAS Airspace Selector Note: The left selector controls the left TCAS display; the right selector controls the right TCAS display. This selector controls the vertical display range of other traffic, and has no effect on the detection and display of proximate traffic, TAs, or RAs. ABV - Altitude range is set to 7000 ft. above the aircraft, and 2700 ft. below the aircraft. N - Altitude range is set to 2700 ft. above the aircraft, and 2700 ft. Below the aircraft. BLW - Altitude range is set to 2700 ft. above the aircraft, and 7000 ft. below the aircraft. 1. TFC – TCAS Display Select Switch When selected allows TCAS traffic to be displayed on the ND. TCAS TRAFFIC DISPLAYS 1. 2. 3. 4. Traffic Targets TCAS Mode Annunciations OFFSCALE Message TRAFFIC Alert Message 1. Traffic Targets Indicates the relative position of traffic targets. A filled red square indicates a Resolution Advisory (RA). A filled amber circle indicates a Traffic Advisory (TA). A filled white diamond indicates proximate traffic. An unfilled white diamond indicates other traffic. The number represents the relative or absolute altitude of the traffic in hundreds and thousands of feet; a missing number indicates the altitude is unknown. The arrow indicates whether the traffic is climbing or descending at a rate of 500 feet per minute or greater; a missing arrow means the traffic is flying relatively level. © 2014 Captain Sim www.captainsim.com ‘777 Captain’ FLIGHT MANUAL Part II – Aircraft and Systems DO NOT USE FOR FLIGHT 119 Displayed only when TCAS is enabled. TCAS Mode Annunciations TFC - TCAS is enabled. TA ONLY - all TAs and RAs are processed and displayed as TAs. TCAS is: Turned on by selecting TA/RA or TA ONLY on the transponder panel Enabled by pushing the EFIS control panel TFC switch Displayed in MAP, MAP CTR, APP and VOR modes. 3. OFFSCALE Message Indicates a TCAS RA or TA is beyond the selected map range. Displayed only if TCAS is enabled. 4. TRAFFIC Alert Message Displayed whenever a TCAS RA or TA is active. Displayed whether TCAS traffic information is being displayed or not. Displayed in all ND modes and ranges. G05. DISPLAY SELECT PANEL 1. Status (STAT) Display Switch 2. Cancel/Recall (CANC/RCL) Switch 1. Status (STAT) Display Switch Push - Displays the status display on the selected MFD. Subsequent pushes · Displays the next page of status messages when additional pages exist · The lower center MFD blanks after the last page of status messages is displayed · The inboard MFDs return to the NAV display after the last page of status messages is displayed. 2. Cancel/Recall (CANC/RCL) Switch Push (when there are EICAS caution or advisory messages displayed) Displays the next page of EICAS messages when additional pages exist Cancels caution and advisory messages when the last page is displayed (warning, memo and communications messages remain). © 2014 Captain Sim www.captainsim.com ‘777 Captain’ FLIGHT MANUAL Part II – Aircraft and Systems DO NOT USE FOR FLIGHT 120 Pushing this switch cancels the red box color of any engine parameter exceedance box that remains after a red line exceeded parameter has cleared. Pushing this switch when there are no EICAS messages displayed: Displays the previously cancelled EICAS messages, if the condition(s) still exist Displays the first page of messages when multiple pages exist Displays previously canceled red exceedance boxes. © 2014 Captain Sim www.captainsim.com ‘777 Captain’ FLIGHT MANUAL Part II – Aircraft and Systems DO NOT USE FOR FLIGHT 121 AIR SYSTEMS AIR CONDITIONING SYSTEM O15. AIR CONDITIONING PANEL 1. 2. 3. 4. 5. 6. Equipment Cooling (EQUIP COOLING) Switch PACK Switches TRIM AIR Switches Air Conditioning Reset (AIR COND RESET) Switch Cabin Temperature (CABIN TEMP) Control Recirculation Fans (RECIRC FANS) Switches 1. Equipment Cooling (EQUIP COOLING) Switch AUTO - Equipment cooling mode is controlled automatically. Off (AUTO not visible) Both equipment cooling supply fans are not operating The smoke/override valve is open The forward cargo heat valve is closed, and OVRD illuminates. OVRD (override) illuminated (amber) - SMOKE/OVRD mode is operating because: Off is selected manually Both equipment cooling supply fans fail, or The smoke/override mode is automatically selected by the smoke detection system. 2. PACK Switches AUTO - The pack is automatically controlled. OFF (AUTO not visible) - The pack flow control valves are commanded closed. OFF illuminated (amber) - The pack flow control valves are commanded closed: Automatically during engine start Automatically due to a pack or compressor outlet high temperature, both flow control valves failed closed, no pneumatic air, or · OFF is manually selected. 3. TRIM AIR Switches ON - The trim air valve is commanded open. Off (ON not visible) The trim air valve is commanded closed, and FAULT illuminates. FAULT illuminated (amber) The trim air valve is failed closed The trim air valve is commanded closed because of a zone supply duct overheat, or The TRIM AIR switch is selected off. © 2014 Captain Sim www.captainsim.com ‘777 Captain’ FLIGHT MANUAL Part II – Aircraft and Systems DO NOT USE FOR FLIGHT 122 4. Air Conditioning Reset (AIR COND RESET) Switch Push Resets any closed pack flow control valves or trim air valves held closed due to overheat, control failure, or valve failure Attempts to reset a failed recirculation fan Resets fault protection. 5. Cabin Temperature (CABIN TEMP) Control Provides automatic passenger cabin temperature control. 6. Recirculation Fans (RECIRC FANS) Switches ON - Provides automatic operation of the associated recirculation fans. Off (ON not visible) - The selected recirculation fans do not operate. PRESSURIZATION SYSTEM O17. PRESSURIZATION PANEL 1. OUTFLOW VALVE Switches 2. OUTFLOW VALVE MANUAL Switches 3. Landing Altitude (LDG ALT) Selector 1. OUTFLOW VALVE Switches AUTO - Outflow valve position is automatically controlled. Manual (AUTO not visible) Outflow valve position is controlled by the OUTFLOW VALVE MANUAL switch MAN illuminates Outflow valve position is displayed on EICAS (an amber M is displayed on the outflow valve position indicator on EICAS). MAN (manual) illuminated (amber) - Outflow valve position is controlled by the associated OUTFLOW VALVE MANUAL switch. 2. OUTFLOW VALVE MANUAL Switches Spring-loaded to center. Controls outflow valve position when MAN is illuminated in the OUTFLOW VALVE switch. OPEN - Moves the outflow valve toward open. CLOSE - Moves the outflow valve toward closed. © 2014 Captain Sim www.captainsim.com ‘777 Captain’ FLIGHT MANUAL Part II – Aircraft and Systems DO NOT USE FOR FLIGHT O16. BLEED AIR SYSTEM 1. Bleed Isolation (ISLN) Switches 2. APU Bleed Switch 3. Engine (ENG) Bleed Switches 1. Bleed Isolation (ISLN) Switches AUTO - The bleed isolation valve is automatically controlled. Off (AUTO not visible) - Manually commands the respective bleed isolation valve to close. CLOSED illuminated (amber) The isolation valve is closed due to a duct leak or bleed loss The valve is closed because the switch is selected to off, or The valve fails closed. 2. APU Bleed Switch AUTO - The APU bleed air valve is automatically controlled. OFF (AUTO not visible) - The valve is commanded closed. OFF illuminated (amber) - The APU bleed air valve is closed: Automatically due to a duct leak Because the switch is selected OFF Due to the valve failing closed Because the APU fire switch is pulled out. 3. Engine (ENG) Bleed Switches ON - The engine bleed valves open when engine bleed air is available. OFF (ON not visible) - Valve is manually commanded closed. OFF illuminated (amber) - The engine bleed valves are closed: Automatically due to a protective bleed shut down or duct leak Because the switch is selected OFF Because the engine is not running, or Because the engine fire switch is pulled out. © 2014 Captain Sim www.captainsim.com 123 ‘777 Captain’ FLIGHT MANUAL Part II – Aircraft and Systems DO NOT USE FOR FLIGHT 124 WEATHER RADAR THEORY OF OPERATION The primary use of this radar is to aid the pilot in avoiding thunderstorms and associated turbulence. Since each operator normally develops specific operational procedures for use of weather avoidance radar, the following information is presented for use at the operator's discretion. Operational techniques for the radar are similar to earlier generation weather avoidance radars. The proficient operator manages antenna tilt control to achieve best knowledge of storm height, size, and relative direction of movement. RADAR PRINCIPLES Radar is fundamentally a distance measuring system using the principle of radio echoing. The term RADAR is an acronym for Radio Detecting and Ranging. It is a method for locating targets by using radio waves. The transmitter generates microwave energy in the form of pulses. These pulses are then transferred to the antenna where they are focused into a beam by the antenna. The radar beam is much like the beam of flashlight. The energy is focused and radiated by the antenna in such a way that it is most intense in the center of the beam with decreasing intensity near the edge. The same antenna is used for both transmitting and receiving. When a pulse intercepts a target, the energy is reflected as an echo, or return signal, back to the antenna. From the antenna, the returned signal is transferred to the receiver and processing circuits located in the receiver transmitter unit. The echoes, or returned signals, are displayed on an indicator. Radio waves travel at the speed of 300 million meters per second and thus yield nearly instantaneous information when echoing back. Radar ranging is a two-way process that requires 12.36 micro-seconds for the radio wave to travel out and back for each nautical mile of target range. As shown in the distance illustration below, it takes 123.6 micro-seconds for a transmitted pulse of radar energy to travel out and back from an area of precipitation 10 nautical miles away. WEATHER RADAR PRINCIPLES Airborne weather avoidance radar, as its name implies, is for avoiding severe weather, not for penetrating it. Whether to fly into an area of radar echoes depends on echo-intensity, spacing between the echoes, aircraft capabilities and pilot experience. Remember that weather radar detects only precipitation drops; it does not detect minute cloud droplets, nor does it detect turbulence. Therefore, the radar provides no assurance of avoiding instrument weather in clouds and fog. The indicator may be clear between intense echoes; this clear area does not necessarily mean it is safe to fly between the storms and maintain visual sighting of them. © 2014 Captain Sim www.captainsim.com ‘777 Captain’ FLIGHT MANUAL Part II – Aircraft and Systems DO NOT USE FOR FLIGHT 125 CONTROLS AND INDICATORS P20. WEATHER RADAR PANEL To switch left or right WXR ON use WXR button on the corresponding EFIS panel. 1. 2. 3. 4. 5. 6. 7. Left Mode Selectors Left Tilt and Gain Control Left System Select Switch Right Mode Selectors Right Tilt and Gain Control Right System Select Switch Test Switch Purpose: The weather radar (WXR) panel has controls for WXR system operation. 1,4. Mode Selector The left and right alternate action mode select switches have these functions: - TFR switch causes the RT to use the same mode, tilt, and gain as the other side - WX – shows weather radar returns at calibrated gain level - WX+T – shows weather returns and turbulence within precipitation at calibrated gain level. Turbulence display is available on displays of 40 miles or less. - MAP position selects the ground map mode - GCS - disabled TCAS © 2014 Captain Sim www.captainsim.com TERR ‘777 Captain’ FLIGHT MANUAL Part II – Aircraft and Systems DO NOT USE FOR FLIGHT 126 2,5. Tilt and Gain Control The left and right antenna tilt controls let you select antenna tilt from +15 degrees to -15 degrees. The tilt controls also have the receiver gain control. The gain control adjusts the system gain in the MAP mode only. 3,6. System Select Switch The left (LR/T) and right (RR/T) select switches allows to select the left or right WXR for operation and activate appropriate Tilt Control and Mode Selectors. 7. Test Switch The test switch lets you do a test of the WXR that is in operation. The test results show on the NDs. © 2014 Captain Sim www.captainsim.com ‘777 Captain’ FLIGHT MANUAL Part II – Aircraft and Systems DO NOT USE FOR FLIGHT 127 CUSTOMER CARE FORUM You are invited to join Captain Sim community forum DAILY NEWS For Captain Sim daily news please follow us at Twitter or Facebook. VIDEO CHANNEL For Captain Sim videos please watch our YouTube channel. TECH SUPPORT The '777 Captain' is one of the most advanced, complete and accurate digital replica of the Boeing 777 aircraft ever available for any game platform. Our product is not perfect (unfortunately nothing is). But we are working on improvements. If you have some important issue to report, please check-in to Your Profile then click Product Name > Customer Support > and use the Trouble Ticket System. We process all tickets and consider the most significant issues for the next service packs. SPECIAL THANKS TO: Mark Fletcher Lou Thieblemont © 2014 Captain Sim www.captainsim.com