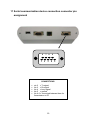
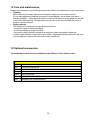
1
User’s manual iThermo L/M Touch model MAN_iThermo_touch (ENG)_REV1_0_P.doc June 2012 CONTENTS 1 INSTRUCTIONS FOR THE INSTALLATION OF THE HEATER ........................................ 3 2 STORAGE CONDITIONS ............................................................................................................... 5 3 INSTALLATION OF THE HEATER AND THE VIEWER ...................................................... 6 3.1 HEATER INSTALLATION DESCRIPTION........................................................................................... 6 3.2 HEATER CONNECTIONS ................................................................................................................. 7 3.3 VIEWER CONNECTIONS ................................................................................................................. 8 3.3.1 Viewer connectors description. ............................................................................................... 8 3.4 VIEWER/HEATER CONNECTION ..................................................................................................... 9 4 HEATER KEYBOARD FUNCTIONALITY .............................................................................. 10 4.1 4.2 5 DESCRIPTION............................................................................................................................... 10 KEY FUNCTIONALITY .................................................................................................................. 10 VIEWER FUNCTIONALITY DESCRIPTION. ......................................................................... 11 5.1 5.2 5.3 5.4 OVERVIEW OF THE VIEWER ......................................................................................................... 11 DESCRIPTION OF THE KEYBOARD................................................................................................ 12 POSITION AND FUNCTIONALITY OF THE KEYS ............................................................................. 12 DISPLAY AREA FUNCTIONALITY ................................................................................................. 13 6 SIMPLE WEIGHING ..................................................................................................................... 16 7 CUSTOM SETTINGS. .................................................................................................................... 17 7.1 LANGUAGE SELECTION ............................................................................................................... 19 7.2 DATE TIME SETTING .................................................................................................................... 19 7.3 TOUCH SCREEN SENSITIVITY ADJUSTMENT................................................................................. 20 7.4 USER PROFILE CREATION, MODIFICATION, AND SELECTION ....................................................... 21 7.4.1 Alphanumeric keyboard use instructions for the insertion of data. ..................................... 22 7.5 DISPLAY APPEARANCE PREFERENCES, ACOUSTIC SIGNAL, PROXIMITY SENSOR FUNCTION SETTING ................................................................................................................................................... 23 7.6 WEIGHING PARAMETERS SETTING. ............................................................................................. 25 7.7 CALIBRATION TYPE ..................................................................................................................... 26 7.8 SETUP OF THE HEATER ................................................................................................................ 28 7.9 PERIPHERAL DEVICE SETTINGS. .................................................................................................. 31 8 DETERMINATION OF THE MOISTURE................................................................................. 34 8.1 8.2 8.3 8.4 8.5 8.6 8.7 TEMPERATURE PROFILE. ............................................................................................................. 34 DRYING END METHOD. ................................................................................................................ 37 PRE-HEATING. ............................................................................................................................. 39 NOMINAL WEIGHT. ...................................................................................................................... 40 RESULT. ...................................................................................................................................... 41 VIEW. .......................................................................................................................................... 41 LAST RESULTS. ............................................................................................................................ 41 9 START OF A DRYING CYCLE ................................................................................................... 42 10 FUNCTION MENU. ........................................................................................................................ 48 11 SERIAL COMMUNICATION DEVICE CONNECTION CONNECTOR PIN ASSIGNMENT ......................................................................................................................................... 53 12 CARE AND MAINTENANCE ...................................................................................................... 54 13 OPTIONAL ACCESSORIES......................................................................................................... 54 14 SCALE TECHNICAL SPECIFICATIONS ................................................................................. 55 1 15 HEATER TECHNICAL SPECIFICATIONS ............................................................................. 55 16 WARRANTY .................................................................................................................................... 56 17 DISPOSAL ........................................................................................................................................ 56 18 DECLARATION OF CONFORMITY ......................................................................................... 57 2 1 Instructions for the installation of the heater WARNING: Please read these installation and use instructions carefully before beginning your work with the new scale. Use of the instrument other than that reported in this manual no longer guarantees the product’s safety. Carefully store the instruction manual. Observe the following indications for a safe and trouble-free use of the moisture analyzer: Use the moisture analyzer exclusively for the determination of the moisture of samples. Any improper use of the device may endanger the safety of persons and damage the instrument or other objects. Do not use the device in areas with a danger of explosion; furthermore, operate the instrument only in accordance with the environmental conditions reported in this instruction manual. If electrical equipment is used in systems and in environmental conditions that require increased safety measures, comply with the provisions in the guidelines for the installation of this equipment in force in your country. The device must only be used by qualified personnel who are familiar with the properties/characteristics of the sample used. Before operating the device for the first time, check that the supply voltage corresponds with the network voltage. To disconnect the device from the network voltage, disconnect the power cord. Lay out the power cord in such a way as to avoid contact with the hot surfaces of the device. Use only extension cords that comply with the regulations and that are equipped with a protective conductor. Heat protection warning Respect the following distance and the free space around the device to prevent a build-up of heat in the device and the overheating of the device itself: - 20 cm around the device - 1 m above the device Do not place flammable material on, under, or near the device as the heating element heats the surrounding area. Remove the samples with caution, as the heating element and the sample pans could still be very hot. Danger for persons or property working with special samples: fire, explosion Flammable or explosive substances Substances containing solvents Substances that emit flammable or explosive gases or vapors during drying Remove the scale and the relative calibration weight from the packaging and check for any visible damage to the instrument. Do not install the scale in environments in which there are drafts of air, sudden changes of temperature and vibrations. 3 The humidity of the environment where the balance is used must be between 45% and 75%. Place the underplate and the plate on the balance (see page 5). Level the balance by adjusting the special feets placed at the front and rear of the scale. Level bubble on the back of the oven Adjustable feet Connect the power supply to connector 2 placed on the back of the balance, and the cable of the heater in the appropriate connector on the back of it (see page 9). Connect the power supply and the cable of the heater to a voltage outlet nearby, which must be easily accessible; after 20 seconds the balance will turn on automatically. Wait 30 minutes after turning the balance on and calibrate it using the calibration weight if provided, following the instructions. Calibrate the balance every time that it is moved to another place. Periodically check the calibration of the balance. Be careful not to let excessively heavy objects fall on the scale’s plate, to prevent it from being damaged. The servicing must be carried out by specialized personnel and the spare parts used must be original. For this purpose it is necessary to contact the retailer where the purchase was made. 4 2 Storage conditions . Storage temperature +5°C - 40°C Storage humidity 45% - 75%. Keep the packaging of the balance in case it must be sent for servicing, and disconnect all of the cables and any accessories to prevent needless damage. Do not expose the balance to extreme temperatures and humidity if not necessary, and avoid violent impacts. 5 3 Installation of the heater and the viewer 3.1 Heater installation description. Lower basin with anti-ventilation cylinder Underplate Plate extractor Sample plate 1. Position the lower basin. 2. Apply the underplate to the weighing cone. 3. Position the plate extractor. 4. Position the sample plate. 6 3.2 Heater connections i-Thermo touch scale rear and lower part 1. CONNECTOR Balance-heater and –viewer connection connector. 2. CONNECTOR Balance power supply connector 4 5 3 3. CONNECTOR Heater power supply connector 4. CONNECTOR Heater-balance connection connector. 5. Heater on SWITCH 2 1 6. ADJUSTABLE FEET 6 8 10 9 7 7 7. 2 balance closure screws 8. 2 balance closure screws: for access, remove the fixed foot (11) and the adjustable one (10). 9. Adjustable rear foot 10. Fixed rear foot 3.3 Viewer connections All of the connectors for the different connections are at the rear part of the viewer. 3.3.1 Viewer connectors description. 1 2 3 4 -1- USB key input connector for database file import and export. -2- Connector for scale viewer connection. -3- Connector for Ethernet connection. -4- Connector for RS232 serial output 8 3.4 Viewer/heater connection Use the supplied cable to connect the viewer to the heater: 15-pin connector to plug into the connector at the back of the balance 9-pin connector to plug into the connector at the back of the heater 9-pin connector to plug into the connector at the back of the viewer 1. Plug the 15-pin connector of the cable into connector 1 on the back of the balance. 2. Plug in the 9-pin female connector of the cable (short wire) into connector 4 on the back of the heater. 3. Plug in the 9-pin female connector of the cable (long wire) into connector 2 on the back of the viewer. 4. Plug in the supply jack to connector 2 on the back of the balance. 5. Plug in the supply cable to connector 3 on the back of the heater. Connect the provided VDE cable to connector 3 of the heater. Connect the 5 V 4 A power supply provided to connector 2 of the scale. 4 1 2 9 4 Heater keyboard functionality The balance-heater is equipped with a keyboard at the front to carry out the most frequent and useful operations during the drying cycle preparation steps. 4.1 Description The keyboard has three keys, two on the sides for zeroing the weighing and a central one to print the results. 4.2 Key functionality TARE and zero button. Print results key. 10 5 Viewer functionality description. The functionalities of the viewer’s keyboard and touch screen display are described below. 5.1 Overview of the viewer 1 2 -1- Membrane keypad with command keys. -2- Area display touch screen. 11 5.2 Description of the keyboard The command keys of the membrane keyboard allow tare and print operations to be carried out, both by pressing the keys and through the proximity sensors positioned at the top of the keyboard. 1 1 4 2 5 3 3 5.3 Position and functionality of the keys -1- Proximity sensors with possibility of activation or deactivation selectable. Settable tare or data printing functions. The command is activated by bringing your hand close to the sensor. -2- Result printing key. -3- Zero and tare key. -4- Status indicator LED: off when the system is operational. Always on during standby. Flashing during data loading phases. -5- Activation/deactivation of the standby status key. 12 5.4 Display area functionality The viewer is equipped with a color display with touch screen functionality that allows, by touching the display in the active areas, rapid access to the instrument’s various menus and functionalities. 3 4 5 1 2 6 1 Area of indication of the weight values or data relative to the moisture during and at the end of the drying cycle TOUCH SCREEN FUNCTIONALITY By touching this symbol it will be possible to enlarge the display area of the weight or of the drying data. g Indication of units of measurement - by touching this symbol it will be possible to access the menu of the measurement units and select the desired one. Stability indicator. -056 °C Zero indicator. Temperature value of the heater indicator. 0_ _max Analog indicator bar of the magnitude being measured. 13 2 Notification area of drying operational parameter setting, or information on the data detected during and after drying. 3 Operational notification area. TOUCH SCREEN FUNCTIONALITY By touching this area, you can access the settings or recall (from the database) menu of the drying mode. 4 Date-time display area. TOUCH SCREEN FUNCTIONALITY By touching this area, you access the menu for the setting and adjustment of the time and date. 5 User name area. TOUCH SCREEN FUNCTIONALITY By touching this area you access the user menu to carry out the quick selection of the desired user. 6 Function keys area. TOUCH SCREEN FUNCTIONALITY By touching the keys displayed in this area, the relative function will be carried out. All of the keys available, which can vary depending on the selected applications, will be illustrated below. 14 Bars of the keys available on the simple weighing screens. It is possible to pass from one to another by touching the symbol “>>” “>>” Start: Key to access the settings or database recall menu of the drying program. Setup: Key to access the menu of the weighing settings, display and heater parameters. Print: Data print activation key. F1-F2-F3: Function keys. A drying program saved in the database can be assigned to these keys. By touching the key, the drying program assigned to it will therefore be loaded. 15 Cal.: Calibration of the balance activation key 0/T: Tare/zero of the weighing operation activation key. Bars of keys available during and at the end of the drying cycle. Esc: Key to exit from the drying function Restart: Key to restart new drying cycle Graf: Graph display key. By touching this key, the display of the drying parameters is switched to the graph and vice versa both during and at the end of the cycle. Stop: Key for the interruption of the drying cycle. By touching this button, you can stop the drying cycle. 6 Simple weighing After connecting the power supply, the LED status indicator on the right of the viewer will start to blink. This phase will last for several seconds. After the data loading phase is finished, a screen will be displayed with the indication of the balance’s capacity and resolution. The instrument will then be positioned at the simple weighing screen. 16 On the simple weighing screen, the value of the weight loaded on the weighing plate is displayed in the weight indication area. Wait for the stability symbol to turn on to detect the weight value in a precise way. Then touch the tare button to zero the value of the weight. After zeroing the value of the weight, the indication of zero “-0-“ will be displayed in addition to the stability symbol. 7 Custom settings. All of the instrument’s customization functions are illustrated in this section. It will be possible to set every function described in a different way for each user. Selection of the language Date time setting Touch screen sensitivity adjustment Creation, modification, and selection of a new user Appearance and acoustic signal preferences, proximity sensor function setting Setting of weighing parameters Calibration type Heater setup 17 Peripheral device setting To access the settings menu, touch the “Setup” menu in the bar at the bottom of the display. The following screens with all of the functions relative to the setup menu will be displayed. Indicator of the number of pages Return to the available. previous Touch the arrows to scroll the pages screen forwards and backwards. 18 Exit from the menu 7.1 Language selection Select the “Language” function in the setup menu The language of use of the instrument can be selected. Touch the “Language” key in the menu list on page two. Then select the desired language. All of the displays will be automatically translated in the selected language. 7.2 Date time setting Select the “date” function in the setup menu. Insert the new date and time values. It will also be possible to select the 12- or 24-hour format for the time. Touch the “Date” key to edit the date or the “Time” key to edit the time. 19 A numerical keypad will be displayed for the insertion of the date and time, in the “dd/mm/yyyy” format. Then touch the “OK” key to confirm the new settings, or touch the “X” to exit without modifying the value. 7.3 Touch screen sensitivity adjustment If during the use of the viewer you note that the touch screen does not respond correctly when touching in correspondence with a specific command, you can carry out a new calibration to correct the alignment. Touch the “Preferences” key from the setup menu and then select the function “Cal. touchscreen”. Touch the key “Cal. touchscreen” to calibrate the touchscreen. Carefully touch the center of the cross. Repeat for all of the points. Then carry out the instructions shown on the display, being careful to position the stylus in an accurate way at the center of the cross. After calibrating the touchscreen, touch the display at any point to exit and save the new calibration. 20 7.4 User profile creation, modification, and selection The balance can be prepared for customized use by multiple users. Up to 10 different user profiles can be created. When it is first turned on, the instrument has the “Admin” user as the active one. This user cannot be eliminated or renamed. Every user can then fully customize all of the instrument’s settings, including the databases. Once his profile has been created, it will be sufficient to touch “on the user area” in the base screen and select the desired user. All of the settings relative to that user, including his databases, will thus be loaded. From this moment on, all of the modifications made with the active user will be saved and recalled every time that this user is activated. To carry out all of the user creation or deletion operations, select the “User” function in the setup menu. From this screen you can: - Select a user by touching the “Select” key - Create a new user by touching the “New” key - Rename an existing user by touching the “Rename” key. - Copy the same settings as an already existing user, to create another with the same settings, by touching the “Copy” key. - Eliminate a user by touching the “Delete” key. To set a default user, touch the “Default” key and select, from the list of existing users, the name of the user with which the instrument should activate itself upon startup. In the functions described above, an alphanumeric keyboard will automatically be activated on the display where it is necessary to insert text (see Section 8.4.1). Note: the maximum number of characters for the insertion of the user name is 20. 21 7.4.1 Alphanumeric keyboard use instructions for the insertion of data. The functionality of the alphanumeric keypad described below is valid for all of the data insertion operations in the various usage modes of the instrument. Mod. 1 The function keys available in the alphanumeric keypad are described below. Selection of the mode of insertion of uppercase or lowercase letters key. Deletion of the last character entered key. Elimination of all of the characters entered key. Key for moving the cursor forward and backward on the entered string. Mod 2 Key for the confirmation and saving of the insertion. Keyboard character selection key. By touching this key, the various characters available for insertion are displayed in a rotation: Mod 1 Mod 2 Mod 3 Mod 3 22 7.5 Display appearance preferences, acoustic signal, proximity sensor function setting It is possible to set a graphic appearance of the display, the function of the proximity sensors, and the activation or not of the acoustic signal for each user. The various options available and their mode of activation are described below. Select the function “Preferences” in the setup menu. The following parameters can be set in the “preferences” menu: Brightness Cal. touchscreen Appearance Beeper Sens. key Brightness 10 levels of brightness of the display are available. Select the desired one by touching the corresponding key. Appearance It is possible to choose from among 6 different color combinations. Select the desired one by touching the corresponding key. 23 Beeper The beeper function allows you to activate or deactivate the acoustic signaler. When it is activated, every time that a key of the keyboard is pressed or the active parts of the touchscreen are touched, an acoustic signal is emitted. Sens. key The proximity sensors can be activated or deactivated, and it is also possible to choose their sensitivity, i.e. the distance from which the presence of your hand is recognized. Sensitivity: it is possible to select 10 different levels of sensitivity of the sensor. Level 1 is that with a lower sensitivity with the hand at ca. 2 cm away from the sensor, up to sensitivity 10, with an operating distance of ca. 30 cm. Left function – Right function: these two keys allow you to enable/disable and assign a specific function to the sensor. The proximity sensor setting menu is the same for both the left and right. The same function can also be set to both, e.g.: print. Disabled: sensor function not active. Tare: assignment of tare command. Print: assignment of print command. 24 7.6 Weighing parameters setting. For a correct use of the balance, it is important to carry out the right settings of the weighing parameters as a function of the usage environment. The filter, stability, auto-zero and weighing unit of measurement parameters are described in this section. Select the function “Weighing parameters” in the setup menu. In the “Weighing parameters” screen, the set values can immediately be checked (in the box with a white background). By touching the key of the parameter to edit, you can edit the value. Unit: this function allows you to edit the unit of measurement of the weight, which will be displayed in “g” or “mg”. Select the desired one by touching the corresponding key. Filter: the filter function allows you to speed up or slow down the response of the balance according to the weighing needs and environmental conditions. Selecting Step 1, the response will be immediate but the balance will remain more sensitive to environmental disturbances such as ventilation and vibrations. By increasing the step, the response will be slower and the indication more stable. 25 Step 1: dosage conditions Step 2: stable conditions Step 3: unstable conditions Stability: this function allows you to adapt the scale to the environmental working conditions. When the instrument is used in an environment with practically no vibrations, select Step 1. The default step is 2. Use Step 3 for very unstable environments. Step 1: For stable environments Step 2: For marginally stable environments Step 3: For unstable environments Auto-zero: the automatic correction of the zero constantly adjusts the zero value. Any variations are due, for example, to dirt that can be deposited on the plate. This function can be deactivated by selecting “Off” mode. Step 1 is the one with the lesser correction, up to step 3E, which is the maximum correction. 7.7 Calibration type The electronic balance carries out measurements of the mass by using gravity (g). Differences in geographic regions and in altitude vary the acceleration of gravity (g). Therefore, to obtain accurate measurements, the scale must be adapted to the environmental conditions. This adjustment is carried out through the calibration function. Select the “Calibration type” function in the setup menu. In the calibration type menu, in addition to setting the calibration type, it is possible to display and possibly print the data from the last calibration carried out. 26 Calibration data: on the data calibration screen, it is possible to check the date on which the last calibration was performed, the mode with which it was carried out, the value of the weight used, and the correction made with respect to the previous calibration. By touching the “Print” key it is possible to print the data displayed. Calibration type: the balance can be set to carry out the calibration with two different modes: External default By selecting the default calibration type when the calibration command is given, the required weight will be that set in the factory by default, the value of which will vary based on the model of the balance. External custom By selecting the external custom calibration type, it is possible to set a custom value of the calibration weight. After selecting the chosen type, touch the weight setting key to set the desired weight value. 27 7.8 Setup of the heater All of the parameters relative to the setting of the heater’s operation mode are addressed in this section. All of these parameters can be customized in different ways for each user profile. Therefore, every time that the user is changed, the parameters will automatically be set as a function of the settings made by the selected user. Standby temperature. Startup. Startup delay. Stability test. Acoustic signal. Temperature adjustment. To access the setup menu of the heater, touch the “Setup” key in the bar at the bottom of the display, then select the “Heater setup” key. Standby temperature: This function allows you to set a heater maintenance temperature value. By selecting “Off” mode, the heater will remain off during the period of inactivity. To activate the standby temperature, select “Temperature setup” and set the desired value. The value that can be selected is between a minimum of 35 °C and a maximum of 100 °C. The numeric keyboard will be displayed for the insertion of the value. Press the “OK” key to confirm the value or “X” to exit. 28 Startup: It is possible to set the heater to start automatically upon the closure of the hinged cover. Manual By selecting this mode, the drying cycle will be activated only after closing the heater and confirming the start with the “OK” button. Automatic By selecting this mode, the drying cycle will be activated automatically upon the closure of the heater. Startup delay: The start of the drying cycle can be delayed with a time interval between 0 and 35 seconds. By touching this key, the numeric keyboard to set the desired time will be activated. Stability test: This function allows you to activate (“ON”) or deactivate (“OFF”) the stability test of the weighing before the start of the drying cycle. Acoustic signal: This function allows you to activate (“ON”) or deactivate (“OFF”) the acoustic signal at the end of the drying cycle. 29 Temperature adjustment: In the “temperature adjustment” menu it is possible to carry out the check and the calibration of the values of the heater thermometer. Note: to carry out the test and the calibration of the thermometer, it is necessary to use the optional STCi-01 calibration kit. See the accessories section. Temperature test. This function allows you to insert a temperature value of which you want to carry out a check. Install the STCi-01 kit to carry out the test. Touch the “Temperature” key to set the temperature value. Then press “Start” to perform the test. Adjustment data. It is possible, by selecting this function, to display and print the thermometer’s calibration data. On the screen it is possible to check: - the number of points with which calibration 1 or 2 has been carried out - the date and time of the calibration - the value after the calibration of P1 and P2 - the value before the measured calibration Reset. The reset function, if confirmed through the “Yes” key, will cancel the calibration data of the thermometer. Attention: delete the calibration data only if you have a STCi-01 calibration kit to recalibrate the thermometer; if you don’t, the temperature value detected will be incorrect. 30 7.9 Peripheral device settings. The functionalities and the relative settings of the RS232 serial output with which the viewer is equipped are described in this section. Select the function “Peripheral devices” in the setup menu. RS232. Select the RS232 function. The values of the set parameters are immediately verifiable in the “RS232” menu screen (in the box with a white background). The menu is divided into two pages 1/2 and 2/2 (see lateral indicator). Touch the up and down arrows to scroll the pages. By touching the key of the parameter to be set, the relative screen will be activated with the list of the various options that can be selected. 31 Mode: this function allows you to select the device connected to the serial output. Manual Dpp250: manual command printing by touching the “Print” key for Dpp250 printing (see accessories section). Automatic Dpp250: automatic printing at the end of the measurement cycle for Dpp250 model printer. Manual Tlp50: manual command printing by touching the “Print” key for Tlp50 printing (see accessories section). Automatic Tlp50: automatic printing at the end of the measurement cycle for Tlp50 model printer. Manual print: manual command printing by touching the “Print” key for generic prints Automatic print: automatic printing at the end of the measurement cycle for generic printing. Continuous weight: selection for connection to PC with continuous transmission of the weight. Note: the printing of the graph is not guaranteed with the use of a generic printer Baud rate: parameter for the selection of the serial transmission speed. The speeds that can be selected are as follows: 1200 baud. 2400 baud. 4800 baud. 9600 baud. 19200 baud. 38400 baud. CTS: the control of the activation of the transmission can be enabled or disabled. On. Control activated. Off. Control deactivated. Stability: stability check before transmission of the datum. It is possible to decide whether to activate or deactivate the stability check before printing the weight’s value: On. Check activated. Off. Check deactivated. 32 Print heading: this function allows you to position a heading at the beginning of the receipt print-out. The function can be: On. Receipt heading activated. Off. Receipt heading deactivated. Printing heading: activation of the screen for the insertion of the desired text for the receipt heading. On the insertion screen, touch the rectangles with the white background relative to the various rows to automatically activate the alphanumeric keyboard and insert the desired text with a maximum number of 40 characters per row. Touch the “OK” key to confirm the inserted text. Note: It is possible to activate and deactivate the receipt heading function without losing the inserted text, which will remain saved until the deletion of the content of the various rows. Line feed: this function allows you to set a number of empty rows to be added at the end of the receipt printout to allow the receipt to exit from the printer. 1 - 5: the number of rows that can be inserted goes from a minimum of 1 to a maximum of 5. GLP: this function allows you to activate or deactivate the printing of the GLP data upon their insertion by the user On. GLP data printing activated. Off. GLP data printing deactivated. For the insertion of the information and the management of the GLP database, see Chapter 11. 33 8 Determination of the moisture. All of the parameters and the relative settings for the determination of the moisture content of a substance are illustrated in this section. Temperature profile. End of drying. Pre-heating. Nominal weight. Result. View. Last results. To access the settings menu, touch the “Start” key in the bar at the bottom of the display. Then choose the “Measure” function. The following screens with all of the items relative to the “Measure menu” will be displayed. The Last data setted are displayed in the boxes with white background Indicator of the number of pages Return to the available. previous Touch the arrows to scroll the pages screen forward and backward. 8.1 Temperature profile. 34 Exit from the menu The temperature profile parameter allows you to set the heating mode for the drying cycle. Select the mode and the heating temperature as a function of the substance to be analyzed. For all of the heating modes, the values of temperature that can be set range from a minimum of 35°C to a maximum of 160°C. Select the function “Temperature profile” in the “Measure” menu. One of the following heating modes can be selected: Standard Fast Ramp Steps Standard: the standard heating mode only requires the insertion of the desired drying temperature. This temperature will be reached automatically and maintained constant until the conclusion of the test. The numeric keyboard will be activated for the insertion of the desired temperature. Enter the temperature value and then press the “OK” key. The standard mode is identified on the display by the following icon during the drying cycle: Fast: the quick heating mode requires the insertion of the desired drying temperature. This temperature will be reached in the shortest time possible with an overshoot of the set temperature value. After reaching the set value, it will be maintained constant for the entire test time. The numeric keyboard will be activated for the insertion of the desired temperature. Enter the temperature value and then press the “OK” key. The quick mode is identified on the display by the following icon during the drying cycle. 35 Ramp: the ramp heating mode requires the insertion of the desired drying temperature and the time in which you want to reach it (the values currently entered are displayed in the boxes with a white background). The set temperature will then be reached in the predetermined time and kept constant until the conclusion of the test. For the insertion of the temperature and desired time, touch the “Temperature” and “Time” keys; the numeric keypad will be activated in both cases. Enter the value of the temperature and of the time, then press the “OK” key to confirm the values. Note: the time that can be set ranges from a minimum of 1 to a maximum of 15 minutes. This time must however be congruous with the set temperature. If the set time is too low to reach the selected temperature, an error screen will be displayed. The ramp mode will be identified on the display by the following icon during the drying cycle: Steps: the steps drying mode allows up to 3 different heating cycles to be set with different temperatures and times, carried out in sequence. The values currently inserted are displayed in the boxes with a white background. Touch the corresponding key to edit them. The numeric keypad will be activated for the insertion of the temperature and time. Enter the temperature and time values, then press the “OK” key to confirm them. The temperature set for the third cycle will be maintained until the end of the test. The time relative to the third cycle is therefore determined by the choice made for the end of drying. Note: the time range that can be set for the first and second cycle ranges from 1 to 99 minutes. 36 8.2 Drying end method. The drying end parameter is the setting that defines the method with which you want to determine the end of the measurement cycle of the moisture contained in the substance to be analyzed. Select the “Drying end” function in the “Measure” menu. It is possible to select one of the following cycle end modes: Manual Time % autostop Absolute autostop. Manual: by setting this drying end method, the cycle will be stopped only when the user decides so by touching the “Stop” key. Time: by setting this method of drying end, the cycle will terminate when the set period of time has elapsed. It will also be possible to stop the cycle manually at any time by touching “Stop”. The numeric keypad will be activated for the insertion of the desired time. Enter the desired number of minutes and then press the “OK” key. Note: the range of time that can be set goes from 1 to 99 minutes. % autostop: by setting this method of drying end, the cycle will terminate when the rate of loss of % moisture is less than the value set for the selected time interval. It will also be possible to manually terminate the cycle at any time by touching the “Stop” key. 37 Touch the “% loss” key for the insertion of the % moisture value; the numeric keypad will be activated. Enter the desired value and then press the “OK” key. Note: the range of % loss must be between a minimum of 0.1% and a maximum of 10.0%. For the insertion of the time value within which to check the variation of % moisture, touch the “Time” key; the numeric keypad will be activated. Enter the desired value and then press the “OK” key. Note: the temperature range must be between a minimum of 5 and a maximum of 99 seconds. If during the insertion of the % moisture and time values the entered values are not correct, an error message will be displayed. Absolute autostop: by setting this method of drying end, the cycle will terminate when the variation of the loss of weight of the substance is less than the set value for the selected time interval. It will also be possible to terminate the cycle manually at any moment by touching the “Stop” key. For the insertion of the weight value, touch the “mg variation” key; the numeric keypad will be activated. Enter the desired value and then press the “OK” key. Note: the range of variation of the weight must be between a minimum of 1 mg and a maximum of 60 mg. 38 For the insertion of the interval of time within which to check the variation of the % moisture, touch the “Time” key; the numeric keypad will be activated. Enter the desired value and then press the “OK” key. Note: the time range must be between a minimum of 5 and a maximum of 99 seconds. 8.3 Pre-heating. The pre-heating function allows you to pre-heat the oven, if this function is activated. Select the “pre-heating” function in the “Measure” menu. The pre-heating function can be set in the following modes: Off function deactivated On function activated With the pre-heating function enabled, before the start of the drying cycle, the pre-heating of the heater will be carried out until the set temperature is reached. Current temperature of the heater (the writing “-L-“ will remain active until 35°C is reached). Temperature set for the pre-heating. You will be asked to close the heater if it is open and the heating will begin and continue until the set temperature is reached. During the pre-heating phase, touching the “Skip” key will allow you to interrupt it and pass directly to the loading phase of the product to be analyzed. Touch the “Esc” key if you want to interrupt the pre-heating and cancel the test. 39 8.4 Nominal weight. The “Nominal weight” function, if activated, allows you to insert a control on the quantity of substance to be used for the moisture measurement, with a tolerance limit that can be set. Select the function “Nominal weight” from the “Measure” menu. The nominal weight function can be deactivated by touching the “Off” key or activated by entering the value of the minimum and maximum nominal weight. To carry out the insertion of the nominal weight, touch the “Nominal weight” key; the numeric keypad will then be activated. Enter the value and press the “OK” key. Carry out the same operation to insert the minimum and maximum weight. To then activate the function with the maximum and minimum values inserted, touch the “OK” key. The values entered will be displayed in the boxes with white background. After the insertion of the values of the nominal weight, minimum and maximum, the instrument automatically carries out a compatibility check of the data; any inaccuracies will be marked by an error message screen. Note: the minimum weight of the substance allowed for the measurement of the moisture must be greater than 0.500 g. If a lesser value is inserted during the insertion of the nominal weight, an error message will be displayed. 40 8.5 Result. The “Result” function allows you to select the parameter with which to display the result at the end of the drying cycle. Select the “Result” function in the “Measure” menu. It is possible to select one of the following result display parameters: Moisture (% M) Solid (% R) Atro (% A) Weight. The selected parameter will be displayed in the results screen at the upper part of the display both during the measurement cycle and at the end. It is possible, independently of the parameter set, to vary the parameter displayed both during and at the end of the measurement cycle. 8.6 View. The “View” function allows you to display, in one screen, all of the settings of the drying parameters set for the test. Select the “View” function in the “Measure” menu. Touch the “OK” key to exit from the screen and return to the measurement menu. 8.7 Last results. The “Last results” function allows you to review and possibly print the results of the last drying cycle performed. To be able to view the results, you must not have changed any drying parameter from the end of the cycle to the recall of the last results. Otherwise a screen will be displayed with the indication of the invalid results. 41 9 Start of a drying cycle After making the settings described in Section 9 to start the drying cycle, touch the “Start” key in the measurement menu. Step 1. Heater activation If the heating function has been activated, you will be asked to close the heater if it is open. It will then be necessary to await the preheating phase. During the preheating phase, the temperature indicator will begin to rise until the temperature reaches the set value. The danger symbol will also be displayed when the heater’s temperature exceeds 50°C. To skip the preheating phase, touch the “Skip” key: Or, to exit and interrupt the test, press the “Stop” key. Step 2 Loading of the substance to analyze The screen with the request to load the substance to be analyzed will then be displayed. Load the desired amount of the substance. If the nominal weighing function has been activated, load the set quantity of substance, respecting the required tolerances. 42 The indication bar of the quantity of substance to be loaded provides visual information during the loading of the substance. By loading the substance, the bar will advance, colored red, until reaching the set minimum value. Once the minimum value has been reached, the bar will change color and become green to indicate that the quantity loaded is within the set limits. It will then remain this color until the set maximum limit of substance is exceeded. Once the correct quantity of the substance has been loaded (greencolored bar), touch the “OK” key to confirm If the maximum value of the substance is exceeded, the bar will return and remain red, to indicate that the upper limit has been exceeded. By touching the “OK” key with the bar colored red, it will in any case be possible to proceed with the drying cycle, but the quantity loaded for the test will not correspond to the set tolerance limits. Note: if the automatic start has been activated, after loading the substance it will be sufficient to close the heater to make the cycle start (see Section 8.8). Step 3 Confirmation of the start of the drying cycle After pressing the “OK” key, if the heater is open, the error screen will be displayed for a few seconds. Close the heater and press the “OK” key again. 43 The start procedure of the drying cycle will then be activated, which will start after satisfying all of the conditions required for the start: (see Section 8.8) - Start delay - Stability test Step 4 Drying underway With the drying cycle activated, all of the information relative to the parameters set and the current values detected will be displayed on the screen. Current heater temperature Percent moisture lost indication bar Rate Heating mode Drying end mode Drying cancel command Drying graphic display Manual interruption of the cycle command Display drying parameter. Note: TO CHANGE THE DISPLAYED PARAMETER, TOUCH THE %M SYMBOL AND SELECT THE DESIRED ONE. 44 Step 5 Parameter display mode The drying information displayed during the test can be modified to suit your needs. The drying parameter, the method (numerical data or graphical representation), and their magnitude can be modified. Graphical/data display: by touching the “Graph” key it is possible to display the sequence of drying values or the graphical trend with instantaneous values. Selection of the displayed parameter: by touching the key with the symbol of the parameter’s unit of display, it is possible to activate the screen of the menu with the various parameters that can be displayed: Moisture (% M) Solid (% R) Atro (% A) Weight. Touch the key with the desired parameter and the display of the data or graph will be automatically updated with the new selection. 45 Character enlargement: by touching the symbol it will be possible to pass to the display of the area where the test values are indicated in large characters. By touching the symbol you will return to the display with small characters. Graph enlargement: when the graph is displayed, by touching the symbol it will be possible to enlarge the display. By touching the symbol you will return to the normal display. Graph functionality description. By selecting the display of the graph during the drying cycle it is possible to visually monitor the trend of the percent moisture measurement. The graph representation is of the dynamic type, and therefore the variation of the drying parameter selected as a function of time can be analyzed in real time. The minimum and maximum values currently reached by the selected parameter are indicated on the vertical axis, while the passage of time is indicated on the horizontal axis. Selectable parameters Moisture (% M) Solid (% R) Other (% A) Weight. 46 Step 6 End of the drying cycle, display and printing of results. 47 10 Function menu. To access the function menu, touch the “Menu” button at the top left of the screen. It will be possible to perform one of the following actions: Moisture determination. GLP. Database management. Moisture determination: Please refer to chapter 8. GLP parameter management: By touching the “GLP” key, you can access the menu for the management of the settings and the database relative to the GLP parameters. 48 It is possible to set the GLP parameters by touching the “GLP settings” key, or inserting them in a database from which it will then be possible to recall and use the desired one, by touching the “GLP database” key. GLP setting: by touching the “GLP setting” key, the screen for the insertion of the data will be displayed. Touch the white rectangle to insert the desired data. Balance ID. Project ID. User ID. After inserting the data, press the “OK” key to confirm them. Note: the maximum number of characters allowed per parameter is 20. GLP database: by touching the key “GLP database”, you enter the page relative to the management of the database. All of the operations necessary to manage the GLP database are listed and described below. 49 Selection by name: by using this command it is possible to enter the desired name to recall the corresponding database. After entering the name, press the “Enter” key to confirm. If the name inserted is incorrect or does not exist, the following notification will be provided: Selection from list: by using this command it will be possible to select the desired name to recall the corresponding database. After selecting the name by touching it, press the “OK” key to confirm. New: it is possible to create and customize up to 300 records with different GLP parameters. By touching the new key, the keyboard for the insertion of the name that you want to assign to the new record will be activated. After inserting the name, touch the “Enter” key to confirm. 50 The data insertion screen will be displayed. Touch the white rectangle to insert the desired data. Balance ID. Project ID. User ID. After inserting the data, press the “OK” key to confirm them. Note: the maximum number of characters allowed per parameter is 20. Edit: the edit key allows you to edit a GLP file after selecting one that is already saved in the database by name or from the list. After selecting the record, the same insertion screen will be activated but with the fields already filled in. Touch the field to be modified and after inserting the desired text, touch the “OK” key to save the new data. Delete: this function allows you to delete a record saved in the database. It is possible to choose the record to be deleted by inserting the name of the file or selecting it from the list. In this case it will also be possible to simultaneously select multiple records by touching above each file to be deleted (the selected records will be highlighted); it is also possible, by using the commands “Select all” and “Deselect all”, to select or deselect all of the records simultaneously. After selecting the desired records, touch the “Delete” key to permanently delete the records. 51 Print: this function allows you to print the content of one or more records saved in the database. It is possible to choose the record to print by entering the name of the record or by selecting it from the list. In this case it will also be possible to simultaneously select multiple records by touching each record to be printed (the selected records will be highlighted); it is also possible, by using the commands “Select all” and “Deselect all”, to select or deselect all of the records simultaneously. After selecting the desired records, touch the “Print” key to print them. The following data relative to each record selected will be present in the printout: Record name. Balance ID. Project ID. User ID. 52 11 Serial communication device connection connector pin assignment 6 1 7 2 8 3 9 4 5 SERIAL OUTPUT CONNECTOR CONNECTIONS pin 2 = Tx signal pin 3 = Rx signal pin 4 = busy signal pin 5 = ground pin 4-6 = connected between them for transmission to PC 53 12 Care and maintenance Regular maintenance of your scale guarantees the safety of measurement of your instrument. Cleaning Before cleaning the scale, disconnect the power supply from the network outlet. Do not use aggressive products (solvents or similar agents), but a damp cloth with a delicate detergent. Avoid allowing liquids to enter the instrument during washing; dry with a soft cloth after cleaning. Sample and dust residue can be removed with the use of a brush or vacuum cleaner. Safety controls The instrument’s safety is no longer guaranteed when: - the power supply is visibly damaged - the power supply no longer functions - the power supply has been stored for a long time under unfavorable conditions. In these cases, please contact the service center, where specialized technicians will carry out any repairs to restore the instrument to safe conditions. 13 Optional accessories The following accessories are available for the iThermo Touch series scales. ACCESSORIES Code DESCRIPTION T214 RS232/USB CONVERTER T216 SERIAL CABLE T221 TLP-50 PRINTER AC007 DPP 250 PRINTER T015 TEST PAN, 80 PIECE PACKAGE T225 TEMPERATURE CALIBRATION KIT 54 14 Scale technical specifications The models listed below are all intended for internal use. Maximum height of use: 4000 m Degree of pollution: 2 Overvoltage category: II Selec. filters +5 +35 °C 4 ppm/°C i-Thermo L Touch 160 0.001 160 0.001 + 0.002 4 sec. Selec. filters +5 +35 °C Selected from menu Selected 5 from ppm/°C menu 15 Heater technical specifications Access to the sample chamber: hinged cover with ample angle of opening Temperature operation interval: 35 – 160 °C settable with steps of 1°C Heating: halogen lamp Power supply voltage: 230 V 50 Hz or 110 V 60 Hz (optional) Power consumption: 400 VA Fuses: 250 V 5 A dimensions 5 X 20 mm 55 100 210x340x 5.2 225 115-230 V AC 15% g 100 (E2) RS232C 100 210x340x 4.2 225 115-230 V AC 15% g 100 (E2) RS232C Communication interface 4 sec. Calibration weight Span drift +10 +30°C + 0.001 Supply voltage Freq. 50-60 Hz Response time (average) Adaptation to environmental conditions Operating temperature 0.0005 Net weight (kg) Linearity (g) 160 Scale dimensions (LxWxH) (mm) Reproducibility (g) (standard deviation) 0.001 Plate dimensions (mm) Tare range (g) 160 OUTPUT: 5 V DC 4 A 25 W Auto-zero Resolution (g) i-Thermo M Touch i-Thermo thermobalance model Weighing capacity (g) Power supply provided: Mod. ES24B05-PJ17 INPUT: 230 V-115 V AC ~ 50Hz 16 Warranty The duration of the warranty is 24 months from the date of purchase, as evidenced by the receipt for the product or from the packing slip. The warranty covers all parts that may be defective in origin. It does not cover mechanical and electronic parts damaged following improper installation, tampering or misuse. The warranty does not cover damage caused by shocks, the fall of the balance or the fall of objects on the weighing plate. Transport to and from the service center is the customer’s responsibility. 17 Disposal If the packaging is no longer used, it can be handed over to the local waste disposal center. The packaging is made entirely from environmentally friendly materials, which can be recycled as valuable secondary raw materials. The discharged batteries must not be disposed of in normal household waste. Throw them in the appropriate collection containers. In the case of scrapping of the equipment, please contact your local authorities. Before scrapping the equipment, remove the batteries. . 56 18 Declaration of conformity Declaration of conformity PRECISION ELECTRONIC SCALES: iThermo M/L Touch Series We declare, under our sole responsibility, that the product to which this declaration refers is in conformity with the regulations cited below EMC standard: SAFETY standard: EN 61326-1 (2006) EN 61010-1 (2001) EN 61000-3-2 (2006) Harmonized by Directive 2006/95/EC EN 61000-3-3 (1995) + A1 (2001) + A2 (2005) Harmonized by Directive 2004/108/EC 57