1
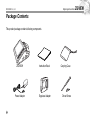
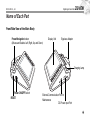
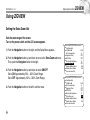
ZIGVIEW
Digital Angle View Finder
SECULINE Co., Ltd.
Digital Angle View Finder
ZIGVIEW
Thank You For Purchasing ZIGVIEW.
The ZIGVIEW is a Digital angle view finder that has a CMOS image sensor and a color TFT LCD attached. It allows
users to take a variety of pictures easily by providing real-time images of view finder information SLR(Single Lens
Reflex) camera.
Before using ZIGVIEW, please read carefully the instructions so as to be fully aware of features of the product.
Copyrights
Except for those privately owned, images of people and certain objects cannot be used. They cannot be displayed in
public places.
Testing ZIGVIEW
You can test this product before installing it on a camera. You can check whether images are properly displayed on
the LCD screen, and whether the product can be operated as instructed in the menus.
■
■
■
2
ZIGVIEW is a trademark belongs to Seculine.
Adobe is a trademark belongs to Adobe Systems.
Windows is a brand or a trademark registered by Microsoft U.S. in the United States and othe countries.
SECULINE Co., Ltd.
Digital Angle View Finder
ZIGVIEW
Safety Precautions
■
■
■
■
■
■
■
■
■
■
■
■
■
■
■
Do not use any accessories such as power adapters other than those recommended in this user’s manual.
Connect the power cord thoroughly, and do not touch the power cord with wet hands. When pulling out the cord, do
not hold the cord, but hold and pull out the plug part.
Do not damage, bend or twist the cord. It may cause electric shock or a fire.
Do not let dirt in the connected parts or cable connections.
Charge the battery at the temperature of 0 to 40 °C.
When excessive heat, smoke or smell is generated while charging a battery , remove the battery from the power outlet immediately.
Place the battery-charging devices out of the reach of children. The cord may stifle or electrically shock a child.
Do not place the cord near a heat-generating object. It may deform the cord or cause a fire or electric shock by melting the insulated parts.
If the product is dropped to the ground and the case is damaged, do not touch the built-in parts. It may cause electric
shock. Call the nearest Customer Service Center.
Do not disassemble or rebuild the product. It may cause permanent damage on the product and malfunctioning that
can harm people.
Place the product out of the reach of children. Damaged product may result in injury.
Before using the product on an airplane in a hospital, you must check whether such usage is allowed. Electronic
waves produced from the product may cause malfunctioning of devices.
Do not keep the equipment in a place where dirt and moist accumulate easily. It can cause a fire or electric shock, or
damage the product.
Do not hold the product alone when the product is installed in the camera. Due to the weight of the camera, it may
damage the connected part between the product and the camera or the product.
Do not clean the device with paint thinner, benzene or other volatile solution. It may cause a fire or harm the human
body.
3
SECULINE Co., Ltd.
Digital Angle View Finder
ZIGVIEW
Handling Precautions
■
■
■
■
■
■
4
This product is a high-precision device. Do not drop the product or apply physical shock to the product.
This product is not water-proof and cannot be used under water. Please be careful not to expose the product
to water directly and indirectly.
If placed on the front seat of a car or exposed to sunlight in other ways, high temperature may damage the product.
Do not disassemble or repair the product yourself. It may cause malfunctioning, and will void your warranty regardless whether the warranty period remains.
Do not place the product near highly-corrosive chemicals for a prolonged time.
The pixel of LCD may differ from the specifications, but the difference is not over 0.01 percent of the valid pixel.
This does not mean malfunctioning of the product.
SECULINE Co., Ltd.
Digital Angle View Finder
ZIGVIEW
Table of Contents
Thank You For Purchasing ZIGVIEW...................2
Safety Precautions.................................................3
Handling Precautions ............................................4
Package Contents .................................................6
Name of Each Part ................................................7
Front/Side View of the Main Body ...............................7
Before Using This Product ....................................8
Attaching Eyepeice Adapter.........................................8
Charging the Battery ....................................................9
Basic Operations .................................................10
Power On and Off / Reset..........................................10
Using the Menu ..........................................................11
Screen Adjustment ..............................................12
Size Adjust..................................................................12
AE Mode.....................................................................13
AE Compensation ......................................................14
Using ZIGVIEW ...................................................15
Screen Effect..............................................................15
Setting the Extra Zoom Out .......................................16
Zooming In..................................................................17
Zooming Out...............................................................17
AE Speed ...................................................................17
Still Image (Hold) .......................................................18
Panning ......................................................................18
Display Zoom and Battery Status ..............................19
Save and Load ...........................................................20
Adjusting Backlight Brightness ............................21
Adjusting the LCD Backlight Brightness....................21
Troubleshooting ...................................................22
Product Specifications .........................................23
Safety Information................................................24
5
SECULINE Co., Ltd.
Digital Angle View Finder
Package Contents
This product package contains following components.
6
ZIGVIEW
Instruction Book
Power Adapter
Eyepiece Adapter
Carrying Case
Driver/Screw
ZIGVIEW
SECULINE Co., Ltd.
Digital Angle View Finder
ZIGVIEW
Name of Each Part
Front/Side View of the Main Body
Power/Navigation button
(Moves and Selects Left, Right, Up and Down)
Display Unit
Eyepiece Adapter
Charging Lamp
Power ON/OFF Switch
RESET
External Communication Port for
Maintenance
DC Power Input Port
7
SECULINE Co., Ltd.
Digital Angle View Finder
ZIGVIEW
Before Using This Product
Attaching Eyepeice Adapter
Install an eyepeice adapter that fits the camera before using this product.
Attach the eyepeice adapter to the main body of ZIGVIEW by using the supplied driver and four screws.
If the screws are not tightly fixed, the main body and the camera may be loosely connected, resulting in
damage on the product. Secure the four screws tightly.
Not fully securing the screw may cause damage to the product due to the loose connection between the main body and
the Camera.
In addition, fastening screws too tightly may damage
threads of screws.
Apply appropriate force to fasten 4 screws evenly, just
enough to secure the adapter.
■
■
8
Extra screws are provided. If you lose the extra screws, please contact your local distributor or salesrep resentative.
You can purchase an extra eyepiece adapter at a local camera store.
SECULINE Co., Ltd.
Digital Angle View Finder
ZIGVIEW
Charging the Battery
Charge the built-in battery fully with the provided battery charger
after opening the package.
It takes about 2 hours to charge the battery fully, which may vary
depending on charging conditions.
Connect the charger and the main body thoroughly when charging battery. Otherwise, it may take longer to charge battery, or
battery may not be fully charged. Turn off the power switch on
the side when charging battery. If the swtich is on, it may take
longer to charge the battery.
■
Repetitive charging / discharging may degrade the internal rechargeable battery performance over time.
9
SECULINE Co., Ltd.
Digital Angle View Finder
ZIGVIEW
Basic Operations
Power On and Off / Reset
■ Power On
1. Push the power switch to ON.
2. Power and the LCD screen are turned on when you push the Navigation button.
When you turn on the switch first time after purchasing the product, displays are set at
factory values. You can change the values in the Set Mode. If you turn off the switch and
turn it on again while using the product, the previously set values are restored.
<Power On>
<Entering the Standby Mode>
■ Standby Mode
1. It is convenient to put the device in standby mode when it is not used temporarily.
In standby mode, it consumes only a little standby current.
2. Pressing and holding the Navigation button in the middle of use will turn off the LCD and
enters standby mode.
3. Pressing the Navigation button in the standby mode will turn on the LCD and enters normal mode.
<Exiting the Standby Mode> <Power Off>
■ Power Off
1. Slide the POWER switch towards OFF. It completely turns standby power off.
2. When not using for a long period of time, turn the POWER switch OFF.
■ RESET
Initialize all the functions by pressing the RESET if the product is
malfunctioning or the screen does not change.
Press the RESET hole with a sharp instrument such as a ballpoint pen as
shown in the picture.
■
10
<Reset>
The power switch and the RESET button are designed to resist physical force, but excessive force may cause damage on these parts.
SECULINE Co., Ltd.
Digital Angle View Finder
ZIGVIEW
Using the Menu
You can set a variety of values such as Screen Size and AE Adjust in the menu mode.
Turn on the power switch to display the LCD screen.
1. Push and hold the Navigation button towards right hand side, then menu Setup
screen appears and enters the menu Setup mode .
2. Push the Navigation button towards right hand side shortly, then the submemu of
the mode that has ( ) icon appears.
For any mode that does not display the icon( ), its setting can be changed
without moving to submenu.
3. In the Setup mode, pushing the Navigation button up and down will move the cursor if the cursor is on a selectable option of a menu.
The value is set if the cursor appears in the set value.
4. In the menu Setup mode, pushing the Navigation button left will switch to the
previous mode.
Push the Navigation button left repeatedly until you exit the menu screen if you
want to exit the menu screen.
The desired value is set when you exit the menu.
11
SECULINE Co., Ltd.
Digital Angle View Finder
ZIGVIEW
Screen Adjustment
Size Adjust
When ZIGVIEW is installed, screen sizes may vary in right, left, up, and down depending on cameras.
Adjust the screen size to fit your camera.
You can adjust the screen in left-up-right-down directions respectively.
Turn on the power switch and the LCD screen appears.
2
1. Push and hold the Navigation button to the right, and the Setup Menu appears.
2. Push the Navigation button up and down to go to the Size Adjust menu. And push
the right side and the arrow ( ) appears on the up and down of the left side.
3. Push the Navigation button to the left and right to adjust the size of the left screen.
4. Push the Navigation button up, and the arrow ( ) appears on the left and right at
the top.
5. Push the Navigation button up and down to adjust the size of the top screen.
6. Push the Navigation button to the right, and the arrow ( ) appears at the top and 2
bottom of right side.
7. Push the Navigation button to the left and right to adjust the size of the right screen.
8. Push the Navigation button down, and the arrow ( ) appears on left and right at the
6
bottom.
9. Push the Navigation button up and down to adjust the size of the bottom screen.
10. When the size adjust is completed, press center of the Navigation button shortly.
12
========SETUP (v0.95)========
■ Size Adjust ➧
■ AE Mode ➧
AVG
■ AE Compensation
+5
■ Negative Effect
OFF
■ B/W Effect
OFF
■ Back-Light Brightness
10
■ Extra Zoom out
OFF
■ Display Battery Status
ON
■ Display Zoom Status
ON
■ Save and Load ➧
4
8
SECULINE Co., Ltd.
Digital Angle View Finder
ZIGVIEW
AE Mode
Setting the appropriate exposure mode for specific subject and conditions improves the image quality displayed for the exposure amount is automatically adjusted.
Turn on the power switch and the LCD screen appears.
2
1. Push and hold the Navigation button to the right, and the Setup Menu appears.
2. Push the Navigation button up and down to move to the AE Mode Menu.
Then, press the Navigation button to the right.
Five AE modes appear.
- AVG: AE values are set after measuring the average of all the shooting subjects.
- CWE: AE values are set after measuring the center of the subject.
3
- C1: AE values for 50% of the center area
- C2: AE values for 25% of the center area
- C3: AE values for 12% of the center area
3. Push the Navigation button up and down to set the desired exposure.
4. Push the Navigation button to the left to exit the menu.
========SETUP (v0.95)========
■ Size Adjust ➧
■ AE Mode ➧
AVG
■ AE Compensation
+5
■ Negative Effect
OFF
■ B/W Effect
OFF
■ Back-Light Brightness
10
■ Extra Zoom out
OFF
■ Display Battery Status
ON
■ Display Zoom Status
ON
■ Save and Load ➧
AE MODE
AE Mode ----
AVG
AVG : Average entire image
CWE : CENTER Weighted
C1 : 50% Area around Center
C2 : 25% Area around Center
C3 : 12% Area around Center
13
SECULINE Co., Ltd.
Digital Angle View Finder
ZIGVIEW
Screen Adjustment
AE Compensation
You can adjust measured exposure when the AE value of shooting subject is consistent or depending on
shooting circumstances so as to adjust brightness of the screen. Turn on the power switch and the LCD
screen appears.
2 ========SETUP (v0.95)========
Size Adjust ➧
AE Mode ➧
AE Compensation
■ Negative Effect
■ B/W Effect
■ Back-Light Brightness
■ Extra Zoom out
■ Display Battery Status
■ Display Zoom Status
■ Save and Load ➧
■
■
1. Push and hold the Navigation button to the right, and the Setup Menu appears.
■
2. Push the Navigation button up and down to move to the AE Compensation menu.
Then, push the Navigation button to the right.
3. Push the Navigation button up and down to set the appropriate AE value that
matches the image displayed on the screen.
If the subject is too bright or too dark, the displayed image may look strange.
4. Push the Navigation button to the left to exit the menu.
14
3
AVG
+5
OFF
OFF
10
OFF
ON
ON
========SETUP (v0.95)========
■ Size Adjust ➧
■ AE Mode ➧
AVG
■ AE Compensation
+5
■ Negative Effect
OFF
■ B/W Effect
OFF
■ Back-Light Brightness
10
■ Extra Zoom out
OFF
■ Display Battery Status
ON
■ Display Zoom Status
ON
■ Save and Load ➧
SECULINE Co., Ltd.
Digital Angle View Finder
ZIGVIEW
Using ZIGVIEW
Screen Effect
You can select the Effect from the menu to give various effects to subjects on the display. Turn on the power
switch and the LCD screen appears.
1. Push and hold the Navigation button to the right, and the Setup Menu appears.
2
========SETUP (v0.95)========
■ Size Adjust ➧
■ AE Mode ➧
AVG
■ AE Compensation
+5
■ Negative Effect
OFF
■ B/W Effect
OFF
■ Back-Light Brightness
10
■ Extra Zoom out
OFF
■ Display Battery Status
ON
■ Display Zoom Status
ON
■ Save and Load ➧
3
========SETUP (v0.95)========
■ Size Adjust ➧
■ AE Mode ➧
AVG
■ AE Compensation
+5
■ Negative Effect
ON
■ B/W Effect
OFF
■ Back-Light Brightness
10
■ Extra Zoom out
OFF
■ Display Battery Status
ON
■ Display Zoom Status
ON
■ Save and Load ➧
2. Push the Navigation button up and down to move to the Negative Effect or the
B/W Effect menu. Then, push the Navigation button to the right.
Negative Effect: Color is reversed to the same form as negative film.
B/W Effect: Color screen is displayed in black and white.
3. Push the Navigation button up and down to select ON/OFF.
15
SECULINE Co., Ltd.
Digital Angle View Finder
ZIGVIEW
Using ZIGVIEW
Setting the Extra Zoom Out
Sets the zoom range of the screen.
Turn on the power switch and the LCD screen appears.
2
========SETUP (v0.95)========
■ Size Adjust ➧
■ AE Mode ➧
AVG
■ AE Compensation
+5
■ Negative Effect
OFF
■ B/W Effect
OFF
■ Back-Light Brightness
10
■ Extra Zoom out
OFF
■ Display Battery Status
ON
■ Display Zoom Status
ON
■ Save and Load ➧
3
========SETUP (v0.95)========
■ Size Adjust ➧
■ AE Mode ➧
AVG
■ AE Compensation
+5
■ Negative Effect
OFF
■ B/W Effect
OFF
■ Back-Light Brightness
10
■ Extra Zoom out
ON
■ Display Battery Status
ON
■ Display Zoom Status
ON
■ Save and Load ➧
1. Push the Navigation button to the right, and the Setup Menu appears.
2. Push the Navigation button up and down to move to the Extra Zoom out menu.
Then, push the Navigation button to the right.
3. Push the Navigation button up and down to select ON/OFF.
Set to ON: Approximately 50% ~ 200% Zoom Range
Set to OFF: Approximately 100% ~ 200% Zoom Range
4. Push the Navigation button to the left to exit the menu.
16
SECULINE Co., Ltd.
Digital Angle View Finder
ZIGVIEW
Zooming In
To zoom in, push the Navigation button downwards.
The Zoom factor displayed increases and the image enlarges from the center.
The current zoom factor is found at the left bottom of the screen.
While zooming, pushing and holding the Navigation button towards right hand side will set the
image displayed to the normal size.
Zooming Out
205%
<Zooming In>
To zoom out, push the Navigation button upwards.
The Zoom factor displayed decreases. Zooming out will stop when it reaches the size that is
set in the Screen Size Adjust.
If the Extra Zoom Out is set to ON, then pushing the Navigation button upwards again at this
time will zoom out the screen.
AE Speed
Adjusting the metering speed or turning the exposure metering off may allow users to
have clearer image under various shooting conditions.
1. Push the Navigation button towards left in a normal or a zoomed in screen.
The current AE Speed value is displayed.
2. Pushing the Navigation button towards left while the AE Speed value is displayed will
change the AE Speed value.
205%
AE Speed
1
<AE Speed>
17
SECULINE Co., Ltd.
Digital Angle View Finder
ZIGVIEW
Using ZIGVIEW
Still Image (Hold)
HOLD
1. Push the Navigation button shortly towards right in normal or zoomed in/out
screen.
The screen is stopped and Hold is displayed at the top of the screen.
2. Pushing the Navigation button shortly towards right again will exit the Hold
mode.
<Still Image>
Panning
1. Press the center of the Navigation button while the screen is zoomed in.
A cross-shaped icon will appear at the bottom center of the screen and the
device enters the panning mode.
2. Move the screen using 4 directional keys of the Navigation button.
3. Pressing the center of Navigation button will exit the panning mode.
18
205%
<panning>
SECULINE Co., Ltd.
Digital Angle View Finder
ZIGVIEW
Display Zoom and Battery Status
■
Display Zoom Status
The zoom rate is displayed at the left bottom of the screen.
Turn on the power switch and the LCD screen appears.
1. Push and hold the Navigation button to the right, and the Setup Menu appears.
2. Push the Navigation button up and down to move to the Display Zoom Status
menu.
Then, press the button to the right.
3. Push the Navigation button up and down to select ON.
When using the zoom function on the screen, the rate is displayed on the left bottom.
■
Display Battery Status
The battery status is displayed at the right top of the screen.
Turn off the power switch and the LCD screen appears.
1. Push and hold the Navigation button to the right, and the Setup Menu appears.
2. Push the Navigation button up and down to move to the Display Battery Status
menu.
Then, press the button to the right.
3. Push the Navigation button up and down to select ON.
The current battery status is displayed at the right top of the screen.
========SETUP (v0.95)========
■ Size Adjust ➧
■ AE Mode ➧
AVG
■ AE Compensation
+5
■ Negative Effect
OFF
■ B/W Effect
OFF
■ Back-Light Brightness
10
■ Extra Zoom out
OFF
■ Display Battery Status
ON
■ Display Zoom Status
ON
■ Save and Load ➧
========SETUP (v0.95)========
■ Size Adjust ➧
■ AE Mode ➧
AVG
■ AE Compensation
+5
■ Negative Effect
OFF
■ B/W Effect
OFF
■ Back-Light Brightness
10
■ Extra Zoom out
OFF
■ Display Battery Status
ON
■ Display Zoom Status
ON
■ Save and Load ➧
19
SECULINE Co., Ltd.
Using ZIGVIEW
Save and Load
■
■
■
Save and Load
You may save and load the screen setup values up to 5 modes depending on the
conditions.
Turn on the power switch and the LCD screen appears.
Save Setup
1. Push and hold the Navigation button to the right, and the Setup Menu appears.
2. Push the Navigation button up and down to move to the Save and Load. Then,
press the button to the right.
3. Push the Navigation button up and down to select the Save Setup, and press the
Navigation button to the right.
4. Push the Navigation button up and down to select between 1 and 5. Then, press
the center of the Navigation button to save the present value.
Load Setup
1. Push and hold the Navigation button to the right, and the Setup Menu appears.
2. Push the Navigation button up and down to move to the Save and Load. Then,
press the button to the right.
3. Push the Navigation button up and down to select the Load Setup, then push the
button to the right.
4. Push the Navigation button up and down to select between 1 and 5. Then, press
the center of the Navigation button after selecting the desired value to reset the
value.
■
■
20
You may set 1 to digital camera, 2 to film camera, and 3 to film viewer, etc.
Number 6 of the load setup is the factory default setting.
Digital Angle View Finder
ZIGVIEW
========SETUP (v0.95)========
■ Size Adjust ➧
■ AE Mode ➧
AVG
■ AE Compensation
+5
■ Negative Effect
OFF
■ B/W Effect
OFF
■ Back-Light Brightness
10
■ Extra Zoom out
OFF
■ Display Battery Status
ON
■ Display Zoom Status
ON
■ Save and Load ➧
SAVE and LOAD
Save Setup
(1~5)
Load Setup
(1~5)[6: Default Load]
001
001
Center : Confirm
SAVE and LOAD
Save Setup
(1~5)
Load Setup
(1~5)[6: Default Load]
Center : Confirm
001
001
SECULINE Co., Ltd.
Digital Angle View Finder
ZIGVIEW
Adjusting Backlight Brightness
Adjusting the LCD Backlight Brightness
1
========SETUP (v0.95)========
■ Size Adjust ➧
■ AE Mode ➧
AVG
■ AE Compensation
+5
■ Negative Effect
OFF
■ B/W Effect
OFF
■ Back-Light Brightness
10
■ Extra Zoom out
OFF
■ Display Battery Status
ON
■ Display Zoom Status
ON
■ Save and Load ➧
2
========SETUP (v0.95)========
■ Size Adjust ➧
■ AE Mode ➧
AVG
■ AE Compensation
+5
■ Negative Effect
OFF
■ B/W Effect
OFF
■ Back-Light Brightness
10
■ Extra Zoom out
OFF
■ Display Battery Status
ON
■ Display Zoom Status
ON
■ Save and Load ➧
1. Push and hold the Navigation button to the right, and the Setup Menu appears.
2. Push the Navigation button up and down to move to the Back-light Brightness
menu.
Then, press the button to the right.
3. Push the Navigation button to select the desired value.
4. Available range is from 1 to 10, 1 is the darkest where 10 is the brightest.
21
SECULINE Co., Ltd.
Digital Angle View Finder
ZIGVIEW
Troubleshooting
1. Images on the camera view finder is shown partially or too small.
■ When you first use the product or if the values are set at factory or a connected camera is changed, you have to adjust
the screen size to the camera to be used. Please refer to the manual and adjust the size of images.
2. The product is not working even after the power switch is turned on.
■ The product does not work if the battery is not charged. Neither does it work when the battery is exhausted. When the
product does not work after charging the battery for certain hours, please call the nearest service center.
3. Battery is not charged even though the adapter is connect.
■ Please check whether the light of the charging lamp is on. Check the connection of the charger and if the battery is not
charged after certain hours, please call the nearest service center.
■ Warranty period of the supplied battery is six months. The performance of the battery can be degraded when it is neglected or is not used for a prolonged time.
4. Still images appear briefly when power is on.
■ When power is off, the last image of the previous screen is saved. So, the saved image may be seen briefly when the
power switch is turned on. This does not mean malfunctioning of the product. You can continue using the product.
5. Images do not change and remain still.
■ Initialize the product by pressing the Reset button. Turn off the power switch and turn it on again if the product still does
not work properly. If still images are displayed long after external shock is applied, it may indicate malfunctioning.
Please call the service center.
6. The Navigation button cannot be pushed or is malfunctioning.
■ The navigation key installed in the product is a high precision device. If you apply excessive force, it may cause malfunctioning. Please push the left, right, up, down and center of the navigation button precisely.
7. Adapter is not attached to the main body.
■ Please check the provided adapter meets the local specifications. Please check whether the main body of the adapter
is damaged. If the adapter is damaged or broken down, you can purchase an adapter separately.
22
SECULINE Co., Ltd.
Digital Angle View Finder
ZIGVIEW
Product Specifications
Image Sensor
Display
External Power
Built-in Battery
Time to charge
Operating Duration
AC Power Adapter
1.3M pixel CMOS sensor
1.9 inch color TFT LCD (176 x 220 x RGB)
DC 5V (AC power adapter)
Rechargeable Lithium Polymer Battery (1000mAh)
2 hours from empty to full
6 hours when it is fully charged (varies upon conditions and operations)
Input voltage 100V ~ 240 V, Output voltage DC 5V
23
SECULINE Co., Ltd.
Digital Angle View Finder
ZIGVIEW
Safety Information
FCC Part 15: This equipment has been tested and found to comply with the limits for a Class B digital device, pursuant to Part 15 of the FCC Rules.
These limits are designed to provide reasonable protection against harmful interference in a residential installation.
This equipment generates, uses, and can radiate radio frequency energy and, if not installed and used in accordance with the instructions, may cause
harmful interference to radio communications. However, this notice is not a guarantee that interference will not occur in a particular installation. If this equipment does cause harmful interference to radio or television reception, which can be determined by turning the equipment off and on, the user is encouraged
to try one or more of the following measures:
■ Reorient or relocate the receiving antenna.
■ Increase the distance between the equipment and receiver.
■ Connect the equipment to an outlet on a circuit different from that to which the receiver is connected.
■ Consult the dealer or an experienced radio/TV technician.
Modifications
Any changes or modifications not expressly approved by the grantee of this device could void the user’s authority to operate the device.
Declaration of Conformity
Name: Seculine Co.,Ltd.
Address: Suite 202,2nd Fl.,Mirae Bldg.854-5,Bangbae-Dong, Seocho-Gu, Seoul, South Korea 137-060
Trade Name: Seculine Co.,Ltd.
Model Number: SC-V100
This device has been tested according to the FCC/CISPR22/95 requirements for Class B devices and found compliant with the following standards:
EMI/EMC: ANSI C63.4 -2000, FCC Part 15 Subpart B
This device complies with part 15 of the FCC Rules.
Operation is subject to the following two conditions:
1. This device may not cause harmful interference, and
2. This device must accept any interference received, including interference that may cause undesirable operation.
Party Responsible for Product Compliance
24