1
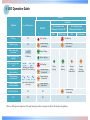
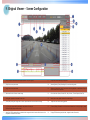
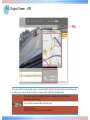
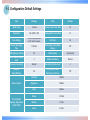
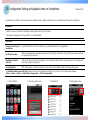
Ver. 02
Livue LB-100 User Manual
It-on Co., Ltd.
http://www.livue.co.kr
Contents
# Precautions
- Precautions for safety when using the product
3p
- Precautions when using a SD card
4p
- Precautions when using a Battery
5p
1. Package
6p
2. Product Features
7p
3. Function
8p
4. How to Install
9p
5. How to Record
10p
6. LED Operation Guide
11p
7. Voice Guide
12p
8. How to Install Original Viewer Program
13p
9. Original Viewer - Screen Configuration
14p
9-1. Original Viewer - Playback
15p
9-2. Original Viewer – GPS
16p
9-3. Original Viewer – Configuration
17p
9-4. Configuration Default Settings
19p
10. Play and set the configuration by smartphone
20p
11. Firmware Update
21p
12. SD card Format
21p
13. Specification
22p
14. Recordable Time
22p
# Warranty
Precautions for safety when using the product
1. Please do not operate the product during driving. It may cause accidents.
2. Please install the product in a place not to interfere with a driver's view.
3. Do not disassemble or convert the product intentionally. It may lead to product failure and the responsibility for the damage to the product resulting from this
shall be borne by the user.
4. When damage to the product itself occurs due to a major accident or the power is disconnected, images of the accident may not be recorded.
5. Please keep the windshield clean at portion of recording before recording.
6. Since this product is a device that records a driving video by using the camera, the image quality may drop when entering the tunnel, in shading contrast,
backlight and photometric conditions, and the middle of the night.
7. In case those foreign objects attach to camera lens, recorded video may not be in good condition. Please keep the lens clean.
8. Do not leave a product in a place exposed to the direct sunlight in a car or in a confined car. It may cause a malfunction.
9. Do not wipe the product using chemicals, detergents, etc., but wipe it lightly using a soft cloth.
10. The thermal environment at below -5℃ or over 55℃ may cause a malfunction or failure of the product. (When not using the product, please be careful about
storage temperature)
11. Do not use the product in a place at high temperature or much moisture.
12. Do not press excessive force to the products (especially buttons and bracket). It may cause a malfunction of the products.
13. Before using the product, make sure to operate it for 3 to 5 minutes and verify that the image saved properly and then use it.
14. If the product is in prolonged exposure to sunlight or high temperatures during the summer, normal operation can be difficult.
15. When firmware upgrade is in progress, if SD card is removed or a power is disconnected, failure of the product may occur, so should be careful.
16. When removing or disconnecting the cigarette lighter cable, it may result in electric shock, so do not touch it with wet hands.
17. Do not use the damaged cigarette lighter cable. It may cause fire and electrical shock.
18. Do not leave the cigarette lighter cable or the product near heating equipment.
19. When not using the product for the long-term, please separate off the cigarette lighter cable from the product.
20. Please plug the cigarette lighter cable correctly and should not be shaken.
21. Do not bend or pull the cigarette lighter cable forcefully or avoid placing heavy objects on the cigarette lighter cable. (A damaged power cord may cause fire
or electric shock)
22. Even if overwrite function is in ‘Off’ condition, a part of recorded file may be deleted to create some recording space at booting.
23. In the lower frame setup, the event may not be recorded. For the stable event recording, recording setup is greater than or equal to 15 frames is
recommended.
Precautions when using a SD card
1.
In order to confirm normal operation of the product, please check the image of a SD card and format it on a regular basis.
(PC format needed one to two times per month)
2. Because an SD card is consumables, if it is used for a long time, you may lose the data or may not record due to an error, so please
check it periodically.
3. When the product is in recording or the power is on, do not eject the SD card forcibly. It may cause a failure of the SD card and data
loss.
4. Due to excessive temperature rise inside the car, the data may not be saved or get damaged, so please park the car in a cool place in
the summer.
5. When identify the car's accident or damage, please keep the SD card separately. Due to overwrite, important data may be deleted.
6. When turn off the power of the body and remove the SD card before LED is turned off, the last recording file may not be saved, so
please be careful.
7 In general, the SD card is a consumable product in life, so if it is not used for a long time, you may not be able to save the data. In this
case, buy a new SD card and use it, and please always check that the recorded images and a SD card have no problems with data storage.
8. When driving a car, do not remove the SD card. Make sure to remove it safely when a car is in parking or stop.
9. After turning on the power, make sure that it is in normal operation.
10. Please note that the warranty period of an SD card is six months, and replace it at the time of more than six months.
11. The SD card randomly purchased other than the one we provide, shall be excluded from the warranty, and we shall not take any
responsibility for loss and damage of the data recorded in the SD card in any case.
12. After check playback recorded video on a Smartphone (support an Android only), remove the SD Card and follow below.
Menu → Configuration → System → Mode change space → SD Card un-mounting
(if you do not "SD Card un-mounting“, SD Card might be damaged.)
# This product is assistant device for recoding driving video.
Please use this product for your reference for checking driving video,
not as special CCTV because the image might not be record depend on environment.
# This product might change without any notice for performance improvement.
# This user manual indicate only basic user manual, please check furthermore detail information from http://livue.co.kr
Precautions when using a Battery
※ Please follow below otherwise Heat Generate, Fire, Explosion, etc might happen.
1. Contact the manufacture or distributor if battery bellowed up even by the naked eye.
2. Use only packaged battery and do not modify and disassemble.
3. Never put this built-in battery product close to fire.
4. Do not leave product for long time inside the car in summer.
5. Use Warranted lithium polymer portable charger by manufacture.
6. Do not disassemble, crimp, destroy.
7. Do not drop from high location and give shock to product.
8. Do not leave product in location that is over 60˚C.
9. Do not leave a product in the humid location.
※ Battery Disposal Instructions
# Do not throw away a used battery.
# When disposing of a battery, do not burn and put them in a fire. (Due to heat, it may cause an explosion or fire.)
# Battery disposal may vary by country and region. (Please dispose it properly).
1. Package
Option Accessory
Package
Video Cable
(Selling separately)
Body & Bracket
Car Cigar jack
Micro SD card
GPS Bracket
SD Card Adaptor
User Manual
(Selling separately)
The viewer program is stored in Micro SD card.
Please use after saving the program in advance in the computer, etc. so that the program can’t be deleted.
(If it is deleted, you can download it from our website.)
The packaged product picture of the user manual may differ from the actual product.
Video cable is used for connection to the TV / car navigation, and can monitor real-time. But please note that depend on monitors,
Video input type is different and check the user manual of monitor.
2. Product Features
1.
2 Mega Pixel image sensor mounting.
2.
150 degrees (based on lens) wide mega lens (based on actual recorded video) are applied.
3.
HD (1280X720) resolution and 30FPS are supported.
4.
Security LED light are mounted on front body (LED Lighting function On/Off can be set in PC viewer)
5.
Car constant power discharge protection function (setup is available in PC viewer) is built-in. Separated power
discharge safety equipment is not necessary.
6.
G sensor built-in Automatic parking recording mode change and event recording mode.
7.
Various recording functions - normal, manual, event, motion, automatic parking recording mode change.
8.
Operating instructions service by voice guidance.
9.
External video output. (real-time video image can be checked)
10.
Soft look and emotional design. (easy removable body)
11.
Driving records can be stored with GPS data. (optional)
12.
PC viewer software are provided to change various setting values and map data can be checked when using GPS. (In
the general video player (e.g. Windows media player), recorded video can be played)
13.
High performance microphone built-in
14.
Back-up battery built-in (safety backup power support)
15.
Memory back-up is available by flash memory, even in the error occurred when firmware is in upgrade.
16.
When car constant power discharge functions in setup, the dark current of less than 2mA is consumed. (based on
12V)
17.
SD card can be formatted as the product itself, without connecting to a PC.
18.
When using car constant power discharge protection functions, If user car voltage is 12V and the voltage of less than
11.8V is maintained for more than 30 seconds the product power will be shuts-off. In case user car is 24V, power will
be shut down after 30min with less than 24V. (Note: Shutdown time depend on the Type of Car and car condition.)
19.
Voice recording On/Off function and speaker output On/Off function.
20.
Each capacity of normal/ event/ motion folder can be set in PC Viewer.
21.
Recording image resolution can be set to change. (HD/D1/VGA)
3. Function
1.
Bracket (GPS Bracket: Selling separately)
8.
Micro SD card Slot
2.
Up-down adjustment screw
9.
Microphone
3.
Security LED
10.
Record LED
4.
Camera Lens
11.
Power LED
5.
GPS Connection
12.
Speaker
6.
External Video Cable(Selling separately)
13.
Record Button (for manual)
7.
Power Input
4. How to Install
Insert the Micro SD card into the
product. (Note the direction of the
SD terminal)
Connect packaged cigar adapter to
the power connecting terminal.
Clean foreign substance in a place
to attach the product first and
attach the product.
Remove protective sticker on the
double-sided tape of the bracket.
Connect cigar jack to the car cigar
socket.
5. How to record
1. Recording: LB100 is automatically booted at power on, and recording starts in basic normal recording mode.
2. Recording Mode: it is classified into driving recording mode and parking (motion) recording mode
3. Recording Method: it is classified into normal recording, event recording, motion recording.
※ For automatic recording and manual recording methods, please refer the below table.
Recording
mode
Driving
recording
mode
Parking
(motion)
recording
mode
Recording
method
Auto recording
method
Manual
recording
method
(button
control)
Normal
recording
-
-
Event
recording
In G-sensor detect Shock
One short press
button
Motion
recording
In G-Sensor is not
detected for more than 8
minutes Automatic
motion recording mode
change
3 second long
press button
Event
recording
In G-sensor detect Shock
One short press
button
Recording time
Recording
folder
Set on configuration
30 / 60 / 120 sec
Normal
Each 15
second
recording
before and
after event or
motion
occurrence
* For HD highest
quality resolution
only,
each 15 second
recording before
and after event or
motion
occurrence
Event
Motion
Event
※ after change to parking recording mode by manual, if you want to change normal recording mode again, please press “REC” button for
3 seconds (during event recording, mode cannot be changed.)
※ Even if power is interrupted during event recording mode, 30 second can be recorded completely before power is off.
(Only if built-in battery is fully charged)
※ If event (G-sensor detection and manual recording by button control) occurs during motion recording mode,
After motion recording mode will be completed, the motion recording file will be changed into event recording files, and event recording
mode will start immediately.
6. LED Operation Guide
Rear LED
Power LED
Situation
Front LED Operation
REC LED
Car Constant Power
Discharge Protection On
Car Constant Power
Discharge Protection Off
OFF
GPS Connect
ON
Booting
Off
Red lighting
Red flashing
Firmware update
Off
Orange flashing
(Green/Red)
Orange flashing
(Green/Red)
Normal recording
mode start
Event recording mode
standby
Green flashing
All flashing
Event recording mode
start
Motion/Parking on
Event recording
Green lighting
Red flashing
left and right LED and
central LED cross-flashing
Motion/Parking
recording start
Motion/Parking
recording standby
GPS Connect
Orange flashing
(Green/Red)
Green
lighting
Green
flashing
Orange
lighting
(Green/Red)
Orange flashing
(Green/Red)
Reciprocation flashing left
and right
Orange lighting
(Green/Red)
No SD Card (Error)
Off
Off
ETC
Off
Off
Orange flashing
(Green/Red)
Off
When no GPS signal or depend on GPS signal receiving location and signal condition, LED display only lightning.
Orange
flashing
(Green/Red)
7. Voice Guide
Situation
Voice Guide
Event / Motion Occur
(Alarm Tone) “Ding-Dong”
Remove SD card / SD card Error
“Please check a SD card.”
Firmware Update Start
“Firmware will be updated.”
Firmware Update Completed
“Firmware update has been completed.”
Normal Recording Mode Start
“Normal recording will start.”
* Event Recording Mode Start
“Event recording will start.”
Parking Recording Mode Start
“Parking recording will start.”
Recording End
“Recording will be end.”
Change the Date / Time setting
“Setting has been changed.”
Automatically change to
Normal Recording Mode
“SD card capacity is full. Normal recording will start”
SD card Format
“Will you format your SD card?”
* Only when event recording mode is set in the configuration, the voice guiding "event recording will start" will announce.
8. How to Install Original Viewer Program
1.
-
System Requirements
Windows XP(32bit), Windows Vista(32bit), Window7(32/64)
Pentium 4 2.8GHz & RAM 1GB .
1024 * 768 Display device is set to be the primary monitor.
DirectX Support (WPF)
2.
Install
-Playback program is in packaged SD card.
-Insert this SD card into the USB card reader and connect to the computer.
-An executable file is in the SD card as below figure.
-If you run “setup.exe”, Winy BB Viewer will be installed. And then, installation will be
continued according to the installation sequence of setup dialog box.
11
22
Select
installation
Folder
Next >
Next >
44
33
55
* Click “Cancel” to stop installation.
Installing >
Installation Complete- Close
Next >
9. Original Viewer – Screen Configuration
1
[1Ch], [2Ch] Select channel and it will playback (LB100 only 1Ch support)
9
[Find] Click, to select the image to playback.
2
[Print] Print current pause screen.
10
[Normal], [Motion], [Event] Recording list, for each recording mode.
3
[Jpeg] Save current pause screen.
11
Window to playback the video. If you double-click during playback, a new window will pop up
and the screen can be expanded.
4
Select saved location of current screen image.
12
Control the video. (Pause / Previous File / Play or Pause / 1 Frame Playback / Next File)
5
[Config] Set operation environment for black box.
13
Identify the current playback location of recorded images
6
[Zoom] After pausing the image, select an area to expand with the mouse and check the image.
14
7
[―] Click, play program will be minimized to the position of a task pad.
[X] Click, the play program will be closed.
15
[G-sensor] Display information on the shock sensor detected on car during driving or parking
8
[Map] Click, GPS information will be recorded with the image and the drive location will be shown on the
map, When connected to GPS module.
16
Display GPS information (speed, latitude / longitude location information)
Adjust the sound volume during playback.
9-1. Original Viewer - Playback
Find
Click [Find], while SD card is connected with the computer, file lists will pop up immediately, but if not connected,
the window ‘browse for folder’ will pop up and select the location where the file is saved.
[Normal] Shows a list of normal recorded files. If the file is double-clicked, the video will be played.
To Play Recorded
Video by
Recording mode
[Motion] Shows parking surveillance (motion recording mode) recorded file list.
If the file is double-clicked, the video will be played.
[Event] Shows event recording mode file list. If the file is double-clicked, the video will be played.
Play by Channel
After pressing 1Ch / 2Ch and changing the screen, you can playback it.
Zoom Function
In the Zoom Function, there are 2 ways with Full Zoom on the screen and Zoom of Menu Item (Partial Zoom)
function.
Double-click on Screen: When double-clicking on the screen, a new window will pop up and when double-clicking
in a new window, the screen will be magnified.
Menu Zoom Function: If you pause the screen and specify the area that you want to enlarge with the mouse, a
new window in the selected area will pop up and 4 X Zoom will be possible.
* If you want to run Print on Menu (Print), Jpeg (Image Save), Zoom (Enlargement), you should pause the video first and then it will be
possible to operate
* Recorded images can be played back in the Windows Media Player in addition to the original viewer.
(When checking GPS information, please use the original viewer only)
9-2. Original Viewer - GPS
If the external GPS module (separate option) is connected to Black Box, GPS information will be recorded during video
recording, so you can see the drive location in the viewer. (Users only for GPS-module bracket)
If you want to identify the location of the video in playback, click the “Map” button.
Map window will be activated.
Map
If you turn the mouse wheel, Map will zoom in/out.
[SPEED] Drive Speed
[POSITION] Latitude/Longitude location information
9-3. Original Viewer - Zoom
1) Expand your entire playback screen
2) Expand part of your playback screen
1. Double Click on the playback screen.
2. New playback screen will be opened.
3. The size of playback screen will be able to be until tripled.
※Note: Expanded entire playback screen can not be printed out.
1. Pause the screen.
2. Click “Zoom” on the header.
3. Drag from top left to bottom right of the particular area.
4. Expanded screen will be opened and the size of this screen able to
be quadruple.
9-3. Original Viewer - Configuration
• Connect SD card to a computer, and then specify configuration.
If you insert the SD card which set configuration into a black box,
the configuration is automatically updated.
9-3. Original Viewer - Configuration
Mode Setup
Selects normal recording mode or event recording mode when driving, and while event recording is set, the data by event recording mode will be
stored. (Default: Normal mode)
Driving Mode Frame
Rate
Sets the frame rate for driving. (Default: 30F) the higher frame rate is set, the movement image will be saved more smoothly.
Time Setting
Sets the current your time. when setting time in PC, please add travel time between the location you set time on PC and the location you apply set
time to black box in a car. (PC -> Travel time -> Car). (When using GPS bracket, time setting will be automatically applied.)
Resolution
Sets the size of image resolution. HD 1280*720 (Default) / D1 720*480 / VGA 640*480
Parking Mode Frame
Rate
Sets the frame rate when parking (Default: 15F)
Set Time?
The time set in [Time Setting] will be applied to black box. Only when changing the time set, select "Yes". (Default: No)
Normal Recording Time
30 seconds / 1 minute (default) / 2 minute. You can set recording time.
Parking Recording Mode
Change
If there is no detection on G-sensor for over a certain time (approximately 8 minutes), it will be automatically switched to parking recording mode,
but if any detection on G-sensor for over a certain time (about 10 seconds), it will be automatically switched to driving recording mode.
LED Lightning Setting
Sets the front LED display or not.
Video Quality
Sets the quality of recording images.
Voice Guide Volume
Level
Sets volume level for voice guide.
Motion Sensitivity
Sets the sensitivity level of motion detection sensor.
G-Sensor Sensitivity
Sets the sensitivity level of shock detection sensor.
Recording Volume Level
Sets the volume level of the recording voice.
Overwrite Function
Deletes the oldest data and sets to overwrite them with a new file.
Car Constant Power
Discharge Protection
If you set this function, you can record by a car battery even when parking in addition to driving the car.
When setting 12V, the black box can work in over a constant voltage (12.5V ± 0.2), but it automatically shut down under the voltage (11.8V ± 0.3).
Time Zone
Sets the time where the user is located.
Summer Time
Sets the Summer Time.
Camera Sensor
Set contrast, brightness and color of camera, and if pressing “Sensor Initialization” button, it returns to the default.
SD card Folder Capacity
Adjustment
Adjusts storage space ratio by recording folder in the entire SD card storage capacity.
9-4. Configuration Default Settings
Item
Settings
Item
Settings
Mode Setup
Normal
Driving mode Frame Rate
30
Resolution
HD (1280 x 720)
Parking Mode Frame Rate
15
Time Setting
The time setting value
on PC will be output.
Set Time?
No
Normal Recording
Time
1 Minute
Parking Recording Mode
Change
Off
LED Lightning Setting
On
Video Quality
High-Quality
Voice Guide Volume
Level
2
Motion Sensitivity
Normal
G-Sensor Sensitivity
Normal
Recording Volume Level
2
Overwrite
(Event/Motion)
On
Car Constant Power
Discharge Protection
Off
Camera Sensor
SD card Folder
Capacity Adjustment
(All 20 Cells)
Contrast
Middle
Brightness
Middle
Color
Middle
Movie
10 Cells
Motion
4 Cells
Event
6 Cells
10. Configuration Setting and playback video on Smartphone
* Android ONLY
Recorded video by LB100 can be played back and delete as well as setting configuration on a smartphone which support only Android.
Installation
1. LB100 can work in all Android Smartphone that support over Froyo (2.2) version.
2. Download the application of “Livue LB100 ” on Android Market.
How to use
Connect SD card to your
smartphone
Insert Micro SD Card to SD Card socket on your Smartphone and run the application.
Set SD card location
After run the application, message will be shown for setting SD card location. If you set first, this window will not
be opened from second time.
Playback and delete a
video file
After mount SD card and run the application, the video file list will be shown as below picture #3. Click particular
video file to playback and delete.
Set configuration
Click “Configuration” as below picture #4, you can check current setting status and change setting value.
※ Precaution when remove a SD card : please remove a SD card after unmounting. If you do not, a SD card may have damage.
Menu → Setup → System → Smart Phone storage space → SD card unmounting.
1. APP installation
Livue
2. SD card Location setup
3. Video file list
4. Configuration setup
11. Firmware Update
• Firmware Update
1. Remove the SD card from the black box after turning off the power completely.
2. Copy the firmware file to the top position of the files in the SD card after connect the SD card to the PC.
3. Boot the power in the black box after inserting the SD card into a black box,
4. If the firmware file is automatically recognized, start to update the firmware after the voice guide to indicate the start of the
firmware.
5. When the firmware update is completed, the firmware file stored in the SD card is automatically deleted and the black box
is rebooted after the voice guide to indicate the completion of the firmware update.
• Firmware File Format
File name will be as FW01_yymmdd.bin - yymmdd will change depending on year/month/date of the firmware version.
12. SD Card Format
• How to format the card if the SD card has recognition error
1. Turn on the power while pressing the “REC” button.
2. While you press “REC” button, format will start.
3. When you press “REC” button briefly within format stand-by time, the SD card will be formatted and rebooted.
* If you press “REC” button a little longer, it will be rebooted and even if stand-by time is over.
13. Specifications
Item
Specifications
Camera
2 Mega pixel,
view angle
Item
Specifications
Video Output
(150 degrees)
NTSC Composite
G-Sensor
3-axis acceleration G Sensor built-in
Voice Recording
Microphone built-in
GPS
An external GPS module (optional)
Voice Guidance
Speaker built-in
Video Compression
H.264/AVC
Recording Media
Micro SD card (SDHC)
Audio Compression
AAC
Recording Channel
1 Channel
Recording Resolution
FPS
Image Quality
Secondary Battery
HD (1280x720), D1 (720x480), VGA(640x480)
Size/Weight
30/25/20/15/10/5FPS selectable
Highest quality (bitrate 8Mbps – HD Standard)
High quality
(bitrate 6Mbps – HD Standard)
General quality (bitrate 4Mbps – HD Standard)
14. Recordable Time
Lithium polymer battery built-in
107(W) x 47(H) x 38(D)mm / ARO 62g
Storage Temperature
-10 ~ +65℃
Operating Temperature
-5 ~ +55℃
• Below table is Recordable Time by setting value at
“SD card Folder Capacity Adjustment” Based on 8GB with high resolution
Recording
mode
Folder
Capacity
Adjustment
(%)
Record
Time(Sec)
Normal
50
60
Event
30
30
30
15
Motion
20
30
15
15
Total
DC 12V ~ 24V Free Voltage
Power Input
Frame Rate (FPS)
Drive On
Parking On
Record Time (Min)
Drive On
30
Parking On
The number of files (files)
Drive On
90
52
Parking On
90
99
66
Available to record 3hours ~ 3hours 20minte based on 8GB SD card
104
198
131
Warranty
■ Warranty
1. The products are manufactured through the strict quality control and inspection process.
2. The defect occurring in normal use of user within the warranty period will be repaired free of charge.
■ Warranty Details (Conditions)
Free Service: The defect occurring under normal use within the warranty period from the date of purchase will be repaired
free of charge.
Paid Service: If the warranty period has passed.
Even within the warranty period, following cases shall be repaired at cost:
Failures caused by natural disasters (fire, lightning, flood damage, etc.)
Failures caused by carelessness using (drop, flooding, shock, breakage, excessive operation)
Failures caused by the malfunction of power in use and connected equipment.
Failures caused by any changes of a product and repaired from an unauthorized service center.
Body
1 Year
(from purchase date)
Accessory
Within 6 months
Excluded
warrantee
SD card, Bracket, Car cigar jack
Card leader, Vided Cable (cut user’s mishandling)
• Accessories are not repaired free of charge. The products other than the warranty period shall not be replaced free
of charge.
Important data shall be backed-up in a safe place and we shall not be responsible for any loss of the data stored in
the product.
Date :
D.
M.
Y.
Distributor :
Customer Service
Manufacture : 4th floor logos building, 880-11, Bangbae-dong, Seocho-gu, Seoul, Korea
Please download the user manual, program from below website
http://livue.co.kr
It-on Co., Ltd.