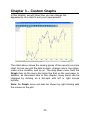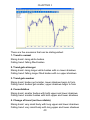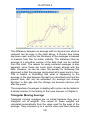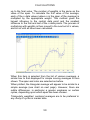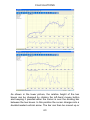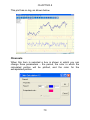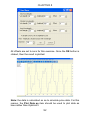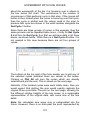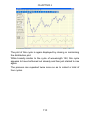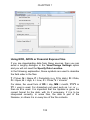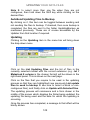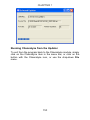
1
USER MANUAL
for
Version 1.0.0
Email: [email protected]
Web site: www.qudosmarketinsight.com
Fax: +44 161 439 2327
Printed October 2008 (v1.2)
CONTENTS
CHAPTER 1 – Introduction to Channalyze..................1
Data Format.....................................................................1
System Requirements.....................................................2
Installation........................................................................2
Installed Files...................................................................3
Changes to Files..............................................................4
The Start-up Screen........................................................4
Changing the Screen View..............................................7
Charting a Security from the Stocklist...........................11
Charting a Security if the Stocklist is Hidden.................12
Reading ASCII (Text) Files............................................13
CHAPTER 2 – Securities and Prices..........................21
Finding a Security..........................................................21
Security Properties........................................................22
Sorting Securities...........................................................23
Showing Security Temporary List .................................23
Adding Securities to Temporary List.............................24
Deleting Securities in Temporary List............................25
Copying Securities in Temporary List............................26
Moving Securities in Temporary List.............................27
Creating a New Security................................................27
The Prices Menu............................................................30
Viewing All Records.......................................................30
Adding a Record............................................................30
Editing Records.............................................................31
Sorting Records.............................................................32
Removing Zeros............................................................33
Removing Duplicates.....................................................33
Deleting Some Records.................................................33
Adjusting for Splits.........................................................33
CHAPTER 3 – Custom Graphs...................................35
Background Color..........................................................36
Data...............................................................................37
CONTENTS
Heikin-Ashi.....................................................................39
Line Thickness...............................................................41
Data Color, Cut-off Color...............................................41
Cut-off Data Color..........................................................42
Grids..............................................................................42
Style...............................................................................42
Color..............................................................................43
Margins..........................................................................43
Restoring Appearance as Shipped................................44
Undoing Previous Rescale............................................44
Labeling Colors and Fonts.............................................44
Changing the Y-Axis......................................................45
Changing the X-Axis......................................................46
Changing the Scales......................................................46
Scaling the Price Axis....................................................49
Plotting in One Box or Two............................................49
Screen Hotspots............................................................49
CHAPTER 4 – Calculations.........................................53
Simple Moving Average.................................................56
Triangular Moving Average...........................................58
Double Average.............................................................60
Linearly Weighted and Exponential Averages...............61
MA (Moving Average) Difference..................................61
MACD (Moving Average Convergence Divergence).....64
RSI (Relative Strength Index)........................................66
Bollinger Bands..............................................................67
CCI (Commodities Channel Index)................................69
Channels........................................................................70
Channel Bending...........................................................75
Changing Channel Depth..............................................78
Millard CyclesTM.............................................................80
Delete, Enable, Disable Calculations............................81
Super Rises and Falls....................................................83
Millard ProbabilityTM.......................................................86
CONTENTS
CHAPTER 5 – Experiment with Sine Waves.............91
Reduction in Amplitude..................................................98
Scanning for Cycles.......................................................99
Lower Frames of Cycle Panel.....................................104
Doppler – Set Maximum Shift......................................104
CHAPTER 6 – Cycles in Market Data.......................105
Closing/Opening the Distribution Plot..........................114
Summing Low, Medium and High Wavelengths.........114
AutoScan.....................................................................118
CHAPTER 7 – Updating Data Files..........................127
Overview of the Universal Updater..............................127
Running the Updater....................................................127
Information Required for Updating to Proceed............129
Adding a New Market..................................................129
Setting the Format of the Updating Files.....................131
Using EOD, ADVN or Financial Express Files............132
Selecting the Folder Holding Updating Files...............136
Selecting the Folders to be Updated...........................138
Custom Formats..........................................................143
File Menu.....................................................................147
List Updating Files to Send to Backup........................147
AutoSend Updating Files to Backup............................149
Updating.......................................................................149
Running Channalyze from the Updater.......................150
Chapter 1 – Introduction to Channalyze
Channalyze™ is the embodiment of Brian Millard’s research into
cycles and channels. Channalyze incorporates sophisticated
mathematical algorithms for isolating cycles from market data. If
cycles are regular, they can be summed to give an indication as
to future movement of the security or market index.
The difficulty is that cycles are subject to random influences, so
that their regularity comes and goes over a period of time. The
importance of using only those cycles which currently are going
through a stable, regular phase is stressed later in the chapter on
cycle analysis (Chapter 6). The program can select such stable
cycles and sum them automatically to provide a good indication
of future price trends. The user can override this automatic
summation and sum chosen stable cycles.
Data Format
The prime data format for Channalyze is the Metastock™ format.
For those investors whose current software uses a different
format, but which can output data in an ASCII (text) form, the
ChannalyzeUpdater (a separate module supplied with
Channalyze) can import this ASCII data into the Metastock
format. All Metastock files, whether native or imported, can be
updated by this updater. Many data vendors will supply historical
data in this format.
Channalyze can also read ASCII. The individual items within
these files can be held in a wide variety of ways. Thus it is
necessary to specify the way in which the data is held in these
files if they are to be read correctly. Text files can have various
file extensions (the characters following the dot in the file name)
such as .csv (comma separated values) and .txt. The file
extension has to be specified before the required files can be
located by the file browser. The way in which Channalyze can be
set up for reading such text files is discussed at the end of this
chapter.
1
CHAPTER 1
System Requirements
Cycle analysis in the scanning mode requires extensive
mathematical computations, so the faster the processor the
better). The program will operate under Microsoft Windows 95,
98, 2000, NT, XP or Vista
Installation
Channalyze comes on a CD (the program CD). Included on the
CD is a folder containing a few data files which are used
throughout this manual.
As mentioned above, this data can be regularly updated by the
ChannalyzeUpdater that is also present on the program CD.
The examples used in this manual come from both the US and
UK markets. They can be found in the Samples folder.
A limited amount of data for the UK, US and Canadian markets
can be downloaded from www.qudosmarketinsight.com.
Installing the Channalyze and Updater Programs
To install, simply put the program CD into your CD drive. The
installation program should then start automatically, but if it does
not, do the following:
Windows 2000, XP
1. Click the Start button in Windows and choose the Run
command. The dialog then appears.
2. In the Open box, type x:setup.exe where x is the drive letter
for the CD drive. If you are not sure, clicking on the My
Computer icon will give you a list of the devices with their
letters that are present in your computer.
3. Click the OK button to start the installation.
Vista
1. Click the Windows icon (bottom left of the screen) and then
click on Computer which is in the list to the right of the list of
programs. You can then navigate to the CD drive and its list
of contents. Then click on the Setup item in this list.
2
INTRODUCTION
Now for all Windows operating platforms
Follow the instructions that are given on the screen. You can
elect to have the program installed in the default folder, which will
normally be:
C:Program Files\Channalyze
As well as data files for the UK or US markets, a folder named
Dustbin (or Trashcan in the US) will be created. The purpose of
this folder is for you to move stocks that have ceased to exist, or
are suspended into it. The stocks are still available if required
and can be moved to another active folder if they are needed
again.
Once the installation has been completed, you will be asked
whether you wish to run the program immediately. There is no
point in delaying the moment of truth, so kick off the program
now.
To run on other occasions, click on either of the Channalyze or
ChannalyzeUpdater icons which should now have been
installed on your desktop. Alternatively you can click on the
Programs item in the Start menu. You will find Channalyze and
the ChannalyzeUpdater in the list of programs, along with their
icons.
Installed Files
Once the program has been installed in its folder, a number of
files with the extension .dta will be created in this folder.
These .dta files contain information about colors, fonts, etc. In
addition a sub-folder with the name Samples will be created. The
Samples folder contains the sample files which have been used
to illustrate this manual.
For those users who do not have their own Metastock Data,
folders containing the FTSE 100, FTSE 250 and the S&P 500
historical data can be downloaded from our web site:
www.qudosmarketinsight.com
As with the Samples folder, these data folders should be installed
as sub-folders of the program folder Channalyze.
3
CHAPTER 1
Once the cycle scanning routine (AutoScan, see Chapter 6) has
been applied to a folder of data files, then that folder will contain
the sub-folders Cycles and Scans. These folders hold the results
of the cycle scans, which can be displayed later if required.
Changes to Files
The program will run in the absence of the .dta files, since these
all contain values which can and probably will be changed by the
user at run time. In the unlikely event that one or more of these
files becomes corrupted and unreadable, then the best option is
to delete the offending file(s) and re-enter any values that you
require via the Channalyze program.
The Start-up Screen
While the program is loading, the ‘Splash’ screen will appear.
After a few seconds, the initial screen, based on the Windows
Explorer style, will appear.
The first time the program is run, the plotting area will be blank
and a box will appear informing you that the previous default
folder is no longer current. In subsequent sessions the first
security in the folder which was used in the previous session will
be plotted.
4
INTRODUCTION
To navigate to the Samples folder, select File from the main
menu bar and then click on Open Channalyze Folder in the
drop-down menu as shown below:
This will bring up the Browser, from which any folder in your
computer can be selected.
The Channalyze folder is itself a sub-folder of the Program Files
folder.
5
CHAPTER 1
To see which securities are held in any folder, click on the button
Show Securities in Above Folder.
Since there are no Metastock files in the Channalyze Program
folder (nor are you allowed to create any in this folder), clicking
on this button at this time will bring up the line ‘No data files
present’ in the right-hand panel.
Clicking on the + alongside the folder for Channalyze will show
all the sub-folders as shown below.
6
INTRODUCTION
Click on the Samples folder, and the full name will be shown in
the top right-hand panel. To see which securities are held in this
folder, click on the button Show Securities in Above Folder.
The five securities are shown as a list below this button, as
shown above.
Clicking on the OK button will produce a chart of Agilent
Technology with a list of the securities in this folder shown in the
left-hand panel.
We will discuss in the next chapter how to change the
appearance of the chart by changing fonts, colors etc. For the
moment, note that as the mouse is moved over the chart,
numerical information is displayed in the status bar at the bottom
of the screen.
Changing the Screen View
There is considerable flexibility in what can be displayed on the
screen. The panel with the list of securities can be hidden or
displayed, the graph can be replaced by prices and the toolbar
buttons can be switched between large and small buttons or
indeed no button at all. The Statusbar at the foot of the screen,
7
CHAPTER 1
which displays information as the cursor is moved over the chart,
can also be hidden. If required therefore the graph itself can be
made to cover almost the whole screen for maximum detail to be
examined.
Clicking on the Graph item in the menu bar displays a drop-down
menu which provides access to the items which change what is
shown on the screen.
When the Buttons, Stocklist, Templist etc. item is selected, a
box is displayed with a number of options in the form of tick
boxes.
8
INTRODUCTION
At any time the screen appearance as shipped can be restored
by clicking on the Default button. This mode has large buttons,
and the Stocklist and Statusbar are displayed.
The other buttons in the bottom row are self-explanatory.
Experiment by selecting different options. For example, you may
feel comfortable with small button displayed, which will give the
advantage of a slightly larger chart.
Although the Statusbar displays prices at the point in time
represented by the cursor position on the chart, from time to time
it may be necessary to view the actual stock prices over
extended periods of time. This display is shown below. The
display where Stocklist, Buttons and Statusbar have been hidden
to produce the largest possible chart is shown on the next page.
The use of the Show Temporary List tick box will be discussed
in the next chapter. For now, suffice it to say that it is used to
show which securities are to be copied, moved or deleted.
9
CHAPTER 1
10
INTRODUCTION
Charting a Security from the Stocklist
If the Stocklist is displayed, then it is only necessary to click on
the security name in the Stocklist for that security to be charted,
along with any calculations that have been imposed.
If there are more securities in the list than can fit into the current
height of the screen then, of course, the list can be scrolled by
using the slider on the right-hand side of the Stocklist panel.
If you have a lengthy list of securities which might be out of
alphabetical order, or perhaps you are not sure of the name or
short code of a particular security, then another way to select it is
to use the Securities item on the menu bar. The first item in the
drop-down list is Find a Security.
Selecting this will bring up a box into which the security name, or
part thereof, or the short code name or part thereof can be
entered. The list will be searched for those securities which
match the entered text string.
As an example, when the securities in the SP500(1) folder are
displayed, entering Jo will find all the securities with the first two
letters in their name being Jo (if Find by Name is enabled). The
position in the list and the security code are displayed.
The desired security can be selected by clicking on its name, and
by clicking the button marked Exit with Selection, the security is
then plotted.
11
CHAPTER 1
Charting a Security if Stocklist is Hidden
There are two ways to do this. The first two buttons in the top row
of the screen, showing right and left arrows will progress up or
down the list of securities, and plot each in turn, whether this list
is hidden or not. The other way is to use the method just
described of using the Find a Security menu. In the Samples
folder, the first press of the forward arrow icon will show the plot
below where the next security in the list has now been plotted.
12
INTRODUCTION
Before moving on to Chapter 2, it is useful to experiment, for
some time, with the various changes that can be made to the
screen view so that you are totally comfortable with the various
operations.
Reading ASCII (Text files)
As mentioned at the beginning of this chapter, text files
containing stock data such as the Date along with Open, High,
Low, Close and Volume values can hold this data in a variety of
ways. It is necessary to specify exactly how these data are held if
the file is to be read correctly. Once these parameters are set,
they are stored in a file (CDetails.dta) in the particular folder
holding the text files. This means that a folder can hold text files
with a different format from those held in another folder.
However, it is vital that any one folder only contains files with the
same format.
The first time a folder is visited then the parameters have to be
set. There is a particular sequence (1 – 10) which must be
followed to set up a folder containing text files for the first time.
Once set, there is no need to repeat this procedure unless
folders or file formats change.
1. Specify file extension
If the file extension is not set, then navigating to a text folder
will appear to show an empty folder. Once it is set, then a list
of files with this extension will be displayed.
The item Text Files Extension in the File drop-down menu
will show whether or not the extension has been set. If it
hasn’t, then the item is displayed as Text Files Extension
(not set). If it has been set, then this item is displayed as
Text Files Extension (.csv) for example.
13
CHAPTER 1
Note: you are not allowed to enter a dot. Thus for .csv files,
you would enter csv and not .csv.
2. Navigate to the text folder containing these files
This is done by selecting Open Text Folder from the File
menu.
Once the required folder is displayed by clicking on its name
in the left-hand panel, its name will appear in the box at the
top right, as shown above. The button marked Show
Securities in Above Folder must then be clicked.
14
INTRODUCTION
This will result in a list of the files with the designated
extension being shown in the right-hand list box. If these are
the right files, then click on OK to close the form (clicking on
the close icon will close the form with no action being taken).
If OK has been clicked, then the form will close and the same
list of text files will be shown in the Stocklist panel of the main
screen. A box will be displayed to remind you that the text file
format has not yet been set.
Click on OK and proceed to the next step.
Note: if you try to plot a security at this point by clicking on its
name in the Stocklist panel then a similar message to that
above will warn you that the format is not set.
15
CHAPTER 1
3. Set text files format
From the File drop-down menu, select Set Text Files Format
to bring up a box where the format can be set by showing the
contents of the first file in the Stocklist (previous page).
By examining a line very closely the exact sequence of the
values held in the file can be determined.
Note 1: some text files include a header line as the first line
which will show the names of the various fields held in each
line. This of course makes the task of specifying the fields
simple.
Note 2: the data can be held in the file in two ways – the most
recent value first or the oldest value first, as shown in the
above example for BBI.
4. Line and field separators
The lines in a file are separated by one or both of the
characters LF (line feed) and CR (carriage return).
Channalyze automatically determines which of these
combinations is being used in the file, so the user need not be
concerned about this.
The same applies to the field separators. In a .csv file, the
separators are obviously commas, but the tab character is
also used in some files. Channalyze determines which is in
use.
A value must be set for each of the four boxes on the right of
the form. In case of difficulty there is a How? button for each
of these explaining exactly how the box should be completed.
5. Set fields
In the Set Fields box, the order of the characters used
represents the order in which they are found in each line of
the file. One character represents one field as follows:
T = Ticker
N = Name
D = Date
16
INTRODUCTION
P = Periodicity (i.e. a D, W, M or I will be held in each line)
O = Open
H = High
L = Low
C = Close
V = Volume
I = Open Interest
X = a field which will be ignored
Note: you must enter an X where a field is present in the file
but is not required.
6. Set date format
While the above list of fields specifies where in the line the
date is held, it is necessary to set the format of the date, since
there is a multitude of ways in which dates are held in files.
The date order can be day, month, year or year, month, day,
or month, day year and so on. The year may be four
characters such as 2008, or may be just two characters, such
08.
The month may be numeric – two characters such as 02 or
11, or may be held as a three character short alphabetical
such as Jan, May, Nov, etc. Two character numeric months
must have DD in their format, while three character
alphabetical months must have DDD in their format.
There may be no separators between the day, months and
years, or there may be a / - or , between them. If there are
separators, these must be indicated by an X at that position.
Some examples:
20081026 would be represented by YYYYMMDD
081026 would be represented by YYMMDD
10/26/08 would be represented by MMXDDXYY
10,26,2008 would be represented by MMXDDXYYYY
26-10-08 would be represented by DDXMMXYY
10Feb2008 would be represented by DDMMMYYYY
17
CHAPTER 1
7. Units
Most data files now set the values for O,H,L,C as decimal,
e.g. 123.25 in which case a zero (0) should be entered in this
box.
If fractions are being used, then decide whether the fractions
are based on 4,8,16,32, etc.
Then, decide on which character separates the whole part of
number and the fractional part. This is usually a hyphen – but
may also be a slash or even a space.
Next, decide how these are displayed, for example if a
hyphen and based on 32, enter as -32. If slash and based on
16, enter /16. If space and based on 8, then enter (space)8
8. Skip lines
This could equally be titled Header Lines. When the file is
viewed, it will be obvious how many lines there are at the
beginning of the file before the first data line is encountered.
In the example shown earlier, there were none, but as
mentioned, some text files contain a very helpful header line,
in which case the skip line would be entered as 1.
Occasionally there may be files which have more than one
line before the first data line, in which case enter the number
of such lines here.
Note: if there is a header line and the number of skip lines
has been set at zero, then Channalyze assumes the header
line is a data line. This will give meaningless values for date
and the data values. When the file is being read prior to
plotting the data, this fact will be signified by a message
saying that there is a problem with the data format and that
the format should be reset.
18
INTRODUCTION
9. Months string
The default for this is:
JanFebMarAprMayJunJulAugSepOctNovDec
The string is used to convert alphabetical months in the date
item into a numeric value 1 to 12. If the date string is different,
perhaps because it is held in a language other than English,
then the string can be changed in this box. The only
restriction is that each month must contain three characters,
giving 36 in total for the string.
10. Test settings
Once you are satisfied that the settings are correct, then it is
desirable to test them before saving the format. First of all
select a line containing data by clicking on it. Then click on
Test Settings. The box below will then be displayed.
19
CHAPTER 1
If all is well then the date will appear correctly. If there is no
periodicity (e.g. D, W), then this item is left blank. If the name is
not present in the file, then the name used as the title of the chart
is the name of the file itself.
Once the OK button on this form is clicked, followed by the OK
button on the Set Text Format form, then the form is closed and
the security is plotted:
From this point on, the Stocklist behaves just as if it contained
Channalyze format files, so that any security can be selected
and the two arrows which traverse the Stocklist are active.
Calculations present in the Calculations list are also carried
out.
20
Chapter 2 – Securities and Prices
When the Securities item in the menu bar is selected, the
following drop-down menu is presented:
We will go through these items one at a time, assuming that we
have moved from the Samples folder to one in which there are a
large number of securities (e.g. SP500(1)).
Finding a Security
This item enables the user to find a security when the list in the
left-hand panel is long or perhaps not in alphabetical order. The
Find Security search box enables a search either on the name
or symbol. It is not necessary to put in the full name or symbol,
since a search on part of this will bring up a list of all securities
matching the characters entered in the search box.
Once the detail has been entered, clicking on the Find button will
set the search going. If a large number of securities are present
in the Stocklist, then the search may take several seconds. Once
completed, a central box is displayed with the security code or
securities codes that match the search string.
21
CHAPTER 2
The ‘237’ shown along with the code K means that the security K
(Kellogg) was found in position 237 in the list.
If a plot of any of the securities displayed is not required, then of
course the Abort button can be clicked. To plot one of the
displayed securities it is necessary to click the mouse on
whichever security is required (even if there is only one shown as
in this example). This security is then highlighted in the main
panel on the left-hand side of the screen. Finally clicking on Exit
with Selection will display a plot of the selection.
Security Properties
This will show the following data on the currently selected
security.
22
SECURITIES AND PRICES
Sorting Securities
This will sort the securities into alphabetical order, and only need
to be used if you have added a security or changed the name of
a security so that it would occupy a different place in the
alphabetical order. Once the list has been sorted, you will notice
that the first security now becomes the selected security, even if
a different one was selected prior to the sorting operation.
Showing Security Temporary List
If this item is not showing a check mark then clicking on this item
will cause the right-hand panel to clear.
This panel is used to display a list (the Temporary List) of
securities which can then be deleted, or copied or moved to
another folder. Securities are placed in this temporary list as
shown on the next page under the heading Adding Securities to
the Temporary List.
The Temporary List can also be accessed from the Screen
menu, as described in Chapter 1. The Show Security
Temporary List item in the drop-down menu will now have a
check mark to its left.
If the Show Security Temporary List item is clicked when it is
checked, then the list is closed, the item becomes unchecked
and the screen will revert to its state prior to selection of the
Temporary List.
When selected, the right-hand panel will then clear (shown over).
23
CHAPTER 2
The header at the top of this blank screen shows Securities
ready for deletion, moving or copying and Security list
number.
These three operations can be carried out on any securities
shown in this Temporary List.
Adding Securities to the Temporary List
This is simply done by clicking on the required security in the lefthand panel. Its name will be duplicated in the temporary panel.
A security can be removed from the list in the Temporary list by
clicking on its name. You cannot add a security name to the list if
it is already present in the Temporary List. A message to that
effect will be given.
The list can be closed without any action being taken by clicking
once again on the ‘Security Temporary List’ item in the Screen
drop-down menu. The check mark will be removed and the panel
will revert to its previous usage with either a chart or price
records being displayed.
As mentioned above, the purpose of the Temporary List is to
provide a list of securities that can be deleted from the current
24
SECURITIES AND PRICES
folder or copied or moved to another folder. These operations
can be delayed until the user is sure that the list is correct.
Shown below is the Temporary List with several securities names
shown in it ready for deletion, moving or copying.
Deleting Securities in Temporary List
If you click on this item you will be given a message asking to
confirm that you wish to delete the securities held in the
Temporary List (see below for an example with two securities in
the Temporary List). Answering Yes will cause the operation to
begin, and the securities will be deleted. Once finished, the
Temporary List will be emptied, although it will still be in the state
in which more security names can be added. The deleted
securities will also disappear from the securities panel. They will
have been removed totally from the folder, and cannot be
recalled. However, because of the two-stage process for
deletion, plus the confirmation box, it is only through total
inattention that securities will be deleted in error. Also, the user
should be keeping back-up copies of all security data on another
storage medium in order to guard against computer problems, so
that deleted items can be reinstated.
25
CHAPTER 2
Once you have no further deletion, copying or moving operations
to carry out, then the Temporary List is removed, as discussed in
Chapter 1 by selecting the Screen item in the menu bar, and
clicking on the Show Temporary List item to remove its ticked
state.
Copying Securities in Temporary List
If you click on this item, you will be given a confirmation box
asking if you wish to copy the securities in the temporary list.
Once this Copy Security item is chosen, then the folder chooser
is displayed, with a caption ‘Select Target Folder'.
You can then choose the target folder in exactly the same way as
you chose the current folder. Copying will then proceed, and
once the operation is finished the message ‘Security copied
successfully’ is displayed.
Note 1: you are not allowed to copy securities into the
Channalyze program folder. If you select this as the target, then a
message box appears alerting you to this fact.
Note 2: you cannot copy a security so as to overwrite a security
with the same name or symbol held in the target folder. A
message will be displayed with the name of the duplicate
security. You must click on this for the process to jump to the
next security in the list if there is one.
Note 3: this operation does not copy a security or securities from
somewhere else to the current folder, but the reverse of this.
26
SECURITIES AND PRICES
Moving Securities in Temporary List
This operation is similar to the previous one except that once the
securities are copied to the target folder, they are then deleted
from the current folder and from the list shown in the left-hand
panel.
Creating a New Security
We will first of all go through the exercise of adding a new
security, storing it, and changing its properties (name, symbol,
etc). It will be added to the current folder. If you wish to add a
security to another, existing folder, then move to that folder via
the File menu by choosing Open Folder. If you wish to create a
new folder in which to add securities, then click on the final item
on the Securities drop-down menu, Make a New Security
Folder.
Note: if you are updating data from a data vendor by using the
Updater (Chapter 7) then new securities that appear in the data
stream will be added automatically to the Work1 folder. The
name Work1 is one which was used in Microvest and CCS, so its
use is continued here for compatibility with these earlier
programs. However, only the symbols will be stored, so it will still
be necessary to change the name from a blank to the correct
name to match with the stored symbol.
You are then presented with the New Security form (shown
over).
27
CHAPTER 2
.
The various fields will be filled in as shown. These data would be
saved as shown but obviously you will want to use your own
name etc. for the security.
Click on the box which contains the name Security1 and enter
the name you wish to use (if you are stuck use a name such as
Test1 or similar). You will need to use the delete key to remove
the current name a character at a time.
The Symbol is the code by which the security will be updated
from a data source such as an ASCII file via the internet. It is
usual to use upper case characters for this. You can either click
on this box or press the Tab key which is a general convention by
which you can cycle around various input boxes on any form.
Once the symbol has been entered, you will need to select the
periodicity, which can be daily, weekly or monthly. Clicking on the
down arrow at the side of this box will give the options. Select
Daily at this point.
The next item is the Display Units box. There is a note
underneath which explains that you should enter 0 if the data is
to be presented as decimal data, i.e. 234.75. However, many
stocks are quoted with fractional parts, usually thirty-seconds. In
28
SECURITIES AND PRICES
such a case enter 32 for thirty-seconds or 16 if the fractions are
sixteenths.
The first and last dates shown will be the date on which you are
creating the new security, and since there is no data in it yet, the
start and end of the data is the same.
If this is the only security that you wish to create at this time, click
on OK. If you wish to keep on adding, click OK/MORE. Obviously
clicking Cancel will cancel this operation.
If you have clicked OK/More, then a fresh form will be presented,
with the fields filled in as Security2, SYMBOL2 and so on. Once
you have entered all of the securities that you wish, click on OK
to finish the operation. The new securities will then be shown in
the securities panel.
The name, symbol, periodicity and display units for a security are
together known as the security properties. Selecting Security
Properties from the drop-down menu will, as explained earlier,
show the same form as used for a new security, but with the
current security information shown.
All you need to do to change the name, symbol or display units is
to over-type the new ones before selecting OK to store the new
information. The OK/MORE button is greyed out, since it is not
appropriate when changing this one security. Obviously clicking
on Cancel will cancel the operation.
Note: you will not be allowed to change the periodicity of the
security since this would mean the stored price data being
invalid.
29
CHAPTER 2
The Prices Menu
Selecting this item will show a drop-down menu:
Viewing All Records
Only the last 50 price records (if they exist) are shown in the
prices panel when a security is first selected. This is to save the
time that would be needed to read in a large number of records
for a security that holds data for many years. If the user wishes to
see all of the price records, then clicking on View All Records
will carry out this operation. With a long data history this would
take some time. You can scan up and down the list of price
records with the slider control on the right of the panel.
Adding a Record
Selecting this item allows you to enter data for a particular. The
entry form is shown on the next page.
The date field will show today’s date (in either DD-MM-YYYY or
MM-DD-YYYY format), while all data fields are shown as zero.
As with the securities form, you can move downwards through
the data fields and back to the date box by pressing the Tab key.
A specific box can also be chosen by using the mouse.
30
SECURITIES AND PRICES
Once you have filled in the data, clicking on OK will obviously
store the record, while clicking on Cancel will cancel the
operation. If OK has been clicked, the prices panel will show this
new data.
Editing Records
To enable records to be edited, it is necessary to have all records
present for viewing. If all records are not being shown, then click
on View All Prices before proceeding.
If a graph is displayed rather than price records then clicking on
the Graph item will allow you to show the price records (see
page 7).
The record that will be edited is the one which has been selected
by a single click on it. If a record has not been selected in this
way, then the first record is taken as the selected one.
This form is the same as the one used for adding a record, but
now with the current data filling the appropriate boxes rather than
a set of zeros.
31
CHAPTER 2
To edit, you can either cycle to the required box with the Tab key,
or go to it directly by clicking on it with the mouse. If you wish to
change all of the price fields, then start with the first one and use
the Tab key to move down to the next field.
Besides amending the data, you can also change the date.
Note: the record will stay in the same place in the file. Thus if you
change an existing date to a new one, then the record will almost
certainly be out of the correct chronological order. You will then
need to sort the data records into date order. The way of doing
this is shown next.
Sorting Records
Clicking on this will cause the records, if any, to be sorted into the
correct chronological order. All the records for that security are
sorted, whether or not they are displayed in the prices panel.
Removing Zeros
Sometimes records may be present which have no data in them.
These as so-called ‘zero’ records, and they need to be removed
since they will cause problems in the plotting module. Many of
32
SECURITIES AND PRICES
the calculation routines will stop when they reach a zero record,
so that the presence of these is counter-productive. Clicking on
this item in the Prices menu will cause a scan to commence
which will remove these records. If necessary the scan can be
repeated again.
Removing Duplicates
It is possible, by using the Edit Records routine for changing the
date of a record, to end up with two records with the same date.
By selecting the Remove Duplicates item, the data for the
selected security will be scanned for duplicates, and the older
ones removed, leaving the most recent in place.
Deleting Some Records
This allows the user to delete one record or a contiguous block of
records. As with previous operations of data records, a record
can be selected by clicking on it. If the Delete Some Records
item is then chosen, then the selected record is deleted, although
naturally the user is given the opportunity to cancel the operation.
To select a block of records, simply click on the first one of the
block to be deleted, then holding down the shift key, click on the
last one in the block. The whole block then becomes highlighted,
and if the operation is not cancelled, the whole block of records is
removed. If the block is particularly large, this might take some
time.
Adjusting for Splits
This is used to adjust the price records back in time for a stock
split or scrip (rights) issue. A typical scrip issue would be one that
was 1 for 1, in which case the price level will be seen suddenly to
halve when a plot is made.
The difficulty with stock splits is keeping track of these. Usually
the investor who is not holding this stock is totally unaware that
there has been a split. One way to keep an eye on these is to
make a careful note of sudden changes in a stock price which
become obvious when scanning through the securities. However,
it is important not to jump to the conclusion that a sudden fall in
price is due to a split. It may well be real due to adverse
33
CHAPTER 2
comment in the press or the release of a profit warning for
example.
The routine allows the user to do any one of four adjustments:
add, subtract, multiple or divide. The user should select the
record from which the adjustment should occur before using this
routine. The adjustment will include the selected record and all
previous records back to the very first. The form that is displayed
is shown on the next page.
As you can see, the user can opt for one of the four mathematical
operations by clicking on the required option. The factor that has
to be applied is then entered into the factor box. The top of the
form reminds the user of the security which is being adjusted,
and also the selected date from which the adjustment will occur.
If you have the wrong security or the wrong adjustment date,
then clicking on Cancel will abort the process and close the form.
If you click on OK to Apply then the data will be adjusted and the
user informed when it is complete.
34
Chapter 3 – Custom Graphs
In this chapter, we will show how you can change the
appearance of a chart to suit your requirements.
The chart above shows the closing prices of the security as a line
chart, but we can plot the data as bars, change colors, line styles,
make a line invisible, and so on. The drop-down menu from the
Graph item on the menu bar looks like that on the next page. In
addition, as discussed later in this chapter, many items can be
changed by clicking on a hot-spot with left or right mouse
buttons.
Note: the Graph menu can also be shown by right clicking with
the mouse on the plot.
35
CHAPTER 3
We have already discussed the first item, Buttons, Stocklist,
Templist etc. as the item which allows the user to change what
is shown on screen.
Background Color
When this item is selected, a color palette box (see next page) is
presented from which you can choose the background color. The
user should avoid strong colors other than black and go for pastel
shades or white if the color as shipped is not to the user’s taste. It
may be necessary to change the color of the grids if these are to
be visible against certain backgrounds.
36
CUSTOM GRAPHS
Data
This will bring up a sub-menu in which the style and color of the
data can be specified.
As shown, the Data Style option will give five further options.
The Lines option plots the data in the way shown in the chart on
the first page.
37
CHAPTER 3
The HiLoCl and OpHiLoCl options will plot the data as bars,
the first being the high, low and closing values of the data, while
the second also includes the open value. This second type of
plot is shown below:
The detail is not easy to see in this lengthy time span, but a
portion of the chart can be expanded to show individual day data.
A simple way of expanding the latest portion of the chart is to
select the Points item on the Graph menu. For expanding other
portions of the chart see later in this chapter.
38
CUSTOM GRAPHS
As shown above, the last 100 points have been selected. The
chart will be redrawn and the detail will be much more obvious.
Heikin-Ashi
This is a form of candlestick plot, as shown in the chart over,
where again the last 100 points have been plotted:
39
CHAPTER 3
There are five scenarios that can be distinguished:
1. Trend is normal
Rising trend: rising white bodies
Falling trend: falling filled bodies
2. Trend gets stronger
Rising trend: rising longer white bodies with no lower shadows
Falling trend: falling longer filled bodies with no upper shadows
3. Trend gets weaker
Rising trend: bodies get smaller, lower shadows begin to form
Falling trend: bodies get smaller, upper shadows begin to form
4. Consolidation
Rising trend: smaller bodies with both upper and lower shadows
Falling trend: smaller bodies with both upper and lower shadows
5. Change of trend (not too reliable)
Rising trend: very small body with long upper and lower shadows
Falling trend: very small body with long upper and lower shadows
40
CUSTOM GRAPHS
As a visual aid, this plot gives a much clearer view of trends
because they are marked by sequences of white or black bodies.
Line Thickness
The final item on the Data menu will allow one of three
thicknesses for the data plot to be selected. This will only apply
when the data is plotted as lines. When selected, a box is
presented from which the desired line thickness can be chosen.
As shown, there are two columns. The Style column is not active
when choosing the line thickness, since it is only used for the
choosing the style of the grid lines. The required thickness is
chosen either by clicking on the radio button or the line itself in
the Thickness column.
Data Color, Cut-Off Color
These are used to change the color of the plotted data. When
either is chosen a box is displayed from which the required color
can be chosen.
41
CHAPTER 3
The data will be drawn again in the new color.
A word of explanation is needed on the Cut-off Data Color.
When the icon with displaying the pair of scissors is clicked, the
user can cut off the data from that point onwards so that it is not
used in any calculation. The data itself is still displayed however,
and its color will be that selected by this item on the Color menu.
Naturally, this color should be different from that of the data itself.
Grids
The style and color for the grids can be chosen from this menu.
Both X-grids and Y-grids will have the same characteristics and
cannot be defined separately.
Style
When this item is chosen, the following box is displayed. Unlike
the options for choosing the thickness, in this case the style of
dotted, dashed, etc. can be selected. The program is shipped
with the first, dotted line style as the default.
42
CUSTOM GRAPHS
Color
The axis colors can be selected from the displayed box of colors.
Note: if you wish the grids to be invisible, then choose the grid
color to be the same as the background color.
Margins
This item will bring up a box into which the allowable margin can
be entered. This is the margin at the right-hand part of the chart
between the last data point and the right-hand vertical axis.
The form is self-explanatory. The maximum margin is 20%.
43
CHAPTER 3
Restoring Appearance as Shipped
There might come a point at which you have changed so much
that you have forgotten what the chart first looked like. In this
case you can revert to the original appearance by clicking on this
item in the Graph menu.
Undo Previous Rescale
Whether the last rescale has involved the Y-axis or the time axis,
by using hotspots, points plotted at start-up or the magnifier, then
it can be undone by using the Undo Previous Rescale item on
the Graph drop-down menu. How to rescale a plot is discussed
further on in this chapter.
Labeling Colors and Fonts
The Graph menu does not give any option to change the size,
style or color of the Title, the X-axis label or the Y-axis label.
However, they can easily be changed by clicking the right button
of the mouse. This will bring up a floating menu of options from
which the desired item can be chosen and changed.
If the Title area of the plot is clicked with the mouse right-hand
button, then the two options presented are to change the color or
the font. The Color box has already been described in this
chapter so needs no further explanation.
If the Font item is selected, then the Font Selection box is
displayed.
44
CUSTOM GRAPHS
From this, you can access any font held in your computer (lefthand panel), choose its style and its size. The current font, style
and size will be highlighted. A sample of the chosen font is
shown in the Sample panel.
Changing the Y-axis
Right clicking on the right-hand price axis will bring up the
following floating menu. This shows the items whose properties
can be changed.
The other items which are not strictly graph items are the font
used in the Stocklist panel whenever the panel is displayed, and
the font used in the prices display if that is shown instead of a
chart.
45
CHAPTER 3
Changing the X-axis
Clicking on the X-axis with the right-hand mouse button brings up
the following floating menu:
The X-axis can be labelled with either dates or numbers. It is not
possible to specify different fonts for the days, months and years
if the x-axis is labelled with dates.
If the X-axis is labelled with dates, then the user can have
different colors for the day, month and year labels.
Note: the user can change rapidly between dates and numbers
on the X-axis by clicking on the X-axis scale using the left-hand
mouse button. Using hot spots in this way is described later in
this chapter.
Changing the Scales
Points plotted on start-up
This was discussed at the beginning of the chapter. The number
of points to be plotted will remain the default value in future
sessions with Channalyze until changed.
Enlarging a section of the chart with the mouse
The seventh button in the row of buttons at the top of the chart
has an icon depicting a magnifying glass. Clicking on this with the
mouse will change the cursor to a cross. To enlarge a section,
position the cursor at the top left of the section of the chart that
you wish to enlarge. Then press the mouse button and keep it
pressed while you move the mouse to the bottom right of the
required section. A box with a solid line is shown as the mouse is
moved.
46
CUSTOM GRAPHS
Once the mouse is released the section within the box is replotted to fill the chart space.
47
CHAPTER 3
Changing the timescale
As already discussed, the number of points plotted can be
changed from the Screen menu by selecting the item Points
Plotted at Start-up.
Whichever number is chosen, this number of points, up to and
including the last data point, will be plotted.
To maintain the same width of plot in terms of numbers of points
plotted, but move to a different part of the plot history, then move
the scroll bar that is displayed at the bottom of the plot (unless it
has been hidden via the Graph item, then select Buttons,
Stocklist, Templist etc.
When all points are plotted the scroll bar fills its whole width and
therefore cannot be moved. If a fewer number of points are
plotted then the scroll bar will allow more and more movement as
the number of points plotted is decreased.
The effect of moving the scroll bar when a limited number of
points are plotted is shown below.
48
CUSTOM GRAPHS
In order to save time when scrolling, the vertical axis is not rescaled. Thus it is possible to move to a section where, as shown
above, the data goes off the top (or bottom) of the scale. The
adjustment to bring it on scale is simple: just put the mouse
pointer within the plotting area of the chart and click the lefthand button. The price data are then brought on scale.
Scaling the Price Axis
The vertical axis can be re-scaled by using hotspots on the chart.
These are described in the next section. They allow the upper
scale value to be increased or decreased by one scale division
and the lower scale value to be increased or decreased by one
division. Only six successive increases or decreases can be
carried out, since this would lead to a chart that could not readily
be interpreted.
Plotting in One Box or Two
Usually any plots which use an entirely different scale, such as
Millard CyclesTM, Average Difference, etc. will be plotted in a
separate lower box. The height of this box can be adjusted by
dragging the center bar between the upper and lower box by
means of the mouse. Same box calculations, such as channels
and moving averages, will be overlaid on the correct box.
In the case of Cycle Sum, accessed via the Chans/Cycles
menu, an option is given to plot this sum in a separate box or
overlay it on the main plot.
Screen Hotspots
There are ten of these, one of which (as described above), is the
whole plotting area. The result of clicking a mouse button
depends on whether the left or right-hand button has been
pressed.
Right-hand Mouse Button
Clicking with the right-hand button has already been discussed,
and allows you to change the labeling of the X-axis, the Y-axis,
the Stocklist panel and the Prices panel.
49
CHAPTER 3
Clicking on the graph itself brings up the Graph menu, the subitems of which were discussed at the beginning of this chapter.
Left-hand Mouse Button
Clicking on the whole plotting area brings the whole of the data
on-scale.
The other hot-spots which will react to a left-hand mouse click
can easily be recognized by the fact that the cursor will show
different versions of itself when in these areas. A small up or
down arrow is displayed when the cursor is in the right-hand or
left-hand Y-axes. Clicking on the left-hand button when an up
arrow is shown will increase the scale by one scale division.
Clicking on the left-hand button when a down arrow is shown will
decrease the scale by one scale division
When the cursor is in the X-axis, it shows a representation of a
set of tick marks. Clicking on the left-hand button in this position
will switch between dates and numbers on the X-axis.
The Screen Hotspots are shown on the next page.
Status Bar
At the very bottom of the plot is an area called a status bar. The
right-hand two panels will show the current date and time, while
the left-hand panel shows the values at the point in time
represented by the current position of the cursor. When the
mouse cursor is in one of the rescaling hotspots, the action
required to rescale is displayed in the status bar. If it is in the xaxis label area, then the fact that the labeling will switch between
numbers and dates will be shown.
The actions shown for the right-hand vertical axis are also
replicated when the cursor is in a similar position in the left-hand
axis.
50
CUSTOM GRAPHS
Hotspots using the left-hand mouse button
These hotspots are the plotting area itself and the time
and price scales.
Decrease max
Increase max
Decrease min
Increase min
Rescale all the data
Change X-labels
51
CHAPTER 3
Hotspots using the right-hand mouse button
These hotspots are the plotting area itself and the time
and price scales.
52
Chapter 4 – Calculations
Clicking on the Calculations item in the menu bar will display the
following drop-down menu:
Note: there are three calculations in this drop-down list that can
be accessed by one click – Super Rises or Falls, Millard
ProbabilityTM Calculation and Experiment with Sine Waves.
These calculations are temporary and their parameters are not
stored.
The other calculations, accessed via sub-menus, are stored in a
list so as to be applied to each security as it is plotted. This list is
created via the Add Calculation item and can be maintained by
the Delete, Enable/Disable items (next page).
At this stage, there are no calculations stored, so clicking on the
first item Number of Calculations will give the message that
there are no calculations. When there are some calculations, this
message will state their number and allow you to see them.
53
CHAPTER 4
The next stage is to add a calculation. This item leads to another
drop-down menu which displays a list of the possible
calculations.
These fall into two categories, those that use the same vertical
scale as the stock data, and those that require a different scale.
The latter are plotted in a second box on the screen. The former
are the moving averages, channels and Bollinger Bands, and the
latter the MA Difference (moving average difference), MACD,
RSI, CCI and Millard Cycles.
Note: Bollinger Bands, MACD, RSI and CCI are present in
Channalyze only as a convenience for those traders who have
used them in the past.
Since you are able to select many calculations, these will be
confusing if they are all plotted at once. This can be avoided by
using the Delete, Enable/Disable Calculations item (page 81).
54
CALCULATIONS
We will start by selecting moving averages. As shown, there are
five different averages from which to choose.
55
CHAPTER 4
Simple Moving Average
Choosing this item will bring up a box into which the period of the
average can be entered, the color selected in which it will be
plotted and whether it should be plotted with no lag or centered.
The pre-set value for the period is 41, and this can be changed in
two ways. Clicking on the up/down arrows will increment or
decrement the value until the required one is obtained.
Alternatively, click on the text box which contains this value, use
the delete key or back delete key to remove the current value
and enter the required value through the keyboard.
The default color is bright blue, and this can be changed by
clicking on this colored box. The standard Windows color box
(shown in the last chapter) is then presented from which the user
can select a new color.
The other small box to the right of the colored box allows different
line styles and thicknesses to be chosen. Clicking on this will
bring up the Line Styles box, already discussed in the last
chapter. The thickness and style can be selected by clicking on
the required line itself or on the appropriate radio button
alongside the line.
Once the OK button is clicked, the previous Add Calculation
form is re-displayed. Clicking on the OK button in this form allows
56
CALCULATIONS
the calculation to proceed. The result is then displayed
graphically.
When averages are plotted with no lag, the latest calculated point
is plotted at the same point in time as the latest data point. This
can be seen in the first chart on the next page.
If, however, a centered average is chosen, then the plot of the
average is set back half of a span in time. A centered average
can be seen to be aligned more closely with the stock data than
an average with no lag, as shown in the lower screen shot on the
next page. Calculating an average is a crude way of smoothing
the data by removing certain fluctuations from the data.
Any cycles present in the data with the same wavelength as the
span of the average will be removed completely, while cycles of
other wavelengths are greatly reduced. Thus to remove very
short-term cycles an average with span of say 15 days to 25
days would be appropriate.
57
CHAPTER 4
The difference between an average with no lag and one which is
centered can be seen in the chart above. A shorter time frame
has been used, and the line thickness of the averages increased
to medium from thin for better visibility. The statement that an
average is a smoother version of the data itself can be verified
from this chart. The reason for using centered averages is also
apparent, since these are much more closely aligned with the
data. However, as can be seen, the penalty for achieving this
alignment is that the average terminates half a span back in time.
This is helpful in illustrating that what is happening to the
average, in the gap between the last true calculated point and the
present time, can only be estimated. An average can change
direction in this gap and the change not become obvious until
after the event.
The properties of averages in dealing with cycles can be tested in
a similar manner to the testing of the cycle scanner in Chapter 6.
Triangular Moving Average
Triangular moving averages are so called because they use a
triangular set of weights. The values of these weights are
calculated automatically from the value used for the span of the
average. They increase up to a central value and then decrease
58
CALCULATIONS
up to the final value. The number of weights is the same as the
value of the span. To calculate the first value of the average,
each of the n data values (where n is the span of the average) is
multiplied by the appropriate weight. This method gives the
largest influence to the central data point and the smallest
influence to the first and last of the n data points. The process of
multiplying with weights is then moved to the next set of n values,
and so on until all have been calculated.
When this item is selected from the list of various averages, a
similar box to that displayed for simple moving averages is then
shown. The span and color are selected as before.
When plotted, the triangular average will appear to be similar to a
simple average (see chart on next page). However, there are
subtle differences, in particular a greater emphasis on certain
cycles, depending upon which span has been chosen.
Triangularly weighted, centered averages are to be preferred in
any study of cycles in market data.
59
CHAPTER 4
Double Average
In this case two averages are applied. Once the first average has
been calculated, the second average is applied to this calculated
data. The second average smooths out any fluctuations due to
short-term movements which have not been removed by the first
average. The input box for a double average using periods of 41and 75-point is shown, along with the plotted average itself.
60
CALCULATIONS
Linearly Weighted and Exponential Averages
These averages put a greater weight on the most recent points in
the data when carrying out the calculation. The result of using an
exponential average is shown below.
These averages are not recommended for use in studies of
cycles and channels, since there is no reason to suggest that
cycles have increased in their influence as the latest point in time
is approached. All points have to be treated equally as the
calculation moves forward from the past to the present.
MA (Moving Average) Difference
We have seen that the smoothing effect of moving averages is
obtained by removal of fluctuations and that the wavelengths
removed depend upon the span used for the average. The
fluctuations that are removed by this process can themselves be
displayed by using the moving average difference. This is the
difference between the value of the data and the values of a
centered moving average. The MA difference will give a crude
picture of the mixture of short-term cycles present in the data.
61
CHAPTER 4
The box into which the span and color can be entered is shown
above.
Note: the greyed out option for centered. This is because only a
centered average can be used in this calculation.
Since this calculation gives values which are totally different from
those for the original data, the result is plotted in a separate box
below that used for the data. The timescales will be exactly the
same, and any rescaling operation on one box which involves a
change of the timescale will also be applied to the other box.
The screen shot on the next page shows the relationship
between the 41-point, triangular, centered moving average in the
top box and the 41-point MA difference in the lower box. When
the data is above the moving average, the values in the lower
box are positive, and when the data lies below the average, the
values in the lower box are negative.
62
CALCULATIONS
As shown in the lower picture, the relative height of the two
boxes can be changed by clicking the left-hand mouse button
and keeping it pressed when the cursor is over the dividing bar
between the two boxes. In this position the cursor changes into a
double-headed vertical arrow. The bar can then be moved up or
63
CHAPTER 4
down as required. The number of points plotted has also been
reduced by selecting Points from the Graph menu.
MACD (Moving Average Convergence Divergence)
This indicator was introduced in the 1960s by Gerald Appel, who
recommended the periods of 12 and 26 days for the periods used
in calculating the Exponential Moving Averages (EMAs).
The formula for the MACD is:
MACD = EMA[12] - EMA[26]
A signal line (or trigger line) is then formed by smoothing this with
a further EMA. The standard period for this is 9 days.
Signal = EMA[9] of MACD
The signals are used as follows:
Buy when the MACD line moves above the signal line
Sell when the MACD line drops below the signal line
The trader should never rely on this indicator by itself, but use
other indicators as confirmation.
When this calculation is request via the Add Calculation menu,
the input box shown on the next page is displayed.
64
CALCULATIONS
Note: the greyed out option for entering the period is set at 26/12
for the reason given on the previous page. The plot will also have
no lag, as shown below.
65
CHAPTER 4
RSI (Relative Strength Index)
The RSI examines the number of daily rises and daily falls in successive 14-day periods. The daily rises in a period are summed
to give a total up, and the daily falls in the same period to give a
total dn.
These are then divided by 14 to give values say uv and dv.
From these the RSI is calculated as follows:
RSI = 100 - (100 / (1 + (uv / dv)))
The input box for this calculation is shown below:
Note: the input box for the period is greyed out, since only the
value 14 is used. As shown on the next page, the line is plotted
with no lag.
When the value of the RSI rises above the 80% level, traders
take this to be a sell signal. Conversely, when the value falls
below 20%, then traders take this to be a buy signal.
66
CALCULATIONS
Bollinger Bands
Bollinger Bands consist of:
1. A middle band being a n-period simple moving average
2. An upper band at k times an n-period standard deviation
above the middle band
3. A lower band at k times an n-period standard deviation
below the middle band
Typical values for n and k are 20 and 2, respectively. These are
the values used in Channalyze.
Because the value used for n is relatively low, short-term
fluctuations are still apparent in the output.
It is important to realize that Bollinger Bands bear no
resemblance to Channalyze channels, which are of constant
depth.
The input box for Bollinger Bands is shown on the next page.
67
CHAPTER 4
Note: the greyed out box for the period, which is set at 20. The
plot, as shown below, has no lag.
68
CALCULATIONS
CCI (Commodities Channel Index)
The sequence of calculations for this indicator is as follows:
1. Calculate the last period's Typical Price
TP = (H + L + C) / 3
(where H = high, L = low, and C = close)
2. Calculate the 20-period Simple Moving Average of the
Typical Price (MATP)
3. Calculate the Mean Deviation
First, calculate the absolute value of the difference
between the last period's MATP and the typical price for
each of the past 20 periods. Add all of these absolute
values together and divide by 20 to find the Mean
Deviation.
4. The final step is to apply the Typical Price (TP), the
Simple Moving Average of the Typical Price (MATP), the
Mean Deviation and a Constant (.015) to the following
formula:
CCI = (TP - MATP) / (0.15 x Mean Deviation)
The input box for this calculation has a period set at 20:
69
CHAPTER 4
This plot has no lag, as shown below.
Channels
When this item is selected a box is shown in which you can
change three parameters – the period, the color in which the
calculated portion will be plotted, and the color for the
extrapolated portion.
70
CALCULATIONS
The calculation is based on a centered, triangularly-weighted
moving average. As such, the channel would terminate half a
span back in time from the latest data point. The program does a
curve fit to the last few points of the calculated average to
determine the path which the average should take to bring it up
to date. As such, it is of course subject to an error, but as we will
see shortly, the user is able to adjust this extrapolated portion
manually if it is felt that the channel could be constructed more
accurately. In order to clearly see this extrapolated part, it is
strongly suggested that a different color is selected for it in order
to emphasize that it is a best guess.
The channel itself is built from the average by calculating where
the upper and lower boundaries should be placed in order that a
certain percentage of data points should lie outside of these
boundaries. This percentage is usually set at 3.5%, but can be
changed from this value as shown later. Thus, with a plot
containing say 1000 data points the boundaries would be
automatically located so that 35 of the points would be outside
the boundaries. Some of these points would be above, and some
below the channel, and not necessarily split 50:50 above and
below.
When a channel is inspected, it will be seen that when a price
approaches a boundary, it retreats from it. Thus a boundary is a
place of high probability for a price reversal. When predicting
future movement therefore, an approach to an extrapolated
boundary is an indication that a price reversal is probably taking
place. The word probably is used advisedly for two reasons.
Firstly, the extrapolated boundary is an estimate of the actual
position of the boundary. Secondly, there are of course random
influences which can result in extreme movements to take the
price outside of the estimated boundary position.
As each new data point is brought in, the estimate of the
boundary position will be updated. It is important, therefore, that
the user does not anticipate such a price reversal but waits until
it becomes clear that the price has retreated from the boundary.
71
CHAPTER 4
It is also important that the user applies the cycle scanning
routine (Chapter 5) which will confirm that a major cycle is also
about to change direction.
An example of a channel which is indicating a reversal of
direction is that for the 201-day channel in British American
Tobacco. Firstly, the channel itself is now flattening out and can
be expected to head downwards. This downward direction will
take the price with it. Secondly, the price is at the upper boundary
and has in fact just retreated slightly from it. The expectation is
that a major reversal in the BAT price is about to take place.
Clicking on the magnifying glass icon and using the mouse to
enlarge the latest section of the plot shows more clearly the
relationship between the price and the upper boundary
72
CALCULATIONS
.
Sometimes there is a small blip at the junction between the
actual and extrapolated channel boundaries, which is a function
of the curve fitting routine and is of no importance.
An example of another stock in which the 201-day channel which
gives a warning of a change in trend is shown for British Airways.
This example is shown because of the sharp downwards hook in
the extrapolated part. This is the result of the curve fitting routine
on the last few points which were starting to curve downwards.
However, in a case like this, the downward hook becomes greatly
exaggerated. This will become obvious once some weeks or
months have gone by. It will be seen from an examination of the
channels produced in a variety of stocks that the turning points in
the channels are more or less symmetrical.
There is of course the possibility that the channel has changed
direction once again and is now rising again. This possibility can
be examined more clearly if an expanded portion of the chart is
used (by using the button with the magnifying glass).
73
CHAPTER 4
Quite clearly, the price data has now risen well above the upper
boundary of the extrapolated channel. The distance above the
upper boundary is far greater than anything which has happened
in the past history of this channel and the data. This indicates
74
CALCULATIONS
that almost certainly the channel has now changed direction and
is headed upwards.
This possibility should be examined in more detail by using the
cycle scanner (see Chapter 6).The channel bending routine can
also be of assistance.
Channel Bending
Sometimes the user will feel that the channel should be in a
different position from that which has been computed by the
program. In such a case the Channel Bending routine will allow
the user to manually adjust the position and turning point in the
channel by changing the bend. This bending routine can be
invoked from the Chans/Cycles item in the menu bar by clicking
on Adjust Channel.
A box is then brought up from which the required channel can be
selected (in case there is more than one displayed).
Clicking on Select Channel will bring up a list of channel
calculations and their parameters. Click in the one which is
required and a button will be displayed which shows OK, Adjust
X (where X is the channel name) and the calculation number
that has been selected.
75
CHAPTER 4
Once this has been clicked, then the chart will appear with three
blobs on it located along the center line of the channel. The
channel bending form will still be displayed but can be moved out
of the way if required. The leftmost blob is at the junction of the
actual channel and the extrapolated portion. This one cannot be
adjusted. The other two can be clicked on with the mouse and
dragged vertically up or down by keeping the mouse button
depressed.
When the mouse button is released the channel is redrawn in the
new position. Moving blobs 2 and 3 by this means will enable the
user to relocate the channel in what the user thinks is a better
position (chart on next page).
76
CALCULATIONS
Once you are satisfied with the new position for the channel, then
click on End Bending and the blobs will disappear, as shown on
the next page. If necessary, you can click on Restore Original to
undo the bending you have carried out.
77
CHAPTER 4
Changing Channel Depth
The default value of 3.5% for the allowable overlap can be
changed by selecting the item Change Channel Depth from the
Chans/Cycles drop-down menu.
A form is displayed (next page) which enables the user to
increase or decrease the depth. The current depth is shown
along with the current overlap percentage. The idea is to
minimize the number or extent of penetrations of the channel
boundaries while keeping as many points as possible where the
data touches the boundaries.
The result of doing this is shown on the next page. It is allowable
to have penetrations at points where the channel changes
direction because such penetrations represent the overshoots
that are the norm in such turning points.
78
CALCULATIONS
The depth has been decreased so that the recent low point in the
data appears to be close to the lower boundary. This is a
preliminary view of the channel, constructed so as to determine if
the next low point to occur in the near future is near the position
of the lower boundary. This will help to establish that the channel
has indeed begun to rise again.
79
CHAPTER 4
Millard Cycles™
This is the fourth calculation on the calculation list. Selecting it
will bring up a form in which the period can be entered.
The cycles have to be plotted in a separate box, as shown over.
As with MA Difference, the relative heights of the two boxes can
be changed by dragging the center dividing bar. For this
example, the Screen option has been used to hide the Stocklist.
It can be seen that over the last year or so, the cycles have
become much more regular and therefore predictable. They can
be followed into the future, but the accuracy of prediction falls off
rapidly the further into the future we look forward.
The whole question of cycles will be dealt with in the next
chapter, so will not be taken further at this point.
80
CALCULATIONS
Delete, Enable/Disable Calculations
These, as their name suggests, allow the user to remove a
calculation from the list, or enable or disable it while still keeping
it in the list.
If Delete Calculation is chosen, a form is displayed which shows
the current list of calculations. It is necessary to click on the
name of the calculation to select it.
Once the calculation has been chosen, a confirmation box is
displayed allowing the process to be aborted if you have second
thoughts about the deletion.
81
CHAPTER 4
The Enable/Disable Calculation allows a calculation to be left in
the list to avoid having to add all of its details again if it becomes
necessary to use it, but to keep it from being applied until it is
enabled again.
Once an item has been selected, a confirmation box is shown.
When it is required to enable this calculation again, a similar box
to that above will be shown with the message ‘Enable Item 1.
Channel’ (or whichever item has been chosen).
82
CALCULATIONS
Super Rises and Falls
The Calculations menu leads to an item Super Rises or Falls.
The sub-menu from this is shown below:
This calculation can be used as a valuable tool in the study of
earthquakes. An earthquake (Millard, Profitable Charting
Techniques, Wiley & Sons Ltd, 1997) is a formation where the
price rises or falls by an extreme amount, and then at some point
later, moves equally extremely in the opposite direction. When
the initial movement is a fall, the pattern looks just like a landslip
that occurs during an actual earthquake. When the return leg of
the formation will occur is difficult to predict, but if it is caught,
offers the prospect of a large profit.
Initially, a change of three standard deviations of the usual price
movement over the selected period of 1, 3 or 5 days is taken as
the significant movement. This value of the sensitivity can be
changed by clicking on the Sensitivity (StdDevs) item.
83
CHAPTER 4
Before any calculation can proceed, it is also necessary to enter
the number of days over which the super rises or falls must
occur.
Once a time period of 1 to 5 days is chosen (see next page), the
plot is scanned for movements larger than the selected sensitivity
in the required direction (or both directions if Both has been
chosen from the sub-menu). The positions of these are marked
by vertical lines in the colors selected from the Colors item in the
sub-menu.
The lower chart on the next page shows Super Rises for Agilent
Technology. If required for research purposes the timescale can
be changed to numbers instead of dates so that the intervals
between Super Rises can be estimated. In the chart on the next
page the grid has also been changed to a very pale color to
make it virtually invisible for clarity.
It is suggested that green is used as the color for Super Rises
and red the color for Super Falls. By doing this, the user will not
get confused about which lines can be attributed to rises or falls.
84
CALCULATIONS
In some cases the start or end of an earthquake can be
determined by using the cycle scanner (see next chapter).
Where earthquakes occur it will be noticed that a number of
cycles are all bottoming out or topping out at the same time. Thus
a prediction where it appears that this will be happening shortly
will indicate a probable earthquake about to happen.
85
CHAPTER 4
Millard Probability™
The drop-down menu gives a number of options.
Before the calculation can proceed it is necessary to enter the
number of trials and the number of days forward for which the
probability of movements outside of the probability bands are
required.
Number of trials
A form is presented into which the number of trials can be
entered.
The larger the number of trials, the more meaningful are the
results. As shown, 500 trials have been entered, but the
maximum of 2000 should be used.
86
CALCULATIONS
Days forward
A form is presented into which the number of days forward over
which the probability of movement outside of the probability
bands is to be calculated.
Band colors
Before the plot can be displayed it is vital that the band colors are
set. If this is not done the colors will be assumed to be black,
resulting in a plot which is undecipherable. The drop-down menu
to set these colors is shown below.
87
CHAPTER 4
Do it!
Clicking on this will bring up a cursor with a dice icon. The cursor
can be moved to the point from which the probability of
movement, over the specified number of days forward into the
future, is to be calculated.
Once the calculation has been carried out, a box is presented
with the numerical probabilities shown.
The box below shows that from the current starting point with a
price of 554.5, there is a 95% probability of the price moving
outside of the range 557 to 566. The larger the range outside of
which the price might move, the lower is the probability of this
happening. Thus there is only a 50% probability of the price rising
above 599 or falling below 540 in the next 50 days.
88
CALCULATIONS
Note: these bands do not have to be symmetrical around the
starting point. In fact they are unlikely to be symmetrical, since
the Millard Probability calculation is finding the separate
probabilities of rises and falls, and there is no reason why the
distribution of these should be symmetrical as it would be in the
case of a normal distribution (the ‘bell’ curve). In the present case
there is a 95% probability that the price will rise, since the band
557 to 566 is above the starting value.
The probability bands are also displayed graphically as bands in
the colors selected via the Bands Colors item in the sub-menu.
The colors should be chosen as pastel shades so that the
underlying price movement can be easily seen. The probability
levels (50, 75 and 95%) are marked at the boundaries of the
bands in the color which has been chosen for the Y-axis labels.
If, as is shown below, the colors have disappeared because of a
clash with the band colors, then the Y-axis color should be
changed to one more visible under these circumstances.
Note: these bands can be cleared from the plot with the Clear
From Plot item in the Millard Probability menu.
89
CHAPTER 4
Finally, the last two items on the Calculations menu are Cycle
Sums and Experiment with Sine Waves.
The Cycle Sums item simply allows you to change the colors
and line thickness. The actual calculation and storage of cycle
sums is dealt with in Chapter 6.
The Experiment with Sine Waves item allows the user to
calculate up to three sine waves and add them together. This is
useful for seeing how moving averages work with cycles and
combinations of cycles. The topic is covered in the next chapter
on the cycle scanner.
90
Chapter 5 – Experiment with Sine Waves
Before examining cycles in stock market data it is vitally
important to build up an understanding of the properties of sine
waves. Market data contains a number of cycles of different
wavelengths, amplitudes and phases added together. While the
aim of this program is to isolate important cycles in market data,
there are limitations to what can be achieved. By using the Sine
Wave Experimenter to generate either single or complex waves
the user can develop a much better idea of how this program
deals with these. Once a complex wave has been generated,
then it can be analyzed by using the scanner.
The three components of a sine wave are the wavelength, the
amplitude and the phase.
The wavelength is the time between successive peaks or
troughs. The time units depend on the circumstances, and could
be days, weeks, months or years.
The amplitude is the vertical height between a peak and a
trough.
We are using the term Offset instead of phase so that its
meaning is more clearly understood. It means how much the
wave is moved from an arbitrary starting point. In the box shown
on the next page, the maximum offset is one wavelength. An
offset of say half a wavelength would shift the peaks one half a
wavelength to the right in the display.
Three different sine waves can be calculated via this item and
they are then added together. To leave out one or two of the
three, simply set the amplitude to zero. Thus a single sine wave
can be produced, or the sum of two or the sum of three.
If the Experiment with Sine Waves item in the Calculations
menu is selected then the screen on the next page is displayed.
91
CHAPTER 5
All offsets are set to zero for this exercise. Once the OK button is
clicked, then the result is plotted:
Note: the data is calculated so as to simulate price data. For this
reason, the Plot Data as item should be used to plot data as
lines rather than OpHiLoCl.
92
EXPERIMENT WITH SINE WAVES
The screen picture on the previous page shows two sine waves,
one of wavelength 50 with amplitude 50, and one of wavelength
201 with amplitude 100. The third, having zero amplitude is left
out of the calculation. Since the data is artificial, the timescale is
what we make it, but we can take it to be in days, so as to
compare the results with real daily stock data. We can take the
amplitude to be in dollars, pounds or whatever currency our usual
stocks are denominated in. In the current series of plots no
particular currency is attached to the vertical axis.
Now, to see the effect of scanning this combined waveform we
can move to the Cycle Panel. This is accessed from the
Chans/Cycles drop-down menu by selecting Show Cycle Panel
and is displayed on the left of the screen as shown on the next
page.
There are three parts to the panel. The top section allows a
single wavelength to be chosen and its value changed either by
entering it directly into the box with the up/down arrows, or by
nudging up or down from its current value. It is now plotted in the
lower box on the chart until the Go button is clicked.
93
CHAPTER 5
If 41 is entered as the cycle wavelength and the Go button
clicked, the chart on the next page is produced, with the cycle
shown in the lower panel (shown over). Quite clearly, most of the
effect of the 201-point cycle has been removed, making it easy to
determine the wavelength of the output by simple taking the
distance from peak to peak. This will be seen to be 41 points.
94
EXPERIMENT WITH SINE WAVES
From this property of highlighting the cycle of the same
wavelength as that entered into the box, it would be expected
that entering 201 will remove the 41-point cycle, leaving the 201point cycle visible.
This is indeed the case, as shown in the resulting chart on the
next page.
It can be seen that we now have a method of focussing on just
one cycle by applying the same wavelength in the calculation.
However, it will be seen that the isolated 41-point cycle is not as
clean an output as the 201-point cycle, with some interference
still present from the higher wavelength cycle.
From this we can deduce that cycles with a wavelength greater
than the current value entered as the wavelength are not
removed as effectively as those of alower wavelength.
Even so, the ability to isolate the individual cycles is a major step
forward in the analysis of complex mixtures of cycles.
95
CHAPTER 5
Now we can experiment with three sine waves added together,
by entering the following values into the box.
The result, shown on the next page, is an even more complex
wave pattern.
96
EXPERIMENT WITH SINE WAVES
From our experiments with two sine waves, we would expect the
cleanest output from applying a wavelength of 301, and this is
indeed the case as shown below.
97
CHAPTER 5
On the other hand, we would not expect the output of applying a
wavelength of 41 to give such a clean output, and this can be
seen below.
Note: after the vertical line at the 1500 point, which represents
the last data point in the sine wave mixture, the wave appears to
be perfectly regular. This is because it has been computed as the
future course of the isolated 41-point cycle by calculation based
on the isolated cycle (although this is not perfectly clean), up to
that point. This extrapolation into the future is used in all scans of
cycles, whether in simulated data or real stock market data.
Reduction in Amplitude
It will be noticed that if you examine the vertical scales of the
isolated cycles, then there is a reduction in the amplitude
compared with that used when the cycles were set up using the
Sine Wave Generator. This reduction in the apparent amplitude
of the cycle is an unavoidable consequence of the mathematics
of the scanning algorithm. What it means is that in real stock
data, the cycles that are isolated have rather more influence in
the stock price movement than is apparent from the plot of the
cycle itself. An idea of the relationship between apparent
98
EXPERIMENT WITH SINE WAVES
amplitude, actual amplitude and wavelength can be obtained by
experimenting with different values in the sine wave generator.
Scanning for Cycles
What we have done so far is based on a knowledge of which
cycles were present in the simulated data. Of course, in stock
market data, we don’t know this, and the object is to find out
which cycle is present. The cycle scanning routines are the way
in which this can be achieved, and the power of the technique
can be shown by using the scanning routine on the simulated
data to see if it will show that there are cycles of wavelengths 41,
201 and 301 present.
The middle section in the Cycle Panel allows the wavelength to
be scanned from a predetermined starting point to an end point.
The steps by which the scan is incremented each time can also
be set. With a step of 1, the scan will take much longer than if a
step of say 10 is used, but the difficulty then is that information of
short span cycles will be lost.
If we leave the setting as above and click Go to scan this
complex sum of three sine waves, with the box Plot while
scanning ticked, then you will see each scan plotted in
succession.
99
CHAPTER 5
You will notice that as the wavelength increases, the short-term
movements gradually disappear, until after a scan value of
around 210 the plot shows an almost clean cycle of wavelength
301.
Since the last part of the plot is extrapolated by calculation, you
will notice that as the scan is proceeding, the peak or trough near
the position of the last data point will move around from left to
right over a small distance. This is due to the small amount of
error inevitably present in predicting the exact path of the future
cycle.
Once the scan is complete (or you stop if by clicking on Stop)
you will be presented with the Cycle Distribution plot. The Y-axis
represents the persistence of each cycle and the X-axis is the
wavelength.
The bars in this graph represent the number of occurrences of
each particular wavelength as the total scan is analysed. Thus
we see a group around 42 to 52, another group around 102 to
112, and a third group from 300 to 310. There are also two small
bars at 32 and 34.
This form enables you to select one of these bars and plot out
the cycle it represents.
Once the button Get Cycle 1 is clicked, the cursor shows a 1 and
short vertical line. As the cursor is moved across the chart, detail
100
EXPERIMENT WITH SINE WAVES
about the wavelength of the bar it is hovering over is shown in
the box below the chart. The persistence is the number of
occurrences of that particular cycle in that scan. If the mouse left
button is then clicked when the cursor is hovering over that cycle,
then the cycle is plotted and the values used in the scan to
produce that cycle are shown in the small window alongside the
Get Cycle 1 button.
Since there are three groups of cycles in this example, then the
same process can be repeated twice more – firstly for Get Cycle
2 and then for Get Cycle 3 so that we will have data in all three
boxes, as shown below. While there is a Get Cycle 4 button, it is
not needed in this case because there are not four groups of
cycles.
The buttons at the top right of the form enable you to plot any of
the selected cycles provided there are values in the boxes.
Clicking on Plot All will sum the cycles which are already
selected and plot the sum. This is shown on the next page.
Naturally, if the isolated cycles were each totally clean, then you
would expect that plotting the sum would exactly replicate the
original three-cycle data. The plot on the next page, allowing for
the different relative heights of the two boxes, is a reasonable
representation of the original data, with some loss of the fine
detail.
Note: the calculated sine wave sum is extrapolated into the
future. However, there is no data past the point represented by
101
CHAPTER 5
the vertical line, i.e. the last real data point, to show how good an
estimation of the future movement this is.
The closeness of the estimated path to what would be the real
path can easily be demonstrated by using the data cut-off. This is
accessed from the button whose icon is a pair of scissors.
When this is clicked, the cursor can be moved over the plot to the
point for which it is desired to cut off the data.
When this whole scanning routine is repeated on the data which
has been cut off in this way, then another plot is produced in
which the calculated and actual future movement can be
compared.
The distribution plot is shown on the next page. Because there is
slightly less data on which to perform the calculation, then there
is a difference around the group of peaks at 102 to 110. This is
where the Allowable Variation % box at the bottom of the plot
comes into play. This is the variation in the peak to peak or
trough to trough distances over the last few sweeps of the
estimated cycle which is allowed. Any estimated cycle which
exceeds this variation is not considered to be a correct
estimation, and is therefore left out of the bar plot. The effect of
reducing this allowable variation to 15% is shown in the upper
plot on the next page.
102
EXPERIMENT WITH SINE WAVES
Clicking on the Plot All button produces the chart shown on the
next page, with the point at which the data has been cut off
shown by the vertical line at about point 1375.
It can be seen that the extrapolation correctly predicts the
position of the next peak and trough, although the fine detail of
the original set of data is somewhat smoothed out.
103
CHAPTER 5
Lower Frames of Cycle Panel
These are shown below.
The Results button will bring up the Distribution plot at any
time, while the Exit button closes the Cycle Panel.
Doppler-Set Maximum Shift
This sets the allowable shift between successive peaks-to-peak
and trough-to-trough distances. A feature of stock market cycles
is that the wavelength, phase and amplitude are all changing
constantly. We wish to catch cycles when they are at their most
stable from this point of view, since under these conditions their
future course is much more predictable. Therefore a limit needs
to be set on this movement. Changes greater than this pre-set
figure are then not used in the distribution plot. A value of 20 is
acceptable.
104
Chapter 6 – Cycles in Market Data
From the exercises in the last chapter, you should now have an
appreciation of how you can isolate individual cycles from a
complex mixture of cycles. You will also understand that
extrapolating an isolated cycle into the future is subject to a
certain amount of error. Cycles in stock market data are subject
to fluctuations in wavelength, amplitude and phase, as will
become apparent when real examples are analyzed.
As well as the Cycle Panel which we explored in the last chapter,
we also have the capability of auto scanning all the securities in
a folder, and can store the names of the folders which we wish to
be scanned. From such an AutoScan we can view two outcomes.
Firstly there is the distribution of cycles in terms of wavelength
and persistence for each cycle that is present, and secondly we
can do an automatic summation of all stable cycles that are
present in the scan data for each security.
Before moving to the AutoScan methods, it is helpful to use the
Cycle Panel to investigate some securities in order to get some
feel for what can be achieved with real stock market data as
opposed to mixtures of artificially generated sine waves.
The chart of Agilent Technology, shown on the next page, is a
good candidate for the study of cycles because there appear to
be four waves with the distance between peaks getting smaller
as we move from the past to the present. The chart is made full
screen by using the Buttons, Stocklist, Templist etc. from the
Graph menu to hide the Stocklist.
With a chart on the screen, select Show Cycle Panel from the
Chans/Cycles menu. The scan start and end points should still
be in their default values of 15 and 350, with an increment value
of 1.
The scan is started by clicking on the Go button. A scan can be
stopped at any time by clicking on the Stop button. A scan can
be restarted once again by clicking on the Go button. In this case
a message is given as to whether to restart from the latest value
or from the overall start point.
105
CHAPTER 6
Note: as the scan progresses, the Good Count box shown
above will start to increment its values. This is the count of the
number of cycles considered to be stable over their last few
sweeps when the current value of Doppler Percentage is applied.
The higher this count the more is the influence that cycles have
in the latest segment of stock movement.
Once the scan has been completed, the distribution plot is
displayed.
106
CYCLES IN MARKET DATA
Obviously the most persistent cycle is the one around scan value
150. Click on Get Cycle 1 and move the cursor until it is hovering
over the highest bar in this group. The values of wavelength and
persistence will be shown in the box at the bottom of the plot as
the cursor moves right or left. Once on the major peak, click on
the mouse so as to accept this wavelength. The values of the
scan which highlight this particular cycle are shown in the box
alongside the Get Cycle 1 button (next page).
The reason that sometimes there is more than one value in this
box is because the mathematical routine, as we saw in the last
chapter, does not eliminate all cycles other than the major one.
There are still often residual cycles of other wavelengths present.
Thus cycles of a particular wavelength are present in other
scans. Also, the wavelengths being scanned for are not
necessarily highlighted by that particular scan value.
107
CHAPTER 6
In the current case, the wavelength 152 has been produced by
scan values of 200 and 203. Close or minimize the distribution
plot (click on OK, Close or the – icon in the box title strip) for the
moment and the plot of the cycle that has been chosen will be
visible.
This particular cycle, whose wavelength is shown in the title of
the lower box, appears to be bottoming out at the current point in
time. Since the persistence of 25 showed it to be the most
important cycle present in the data, this cycle will have a large
influence over future movement of the stock price.
The mathematics of the computation for each individual cycle
means that the last true calculated point terminates half of the
value of the scanning period in the past from the latest data point.
The pathway of the cycle is extrapolated from that point to the
present and on into the not too distant future. The further away
from this last true point we move, the greater is the inaccuracy,
but it is not unacceptable for some modest distance (say half of
the wavelength) into the future.
The purpose of these operations is to select up to four significant
cycles, view each of these individually and then add them
108
CYCLES IN MARKET DATA
together. This will then provide an indication of how the
underlying trend of the stock data should proceed into the future.
Sometimes of course, there aren’t four such cycles present, or
there are many more than four. In this case, judgement has to be
used as to which cycles should be chosen. However, it will be
seen that in the AutoScan mode, all stable cycles will be
collected and summed. The current operations serve more as a
research tool into the significance of certain cycles in determining
future movement.
Now restore the distribution plot, either by clicking on the Results
button at the bottom of the cycle panel, or on the minimized form
at the bottom of the screen. Then click on Get Cycle 2 and move
the cursor to the next high peak, which is at wavelength 142. The
value 232 is displayed in the box alongside this button. In this
case, unlike the cycle of wavelength 152, only this scan value
produced this wavelength. The distribution plot is shown below.
109
CHAPTER 6
The plot of this cycle is again displayed by closing or minimizing
the distribution plot.
While broadly similar to the cycle of wavelength 152, this cycle
appears to have bottomed out already and has just started to rise
again.
The process can repeated twice more so as to collect a total of
four cycles.
110
CYCLES IN MARKET DATA
By clicking on Plot All, the sum of these is plotted in the lower
box.
If one or other of the cycles when plotted does not look
reasonably regular over its last few excursions then it can be left
out by clicking on the OK, Close button and then re-selecting the
Results button. The four boxes at the top of the distribution
screen will be clear of values, and the selection process can be
repeated, leaving out the irregular cycle.
It is not strictly necessary to select four cycles since good results
can usually be obtained with three provided the cycles are very
persistent and are obviously much more important than any
others in the distribution plot. The longer wavelength cycles tend
to be the most regular, and the shorter wavelengths the least. It
is important that the cycles of higher wavelengths are selected
for the summation process.
Again, the distribution can be closed by clicking on OK, Close.
The plot of the four chosen cycles which have been summed is
shown below.
Because of the selection limit of four cycles, this method is best
used as a research tool as mentioned previously. The AutoScan
function will select many more stable cycles and add them
111
CHAPTER 6
together to give a much better forecast of the future movement of
the underlying trend in the price movement.
The Print button will allow the distribution chart to be copied to a
printer for future reference.
Although mentioned in the previous chapter, the other controls
seen on the distribution plot are the Replot with New % and
Allowable Variation. Increasing the allowable variation will
display more cycles, but there comes a point where their validity
is in question as a predictor of future movement. A value of 30%
is the maximum that should be used. In the present case, a lower
value than the 25% used will reduce the number of cycles shown.
At any time the data that has produced the chart of the cycles
can be displayed by clicking the Data button.
112
CYCLES IN MARKET DATA
The cycles are separated into the categories short, medium and
long. The Wavelength is the nominal value used on the scan
which normally would run from 15 to 350. The Latest is the
wavelength of the most recent segment of the isolated cycle. The
Amplitude is self explanatory. The Tolerance is the change in
wavelength over the last few sweeps of that cycle. Finally the
Direction gives the status of the cycle at the current position of
the last data point (or position of the cut-off point if the cut-off has
been used).
It is from this data set which stores results from each scan that
the distribution chart is created.
113
CHAPTER 6
Closing/Opening the Distribution Plot
The distribution plot is a floating form that always stays on top of
any other form. It can be minimized and brought back at any
time, or it can be resized and moved out of the way of any detail
that you might wish to examine. If it is moves in this way, then the
cycles which have been chosen remain as chosen. If the OK,
Close button is clicked the plot is closed. It can be brought back
by clicking on the Results button in the Cycle Panel. If this is
done, then, although the distribution plot remains as it was, the
selected cycles will have been cleared and will need to be
selected again.
Summing Low, Medium and High Wavelengths
The bar below the distribution plot is divided into three sections.
From left to right they are colored red, green and blue. These
allow you to sum three segments of cycles – low, medium and
high wavelengths. The boundaries or cut-offs between low and
medium, and medium and high wavelengths can be adjusted by
means of the two boxes at the top of the form to the left of the
Sum Red and Sum Blue buttons. The default values are 75 and
25. With these settings, clicking on Sum Red will sum the stable
cycles between wavelengths 15 and 25 inclusive (stable cycles
means those cycles that are shown in the distribution plot).
Clicking on Sum Green will sum those cycles of wavelengths
between 26 and 75. Clicking on Sum Blue will sum those cycles
between 76 and the last scan value selected (350 in the current
scan).
Note: there is no way that the sum of all the cycles can be
plotted from this distribution plot. Such a total sum is carried out
via the AutoScan item in the Chan/Cycles menu, as discussed
later in this chapter.
The results of clicking on Sum Red, Sum Green and Sum Blue
with the current boundaries of 25 and 75 are shown on the next
two pages.
114
CYCLES IN MARKET DATA
Sum Red, wavelengths from 15 to 25
Sum Green, wavelengths from 26 to 75
115
CHAPTER 6
Sum Blue, wavelengths from 76 to 350
In many cases the distribution plot shows more concentration of
cycles over just a few bands of wavelengths. A good example of
this is Lloyds TSB, which is in the Samples folder. As seen on the
next page, the stable cycles are distributed between two bands,
with no cycles of long wavelength present.
If the Low/Medium divider is set at a value of 35, and the
Medium/High divider at 63, the consequent Sum Red plot is
shown at the bottom of the next page, and the Sum Blue plot at
the top of the page after that.
The above shows that this sum of medium wavelengths is
sufficiently stable, with only minor changes in wavelength, to be a
useful predictor of future movement, showing a fall at present,
but a rise in the near future.
This principle of summing low, medium and high wavelength
cycles can be applied in the AutoScan technique which is
described in the next section.
116
CYCLES IN MARKET DATA
Distribution plot for Lloyds TSB
Sum Red, wavelengths from 15 to 35
117
CHAPTER 6
Sum Red, wavelengths from 63 to 350
The reason for being able to sum these bands separately is to
give the user a powerful research tool into short-term, mediumterm and long-term movements in market data. Short-term
traders will find the sum of short-term cycles invaluable in
determining short-term changes in direction.
AutoScan
There are two items on the Chans/Cycles drop-down menu
(shown over) that are concerned with autoscanning of the data.
These are AutoScan Millard Cycles and Specify Folders to be
Scanned. In addition, two other items concern the display of the
results. Show Cycle Sums for Each Plot will allow the sum,
which has been stored for each security that has been scanned,
to be shown as the security is selected from the Stocklist. In a
similar way the Show Cycle Distribution item will show the
distribution for each security.
118
CYCLES IN MARKET DATA
Before the AutoScan Millard Cycles routine is set running, it is
best to specify which folders are to be scanned. These can be
anywhere in your system, but the screen shot below shows all of
the sub-folders in the Channalyze program folder as being
selected.
Once the folders have been selected in this way, then AutoScan
Cycles can be selected. This will give a number of options, as
shown on the next page.
119
CHAPTER 6
The options as shown above are self explanatory except for the
Step Profile. The Constant increment of one unit option will
carry out the same scan as we saw with the Cycle Panel. While
this is fine if a limited number of securities are scanned, it is too
time consuming for a large number. The user should opt for the
second or third options (the default value is the second option).
If Scan current security is selected then the cycles in Agilent
Technology are determined and their sum produced as a plot in
the lower box.
120
CYCLES IN MARKET DATA
The cycle sum of course only uses cycles with wavelength of 15
days and above. Therefore the day to day fluctuations in the
actual market data will not be apparent. Even so, it is clear from
comparing the upper and lower boxes that the cycle sum is a
good representation of the underlying trends, with some
differences in the amplitude of the movements.
Scanning for cycles in this way has the effect of clearing all
calculations from the chart in the upper box. Any such
calculations can be activated again by clicking on the item Show
Cycle Sums in the drop-down menu. This is useful for comparing
moving averages or channel plots with the cycle plot.
The summed data will now be read from a file where it has been
stored. The option is given to plot in a separate box, i.e. the lower
box, or to overlay it on the data plot and whatever other
calculations are displayed on the data.
121
CHAPTER 6
This time a 15-point, triangularly weighted, centered moving
average is plotted on the top chart as a thick line for extra
visibility.
Since the average represents a trend in the market data, it is
astonishing how closely the summed cycle data mimics the
movement of the average, bearing in mind that the cycles from
around 150 days in the past to a point into the future has been
estimated, and is not cast-iron calculated data.
The cycle sum predicts that there should be a slight downward
blip in the stock price over the next two weeks, followed by a
substantial rise after that, before peaking out in January 2008.
Note: the distance into the future for the predicted movement is
fixed and has been set to a point where the forecast has a good
level of predictability.
122
CYCLES IN MARKET DATA
If the cycle distribution is required, then clicking on Show Cycle
Distribution for Each Plot will display the distribution plot.
Before we discuss this plot, it is useful to scan all of the securities
in the current Samples folder. This is done by selecting AutoScan
again, and this time clicking on Scan from current security to
last in folder. It is assumed that the currently selected security is
Agilent Technology. With the Step Profile set to its default of
Linear Ramp 1-10 (fast) the scan should take around 10
seconds per security, so that the scan of all five will be completed
in less than a minute.
The distribution plot will be displayed, but it can be reduced in
size by dragging its bottom right-hand corner with the mouse.
Now if you move through the security list by clicking on the button
with the right and left arrows keys, you will see that both the cycle
sum and the distribution plot for each security is shown at the
same time. This is useful for selecting those securities in which
there are just a few dominant cycles.
The distribution plot from this AutoScan using the middle
scanning option is not the same as the one done by the manual
method using the Cycle Panel (shown over).
123
CHAPTER 6
This is because during a manual scan using the Cycle Panel, as
the wavelengths increase then the rate at which they change
slows down. Sometimes a change of around 20 or 30 units will
have no effect on the cycle plot.
This fact was used to create a faster scanning process by
omitting some of the scans at these higher wavelengths. This
gives us the two other scanning options in the Step Profile
section of the form.
These linear profiles used in the second and third Step Profile will
therefore reduce the influence of the higher wavelengths in the
cycle distribution.
Because of this, the higher wavelengths will not have the same
apparent persistence in the distribution plot. Experiments have
shown that the cycle sum produced from this profile has more
contribution from short wavelength cycles, and therefore can give
a better indication of short-term movements in the immediate
future.
124
CYCLES IN MARKET DATA
Step Profile option 1 (constant interval of 1)
Step Profile option 2 (linear ramp 1 to 10)
125
CHAPTER 6
Shown on the previous page is a scan where the Step Profile
has been selected as option 1 (constant interval of 1), while in
the second picture the step interval is the default Step Profile
option 2 (linear ramp 1 to 10), to illustrate the fact that short-term
movements are not as apparent when option 1 is selected as
when option 2 (or 3) is selected.
Note: the cycle plot in the lower panel shows a longer title than
that in the upper panel. This is to illustrate the point that it was
retrieved from the stored scan. In this case, the date of the scan
has been stored, along with the date of the last data point in that
scan, and the date of any cut-off of the data (see page 42).
Thus paradoxically, the faster scanning profiles give a better
indication of movement than slower ones.
126
Chapter 7 – Updating Your Data Files
Most investors acquire their data from a data provider. This may
be by a direct telephone or cable link, or via the Internet. The
Update Menu in Channalyze assumes that you are able to
download the data in the form of an ASCII (text) file which is then
stored on the disk. Unfortunately, there are almost as many
forms of ASCII data in these files as there are data providers, but
the Updater provides a way of overcoming these difficulties.
Overview of the Universal Updater
The Updater has to cope with the fact that many investors now
store data on more than one market, for example the New York
Stock Exchange, NASDAQ and the London Stock Exchange.
The data for updating these various markets may also be
provided by different data vendors.
This dilemma is catered for in the Updater by storing information
about each market, such as where the updating files are stored,
what formats these files have (they might be different for different
markets), which folders hold the historical data that is being
updated, and so on. The Updater stores a list of these markets
with names decided by the user. The names can be changed,
added to and deleted. Within the program file folder (Channalyze)
there is a folder with the name Markets. For each market name
that is added, a separate folder is created which will contain all of
these details. Once these details are in place and the user
wishes to update a market, it is only necessary to select that
market name, choose which files are to be used, and then start
updating. Once updating is complete, a log file is created so that
the user can see which files have been used, and if any problems
have been encountered, such as corrupt data files.
Running the Updater
ChannalyzeUpdater is a separate module which is accessed in
the same way as the Channalyze program, i.e. from the list of
programs. As with Channalyze, an icon can be produced so that
the program is accessible from the desktop. The program can
127
CHAPTER 7
also be accessed from Channalyze via the menu item. In this
case, a message is given:
Unlike Channalyze, this module will not read-in the default list of
securities as this is usually not required during updating. If
necessary, the security list in a folder can be read, for example in
order to check how up to date the data is that is being held in it.
The initial appearance of the screen is shown below. The second
item on the menu bar, Security is greyed out but will become live
if the File menu is used to Open/View the securities in a folder.
.
128
UPDATING YOUR DATA FILES
Information Required for Updating to Proceed
Before the Updater can be used for the first time, it must be given
certain information. After this, this will only need to be done if
current details need to be changed or a new market added.
If this information is missing, the fact can be established by
looking at the two labels below the row of buttons. If no market is
selected or available, then the first label shows Current market:
none.
If a market has not been selected or the format has not been set,
then the second label shows Format not set.
The first time of use, there will be no list of markets from which to
choose. Clicking on the Markets menu will bring the following
drop-down menu.
Adding a New Market
For first time users, this is the first thing to be done. Clicking on
Add a New Market will display a form into which the name of the
market can be entered. As shown, up to 25 characters including
the space and underscore characters can be used to name the
market.
129
CHAPTER 7
Once the market name has been entered, clicking on Add the
New Market will add it to the list in the left-hand box. Clicking on
OK, Accept Changes will then store the name of this market,
which will then be shown in the main form:
130
UPDATING YOUR DATA FILES
Setting the Format of the Updating Files
This is done via the Market Parameters menu. Clicking on this
item shows a drop-down menu which allows you to Choose
Market or Set or Change Parameters. Click on Choose Market
(even though in this case there is only one – London). Then
select the market for which you wish to enter the format. As an
example, the screen for setting parameters for London is shown
below:
As can be seen, the current format has no details, the label which
shows where the updating files are stored is blank, and the
number of target folders (i.e. the folders containing the data to be
updated) is set at 0. No updating can proceed unless all these
items have details stored against them.
The user can select from a large number of pre-set formats from
a number of data providers such as that from EODData.com,
Financial Express, etc. or can build a custom format.
Clicking on the Pre-set Formats item will bring a drop-down
menu.
131
CHAPTER 7
Using EOD, ADVN or Financial Express Files
If you are downloading data from these sources, then you can
avoid a lengthy dialogue in the View/Change Settings option
and you will not need the Specify Date Location.
In the following explanation, these symbols are used to describe
the field order in the files:
T =Ticker, N = Name, P = Periodicity (e.g. D for daily), D = Date,
O = Open, H = High, L = Low, C = Close, V = Volume
For dates, the usual form of DD = day, MM = month, YYYY or
YY = year is used. For characters not used such as / or, or – ,
then an X is used. It is important that the Updater is given the
correct format for the date, with Xs if necessary, if it is to be
interpreted correctly. In some files, the date is part of the
filename; in others it is in every line of the file contents.
132
UPDATING YOUR DATA FILES
Financial Express Files
From this option you will then be given a menu from which you
can then select from:
D files – these have the extension .m and field order TOCHLV.
The date is contained in the filename and is of the form
XYYMMDD
Channalyze/ CCS/Metastock/Microvest files – these have the
extension .DMS and field order TPDOHLCV. The date is in every
line and is of the form YYMMDD
M files – these have the extension .m and the field order TC.
The date is in the filename and is of the form XYYMMDD
ADVN Files
These have the extension .met and the filed order is
TPDOHLCV. The date is in every line and is of the form
YYMMDD.
EOD Data files
These eight items shown in the drop-down menu have the
following formats:
Advanced Get ASCII
These have the extension .txt and field order TPDOHLCV. The
date is contained in each line in the file and is of the form
YYMMDD.
Ezycharts
These have the extension .txt and field order TDOHLCV. The
date is contained in each line in the file and is of the form
YYMMDD.
Metastock ASCII 7 Column
These have the extension .txt and field order TDOHLCV. The
date is contained in each line in the file and is of the form
YYYYMMDD.
133
CHAPTER 7
Metastock ASCII 8 Column
These have the extension .txt and field order TPDOHLCV. The
date is contained in each line in the file and is of the form
YYYYMMDD.
Metastock with Names
These have the extension .txt and field order NTDOHLCV. The
date is contained in each line in the file and is of the form
YYYYMMDD.
Quicken
These have the extension .txt and field order TCDHLV. The date
is contained in each line in the file and is of the form
MMXDDXYYYY.
Stockscreen Pro
These have the extension .txt and field order TNDOHLCV. The
date is contained in each line in the file and is of the form
DDMMYYYY.
Note 1: these pre-determined settings for EOD, ADVN and
Financial Express need to have been stored before you
determine the location of the updating files via the Change
Source Folder option of the Folders item.
Note 2: if any of these pre-determined formats are used, then the
only other item in this menu that you will need is the Change
Source Folder option of the Folders item, since at this point the
program does not know the location of the updating files.
Choosing EOD Data Files will bring down a list of currently
supported formats as just discussed (which can be selected
when you download from the EODData.com web site). You
should obviously use the one which you specified when using the
download. This list is shown in the first screen picture on the next
page.
Note 3: on the EODData web site, there is an option to download
the header information as the first line in the file. Do not select
this, since the number of items in the header file does not always
134
UPDATING YOUR DATA FILES
match up with the number of fields in the lines of actual market
data. This will cause the updating process to fail.
As an example, the Metastock 8 column format was chosen
from this list. The second screen shot below shows that the
details for the updating format are now filled in.
135
CHAPTER 7
Selecting the Folder Holding Updating Files
As far as the files which are to be used for updating are
concerned, the program must be given the location of the files
which will be used for updating (i.e. the folder containing them).
The folder holding these files can be selected by clicking on the
Folders item in the menu.
From the drop-down menu, choose Change Folder holding
Updating Files.
This will bring up the browser, from which the appropriate folder
can be chosen and its location stored. The screen for this is
shown on the next page.
You should navigate to the appropriate folder on the list of folders
held on the computer. Double clicking on this will put its name in
the box at the top right-hand of the form.
If you are not sure whether the folder holds the correct updating
files, then click on the button Show Updating Files in Above
Folder. This will list the files (if they have the correct file
extension, e.g. .txt) as shown on the next page.
If this is the correct folder, then click on OK to store this
information and return to the previous screen.
136
UPDATING YOUR DATA FILES
The box at the lower left now shows the selected location for the
updating files.
137
CHAPTER 7
Selecting the Folders to be Updated
This is now the last item to be determined. Up to 50 folders can
be designated as target folders for each market. If for some
reason you require more than this, then simply add another
market with a different name and go through the sequence above
but choose the (different!) folders for that other market in the
following manner.
From the Folders item in the menu, choose Select Folders to
be Updated. You will then be presented with the following screen
where a folder FTSE 100 has been selected. Its full name
appears in the top right-hand box. It can be added to the tabbed
list headed Folder by clicking on the Add Above Folder button.
This can be done for all the folders you wish to update from this
one set of updating files. Shown on the next page is a form in
which four folders containing data from the London market have
been selected in sequence.
138
UPDATING YOUR DATA FILES
Once you have chosen all the folders you wish to be updated,
then click on OK to take you back to the Parameters. As shown,
the number of target folders has changed from 0 to 4.
139
CHAPTER 7
Since all items now have details stored for them, there is only
one important task to perform, and that is to check on an
updating file to confirm it has been allocated the correct format
of field order, date format, and so on.
To do this, click on the Check Format item in the menu bar. The
following drop-down menu is shown.
In order to check a file, the correct sequence must be followed,
selecting items in the drop-down box in the order in which they
occur.
Clicking on List Updating Files will show a list of the files
present in the folder which holds these files, as shown on the
next page.
One of these files must be selected by clicking on its name
before moving to the next stage.
Once selected, you can then click on the View File Contents
item in the Check Format drop-down menu. This will show lines
present in the file up to a maximum of 500 lines.
These two types of list are shown on the next page.
140
UPDATING YOUR DATA FILES
141
CHAPTER 7
At this point, you could examine items such as the date format
and field order to check that it is in agreement with the settings
stored on the left of the form. However, this task can be
performed for you by clicking on Show Field Order in the dropdown menu. You are then shown a form in which the fields have
been interpreted.
This form needs to be studied very carefully, since errors in the
way the date is displayed, for example, will have serious
repercussions in the updating process. If a date is misinterpreted
so that the year is some way into the future then the data is
stored for this date, giving the user a hard time in making sense
of any charts. Within the Channalyze program records can be
deleted, but it is a tedious process and can be avoided by taking
care at this stage.
It is possible that data providers may change the file format
without notice, and this again would cause a problem. It is
sensible to check the format of the updating files periodically to
check that all is well.
142
UPDATING YOUR DATA FILES
Custom Formats
If your file format is not one of the pre-set ones, or even if you
find that there is something wrong with a pre-set format, you
can use the Custom Format item to change or create a new
format. Choosing this item will display two options.
Taking the Specify Field Order item first, a tabbed form will be
displayed with each tab giving the opportunity to enter the
required detail.
143
CHAPTER 7
Two items which are not displayed under the Current Format
details are the Units and Skip Lines. It is now not very common to
have stock units specified in anything other than decimal, but this
option allows for eighths, sixteenths and thirty seconds. The Skip
Lines option caters for those files which contain a few lines of
headers before the lines containing stock data within the file.
The front form is displayed initially, and gives some suggested
file extensions normally used by the data providers. Without this
extension being stored, Channalyze would not be able to locate
the files.
The above example shows the extension D (this is used by
Financial Express for their files which have the Standard format).
The Apply button would apply the settings for each of these
tabbed forms and still leave the form on the screen. The OK
button would apply the settings and store them on disk and then
close the form. The Cancel button obviously closes the form
without doing anything. The Help button brings up a help list for
the selected tab. Clicking on the tabs at the top will bring the form
belonging to the selected tab to the front.
For Field Order it is important that a field which is not required is
entered as an X. Thus, frequently the Open Interest (I) field is
always zero. In such a case it should be represented by an X. It
144
UPDATING YOUR DATA FILES
is particularly important for the date format that slashes or
hyphens are designated by Xs if the date is to be interpreted
correctly.
It is important that all tabbed items have an entry before clicking
on the OK button. If you are just changing an existing format then
there will already be entries for each item.
The next task is to specify how the Updater can find the
appropriate date for the updating data. The sequence to get to
this item is Market Parameters – Set or Change Parameters –
Custom Format – Specify Date/Ticker Locations. This brings
up a form in which options can be selected. If the In the
Filename is clicked, then the lower panel is greyed out, since it
does not apply.
If the In the filename is selected, then the middle panel is
greyed out.
145
CHAPTER 7
If the Within the file itself is selected, then the middle panel
becomes enabled.
In the case of the Within the file itself option there are two
possibilities. The Date in one line option would be used for those
types of file in which one of the first few header files contain the
date. We would then use the Line number containing date box
to enter the line number in which the date is held. The files from
EODData, for example, have the date in every line and so the
Date in every line option would be selected.
The position of the ticker can be specified in the lower panel.
Once you are satisfied with the details, click on OK to exit this
form.
Since you have made changes or entered totally new details, it is
necessary to check the format of the updating files before leaving
the Parameters form. Once everything is acceptable, then click
on the Save Format button to go back to the starting screen.
146
UPDATING YOUR DATA FILES
File Menu
The File menu gives a drop-down menu with many further
options.
The first two items will list the securities in either the current
folder being used by Channalyze or in a folder which can be
selected in the same way as in Channalyze.
The list of securities is displayed, along with the latest few
records as shown on the next page.
The Print Setup item allows the user to choose the printer and
whether the output is in portrait or landscape format. Selecting
Print will print out the list of price data held in the price view.
List Updating Files to Send to Backup
This allows the user to move updating files away from the folder
where they are stored to a backup folder. If this is not done
periodically then a long list of files will be presented from which to
select those required to use in the current updating process.
147
CHAPTER 7
This folder has the name DownloadBackup and is a sub-folder
of the Channalyze program folder. Once files have been selected
by clicking on them, they can be sent to the backup folder by
clicking on the Send selected Update files to backup item.
Note 1: that a block of files can be selected by clicking on the
first one in the block, holding down the Caps key and clicking on
the last in the block. The whole block then becomes highlighted.
148
UPDATING YOUR DATA FILES
Note 2: to select more than one file when they are not
contiguous, then hold down the Shift key while clicking on the
desired files.
AutoSend Updating Files to Backup
By clicking on it, this item can be toggled between sending and
not sending the files to backup. If checked, then once backup is
completed, the files are sent to the folder UpdatingBackup as
mentioned previously. These are of course accessible by the
Updater from that location if required.
Updating
Clicking on the Updating item in the menu bar will bring down
the drop-down menu.
Click on the List Updating Files and the list of files in the
currently selected market with the correct extension (e.g. .txt if
Metastock 8 column is the chosen format) will be shown in the
right-hand panel. This is shown on the next page.
Click on the files that you require to be used in the updating
process so that they are highlighted (see previously List update
files to send to backup to see how to select a block or noncontiguous files), and finally click on Update with Selected files.
The updating process will commence and a form shown in the
middle of the screen which displays the folder being updated, the
updating file being used and the date for which the updating is
occurring.
Once the process has completed, a message to that effect will be
briefly shown.
149
CHAPTER 7
Running Channalyze from the Updater
To exit from the program back to the Channalyze module, simply
click on the Channalyze item in the menu bar, or click on the
button with the Channalyze icon, or use the drop-down File
menu.
150