1
MODEL TC01
STAND ALONE DIGITAL TEMPERATURE CONTROLLER
USER MANUAL
The information in this document has been carefully checked and is believed to be entirely
reliable. No responsibility however, is assumed for inaccuracies. Furthermore, such information does not
convey to the purchaser of the productdescribed any license under the patent rights of SUN ELECTRONIC
SYSTEMS, Inc. or others.
Sun Electronic Systems strives constantly to improve the quality andperformance of all its products
in design, construction and cost. As a consequence, SUN ELECTRONIC SYSTEMS, INC., reserves the
right to change specifications or installation procedures without notice.
Any software and programs used in Sun Electronic Systems products remain the sole property of
SUN ELECTRONIC SYSTEMS, INC., and may not be copied by any means. Purchase of said product
constitutes agreement that software rights remain SUNELECTRONIC SYSTEMS, INC. Upon purchase,
Sun Electronic Systems grants perpetual license for use by customer.
REV F
FOURTH EDITION
Copyright 1984 to 2000 by SUN ELECTRONIC SYSTEMS, INC.
0707
TC01-F Manual Ver. 0707
1
LIMITED WARRANTY INFORMATION
TCO1 TEMPERATURE CONTROLLERS
SUN ELECTRONIC SYSTEMS WARRANTS THIS PRODUCT TO THE ORIGINAL PURCHASER TO
BE FREE FROM DEFECTS IN MATERIAL AND WORKMANSHIP AND TO OPERATE WITHIN
APPLICABLE SPECIFICATIONS FOR A PERIOD OF TWO (2) YEARS FROM THE DATE OF
SHIPMENT PROVIDED ITIS USED UNDER NORMAL OPERATING CONDITIONS. THIS WARRANTY DOES NOT APPLY TOSEALED ASSEMBLIES WHICH HAVE BEEN OPENED OR TO ANY
ITEM WHICH HAS BEEN REPAIREDOR ALTERED WITHOUT AUTHORIZATION.
RISK OF LOSS OR DAMAGE TO PRODUCT SHALL PASS TO THE CUSTOMER UPON DELIVERY
BYSUN ELECTRONIC SYSTEMS TO THE CARRIER AT SUN ELECTRONIC SYSTEMS’ PREMISES.
WE WILL REPAIR OR, AT OUR OPTION, REPLACE AT NO CHARGE ANY OF OUR PRODUCTS
WHICH, IN SUN ELECTRONIC SYSTEMS’ JUDGEMENT, ARE FOUND TO BE DEFECTIVE UNDER
THE TERMS OF THIS WARRANTY. EXCEPT FOR SUCH REPAIR OR REPLACEMENT, WE WILL
NOT BE LIABLE FOR LOSS OR DAMAGE TO PERSONS OR PROPERTY CAUSED EITHER
DIRECTLY ORINDIRECTLY BY USE OF THIS PRODUCT OR FOR ANY INCIDENTAL DAMAGES
OR FOR ANYCONSEQUENTIAL DAMAGES, AS THOSE TERMS ARE DEFINED IN SECTION 2-715
OF THEUNIFORM COMMERCIAL CODE. BEFORE USING, PURCHASER SHALL DETERMINE
THE SUITABILITY OF THE PRODUCT AND THIS DOCUMENT FOR HIS INTENDED USE AND
PURCHASER ASSUMES ALL RISKS AND LIABILITY WHATSOEVER IN CONNECTION THEREWITH. NO STATEMENT OR RECOMMENDATION NOT CONTAINED HEREIN SHALL HAVE ANY
FORCE OREFFECT UNLESS IN AN AGREEMENT SIGNED BY OFFICERS OF SUN ELECTRONIC
SYSTEMS.
2
TC01-F Manual Ver. 0707
Contents
SECTION I - GENERAL INFORMATION ..................................................................................... 5
1-1 INTRODUCTION ......................................................................................................................... 5
1-1.1 EARLIER VERSION COMPATIBILITY ............................................................................................................... 6
1-2 INITIAL INSPECTION ................................................................................................................ 6
1-2.1 LOST OR DAMAGED EQUIPMENT ................................................................................................................... 7
1-2.2 UPS SHIPMENTS ................................................................................................................................................ 7
1-3 TC01 SPECIFICATIONS ........................................................................................................................................... 8
TABLE 1-1 ................................................................................................................................................................... 8
1-4 SAFETY CONSIDERATIONS ................................................................................................................................... 9
1-4.1 OPERATION........................................................................................................................................................ 9
1-4.2 INSTALLATION .................................................................................................................................................. 9
1-5 CONTROLLERS COVERED BY THIS MANUAL ..................................................................................................... 9
1-6 TC01 DESCRIPTION ............................................................................................................................................... 10
1-6.1 GENERAL DESCRIPTION ................................................................................................................................ 10
1-6.2 BLOCK DIAGRAM DESCRIPTION ................................................................................................................... 10
1-6.3 FAILSAFE FEATURES ..................................................................................................................................... 11
1-7 OPTIONS ................................................................................................................................................................ 13
1-7.1 220 VOLT 50/60 HZ OPERATION - OPTION 00 ................................................................................................. 13
1-7.2 PROBE TYPES SUPPORTED ............................................................................................................................ 13
1-7.3 TIME SET IN HOURS - OPTION 07 .................................................................................................................. 13
1-8 REPAIR ................................................................................................................................................................... 13
1-9 RETURN OF MERCHANDISE ................................................................................................................................ 13
SECTION II - INSTALLATION / PRELIMINARY CHECKOUT ............................................... 15
2-1 CONNECTOR DETAIL ........................................................................................................................................... 15
2-2 INSTALLATION INSTRUCTIONS ......................................................................................................................... 16
2-3 PRELIMINARY CHECKOUT .................................................................................................................................. 17
SECTION III - OPERATION ........................................................................................................... 19
3-1 FRONT PANEL CONTROLS/STATUS.................................................................................................................... 19
3-2 LOCAL KEYBOARD CONTROL ............................................................................................................................ 20
3-2.1 KEYBOARD COMMANDS: SINGLE TEMPERATURE MODE ....................................................................... 20
3-2.2 KEYBOARD COMMANDS: SCAN MODE ....................................................................................................... 21
3-2.3 KEYBOARD COMMANDS: CONTROL GROUP.............................................................................................. 24
3-2.4 TIME-OUT INDICATIONS ............................................................................................................................... 25
3-3 RS232-C REMOTE CONTROL ................................................................................................................................ 26
3-3.1 RS232 COMMANDS: SINGLE TEMPERATURE MODE ................................................................................. 26
3-3.2 RS232 COMMANDS: SCAN MODE .................................................................................................................. 29
3-3.3 RS232 COMMANDS: CONTROL GROUP ........................................................................................................ 33
3-3.4 RS232 SPECIAL GROUP .................................................................................................................................. 37
3-3.5 TIME-OUT/PROBLEM INDICATIONS ............................................................................................................ 39
TABLE 3-1 RS232-C CONTACTASSIGNMENTS & WIRING DIAGRAM ................................................................ 41
3-4 IEEE-488 REMOTE CONTROL ............................................................................................................................... 42
3-4.1 GPIB COMMANDS: SINGLE TEMPERATURE MODE .................................................................................. 42
3-4.2 GPIB COMMANDS: SCAN MODE ................................................................................................................... 44
3-4.3 GPIB COMMANDS: CONTROL GROUP ......................................................................................................... 47
3-4.4 GPIB COMMANDS: SPECIAL ......................................................................................................................... 50
3-4.5 TIME-OUT/PROBLEM INDICATIONS ............................................................................................................ 53
3-5 REMOTE ADDRESS SELECT SWITCH ................................................................................................................ 55
TABLE 3-2 ................................................................................................................................................................. 55
TABLE 3-3 ................................................................................................................................................................. 56
TABLE 3-4 ................................................................................................................................................................. 57
SECTION IV -USER ADJUSTMENTS / MODIFICATIONS ..................................................... 61
TC01-F Manual Ver. 0707
3
4-1 INTRODUCTION .................................................................................................................................................... 61
4-2 TEMPERATURE TRANSDUCER CALIBRATION ................................................................................................ 61
4-2.1 PROBE CALIBRATION .................................................................................................................................... 61
4-3 RS232 BAUD RATE CHANGE ................................................................................................................................ 61
4-4 COOLING LOGIC SENSE INVERSION ................................................................................................................... 62
4-5 FAILSAFE LOGIC SENSE INVERSION .................................................................................................................. 62
SECTION V- REPAIR / PARTS REPLACEMENT ...................................................................... 63
5-1 PARTS REPLACEMENT POLICY .......................................................................................................................... 63
5-2 OUT OF WARRANTY REPAIR ............................................................................................................................. 63
SECTION VI - ERROR CODES ..................................................................................................... 63
FIGURE 1 - TC01 BLOCK DIAGRAM .......................................................................................... 64
FIGURE 3 - PROCESS I/O CONNECTIONS ............................................................................... 65
FIGURE 4 - TC01 FRONT PANEL ................................................................................................. 66
FIGURE 5 - FRONT PANEL CUTOUT .......................................................................................... 67
FIGURE 6 - REMOTE I/O CUTOUT ............................................................................................. 68
FIGURE 7 - REMOTE I/O & ADDRESS SWITCH ...................................................................... 69
FIGURE 8 - TC01-F CONTROLLER , REAR VIEW ................................................................... 70
FIGURE 9 - TC01-F, CPU BOARD ................................................................................................. 71
FIGURE 10 - TC01-F, POWER SUPPLY BOARD ......................................................................... 72
FIGURE 11 - TC01-F, HEAT TRIAC ............................................................................................... 73
FIGURE 12 - TC01 REV. A-E AND REV. F COMPARISON ...................................................... 74
4
TC01-F Manual Ver. 0707
SECTION I - GENERAL INFORMATION
1-1 INTRODUCTION
CONGRATULATIONS ON YOUR PURCHASE OF THE TC01 TEMPERATURE CONTROLLER
Your new temperature controller was manufactured under stringent quality control procedures to insure
trouble-free operation for many years. If you shouldencounter difficulties with the use or operation of your
controller, contactSun Electronic Systems’ customer service department at (321)383-9400.
As with all Sun Electronic Systems’ products, we would appreciate any comments that you may have
regarding your evaluation and application for this equipment. Please address your comments to:
Sun Electronic Systems, Inc.
1845 Shepard Drive
Titusville, FL 32780
Tel: (321)383-9400
Fax: (321)383-9412
Website: www.sunelectronics.com
Email: [email protected]
This manual contains user information for the TC01 microprocessorcontrolled temperature controller and
is divided into five sections which provide information as follows:
SECTION I, GENERAL INFORMATION.
Contains the TC01 description and specifications as well as option descriptions. SUN markets the TC01
directly to end-users and also through OEM channels.
SECTION II, INSTALLATION/PRELIMINARY CHECKOUT.
Contains informationrelative to receiving inspections, preparation for use, and, if installation isrequired,
how to proceed.
SECTION III, OPERATION.
Contains operating instructions for the TC01 series.
SECTION IV, USER ADJUSTMENTS.
Contains information on adjustments and modifications that may be made in the field.
SECTION V, REPAIR/PARTS REPLACEMENT.
Contains information on repair and warranty policy.
TC01-F Manual Ver. 0707
5
1-1.1 EARLIER VERSION COMPATIBILITY
This latest version of the TC01 controller presents a significant increase in controller capability. New
temperature probe support, and performance features provide greater flexibility and greater performance/price ratio to the end-user. This section will serve to summarize the increased capability for
those that have used the earlier versions.
PROCESS WIRING CHANGES
The Line wiring and load connection to the new TC01 is the same as far as location and function at the
8 pos screw terminal. The fusing of this new TC01 has changed. See figure 3 for a schematic of the line
interface. The fusing of this new TC01 are; The cool output, the TC01 line transformer, and the
switched line output are now all protected by one fuse. In the previous versions there was a fuse for the
line transformer, a fuse for the cool output, and no fusing on the switched line output. The only change
the user should notice is, if your system requires more than 4 amps total from the cool output and the
switched line output, then you will need to run a line powered relay from the TC01 switched line
output. That relay will then provide the high current switched line to your system.
A new input has been added for a TTL level failsafe input. The new failsafe input can be configured for
pos/neg true level via a jumper on the CPU PC board. When the failsafe input is active, the heat and
cool outputs are automatically turned off. The default active level is low.
COMMANDS THAT HAVE CHANGED
An effort was made to have the new version TC01 as compatible as possible with earlier versions. One
command has changed and a new command has been added;
Command: OPT
Changes:
remote command to determine TC01 configuration.
The OPT command now provides more information.
Command: INIT
Changes:
remote command to configure TC01.
A new command.
SEE RS232 or GPIB detailed command description section.
ADDED COMMANDS
Table 3-4 summarizes the commands available for the TC01. commands and features that have been
added since the last manual are proceeded with a plus (+) sign.
1-2 INITIAL INSPECTION
Inspect the shipping container for obvious damage. If the shipping container or cushioning
material is damaged then a written note (on the bill of lading) of the damage should be made while the
delivery person is still on the premises. This documents damage to the shipping company should a
6
TC01-F Manual Ver. 0707
claim need to be made. Save any damaged carton or cushioning material until the temperature controller has been checked mechanically and electrically. The contents of the shipment should be checked
against the packing slip. Procedures for checking the mechanical and electrical operation are given in
SECTION III — OPERATION.
1-2.1 LOST OR DAMAGED EQUIPMENT
The goods described on your packing slip were delivered to the transportationcompany at Sun Electronic
Systems’ premised in complete and good condition. If any of the goods called for on the packing slip are
short or damaged, you must file a claim WITH THE TRANSPORTATION COMPANY FOR THE
AMOUNT OF THE DAMAGEAND/OR LOSS.
If any of the goods called for on your packing slip are short or damaged at the time of delivery, ACCEPT
THEM, but insist that the freight agent make a damaged or short notation on your freight bill or express
receipt and sign it.
If any concealed loss or damage is discovered, notify your local freight agentor express agent AT ONCE
and request him to make an inspection. This isabsolutely necessary. Unless you do this, the transportation
company will notconsider your claim for loss or damage valid. If the agent refuses to make aninspection,
you should draw up an affidavit to the effect that you notified himon a certain date and that he failed to make
the necessary inspection.
If you have ascertained that the extent of the damage renders the controllerinoperative call Sun Electronic
Systems for an RMA number (see paragraph 1.9,RETURN OF MERCHANDISE) and return the controller.
We will repair or replace the controller, as necessary, and bill you for the cost. This new invoice will then
be part of your claim for reimbursement from the transportation company. This,together with other papers,
will properly support your claim.
1-2.2 UPS SHIPMENTS
The claims adjustment procedure for UPS shipments varies somewhat from theprocedure listed above for
regular motor and air freight shipments. If your equipment was shipped via UPS and sustained either
damage or loss, the UPS representative in your area must initiate the claim by inspecting the goods and
assigning a freight claim number to the damage equipment. The representativewill attach a “Call Tag” to
the outside of the equipment box which will be yourauthorization to return the merchandise to our factory
for claim adjustment.
Upon receipt of this damaged equipment, we will perform the necessary repairs, process the appropriate
paperwork with UPS and return the equipment to you.Please allow time for processing of any type claim.
Normal time for proper processing of a UPS claim in 15-30 working days.
Remember, it is extremely important that you do not give the transportation company a clear receipt if
damage or shortages are evident upon delivery. Itis equally important that you call for an inspection if the
loss or damage isdiscovered later. DO NOT, UNDER ANY CIRCUMSTANCES, ORDER THE TRANSPORTATIONCOMPANY TO RETURN SHIPMENT TO OUR FACTORY OR REFUSE SHIPMENT
UNLESS WE HAVEAUTHORIZED SUCH RETURN.
TC01-F Manual Ver. 0707
7
1-3 TC01 SPECIFICATIONS
TABLE 1-1
Set Temperature Range
Absolute error over temp range
Temperature Control
Long term stability
Repeatability
Resolution
Temperature control technique
Time at temperature range (soak time)
Time at temperature resolution
-199 to +315 deg C
+/- 1 deg C
+/- .2 deg C
+/- .25 deg C
+/- .1 deg C
.1 deg C
PID algorithm - Pulse width
modulation at .5 HZ
.1 deg C below 200 deg C
1 deg C 200 deg C and above
1 to 1800 minutes(hour) & continuous
.1 minute(hour)
Number of scan set temps
Number of scan set times
Number of ‘Cycles’
10
10
1-1800 & infinite
Compressor Auxiliary Output
w/Compressor time-out
Auxiliary Output #2
Auxiliary Input
Failsafe Input
TTL open collector + pullup
Temperature display resolution
TTL open collector + pullup
TTL level input + pullup
TTL input with pullup. Active low
default. Level configurable
Local control
Remote control
Via 16 key keyboard
IEEE-488 bus and RS232-C (*)
Controller power requirement
2 watts, 110 volts 50/60 HZ
220 volts jumper selectable
1 amp 240 volts max @ zero cross
15 amps 240 volts max @ zero cross
Cooling solenoid control
Heater control
Size
OPTIONS:
23 cm H x 12 cm W x 11.5 cm D
9" H x 4.75" W x 4.5" D
see Section 1.7
(*); 1200, 2400, 4800, & 9600 Baud available for RS232-C. Baud Rate adjustable by user. 9600 Baud
default. — see Paragraph 4-3
8
TC01-F Manual Ver. 0707
1-4 SAFETY CONSIDERATIONS
1-4.1 OPERATION
AC power supplied to the temperature controllers must be in accordance with SECTION II —
INSTALLATION. The installation instruction allow connection to either 110 volt or 240 volt systems.
Section 2-3 — INSTALLATION contains information on how to determine whether aparticular TC01 is
wired for 110 or 220 volts.
WARNING !
Any interruption of the protective (grounding) power conductor, inside or outside of the system to which
the TC01 is installed(including the wall outlet), or disconnection of the protective earth terminal,could be
dangerous. The controller and associated user system should only be plugged into a properly installed
grounded outlet. The TC01 must be mounted in the users equipment in such a manner that the operator is
protected from coming into contact with any dangerous voltages.
1-4.2 INSTALLATION
Although the TC01 series of temperature controllers have been designed inaccordance with accepted safety
standards, the information, cautions, andwarnings in this manual must be followed to ensure safe operation.
Installation, if any, should be performed only by qualified personnel. All user adjustments are described
in SECTION IV — USER ADJUSTMENTS.
1-5 CONTROLLERS COVERED BY THIS MANUAL
The contents of the manual apply to controllers with the serial number prefixes listed under SERIAL
NUMBERS on title page iii.
TC01-F Manual Ver. 0707
9
1-6 TC01 DESCRIPTION
1-6.1 GENERAL DESCRIPTION
The TC01 temperature controller offers the following features to allow forlocal front panel control, as well
as remote computer control, of the users temperature chamber system.
- Set and read the chamber set temperature
- Set the amount of time the chamber should remain at the set temperature (1 to 180 minutes
or indefinitely)
- Read the remaining time at temperature
- Read the chamber temperature
- Set and read any of 10 scan temperatures
- Set and read any of 10 scan times
- Start the scan mode or the cycle mode
- Enable/disable Compressor and auxiliary outputs
- Reset the controller to power up conditions (TEMP = 25c TIME = infinity, single tempera
ture mode)
- Gives an audio and visual indication when the time at temperature expires and if in remote
mode, generates and interrupt (SRQ for IEEE-488 and ASCII “I” character for RS232)
- Local control keyboard can be enabled or disabled via IEEE-488 bus commands.
1-6.2 BLOCK DIAGRAM DESCRIPTION
As shown in Figure 1, the microprocessor(uP) unit is the heart of the system which controls all actions of
the controller. The uP contains three types ofmemory. It has ROM for program storage, RAM for variables,
and EEPROM for storage of seldom changed variables that are retained during power down.
The timer generates interrupts to the microprocessor which are derivedfrom the crystal oscillator system
clock. These interrupts are used in timingthe pulse width modulated heat and cool times, time at temperature
timing, watchdog timing, and display timing. The heater driver and the cooling valve driver are optically
coupled triacs that switch the heater and the coolingvalve to the power line. The heater and cooling outputs
are synchronized to the zero crossing of the power line to reduce electrical noise.
The temperature measurement circuitry provides the necessary interface to scale the output of the
temperature probe and to convert its analog output to a digital number which can be used by the
10
TC01-F Manual Ver. 0707
microprocessor in its control program. The chamber temperature is always measured with a resolution of
0.1 deg C.
The keyboard logic provides the interface to the 16 key keyboard. The actualencoding is performed by the
microprocessor. The display logic interfaces the microprocessor to the LED displays. Thedisplays consist
of a 3 1/2 digit, seven segment display which normally displays the chamber temperature and can be
instructed to display the remaining time at temperature, the current set temperature, any of the 10 scan
temperatures or scan times, etc. There are also five LED indicators that showwhether or not: the chamber
requires heating or cooling; the controller has been set to the remote mode; the chamber temperature is
currently being displayed; and if the time at temperature has expired. An audio indication is also generated
when a timeout occurs. Below 200 C, the display resolution is .1 C. Above 200 C, the display resolution
is 1 deg C.
The asynchronous serial interface provides a remote RS232-C interface to thecontroller in order to allow
remote control in almost any digital system.
The IEEE-488 (GPIB) interface allows remote control via the IEEE-488 standard bus. Due to its higher
speed of operation and increased capabilities,the IEEE-488 interface is best suited for remote control when
feasible. When the controller is controlled via the IEEE-488 bus, a command is supported which allows
ASCII characters to be input via the IEEE-488 bus andsent out via the RS232-C bus. This extra feature can
be used to control another RS232-C compatible device. For example, a CRT terminal could beconnected
to provide operator information from the system controller, or an RS232-C compatible switching device
could be used to control measurements.
Two auxiliary outputs (open collector TTL) are available to control externalevents. The AUX1 (compressor
control ) is special in that it has an automatic time-out feature useful when the TC01 is incorporated into
compressor-cooled chambers. Both outputs are under GPIB/RS232 control. Aone-bit input port is available
and can be read under RS232 or GPIB control. Finally a failsafe input is provided to inform the TC01 that
an external device has detected an error condition. The TC01 will turn off the heat and cool outputs in
response to the failsafe input.
1-6.3 FAILSAFE FEATURES
Several features have been designed into the TC01 that provide a measure ofprotection against damaging
or unusual controller operation conditions. Whilethese failsafes features provide the user with a first level
failsafe, thecontroller cannot detect all failure modes and therefore your chamber must havean independent
failsafe mechanism.
FUSES
Two fuses are located on the power supply board (board furthest from front panel) that protect against
damaging loads. Refer to figure 3 for reference.F2 is a 15 amp fuse that is in series with the heating Triac.
F1 is a 5 amp fuse in serieswith the TC01 power transformer input, the cool Triac circuit, and the switched
line output.
TC01-F Manual Ver. 0707
11
WATCHDOG TIMER
This hardware within the TC01 protects against microprocessor malfunction or other form of loss-ofprogram-control. This hardware is accessed by theprocessor and associated software approximately every
second. If a malfunction occurs and said hardware is not accessed, the watch-dog circuitry takes control
and provides an orderly shutdown of the TC01. Heat, cool, Aux#1, and Aux#2 outputs are automatically
disabled and the TC01 is put into an “OFF” state. This condition cannot be reset by any bus or keyboard
command. The TC01 must be turned off in order to reset. If some permanent hardware malfunction is
present, the watch-dog circuitry will again shut down the TC01 upon power-up. In this latter case, the TC01
will most likely require factory service. SeeSection 1-8 and 1-9 for further information on repair and return
of merchandise.
SHORTED/OPEN PROBE
The TC01 controller contains built-in circuitry to detect the two most common temperature probe failure
modes. If a controller temperature probe fails, i.e. becomes a high or low resistance, the controller will
automatically disable the heat and cool outputs within 30 seconds of the probe failure.
UPPER TEMPERATURE LIMIT (UTL)
The TC01 can be programmed via the RS232 or GPIB to alert the user when some user-selected Upper
Temperature Limit (UTL) has been exceeded. This feature is useful to protect equipment that may be
damaged at some temperature lower than the TC01/Chamber maximum capability. As an example, if it is
known that a plastic housing will start to deform at 105c, a UTL can be set to be 90c. If any command is
entered that subsequently attempts to raise the chamber temperature above this UTL, a ‘command error”
will be generated. If the measured chamber temperature should exceed the current UTL then the TC01
responds with an ASCII character (‘O’) or a GPIB interrupt (Hex 47). Additionally, the heat output will
automatically be disabled until the chamber temperature falls below the UTL. The Special Commands to
accomplish theUTL function are further described in Section 3-3.4 RS232 Special Group andSection 34.4 GPIB Commands: Special.
BUS TIME-OUT
The processing of some GPIB commands by the TC01 require waiting for a responsefrom the GPIB system
controller. For example, the GPIB system controller may write to the TC01: sends ASCII “T”. This “T”
character is interpretedby the TC01 to mean “please send the current chamber temperature.” If a “READ”
statement is not incorporated into the system controller program, the TC01 would be waiting forever to
transmit the chamber temperature. This lock-up condition is averted by the Bus Time-Out feature. If the
TC01 is locked-upwaiting for some system controller response, it will only wait approximately 5seconds
and generate an interrupt (Hex 4F) that alerts the controller that abus time-out has occurred. The interrupt
handling routine in the calculator then processes this information and can alert the operator as to the
problem.
12
TC01-F Manual Ver. 0707
CHAMBER FAILSAFE
The ultimate failsafe against high temperature damage is provided by theindependent failsafe mechanism,
usually a bimetal sensor, found in most all temperature and environmental chambers. This failsafe
mechanism is an independent check on reckless system operation and should be known to be in proper
operation condition. The TC01 provides for a TTL level failsafe inputsignal that will cause all TC01 outputs
to turn off. The active level of thefailsafe input is jumper selectable. The default failsafe active level is low.
The users failsafe circuitry must provide for an independent interruption of the heater circuit to protect
against TC01 heat triac failure in the on condition. Triac failure is very rare but still possible.
1-7 OPTIONS
1-7.1 220 VOLT 50/60 HZ OPERATION - OPTION 00
Option 00 allows the TC01 to be powered by a 220 volt 50/60 Hz source. Factory installed jumpers connect
two power transformer windings either in parallel (for 110 volt operation) or in series (for 220 volt
operation). The correct jumpers were factory installed per the original customer order. Section 2.3 contains
information on how to determine whether a particular TC01 is wired for a 110 volt or a 220 volt source.
1-7.2 PROBE TYPES SUPPORTED
The TC01 can be ordered to operate with the following temperature probes; RTD 100 ohm platinum 3 wire
(.385 or .392 alpha) or J or K or T type thermocouple. With the new INIT command the user can nowchange
probe type in the field.
1-7.3 TIME SET IN HOURS - OPTION 07
Some applications require very long ‘soak times’ approaching thousands ofhours. For these applications,
option 07 will allow local and remoteprogramming to be set in the units of hours. Set resolution is .1 hour.
With the new INIT command the user can now change the time units in the field.
1-8 REPAIR
Due to the rather elaborate test system required, field repair of the TC01 may not be feasible for some
failures. Sun Electronic Systems maintains a full service department that will attempt to resolve any
problems first by telephone and subsequently by repair of the controller.
1-9 RETURN OF MERCHANDISE
When calling for return of a controller, the Customer Service Department will issue a Return Material
Authorization (RMA) number which will be valid for a period of 30 days.
TC01-F Manual Ver. 0707
13
Any equipment returned to Sun Electronic Systems without an RMA number will result in repair delay.
After securing an RMA number from the Customer Service Department, return thespecified controller to
Sun Electronic Systems, freight prepaid, at the address below. NOTE: The RMA number must be plainly
marked and visible on your shipping label to insure proper routing at Sun’s Receiving Department.
Customer Service Department
Sun Electronic Systems, Inc.
1900 Shepard Drive
Titusville, FL 32780
The Customer Service Department can give you an estimate ofthe time it should take to process and repair
your controller. Turn around time for repair varies depending on workloads and parts availability but
normally your controller will be repaired and returned to you within 2 working days of receipt.
Be sure a declared value equal to the price of the unit is shown on the Bill of Lading, Express Receipt or
Air Freight Bill, whichever is applicable. Risk of loss or damage to Sun equipment during the time it is in
transit either to orfrom Sun’s facilities is your sole responsibility. A declared value must beplaced on your
Bill of Lading to insure substantiation of your freight claim if shipping damage or loss is incurred.
All equipment returned to Sun Electronic Systems must be freight prepaid. Equipment not prepaid on
arrival at Sun’s Receiving Department cannot beaccepted. Upon repair to the defective equipment, it will
be returned to you F.O.B. the factory in Titusville, FL via UPS or equivalent groundtransportation unless
you specify otherwise.
14
TC01-F Manual Ver. 0707
SECTION II - INSTALLATION / PRELIMINARY CHECKOUT
This section provides reference for installation of the stand alone version. For those who have purchased
a chamber/TC01 combination it is only necessary tosupply the proper AC line voltage to the chamber/TC01
combination as given on the chamber data plate on its rear panel.
2-1 CONNECTOR DETAIL
The TC01 contains several cables that are used for I/O. This section serves as a reference for proper
connection to the various male/female connectors on the controller.
I/O Cable
A 26 conductor flat cable serves as interconnect for RS232 and GPIB I/O. One end connects to the TC01
CPU board (board with LED display) and the other to asmall PC board that has RS232 and GPIB connectors
mounted to it (the remote board).
Temperature Probe
The TC01 uses a 4 pin screw terminal to connect the temperature probe. The header is located at the bottom
of the CPU board (board with LED display). The connector is polarized and can easily be mated in only
one way. See figure 3 for probe wiring.
Auxiliary Outputs/Inputs [ for stand alone controller ]
The TC01 provides 2 TTL level outputs AUX1 and AUX2 that the user may control. It also has one TTL
level input AUXIN that the user can read. Lastly a failsafeTTL level input is provided. All of these signals
are available on a 8 position small green screw header located at the top of the power supply board (board
with line transformer). See figure 3 for wiring.
Power Input and process connection [ for stand alone controller ]
Figure 3 provides the schematic for the TC01 line and process connection. Allline and line powered process
(chamber) connections are to the large 8 positionscrew terminal located on the bottom of the power supply
board (top board that has line transformer). Pin 1 and 3 are the input / output for the heater. Pin 2 provides
triac switched line hot for the cooling device. Pin 4 is connected to line neutral (ph B) and pin 6 is for line
hot (ph A) input. Pin 7 provides line hot when the TC01 controller’s power switch is on, and is limited to
approximately 4 amp. Finally pin 8 provides a ground point to the TC01 ground. Note; The TC01 controller
that is supplied as the controller in Sun’s modelEC0x chambers, has a different power / process interface.
Installation of the TC01 into your systemmay require custommetalwork on the host system. For these cases,
figures 5 and 6 give sufficient detail to install the TC01 in a panel.
TC01-F Manual Ver. 0707
15
2-2 INSTALLATION INSTRUCTIONS
The chamber interface circuitry of the TC01 is flexible enough to accommodatepractically any temperature
chamber. The factors involved in the retrofit arediscussed below. The schematic in figure 3 should be used
as a guide.
MAXIMUM POWER CONTROLLED
The HEAT triac circuit of the TC01 ( pos 1 & 3, fig 3 ) can drive a 100 to240 VAC 15 AMP max load. The
COOL triac circuit ( pos 2 ) can drive a 100 to 240 VAC 2 AMP load. The switched line hot output ( pos
7 ) provides the linevoltage that is on position 6 when the TC01 power switch in on. The total loadcurrent
used by the cool output and the switched line output should not exceed4 AMP. To boost the switched line
output current capability you can add a relay that is controlled by the TC01 switched line output.
COOL OUTPUT SENSE
The sense of the cool output, as shipped from the factory, is such that when cooling is required the cool
output will provide line hot on position 2 of the 8 pos screw terminal. If an inversion is required by your
system ( when cooling is required the cool, output at pos 2, needs to be off ) then the COOLPOL jumper
on the CPU board ( board with LED display ) must be jumpered. The jumperis located below the uP socket.
LINE VOLTAGE SELECTION
The TC01 was designed to operate with 100-120 VAC or 200-240 VAC line power. There are 3 solder
jumpers located on the power supply board ( top board withline transformer ) that are used to set the TC01
line voltage. For 110 VAC operation, solder in wire jumpers in J2 & J3 and remove jumper from J1. For
220 VAC operation, solder in a wire jumper in J1 and J2 & J3 must be open.
AUXILIARY I/O
The TC01 provides 2 TTL open collector auxiliary outputs. AUX 1 is, by default, used to turn on/off the
compressor, if required. One auxiliary TTLlevel input with integral pull up to +5V and a TTL level failsafe
input with integral pull up. All 4 signals are provided to a small 8 position screw header that is located at
the top right side of the power supply board. Figure 3provides the pin connection information. The failsafe
input provides for anexternal input that will cause the TC01 to turn off its heat and cool outputs. The active
polarity of the failsafe input in by default low level and can be changed to high level active state by
jumpering the FS POL jumper on the CPU (board with LED display ) board. NOTE: while the failsafe input
causes the TC01 to turn off its outputs, the users failsafe circuitry must provide for an independent
interruption ofthe heater circuit to protect against TC01 heat triac failure in the oncondition. Triac failure
is very rare but still possible. The same is true for cooling if it poses a potential hazard.
MOUNTING THE CONTROLLER
To mechanically mount the TC01 controller into your system you may need to cut panel openings for the
controller and the remote I/O assembly. Figure 5 and 6 provide cutout dimensions.
16
TC01-F Manual Ver. 0707
2-3 PRELIMINARY CHECKOUT
The following procedure allows checking basic control function of the TC01. Data entry is via the 16 key
keyboard. At this time refer to the TC01 command summary, TABLE 3-4.
Enable the Heat and Cool toggle switches to the ‘ON’ position. Apply power to the system by switching
the power switch to the ‘ON’ position. In TABLE 3-4note the column “Keyboard/DISPLAY”. This column
summarizes keystroke entry for the various functions supported by the TC01. With TABLE 3-4 as a
reference, input the following sequences and note the controller response.
KEYSTROKE
————
CONTROLLER RESPONSE
—————————
C
Rest Controller (Clear)
the GPIB address is displayed for a few seconds
Time is set to Infinity (1999)
Temp is set to 25c
50 TEMP
Set Chamber to 50c
5 TIME
Set Time at Temp = 5 minutes
At this point, Heat will be enabled and chamber temperature will rise. At anytime, ‘TEMP’ or ‘TIME’ keys
can be depressed to give status.
TEMP
Chamber SET Temp Displayed
TIME *
C
Remaining Time at 50c
Reset Controller (Clear)
stop controlling temperature, display GPIB address
Time = Infinity
Temp = 25c
* In 5 minutes, after reaching the set temp, the controller will ‘Time-Out’ and sound the audible alarm.
Depress ‘C’ to clear the controller back to time = Infinity and Temp = 25c.
If the controller is operating properly, continue on to Section III - OPERATION for more detailed
information.
TC01-F Manual Ver. 0707
17
18
TC01-F Manual Ver. 0707
SECTION III - OPERATION
3-1 FRONT PANEL CONTROLS/STATUS
The Heat switch and Cool switch are located on either side of the main power switch. The function of the
Heat (Cool) switch is to disable application of power to the heaters (cooling solenoid) when in the “off”
position. The TC01 microprocessor system continues to make heat or cool decisions independent of the
switch settings but actual power is applied onlyif the hear/cool switches are in the ‘on’ position. This feature
allows the operator to manually override the heat/cool decisions of the TC01.
After power-up and/or after a reset command, the heat and cool outputs aredisabled. Setting the single mode
‘set temp’ or starting the ‘scan mode’ willenable the heat and cool outputs automatically. Control of heat
and cool outputs is also provided by the ‘ON’ and ‘OFF’ commands via the RS232 port, orIEEE-488 bus.
The 3 1/2 digit numeric display indicates Temperature or Time depending uponprevious keystrokes. The
display will default to indicating Chambertemperature when no key is pressed and 3 seconds have elapsed.
Set Temperature and Set Time are displayed when the “Temp” key and “Time” key are depressed,
respectively.
Five LEDs offer status information on the TC01. The left side of the frontpanel contains the Heat and Cool
LEDs. When power is going to the heater and the cooling circuit the LED will be on.
From left to right, three red LEDs above the main display are labeled “Box Temp”, “REM”, and “TIME
OUT” respectively. Activation of the Box Temp LED indicates that the numerals on the display are
indicating Chamber Temperature. The “REM” LED will activate when the TC01 is in the “Remote” mode.
Remote modeis current when information is being transferred via either the RS232 orIEEE-488 bus. The
“TIME OUT” LED will activate when the Temperature Chamber has been at the Set Temperature for the
required amount of time. Simultaneously, an audio indication will sound. The buzzer can be reset by
depressing the “time” or“temp” or “C” (clear) key on the keyboard orby setting any controller temp/time
function. (For any key to have effect, the keyboard must not have been “locked out” by an IEEE-488
lockout command. See paragraph 3-4.3, #10.)
Slightly below the 16 key keyboard are two holes with attending large panheadscrews that are unlabeled.
These holes provide access to calibration pots that are used to calibrate the TC01. Details are given in
SECTION IV- UserAdjustments.
TC01-F Manual Ver. 0707
19
3-2 LOCAL KEYBOARD CONTROL
The following commands are provided by the local keyboard, assuming the controller has not been
instructed via and IEEE-488 interface command to ‘lock out’ local control. Any invalid data or any
command error immediately causes the display to read ‘0.0’ with no action taken by the controller
CONVENTIONS:
1. “n” or “m” refers to any numeric key (a single keystroke)
2. “-” refers to the minus key
3. Items enclosed in parentheses are optional. Thus n(n(n))means that at least one numeric key has
to be depressed. Two additional numeric keystrokes are optional.
4. “A => B” is read as “A is equal to or greater than B”
5. All temperatures referred to are in the units of “degrees centigrade”.
6. Keystrokes are noted as a sequence of numbers and words that define each entry. “n(n(n))
TEMP” means “press 1,2, or 3 numeric keys, then press the TEMP key.” “SCAN TEMP m”
means “press the key marked ‘SCAN TEMP’ followed by a numeric entry. ” BOLD type in the
examples indicate keystrokes.
3-2.1 KEYBOARD COMMANDS: SINGLE TEMPERATURE MODE
(See Command Summary, TABLE 3-4)
1. to SET the CHAMBER TEMPERATURE
(-)n(n(n)) TEMP where -100 <= (-)n(n(n)) <= UTL
A) If the controller was in the scan mode before this command, the scan mode is
terminated and the single temp mode is initiated.
B) UTL is the user-settable limit temperature. UTL can only be set <= PLIMIT.
PLIMIT is the highest temperature allowed or 315 deg C.
C) Fractional temperatures can be entered using the - key as a decimal point once a
digit has been entered.
D) Setting the temperature enables the heat and cool outputs with heat/cool switch
override.
E) A temperature < -100 or > UTL is ignored and no action will be initiated by the
controller.
F) EXAMPLES:
20
50 TEMP sets the chamber to +50 deg C
-38-5 TEMP sets the chamber to -38.5 deg C
-108 TEMP is ignored
TC01-F Manual Ver. 0707
2. to SET the TIME-AT-TEMPERATURE (Soak Time)
n(n(n(n))) TIME where 0 <= n(n(n(n))) <= 1999
A) A time < 0 or > 1999 is ignored and no action is taken by the controller.
B) A time > 1800 and <= 1999 sets the time to infinity.
C) Time is interpreted as minutes unless the HR option is selected whereby time is
interpreted as hours.
D) EXAMPLES:
10 TIME sets the soak time to 10 minutes
1981 TIME sets the soak time to infinity
-10 TIME is ignored
3. to DISPLAY the CHAMBER TEMPERATURE
No action is required to display the chamber temperature since the chamber temperature is normally displayed, unless the controller has been instructed to display another
parameter. If so instructed, the controller will once again display the chamber temperature 3 seconds after the instruction.
4. to DISPLAY the SET TEMPERATURE
TEMP
The chamber set temperature will be displayed for 3 seconds.
TIME
The remaining time-at-temperature in minutes will be displayed for 3 second. If the HR
option is selected, time will be displayed in hours.
3-2.2 KEYBOARD COMMANDS: SCAN MODE
(See Command Summary TABLE 3-4)
1. to SET/DELETE a SCAN TEMPERATURE
(-)n(n(n)) SCAN TEMP M where -100 <= (-)n(n(n)) <= UTL and where 0 <= m <=9
A) A temperature of < -100 or > UTL is ignored and no action will be initiated by the
controller.
B) UTL is the user-settable limit temperature. UTL can only be set <= PLIMIT.
PLIMIT is the highest temperature allowed or 315 deg C.
TC01-F Manual Ver. 0707
21
C) - SCAN TEMP m will delete scan temperature and scan time m
D) Fractional temperatures can be entered using the - key as a decimal point once a
digit has been entered.
E) Scan Temps can be assigned in any order. However, Scan Temps will be executed
in ascending order.
F) EXAMPLES: -30 SCANTEMP 3 sets Scan Temp #3
50 SCANTEMP 0 sets Scan Temp #0
100 SCANTEMP 8 sets Scan Temp #8
The above sequence will be executed +50c first, -30c second, and 100c third.
- SCANTEMP 3 deletes Scan Temp #3
150 SCANTEMP 8 changes Scan Temp #8
G) A Scan Temp entered without a corresponding Scan Time is ignored at execution
time.
2. to SET/DELETE a SCAN TIME
n(n(n(n))) SCAN TIME m where 0 < n(n(n(n))) <= 1999
A) A time < 0 or > 1999 is ignored and no action is initiate by the controller.
B) A time > 1800 and <= 1999 sets the time to infinity.
C) -SCAN TIME m will delete scan temp and scan time m.
D) Scan Times can be assigned in any order. They, along with their corresponding Scan
Temp, will be executed in ascending order.
E) Time is interpreted as minutes unless the HR option is selected whereby time is interpreted as hours.
F) EXAMPLES: 10 SCANTIME 3 sets Scan Time #3
82 SCANTIME 0 sets Scan Time #0
100 SCANTIME 8 sets Scan Time #8
The soak time at the first executed temperature will be 82 minutes, at the second temperature 10 minutes, and at the third temperature 100 minutes.
- SCANTIME 3 deletes Scan Time #3
55 SCANTIME 8 changes Scan Time #8
G) A Scan Time entered without a corresponding Scan Temp isignored at execution time.
22
TC01-F Manual Ver. 0707
3. to SET the number of ‘CYCLES’ for the SCAN MODE
n(n(n(n))) SCAN TIME - where 0 <= n(n(n(n))) <= 1999
An input > 1800 and <= 1999 sets the number of cycles to infinity.
4. to DISPLAY a SCAN TEMPERATURE
SCAN TEMP m where 0<= m <=9
Scan temperature m will be displayed for 3 seconds.
5. to DISPLAY a SCAN TIME
SCAN TIME m
Scan time m will be displayed for 3 seconds.
6. to DISPLAY the CURRENT CYCLE NUMBER
SCAN TIME NOTE: ‘1’ will be displayed during the first cycle or loop, ‘2’ willbe displayed during the second,
etc. The scan will terminateautomatically after the cycle where the current cycle number equalsthe
number of cycles ‘to do’. When the scan mode is terminated, theheat and cool outputs are disabled,
the ‘set temp’ is set for 25c and the time at temperature is set to infinity, and the number of cycles
‘to do’ is set to infinity. If the Scan Mode hasn’t started, or hasbeen stopped (See #11, this section)
then this command displays the original number of cycles set.
7. to DISPLAY the CHAMBER TEMPERATURE
No action is required to display the chamber temperature since the chamber temperature is
normally displayed, unless the controller has been instructed to display another parameter.
Is so instructed, the controller will once again display the chamber temperature 3 seconds
after the instruction.
8. to DISPLAY the CURRENT SCAN TEMPERATURE
TEMP
The set temperature will be displayed for 3 seconds.
9. to DISPLAY REMAINING TIME at the CURRENT TEMPERATURE
TIME
The remaining time-at-temperature will be displayed for 3 seconds.
TC01-F Manual Ver. 0707
23
10. to START the SCAN MODE
SCAN TEMP SCAN TIME
Starting the Scan Mode without any valid Scan Temp/Scan Time data programmed will
cause a ‘command error’ response.
11. to STOP the SCAN MODE
SCAN TIME SCAN TEMP
Stopping the Scan Mode disables the heat and cool outputs, and disables the time-out
function. Upon restarting, execution begins at the FIRST valid Scan Time/Temp of the
‘loop’ or ‘cycle’ in which it was stopped. Execution does NOT continue at the Scan
Time/Temp at which the Scan was stopped.
3-2.3 KEYBOARD COMMANDS: CONTROL GROUP
to RESET (clear) the CONTROLLER
C
The controller is reset to power up conditions:
1) Single Temp mode
2) All scan temperature and time cleared
3) Set temperature equal to 25 degrees
4) Time-at-temperature equal to infinity
5) # of cycles equal to infinity
6) Compressor and auxiliary outputs disabled
7) Heat/Cool outputs disables
8) RS232-C echo disabled
9) IEEE-488 address displayed for 3 seconds
10) Local control enabled
11) PID coefficients and period unchanged
12) Scan interrupts are disabled
13) UTL = PLIMIT
14) Deviation limit checking disabled
24
TC01-F Manual Ver. 0707
3-2.4 TIME-OUT INDICATIONS
SINGLE TEMPERATURE MODE
When the desired soak time (time-at-temperature) has been reached, the operator is alerted to this fact in
two ways. First, the ‘TIME-OUT’ LED located on the front panel is turned ‘ON’. Secondly, a continuous
tone is emitted from atransducer located on the TC01 power supply board. The LED and audio indication
will continue until a TIME or TEMP key is pressed. Alternately, the controllermay be RESET by depressing
the ‘C’ (clear) key. Note that when RESET, all SCANtemps and times are cleared and the Single Temp mode
is entered. See 3-2.3.
SCAN MODE
The TC01 Scan Mode allows a maximum of 10 segments (0 through 9) to be programmed through the
keyboard. Each segment is described by a Temperature anda Soak Time (time-at-temperature). One minute
before any particular Soak Timeis compete, an audible indication will start and continue for the remaining
one minute. This time-out is distinguished from the single temp mode time-outmentioned above in that the
sound is ‘ON’ for 1 second and ‘OFF’ for 1 second. At the end of the 1 minute on/off period, the audible
indication is automatically turned ‘OFF’. The TC01 then moved on to the next Scan segment. This one
minute “warning” can be used to alert an operator to start taking data or measurements during the final
minute of the programmed soak time. If a number of cycles have been programmed, the above sequence
is repeated for each cycle. At the end of the last soak time of the last cycle, a continuous tome is emitted
until a TIME or TEMP key is pressed. Alternately, the controller can beRESET by depressing ‘C’(clear)
on the keyboard. Note that when RESET, all SCAN temps and times are cleared and the single temp mode
is entered. See 3-2.3
TC01-F Manual Ver. 0707
25
3-3 RS232-C REMOTE CONTROL
CONVENTIONS/COMMENTS:
1. “n” or “m” refers to any numeric character 0 through 9.
2. Items enclosed in parentheses “( )” are optional. Thus n(n(n(n))) means that at least
one numeric character has to be sent. One or two additional numeric characters to the
left of a decimal and one character after a decimal is allowed.
3. All times referred to are in the unit of minutes or hours.
4. All temperatures referred to are in the unit of “degrees centigrade.”
5. Commands sent to the controller and data sent from the controller are in the form of
“ASCII character strings”. Commands sent to the controller are masked to 7 bits and
may contain space characters (blanks).
6. The RS232 encoding format used for Windows is: Baud Rate: 9600, Data: 8 Bits,
Parity: None, Flow Control: None, Stop Bits: 1 (Note: Older equipment with serial
numbers below C1508, Baud Rate = 2400)
7. Data sent from controller are followed by carriage return and line feed characters as line
terminator.
8. See TABLE 3-1 for RS232-C CONTACT ASSIGNMENTS and WIRING DIAGRAM.
9. The command processor software ignores leading zero’s and trailing digits on all numeric data received. For example, -0000025.32c will set the single mode temperature
to -25.3c.
10. BOLD type in the Terminal Examples indicate keystrokes required from the terminal
keyboard.
11. When a ‘dumb terminal’ is used for the RS232 interface, any TC01 output will automatically be displayed on the terminal. When using a computer, any TC01 output must
be read through some form of ‘INPUT’ or READ’ statement- usually a part of an
application program written in a language such as BASIC.
12. Computer examples are written in BASIC. In these BASIC statements, the variables
X, Y, and A$ are assumed to be defined somewhere else in the BASIC program and
contain the proper values for desired results. The BASIC program statements:
PRINT#1 and INPUT#1 are assumed to output RS232 data to the TC01 and input
RS232 data from the TC01, respectively.
3-3.1 RS232 COMMANDS: SINGLE TEMPERATURE MODE
(See Command Summary TABLE 3-4)
1. to SET the CHAMBER TEMPERATURE
(-)n(n(n(.(n)))Cwhere -100 <= (-)n(n(n.(n))) <= UTL
A) If the controller was in the scan mode before this command,the scan mode is terminated
and the single temp mode is initiated.
B) UTL is the user-settable limit temperature. UTL can only be set <= 315.
26
TC01-F Manual Ver. 0707
C) Setting the temperature enables the heat and cool outputs, with heat cool switch override.
D) A temperature < -100 or > UTL is ignored and no action will be initiated by the
controller.
E) TERMINAL EXAMPLES:
50c sets the chamber to +50.0c
-38.2c sets the chamber to -38.2c
-108C is ignored
F) COMPUTER EXAMPLES:
PRINT#1,”-38.2C”or PRINT#1,X,”C”
2. to SET the TIME-AT-TEMPERATURE (Soak Time)
n(n(n(n)))M where 0 < n(n(n(n))) <= 1999
A) A time < 0 or > 1999 is ignore and no action is initiated by the controller.
B) A time between 1800 and 1999 sets the time to infinity.
C) TERMINAL EXAMPLES:
10M sets the soak time to 10 minutes
1981M sets the soak time to infinity
-10M is ignored
D) COMPUTER EXAMPLES:
PRINT#1,”10M” or PRINT#1,X”M”
3. to SET the DEVIATION LIMIT and ENABLE DEVIATION INTERRUPT
EDIn(n(n(.(n))))
where 0 <= n(n(n(.(n)))) <= UTL
A) The allowed temperature deviation before generating adeviation interrupt is +/- the set
value around the target chamber set temperature.
B) The deviation checking is automatically disabled duringtransitions between chamber
temperature set points and begins once the chamber temperature is within the deviation limits of the set temperature.
C) The deviation limit will be checked each time a new heat/coolperiod is calculated (once
every 2 seconds, default).
D) TERMINAL EXAMPLE:
EDI5.3 enables interrupt and set limit to +/- 5.3c
E) COMPUTER EXAMPLE:
PRINT#1,”EDI5.3"or PRINT#1,”EDI”,X
TC01-F Manual Ver. 0707
27
4. to READ the CHAMBER TEMPERATURE
T
A) The resolution of the temperature reading read over theinterface is .1 degree centigrade.
B) The front panel LED display will display to .1 deg up to 199.9 deg. At temperatures
>200 deg, the display resolution is 1 deg.
C) TERMINAL EXAMPLE:
T chamber temp is displayed on terminal
D) COMPUTER EXAMPLE:
PRINT#1,”T” output command to TC01
INPUT#1, X read chamber temperature
5. to READ the SET TEMPERATURE
C
A) The resolution of the temperature reading read over theinterface is .1 degree centigrade.
B) The front panel LED display will display to .1 deg up to 199.9 deg. At temperatures >
200 deg, the display resolution is 1 deg.
C) TERMINAL EXAMPLE:
C outputs Set Temp to terminal
D) COMPUTER EXAMPLE:
PRINT#1,”C” outputs command to TC01
INPUT#1, X read Set Temp
6. to READ the REMAINING TIME at the CURRENT TEMPERATURE
M
A) Time is interpreted as minutes unless hours was selected by the INIT command. OPT
can be used to determine time setting.
28
B) TERMINAL EXAMPLE:
M outputs Time to terminal
C) COMPUTER EXAMPLE:
PRINT#1,”M” output command to TC01
INPUT#1,X read Time
TC01-F Manual Ver. 0707
3-3.2 RS232 COMMANDS: SCAN MODE
(See Command Summary TABLE 3-4)
1. to SET/DELETE a SCAN TEMPERATURE
(-)n(n(n.(n))))Am where -100.0 <= (-)n(n(n(.(n)))) <= UTL and 0 <= m <= 9
A) A temperature < -100 or > UTL is ignored and no action is initiated by the controller.
B) UTL is the user-settable limit temperature. UTL can only be set <= PLIMIT. PLIMIT
is the highest temperature allowed or 315 deg C.
C) -Am will delete scan temperature and time m.
D) Scan Temps can be assigned in any order. Scan Temps will be executed in ascending
order.
E) The resolution of the temperature set of the interface is .1 deg. The LED display will
only display to .1 degree up to 199.9 deg. At temperatures >200 deg, the display
resolution is 1 deg.
F) TERMINAL EXAMPLES:
-30A3 sets Scan Temp #3 to -30 C
50.2A0 sets Scan Temp #0 to +50.2 C
100.5A8 sets Scan Temp #8 to +100.5 C
The above sequence will be executed +50.2 C first, -30.0 C second, and +100.5 C third.
-A3 deletes Scan Temp #3
With Scan Temp #3 deleted, execution will start with +50.2 C and end with +100.5 C.
150.5Ab sets Scan Temp #8 to +150.5 C
Note that the new Scan Temp of 150.5 writes over the old one of 100.5.
G) COMPUTER EXAMPLES:
PRINT#1,”-30A3"or PRINT#1,X,”A”,Y
2. to SET/DELETE a SCAN TIME
A) A time < 0 or > 1999 is ignored and no action is initiated by the controller.
B) A time between 1800 and 1999 sets the time to infinity.
C) -Bm will delete scan temperature and time m.
D) Scan Times can be assigned in any order. They, along with their corresponding Scan
Temp, will be executed in ascending order.
TC01-F Manual Ver. 0707
29
E) TERMINAL EXAMPLES:
10B3 sets Scan Time #3 to 10 minutes
82B0 sets Scan Time #0 to 82 minutes
100B8 sets Scan Time #8 to 100 minutes
The soak-time at the first executed temperature will be 82 minutes, at the second temperature, 10 minutes, and at the third temperature, 100 minutes.
F) COMPUTER EXAMPLES:
PRINT#1,”10B3"or PRINT#1,X,”B”,Y
3. TO SET THE NUMBER OF ‘CYCLES’ OR ‘LOOPS’ FOR THE SCAN MODE
n(n(n(n)))B-
where 1 <= n(n(n(n))) <= 1999
A) An input >1800 and <= 1999 sets the number of cycles to infinity.
B) The number of cycles that have been set can only be displayed before the Scan
sequence has started. (see #7 below) or, once the scan sequence has been started, by
stopping the scan sequence and executing command #7 below. See command #12,
this section.
C) TERMINAL EXAMPLES:
124B- sets the number of cycles to 124
D) COMPUTER EXAMPLES:
PRINT#1,”125B-”or PRINT#1,X,”B-”
4. to SET the DEVIATION LIMIT and ENABLE DEVIATION INTERRUPTS
EDIn(n(n(.(n))) where 0 <= n(n(n.(n)))) <= UTL
A) The allowed temperature deviation before generating adeviation interrupt is +/- the set
value around the target chamber set temperature.
B) The deviation checking is automatically disabled duringtransitions between chamber
temperature set points and begins once the chamber temperature is within the deviation limits of the set temperature.
C) The deviation limit will be checking each time a new heat/cool period is calculated
(once every 2 seconds, default).
30
D) TERMINAL EXAMPLES:
EDI5.3 enables interrupt and sets limit to +/- 5.3 C
E) COMPUTER EXAMPLES:
PRINT#1,”EDI5.3"or PRINT#1,EDI”,X
TC01-F Manual Ver. 0707
5. to READ a SCAN TEMPERATURE
Am where 0 <= m <= 9
A) The resolution of the temperature measurement of the interface is .1 deg. The LED
display will only display to .1 degree up to 199.9 deg. At temperatures > 200 deg,
the display resolution is 1 deg.
B) TERMINAL EXAMPLES:
A3 causes TC01 to output Scan Temp #3
C) COMPUTER EXAMPLES:
PRINT#1,”A3" outputs command to TC01
INPUT#1,X reads Scan Temp #3
or PRINT#1,”B”,Y
INPUT#1,X
6. TO READ THE CURRENT CYCLE NUMBER
BA) ‘1’ will be displayed during the first cycle or loop, ‘2’ will be displayed during the
second, etc. The scan will terminate automatically after the cycle where the current
cycle number equals the number of cycles ‘to do’. When the scan mode is terminated, the heat and cool outputs are disabled, the ‘set temp’ is set for 25 deg., the time
at temperature is set to infinity, and the number of cycles ‘to do’ is set to infinity. If
the Scan Mode hasn’t started, or has been stopped (see #11, this section), then this
command displays the original number of cycles set.
B) TERMINAL EXAMPLES:
B- reads current cycle number
C) COMPUTER EXAMPLES:
PRINT#1,”B-”INPUT#1,X
7. to READ the CURRENT CHAMBER TEMPERATURE
T
A) The resolution of the temperature measurement of the interface is .1 deg. The LED
display will only display to .1 deg up to 199.9 deg. At temperatures > 200 deg, the
display resolution is 1 deg.
B) TERMINAL EXAMPLES:
T causes TC01 output current Temp
C) COMPUTER EXAMPLES:
PRINT#1,”T”INPUT#1,X
TC01-F Manual Ver. 0707
31
8. to READ the CURRENT SCAN TEMPERATURE
C
A) See 8 A) above
B) TERMINAL EXAMPLES:
C causes TC01 to output current Scan Temp
C) COMPUTER EXAMPLES:
PRINT#1,”C” INPUT#1,X
9. to Read REMAINING TIME at CURRENT TEMPERATURE
M
A) Time is interrupted as minutes unless hours was selected by the INIT command then it
is in hours.
B) TERMINAL EXAMPLES:
C causes TC01 to output remaining time
C) COMPUTER EXAMPLES:
PRINT#1,”M” outputs commands to TC01
INPUT#1,X reads Time
10. to START the SCAN MODE
AB
A) Starting the Scan Mode without any valid Scan Temp/Scan Timedata programmed will
cause a ‘command error’ response.
B) TERMINAL EXAMPLES:
PRINT#1,”AB” starts Scan Mode
or PRINT#1,A$
11. to STOP the SCAN MODE
BA
A) Heat and Cool outputs are disabled, the time-outs function is turned off. Upon restarting, execution beings at the FIRST valid Scan Temp/Time data of the ‘loop’ or ‘cycle’
in which it was stopped. It does NOT continue at the scan data at which the Scan was
stopped.
32
B) TERMINAL EXAMPLES:
BA stops scan mode
C) COMPUTER EXAMPLES:
PRINT#1,”BA” stops Scan Mode
TC01-F Manual Ver. 0707
3-3.3 RS232 COMMANDS: CONTROL GROUP
1. to RESET (clear) the CONTROLLER
R
The controller is rest to power up conditions:
1) Single Temp Mode
2) All scan temperatures and times cleared
3) Set temperature equal to 25 degrees
4) Time-at-temperature equal to infinity
5) # of cycles equal to infinity
6) Compressor and auxiliary outputs disabled
7) Heat/Cool outputs disabled
8) RS232-C echo disabled
9) IEEE-488 address displayed for 3 seconds
10) Local control enabled
11) PID coefficients unchanged
12) Scan interrupts are disabled
13) UTL =PLIMIT
14) Deviation limit checking disabled
2. to ENABLE LOCAL CONTROL of the CONTROLLER
Pressing a local keyboard key returns the controller to local mode. There is no local lock
out function supported for the RS232-C bus.
3. to ENABLE REMOTE CONTROL
The controller is automatically set in the remote mode whenever it receives a character over
the RS232-C bus.
4. to ENABLE RS232 ECHO mode
H
A) The default mode is ‘no echo’ of characters that come in the RS232 port.
B) This command sets the controller in the ‘echo mode’ which causes any character input
to the RS232 port to be echoed back out to the RS232 port.
C) To re-enter the ‘no echo’ mode, the controller must be RESET. Note that RESET will
clear all SCAN times and temps and controller will enter single temp mode.
D) TERMINAL EXAMPLES:
H enables RS232 Echo
E) COMPUTER EXAMPLES:
PRINT#1,”H” enables RS232 Echo
TC01-F Manual Ver. 0707
33
5. to ENABLE the HEAT and COOL OUTPUTS
ON
A) Setting the single mode ‘set temp’ or starting the ‘scan mode’also automatically enables
the heat and cool outputs.
B) TERMINAL EXAMPLES:
ON enables Heat/Cool outputs
C) COMPUTER EXAMPLES:
PRINT#1,”ON”or PRINT#1,A$
6. to ENABLE the AUXILIARY #1 OUTPUT
OUT1ON
A) This auxiliary output is typically used for compressor control in mechanically cooled
temperature chambers. At power up, the TC01 sets a status bit that instructs it to use
the AUX #1 output for compressor control. The TC01 will automatically turn the
compressor ON when one of the following conditions is met:
1) When the SET temperature <= 40 deg C and heat/cool outputs enabled.
2) When the TC01 is in the scan mode and the next scan settemperature is less than
the current scan set temp and the time remaining at the current is < 1 minute and
heat/cool outputs enabled.
3) Whenever cooling is required (and has been required for > 1minute) regardless
of the current set temperature value and heat/cool outputs enabled.
4) If a new set temp < the current set temp in the single temp mode.
B) The TC01 will automatically turn the compressor OFF when:
1) The SET temperature > 40 deg C and cooling has not been requiredfor a period
of 1 minute and not in the last minute of a scan temp point.
2) The TC01 has received an OFF command or whenever the heat/cooloutputs are
disabled.
The TC01 will always perform the above automatic compressor controlunless it receives an “OUT1ON”
or an “OUT1OFF” command. Once itreceives either, the automatic compressor control is disabled until
the TC01 is RESET. Once disabled, the user can enable or disable this output (via “OUT1ON” or
“OUT1OFF”) at will to control whateverexternal event desired, including any compressor. The auxiliary
outputconsists of an open collector output plus a 5 volt/270 ohm current source which can be used to drive
opto coupler circuits. See Figure 3B for the auxiliary output interface.
34
TC01-F Manual Ver. 0707
C) TERMINAL EXAMPLES:
OUT1ON enables Aux#1 output
D) COMPUTER EXAMPLES:
PRINT#1,”OUT1ON”or PRINT#1,A$
7. to ENABLE the AUXILIARY #2 OUTPUT
OUT2ON
A) This auxiliary output is not used by any TC01 internal function. The default condition
is off.
B) TERMINAL EXAMPLES:
OUT2ON
enables Aux#2 output
C) COMPUTER EXAMPLES:
PRINT#1,”OUT2ON”or PRINT#1,A$
8. to ENABLE SCAN MODE INTERRUPTS
ESI
A) While the RS232 port does not experience or deliver ‘interrupts’as such, this com
mand allows the TC01 to output the various characters that signify end-of-soak-times
as discussed in Section 3-3.5.
B) TERMINAL EXAMPLES:
ESI enables Scan Mode Interrupts
C) COMPUTER EXAMPLES:
PRINT#1,”ESI”or PRINT#1,A$
9. to ENABLE DEVIATION INTERRUPTS
See section 3-3.2, #4.
10. to DISABLE LOCAL KEYBOARD CONTROL
There is no command to disable local control from the RS232 port. See IEEE-488 command
on local lockout.
11. to DISABLE RS232 ECHO
R
A) Note that this is a reset command which will also reset most other controller parameters.
See COMMAND 1 of the section.
B) TERMINAL EXAMPLES:
R will disable Echo and Reset TC01
C) COMPUTER EXAMPLES:
PRINT#1,”R”or PRINT#1,A$
TC01-F Manual Ver. 0707
35
12. to DISABLE the HEAT and COOL OUTPUTS
OFF
A) TERMINAL EXAMPLES:
OFF disables Heat/Cool outputs
B) COMPUTER EXAMPLES:
PRINT#1,”OFF” or PRINT#1,A$
13. to DISABLE THE AUXILIARY #1 OUTPUT
OUT1OFF
A) See discussion in this section at command #6.
B) TERMINAL EXAMPLES:
OUT1OFF disables Aux#1 output
C) COMPUTER EXAMPLES:
PRINT#1,”OUT1OFF”or PRINT#1,A$
14. to DISABLE the AUXILIARY #2 OUTPUT
OUT2OFF
A) TERMINAL EXAMPLE :
OUT2OFF disables Aux #2 output
B) COMPUTER EXAMPLE :
PRINT#1,”OUT2OFF”or PRINT#1,A$
15. to DISABLE SCAN MODE INTERRUPTS
DSI
A) See discussion at command #8, Enable Cycle Interrupts.
B) TERMINAL EXAMPLE:
DSI disables Scan Mode Interrupts
C) COMPUTER EXAMPLE:
PRINT#1,”DSI”or PRINT#1,A$
16. to DISABLE the DEVIATION INTERRUPT
DDI
A) See discussion at Section 3-3.2 #4.
36
B) TERMINAL EXAMPLE :
DDI disables deviation interrupts
C) COMPUTER EXAMPLE :
PRINT#1,”DDI”or PRINT#1,A$
TC01-F Manual Ver. 0707
3-3.4 RS232 SPECIAL GROUP
1. PID COEFFICIENT CHANGE
Modification of the PID coefficients used in the TC01 algorithm is not generally recommended
for the casual user. The standard TC01 PID coefficients have been chosen to provide a good
compromise between fast settling time and good overshoot characteristics. However, for those
who wish to optimize the TC01 transient or steady state response for their particular application,
an application note (part # 680008) has been written to assist in the PID coefficient changes.
See our web home page at www.sunelectronics.com.
The TC01 controller calculates the amount of heating or cooling required to maintain the
chamber temperature at the set temperature using a 3 mode proportional, integral, derivative
servo equation. There is a weighing coefficient for each of the three components of the control
equation. At power up, the TC01 reads the default PID coefficients from its EEPROM memory
and will use these coefficients unless they are changed, by the user, using this command.
Once changed, the TC01 will continue to use the new coefficient until changed by another
command or until the TC01 is powered off. Therefore, if other than the default coefficients are
to be used, they must be set each time the TC01 is powered on. A new command “INIT” has
been added to allow permanent changes to be made by the user.
to SET PID WEIGHING COEFFICIENTS
PID= (-)n, (-)n, (-)n
where 0 < n < 9
A) The above values of ‘n’ are interpreted as exponents of 2. Therefore each multiplier has
a range of 2^(-9) to 2^(+9).
B) The first value is the ‘proportional coefficient.’ multiplier. The second value is the
‘integral coefficient’ multiplier. The third value is the ‘derivative coefficient’
multiplier.
C) TERMINAL EXAMPLE:
PID=0, -3,4 sets the proportional coefficient to one since 2^(0) = 1,
sets the integral coefficient. to 2^(-3) = .125,
sets the derivative coefficient. to 2^(4) = 16
D) COMPUTER EXAMPLE:
PRINT#1,”PID=0,-3,4"
PRINT#1,”PID=”,X,”,”,Y,”,”,Z
to READ the CURRENT PID COEFFICIENTS
PID?
A) The three multipliers will be sent, each followed by CR LF
B) TERMINAL EXAMPLE:
TC01-F Manual Ver. 0707
PID?
37
C) COMPUTER EXAMPLE:
PRINT#1"PID?”
INPUT#1,P$
INPUT#1,I$
INPUT#1,D$
2. OUTPUT THE INSTALLED OPTIONS
OPT
The OPT command allows the user to determine the type of unit that he is talking to, the type of
probe, and the units of time that have been selected. Upon receiving the OPT command the
TC01 will send an ASCII string containing “ TC01, probe type, time units “. The substring
TC01 informs the user that he is talking to a TC01. The probe type substring provides info on
the type of temperature sensor that the TC01 is configured for. The substring time units will
be MIN when minutes selected or HRS for hours time selection.
3. OUPUT AUXILIARY INPUT STATE
IN1
A) The value returned is 0 if the input is a TTL logic low, and 1 if the input is a logic high.
B) See figure 3 for the AUXIN wiring.
C) TERMINAL EXAMPLE :
IN1 causes TC01 to output State
D) COMPUTER EXAMPLE :
PRINT#1,”IN1"or PRINT#1,A$
4. to SET UPPER TEMPERATURE LIMIT (UTL)
(-)n(n(n(.(n))))UTL where -100 <= (-)n(n(n(.(n)))) <= PLIMIT
A) UTL may be set to any value between -100 and PLIMIT inclusive. The value of PLIMIT
is 315 deg C.
B) UTL is set equal to PLIMIT at power up.
C) TERMINAL EXAMPLE :
100.0UTL sets the UTL to 100.0 C
D) COMPUTER EXAMPLE :
PRINT#1,”UTL”or PRINT#1.A$
5. INIT TC01 OPERATING MODES
INITn,p,i,d,M or H,C
The INIT command allows the user to change most TC01 modes. The INIT command is a
remote only command. The parameters that it changes are stored in EEPROM such that the
information is saved with power off.
38
TC01-F Manual Ver. 0707
n is a digit between 1 and 7 and selects the temperature probe type as follows;
1= RTD 3 wire 100 ohm .385 alpha
2= RTD 3 wire 100 ohm .392 alpha
3= J thermocouple
4= K thermocouple
5= T thermocouple
, data separator
p allows permanent change to the PID P coefficient
, data separator
i allows permanent change to the PID I coefficient
, data separator
d allows permanent change to the PID D coefficient
, data separator
M to set time units to minutes or H for hours units
, data separator
finally always send C character
3-3.5 TIME-OUT/PROBLEM INDICATIONS
TIME-OUT INDICATIONS — SINGLE TEMPERATURE MODE
When the desired soak time (time-at-temperature) has been reached, the operator is alerted to this fact in
three ways. Firstly, the ‘TIME-OUT’LED located on the front panel is turned ‘ON’. Secondly, a continuous
tone is emitted from a transducer located on the TC01 power supply board. Thirdly, an
ASCII ‘I’ is sent by the TC01 to the host RS232 device. The LED and audioindication will continue until
a TIME or TEMP key is pressed. Alternately,the controller may be RESET by sending a RESET command
(see Section 3-3.3) or by depressing the ‘C’ key on the TC01 keyboard. Note that all SCAN temps are
cleared by the RESET command.
TIME-OUT INDICATIONS — SCAN MODE
Time-out bus and port indications may be ENABLED or DISABLED per commands in3-3.3. The default
condition is that Time-Out Indications are DISABLED. Audio (buzzer) and visual (LED) indicators are
always enabled and may never be disabled.
The TC01 SCAN mode allows a maximum of 10 segments to be programmed through theRS232 port. Each
TC01-F Manual Ver. 0707
39
segment is described by a temperature and a soak-time(time-at-temperature). Additionally, the scan mode
sequence chosen by the user can be programmed to be automatically repeated any number of times up to
a total of 1800 ‘cycles’. Thus we may define several types of ‘time-outs’ that would be useful to the user.
The first to consider is a time-out indication at the end of each soak timepoint within the temperature scan
sequence. Another type would be a time-outsignifying completion of the last soak time in a scan sequence.
Since the scan sequence can be cycled, yet another time-out indication would be to alert that all cycles
programmed have been completed.
The TC01 outputs three different ASCII characters for each of the threedistinct time-outs (assuming timeout indications are ENABLED). The table below describes said characters. The characters are sent out 1
minute beforecompletion of time-out.
TIME-OUT TYPE
_______________
ASCII CHARACTER SENT
——————————
SOAK TIME COMPLETE
P
CYCLE (‘LOOP’) COMPLETED
L
END OF TOTAL RUN
E
PROBLEM INDICATORS
Three problem indicators have been incorporated into the TC01.
PROBLEM TYPE
——————
40
ASCII CHARACTER SENT
——————————
Deviation Limit Exceeded
(when enabled)
D
Chamber Temp Exceeds UTL
(automatically disables heat/cool)
O
Command Error
CMD ERROR!!
TC01-F Manual Ver. 0707
TABLE 3-1 RS232-C CONTACT ASSIGNMENTS & WIRING DIAGRAM
—————————————
CONTACT
SIGNAL LINE
———————————————————————————————————————
1
‘
GROUND
‘
2
‘
TRANSMIT DATA
‘
3
‘
RECEIVE DATA
———————————————————————————————————————
7
‘
SIGNAL GROUND
‘
20
‘
DATA TERMINAL READY
———————————————————————————————————————
To communicate over the RS232 bus, a cable constructed with a male DB25 connector on the TC01 controller and a female DB9 connector on PC end and wired as follows is required:
TC01 CONTROLLER (DB25 Male)
COMPUTER (DB9 Female)
Pin#
Pin#
(2) TxD _____________________ RxD (2)
(3) RxD _____________________ TxD (3)
(7) GND ____________________ GND (5)
For TC01 Controllers with serial number C1508 or later, use the following settings to communicate through Windows:
Connect using desired COM port
Bits per second: 9600
Data bits: 8
Parity: NONE
Stop bits: 1
Flow Control: NONE
CAPS LOCK ON FOR TCO1
**Note: If you are running Windows and operating a TC01 Controller with a serial number
prior to C1508 you will need to use the following settings:
Connect using desired COM port
Bits per second: 2400
Data bits: 8
Parity: NONE
Stop bits: 1
Flow Control: NONE
CAPS LOCK ON FOR TC01
TC01-F Manual Ver. 0707
41
If your computer is using a DB25 Male connector instead of the DB9, the wiring connections are as follows.
TC01 CONTROLLER (DB25 Male)
COMPUTER (DB25 Female)
Pin#
Pin#
(2) TxD ________________ RxD (3)
(3) RxD ________________ TxD (2)
(7) GND ________________ GND (7)
3-4 IEEE-488 REMOTE CONTROL
CONVENTIONS:
1. “n” or “m” refers to any numeric character 0 through 9
2. Items enclosed in parentheses “( )” are optional. Thus n(n(n(.(n)))) means that at least one
numeric character has to be sent. Optionally, one or two additional characters to the left of
a decimal are allowed and one character after the decimal is allowed.
3. The sample 9825 commands assume that the calculator’s IEEE-488 interface card is set to
select code 7; and that the temperature controller’s address has been set to binary 3.
4. Blanks, or space char, are ignored.
5. “X” and “Y” are variables assumed to be defined elsewhere in the controlling program.
6. See table 3-2 for IEEE-488 CONTACT ASSIGNMENTS
7. See table 3-3 for IEEE-488 BUS ADDRESS SWITCH SETTINGS
8. The command processor software ignores leading zero’s and trailing digits on all numeric
data received. For example: -0000025.321000 C will set the signal mode temperature to
-25.3 deg.
3-4.1 GPIB COMMANDS: SINGLE TEMPERATURE MODE
(see Command Summary
TABLE 3-4)
1. to SET the CHAMBER TEMPERATURE
(-)n(n(n(.(n))))C where -100.0 <= (-)n(n(n(.(n)))) <= UTL
A) If the controller was in the scan mode before this command, thescan mode is terminated
and the single temp mode is initiated.
B) UTL is the user-settable limit temperature. UTL can only be set <= PLIMIT. PLIMIT
is the highest temperature allowed for the TC01 and is 315 deg C.
C) Setting the temperature enables the heat and cool outputs withheat cool switch override.
D) A temperature < -100 or > UTL is ignored and no action will be initiated by the controller.
E) Sample GPIB commands write 703,”50.2C” assume controller id=7, TC01 device
address = 03, string=”50.2C” sets the chamber temperature to +50.2 deg C
42
TC01-F Manual Ver. 0707
2. to SET the TIME-AT-TEMPERATURE (Soak Time)
n(n(n(n)))M
where 0 <= n(n(n(n))) <= 1999
A) A time < 0 or > 1999 is ignored and no action is initiated by the controller.
B) A time between 1800 and 1999 sets the time to infinity.
C) Time is interpreted as minutes unless the HR option is installed whereby time is
interpreted as hours.
3. to SETthe DEVIATION LIMIT and ENABLE DEVIATION INTERRUPT
EDIn(n(n(.(n)))) where 0 <= n(n(n(.(n)))) <= UTL
A) The allowed temperature deviation before generating a deviationinterrupt is +/- the set
value around the target chamber set temperature.
B) The deviation checking is automatically disabled duringtransitions between chamber
temperature set points and begins once the chamber temperature is within the deviation limits os the set temperature.
C) The deviation limits will be checked each time a new heat/coolperiod is calculated (once
every 2 seconds, default).
4. to READ the CHAMBER TEMPERATURE
T
A) The resolution of the temperature reading read over the bus is .1 degree centigrade.
B) The LED display will only display from .1 deg up to 199.0 deg. At temperatures >200
the display resolution is 1 deg.
5. to READ the SET TEMPERATURE
C
A) The resolution of the temperature reading read over the bus is .1 degree centigrade.
B) The LED display will only display to .1 deg up to 199.9 deg.
>200 the display resolution is 1 deg.
TC01-F Manual Ver. 0707
AT temperatures
43
6. to READ the REMAINING TIME at the CURRENT TEMPERATURE
M
A) Time is interpreted as minutes unless the HR option is installed
whereby time is interpreted a hours.
3-4.2 GPIB COMMANDS: SCAN MODE
(see Command Summary TABLE 3-4)
1. to SET/DELETE a SCAN TEMPERATURE
(-) (n(n(n(.(n))))Am where -100.0 <= (-)n(n(n(.(n)))) <= UTL
A) A temperature <-100 or > UTL is ignored and no action is initiated by the controller.
B) UTL is the user-settable limit temperature. UTL can only beset <= PLIMIT. PLIMIT
is the highest temperature allowed for the TC01 and is 315 deg C.
C) -Am will delete scan temperature and time m
D) Scan Temps can be assigned in any order. However, Scan Temps will be executed in
ascending order of ‘m’.
E) The resolution of the temperature set over the interface is .1 deg. However, the LED
display will only display to .1 deg up to 199.9. At temps >200 deg, the display resolution is 1 deg.
2. to SET/DELETE a SCAN TIME
n(n(n)0Bm where 0 <= n <= 1999 and 0 <= m <= 9
A) A time < 0 or > 1999 is ignored and no action is initiated by the controller.
B) A time between 1800 and 1999 sets the time to infinity.
C) -Bm will delete scan temperature and time m
D) Scan times can be assigned in any order. They, along with their corresponding Scan
Temp, will be executed in ascending order.
E) Time is interpreted as minutes unless the HR option is installed whereby time is
interpreted as hours.
44
TC01-F Manual Ver. 0707
3. to SET the number of CYCLES for the SCAN MODE
n(n(n))B- where a <= n(n(n)) <= 180
A) An input >1800 ans <= 1999 sets the number of cycles to infinity.
B) The number of cycles that have been set can only be displayedbefore the Scan sequence
has begun (see #7 below) or, once the Scan sequence has started, by stopping the
scan sequence and executing command #7 below. See command #12 of this section.
4. to SET the DEVIATION LIMIT and ENABLE DEVIATION INTERRUPTS
EDIn(n(n(.(n)))) where 0 <= n(n(n(.(n)))) <= UTL
A) The allowed temperature deviation before generating a deviationinterrupt is +/- the set
value around the target chamber set temperature.
B) The deviation checking is automatically disabled duringtransitions between chamber
temperature set points and begins once the chamber temperature is within the deviation limits os the set temperature.
C) The deviation limit will be checked each time a new heat/coolperiod is calculated (once
every 2 seconds, default)
5. to READ a SCAN TEMPERATURE
Am where 0 <= m <= 9
A) The resolution of the temperature measurement of theinterface is .1 deg. However, the
LED display will only display to .1 deg up to 199.9 deg. At temperatures >200 deg,
the display resolution is 1 deg.
6. to READ a SCAN TIME
Bm where 0 <= m <= 9
A) Time is interpreted as minutes unless the HRS has been selectedwhereby time is interpreted as hours.
7. to READ the CURRENT CYCLE NUMBER
BA) ‘1’ will be displayed during the first cycle or loop, ‘2’ will be displayed during the
second, etc. The scan will terminate automatically after the cycle where the current
cycle number equals the number of cycles ‘to do.’ When the scan mode is terminated, the heat and cool outputs are disabled, the ‘set temp’ is set for 25 deg. and the
time-at-temperature is set to infinity, and the number of cycles ‘to do’ is set to infinity.
TC01-F Manual Ver. 0707
45
If the Scan Mode has not started, or has been stopped (see #12 of this section) then
this command displays the original number of cycles set.
8. to READ the CURRENT CHAMBER TEMPERATURE
T
A) The resolution of the temperature reading read over the bus is.1 degree centigrade. The
LED display will only display to .1 deg up to 199.9 deg. At temperatures >200, the
display resolution is 1 deg.
9. to READ the CURRENT SCAN TEMPERATURE
C
A) See 8 A) above
10. to READ the REMAINING TIME at CURRENT TEMPERATURE
M
A) Time is interpreted as minutes unless the HR option is installed whereby time is
interpreted as hours.
11. TO START THE SCAN MODE
AB
A) Starting the Scan Mode without any valid Scan Temp/Scan Time dataprogrammed will
cause a ‘command error’ response.
12. to STOP the SCAN MODE
BA
A) Heat and Cool outputs are disabled, the time-out function isturned off. Upon restarting,
execution begins at the FIRST valid Scan Temp/Time data of the ‘loop’ or ‘cycle’ in
which it was stopped. It does NOT at the scan data at which the Scan was stopped.
46
TC01-F Manual Ver. 0707
3-4.3 GPIB COMMANDS: CONTROL GROUP
1. to RESET the CONTROLLER
R
A) The controller is reset to power up conditions:
1) Single temp mode
2) All scan temperatures and times cleared
3) Set temperature equal to 25 degrees
4) Time-at-temperature equal to infinity
5) # of cycles equal to infinity
6) Compressor and auxiliary outputs disabled
7) Heat/Cool outputs disabled
8) RS232-C echo disabled
9) IEEE-488 \address displayed for 3 seconds
10) Local controls enabled
11) PID coefficients unchanged
12) Scan interrupts are disabled
13) UTL = PLIMIT
14) Deviation limit checking disabled
2. to ENABLE LOCAL CONTROL
See IEEE std 488-1975
A) Sample GPIB command
lcl 7 (see your GPIB system documentation for its command)
B) After the return to local command is received, pressing the RESETkey (the ‘C’ key) on
the local keyboard is necessary to return the controller to local control.
3. to ENABLE REMOTE CONTROL
See IEEE std 488-1975
A) Sample GPIB command
rem 703 (see your GPIB system documentation for its command)
B) The controller is also set in remote mode whenever it is selected during a bus transfer.
TC01-F Manual Ver. 0707
47
4. to ENABLE RS232 ECHO MODE
H
A) The default mode is ‘no echo’ of characters that come in the RS232 port.
B) This command sets the controller in the ‘echo mode’ which causesany character put to
the RS232 port to be echoed back out the RS232 port.
C) To re-enter the ‘no echo’ mode, the controller must be RESET. Note that RESET will
clear all SCAN times and temps and the controller will enter the single temp mode.
See command #1 above.
5. to ENABLE the HEAT and COOL OUTPUTS
ON
A) Setting the single mode ‘set temp’ or starting the ‘scan mode’also automatically enables
the heat and cool outputs.
6. to ENABLE the AUXILIARY #1 OUTPUT
OUT1ON
A) This auxiliary output is typically used for compressor control in mechanically cooled
temperature chambers. At power up, the TC01 sets a status bit that instructs it to use
the AUX #1 output for compressor control. The TC01 will automatically turn the
compressor ON when one of the following conditions is met:
1) When the SET temperature <= 40 deg and heat/cool outputs enabled.
2) When the TC01 is in the scan mode and the next scan settemperature is less than
the current scan set temp and the time remaining at the current point is < 1
minute and heat/cool outputs enabled.
3) Whenever cooling is required (and has been required continuously for > 1
minute) regardless of the current set temperature value and heat/cool outputs
enabled.
4) If a new set temp < current set temp in the single temp mode.
B) The TC01 will automatically turn the compressor OFF when:
1) The SET temperature > 40 deg C and cooling has not been requiredfor a period
of 1 minute and not in the last minute of a scan temp point.
2) The TC01 has received an OFF command or whenever the heat/cooloutputs are
disabled.
48
TC01-F Manual Ver. 0707
The TC01 will always perform the above automatic compressor control unless it receives an
“OUT1ON” or an “OUT1OFF” command. Once it receives either, the automatic compressor
control is disabled until the TC01 is RESET or turned OFF then ON again. Once disabled, the
user can then enable or disable this output (via “OUT1ON” or “OUT1OFF”) at will to control
whatever external event desired, including any compressor. The auxiliary output consists of an
open collector output plus a 5 volt/270 ohm current source which can be used to drive opto
coupler circuits. See figure 3 for auxiliary output interface.
7. to ENABLE the AUXILIARY #2 OUTPUT
OUT2ON
A) This auxiliary output is not used by internal TC01 functions. The default condition is
DISABLED.
8. to ENABLE SCAN MODE INTERRUPTS
ESI
A) This command allows the TC01 to output the various characters thatsignify end-of-soaktimes as discussed in Section 3-4.5.
9. to ENABLE DEVIATION INTERRUPT
Deviation Interrupts are automatically enabled by setting thedeviation limit. See 3-4.3 #4.
The interrupt character output by the TC01 is discussed in section 3-4.5.
10. to DISABLE LOCAL CONTROL
See IEEE-488 standard 488-1975 or above
11. to DISABLE RS232 ECHO
R
A) Note that this is a reset command which will also reset mostother controller parameters.
See COMMAND 1 of this section.
12. to DISABLE the HEAT and COOL OUTPUTS
OFF
13. to DISABLE the AUXILIARY #1 OUTPUT
OUT1OFF
See discussion at command #6.
TC01-F Manual Ver. 0707
49
14. to DISABLE the AUXILIARY #2 OUTPUT
OUT2OFF
15. to DISABLE SCAN MODE INTERRUPTS
DSI
A) See discussion at command #8.
16. to DISABLE the DEVIATION INTERRUPT
DDI
A) See discussion in this section at command #9.
3-4.4 GPIB COMMANDS: SPECIAL
1. to INPUT CHARACTER STRING from SYSTEM CONTROLLER & OUTPUT SAID
STRING to RS232-C INTERFACE
!ssss...sss where ssss...sss is an ASCII character string
A) This command allows direct control of custom circuitry by theGPIB System Controller.
Any custom circuitry with an RS232 interfacecan be controlled by this command, and
interrogated with the use of the next command. Thus an unlimited number of events
and status thereof can be incorporated as part of the automated test facility. For example, one may wish to test, say, 100 component (resistors, thermistors, etc.) in an
automated setup. One way to accomplish this would be to build the necessary switching circuitry with an RS232 interface. Then, the GPIB System Controller would direct
theproper switching sequence via the TC01 controller. Similarly,command #2 below
could be used to ascertain status information from the switching circuitry.
2. TO INPUT CHARACTER STRING FROM RS232 INTERFACE TO IEEE-488 SYSTEM
CONTROLLER
S
Sample 9825 command
wrt703,”S”,red703,R$
System controller reads a line of characters that are sent to the TC01 via the RS232 port.
A carriage return or line feed terminates the sequence.
50
TC01-F Manual Ver. 0707
3. PID COEFFICIENT CHANGE
Modification if the PID coefficients used in the TC01 algorithm is not generally recommended
for the casual user. The standard TC01 PID coefficients have been chosen to provide a good
compromise between fast settling time and good overshoot characteristics. However, for
those who wish to optimize the TC01 transient or steady state response for their particular
application, an application note (part #680008) has been written to assist in the PID coefficient
changes. See our home page at www.sunelectronics.com to download the ap note.
The TC01 controller calculates the amount of heating or cooling required to maintain the
chamber temperature at the set temperature using a 3 mode proportional, integral, derivative
servo equation. There is a weighing coefficient for each of the three components of the
control equation. At power up, the TC01 reads the default PID coefficients from its EEPROM
memory and will use these coefficients unless they are changed, by the user, using this command. Once changed, the TC01 will continue to use the new coefficients until changed by
another command or until the TC01 is powered off. Therefore, if another command or default
coefficients are to be used, they must be set each time the TC01 is powered on. A new “INIT”
command has been added to allow the user to permanently change the PID coefficients.
to SET PID WEIGHING COEFFICIENTS
PID=(-)n,(-)n,(-)n where 0 < n < 9
A) The above values of ‘n’ are interpreted as exponents of 2. Therefore each multiplier has
a range of 2^(-9) to 2^(+9).
B) The first value is the ‘proportional coefficient.’ multiplier
The second value is the ‘integral coefficient’ multiplier
The third value is the ‘derivative coefficient’ multiplier
to READ the CURRENT PID COEFFICIENTS
PID?
A) The three multipliers will be sent, each followed by CR LF
4. OUTPUT THE INSTALLED OPTIONS
OPT
The OPT command allows the user to determine the type of unit that he is talking to, the type of
probe, and the units of time that have been selected. Upon receiving the OPT command the
TC01 will send an ASCII string containing “ TC01, probe type, time units “. The substring
TC01 informs the user that he is talking to a TC01. The probe type substring provides info on
the type of temperature sensor that the TC01 is configured for. The substring time units will
be MIN when minutes selected or HRS for hours time selection.
TC01-F Manual Ver. 0707
51
5. OUTPUT AUXILIARY INPUT STATE
IN1
A) The value returned is 0 if the input is a TTL logic low, and 1 if the input is at logic high.
B) See figure 3 for wiring information.
6. to SET UPPER TEMPERATURE LIMIT (UTL)
(-)n(n(n(n(.(n))))UTL where -100 <= (-)n(n(n(n(.(n)))) <= PLIMIT
A) UTL may be set to any value between -100 and PLIMIT inclusive. The value is PLIMIT
is 315 deg C.
B) UTL is set equal to PLIMIT at power up.
7. to OUTPUT CURRENT TEMPERATURE LIMIT (UTL)
UTL
8. INIT TC01 OPERATING MODES
INITn,p,i,d,M or H,C
The INIT command allows the user to change most TC01 modes. The INIT command is a
remote only command. The parameters that it changes are stored in EEPROM such that the
information is saved with power off.
n is a digit between 1 and 7 and selects the temperature probe type as follows;
1= RTD 3 wire 100 ohm .385 alpha
2= RTD 3 wire 100 ohm .392 alpha
3= J thermocouple
4= K thermocouple
5= T thermocouple
, data separator
p allows permanent change to the PID P coefficient
, data separator
i allows permanent change to the PID I coefficient
, data separator
52
TC01-F Manual Ver. 0707
d allows permanent change to the PID D coefficient
, data separator
M to set time units to minutes or H for hours units
, data separator
finally always send C character
3-4.5 TIME-OUT/PROBLEM INDICATIONS
TIME-OUT INDICATIONS — SINGLE TEMPERATURE MODE
When the desired soak time (time-at-temperature) has been reached, the operator is alerted to this fact in
three ways. Firstly, the “TIME-OUT’ LED located on the front panel is turned ‘ON’. Secondly, a
continuous tone is emitted from atransducer located on the TC01 power supply board. Thirdly, a ‘service
request’ is made by activating the SRQ line on the GPIB bus. When the GPIB system controller
subsequently polls the TC01 that requested service, the timed-out TC01 responds with a HEX 41.
Any TC01 that has not timed-out willrespond to the polling with a HEX 00. The LED and audio indication
will continue until the controller is sent a RESET command via the GPIB bus, or isreset manually (if local
lockout not enabled) by depressing the ‘C’ (clear) keyon the TC01 keyboard. Setting or reading TIME or
TEMP will also clear the buzzer and LED.
TIME-OUT INDICATIONS — SCAN MODE
Time-out indications may be ENABLED or DISABLED per commands in 3-4.3. Thedefault condition is
that Time-Out indications are DISABLED.
The TC01 SCAN mode allows a maximum of 10 segments to be programmed through theIEEE-488 bus.
Each segment is described by a temperature and a soak-time(time-at-temperature). Additionally, the scan
mode sequence chosen by the usercan be programmed to be automatically repeated any number of times
up to a total of 1800 ‘cycles’. Thus we may define several types os ‘time-outs’ that would be useful to the
user.
The first to consider is a time-out indication at the end soak time pointwithin the temperature scan sequence.
Another type would be a time-out signifying completion of the last soak time in a scan sequence. Since
the scan sequence can be cycled, yet another time-out indication would be to alert the user that all cycles
programmed have been competed.
TC01-F Manual Ver. 0707
53
The TC01 outputs three different interrupt characters, one for each of thethree distinct time-outs (assuming
time-out indications are ENABLED). The table below describes said characters. The characters are sent
out 1 minute before completion of time-out.
TIME-OUT TYPE
———————
INTERRUPT CHARACTER SENT (HEX)
————————————————
SOAK TIME COMPLETE
43
CYCLE (‘LOOP’) COMPLETED
44
END OF TOTAL RUN
45
PROBLEM INDICATORS
Four problem indicators have been incorporated into the TC01.
PROBLEM TYPE
——————
54
INTERRUPT CHARACTER SENT (HEX)
———————————————
Deviation Limit Exceeded
(when enabled)
46
Chamber Temp exceeds UTL
47
Command Error
42
IEEE-488 Bus lock-up time-out
4F
TC01-F Manual Ver. 0707
3-5 REMOTE ADDRESS SELECT SWITCH
Figure 7 shows the location of the RS232-C connector, the IEEE-488 connector, and the address select
switch on the remote I/O panel.
The talk/listen address for the IEEE-488 interface is set using the four position switch located on the I/O
panel. The switches are such that a “zero”is set having the switch “ON” and a “one” is set with the switch
“OFF”. If there is any doubt about which address is encoded, the display will show the GPIB address for
three seconds immediately upon power-up or upon given a RESET (clear) command.
TABLE 3-2 lists the contact pin assignments for the IEEE-488 connector.
TABLE 3-3 lists the 16 possible addresses as determined by the switch settings.
TABLE 3-2
IEEE-488 CONTACT ASSIGNMENTS
———————————————
CONTACT
SIGNAL LINE
‘
CONTACT
SIGNAL LINE
———————————————————————————————————————
‘
1
DIO 1
‘
13
DIO 5
2
DIO 2
‘
14
DIO 6
3
DIO 3
‘
15
DIO 7
4
DIO 4
‘
16
DIO 8
———————————————————————————————————————
5
EOI
‘
17
REN
6
DAU
‘
18
GND
7
NRFD
‘
19
GND
8
NDAC
‘
20
GND
———————————————————————————————————————
9
IFC
‘
21
GND
10
SRQ
‘
22
GND
11
ATN
‘
23
GND
12
SHIELD
‘
24
GND, LOGIC
———————————————————————————————————————
TC01-F Manual Ver. 0707
55
TABLE 3-3
IEEE-488 BUS ADDRESS SWITCH SETTING
—————————————————
ADDRESS SWITCH
TALK ADDRESS LISTEN ADDRESS
DECIMAL
1 2 3 4
CHARACTER
CHARACTER
VALUE
———————————————————————————————————————
0 0 0 0
@
SP
0
1 0 0 0
A
!
1
0 1 0 0
B
“
2
1 1 0 0
C
#
3
———————————————————————————————————————
0 0 1 0
D
$
4
1 0 1 0
E
%
5
0 1 1 0
F
&
6
1 1 1 0
G
‘ (single quote)
7
———————————————————————————————————————
0 0 0 1
H
(
8
1 0 0 1
I
)
9
0 1 0 1
J
*
10
1 1 0 1
K
+
11
———————————————————————————————————————
0 0 1 1
L
, (comma)
12
1 0 1 1
M
- (dash)
13
0 1 1 1
N
. (period)
14
1 1 1 1
O
/
15
———————————————————————————————————————
0 = switch “on”
1 = switch “off”
56
TC01-F Manual Ver. 0707
TABLE 3-4
COMMAND SUMMARY/EXAMPLES
—————————————————
FUNCTION
————
KEYBD/DISPLAY*
——————
RS232*
——
IEEE-488*
————
50 TEMP
5 TIME
(n/a)
automatic
TEMP
50.0C
5M
EDI10
T
C
50.0C
5M
EDI10
T
C
TIME
M
M
SINGLE TEMP MODE
————————
SET Chamber Temp
SET Time-at-Temp
SET Deviation Limit
OUTPUT Chamber Temp
OUTPUT Current Set Temp
OUTPUT remaining Time
at current Temp
SCAN MODE
————
SET Scan Temp m
SET Scan TIme m
SET # of Cycles
SET Deviation Limit
OUTPUT Scan Temp m
OUTPUT Scan Time m
OUTPUT Current Cycle #
OUTPUT Chamber Temp
OUTPUT Current
SET Scan Temp
OUTPUT Current
remaining Scan Time
DELETE Scan Temp m
DELETE Scan Time m
START Scan Mode
STOP Scan Mode
50 SCANTEMP 0
5 SCANTIME 0
10 SCANTIME 0
(n/a)
SCANTEMP 0
SCANTIME 0
SCANTIME automatic
50.0A0
5B2
10BEDI10
A0
B0
BT
50.0A0
5B2
10BEDI10
A0
B0
BT
TEMP
C
C
TIME
- SCANTEMP 0
- SCANTIME 0
SCANTEMP SCANTIME
SCANTIME SCANTEMP
M
-A0
-BO
AB
BA
M
-A0
-B0
AB
BA
*For the single temperature mode, the commands assume a desired temperature of 50 deg C, and a soak
time of 5 minutes. A 10 degree deviation limit is required. For the SCAN mode, the commands assume
that the first allowed segment (m=0) is being set to a temperature of 50 deg C for 5 minutes.
Additionally, 10 cycles of the scan sequence are desired along with a 10 degree deviation alarm.
+ Denotes new command/feature since last manual update.
TC01-F Manual Ver. 0707
57
TABLE 3-4
COMMAND SUMMARY/EXAMPLES (cont’d)
—————————————————————
FUNCTION
————
KEYBD/DISPLAY*
——————
CONTROL GROUP
——————
Reset (Clear)
ENABLE Local Control
ENABLE Remote Control
ENABLE RS232 Echo
ENABLE HEAT/COOL Out
ENABLE Auxiliary #1 Out
ENABLE Auxiliary #2 Out
ENABLE Scan Interrupts
ENABLE Deviation In’rpt
DISABLE Local Control
DISABLE RS232 Echo
DISABLE Heat/Cool Out
DISABLE Auxiliary #1 Out
DISABLE Auxiliary #2 Out
DISABLE Scan Interrupts
DISABLE Deviation In’rpt
C
(n/a)
(n/a)
(n/a)
H/C switches ON
(n/a)
(n/a)
(n/a)
(n/a)
(n/a)
(n/a)
H/C switches OFF
(n/a)
(n/a)
(n/a)
(n/a)
SPECIAL
———
TRANSFER GPIB to RS232 (n/a)
TRANSFER RS232 to GPIB (n/a)
PID COEFFICIENTS CHANGE (n/a)
+ OUTPUT probe option
(n/a)
OUTPUT Aux Input State
(n/a)
SET UTL
(n/a)
OUTPUT UTL
(n/a)
+ INIT
(n/a)
RS232*
——
IEEE-488*
————
R
Press Key
automatic
H
ON
OUT1ON
OUT2ON
ESI
EDI10
(n/a)
R
OFF
OUT1OFF
OUT2OFF
DSI
DDI
R
lcl 7 **
rem703**
H
ON
OUT1ON
OUT2ON
ESI
EDI10
llo 7 **
R
OFF
OUT1OFF
OUT2OFF
DSI
DDI
(n/a)
(n/a)
!sss
S
refer to manual
OPT
IN1
180UTL
UTL
INITn,...
OPT
IN1
180UTL
UTL
INITn,...
* See Previous page for * details
** See your GPIB System Controller documentation for its commands
+ Denotes new command/feature since last manual/update
58
TC01-F Manual Ver. 0707
INTERRUPT CHARACTER
Condition
————
No interrupt
Single Temp Mode time-out
Command Error
SCAN Temp Point time-out
SCAN Temp Cycle time-out
SCAN Temp End of Run
DEVIATION Alarm
Chamber Temp > UTL
GPIB lock-up time-out
TC01-F Manual Ver. 0707
RS232 (ASCII)
——————
(n/a)
I
CMD ERROR!!
P
L
E
D
O
(n/a)
IEEE-488 (HEX)
———————
00
41
42
43
44
45
46
47
4F
59
60
TC01-F Manual Ver. 0707
SECTION IV -USER ADJUSTMENTS / MODIFICATIONS
4-1 INTRODUCTION
User adjustments are limited to calibration of the temperature transducer,adjustment of the baud rate of the
RS232-C interface, modification of thefailsafe polarity, polarity of thecooling sense output, and selection
of 110 or 220 volt operation.The temperature probe type and minutes/hours time units is covered in RS232
and GPIB command section, see INIT command.
4-2 TEMPERATURE TRANSDUCER CALIBRATION
Calibration for the TC01 is accomplished by adjusting two calibration pots; one for ‘0’ degree centigrade
calibration point and one for a ‘100’ degree centigrade calibration point. The calibration pots are below
the keyboard. Two panhead screws are installed in the calibration holes to protect the pots.
As one looks at the front panel, the ‘0’ degree calibration pot is accessedthrough the hole on the right while
the ‘100’ degree pot is accessed through the left hole.A small-bladed screwdriver will be needed for the
adjustment.
4-2.1 PROBE CALIBRATION
The controller is calibrated by adjusting the 0 degree pot for a 0 degree reading on the TC01 display with
the probe held at a 0 degrees centigrade. Similarly, the 100 degree pot is adjusted for a 100 degree reading
with the probe held at 100 degrees centigrade. The calibration procedure can be
accomplished with the probe in the chamber while using another standardtemperature meter to monitor the
chamber or the freezing and boiling points of distilled water can be used as the two calibration points. For
this latter method, carefully remove the temperature probe from the chamber so that it may
be placed in contact with the hot or cold water. Sun also manufactures a dual well probe calibrator that
provides the 0 and 100 deg C temperatures.
4-3 RS232 BAUD RATE CHANGE
The baud rate of the RS232 port is factory set at 9600 baud. The baud rate is field-changeable by 2 jumpers
on the CPU board. The jumpers are located below the uP socket on the CPU board. Proceed as follows:
The controller will need to be taken out of the chamber for the baud rate change.
CAUTION: BE SURE THAT THE CHAMBER IS UNPLUGGED!
1.
2.
3.
4.
The CPU board is the board that contains the LED display. To gain access to the CPU board,
remove 4 front panel screws that hold the board stack to the front panel sheet metal.
Install jumpers in location BAUD-0 and BAUD-1 as given below. The two jumpers are located
just below the square uP socket.
If the cool polarity or failsafe polarity need to be changed do them now see below.
Replace board stack and reinstall TC01 controller.
TC01-F Manual Ver. 0707
61
jumper
jumper
BAUD-0
BAUD-1
baud rate
—————————————————
out
out
9600
in
out
4800
out
in
2400
in
in
1200
4-4 COOLING LOGIC SENSE INVERSION
The ‘sense’ of the cool output as shipped from the factory is such that when cooling is required, the cool
output (terminal #2, figure 3) will be switched to the ‘hot side’ of the incoming power. If an inversion is
required for interfacing, then a jumper will need to be installed.
1.
2.
3.
4.
The CPU board is the board that contains the LED display. To gain access to the CPU board,
remove 4 front panel screws that hold the board stack to the front panel sheet metal.
Install jumper in location COOLPOL. The jumper is located below the square uP socket.
If the baud rate or failsafe polarity need to be changed do them now see above and below.
Replace board stack and reinstall TC01 controller.
4-5 FAILSAFE LOGIC SENSE INVERSION
The ‘sense’ of the failsafe input as shipped from the factory is such that whena low level is input, the TC01
will go into the failsafe mode and turn off the heat and cool outputs. If an inversion is required for
interfacing, than a jumper will need to be installed.
1.
2.
3.
4.
62
The CPU board is the board that contains the LED display. To gain access to the CPU board,
remove 4 front panel screws that hold the board stack to the front panel sheet metal.
Install jumper in location FS POL. The jumper is located below the square uP socket.
If the baud rate or cooling polarity need to be changed do them now see above.
Replace board stack and reinstall TC01 controller.
TC01-F Manual Ver. 0707
SECTION V- REPAIR / PARTS REPLACEMENT
5-1 PARTS REPLACEMENT POLICY
Field service of the TC01 is not always possible due to the type os test equipment required for proper
troubleshooting. Any problem with the controller should be brought to the attention of Sun systems by
telephone. If the problemcannot be fixed by phone, Sun Systems will issue an RMA number (see paragraph
1-9) to initiate factory repair os the controller.
5-2 OUT OF WARRANTY REPAIR
Out-of-warranty repair is supported by Sun Systems by submitting the controller and associated RMA
number (see paragraph 1-9) for factory repair. A minimum repair charge of one hour labor plus parts will
be incurred. If parts and/or labor exceed the minimum, the customer will be contacted and informed of
repair changes before proceeding. Turn around time for repair varies dependingon work-loads and parts
availability, but normally a controller will be repairedand returned to the customer within 2 working days
of receipt.
See section 1-9 for details on return of merchandise.
SECTION VI - ERROR CODES
E0
FOREGROUND PROGRAM ERROR
E1
PROBE INT ERROR
E2
ILLEGAL OP CODE
E3
FAILSAFE ACTIVE MODE
TC01-F Manual Ver. 0707
63
FIGURE 1 - TC01 BLOCK DIAGRAM
64
TC01-F Manual Ver. 0707
FIGURE 3 - PROCESS I/O CONNECTIONS
TC01-F Manual Ver. 0707
65
FIGURE 4 - TC01 FRONT PANEL
66
TC01-F Manual Ver. 0707
FIGURE 5 - FRONT PANEL CUTOUT
TC01-F Manual Ver. 0707
67
FIGURE 6 - REMOTE I/O CUTOUT
68
TC01-F Manual Ver. 0707
FIGURE 7 - REMOTE I/O & ADDRESS SWITCH
TC01-F Manual Ver. 0707
69
FIGURE 8 - TC01-F CONTROLLER , REAR VIEW
70
TC01-F Manual Ver. 0707
FIGURE 9 - TC01-F, CPU BOARD
TC01-F Manual Ver. 0707
71
FIGURE 10 - TC01-F, POWER SUPPLY BOARD
72
TC01-F Manual Ver. 0707
FIGURE 11 - TC01-F, HEAT TRIAC
TC01-F Manual Ver. 0707
73
FIGURE 12 - TC01 REV. A-E and REV. F COMPARISON
74
TC01-F Manual Ver. 0707


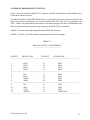
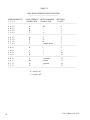


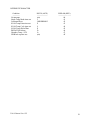


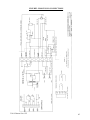

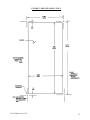
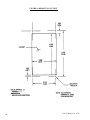
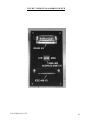

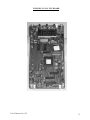
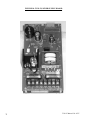

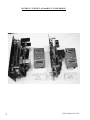


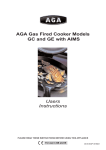

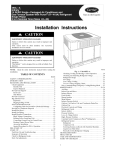
![[ITA] CE100-8 Utente v7-3-4](http://vs1.manualzilla.com/store/data/006163579_1-e446025dc8d37ff792b1e593cfad2f55-150x150.png)