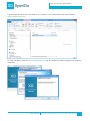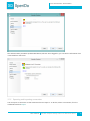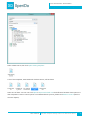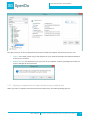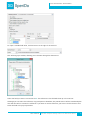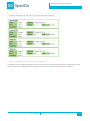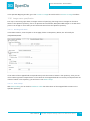
1
User manual XperiDo template design add-in for Microsoft Word Last updated : 12-09-2014 Your documents. Automated. Master your data flows. Boost your output streams. Table of contents Table of contents.............................................................................................................................................................................................. 2 1 2 Introduction ............................................................................................................................................................................................. 7 1.1 XperiDo add-in for Microsoft Word ..................................................................................................................................... 7 1.2 About this document ................................................................................................................................................................. 7 1.2.1 Disclaimer .................................................................................................................................................................................. 7 1.2.2 Version ........................................................................................................................................................................................ 7 Setup ........................................................................................................................................................................................................... 8 2.1 2.1.1 Supported operating systems ........................................................................................................................................... 8 2.1.2 Supported architectures ...................................................................................................................................................... 8 2.1.3 Minimum hardware requirements ................................................................................................................................... 8 2.1.4 Prerequisites ............................................................................................................................................................................. 8 2.2 Installation ...................................................................................................................................................................................... 8 2.3 In Microsoft Word .................................................................................................................................................................... 10 2.3.1 3 Connection settings ................................................................................................................................................................. 12 3.1.1 Creating a new connection .............................................................................................................................................. 12 3.1.2 Exporting and importing connections ......................................................................................................................... 16 3.2 Connections list ......................................................................................................................................................................... 17 3.3 Local workspace ........................................................................................................................................................................ 17 Templates ............................................................................................................................................................................................... 19 4.1 Opening an existing template ............................................................................................................................................. 19 4.1.1 Via the templates folder.................................................................................................................................................... 19 4.1.2 Via the datasets folder ....................................................................................................................................................... 20 4.1.3 Speeding up things ............................................................................................................................................................. 22 4.2 Import and export templates ............................................................................................................................................... 22 4.2.1 Export ....................................................................................................................................................................................... 22 4.2.2 Import ....................................................................................................................................................................................... 25 4.3 5 What if the XperiDo tab doesn't appear? .................................................................................................................. 10 Server connection ............................................................................................................................................................................... 12 3.1 4 System requirements.................................................................................................................................................................. 8 Documents without a data source ..................................................................................................................................... 28 Revision control ................................................................................................................................................................................... 29 User manual XperiDo template design add-in for Microsoft Word 2 Your documents. Automated. Master your data flows. Boost your output streams. 5.1 5.1.1 Opening an unlocked template ..................................................................................................................................... 30 5.1.2 Opening a template that has been checked out by you ..................................................................................... 32 5.1.3 Opening a template that has been checked out by somebody else .............................................................. 33 5.2 Check in ................................................................................................................................................................................... 35 5.2.2 Save and commit ................................................................................................................................................................. 36 5.2.3 Show history .......................................................................................................................................................................... 37 5.2.4 Cancel edit (rollback) .......................................................................................................................................................... 40 5.2.5 Cancel edit (leave as is) ..................................................................................................................................................... 42 Check out ................................................................................................................................................................................ 45 5.3.2 Revert to server version .................................................................................................................................................... 45 Administrator privileges ......................................................................................................................................................... 46 Template design basics .................................................................................................................................................................... 47 6.1 Screen layout .............................................................................................................................................................................. 47 6.2 Mapping a field ......................................................................................................................................................................... 48 6.3 Mapping overview .................................................................................................................................................................... 50 6.4 Field names ................................................................................................................................................................................. 50 Previews .................................................................................................................................................................................................. 52 7.1 Samples ........................................................................................................................................................................................ 52 7.1.1 Show sample ......................................................................................................................................................................... 52 7.1.2 Field inspector ....................................................................................................................................................................... 53 7.2 7.2.1 7.3 8 Options within an unlocked template .............................................................................................................................. 44 5.3.1 5.4 7 Options within a checked out template .......................................................................................................................... 35 5.2.1 5.3 6 Opening a template ................................................................................................................................................................. 30 Previewing ................................................................................................................................................................................... 54 Previewing a template not locked by you ................................................................................................................. 56 Refreshing .................................................................................................................................................................................... 56 Loops ....................................................................................................................................................................................................... 57 8.1 Introduction ................................................................................................................................................................................ 57 8.2 Creating a loop .......................................................................................................................................................................... 57 8.2.1 Select the field that recurs ............................................................................................................................................... 57 8.2.2 Creating a simple loop ...................................................................................................................................................... 57 8.3 Loops and lists ........................................................................................................................................................................... 59 8.4 Loops and tables ....................................................................................................................................................................... 60 User manual XperiDo template design add-in for Microsoft Word 3 Your documents. Automated. Master your data flows. Boost your output streams. 8.5 8.5.1 Loop settings ......................................................................................................................................................................... 65 8.5.2 Precedence rules .................................................................................................................................................................. 67 8.6 9 Loops in loops, conditions in loops ................................................................................................................................... 67 8.6.1 Loop inside a loop ............................................................................................................................................................... 68 8.6.2 Grouping items within a loop ......................................................................................................................................... 68 8.6.3 Conditional loops ................................................................................................................................................................ 69 Conditional content/lay-out ........................................................................................................................................................... 71 9.1 Introduction ................................................................................................................................................................................ 71 9.2 Conditional content ................................................................................................................................................................. 72 9.2.1 Conditions with field values ............................................................................................................................................ 74 9.2.2 Conditions with expressions ............................................................................................................................................ 78 9.3 10 Loop configuration................................................................................................................................................................... 64 Conditional lay-out .................................................................................................................................................................. 82 9.3.1 Using the field formatting section of the mapping dialogue ............................................................................ 83 9.3.2 Font and formatting options ........................................................................................................................................... 84 Advanced fields ................................................................................................................................................................................... 86 10.1 Types of fields ............................................................................................................................................................................ 86 10.2 Pseudo-fields .............................................................................................................................................................................. 86 10.2.1 Creating a pseudo-field ............................................................................................................................................... 86 10.2.2 Editing and removing pseudo-fields ...................................................................................................................... 88 10.2.3 Example: split function ................................................................................................................................................. 88 10.3 Dynamic fields ............................................................................................................................................................................ 91 10.3.1 10.4 11 Preserve formatting of text box dynamic fields ................................................................................................. 92 Resultsets ..................................................................................................................................................................................... 93 10.4.1 Defining a resultset ........................................................................................................................................................ 94 10.4.2 Using resultsets ............................................................................................................................................................... 95 10.4.3 Advanced usage ............................................................................................................................................................ 101 Optimization ....................................................................................................................................................................................... 109 11.1 General ........................................................................................................................................................................................ 109 11.2 Optimization settings ............................................................................................................................................................ 109 11.2.1 Optimize access to grouped fields ........................................................................................................................ 109 11.2.2 Schema-object cache size ......................................................................................................................................... 109 11.2.3 Skip validation of empty table cells ...................................................................................................................... 110 User manual XperiDo template design add-in for Microsoft Word 4 Your documents. Automated. Master your data flows. Boost your output streams. 12 Post-processing/data rendering ................................................................................................................................................. 111 12.1 Introduction .............................................................................................................................................................................. 111 12.2 Text editing ............................................................................................................................................................................... 111 12.2.1 12.3 Hyperlinks .................................................................................................................................................................................. 112 12.3.1 12.4 Examples .......................................................................................................................................................................... 113 12.5 Working with numbers ......................................................................................................................................................... 116 12.6 Converting input data to images ..................................................................................................................................... 117 12.6.1 Image source specification ....................................................................................................................................... 118 12.6.2 Image settings ............................................................................................................................................................... 121 12.7 Converting input data to barcodes or QR codes ....................................................................................................... 121 12.7.1 Inserting a QR code based on static content .................................................................................................... 122 12.8 Removing blank paragraphs .............................................................................................................................................. 123 12.9 Inserting text with formatting ............................................................................................................................................ 124 12.9.1 Format ............................................................................................................................................................................... 124 12.9.2 Import Format Mode .................................................................................................................................................. 124 12.9.3 Datasource ...................................................................................................................................................................... 124 12.9.4 Data is base64 encoded ............................................................................................................................................. 125 12.9.5 Skip external content .................................................................................................................................................. 125 12.9.6 Remove empty paragraphs at the end ................................................................................................................ 125 12.10 14 E-mail hyperlink............................................................................................................................................................. 113 Case-conversion ...................................................................................................................................................................... 113 12.4.1 13 Replacing text ................................................................................................................................................................ 111 Inserting a formula ............................................................................................................................................................ 125 XperiDo styles ..................................................................................................................................................................................... 129 13.1 Introduction .............................................................................................................................................................................. 129 13.2 Add, remove and edit styles ............................................................................................................................................... 129 13.3 Apply styles and assign default styles to fields .......................................................................................................... 131 List of functions ................................................................................................................................................................................. 132 14.1 Additional information ......................................................................................................................................................... 132 14.1.1 Regular expressions ..................................................................................................................................................... 132 14.1.2 Extended characters .................................................................................................................................................... 132 14.2 Mathematical functions ........................................................................................................................................................ 132 14.2.1 Elementary arithmetic ................................................................................................................................................. 132 User manual XperiDo template design add-in for Microsoft Word 5 Your documents. Automated. Master your data flows. Boost your output streams. 14.2.2 Basic ................................................................................................................................................................................... 134 14.2.3 Power ................................................................................................................................................................................. 135 14.2.4 Logarithms....................................................................................................................................................................... 136 14.2.5 Rounding ......................................................................................................................................................................... 136 14.2.6 Trigonometrical ............................................................................................................................................................. 137 14.3 Text functions ........................................................................................................................................................................... 138 14.3.1 Basic ................................................................................................................................................................................... 138 14.3.2 Trim .................................................................................................................................................................................... 139 14.3.3 Case .................................................................................................................................................................................... 139 14.3.4 Check ................................................................................................................................................................................. 139 14.3.5 Replace ............................................................................................................................................................................. 141 14.3.6 Split .................................................................................................................................................................................... 142 14.4 Logical functions ..................................................................................................................................................................... 143 14.4.1 Logic .................................................................................................................................................................................. 143 14.4.2 Comparision.................................................................................................................................................................... 143 User manual XperiDo template design add-in for Microsoft Word 6 Your documents. Automated. Master your data flows. Boost your output streams. 1 Introduction 1.1 XperiDo add-in for Microsoft Word This document is a concise user manual for the XperiDo add-in for Microsoft Word (XDWord). With the add-in you can create and edit XperiDo templates for automatic document creation. The aim of this manual is to guide you through the essential features of the add-in. For more detailed information on XperiDo and the XperiDo add-in for Microsoft Word 2007/2010/2013, please refer to www.xperido.com or your local Invenso partner. 1.2 About this document 1.2.1 Disclaimer In this manual, we try our best to explain every function of XDWord in a manner that's understandable to everyone. If something isn't clear, wrong or missing, please let us know by sending an email to [email protected]. The images in this document are taken from various versions of XDWord. If you notice that the screenshots in this manual don't always fully correspond to your screen, know that the main functionality hasn't changed, and that purely aesthetic changes might not be updated immediately in the manual. 1.2.2 Version This manual best describes the features found in XDWord 6.5.17+ User manual XperiDo template design add-in for Microsoft Word 7 Your documents. Automated. Master your data flows. Boost your output streams. 2 Setup 2.1 System requirements 2.1.1 Supported operating systems Windows 8 Windows 7 Windows 7 Service Pack 1 Windows Vista Service Pack 1 Windows XP Service Pack 3 2.1.2 Supported architectures x86 x64 2.1.3 Minimum hardware requirements Processor speed: Pentium 1 GHz Memory: 512 MB RAM Available disk space: 120 MB 2.1.4 Prerequisites Windows Installer 3.1+ Internet Explorer 5.01+ Microsoft Word 2007/2010/2013 Microsoft .NET Framework 4.5+ Microsoft Visual Studio 2010 Tools for Office Runtime The installer will verify that these prerequisites are present on your system and it will prompt you to download and install missing components, provided that these are freely available for download. 2.2 Installation You can download the XperiDo add-in for Microsoft Word from the XperiDo website at http://www.xperido.com/testdrive-xperido. Apply for a testdrive account and download different components of your testdrive installation. One of these components is the XperiDo Template Design Add-In for Microsoft Word. User manual XperiDo template design add-in for Microsoft Word 8 Your documents. Automated. Master your data flows. Boost your output streams. You can either choose to save the installer to your system or run it. The default name of the installer is Invenso.XperiDo.Setup.exe. To install the add-in, open the Invenso.XperiDo.Setup.exe file. An installation wizard will guide you through the installation. User manual XperiDo template design add-in for Microsoft Word 9 Your documents. Automated. Master your data flows. Boost your output streams. 2.3 In Microsoft Word When you start Microsoft Word, you will notice that it loads the XperiDo Add-In while starting up. A new tab called XperiDo will appear in the Microsoft Word ribbon. This tab contains a large Connection button, and two smaller buttons, Properties and About. 2.3.1 What if the XperiDo tab doesn't appear? If the XperiDo tab does not appear in the ribbon, you can double-check the prerequisites or you can doublecheck the Word Add-ins. 2.3.1.1 Prerequisites Verify that these prerequisites are installed on your computer: Microsoft Word 2007, Microsoft Word 2010 or Microsoft Word 2013 Microsoft .NET Framework 4.0 Microsoft Visual Studio 2010 Tools for Office Runtime 2.3.1.2 Word Add-ins Refer to the Add-Ins tab of the Word Options dialogue (File > Options > Add-Ins) and verify that the XperiDo Add-In is marked as an Active Application Add-In. If it is listed with the Inactive Application Add-Ins, select COM Add-Ins and click the Go button at the bottom of the dialogue box to activate it. User manual XperiDo template design add-in for Microsoft Word 10 Your documents. Automated. Master your data flows. Boost your output streams. Should the XperiDo plug-in not appear in the list, select Disabled Items at the bottom of the screen and click Go. It might appear in this window. User manual XperiDo template design add-in for Microsoft Word 11 Your documents. Automated. Master your data flows. Boost your output streams. 3 Server connection XperiDo is a server application, which means that you need to establish a connection between your local computer and an XperiDo server. To connect to your XperiDo server, click the Connection button in the XperiDo ribbon: The connection panel opens. In this panel you can select, import and create connections to XperiDo servers. It also provides access to all the XperiDo resources on the server(s) you connect to, such as Projects, Data sets and Templates. Click the blue pencil inside the empty connection box to open the connection settings. These settings can also be opened by clicking Properties in the XperiDo ribbon, followed by clicking Server Instances. 3.1 Connection settings In this window, you can manage your different connections. This is useful when you have multiple environments/XperiDo servers to connect to. 3.1.1 Creating a new connection To create a new connection, click New, specify the host, the port and the type of connection. User manual XperiDo template design add-in for Microsoft Word 12 Your documents. Automated. Master your data flows. Boost your output streams. Host is the DNS name of the XperiDo server; Port is the port through which the XperiDo server is accessible this is 8080 by default. The type of connection is either by using an XperiDo native ID or through a Microsoft account (also known as a Windows Live ID). If you want to use an XperiDo native ID, click the blue XD icon, if you want to use a Microsoft account, click the Microsoft logo. 3.1.1.1 XperiDo native ID An XperiDo native ID uses the credentials you got from your XperiDo partner. Input them in the correct boxes and click Apply to save the connection properties. User manual XperiDo template design add-in for Microsoft Word 13 Your documents. Automated. Master your data flows. Boost your output streams. If you want to go back to selecting an XperiDo native ID/Microsoft account, click the green arrow to the right. Click Test Connection to test the connection. 3.1.1.2 Microsoft account (Windows Live ID) You can also use your Microsoft account to authenticate yourself. This is only possible if your email address has been recognized by the applicable XperiDo server. To use your Microsoft account, type in localhost in the host box, then click Test Connection. A window will pop up, asking for your credentials. Log in to Microsoft with your email address. Once this is done, you will need to give XperiDo authorization to use your email address for authentication. This email address is used to assign rights to you. User manual XperiDo template design add-in for Microsoft Word 14 Your documents. Automated. Master your data flows. Boost your output streams. Clicking Yes will send the email address to the XperiDo server, which will allow you to work with XperiDo by using your Microsoft account. Additionally, you can choose to sign in beforehand, by setting the properties in the XperiDo options. To do this, click Properties. Then, choose Live ID. Click Sign In. User manual XperiDo template design add-in for Microsoft Word 15 Your documents. Automated. Master your data flows. Boost your output streams. The authentication procedure (as described above) will start. Once logged in, you can see the information that is retrieved from the server. 3.1.2 Exporting and importing connections You can export a connection so that someone else can import it. To do this, select a connection, fill in the credentials and click Export: User manual XperiDo template design add-in for Microsoft Word 16 Your documents. Automated. Master your data flows. Boost your output streams. Export: this exports the connection with the username but without the password. Export without usernames: this exports the connection without the username and password. Export with passwords: this exports the connection with both the username and password. The connection will be exported as an XML file. To import an XML connection file, click Import and select the file. 3.2 Connections list Once you have set a connection, it will appear in the Connections list of the Connection Panel. The Projects dropdown box lists all the projects that are available to you on the connected XperiDo Server. If no projects appear in the list, it could be because of a rights issue on the server. If this is the case, please refer to your system administrator. 3.3 Local workspace While you can access template on the server, these are stored locally during the design process. The place where these are stored on your computer is called the local workspace. The default location of the local workspace is <My Documents>\XperiDo. You can change this in the XperiDo options: User manual XperiDo template design add-in for Microsoft Word 17 Your documents. Automated. Master your data flows. Boost your output streams. This setting only applies to current users on the computer. When changing this location, please note the following: When a template is checked out, it is checked out to the local workspace. When you change the location of the local workspace, the template stays checked out in the old folder. Therefore, before changing the location of the local workspace, it is advised to check in all templates that you've checked out. In order for the location of the local workspace to effectively change, you need to restart all instances of Word. User manual XperiDo template design add-in for Microsoft Word 18 Your documents. Automated. Master your data flows. Boost your output streams. 4 Templates 4.1 Opening an existing template To open an existing XperiDo template, go to the Connection panel by clicking the large blue XD icon in the upper left corner of the XperiDo ribbon. Make a connection to the XperiDo server and select a project. You can browse through the existing templates. Go to the DataSets folder to show the available templates per data source. If you want a full list of all the templates in the selected project, go to the Templates folder. 4.1.1 Via the templates folder To open a template via the templates folder, go to the Templates folder: Then, select a template: User manual XperiDo template design add-in for Microsoft Word 19 Your documents. Automated. Master your data flows. Boost your output streams. You can now click Open or Open and Check out. The difference between these option are due to XperiDo's revision control system. To understand both options, please read Revision Control (which is the next chapter). 4.1.2 Via the datasets folder To open a template via the datasets folder, go to the DataSets folder: User manual XperiDo template design add-in for Microsoft Word 20 Your documents. Automated. Master your data flows. Boost your output streams. Select a data source, then click Open existing template: A list of the templates, associated with this data source, will be shown: Select one of them. You can now click Open or Open and Check out. The difference between these option are due to XperiDo's revision control system. To understand both options, please read Revision Control (which is the next chapter). User manual XperiDo template design add-in for Microsoft Word 21 Your documents. Automated. Master your data flows. Boost your output streams. 4.1.3 Speeding up things Should you have a very large amount of templates, it might take a while for XperiDo to have finished loading all of them. If you find the waiting time to be too long, you can change XperiDo's loading behaviour to not load all the templates at once. Click on Properties in the ribbon to open up the XperiDo Options: Then, go to General and find Show templates when connecting. Disabling this option will speed up the process because templates are only loaded when you click on a data source. Now, you can find the templates associated with a data source by clicking on that data source. 4.2 Import and export templates 4.2.1 Export With XperiDo for Word, you can export templates so you can send them to someone else. This is especially useful when you have a question for the Invenso helpdesk team. To export templates, execute the following steps: 1) Open the template you wish to export. 2) In the XperiDo ribbon, click Properties: User manual XperiDo template design add-in for Microsoft Word 22 Your documents. Automated. Master your data flows. Boost your output streams. 3) Click Support in the left pane of the window: 4) Click the Export or the Export & Send button to start the export. Both buttons will produce a file that can be imported later. Export & Send will also open your email client, create a new email and attach the file to the email. 5) A wizard will open to guide you through the process. In the first screen, the names of the document and the datasource will be shown. You can also choose whether to include diagnostic information, such as the version of Microsoft Word you are using. If you are planning to send this template to the Invenso helpdesk, it is advised to check this box. You can also choose which samples to include. Click Next to continue. User manual XperiDo template design add-in for Microsoft Word 23 Your documents. Automated. Master your data flows. Boost your output streams. 6) On the second screen, you can select a folder where all the export files will be placed. By default, the name of the template will be used as the name for the export file, but you can choose to change it. There is also an option to remove temporary files that were created during the export process. Click Next to continue. 7) The final screen shows the progress of the export action. When the export is finished, the location of the file is shown. Click Finish to close the wizard. User manual XperiDo template design add-in for Microsoft Word 24 Your documents. Automated. Master your data flows. Boost your output streams. 8) If you clicked Export & Send, a new mail window will be open, with the exported files as attachments. 4.2.2 Import You can import templates by executing the following steps: 1) In the XperiDo ribbon, click Properties: 2) Click Support in the left pane of the window: User manual XperiDo template design add-in for Microsoft Word 25 Your documents. Automated. Master your data flows. Boost your output streams. 3) Click the Import button to start the import. 4) A wizard will open to guide you through the process. On the first screen, you need to select the file you wish to import. Click Next to continue. 5) If this is a valid file, the next screen will show you what is inside the file. If there are samples present, you can select which samples you want to include. Click Next to continue. User manual XperiDo template design add-in for Microsoft Word 26 Your documents. Automated. Master your data flows. Boost your output streams. 6) This screen will show you the connection to use and the project to import into, based on what is in the export file. You can choose to restore the files to their original location, or you can specify a group in which all the files that are imported will be placed. The box that says Import Datasource should be checked if you want to import the data source. When you already have the data source in your repository, you might not want to import the data source.The option Check to overwrite... should be checked if you want to overwrite items that already exist. If you leave it unchecked, items with the same name will get a suffix added to their name during import. Click Next to continue. 7) The final screen shows the progress of the import action. You can choose to open the template upon completion by checking the box that says so. Click Finish to close the wizard. User manual XperiDo template design add-in for Microsoft Word 27 Your documents. Automated. Master your data flows. Boost your output streams. 4.3 Documents without a data source While the main use of the XperiDo template design add-in is designing templates, it can also be used for designing documents without a data source attached. These documents can be stored in the repository and can be edited like regular Word documents. For example, the terms and conditions of a company typically don't require a data source, as their content is purely static. By allowing documents without a data source, XperiDo allows you to save these documents along with your templates, in the repository. Opening a document without a data source works in the same way as opening a regular template. The main difference is in the simplified ribbon: You can insert images from the Assets folder and check the template back in to the repository. The XperiDo pane also isn't visible, since there is no data source and as such there can be no mappings. User manual XperiDo template design add-in for Microsoft Word 28 Your documents. Automated. Master your data flows. Boost your output streams. 5 Revision control When there are multiple template designers, it is counter-productive if some of them are working on the same template at the same time. They might overwrite each other's changes, so that neither makes any significant progress. To prevent this from happening, template designers can check out templates, which means that noone else can edit them until that same template designer checks those templates back in. The following diagram shows how it works. A template on the left is in the central repository (on the server), a template on the right is opened in Word on your local machine. First, the template is in the central repository, unlocked (shown by the orange open lock). Its current version is 1.0. Then, you select it and click open & check out, which locks the template (shown by the green closed lock) and opens a local copy on your machine. This copy's version number is now 1.1, which designates that you're working on a new version. Next, you make some changes, and decide that your template is ready. User manual XperiDo template design add-in for Microsoft Word 29 Your documents. Automated. Master your data flows. Boost your output streams. You click check in, which updates the version on the server (it becomes 1.1). Finally, the server version becomes unlocked again, which means that someone else can now open and edit it. 5.1 Opening a template Depending on the state of the template, different options are available. 5.1.1 Opening an unlocked template When you select an unlocked template, the following screen shows: The orange lock at the top lets you know that the template currently isn't locked by anyone, which means you can: User manual XperiDo template design add-in for Microsoft Word 30 Your documents. Automated. Master your data flows. Boost your output streams. Open it: this creates a local copy of the template on your machine, but the template stays unlocked because you didn't check it out. A warning message will inform you that any changes you make will not be saved unless you check out the template and check it back in to the server. Open is useful for when you want to view a template without editing it. Open and check it out: this creates a local copy of the template on your machine, increases the version number and locks the template on the server so that no-one else can edit it while you're editing it. Use this if you want to make changes to the template. If you intend on editing a template, it is advised to immediately check it out when opening it (by clicking Open and check out). But, you can also open it, make changes, and check it out later. The following diagram shows how this works. A template on the left is in the central repository (on the server), a template on the right is opened in Word on your local machine. First, the template is in the central repository, unlocked. You decide to open it, without checking it out. User manual XperiDo template design add-in for Microsoft Word 31 Your documents. Automated. Master your data flows. Boost your output streams. Then, you make changes to your local copy. Next, you check out the template on the server. This locks it and increases the version number of your local copy. You check in the template, updating the server version. The version on the server is now updated and unlocked. Please be advised that the above procedure is not recommended, as it leaves a window open for other users to check out the template you are editing, and therefore making you unable to save your changes to the server. For that reason we advise using the Open and check out option whenever you intend on making changes, and use the Open option only when you just want to view the template without editing. 5.1.2 Opening a template that has been checked out by you When you select a template that you have checked out, the following dialog pops up: User manual XperiDo template design add-in for Microsoft Word 32 Your documents. Automated. Master your data flows. Boost your output streams. The green lock icon at the top indicates that you have locked this template, which means that you can: Open it: this creates a local copy of the template on your machine and keeps the template locked so that only you can edit it. Release the lock: this releases the lock you have on the template. A warning message will inform you that no changes will be committed. 5.1.3 Opening a template that has been checked out by somebody else When you select a template that someone else has checked out, the following dialog pops up: User manual XperiDo template design add-in for Microsoft Word 33 Your documents. Automated. Master your data flows. Boost your output streams. The red lock at the top indicates that someone else has locked this template, which means you can: Open it: this creates a local copy of the template on your machine. A warning message will inform you that any changes you make will not be saved unless the other person unlocks the template. Release the lock: this releases the lock the other person has on the template. A warning message will inform you that releasing someone else's lock will prevent them from continuing. User manual XperiDo template design add-in for Microsoft Word 34 Your documents. Automated. Master your data flows. Boost your output streams. 5.2 Options within a checked out template When working in a template that you've checked out, the following options are available: 5.2.1 Check in This checks in the template to the central repository and unlocks it again. A window will pop up, allowing you to comment on the version you're checking in. Under the comment box, you can also choose a previously entered comment, or click the button next to it to copy the comment from the previous version. Click OK to check in the template. This updates the version on the server and unlocks it. User manual XperiDo template design add-in for Microsoft Word 35 Your documents. Automated. Master your data flows. Boost your output streams. 5.2.2 Save and commit This checks in the template to the central repository, but keeps it locked so you can continue working. This is a good way to keep your work saved while you want to keep working on it. The following diagram shows how this works. A template on the left is in the central repository (on the server), a template on the right is opened in Word on your local machine. First, the template is in the central repository, unlocked. Then, you select it and click open & check out. Next, you make some changes. You decide to save your work so far, so you click save & commit. The template stays locked, but is updated on the server. User manual XperiDo template design add-in for Microsoft Word 36 Your documents. Automated. Master your data flows. Boost your output streams. Next, you make some more changes to the template. Now you decide it's ready. You check in the template. The version on the server is now updated and unlocked. 5.2.3 Show history This makes a window pop up, showing the history of the template. Who created what version, when and what they commented. User manual XperiDo template design add-in for Microsoft Word 37 Your documents. Automated. Master your data flows. Boost your output streams. Click a version to select it. Then, you can click the Rollback button to change the content of the current version back to the content of the selected version. The following diagram shows how this works. A template on the left is in the central repository (on the server), a template on the right is opened in Word on your local machine. First, the template is in the central repository, unlocked. User manual XperiDo template design add-in for Microsoft Word 38 Your documents. Automated. Master your data flows. Boost your output streams. Then, you select it and click open & check out. Next, you make some changes, and decide that your template is ready. You check in the template. The version on the server is now updated to 1.1. After a while, you find that the changes you've made aren't an improvement; in fact, version 1.1 of the template is worse than version 1.0! Luckily, you can roll back. You click open & check out so you can edit the template again. User manual XperiDo template design add-in for Microsoft Word 39 Your documents. Automated. Master your data flows. Boost your output streams. You click show history, rollback and choose to roll back the template to the 1.0 version. This sets the content back to the way it was as version 1.0. You'll notice the version number increases to 1.2 even though you've selected 1.0. Whichever version you roll back to, the version number always increases. This is because we always want to keep every version available this way no version is ever overwritten, so you can always decide to roll back to version 1.1, should you want to. You check in the template. The template is now unlocked on the server. The 1.2 version now has the same content as the 1.0 version, since we rolled back to that version. 5.2.4 Cancel edit (rollback) This cancels the edits you've made so far. A window will pop up, asking how far back you want to go: User manual XperiDo template design add-in for Microsoft Word 40 Your documents. Automated. Master your data flows. Boost your output streams. If you choose to rollback to the previous version, the template will be put back in the state it was in before you checked it out. The following diagram shows how this works. A template on the left is in the central repository (on the server), a template on the right is opened in Word on your local machine. First, the template is in the central repository, unlocked. Then, you select it and click open & check out. Next, you make some changes. User manual XperiDo template design add-in for Microsoft Word 41 Your documents. Automated. Master your data flows. Boost your output streams. You decide to save your work so far, so you click save & commit. The template stays locked, but is updated on the server. Next, you make some more changes to the template. But you decide those changes weren't for the best, so you click cancel edit and roll back. This puts the template in the state it was in before you checked it out. The version on the server is now back the way it was before you checked it out. 5.2.5 Cancel edit (leave as is) This cancels the edits you've made so far. A window will pop up, asking how far back you want to go: User manual XperiDo template design add-in for Microsoft Word 42 Your documents. Automated. Master your data flows. Boost your output streams. If you choose to just stop editing and leave the template as it is, the server version will be kept the way it is. The following diagram shows how this works. A template on the left is in the central repository (on the server), a template on the right is opened in Word on your local machine. First, the template is in the central repository, unlocked. Then, you select it and click open & check out. Next, you make some changes. User manual XperiDo template design add-in for Microsoft Word 43 Your documents. Automated. Master your data flows. Boost your output streams. You decide to save your work so far, so you click save & commit. The template stays locked, but is updated on the server. Next, you make some more changes to the template. But you decide you're going nowhere with your changes, so you click cancel edit and just stop editing. This doesn't change the version on the server. The version on the server is now the way it was when you last saved it. 5.3 Options within an unlocked template When working in a template that's unlocked, the following options are available: User manual XperiDo template design add-in for Microsoft Word 44 Your documents. Automated. Master your data flows. Boost your output streams. 5.3.1 Check out Lock the template on the server so no-one else can make changes to it. This also increases the version number of your local copy, so that the previous copy doesn't get overwritten. 5.3.2 Revert to server version This removes all the changes you've made since opening the template and reverts it back to the version found on the server. A warning message will inform you that you will lose your changes. The following diagram shows how it works. A template on the left is in the central repository (on the server), a template on the right is opened in Word on your local machine. First, the template is in the central repository. You decide to open it, without checking it out. User manual XperiDo template design add-in for Microsoft Word 45 Your documents. Automated. Master your data flows. Boost your output streams. Then, you make changes to your local copy. You decide your changes aren't good, so you click revert to server version. This resets your local copy to the version found on the server. The server version never changed, since you never checked out. 5.4 Administrator privileges While unlikely, it is possible that an administrator locks or unlocks a template directly on the server while you have it opened. Should this occur, the following message will appear: In this case, it is best to contact your system administrator and check with them what they changed and why. There usually is a good reason for the change, so we advise to click Yes so you get the latest version from the server. User manual XperiDo template design add-in for Microsoft Word 46 Your documents. Automated. Master your data flows. Boost your output streams. 6 Template design basics A template consists of static and dynamic content. You can insert the static content simply by using Word as you're used to, and this content will always appear in the final document. Dynamic content, however, is data that is automatically collected from other sources and which is merged into your document when it is created. In this chapter, we'll give you an overview of XperiDo's layout. We'll also explain how to map a field (from your data source) onto your template and how to review the mappings that are currently in the template. 6.1 Screen layout The previous chapters explain how to open or create a template. After doing that, the following screen should now be visible: At the top, you can see the XperiDo ribbon: The ribbon gives you quick access to plenty of features XperiDo has to offer: Connect: the Connect tab is used for connecting to the server, changing XperiDo's options and reviewing information about the XperiDo add-in. View: the View tab is used to change the view of the XperiDo pane (on the right), opening the XperiDo assets manager or for turning on design mode. User manual XperiDo template design add-in for Microsoft Word 47 Your documents. Automated. Master your data flows. Boost your output streams. Insert: the Insert tab is used to insert various types of content in your template. Repository: the Repository tab is used for generating previews and everything that has to do with revision control (see previous chapter). Data Source: the Data Source tab is used for viewing samples, refreshing the data and selecting styles. Template Properties: the Template Properties tab provides you with information regarding the current template. What every button does is explained in detail in the following chapters. To the right, you can see the XperiDo pane: The pane is where you keep track of the variable content in your template: Datasource: the Datasource tab contains a tree view of the data fields in the data source of the templae. Mapping: the Mapping tab contains a list of all the data mappings that are currently in the template. XperiDo Styles: the XperiDo Styles tab contains a list of the quick formatting styles that you have defined for this template. Field Inspector: the Field Inspector tab (at the bottom) shows sample values for selected data fields. Again, detailed descriptions of how to use these tabs and their functions can be found further in the manual. 6.2 Mapping a field Mapping a field from your dataset onto your template can be done by following these steps: User manual XperiDo template design add-in for Microsoft Word 48 Your documents. Automated. Master your data flows. Boost your output streams. 1) First, place the cursor at the spot in the document where you want the mapping to be: 2) Next, select the field you want to map. To do this, click its name in the XperiDo pane: 3) Then, you do one of the following: double-click the selected field in the XperiDo pane, click Data Field in the XperiDo ribbon or click the Data Field icon in the XperiDo pane: 4) You'll see the mapping as follows: 5) Around the mapping, a box will be placed to clearly show that this is a mapping: User manual XperiDo template design add-in for Microsoft Word 49 Your documents. Automated. Master your data flows. Boost your output streams. When previewing a document (see the chapter Previews) or when generating a document, this mapping will be replaced by data. 6.3 Mapping overview The mapping tab in the XperiDo pane shows you the mappings that are currently in the template. You can jump to any mapping by clicking it in the mapping tab. Inversely, iIf you click a mapping in your document, it will be highlighted in the mapping tab. The mapping tab has four controls that you can use to manipulate the mappings in the template: Settings: adjust the settings of the selected mapping. Delete: delete the mapping. Toggle View: toggle between the full fieldname and the short fieldname view: Refresh: refresh the mappings. 6.4 Field names A field in XperiDo can have multiple names. When using XperiDo for Microsoft Dynamics CRM, each field has a display name, a logical name and a schema name. Behind the scenes, XperiDo always uses the schema name for fields. User manual XperiDo template design add-in for Microsoft Word 50 Your documents. Automated. Master your data flows. Boost your output streams. In the mapping tab of the XperiDo pane, the schema name is shown - but in the data source tab of the XperiDo pane, the display name is shown. This behaviour can be changed so that the data source tab shows the schema name. To do this, go to the XperiDo options by clicking Properties in the XperiDo ribbon. Then, in the general options, deselect Use alternate names for fields. When creating a dataset in XperiDo for Microsoft Dynamics CRM, the display name of the fields is decided based on CRM's UI language. That means that, when you create a data set with your UI language set to Dutch, that Word will show these fields' names in Dutch (when available) in the data source tab. However, the mapping tab will still show the schema names, which are in English. User manual XperiDo template design add-in for Microsoft Word 51 Your documents. Automated. Master your data flows. Boost your output streams. 7 Previews XperiDo allows you to preview the template you're making, so that you can check what your document will look like. This is a helpful tool during the template design process. 7.1 Samples If you want to preview a template, there needs to be at least one sample attached to it. This is because a dataset doesn't contain data, it is merely a description of what data should look like. The actual data for the preview comes from the sample. This means that you can generate different previews from one template by using different samples. To see whether a sample is attached to your template, click the Samples button in the XperiDo ribbon: In the above image, there is one sample called ShippingOrderXML.xml. The blue area around the icon next to the sample name shows that it is currently selected; this is always the case when there is only one available sample. If you have multiple samples, just click the one you want to use to select it. There are two ways to review the content of a sample: the Show sample option and the Field inspector. 7.1.1 Show sample Click Show sample in the Samples submenu to bring up the following window: User manual XperiDo template design add-in for Microsoft Word 52 Your documents. Automated. Master your data flows. Boost your output streams. In this window, the content of the current sample is shown in XML format. Should your XML not be formatted in a visually appealing way, you can click Pretty Print at the top to re-structure the XML. If you have a very large sample and you are looking for something, it might be a good idea to use the Find button: 7.1.2 Field inspector The Field inspector is a more user-friendly way of displaying the content of the current sample. First, click on a field in the datasource tab of the XperiDo pane: User manual XperiDo template design add-in for Microsoft Word 53 Your documents. Automated. Master your data flows. Boost your output streams. Then, the Field inspector (below the datasource) shows the content of the selected element (and its children): The Field inspector is a very easy way of checking whether you are mapping the correct field. 7.2 Previewing If you want to preview your template, click Preview in the XperiDo ribbon: Clicking the lower part of the button brings up the following dropdown: User manual XperiDo template design add-in for Microsoft Word 54 Your documents. Automated. Master your data flows. Boost your output streams. This dropdown asks you to choose the format for the resulting document. Click the format of your choice to generate the document. You can also click the upper part of the button: In this case, a window pops up: Here, you can choose the default format to use for the generated document. Selecting one here is the same as selecting a format in the XperiDo options: User manual XperiDo template design add-in for Microsoft Word 55 Your documents. Automated. Master your data flows. Boost your output streams. If you select a format, then clicking on the upper part of the Preview button automatically generates a document in the specified format. 7.2.1 Previewing a template not locked by you When you try to preview a template that isn't locked by you, you will get the following warning: While you are able to generate a preview, the preview will not contain the changes you might have made to the template. 7.3 Refreshing Whenever a new or updated version of a data source, sample, template or asset is available on the server, it might not be automatically updated in the XperiDo add-in. For instance, updating a sample in XperiDo for Dynamics CRM doesn't automatically update the sample in the XperiDo add-in. To update all of the items related to a template, click the Refresh button in the XperiDo ribbon: Refreshing your template when you suspect changes to any of the related items is a good way of making sure that you're working with the latest version of the data source, sample etc. User manual XperiDo template design add-in for Microsoft Word 56 Your documents. Automated. Master your data flows. Boost your output streams. 8 Loops 8.1 Introduction In many cases, your data source contains recurring fields. One account may have several contacts, one order may have multiple order lines, etc. Documents often need to provide an overview (a bullet list, a numbered list, a table…) of these recurring fields. A quotation and/or order confirmation typically contains a list of products that will be or have been ordered. To repeat a field in your template and fill it up with the different values that it takes in the data source, XperiDo allows you to define so-called loops. In this chapter we will go into the procedure and the different lay-out options XperiDo offers for loops. 8.2 Creating a loop 8.2.1 Select the field that recurs Probably the most important step in the process of creating a loop is selecting the correct field in the XperiDo pane. You will need to select a field that recurs in your data source. If you try to place a loop on a non-recurring data-field, you will not be able to generate documents based on your template. Therefore, do make sure to select a field that recurs in the data source. Particularly helpful in this respect is the View Sample option, that you can use to view the sample data set that is connected to your template. In the example below, you could place a loop on Event, which is a recurring field in the data source, to create a list of event tour dates. 8.2.2 Creating a simple loop After you have selected the field that recurs (Event in the example below), create the loop by clicking the loop icon in the XperiDo pane or ribbon: User manual XperiDo template design add-in for Microsoft Word 57 Your documents. Automated. Master your data flows. Boost your output streams. This will create a loop area that says Click here to enter text. You can now start entering text and mapping fields into the loop area. In this example you could make a list of events indicating start and end dates, the name of the event, the venue, the city and the state. This will result in a list of events. User manual XperiDo template design add-in for Microsoft Word 58 Your documents. Automated. Master your data flows. Boost your output streams. 8.3 Loops and lists In many cases, loops will be presented as numbered lists or bullet lists, or tables. To make a list, simply use the list features of Microsoft Word as you insert your data fields. You can make single level or multilevel bullet lists and numbered lists. Apply any other formatting you like. These loops result in these previews: User manual XperiDo template design add-in for Microsoft Word 59 Your documents. Automated. Master your data flows. Boost your output streams. 8.4 Loops and tables Another typical use of loops is building tables. You can create a table with looping fields in four simple steps: 1) Create a table in Microsoft Word, 2) Select the row(s) or column(s) that you want to repeat, 3) Select a recurring field in the data source tab of the XperiDo pane, User manual XperiDo template design add-in for Microsoft Word 60 Your documents. Automated. Master your data flows. Boost your output streams. 4) Click the loop icon. Now your loop has been created and you can start inserting data fields into it. This loop should result in a nice table like this in the preview: User manual XperiDo template design add-in for Microsoft Word 61 Your documents. Automated. Master your data flows. Boost your output streams. All the nice table features of Microsoft Word are available to style your table the way you want it to look. From borders and shadings, to preset table styles with banded rows and columns, fixed row height and column width, page break with repeating headers, it’s all there. User manual XperiDo template design add-in for Microsoft Word 62 Your documents. Automated. Master your data flows. Boost your output streams. User manual XperiDo template design add-in for Microsoft Word 63 Your documents. Automated. Master your data flows. Boost your output streams. 8.5 Loop configuration When looping over an item, you can set a number of properties. User manual XperiDo template design add-in for Microsoft Word 64 Your documents. Automated. Master your data flows. Boost your output streams. The template IterationSettings, found in /XperiDoDemo/Manuals/Basics/Loops, contains a number of different scenarios for these settings. 8.5.1 Loop settings 8.5.1.1 Insert break on each iteration after first When specified, a break will be inserted on each iteration. The following options exist: Nobreak: don't insert a break. This is the default behaviour. Textwrapping: go to the next line but don't start a new paragraph. Column: start a new column. Only applicable when using multiple columns. Page: start a new page. 8.5.1.2 Remove the last paragraph When checked, the last paragraph will be removed. This is useful when used with tables. When you insert a loop over a table, an empty paragraph is added after each table, and it's not always possible to remove this when editing the template. Check the box to merge all tables into one table at document generation time. 8.5.1.3 Loop in reversed order When checked, the order in which the elements appear in the loop, will be reversed. User manual XperiDo template design add-in for Microsoft Word 65 Your documents. Automated. Master your data flows. Boost your output streams. 8.5.1.4 Enable sorting When checked, additional options appear: Field is the field over which the set will be sorted. Only children of the field over which will be looped can be selected here. Datatype is the sorting style used. For instance, sorting (1 5 10 15 20) as text will result in (1 10 15 20 5). Sorting it as numbers results in (1 5 10 15 20). Order lets you choose between ascending or descending. Case-order orders by case: Upper-first: (a A aa b B bb) becomes (A a aa B b bb) Lower-first: (a A aa b B bb) becomes (a aa A b bb B) Ignore-case: (a A aa b B bb) becomes (a A aa b B bb) 8.5.1.5 Only iterate over the first X occurences When checked, the looping will stop after X iterations. You can change the value of X by clicking on the number: User manual XperiDo template design add-in for Microsoft Word 66 Your documents. Automated. Master your data flows. Boost your output streams. 8.5.1.6 Only iterate over the last X occurences When checked, the looping will start X iterations before the last. You can change the value of X by clicking on the number. 8.5.2 Precedence rules When multiple options are selected, this is the order in which they are executed: 1) Loop in reversed order 2) Only iterate over the first/last X occurences 3) Sorting For instance, let's say the set you want to loop over is (A B C D). The following happens: 1) Loop in reversed order: set becomes (D C B A) 2) Only iteratie over the first 2 occurences: set becomes (D C) 3) Sort descending: set becomes (C D) 8.6 Loops in loops, conditions in loops In more complex document templates you can perfectly insert a second loop into a loop, or set conditions for insertion of looping fields. User manual XperiDo template design add-in for Microsoft Word 67 Your documents. Automated. Master your data flows. Boost your output streams. 8.6.1 Loop inside a loop To introduce a second loop inside a loop, simply place the cursor within an existing loop and go through the steps of creating a simple loop again. 8.6.2 Grouping items within a loop In many cases, you would want to group the items within a loop. You could think of reordering products per product type, cities per state, contact persons per customer… To be able to group items within a loop, the toolbar of the XperiDo pane has a grouping function. In the example below there is a loop over a number of events, which are to be grouped by the American state where they take place. To achieve that, take these steps: 1) Select either the table row or paragraph that contains the loop, highlight the field in the XperiDo pane that you want to use to define the different groups, in this case that would be StateOrProvince and click the group icon. 2) Insert the grouping header within the Grouping box by mapping the group identifier field. 3) This results in a grouped loop that looks like this: User manual XperiDo template design add-in for Microsoft Word 68 Your documents. Automated. Master your data flows. Boost your output streams. 8.6.3 Conditional loops In many cases, you would like to introduce a condition inside a loop. By using a condition, you can filter which instances of a recurring field will be part of the loop and which ones won’t. In the example below, there’s a condition inside the loop on Event, that states that only events will be shown that take place in a venue that is located in the state of customer. To apply that filter, you insert a conditional block into the loop that states that condition. The next chapter will elaborate in further detail on defining such simple and more complex conditions. The resulting document for a customer that is located in the state of Tennessee, US: User manual XperiDo template design add-in for Microsoft Word 69 Your documents. Automated. Master your data flows. Boost your output streams. User manual XperiDo template design add-in for Microsoft Word 70 Your documents. Automated. Master your data flows. Boost your output streams. 9 Conditional content/lay-out 9.1 Introduction XperiDo allows you to make your document templates intelligent. In this context, the term intelligent refers to the ability that you have to show or not show data fields in the final document, or to format fields in a certain manner according to your own rules and conditions. XperiDo has a very intuitive wizard to set and manage your conditions. The wizard is made up of two major blocks: the Field Selection block, where you can set conditions on the insertion of fields; and the Field Formatting block where you can set conditions on the formatting of the inserted fields. To clarify this, the Field Insertion block will determine whether fields are inserted or not, the Field Formatting block will determine how these fields will look in the final document. User manual XperiDo template design add-in for Microsoft Word 71 Your documents. Automated. Master your data flows. Boost your output streams. 9.2 Conditional content Say that you would like to insert a value only if a certain condition is true, like inserting an advertisement on an invoice only if it is relevant for the customer, then you can define that condition in your XperiDo template. To insert conditional content – this can be a data field, plain text, an image or any other content, execute the following steps: 1) Create the content in the position where it needs to go on the final document and select it. 2) Click the condition button in the XperiDo ribbon. User manual XperiDo template design add-in for Microsoft Word 72 Your documents. Automated. Master your data flows. Boost your output streams. 3) In the Condition Settings Dialogue, give your condition a relevant name and set the condition parameters. First, you select the type of condition, then you select whether to work with a field value or an expression. Then, to the left, you select the field to check and to the right, the value to check against. XperiDo supports different types of conditions: Always: the default state of a condition. Check whether a field occurs: select the field in the field selection box and check whether you want to consider blank values as non-occurrences. Check whether a field occurs multiple times: select the field in the field selection box, define a condition and check whether you want to consider blank values as non-occurrences. Check whether a field has a specific value: select the field in the field selection box, define the type of value this field has (text, number, date) and define your condition for the value. User manual XperiDo template design add-in for Microsoft Word 73 Your documents. Automated. Master your data flows. Boost your output streams. Check whether an expression is true: define an expression. You can either work with field or expression values in your conditions. Conditions with field values are straightforward in a sense that you use the values of a certain field in your condition. Conditions with expressions use the outcome of a formula that includes one or more fields. Expressions are a bit more complex to define, but they enable you, as a template designer, to build any kind of conditional data insertion into your template. 9.2.1 Conditions with field values To work with a field value, follow these three steps: choose the modus (check whether it occurs/whether it occurs multiple times/whether it has a specific value), select the field you want to use in the field selection box and define your condition. To input a value, first you need to choose the type. There are 3 types: text, number or date. When you select as date, you can choose either time, date or datetime: Then, depending on whether you chose text, number or date, you choose the operator you want to use in your condition: Finally, to the right of the operator box, you can input the value you want to check against. There are two kinds of field values: static and variable . Static values are typed in and don't change; Variable values are referenced and thus can change depending on the value of the field you're referring to. 9.2.1.1 Static field values When using static field values, the value you choose doesn't change. When working with text or numbers, simply type in the value you want to use. If, however, you're working with a date or time, you can choose the value by clicking on the date or time button to the right: The button to the right brings up the following window, where you can choose a date (or datetime, depending on which you chose): User manual XperiDo template design add-in for Microsoft Word 74 Your documents. Automated. Master your data flows. Boost your output streams. Next, we'll provide 2 real-life examples of working with conditional, static field values: Example 1 You could, for instance, promote an upsell product in an invoice. Imagine that you want to insert the promotion only for customers who are residents of the state of Tennessee in the US. Here’s how you can set that condition in your template: 1) Create promotional content (a shape, a picture, plain text…) and insert it where you want it to go in the final document and select it. 2) Click the condition icon to set your condition. 3) In the Condition Settings dialogue, give your condition a name such as “only for TN customers” and select the Check whether a field has a specific value option. 4) Select the field Account/Address/StateOrProvince in the field selection box. 5) Choose work with value as text and set TN as the value to be checked. If you want to show another ad to residents of another state, say Florida, you simply insert your Florida ad immediately after the Tennessee ad and follow same five steps. Name your condition “only for Florida customers” and replace TN by FL in the final step. Example 2 Also consider this slightly more complex example that combines a condition and a loop: you want to promote a certain product if it features in a list of suggested products that you keep for every individual customer. Here’s what to do: 1) Create promotional content (a shape, a picture, plain text…) and insert it where you want it to go in the final document and select it. 2) Insert a loop with the loop icon as you would (refer to the previous chapter for more information on loops). 3) Select your content again and click the condition icon. User manual XperiDo template design add-in for Microsoft Word 75 Your documents. Automated. Master your data flows. Boost your output streams. 4) In the Condition Settings dialogue, give your condition a name such as “If SunBurst is Suggested” and select the Check whether a field has a specific value option. 5) Select the field Account/AccountSuggestedProduct/ProductName in the field selection box. 6) Choose work with value as text and set contains SunBurst as the value to be checked. Note that you need to insert the loop because the field you want to check for a certain value has multiple occurrences (there may be more than one suggested product). By inserting the loop, XperiDo will check whether the condition you set is true or false for each occurrence of the field ProductName. 9.2.1.2 Variable field values In the configuration below, the value of InvoiceDate is checked to be before the value of InvoiceDueDate. This means that, instead of checking a static value, a variable value is taken, which is always taken from a field in the dataset. User manual XperiDo template design add-in for Microsoft Word 76 Your documents. Automated. Master your data flows. Boost your output streams. To input a variable field value, click the button to the right of the text box: This will bring up a window, allowing you to browse through the data source. Select the field you want to use and click OK. The reference to the field will show up in the text box. Although you can select the reference, copy and paste it elsewhere, this pasted version will be considered plain text and thus will not contain the reference. If you want to use the reference, you have to click the button and select the field in the pop-up window. User manual XperiDo template design add-in for Microsoft Word 77 Your documents. Automated. Master your data flows. Boost your output streams. Be careful that you select the correct type. 9.2.2 Conditions with expressions You can create more complex conditions if you work with expressions instead of fields. XperiDo has a broad set of functions that you can use to create an expression. Expressions work in a very easy way: you create an expression, if it returns value 1 (true), then the content on which you have placed the condition will be shown. If it returns value 0 (false), then the content will not be shown in the final document. To insert an expression: 1) Insert a condition using the condition icon. 2) Select Check whether an expression is true in the condition dialogue. 3) Click the Insert Function icon to select a function. XperiDo supports a broad set of text, logical, mathematical, trigonometric, statistical and XML functions. User manual XperiDo template design add-in for Microsoft Word 78 Your documents. Automated. Master your data flows. Boost your output streams. 4) Select your function and click OK. A window will pop up, asking for values or fields to use as arguments. 5) Click on the formula button to the right to open another expression editor, where you can either type in a value or drag and drop a field value: User manual XperiDo template design add-in for Microsoft Word 79 Your documents. Automated. Master your data flows. Boost your output streams. 6) Click OK to see that one argument has been inserted. Do the same for all the arguments you wish to use. Note that you don't always need to use every argument. 7) Finally, see that your expression has been inserted: User manual XperiDo template design add-in for Microsoft Word 80 Your documents. Automated. Master your data flows. Boost your output streams. Note that you can also type add(,) and then drag and drop the field values you used as arguments. The lists below may be useful when you work with expressions. Here is a list of all operators that can be used with data field values, which are formatted as ${fieldname}: + adds two values together. - subtracts one value from the other. * multiplies two values. / divides a value by another. % finds the remainder of the division of the two values. < checks whether the first value is smaller than the second value. > checks whether the first value is greater than the second value. = checks whether both values are equal. != checks whether both values are not equal. <= checks whether the first value is smaller or equal to the second value. >= checks whether the first value is greater or equal to the second value. The format to use any of these is (${fieldname}) operator (${fieldname}). You can also use boolean logic to combine arguments by using the following operators: & returns true only if both arguments are true. User manual XperiDo template design add-in for Microsoft Word 81 Your documents. Automated. Master your data flows. Boost your output streams. | returns true if at least one of the arguments is true. The format to use this is (argument) operator (argument). The last operator, !, is used to invert the boolean value of an argument: ! returns true if the argument is false, and false if the argument is true. The format to use ! is !(argument). 9.2.2.1 Managing multiple conditions You can combine multiple conditions and set up a hierarchy of conditions. In such case one condition overrules the other. All the conditions that apply to a certain data mapping will be listed up in the Field selection tab of the Mapping Dialogue. You can add and remove conditions, or move them up and down the hierarchy with the hierarchy controls. This feature may be helpful to replace a mapped field by another field when a certain condition is true. Say you would like to create an invoice based on an order in Microsoft Dynamics CRM. An order in Microsoft Dynamics CRM may contain standard products, but also so-called write-in products. These are products that are not known to Microsoft Dynamics CRM as standard products. The name of such write-in products is in a field called Description, whereas the name of a standard product is in the field ProductName. The value of the field WriteInProduct (true/false) indicates whether a product is a standard product or a write-in product. Say you would like to build a table in your invoice with all the products of your invoice. In that case you would probably want to have a column in your table with the product name of all products ordered (regardless of whether they are standard or write-in products). How to proceed: 1) Map the field ProductName to the correct cell of your table. 2) Double click the mapping in the XperiDo tab to open the Mapping Settings dialogue. 3) Adjust the “always” condition by clicking the pencil icon next to it. 4) Set a check whether field has a specific value condition in the field “WriteInProduct” and enter False as the value to be checked. 5) In the Mapping Settings add a condition with the Add button. 6) Select the Description Field as the field to be inserted. 7) Set a check whether field has a specific value condition in the field “WriteInProduct” and enter True as the value to be checked. 9.3 Conditional lay-out Whereas Microsoft Excel has a number of capabilities for conditional formatting, Microsoft Word has not. However, with the XperiDo add-in for Microsoft Word, you can apply conditional lay-out to text and data fields you map in your templates. User manual XperiDo template design add-in for Microsoft Word 82 Your documents. Automated. Master your data flows. Boost your output streams. 9.3.1 Using the field formatting section of the mapping dialogue You can set conditions for formatting in the Field Formatting section of the Mapping dialogue. To open the Mapping dialogue, double click a mapping in the Mapping tab of the XperiDo pane. The Field Formatting section of this dialogue mainly consists of four areas: Application area (1): the Application Area is helpful for applying conditional lay-out to mappings with a conditional field selection. You can either select one of the field selection conditions and apply conditional formatting on that particular conditional value, or you can apply the conditional formatting to all of the values of the mapping (disregarding the field selection conditions). Condition Settings area (2): in this area you can define conditions for conditional formatting. Setting the conditions for formatting is analogous to setting conditions for field insertion. You can add, remove and re-order conditions. Lay-out Settings area (3): for each of the conditions, you can set different font and formatting options in the Lay-out Settings Area. This area also contains rendering options. User manual XperiDo template design add-in for Microsoft Word 83 Your documents. Automated. Master your data flows. Boost your output streams. In the above example you apply conditional formatting to a data mapping called InvoiceReduction. In the field selection section you can see that the value of the field InvoiceReduction will be shown if it is a number greater than 0. Otherwise the text ‘None’ will be shown. In the Application Area (1) of the Field Formatting section you choose to apply conditional formatting only if the value of InvoiceReduction is greater than 0. Imagine that you would like to print reductions exceeding 250 dollars in Arial, bold, red. You can set the condition InvoiceReduction higher than 250 in the Condition Settings Area (2) and define the desired font style in the Font tab of the Lay-out Settings Area (3). 9.3.2 Font and formatting options In the Lay-out Settings Area of the Mapping dialogue, you can define font and formatting options for the selected mapping. As pointed out you can choose whether these lay-out settings will either apply always or only if a certain condition defined in the Condition Settings Area is true. User manual XperiDo template design add-in for Microsoft Word 84 Your documents. Automated. Master your data flows. Boost your output streams. 9.3.2.1 Font options Font options include font selection, style, size, font color, underline style, underline color and font effects. There’s a little preview window that shows how the content you are formatting will look when laid out with the selected font options. 9.3.2.2 Formatting options The Formatting tab offers formatting options that look a lot like the cell formatting options in Microsoft Excel. You can redefine your input data as a number, a currency, a date, a time or a date-time combination, a percentage, a plain text value or a custom format. For each of these categories you can set specific formatting options. In the example below, you define an input field as being a currency and you select a currency symbol, a preset number of decimals and a thousand separator. User manual XperiDo template design add-in for Microsoft Word 85 Your documents. Automated. Master your data flows. Boost your output streams. 10 Advanced fields 10.1 Types of fields There are four types of fields: Basic fields are fields that are defined by the data source that is used to build the template on. Pseudo-fields are temporary fields that are not part of the data set. They can be used to perform calculations or apply formulas on basic fields. Dynamic fields are extra fields that are available as a property on the XperiDo template; these can be set during the template creation process in CRM. Resultsets are groups of fields that have a filter applied to them. Pseudo-fields, dynamic fields and resultsets are the advanced fields you can use within XperiDo. 10.2 Pseudo-fields You can add pseudo-fields to the data set as it is shown in the Datasource tab of the XperiDo Pane. Such fields do not pull their value from the data set this template is connected to, but from an expression or a formula which you can set yourself as you design the template. Pseudo-fields are marked with a blue instead of a green icon: They can be used in mappings, conditions and expressions just like basic fields. 10.2.1 Creating a pseudo-field Follow these three steps to create a pseudo-field: 1) Select the parent node under which you would like to create your pseudo-field. This will often be the root element of the data set, but it can be any node that has children. 2) Click the add pseudo-field icon in the function bar at the top of the XperiDo Pane. User manual XperiDo template design add-in for Microsoft Word 86 Your documents. Automated. Master your data flows. Boost your output streams. 3) The Edit pseudo-field dialog opens. 4) Give the pseudo-field a name and a type, and build the expression that will be used to calculate its value by typing in the middle text box. 5) You can click Insert Function to insert a function, and click Validate to validate the syntax. If you require a value from a field, you can select the field to the right and click and drag that field. User manual XperiDo template design add-in for Microsoft Word 87 Your documents. Automated. Master your data flows. Boost your output streams. 6) If necessary, you can change the parent node of the pseudo-field in this dialog as well. 10.2.2 Editing and removing pseudo-fields To edit the settings of a pseudo-field, or remove it altogether, you can use the edit and remove pseudo-field buttons in the XperiDo pane: 10.2.3 Example: split function One particular use of pseudo-fields is the split function. To illustrate this, we'll work with the following example: User manual XperiDo template design add-in for Microsoft Word 88 Your documents. Automated. Master your data flows. Boost your output streams. This dataset contains a texts parent node, with textA and textB as child elements. TextA contains a single line of text while textB contains 3 lines of text. If we map these as basic fields, without changing any settings... ...then we get the following result: While the Field Inspector shows the content of textB as 3 separate lines, in the output this isn't the case. To split these correctly, we can use a pseudo-field. Select the parent node and click add pseudo-field: Give it a name and select Text as the type. In the middle text box, type splitLines(), select and drag textB from the right and drop it in between the brackets: User manual XperiDo template design add-in for Microsoft Word 89 Your documents. Automated. Master your data flows. Boost your output streams. Now we have a new pseudo-field: Select the pseudo-field and click the loop icon: A loop box will now appear: Inside the loop box, insert the pseudo-field: Note that you can't simply map the pseudo-field as we've splitted the content into 3 lines, meaning that you need to loop over these 3 lines in order to show them all. If you just map the pseudo-field, only the first line will be shown. This is the template with 4 different mappings: 2 basic fields, 1 pseudo-field and 1 loop around a pseudo-field: User manual XperiDo template design add-in for Microsoft Word 90 Your documents. Automated. Master your data flows. Boost your output streams. And this is the resulting output: 10.3 Dynamic fields Dynamic fields are extra fields that can be set during the template creation process. They are independant of the data source, and their value is determined by the end user that is creating the document. Dynamic fields can be a line of text, a text box, one or multiple options, a time, a date or a number. The template designer decides the type(s), and the end user decides the values. Note that dynamic fields can only be created by using an other XperiDo product, such as XperiDo for Microsoft Dynamics CRM. Dynamic fields can be used for a number of things. For example, by using conditional content, the template designer can decide to add a few promotions, which only become visible when the end user selects these in the document creation process. This way, the end user decides part of the content at the time of generating the document. Dynamic fields appear under the Dynamic Fields node in the data source of the document. User manual XperiDo template design add-in for Microsoft Word 91 Your documents. Automated. Master your data flows. Boost your output streams. In the above screenshot, there are four dynamic fields, three of which were set during the template creation process. The fourth dynamic field, XDRequester, is the user generating the document. 10.3.1 Preserve formatting of text box dynamic fields When working with dynamic fields that are specified as text box, the formatting of the content may be lost in the transition to the Word add-in. To make sure that the formatting is kept intact, you can use the following settings: These can be set in the rules tab in the XperiDo Mapping window. Please note that these settings will overwritten by the settings of an XperiDo Style, should you decide to assign it to the mapping. Unless, of course, you apply these settings to the XperiDo Style. Since this is probably always the desired results, these settings are configured like this by default when mapping a text box dynamic field. This behaviour can be changed in the XperiDo options: User manual XperiDo template design add-in for Microsoft Word 92 Your documents. Automated. Master your data flows. Boost your output streams. Please note that this setting is not retroactive, meaning that turning this on will only affect future mappings. If you want to enable this for existing mappings, you need to re-map these. 10.4 Resultsets Resultsets are groups of fields that have a filter applied to them. For example, you can create a resultset that only features the male contacts that are over 30 years old. Any condition is possible, and you can use the resultsets as fields for further refining/calculations. Understanding how resultsets work, how to use them and what their main strength is will be done through the use of an example. We'll start with a document that lists all the contacts and their properties. The dataset we'll be using consists of 10 contacts and their information. We've set up the template as follows: User manual XperiDo template design add-in for Microsoft Word 93 Your documents. Automated. Master your data flows. Boost your output streams. Which results in the following document: (only a part is shown, all 10 contacts are there) Next, we'll define a resultset which filters the external contacts out of the group. 10.4.1 Defining a resultset To define a resultset, add a pseudo-field of type resultset: Be careful when specifying a name, as changing it later on can affect the mappings that are based on this resultset. It is therefore advised to choose a name that is clear and makes sense. In this example, we'll create a resultset called Internal Contacts, as we only want the internal contacts. Next, choose the field on which the resultset will be based. The field we will choose in this texample is /Contacts/Contact, which means that the resultset is made up of a number of Contact elements that satisfy the condition(s) we will specify in the next step. When no conditions are applied, the resultset will simply contain all User manual XperiDo template design add-in for Microsoft Word 94 Your documents. Automated. Master your data flows. Boost your output streams. the Contact elements from the input. Now you need to define the condition that only the internal contacts should be included in the resultset. Adding conditions is done by clicking the Add Condition icon, after which you can configure the condition. The condition should be that the field Type is equal to Internal. To finalize this condition, you need to click the following button: This applies all the changes to the condition. Now the condition will look like this: Click OK to add the resultset. Now, you have a resultset that contains only the internal contacts. 10.4.2 Using resultsets Now that the resultset is defined, it will show up in the data source: Since it is based on the field Contact, it contains all of the fields that Contact contains. User manual XperiDo template design add-in for Microsoft Word 95 Your documents. Automated. Master your data flows. Boost your output streams. Now, to create a list of only the internal contacts, start with the same setup you used for creating a list of all contacts. The only difference is that now, you loop over Internal Contacts: You don't have to use loops to map resultsets. But if you map a resultset like you map a basic field, only the first element of the resultset is used. The template now looks like this: User manual XperiDo template design add-in for Microsoft Word 96 Your documents. Automated. Master your data flows. Boost your output streams. The fields inside the loop can either be mapped to /Contacts/Contact/ or to /Internal_Contacts/, there is no output difference. Outside of the Internal Contacts loop, /Internal_Contacts/@id will return the id of the first internal contact, and /Contacts/Contact/@id will simply return the id of the first contact. The document now looks like this: 10.4.2.1 In sorted loops When looping over the fields of a resultset, you can apply sorting based on a field, just as you can with regular fields. In this example, we'll loop over the first names of the internal contacts: User manual XperiDo template design add-in for Microsoft Word 97 Your documents. Automated. Master your data flows. Boost your output streams. This will show the loop of Internal Contacts and sort them based on their first name: User manual XperiDo template design add-in for Microsoft Word 98 Your documents. Automated. Master your data flows. Boost your output streams. 10.4.2.2 In expressions Resultsets can also be used in expressions. Say that you want to know the average seniority of the internal contacts, you can use the following expression in a field: User manual XperiDo template design add-in for Microsoft Word 99 Your documents. Automated. Master your data flows. Boost your output streams. You then setup your template as follows: The first formula is just a count on all internal contacts, the second formula can be found above. This is the result: User manual XperiDo template design add-in for Microsoft Word 100 Your documents. Automated. Master your data flows. Boost your output streams. 10.4.3 Advanced usage In this part, we'll use an example to look at some of the more advanced uses of resultsets. We'll build on the previous example by using an extended datasource: as well as a list of all contacts with their data, each contact now contains a few orders as well. To show an overview of all orders, the template has been setup the following way: Note that the pseudo-field Total has been added, which is the product of Amount and UnitPrice: User manual XperiDo template design add-in for Microsoft Word 101 Your documents. Automated. Master your data flows. Boost your output streams. This results in the following output (only part is shown): This is our starting document. Now we'll use resultsets to filter the orders. User manual XperiDo template design add-in for Microsoft Word 102 Your documents. Automated. Master your data flows. Boost your output streams. 10.4.3.1 Multiple conditions Resultsets can feature multiple conditions: suppose that we want to show all the orders of internal contacts that are made between 8am and 12pm. The resultset now looks like this: And this is what the output looks like (only part is shown): User manual XperiDo template design add-in for Microsoft Word 103 Your documents. Automated. Master your data flows. Boost your output streams. 10.4.3.2 Conditions on fields that are not in the resultset In resultsets, you can define condtions on fields that are not in the resultset itself, but at a higher level. In this example, we create a resultset with a condition based on the Type field, which isn't in the resultset: User manual XperiDo template design add-in for Microsoft Word 104 Your documents. Automated. Master your data flows. Boost your output streams. This is the output (only a part is shown): User manual XperiDo template design add-in for Microsoft Word 105 Your documents. Automated. Master your data flows. Boost your output streams. The values of the fields that are used in the condition(s) of the resultset correspond to the field on which the resultset is defined. In this case, the resultset is defined on field /Contacts/Contact/Orders/Order, so the value of the Type field will be taken from the contact that contains the current order. 10.4.3.3 Grouping resultsets Just as you can group basic fields, you can group the output of results. Let's say that we want to display all orders that are placed by internal contacts between 8am and 12pm. This is how we set up the template: The grouping is defined on the status field of the resultset: For every different value of status, the order block will be repeated. The total of all the orders with the same status is also calculated: User manual XperiDo template design add-in for Microsoft Word 106 Your documents. Automated. Master your data flows. Boost your output streams. This is what the document looks like: 10.4.3.4 Condition groups By default, all specified conditions must be satisfied in order for the order to be included in the resultset. This behaviour can be changed by using condition groups, which define how conditions are checked. User manual XperiDo template design add-in for Microsoft Word 107 Your documents. Automated. Master your data flows. Boost your output streams. There are two types of groups: AND and OR. In an AND group, all the conditions must be satisied, while in an OR group, at least one must be satisfied. The following diagrams visualize this: To group conditions, check the boxes in front of them and click Group AND or Group OR: To remove a group, click the remove group icon, found to the right of Change to. Change to gives you the possibility to change the type of the group. We could use an AND group to get the same result as in the screenshot above: This is the same because the default behaviour is AND. However, if we rewrite the condtions with an OR group, the behaviour will change: Instead of showing all orders placed by internal contacts between 8am and 12pm, it now shows all orders that were placed by internal contacts, as well as those placed between 8am and 12pm. This is because only one condition has to be satisfied. User manual XperiDo template design add-in for Microsoft Word 108 Your documents. Automated. Master your data flows. Boost your output streams. 11 Optimization XperiDo offers a few options at runtime which speed up the add-in by changing some settings. How these are used and what their effects are is explained in this chapter. 11.1 General Optimization settings are turned on by default for new templates. If you want to enable these settings for existing templates, you can do so in the XperiDo options > Runtime. 11.2 Optimization settings The following settings are available: 11.2.1 Optimize access to grouped fields By turning this setting on, variables are introduced behind the scenes that keep track of the used conditions and their evaluated results. By doing this, less evaluations need to be performed which reduces the loading times of grouped fields. 11.2.2 Schema-object cache size This setting specifies the size of the schema-object cache. This cache keeps track of the types of fields that are used. Setting this value to 125 means that for the first 125 fields, the type is stored and so the lookup is less CPU-intensive the second time around. User manual XperiDo template design add-in for Microsoft Word 109 Your documents. Automated. Master your data flows. Boost your output streams. Unless you are looping over blocks which contain over 125 fields, we recommend leaving it at 125. 11.2.3 Skip validation of empty table cells By turning this setting on, XperiDo will skip a validation step at document generation time. This step checks for invalid tables, which can be produced as a result of a combination of settings. Turning on this settings speeds up the document generation but introduces a small chance of the resulting docx file (if you export to docs) being unreadable by Word. If you use tables in your document, it is advised to test docx document generation with this setting turned on and see whether the resulting docx file can be opened by Word. Due to the large potential difference between data used in documents, some records might generate a valid docx while others may not. User manual XperiDo template design add-in for Microsoft Word 110 Your documents. Automated. Master your data flows. Boost your output streams. 12 Post-processing/data rendering 12.1 Introduction XperiDo offers a wide range of rendering options, also called post-processing features. In this context, rendering refers to the process of transforming the dynamic input data. You could for instance render a website URL into a QR code, or a numerical value into a barcode. Other examples include changing text into pictures or merely replacing text by other text. The rendering features are available through the Mapping dialogue, which you open by double clicking any of your mappings in the XperiDo pane. 12.2 Text editing With the Text Editing tab, you can modify the text value of the mapped field. You can either replace or insert text. You can find the Text Editing tab in the settings window of a mapping. 12.2.1 Replacing text Under the Replace Text line, there are two text boxes. In the first box, you type the text you want to replace; in the second box, the text you want to replace it with. You can open additional options by clicking the ellipsis to the right. A window will open: User manual XperiDo template design add-in for Microsoft Word 111 Your documents. Automated. Master your data flows. Boost your output streams. There is an ignore case checkbox which, when checked, will consider BROWN, bROwN and brown to be identical. You can also change the search mode. Normal mode: the text is considerd to be plain text, no special characters are used. Extended: this allows the insertion of special characters. See http://en.wikipedia.org/wiki/Control_characters. \n is a newline. \r is a carriage return. \t is a tab. \x## is a hexadecimal value (between 00 and FF). \u#### is an extended hexadecimal value meant for Unicode characters (between 0000 and FFFF). \d### is a decimal value (between 000 and 255). Regular expression: when you search on regular expressions, the Find what: box is considered to be a regular expression, Replace with: is the replacement text. See http://docs.oracle.com/javase/7/docs/api/java/util/regex/Pattern.html#sum. 12.3 Hyperlinks You can render fields as clickable hyperlinks in your documents by using the hyperlinks feature, found in the Rules tab of the XperiDo Mapping window: In the Hyperlink Target box, you can type in the URL of the link you wish to point to. You can also click the button to the right of the box to use a field value for the link. The content of the Tooltip box define what is shown when hovering over the link. Here as well, you can insert a field value. User manual XperiDo template design add-in for Microsoft Word 112 Your documents. Automated. Master your data flows. Boost your output streams. 12.3.1 E-mail hyperlink If you want to create an e-mail hyperlink, follow these steps: 1) Create a pseudo-field of type Text. 2) Give it the value concat('mailto://',${field with link}), where ${field with link} is the field that contains the link. Insert this by dragging it from the right. 3) Then, use this created field as the Hyperlink Target. By adding the mailto://, the field is specified to be an e-mail link. 12.4 Case-conversion Sometimes the text value of a field isn't in the correct case. A name might be fully in caps, such as JOHN DOE, whereas you want John Doe to appear in your documents. XperiDo provides functionality for case-conversion, found in the Rules tab of the XperiDo Mapping window. Check the checkbox next to Apply advanced case-convert rules. The following options are available: Don't change: the text stays as it is. Sentence case: everything is converted to lowercase, except the first letter and every letter following a dot. lowercase: everything is converted to lowercase. UPPERCASE: everything is converted to uppercase. Capitalize Each Word: everything is converted to lowercase except the first letter of each word. tOGGLE cASE: invert the case of each character. 12.4.1 Examples The following 6 sentences will be used to show how these options work: lowercase User manual XperiDo template design add-in for Microsoft Word 113 Your documents. Automated. Master your data flows. Boost your output streams. UPPERCASE captialize each word this is sentence one. THIS IS SENTENCE TWO. lEaDiNg spaces are ignored. 123 number are taken into account. 'Quotes' and Other characters !@#$%^ etc. are ignored at the start of a sentence. Abbreviations are considered to be the end of a sentence. This is how the case-conversion functions change these sentences: User manual XperiDo template design add-in for Microsoft Word 114 Your documents. Automated. Master your data flows. Boost your output streams. User manual XperiDo template design add-in for Microsoft Word 115 Your documents. Automated. Master your data flows. Boost your output streams. 12.5 Working with numbers In the Format tab, you can select Number: This setting formats the input to a number with the amount of specified decimal places. While this may seem straightforward, there are a few settings that can influence the behaviour of this formatting. The first (and most important factor) is the type of field in the data source. When the type is numerical, it has to follow rules that are defined by the XML schema specification. See http://www.w3.org/TR/2001/RECxmlschema-2-20010502/datatypes.html#built-in-primitive-datatypes. When the type is non-numerical, you can convert the value to a number. The rules to do this by are based on the locale that is defined in the document properties. These can be accessed by clicking Properties > Data Formatting: User manual XperiDo template design add-in for Microsoft Word 116 Your documents. Automated. Master your data flows. Boost your output streams. The locale of this template has been set to Dutch (Belgium) (nl_BE). This means that, for every text field that is converted to a number, the rules (that are associated with this locale) are used to parse the value. Under the locale, the locale's symbols for 1000 seperator and decimal seperator are shown. There is also an option to remove non-numeric characters before converting. This is particularly handy for currency symbols. Note that there's a difference between the locale you set in the options (document locale) and the locale you choose in the Format tab (format locale). First, the input text value is converted to a number using the document locale. Then, this number value is formatted using the format locale: 12.6 Converting input data to images With the Convert to Image tab, you can render the value of the mapped field into an image, retrieve an image from the repository or from the internet. You can access the Convert to Image tab either through the Mapping dialogue or through the Insert Image icon in the XperiDo ribbon. User manual XperiDo template design add-in for Microsoft Word 117 Your documents. Automated. Master your data flows. Boost your output streams. In the XperiDo Mapping window, go to the Convert to image tab and check the Convert to image checkbox. 12.6.1 Image source specification First step in converting input data to images consists of specifying the image source. Images can be either Assets in the XperiDo repository, files on an XperiDo Server FileShare, BinaryEncoded images or an URL which points to an image. In most cases you will work with Assets from the XperiDo repository. 12.6.1.1 Working with assets In the Base Location, enter the path to the image(s) folder. For Repository Assets, this will usually be \ProjectName\Assets. If the values of the mapped field correspond exactly with the names of assets in the repository, then you can use the Asset type Source Specification. If the values of the mapped fields do not entirely correspond with the names of assets in the repository, you will have to use Asset Lookup. 12.6.1.2 Asset lookup With Asset Lookup you can build a Translation Table that links values of the mapped field to assets in the XperiDo repository. User manual XperiDo template design add-in for Microsoft Word 118 Your documents. Automated. Master your data flows. Boost your output streams. Click Add to add a mapping, after which you select the image to use (you can browse with the XperiDo Assets manager). Then,you type in the value that will be translated to the image. For instance, if you want this mapping to show an image when its value is image, then you would type in image. You can also set a default image for values that are not linked to an asset in the translation table by clicking Select and choosing an image. 12.6.1.3 Asset management You can manage repository assets with the Asset Manager. Access the Asset Manager with the XperiDo Assets icon in the XperiDo ribbon. Assets are image files that are available for use in templates. The Asset Manager supports the .jpg, .gif, .png and .bmp image formats. The Asset Manager allows you to upload and manage two types of assets: Global assets are image files that are available for use by any XperiDo template, regardless of the project your template is part of. Project assets are image files that are only available for use in the project your current template is part of. Use the Organize function to add and delete assets and to refresh the view. User manual XperiDo template design add-in for Microsoft Word 119 Your documents. Automated. Master your data flows. Boost your output streams. 12.6.1.4 Image from URL You can also choose to consider the content of the field to be an URL, pointing to an image. This way, you can use images from the internet in your templates. An important things to notice is that this means that, each time a document is generated (from a template that uses this functionality), the image is fetched from that URL. This can have a serious negative impact on the performance of document generation, so keep that in mind when using this function, as it is much faster to use images from the repository. To use a field as an URL, select URL from the drop-down list: Now the data will be considered to be an URL. You can also specifiy a base location. This is useful when the field only contains part of a URL. Consider the following example: Two images can be found in the following locations: http://www.invenso.com/images/logo.png and http://www.invenso.com/images/menu_button.png. FieldA has as value /images/logo.png. FieldB has as value /images/menu_button.png. Instead of changing the value of the fields so that each points to the URLs above, you can provide the following base location in the box next to Base Location: http://www.invenso.com. By doing this, the images will also point to the URLs above, but without having to change the value of the fields. User manual XperiDo template design add-in for Microsoft Word 120 Your documents. Automated. Master your data flows. Boost your output streams. 12.6.2 Image settings Once you have specified the source of your image(s), you can edit the size of the image and add a description. The description will be shown as a text alternative in case no images can be shown in the final document. 12.7 Converting input data to barcodes or QR codes With XperiDo you can convert input data to barcodes and QR codes. The add-in for Word supports all commonly used barcode formats. To render a value to a barcode, follow these three steps: 1) Select the field that contains the values to be rendered in the XperiDo pane. 2) Click the barcode/QRcode icon in the XperiDo ribbon and select the type of barcode that you would like to insert. User manual XperiDo template design add-in for Microsoft Word 121 Your documents. Automated. Master your data flows. Boost your output streams. 3) In the Convert to Barcode tab of the Mapping dialogue, set all your preferences for the lay-out of the barcode or QR code. 12.7.1 Inserting a QR code based on static content If one of the fields you are mapping in your template has a URL (website address) as a value, you can render that value to a QR code and print it on the final document. However, you can also render static content, i.e. content that is not mapped, into a QR code. Just take these five steps: 1) Navigate to the position where you want your QR code to go. 2) Make sure no fields are selected in the Data Source tab of the XperiDo Pane. 3) Click the Barcode/QRcode icon in the XperiDo ribbon. User manual XperiDo template design add-in for Microsoft Word 122 Your documents. Automated. Master your data flows. Boost your output streams. 4) Insert the URL of your barcode as a fixed expression between single quotes in the field selection section of the Mapping dialogue. 5) Set your QR display preferences in the Convert to Barcode tab of the Mapping dialogue. 12.8 Removing blank paragraphs When mapping data fields into a template, you have to realize that not every field you map will necessarily be filled with data at generation time. And that may result in unwanted blank lines in the final document. To get rid of them, you can make use of the blank paragraph remover option in the Rules section of the Mapping Settings Dialog. Address Line fields in your data set can often cause unwanted blank paragraphs. This address block mapping will result in a block with two empty paragraphs if AddressLine2 and AddressLine3 are blank, as shown below: To get rid of these blank lines, go to the Rules tab of the Mapping settings dialog of both the AddressLine2 and AddressLine3 mappings and tick the remove paragraph when blank checkbox. User manual XperiDo template design add-in for Microsoft Word 123 Your documents. Automated. Master your data flows. Boost your output streams. 12.9 Inserting text with formatting While most text in your data source will be straight text, you might sometimes encounter text that has formatting applied to it, such as HTML or RTF. Simply using these values as text won't produce the desired results, since the formatting is included in the text. For instance, when importing text from emails in CRM, the HTML might be imported along with it. Luckily, XperiDo offers a way to extract the actual text, by using the Preserve formatted text option: This option is found in the Rules tab of the formatting settings of a mapping. The Preserve formatted text option has a few additional options. 12.9.1 Format The format the data is in. The possible values are HTML, plain text, Rich text, Microsoft Office Word documents, OpenDocument documents and Auto. Auto automatically chooses the correct format, but it is advised to manually enter the format if possible. 12.9.2 Import Format Mode What to do with the styles that are used in the formatted data. This option is only applicable when the format supports styles, such as the Microsoft Word formats. The possible values are Use Destination Styles and Keep Source Formatting. Use Destination Styles will overwrite styles if these are defined in the current document. So if a Heading 1 style is defined in the current document and you import a format with a valid Heading 1 style, then the style of the current document will be used. Keep Source Formatting will keep the style of the imported text. 12.9.3 Datasource The type of the datasource. The following options are available: User manual XperiDo template design add-in for Microsoft Word 124 Your documents. Automated. Master your data flows. Boost your output streams. Value: this takes the value of the mapped field as is, meaning that links and URLs are treated as plain text. Fileshare: this takes the value of the mapped field as a link to a file, relative to the XperiDo server. This can be used to get the data from files found on the XperiDo server. Repository: this takes the value of the mapped field as a link to a file inside the repository. This can be used to get the data from files found in the repository. For instance, /Project/Group/File.docx Url: this takes the value of the mapped field as a url, which allows you to get the content of webpages, for instance 12.9.4 Data is base64 encoded When this option is enabled, the data will be decoded to a binary stream before being inserted in the document. 12.9.5 Skip external content When this option is enabled, external content inside files will be skipped. For instance, you want to grab the content from another Word file in which there are images that get their source from a webpage. At document generation time, XperiDo will visit this webpage and try to download the images for use in the final document. Should the webpage be down, or the internet connection is down, then this can create errors and time-outs during document generation time. By enabling this setting, you prevent this. 12.9.6 Remove empty paragraphs at the end When this option is enabled, empty paragraphs at the end are removed. 12.10 Inserting a formula Microsoft Word is obviously not a worksheet or a calculator. But in some cases it may be useful to make calculations. Typically in invoices or quotations for instance, one would like to include quote/order line subtotals, even if these are not provided in the data source. For that purpose, XperiDo has a calculator feature that is available through the Formula icon in the XperiDo ribbon. Inserting a formula is pretty much the same as inserting an expression. It may look a bit complicated, but you’ll soon get the hang of it. To create a formula, you can either work with operators or use the function wizard. If you choose the operator approach, simply drag and drop the data fields you want to use in your formula to the formula board and type the operator of your choice. The chapter Work with conditions contains a list of the operators you can use in your formulas. User manual XperiDo template design add-in for Microsoft Word 125 Your documents. Automated. Master your data flows. Boost your output streams. If you feel more comfortable using the function wizard, you can choose a more guided approach towards creating your formula. 1) Click the Insert Function icon to select a function. 2) Select your function and click OK. A window will pop up, asking for values or fields to use as arguments. 3) Click on the formula button to the right to open another expression editor, where you can either type in a value or drag and drop a field value: User manual XperiDo template design add-in for Microsoft Word 126 Your documents. Automated. Master your data flows. Boost your output streams. 4) Click OK to see that one argument has been inserted. Do the same for all the arguments you wish to use. Note that you don't always need to use every argument. 5) Finally, see that your expression has been inserted: User manual XperiDo template design add-in for Microsoft Word 127 Your documents. Automated. Master your data flows. Boost your output streams. 6) You can click Validate to make sure that the expression's syntax is correct. User manual XperiDo template design add-in for Microsoft Word 128 Your documents. Automated. Master your data flows. Boost your output streams. 13 XperiDo styles 13.1 Introduction Styles allow you to apply the same formatting to several fields with a single click. It’s pretty much comparable to the preset formatting styles that Microsoft Word offers, which obviously you can use as well. You can find XperiDo Styles through the XperiDo Styles tab of the XperiDo pane. You could create a Currency style to format all the currency values in your template in the same way, or a Negative number style to color all negative numbers red, or a Time style, a Date style, a Percentage style, anything. 13.2 Add, remove and edit styles The XperiDo Styles tab has buttons to add, remove, edit and assign styles: User manual XperiDo template design add-in for Microsoft Word 129 Your documents. Automated. Master your data flows. Boost your output streams. To add a style, follow these steps: 1) Click the add button and give your new style a name. 2) Click the edit style button. 3) Set your font and formatting preferences (whether or not linked to conditions). The style in the example above formats a numerical value as a currency with two decimals and a thousand separator. Depending on whether the value of the field {InvoiceCurrency} contains euro or dollar, the € or $ symbol will precede the value. User manual XperiDo template design add-in for Microsoft Word 130 Your documents. Automated. Master your data flows. Boost your output streams. 13.3 Apply styles and assign default styles to fields You can either apply a style to an individual mapping, or set a style as the default style for a field. In the latter case, every time you map this field into your template, it will by default be styled with the assigned style. To assign a style as the default style for field, follow these three steps: 1) Select the style in the XperiDo pane and click the Assign button. 2) Select the field for which you want to set the style as default style. 3) Close with OK. To apply a style to an individual mapping in your template, you can either: Select the mapping in the document window, right-click and select Assign XperiDo Style from the right mouse button context menu; Double click the mapping in the Mapping tab of the XperiDo pane and select the style in the Field Formatting section of the Mapping dialogue. User manual XperiDo template design add-in for Microsoft Word 131 Your documents. Automated. Master your data flows. Boost your output streams. 14 List of functions XperiDo for Microsoft Word offers a wide array of useful functions. This page lists all of them in detail. 14.1 Additional information 14.1.1 Regular expressions Some of the functions that you can use in XDWord allow you to make use of regular expressions. To learn more about regular expressions, visit http://docs.oracle.com/javase/tutorial/essential/regex/. 14.1.2 Extended characters Some of the functions that you can use in XDWord allow you to make use of extended characters. To learn more about extended characters, visit http://en.wikipedia.org/wiki/Control_characters. \n is a newline. \r is a carriage return. \t is a tab. \\ is a backslash. \x## is a hexadecimal value (between 00 and FF). \u#### is an extended hexadecimal value meant for Unicode characters (between 0000 and FFFF). \d### is a decimal value (between 000 and 255). 14.2 Mathematical functions 14.2.1 Elementary arithmetic add Returns the sum of c and b. (c + b) add(c, b) add('1.2','2.3') = 3.5 add('1.2',2.3) = 3.5 add(1.2,2.3) = 3.5 uadd Returns the sum of c and 1. (c + 1) uadd(c) uadd(10) = 11 User manual XperiDo template design add-in for Microsoft Word 132 Your documents. Automated. Master your data flows. Boost your output streams. sub Returns the result of subtracting b from c. (c - b) sub(c, b) sub(9,3) = 6 sub(3,9) = -6 div Returns the result of dividing c by b. (c / b) div(c, b) div(9,2) = 4.5 div(-9,2) = -4.5 div(2,4) = 0.5 mod Returns the remainder of the division of c and b. mod(c, b) mod(9,2) = 1 mod(9,3) = 0 mod(8,3) = 2 mod(-9,-2) = -1 mult Returns the multiplication of c with b. (c x b) mult(c, b) mult(2,6.5) = 13 mult(-2,8) = -16 sum Returns the sum of all arguments. (a + b + c + d...) sum(a, b, c, d...) sum(1,6.5,2) = 9.5 sum(1,0,0,0,6) = 7 prod Returns the product of all arguments. (a x b x c x d...) prod(a, b, c, d...) prod(2,3,4) = 24 User manual XperiDo template design add-in for Microsoft Word 133 Your documents. Automated. Master your data flows. Boost your output streams. prod(-2,1,-3.5,2) = 14 14.2.2 Basic rnd Returns a new random number between 0.0 and 1.0. Seed is the number used to initialize a pseudorandom number generator. rnd(seed) rnd(25) = 0.645 abs Returns the absolute value of c. ( |c| ) abs(c) abs(123) = 123 abs(-123) = 123 max Returns the largest number of c and b. max(c, b) max(5,2) = 5 max(-3,7) = 7 max(-3,-5) = -3 min Returns the smallest number of c and b. min(c,b) min(5,2) = 2 min(-3,7) = -3 min(-3,-5) = -5 negate Returns c multiplied with -1. negate(c) negate(63) = -63 negate(-63) = 63 User manual XperiDo template design add-in for Microsoft Word 134 Your documents. Automated. Master your data flows. Boost your output streams. sign Returns -1 if c is negative, 1 if c is positive and 0 if c is 0. sign(c) sign(0) = 0 sign(-4) = -1 sign(7) = 1 val Converts c to a floating point value. val(c) val(1.2) = 1.2 14.2.3 Power sqrt Returns the square root of c. sqrt(c) sqrt(121) = 11 sqrt(499849) = 707 sqr Returns the square of c. (c²) sqr(c) sqr(11) = 121 sqr(707) = 499849 exp Returns e raised to the power c. exp(c) exp(2) = 7.389 pow User manual XperiDo template design add-in for Microsoft Word 135 Your documents. Automated. Master your data flows. Boost your output streams. Returns c raised to the power b. (c ^ b) pow(c, b) pow(10,3) = 1000 pow(2,8) = 256 pow(3,3) = 27 14.2.4 Logarithms ln Returns the natural logarithm of c. (base e) ln(c) ln(10) = 2.303 log Returns the logarithm of c in base 10. log(c) log(1000) = 3 log(100) = 2 log2 Returns the logarithm of c in base 2. log2(c) log2(1024) = 10 log2(256) = 8 logn Returns the logarithm of c in base n. logn(c, n) logn(343,7) = 3 logn(64,4) = 3 logn(100,10) = 2 14.2.5 Rounding ceil Returns the smallest integer higher than or equal to c. (rounding up) ceil(c) ceil(1.0) = 1 User manual XperiDo template design add-in for Microsoft Word 136 Your documents. Automated. Master your data flows. Boost your output streams. ceil(1.1) = 2 ceil(1.8) = 2 ceil(-1.0) = -1 ceil(-1.1) = -1 floor Returns the largest integer lower than or equal to c. (rounding down) floor(c) floor(1.0) = 1 floor(1.1) = 1 floor(2.5) = 2 floor(-1.0) = -1 floor(-1.3) = -2 trunc Returns c without the decimal part. trunc(c) trunc(1.0) = 1 trunc(1.6) = 1 trunc(2.5) = 2 trunc(-3.6) = -3 14.2.6 Trigonometrical sin Returns the sine of c. (c in degrees) sin(c) sin(0) = 0 sin(30) = 0.5 sin(45) = 0.707 sin(90) = 1 cos Returns the cosine of c. (c in degrees) cos(c) cos(0) = 1 cos(45) = 0.707 User manual XperiDo template design add-in for Microsoft Word 137 Your documents. Automated. Master your data flows. Boost your output streams. cos(60) = 0.5 cos(90) = 0 tan Returns the tangent of c. (c in degrees) tan(c) tan(0) = 0 tan(45) = 1 tan(60) = 1.732 14.3 Text functions 14.3.1 Basic str Converts c to a string. str(c) str(1.2) = 1.2 strlen Returns the length of c. strlen(c) strlen('Hello world!') = 12 strlen('XperiDo') = 7 concat Returns the string that results from concatenating c and b. concat(c, b) concat('Hello ', 'world') = 'Hello world' substr Returns the substring of s starting from c with length b. substr(s, c, b) substr('Hello World!', 1, 4) = 'ello' substr('Hello World!', 3, 2) = 'lo' substr('Hello World!', 3, -2) = 'el' substr('Hello World!', 100, -4) = 'rld!' User manual XperiDo template design add-in for Microsoft Word 138 Your documents. Automated. Master your data flows. Boost your output streams. chr Returns the nth character of c. chr(c, n) chr('XperiDo', 2) = 'p' chr('XperiDo', 150) = '' 14.3.2 Trim trim Removes all leading and trailing whitespaces from c. trim(c) trim(' some text ') = 'some text' rtrim Removes all trailing whitespaces from c. rtrim(c) rtrim(' some text ') = ' some text' ltrim Removes all leading whitespaces from c. ltrim(c) ltrim(' some text ') = 'some text ' 14.3.3 Case toLower Returns c with all characters in lowercase. toLower(c) toLower('XperiDo') = 'xperido' Please note that the function lowercase has the same effect. toUpper Returns c with all characters in uppercase. toUpper(c) toUpper('XperiDo') = 'XPERIDO' Please note that the function uppercase has the same effect. 14.3.4 Check contains User manual XperiDo template design add-in for Microsoft Word 139 Your documents. Automated. Master your data flows. Boost your output streams. Returns 1 if c contains s, 0 if it doesn't. Case is ignored. contains(c, s) contains('XperiDo', 'Xp') = 1 contains('XperiDo', 'xP') = 1 contains('XperiDo', 'Xu') = 0 contains('XperiDo', 'u') = 0 containsc Returns 1 if c contains s, 0 if it doesn't. Case-sensitive. containsc(c, s) containsc('XperiDo', 'Xp') = 1 containsc('XperiDo', 'xP') = 0 containsc('XperiDo', 'Xu') = 0 containsc('XperiDo', 'u') = 0 startsWith Returns 1 if c starts with s, 0 if it doesn't. Case is ignored. startsWith(c, s) startsWith('XperiDo', 'xp') = 1 startsWith('XperiDo', 'X') = 1 startsWith('XperiDo', 'do') = 0 startsWith('XperiDo', 'Do') = 0 startsWithC Returns 1 if c starts with s, 0 if it doesn't. Case-sensitive. startsWithC(c, s) startsWithC('XperiDo', 'xp') = 0 startsWithC('XperiDo', 'X') = 1 startsWithC('XperiDo', 'do') = 0 startsWithC('XperiDo', 'Do') = 0 endsWith Returns 1 if c ends with s, 0 if it doesn't. Case is ignored. endsWith(c, s) endsWith('XperiDo', 'xp') = 0 endsWith('XperiDo', 'X') = 0 endsWith('XperiDo', 'do') = 1 endsWith('XperiDo', 'Do') = 1 endsWithC Returns 1 if c ends with s, 0 if it doesn't. Case-sensitive. endsWithC(c, s) User manual XperiDo template design add-in for Microsoft Word 140 Your documents. Automated. Master your data flows. Boost your output streams. endsWithC('XperiDo', 'xp') = 0 endsWithC('XperiDo', 'X') = 0 endsWithC('XperiDo', 'do') = 0 endsWithC('XperiDo', 'Do') = 1 14.3.5 Replace replaceText Returns a string where each occurence of d in c has been replaced with e. Case is ignored. replaceText(c, d, e) replaceText('The quick brown fox jumps over the lazy dog', 'brown', 'orange') = 'The quick orange fox jumps over the lazy dog' replaceText('The quick brown fox jumps over the lazy dog', 'BROWN', 'ORANGE') = 'The quick ORANGE fox jumps over the lazy dog' replaceText('The quick BROWN fox jumps over the lazy dog', 'brown', 'orange') = 'The quick orange fox jumps over the lazy dog' replaceText('The quick brown fox jumps over the lazy dog', 'brown', '') = 'The quick fox jumps over the lazy dog' replaceTextC Returns a string where each occurence of d in c has been replaced with e. Case-sensitive. replaceTextC(c, d, e) replaceTextC('The quick brown fox jumps over the lazy dog', 'brown', 'orange') = 'The quick orange fox jumps over the lazy dog' replaceTextC('The quick brown fox jumps over the lazy dog', 'BROWN', 'ORANGE') = 'The quick brown fox jumps over the lazy dog' replaceTextC('The quick BROWN fox jumps over the lazy dog', 'brown', 'orange') = 'The quick BROWN fox jumps over the lazy dog' replaceTextC('The quick brown fox jumps over the lazy dog', 'brown', '') = 'The quick fox jumps over the lazy dog' replaceExtended Returns a string where each occurence of d in c has been replaced with e. d and e are considerd to be texts with extended characters. Case is ignored. replaceExtended(c, d, e) replaceExtended('"Ā"', '\u0100', 'Latin capital letter A with macron') = '"Latin capital letter A with macron"' replaceExtendedC Returns a string where each occurence of d in c has been replaced with e. d and e are considerd to be texts with extended characters. Case-sensitive. replaceExtendedC(c, d, e) replaceExtendedC('"Ā"', '\u0100', 'Latin capital letter A with macron') = '"Latin capital letter A with macron"' User manual XperiDo template design add-in for Microsoft Word 141 Your documents. Automated. Master your data flows. Boost your output streams. replaceRegEx Returns a string where each occurence of d in c has been replaced with e. d and e are considered to be regular expressions. replaceRegEx(c, d, e) replaceRegEx('The quick brown fox jumps over the lazy dog', '(dog|fox)', '\[animal\]$1\[animal\]') = 'The quick brown [animal]fox[animal] jumps over the lazy [animal]dog[animal]' 14.3.6 Split split Splits a field into separate parts, which can be stored as an array in a pseudo-field. These can then be accessed by mapping the pseudo-field. split(text, separator, isRegex, removeEmpty, trimParts) text - the text to be split into pieces (text) separator - the value to split on (text) isRegex - whether separator is a regular expression or not (1 = true, 0 = false) removeEmpty - whether to remove empty pieces from the result (1 = true, 0 = false) trimParts - whether to trim the pieces (1 = true, 0 = false) Example: split on lines split(${./Content}, '\\\\r?\\\\n', 1, 1, 1) Splits the value of element <Content> into pieces separated by the regular expression \r?\n. empty parts are removed and the separate parts are trimmed. The reason that you need to place all the backslashes here is that the regular expression is translated two times before it is fed to the regular expression matcher. The expression is translated to a java-string before it is evaluated; \\\\r -> \\r -> \r. Example: split on , or ; split(${./Content}, '[,]|[;]', 1, 0, 0) Splits the value of element <Content> into pieces separated by the regular expression [,]|[;].This means either a comma or a semi-colon. Empty parts are kept and the separate parts are not trimmed. Example: split on space split(${./Content}, ' ', 0, 0, 0) Splits the value of element <Content> into pieces separated by one space. empty parts are kept and the separate parts are not trimmed. splitLines Splits a field into separate parts, splitting on newlines. splitLines(text) This function is equivalent to split(text, '\\\\r?\\\\n', 1, 1, 1) and will split text into pieces separated by a newline. splitWords User manual XperiDo template design add-in for Microsoft Word 142 Your documents. Automated. Master your data flows. Boost your output streams. Splits a field into separate parts, splitting on whitespaces. splitWords(text) This function is equivalent to split(text, '\\\\s+', 1, 1, 1) and will split text into pieces separated by whitespaces. 14.4 Logical functions 14.4.1 Logic if Returns d if c equates to true, e if s equates to false. if(c, d, e) if(1, yes, no) = yes if(0, yes, no) = no if(2, yes, no) = yes if(-1, yes, no) = yes and Returns the logical AND of c and d. and(c, d) and(1, 1) = 1 and(1, 0) = 0 and(0, 1) = 0 and(0, 0) = 0 or Returns the logical OR of c and d. or(c, d) or(1, 1) = 1 or(1, 0) = 1 or(0, 1) = 1 or(0, 0) = 0 not Returns 1 if c is 0, 0 otherwise. not(c) not(0) = 1 not(1) = 0 not(2) = 0 not(-1) = 0 14.4.2 Comparision eq User manual XperiDo template design add-in for Microsoft Word 143 Your documents. Automated. Master your data flows. Boost your output streams. Returns 1 if c is equal to d, 0 otherwise. When used with text, the values are trimmed (trailing and leading whitespaces are removed), and case is ignored. eq(c, d) eq(2, 2) = 1 eq(2, 5) = 0 eq(2.0, 2) = 0 eq(' AbC ','abc') = 1 neq Returns 1 if c is not equal to d, 0 otherwise. When used with text, the values are trimmed (trailing and leading whitespaces are removed), and case is ignored. neq(c, d) eq(2, 2) = 0 eq(2, 5) = 1 eq(2.0, 2) = 1 eq(' AbC ','abc') = 0 Extensions of eq and neq The eq and neq functions can be extended for use with text: eqc - the same as eq, but case-sensitive. eqt - the same as eq, but the values aren't trimmed. eqct - the same as eq, but case-sensitive and the values aren't trimmed. neqc - the same as neq, but case-sensitive. neqt - the same as neq, but the values aren't trimmed. neqct - the same as neq, but case-sensitive and the values aren't trimmed. gt Returns 1 if c is bigger than d, 0 otherwise. gt(c, d) gt(2, 1) = 1 gt(2, 5) = 0 gt(2, 2) = 0 geq Returns 1 if c is bigger than or equal to d, 0 otherwise. geq(c, d) geq(2, 1) = 1 geq(2, 5) = 0 geq(2, 2) = 1 lt User manual XperiDo template design add-in for Microsoft Word 144 Your documents. Automated. Master your data flows. Boost your output streams. Returns 1 if c is lower than d, 0 otherwise. lt(c, d) lt(2, 1) = 0 lt(2, 5) = 1 lt(2, 2) = 0 leq Returns 1 if c is lower than or equal to d, 0 otherwise. leq(c, d) leq(2, 1) = 0 leq(2, 5) = 1 leq(2, 2) = 1 User manual XperiDo template design add-in for Microsoft Word 145