1
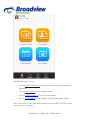
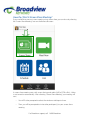
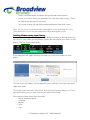
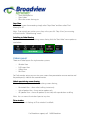
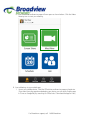
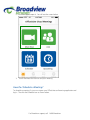
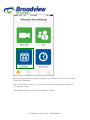
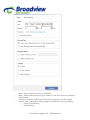
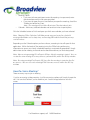
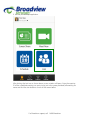
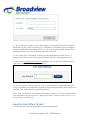
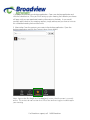
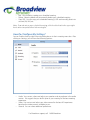
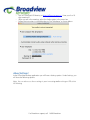
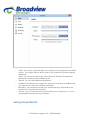
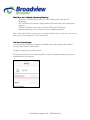
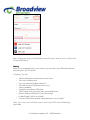
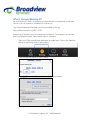
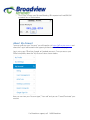
OfficeSuite HD Meeting – User Manual
Welcome to Broadview Networks OfficeSuite HD Meeting. Our
service unifies cloud video conferencing, simple online meeting
and mobile collaboration into one easy-to-use platform. Our
solution offers the best video and web screen-sharing quality
across Windows, Mac, iOS, Android and H.323/SIP room systems.
How Do I Begin?
You should have received an email that will confirm who you are by asking you to “Click
here to activate your account”. You’ll be asked to enter your account password, and type
that new password a second time to confirm you typed it correctly. Click the Go button.
Confirm your Name, Phone Number and Company information, and click the option
boxes that you wish to activate followed by the Save Changes button.
Note: Save this link to your favorites. This is the link you can
use to update your profile at any time you wish.
After confirming your account information, you can start a meeting. By starting a meeting,
you will automatically download the OfficeSuite HD Meeting application onto your
computer.
Depending on your browser, you may have to open the downloadable file on the bottom
left of your web browser. Follow the on-screen prompts to complete the download if it
doesn’t download automatically.
End the Meeting.
Home Options?
When the meeting ends, you will see a new icon on your desktop. Double-click the icon
to open the main dialog box as shown below. The default tab is “Home”.
For Broadview support, call: 1-800-Broadview
This dialog box allows you to:
-
Click on Screen Share Meeting to start a meeting sharing your “desktop” or
“application”
-
Click on Video Meeting to start a video meeting
-
Click on Schedule Meeting to set up a future meeting
-
Click on Join a Meeting to join a meeting that has already been started
Note: Click on the account drop-down arrow to view your profile, check for updates,
switch accounts, and log-out.
For Broadview support, call: 1-800-Broadview
How Do I Start A Screen Share Meeting?
If you would like to start an instant meeting using screen share, you can do so by selecting
the “Screen Share Meeting” icon on the Home tab screen.
A screen share meeting starts with screen sharing and audio (VoIP or PSTN call-in). Video
is not turned on automatically. After selecting “Screen Share Meeting” your meeting will
start.
-
You will first be prompted to select the window or desktop to share.
-
Then, you will be prompted to invite other participant(s) to your screen share
meeting.
For Broadview support, call: 1-800-Broadview
-
Video is not automatically turned on during the screen share meeting.
-
During your screen sharing, any participant can start their screen sharing. There is
no need to pass presenter functionality.
-
Your screen sharing will stop when another participant shares their screen.
Note: You can prevent a participant from showing their screen by locking the screen
share to only your screen and preventing others from showing their screen.
Switching
Switching Windows during Screen Sharing
During screen sharing, you can switch between different windows or desktop by moving
the cursor on your screen over the Meeting Options Bar at the top of your screen (as seen
below). Click the “Share” menu option.
A new dialog box will appear showing the screens you current have open (as show
below).
Click the “Show all windows” link to expend the screen selection if you have more than 3
applications open.
Click on the screen you now want to share. By sharing your Desktop (either 1 or 2 if you
have split screens) you can show anything you open on that screen.
Other options during screen sharing includes:
- Mouse/ keyboard control
- Annotate
- Record
- Mute
- Chat
For Broadview support, call: 1-800-Broadview
-
Show participant list
Open video
Pause the screen sharing, etc
Stop Share
To end your screen share meeting simply select “Stop Share” and then select “End
Meeting for All”.
Note: If you started your video screen share, when you click “Stop Share” your meeting
will return to the “Video Meeting” mode.
Switching to Video Meeting
If you would like to add video during screen sharing click the “Start Video” menu option as
seen below.
Video Layouts
There are 4 video layouts for single-monitor systems.
-
Window View
Full Screen View
Gallery View
Mini View
For Dual-monitor setup, you can view your screen share presentation on one monitor and
the participant(s) video on the second monitor.
Video Layout during screen sharing
There are 3 layouts if you enabled video during screen-sharing;
-
Minimized View – shows who’s talking via text only
Active Speaker View – shows active speaker only
All Speaker View – shows all speakers (4 at a time) with up and down scrolling
Note: You can move the window layout at any time.
Fit to window
There is an option in Settings to “fit to window” as default.
For Broadview support, call: 1-800-Broadview
Fit to window can reduce the quality for the video on the screen. Original size will
maintain the original quality.
You can also make this change when “Viewing” a shared screen/presentation.
How Do I Host A Video Meeting?
There are several ways to Host a Video Meeting. Listed below are 3 different ways to start
that process.
I. Start a meeting via the web-portal
1. To host a video meeting, you can go to http://officesuite.zoom.us and click the
Host a Meeting button.
2. You will be taken to the login page where you can enter the Email and password
that you have created for your account, or use your Google (Gmail or Google App)
or Facebook account.
3. Then click on the Start Meeting button
4. Your meeting will now open
II. Start a meeting via your desktop app
1. On your desktop, click the OfficeSuite conferencing icon.
2. In the dialog box, click the Host a Meeting button.
For Broadview support, call: 1-800-Broadview
3. Login to the app with your Email and password that you have created for your
account, or use your Google (Gmail or Google App) or Facebook account as
shown below.
For Broadview support, call: 1-800-Broadview
4. The OfficeSuite conferencing app will now open as shown below. Click the Video
Meeting icon to start your meeting.
III. Start a Meeting via your mobile app
1. Access your mobile device. Find the OfficeSuite conferencing app on the device.
(If you don’t have the app downloaded to your device, you can easily find the app
in iTunes or GooglePlay by searching for OfficeSuite. Download the app for Free.)
For Broadview support, call: 1-800-Broadview
2. Touch the app to open it. You will see the screen below.
3.
Touch the Meet Now icon to start your meeting.
How Do I Schedule a Meeting?
To schedule a meeting, first you must open your OfficeSuite conferencing application and
log in. The click the Schedule icon as shown below.
For Broadview support, call: 1-800-Broadview
When you have opened the meeting scheduler, you can then start to set-up your future
OfficeSuite HD Meetings.
Note: All scheduled meetings can be started by the host at anytime, regardless of the
date and time settings.
The Schedule a Meeting screen (as shown below) will open.
For Broadview support, call: 1-800-Broadview
-
Topic: Choose a topic/name for your meeting.
When: Select a date and time for your meeting. If you want a recurring meeting,
check the box.
TimeZone: By default, OfficeSuite will use your computers time zone setting.
Meeting Type: Select which meeting type you would like to start the meeting
o Screen Share Meeting
o Video Meeting
For Broadview support, call: 1-800-Broadview
-
Meeting Option
o If you want to have participants enter the meeting via a password, enter
the desired password in the space provided.
o If you want an open forum to start before you open the meeting, check the
“Enable join before host” box.
-
Calendar: Add to any selected calendar and send out invites to participants.
Note: The meeting will end after 40-minutes if the host doesn’t join.
Click the Schedule button to finish and open up which ever calendar you have selected.
Note: Choosing “Other Calendars” will allow you to copy and paste the scheduled
meeting information such as date, time, and meeting URL into the Email that you may
send to invitees.
Depending on the Calendar option you have chosen, a meeting invite will open for that
application. Within the body of the meeting invite, the OfficeSuite conferencing
information to access your newly scheduled meeting is automatically populated. Simply
add invitees to the meeting invite and send at the date and time you have designated.
Note: Non-recurring meeting ID’s will expire 30 days after the meeting is started. You can
re-start the same meeting ID as many times as you would like, within the 30 day window.
Note: Recurring meeting ID will expire 365 days after the meeting is started on the first
occurrence. You can re-use the meeting ID for future occurrences within the 365 day
window.
How Do I Join a Meeting?
There are many ways to join a meeting.
I. Join by answering a video meeting. Just like answering a phone call, simply Accept the
call. You can also Decline if you’re unable to join. See the image below to view this
screen.
For Broadview support, call: 1-800-Broadview
II. Join via your desktop application.
After clicking the Join icon as shown above, a new window will open. Enter the meeting
ID of the scheduled meeting you are trying to join in the space provided, followed by you
name and click the Join button as show on the screen below.
For Broadview support, call: 1-800-Broadview
III. Join via URL link in meeting invite. Each meeting invite comes with a link that allows
participants to join simply by clicking on it. Participants will be taken right into meeting
without a need to enter the meeting ID first. Users may be asked for their name if that’s
required by the host as a way to identify everyone on the call.
IV. Join via IM Chat. The meeting invite link can also be applied to a chat session. A
participant can click on the link to open the meeting from the Chat application too.
V. Join via the http://officesuite.zoom.us webpage. Click on the Join a Meeting button.
Enter your video call ID to join as shown below.
VI. Join using Dial-in from your phone. You can join a meeting via teleconferencing by
using your landline or mobile device by dialing the number provided in the invitation you
received. You will be asked to enter the meeting ID.
Note: If you are already in the meeting via a computer for the screen share/video portion,
you will also be asked to enter your 2-digit participant ID number so that your access to
the meeting is synchronized.
How Do I Invite Others To Join?
The are many ways to invite participants onto your hosted calls.
For Broadview support, call: 1-800-Broadview
I. Schedule an invite via your desktop application. Open your desktop application and
click the Schedule icon. After you finish setting up your meeting, the calendar you choose
will open with your pre-populated meeting information in the body. As you would
normally add invitees to your meeting requests, simply add anyone you want to invite to
this scheduled meeting and send the invite.
II. Select others from the contacts you create in the desktop application. Open the
desktop application and click the Contacts tab as shown below.
Note: A green dot (for Google and Facebook only) means that the person is currently
online. The invitees do not need to have OfficeSuite conferencing pre-installed to join
your meeting.
For Broadview support, call: 1-800-Broadview
III. Invite contacts while in an OfficeSuite HD Meeting by selecting the “invite” tab in your
in-meeting toolbar as shown below.
From here, you can:
- Invite using your “Default, Google, or Yahoo” Email Contacts.
- Invite using your “Favorites, Google, or Facebook” IM Contacts.
- You can “Copy URL” or ”Copy Invitation” and paste it anywhere for your contacts to
use to join the meeting.
See the screen below for these details.
Scheduled Meetings
Select the Meetings tab to view, start, edit, or delete your personal meeting ID, scheduled
meetings, and recorded meetings.
-
Start: Select start to begin the pre-scheduled meeting that you have listed in your
upcoming meetings.
For Broadview support, call: 1-800-Broadview
-
Edit: You can edit or update your scheduled meeting.
Delete: Selecting delete will permanently delete your scheduled meeting.
Copy URL: You can copy your scheduled meeting(s) URL and manually paste into
an email, IM, SMS, etc.
Note: If you do not see your scheduled meeting, click the refresh tab in the upper righthand corner to update/refresh the meeting list.
How Do I Configure My Settings?
You can find the Settings tab in the main dialog box or in the in-meeting menu bar. After
clicking on Settings, you will have the following options:
-
Audio: You can test, select and adjust your speakers and microphone in the audio
section. We suggest that you do this prior to your meeting for the best meeting
experience.
Video: You can test and select your video camera for the best HD experience
based on the video camera’s available to you.
General: You can select additional preferences.
For Broadview support, call: 1-800-Broadview
-
Feedback: We welcome any suggestions, questions, comments, or feedback that
you may have on making this product even better.
Recording: You can browse or open your stored recordings (all recordings are
stored on your local device/computer).
Account: You can see what version of the software you currently have. You can
also upgrade or mange your account details.
What Can I Do In a Meeting?
When you have started or joined a meeting, you can perform the following actions from
the menu bar located at the bottom of the meeting window (move your mouse to
toggle):
-
Invite more people to join by Email, IN, SMS (mobile users) or via meeting ID (link)
Screen share your desktop or specific application window
Start a group or private chat
Record your meeting
Manage participants
Mute and Un-mute your audio
Select audio connect to dial-in via phone and disconnect computer audio
Stop and start your video
Configure your Settings
Leave or end the meeting
Screen Sharing and
and Annotations
To start the screen sharing click the “Share Screen” button located in your in-meeting
toolbar.
After selecting “Share Screen”, you can choose to share your desktop or an individual
application/window open on your computer.
Note: You can select to share computer audio when sharing a video clip such as a
YouTube or locally stored video clip.
Note: If using dual monitor set-up, you can show the screen sharing on one monitor and
the participants on the second monitor.
During your screen share you will have the option of using several features. By selecting
the Annotate button (shown below) on the top menu bar you can perform the following
tasks.
For Broadview support, call: 1-800-Broadview
-
Select Mouse (set as default)
Select Spotlight to show something on the screen with special attention
Select Highlight to highlight anything on the screen with the color indicated
Select Pen to write on the screen with the color indicated
Select arrow to click and drop arrows on the screen where you want to call
attention
Select Erase All to erase all annotations made to that point
Select Color to change the color of the writing and arrow annotation items
Audio, Video and More
- The Audio option allows you to connection via phone, and disconnect the
computer audio
- The Video option turns video on, or off depending on how you started the
meeting (Screen Share mode or Video mode).
- The More option gives you added features including:
o Participants – given you a list of participants in the meeting at that time
o Chat – given you the ability to chat with someone in the meeting
o Start Recording – giving you the ability to record the meeting
o Invite – giving you the ability to invite more people
o Hide/Show Video Panel – allows you to either hide or show the video
panel depending on your preference, and if Video is on
o Settings – giving you access to your meeting settings
o End Meeting – allowing you to not only stop sharing, but will also give you
an option to close the meeting for all
How Do I Record a Meeting?
To record a meeting, you will need to either be the host or the host must grant you
permission to record.
While you are in an OfficeSuite HD Meeting, move you mouse around the screen to toggle
the menu bar. (Depending on the mode your in, the toolbar will be the top or bottom of
the screen.)
For Broadview support, call: 1-800-Broadview
1. Select the Record button in the “More” tab of the upper toolbar. The Record
button is located by itself on the lower screen toolbar.
2. Optional – Click on a participant to allow them to record.
3. All participants in the meeting will see a recording indicator in the upper-left
corner of the screen as shown below.
4. When the meeting ends, recording will automatically stop, or you can stop the
recording prior to the meeting ending.
What can I record?
You can record the active speaker, content sharing with active video panel and M4A
audio.
Where is my saved recording file?
To access your saved recorded meetings, open your desktop application. Then select
“Meetings”, and on the top part of window select the Recorded tab as shown below.
For Broadview support, call: 1-800-Broadview
All recorded meetings are stored locally on your device or computer.
Note: Your recorded meeting will be converted and added after you have ended the
meeting that you were currently recording.
What can I do with my saved recording?
Using you mouse, toggle over your saved recording to view your options.
-
Play video: Selecting “Play” from your desktop application will play the saved
meeting with your default media player.
Open: Selecting “Open” will allow you to view your saved file in your device or
computer’s folder.
Delete: After deleting your saved recorded meeting, it will still be saved to your
local device or computer.
What formats will me recordings be saved as?
After you have ended your meeting, your recorded file will be converted and saved to
your local device/computer. You will have four (4) different file types to choose from.
For Broadview support, call: 1-800-Broadview
-
M3U playlist: A playlist to play the individual MP4 files – Windows only
MP4 file: Video file or split video and screen sharing files – Windows and Mac
M4A file: A single audio only file
VLC player (MP4) file: A single file for video and screen sharing view via VLC Player
– Windows
MP4 file: A single file for video and screen sharing – Mac Only
Note: The VLC Player(MP4) file and single MP4 (Mac) file can also be opened by Quicktime
player. You can convert the file to .MOV and edit using iMovie.
Change the location of stored recordings
You can change the location of where your recorded meeting file is stored on your
computer.
Open the desktop application and click the Settings button. On the left menu, click the
Recording option. From here you can:
-
Change where your recorded file will be stored
Select an option to pop up a location selection each time a recorded meeting en
How Do I Join By Teleconferencing?
You can join an OfficeSuite HD Meeting via teleconferencing/audio conferencing using a
traditional dial-up phone. This is useful in occasions where:
-
You don’t have a microphone or speaker on your PC/Mac
You don’t have a smartphone (iOS or Android) while on the road
You could not connect to a network for video and VoIP/computer audio
Joining by Teleconferencing
I. Join by computer for video and phone for audio.
For Broadview support, call: 1-800-Broadview
-
Join an OfficeSuite HD Meeting at https://officesuite.zoom.us. Enter your 9 or 10
digit meeting ID
When you are in the meeting, select the Audio option in the menu bar
Follow the instructions in the dialog box to “Use Telephone” as shown below
About Settings!
In the OfficeSuite desktop application you will have a Settings option. Under Settings, you
will have the following options.
Note: You can also access these settings in your in-meeting toolbar during an OfficeSuite
HD Meeting.
For Broadview support, call: 1-800-Broadview
-
Audio: You can test, select and adjust your speakers and microphone in the audio
section. We suggest that you do this prior to your meeting for the best meeting
experience.
Video: You can test and select your video camera for the best HD experience
based on the video camera’s available to you.
General: You can select additional preferences.
Feedback: We welcome any suggestions, questions, comments, or feedback that
you may have on making this product even better.
Recording: You can browse or open your stored recordings (all recordings are
stored on your local device/computer).
Account: You can see what version of the software you currently have. You can
also upgrade or mange your account details.
Getting Started With IOS
For Broadview support, call: 1-800-Broadview
OfficeSuite works on your iPhone, iPad, and any other iOS device. You can download the
OfficeSuite app from the Apple App Store. Simply type OfficeSuite in the search option
and select the conferencing app.
When you have the OfficeSuite app installed, tap the OfficeSuite application icon on your
iOS device to open the meeting controls. In the meeting controls, you can enable
“Contacts”. Enabling contacts will allow you to invite family, friends and colleagues that
already exist in your contacts list.
Note: Adding contacts to your OfficeSuite HD Meeting app will allow you to invite others
quickly into an OfficeSuite HD Meeting and send one-on-one or group messages.
Click the Contacts button on the bottom of the screen. Then, enter your number in the
Phone number field as seen below.
For Broadview support, call: 1-800-Broadview
OfficeSuite will send you a message with your verification code that you can then enter to
verify your phone. Now you’re ready to start inviting your contacts. Select “Invite” to
choose which contacts you would like to add.
You can also select “Chat” and choose someone you would like to send IM messages to.
For Broadview support, call: 1-800-Broadview
M eet Now, Join, Schedule, Upcoming Meetings
- Meet Now: Will allow you to start an instant meeting and invite up-to 25
participants.
- Join: Will allow you to enter a 9-digit meeting ID and instantly join another hosts
meeting.
- Schedule: Will allow you to set-up a future OfficeSuite HD Meeting.
- Upcoming Meetings: View all of your future scheduled meetings.
Note: If you don’t link you account, your meeting(s) will be timed via our free trial account
offer, and each meeting will end after 40 minutes.
Link Your Account Login
You can Link your OfficeSuite, Google or Facebook account by selecting the “Settings”
icon and then choose “Link Account”.
To logout, simply select “unlink account”.
By linking your account, you will also be able to view any upcoming meetings you have
associated with your account.
For Broadview support, call: 1-800-Broadview
Note: Linking your account will also allow you to find more contacts and use features like
“Personal Meeting ID”.
Settings
When you’ve completed linking your account, you can access more OfficeSuite features
and settings for your iOS device.
In “Settings” you can:
-
Add a profile picture and choose a screen name.
View your Linked account
View your personal 10-digit meeting ID
See what version of OfficeSuite you’re using
Send us feedback
Spread the word about OfficeSuite
“Add” already existing contacts from your mobile device
Receive “pop-up notifications” from IM messages
Enable/Disable “Safe Driving Mode”
Connect OfficeSuite to another computer/device using “Airplay!”
Note: Your screen name will show as your name in your OfficeSuite HD Meetings
application.
For Broadview support, call: 1-800-Broadview
What Is Personal Meeting ID?
Personal Meeting ID (PMI) is assigned to you automatically as a permanent virtual room.
You can start it at anytime or schedule it for a future use.
Your Personal Meeting ID becomes your Personal Meeting URL, eg:
https://officesuite.zoom.us/j/5551112222
If you are on a Paid plan, you can customize the 10 digit ID. For example, you can make
the ID your phone number. Follow these steps to customize.
-
Open your OfficeSuite desktop application or mobile app. Click on the “Meetings”
button on the Home page as shown below.
-
Then click the edit button as shown below.
-
Then click “Change your Personal Meeting ID” as shown below.
For Broadview support, call: 1-800-Broadview
-
Click “Copy” to copy your Personal Meeting URL to paste into Email/SMS/IM
invitation, etc. as shown below.
About: My Account
To access and view your “Account” you will need to visit https://officesuite.zoom.us and
select the “Login” tab located in the upper-right hand corner of the web-page.
Log in using your OfficeSuite, Google, or Facebook account. Once you access your
OfficeSuite profile, select the “My Account” tab as shown below.
Here you can view your “Account type”, “Your role” and you can “Cancel/Terminate” your
account.
For Broadview support, call: 1-800-Broadview
How Do I Connect OfficeSuite HD Meeting To My Room
Conferencing System
Many companies have a Video conferencing system in their physical conferencing space
to connect with other corporate locations. Broadview’s OfficeSuite HD Meeting software
allows for the use of these room systems to connect to a regular meeting.
-
To start, turn on the TV or screen used for the video presentation in the conference
room.
Activate the room system camera.
Use the controls to make a call.
In the prompt, enter the OfficeSuite IP Address (you may need to use a remote for
this step. You can enter the number like you would on a TV, but to get the period,
you may need to hold the number 1 until you see the period display. Then let go
of the 1 key and you can enter the next number).
Note: The IP Address will be in the following design; number, dot, number, dot,
number, dot, number (example: 4.34.125.151).
-
Click Call.
When the system connects, you will be prompted to enter the Meeting ID. This
will be the number that is at the end of the OfficeSuite URL that is sent to you
(example: https://officesuite.zoom.us/j/424782207).
You will now be connected to the meeting.
For Broadview support, call: 1-800-Broadview
For Broadview support, call: 1-800-Broadview