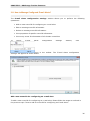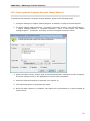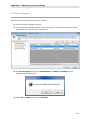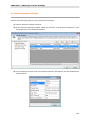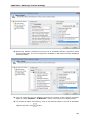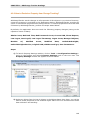
1
User Manual Active Directory Change Tracker Last Updated: January 2015 Copyright © 2015 Vyapin Software Systems Private Ltd. All rights reserved. This document is being furnished by Vyapin Software Systems Private Ltd for information purposes only to licensed users of the Active Directory Change Tracker software product and is furnished on an “AS IS” basis, that is, without any warranties, whatsoever, express or implied. Active Directory Change Tracker is a trademark of Vyapin Software Systems Private Ltd. Information in this document is subject to change without notice and does not represent any commitment on the part of Vyapin Software Systems Private Ltd. The software described in this document is furnished under a license agreement. The software may be used only in accordance with the terms of that license agreement. It is against the law to copy or use the software except as specifically allowed in that license. No part of this document may be reproduced or retransmitted in any form or by any means, whether electronically or mechanically, including, but not limited to the way of: photocopying, recording, or information recording and retrieval systems, without the express written permission of Vyapin Software Systems Private Ltd. Vyapin Software Systems Private Limited Website: http://www.vyapin.com/ Sales Contact: [email protected] Technical Support: [email protected] Table of Contents Active Directory Change Tracker .............................................................................. i 1 General ............................................................................................................. 1 1.1 About Vyapin Active Directory Change Tracker (ADChangeTracker) .................. 2 1.2 System Requirements ................................................................................. 3 1.3 Who can Use ADChangeTracker? .................................................................. 4 1.4 How to Activate the Software? ..................................................................... 5 2 Getting Started .................................................................................................. 7 2.1 Configure ADChangeTracker ........................................................................ 8 2.2 Configure Active Directory Auditing ............................................................ 11 2.3 Change Application Data folder location ...................................................... 13 2.4 How to Get the Change Made by Value Successfully? .................................... 15 3 ADChangeTracker Features ................................................................................ 17 3.1 How to Track Changes? ............................................................................. 18 Change Reports ............................................................................................. 21 3.2 How to Generate ADChange Reports? ......................................................... 21 3.3 How to Generate GPO Change Reports? ...................................................... 22 3.4 Understanding the Change Reports ............................................................. 23 Search Reports .............................................................................................. 25 3.5 How to Search Change History? ................................................................. 25 3.6 How to Search Events? ............................................................................. 27 History Manager ............................................................................................ 29 3.7 How to cleanup Change History? ................................................................ 29 3.8 How to Cleanup Events History? ................................................................. 30 Alerts ........................................................................................................... 31 3.9 About Alerts ............................................................................................ 31 3.10 How to Add an Event ID for Configuring an E-mail Alert? ................................ 32 3.11 How to Manage Configured E-mail Alerts? .................................................... 36 Service Controller ............................................................................................. 39 3.12 About Service Controller .......................................................................... 39 3.13 How to View the Subscription Status of Domain Controllers? ........................ 39 3.14 How to Manage 'ADCT Listener Service'? ................................................... 40 Events Reports ................................................................................................. 42 3.15 About Events Reports .............................................................................. 42 3.16 Configure Events Reports ........................................................................ 43 3.17 How to generate User Logon/Logoff Reports? ............................................. 45 3.18 How to generate Password Change Reports? .............................................. 47 3.19 How to generate Terminal Services Activity Reports? .................................. 49 3.20 Object Change Reports ............................................................................ 51 3.21 Permissions Change Reports .................................................................... 66 4 ADChange Tracker Settings ......................................................................................................................... 92 4.1 Configure Domain Settings ........................................................................ 93 4.2 Configure Change Tracking Settings ......................................................... 103 4.3 Configure SQL Server ............................................................................. 109 4.4 User Profiles .......................................................................................... 111 5 References..................................................................................................... 114 5.1 How to Uninstall ADChange Tracker? ........................................................ 115 5.2 Technical Support................................................................................... 118 6 Index ............................................................................................................ 119 iii 1 General About ADChangeTracker System Requirements Who can use ADChangeTracker? How to purchase? How to activate the software? 1 1.1 About Vyapin Active Directory Change Tracker (ADChangeTracker) Vyapin Active Directory Change Tracker (ADChangeTracker) audits, tracks and analyzes all changes made to your Active Directory configuration. The tool audits all changes made to your Active Directory by periodically collecting only the changed data, reporting what exactly changed, along with the new and old values, when the change was made, where the change happened in your Active Directory and the tool also determines who made the change by looking up the Security Event logs of your auditenabled Active Directory.. Active Directory Change tracker records and maintains the entire history all tracked changes along with the relevant Event log data in a SQL server database for future reference and analysis. A powerful search tool helps you analyze all past changes on any predefined search criteria. Changes can be selectively tracked (such as only OUs) and a powerful email notification mechanism lets you configure different types of changes (such as Created, Deleted, and Modified) and get them notified to different end users based on the OUs/containers where the changes happened. 2 1.2 System Requirements For the computer running ADChangeTracker Processor Intel Pentium Processor Disk Space & Memory 512 MB RAM and minimum of 20 MB of free disk space Operating System Windows 8.1 / Windows 8 / Windows 7 / Windows Vista / Windows XP / Windows Server 2003 / Windows Server 2008 / Windows Server 2008 R2 / Windows Server 2012 / Windows Server 2012 R2 with .NET Framework 4.0 or higher with the latest service packs. Database Microsoft SQL Server 2012 (Enterprise / Standard / Developer / Express edition) or Microsoft SQL Server 2008 (Enterprise / Standard / Developer / Express edition) or Microsoft SQL Server 2005 (Enterprise / Standard / Developer / Express edition) running in local / remote computer with latest Service Pack. Software MDAC v2.5/2.6/2.8 For the computers reported by ADChangeTracker Windows Server 2012 R2 / Windows Server 2012 / Windows Server 2008 R2 / Windows Server 2008 / Windows Server 2003 (SP2) running Active Directory. 3 1.3 Who can Use ADChangeTracker? Organizations running Microsoft Active Directory can greatly benefit from ADChangeTracker. It is a powerful Change auditing tool for Active Directory Administrators. System Administrators can monitor changes to Active Directory Servers across the enterprise network in any location. Users that would benefit from ADChangeTracker: Systems management personnel CIOs and CSOs Security and Systems Audit personnel System Administrators Organizations that would benefit from ADChangeTracker: Companies having enterprise network based on Active Directory Any company having Windows 2012 R2 / 2012 / 2008 R2 / 2008 / 2003 Active Directory servers 4 1.4 How to Activate the Software? Once you purchase the software online or through any one of our resellers, you will receive a sale notification through e-mail from our sales department. We will send you an e-mail with the necessary instructions to activate the software. In case you do not receive an e-mail from our sales team after you purchase the software, please send the following information to our sales department at [email protected] with the sales order number: Company Name: End-user Company Name Location: City & Country for the Company Name given above Please allow 12 to 24 hours from the time of purchase for our sales department to process your orders. Image 1 - Activate screen Perform the following steps to activate the software: 1) Download evaluation/trial copy of software from the respective product page available in our website at http://www.vyapin.com/ 2) Install the software on the desired computer. 3) You will receive a license key through e-mail as soon as the purchase process is complete. 4) Click 'Activate' in Help -> About -> Activate menu to see the Activate dialog (as shown in Image 1). 5) Copy the license key sent to you through email and pastes it in the 'License Key' textbox. For help on how to copy the license key, click 'Click here to see how to copy and paste the license key' link in the Activate dialog (as shown in Image 2). 5 CHAPTER 1 –Active Directory Change Tracker Image 2 - How to copy license key screen 2 Getting Started Configure ADChangeTracker Configure Active Directory Auditing Chang Application Data Folder location How to get the change made by value successfully? 7 2.1 Configure ADChangeTracker ADChangeTracker Startup wizard will help you configure the ADChangeTracker application to track changes in Active Directory domain. The following wizard will appear when you run the application for the very first time. Click Next to Proceed. 8 CHAPTER 2 – Getting Started You can add one or more domains in order to track changes by clicking on 'Add' button. Changes are tracked for each domain separately. You may add as many domains as you would like to track changes on. 9 CHAPTER 2 – Getting Started ADChangeTracker uses SQL Server database for its data storage to generate auditing reports. ADChangeTracker requires an SQL Server running SQL Server 2012 / 2008 / 2005 (Enterprise / Standard / Express editions) to connect and create a database. ADChangeTracker will connect to the specified SQL Server based on the authentication mode and user credentials to create manage its own application databases. A new database will be created in your SQL server by the name ADChangeTracker<COMPUTER>, where COMPUTER stands for the computer name that is running ADChangeTracker application. Thus, each installation of ADChangeTracker will deploy its own database based on the computer where ADChangeTracker is installed. For example, if you install the software on 3 different machines, 3 different databases will be created and each installed application will track changes separately independent of each other. Specify the SQL Server name, authentication mode, user name and password in the above screen. Click Finish to save configuration settings. 10 CHAPTER 2 – Getting Started 2.2 Configure Active Directory Auditing This section provides step-by-step procedures for enabling auditing of changes to objects in AD DS. This process consists of two primary steps: Step 1: Enable audit policy. Step 2: Set up auditing in object SACLs by using Active Directory Users and Computers console. Step 1: Enable audit policy. 1) Click Start, point to Administrative Tools, and then Group Policy Management. 2) In the console tree, double-click the name of the forest, double-click Domains, double-click the name of your domain, double-click Domain Controllers, rightclick Default Domain Controllers Policy, and then click Edit. 3) Under Computer Configuration, double-click Policies, double-click Windows Settings, double-click Security Settings, double-click Local Policies, and then click Audit Policy. 4) In the details pane, right-click Audit directory service access, and then click Properties. 5) Select the Define these policy settings check box. 6) Under Audit these attempts, select the Success, check box, and then click OK. Step 2: Set up auditing in object SACLs. The following procedure presents an example of just one of many different types of SACLs that you can set in AD. You can configure additional SACLs based on the operations that you want to audit. To set up auditing in object SACLs 1) Click Start, point to Administrative Tools, and then click Active Directory Users and Computers. 2) Right-click the organizational unit (OU) (or any object) for which you want to enable auditing, and then click Properties. 3) Click the Security tab, click Advanced, and then click the Auditing tab. 4) Click Add, and under Enter the object name to select, type Authenticated Users (or any other security principal), and then click OK. 5) In Apply onto, click This object and all descendant objects. 11 CHAPTER 2 – Getting Started 6) Under Access, select the Successful check box for Write all properties. If you want to audit creation and deletion of objects, select the Successful check box for Delete, Delete subtree and Create all child objects too. 7) Click OK until you exit the property sheet for the OU or other object. 12 CHAPTER 2 – Getting Started 2.3 Change Application Data folder location ADChangeTracker enables you to change Application Data folder location, where its application settings and error log are stored, at any time after installing ADChangeTracker software. To change the Application Data folder location, perform the following steps given below: 1) Select About ADChangeTracker from Help menu 2) The About ADChangeTracker dialog appears as shown below: 3) Click Change... button to change ADChangeTracker application. Application Data folder location of 13 CHAPTER 2 – Getting Started The Browse for Folder location dialog will appear as shown below: 4) Select a desired folder location and Click OK. The folder location can be local drives or mapped network drives. 5) ADChangeTracker provides an option to copy or move the existing ADChangeTracker application settings and error log to the new location once you change the Application Data Folder. Once you specify the new Application Data folder location, ADChangeTracker will prompt you to copy or move existing ADChangeTracker application settings to the new location as shown below: 6) Click the desired action (Copy / Move / Close) to proceed. ADChangeTracker will use the new Application Data folder location henceforth. 14 CHAPTER 2 – Getting Started 2.4 How to Get the Change Made by Value Successfully? ADChangeTracker reports the 'Change made by' value for all AD objects' changes in the Active Directory. The ‘Change made by’ is retrieved from the event log of the domain controller in which the change is made. This feature is applicable for Windows Server 2008 or later operating systems only. The ‘Change made by’ field in the report may sometimes not get reflected immediately after a change is observed in AD (will be empty/blank in the report window). This may be due to a delay/failure in receiving the Event subscription notification by the ADCT Service application. Click Refresh button in the report window to refresh the ‘Change made by’ field. If the ‘Change made by’ value continues to remain unavailable, please ensure the following points in order to retrieve Change made by value successfully: a) Select the ‘Use Security event log in DC to retrieve additional Change data (Who & When)’ checkbox in the Add domain or Edit domain dialog. b) Enable the Audit directory service access Policy and set to success in Default Domain Controllers Policy as shown below: c) Select Write all properties, Delete, Delete subtree and Create all child objects properties for the OU or domain in which you wish to track changes as shown below: 15 CHAPTER 2 – Getting Started d) Ensure that there is no Event flooding which may sometimes prevent the ADCT Service application from receiving the subscribed events. For example, ensure that “Read All Properties” is not selected in object’s Auditing. Selecting this setting will create a flurry of events in DC and will cause Event flooding. e) Disable firewall protection to read event logs: Ensure that the target Domain Controller is not protected by Windows firewall to read event logs by remote clients. f) Ensure that the 'ADCT Listener Service' is running in the computer where AD Change Tracker application is installed (can be verified in How to view the subscription status of domain controllers?). 16 3 ADChangeTracker Features Track Changes Change Reports Search Reports History Manager Alerts Service Controller Events Reports 17 3.1 How to Track Changes? The Track Changes feature allows you to track the list of all the changes made in Active Directory. You can check for various changes in Active Directory like addition or deletion of objects, modification of properties. Select button in the toolbar. The Track Changes window will be launched. Select Track now option to track changes made to Active Directory domain immediately upon clicking the Finish button or select Track at scheduled intervals option to track changes made to Active Directory domain at scheduled intervals. Changes will be tracked since the last time a tracking was performed. The tracking process will only collect the changed data and store it in the application's change history database. You will have to view the changes by clicking on the Change Reports button in the toolbar. Change the task schedule settings as required and set the password for the specified Run As user. 18 CHAPTER 3 –ADChange Tracker Features Click Next to proceed to the next step. 19 CHAPTER 3 –ADChange Tracker Features Select Export or E-mail options as necessary. Use Browse button to change the export path. The export path refers to the destination folder where the report output file generated should be stored. By default, for each task, a sub-folder with the task name will be created under the specified export path. All selected reports will be exported to a time-stamped folder in the format "yyyy-mm-dd hh.mm.ss", under the task name folder. If you want to export to the task name sub-folder in the specified folder (without time stamp folder) instead, clear "Export to timestamped sub-folder" option. NOTE: Clearing the "Export to time-stamped sub-folder" option will not create time-stamp folder and overwrite existing files, if any, in the specified export path. Click Message Settings button to specify optional e-mail settings as shown below. Click Finish to save the task details Once data collection is complete, you can view the changes made to your Active Directory domain with the help of Change Reports feature. 20 CHAPTER 3 –ADChange Tracker Features Change Reports 3.2 How to Generate ADChange Reports? The AD Change Reports feature allows you to report all the changes made to your Active Directory since the last time a tracking was done by the application. Tracking is a process where all changes made to your Active Directory are detected and synchronized with the application database. ADChangeTracker will maintain all the timestamps corresponding to the changes detected during tracking. Based on the timestamps listed in the left treeview of Change History report window, you can view the changes for a specific date and time. To launch 'AD Change Reports' window, click toolbar. The 'AD Change Reports' window will appear as shown below: menu in the Select and expand the root node in the left pane of the newly launched report window. You can also click Show All Changes, Only Added, Only Modified; Only Deleted tabs to view the list of all changes, added, edited and deleted changes. 21 CHAPTER 3 –ADChange Tracker Features 3.3 How to Generate GPO Change Reports? The GPO Change Reports feature allows you to report all the changes made to your Group Policy Objects (GPO) since the last time a tracking was done by the application. Tracking is a process where all changes made to your Group Policy Objects in Active Directory are detected and synchronized with the application database. ADChangeTracker will maintain all the timestamps corresponding to the changes detected during tracking. Based on the timestamps listed in the left treeview of Change History report window, you can view the changes for a specific date and time. To launch 'GPO Change Reports' window, click toolbar. The 'GPO Change Reports' window will appear as shown below: menu in the Select and expand the root node in the left pane of the newly launched report window. You can also click Show All Changes, Only Added, Only Modified; Only Deleted tabs to view the list of all GPO changes, added, edited and deleted changes. 22 CHAPTER 3 –ADChange Tracker Features 3.4 Understanding the Change Reports The Change Reports contains the following information: Field Names Object Name Description Active Directory object name of Added / modified / deleted objects. Object Path Fully Qualified Domain Name of AD objects. Object Class AD Object Type Change Type Property Name Old Value New Value Change made by Change made on Type of modification made on AD object. Example Administrator CN=Administrator, CN=Users, DC=Domain, DC=Com User/Group/Computer etc., Added / Modified / Deleted Attribute / Property name of AD object. E-mail, Description, Member Of Value defined for the property before change. E-mail: [email protected] Value defined for the property after change. E-mail: [email protected] The account, who made the change. The actual date and time of the change. PATHFINDER\Trainee1 1/29/2011 3:46 PM 23 CHAPTER 3 –ADChange Tracker Features 24 CHAPTER 3 –ADChange Tracker Features Search Reports 3.5 How to Search Change History? The Search Change History is a powerful feature that allows you to locate specific changes from the past such as ‘all newly created user accounts between a time periods’. You can specify a search criteria based on the different search options available. To launch 'Search Change History' window, click toolbar. The 'Search Change History' dialog will appear as shown below: menu in the Specify the Date range, Object type, Change type and a field based Filter criteria to find specific changes in the application’s Change History database. Select the desired Domains to perform your search on. Optionally, you can save this search by specifying a name for your search and clicking on the Save button. This will save the search for a future use. You can thus maintain a list of your saved searches for repeated use in the future. Click on Generate button to begin search. 25 CHAPTER 3 –ADChange Tracker Features If you want to use or edit an already saved search, select the name of saved search from the drop down list. This will load the saved search’s settings. You may also edit this and click on Save again to save the modified search. Once you load a saved search, you may click Generate to perform a search. After the data collection process is complete, the report would be generated in a report window as shown below: 26 CHAPTER 3 –ADChange Tracker Features 3.6 How to Search Events? The Search Events is a powerful feature that allows you to locate specific events that occurred over a time period and stored in the application's Events History database. To launch 'Search Events' window, click The 'Search Events' dialog will appear as shown below: menu in the toolbar. Specify the Date range and Event IDs to find in the application’s Events History database. You can also select multiple events for search. You can also perform the events search for the entire database by selecting the All dates in the application database option. Select the desired Domains to perform your search on. Optionally, you can save this search by specifying a name for your search and clicking on the Save button. This will save the search for a future use. You can thus maintain a list of your saved searches for repeated use in the future. Click Generate button to begin search. 27 CHAPTER 3 –ADChange Tracker Features If you want to use an already saved search, select the name of saved search from the drop down list. This will load the saved search’s settings. Once you load a saved search, you may click Generate to perform a search. After the data collection process is complete, the report would be generated in a report window as shown below: 28 CHAPTER 3 –ADChange Tracker Features History Manager 3.7 How to cleanup Change History? The Change History Manager allows you to cleanup any unwanted past changes and their related data from the Change History database. The Change History database contains all changes from the time you started using the application. Please be careful while you perform cleanups of changes as this will permanently delete the selected changes from your database. It is highly recommended that you maintain a full backup of the application’s database at regular intervals to recover any accidental loss of change data. To launch 'Change History Manager' window, click the toolbar. The 'Change History Manager' dialog will appear as shown below: menu in Click on desired history instances and click on Cleanup button to delete all changes for the selected timestamps. Select the parent node and click Cleanup in order to delete all of its child timestamp nodes. 29 CHAPTER 3 –ADChange Tracker Features 3.8 How to Cleanup Events History? The Events History Manager allows you to clean up any unwanted events and their related data from the Events History database. The Events History database contains all events from the time you configured the specified event ID in the application. Please be careful while you perform cleanups of events as this will permanently delete the selected events from your database. It is highly recommended that you maintain a full backup of the application’s database at regular intervals to recover any accidental loss of events data. To launch 'Events History Manager' window, click toolbar. The 'Events History Manager' dialog will appear as shown below: menu in the Specify the Date range and Event IDs to cleanup specific event ID in the application’s Events History database. Select the desired Domains to perform the cleanup. Optionally, you can cleanup the events by selecting a template from the saved templates. Click on Cleanup button to delete all the events for the selected date range and domain. NOTE: You can also delete the entire events history by selecting the 'All dates in the application database' option. 30 CHAPTER 3 –ADChange Tracker Features Alerts 3.9 About Alerts Alerts feature enables the user to be notified of the occurrence of specific event ID(s) in security event log of a domain controller, through e-mail. This feature is powered by a multitasking listener service called ADCT Listener Service. Benefits ADCT Listener Service runs in background even after the ADChangeTracker application is closed. Multiple domain controllers can be subscribed for multiple event IDs. E-mail alert notification can be limited to a threshold limit. i.e. (Say, send an email when the event ID 'x' occurs for 'y' times) Provision to add, edit, delete and view properties of specific event ID information. Attempts to reconnect for every one minute if a DC is not reachable. 31 CHAPTER 3 –ADChange Tracker Features 3.10 How to Add an Event ID for Configuring an E-mail Alert? The E-mail alerts configuration settings window allows you to create a new alert edit delete or view properties of existing alerts Configured. To launch 'E-mail alerts configuration settings' window, click menu in the toolbar. The 'E-mail alerts configuration settings' dialog will appear as shown below: Step 1: Domain controller Selection Right click on 'Domain controllers' and click 'Add Domain Controller...' menu. Add domain dialog will appear as shown below: 32 CHAPTER 3 –ADChange Tracker Features Enter a valid domain controller, credentials and settings and click 'OK'. Step 2: Add Event ID(s) for Domain Controller(s) Select a domain controller for which you wish to add an alert and click 'Add'. An add event information dialog will appear as shown below: Enter the list of Event IDs for collection from event logs 33 CHAPTER 3 –ADChange Tracker Features Select the Send E-mail option to receive E-mail alerts for specific event IDs. Email alerts will be sent only for those events for which this option has been set. If you select the Send E-mail, you must specify the values for 'SMTP Server Name', 'Sender', 'Recipients' and 'Send Alerts for every __ events'. Value of 'Description' field can be provided optionally if you wish to append it to the subject of the E-mail. Click 'OK'. The field 'Send Alerts for every __ events' helps to reduce the number of alerts if there are too many events generated (Event Flooding). This also helps to receive a consolidated list of alerts, instead of one alert for each event. A sample 'Add Event information' dialog filled with e-mail alerts is shown below: NOTE: You can also select the events using the 'Event ID Selector' with all security audit category events by clicking the 'Select...' button next to the 'Event ID' field. A sample 'Add Event Information' dialog filled without e-mail alerts is shown below. 34 CHAPTER 3 –ADChange Tracker Features Click 'OK' in 'E-mail alerts configuration settings' window to complete the process. 35 CHAPTER 3 –ADChange Tracker Features 3.11 How to Manage Configured E-mail Alerts? The E-mail alerts configuration settings window allows you to perform the following operations: To Add an new event ID for configuring an e-mail alert Edit an existing event ID information Delete an existing event ID information View properties of specific event ID information View every event ID information of all domain controllers launch 'E-mail alerts configuration settings' window, click menu in the toolbar. The 'E -mail alerts configuration settings' will appear as shown below: Add a new event ID for configuring an e-mail alert To add a new event ID for configuring an e-mail alert, Please follow the steps as outlined in the previous topic "How to add an event ID for configuring an E-mail alert?” 36 CHAPTER 3 –ADChange Tracker Features Edit existing event ID information To edit an existing event ID information that corresponds to a domain controller, select the desired domain controller by expanding 'Domain Controllers' in E-mail alerts configuration settings window. The entire event IDs corresponding to the domain controller will be listed. Select the event ID information that needs to be edited and click 'Edit'. During the edit operation you can modify the list of fields that make up the specific event ID information. Delete an existing event ID Information To delete an existing event ID information which corresponds to a domain controller, select the desired domain controller by expanding 'Domain Controllers' in E-mail alerts configuration settings window. The entire event IDs corresponding to the domain controller will be listed. Select the event ID information that needs to be deleted and click 'Delete'. The application will prompt you for your confirmation to delete the selected event ID information, as shown below. Click 'Yes' to delete. View properties of specific event ID information To view properties of a specific event ID information which corresponds to a domain controller, select the desired domain controller by expanding 'Domain Controllers' in Email alerts configuration settings window. The entire event IDs corresponding to the domain controller will be listed. Select the event ID information that needs to be viewed and click 'Properties'. 37 CHAPTER 3 –ADChange Tracker Features View event ID information of all domain controllers To view event ID information of all configured domain controllers, select 'Domain Controllers'. Entire event ID information will be displayed as shown below: 38 CHAPTER 3 –ADChange Tracker Features Service Controller 3.12 About Service Controller Service Controller allows the user to view the subscription status of domain controllers. It can also be used to manage 'ADCT Listener Service' by using the provision to start, stop, restart and refresh the service. 3.13 How to View the Subscription Status of Domain Controllers? Service Controller window allows you to view the subscription status of domain controllers. To launch Service Controller window, click menu in the toolbar. You can view the subscription status of domain controllers under’ Status’ column in the bottom pane of the service controller window as shown below: 39 CHAPTER 3 –ADChange Tracker Features 3.14 How to Manage 'ADCT Listener Service'? ADCT Listener Service can be started, stopped, restarted and refreshed using Service Controller window. To launch Service controller window, click 'Service Controller' window will appear as shown below: menu in the toolbar. The Here you can Start Stop, Restart and Refresh the service by clicking the corresponding buttons located near the top left corner of the window. 40 CHAPTER 3 –ADChange Tracker Features 41 CHAPTER 3 –ADChange Tracker Features Events Reports 3.15 About Events Reports Events Reports in ADChangeTracker is a powerful feature that enables the user to report the events data for AD object changes, User logon/logoff activities, Password change activities and Terminal Services activities based on specific event ID(s) in the security event log of domain controller. This feature is powered by a listener Service called ADCT Listener Service. ADCT Listener Service collects the events data and stores in the application's Events History database. You can view events data by specifying the timestamp, domain, change type, category and field based filter query that occurred over a time period. Benefits • Reports User Logon/Logoff activities in a domain with valuable information like Client Name, Logon Type and Workstation Name. • Reports events data with When and Who made the changes for Password change activities in Active Directory. • Reports Terminal Services Activities of roaming users in a domain with valuable information like Connected User Name, Workstation Name and Session Type. • Reports What exactly changed, along with Old Value and New Value, When the change was made, Where the change was made in Active Directory and Who made the changes in Active Directory objects. 42 CHAPTER 3 –ADChange Tracker Features 3.16 Configure Events Reports This section provides step-by-step procedure for configuring Events Reports. This process consists of three primary steps: Enable audit policy. Configure event ID(s) in application for security event log data collection. Set up auditing in object's SACL. This step is applicable for Object Change Reports and Permissions Change Reports only. Enable audit policy 1. Click Start, point to Administrative Tools, and then Group Policy Management. 2. In the console tree, double-click the name of the forest, double-click Domains, doubleclick the name of your domain, double-click Domain Controllers, rightclick Default Domain Controllers Policy, and then click Edit. 3. Under Computer Configuration, double-click Policies, double-click Windows Settings, double-click Security Settings, double-click Local Policies, and then click Audit Policy. 4. In the details pane, right-click the Policy pertaining to the report as shown in the following table and then click Properties. Report Name Policy User Logon/Logoff Reports Audit logon events Password Change Reports Audit account management Terminal Services Activity Reports Audit logon events Object Change Reports Audit directory service access Permissions Change Reports Audit directory service access 5. Select the Define these policy settings check box. 6. Under Audit these attempts, select the Success check box, and then click OK. Configure event ID(s) in application for security event log data collection. For security event log data collection, configure event ID(s) corresponding to each report in Real Time Events -> Alerts as stated in the following table: Report Name User Logon/Logoff Reports Event ID(s) 4624, 4634 43 CHAPTER 3 –ADChange Tracker Features Password Change Reports Terminal Services Activity Reports Object Change Reports Permissions Change Reports 4724 4778, 4779 5136, 5137, 5139, 5141 5136 Set up auditing in object's SACL: To set up SACL auditing for directory objects, perform the following steps. 1. Click Start, point to Administrative Tools, and then click Active Directory Users and Computers. 2. Right-click the organizational unit or any object for which you want to enable auditing, and then click Properties. 3. Click the Security tab, click Advanced, and then click the Auditing tab. 4. Click Add, and under Enter the object name to select, type Authenticated Users (or any other security principal), and then click OK. 5. In Apply onto, click This object and all descendant objects. 6. For Object Change Reports: Under Access, select the Successful check box for Write all properties. If you want to report events data for creation and deletion of objects, select the Successful check box for Delete, Delete subtree and Create all child objects too. 7. For Permission Change Reports: Under Access, select the Successful check box for Modify Permissions. 8. Click OK until you exit the property sheet of the organizational unit or other object. 44 CHAPTER 3 –ADChange Tracker Features 3.17 How to generate User Logon/Logoff Reports? To generate the User Logon/Logoff Reports, perform the following steps. 1. Configure settings for 'User Logon/Logoff Reports' as stated in Configure Events Reports. 2. To launch 'User Logon/Logoff Reports' menu in window, the click toolbar. The 'User Logon/Logoff Reports' window will appear as shown below: 45 CHAPTER 3 –ADChange Tracker Features 3. Specify the Date range, Category and a field based Filter criteria to find the User logon/logoff events in the application’s Events History database. 4. Select the desired Domains to generate your reports on. 5. Click Generate button to generate the report. 6. Once the data collection is complete, the report will be generated in a report window as shown below: 46 CHAPTER 3 –ADChange Tracker Features 3.18 How to generate Password Change Reports? To generate the Password Change Reports, perform the following steps. 1. Configure settings for 'Password Change Reports' as stated in Configure Events Reports. 2. To launch 'Password Change Reports' window, click menu in the toolbar. The 'Password Change Reports' window will appear as shown below: 3. Specify the Date range and a field based Filter criteria to find the Password change events in the application’s Events History database. 4. Select the desired Domains to generate your reports on. 5. Click Generate button to generate the report. 6. Once the data collection is complete, the report will be generated in a report window as shown below: 47 CHAPTER 3 –ADChange Tracker Features 48 CHAPTER 3 –ADChange Tracker Features 3.19 How to generate Terminal Services Activity Reports? To generate the Terminal Services Activity Reports, perform the following steps. 1. Configure settings for 'Terminal Services Activity Reports' as stated in Configure Events Reports. 2. To click launch 'Terminal Services Activity Reports' window, menu in the toolbar. The 'Terminal Services Activity Reports' window will appear as shown below: 3. Specify the Date range, Change type and a field based Filter criteria to find the Terminal Services activity events in the application’s Events History database. 4. Select the desired Domains to generate your reports on. 5. Click Generate button to generate the report. 49 CHAPTER 3 –ADChange Tracker Features 6. Once the data collection is complete, the report will be generated in a report window as shown below: 50 CHAPTER 3 –ADChange Tracker Features 3.20 Object Change Reports Object Change Reports in ADChangeTracker allows you to view events data for any change made to your Active Directory objects since the application is configured for event data collection. By default, ADChangeTracker collects and reports events data for the following objects only: Builtin-Domain, Computer, Contact, Domain, Domain DNS, Group, Group Policy Container, Organizational Unit, User. 51 CHAPTER 3 –ADChange Tracker Features 3.20.1 How to generate Computer Accounts Change Reports? To generate the Computer Accounts Change Reports, perform the following steps. 1. Configure settings for 'Object Change Reports' as stated in Configure Events Reports. 2. To launch 'Object Change Reports - [Computer Accounts]' window, click Events Reports > Object Change Reports -> Computer Accounts... menu in the toolbar. The 'Object Change Reports - [Computer Accounts]' window will appear as shown below: 3. Specify the Date range, Change type and a field based Filter criteria to find the Computer Accounts change events in the application’s Events History database. 4. Select the desired Domains to generate your reports on. 5. Click Generate button to generate the report. 6. Once the data collection is complete, the report will be generated in a report window as shown below: 52 CHAPTER 3 –ADChange Tracker Features 53 CHAPTER 3 –ADChange Tracker Features 3.20.2 How to generate Contacts Change Reports? To generate the Contacts Change Reports, perform the following the steps. 1. Configure settings for 'Object Change Reports' as stated in Configure Events Reports. 2. To launch 'Object Change Reports - [Contacts]' window, click Events Reports -> Object Change Reports -> Contacts... menu in the toolbar. The 'Object Change Reports [Contacts]' window will appear as shown below: 3. Specify the Date range, Change type and a field based Filter criteria to find the Contacts change events in the application’s Events History database. 4. Select the desired Domains to generate your reports on. 5. Click Generate button to generate the report. 6. Once the data collection is complete, the report will be generated in a report window as shown below: 54 CHAPTER 3 –ADChange Tracker Features 55 CHAPTER 3 –ADChange Tracker Features 3.20.3 How to generate Domain Change Reports? To generate the Domain Change Reports, perform the following steps. 1. Configure settings for 'Object Change Reports' as stated in Configure Events Reports. 2. To launch 'Object Change Reports - [Domain]' window, click Events Reports -> Object Change Reports -> Domain... menu in the toolbar. The 'Object Change Reports - [Domain]' window will appear as shown below: 3. Specify the Date range, Change type and a field based Filter criteria to find the Domain change events in the application’s Events History database. 4. Select the desired Domains to generate your reports on. 5. Click Generate button to generate the report. 6. Once the data collection is complete, the report will be generated in a report window as shown below: 56 CHAPTER 3 –ADChange Tracker Features 57 CHAPTER 3 –ADChange Tracker Features 3.20.4 How to generate Groups Change Reports? To generate the Groups Change Reports, perform the following steps. 1. Configure settings for 'Object Change Reports' as stated in Configure Events Reports. 2. To launch 'Object Change Reports - [Groups]' window, click Events Reports -> Object Change Reports -> Groups... menu in the toolbar. The 'Object Change Reports - [Groups]' window will appear as shown below: 3. Specify the Date range, Change type and a field based Filter criteria to find the Groups change events in the application’s Events History database. 4. Select the desired Domains to generate your reports on. 5. Click Generate button to generate the report. 6. Once the data collection is complete, the report will be generated in a report window as shown below: 58 CHAPTER 3 –ADChange Tracker Features 59 CHAPTER 3 –ADChange Tracker Features 3.20.5 How to generate Group Policy Objects Change Reports? To generate the Group Policy Objects Change Reports, perform the following steps. 1. Configure settings for 'Object Change Reports' as stated in Configure Events Reports. 2. To launch 'Object Change Reports - [Group Policy Objects]' window, click Events Reports -> Object Change Reports -> Group Policy Objects... menu in the toolbar. The 'Object Change Reports - [Group Policy Objects]' window will appear as shown below: 3. Specify the Date range, Change type and a field based Filter criteria to find the Group Policy Objects change events in the application’s Events History database. 4. Select the desired Domains to generate your reports on. 5. Click Generate button to generate the report. 6. Once the data collection is complete, the report will be generated in a report window as shown below: 60 CHAPTER 3 –ADChange Tracker Features 61 CHAPTER 3 –ADChange Tracker Features 3.20.6 How to generate Organizational Units Change Reports? To generate the Organizational Units Change Reports, perform the following steps. 1. Configure settings 'Object Change Reports' as stated in Configure Events Reports. 2. To launch 'Object Change Reports - [Organizational Units]' window, click Events Reports > Object Change Reports -> Organizational Units... menu in the toolbar. The 'Object Change Reports - [Organizational Units]' window will appear as shown below: 3. Specify the Date range, Change type and a field based Filter criteria to find the Organizational Units change events in the application’s Events History database. 4. Select the desired Domains to generate your reports on. 5. Click Generate button to generate the report. 6. Once the data collection is complete, the report will be generated in a report window as shown below: 62 CHAPTER 3 –ADChange Tracker Features 63 CHAPTER 3 –ADChange Tracker Features 3.20.7 How to generate Users Change Reports? To generate the Users Change Reports, perform the following steps. 1. Configure settings 'Object Change Reports' as stated in Configure Events Reports. 2. To launch 'Object Change Reports - [Users]' window, click Events Reports -> Object Change Reports -> Users... menu in the toolbar. The 'Object Change Reports - [Users]' window will appear as shown below: 3. Specify the Date range, Change type and a field based Filter criteria to find the Users change events in the application’s Events History database. 4. Select the desired Domains to generate your reports on. 5. Click Generate button to generate the report. 6. Once the data collection is complete, the report will be generated in a report window as shown below: 64 CHAPTER 3 –ADChange Tracker Features 65 CHAPTER 3 –ADChange Tracker Features 3.21 Permissions Change Reports Permissions Change Reports in ADChangeTracker allows you to view events data for Permissions changes made to your Active Directory objects since the application is configured for event data collection. By default, ADChangeTracker collects and reports events data for the following objects only: Builtin-Domain, Computer, Contact, Domain, Domain DNS, Group, Group Policy Container, Organizational Unit, User. 3.21.1 How to generate Computer Accounts Permissions Change Reports? To generate the Computer Accounts Permissions Change Reports, perform the following steps. 1. Configure settings for 'Permissions Change Reports' as stated in Configure Events Reports. 2. To launch 'Permissions Change Reports - [Computer Accounts]' window, click Events Reports -> Permissions Change Reports -> Computer Accounts... menu in the toolbar. The 'Permissions Change Reports - [Computer Accounts]' window will appear as shown below: 3. Specify the Date range and a field based Filter criteria to find the Computer Accounts Permissions change events in the application’s Events History database. 4. Select the desired Domains to generate your reports on. 66 CHAPTER 3 –ADChange Tracker Features 5. Click Generate button to generate the report. 6. Once the data collection is complete, the report will be generated in a report window as shown below: 67 CHAPTER 3 –ADChange Tracker Features 3.21.2 How to generate Contacts Permissions Change Reports? To generate the Contacts Permissions Change Reports, perform the following steps. 1. Configure settings for 'Permissions Change Reports' as stated in Configure Events Reports. 2. To launch 'Permissions Change Reports - [Contacts]' window, click Events Reports -> Permissions Change Reports -> Contacts... menu in the toolbar. The 'Permissions Change Reports - [Contacts]' window will appear as shown below: 3. Specify the Date range and a field based Filter criteria to find the Contacts Permissions change events in the application’s Events History database. 4. Select the desired Domains to generate your reports on. 5. Click Generate button to generate the report. 6. Once the data collection is complete, the report will be generated in a report window as shown below: 68 CHAPTER 3 –ADChange Tracker Features 69 CHAPTER 3 –ADChange Tracker Features 3.21.3 How to generate Domain Permissions Change Reports? To generate the Domain Permissions Change Reports, perform the following steps. 1. Configure settings for 'Permissions Change Reports' as stated in Configure Events Reports. 2. To launch 'Permissions Change Reports - [Domain]' window, click Events Reports -> Permissions Change Reports -> Domain... menu in the toolbar. The 'Permissions Change Reports - [Domain]' window will appear as shown below: 3. Specify the Date range and a field based Filter criteria to find the Domain Permissions change events in the application’s Events History database. 4. Select the desired Domains to generate your reports on. 5. Click Generate button to generate the report. 6. Once the data collection is complete, the report will be generated in a report window as shown below: 70 CHAPTER 3 –ADChange Tracker Features 71 CHAPTER 3 –ADChange Tracker Features 3.21.4 How to generate Groups Permissions Change Reports? To generate the Groups Permissions Change Reports, perform the following steps. 1. Configure settings for 'Permissions Change Reports' as stated in Configure Events Reports. 2. To launch 'Permissions Change Reports - [Groups]' window, click Events Reports > Permissions Change Reports -> Groups... menu in the toolbar. The 'Permissions Change Reports - [Groups]' window will appear as shown below: 3. Specify the Date range and a field based Filter criteria to find the Groups Permissions change events in the application’s Events History database. 4. Select the desired Domains to generate your reports on. 5. Click Generate button to generate the report. 6. Once the data collection is complete, the report would be generated in a report window as shown below: 72 CHAPTER 3 –ADChange Tracker Features 73 CHAPTER 3 –ADChange Tracker Features 3.21.5 How to generate Group Policy Objects Permissions change Reports? To generate the Group Policy Objects Permissions Change Reports, perform the following steps. 1. Configure settings for 'Permissions Change Reports' as stated in Configure Events Reports. 2. To launch 'Permissions Change Reports - [Group Policy Objects]' window, click Events Reports -> Permissions Change Reports -> Group Policy Objects... menu in the toolbar. The 'Permissions Change Reports - [Group Policy Objects]' window will appear as shown below: 3. Specify the Date range and a field based Filter criteria to find the Group Policy Objects Permissions change events in the application’s Events History database. 4. Select the desired Domains to generate your reports on. 5. Click Generate button to generate the report. 6. Once the data collection is complete, the report will be generated in a report window as shown below: 74 CHAPTER 3 –ADChange Tracker Features 75 CHAPTER 3 –ADChange Tracker Features 3.21.6 How to generate Organizational Units Permissions change Reports? To generate the Organizational Units Permissions Change Reports, perform the following steps. 1. Configure settings for 'Permissions Change Reports' as stated in Configure Events Reports. 2. To launch 'Permissions Change Reports - [Organizational Units]' window, click Events Reports -> Permissions Change Reports -> Organizational Units.. menu in the toolbar. The 'Permissions Change Reports - [Organizational Units]' window will appear as shown below: 3. Specify the Date range and a field based Filter criteria to find the Organizational Units Permissions change events in the application’s Events History database. 4. Select the desired Domains to generate your reports on. 5. Click Generate button to generate the report. 6. Once the data collection is complete, the report will be generated in a report window as shown below: 76 CHAPTER 3 –ADChange Tracker Features 77 CHAPTER 3 –ADChange Tracker Features 3.21.7 How to generate Users Permissions Change Reports? To generate the Users Permissions Change Reports, perform the following steps. 1. Configure settings for 'Permissions Change Reports' as stated in Configure Events Reports. 2. To launch 'Permissions Change Reports - [Users]' window, click Events Reports -> Permissions Change Reports -> Users... menu in the toolbar. The 'Permissions Change Reports - [Users]' window will appear as shown below: 3. Specify the Date range and a field based Filter criteria to find the Users Permissions change events in the application’s Events History database. 4. Select the desired Domains to generate your reports on. 5. Click Generate button to generate the report. 6. Once the data collection is complete, the report will be generated in a report window as shown below: 78 CHAPTER 3 –ADChange Tracker Features 79 CHAPTER 3 –ADChange Tracker Features 3.22 How to use Advanced Filter? Advanced Filter tool in Events Reports allows you to filter report data based on complex filter conditions. Unlike Quick Filter, Advanced Filter gives the user the ability to create filter conditions that include one or more fields in the report and is also capable of reporting fields with empty values in the report. The Advanced Filter tool is available below the report grid in the right pane as shown below: To apply a filter to the current report, select the filter from the Advanced Filters dropdown and click on button. To remove a filter applied to the current report, select No Filter Applied from the Advanced Filters drop-down and click on button. Create a new filter Click on to create a new advanced filter for the current report. 80 CHAPTER 3 –ADChange Tracker Features The Filter window will appear as shown below: To set a filter condition, perform the following steps. 7. Specify a name for the filter. 8. Choose a field name, an operator and a possible value from the respective dropdowns. 9. Click the button to add the filter condition. 10. The Add to Filter button will change to AND to Filter. OR to Filter button will be enabled. The selected condition will be added as shown below. 81 CHAPTER 3 –ADChange Tracker Features 11. Click Save to apply the filter to the current report. Also, the filter will be saved to the filter database for future use. The report status label above the grid, shows the filter status "Filter:" followed by its current status. For a normal view, the filter status will appear as For a filtered view, the filter status will appear as Note: Click to clear all the filter conditions in the list. Use enhanced filter condition as shown below: and to build ([Change Type]= 'Modified (Value Added)' AND [Property Name] = 'Telephone Number') OR ([Object Name] = 'Alex' AND [Property Name]= 'E-mail') Use to remove the parenthesis Use to delete a condition from the list of filter conditions. This will remove the currently selected filter condition from the list. Edit an existing filter To edit an existing saved filter, select the filter from the advanced filters drop-down and 82 CHAPTER 3 –ADChange Tracker Features then click the button. The filter window will appear on the screen. You may edit the fieldslist and filter conditions. Also, you can choose to save the filter in a different name, retaining the original filter, or overwrite the existing filter with the new filter conditions and fields-list. Delete an existing filter To delete an existing filter, select the filter from the advanced filters drop-down list and click the button. However, if the filter is already applied to a report, ADChangeTracker clears the filter in the report and deletes the selected filter. 83 CHAPTER 3 –ADChange Tracker Features 3.23 How to use Quick Filter? The Quick Filter in Events Reports allows you to view a narrow subset of data by specifying a filter condition that could either be applied to any of the fields or to a specific field in the current report. The Quick Filter tool is available below the report grid in the right pane as shown below: Apply Filter To filter report data, perform the following steps: 1. Select a field from the fields drop-down. If you want to apply the filter condition to any of the fields in the current report, select “Any Field” from the fields dropdown. 2. Select an operator from the operators drop-down, next to fields drop-down. 3. Type in a filter condition in the edit box. Note: You can use wildcard characters such as “*” and “?” in the filter condition. The filter condition can include regular characters as well as wildcard characters as given below: Filter Condition a* Description Example Character starting with a [Object Name] = a* finds object name beginning with a, for example Adminuser, Administrator. a? Character starting with a and maximum of two characters including a [Object Name] = a? finds object name that has only two characters, starting with a, for example AD. a?d* Minimum of three characters, the first character being a, middle character may be any single character and the last character being d [Object Name] = a?d* finds object name beginning with a, that has any single character in the middle and ending with d followed by zero or more characters. Click on to apply the filter condition. Remove Filter To remove the quick filter that has been applied to the current report, click the button. 84 CHAPTER 3 –ADChange Tracker Features 3.24 How to find data in a report? You can use the find feature in ADChangeTracker to search for specific data in a report. To search for data in a report, just type the characters or words you want to find in the find edit box available in the report window and click on . 1. ADChangeTracker performs a case insensitive search of the specified search criteria in the report. 2. The search criteria should not be enclosed within quotation marks. 3. You can use the "*" wildcard character in the search criteria. The "*" wildcard character act as a place holder for zero or more characters. However, note that you cannot use the "?" wildcard character in the search criteria. For instance, if you want to search for 'Domain' in a report. Type Domain, without quotations, in the edit box, and then click on Find Button. By default, ADChangeTracker adds an asterisk as a suffix to the specified search criteria, if no wildcard character is present in it. In this case, ADChangeTracker finds a match in the report for all fields that have the text Domain followed by zero or more characters, that is, Domain, Domain Controllers, Domain Admins, etc. For all the matches found, ADChangeTracker highlights the corresponding columns in the grid, and scrolls the grid automatically to the first occurrence. 4. ADChangeTracker finds additional occurrences of the specified search criteria instantaneously. To locate other occurrences of the same search criteria in a report you need to scroll the report grid downwards. 85 CHAPTER 3 –ADChange Tracker Features 86 CHAPTER 3 –ADChange Tracker Features 3.25 How to Export data? The Export feature helps the user to export report data generated by ADChangeTracker to a file using various formats namely HTML/CSV/XLSX. Click on button in the report window or select Export option under File menu to export report data to a file in the desired format. Specify a file name to export report data to or accept the default file name. Specify the export path and select a desired file format. The path refers to the destination location where the output file generated should be stored. It can be given using the Browse button. By default, the report will be exported to a time-stamped sub-folder in the format 'YYYYMMDD HH.MM.SS' under the specified export path. This will be useful to avoid overwriting of existing files, if any, in the specified export path. In CSV file format, the information is stored as comma separated values. For each report, a CSV file will be generated. The name of the CSV file will be the name of the report. In HTML and XLSX file formats, the information is stored in html and xlsx files respectively. For each report, a file corresponding to the selected file format will be generated. The name of the file will be the name of the report. 87 CHAPTER 3 –ADChange Tracker Features 3.26 How to E-mail data? ADChangeTracker provides the option to e-mail a change report to different users. The change reports generated after tracking will be e-mailed to the specified recipients. Click button in the toolbar to e dialog will be displayed as shown below: -mail the report to e -mail recipients. E -mail For e-mailing reports, ADChangeTracker requires the SMTP Server name, From E-mail Address, To E-mail Addresses (recipients separated by semicolon) and the report attachment format. Specify SMTP server name, from Address, To address, mail subject, mail content, attachment format and option to compress the attachment. Click button to send the report by e-mail to the selected recipients. Check names ADChangeTracker provides check name feature to check the existence of corresponding 88 CHAPTER 3 –ADChange Tracker Features mail-enabled recipient object in Active Directory. To check name, click button. If the entered name matches with a mail object in the Active directory / its trusted domain, name entered in From address textbox will be replaced by the corresponding active directory recipient object. If there is more than one match, a dialog which contains matching Active Directory recipients will appear as shown below. You can select one or more recipients and click OK. To get more information about the listed recipients under Change to, select the name and then click . 89 CHAPTER 3 –ADChange Tracker Features If there is no match for the name entered by the user in Active Directory, a dialog will appear as shown below: Select Delete option in the above dialog to remove the recipient name from To address text box. Click Cancel button to close this dialog and the unresolved recipient(s) will appear in red color. Address Book ADChangeTracker provides Address Book feature to search for any mail enabled recipient object (say, person, distribution list, contact, public folder) you want to send a message to. Click button and then use the Find Names dialog box to search for the recipient object you want to send a message to. (Note that you can't use the Find Names dialog box to search for distribution lists in your Contacts folder.) Select the object's name in the list and then click Add recipient to...To. 90 CHAPTER 3 –ADChange Tracker Features To get more informa tion about one of the names in the list, such as department or phone number, select the name, and then click . 91 4 ADChange Tracker Settings Configure Domain Settings Configure Change Tracking Settings 92 4.1 Configure Domain Settings Domain Settings You can launch ADChangeTracker Domain Settings by clicking Tools -> Configuration Settings menu in the ADChangeTracker main application window, as shown below: The various operations that can be performed in the Domain Settings are given below: Operation Description Add To Add a Domain to the domain list. Edit To Edit the properties of the Domain in the domain list. Select a Domain and click Edit button. Delete To Delete a Domain from the domain list. Select a Domain and click Delete button. 93 CHAPTER 4 –ADChange Tracker Settings View Properties To view the properties of the Domain in the list. Select a Domain and click Properties button. 94 CHAPTER 4 –ADChange Tracker Settings 4.1.1 Add a Domain You have to specify the domain information for adding a domain in ADChangeTracker. Add a Domain to the List 1) Launch Domain Settings window. 2) In the Domain Settings window, click Add button to add a domain to the list. 3) The New Domain window will be displayed as shown below: a) The list of domains available in the network will be loaded in the Domain Name dropdown. b) Select a domain from the Domain Name dropdown. c) The list of domain controllers for the selected domain will be loaded in the Domain Controller Name dropdown. d) Select a domain controller from the Domain Controller Name dropdown. 95 CHAPTER 4 –ADChange Tracker Settings 4) Specify user name and the corresponding password to connect to the specified server. 5) In order to find who, and a more accurate time of when, a change happened, ADChangeTracker will have to read the applicable change events (logged through native AD auditing) in the Windows Security Event Logs from all the domain controllers in the domain. This is an optional setting that can be used if you need to find out who made a change. You can select 'Use Security event log in DC to retrieve additional change data (Who & When)' option to collect information from Security logs (applicable only if Active Directory Auditing was enabled). 6) Also you can track the change made to your Group Policy Objects (GPOs) by checking 'Track Group Policy Object changes (GPO)' option. 7) You may select specific containers in the domain to restrict the tracking scope and collect data for objects in selected containers. If no containers are selected, data will be collected by searching the entire domain structure. 96 CHAPTER 4 –ADChange Tracker Settings In order to select specific containers, Click Tracking Scope button. Tracking Scope dialog will be displayed as shown below: 8) In order to select specific containers, select selected containers in Domain option, and then click Browse to select containers in the domain. The container browser dialog will be displayed as shown below: 9) Select the desired container and click OK. Note that only one container may be selected at a time. 10) Click OK to add the domain to the Domain Settings. 11) ADChangeTracker will connect to the domain with the newly provided connection parameters and add it to the list, upon successful connection to the domain. 97 CHAPTER 4 –ADChange Tracker Settings 98 CHAPTER 4 –ADChange Tracker Settings 4.1.2 Edit a Domain To Edit a domain in Domain Settings, follow the steps given below: 1) Launch Domain Settings window. 2) In the Domain Settings window, select any row (Domain), Click Edit button to Edit an existing Domain in the list, as shown below: 3) The Domain Name cannot be modified during the edit operation. 4) Specify user name and the corresponding password to connect to the specified domain. 5) You can change the Event Log, GPO settings and Tracking Scope settings. 6) Click OK to save and connect to the domain with the newly provided connection parameters and update the domain. 7) ADChangeTracker will connect to the domain with the newly provided connection parameters and modify it in the list, upon successful connection to the domain. 99 CHAPTER 4 –ADChange Tracker Settings 100 CHAPTER 4 –ADChange Tracker Settings 4.1.3 Delete a Domain Perform the following steps to delete a domain: 1) Launch Domain Settings window. 2) In the Domain Settings window, select any domain, click Delete button to delete the domain from the Domain Settings list. 3) An alert message asking for confirmation to delete the domain will be displayed as shown below: 4) Click Yes to delete the selected domain. 101 CHAPTER 4 –ADChange Tracker Settings 4.1.4 View Properties of Domain Perform the following steps to view properties of domain: 1) Launch Domain Settings window. 2) In the Domain Settings window, select any domain, click Properties button to view the properties of the selected domain. 3) The Properties window with the selected domain information will be displayed as shown below: 102 CHAPTER 4 –ADChange Tracker Settings 4.2 Configure Change Tracking Settings By design, ADChangeTracker tracks the list of AD objects and all of their properties except those configured in the application settings. You can configure the list of objects that are to be tracked and the list of properties that are to be excluded for tracking in the application. Refer the following links for detailed steps: 4.2.1 How to Select an Object for Change Tracking? ADChangeTracker tracks all changes to the AD objects in your Active Directory, as configured in the application setting. ADChangeTracker provides an option to include AD objects for tracking. To include object for audit data collection and tracking by ADChangeTracker, perform the steps stated below: By default, ADChangeTracker tracks changes made to the following objects only: They are Built-in-Domain, Computer, Contact, Domain, Domain DNS, Group, Group Policy Container, Organizational Unit, User. Steps: 1) To launch Object Settings window, click Tools -> Configuration Settings... menu in the toolbar and select Object Settings node in the tree view. The Object Settings window will appear as shown below: The list of objects maintained by the application and the objects available in Active Directory schema will be displayed under General and From Schema tabs respectively as shown below. You can add an object by selecting it from the common objects under General tab or all objects (including custom objects) under From Schema tab. 103 CHAPTER 4 –ADChange Tracker Settings 2) Select any domain controller from the list of available domain controllers under From Schema tab. The list of objects as available in AD schema will be displayed as shown below: 3) You can right click on the domain controller to connect to the domain controller again by using Connect… or Refresh... menu and retrieve the objects afresh. 4) To include an object for tracking, click on the desired object in the list of Available Objects and then click button. 104 CHAPTER 4 –ADChange Tracker Settings 5) To remove an object from Selected Objects list, click on the desired object in the Selected Objects and then click button. 6) You can also manually add the object by entering the LDAP display name of the object in the Object Name text box and then click button as shown below: 7) Click OK button to save the object settings. NOTE: To know more about LDAP display name of objects in Active Directory, visit this link:http://msdn.microsoft.com/enus/library/windows/desktop/ms680938 (v=vs.85).aspx 105 CHAPTER 4 –ADChange Tracker Settings 4.2.2 How to Exclude a Property from Change Tracking? ADChangeTracker tracks changes to all properties of AD objects in your Active Directory, unless the property is excluded in the application setting. ADChangeTracker provides an option to exclude AD properties from being tracked. To exclude properties from audit data collection by ADChangeTracker, perform the steps stated below: By default, the application does not track the following property changes (owing to the repetitive nature of data): Admin Count, Bad Pwd Time, Bad Password Count, Current USN, Direct Reports, Last Logon, Last Logoff, Last Logon Timestamp, Logon Count, Managed Objects, Member Of, Modified Count, Modified Date, msExchAuthOrigBL, msExchALObjectVersion, Original USN, sAMAccountType, User Parameters. Steps: 1) To launch Property Settings window, click on Tools -> Configuration Settings... menu in the toolbar and select Property Settings node in the tree view. The Property Settings window will appear as shown below: 2) Select an object from the list of objects in the Object Name drop down. You will be able to select properties of the selected object which are to be excluded from audit data collection and tracking. 106 CHAPTER 4 –ADChange Tracker Settings 3) Select any domain controller from the list of available domain controllers under From Schema tab. The list of properties pertaining to the selected object as available in AD schema will be displayed as shown below: 4) You can right click on the domain controller to connect to the domain controller again by using Connect... or Refresh... menu and retrieve the properties afresh. 5) To select a property for exclusion, click on the desired property in the list of Available Properties and then click button. 6) To remove a property from Excluded Properties list, click on the desired property in the Excluded Properties and then click button. 7) You can also manually add the property by entering the LDAP display name of the property in the Property Name text box and then click button as shown below: 107 CHAPTER 4 –ADChange Tracker Settings 8) Click OK button to save the property settings. NOTE: To know more about LDAP display name of properties in Active Directory, please visit this following link: http://msdn.microsoft.com/en-us/library/windows/desktop/ms677286 (v=vs.85).aspx 108 CHAPTER 4 –ADChange Tracker Settings 4.3 Configure SQL Server ADChangeTracker uses SQL Server database for its internal data storage, including storage of Change History. ADChangeTracker requires an SQL Server running SQL Server 2012 / 2008 / 2005 (Enterprise / Standard / Express editions) to connect and create a new application database. ADChangeTracker will connect to the specified SQL Server based on authentication mode and user credentials to manage its own application database. You can launch SQL Server settings to use by clicking Tools -> Options menu in the ADChangeTracker main application window, as shown below. ADChangeTracker wizard will prompt for the SQL settings (Server name, authentication mode, user name and password) when the application is launched for the very first time. This setting can be accessed again from the Tools -> Configuration Settings... menu: User Authentication To connect to SQL Server, ADChangeTracker uses the relevant user accounts based on the authentication mode as listed below: A. Windows Authentication: In this method, ADChangeTracker uses the currently logged on user account while tracking changes using ‘Track Now’ or the Run as account while using ‘Track at scheduled intervals’. B. SQL Authentication: 109 CHAPTER 4 –ADChange Tracker Settings In this method, ADChangeTracker uses the specified SQL user account and password while tracking changes. ADChangeTracker stores the SQL user name and password as a user profile in 'Stored User Names and Passwords' applet for its usage. Note: ADChangeTracker expects the user account to have sufficient privileges to create, add to and delete database in the SQL server. Database Creation ADChangeTracker creates databases in SQL Server as per the information outlined below: ADChangeTracker creates a single application database in the default data storage location used by the SQL Server during application launch. ADChangeTracker uses the following naming convention: ADChangeTracker-<COMPUTERNAME>, where COMPUTERNAME is the name of the computer running ADChangeTracker. For example, if the computer running the ADChangeTracker is ‘CLIENT01’, ADChangeTracker creates 'ADChangeTracker-CLIENT01' with data ('ADChangeTrackerCLIENT01.mdf') and log ('ADChangeTracker-CLIENT01_log.LDF') files stored in the default SQL data folder in the SQL server (for example, C:\Program Files\Microsoft SQL Server\MSSQL.1\MSSQL\Data). Database Cleanup ADChangeTracker will delete the application ADChangeTracker application from the computer. database while uninstalling the 110 CHAPTER 4 –ADChange Tracker Settings 4.4 User Profiles ADChangeTracker creates a user profile in Windows Stored User Names and Passwords applet, in order to store the SQL and Directory Server user context for report generation. The stored user profile will be useful for generating reports using ADChangeTracker under the following scenarios: a) Using an SQL Server having a dedicated SQL user account for report generation using ADChangeTracker (highly recommended) b) Using an SQL Server where SQL authentication mode is enabled c) Using an alternate user account to connect to the Directory Server to retrieve AD information The stored user profile persists for all subsequent logon sessions on the same computer where ADChangeTracker is installed. The stored user profiles are visible to the application under other logon sessions on the same computer. The stored user profile created by ADChangeTracker is restricted to the Windows User Profile context. If the Windows User Profile is maintained locally, ADChangeTracker stored user profile is accessible only by the same user in the same computer. If the user who creates ADChangeTracker stored user profile, has a Roaming user account in the enterprise, the ADChangeTracker stored user profile can be accessed by the same user in any computer in the Windows enterprise. The stored user profile is a generic credential of Windows Stored User Names and Passwords applet and can be used by ADChangeTracker application only. The credential information is stored securely in a 256 bit encrypted format in Windows Stored User Names and Passwords applet. The stored user profile corresponding to the SQL user account will be used by ADChangeTracker application in order to connect to the SQL Server, if SQL authentication is enabled in ADChangeTracker SQL settings. Using the User Profiles dialog shown below (Tools -> User Profiles...), new profile can be created and available profiles can be removed from the profiles list. 111 CHAPTER 4 –ADChange Tracker Settings Click New button to add a new profile and a dialog will appear as shown below: Click Remove button in the User Profiles dialog to remove available profiles. 112 CHAPTER 4 –ADChange Tracker Settings 113 5 References Frequently asked questions How to uninstall ADChangeTracker Technical Support 5.1 How to Uninstall ADChange Tracker? When you uninstall ADChangeTracker through Control Panel - Add / Remove Programs applet, Windows Installer program will remove only the application files from your computer. But, the application related files created by ADChangeTracker remain in the computer. In order to remove ADChangeTracker worker files completely, the uninstall wizard provides a set of cleanup options to perform the cleanup operation based upon your selection. Use this wizard to cleanup the files that are created by ADChangeTracker application selectively and uninstall ADChangeTracker completely from the computer. 1) Launch the Uninstall wizard by clicking Start -> Programs -> Active Directory Change Tracker -> Uninstall ADChangeTracker. 2) The ADChangeTracker Uninstall Wizard dialog will be shown as below: CHAPTER-5- References Click Next to Proceed. 3) Select required cleanup options as shown below: Click Next to Proceed. 4) Confirm the cleanup and/or uninstall process. CHAPTER-5- References Click Finish to run cleanup and/or uninstall process. Click Cancel to close the wizard. 116 1) Once the file cleanup process is complete, the uninstall wizard will automatically run Windows Installer program to remove ADChangeTracker application from the computer. 117 5.2 Technical Support If and when a problem arises, please forward the [email protected] to revert back to you with a solution. following information to Error log file - e.g., <Application Data Folder>\ADChangeTracker\ADChangeTrackerErrorLog.log The <Application Data Folder> is the common location where ADChangeTracker settings will be stored in the computer running ADChangeTracker application. The <Application Data Folder> can be found from the Help -> About screen. The default path of <Application Data Folder> is as follows: a) Windows XP, Windows 2003 - C:\Documents and Settings\All Users\Documents b) Windows 8.1, Windows 8, Windows 7, Windows Vista, Windows 2008, Windows 2008 R2, Windows 2012, Windows 2012 R2 - C:\Users\Public\Documents 118 6 Index Active Directory Auditing, 8, 79 Active Directory Change Tracker, 1, 97 ADChangeTracker, 1, 2, 3, 5, 7, 76, 77, 79, 80, 92, 93, 94, 97, 99 Intel Pentium Processor, 2 List contents, 97, 100 alert message, 84 browse Migrate, 97, 100 option, 97 Migrate SharePoint, 97, 100 Change History Manager, 25 Operating System, 2 Cleanup, 25, 93 cleanup Search Change History, 21 options, 97, 98 Database, 2, SharePoint, 5 Software, 2 93 specific containers, 79, 80 SQL Server, 7, 92, 93, 94 Delete a Domain, 77, 84 Delete button, 77, 84 System Administrators, 3 Task Manager, 77 uninstall Disk Space & Memory, 2 process., 98, 99 User DocKIT, 5 domain Authentication, 92 controller, 78 User Profiles, 94, 95 Domain Controller Name, 78 Domain View Properties, 77, 85 Name, 19, 78 Windows Stored User Names and Domain Settings, 76, 77, 80, 84, 85 Passwords, 94 History, 25 119