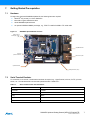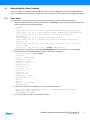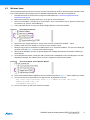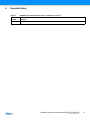
1
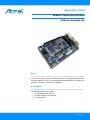
Application Note SAMA5D3 Xplained Getting Started ARM-based Embedded MPU ED AIN XPL 3 5D MA SA Scope This document explains how to get started quickly with your SAMA5D3 Xplained board. It provides details on how to connect the SAMA5D3 Xplained board to a computer and the steps to access the on-board Linux distribution. Kit Contents The SAMA5D3 Xplained Kit contains: One SAMA5D3 Xplained board One Micro-AB to typeA USB cable A welcome letter 11270A–ATARM–20-Feb-14 1. Reference Documents Table 1-1. Reference Documents Information Document Title User Manual Electrical/Mechanical Characteristics SAMA5D3 Series Datasheet Ordering Information SAMA5D3 Xplained User Guide 2. Power Warning Warning: 2.1 SAMA5D3 Xplained User Guide Unlike Arduino Uno boards, the Atmel SAMA5D3 Xplained board runs at 3.3V. The maximum voltage tolerated by the I/O pins is 3.3V. Providing higher voltage levels, e.g., 5V, to an I/O pin may result in damage to the board. Electrostatic Warning Electrostatic sensitive device Warning: ESD-Sensitive Electronic Equipment! In the evaluation kit box, the board is packaged in a protective anti-static bag. When in use, the board must not be subjected to high electrostatic potentials. When not in use, it is recommended to store the board in the protective bag. It is strongly recommended to use a grounding strap or similar ESD protective device when handling the board in hostile ESD environments (e.g., offices with synthetic carpeting). Avoid touching the component pins or any other metallic element on the board. 2.2 Power Supply Warning Warning: Hardware Power Supply Limitation Using a power adapter greater than 5Vcc (e.g., at 12Vcc from other kits such as Arduino) may damage the board Warning: Hardware Power Budget Using USB as the main power source (max. 500 mA) is acceptable only with the use of the on-board peripherals and lowpower LCD extension. When an external peripheral or add-on boards must be powered, it is recommended to use an external power adapter connected to the J2 DC jack (can provide up to 1.2A on the 3.3V node). SAMA5D3 Xplained Getting Started [APPLICATION NOTE] 11270A–ATARM–20-Feb-14 2 3. Introduction The SAMA5D3 Xplained board is pre-loaded with a Linux-based embedded operating system. The software components stored in the NANDFlash have been compiled following instructions found on the Linux4SAM website. All related source code is located on the Linux4SAM github account: Bootloaders AT91Bootstrap U-Boot and associated environment Linux kernel and associated Device Tree database Poky distribution root filesystem (from the Yocto project). The on-board pre-installed Linux distribution can be controlled through the standard Linux console accessible via the Atmel SAMA5D36 DBGU (standard debug interface (J23)). An additional USB-CDC console is configured and can be directly accessed using the USB Micro-AB cable included in the evaluation kit. This is an efficient single-cable solution for easy log-in and fast access to the pre-installed Linux distribution. Figure 3-1. Linux4SAM Website Organization Main entry point & link to component pages AT91Boostrap Doc Bin Sources Introduction Demo-Flash Memory map Requirements using automated script Bin Sources Linux Kernel Bin Doc Pre-built binaries flashing, U-boot / barebox Doc Boot sequence Sources OPEN-SOURCE PROJECTS VALUABLE WEB SITES Demo Rootfs Bin Doc Bin pkg Sources SAMA5D3 Xplained Getting Started [APPLICATION NOTE] 11270A–ATARM–20-Feb-14 3 4. Powering the Board Unpack the board, taking care to avoid electrostatic discharge. Connect the USB Micro-AB cable from the connector (J6) to a free USB port of your PC. When the board is powered, the blue LED (marked D2) will light up and the default board firmware will start to run. Figure 4-1. Device USB Port Used as Supply USB A Device And Supply Input (J6) SAMA5D3 Xplained Getting Started [APPLICATION NOTE] 11270A–ATARM–20-Feb-14 4 5. Boot Sequence Several pieces of software are used to boot a Linux kernel on SAM products: ROM code AT91Bootstrap U-Boot bootloader The following steps describe the boot sequence of the Linux kernel: 1. The ROM code checks if a valid application is present in the supported media (Flash, DataFlash, NANDFlash, SDCARD). If so, the ROM code downloads it into internal SRAM. For details, refer to the AT91Bootstrap section on Linux4SAM and the sub-chapters “Boot strategies” and “Boot capabilities matrix”. 2. The AT91Bootstrap manages the hardware configuration and downloads the U-Boot / barebox binary from Flash to SDRAM / DDRAM. It starts the bootloader (third-level bootloader). 3. U-Boot is the bootloader in charge of downloading kernel binaries from Flash, the network, an SD card, etc. It then loads the Device Tree Binary and starts the Linux kernel. Figure 5-1. Boot Sequence ROM CODE Boot Media Check if AT91Bootstrap Linux Kernel is present on FLASH Boot Media Load it from FLASH to SRAM & Start it 3 Device Tree Binary (DTB) 1 2 U-Boot / barebox AT91Bootstrap 1 AT91Bootstrap SRAM SDRAM/DDRAM, Clock Initialization Load U-Boot/Barebox from FLASH to SDRAM/DDRAM & Start it 2 AT91Bootstrap U-Boot / barebox Load Kernel Image SDRAM / DDRAM Load Device Tree binary (DTB) from FLASH to SDRAM/DDRAM & Start it 3 U-Boot / barebox Device Tree Binaty (DTB) Linux Kernel Kernel Starting Kernel Uncompressing Linux SAMA5D3 Xplained Getting Started [APPLICATION NOTE] 11270A–ATARM–20-Feb-14 5 6. On-board Linux4SAM Demo - Memory Map Figure 6-1. NANDFlash Memory Map Root FS (UBIFS) 0x800000 Linux Kernel 0x200000 Device Tree (DTB) 0x180000 U-Boot Env. Redundant 0x100000 U-Boot Env. 0x0C0000 U-Boot 0x0400000 AT91Bootstrap 0x000000 NAND FLASH SAMA5D3 Xplained Getting Started [APPLICATION NOTE] 11270A–ATARM–20-Feb-14 6 7. Getting Started Pre-requisites 7.1 Hardware To begin using the Atmel SAMA5D3 Xplained kit, the following items are required: Windows® XP (or later) or a Linux distribution Micro-AB to TypeA USB Device cable Atmel SAMA5D3 Xplained board An optional USB/Serial DBGU port bridge, e.g., FTDI TTL-232R-3V3 USB to TTL serial cable Figure 7-1. SAMA5D3 Xplained Board Overview USB Host Interfaces USB A Device And Supply Input (J6) ATSAMA5D36 CU 1401 A XXXXXXXXXX XX ARM GigaBit Ethernet Blue Led (Power Indicator) Ethernet 10/100 SAMA5D3 X PLAINED System Buttons Debug Interface (J23) 7.2 Serial Terminal Emulator To access the Linux console, a serial terminal emulator is required, e.g., HyperTerminal, minicom, PuTTY, picocom, screen, etc.. The standard serial communication parameters are 115200 8-N-1: Table 7-1. Serial Communication Port Parameters Parameter Parameter Value Baud Rate 115200 Data 8 bits Parity None Stop 1 bit Flow Control None SAMA5D3 Xplained Getting Started [APPLICATION NOTE] 11270A–ATARM–20-Feb-14 7 8. Accessing the Linux Console The Linux console is accessed through the USB device (also known as “USB gadget”) port of the SAMA5D36 device. Connect the USB Micro-AB cable from the connector (J6) to a free USB port of your PC and use the USB-CDC interface. 8.1 Linux Users Once the board is powered up and the connection with the host machine is made, follow the steps below: 1. Identify the USB connection by monitoring the last lines of the dmesg command. The /dev/ttyACMx number will be used to configure the serial terminal emulator. $ dmesg [..] [73507.188239] usb 1-1.1.1: new high-speed USB device number 49 using ehci-pci [73507.281410] usb 1-1.1.1: New USB device found, idVendor=0525, idProduct=a4a7 [73507.281418] usb 1-1.1.1: New USB device strings: Mfr=1, Product=2, SerialNumber=0 [73507.281421] usb 1-1.1.1: Product: Gadget Serial v2.4 [73507.281422] usb 1-1.1.1: Manufacturer: Linux 3.10.0-yocto-standard with atmel_usba_udc [73507.287341] cdc_acm 1-1.1.1:2.0: This device cannot do calls on its own. It is not a modem. [73507.287377] cdc_acm 1-1.1.1:2.0: ttyACM0: USB ACM device The CDC driver is used and you can see that a /dev/ttyACM0 node has been created on your host system. 2. Run the serial terminal emulator application with the 115200 8-N-1 parameters. 3. $ picocom -b 115200 /dev/ttyACM0 picocom v1.7 port is : /dev/ttyACM0 flowcontrol : none baudrate is : 115200 parity is : none databits are : 8 escape is : C-a local echo is : no noinit is : no noreset is : no nolock is : no send_cmd is : sz -vv receive_cmd is : rz -vv imap is : omap is : emap is : crcrlf,delbs, Terminal ready Connect to the board with the root login account. No password is required. 4. Poky (Yocto Project Reference Distro) 1.5.1 SAMA5D3 Xplained /dev/ttyGS0 SAMA5D3 Xplained login: root root@SAMA5D3 Xplained:~# You are now ready to go with the on-board Linux system. SAMA5D3 Xplained Getting Started [APPLICATION NOTE] 11270A–ATARM–20-Feb-14 8 8.2 Windows Users After the board is powered up and the connection with the host machine is made, the Windows system requests a driver for the USB-CDC device that corresponds to the SAMA5D3 Xplained board. Then follow the steps below: 1. Download the official .inf file required to configure the USB-CDC driver: www.kernel.org/doc/Documentation/usb/linux-cdc-acm.inf 2. Make sure that the file is properly saved as an .inf file. Do not use a.txt extension. 3. Click on the “Start Menu”, and open up the “Control Panel”. In the “Control Panel“ click on “System”. Once the System window is up, open the “Device Manager”. 4. Look under Other devices. An open port named “Gadget Serial v2.4” should be available. Figure 8-1. Device Manager Window 5. Right-click on the “Gadget Serial V2.4 “ device and choose the “Update Driver Software...” option. 6. Install the serial driver with “Browse my computer for driver software” option. 7. Windows may prompt for confirmation to install the driver. If so, accept the installation. The use of the official gadget serial .inf file (see Step 1.) ensures driver software integrity. 8. After the driver installation process, the system displays the message:“Windows has successfully installed your driver software”. 9. On the Windows host system, identify the USB connection that is established: the port should appear in the Windows Device Manager. The COMxx number is used to configure the serial terminal emulator. Figure 8-2. Serial Port Installed - Device Manager Window 10. Run a serial terminal emulator application with the parameters specified in Table 7-1 and the COMxx port number. 11. You can now login to the board with the root login account. No password is required. Poky (Yocto Project Reference Distro) 1.5.1 SAMA5D3 Xplained /dev/ttyGS0 SAMA5D3 Xplained login: root root@SAMA5D3 Xplained:~# 12. You are now ready to go with the on-board Linux system. SAMA5D3 Xplained Getting Started [APPLICATION NOTE] 11270A–ATARM–20-Feb-14 9 9. Revision History Table 9-1. Doc. Rev. 11270A SAMA5D3 Xplained Getting Started Rev. 11270A Revision History Changes First Issue. SAMA5D3 Xplained Getting Started [APPLICATION NOTE] 11270A–ATARM–20-Feb-14 10 Atmel Corporation 1600 Technology Drive Atmel Asia Limited Unit 01-5 & 16, 19F Atmel Munich GmbH Business Campus Atmel Japan G.K. 16F Shin-Osaki Kangyo Bldg San Jose, CA 95110 BEA Tower, Millennium City 5 Parkring 4 1-6-4 Osaki, Shinagawa-ku USA 418 Kwun Tong Road D-85748 Garching b. Munich Tokyo 141-0032 Tel: (+1) (408) 441-0311 Kwun Tong, Kowloon GERMANY JAPAN Fax: (+1) (408) 487-2600 HONG KONG Tel: (+49) 89-31970-0 Tel: (+81) (3) 6417-0300 www.atmel.com Tel: (+852) 2245-6100 Fax: (+49) 89-3194621 Fax: (+81) (3) 6417-0370 Fax: (+852) 2722-1369 © 2014 Atmel Corporation. All rights reserved. / Rev.: 11270A–ATARM–20-Feb-14 Atmel®, Atmel logo and combinations thereof, Enabling Unlimited Possibilities®, and others are registered trademarks or trademarks of Atmel Corporation or its subsidiaries. Windows® is a registered trademark of Microsoft Corporation in U.S. and or other countries. ARM® is a registered trademark of ARM Ltd. Other terms and product names may be trademarks of others. Disclaimer: The information in this document is provided in connection with Atmel products. No license, express or implied, by estoppel or otherwise, to any intellectual property right is granted by this document or in connection with the sale of Atmel products. EXCEPT AS SET FORTH IN THE ATMEL TERMS AND CONDITIONS OF SALES LOCATED ON THE ATMEL WEBSITE, ATMEL ASSUMES NO LIABILITY WHATSOEVER AND DISCLAIMS ANY EXPRESS, IMPLIED OR STATUTORY WARRANTY RELATING TO ITS PRODUCTS INCLUDING, BUT NOT LIMITED TO, THE IMPLIED WARRANTY OF MERCHANTABILITY, FITNESS FOR A PARTICULAR PURPOSE, OR NON-INFRINGEMENT. IN NO EVENT SHALL ATMEL BE LIABLE FOR ANY DIRECT, INDIRECT, CONSEQUENTIAL, PUNITIVE, SPECIAL OR INCIDENTAL DAMAGES (INCLUDING, WITHOUT LIMITATION, DAMAGES FOR LOSS AND PROFITS, BUSINESS INTERRUPTION, OR LOSS OF INFORMATION) ARISING OUT OF THE USE OR INABILITY TO USE THIS DOCUMENT, EVEN IF ATMEL HAS BEEN ADVISED OF THE POSSIBILITY OF SUCH DAMAGES. Atmel makes no representations or warranties with respect to the accuracy or completeness of the contents of this document and reserves the right to make changes to specifications and products descriptions at any time without notice. Atmel does not make any commitment to update the information contained herein. Unless specifically provided otherwise, Atmel products are not suitable for, and shall not be used in, automotive applications. Atmel products are not intended, authorized, or warranted for use as components in applications intended to support or sustain life.