1
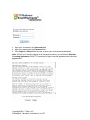
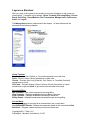
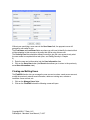
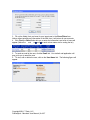
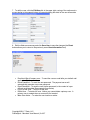
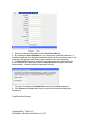
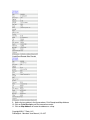
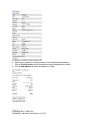
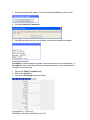
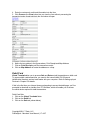
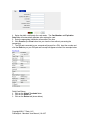
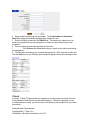
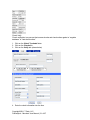
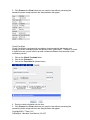
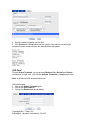
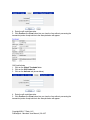
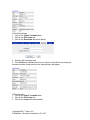
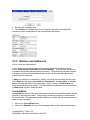
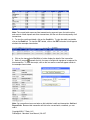
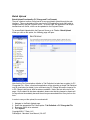
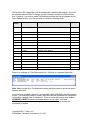
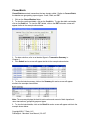
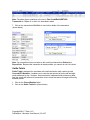
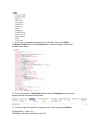
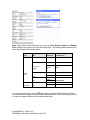
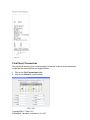
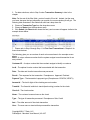
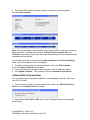
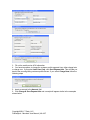
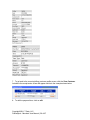
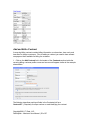
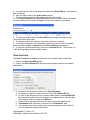
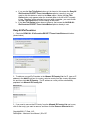
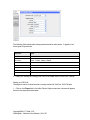
Merchant User Manual Published March 2011 T-Gate, LLC 1821 Walden Square Suite 220 Schaumburg, IL 60173 www.tgatepayments.com Copyright©2011 T-Gate, LLC. Pathwaylink - Merchant User Manual | 1 of 67 Table of Contents REFERENCES ...................................................................................................................................................................3 OVERVIEW ........................................................................................................................................................................3 CH 1: B EGINNING TO US E T-GATE TPI PAYMENT S ERVER...................................................................3 LOGON AS A M ERCHANT ................................................................................................................................................ 5 A DDING A NEW USER...................................................................................................................................................... 6 FINDING AND EDITING USERS........................................................................................................................................ 7 CH 2: CREATING TRANSACTIONS WITH VIRTUAL TERMINALS..................................................... 10 CREDIT CARD ................................................................................................................................................................. 10 DEBIT CARD.................................................................................................................................................................... 17 CHECK ............................................................................................................................................................................. 19 GIFT CARD ...................................................................................................................................................................... 24 CH 3: B ATCHES AND S ETTLEMENT................................................................................................................. 28 CURRENT BAT CH ........................................................................................................................................................... 28 BAT CH UPLOAD ............................................................................................................................................................. 30 CLOSED BAT CH.............................................................................................................................................................. 32 SETTLE TOTALS.............................................................................................................................................................. 33 END OF DAY ................................................................................................................................................................... 34 CH 4: FIND TRANSACTIONS ................................................................................................................................. 35 TRANSACT ION SUMMARY............................................................................................................................................. 35 FIND CARD TRANSACT IONS ......................................................................................................................................... 36 FIND CHECK TRANSACTIONS....................................................................................................................................... 41 VOID TRANSACT IONS.................................................................................................................................................... 43 REFUND TRANSACT IONS............................................................................................................................................... 44 REPEAT SALE TRANSACTIONS..................................................................................................................................... 45 CAPT URE PREAUT H TRANSACT IONS .......................................................................................................................... 46 CH 5: RECURRING B ILLING................................................................................................................................. 47 A DD AND EDIT A CUST OMER ....................................................................................................................................... 47 A DD AND EDIT A PAYMENT IT EM................................................................................................................................ 48 A DD AND EDIT A CONT RACT ....................................................................................................................................... 52 VIEW CUST OMERS ......................................................................................................................................................... 54 VIEW CONT RACT S ......................................................................................................................................................... 55 BILLING REPORT ............................................................................................................................................................ 56 CH 6: PREFERENC ES AND MERCHANT S UPPORT.................................................................................... 57 U SER A CCESS CONT ROL............................................................................................................................................... 57 A LLOW ALL IPS/ COUNT RIES ....................................................................................................................................... 58 DENY ALL IPS/COUNT RIES .......................................................................................................................................... 59 CUST OM FIELDS............................................................................................................................................................. 60 SETT ING UP INPUT DEVICES......................................................................................................................................... 61 CHANGING U SER PASSWORD ....................................................................................................................................... 64 SETT ING SECURITY........................................................................................................................................................ 65 SENDING EMAIL TO MERCHANT SUPPORT ................................................................................................................. 67 SYST EM LOGOUT ........................................................................................................................................................... 67 Copyright©2011 T-Gate, LLC. Pathwaylink - Merchant User Manual | 2 of 67 References This document is a compilation of the following manual(s) tailored specifically for merchants using the T-Gate TPI Payment Server and other T-Gate Products. Document PaymentServerMerchantManual.doc Version Description 2.06.1221 Merchant User Manual Overview By using the T-Gate TPI Payment Server, the administrator users can manage their accounts with little more than a few keystrokes and mouse clicks. Through an intuitive graphical user interface, an administrator can set up new accounts and modify or delete existing ones. In turn, merchants can upload POS transactions from their terminals and capture images of signed sales drafts. As a result, merchants no longer have to hold copies of these transactions for retrieval requests. Instead, the images are housed on the web and available to the merchant by using a web browser. Additionally, merchants also have access to manage accounts at the user level within their merchant accounts*. This versatility thus not only supports a wide level of account management, but also reduces the need for administrator involvement in routine and simple adjustments to the merchant account. In addition, the T-Gate TPI Payment Server provides tools to customize logos and contact information, which locate on the T-Gate TPI Payment Server web pages viewable to every user. In this way, while maintaining a professional business presentation, an administrator can conveniently provide merchants with vital contact information. This documentation targets individuals who will monitor the T-Gate TPI Payment Server system on a regular basis. Some knowledge of basic system administrative principles is a plus. For an administrator, although prior experience with system administration is not required, it will help facilitating installation and maintenance of the payment server. * Managing user accounts is dependent on the merchant’s assigned security permissions Ch 1: Beginning to Use T-Gate TPI Payment Server What to expect and what to do when beginning to use the T-Gate TPI Payment Server for payment processing. In this introductory chapter, you will learn the basics on how to use the T-Gate TPI Payment Server for payment processing. The topics covered include the payment server’s logon process, graphical user interface (GUI), and user account management. To begin using the T-Gate TPI Payment Server, you must first logon to the system. 1. Open your internet browser 2. Type the Uniform Resource Locator (URL) for the payment server login page in the Address field (For example: http://gateway.itstgate.com/Admin/login.aspx). Consult the system administrator for the T-Gate TPI Payment Server if you are unsure of the correct URL and the login page for the T-Gate TPI Payment Server should open (shown below) Copyright©2011 T-Gate, LLC. Pathwaylink - Merchant User Manual | 3 of 67 3. Input your username in the Username field 4. Input your password in the Password field 5. Click Login (the Reset button lets you re-enter your username and password) Note: If this is your first time logging on to the payment server, you will see an End User Licensing Agreement (EULA). To continue your login, read the agreement and click the I agree button. Copyright©2011 T-Gate, LLC. Pathwaylink - Merchant User Manual | 4 of 67 Logon as a M erchant After you logon to the system as a merchant, a menu bar will appear on the screen (as shown below). It contains a list of options: Virtual Terminals, Recurring Billing, Current Batch, End of Day, Closed Batches, Find Transactions, Manage Users, Preferences, Email, and Logout. The Manage Users feature is discussed in this chapter. All other features will be discussed in the following chapters. Virtual Terminal Credit – Process Sale, PreAuth, or ForceAuth transactions on credit card Debit – Process Sale or Return transactions on debit card Checks – Process Sale, Verify (PreAuth), Void, Return, or ForceSale (PostAuth) transactions on check Gift Cards – Process Redeem, Reload, Refund, Activate, Deactivate, or Inquire transactions on gift card (Note: A gift card must be activated to be used) Recurring Billing Add Customer – Add a new customer for recurring billing View Customer – Displays established recurring billing customers View Contracts – Displays established contracts for customers Billing Report – Displays transactions processed through recurring billing Current Batch Summary – Displays a summary list on transactions in the current batch Credit/Debit/EBT/Checks – Displays the transaction details in the current batch Host Batch Info – Displays a batch summary form the processor host Copyright©2011 T-Gate, LLC. Pathwaylink - Merchant User Manual | 5 of 67 End of Day Credit/Debit/EBT/Checks – Displays the current batch summary and allow you to submit the batch Closed Batches Credit/Debit/EBT/Checks – Displays the transaction details of closed batch Find Transactions Summary – Displays a summary list on all transactions categorized by the payment type Credit/Debit/EBT/Gift Cards/Check – Displays the transaction details, including receipt and/or check images if applied Manage Users Add – Add a new user account Find/Edit – Find, edit or delete user account Preferences Access Control – Grant or deny access to log into an account by verifying the IP address Custom Fields – Add data field to the Virtual Terminals pages. The field will be saved along with the transaction Device Setup – Set up input devices connected to your system Password – Change the user password Security – Set security for functions performed at the user level Email Sales - Send email to the T-Gate TPI Payment Server sales team Support - Send email to the T-Gate TPI Payment Server support team Logout – Exit the T-Gate TPI Payment Server Adding a New User The Manage Users section is used to add, find, edit, or delete user accounts. The following examples describe two scenarios in which you would want to add a new user. Your company must establish a user account for each terminal. This account is set up specifically to upload transactions and sales draft/check images to the web Your company wants to establish a user account for an office manager. This manager needs a user name and password fro access to retrieve images and view reports Adding a new user: 1. Click on the Manage Users folder 2. Click on the Add link to add a new user and the following screen will appear Copyright©2011 T-Gate, LLC. Pathwaylink - Merchant User Manual | 6 of 67 Without your specifying a user name in the User Name field, the payment server will generate a user name for you The First Name and Last Name fields are where you will need to identify the terminal that will be uploading to this account or the entity that will be using this account The Security Level box should be defined correctly to give the user access to only what the user needs to complete his/her task (Also, see Setting Security in Chapter 6) 3. Enter the new user’s information into the User Information form 4. Click on the Save User button (the Reset button allows you to return to the previously saved User Information state) Finding and Editing Users The Find/Edit function lets you manage the user account, such as, search a user account, modify the previously entered user information, delete an existing user, activate or inactivate a user account, etc. 1. Click on the Manage Users folder 2. Click on the Find/Edit link and the following screen will open Copyright©2011 T-Gate, LLC. Pathwaylink - Merchant User Manual | 7 of 67 3. Fill out the field(s) that you know for your target user in the Show Filters form. Notice without entering any information in the filter form, it will return all user accounts 4. Click Find (the Reset button lets you re-enter the information) and a list of users will appear (Notice the and arrows under each column name are for sorting the list) 5. To send an email to the user, click the Email link. Your default mail application will pop up for you to email the user 6. To view, edit or delete the user, click on the User Name link. The following figure will appear Copyright©2011 T-Gate, LLC. Pathwaylink - Merchant User Manual | 8 of 67 7. To edit the user, click the Edit User link in the upper right corning of the section and a screen similar to the example below will open displaying the detail of the user information 8. Edit the fields as necessary and click Save User to save the changes (the Reset button allows you to return to the previously saved User Information form) Email:[email protected] – To send the user an email after your default mail application appears Reset Password – To reset the user password. The payment server will automatically generate a new user password. Email Password – To send the user his/her password, in the context of a predefined email template (See example figure below) Log in as this User – To log in as this user Delete User – To delete the user. Notice you cannot delete a primary user. A primary user is created when an account is first created. Make User Active – To make the user inactive or active. Copyright©2011 T-Gate, LLC. Pathwaylink - Merchant User Manual | 9 of 67 Ch 2: Creating Transactions with Virtual Terminals How to use virtual terminals Virtual Terminals allow you to process various transactions on credit card, debit card, check, and gift card. The transaction types include Sale, PreAuth (pre-authorization), ForceAuth (post-authorization), Void, Return, etc. This chapter describes how to process each type of transaction, grouped by the payment methods: Credit Card, Debit Card, Check, and Gift Card. In general, when filling out the transaction forms (illustrated as screenshots in this chapter), be aware that the industry type of your merchant account, such as retail or eCommerce, has different requirements on certain fields to be populated or not. For example, some payment processors do not require an address for a retail transaction, but require for an e-Commerce one. Consult your service provider if you are unsure of these requirements. To process retail transactions, you will need various devices, such as card reader, PIN pad, and check reader. Refer to Setting up Input Devices in Chapter 6 for details. Credit Card The virtual terminal does not facilitate Void and Return transactions on credit card. Instead, they are provided through Find Transactions. This is to ensure a void or return transaction only to be made on an existing transaction, which further help reduce fraud. Credit Card Sale 1. Click on the Virtual Terminals folder 2. Click on the Credit link 3. Click on the Sale tab (shown below) Copyright©2011 T-Gate, LLC. Pathwaylink - Merchant User Manual | 10 of 67 4. Enter the credit card information into the Credit Card Sale form 5. By checking the Force Duplicate box, you can process a duplicate transaction. A duplicate transaction is an attempted transaction identical to the one already made on the same day, with the same credit card number, expiration date, and total amount 6. The Repeat Sale function is designed for a credit card payment with installments. If this transaction is a repeat sale, check the Repeat Sale box to expand the section (shown below). Otherwise, skip this step and go to Step 8 7. Fill out the two fields in the Repeat Sale section for an installation payment 8. Click Process (the Clear button lets you clear the form without processing the transaction) Credit Card Sale Receipt Copyright©2011 T-Gate, LLC. Pathwaylink - Merchant User Manual | 11 of 67 Credit Card Repeat Sale Receipt 9. Notice the two options in the figures above: Print Receipt and Map Address 10. Click on Print Receipt to print the transaction receipt 11. Click on Map Address to locate the address on a map Copyright©2011 T-Gate, LLC. Pathwaylink - Merchant User Manual | 12 of 67 Credit Card PreAuth PreAuth is the process of authorizing and reserving the funds for the transaction – ensuring the card is valid, and the cardholder has sufficient open-to-buy funds to cover the purchase amount and reserving the funds for completion. 1. Click on the Virtual Terminals folder 2. Click on the Credit link 3. Click on the PreAuth tab (shown below) 4. Enter the credit card information into the form 5. Click Process (the Clear button lets you clear the form without processing the transaction) and a receipt like the example below will appear Copyright©2011 T-Gate, LLC. Pathwaylink - Merchant User Manual | 13 of 67 6. Notice the two options in the figures above: Print Receipt and Map Address 7. Click on Print Receipt to print the transaction receipt (example shown below) 8. Click on Map Address to locate the address on a map Copyright©2011 T-Gate, LLC. Pathwaylink - Merchant User Manual | 14 of 67 Credit Card Return A Credit Card Return is a return transaction in which a previous Credit Card Sale is to be returned / voided. 1. Click on the Virtual Terminals folder 2. Click on the Credit link 3. Click on the Return tab (shown below) 4. Read the information and click Transaction Reports (shown below) Note: The date is defaulted to today’s date. 5. Enter the appropriate information. (No information needs to be entered onto this page, by clicking the Submit button, you will view all transactions today) 6. Click Submit and a list of transactions similar to the sample screen below will appear Copyright©2011 T-Gate, LLC. Pathwaylink - Merchant User Manual | 15 of 67 7. A list of transactions will appear, click on the transaction Ref # you wish to return 8. Click Yes, Void this Transaction 9. Click OK and similar screen to the following void response example will appear Credit Card ForceAuth ForceAuth is a sale transaction for which a merchant received a voice authorization. A ForceAuth is done so that the previously authorized transaction can be settled and the merchant can receive funds. 1. Click on the Virtual Terminals folder 2. Click on the Credit link 3. Click on the ForceAuth tab (shown below) Copyright©2011 T-Gate, LLC. Pathwaylink - Merchant User Manual | 16 of 67 4. Enter the customer’s credit card information into the form 5. Click Process (the Clear button lets you clear the form without processing the transaction) and a receipt similar to the one below will open 6. Notice the two options in the figures above: Print Receipt and Map Address 7. Click on Print Receipt to print the transaction receipt 8. Click on Map Address to locate the address on a map Debit Card Virtual Terminals allow you to process Sale and Return (void) transactions on debit card. To process debit card transactions, you need to first connect both PIN (Personal Identification Number) pad and card reader with your computer. Refer to Setting up Input Devices in Chapter 6 for details. If this is the first time your Internet browser attempting to access the debit page, you’ll be prompted to download an installer from TPI Software, which will enable you to access the serial device required for debit transactions. Debit Card Sale 1. Click on the Virtual Terminals folder 2. Click on the Debit link 3. Click on the Sale tab (shown below) Copyright©2011 T-Gate, LLC. Pathwaylink - Merchant User Manual | 17 of 67 4. Swipe the debit card through the card reader. The Card Number and Expiration Date fields will automatically populate after swiping the card 5. Enter the appropriate transaction information in the form 6. Click Process (the Clear button lets you clear the form without processing the transaction) 7. The PIN pad connected to your computer will prompt for a PIN. Input the number and click the Enter key on your PIN pad and a receipt will appear similar to the example below Debit Card Return 1. Click on the Virtual Terminals folder 2. Click on the Debit link 3. Click on the Return tab (shown below) Copyright©2011 T-Gate, LLC. Pathwaylink - Merchant User Manual | 18 of 67 4. Swipe a debit card through the card reader. The Card Number and Expiration Date fields will be automatically populated after swiping the card 5. Enter the PINRef number into the PINRef field. This number you obtain from your earlier processed debit card sale transaction, on which you are performing the return transaction 6. Enter necessary transaction information into the form 7. Click Process (the Clear button lets you clear the form without processing the transaction) 8. The PIN pad connected to your computer will prompt for a PIN. Input the number and click the Enter key on your PIN pad and a receipt will appear similar to the example below Check Currently, T-Gate TPI Payment Server supports two check processors in North America: Rocky Mountain Retail System and Intercept Delaware. Therefore, depending on your merchant processor setup, you will see one of the following user interfaces for your check processing: Rocky Mountain Retail System: Copyright©2011 T-Gate, LLC. Pathwaylink - Merchant User Manual | 19 of 67 Intercept Delaware: This section describes Sale, Verify (Pre-Auth), Void, ForceSale (Post-Auth) and Return check transactions crossed on the two check processors. Check Sale 1. Click on the Virtual Terminals folder 2. Click on the Checks link 3. Click on the Sale tab (shown below) 4. Enter the check information into the form 5. Click Process (the Clear button lets you clear the form without processing the transaction) and a receipt will appear similar to the example below Copyright©2011 T-Gate, LLC. Pathwaylink - Merchant User Manual | 20 of 67 Check Verify Check verification is a process that screens checks and check writers against a “negative database” of “bad check writers”. 1. Click on the Virtual Terminals folder 2. Click on the Checks link 3. Click on the Verify tab (shown below) 4. Enter the check information into the form Copyright©2011 T-Gate, LLC. Pathwaylink - Merchant User Manual | 21 of 67 5. Click Process (the Clear button lets you clear the form without processing the transaction) and a receipt similar to the example below will appear Check ForceSale Check ForceSale is a process that completes a check transaction that already went through the check verification phase and proved to be a “good check”. Therefore, to make a check force sale, you will need to provide a reference obtained from the earlier check verification process. 1. Click on the Virtual Terminals folder 2. Click on the Checks link 3. Click on the ForceSale tab (shown below) 4. Enter the check information into the form 5. Click Process (the Clear button lets you clear the form without processing the transaction) and a receipt similar to the example below will appear Copyright©2011 T-Gate, LLC. Pathwaylink - Merchant User Manual | 22 of 67 Check Void Voiding a transaction is the reversal of a current transaction that has been authorized but not settled. Settled transactions require processing of RETURN (a.k.a., REFUND, CREDIT) in order to be reversed. 1. Click on the Virtual Terminals folder 2. Click on the Checks link 3. Click on the Void tab (shown below) 4. In the Original PNRef field, enter the PNRef number you received from the corresponding check transaction on which you are performing this void 5. Click Process (the Clear button lets you clear the form without processing the transaction) and a receipt similar to the example below will appear Check Return 1. Click on the Virtual Terminals folder 2. Click on the Checks link 3. Click on the Return tab (shown below) Copyright©2011 T-Gate, LLC. Pathwaylink - Merchant User Manual | 23 of 67 4. Enter the check information into the form 5. Click Process (the Clear button lets you clear the form without processing the transaction) and a receipt similar to the example below will appear Gift Card Through Virtual Terminals, you can process Redeem (Sale), Reload, and Refund transactions on a gift card. You can also Activate, Deactivate, or Inquire a gift card. Note: A gift card must be activated before use. Gift Card Redeem 1. Click on the Virtual Terminals folder 2. Click on the Gift Cards link 3. Click on the Redeem tab (shown below) Copyright©2011 T-Gate, LLC. Pathwaylink - Merchant User Manual | 24 of 67 4. Enter the gift card information 5. Click Process (the Clear button lets you clear the form without processing the transaction) and a receipt similar to the example below will appear Gift Card Reload 1. Click on the Virtual Terminals folder 2. Click on the Gift Cards link 3. Click on the Reload tab (shown below) 4. Enter the gift card information 5. Click Process (the Clear button lets you clear the form without processing the transaction) and a receipt similar to the example below will appear Gift Card Refund 1. Click on the Virtual Terminals folder 2. Click on the Gift Cards Link 3. Click on the Refund tab (shown below) Copyright©2011 T-Gate, LLC. Pathwaylink - Merchant User Manual | 25 of 67 4. Enter the gift card information 5. Click Process (the Clear button lets you clear the form without processing the transaction) and a receipt similar to the example below will appear Gift Card Activate 1. Click on the Virtual Terminals folder 2. Click on the Gift Cards Link 3. Click on the Activate tab (shown below) 4. Enter the gift card information 5. Click Process (the Clear button lets you clear the form without processing the transaction) and a receipt similar to the example below will appear Copyright©2011 T-Gate, LLC. Pathwaylink - Merchant User Manual | 26 of 67 Gift Card Deactivate 1. Click on the Virtual Terminals folder 2. Click on the Gift Cards Link 3. Click on the Deactivate tab (shown below) 4. Enter the gift card information 5. Click Process (the Clear button lets you clear the form without processing the transaction) and a receipt similar to the example below will appear Gift Card Inquire 1. Click on the Virtual Terminals folder 2. Click on the Gift Cards Link 3. Click on the Inquire tab (shown below) Copyright©2011 T-Gate, LLC. Pathwaylink - Merchant User Manual | 27 of 67 4. Enter the gift card information 5. Click Process (the Clear button lets you clear the form without processing the transaction) and a receipt similar to the example below will appear Ch 3: Batches and Settlement How to create and settle batches In this chapter, we will discuss the payment server’s batch and settlement features, mainly, Current Batch, End of day, and Closed Batches. These features are there for merchants with terminal-based payment processors. Terminal-based processor requires merchant to store the authorized transactions locally until the merchant captures and submits them for settlement. A batch is a collection of transactions. Usually a merchant has one batch per day or per shift. Batch has two types: open batch and closed batch. An open batch, or current batch, is a batch that has not yet been settled. On the contrary, a closed batch is a batch that has already been settled. To submit/settle the transactions in the current batch, the End of Day function comes into place. Current Batch Current Batch consists of two parts, transaction summary and transaction details, that are grouped by the payment method. The summary provides an overview of transactions in the current batch. The transaction details enable you to further explore and perform more tasks on each transaction. 1. Click on the Current Batch folder 2. Click on the Summary link and a list will appear similar to the example shown below Copyright©2011 T-Gate, LLC. Pathwaylink - Merchant User Manual | 28 of 67 Note: The current batch summary lists transactions by payment types, the total number and amount of both deposit and return transactions, and the net amount and quantity of all transactions. 3. To view the credit card details, click on the Credit link. To view the debit care details, click on the Debit link. To view the EBT details, click on the EBT link and a list will appear similar to the example shown below 4. Click on the transaction’s Ref # link to further display the detail of the transaction 5. Notice if you see beneath the link, it means a receipt with signatures is captured for this transaction. To view the receipt, click on the icon and a screen will appear similar to the example shown below Note: You can perform two more tasks on this individual credit card transaction: Void and Repeat Sale. Because this transaction still sits in the current batch, unsettled, you can void it. Copyright©2011 T-Gate, LLC. Pathwaylink - Merchant User Manual | 29 of 67 Batch Upload Batch Upload Functionality (PC Charge and Text Formats) There is a feature to allow a merchant to do a manual batch upload through the web interface. This may be desired if the merchant’s POS application is not easily able to integrate directly with the Payment Server. In such a case, the application can output transactions to a flat file, which can be uploaded to the Payment Server. To access Batch Upload within the Payment Server go to: Tools – Batch Upload When you click on this option, the following page will open: Note that the File Format option defaults to Tab Delimited, but also has an option for PC Charge dat File. Often, a merchant’s application will be outputting a simple Tab Delimited text file (see below for details), but a merchant using PC Charge will need to import a file in PC Charge’s dat format; both formats are available. Notice the text at the top of the page: “Once a batch file has been uploaded, please note that the changes in reports will not be reflected immediately because the server processes batch files every hour on the hour.” In order to carry out the upload, the merchant will: 1. Navigate to the Batch Upload page 2. Select the appropriate File Format option: Tab Delimited or PC Charge dat File 3. Browse to the file to be selected 4. Click Upload Copyright©2011 T-Gate, LLC. Pathwaylink - Merchant User Manual | 30 of 67 The format for PC Charge files (.dat) is automatically created by that program. If you will be uploading batches from PC Charge, you will not need to modify the format of those files. However, if you wish to create Tab Delimited text files that can be uploaded by the Batch Upload function, your files will need to contain the following fields: Field Number Field Name Description Required 1 Transaction Type SALE, REPEATSALE, AUTH, RETURN, FORCE Y 2 Account Num Account Number Y 3 Exp Date Expiration Date Y 4 Amount Total Amount Y 5 Invoice Num Invoice Number N 6 Zip Zip Code N 7 Street Street of Billing Address N 8 Name On Card Card Holder’s Name As On Card N 9 PO Num Purchase Order Number N 10 Tax Amount Tax Amount N 11 City City of Billing Address N 12 Sate State N 13 Auth Code Authorization Code N 14 PNRef Unique Reference Number N 15 Card Type Ex: Visa, MasterCard, etc. N Below is an example of a Tab Delimited text file. Each line is a separate transaction. Note: Make sure the file is Tab Delimited meaning that there needs to be one tab space between each field. Once you have uploaded a batch file, an executable called OfflineBatch.exe will complete the job. The executable scans for “ready” batch files and then processes the transactions found within, readying them for settlement. This is an automatic process once enabled. HOWEVER it MUST be set as a scheduled task to run every hour, otherwise OfflineBatch.exe will not run and the uploaded transactions will never actually be processed (or settled). Copyright©2011 T-Gate, LLC. Pathwaylink - Merchant User Manual | 31 of 67 Closed Batch Closed Batches contain transactions that are already settled. Similar to Current Batch, the batches are grouped by payment types: Credit, Debit, and EBT. 1. Click on the Closed Batches folder 2. To view the credit card details, click on the Credit link. To view the debit card details, click on the Debit link. To view the EBT details, click on the EBT link and a screen will appear similar to the example shown below 3. For date selection, refer to an identical figure in Transaction Summary in Chapter 4 4. Click Submit and a screen will appear similar to the example shown below 5. To view the batch summary, click on the Summary link and a screen will appear similar to the example shown below Note: The summary displays the batch’s total number and amount of both deposit and return transactions, grouped by payment types. 6. To view the batch details, click on the Detail link and a screen will appear similar to the example shown below Copyright©2011 T-Gate, LLC. Pathwaylink - Merchant User Manual | 32 of 67 Note: The above figure is identical to the one in Find Credit/Debit/EBT/Gift Transaction in Chapter 4, in which it is described in detail. 7. Click on the transaction’s Ref # link to view further details of the transaction (shown below) Note: You can perform two more tasks on this credit card transaction: Refund and Repeat Sale. Because this transaction is already settled, you cannot do void, but refund. Settle Totals Settle Totals is designed for merchants with credit card and/or debit card set up with Concord EFS Network. It enables you to view the total amount of both credit and debit cards settlement by day. However, be aware that the settlement totals shown may differ from the actual total amount of transactions, due to some fees and surcharges involved by affiliated parties. 1. Click on the Closed Batches folder 2. Click on the Settle Totals link (shown below) Copyright©2011 T-Gate, LLC. Pathwaylink - Merchant User Manual | 33 of 67 3. Click on the date link Note: The settlement totals will be populated into Debit Settle Totals and Credit Settle Totals accordingly. End of Day The End of Day settlement is the process through which transactions with authorization codes are submitted to the payment processor for transfer of funds. This procedure is usually conducted at the end of the business day. After the settlement, the transactions in Current Batch are moved into Closed Batches. 1. 2. 3. 4. Click on the End of Day folder To settle the credit card transactions, click on the Credit link To settle the debit card transactions, click on the Debit link To settle the EBT transactions, click on the EBT link Copyright©2011 T-Gate, LLC. Pathwaylink - Merchant User Manual | 34 of 67 5. Click Close Batch and a screen will appear similar to the example shown below Ch 4: Find Transactions How to view transactions and receipts Find Transactions displays transactions that are processed through T-Gate TPI Payment Server. Inside the folder, transactions are grouped by payment types: credit, debit, gift, EBT and check. They can also be image-attached, such as check image and signature image. Furthermore, you can process post-auth, repeat sale, return/refund, and void through Find Transactions, basing on the transactions you can locate in Find Transactions. Transaction Summary The Summary inside Find Transactions provides an overview of all transactions processed within a chosen date range. 1. To view Transaction Summary, click on the Find Transactions folder 2. Click on the Summary link Copyright©2011 T-Gate, LLC. Pathwaylink - Merchant User Manual | 35 of 67 3. Select a pre-defined date range from the Date Range drop-down list. Or, modify Start Date and End Date. Or, use the “≤” or “≥” link in the month bar to switch the month, and click on any date link in the calendar for a particular date. 4. Click Generate Report and a screen will appear similar to the example shown below Find Card Transactions Card transactions include credit card, debit card, gift card, and EBT card transactions. Since they all have similar transaction fields, we will discuss one card type, credit card, in detail. 1. Click on the Find Transactions folder Copyright©2011 T-Gate, LLC. Pathwaylink - Merchant User Manual | 36 of 67 2. To view the credit card details, click on the Credit link. To view the debit card details, click on the Debit link. To view gift card transactions, click on the Gift Cards link. To view the EBT details, click on the EBT link 3. Refer to Step 3, date range selection, in Transaction Summary later in this chapter for specifying a date range Note: For the rest of the filter fields, you don’t need to fill them all. Instead, just the ones you know, because the less information you provide, the more matches you will get. The following table illustrates 3 filter fields that each has a drop-down list. 4. Choose a Transaction Type from the drop-down list 5. Choose an option to Exclude Void transactions or not (by default, this box is checked) 6. Choose a card Payment Type from the drop-down list 7. Choose a Status from the drop-sown list 8. After entering all necessary information, click on the Submit button (the Reset button clears the form) and a screen will appear similar to the example shown below Copyright©2011 T-Gate, LLC. Pathwaylink - Merchant User Manual | 37 of 67 The following gives you a quick overview of each column in the example screen above. Ref # – A unique reference number that the system assigns to each transaction for an easy retrieval Customer ID – A unique number that the merchant assigns to identify a customer Inv # – The optional invoice number that is associated with the transaction Date – The date and time the transaction was processed Result – The response for the transaction (Examples are: Approved, Declined) Payment Type – The transaction’s payment type (Examples are: Visa, MasterCard, Visa, Amex, etc) Account Type – Same as Payment Type Card – The partially masked card number Name – The customer’s name Type – The transaction type (Examples are: Sale, Authorization, ForceCapture, Repeat Sale, and Credit) Status – The status of the transaction. If a transaction is declined, usually an error message is displayed (Examples are: Approval, Missing Key (See ADDRESS)) Approval Code – The approval or error code of the transaction Auth Amt – The dollar amount of an approval or authorization request Capture Amount – The transaction amount that is captured by the host User – The user name or terminal that processed the transaction Register – The register number on which the transaction is performed 9. If you want to change the number of transactions listed per screen page, edit the Items per page box. By default, the screen shows 10 transactions per page. Entering 0 will display all transactions in one page. Click Refresh 10. If you want to review the filter fields you have entered earlier for your receiving the current transaction list, click on the sign to expand the filter list. Copyright©2011 T-Gate, LLC. Pathwaylink - Merchant User Manual | 38 of 67 11. If you want to download the transaction list in the XML format, select XML in the Report Format field, and click Download and a screen will appear similar to the example shown below 12. Or you may choose a Tab Delimited format, and click Download and a screen will appear similar to the example shown below 13. To further explore the detail of a transaction, click on the transaction’s Ref# link Copyright©2011 T-Gate, LLC. Pathwaylink - Merchant User Manual | 39 of 67 Note: There are four kinds of task box you may see, Void, Refund, Capture and Repeat Sale, locating to the right of the card transaction detail. The following table shows a list of task box(s) matching transaction types: Card Type Transaction Type Settlement Task Box(es) PreAuth N/A Cature, Repeat Sale Unsettled Void, Repeat Sale Settled Refund, Repeat Sale Unsettled Void, Repeat Sale Settled Repeat Sale Sale, Force Capture Credit Card Credit Unsettled Void Gift Card Sale Settled Unsettled Repeat Sale Void Settled Refund 14. In the transaction list, if you see (the image icon) beneath the transaction’s Ref# link, which means a signature is captured for this transaction. Click on the image icon and a screen will appear similar to the example shown below Copyright©2011 T-Gate, LLC. Pathwaylink - Merchant User Manual | 40 of 67 Find Check Transactions The process of searching for a check transaction is identical to that for a card transaction, except that the searching filters are slightly different. 1. Click on the Find Transactions folder 2. Click on the Check link (shown below) Copyright©2011 T-Gate, LLC. Pathwaylink - Merchant User Manual | 41 of 67 3. For date selections, refer to Step 3 under Transaction Summary in later in the chapter Note: For the rest of the filter fields, you don’t need to fill out all. Instead, just the ones you know, because the less information you provide, the more matches you will get. The following table illustrates 2 filter fields that each has a drop-down list. 4. Choose a Transaction Type from the drop-down menu 5. Choose a Status from the drop-down menu 6. Click Submit (the Reset button clears the form) and a screen will appear similar to the example shown below 7. Please refer to Step 9 through Step 11 in Find Card Transactions in Chapter 4 for these three features The following gives you an overview of each column as shown in the example screen above. Ref # – A unique reference number that the system assigns to each transaction for an easy retrieval Customer ID – A unique number that the merchant assigns to identify a customer Inv # – The optional invoice number that is associated with the transaction Date – The date and time the transaction was processed Result – The response for the transaction. Examples are: Approved, Declined Payment Type – The transaction’s payment type (Examples are: ECHECK, VERIFY) Account # – The last 4 digits of the checking account number Transit # – The financial institution’s transit (bank routing) number for the check Check # – The check number Name – The customer’s name shown on the check Type – The type of transaction processed. Examples are: Sale, Credit Amt – The dollar amount of the check transaction User – The user name or terminal that processed the transaction Copyright©2011 T-Gate, LLC. Pathwaylink - Merchant User Manual | 42 of 67 Register – The register number on which the transaction is performed 8. To view the detail of a check transaction, click on its Ref# link Note: There are three kinds of task box you may see, Void, Refund, and Repeat Sale, locating to the right of the check transaction detail. The following table shows task boxes matching types of check transactions: Settlement Transaction Type Task Box(es) Void, Repeat Sale Unsettled Sale Refund, Repeat Sale Settled Sale Unsettled Credit Void Refer to the Void, Refund, and Repeat Sale section in this chapter. 9. In the transaction list, if you see (the image icon) beneath the transaction’s Ref# link, which means a check image is captured for this transaction. Click on the image icon Void Transactions Through Find Transactions, you can perform void on unsettled credit card, gift card and check transactions: Copyright©2011 T-Gate, LLC. Pathwaylink - Merchant User Manual | 43 of 67 1. To void a transaction, click Yes, Void this Transaction and a screen will appear similar to the example shown below Refund Transactions Similar to void transactions, through Find Transactions, you can perform refund on the settled credit card, gift card and check transactions: Copyright©2011 T-Gate, LLC. Pathwaylink - Merchant User Manual | 44 of 67 1. To adjust the refund amount, edit the amount field (a valid refund amount is less than or equal to the original transaction amount) 2. Click on Yes, Refund Account and a screen will appear similar to the example shown below Repeat Sale Transactions Through Find Transactions, you can perform repeat sale on existing credit card and check transactions. For credit card repeat sale, you are actually processing a brand new sale transaction, which is slightly different from the repeat sale discussed in Virtual Terminals. Under Virtual Terminals, the repeat sale refers to a recurring or installment transaction. Through Find Transactions, theoretically, you can perform repeat sale on any existing Sale, PreAuth, ForceCapture (PostAuth or ForceAuth), and Return/Credit credit card transaction. To make a repeat sale, first find the target transaction through the steps described earlier in this chapter. Then click on the transaction’s Ref# link. A repeat sale task box will appear (shown below). Copyright©2011 T-Gate, LLC. Pathwaylink - Merchant User Manual | 45 of 67 1. To chant the amount of the repeat sale, edit the amount field 2. Click on Yes, Charge Account and a screen will appear similar to the example shown below Capture PreAuth Transactions The procedure of capturing a PreAuth credit card transaction is also called PostAuth. It is the completion of a PreAuth transaction. To do so, first locate the transaction through the steps described earlier in this chapter. Then click on the transaction’s Ref# link. A Capture task box will appear to the right of the transaction detail. 1. To change the capturing amount, edit the amount field 2. Click Yes, Capture Amount and a screen similar to the example below will appear Copyright©2011 T-Gate, LLC. Pathwaylink - Merchant User Manual | 46 of 67 Ch 5: Recurring Billing How to configure transactions for recurring billing The Recurring Billing functions allow merchants to bill customers on a recurring basis. Each day, a batch process runs automatically and processes all the recurring transactions scheduled for that day. This chapter describes how to set up a customer’s recurring billing, including: add a recurring billing customer, add a payment method for the billing, and configure the recurring billing contract. Add and Edit a Customer 1. Click on the Recurring Billing folder 2. Click on Add Customer link and a screen will appear similar to the example shown below Note: In the new customer information form, the Customer ID field is for your own reference. Typically, you should make this field same as the customer identifier in your CRM (Customer Relationship Management) or billing system. The required fields in the form are: Customer ID, plus one of these three fields: First Name, Last Name, or Company. Copyright©2011 T-Gate, LLC. Pathwaylink - Merchant User Manual | 47 of 67 3. Enter all the information necessary to identify a customer for recurring billing; then click Add Customer Note: The recurring billing customer profile screen appears after you add a new recurring billing customer. It includes three sections: Primary Contact, Payment Info, and Contracts. Each section has a link in the header that allows you to edit or add information associated with that section. You can also reach this screen by selecting View Customers in the Recurring Billing folder, which we will discuss later in this chapter. 4. To edit the customer primary contact information, click on the Edit Customer link in the Primary Contract section header 5. The customer contact information form will appear. Edit the fields accordingly 6. Click Update Customer. This will take you back to Customer Profile Screen Add and Edit a Payment Item You can add two types of payment method for a recurring billing customer: Credit Card and ACH (E-Check). 1. From the recurring billing customer profile screen, click on the Add Credit Card or ACH link in the Payment Info section header 2. Select either Credit Card or ACH and a screen will appear similar to the examples shown below Copyright©2011 T-Gate, LLC. Pathwaylink - Merchant User Manual | 48 of 67 3. Fill out the credit card or ACH information 4. You have two options to charge the customer on this payment item: either charge later or charge now. If you select Later User Only, click Save Payment Info. This will take you back to the recurring billing customer profile screen. If you select Charge Now, follow the following steps 5. Insert an amount in the Amount field 6. Click Charge & Save Payment Info and a receipt will appear similar to the examples shown below Copyright©2011 T-Gate, LLC. Pathwaylink - Merchant User Manual | 49 of 67 7. To go back to the recurring billing customer profile screen, click the View Customer link above the receipt and a screen will appear similar to the example shown below 8. To edit the payment item, click on edit Copyright©2011 T-Gate, LLC. Pathwaylink - Merchant User Manual | 50 of 67 9. Edit the payment information and click Update Payment Item. This will take you back to the recurring billing customer profile screen Note: Once a payment term is properly populated, you will have the option to charge to the customer’s payment account. 10. To charge to an established payment item account, input an amount in the Charge Amount box, and click on the Charge link Copyright©2011 T-Gate, LLC. Pathwaylink - Merchant User Manual | 51 of 67 Add and Edit a Contract A recurring billing contract contains billing information, such as when, how much, and how often to charge a customer. Prior to adding a contract, you need to have at least one payment item available for billing the customer. 1. Click on the Add Contract link in the header of the Contracts section inside the recurring billing customer profile screen and a screen will appear similar to the example shown below The following describes each input fields in the Contracts Info form Contract ID – (Required) A unique number or word identifying the contract Copyright©2011 T-Gate, LLC. Pathwaylink - Merchant User Manual | 52 of 67 Contract Name – (Optional) The name of a contract. You can also use this field to specify a contract type, such as Gold, Silver, or Bronze Start Date – (Required) The first date the contract to be executed. Notice the start date cannot be on the same day that you enter the contract. This is because the payment server’s recurring batch process may have already run for the day End Date – (Optional) The date that the contract to be terminated. If the contract is ongoing, leave this field blank Subtotal – (Required) The amount before tax to be charged to the customer each time the contract gets executed Tax – (Optional) The tax amount for the payment Total – A Read Only field, which is automatically populated by adding Subtotal and Tax; This is the total amount that will be charged every time the contract gets executed Status – (Required) By default, a contract is set to Active when created. Once a contract or customer expires, the status will be automatically set to Inactive. A contract with Inactive status will not be executed Payment Item – (Which Account should be Billed for this Contract) (Required) Select a payment item for the contract to execute on Contract Frequency – (Execute this Contract) (Required) Select how often the contract gets executed Retry Processing Payment – (Required) If a contract is executed, but for some reason, the transaction is declined, this field will tell the payment server how many times to reprocess the transaction. A contract will only be executed once per day. Any transactions that fail will not be attempted again until the following day. By selecting “0”, the contract will not execute again until the next scheduled charge date and will only charge the regular amount of the contract. In other words, when this field is set to “0”, and a transaction fails, the recurring billing system will not try to recover the funds that is failed to obtain previously Email Approval – (Required) Choose to receive a confirmation email every time the contract’s payment is approved Email Declined – (Required) Choose to receive a confirmation email every time the contract’s payment is declined Note: The following are two reminders when processing transactions through recurring billing. If a transaction is declined and you have selected “10” retries (the maximum amount of times you can retry) in the Retry Processing Payment field, the payment server will keep trying to process the transaction until it is either approved or retried 10 times. This will not affect the next bill date. For example, you have a contract setup to charge $15 to a credit card on the first day of every month; if on 5/1/2004 the transaction is declined, but it is finally approved on 5/6/2004, the next bill date will still be 6/1/2004 Copyright©2011 T-Gate, LLC. Pathwaylink - Merchant User Manual | 53 of 67 A contract can only have one transaction pending at any given time. For example, you have a contract set up to process daily. If the credit card gets declined today and you requested to have it retry several times, the contract will not execute at its regular time tomorrow. When the recurring billing system of T-Gate TPI Payment Server runs tomorrow, it will see this contract is flagged as declined and will try to reprocess the declined transaction. Therefore, the new charge for tomorrow will not be queued. It is recommended that daily contracts have retries set to “0” and that you request to have a decline confirmation email sent. This way, you can take the necessary steps to resolve declined payments without missing any further payments 2. Input the contract information into the Contract Info form 3. Click Add Contract. This will take you back to the recurring billing customer profile screen 4. To edit a contract, click on its Contract ID link 5. The Contract Info form will appear again for you to edit 6. Click Update Contract afterwards. This will take you back to the recurring billing customer profile screen 7. To view the payment history on this contract, click on the Payment History link and a screen will appear similar to the example shown below View Customers The View Customers link inside the Recurring Billing folder enables you to search for a customer under certain filters. 1. Click on the Recurring Billing folder 2. Click on the View Customers link 3. To display all customers, click Find Customer(s). Copyright©2011 T-Gate, LLC. Pathwaylink - Merchant User Manual | 54 of 67 a. To search by field, click on the drop-down arrow in the Search By box, and choose a field accordingly b. Input the search value in the Search Value text box c. To view customer based on their status, select the status option 4. Click Find Customer(s) (the Clear Filters button lets you clear all the field contents you have entered) and a screen will appear similar to the example shown below 5. To refine your search, check the Show Filters box to expand the filter section. Then edit the filter fields again a. To send an email to the customer, click on the customer’s email link b. To activate or inactivate a recurring billing customer account, check the customer and choose either Active or Inactive from the Active/Inactive drop-down list 6. To view the customer information, click on the Customer ID link. This will take you to the recurring billing customers profile screen View Contracts The View Contracts link enables you to search for a contract under certain filters. 1. Click on the Recurring Billing folder 2. Click on the View Contracts link and a screen will appear similar to the example shown below 3. IF you want to view all active contracts, click Find Contract(s) a. To search for a specific contract, input the ID into the Contract ID field b. Or, click on the drop-down arrow to choose a date option for the Next Bill Date field, and enter the date either by clicking no the calendar link to select the date, or by entering a date manually in the Date box c. Or/And click on the drop-down arrow to choose an amount option for the d. Total Amount field, and enter an amount in the Total Amount field e. You may also narrow your search by the contract’s payment method; click on one of the payment method radio buttons Copyright©2011 T-Gate, LLC. Pathwaylink - Merchant User Manual | 55 of 67 To search according to the contract’s status, choose one option from the four status radio buttons 4. Click on the Find Contract(s) button (the Clear Filters button lets you clear all the field contents you have entered as search criteria) and a screen will appear similar to the example shown below f. 5. To refine your search, check the Show Filters box to expand the filter section. Then enter your search criteria a. To view the contract’s owner, click on the Customer ID link. This will take you to the recurring billing customer profile screen b. To view the payment history on this contract, click on the Payment History link 6. To view the detail of a contract, click on that contract’s ID link. This will take you to the Contract Info form Billing Report The Billing Report link enables you to view all the approved transactions inline with their corresponding contracts. In the report, transactions processed automatically through recurring billing will be listed. Other transactions made under Recurring Billing will not appear, including charging on either a payment item when it’s newly created, or a payment item inside the Payment Info section. You can find those transactions through Find Transactions instead. 1. Click on the Recurring Billing folder 2. Click on the Billing Report link and a screen will appear similar to the example shown below Note: The Show Filters section help you narrow down the transaction report for a specific recurring billing customer, amount, date range, or payment method. 3. To search for a specific contract, input the Contract ID into the Contract ID field a. And/Or click on the drop-down arrow to choose an amount option for the Billed Amount field, and enter an amount in the Billed Amount field b. And/Or choose a date range by clicking on the drop-down arrow, and Copyright©2011 T-Gate, LLC. Pathwaylink - Merchant User Manual | 56 of 67 select a pre-defined date range. Also you may manually enter the start date and end date for a date range c. You can also narrow down your search by the contract’s payment method; click on one of the payment method radio buttons 4. Click on the Find Billing(s) button (Clear Filters lets you clear all the field contents you have entered as search criteria) and a screen will appear similar to the example shown below. Notice the and buttons under each column name are for sorting the listed transactions 5. To view the contract for a particular transaction, click on it’s Contract ID link 6. To view the details of a transaction, click on the transaction’s Ref # link Ch 6: Preferences and Merchant Support How to change personal settings and get additional support This chapter discusses five main functions of Preferences: regulate access to a user account, add custom fields for transactions, set up input devices for the payment server, change the user password, and modify security levels to grant a user specific access to certain functions. Furthermore, we include information on the remaining features in the menu bar: send emails to your payment solution service provider, and log out of the TGate TPI Payment Server. User Access Control By verifying the requesting party’s IP (Internet Protocol) address and country, the Access Control preference grants or denies access to a merchant user account. All IPs and all countries are allowed accesses by default. 1. Click on the Preferences folder 2. Click on the Access Control link and a screen will appear similar to the example shown below Note: Validating IP and validating country have identical steps to follow. 3. To validate IP/Country, check Validate IP/Country Address When Logging In and a screen will appear similar to the examples shown below Copyright©2011 T-Gate, LLC. Pathwaylink - Merchant User Manual | 57 of 67 Note: There are two options: DENY ALL IPs/Countries EXCEPT Those Listed Below ALLOW ALL IPs/Countries EXCEPT Those Listed Below The default settings for both IP and country are ALLOW. Besides, for country, all unknown countries are set to deny. Allow All IPs/Countries 1. To add one or more IPs/Countries to the Denied IP/Country List, for IP, type an IP address in the Add IP text box; for country, select a country from the country drop-down list, and then click Add IP/Country. The IP address or country will be automatically populated into Denied IP/Country List 2. If you want to remove the IP/Country form the Denied IP/Country List one by one, click on the one you want to remove; then click the Remove Selected button. Or, you may click the Remove All button to clear all IPs/Countries shown in the Denied IP/Country List 3. After you complete editing the settings for ALLOW ALL IPs/Countries EXCEPT Those Listed Below, you need to ensure this option will be in use Copyright©2011 T-Gate, LLC. Pathwaylink - Merchant User Manual | 58 of 67 a. If you see the Use This Option button as it is shown in, this means the Deny All IPs/Countries EXCEPT Those Listed Below option is currently in use, you need to click this button to switch to the Allow option. Notice the Use This Option button only appears when the checked option to its left is NOT currently in use. Therefore, when switching from one option to another, you must click on the Use This Option button for the change to take effect b. If the Use This Option button does not show up, that means the ALLOW ALL IPs/Countries EXCEPT Those Listed Below option is already in use Deny All IPs/Countries 1. Check the DENY ALL IPs/Countries EXCEPT Those Listed Below radio button (shown below) 2. To add one or more IPs/Countries to the Allowed IP/Country List, for IP, type an IP address in the Add IP text box; for country, select a country from the country drop-down list, and then click Add IP/Country. The IP address or country will be automatically populated into Allowed IP/Country List 3. If you want to remove the IP/Country from the Allowed IP/Country List one by one, click on the one(s) you want to remove, and then click the Remove Selected button. Copyright©2011 T-Gate, LLC. Pathwaylink - Merchant User Manual | 59 of 67 Or, you can click the Remove All button to clear all IPs/countries shown in the Allowed IP/Country List 4. After you complete editing the settings for DENY ALL IPs/Countries EXCEPT Those Listed Below, you need to ensure this option will be in use a. If you see the Use This Option button as it is shown in, this means the Allow All IPs/Countries EXCEPT Those Listed Below option is currently in use, you need to click this button to switch to the Deny option. Notice the Use This Option button only appears when the checked option to its left is NOT currently in use. Therefore, when switching from one option to another, you must click on the Use This Option button for the change to take effect b. If the Use This Option button does not show up, that means the DENY ALL IPs/Countries EXCEPT Those Listed Below option is already in use Custom Fields The Custom Fields preference allows you to add up to 30 string (for character) and numeric (for number) fields respectively for your specific needs. After adding the fields, you can populate them when performing credit card or check transactions under Virtual Terminals. In addition, you can use those fields as filters to find a transaction through Find Transactions. 1. Click on the Preferences folder 2. Click on the Custom Fields link and a screen will appear similar to the example shown below 3. Choose a custom Field Type as either String/VarChar (for character) or Numeric/Decimal (for number) 4. Give the field a descriptive name 5. Further describe this field 6. If the custom field is string type, enter the minimum length for the string (Notice the length must be ≥ 0). If the custom field is number type, enter a minimum value for the number 7. If the custom field is string type, enter the maximum length for the string (Notice the length must be ≤ 50). If the custom field is number type, enter a maximum value for the number 8. Choose either Yes or No for this custom field to be required or not 9. Click on the Add Field button and a screen will appear similar to the example shown below Copyright©2011 T-Gate, LLC. Pathwaylink - Merchant User Manual | 60 of 67 10. To remove a custom field, click on the Remove link as shown in the figure above Setting up Input Devices The Device Setup preference enables you to configure parameters specific to what type of input device you desire to use with the T-Gate TPI Payment Server. The input devices configurable are card readers, PIN pads, and check readers. Once configured, they can be used when you make transactions under Virtual Terminals. For more information on what parameters you need, to set up a device properly, check your device manual or consult the device manufacturer. 1. Click on the Preferences folder 2. Click on the Device Setup link Setting up a Card Reader The payment server’s virtual terminal currently works with card reader devices such as serial card reader and keyboard wedge. 1. By default, the device setup screen first show the Card Reader setup. Select the type of card reader from the Card Reader Type drop-down list Copyright©2011 T-Gate, LLC. Pathwaylink - Merchant User Manual | 61 of 67 The following table shows each setup parameter and its valid values. It applies to all three types of input device. Input Device Setup Parameter Value Com Port 1 – 30 Baud Rate 110, 300, 600, 1200, 2400, 4800, 14400, 19200, 28800, 38400, 56000, 57600, 115200, 128000, 256000 Flow Control No Flow Control, Software, Hardware Parity No Parity, Odd, Even, Mark, Hardware Stop Bits 1, 1.5, 2 Data Bits 5,6,7,8 Time Out (Numeric time out value in second) 2. Editing the settings accordingly and click on the Save button to save your settings Setting up a PIN Pad The payment server’s virtual terminal currently works with VeriFone 1000 PIN pad. 1. Click on the Pinpad link in the Initial Device Setup screen and a screen will appear similar to the example shown below Copyright©2011 T-Gate, LLC. Pathwaylink - Merchant User Manual | 62 of 67 2. Select a Pinpad Type from the drop-down list 3. Choose either Master Session or DUKPT from the Key Management option 4. Editing the settings accordingly and click on the Save button to save your settings (Refer to Input Device Setup Parameter) Setting up a Check Reader The payment server’s virtual terminal currently works with serial checker reader and check image reader such as Magtek MICR Imager. 1. Click on the Check Reader link in the Initial Device Setup screen Copyright©2011 T-Gate, LLC. Pathwaylink - Merchant User Manual | 63 of 67 2. Select a check reader type from the drop-down list 3. Edit the settings accordingly and click the Save button to save your settings (Refer to Input Device Setup Parameter) Changing User Password 1. Click on the Preferences folder 2. Click on the Password link and a screen will appear similar to the example shown below Copyright©2011 T-Gate, LLC. Pathwaylink - Merchant User Manual | 64 of 67 3. Input the current password in the Old Password field 4. Input your new password in the New Password field 5. Confirm your new password by inputting it into the Enter New Password Again field 6. Click on the Change Password button (the Reset button clears the contents in the fields) Setting Security The Security preference is to set security for functions performed at the merchant user level. The user security level is assigned when each new user account is created. A merchant user will be able to access each function if his/her security level is greater than or equal to the number defined in this preference. 1. Click on the Preferences folder 2. Click on the Security link and a screen will appear similar to the example shown below 3. Select a proper security level for each item 4. Click Change Security (the Reset button allows you to return to the previously saved settings) Note: The payment server currently has four levels of security settings: 1, 2, 3 and 4, with 4 being the highest security level and 1 the lowest. In the above figure, the numbers represent the minimum security level that a merchant user must have, in order to access the corresponding features. For example, if "Void" is set to 2, then a merchant user with security level of 2, 3 or 4 can void a transaction, but a merchant user with Copyright©2011 T-Gate, LLC. Pathwaylink - Merchant User Manual | 65 of 67 security level of 1 cannot perform voiding transactions. The table below provides more details on each security item in the above figure. Effected Functionality Security Setting Sale Folder Functions Virtual Terminals Credit – Sale Debit – Sale Checks – Sale Gift Cards – Redeem Find Transactions Credit – Repeat Sale Current Batch (for terminalbased processor) Credit – Repeat Sale Virtual Terminals Debit – Return Checks – Return Gift Cards – Refund Find Transactions Credit – Refund Virtual Terminals Checks – Void Credit – Void Gift Cards – Void Return Find Transactions Void Current Batch (for terminalbased processor) Credit – Void Pre-Auth Virtual Terminals Credit – PreAuth Checks – Verify Force-Auth Virtual Terminals Credit – ForceAuth Checks – ForceSale Find Transactions Reports End-of-Day End of Day (for terminal-based processor only) User Admin Manage Users Change Security Preferences -> Security Tools N/A Copyright©2011 T-Gate, LLC. Pathwaylink - Merchant User Manual | 66 of 67 Sending Email to M erchant Support The Email function provides contact links to merchant support from TPI Software. Clicking on the email link will lead you to send an email to either Sales or Support team of TPI Software. 1. Click on the Email folder 2. To email the sales staff, click on the Sales link 3. To email the support staff, click on the Support link 4. After your default mail application appears, type you email and click on Send in you email software System Logout The Logout link lets you logout of the system with the current user name. 1. Click on the Logout link Copyright©2011 T-Gate, LLC. Pathwaylink - Merchant User Manual | 67 of 67