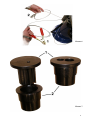
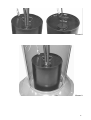
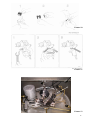
1
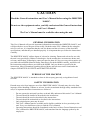
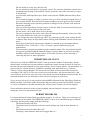
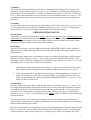
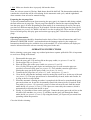
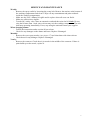
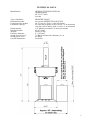
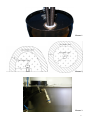
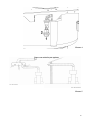
General instructions
and
User’s Manual
for
spray gun cleaner
DRESTER 3600GC
DOC. NO.: 13552
REV: 050422/NJ
APPR:
PAGE: 1/16
CAUTION
Read the General instructions and User’s Manual before using the DRESTER
3600GC.
Do not use the equipment unless you fully understand the General instructions
and User’s Manual.
The User’s Manual must be available when using the unit.
GENERAL INFORMATION
This User’s Manual will provide important information concerning the DRESTER 3600GC, and
will describe how to use the gun cleaner safely. Read the entire User’s Manual before using the
unit. For safe use, it is important that the unit, the drums and the solvent are of the described
specifications, and that they are handled properly. It is important that you follow the instructions
carefully.
The DRESTER 3600GC utilizes drums of solvent for cleaning. Drums and solvent for use with
the unit is not provided by Hedson Technologies. On the market there are numerous drums and
solvents, and Hedson Technologies cannot account for them all. Never use any solvent unless it is
provided with an MSDS (Material Safety Data Sheet). Read the MSDS carefully, and follow all
the instructions and procedures provided in the MSDS. Only use drums as specified in the
instructions. More information regarding allowed drums and solvents can be found under the
chapters PERMITTED SOLVENTS and PERMITTED DRUMS.
PURPOSE OF THE MACHINE
The DRESTER 3600GC is intended to clean air-driven spray guns only, using thinner-based
solvents.
SAFETY INFORMATION
Hazards may arise from improper use of the DRESTER 3600GC. Hazards may also arise from
improper choice/handling of drums or solvent. In order to maintain the high safety standard of the
unit, it is important that these instructions are followed.
-
Do not operate the unit until you have read and fully understood this entire User’s Manual.
The unit should be intalled as described in the instructions.
The unit should be used as described in the instructions.
The unit should be maintained as decribed in the instructions.
Only original spare parts may be used.
This User’s Manual must be available and in legible condition in close proximity to the
unit. Every user shall know where to find the User’s Manual.
Operating instructions should be formulated on the basis of these General Instructions and
User’s Manual for DRESTER 3600GC, and translated into the language spoken by the
employees.
2
-
-
-
-
Do not modify or in any way alter the unit.
Do not operate the unit unless it is properly vented. The extractor should be connected to a
grounded metal ducting vented outside. Do not operate the unit if the extraction of vapors
is insufficient.
Avoid contact with liquid and vapor. Refer to the solvents’ MSDS (Material Safety Data
Sheet).
Wear chemical goggles or similar, to protect your eyes. Wear chemical-resistant gloves to
prevent skin-contact. Wear chemical-resistant clothing to protect against spills or splash.
Personnel suffering from respiratory problems or allergies to the solvents used, must not
operate the machine.
Clean up spills immediately. Solvent vapors are heavier than air and can spread a long way.
They may also collect in pits or other low areas.
Do not smoke, eat or drink while close to the unit.
The unit is equipped with a safety valve that will interrupt the automatic wash cycle if the
lid is opened before the wash cycle is completed.
A fire extinguisher (dry chemical type ABC, dry chemical type BC, foam, carbon dioxide
or Halon) must always be kept nearby when working with flammable solvents. Do not use
water.
Spray guns cleaned in the unit must be suitable for cleaning in gun cleaning machines
classified as Class 1, Division 1 / Zone 1. If unsure, please contact the spray gun
manufacturer.
The unit must be properly grounded using the attached clamps. The solvent drums should
be properly grounded using the attached clamps. If plastic drums are used, the openings
should be wiped off with a damp cloth, to avoid static electricity, before inserting or
removing any hoses or other equipment.
PERMITTED SOLVENTS
Solvent for use with the DRESTER 3600GC is not provided by Hedson Technologies. On the
market, there are numerous solvents and these instructions cannot account for them all. Only use
the unit with solvents intended for spray gun cleaning, such as lacquer thinner. Lacquer thinner is a
generic term for solvent mixtures, commonly containing such ingredients as e.g. Acetone,
Toluene, Xylene and iso-Butanol. The unit can be used with solvents classified as Group IIA
according to IEC 60079-20. The unit can also be used with water. All solvents must have a pH
value between 4 and 10. Be sure not to mix water-based solvents with thinner-based solvents. It is
important that all users are informed of what solvent is being used, at all times.
Never use any solvent if it is not provided with an MSDS (Material Safety Data Sheet). Read the
MSDS carefully, and follow all the instructions and procedures provided in the MSDS. If unsure,
or if more information is needed concerning the solvent, please contact your solvent supplier.
Do not add other chemicals to the solvent including, but not limited to, kerosene, gasoline,
detergents, fuel oil or chlorinated solvents.
PERMITTED DRUMS
It is important that the drums fit the gun cleaner properly, for safe use. There are several types of
solvent drums on the market. The DRESTER 3600GC can be used with different types of drums
and bungs, but they must comply with the following:
- The drums must be leak-free.
- The drums must fit inside the enclosed circular spillage tray with an inner diameter of
14.2”.
- The drums must not be taller than 18.5”.
- The bung’s inner diameter must not be bigger than 2.6”.
3
-
The bung must be big enough to accommodate 2 hoses, 0.61” and 0.82” respectively (see
picture 1).
Solvent drums are not provided by Hedson Technologies, thus Hedson Technologies does not take
any responsibility for the drums. Follow the solvent supplier’s instructions carefully.
For more information concerning drums, bungs etc, please see chapter PREPARATIONS FOR
USE.
ASSEMBLY
See separate “Assembly instructions for spray gun cleaner DRESTER 3600GC”, (document no.
13582).
PLACING THE UNIT
Area classification
The DRESTER 3600GC can be placed in locations classified as Class 1, Division 1 / Zone 1.
If the DRESTER 3600GC is installed in locations classified as Class 1, Division 2 / Zone 2, or in
unclassified locations, the area within 5 feet from the unit is to be classified as Class 1, Division 1
/ Zone 1. Outside said area, another 3 feet is to be classified as Class 1, Division 2 / Zone 2 (see
picture 2).
Within these classified areas of Class 1, Division 1 / Zone 1 and Class 1, Division 2 / Zone 2, all
equipment, such as electrical items and ventilation equipment, must be approved for the applicable
Division / Zone. Equipment that generates naked flames or sparks (e.g. welding or grinding
equipment) may not be used in this area. Smoking is not permitted. If in any doubt, contact the
local fire service authorities for advice.
Fire extinguisher
A fire extinguisher (dry chemical type ABC, dry chemical type BC, foam, carbon dioxide or
Halon) must always be kept nearby when working with flammable solvents. Do not use water.
Drain water protection
The unit must be placed in a location where any accidental leakage of solvent is prevented from
spreading into the drain water system.
INSTALLATION
Compressed air
Fit a quick-coupling to the air line on the left side of the unit (see picture 3). This air line is used if
you want to blow out the spray gun manually, after the cleaning procedure.
The unit must be connected to compressed air of 90-175 psi (6-12 bar). The air connection (1/4”
female thread) is at the back of the unit (see picture 4, item 1). When connected, open the main
valve (see picture 4, item 2) slowly, to spare the pneumatics from a pressure blast.
When running an automatic wash, the air consumption is 3.5 cfm (100 liters/min). When having
the lid open and using the manual rinse nozzle, the unit temporarily consumes up to 9 cfm (250
liters/min) of air. To prevent pressure drops, the air-line and couplings must be adequately
dimensioned for air pressures and flows as stated above. The pressure regulator on the unit is preset to 87 psi (6 bar). The compressed air supplied to the unit must be clean, dry and free from oil.
Otherwise, it may cause damage to the pneumatic components of the unit, and any warranty claims
will be invalidated.
4
Ventilation
The air-driven extractor should be connected to a grounded metal ducting, with a smooth inner
surface, to lead the exhausts outdoors (see picture 5). Alternatively, lead the metal ducting into a
hood, which is in turn connected to a suitable ventilation system approved for Class 1, Division 1 /
Zone 1. Such a hood should have an open design to avoid constant extraction (see picture 5). The
metal ducting may not be longer than 50 feet, and must be connected in a way ensuring that it is
grounded.
Grounding
Securely ground the unit, using the main ground clamp on the back of the unit (see picture 6, item
1). Also ground the drums, using the grounding clamps (see picture 6, item 2). If using painted
drums, scrape off some paint to ensure proper contact for the ground clamps.
PREPARATIONS FOR USE
Solvent drums
Two drums are needed, one drum that is empty, and one drum full of solvent. Both drums must be
of the same size, and they must meet the requirements described under chapter PERMITTED
DRUMS. Both drums must be clean on the inside and they must not contain any solids or other
objects that could be sucked into the pumps when running.
Drum plugs
There are several types of solvent drums on the market. DRESTER 3600GC can be used with
different types of drums and bungs. Read these instructions and chose the setup suitable for your
kind of drums.
Depending on the appearance of the bungs, the hoses are led through the bungs in different ways.
Enclosed are drum plugs (see picture 7, item 1) that can be used with different bung sizes. The
drum plugs can be used with or without the enclosed drum plug collars (see picture 7, item 2). The
drum plug collars are tapered to fit different sized bungs.
1. If the diameter of the drum bungs is more than 1.6”, then use the drum plugs. If the drum
plug collars fit into your bungs, use them together with the drum plugs (see picture 8).
2. If the solvent drums have got flexible pull-up spigots, with bung diameters less than 1.6”,
then no drum plugs are used. When using such drums, it is usually practical to have the
flexible spigot pushed down when used with the DRESTER 3600GC (see picture 1). This
makes it easier to fit the hoses.
Solvent fill-up
Place the spillage tray on the floor, inside the gun cleaner’s foot plate (see picture 9, item 1). Use
one empty drum and another identical drum full of clean solvent. Place the first drum, the empty
one, underneath the unit. Fit the drain hose into the drum together with the ½” black grooved
suction hose. Use drum plugs as described earlier under section Drum plugs. If a drum plug is
fitted (see picture 9, item 2), use the drum plug with 2 holes. Make sure that the hoses are properly
led into the drum.
Open the gun cleaner’s lid. Take the second drum, the one full of solvent, and pour half of its
contents into the gun cleaner’s washing compartment. The solvent that is poured in will drain into
the drum underneath the gun cleaner.
Place the second drum, now half full, on the floor on the right-hand side of the gun cleaner. Fit the
black ¼” solvent line, into the drum. Do not bend the hose more than necessary. Use drum plugs
as described above under section Drum plugs. If a drum plug is fitted, use the drum plug with
5
1 hole. Make sure that the hose is properly led into the drum.
Now, the solvent system is filled-up. Both drums should be half full. The drum underneath the unit
contains the solvent that will be recirculating for the automatic wash cycle, and the right-hand
drum contains clean solvent for manual rinsing.
Preparing the air purge lines
To prevent contaminated solvent from enetering the spray gun’s air channels while being washed,
the unit utilizes an air purge line. The air purge line should be fitted with a tapered plug that fits
into the spray gun’s air inlet. Depending on what model of air-connection you use on your spray
gun, there are different tapered plugs to fit all models. Pick the tapered plug that fits your type of
air-connection (see picture 10). Break it off and fit it to the air purge line. There are two air purge
lines to fit both gravity-fed spray guns and suction-type spray guns. Fit both lines with tapered
plugs.
Operating instructions
Operating instructions should be formulated on the basis of these General Instructions and User’s
Manual for DRESTER 3600GC, and translated into the language spoken by the employees.
Instructions should always be available close to the machine. To avoid confusion, all employees
must be informed about the solvent currently being used in the unit.
OPERATING INSTRUCTIONS
Before cleaning a spray gun, empty any residual paint into a separate spills-dish. This is important
to avoid over-filling of the drums.
1.
2.
3.
4.
5.
6.
7.
8.
Disassemble the spray gun.
Place the spray gun’s cup and cup lid on the spray cradle (see pictures 12 and 13).
Fit the trigger clip (see picture 11).
Place the spray gun on the spray cradle (see pictures 12 and 13).
Note: Gravity fed spray guns require an extension pipe. Several extension pipes are
provided, to fit most spray guns (see picture 15). Fit a suitable extension pipe before
placing the spray gun on the spray cradle (see picture 14, item 2).
Connect the air purge line (see picture 12, item 1 and picture 13, item 1).
Close the lid, and start the automatic wash by turning the on/off-lever on the top of the unit
(see picture 15). The spray gun will now be automatically cleaned, inside and outside, for
as long as the lever stays turned.
When the automatic cleaning procedure is completed, the lid can be opened and the spray
gun can be taken out. It can now be manually rinsed with clean solvent, if required. If the
foot pedal (see picture 15) is pressed, a spray of clean solvent will come from the nozzle
under the lid (see picture 16, item 1). The vapors are removed by the extractor, which is
automatically activated when the lid is open.
Finally, it is possible to blow out the spray gun. Connect the spray gun to the air line on the
left side of the machine (see picture 3), and blow out the spray gun through the funnel
under the lid (see picture 16, item 2). By using this funnel, you vapors are prevented from
spreading within the premises.
Close the lid after cleaning.
6
SERVICE AND MAINTENANCE
Weekly:
- Remove the spray cradle by loosening the center bolt. Remove the strainer at the bottom of
the washing compartment and clean it. Wipe off any contaminants and paint residuals
inside the washing compartment.
- Make sure the User’s Manual is legible and in a place where all users can find it.
- Make sure all decals are legible.
- Test the lid’s safety valve. Start an automatic wash and then raise the lid 1 inch. Do not
raise the lid more than 1 inch, since solvent may exit the washing compartment. The unit
shall stop operating immediately. If not, stop using the unit and contact your supplier.
When changing drums:
- Follow the instructions under section Solvent drums.
- Check for any damages on the drums and hoses. Replace if damaged.
Monthly:
- Remove the seven spray nozzles (see picture 17) and clean them with clean solvent.
- Check hoses for any damages. Replace if damaged.
Yearly:
- Remove the extractor. Check the air-jet nozzle in the middle of the extractor. If there is
paint build-up on the nozzle, replace it.
7
TECHNICAL DATA
Manufacturer:
HEDSON TECHNOLOGIES AB
Hammarvägen 4
SE-232 37 Arlöv
Sweden
Type of machine:
Permitted solvents:
Compressed air needed:
Extraction capacity:
DRESTER 3600GC
See section PERMITTED SOLVENTS
90-175 psi (6-12 bar), 9 cfm (250 l/min)
82 cfm (140 m3/hour) (with a 50 feet / 15 m extension)
106 cfm (180 m3/hour) (with a 16 feet / 5 m extension)
2.65 gallons per minute (10 liters per minute)
45 psi (3 bar)
66 lbs (30 kg)
5” (125 mm)
71 dB(A) measured at a distance of 1 m
85 dB(A)
See below.
Pump capacity:
Solvent pressure:
Weight:
Extractor diameter:
Sound pressure level:
Sound power level:
Overall dimensions:
8
Picture 1
Picture 2
Picture 3
9
Picture 4
Vapor extraction layout options:
Picture 5
10
Picture 6
Picture 7
11
Picture 8
2
1
Picture 9
12
Picture 10
Picture 11
1
Picture 12
13
2
1
Picture 13
Picture 14
Picture 15
14
Picture 16
Picture 17
15
16