1
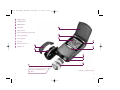
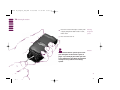
Roche 014103 – Accu-Chek Compact_CAN – Cover Schwarz Cyan Magenta Gelb PMS 249
Prüfmittel-Nr. 30 X
ACCU-CHEK
Compact
BLOOD GLUCOSE MONITOR
User’s Manual
0088
Made in Germany for export to:
Roche Diagnostics
201 Boul. Armand-Frappier
Laval, Québec
CANADA, H7V 4A2
Diabetes Care Info-Line:
Montreal area: (450) 686-7100
Outside Montreal (toll free): 1-800-363-7949
www.accu-chek.ca
Roche Diagnostics GmbH
D-68298 Mannheim, Germany
www.accu-chek.com
0 3535517001(01) - 02/03
ACCU-CHEK and SOFTCLIX
are trademarks of a Member
of the Roche Group
Integrated test strips
®
014103 AC_Compact_ImP_CAN
12.08.2003
11:23 Uhr
Seite u2
CONTENTS
CONTENTS
1
Introduction
2
Inserting or replacing batteries
10
3
Inserting or replacing the test strip drum
16
4
Settings
26
4.1 Enabling/disabling the beep tone
4.2 Setting the year
4.3 Changing the date/time format
4.4 Setting the time
4.5 Setting the date
28
30
32
34
36
Performing a blood glucose test
5
6
u2
6
7
Checking, cleaning and storing your monitor
56
7.1 Checking the monitor
7.2 Cleaning the monitor
7.3 Storing the monitor
56
60
65
8
Technical data
66
9
Problem checklist
68
10
Display messages and troubleshooting guide
70
11
Guarantee
90
38
12
Customer support and service
92
5.1 Using the Accu-Chek Softclix lancing device
5.2 Testing blood glucose
5.3 Testing conditions
38
40
48
13
System components
94
14
Alphabetical index
98
Reviewing stored blood glucose results
50
6.1 Highest value, lowest value, average
6.2 Downloading test results to a computer
52
54
1
014103 AC_Compact_ImP_CAN
12.08.2003
1
Display window
2
ON/OFF button
3
MEMO button
4
SET button
5
Optical system
6
Drum compartment release button
7
Drum compartment
8
Test strip drum
9
Test strip
11:23 Uhr
Seite 2
11
3
1
4
10 Optical system cover*
10
11 Display cover*
2
5
6
7
8
9
Front edge of strip that draws up
the blood
* available as replacement part
2
3
2
3
014103 AC_Compact_ImP_CAN
12.08.2003
11:23 Uhr
Seite 4
12 Infrared data transmission window
13 Control window (shows the number of strips remaining)
14 Battery compartment
15 Batteries: Type AAA, LR 03, AM 4, Micro
16 Battery compartment cover*
17 Test strip guide
16
13
17
12
14
15
* available as replacement part
4
5
4
5
014103 AC_Compact_ImP_CAN
12.08.2003
11:23 Uhr
Seite 6
1 Introduction
Accu-Chek Compact is a completely new type of blood glucose
monitor for people with diabetes who test their own blood
glucose regularly. We have designed it to be as easy and safe
to use as possible. You will quickly discover that Accu-Chek
Compact is a reliable blood glucose monitor that you can take
anywhere.
We recommend that you use the Accu-Chek Softclix lancing
device to obtain capillary blood samples. Blood collection with
an Accu-Chek Softclix lancing device is virtually pain-free.
With Accu-Chek Compact you’ve got it all at your fingertips.
You can monitor your blood glucose quickly, simply, and with
no cumbersome preparations – anywhere, anytime.
Operating Accu-Chek Compact is easy: there is just one button
to press. You no longer have to handle individual test strips,
as they now come conveniently loaded in a drum. Each drum
holds 17 strips and two simple steps are all it takes to insert
the drum into the monitor. Coding occurs automatically.
When you want to take a blood glucose reading, just press the
button and a test strip moves from the drum into the correct
position. Once you have completed the test, just press the
button again and the strip is ejected automatically. Your results
are stored in memory and can be transferred to your computer
if you wish.
6
7
6
7
014103 AC_Compact_ImP_CAN
12.08.2003
11:23 Uhr
Seite 8
1 Introduction
This User’s Manual gives you full details of how to operate
Accu-Chek Compact. It also tells you how to clean and look
after your monitor. At the back of the manual is a list of all
possible error messages with recommendations for troubleshooting.
Please read carefully all text preceded by the following
symbols:
Warning!
This warns of a situation that may pose a risk to your
health (e.g. as a result of you calculating the wrong
insulin dose).
Important!
This symbol highlights important information that will
help you get the most out of your monitor.
Please take time to read this Manual and the instructions that
came with your lancing device and test strip drums. Also, when
you have a quiet moment, practise testing. To help you learn,
check the instructions and other information in this Manual
against the description of the monitor’s parts on pages 2-5.
Check that the pack contains all of the items listed. If any are
missing, please call our Diabetes Care Info-Line (for details
see Chapter 12 “Customer support and service”).
Caution!
This symbol indicates that your monitor is at risk of being
damaged (e.g. through improper cleaning), or that there
may be a problem during testing.
8
9
8
9
014103 AC_Compact_ImP_CAN
12.08.2003
11:23 Uhr
Seite 10
2 Inserting or replacing batteries
If the monitor is on, turn it off.
2
1
Press lightly on the lid of the battery
compartment and slide it in the direction
of the arrow 1 . Open the battery
compartment 2 .
Opening
the battery
compartment
10
10
11
10
11
014103 AC_Compact_ImP_CAN
12.08.2003
11:23 Uhr
Seite 12
2 Inserting or replacing batteries
Remove any used batteries.
Battery types
Insert two batteries (type AAA, LR 03, AM 4
or Micro). Make sure that the minus (-) pole
of the battery is next to the minus contact in
the battery compartment.
A new set of batteries provides enough power
to carry out a minimum of 500 blood glucose
tests. When battery power is low, the battery
symbol
will appear. You can then perform a minimum of 50 more blood glucose
tests.
12
13
12
13
014103 AC_Compact_ImP_CAN
12.08.2003
11:23 Uhr
Seite 14
2 Inserting or replacing batteries
Replacing
batteries
Important
When you replace the batteries, your stored results are
retained in memory. However, you will need to re-enter
the date and time. If you fail to do so, any blood glucose
test results you obtain from this point forward will be
displayed and saved without the date and time. In this
case, the test results saved in memory will be numbered
consecutively so you can still see the order in which you
took the readings.
To keep things simple, we recommend you
use up any current drum of strips before
replacing the batteries. Otherwise, it may
take the monitor a long time to advance the
first test strip from the next drum, and the
“use-by” date warning may also be lost.
(see Chapter 3).
Please take used batteries to a collection
point or to your local dealer.
14
15
14
15
014103 AC_Compact_ImP_CAN
12.08.2003
11:23 Uhr
Seite 16
3 Inserting or replacing the test strip drum
If the monitor is on, turn it off. Wait for the
motor to stop before you open the monitor.
Slide the release button on the right side
of the monitor in the direction indicated by
the arrow. The drum compartment opens.
Opening the
drum
compartment
16
17
16
17
014103 AC_Compact_ImP_CAN
12.08.2003
11:23 Uhr
Seite 18
3 Inserting or replacing the test strip drum
To exchange the drum, first tip the monitor
upright. The old drum drops out.
18
19
18
19
014103 AC_Compact_ImP_CAN
12.08.2003
11:23 Uhr
Seite 20
3 Inserting or replacing the test strip drum
Insert the new drum.
Close the drum compartment.
The monitor automatically moves the drum to
the correct position and reads the code on the
drum.
Closing
the drum
compartment
20
21
20
21
014103 AC_Compact_ImP_CAN
12.08.2003
11:23 Uhr
Seite 22
3 Inserting or replacing the test strip drum
13
A dot appears in the small control window 13 on the reverse
side of the monitor. This dot indicates that you have inserted
a new, full drum containing 17 test strips. When you perform
a blood glucose test, the monitor counts the number of test
strips that have been used and displays the number of strips
remaining.
When all the strips have been used, the dot reappears in the
control window. “End” flashes in the display, indicating that
the drum is empty.
22
23
22
23
014103 AC_Compact_ImP_CAN
12.08.2003
11:23 Uhr
Seite 24
3 Inserting or replacing the test strip drum
Warning
Handle the test strip drums with extreme care! If the aluminium foil (the silver ends) on a new test strip drum has
been damaged, do not use it. If you do, your blood glucose test results may be incorrect.
Once you remove a drum from its container,
you have 90 days to use up all the test strips.
The monitor counts the number of days
remaining. Do not open the drum compartment until all of the strips have been used.
Whenever the drum compartment is opened
and closed, or when the batteries are
replaced, the monitor thinks a new drum has
been inserted, and resets the 90-day countdown.
If an open test strip drum is removed from the
monitor and reinstalled, the 90-day “use-by”
period displayed on the monitor ceases to
have any significance. The message “CTRL”
flashes in the display indicating that a quality
control test should be performed. Perform a
quality control test (as described in Chapter
7.1) to ensure that the strips are still usable.
The display indicating the 90-day “use-by”
period (flashing drum symbol and date) is
still invalid, however.
If you use expired test strips, you may obtain
incorrect blood glucose test results.
24
25
24
25
014103 AC_Compact_ImP_CAN
12.08.2003
11:23 Uhr
Seite 26
4 Settings
SET menu
You may now move to the SET menu to enable
or disable the beep tone, to set the year, date and
time, and to define the time and date format.
Press the SET button to call up the SET menu.
The field currently flashing in the menu may now
be changed.
To quit the SET menu, press the ON/OFF button.
26
27
26
27
014103 AC_Compact_ImP_CAN
12.08.2003
11:23 Uhr
Seite 28
4.1 Enabling/disabling the beep tone
When the beep tone is enabled, the monitor beeps when it
starts to test, as confirmation that the test strip has received a
sufficient amount of blood or control solution. It also beeps
each time it displays a message.
MEMO button
3. Press the MEMO button to disable the beep tone.
“OFF” appears in the display. If you press the MEMO
button again, “ON” reappears.
SET button
1. Check the monitor is off and press the SET button. The
monitor turns on without advancing a test strip from the
drum.
2. The symbol for the beep tone flashes in the display
window, and “ON” appears.
ON/OFF button
4. If you wish to set the year, leave the monitor turned on
and proceed to step 2 in the next section. If not, press the
ON/OFF button to turn the monitor off. The current settings
will be saved automatically.
28
29
28
29
014103 AC_Compact_ImP_CAN
12.08.2003
11:23 Uhr
Seite 30
4.2 Setting the year
SET button
1. Check the monitor is off and press the SET button. The
monitor turns on without advancing a test strip from the
drum.
2. Press the SET button repeatedly until the current year
setting flashes at top right of the display.
ON/OFF button
4. If you wish to define the date and time format, leave
the monitor turned on and proceed to step 2 in the next
section. If not, press the ON/OFF button to turn the monitor off. The current settings will be saved automatically.
Important
MEMO button
3. Press the MEMO button to adjust the year. The monitor
scrolls upwards through the year values. If you hold the
MEMO button down, the monitor fast-scrolls forward to
2032 and then begins again at 2000.
The year is not displayed during testing or
review of blood glucose test results. It is still
important, however, as February 29 in a leap
year will only be recognised when the year is
properly set. The current year setting is also
needed to unambiguously identify your blood
glucose test results if you transfer them from
your monitor’s memory to a computer.
30
31
30
31
014103 AC_Compact_ImP_CAN
12.08.2003
11:23 Uhr
Seite 32
4.3 Changing the date/time format
MEMO button
If you have a new monitor or you have just replaced the batteries, the date will be set to 01.01.2000, and the time to 00:00
hours. The correct date and time are needed to enable you to
unambiguously identify your blood glucose test results and to
transfer them from your monitor's memory to a computer (see
Chapter 6.2).
You can choose between the standard 24-hour format (0:00 to
24:00), in which case the date format is DD.MM.YY (day followed by month, followed by year), and the 12-hour format
(0 to 12 o’clock with a.m. or p.m.). In the latter case the date
format changes to MM.DD.YY, i.e. month, followed by day,
followed by year.
3. Press the MEMO button to select 12-hour format. In the
display you see “12h” and the 12-hour display is set to a.m.
ON/OFF button
4. If you wish to set the date, leave the monitor turned on
and proceed to step 2 in the next section. If not, press the
ON/OFF button to turn the monitor off. The current settings
will be saved automatically.
Important
SET button
1. Check the monitor is off and press the SET button. The
monitor turns on without advancing a test strip from the
drum.
2. Press the SET button repeatedly until “24h” is displayed.
24-hour format is selected.
32
32
If you do not set the date and time, these
fields will be filled with zeroes during testing.
Your blood glucose test results saved in
memory will be numbered consecutively.
However, only blood glucose results that
are saved with the date and time will be
included in the statistical display (please
see Chapter 6.1).
33
33
014103 AC_Compact_ImP_CAN
12.08.2003
11:23 Uhr
Seite 34
4.4 Setting the time
MEMO button
SET button
1. Check the monitor is off and press the SET button. The
monitor turns on without advancing a test strip from the
drum.
2. Press the SET button repeatedly until the hour field
flashes.
5. Press the MEMO button repeatedly to set the minute.
ON/OFF button
6. If you wish to set the date, leave the monitor turned on
and proceed to step 2 in the next section. If not, press the
ON/OFF button to turn the monitor off. The current settings
will be saved automatically.
MEMO button
3. Press the MEMO button repeatedly to set the hour.
Caution
At temperatures below minus 10°C the
batteries do not have enough power to
keep the internal clock functioning. In this
event the clock must be reset.
Important
SET button
4. Press the SET button again. The minute field flashes.
Instead of pressing the MEMO button
repeatedly, you can hold it down to scroll
forward quickly.
34
35
34
35
014103 AC_Compact_ImP_CAN
12.08.2003
11:23 Uhr
Seite 36
4.5 Setting the date
SET button
1. Check the monitor is off and press the SET button. The
monitor turns on without advancing a test strip from the
drum.
SET button
4. Press the SET button. The day field flashes.
2. Press the SET button repeatedly until the month field
flashes.
MEMO button
5. Press the MEMO button repeatedly to select the correct
day.
MEMO button
3. Press the MEMO button repeatedly to select the correct
month.
ON/OFF button
36
36
6. Press the ON/OFF button to turn the monitor off.
The current settings will be saved automatically.
37
37
014103 AC_Compact_ImP_CAN
12.08.2003
11:23 Uhr
Seite 38
5 Performing a blood glucose test
5.1 Using the Accu-Chek Softclix lancing device
1. Pull off the Accu-Chek Softclix cap. Insert a new
Accu-Chek Softclix lancet in the lancet
holder and push it in until it clicks.
Remove the protective cap from the lancet
with a twisting motion. To avoid injuries,
keep cap and replace on lancet before discarding. Use a
new lancet each time you take blood to prevent infection
and to ensure virtually painless blood sampling.
2. Press the Accu-Chek Softclix cap on
again until it clicks.
Be sure to align the notch on the cap with
the centre of the semicircular cutout on the ejector.
3. Rotate the Comfort Dial on the Accu-Chek Softclix
cap to set the penetration depth.
If you are using the Accu-Chek Softclix
lancing device for the first time, set the Comfort Dial to 1.
For thicker or calloused skin, select a higher setting.
4. Press in the priming button until it clicks.
Be careful not to press the release button at
the same time. The lancing device is primed
when a yellow dot appears in the transparent
release button. Do not prime the Accu-Chek
Softclix lancing device until you are ready to take blood.
38
38
5. Gently press the Accu-Chek Softclix lancing device against the side of the fingertip
or earlobe and press the release button.
Take care not to push against the priming
button or to impede its free movement.
Wait a few seconds to allow a droplet of
blood to form or gently squeeze the fingertip
to develop a drop of blood. Gently touch the
front edge of the test strip against the blood. Test strip
If you do not obtain sufficient blood, try the test
again with progressively higher settings. After
obtaining the blood sample, wipe the puncture
site with a dry, clean paper towel. If necessary,
gently press the towel onto the site and, if
bleeding persists, cover with a bandage.
6. To remove the lancet, remove the
Accu-Chek Softclix cap. Place the
protective cap back on the lancet and
slide the ejector forwards to release
the lancet.
Dispose of lancet in a safe container
(a coffee can with a slot in the cover,
for instance).
39
39
014103 AC_Compact_ImP_CAN
12.08.2003
11:23 Uhr
Seite 40
5.2 Testing blood glucose
Warning
Blood glucose results can be displayed in
2 different units (mmol/L or mg/dL). Consequently, we sell two different versions of the
same monitor. Check that your monitor
displays the unit you are accustomed to.
Using the wrong unit can cause you to
wrongly interpret the test result.
Wash your hands thoroughly with warm water and dry
them well.
Open the display cover.
Press the ON/OFF button.
The monitor turns on. “ON” appears in the display window,
followed by 888 and the date line.
Shortly afterwards a test strip is advanced from the drum.
40
41
40
41
014103 AC_Compact_ImP_CAN
12.08.2003
11:23 Uhr
Seite 42
5.2 Testing blood glucose
With a lancing device such as Accu-Chek
Softclix prick the side of a fingertip. Gently
squeeze the fingertip to develop a small drop
of blood.
Wait until the flashing hand symbol and blood
drop symbol appear in the display and the
monitor beeps (as long as the beep tone is
enabled).
Hold the monitor so the test strip is pointing Applying
downwards at a slight angle (see illustration). blood
Gently touch the front edge of the test strip
against the blood. The strip draws up the
blood. As soon as the correct amount of blood
has been drawn up, the monitor beeps and
the test commences automatically. The
monitor recognizes if too little blood has been
applied and displays an error message. 000
appears in the display at the start of the test.
42
43
42
43
014103 AC_Compact_ImP_CAN
12.08.2003
11:23 Uhr
Seite 44
5.2 Testing blood glucose
The three 000 in the display gradually disappear. When they have totally disappeared,
the test is complete and the test result is displayed. The test strip symbol flashes. Press
the ON/OFF button. This saves the test result
to memory, releases the strip and turns the
monitor off. Hold the monitor upright so the
used test strip falls out at the bottom.
Used test
strip ejected
44
45
44
45
014103 AC_Compact_ImP_CAN
12.08.2003
11:23 Uhr
Seite 46
5.2 Testing blood glucose
mmol/L
short display segment check
If your blood glucose test result does not agree with the
way you feel, please contact your doctor. If the message
HI is displayed, your blood glucose result is above
33.3 mmol/L. If the message LO is displayed, your blood
glucose result is below 0.6 mmol/L. The results obtained
will not be used in statistical calculations (see Chapter
6.1 “Highest value, lowest value, average”). If a segment
is missing from one of the three 888 at power-on (in the
display segment test), or if strange characters appear
instead of a proper blood glucose result, the display is
malfunctioning. Please do not run any more blood tests;
contact our Diabetes Care Info-Line (please refer to
Chapter 12: “Customer support and service”).
Do not reuse a test strip that has been completely ejected from the monitor.
Do not allow your Accu-Chek Compact monitor to be
used by more than one person. To do so would place all
users at risk of infection (see Chapter 7.2 “Cleaning the
monitor”).
Keep the test strip away from skin unless you are touching it against blood or control solution. Do not bend the
test strip, or an error message will be displayed.
mmol/L
full display segment check
Important
If you hold down the ON/OFF button for a
few seconds when you turn the monitor on,
you can perform a full segment check. Do
this to verify that all of the display segments
are properly displayed.
When performing a quality control test, refer
to the list of expected values given on the
peel-off label attached to the test strip drum
container. Keep this label until you have
used up all the strips in that drum.
Accu-Chek Compact turns off automatically
after 5 minutes of non-use. After a blood
glucose test result has been displayed, the
monitor turns off automatically after
60 seconds.
Please dispose of used test strips with your
regular household waste.
46
47
46
47
014103 AC_Compact_ImP_CAN
12.08.2003
11:23 Uhr
Seite 48
5.3 Testing conditions
To obtain reliable blood glucose test results, ensure the following conditions are met:
Temperature range
The test must be carried out at a temperature between plus
10°C and plus 40°C, because chemical reactions are affected
by temperature. If the test is performed at a temperature outside this range, the test result may be incorrect. At ambient
temperatures outside this range, the monitor turns off automatically, or error messages or results are displayed together
with the thermometer symbol. Do not make treatment decisions based on such results. They are for reference only.
Humidity
Relative humidity must be below 85 %.
A sudden change in temperature can cause
moisture to condense on or inside the monitor.
If this happens, do not turn the monitor on.
Wait until it is thoroughly dry again. Make sure
that it returns to room temperature slowly.
Electromagnetic fields
Very strong electromagnetic fields may affect the
monitor’s performance. Such electromagnetic
fields can occur in the open near transmitters
(radio, television, CB stations and hand-held sets,
mobile telephones), and in the household near
electrical equipment (microwave ovens, poorly
suppressed electrical equipment). If this happens,
the error message “Err” is displayed.
Move to a different location and repeat the test.
Interference
from electromagnetic
fields
48
49
48
49
014103 AC_Compact_ImP_CAN
12.08.2003
11:23 Uhr
Seite 50
6 Reviewing stored blood glucose results
Accu-Chek Compact stores up to 100 test results together with
date and time. Any important information that was displayed
along with the test result is saved as well. For instance, if the
thermometer symbol was displayed as a warning during a test
because the ambient temperature was too high or too low, this
information is stored along with the test result.
SET button
Press the SET button to move towards the “oldest” result
stored. Press the MEMO button to scroll forward to the
“newest” result again. You can hold down the buttons to
scroll through your results more quickly.
MEMO button
With the monitor turned off, press the MEMO button.
ON/OFF button
The monitor turns on without advancing a test strip from
the drum. The most recent test result and “MEMO” are
displayed.
Press the ON/OFF button to turn the monitor off.
A test strip is not ejected.
50
51
50
51
014103 AC_Compact_ImP_CAN
12.08.2003
11:23 Uhr
Seite 52
6.1 Highest value, lowest value, average
Your monitor can display the highest and lowest blood glucose
results and the average (or mean) of current test results. Statistics are based on the test results stored for the last 7 days,
as long as they were saved with date and time. If more than
100 tests were carried out during this period, statistics will be
based on the last 100.
MEMO button
Press the MEMO button again. The highest measured test
result is displayed together with date and time.
MEMO button
Press the MEMO button to enter the memory mode. The
monitor turns on without advancing a test strip from the
drum.
MEMO button
Press the MEMO button again. The lowest measured test
result is displayed together with date and time.
MEMO button and SET button
ON/OFF button
Press the SET and MEMO buttons at the same time. The
average of your current test results is displayed, identified
by an “A”.
Press the ON/OFF button to turn the monitor off.
A test strip is not ejected.
52
53
52
53
014103 AC_Compact_ImP_CAN
12.08.2003
11:23 Uhr
Seite 54
6.2 Downloading test results to a computer
Install the software according to the manufacturer’s instructions.
Locate the infrared interface on the
Accu-Chek Compact 12 .
The blood glucose test results stored in your monitor can be
downloaded to a computer. This way you can keep a permanent record of long-term trends in your blood glucose values.
To transfer stored blood glucose test results to a computer,
you need the appropriate hardware and software for infrared
data transfer (please call our Diabetes Care Info-Line –
see Chapter 12 for details).
Infrared
adaptor
Position the infrared adaptor less than 10 cm
away, so the two infrared windows are pointing toward one another.
Press the SET button and MEMO button at the
same time. The monitor turns on without
advancing a test strip from the drum. The
monitor automatically downloads all stored
blood glucose test results to your computer.
Two arrows flash in the display during the
download. Once downloading has finished, the
monitor turns off automatically. A message is
displayed on the computer indicating that the
data transfer is complete.
The computer turns Accu-Chek Compact off.
Important
12
If data transfer did not occur or was incomplete, the monitor turns off automatically after
5 minutes. To make the most of the download
feature, you must set the year, date and time
in your monitor.
54
55
54
55
014103 AC_Compact_ImP_CAN
12.08.2003
11:23 Uhr
Seite 56
7 Checking, cleaning and storing your monitor
7.1 Checking the monitor
To ensure reliable results, you must periodically check the
performance of your Accu-Chek Compact. Do this by running
a quality control check using Accu-Chek Compact Control
Solution (not supplied with the monitor).
When should I check my Accu-Chek Compact system?
When you open a new pack of test strips.
After you have replaced the batteries.
Running a quality control test
Press the ON/OFF button. The monitor turns
on and automatically advances a test strip.
Press the SET button. “CTRL” appears in the
display (simultaneously with the hand symbol)
and is automatically stored along with the
result, to flag it in memory as a control test
result.
Quality
control
checking
If your monitor flashes “CTRL”, indicating that a quality
control test is required.
After you have cleaned your monitor.
If your result does not agree with how you feel.
56
57
56
57
014103 AC_Compact_ImP_CAN
12.08.2003
11:23 Uhr
Seite 58
7.1 Checking the monitor
Wait for the hand symbol and the blood drop to flash in
the display before you apply control solution.
Take a bottle of control solution and hold the dropper tip
downwards until a hanging drop forms at its end. Gently
touch the drop of control solution against the front edge of
the test strip near the black notch until the monitor beeps
and 000 appears in the display.
The monitor runs a test, then displays the result and
“CTRL”.
Refer to the table of expected values on the peel-off label
of the test strip drum container. If the result is outside this
range, run another quality control check. If the result of the
second test is outside the expected range as well, refer to
the “Problem Checklist” in Chapter 9. If you are unable to
identify or eliminate the source of the problem, contact our
Diabetes Care Info-Line. Please see Chapter 12 for details.
Important
Control readings (identified by “CTRL”)
are not used in statistical calculations.
58
59
58
59
014103 AC_Compact_ImP_CAN
12.08.2003
11:23 Uhr
Seite 60
7.2 Cleaning the monitor
If the outside of your monitor or the display are dirty, wipe
them off with a slightly dampened cloth. If blood has entered
the test strip guide, or if the message “OFF” is displayed, clean
the monitor as follows:
Remove the cover from the measurement
optics by slightly squeezing it from both
sides 1 and lifting it off 2 .
Removing
the optical
system cover
1
2
60
60
1
61
61
014103 AC_Compact_ImP_CAN
12.08.2003
11:23 Uhr
Seite 62
7.2 Cleaning the monitor
Clean the measurement optics carefully with
a slightly dampened cotton swab or a soft,
lintfree cloth.
Cleaning
the optical
system
Press the cover back on.
Caution
Please ensure that the optical system cover
(see description of the monitor’s parts on
pages 2-3) is firmly in place when you want
to test. Otherwise it may block the strip from
moving into test position or from being
ejected.
62
63
62
63
014103 AC_Compact_ImP_CAN
12.08.2003
11:23 Uhr
Seite 64
7.2 Cleaning the monitor
7.3 Storing the monitor
A potential risk of infection exists. Medical staff and
other persons using Accu-Chek Compact to test blood
glucose from more than one patient must be aware that
any item coming into contact with human blood is a
potential source of infection. (Please see “Protection of
Laboratory Workers from Infectious Diseases Transmitted
by Blood, Body Fluids, and Tissues”; Second Edition,
Tentative Guideline, 1991, Document M29-T2, National
Committee for Clinical Laboratory Standards).
With the batteries removed, the monitor may be Storing the
monitor
stored at between minus 40°C and plus 70°C.
Please refer to the test strip package insert for the
temperature at which to keep the test strips.
Caution
If you use 70 % alcohol or a strongly diluted rinsing
solution in the medical environment, wipe these fluids
off immediately after application.
Do not use cleaning agents that contain acetic acid
(vinegar) or scouring agents because they can damage
the display and the measurement optics.
Do not store the monitor at above plus 50 °C
when it contains batteries. At this temperature and above, the batteries could leak and
damage the monitor.
At temperatures below minus 10°C the batteries do not have enough power to keep the
internal clock functioning.
Store the monitor in a dry place to keep it in
good working condition.
64
65
64
65
014103 AC_Compact_ImP_CAN
12.08.2003
11:23 Uhr
Seite 66
8 Technical data
Monitor type
Accu-Chek Compact
Memory capacity
Test principle
Determination of glucose in fresh capillary blood by reflectance photometry.
For use with venous blood, please refer
to the package insert for the test strip
drums.
100 test results with time and date,
average, highest and lowest blood
glucose reading
Dimensions
103 x 52 x 31 mm
Weight
Approx. 120 g with batteries and
test strip drum
Display
Liquid Crystal Display (LCD) with
symbols
Measuring range
0.6–33.3 mmol/L
Sample size
Approx. 1.5 µL (millionths of a litre)
Measuring time
Approx. 8 seconds (depending on
concentration)
Automatic
power-off
After 60 seconds /
5 minutes depending on testing status
System operating
conditions
Plus 10°C to plus 40°C
Power supply
2 batteries (type AAA, LR 03, AM 4
or Micro)
Monitor storage
conditions
Without batteries and test strips:
minus 40°C to plus 70°C
With batteries and test strips:
plus 2°C to plus 30°C
With batteries but without test strips:
minus 10°C to plus 50°C
Battery life
at least 500 readings
Interface
Infrared interface
Safety class
III
LED/IRED
Laser Class 1
Humidity
Less than 85 % relative humidity
66
67
66
67
014103 AC_Compact_ImP_CAN
12.08.2003
11:23 Uhr
Seite 68
9 Problem checklist
If your monitor repeatedly displays error messages, if you have
reason to doubt the validity of a test result, or if a quality control check returns a result that is outside the expected range
(see Chapter 7.1), please check the following points.
Did you perform the test as directed (see Chapter 5)?
Is the optical system dirty (see Chapter 7.2)?
Do the batteries still have enough power? Are they properly
inserted (see Chapter 2)?
Did you perform the test within the correct temperature
range (plus 10°C to plus 40°C)?
Have the proper storage conditions for the monitor and test
strip drum been observed (see Chapter 7.3 and the package
insert that came with the test strip drum)?
For quality control checks: Is the control solution beyond its
expiry date (see label on bottle)? Or has the control solution
been opened for more than 3 months?
For quality control checks: Did you use the correct quality
control solution (Accu-Chek Compact Control)?
If you have checked these points and still receive error
messages or doubt the validity of results, please contact
your dealer or support/service representative. Please see
Chapter 12 for details of customer support and service centres.
Are the test strips beyond their expiry date
(see peel-off label on test strip drum container)?
Has the 3-month “use-by” period for the drum been
exceeded (see pack insert)?
68
69
68
69
014103 AC_Compact_ImP_CAN
12.08.2003
11:23 Uhr
Seite 70
10 Display messages and troubleshooting guide
When symbols and numbers are shown in purple below,
it indicates that they flash in the monitor’s display.
Display
Cause
Action
Monitor will not turn on.
• Batteries are empty.
• Ambient temperature is too
low.
• Display is damaged.
• Monitor is defective.
• Insert new batteries.
• Move somewhere warmer and repeat the test.
Battery power is sufficient for
a maximum of 50 more tests.
Continue testing until all the test strips in the test strip drum
have been used. Then insert two new batteries (type AAA) and
a new test strip drum.
Battery symbol appears and
disappears after 3 seconds.
Insufficient battery power –
no further tests can be
performed.
Insert two new batteries (type AAA).
Clock has stopped. Clock is
slow after the monitor is
turned on.
The monitor was exposed to
temperatures below minus
10°C, and the batteries are
starting to freeze.
Always store the monitor at above minus 10°C.
• Contact our Diabetes Care Info-Line (for details see
Chapter 12 “Customer support and service”).
70
71
70
71
014103 AC_Compact_ImP_CAN
12.08.2003
11:23 Uhr
Seite 72
10 Display messages and troubleshooting guide
Display
mmol/L
Cause
Action
Temperature was outside the
indicated range during testing.
The displayed test result may only be used for reference
purposes. It is saved along with the thermometer symbol.
To perform an accurate test, let the monitor and test strips
slowly cool down or warm up, and repeat the test. The
optimum measuring temperature is between plus 10°C and
plus 40°C.
It is too warm or too cold for
the test, i.e. warmer than plus
45°C or colder than plus 5°C.
No test result is displayed or saved. Let the monitor and test
strips slowly cool down or warm up, and repeat the test. The
optimum measuring temperature is between plus 10°C and
plus 40°C.
There was not enough blood
on the strip.
Repeat the test with a larger drop of blood.
The test strip drum in the
monitor is empty.
Insert a new drum. If the message is still displayed, please
contact our Diabetes Care Info-Line (for details see Chapter 12
“Customer support and service”).
A dot appears in the control
window at the back of the
monitor.
72
72
73
73
014103 AC_Compact_ImP_CAN
12.08.2003
11:23 Uhr
Seite 74
10 Display messages and troubleshooting guide
Display
Cause
Action
The bar code information
stored from the test strip
drum has been lost.
Open the drum compartment and close it again.
Caution
The display showing the 90-day “use-by”
period will be lost (see Chapter 3).
or
There is no test strip drum in
the monitor.
Insert a test strip drum.
You inserted a test strip drum
that has already been used.
The monitor cannot determine how long the test strip drum
has been outside the monitor, or whether it is still usable. If
you are certain that the 3-month “use-by” period has not been
exceeded, you may continue to use the drum. Perform a quality
control check. The result of the quality control check will be
stored in memory along with “CTRL”, and the drum symbol will
remain displayed until a new drum is inserted. If you do not
perform a quality control check, the flashing drum symbol and
the flashing “CTRL” will appear with every new test until a new
drum is inserted. Until this point, all test results will be stored
along with the flashing drum symbol and “CTRL”.
74
75
74
75
014103 AC_Compact_ImP_CAN
12.08.2003
11:23 Uhr
Seite 76
10 Display messages and troubleshooting guide
Display
Cause
Action
Drum symbol and “E-2” flash
when the first drum from a
new pack is inserted.
During subsequent tests the
drum symbol flashes.
The bar code on the drum is
damaged.
Remove the drum from the monitor and return it to its
container. Insert the second drum from the package and use
all 17 test strips. When it is time to replace the drum, insert the
first drum with the damaged bar code. When the error message is displayed, press the SET button. The monitor uses the
code from the previous drum. “CTRL” flashes in the display,
requesting you to perform a quality control check. You can use
all 17 test strips. The drum symbol continues to flash in the
display until a new drum is inserted.
Warning
All test strip drums in the same package
have a bar code unique to that package. Do
not try to code the monitor using drums from
a different package. Check you are using the
correct drums by comparing their lot codes.
The lot code is preceded by the symbol LOT .
If the message is still displayed, please contact our Diabetes Care Info-Line (for address
see Chapter 12 “Customer support and service”).
76
77
76
77
014103 AC_Compact_ImP_CAN
12.08.2003
11:23 Uhr
Seite 78
10 Display messages and troubleshooting guide
Display
Cause
Action
Drum symbol and “E-2” flash
when the second or third
drum of a package is
inserted.
During subsequent tests the
drum symbol flashes.
The bar code on the drum is
damaged.
Press the SET button. The monitor uses the bar code from the
first drum. The error message disappears. “CTRL” flashes in
the display, requesting you to perform a quality control check.
You can use all 17 test strips. The drum symbol continues to
flash in the display until a new drum is inserted.
Warning
All test strip drums in the same package
have a bar code unique to that package. Do
not try to code the monitor using drums from
a different package. Check you are using the
correct drums by comparing their lot codes.
The lot code is preceded by the symbol LOT .
If the message is still displayed, please contact our Diabetes Care Info-Line (for details
see Chapter 12 “Customer support and service”).
78
79
78
79
014103 AC_Compact_ImP_CAN
12.08.2003
11:23 Uhr
Seite 80
10 Display messages and troubleshooting guide
Display
Cause
Action
The 3-month “use-by” period
has been exceeded. The test
strips in the drum are unusable.
Insert a new drum.
or
Warning
If you continue to use the drum, carry out a
quality control test. The test results obtained
under these conditions may only be used for
reference purposes. The error message continues to flash in the display until a new drum
is inserted.
Warning
When reviewing results:
The test strips used to obtain
the stored result were unusable (more than 3 months
old).
The test results obtained under these conditions may only be used for reference
purposes and must not be used for decisions
regarding therapy.
80
81
80
81
014103 AC_Compact_ImP_CAN
12.08.2003
11:23 Uhr
Seite 82
10 Display messages and troubleshooting guide
Display
Cause
Action
• A test error has occurred.
• There is electromagnetic
interference.
• Repeat the test.
• Move away from possible sources of interference
(see Chapter 5.3 “Testing conditions”).
• You forcibly removed the
test strip during testing.
• You bent the strip while
applying blood or during
measurement.
• The optical system cover
may not be closed properly.
• Repeat the test with a new strip, this time ejecting it by
means of the ON/OFF button.
• Repeat the test with a new strip.
The test strip is stuck in the
guide.
Pull the strip out of the monitor.
Carefully open the drum compartment and remove the drum
without turning it.
Reinsert the drum.
Close the drum compartment.
Keep the “use-by” period in mind when reusing the drum.
• Ensure that the optical system cover is firmly in place.
82
83
82
83
014103 AC_Compact_ImP_CAN
12.08.2003
11:23 Uhr
Seite 84
10 Display messages and troubleshooting guide
Display
Cause
Action
• You touched the test strip
against the blood drop too
soon.
• Turn the monitor off and on again. Repeat the test. Wait until
the hand symbol has appeared in the display before touching the test strip against the blood drop.
• The optical system is dirty.
• The test strips are too old.
• The monitor was turned off
and on again. The strip is
still in the monitor.
• You forcibly removed the
test strip during testing.
• Clean the optical system and repeat the test.
• Insert a new test strip drum.
• Hold the monitor upright and let the strip drop out, or
remove the strip manually, even if it takes a small amount of
force.
• Repeat the test with a new strip, this time ejecting it by
means of the ON/OFF button.
The blood glucose result
is above the upper limit of
33.3 mmol/L.
If this test result agrees with the way you
feel, follow your doctor’s advice. If the way
you feel does not agree with this test result,
please perform a quality control check with
Accu-Chek Compact Control and a new test
strip.
Warning
84
85
84
85
014103 AC_Compact_ImP_CAN
12.08.2003
11:23 Uhr
Seite 86
10 Display messages and troubleshooting guide
Display
Cause
The blood glucose result is
below the lower limit of
0.6 mmol/L.
The download symbols are
not displayed,
Accu-Chek Compact turns
off after 5 minutes and the
computer displays a download-related error message.
• An error occurred while
data was being downloaded.
• A bright light source is
too close to the infrared
adaptor or the monitor.
• The monitor and the infrared adaptor are too far
away from one another or
not correctly aligned.
• A computer software error
occurred.
Action
Warning
If this test result agrees with the way you feel,
follow your doctor’s advice. If the way you feel
does not agree with this test result, please perform a quality control check with Accu-Chek
Compact Control and a new test strip.
• Download the data again.
• Increase the distance from the light source.
• Decrease the distance between the two units to
less than 10 cm. Make sure the two IR windows
are pointing toward one another.
• Read the Manual for the download software.
86
87
86
87
014103 AC_Compact_ImP_CAN
12.08.2003
11:23 Uhr
Seite 88
10 Display messages and troubleshooting guide
Display
Cause
Action
• Electrostatic discharge
• Switch the monitor off and then on again.
• Monitor is defective.
• Please contact our Diabetes Care Info-Line
(for details see Chapter 12 “Customer support
and service”).
Important
Please note: Several messages may be
displayed simultaneously.
A combination such as a thermometer, drum
symbol, blood glucose result, date and “CTRL”
flashing means that - the temperature during
measurement was outside the indicated range
and the 90-day countdown period for the
drum has ended.
88
89
88
89
014103 AC_Compact_ImP_CAN
12.08.2003
11:23 Uhr
Seite 90
11 Guarantee
Guarantee:
The statutory guarantee provisions governing the sale of
consumer goods in the country of purchase shall prevail.
On packaging, on the type plate and in the User’s Manual you
may encounter the following symbols, shown here with their
meaning:
For in vitro diagnostic use. Do not ingest!
IVD
0088
REF
This product fulfils the requirements of Directive
98/79/EC on in vitro diagnostic medical devices.
Catalogue number
Please consult instructions for use
Caution (refer to accompanying documents).
Please refer to safety-related notes in the manual
accompanying this instrument.
Manufactured by
Last updated: February 2003
90
91
90
91
014103 AC_Compact_ImP_CAN
12.08.2003
11:23 Uhr
Seite 92
12 Customer support and service
If you have questions or concerns, call the
Diabetes Care Info-Line:
Montreal area: (450) 686-7100
Outside Montreal (toll free): 1 800-363-7949
Made in Germany for export to:
Roche Diagnostics
201 Boul. Armand-Frappier
Laval, Québec
CANADA, H7V 4A2
www.accu-chek.ca
92
93
92
93
014103 AC_Compact_ImP_CAN
12.08.2003
11:24 Uhr
Seite 94
13 System components
1 Accu-Chek Compact
2
Holster for Accu-Chek Compact
3
Accu-Chek Softclix
1
2
3
94
95
94
95
014103 AC_Compact_ImP_CAN
12.08.2003
11:24 Uhr
Seite 96
13 System components
4
Drum with 17 test strips. Each drum comes individually
packaged in its own container.
5
Accu-Chek Compact Control for checking the performance
of your system*
7
6
200 sterile lancets*
6
7
Carry-case
5
4
* available separately
96
97
96
97
014103 AC_Compact_ImP_CAN
12.08.2003
11:24 Uhr
Seite 98
14 Alphabetical index
E
Electromagnetic fields
Expiry date, test strips
G
Guarantee
Page
B
Bar code
Batteries, inserting or replacing
Battery types
Beep tone, enabling/disabling
Blood, dosing the strip
Blood, too little applied
C
Checking the monitor
Cleaning, monitor
Coding, test strip drum
Computer, downloading results to a
Control features, description
Control solution
Control window, test strip drum
Customer support
D
Date, setting the date
Display messages
Drum compartment
74ff.
10ff.
13
28ff.
43
43
56
60ff.
6
54
2
56ff., 69
4, 23
92
32ff.
70ff.
2, 17, 21, 83
H
Humidity
I
Infrared adaptor
Introduction
49
24ff.
90
49, 66
32, 55, 86, 87
6
L
Lancing device
Lot code
7, 38-39, 43
77-79
M
MEMO button
Monitor, checking monitor performance
Monitor, checking the monitor
Monitor, cleaning the monitor
Monitor, description of
Monitor, storing the monitor
2, 29ff., 50ff.
57
56ff.
60ff.
2
64ff.
O
ON/OFF button
2, 27ff., 41, 45, 51, 53, 57, 83ff.
Optical system
2
Optical system, cleaning the optical system
63
Optical system, opening the optical system
61
98
99
98
99
014103 AC_Compact_ImP_CAN
12.08.2003
11:24 Uhr
Seite 100
14 Alphabetical index
P
Performance, checking monitor
Problem checklist
Q
Quality control test
Storage temperature, monitor
Symbols explained
System components
56-59
68-69
25, 47, 57, 71, 79
R
Results
14, 24, 31f., 41, 46ff., 50ff.
Results, downloading to a computer
54ff.
Results, reviewing stored
50ff.
Results, reviewing stored results
50ff.
Results, transferring stored results
55
S
Service
Service, customer support and
SET button
SET menu
Setting the time
Settings
- Date
- Enabling/disabling the beep tone
- Time
- Year
92
92
2
27ff.
34
26ff.
36ff.
28ff.
34ff.
30ff.
65
8, 91
94ff.
T
Technical data
Temperature range
Test strip drum, inserting or replacing
Test strip ejection
Testing blood glucose
Testing conditions
Troubleshooting guide
66ff.
48, 70, 72-73
16ff.
45
40ff.
48ff.
70ff.
U
Units (mg/dL and mmol/L)
Use-by date, test strip drum
41
15, 25, 75, 80
V
Values, highest, lowest, average
52
W
Warnings
8ff.
Y
Year, setting the year
30ff.
100
101
100
101