1
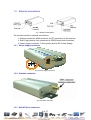
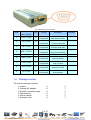
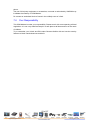
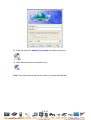
LBGSMMODEM31
GSM GPRS
/
MODEM SERIES
User ’s Manual
1 of 27
[email protected]
www.logicbus.com
List of abbreviations
ACM
Accumulated Call Meter
MO
Mobile Originated
AT
ATtention (prefix for modem commands)
MS
Mobile Station
CS
Coding Scheme
MT
Mobile Terminated
CTS
Clear To Send
NC
Not Connected
DC
Direct Current
PCL
Power Control Level
DCD
Data Carrier Detect
PDP
Packet Data Protocol
DCE
Data Communication Equipment
PDU
Protocol Data Unit
DCS
Digital Cellular System
PIN
Personal Identification Number
DSR
Data Set Ready
PLMN
Public Land Mobile Network
DTE
Data Terminal Equipment
PSTN
Public Switched Telephone Network
DTR
Data Terminal Ready
PUK
Personal Unblocking Key
EMI
Electro Magnetic Interference
RF
Radio Frequency
ESD
Electro Static Discharges
RFI
Radio Frequency Interference
FAQ
Frequently Asked Question
RI
Ring Indicator
GND
GrouND
RTS
Request To Send
GPRS
General Packet Radio Service
RX
Receive
GSM
Global System for Mobile communications
SIM
Subscriber Identification Module
I/O
Input / Output
SMS
Short Message Service
ISDN
Integrated Service Digital Network
TX
Transmit
LED
Light Emitting Diode
VRMS
Volt Root Mean Square
ME
Mobile Equipment
VSWR
Voltage Standing Wave Ratio
2 of 27
[email protected]
www.logicbus.com
Table of Contents
1 General description..................................................................................5
1.1
Introduce .....................................................................................................................5
1.2
Features .......................................................................................................................5
1.3
External connections ..................................................................................................6
1.4
Package content ..........................................................................................................7
2 Functional description ...........................................................................8
2.1
Architecture ...............................................................................................................8
2.2
RS232 serial link........................................................................................................8
3 Characteristics........................................................................................10
3.1
Basic services.............................................................................................................10
3.2
Physical characteristics ............................................................................................11
3.3
Electrical characteristics..........................................................................................11
3.4
Environmental characteristics ................................................................................12
4 Using the modem ...................................................................................13
4.1
Getting started with the modem..............................................................................13
4.2
Operational status of the modem ............................................................................14
4.3
Verifying the received signal strength.....................................................................14
4.4
Verifying the network registration of the modem..................................................14
5 AT commands for the modem ...............................................................15
6 Troubleshooting .....................................................................................16
6.1
No connection with the modem through the serial link ........................................ 16
6.2
Receiving “ERROR” message .................................................................................17
6.3
Receiving “No carrier” message..............................................................................19
7 Safety recommendations .......................................................................21
7.1
General Safety...........................................................................................................21
7.2
Vehicle Safety ............................................................................................................22
7.3
Care And Maintenance ............................................................................................22
7.4
Your Responsibility ..................................................................................................23
8 Proper Usage ..........................................................................................24
8.1
Use accessories in the original packaging...............................................................24
3 of 27
[email protected]
www.logicbus.com
8.2
Prevent embezzlement..............................................................................................24
8.3
Proper usage..............................................................................................................24
9 Quality guarantee ...................................................................................24
10 GPRS Modem Internet Access setup guide .........................................25
4 of 27
[email protected]
www.logicbus.com
1
1.1
General description
Introduce
The modem is a self-contained E-GSM/GSM-GPRS 900/1800 dual-band
modem and is GPRS class 10 capable.
This modem supports the following transmissions:
¾ Data,
¾ Fax,
¾ Short Messages (Point to point and Cell Broadcast),
¾ Voice calls.
The modem comprises several interfaces:
¾ LED function indicating the operating status,
¾ External antenna (via SMA connector),
¾ RS232 Serial (via 9-pin SUB HD connector),
¾ Power supply (via 2.5mm DC power jack),
¾ SIM card holder.
1.2
Features
The main features of the modem are the following:
¾ 2 Watts E-GSM 900 radio section.
¾ 1 Watt GSM1800 radio section.
¾ Echo Cancellation + noise reduction.
¾ Full GSM or GSM / GPRS software stack.
¾ Hardware GPRS class 10 capable.
¾ Complete shielding.
¾ A DC Power supply.
¾ A RS232 serial link.
¾ A 1.8V / 3.3V SIM interface.
5 of 27
[email protected]
www.logicbus.com
1.3
External connections
fig. 1 Modem Presentation
The modem has three external connections:
¾ Antenna connector: SMA connector for RF connection to the antenna,
¾ Sub D high density 9-pin connector for RS232 serial link connection,
¾ Power supply connector: 2.5mm power jack for DC Power Supply.
1.3.1 Power supply connector
fig. 2 Power supply connector
1.3.2 Antenna connector
fig. 3 Antenna connector
1.3.3 Sub HD 9-pin connector
6 of 27
[email protected]
www.logicbus.com
fig. 4 Sub HD 9-pin connector
Pin #
Signal
(EIA / CCITT)
I/O
I/O type
Description
1
DCD / CT109
O
RS232
STANDARD
RS232
Data Carrier Detect
2
TX / CT103
O
RS232
STANDARD
RS232
Transmit serial data
3
RX / CT104
I
RS232
STANDARD
RS232
Receive serial data
4
DTR / CT108-2
I
RS232
STANDARD
RS232
Data Terminal Ready
5
GND
-
GND
Ground
6
DSR / CT107
O
RS232
STANDARD
RS232
Data Set Ready
7
CTS / CT106
O
RS232
STANDARD
RS232
Clear To Send
8
RTS / CT105
I
RS232
STANDARD
RS232
Request To Send
9
RI / CT125
O
RS232
STANDARD
RS232
Ring Indicator
1.4
Comment
Package content
The modem package includes:
¾
¾
¾
¾
¾
¾
modem
External AC adapter
RS-232 connecting cable
0dBi Antenna
User’s manual
Warranty Card
×1
×1
×1
×1
×1
×1
□
□
□
□
□
□
7 of 27
[email protected]
www.logicbus.com
2
Functional description
2.1
Architecture
fig. 5 Modem Functional architecture
2.2
RS232 serial link
2.2.1 General presentation
The RS232 interface performs the voltage level adaptation (V24/CMOS⇔
V24/V28) between the internal SIMCOM module (DCE) and the external world
(DTE).
The RS232 interface is protected (by ESD protection) against electrostatic
surges on the RS232 lines.
Filtering guarantees:
¾ EMI/RFI protection in input and output,
¾ Signal smoothing.
A flexible 6-wire serial interface is available complying with RS232 protocol
signaling.
8 of 27
[email protected]
www.logicbus.com
The signals available are:
¾ TX data (TX / CT103),
¾ RX data (RX / CT104),
¾ Request To Send (RTS / CT105),
¾ Clear To Send (CTS / CT106),
¾ Data Terminal Ready (DTR / CT108-2),
¾ Data Set Ready (DSR / CT107).
The 2 additional signals are Data Carrier Detect (DCD / CT109) and Ring
Indicator (RI / CT125).
fig. 6 RS232 Serial Link signals
RS232 interface has been designed to allow a certain flexibility in the use of
the serial interface signals. However, the use of TX, RX, CTS and RTS signals
is mandatory which is not the case for DTR, DSR, DCD and RI signals which
can be not used.
2.2.2 Pin out description
Signal
Pin #
I/O
I/O type
RS232 STANDARD
Description
TX / CT103
2
O
TX
Transmit serial data
RX / CT104
3
I
RX
Receive serial data
RTS / CT105
8
I
RTS
Request To Send
CTS / CT106
7
O
CTS
Clear To Send
DSR / CT107
6
O
DSR
Data Set Ready
DTR / CT108-2
4
I
DTR
Data Terminal Ready
DCD / CT109
1
O
DCD
Data Carrier Detect
RI / CT125
9
O
RI
Ring Indicator
GND / CT102
5
-
GND
Ground
9 of 27
[email protected]
www.logicbus.com
3
Characteristics
3.1
Basic services
The basic services of the modem are given in the table below.
Standard
Interface
SMS
Data
Fax
GPRS
GSM
DCS
900 MHz
E-GSM compliant
Class 4 (2W).
GSM phase 2.
Serial interface RS232 V.24/V.28
AT command set based on V.25ter
and GSM 07.05 & 07.07.
Auto-bauding function between
2400 bits/s and 19200 bits/s
No auto-framing available
Mobile Originated (MO) and
Mobile Terminated (MT).
Mode Text & PDU point to point.
Cell broadcast.
In accordance with GSM 07.05
Asynchronous 2400, 4800,
9600 and 14400 bits/s.
Transparent and Non-Transparent
mode
In Non Transparent Mode: 300,
1200, 1200/75 bauds.
Mode 3.1 kHz (PSTN) and V110
(ISDN)
2400/4800/7200/9600 bits/s,
GSM teleservice 62 in
Transparent Mode.
Class 1 & Class 2.
Group 3 compatible.
Class 10.
Coding schemes: CS1 to CS4
Compliant with SMG31bis
1800 MHz
E-GSM compliant
Class 1 (1W)
GSM phase 2.
Serial interface RS232 V.24/V.28
AT command set based on V.25ter
and GSM 07.05 & 07.07.
Auto-bauding function between
2400 bits/s and 19200 bits/s
No auto-framing available
Mobile Originated (MO) and
Mobile Terminated (MT).
Mode Text & PDU point to point.
Cell broadcast.
In accordance with GSM 07.05
Asynchronous 2400, 4800,
9600 and 14400 bits/s.
Transparent and Non-Transparent
mode
In Non Transparent Mode: 300,
1200, 1200/75 bauds.
Mode 3.1 kHz (PSTN) and V110
(ISDN)
2400/4800/7200/9600 bits/s,
GSM teleservice 62 in
Transparent Mode.
Class 1 & Class 2.
Group 3 compatible.
Class 10.
Coding schemes: CS1 to CS4
Compliant with SMG31bis
10 of 27
[email protected]
www.logicbus.com
3.2
Physical characteristics
Dimensions
98mm×54mm×25mm (without connectors)
Overall Dimension
110mm×54mm×25mm
Weight
< 130g
Volume
132.3 cm3
Housing
Aluminum profiled
3.3
Electrical characteristics
3.3.1 Power supply
Table 1: Electrical characteristics
5 V to 32 V DC (GSM or DCS).
Operating Voltage ranges
5.5 V to 32 V DC (GPRS Class 10).
480 mA Average at 5.5V.
Maximum current
1.7 A Peak at 5V.
Note: the modem is permanently powered once the power supply is connected. The
following table describes the consequences of over voltage and under voltage with the
GSM/GPRS Modem.
Table 2: Effects of power supply defect
If the voltage:
Then:
falls below 5V
The GSM communication is not guaranteed.
falls below 5.5V
The GPRS Class 10 is not guaranteed.
Voltage over 32V
(Transient peaks)
The modem guarantees its own protection.
Voltage over 32V
(continuous overvoltage)
Protection of the modem by the fuse (the
supply voltage is disconnected).
The following table provides information on power consumption of the
Fastrack modem, assuming an operating temperature of +25 °C and using a 3 V SIM
card.
3.3.2 RF characteristics
3.3.2.1
Frequency ranges
Table 4: Frequency ranges
Characteristic
E-GSM 900
DCS 1800
Frequency TX
880 to 915 MHz
1710 to 1785 MHz
Frequency RX
925 to 960 MHz
1805 to 1880 MHz
3.3.2.2 RF performances
RF performances are compliant with the ETSI recommendation GSM 05.05.
11 of 27
[email protected]
www.logicbus.com
The RF performances for receiver and transmitter are given in the table below.
Table 5: Receiver and transmitter RF performances
Receiver
E-GSM900 Reference Sensitivity
-104 dBm Static & TUHigh
DCS1800 Reference Sensitivity
-102 dBm Static & TUHigh
Selectivity @ 200 kHz
> +9 dBc
Selectivity @ 400 kHz
> +41 dBc
Linear dynamic range
63 dB
Co-channel rejection
>= 9 dBc
Transmitter
Maximum output power (E-GSM 900)
at ambient temperature
33 dBm +/- 2 dB
Maximum output power (DCS1800)
at ambient temperature
30 dBm +/- 2 dB
Minimum output power (E-GSM 900)
at ambient temperature
5 dBm +/- 5 dB
Minimum output power (DCS1800)
at ambient temperature
0 dBm +/- 5 dB
3.3.2.3 External antenna
The external antenna is connected to the modem via the SMA connector.
The external antenna must fulfill the characteristics listed in the table below.
Table 6: External antenna characteristics
Antenna frequency range
Dual-band GSM 900/DCS 1800 MHz
Impedance
50 Ohms
Gain (antenna + cable)
0 dBi
VSWR (antenna + cable)
-10 dB
Note: refer to chapter 8 for recommended antenna.
3.3.3 SIM card
Table 7: SIM card characteristics
SIM card
3.4
1.8V or 3.3V
Environmental characteristics
To ensure the proper operation of the Modem, the operating environment must be within
a specific temperature as described in the table below.
Table 9: Ranges of temperature
Operating temperature range
-20 °C to +55 °C
Storage temperature range
-25 °C to +70°C
12 of 27
[email protected]
www.logicbus.com
4
4.1
Using the modem
Getting started with the modem
4.1.1 Setting up the modem
To set up the modem, do the following:
1
Press SIM card holder ejector (yellow button) with a sharp object (the tip of a
pen for example).
2
Insert the SIM card in the holder.
3
Verify the SIM card fits in the holder properly.
4
Connect the antenna to the SMA connector.
5
Connect both sides of the serial cable (9-pin Sub HD connector on the modem
side).
6
Connect the power supply cable to the power supply source.
Note: for automotive application, it is recommended to connect the V+ line of
the modem directly to the positive terminal of the battery.
7
Plug the power supply cable into the modem and switch on the external power
supply.
8
Now the modem is ready to work. Refer to chapter 5 for some AT commands
to configure the modem.
4.1.2 Checking the communication with the modem
Connect the RS232 link between the DTE (port COM) and the modem (DCE). Configure
the RS232 port of the DTE as follows:
¾ Bits per second: 115.200 kbps,
¾ Data bits: 8,
¾ Parity: None,
¾ Stop bits: 1,
¾ Flow control: Hardware Flow control.
Using a communication software such as HyperTerminal program, enter the AT ↵
command. The response of the modem must be OK displayed in the HyperTerminal
window.
If the communication cannot be established with the modem, do the following:
¾ Check the RS232 connection between the DTE and the modem (DCE),
¾ Check the configuration of the port COM used on the DTE.
Example of AT commands which can be used after getting started the modem:
¾ AT+CGMI: modem answer is “WAVECOM MODEM” when serial link is OK.
¾ AT+CPIN=<Pin Code>: to enter a PIN code (if activated).
¾ AT+CSQ: to verify the received signal strength.
¾ AT+CREG?: to verify the registration of the modem on the network.
¾ ATD<phone number>;: to initiate a call.
¾ ATH: to hang up (end of call).
For further information about these AT commands and their associated parameters, refer
to document [1].
13 of 27
[email protected]
www.logicbus.com
4.2
Operational status of the modem
The operational status of the modem is given by the LED light located on the front panel of
the modem. The table below gives the meaning of the various statuses available.
Table 10: Operational status of the modem
LED Status
LED light activity
Modem status
ON
LED ON permanent
Modem is switched on
Not registered on the network
LED Flashing slowly
Idle mode
Connected to the network
LED Flashing rapidly
Transmission mode
LED OFF
Modem is switched off
OFF
4.3
Verifying the received signal strength
The modem establishes a call only if the received signal is sufficiently strong. To verify
the received signal strength, do the following:
Using a communication software such as HyperTerminal program, enter the AT command
AT+CSQ. Value appears for the received signal strength.
Verify the result with the values given in the table below.
Table 11: Values of received signal strength
Value of received signal strength
(AT+CSQ response)
Interpretation of the
received signal strength
0 - 10
Insufficient(*)
11 - 31
Sufficient(*)
Greater than 99
Insufficient(*)
(*) Based on general observations.
4.4
Verifying the network registration of the modem
1. Make sure a valid SIM card has been previously inserted in the SIM card holder of the
modem.
2. Using a communication software such as HyperTerminal program, enter the following
AT command: AT+CREG?. Value appears as a response.
3. Verify the result with the values given in the table below.
Table 12: Values of network registration
Value(*)
Network registration
0,1
Yes
0,5
Yes (registered roaming)
(*) refer to AT commands documentation [1] for further information about the other
returned values and their meaning.
If the modem is not registered, perform the following procedure:
¾ Check the connection between the modem and the antenna.
¾ Verify the signal strength to determine the strength of the received signal (refer to
14 of 27
[email protected]
www.logicbus.com
paragraph 4.3).
5
AT commands for the modem
The table below reminds the main AT commands required for getting started the modem.
For other AT commands available or further information about the AT commands, refer to
document [1].
Description
Enter PIN Code
AT commands
AT+CPIN=1234
Modem’s response
Comment
OK
PIN Code accepted.
+CME ERROR: 16
Incorrect PIN Code
(with +CMEE = 1 mode).
+CME ERROR: 3
PIN already entered
(with +CMEE = 1 mode).
Modem
AT+CREG?
CREG=<mode>, 1
synchronization
Modem synchronised on the
network.
checking
CREG=<mode>, 2
Synchronization lost,
resynchronization attempt.
CREG=<mode>, 0
Modem not synchronized on
the network, no
synchronization attempt.
Receiving an
ATA
OK
Answer the call.
ATD<phone number>;
OK
Communication established.
(Don’t forget the “ ; ” at the
CME ERROR: 11
PIN code not entered (with
incoming call
Initiate a call
end for « voice » call)
+CMEE = 1 mode).
CME ERROR: 3
AOC credit exceeded or a
communication is already
established.
Communication
NO CARRIER
loss
Hang up
ATH
OK
Store the
AT&W
OK
parameters in
The configuration settings are
stored in EEPROM.
EEPROM
15 of 27
[email protected]
www.logicbus.com
6
Troubleshooting
This section of the document describes possible problems encountered when using the
modem and their solutions.
6.1
No connection with the modem through the serial link
If the modem does not answer through the serial link, refer to the table below for possible
causes and solutions.
Table 13: Solutions for no connection with modem through serial link
If the modem
returns…
Then ask
Action
Nothing
Is the modem powered
correctly?
Provide a power supply in
the range of 5 V (5.5V for
GPRS Class 10) to 32 V.
Does the serial cable follow
correctly pin assignment
shown in paragraph 1.2.1.3.
Connect the cable by
following pin assignment
given in paragraph 1.2.1.3.
Is the communication
program properly
configured?
Ensure the setting of the
communication program is
fit to setting of modem.
Modem factory setting is:
Data bits = 8
Parity = none
Stop bits = 1
Baud = 115.200 kbps.
Flow control = Hardware
Is there another program
interfering with the
communication program
(i.e. Conflict on
communication port
access)
Close the application (e.g.
mouse or printer driver).
16 of 27
[email protected]
www.logicbus.com
6.2
Receiving “ERROR” message
If the modem returns a message of ERROR upon an attempted transmission of data, or
voice signals, then refer to the table below for possible causes and solutions.
Table 14: Solutions for “ERROR” message
If the modem
returns…
Then ask
Action
ERROR
Is the modem registered on the
Refer to paragraph 4.4 to
network?
verify that the modem is
registered on the network.
Is the modem receiving an
incoming call or is it already in
communication?
End any incoming by using
ATH command.
Is the selected bearer type
supported by the called party?
Enter AT+CMEE to view the
extended error code.
Note: Refer to Table 15.
Ensure that the selected bearer
type is supported by the called
party.
Ensure that the semicolon (;) is
entered immediately after the
phone number in the AT
command.
e.g. ATD######;
Is the selected bearer type
supported by the network?
Is the received signal strong
enough?
Refer to paragraph 4.3 to
verify the strength of the
received signal.
Is the antenna properly
connected?
Refer to paragraph 3.3.2.3 for
antenna requirements
If the modem returns a message of ERROR, you can have the extended error code by
using AT command AT+CMEE=1. Refer to the table below for interpretation of extended
error code.
17 of 27
[email protected]
www.logicbus.com
Table 15: Interpretation of extended error code
Error
Code
0
3
4
Diagnostic
Hint
Phone failure
Operation not allowed
Operation not supported
Call your technical support.
10
SIM not inserted
11
SIM PIN required
12
SIM PUK required
13
SIM Failure
16
17
Incorrect password
SIM PIN2 required
18
SIM PUK2 required
26
30
103
106
Dial string too long
No network service
Network not allowed Emergency
calls only
Network personalization PIN
required (Network lock)
Illegal MS (#3)
Illegal ME (#6)
107
GPRS services not allowed (#7)
111
112
148
PLMN area not allowed (#11)
Location area not allowed (#12)
Roaming not allowed in this
location area (#13)
Service option not supported
(#32)
Requested
service option not
subscribed (#33)
Service option temporarily out of
order (#34)
Unspecified GPRS error
149
PDP authentication failure
150
Invalid mobile class
32
40
113
132
133
134
No action.
If SIM card is inserted, check the SIM card if it is
clean and properly inserted.
Enter PIN code.
Enter PUK code.
Note: Call your network provider if you don’t know
this code.
Check validity of your SIM card. If SIM card
damaged, call your network provider.
Check the code you entered.
Enter PIN2 code.
Enter PUK2 code (call your network provider if you
don’t know this code).
Check your phone number (max 20 digits).
No action.
No action.
Enter Network lock code (call your network
provider if you don’t know this code).
No action.
No action.
Contact your network provider to subscribe to the
GPRS services.
No action.
No action.
No action.
Check the service option.
Call your network provider to subscribe to the
requested service option.
No action.
No action.
Call your network provider to know the right
authentication parameters.
Change the class of the mobile to a valid one.
Note: For all other codes, and/or details, refer to AT commands documentation.
18 of 27
[email protected]
www.logicbus.com
6.3
Receiving “No carrier” message
If the modem returns a message of No carrier upon an attempted transmission of data, or
voice signals, then refer to the table below for possible causes and solutions.
Table 16: Solutions for “No carrier” message
If the modem
returns…
Then ask…
Action…
Is the received signal strong
enough?
Refer to paragraph 4.3 to
verify the strength of the
received signal.
Is the antenna properly
connected?
Refer to paragraph 3.3.2.3
for antenna requirements.
No carrier (when trying to
issue a voice
communication)
Is the semicolon (;) entered
immediately after the phone
number in the AT
command?
Ensure that the semicolon
(;) is entered immediately
after the phone number in
the AT command.
e.g. ATD######;
No carrier (when trying to
issue a data
communication)
Is SIM card configured for
data / fax calls?
Configure the SIM card for
data / fax calls (Ask your
network provider if
necessary).
Is the selected bearer type
supported by the called
party?
Ensure that the selected
bearer type is supported by
the called party.
Is the selected bearer type
supported by the network?
Ensure that the selected
bearer type is supported by
the network.
If no success, try bearer
selection type by AT
command:
AT+CBST=0,0,3
No carrier
If the modem returns a message of No carrier, you can get the extended error code by
using AT command AT+CEER. Refer to the table below for interpretation of extended error
code.
Table 17: Interpretation of extended error code
Error Code
Diagnostic
Hint
1
Unallocated phone number
Not applicable.
19 of 27
[email protected]
www.logicbus.com
16
Normal call clearing
17
User busy
18
No user responding
19
User alerting, no answer
21
Call rejected
22
Number changed
31
Normal, unspecified
50
Requested facility not
subscribed
Check your subscription (data
subscription available?).
68
ACM equal or greater than
ACM max
Credit of your pre-paid SIM
card expired.
252
Call barring on outgoing calls
Not applicable.
253
Call barring on incoming calls
3, 6, 8, 29,
34, 38, 41,42,
43, 44, 47,
49, 57, 58,
63, 65, 69,
70, 79, 254
Network causes
See AT commands manual for
further details or call network
provider.
Note: For all other codes, and/or details, see AT commands documentation.
20 of 27
[email protected]
www.logicbus.com
7
7.1
Safety recommendations Safety recommendations
General Safety
Please read these simple guidelines carefully. It is important to follow any special
regulations regarding the use of radio equipment due in particular to the possibility of
Radio Frequency (RF) interference. Please follow the safety advice given below carefully.
Switch on Safety
Respect restrictions on the use of radio equipment in fuel depots, chemical
plants or where blasting operations are in progress. Do not switch the
modem on when wireless device use is prohibited or when it may cause
interference or danger.
Switch OFF your GSM Modem when in an aircraft. The use of cellular
telephones in an aircraft may endanger the operation of the aircraft, disrupt
the cellular network and is illegal. Failure to observe this instruction may lead
to suspension or denial of cellular telephone services to the offender, or legal
action or both.
Switch OFF your GSM Modem when at a refueling point.
Switch OFF your GSM Modem in hospitals and any other place where
medical equipment may be in use. There may be a hazard associated with
the operation of your GSM Modem close to in adequately protected personal
medical devices such as hearing aids and pacemakers. Consult the
manufactures of the medical device to determine if it is adequately
protected.
Interference
All modem may be susceptible to interference, which could affect
performance. Operation of your GSM Modem close to other electronic
equipment may also cause interference if the equipment is inadequately
protected. Observe any warning signs and manufacturers
recommendations.
Switch off when refueling
Do not use the modem at a refueling point. Do not use near fuel or
chemicals.
Switch off near blasting
Follow any restrictions. Do not use the the GSM/GPRS/CDMA modem
where blasting is in progress.
Use sensibly
Use only in the normal position as explained in the product documentation.
Do not touch the antenna unnecessarily.
21 of 27
[email protected]
www.logicbus.com
Qualified service
Only qualified personnel may install or repair this product.
Water-resistance
Your product is not water-resistant. Keep it dry.
The modem is designed for and intended to be used in fixed and mobile applications:
“Fixed” means that the device is physically secured at one location and is not able to
be easily moved to another location.
“Mobile” means that the device is designed to be used in other than fixed locations
and generally in such a way that a separation distance of at least 20 cm (8 inches) is
normally maintained between the transmitter’s antenna and the body of the user or
nearby persons.
The Modem is not designed for and intended to be used in portable applications (within 20
cm of the body of the user) and such uses are strictly prohibited.
7.2
Vehicle Safety
Do not use your GSM Modem while driving, unless equipped with a correctly installed
vehicle kit allowing ’Hands-Free’ Operation.
Respect national regulations on the use of cellular telephones in vehicles. Road safety
always comes first.
If incorrectly installed in a vehicle, the operation of GSM Modem telephone could interfere
with the correct functioning of vehicle electronics. To avoid such problems, ensure that the
installation has been performed by a qualified personnel. Verification of the protection of
vehicle electronics should form part of the installation.
The use of an alert device to operate vehicle’s lights or horn on public roads is not
permitted.
7.3
Care And Maintenance
Your GSM Modem is the product of advanced engineering, design and craftsmanship and
should be treated with care. The suggestion below will help you to enjoy this product for
many years.
Do not expose the GSM Modem to any extreme environment where the temperature or
humidity is high.
Do not attempt to disassemble the GSM Modem. There are no user serviceable parts
inside.
Do not expose the GSM Modem to water, rain or spilt beverages, It is not waterproof.
Do not abuse your GSM Modem by dropping, knocking, or violent shaking. Rough
handling can damage it.
Do not place the GSM Modem alongside computer discs, credit or travel cards or other
magnetic media. The information contained on discs or cards may be affected by the
22 of 27
[email protected]
www.logicbus.com
phone.
The use of third party equipment or accessories, not made or authorized by SIMCOM may
invalidate the warranty of GSM Modem.
Do contact an authorized Service Center in the unlikely event of a fault.
7.4
Your Responsibility
This GSM Modem is under your responsibility. Please treat it with care respecting all local
regulations. It is not a toy therefore keep it in a safe place at all times and out of the reach
of children.
Try to remember your Unlock and PIN codes. Become familiar with and use the security
features to block unauthorized use and theft.
23 of 27
[email protected]
www.logicbus.com
8
8.1
Proper Usage
Use accessories in the original packaging
Please only use accessories in the original packing or those approved by supplier. It may
cause malfunctions and shorten lift-span of the product if using unapproved accessories.
8.2
Prevent embezzlement
If you lost modem with SIM card, contact your GSM/GPRS/CDMA service provider
immediately to prevent embezzlement.
8.3
Proper usage
Turn off the power before you insert or remove the SIM card
9
¾
¾
¾
¾
¾
Quality guarantee
We provide one-year quality guarantee. We will repair the modem free of charge if
quality problems arise from normal using and under normal operation conditions. We
are not responsible for any related costs or damages caused directly or indirectly by
malfunction.
It will be charged for maintenance after the guarantee period.
Shipping charge will be shared half/half during the guarantee period, and will be
afforded by buyer after guarantee period.
We will return the product in 15 days (shipping date excluded), depends on how it
damaged.
You should return the full package when sending back for repairing. Insulation
method and ant-extrusion method should be taken.
24 of 27
[email protected]
www.logicbus.com
10 GPRS Modem Internet Access setup guide
Step 1: Install modem
1. Connect modem with PC, then power up modem
2. Double click Phone and Modems Options in Control Panel
3. Select Modems in Phone and Modems Options and click Add button
4. Select ‘Don’t detect my modem; I will select if from a list.’ Æ Select
Standard Modems Types Æ Select Standard 33600 bps Modem Æ
Select relevant port of modem plugged in Æ Complete modem installation.
Step 2: Setup modem
1. Click Properties and select Advanced option.
25 of 27
[email protected]
www.logicbus.com
2. Enter AT command AT+CGDCONT=1,"IP","CMNET" into textbox.
Step 3: Establish dial connection
1. Establish Dial Connection. Dial number is *99***1# or *99#, User name
and Password leave empty.
26 of 27
[email protected]
www.logicbus.com
2. Click the icon from Network Connection to initial connection.
3. After initial period, the connection is on.
Note: Turn off the power before you insert or remove the SIM card.
27 of 27
[email protected]
www.logicbus.com