1
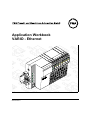
Application Workbook
VARIO - Ethernet
9499-040-69311
VARIO BK ETH
9499-040-69311
VARIO BK ETH
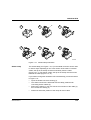
Please Observe the Following Notes:
In order to ensure the safe use of your device, we recommend that you
read this manual carefully. The following notes provide information on how
to use this manual.
Requirements of the User Group
The use of products described in this manual is oriented exclusively to
qualified electricians or persons instructed by them, who are familiar with
applicable national standards. We assume no liability for erroneous
handling or damage to the products or external products resulting from
disregard of information contained in this manual.
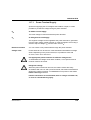
Explanation of Symbols Used
The attention symbol refers to an operating procedure which, if not
carefully followed, could result in damage to equipment or personal injury.
The note symbol informs you of conditions that must strictly be observed to
achieve error-free operation. It also gives you tips and advice on the
efficient use of hardware and on software optimization to save you extra
work.
The text symbol refers to detailed sources of information (manuals, data
sheets, literature, etc.) on the subject matter, product, etc. This text also
provides helpful information for the orientation in the manual.
9499-040-69311
VARIO BK ETH
Statement of Legal Authority
This manual, including all illustrations contained herein, is copyright
protected. Use of this manual by any third party in departure from the
copyright provision is forbidden. Reproduction, translation, or electronic or
photographic archiving or alteration requires the express written consent of
the author. Violators are liable for damages.
We reserve the right to make any technical changes that serve the purpose
of technical progress.
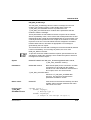
Warning
The VARIO BK ETH module is designed exclusively for SELV
operation according to IEC 950/EN 60950/VDE 0805.
Shielding
The shielding ground of the connected twisted pair cables is
electrically connected with the female connector. When
connecting network segments, avoid ground loops, potential
transfers, and voltage equalization currents using the braided
shield.
ESD
The modules are fitted with electrostatically sensitive
components. Exposure to electric fields or charge imbalance
may damage or adversely affect the life of the modules.
The following protective measures must be taken when using
electrostatically sensitive modules:
Create an electrical equipotential bonding between yourself and
your surroundings, e.g., using an ESD wristband, which is
connected to the grounded DIN rail on which the module will be
mounted.
Housing
Only authorized service personnel are permitted to open the
housing.
9499-040-69311
VARIO BK ETH
About This Manual
Purpose of this
manual
This manual illustrates how to configure an Ethernet station to meet
application requirements.
Who should use this
manual
Use this manual if you are responsible for configuring and installing an
Ethernet/Inline station. This manual is written based on the assumption that
the reader possesses basic knowledge about Inline systems.
Related
documentation
For specific information on the individual Inline terminals see the
corresponding terminal-specific data sheets.
Latest
documentation on
the Internet
Make sure you are always working with the latest documentation
published. Changes in or additional information on present documentation
can be found on the Internet at http://www.pma-online.de
9499-040-69311
VARIO BK ETH
Orientation in this
manual
About this user
manual
Validity of
documentation
For easy orientation when looking for specific information the manual offers
the following help:
–
The manual starts with the main table of contents that gives you an
overview of all manual topics.
–
Each manual section starts with an overview of the section topics.
–
On the left side of the pages within the sections you will see the topics
that are covered in the section.
–
In the Appendix you will find a list of figures and a list of tables.
In the first section you are introduced to Inline basics and general
information that applies to all terminals or terminal groups of the Inline
range. Topics are, for example:
–
Overview of the Inline product groups
–
Terminal structure
–
Terminal installation and wiring
–
Common technical data
We reserve the right to make any technical extensions and changes to the
system that serve the purpose of technical progress.
9499-040-69311
VARIO BK ETH
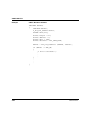
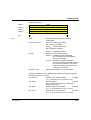
Contents
VARIO BK ETH.....................................................................................................1-3
1.1
General Functions.......................................................................1-3
1.1.1
Product Description........................................................1-3
1.2
Structure VARIO BK ETH Bus Coupler.......................................1-5
1.3
Local LED Status and Diagnostic Indicators ...............................1-6
1.4
Connecting the Supply Voltage...................................................1-7
1.5
Connector Assignment................................................................1-8
1.6
Supported I/O-Modules ...............................................................1-9
1.7
Basic Structure of Low-Level Signal Modules...........................1-10
1.7.1
Electronics Base ..........................................................1-11
1.7.2
Connectors...................................................................1-12
1.7.3
Connector identification ...............................................1-13
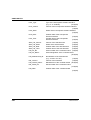
1.8
Function Identification and Labeling..........................................1-16
1.9
Dimensions of Low-Level Signal Modules ................................1-20
1.10
Electrical Potential and Data Routing........................................1-23
1.11
Circuits Within an VARIO Station and Provision of the Supply Voltages ............................................................................................1-25
1.11.1 Supply of the Ethernet Bus Coupler.............................1-26
1.11.2 Logic Circuit UL............................................................................. 1-26
1.11.3 Analog Circuit UANA .................................................................... 1-27
1.11.4 Main Circuit UM............................................................................. 1-28
1.11.5 Segment Circuit ...........................................................1-30
1.12
Potential Concept......................................................................1-32
1.13
LED Diagnostic and Status Indicators.......................................1-39
1.13.1 LEDs on the Ethernet Bus Coupler..............................1-39
1.13.2 Supply Terminal Indicators ..........................................1-41
1.13.3 I/O Module Indicators...................................................1-43
1.13.4 Indicators on Other Inline Modules ..............................1-44
1.14
9499-040-69311
Mounting/Removing Modules and Connecting Cables .............1-45
VARIO BK ETH
1.14.1 Installation Instructions ................................................1-45
1.14.2 Mounting and Removing Inline Modules......................1-45
1.14.3 Mounting ......................................................................1-46
1.14.4 Removal.......................................................................1-48
1.14.5 Replacing a Fuse .........................................................1-50
1.15
Grounding an VARIO Station ....................................................1-52
1.15.1 Shielding an Inline Station ...........................................1-54
1.15.2 Shielding Analog Sensors and Actuators.....................1-54
1.16
Connecting Cables....................................................................1-57
1.16.1 Connecting Unshielded Cables....................................1-57
1.16.2 Connecting Shielded Cables Using the Shield Connector .
1-59
1.17
Connecting the Voltage Supply.................................................1-62
1.17.1 Power Terminal Supply................................................1-63
1.17.2 Provision of the Segment Voltage Supply at Power Terminals1-64
1.17.3 Voltage Supply Requirements .....................................1-64
1.18
Connecting Sensors and Actuators...........................................1-64
1.18.1 Connection Methods for Sensors and Actuators .........1-65
1.18.2 Examples of Connections for Digital I/O Modules........1-66
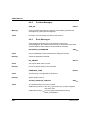
Startup/Operation .................................................................................................2-3
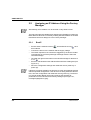
2.1
Sending BootP Requests ............................................................2-3
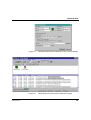
2.2
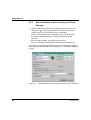
Assigning an IP Address Using the Factory Manager.................2-4
2.3
2.4
2.2.1
BootP .............................................................................2-4
2.2.2
Manual Addition of Devices Using the Factory Manager .26
Selecting IP Addresses ...............................................................2-7
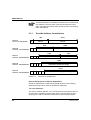
2.3.1
Possible Address Combinations ...................................2-8
2.3.2
Subnet Masks ................................................................2-9
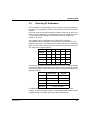
2.3.3
Structure of the Subnet Mask ......................................2-10
Factory Line I/O Configurator....................................................2-12
9499-040-69311
VARIO BK ETH
Driver Software .....................................................................................................3-3
3.1
Documentation ............................................................................3-3
3.1.1
3.2
Hardware and Software User Manual............................3-3
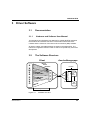
The Software Structure ...............................................................3-3
3.2.1
Ethernet Bus Coupler Firmware.....................................3-4
3.2.2
Driver Software ..............................................................3-4
3.3
Support and Driver Update .........................................................3-6
3.4
Transfer of I/O Data ....................................................................3-7
3.4.1
3.5
Startup Behavior of the Bus Coupler...........................................3-9
3.5.1
3.6
3.7
3.8
Position of the Process Data (Example) ........................3-8
Plug &Play Mode ...........................................................3-9
3.5.2
Expert Mode.................................................................3-10
3.5.3
Possible Combinations of the Modes...........................3-10
3.5.4
Startup Diagram of the Bus Coupler ............................3-11
3.5.5
Changing and Starting a Configuration in P&P Mode..3-13
Changing a Reference Configuration Using the Software ........3-14
3.6.1
Effects of Expert Mode.................................................3-14
3.6.2
Changing a Reference Configuration...........................3-15
Description of the Device Driver Interface (DDI) .......................3-16
3.7.1
Introduction ..................................................................3-16
3.7.2
Overview ......................................................................3-16
3.7.3
Working Method of the Device Driver Interface ...........3-16
3.7.4
Description of the Functions of the
Device Driver Interface3-19
Monitoring Functions.................................................................3-35
3.8.1
Connection Monitoring .................................................3-35
3.8.2
Data Interface (DTI) Monitoring ...................................3-41
3.9
Handling the SysFail Signal for the Ethernet/Inline Bus Coupler ..345
3.10
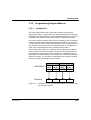
Programming Support Macros ..................................................3-51
3.10.1 Introduction ..................................................................3-51
3.11
Description of the Macros .........................................................3-53
3.11.1 Macros for Converting the Data Block of a Command.3-55
9499-040-69311
VARIO BK ETH
3.11.2 Macros for Converting the Data Block of a Message...3-57
3.11.3 Macros for Converting Input Data ................................3-59
3.11.4 Macros for Converting Output Data .............................3-62
3.12
Diagnostic Options for Driver Software .....................................3-64
3.12.1 Introduction ..................................................................3-64
3.13
Positive Messages ....................................................................3-66
3.14
Error Messages.........................................................................3-67
3.14.1 General Error Messages..............................................3-67
3.14.2 Error Messages When Opening a Data Channel.........3-69
3.14.3 Error Messages When Transmitting Messages/Commands
3-70
3.14.4 Error Messages When Transmitting Process Data......3-73
3.15
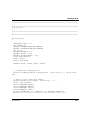
Example Program .....................................................................3-76
3.15.1 Demo Structure Startup ...............................................3-77
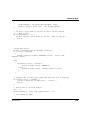
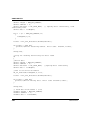
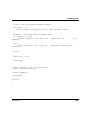
3.15.2 Example Program Source Code ..................................3-78
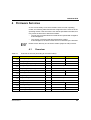
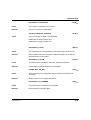
Firmware Services ................................................................................................4-3
4.1
Overview .....................................................................................4-3
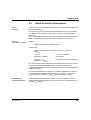
4.2
Notes on Service Descriptions ....................................................4-5
4.3
Services for Parameterizing the Controller Board.......................4-8
4.3.1
"Control_Parameterization" Service...............................4-8
4.3.2
"Set_Value" Service.....................................................4-10
4.3.3
"Read_Value" Service..................................................4-12
4.3.4
"Initiate_Load_Configuration" Service .........................4-14
4.3.5
"Load_Configuration" Service ......................................4-16
4.3.6
"Terminate_Load_Configuration" Service....................4-20
4.3.7
"Read_Configuration" Service .....................................4-22
4.3.8
"Complete_Read_Configuration" Service ....................4-29
4.3.9
"Delete_Configuration" Service....................................4-32
4.3.10 "Create_Configuration" Service ...................................4-34
4.3.11 "Activate_Configuration" Service .................................4-36
4.3.12 "Control_Device_Function" Service .............................4-38
4.3.13 "Reset_Controller_Board" Service...............................4-40
9499-040-69311
VARIO BK ETH
4.4
4.5
4.6
Services for Direct INTERBUS Access .....................................4-42
4.4.1
"Start_Data_Transfer" Service.....................................4-42
4.4.2
"Alarm_Stop" Service...................................................4-44
Diagnostic Services...................................................................4-46
4.5.1
"Get_Error_Info" Service..............................................4-46
4.5.2
"Get_Version_Info" Service .........................................4-49
Error Messages for Firmware Services:....................................4-53
4.6.1
Overview ......................................................................4-53
4.6.2
Positive Messages .......................................................4-54
4.6.3
Error Messages............................................................4-54
Technical Data......................................................................................................5-3
5.1
9499-040-69311
Ordering Data............................................................................5-11
VARIO BK ETH
9499-040-69311
Chapter 1
This section informs you about
–
the basic structure of low-level signal modules
–
the assignment of diagnostic and status indicators
–
potential and data routing
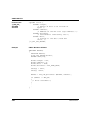
VARIO BK ETH.....................................................................................................1-3
1.1
General Functions.......................................................................1-3
1.1.1
Product Description........................................................1-3
1.2
Structure VARIO BK ETH Bus Coupler.......................................1-5
1.3
Local LED Status and Diagnostic Indicators ...............................1-6
1.4
Connecting the Supply Voltage...................................................1-7
1.5
Connector Assignment................................................................1-8
1.6
Supported I/O-Modules ...............................................................1-9
1.7
Basic Structure of Low-Level Signal Modules...........................1-10
1.7.1
Electronics Base ..........................................................1-11
1.7.2
Connectors...................................................................1-12
1.7.3
Connector identification ...............................................1-13
1.8
Function Identification and Labeling..........................................1-16
1.9
Dimensions of Low-Level Signal Modules ................................1-20
1.10
Electrical Potential and Data Routing........................................1-23
1.11
Circuits Within an VARIO Station and Provision of the Supply
Voltages ....................................................................................1-25
1.11.1 Supply of the Ethernet Bus Coupler.............................1-26
1.11.2 Logic Circuit UL............................................................................. 1-26
1.11.3 Analog Circuit UANA .................................................................... 1-27
1.11.4 Main Circuit UM............................................................................. 1-28
1.11.5 Segment Circuit ...........................................................1-30
1.12
1.13
Potential Concept......................................................................1-32
LED Diagnostic and Status Indicators.......................................1-39
1.13.1 LEDs on the Ethernet Bus Coupler..............................1-39
1.13.2 Supply Terminal Indicators ..........................................1-41
1.13.3 I/O Module Indicators...................................................1-43
9499-040-69311
1-1
VARIO BK ETH
1.13.4 Indicators on Other Inline Modules ..............................1-44
1.14
Mounting/Removing Modules and Connecting Cables .............1-45
1.14.1 Installation Instructions ................................................1-45
1.14.2 Mounting and Removing Inline Modules......................1-45
1.14.3 Mounting ......................................................................1-46
1.14.4 Removal.......................................................................1-48
1.14.5 Replacing a Fuse .........................................................1-50
1.15
Grounding an VARIO Station ....................................................1-52
1.15.1 Shielding an Inline Station ...........................................1-54
1.15.2 Shielding Analog Sensors and Actuators.....................1-54
1.16
Connecting Cables....................................................................1-57
1.16.1 Connecting Unshielded Cables....................................1-57
1.16.2 Connecting Shielded Cables Using the Shield Connector .
1-59
1.17
Connecting the Voltage Supply.................................................1-62
1.17.1 Power Terminal Supply................................................1-63
1.17.2 Provision of the Segment Voltage Supply at Power
Terminals1-64
1.17.3 Voltage Supply Requirements .....................................1-64
1.18
Connecting Sensors and Actuators...........................................1-64
1.18.1 Connection Methods for Sensors and Actuators .........1-65
1.18.2 Examples of Connections for Digital I/O Modules........1-66
1-2
9499-040-69311
VARIO BK ETH
1
VARIO BK ETH
1.1
1.1.1
General Functions
Product Description
Ethernet bus coupler
Features
–
Ethernet coupler for the VARIO-I/O system
–
Ethernet TCP/IP
- 10/100 Base-T(X)
–
Up to 63 other VARIO modules can be connected (process data
channel)
–
Flexible installation system for Ethernet
–
IP parameter setting via BootP
–
DDI software interface (Device Driver Interface)
–
Driver software for Sun Solaris/Windows NT
–
Software interface kit for other Unix systems
Applications
–
Connection of sensors/actuators via Ethernet.
Exchange of process data via Ethernet using a Unix workstation or a
Windows NT/2000 computer.
9499-040-69311
1-3
VARIO BK ETH
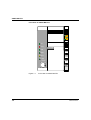
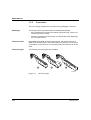
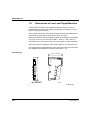
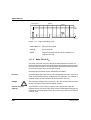
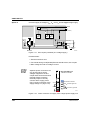
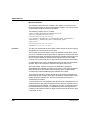
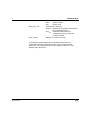
Front View of VARIO BK ETH
U S
U M
U L
P P
F A IL
1
2
0 0 .A 0 .4 5 .5 0 .A 1 .7 7
1 0 0
1
2
2
X M T
1
R C V
L IN K
3
3
1 0 /1 0 0
4
4
6 1 5 9 0 0 0 2
Figure 1-1
1-4
Front view of VARIO BK ETH
9499-040-69311
VARIO BK ETH
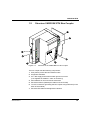
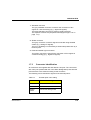
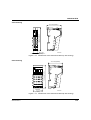
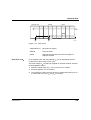
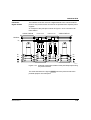
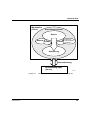
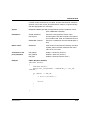
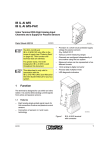
1.2
Structure VARIO BK ETH Bus Coupler
1
2
7
6
3
4
5
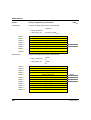
Figure 1-2
Structure of the VARIO BK ETH bus coupler
The bus coupler has the following components:
9499-040-69311
1
End plate to protect the last VARIO module
2
diagnostic indicators
3
24 V DC supply and functional earth ground connector
(not supplied as standard - order as accessory)
4
MAC address in clear text and as a barcode
5
Ethernet interface (twisted pair cables in RJ-45 format)
6
Two FE contacts for grounding the bus coupler using a DIN rail (on the
back of the module)
7
Ethernet LED status and diagnostic indicators
1-5
VARIO BK ETH
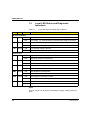
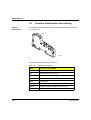
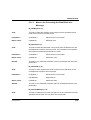
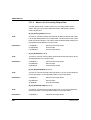
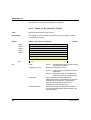
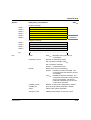
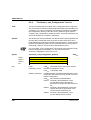
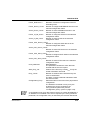
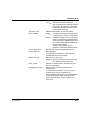
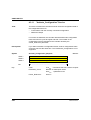
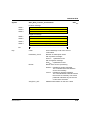
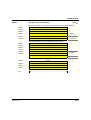
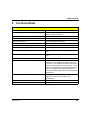
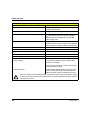
1.3
Local LED Status and Diagnostic
Indicators
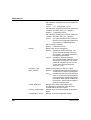
Table 1-1
Des.
Color
Status
Local LED status and diagnostic indicators
Meaning
Electronics Module
UL
UM
US
Green
Green
Green
ON
24 V supply, 7 V communications power/interface supply present
OFF
24 V supply, 7 V communications power/interface supply not present
ON
24 V main circuit supply present
OFF
24 V main circuit supply not present
ON
24 V segment supply is present
OFF
24 V segment supply is not present
ON
Plug & play mode is activated
OFF
Plug & play mode is not activated
ON
The firmware has detected an error
OFF
The firmware has not detected an error
ON
Operation at 100 Mbps (if LNK LED active)
OFF
Operation at 10 Mbps (if LNK LED active)
ON
Data telegrams are being sent
OFF
Data telegrams are not being sent
ON
Data telegrams are being received
OFF
Data telegrams are not being received
ON
Physical network connection ready to operate
OFF
Physical network connection interrupted or not present
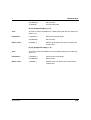
Ethernet Port
PP
FAIL
100
XMT
RCV
LNK
Green
Red
Green
Green
Yellow
Green
Reset
The bus coupler can be reset by switching the supply voltage off and on
again.
1-6
9499-040-69311
VARIO BK ETH
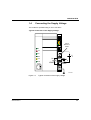
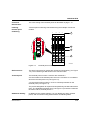
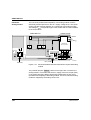
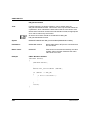
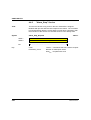
1.4
Connecting the Supply Voltage
The module is operated using a +24 V DC SELV.
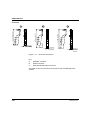
Typical Connection of the Supply Voltage
U S
U M
U L
P P
1
in te r n e
B r ü c k e im
M o d u l
2
F A IL
1
1
2
2
1 0 0
X M T
R C V
L IN K
1 0 /1 0 0
U
B K
L G N D
+
-
+
3
3
+
4
4
-
U
M
-
U
S
S G N D
6 1 5 9 0 0 0 4
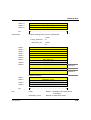
Figure 1-3
9499-040-69311
Typical connection of the supply voltage
1-7
VARIO BK ETH
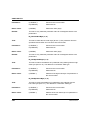
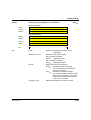
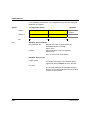
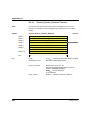
1.5
Connector Assignment
Table 1-2
Connector assignment
Term.
Point
Assignment
Wire Color/Remark
Conn.
Power Connector
1.1
24 V DC 24 V segment supply The supplied voltage is directly led to the potential
(US)
jumper.
1.2
24 V DC 24 V supply
(UBK)
The communications power for the bus coupler and the
connected local bus devices is generated from this
power. The 24 V analog power (UANA) for the local bus
devices is also generated.
2.1, 2.2 24 V DC Main voltage
(UM)
The main voltage is diverted to the local bus devices via
the potential jumpers.
1.3
LGND
Reference potential The potential is the reference ground for the
logic ground for UBK communications power UBK.
2.3
SGND
Reference potential
for US and UM
The reference potential is directly routed to the potential
jumper and is, at the same time, ground reference for the
main and segment supply.
Functional earth
ground (FE)
The functional earth ground must be connected to the
24 V DC supply/functional earth ground connection. The
contacts are directly connected with the potential jumper
and FE springs on the bottom of the housing. The
terminal is grounded when it is snapped onto a grounded
DIN rail. Functional earth ground is only used to
discharge interference.
1.4, 2.4 FE
The GND potential jumper carries the total current from the main
and segment circuits. The total current must not exceed the
maximum current carrying capacity of the potential jumper (8 A).
If the 8 A limit is reached at one of the potential jumpers US, UM,
and GND during configuration, a new power terminal must be
used.
The functional earth ground must be connected to the 24 V DC
supply/functional earth ground connection.
1-8
9499-040-69311
VARIO BK ETH
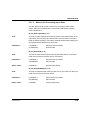
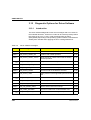
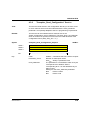
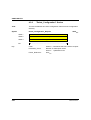
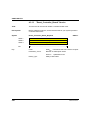
1.6
Table 1-3
Supported I/O-Modules
Digital I/O modules
Designation
Properties
Order No.
VARIO DI 2/24
2 inputs, 4-wire connection, 24 V DC
KSVC-102-00121
VARIO DI 4/24
4 inputs, 3-wire connection, 24 V DC
KSVC-102-00131
VARIO DI 8/24
8 inputs, 4-wire connection, 24 V DC
KSVC-102-00141
VARIO DI 16/24
16 inputs, 3-wire connection, 24 V DC
KSVC-102-00151
VARIO DO 2/24
2 outputs, 500 mA, 4-wire connection, 24 V DC
KSVC-102-00221
VARIO DO 4/24
4 inputs, 500 mA, 3-wire connection, 24 V DC
KSVC-102-00231
VARIO DO 8/24
8 inputs, 500 mA, 4-wire connection, 24 V DC
KSVC-102-00241
VARIO DO 16/24
16 inputs, 500 mA, 3-wire connection, 24 V DC
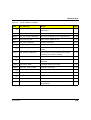
KSVC-102-00251
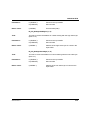
Table 1-4
Analog I/O modules
Designation
Properties
Order No.
VARIO AI 2/SF
2 inputs, 2-wire connection, 24 V DC, 0 - 20 mA,
4 - 20 mA, 0 - 10 V, ±10 V
KSVC-103-00121
VARIO AI 8/SF
8 inputs, 2-wire connection, 24 V DC, 0 - 20 mA,
4 - 20 mA, 0 - 10 V, ±10 V
KSVC-103-00141
VARIO AO 1/SF
1 output, 2-wire connection, 24 V DC, 0 - 20 mA,
4 - 20 mA, 0 - 10 V
KSVC-103-00211
VARIO AO 2/U/BP
2 outputs, 2-wire connection, 24 V DC, 0 - 10 V, ±10 V KSVC-103-00221
Table 1-5
Special function modules
Designation
Properties
Order No.
VARIO UTH 2
2 inputs, 2-wire connection, 24 V DC, thermocouples
KSVC-103-00421
VARIO RTD 2
2 inputs, 4-wire connection, 24 V DC, resistance
sensors
KSVC-103-00321
Table 1-6
Power and segment terminals
Designation
Properties
Order No.
VARIO PRW IN
Power terminal, 24 V DC
KSVC-105-00001
9499-040-69311
1-9
VARIO BK ETH
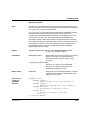
1.7
Basic Structure of Low-Level Signal
Modules
Regardless of the function and the design width, an Inline low-level signal
module consists of the electronics base (or base for short) and the plug-in
connector (or connector for short).
Z B F M
m a rk e r fo r c o n n e c to rs
T r a n s p a r e n t fie ld
B a c k c o n n e c to r s h a ft la tc h
A tta c h m e n t fo r la b e l p la te
Z B F M
m a r k e r fo r s ig n a l 1 /2
S ig n a l te r m in a ls 1 /2
V o lta g e te r m in a ls
D ia g n o s tic a n d s ta tu s
in d ic a to r s
F u n c tio n
c o lo r - c o d in g
F E o r s ig n a l te r m in a ls 3 /4
Z B F M
m a r k e r fo r s ig n a l 3 /4
C o n n e c to r
B a c k s n a p - o n m e c h a n is m
F r o n t c o n n e c to r s h a ft la tc h
Z B F M m a rk e r
fo r m o d u le id e n tific a tio n
E le c tr o n ic s b a s e
S lo t c o d in g
D a ta r o u tin g
V o lta g e r o u tin g
F r o n t s n a p - o n m e c h a n is m
L a tc h fo r D IN r a il
F e a th e rk e y fo r
k e y w a y /fe a th e r k e y c o n n e c tio n
Figure 1-4
5 5 2 0 A 0 3 3
Basic structure of an VARIO module
The most important of the components shown in Figure 1-4 are described
in "Electronics Base" on page 1-11 and "Connectors" on page 1-12.
ZBFM:
Zack markers, flat
(see also the "Function Identification and Labeling" section on
page 1-16)
The components required for labeling are listed in the Phoenix Contact
"CLIPLINE" catalog.
1-10
9499-040-69311
VARIO BK ETH
1.7.1
Electronics Base
The electronics base holds the entire electronics for the Inline module and
the potential and data routing.
Design widths
9499-040-69311
The electronics bases for low-level signal modules are available in a width
of 8 terminal points (8-slot terminal) or 2 terminal points (2-slot terminal).
Exceptions are combinations of these two basic terminal widths (see also
the "Dimensions of Low-Level Signal Modules" section on page 1-20).
1-11
VARIO BK ETH
1.7.2
Connectors
The I/O or supply voltages are connected using a pluggable connector.
Advantages
This snap-in-place connection offers the following advantages:
–
Easy replacement of electronics module during servicing. There is no
need to remove the wiring.
–
Different connectors can be used on one electronics base, depending
on your requirements.
Connector width
Regardless of the width of the electronics base, the connectors have a
width of two terminal points. This means that you must plug 1 connector on
a 2-slot base, 2 connectors on a 4-slot base, and 4 connectors on an 8-slot
base.
Connector types
The following connector types are available:
1
2
3
6 1 5 6 0 0 1 0
Figure 1-5
1-12
connector types
9499-040-69311
VARIO BK ETH
1 Standard connector
The grey standard connector is used for the connection of two
signals in 4-wire technology (e.g., digital I/O signals).
The black standard connector is used for supply terminals.
The adjacent contacts are jumpered internally (see Figure 1-6 on
page 1-14).
2 Shield connector
This grey connector is used for signals connected using shielded
cables (e.g., analog I/O signals).
The FE or shielding is connected by a shield clamp rather than by a
terminal point.
3 Extended double signal connector
This green connector is used for the connection of four signals in
3-wire technology (e.g., digital I/O signals).
1.7.3
Connector identification
All connectors are supplied with and without color print. The connectors
with color print (marked with CP in the Order Designation) have terminal
points that are color-coded according to their functions.
The following colors indicate the signals of the terminal points:
9499-040-69311
Table 1-7
Terminal point color-coding
Color
Terminal Point Signal
Red
+
Blue
-
Green/
yellow
Functional earth ground
1-13
VARIO BK ETH
Internal structure of
the connectors
A
B
1
2
C
1
D
2
1
1
2
2
1
1
1
1
1
1
1
1
2
2
2
2
2
2
2
2
3
3
3
3
3
3
4
4
4
4
3
4
3
4
4
4
5
6
Figure 1-6
A
6
5
6 1 5 6 0 0 1 1
Internal structure of the connectors
Green connector for I/O connection
B
Black connector for supply terminals
C
Shield connector for analog terminals
D
Double signal connector for I/O connection
Jumpered terminal points integrated into the connectors are shown in
Figure 1-6.
The shield connector is jumpered through the shield connection. All other
connectors are jumpered through terminal point connection.
To avoid a malfunction, only snap a suitable connector onto a module.
Refer to the module-specific data sheet to select the correct connectors.
The black connector must not be placed on a module for which a double
signal connector is to be used. Incorrect connection may lead to a short
circuit between two signal terminal points (1.4 - 2.4).
Only place black connectors on supply terminals.
When the terminal points are jumpered, power is carried through the
jumpering in the connector and not through the printed circuit board of the
module.
1-14
9499-040-69311
VARIO BK ETH
Connector keying
You can prevent the mismatching of connectors by keying the base and the
connector.
A1
B1
C1
21
1
6 1 5 6 0 0 1 2
Figure 1-7
Connector keying
•
Plug a keying profile (disc) into the keyway in the base (1) and turn it
away from the small plate (2) (Figure 1-7, A).
•
Use a diagonal cutter to cut off the keying tab from the connector
(Figure 1-7, B).
Now, only the base and connector with the same keying will fit together
(Figure 1-7, C).
9499-040-69311
1-15
VARIO BK ETH
1.8
Function
identification
Function Identification and Labeling
The modules are color-coded to enable visual identification of the functions
(1 in Figure 1-8).
.
1
5 5 2 0 A 0 7 5
Figure 1-8
Function identification
The following colors indicate the functions:
Table 1-8
1-16
Module color-coding
Color
Function of the Module
Light blue
Digital input 24 V DC area
Pink
Digital output 24 V DC area
Blue
Digital input 120/230 V AC area
Red
Digital output 120/230 V AC area
Green
Analog input
Yellow
Analog output
Orange
Fieldbus coupler, special function modules
Black
Power terminal/segment terminal
9499-040-69311
VARIO BK ETH
Connector
identification
The color-coding of the terminal points is described on page 1-13.
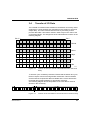
Labeling/
terminal point
numbering
Terminal point numbering is illustrated using the example of an 8-slot
module.
1
1
1
4
3
2
1 .1
1
1
2 .1
1 .2
2
2
2 .2
1 .3
3
3
2 .3
1 .4
4
4
2 .4
X .Y
2
1
2
1
2
1
2
1
2
2
1 1
1 1
1 1
1
2
2 2
2 2
2 2
2
3
3 3
3 3
3 3
3
4
4 4
4 4
4 4
4
3
1
4
5 5 2 0 A 0 3 5
Figure 1-9
Terminal point numbering
Slot/connector
The slots (connectors) on a base are numbered consecutively (1 in Figure
1-9). This numbering is not shown on the actual module.
Terminal point
The terminal points on each connector are marked X.Y.
X is the number of the terminal point row on the connector. It is indicated
above the terminal point row (2 in Figure 1-9).
Y is the terminal point number in a row. It is directly indicated on the
terminal point (3 in Figure 1-9).
The precise designation for a point is thus specified by the slot and terminal
point. The highlighted terminal point (4 in Figure 1-9) would be numbered
as follows: slot 3, terminal point 2.3.
Additional labeling
9499-040-69311
In addition to this module marking, you can identify the slots, terminal
points, and connections using Zack markers and labeling fields.
1-17
VARIO BK ETH
1
3
2
4
6
5
5 5 2 0 A 0 3 6
Figure 1-10
1-18
Labeling of modules
9499-040-69311
VARIO BK ETH
Various options are available for labeling slots and terminal points:
1
Each connector can be labeled individually with Zack markers.
2/3
Another option is to use a large labeling field. This labeling field is
available in two widths, either as a labeling field covering one
connector (2) or as a labeling field covering four connectors (3). You
can label each channel individually with free text. On the upper
connector head there is a keyway for attaching this labeling field.
The labeling field can be tilted up and down. At each end there is a
small latching, which ensures that the labeling field remains in place.
4/5
Each signal can be labeled individually using Zack markers. On a
double signal connector, the upper keyway (4) is designed for
labeling signals 1/2 and the lower keyway (5) is for signals 3/4.
6
On the electronics base it is possible to label each slot individually
using Zack markers. These markers are covered when a connector
is plugged in.
Using the markers on the connector and on the electronics base, you can
clearly assign the connector and slot.
The components required for labeling are listed in the Phoenix Contact
"CLIPLINE" catalog.
9499-040-69311
1-19
VARIO BK ETH
1.9
Dimensions of Low-Level Signal Modules
Today, small I/O stations are frequently installed in 80 mm (3.150 in.)
standard switch boxes. Inline modules are designed so that they can be
used in this type of switch box.
The housing dimensions of a module are determined by the dimensions of
the electronics base and the dimensions of the connector.
Electronics bases for low-level signal modules are available in three widths
(12.2 mm, 24.4 mm, and 48.8 mm [0.480 in., 0.961 in., and 1.921 in.]).
They take one (1), two (2) or four (4), 12.2 mm (0.480 in.) wide connectors.
When a connector is plugged in, each module depth is 71.5 mm (2.815 in.).
The height of the module depends on the connector used. The connectors
are available in three different versions (see Figure 1-14).
2-slot housing
(2 .8 1 5 ")
1 2 0 m m
(4 .7 2 4 ")
7 1 ,5 m m
1 2 ,2 m m
(0 .4 8 0 ")
Figure 1-11
1-20
5 5 2 0 1 0 2 3
Dimensions of the electronics bases (2-slot housing)
9499-040-69311
VARIO BK ETH
4-slot housing
(2 .8 1 5 ")
1 2 0 m m
(4 .7 2 4 ")
7 1 ,5 m m
2 4 ,4 m m
(0 .9 6 1 ")
Figure 1-12
5 5 2 0 1 0 2 2
Dimensions of the electronics bases (4-slot housing)
8-slot housing
(2 .8 1 5 ")
1 2 0 m m
(4 .7 2 4 ")
7 1 ,5 m m
4 8 ,8 m m
(1 .9 2 1 ")
Figure 1-13
9499-040-69311
5 5 2 0 1 0 2 4
Dimensions of the electronics bases (8-slot housing)
1-21
VARIO BK ETH
Connector
2
3
3
4
4
(5 .3 9 4 ")
1
2
1 1 2 ,4 m m
1
1
2
1
1
2
2
3
3
4
1 2 ,2 m m
(0 .4 8 0 ")
1
1 3 7 m m
2
1 3 2 m m
1
C
(5 .1 9 7 ")
B
(4 .4 2 5 ")
A
4
2
1
1
2
2
3
3
4
4
5
1 2 ,2 m m
(0 .4 8 0 ")
6
5
6
1 2 ,2 m m
(0 .4 8 0 ")
5 5 2 0 0 0 5 8
Figure 1-14
Connector dimensions
Key:
A
Standard connector
B
Shield connector
C
Extended double signal connector
The depth of the connector does not influence the overall depth of the
module.
1-22
9499-040-69311
VARIO BK ETH
1.10
Electrical Potential and Data Routing
An important feature of the INTERBUS Inline and Ethernet bus coupler
product ranges is their internal potential routing system. The electrical
connection between the individual station devices is created automatically
when the station is installed. When the individual station devices are
connected, a power rail is created for the relevant circuit. This is created
mechanically through the interlocking of knife and featherkey contacts on
the adjacent modules.
A special segment circuit eliminates the need for additional external
potential jumpering to neighboring modules.
Two independent circuits are created in a station: the logic circuit and the
I/O circuit.
1
2
3
4
5
6
7
a
9
Figure 1-15
9499-040-69311
8
b
c
6 1 5 6 0 0 1 7
Potential and data routing
1-23
VARIO BK ETH
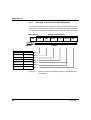
Table 1-9
Potential jumper (see Figure 1-15)
No.
Function
Meaning
1
FE
FE
Functional earth ground
2
SGND
SGND
Ground of segment and main supply
3
24 V
UM
Supply for main circuit (if necessary with overload protection)
4
24 V
US
Supply for segment circuit (if necessary with overload protection)
This jumper does not exist in power levels 120/230 V AC.
5
LGND
UL-
Ground of communications power and I/O supply for analog
modules
6
24 V
UANA
I/O supply for analog modules
7
7.5 V
UL+
Supply for electronics module
(9)
FE spring
FE contact to DIN rail
The GND potential jumper carries the total current from the main and
segment circuits. The total current must not exceed the maximum current
carrying capacity of the potential jumper (8 A). If the 8 A limit is reached at
one of the potential jumpers US, UM, and GND during configuration, a new
power terminal must be used.
The FE potential jumper must be connected via terminal point 1.4 or 2.4 at
the Ethernet bus coupler to a grounding terminal (see Figure 1-9). The FE
potential jumper is led through all of the modules and connected via the FE
spring to the grounded DIN rail of every supply terminal.
Table 1-10
Data jumper (see Figure 1-15)
No.
Function
Meaning
8a
DI1
Local bus signal (Data IN)
8b
DO1
Local bus signal (Data OUT)
8c
DCLK
Clock signal, local bus
1-24
9499-040-69311
VARIO BK ETH
1.11
Circuits Within an VARIO Station and
Provision of the Supply Voltages
There are several circuits within an VARIO station. These are automatically
set up when the modules have been properly installed. The voltages of the
different circuits are supplied to the connected modules via the potential
jumpers.
Please refer to the module-specific data sheet for the circuit to which the
I/O circuit of a special module is to be connected.
Load capacity of the
jumper contacts
Observe the maximum load capacity of the jumper contacts of each circuit.
The load capacities for all potential jumpers are given in the following
sections.
The arrangement of the potential jumpers can be found in the "Electrical
Potential and Data Routing" section on page 1-23.
For voltage connection, please refer to the notes given in the
module-specific data sheets.
9499-040-69311
1-25
VARIO BK ETH
1.11.1
Supply of the Ethernet Bus Coupler
The supply voltage UBK and the segment voltage US must be connected
to the Ethernet bus coupler. From the supply voltage UBK , the voltages for
the logic circuit UL (7.5 V) and the supply of the modules for analog signals
UANA (24 V) are internally generated. The segment voltage is used to
supply the sensors and actuators.
U S
U M
U L
P P
1
in te r n e
B r ü c k e im
M o d u l
2
F A IL
1
1
2
2
1 0 0
X M T
U
R C V
L IN K
1 0 /1 0 0
B K
L G N D
+
-
+
3
3
+
4
4
-
U
M
-
U
S
S G N D
6 1 5 9 0 0 0 4
Figure 1-16
1.11.2
Typical connection of the supply voltage
Logic Circuit UL
The logic circuit with communications power UL starts at the bus coupler,
is led through all modules of a station and cannot be supplied via another
supply terminal.
Function
The logic circuit provides the communications power for all modules in the
station.
Voltage
The voltage in this circuit is 7.5 V DC.
1-26
9499-040-69311
VARIO BK ETH
Generation of UL
The communications power UL is generated from the supply voltage UBK
of the bus coupler.
The communications power is not electrically isolated from the 24 V input
voltage for the bus coupler.
Current carrying
capacity
The maximum current carrying capacity of UL is 2 A.
1.11.3
Analog Circuit UANA
The analog circuit with the supply for the analog modules (here also called
analog voltage) UANA is supplied at the bus coupler and is led through all
the modules in an VARIO station. Power cannot be supplied by the supply
terminals. UANA is not electrically isolated from UBK .
Function
The module I/O devices for analog signals are supplied from the analog
circuit.
Voltage
The voltage in this circuit is 24 V.
Generation of UANA
The analog voltage UANA is generated from the main voltage UBK of the
bus coupler.
Current carrying
capacity
The maximum current carrying capacity of UANA is 0.5 A.
9499-040-69311
1-27
VARIO BK ETH
V A R IO
B K E T H
P W R IN
S E G /F
U
U
U
U
L
A N A
G N D L
U
S
M
6 5 4 4 0 0 0 1
M
Figure 1-17
Logic and analog circuit
VARIO BK ETH
Ethernet bus coupler
PWR IN
Power terminal
SEG/F
Segment terminal with fuse as an example of a
segment terminal
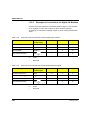
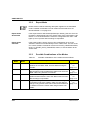
1.11.4
Main Circuit UM
The main circuit with the main voltage UM starts at the bus coupler or a
power terminal and is led through all subsequent modules until it reaches
the next power terminal. A new circuit that is electrically isolated from the
previous one begins at the next power terminal.
Several power terminals can be used within one station.
Function
Several independent segments can be created within the main circuit. The
main circuit provides the main voltage for these segments. For example, a
separate supply for the actuators can be provided in this way.
Voltage
The maximum voltage in this circuit is 24 V DC. UM can only be a maximum
of 250 V AC when using special PWR-IN modules.
Current carrying
capacity
The maximum current carrying capacity is 8 A (total current with the
segment circuit). If the limit value of the common GND potential jumper for
UM and US is reached (total current of US and UM), a new power terminal
must be used.
1-28
9499-040-69311
VARIO BK ETH
V A R IO
B K E T H
P W R IN
S E G /F
U
U
U
U
Figure 1-18
Generation of UM
U
M
M
L
A N A
G N D L
U
S
M
6 5 4 4 0 0 0 2
Main circuit
VARIO BK ETH
Ethernet bus coupler
PWR IN
Power terminal
SEG/F
Segment terminal with fuse as an example of a
segment terminal
In the simplest case, the main voltage UM can be supplied at the bus
coupler and in which case it is 24 V DC.
The main voltage UM can also be supplied via a power terminal. A power
terminal must be used if:
9499-040-69311
1
Different voltage areas (e.g., 120 V AC) are to be created.
2
Electrical isolation is to be created.
3
The maximum current carrying capacity of a potential jumper (UM, US
or GND, total current of US and UM) is reached.
1-29
VARIO BK ETH
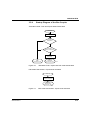
1.11.5
Segment Circuit
The segment circuit or auxiliary circuit with segment voltage US starts at the
Ethernet bus coupler or a supply terminal (power terminal or segment
terminal) and is led through all subsequent modules until it reaches the
next supply terminal.
Function
You can use several segment terminals within a main circuit, and therefore
segment the main circuit. It has the same reference ground as the main
circuit. This means that circuits with different fuses can be created within
the station without external cross wiring.
Voltage
The voltage in this circuit must not exceed 24 V DC.
Current carrying
capacity
The maximum current carrying capacity is 8 A (total current with the main
circuit). If the limit value of the common potential jumper for UM and/or US
is reached (total current of US and UM), a new power terminal must be
used.
1-30
9499-040-69311
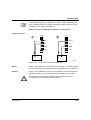
VARIO BK ETH
Generation of US
There are various ways of providing the segment voltage US:
1
The segment voltage can be supplied at the Ethernet bus coupler or a
power terminal.
2
The segment voltage can be tapped from the main voltage at the
Ethernet bus coupler or a power terminal using a jumper or a switch.
3
A segment terminal can be used with a fuse. Within this terminal the
segment voltage is automatically tapped from the main voltage.
4
A segment terminal can be used without a fuse and the segment
voltage can be tapped from the main voltage using a jumper or a
switch.
With 120 V/230 V AC voltage levels, segments cannot be created. In this
case, only the main circuit is used.
V A R IO
B K E T H
P W R IN
S E G /F
U
U
U
M
U
Figure 1-19
9499-040-69311
U
S
M
U
L
A N A
G N D L
U
S
M
6 5 4 4 0 0 0 3
Segment circuit
VARIO BK ETH
Ethernet bus coupler
PWR IN
Power terminal
SEG/F
Segment terminal with fuse as an example of a
segment terminal
1-31
VARIO BK ETH
1.12
Potential Concept
The Ethernet bus coupler and the Inline local bus system have a defined
potential and grounding concept.
This avoids an undesirable effect on I/O devices in the logic area,
suppresses undesirable compensating currents, and increases noise
immunity.
Electrical isolation:
Ethernet
The Ethernet interface is electrically isolated from the bus coupler logic.
The Ethernet cable shielding is directly connected to functional earth
ground. The device has two functional earth ground springs, which have
contact with the DIN rail when they are snapped on. The springs are used
to discharge interference, rather than serve as a protective earth ground.
To ensure effective interference discharge, even for dirty DIN rails,
functional earth ground is also led to terminals 1.4 and 2.4. Always ground
either terminal 1.4 or 2.4 (see Figure 1-32 on page 1-52). This also
grounds the Inline station of the bus coupler sufficiently up to the first power
terminal.
A 120 V AC or 230 V AC power terminal interrupts the FE potential jumper.
Therefore a 24 V DC power terminal, which is located directly behind such
an area, must also be grounded using the FE terminal point.
To avoid the flow of compensating currents, connect a suitably sized
equipotential bonding cable parallel to the Ethernet cable.
No electrical
isolation of the
communications
power
The bus coupler does not have electrical isolation for the Inline module
communications power. UBK (24 V), UL (7.5 V), and UANA (24 V) are not
electrically isolated.
Isolated supply for
logic and I/O devices
The logic and I/O devices can be supplied by separate power supply units.
If you wish to use different potentials for the communications power (UBK)
and the segment/main voltage (US/UM), do not connect the GND and
GNDUBK grounds of the supply voltages.
1-32
9499-040-69311
VARIO BK ETH
Option 1
The Fieldbus coupler main voltage UM and the I/O supply US are provided
separately with the same ground potential from two voltage supplies:
L o k a lb u s
U L+
U AN A
U L- (G N D
µC
1
4
3 ,3 V
5 V
2 4 V
M
)
7 ,5 V
2 4 V
2 4 V
2
3
S
+ 2 4 V (U
M
)
+ 2 4 V (U
)
U
M
U
S
2
G N D
U B K
U
B K
E th e rn e t
6 1 5 6 0 0 0 4
Figure 1-20
Potential areas in the bus coupler (two voltage supplies)
Potential areas:
9499-040-69311
1
Ethernet interface area
2
Functional earth ground (PE) and (shield) Ethernet interface area
3
Main voltage UM and I/O voltage US area
4
communications power
1-33
VARIO BK ETH
Option 2
Common supply of voltages UBK, UM, and US from a single voltage supply:
L o k a lb u s
U L+
U AN A
U L- (G N D
µC
1
3
3 ,3 V
2 4 V
5 V
M
)
7 ,5 V
2 4 V
2 4 V
2
3
S
+ 2 4 V (U
M
)
+ 2 4 V (U
U
2
M
U
S
G N D
G N D
E th e rn e t
Figure 1-21
B K
U
)
U B K
6 1 5 6 0 0 0 5
Bus coupler potentials (one voltage supply)
Potential areas:
1 Ethernet interface area
2 Functional earth ground/(shield) Ethernet interface area, bus coupler
3 Main voltage UM and I/O voltage US area
Adjacent power connectors can
only be used when all the
voltages supplied to the bus
coupler have the same reference
potential. Simply insert the
external jumper to correctly
connect all the supply points
(see "Typical connection of the
supply voltage" on page 1-26).
IB IL S C N -P W R IN -C P
A r t.-N o .: 2 7 2 7 6 3 7
1
1
1
1 .1
2 .1
2
2
1 .2
2 .2
3
3
1 .3
2 .3
4
4
1 .4
2 .4
2 4 V D C
G N D
2
e x te rn e B rü c k e
im
M o d u l g e b rü c k t
im
S te c k e r g e b rü c k t
6 1 5 6 0 0 2 1
Figure 1-22
1-34
Power connector for supply from a single power supply unit
9499-040-69311
VARIO BK ETH
Potentials:
Digital module
The isolation of the I/O circuit of a digital module to the communications
power is only ensured if UBK and UM/US are provided from separate power
supplies.
An example of this principle is shown in Figure 1-23 on a section of an
Inline station.
V A R IO
P W R IN
L o k a lb u s
U
U
U
V A R IO
O P C
D I 2 /2 4
V A R IO
D O
V A R IO
2 /2 4
P W R IN
O P C
L
U
S
M
U
S
U
M
U
S
M
6 1 5 6 0 0 1 3
Figure 1-23
Example: Interruption/creation of the potential jumpers using
the power terminal
The areas hatched in the figure X X X X X
potential jumpers are interrupted.
9499-040-69311
show the points at which the
1-35
VARIO BK ETH
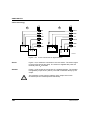
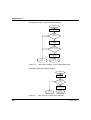
Potentials:
Analog module
The I/O circuit (measurement amplifier) of an analog module receives
electrically isolated power from the 24 V supply voltage UANA. The power
supply unit with electrical isolation is a component of an analog module.
The voltage UANA is looped through in each module and so is also available
to the next module.
V A R IO
B K E T H
V A R IO
m C
A I 2 /S F
L o k a lb u s
O P C
U
1
4
3 ,3 V
2 4 V
2 4 V
5 V
IB
7 ,5 V
2 4 V
E le k tr o n ik
IL A I 2 /S F
U
L +
A N A
U
L -
(G N D
M
)
+ 5 V
/ + 1 0 V
µ P
M U X
2 4 V
R E F
E E P R O M
2
3
U
4
U
S
M
2
U
E th e rn e t
Figure 1-24
B K
, U
M
/U
S
6 5 4 4 0 0 1 1
Electrical isolation between Ethernet bus coupler and analog
module
The potential jumpers X X X X X hatched in the figure are not used in the
analog module. This means that the 24 V supply of the bus coupler (UBK)
or the power terminal is always electrically isolated from the I/O circuit
(measurement amplifier) of the analog module. The I/O circuit of the analog
module is supplied by the analog circuit UANA.
1-36
9499-040-69311
VARIO BK ETH
Electrically
isolated I/O
supplies
Several electrically isolated segment or main circuits can be created by
using power terminals. A power terminal interrupts the US/UM , and GND
potential jumpers and has terminal points for another power supply unit. In
this way, the I/O circuits of the VARIO modules are electrically isolated
from one another before and after the power terminal.
During this process the 24 V power supply units on the low voltage side
must not be connected to one another.
One method of electrical isolation using a power terminal is illustrated in
Figure 1-25. If a number of grounds are connected, e.g., to functional earth
ground, the electrical isolation is lost.
Because US and UM can be supplied separately, it is possible to create
separate segment circuits using a segment terminal. Using a switch, it is
possible, for example, to create a switched segment circuit (see
Figure 1-25 on page 1-38). US and UM can be protected separately, yet still
have a common ground potential. Please observe the maximum total
current of 8 A.
9499-040-69311
1-37
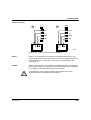
VARIO BK ETH
I/O Supplies Electrically Isolated From One Another
V A R IO
B K E T H
V A R IO
P W R IN
D O
D I
U S
1
U M
U M
U L
P W R
P P
1
1
2
2
1
2
1
2
1
1
2
IN
2
1
2
1
2
1
2
1
2
F A IL
1
2
2
X M T
1 1
1 1
1 1
1 1
1 1
2 2
2 2
2 2
2 2
2 2
3
3 3
3 3
3 3
3 3
4
4 4
4 4
4 4
4 4
1
1
1 0 0
2
2
R C V
3
L IN K
4
1 1
1
2 2
2 2
2 2
2
3 3
3 3
3 3
3 3
3
4 4
4 4
4 4
4 4
4
4
U
+
B K
Figure 1-25
1 1
3
1 0 /1 0 0
U
1 1
3
M 1
-/ U +
S 1
U
-
+
M 2
/ U
S 2
6 5 4 4 0 0 0 4
Structure of I/O supplies that are electrically isolated from
one another
Potentials within the station:
1-38
1
Bus logic of the station
2
I/O (outputs)
3
I/O (inputs)
9499-040-69311
VARIO BK ETH
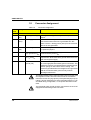
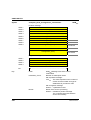
1.13
LED Diagnostic and Status Indicators
All modules are provided with LED diagnostic and status indicators for local
error diagnostics.
Diagnostics
The diagnostic indicators (red/green) indicate the type and location of the
error.
Once errors have been removed, the indicators immediately display the
current status.
Status
The status indicators (yellow) display the status of the relevant inputs/
outputs or the connected device.
Refer to the module-specific data sheet for information about the LED
diagnostic and status indicators on each module.
1.13.1
LEDs on the Ethernet Bus Coupler
P P
U S
U M
F A IL
U L
1 0 0
X M T
R C V
L IN K
6 5 4 4 0 0 0 5
Figure 1-26
9499-040-69311
LEDs on the Ethernet bus coupler
1-39
VARIO BK ETH
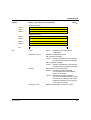
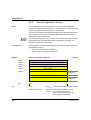
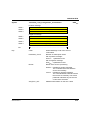
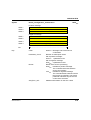
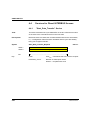
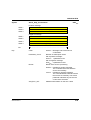
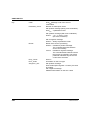
Diagnostics
The following states can be read on the bus coupler:
Table 1-11
Diagnostic LEDs on the bus coupler
Des. Color Status Meaning
Electronics Module
UL
Green
UM Green
US
Green
ON
24 V supply, 7 V communications power/interface supply present
OFF
24 V supply, 7 V communications power/interface supply not present
ON
24 V main circuit supply present
OFF
24 V main circuit supply not present
ON
24 V segment supply is present
OFF
24 V segment supply is not present
ON
Plug & play mode is activated
OFF
Plug & play mode is not activated
ON
The firmware has detected an error
OFF
The firmware has not detected an error
ON
Operation at 100 Mbps (if LNK LED active)
OFF
Operation at 10 Mbps (if LNK LED active)
ON
Data telegrams are being sent
OFF
Data telegrams are not being sent
ON
Data telegrams are being received
OFF
Data telegrams are not being received
ON
Physical network connection ready to operate
OFF
Physical network connection interrupted or not present
Ethernet Port
PP
FAIL
Green
Red
100 Green
XMT Green
RCV Yellow
LNK Green
1-40
9499-040-69311
VARIO BK ETH
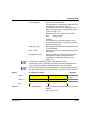
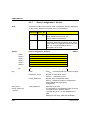
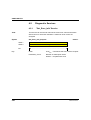
1.13.2
Supply Terminal Indicators
1
1
1
U S
E
U S
3
U S
U M
E
1
2
1
1
1
1
3
1
2
1
2
2
1
1
6 1 5 6 0 0 2 2
Figure 1-27
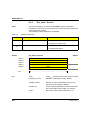
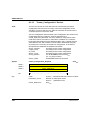
Diagnostics
The following states can be read from the supply terminals
Table 1-12
Diagnostic LED on the power terminal
LED
Color
State
Description of the LED States
UM
(2)
Green
ON
24 V main circuit supply present
OFF
Main circuit supply not present
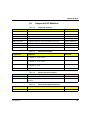
Table 1-13
9499-040-69311
Possible indicators on supply terminals
(segment terminal with and without fuse and
power terminal)
Diagnostic LED on the segment terminal
LED
Color
State
Description of the LED States
US
(1)
Green
ON
24 V segment circuit supply present
OFF
Segment circuit supply not present
1-41
VARIO BK ETH
Table 1-14
Additional LED on supply terminals with fuse
LED
Color
State
Description of the LED States
E
(3)
Red
ON
Fuse not present or blown
OFF
Fuse OK
On modules with fuses, the green LED indicates that the main or segment
voltage is present at the line side of the fuse, meaning that if the green
LED is on, there is voltage on the line side of the fuse. If the red LED is also
on, the voltage is not present on the output side. Either no fuse is present
or it is faulty.
1-42
9499-040-69311
VARIO BK ETH
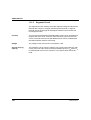
1.13.3
I/O Module Indicators
1
1
1
2
D
1
1
2
1
2
1
2
3
2
D
2
4
2
1
1
2
1
1 1
2
1
1 1
2
1
2
1 1
1
1
1
2
1
5 5 2 0 0 0 5 2
Figure 1-28
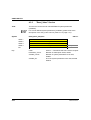
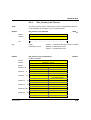
Diagnostics
I/O module indicators
The following states can be read from the I/O modules:
Table 1-15
Diagnostic LED of the I/O modules
LED
Color
State
D
(1)
Green
ON
2 Hz
(medium)
9499-040-69311
Local bus active
Flashing:
0.5 Hz
(slow)
Status
Description of the LED States
Communications power present, local
bus not active
Communications power present, I/O
error
4 Hz
(fast)
Communications power present,
module in front of the flashing module
has failed or the module itself is faulty;
Modules following the flashing module
are not part of the configuration frame
OFF
Communications power not present,
local bus not active
The status of the input or output can be read from the relevant yellow LED:
1-43
VARIO BK ETH
Table 1-16
Status LEDs for the I/O terminals
LED
Color
State
Description of the LED States
1, 2, 3, 4
(2)
Yellow
ON
Relevant I/O set
OFF
Relevant I/O not set
Assignment Between Status LED and I/O
The assignment of a status LED and the corresponding I/O is given in the
module-specific data sheet.
1.13.4
Indicators on Other Inline Modules
For LED diagnostic and status indicators on other Inline modules (e.g.,
special function modules or power modules), please refer to the modulespecific data sheet.
1-44
9499-040-69311
VARIO BK ETH
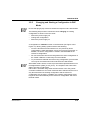
1.14
1.14.1
Mounting/Removing Modules and
Connecting Cables
Installation Instructions
To ensure installation is carried out correctly, please read "Installation
Instructions for the Electrical Engineer" supplied with the bus coupler.
Do not replace modules while the power is connected
Before removing or mounting a module, disconnect the power to the entire
station. Make sure the entire station is reassembled before switching the
power back on. Failure to observe this rule may damage the module.
1.14.2
Mounting and Removing Inline Modules
An Inline station can be set up by mounting the individual components side
by side. No tools are required. Mounting side by side automatically creates
potential and bus signal connections (potential and data routing) between
the individual station components.
The modules are mounted perpendicular to the DIN rail. This ensures that
they can be easily mounted and removed even within limited space.
After a station has been set up, individual modules can be exchanged by
pulling them out or plugging them in. Tools are not required.
DIN rail
All Inline modules are mounted on 35 mm (1.378 in.) standard DIN rails.
End clamp/CLIPFIX
Mount end clamps on both sides of the Inline station. The end clamps
ensure that the VARIO station is correctly assembled. End clamps fix the
VARIO station on both sides and keep it from moving side to side on the
DIN rail. Phoenix Contact recommends using the CLIPFIX 35
(Order No. 30 22 21 8) or E/UK end clamp (Order No. 12 01 44 2).
To remove the bus coupler, the left end clamp must be removed first.
9499-040-69311
1-45
VARIO BK ETH
End plate
An Ethernet VARIO station must be terminated with an end plate. It has no
electrical function. It protects the station against ESD pulses and the user
against dangerous contact voltage. The end plate is supplied with the bus
coupler and need not be ordered separately.
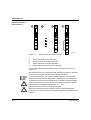
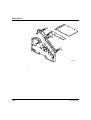
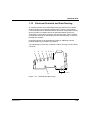
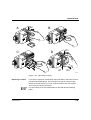
1.14.3
Mounting
When mounting a module, proceed as follows (Figure 1-29):
•
First attach the electronics base, which is required for mounting the
station, perpendicular to the DIN rail (A).
Ensure that all featherkeys and keyways on adjacent modules are
interlocked (B).
The keyway/featherkey connection links adjacent modules and
ensures safe potential routing.
•
Next, attach the connectors to the corresponding base.
First, place the front connector shaft latching in the front snap-on
mechanism (C).
Then press the top of the connector towards the base until it snaps into
the back snap-on mechanism (D).
The keyways of an electronics base do not continue when a connector has
been installed on the base. When snapping on an electronics base, there
must be no connector on the left-hand side of the base. If a connector is
present, it will have to be removed.
Use end clamps to fix the VARIO station to the DIN rail (see Ordering
Data).
1-46
9499-040-69311
VARIO BK ETH
A
B
C
D
6138A015
Figure 1-29
9499-040-69311
Snapping on a module
1-47
VARIO BK ETH
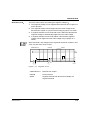
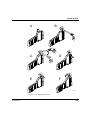
1.14.4
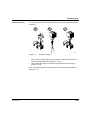
Removal
When removing a module, proceed as follows (Figure 1-30):
•
If there is a labeling field, remove it (A1 in Figure A).
If a module has more than one connector, all of these must be
removed. Below is a description of how to remove a 2-slot module.
Lift the connector of the module to be removed by pressing on the back
connector shaft latching (A2 in Figure A).
1-48
•
Remove the connector (B).
•
Remove the left-adjacent and right-adjacent connectors of the
neighboring modules (C). This prevents the potential routing
featherkeys and the keyway/featherkey connection from being
damaged. You also have more space available for accessing the
module.
•
Press the release mechanism, (D1 in Figure D) and remove the
electronics base from the DIN rail by pulling the base straight back (D2
in Figure D). If you have not removed the connector of the next module
on the left, remove it now in order to protect the potential routing
featherkeys and the keyway/featherkey connection.
•
To remove the bus coupler, the left end clamp must be removed first.
9499-040-69311
VARIO BK ETH
A
A 2
B
A 1
C
D 1
D
D 1
D 2
6 5 4 4 0 0 0 6
Figure 1-30
Replacing a module
Removing a module
If you want to replace a module within the Inline station, follow the removal
procedure described above. Do not snap the connector of the module
directly to the left back on yet. First, insert the base of the new module.
Then reconnect all the connectors.
Use end clamps to fix the VARIO station to the DIN rail (see Ordering
Data).
9499-040-69311
1-49
VARIO BK ETH
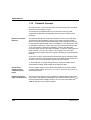
1.14.5
Replacing a Fuse
The power and segment terminals are available with or without fuses.
For modules with fuses, the voltage presence and the fuse state are
monitored and indicated by diagnostic indicators.
If a fuse is not present or faulty, you must insert or replace it.
Observe the following notes when replacing a fuse for the protection
of your health and your system.
1. Use the screwdriver carefully to avoid injury.
2. Lift the fuse out by the metal contact. Do not lift the fuse out by the glass
part as you may break it.
3. Carefully lift the fuse out at one end and remove it by hand. Make sure
the fuse does not fall into your system.
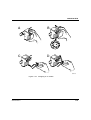
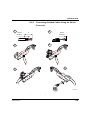
When replacing a fuse, proceed as follows (see Figure 1-31):
1-50
•
Lift the fuse lever (A).
•
Insert the screwdriver behind a metal contact of the fuse (B).
•
Carefully lift out the metal contact of the fuse (C).
•
Remove the fuse by hand (D).
•
Insert a new fuse (E).
•
Push the fuse lever down again until it clicks into place (F).
9499-040-69311
VARIO BK ETH
A
B
D
C
F
E
5 5 2 0 C 0 1 1
Figure 1-31
9499-040-69311
Replacing a fuse
1-51
VARIO BK ETH
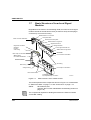
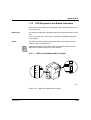
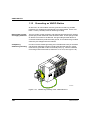
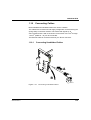
1.15
Grounding an VARIO Station
All devices in an Inline station must be grounded so that any possible
interference is shielded and discharged to ground potential. A wire of at
least 1.5 mm2 (16 AWG) must be used for grounding.
Ethernet bus coupler
and supply terminals
The bus coupler, power terminals, and segment terminals have FE springs
(metal clips) on the underside of the electronics base. These springs create
an electric connection to the DIN rail. Use grounding terminal blocks to
connect the DIN rail to protective earth ground. The modules are grounded
when they are snapped onto the DIN rail.
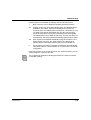
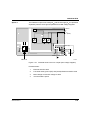
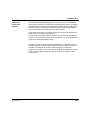
Compulsory
additional grounding
In order to ensure reliable grounding even if the DIN rail is dirty or the metal
clip has been damaged, Phoenix Contact specifies that the bus coupler
must also be grounded via the FE terminal point (e.g., with the USLKG 5
universal ground terminal block, Order No. 04 41 50 4, see Figure 1-32).
6 5 4 4 0 0 0 7
Figure 1-32
1-52
Additional grounding of the VARIO BK ETH
9499-040-69311
VARIO BK ETH
FE potential jumper
The FE potential jumper (functional earth ground) runs from the bus
coupler through the entire Inline station. Ground the DIN rail. FE is
grounded when a module is snapped onto the DIN rail correctly. If supply
terminals are part of the station, the FE potential jumper is also connected
with the grounded DIN rail.
Functional earth ground is only used to discharge interference. It does not
provide shock protection for people.
Low-level signal
The other VARIO low-level signal modules are automatically grounded via
the FE potential jumper when they are mounted adjacent to other modules.
Power level
The FE potential jumper is also connected to the power modules.
9499-040-69311
1-53
VARIO BK ETH
1.15.1
Shielding an Inline Station
Shielding is used to reduce the effects of interference on the system.
In the Inline station, the Ethernet cable and the module connecting cables
for analog signals are shielded.
Observe the following notes when installing shielding:
–
Fasten the shielding so that as much of the braided shield as possible
is held underneath the clamp of the shield connection.
–
Make sure there is good contact between the connector and module.
–
Do not damage or squeeze the wires. Do not strip off the wires too far.
–
Make a clean wire connection.
1.15.2
Shielding Analog Sensors and Actuators
–
Always connect analog sensors and actuators with shielded, twisted
pair cables.
–
Connect the shielding to the shield connector. The method for
connecting the shielding is described in Section 1.16.2, "Connecting
Shielded Cables Using the Shield Connector".
Analog input and output modules require different shielding connections.
The cable lengths must also be considered.
Table 1-17
Overview: shield connection of analog sensors/actuators
Module Type
Connection to the
Module
Cable
Length
Connection to the
Sensor/Actuator
Analog input module
VARIO AI 2/SF
Within the module, ground
is connected to FE via an
RC element.
<10 m
(32.81 ft.)
–
>10 m
(32.81 ft.)
Connect the sensor directly
to PE
Via shield clamp directly to
FE
<10 m
(32.81 ft.)
–
>10 m
(32.81 ft.)
Isolate the actuator with an
RC element and connect it
to PE
Analog output module
VARIO AO ...
1-54
9499-040-69311
VARIO BK ETH
1.15.2.1
Connecting an VARIO AI 2/SF Analog Input Module
•
Connect the shielding to the shield connector (see Section 1.16.2,
"Connecting Shielded Cables Using the Shield Connector").
•
When connecting the sensor shielding with FE potential, ensure a large
surface connection.
Within the module, ground is connected to FE via an RC element.
A
B
5 5 2 0 0 0 4 3
Figure 1-33 Connection of analog sensors, signal cables >10 m (32.81 ft.)
A
Module side
B
Sensor side
If you want to use both channels of the VARIO AI 2/SF module, there are
different ways of connecting the shielding, depending on the cross section.
1
Use a multi-wire cable for the connection of both sensors and connect
the shielding as described above to the shield connector.
2
Use a thin cable for the connection of each sensor and connect the
shielding of both cables together to the shield connector.
3
Use the standard connector (IB IL SCN-8; without shield connector).
Twist the braided shield of each cable and place it on one of the
terminal points to be used for FE connection.
You should only use this option if the cross section is too large and the
first two methods are not possible.
1.15.2.2
•
9499-040-69311
Connecting an Analog Output Module VARIO AO ...
Connect the shielding via the shield connector (see Section 1.16.2,
"Connecting Shielded Cables Using the Shield Connector").
1-55
VARIO BK ETH
•
When connecting the shielding with the FE potential, ensure a large
surface connection.
Danger of creating ground loops
The shielding must only be directly connected with the ground potential at
one point.
–
For cable lengths exceeding 10 meters (32.81 ft.) the actuator side
should always be isolated by an RC element.
Typically, capacitor C should be rated between 1 nF and 15 nF. The
resistor R should be at least 10 MW.
A
R
B
C
5 5 2 0 0 0 4 2
Figure 1-34
1-56
Connection of actuators, signal cables >10 m (32.81 ft.)
A
Module side
B
Actuator side
9499-040-69311
VARIO BK ETH
1.16
Connecting Cables
Both shielded and unshielded cables are used in a station.
The cables for the I/O devices and supply voltages are connected using the
spring-clamp connection method. This means that signals up to
250 V AC/DC and 5 A with a conductor cross section of 0.2 mm2 through
1.5 mm2 (AWG 24 - 16) can be connected.
The Ethernet cable is connected via an 8-pos. RJ-45 connector.
1.16.1
Connecting Unshielded Cables
A
1
In p
ta l
ig i
B
6138A016
Figure 1-35
9499-040-69311
Connecting unshielded cables
1-57
VARIO BK ETH
Wire the connectors as required for your application.
For connector assignment, please consult the appropriate module-specific
data sheet.
When wiring, proceed as follows:
•
Strip 8 mm (0.31 in.) off the cable. Fieldbus coupler and Inline wiring is
normally done without ferrules. However, it is possible to use ferrules.
If using ferrules, make sure they are properly crimped.
•
Push a screwdriver into the slot of the appropriate terminal point
(Figure 1-35, A), so that you can plug the wire into the spring opening.
Phoenix Contact recommends using a SFZ 1 – 0,6-x-3,5 screwdriver
(Order No. 12 04 51 7; see "CLIPLINE" catalog from Phoenix Contact).
•
Insert the wire (Figure 1-35, B). Pull the screwdriver out of the opening.
The wire is clamped.
After installation, the wires and the terminal points should be labeled.
1-58
9499-040-69311
VARIO BK ETH
1.16.2
1
1 5 m m
(0 .5 9 1 ")
Connecting Shielded Cables Using the Shield
Connector
2
a
8 m m
(0 .3 1 5 ")
4
3
6
5
5 9 8 1 A 0 2 3
Figure 1-36
9499-040-69311
Connecting the shield to the shield connector
1-59
VARIO BK ETH
This section describes the connection of a shielded cable, using an "analog
cable" as an example.
Connection should be carried out as follows:
Stripping cables
•
Strip the outer cable sheath to the desired length (a). (1)
The desired length (a) depends on the connection position of the wires
and whether there should be a large or a small space between the
connection point and the shield connection.
•
Shorten the braided shield to 15 mm (0.59 in.). (1)
•
Fold the braided shield back over the outer sheath. (2)
•
Remove the protective foil.
•
Strip 8 mm (0.31 in.) off the wires. (2)
Inline wiring is normally done without ferrules. However, it is possible
to use ferrules. If using ferrules, make sure they are properly crimped.
Wiring the
connectors
•
Push a screwdriver into the slot of the appropriate terminal point
(Figure 1-35 on page 1-57, 1), so that you can plug the wire into the
spring opening.
Phoenix Contact recommends using a SFZ 1 – 0,6-x-3,5 screwdriver
(Order No. 12 04 51 7; see "CLIPLINE" catalog from Phoenix Contact).
•
Insert the wire (Figure 1-35 on page 1-57, 2). Pull the screwdriver out
of the opening. The wire is clamped.
For connector assignment, please consult the appropriate module-specific
data sheet.
Connecting the
shield
1-60
•
Open the shield connector. (3)
•
Check the direction of the shield clamp in the shield connector (see
Figure 1-37).
•
Place the cable with the folded braided shield in the shield connector.
(4)
•
Close the shield connector. (5)
•
Fasten the screws for the shield connector using a screwdriver. (6)
9499-040-69311
VARIO BK ETH
1
21
41
a
51
31
61
5 5 2 0 A 0 6 8
Figure 1-37
Shield clamp
Shield clamp orientation
The shield clamp (a in Figure 1-37, 2) in the shield connector can be used
in various ways depending on the cross section of the cable. For thicker
cables, the dip in the clamp must be turned away from the cable
(Figure 1-37, 2). For thinner cables, the dip in the clamp must be turned
towards the cable (Figure 1-37, 6).
If you need to change the orientation of the shield clamp, proceed as shown
in Figure 1-37:
9499-040-69311
•
Open the shield connector housing (1).
•
The shield connection is delivered with the clamp positioned for
connecting thicker cables (2).
•
Remove the clamp (3), turn it to suit the cross section of the cable (4),
then reinsert the clamp. (5)
•
Number 6 shows the position of the clamp for a thin cable.
1-61
VARIO BK ETH
1.17
Connecting the Voltage Supply
To operate a station you must provide the supply voltage for the bus
coupler, logic of the modules, and the sensors and actuators.
The voltage supplies are connected using unshielded cables
(Section 1.16.1).
For the connector assignment of the supply voltage connections please
refer to the module-specific data sheets for power and segment terminals.
Do not replace terminals while the power is connected.
Before removing or mounting a module, disconnect the power to the entire
station. Make sure the entire station is reassembled before switching the
power back on.
1-62
9499-040-69311
VARIO BK ETH
1.17.1
Power Terminal Supply
Apart from supplying the I/O voltage at the Fieldbus coupler, it is also
possible to provide the voltage through a power terminal.
UM
24 V Main Circuit Supply
The main voltage is reintroduced at the power terminal.
US
24 V Segment Circuit Supply
The segment voltage can be supplied at the power terminal or generated
from the main voltage. Install a jumper or create a segment circuit using a
switch to tap the voltage US from the main circuit UM.
Electrical isolation
You can create a new potential area through the power terminal.
Voltage areas
Power terminals can be used to create substations with different voltage
areas. Depending on the power terminal, it is possible to work with
24 V DC, 120 V AC or 230 V AC.
Use appropriate power terminals for different voltage areas
To utilize different voltage areas within a station, a new power terminal
must be used for each area.
Dangerous voltage
When the power terminal is removed, the metal contacts are freely
accessible. With 120 V or 230 V power terminals, it should be assumed that
dangerous voltage is present. You must disconnect power to the station
before removing a terminal.
If these instructions are not followed, there is a danger of health risk,
or even of a life-threatening injury.
9499-040-69311
1-63
VARIO BK ETH
1.17.2
Provision of the Segment Voltage Supply at
Power Terminals
You cannot provide voltage at the segment terminal.
A segment terminal can be used to create a new partial circuit (segment
circuit) within the main circuit. This segment circuit permits the separate
supply of power outputs and digital sensors and actuators.
You can use a jumper to tap the segment voltage from the main circuit. If
you use a switch, you can control the segment circuit externally.
You can create a protected segment circuit without additional wiring by
using a segment terminal with a fuse.
1.17.3
Voltage Supply Requirements
Use power supply units with safe isolation.
Only use power supply units that ensure safe isolation between the primary
and secondary circuits according to EN 50178.
For additional voltage supply requirements, please refer to the data sheets
for the segment and power terminals.
1.18
Connecting Sensors and Actuators
Sensors and actuators are connected using connectors. Each
module-specific data sheet indicates the connector(s) to be used for that
specific module.
Connect the unshielded cable as described in Section 1.16.1 on page 1-57
and the shielded cable as described in Section 1.16.2 on page 1-59.
1-64
9499-040-69311
VARIO BK ETH
1.18.1
Connection Methods for Sensors and Actuators
Most of the digital I/O modules in the Inline product range permit the
connection of sensors and actuators in 2, 3 or 4-wire technology.
Because of the different types of connectors, a single connector can
support the following connection methods:
–
2 sensors or actuators in 2, 3 or 4-wire technology
–
4 sensors or actuators in 2 or 3-wire technology
–
2 sensors or actuators in 2 or 3-wire technology with shielding
(for analog sensors or actuators)
When connecting analog devices please refer to the module-specific data
sheets, as the connection method for analog devices differs from that for
digital devices.
9499-040-69311
1-65
VARIO BK ETH
1.18.2
Examples of Connections for Digital I/O Modules
Various connection options are described below using 24 V DC modules
as an example. For the 120 V/230 V AC area, the data changes
accordingly. A connection example is given in each module-specific data
sheet.
Table 1-18
Overview of the connections used for digital input modules
Connection
Representation
in the Figure
2-Wire
3-Wire
4-Wire
Sensor signal IN
IN
X
X
X
Sensor supply US/UM
US (+24 V)
X
X
X
Ground GND
GND (^)
–
X
X
Ground/FE shielding
FE (
–
–
X
2-Wire
3-Wire
4-Wire
Table 1-19
X
Used
–
Not used
)
Overview of the connections used for digital output modules
Connection
Representation
in the Figure
Actuator signal OUT
OUT
X
X
X
Actuator supply US
US (+24 V)
–
–
X
Ground GND
GND (^)
X
X
X
Ground/FE shielding
FE (
–
X
X
1-66
X
Used
–
Not used
)
9499-040-69311
VARIO BK ETH
In the following figures US designates the supply voltage. Depending on
which potential jumper is accessed, the supply voltage is either the main
voltage UM or the segment voltage US.
Different Connection Methods for Sensors and Actuators
2-wire technology
B
IN 1
O U T 1
U
U
S
S
G N D
G N D
F E
F E
O U T 1
IN 1
+ 2 4 V
A
5 5 2 0 0 0 2 7
Figure 1-38
2-wire connection for digital devices
Sensor
Figure 1-38, A shows the connection of a 2-wire sensor. The sensor signal
is led to terminal point IN1. Sensor power is supplied from the voltage US.
Actuator
Figure 1-38, B shows the connection of an actuator. The actuator power is
supplied by output OUT1. The load is switched directly by the output.
The maximum current carrying capacity of the output must not be
exceeded (see the module-specific data sheet).
9499-040-69311
1-67
VARIO BK ETH
3-wire technology
B
A
IN 1
O U T 1
G N D
U
G N D
F E
IN 2
O U T 2
F E
O U T 2
G N D
IN 2
+ 2 4 V
G N D
S
O U T 1
U
IN 1
+ 2 4 V
S
5 5 2 0 0 0 3 8
Figure 1-39
3-wire connection for digital devices
Sensor
Figure 1-39, A shows the connection of a 3-wire sensor. The sensor signal
is led to terminal point IN1 (IN2). The sensor is supplied with power via
terminal points US and GND.
Actuator
Figure 1-39, B shows the connection of a shielded actuator. The actuator
is supplied by output OUT1 (OUT2). The load is switched directly by the
output.
The maximum current carrying capacity of the output must not be
exceeded (see the module-specific data sheet).
1-68
9499-040-69311
VARIO BK ETH
4-wire technology
B
IN 1
O U T 1
U
U
S
S
G N D
G N D
F E
F E
O U T 1
+ 2 4 V
IN 1
+ 2 4 V
A
5 5 2 0 0 0 3 7
Figure 1-40
4-wire connection for digital devices
Sensor
Figure 1-40, A shows the connection of a shielded 4-wire sensor. The
sensor signal is led to terminal point IN1. The sensor is supplied with power
via terminal points US and GND. The sensor is grounded via the FE
terminal point.
Actuator
Figure 1-40, B shows the connection of a shielded actuator. The provision
of the supply voltage US means that even actuators that require a separate
24 V supply can be connected directly to the terminal.
The maximum current carrying capacity of the output must not be
exceeded (see the module-specific data sheet).
9499-040-69311
1-69
VARIO BK ETH
1-70
9499-040-69311
Chapter 2
This section informs you about
–
startup
–
assigning IP parameters
–
the Management Information Base (MIB)
Startup/Operation .................................................................................................2-3
2.1
Sending BootP Requests ............................................................2-3
2.2
Assigning an IP Address Using the Factory Manager.................2-4
2.3
2.4
9499-040-69311
2.2.1
BootP .............................................................................2-4
2.2.2
Manual Addition of Devices Using the Factory Manager .26
Selecting IP Addresses ...............................................................2-7
2.3.1
Possible Address Combinations ...................................2-8
2.3.2
Subnet Masks ................................................................2-9
2.3.3
Structure of the Subnet Mask ......................................2-10
Factory Line I/O Configurator....................................................2-12
2-1
VARIO BK ETH
2-2
9499-040-69311
VARIO BK ETH
2
Startup/Operation
2.1
Sending BootP Requests
Initial Startup:
During initial startup, the device sends a BootP request without interruption
until it receives a valid IP address. The requests are transmitted at varying
intervals (2 s, 4 s, 8 s, 2 s, 4 s, etc.) so that the network is not loaded
unnecessarily.
If valid IP parameters are received, they are saved as configuration data by
the device.
Later Startups:
If the device already has valid configuration data, it only sends three more
BootP requests on a restart. If it receives a BootP reply, the new
parameters are saved. If the device does not receive a reply, it starts with
the previous configuration.
9499-040-69311
2-3
VARIO BK ETH
2.2
Assigning an IP Address Using the Factory
Manager
Alternatively, the IP address can be entered via any BootP server.
There are two options available when assigning the IP address: reading the
MAC address via BootP or manually entering the MAC address in the Add
New Ethernet Device dialog box in the Factory Manager.
2.2.1
BootP
–
Ensure that the network scanner
been started.
and the BootP server
have
–
Connect the device to the network and the supply voltage.
–
The BootP request for the new device triggered by the device restart/
reset appears in the Factory Manager message window. Select the
relevant message.
–
Click with the right mouse button on the BootP message for the device
or on
.
–
Enter the relevant data in the Add New Ethernet Device dialog box (see
Figure 2-1).
–
Save the configuration settings and restart the device (reset key or
power up).
If the device is being started for the first time, it is then automatically booted
with the specified configuration. If the device is not being started for the first
time, save the configuration and restart the device (power up). The device
now sends another BootP request and receives the specified IP
parameters from the BootP server/Factory Manager (see Figure 2-1,
message highlighted in gray).
2-4
9499-040-69311
VARIO BK ETH
.
9499-040-69311
Figure 2-1
Add New Ethernet Device dialog box in the Factory Manager
Figure 2-2
Requesting and receiving the IP parameters (gray)
2-5
VARIO BK ETH
2.2.2
Manual Addition of Devices Using the Factory
Manager
–
Open the Add New Ethernet Device dialog box (see Figure 2-3) by
clicking on
, by selecting "Add Device" from the Device View
context menu or by using the Ctrl+A key combination.
–
Enter the desired data under "Description" and "TCP/IP Address".
–
Activate the "BootP Parameter" by selecting "Reply on BootP
requests".
–
Enter the MAC address. It is displayed on the front.
–
Save the configuration settings and restart the device (power up).
The device now sends another BootP request and receives the specified
IP parameters from the BootP server (see Figure 2-3, message highlighted
in gray).
Figure 2-3
2-6
Add New Ethernet Device dialog box in the Factory Manager
9499-040-69311
VARIO BK ETH
2.3
Selecting IP Addresses
The IP address is a 32-bit address, which consists of a network part and a
user part. The network part consists of the network class and the network
address.
There are currently five defined network classes; classes A, B, and C are
used in modern applications, while classes D and E are hardly ever used.
It is therefore usually sufficient if a network device only "recognizes"
classes A, B, and C.
The network class is represented by the first bits for the binary
representation of the IP address. The key factor is the number of "ones"
before the first "zero". The assignment of classes is shown in the following
table. The free cells in the table are not relevant to the network class and
are used for the network address.
Bit 1 Bit 2 Bit 3 Bit 4 Bit 5
Class A
0
Class B
1
0
Class C
1
1
0
Class D
1
1
1
0
Class E
1
1
1
1
0
The bits for the network class are followed by those for the network address
and the user address. Depending on the network class, a different number
of bits are available, both for the network address (network ID) and the user
address (host ID).
Network ID
Host ID
Class A
7 bits
24 bits
Class B
14 bits
16 bits
Class C
21 bits
8 bits
Class D
28-bit multicast identifier
Class E
27 bits (reserved)
IP addresses can be represented in decimal, octal or hexadecimal
notation. In decimal notation, bytes are separated by dots (dotted decimal
notation) to show the logical grouping of the individual bytes.
9499-040-69311
2-7
VARIO BK ETH
The decimal points do not divide the address into a network and
user address. Only the value of the first bits (before the first
"zero") specifies the network class and the number of remaining
bits in the address.
2.3.1
K la s s e A
0 .0 .0 .0 - 1 2 7 .2 5 5 .2 5 5 .2 5 5
Possible Address Combinations
0
K la s s e B
1 2 8 .0 .0 .0 - 1 9 1 .2 5 5 .2 5 5 .2 5 5
7 B it
2 4 B it
N e tz -ID
H o s t-ID
0
1
K la s s e C
1 9 2 .0 .0 .0 - 2 2 3 .2 5 5 .2 5 5 .2 5 5
1
1
1 4 B it
1 6 B it
N e tz -ID
H o s t-ID
0
2 1 B it
8 B it
N e tz -ID
H o s t-ID
2 8 B it
K la s s e D
2 2 4 .0 .0 .0 - 2 3 9 .2 5 5 .2 5 5 .2 5 5
1
1
Id e n tifik a to r fü r M u ltic a s t-G r u p p e
1
0
2 7 B it
K la s s e E
2 4 0 .0 .0 .0 - 2 4 7 .2 5 5 .2 5 5 .2 5 5
1
1
Figure 2-4
1
1
0
R e s e r v ie r t fü r z u k ü n ftig e A n w e n d u n g e n
Structure of IP addresses
Special IP Addresses for Special Applications
Certain IP addresses are reserved for special functions. The following
addresses should not be used as standard IP addresses.
127.x.x.x Addresses
The class A network address "127" is reserved for a loop-back function on
all computers, regardless of the network class. This loop-back function
must only be used on networked computers for internal test purposes.
2-8
9499-040-69311
VARIO BK ETH
If a telegram is addressed to a computer with the value 127 in the first byte,
the receiver immediately sends the telegram back to the sender.
The correct installation and configuration of the TCP/IP software, for
example, can be checked in this way.
The first and second layers of the ISO/OSI model are not included in the
test and should therefore be tested separately using the ping function.
Value 255 in the Byte
Value 255 is defined as a broadcast address. The telegram is therefore
sent to all the computers that are in the same part of the network. Examples
include: 004.255.255.255, 198.2.7.255 or 255.255.255.255 (all the
computers in all the networks). If the network is divided into subnetworks,
the subnet masks must be observed during calculation, otherwise some
devices may be omitted.
0.x.x.x Addresses
Value 0 is the ID of the specific network. If the IP address starts with a zero,
the receiver is in the same network. Example: 0.2.1.1 refers to device 2.1.1
in this network.
The zero previously signified a broadcast address. If older devices are
used, an unauthorized broadcast and the complete overload of the entire
network (broadcast storm) may occur when using the IP address 0.x.x.x.
2.3.2
Subnet Masks
Routers and gateways divide large networks into subnetworks. The IP
addresses for individual devices are assigned to specific subnetworks by
the subnet mask. The network part of an IP address is not modified by the
subnet mask. An extended IP address is generated from the user address
and subnet mask. Because the masked subnetwork is only recognized by
the local computer, all the other devices display this extended IP address
as a standard IP address.
9499-040-69311
2-9
VARIO BK ETH
2.3.3
Structure of the Subnet Mask
The subnet mask always contains the same number of bits as an IP
address. The subnet mask has the same number of bits (in the same
position) set to "one", which is reflected in the IP address for the network
class.
Example: An IP address from class A contains a 1-byte network address
and a 3-byte PC address. Therefore, the first byte of the subnet mask may
only contain "ones".
The remaining bits (three bytes) then contain the address of the
subnetwork and the PC. The extended IP address is created when the bits
for the IP address and the bits for the subnet mask are ANDed. Because
the subnetwork is only recognized by local devices, the corresponding IP
address appears as a "normal" IP address to all the other devices.
Application
If the ANDing of the address bits gives the local network address and the
local subnetwork address, the device is located in the local network. If the
ANDing gives a different result, the data telegram is sent to the subnetwork
router.
Example for a class B subnet mask:
D e z im a le D a r s te llu n g :
2 5 5 .2 5 5 .1 9 2 .0
B in ä r e D a r s te llu n g :
1 1 1 1 1 1 1 1 .1 1 1 1 1 1 1 1 .1 1 0 0 0 0 0 0 .0 0 0 0 0 0 0 0
S u b n e tz m a s k e n b its
K la s s e B
Using this subnet mask, the TCP/IP protocol software differentiates
between the devices that are connected to the local subnetwork and the
devices that are located in other subnetworks.
Example: Device 1 wants to establish a connection with device 2 using the
above subnet mask. Device 2 has IP address 59.EA.55.32.
IP address display for device 2:
The individual subnet mask and the IP address for device 2 are then
ANDed bit-by-bit by the software to determine whether device 2 is located
in the local subnetwork:
2-10
9499-040-69311
VARIO BK ETH
H e x a d e z im a le D a r s te llu n g : 5 9 .E A .5 5 .3 2
B in ä r e D a r s te llu n g :
0 1 0 1 1 0 0 1 .1 1 1 0 1 0 1 0 .0 1 0 1 0 1 0 1 .0 0 1 1 0 0 1 0
ANDing the subnet mask and IP address for device 2:
S u b n e tz m a s k e :
IP -A d re s s e :
U N D
1 1 1 1 1 1 1 1 .1 1 1 1 1 1 1 1 .1 1 0 0 0 0 0 0 .0 0 0 0 0 0 0 0
0 1 0 1 1 0 0 1 .1 1 1 0 1 0 1 0 .0 1 0 1 0 1 0 1 .0 0 1 1 0 0 1 0
V e r k n ü p fu n g s e r g e b n is : 0 1 0 1 1 0 0 1 .1 1 1 0 1 0 1 0 .0 1 0 0 0 0 0 0 .0 0 0 0 0 0 0 0
S u b n e tz
After ANDing, the software determines that the relevant subnetwork (01)
does not correspond to the local subnetwork (11) and the data telegram is
transferred to a subnetwork router.
9499-040-69311
2-11
VARIO BK ETH
2.4
Factory Line I/O Configurator
The Factory Line I/O configurator is a software package for the
configuration, startup, and diagnostics of Inline local buses and OPC
communication of process data.
Configuration
The software provides support in the form of an integrated online product
catalog in XML format when planning the system and Inline station. You
have access to all supported Inline terminals, which can be integrated into
the Inline local bus by using drag and drop. In the following
I/O browser window, the bus structure is displayed on the left and the
product catalog on the right.
Figure 2-5
2-12
I/O browser screen
9499-040-69311
VARIO BK ETH
Linking Items and Physical Terminal Points
An item can be created for each physical I/O terminal in your bus
configuration and the entire configuration can be stored in a project file.
The project file and an OPC server provide the application program or the
visualization with direct access to the process data for the bus
configuration.
Figure 2-6
Linking items and terminal points
The entire configuration can be carried out offline.
9499-040-69311
2-13
VARIO BK ETH
Startup
After the hardware has been installed, the bus configuration can either be
configured online or started up using the project file.
Diagnostics
The operating state of the Inline station can be checked at any time. The
comprehensive diagnostic functions provide support when removing errors
from the local bus (configuration).
OPC Communication
Configure the OPC server from Phoenix Contact for this type of bus coupler
using the project file that was created using this software. The project file
and an OPC server provide the application program or the visualization
with direct access to the process data for the bus configuration.
2-14
9499-040-69311
Chapter 3
This section informs you about
–
the driver software
–
an example program
Driver Software .....................................................................................................3-3
3.1
Documentation ............................................................................3-3
3.1.1
3.2
The Software Structure ...............................................................3-3
3.2.1
Ethernet Bus Coupler Firmware.....................................3-4
3.2.2
Driver Software ..............................................................3-4
3.3
Support and Driver Update .........................................................3-6
3.4
Transfer of I/O Data ....................................................................3-7
3.4.1
3.5
3.6
3.7
3.8
3.9
Position of the Process Data (Example) ........................3-8
Startup Behavior of the Bus Coupler...........................................3-9
3.5.1
9499-040-69311
Hardware and Software User Manual............................3-3
Plug &Play Mode ...........................................................3-9
3.5.2
Expert Mode.................................................................3-10
3.5.3
Possible Combinations of the Modes...........................3-10
3.5.4
Startup Diagram of the Bus Coupler ............................3-11
3.5.5
Changing and Starting a Configuration in P&P Mode..3-13
Changing a Reference Configuration Using the Software ........3-14
3.6.1
Effects of Expert Mode.................................................3-14
3.6.2
Changing a Reference Configuration...........................3-15
Description of the Device Driver Interface (DDI) .......................3-16
3.7.1
Introduction ..................................................................3-16
3.7.2
Overview ......................................................................3-16
3.7.3
Working Method of the Device Driver Interface ...........3-16
3.7.4
Description of the Functions of the
Device Driver Interface3-19
Monitoring Functions.................................................................3-35
3.8.1
Connection Monitoring .................................................3-35
3.8.2
Data Interface (DTI) Monitoring ...................................3-41
Handling the SysFail Signal for the Ethernet/Inline Bus Coupler ..345
3-1
VARIO BK ETH
3.10
Programming Support Macros ..................................................3-51
3.10.1 Introduction ..................................................................3-51
3.11
Description of the Macros .........................................................3-53
3.11.1 Macros for Converting the Data Block of a Command.3-55
3.11.2 Macros for Converting the Data Block of a Message...3-57
3.11.3 Macros for Converting Input Data ................................3-59
3.11.4 Macros for Converting Output Data .............................3-62
3.12
Diagnostic Options for Driver Software .....................................3-64
3.12.1 Introduction ..................................................................3-64
3.13
3.14
Positive Messages ....................................................................3-66
Error Messages.........................................................................3-67
3.14.1 General Error Messages..............................................3-67
3.14.2 Error Messages When Opening a Data Channel.........3-69
3.14.3 Error Messages When Transmitting Messages/Commands
3-70
3.14.4 Error Messages When Transmitting Process Data......3-73
3.15
Example Program .....................................................................3-76
3.15.1 Demo Structure Startup ...............................................3-77
3.15.2 Example Program Source Code ..................................3-78
3-2
9499-040-69311
VARIO BK ETH
3
Driver Software
3.1
Documentation
3.1.1
Hardware and Software User Manual
This Hardware and Software User Manual for VARIO BK ETH describes
the hardware and software functions in association with an Ethernet
network and the functions of the Device Driver Interface (DDI) software.
All figures, tables, and abbreviations are listed in the Appendices. The
index in the Appendix makes it easier to search for specific key terms and
descriptions.
3.2
The Software Structure
A n s c h a ltb a u g r u p p e
C lie n t
D e v ic e
D r iv e r
In te r fa c e
A
N
W
F ir m w a r e
P D
M X
N
E
U
C
E
T C P /IP
T C P /IP
K o p p e ls p e ic h e r
b z w .
M P M
C
K
E
E th e rn e t
S
N
S
O
K
D
G
S
O
T
S
T
E th e rn e t-A d a p te r
IB S
M a s te r
6 1 5 6 0 0 1 8
T r e ib e r -S o ftw a r e
Figure 3-1
9499-040-69311
Software structure
3-3
VARIO BK ETH
3.2.1
Ethernet Bus Coupler Firmware
The Ethernet/Inline bus coupler firmware controls the Inline functions and
Ethernet communication, shown on the right-hand side in Figure 3-1.
The bus coupler provides a basic interface for using services via the
Ethernet network. The software primarily encodes and decodes the data
telegrams for addressing the bus coupler services. The firmware also
ensures the network-specific addressing of the bus coupler in the network,
i.e., the management of IP parameters.
3.2.2
Driver Software
The driver software (DDI) enables the creation of an application program,
shown on the left-hand side in Figure 3-1. A library is available for Sun
Solaris 2.4. Due to the large variety of different operating systems, the
driver software is available as source code in the IBS ETH DDI SWD E
(Order No. 27 51 13 7).
The driver software can be divided into three groups. The Device Driver
Interface functions form the first group, which controls the bus coupler via
the Ethernet network. Using these functions, firmware services can be
called and started, and results can be requested on the bus coupler. The
second group contains functions for monitoring the bus coupler and the
workstation with the application program. The third group contains macro
functions for the conversion of data between Intel and Motorola data
format.
Figure 3-2 illustrates the creation of an application program from the parts
of the driver software.
3-4
9499-040-69311
VARIO BK ETH
W o r k s ta tio n
(C lie n t)
A n w e n d e rp ro g ra m m
S o u rc e
L ib r a r y m it
D D I- u n d E T H A F u n k tio n e n
M a k ro s
A u s fü h ru n g
D a te n v e r b in d u n g
A n s c h a ltb a u g r u p p e
(S e rv e r)
Figure 3-2
9499-040-69311
5 2 2 5 A 0 0 1
Using the driver software in the application program
3-5
VARIO BK ETH
3.3
Support and Driver Update
In the event of problems, please phone our 24-hour hotline on
+49 - 52 35 - 34 18 88.
Driver updates and additional information are available on the Internet at
http://www.phoenixcontact.com.
Training Courses
Our bus coupler training courses enable you to take advantage of the full
capabilities of the connected Inline system. For details and dates, please
see our seminar brochure, which your local Phoenix Contact
representative will be happy to mail to you.
3-6
9499-040-69311
VARIO BK ETH
3.4
Transfer of I/O Data
The I/O data of individual Inline modules is transferred via memory areas
organized in a word-oriented way (separate memory areas for input and
output data). The Inline modules use the memory according to their
process data width. User data is stored in word arrays in the order of the
connected modules. The assignment of the individual bits is shown in the
following diagram:
B it 1 5
B it 1
2 W o rte
1 W o rt
1 B y te
4 B it
2 B it
6 1 5 5 0 0 0 7
Figure 3-3
Position of the user data for individual devices in the word
array
To achieve cycle consistency between I/O data and the station bus cycle,
the bus coupler uses an exchange buffer mechanism. This mechanism
ensures that the required I/O data is available at the correct time and is
protected during writing/reading by appropriate measures.
The following diagram shows the position of the user data for several
devices in the word array.
1 5
0 1 5
B y te - T e iln e h m e r
0 1 5
4 B it- T e iln e h m e r
0
2 B it- T e iln e h m e r
6 1 5 5 0 0 0 8
Figure 3-4
9499-040-69311
Position of the user data for several devices in the word array
3-7
VARIO BK ETH
3.4.1
Position of the Process Data (Example)
The physical assignment of the devices to the bus coupler determines the
order of the process data in the memory. The following diagram illustrates
an example bus configuration and the position of the relevant process data.
V A R IO
B K E T H
B K
D O 8
E th e rn e t
D O 4
D O 1 6
D O 2
D O 3 2
D O 1
L o k a lb u s
1 5
0
x x x x x x x x
W o rt 1
x x x x
W o rt 2
x x x x x x x x x x x x x x x x
W o rt 3
x x
W o rt 4
x x x x x x x x x x x x x x x x
W o rt 5
x x x x x x x x x x x x x x x x
W o rt 6
x
W o rt 7
Figure 3-5
3-8
d ig ita le A u s g a b e m o d u le
6 5 4 4 0 0 0 8
Position of the process data according to the physical bus
configuration
9499-040-69311
VARIO BK ETH
3.5
Startup Behavior of the Bus Coupler
The startup behavior of the bus coupler is determined by two system
parameters: plug & play mode and expert mode. In the delivery state the
P&P mode is activated and the expert mode is deactivated.
3.5.1
Plug &Play Mode
Please note that the following description only applies if the expert mode is
deactivated. Possible combinations of the two modi and their behaviour are
described in table 3-1 on page 3-10.
P&P mode activated
The FL IL 24 BK-B supports plug & play mode (P&P). This mode enables
connected Inline modules to be started up in the field using the Ethernet
interface without a higher-level computer. The P&P status (active or
inactive) is stored retentively on the bus terminal. In the P&P mode the
connected Inline terminals are detected and their function is checked. If the
physical configuration is ready for startup, it is stored retentively as
reference configuration.
If the connected configuration could be installed as reference configuration
the "PP" LED of the bus coupler lights up.
The P&P mode must be deactivated again so that the reference
configuration will not be overwritten next time the bus coupler is started.
The deactivation of the P&P mode at the same time serves as
acknowledgement of the reference configuration and the release of the
process data exchange.
Deactivated P&P
mode
In the deactivated P&P mode the reference configuration is compared to
the physical configuration. If they are identical the bus coupler can be set
into the "RUN" state.
If, however, the reference configuration and the physical configuration are
not identical, the "FAIL" LED lights up and a process data exchange is not
possible due to safety reasons.
There are two possibilities how you can to operate the bus nevertheless:
1. Restore the original configuration so that the reference configuration
and the physical configuration are identical again or
2. activate the P&P mode so that the current physical configuration can
be accepted as reference configuration.
9499-040-69311
3-9
VARIO BK ETH
3.5.2
Expert Mode
Please observe that the following description applies for the dactivated
mode. Possible combinations of both modes and their behavior are
describedTable 3-1 on page 3-10.
Expert mode
deactivated
If the expert mode is deactivated (default upon delivery) the error-free configuration is automatically set to the "RUN" state. If the configuration is defective or is not identical with the reference configuration the "FAIL" LED
lights up and a process data exchange is impossible.
Expert mode
activated
If the expert mode is active, the error-free configuration is set to the
"READY" state but not automatically into the "RUN" state. The user must
use correct firmware commands such as ACTIVATE_CONFIGURATION,
0x0711 or START_DATA_TRANSFER, 0x0701, to set the station to the
"RUN" state.
3.5.3
Table 3-1
P&P
Mode
Deactive
Expert
Mode
Deactive
Deactive
Active
Active
Deactive
Active
Active
3-10
Possible Combinations of the Modes
Possible combinations of the modes and their effects
Description / Effect
Diagram
Under normal circumstances- the station sets valid configurations in the "RUN" state. Process data exchange is
possible.
A valid configuration is set to the "READY" state. Process
data exchange is only possible if the station was set to the
"RUN" state using firmware commands.
The connected configuration is stored as reference configuration and the station is set to the "RUN" state. Process
data exchange is impossible.
A physical configuration is stored as reference configuration and the is set to the "Ready" state. Process data exchange is only possible if the P&P mode is deactivated and
the station is set to the "RUN" state using firmware commands.
Figure 3-6
on
page 3-11
Figure 3-7
on
page 3-11
Figure 3-8
on
page 3-12
Figure 3-9
on
page 3-12
9499-040-69311
VARIO BK ETH
3.5.4
Startup Diagram of the Bus Coupler
"Standard" Mode / P&P and Expert Mode Deactivated
P o w e r U p
R e a d
c o n n e c te d c o n fig u r a tio n
N o
O p e r a b le
c o n fig u r a tio n ?
Y e s
N o
C o n fig u r a tio n =
R e fe r e n c e c o n fig u r a tio n ?
Y e s
S e P t o s w t a e tr i o U n p t o
"R U N " s ta te
S to p
F a il: O N / P P : O F F
Figure 3-6
S ta tio n in
"R U N " s ta te
F a il: O F F / P P : O F F
6 1 5 6 0 0 2 3
"Standard" mode / expert and P&P mode deactivated
P&P Mode Deactivated - Expert Mode Activated
P o w e r U p
R e a d
r e fe r e n c e c o n fig u r a tio n
S ta tio n in
"R E A D Y " s ta te
F a il: O F F / P P : O F F
6 1 5 6 0 0 2 4
Figure 3-7
9499-040-69311
P&P mode deactivated - expert mode activated
3-11
VARIO BK ETH
P&P Mode Activated - Expert Mode Deactivated
P o w e r U p
R e a d c o n n e c te d
c o n fig u r a tio n
N o
O p e r a b le
c o n fig u r a tio n ?
Y e s
S a v e P a o s w e r e r f U e pr e n c e
c o n fig u r a tio n
N o
C o n fig u r a tio n =
R e fe r e n c e c o n fig u r a tio n ?
Y e s
S e P t o s w t a e tr i o U n p t o
"R U N " s ta te
S to p
F a il: O N / P P : O F F
S ta tio n in
"R U N " s ta te
F a il: O F F / P P : O N
6 1 6 5 0 0 2 5
Figure 3-8
P&P mode activated - expert mode deactivated
P&P Mode and Expert Mode Activated
P o w e r U p
R e a d c o n n e c te d
c o n fig u r a tio n
N o
O p e r a b le
c o n fig u r a tio n ?
Y e s
S a v P e o rw e e t e r n U t p i v e l y
a s
r e fe r e n c e c o n fig u r a tio n
S to p
F a il: O N / P P : O F F
S ta tio n in
"R E A D Y " s ta te
F a il: O F F / P P : O N
6 1 5 6 0 0 2 6
Figure 3-9
3-12
P&P mode and expert mode activated
9499-040-69311
VARIO BK ETH
3.5.5
Changing and Starting a Configuration in P&P
Mode
Ensure that plug & play mode is activated and expert mode is deactivated.
The following steps must be carried out when changing an existing
configuration as shown in the flow chart:
–
Switch the power supply off.
–
Change the configuration.
–
Switch the power supply on.
A configuration is started as shown in the flowchart (see Figure 3-6 to
Figure 3-9). During startup, please observe the following:
–
Once the terminal has been switched on, the previously found
configuration is read and started, as long as no errors are present. In
addition, the active configuration is saved in the EEPROM as the
reference configuration.
–
All connected Inline devices are integrated in the active configuration if
the "DIAG" LEDs are continuously lit on all modules.
–
To prevent the accidental use of the wrong configuration, process data
can only be accessed when P&P mode has been deactivated.
When P&P mode is active, access to process data is rejected with the error
message 00A9hex (ERR_PLUG_PLAY). The outputs of the entire Inline
station are reset in P&P mode.
P&P mode is activated using either the I/O browser or the "Set_Value"
command via Ethernet. Once P&P mode has been switched off, the bus is
only disconnected if the existing configuration and the reference
configuration are the same. In addition, the existing configuration will no
longer be saved automatically as the reference configuration after a bus
terminal restart.
9499-040-69311
3-13
VARIO BK ETH
3.6
3.6.1
Changing a Reference Configuration Using
the Software
Effects of Expert Mode
Only switch to expert mode if you want to deactivate automatic
configuration and activate manual configuration using the firmware
commands.
If expert mode (object 2275hex) is activated, automatic startup of the
connected local bus is prevented.
The user must manually place the bus in RUN state by activating the
configuration (Activate_Configuration/0711hex object or
Create_Configuration/0710hex object) and by starting the local bus
(Start_Data_Transfer/0701hex object).
In expert mode, the bus terminal behaves in the same way as the gateways
(IBS SC/I-T or IBS 24 ETH DSC/I-T).
3-14
9499-040-69311
VARIO BK ETH
3.6.2
–
Changing a Reference Configuration
Deactivate P&P mode.
–
Activate expert mode (for access to all firmware commands).
–
Place the bus in "Active" or "Stop" state (e.g., using the "Alarm_Stop"
command).
–
The reference configuration can be downloaded or deleted.
–
The connected bus can be read using the "Create_Configuration"
command and saved as the reference configuration, as long as the bus
can be operated.
–
The bus is started using the "Start_Data_Transfer" command. If access
to process data is rejected with an error message, this means that no
reference configuration is present.
Table 3-2
System parameters for the "Set_Value" service
Variable ID System Parameter
Value/Note
2240hex
Plug & play mode
0 -> plug & play mode inactive
1 -> plug & play mode active
2275hex
Expert mode
0 -> expert mode inactive
1 -> expert mode active
9499-040-69311
3-15
VARIO BK ETH
3.7
3.7.1
Description of the Device Driver Interface
(DDI)
Introduction
The Device Driver Interface (DDI) is provided for using the bus terminal
services. The functions of the DDI are combined in a library, which must be
linked.
3.7.2
Overview
Table 3-3
Functions
Page
DDI_DevOpenNode
3-19
DDI_DevCloseNode
3-22
DDI_DTI_ReadData
3-23
DDI_DTI_WriteData
3-25
DDI_DTI_ReadWriteData
3-27
DDI_MXI_SndMessage
3-29
DDI_MXI_RcvMessage
3-31
GetIBSDiagnostic
3-33
3.7.3
Remote procedure
call
3-16
Overview of the functions in the DDI
Working Method of the Device Driver Interface
The entire Device Driver Interface (DDI) for the bus coupler operates as
remote procedure calls . It does not use the standard libraries due to time
constraints. A remote procedure call means that the relevant function is not
executed on the local computer or the local user workstation (client), but on
another computer in the network. In this case, this is the bus coupler for
Ethernet. The user does not notice anything different about this working
method except that it is faster. The sequence of a remote procedure call is
shown in Figure 3-10.
9499-040-69311
VARIO BK ETH
Editing data
telegrams
When a function is called, the transfer parameters for the DDI function and
an ID for the function to be executed are copied into a data telegram
(network telegram) on the client and sent to the server (bus coupler) via the
Ethernet network (TCP/IP). The server decodes the received data
telegram, accepts the parameters for the function, and calls the function
using these parameters. The DDI_DTI_ReadData(nodeHd, dtiAcc)
function is called as an example in Figure 3-10.
During function execution by the server (bus coupler), the thread (process)
is in sleep state on the client until a reply is received from the server.
Once the function has been executed on the server, the read data and the
return value for the function are copied into a data telegram on the server
and sent back to the client (user workstation). The workstation decodes this
data telegram and makes the return value of the function available to the
user.
This working method is the same for each DDI function, which is executed
on the server as a remote procedure call.
9499-040-69311
3-17
VARIO BK ETH
Remote Procedure Call Process
L o k a le r R e c h n e r (W o r k s ta tio n )
E th e r n e t (T C P /IP )
IB S E T H
A n s c h a ltb a u g r u p p e
D D I_ D T I_ R e a d D a ta ( n o d e H d , d tiA c c )
{
D a ta g ra m m
}
...
re tu rn (re t);
D D I_ D T I_ R e a d D a ta ( n o d e H d , d tiA c c )
{
}
...
re tu rn (re t);
D a ta g ra m m
5 2 2 5 A 0 0 2
Figure 3-10
3-18
Execution of a remote procedure call
9499-040-69311
VARIO BK ETH
3.7.4
Description of the Functions of the
Device Driver Interface
DDI_DevOpenNode
UNIX
Task:
In order for the Device Driver Interface (DDI) to be able to find and address
the desired bus coupler in the Ethernet network using the device name, a
file called ibsetha must be created. This file contains the assignment
between the device name and the IP address or the host name of the bus
coupler.
Another name cannot be used for the file.
The structure of the file and its entries is as follows:
192.168.5.76
IBETH01N1_M IBETH01N1_D
etha2
IBETH02N1_M IBETH02N1_D
Several device names can be assigned to a single IP address or host
name. The individual device names are separated by spaces. The address
of the bus coupler can be entered in dotted notation: 192.168.5.76 or as
a host name: etha2. If a device name is used several times, only the first
occurrence in the file is evaluated.
9499-040-69311
3-19
VARIO BK ETH
Windows NT/2000
The following entries must be created in the registry so that the Device
Driver Interface (DDI) can find the selected bus coupler. The entries can be
created easily using the setup tool provided.
The following registry entry is created:
[HKEY_LOCAL_MACHINE\SOFTWARE\Phoenix
Contact\IBSETH\Parameters\1]
ConnectTimeout=08,00,00,00
DeviceNames=IBETH01N1_M IBETH01N0_M@01 IBETH01N1_D
IBETH01N0_D IBETH01N1_M@00 IBETH01N1_M@05
InUse=YES
ReceiveTimeout=08,00,00,00
IPAddress=192.168.36.205
Function:
The DDI_DevOpenNode function opens a data channel to the bus coupler
specified by the device name or to a node.
The function receives the device name, the desired access rights, and a
pointer to a variable for the node handle as arguments. If the function was
executed successfully, a handle is entered in the variable referenced by the
pointer, and this handle is used for all subsequent access to this data
channel. In the event of an error, a valid value is not entered in the variable.
An appropriate error code is instead returned by the DDI_DevOpenNode
function, which can be used to determine the cause of the error.
The node handle, which is returned to the application program is
automatically generated by the DDI or bus coupler. This node handle has
direct reference to an internal control structure, which contains all the
corresponding data for addressing the relevant bus coupler.
The local node handle is used to obtain all the necessary parameters for
addressing the bus coupler, such as the IP address, socket handle, node
handle on the bus coupler, etc. from this control structure when it is
subsequently accessed.
A control structure is occupied when the data channel is opened and is not
released until the DDI_DevCloseNode function has been executed or the
connection has been aborted. The maximum number of control structures
is determined when the library is compiled and cannot subsequently be
modified. In Windows NT there are eight control structures per device, with
a maximum of 256.
3-20
9499-040-69311
VARIO BK ETH
If all the control structures are occupied, another data channel cannot be
opened. In this case, if DDI_DevOpenNode is called, it is rejected locally
with the appropriate error message.
Syntax:
IBDDIRET IBDDIFUNC DDI_DevOpenNode (CHAR *devName, INT16
perm, IBDDIHND *nodeHd);
Parameters:
CHAR *devName
Pointer to a string with the device name.
INT16 perm
Access rights to the data channel to be opened.
This includes read, write, and read/write access.
IBDDIHND *nodeHd
Pointer to a variable for the node handle (MXI or
DTI).
Return value:
IBDDIRET
If the function is executed successfully, the value
0 (ERR_OK) is returned. Otherwise the return
value is an error code.
Constants for the
perm parameter
DDI_READ
0x0001 /* Read only access */
DDI_WRITE
0x0002 /* Write only access */
DDI_RW
0x0003 /* Read and write access */
Example
UNIX / Windows NT/2000:
IBDDIHND ddiHnd;
{
IBDDIRET ddiRet;
ddiRet=DDI_DevOpenNode ("IBETH01N1_D", DDI_RW,
&ddiHnd);
if (ddiRet != ERR_OK)
{
/* Error treatment */
.
.
return:
}
.
.
.
}
9499-040-69311
3-21
VARIO BK ETH
DDI_DevCloseNode
Task:
If a data channel is no longer needed, it can be closed using the
DDI_DevCloseNode function. This function uses only the node handle as
a parameter, which indicates the data channel that is to be closed. If the
data channel cannot be closed or the node handle is invalid, an appropriate
error code is returned by the function.
All active connections should be closed before calling the
DDI_DevCloseNode function.
Syntax:
IBDDIRET IBDDIFUNC DDI_DevCloseNode(IBDDIHND nodeHd);
Parameters:
IBDDIHND nodeHd
Node handle (MXI or DTI) for the connection that
is to be closed.
Return value:
IBDDIRET
If the function is executed successfully, the value
0 (ERR_OK) is returned. Otherwise the return
value is an error code.
Example
UNIX / Windows NT/2000
IBDDIHND ddiHnd;
{
IBDDIRET ddiRet;
.
.
.
ddiRet=DDI_DevCloseNode (ddiHnd);
if (ddiRet != ERR_OK)
{
/* Error treatment */
.
.
.
}
return;
}
3-22
9499-040-69311
VARIO BK ETH
DDI_DTI_ReadData
Task
The DDI_DTI_ReadData function is used to read process data from the
Inline bus coupler. The function is assigned the node handle and a pointer
to a T_DDI_DTI_ACCESS data structure.
The T_DDI_DTI_ACCESS structure contains all the parameters that are
needed to access the process data area of the bus coupler and
corresponds to the general DDI specification. A plausibility check is not
carried out on the user side, which means that the parameters are
transmitted via the network just as they were transferred to the function.
The nodeHd parameter specifies the bus coupler in the network to which
the request is to be sent. The node handle must also be assigned to a
process data channel, otherwise an appropriate error message is
generated by the bus coupler.
Syntax:
IBDDIRET IBDDIFUNC DDI_DTI_ReadData(IBDDIHND nodeHd,
T_DDI_DTI_ACCESS *dtiAcc);
Parameters:
IBDDIHND nodeHd
Node handle (DTI) for the connection from which
data is to be read. The node handle also
determines the bus coupler, which is to be
accessed.
T_DDI_DTI_ACCESS *dtiAcc
Pointer to a T_DDI_DTI_ACCESS data
structure. This structure contains all the
parameters needed for access.
Return value:
IBDDIRET
Format of the
T_DDI_DTI_
ACCESS
structure:
typedef struct {
USIGN16 length;
/* Amount of data to be read in bytes */
USIGN16 address;
/* Address in the DTI area (byte address) */
USIGN16 dataCons;
/* Desired data consistency area */
USIGN8 *data;
/* Pointer to the data (read and
write) */
} T_DDI_DTI_ACCESS;
9499-040-69311
If the function is executed successfully, the value
0 (ERR_OK) is returned. Otherwise the return
value is an error code.
3-23
VARIO BK ETH
Example
UNIX / Windows NT/2000
IBDDIHND ddiHnd;
{
IBDDIRET ddiRet;
T_DDI_DTI_ACCESS dtiAcc;
USIGN8 iBuf[512];
dtiAcc.length = 512;
dtiAcc.address = 0;
dtiAcc.data = iBuf;
dtiAcc.dataCons = DTI_DATA_BYTE;
ddiRet = DDI_DTI_ReadData (ddiHnd, &dtiAcc);
if (ddiRet != ERR_OK)
{
/* Error treatment */
.
.
.
}
.
.
.
}
3-24
9499-040-69311
VARIO BK ETH
DDI_DTI_WriteData
Task:
The DDI_DTI_WriteData function is used to write process data to the bus
coupler.
So that the outputs are reset in the event of an error on the network line
(e.g., faulty cable) or at the client (system crash or TCP/IP protocol stack
disconnected), one of the monitoring mechanisms
–
connection monitoring or Data Interface (DTI) monitoring
must be activated. If neither monitoring mechanism is activated, the last
process data item remains unchanged in the event of an error (see page
3-35).
The function is assigned the node handle and a pointer to a
T_DDI_DTI_ACCESS data structure.
The T_DDI_DTI_ACCESS structure contains all the parameters that are
needed to access the process data area of the bus coupler and
corresponds to the general DDI specification. A plausibility check is not
carried out on the user side, which means that the parameters are
transmitted via the network just as they were transferred to the function.
The nodeHd parameter specifies the bus coupler in the network to which
the request is to be sent. The node handle must also be assigned to a
process data channel, otherwise an appropriate error message is
generated by the bus coupler.
Syntax:
IBDDIRET IBDDIFUNC DDI_DTI_WriteData(IBDDIHND nodeHd,
T_DDI_DTI_ACCESS *dtiAcc);
Parameters:
IBDDIHND nodeHd
Node handle (DTI) for the connection to which
data is to be written. The node handle also
determines the bus coupler, which is to be
accessed.
T_DDI_DTI_ACCESS *dtiAcc
Pointer to a T_DDI_DTI_ACCESS data
structure. This structure contains all the
parameters needed for access.
Return value:
9499-040-69311
IBDDIRET
If the function is executed successfully, the value
0 (ERR_OK) is returned. Otherwise the return
value is an error code.
3-25
VARIO BK ETH
Format of the
T_DDI_DTI_
ACCESS
structure
typedef struct {
USIGN16 length;
/* Amount of data to be written in
bytes */
USIGN16 address;
/* Address in the DTI area (byte address) */
USIGN16 dataCons;
/* Desired data consistency area */
USIGN8 *data;
/* Pointer to the data (read and
write) */
} T_DDI_DTI_ACCESS;
Example
UNIX / Windows NT/2000
IBDDIHND ddiHnd;
{
IBDDIRET ddiRet;
T_DDI_DTI_ACCESS dtiAcc;
USIGN8 oBuf[512];
dtiAcc.length = 512;
dtiAcc.address = 0;
dtiAcc.data = oBuf;
dtiAcc.dataCons = DTI_DATA_BYTE;
oBuf[0] = 0x12;
oBuf[1] =0x34;
ddiRet = DDI_DTI_WriteData (ddiHnd, &dtiAcc);
if (ddiRet != ERR_OK)
{
/* Error treatment */
}
.
.
}
3-26
9499-040-69311
VARIO BK ETH
DDI_DTI_ReadWriteData
Task:
The DDI_DTI_ReadWriteData function is used to read and write process
data in one call. This function increases performance considerably,
especially when using process data services via the network, because
process data is read and written in a single sequence.
So that the outputs are reset in the event of an error on the network line
(e.g., faulty cable) or at the client (system crash or TCP/IP protocol stack
disconnected), one of the monitoring mechanisms
–
connection monitoring or Data Interface (DTI) monitoring
must be activated. If neither monitoring mechanism is activated, the last
process data item remains unchanged in the event of an error (see page
3-35).
The function is assigned the node handle and two pointers to
T_DDI_DTI_ACCESS data structures. One structure contains the
parameters for read access and the other structure contains the
parameters for write access. The T_DDI_DTI_ACCESS structure
corresponds to the general DDI specification. A plausibility check is not
carried out on the user side, which means that the parameters are
transmitted via the network just as they were transferred to the function.
The nodeHd parameter specifies the bus coupler in the network to which
the request is to be sent. The node handle must be assigned to a process
data channel, otherwise an appropriate error message is generated by the
bus coupler.
Syntax:
IBDDIRET IBDDIFUNC DDI_DTI_ReadWriteData (IBDDIHND nodeHd,
T_DDI_DTI_ACCESS *writeDTIAcc,
T_DDI_DTI_ACCESS *readDTIAcc);
Parameters:
IBDDIHND nodeHd
Node handle (DTI) for the connection to which data
is to be written. The node handle also determines
the bus coupler, which is to be accessed.
T_DDI_DTI_ACCESS *writeDTIAcc
Pointer to a T_DDI_DTI_ACCESS data structure
with the parameters for write access.
T_DDI_DTI_ACCESS *readDTIAcc
Pointer to a T_DDI_DTI_ACCESS data structure
with the parameters for read access.
Return value:
9499-040-69311
IBDDIRET
If the function is executed successfully, the value 0 (ERR_OK)
is returned. Otherwise the return value is an error code.
3-27
VARIO BK ETH
Format of the
T_DDI_DTI_
ACCESS
structure
typedef struct {
USIGN16 length;
/* Amount of data to be read in bytes */
USIGN16 address;
/* Address in the DTI area (byte address) */
USIGN16 dataCons;
/* Desired data consistency area */
USIGN8 *data;
/* Pointer to the data (read and
write) */
} T_DDI_DTI_ACCESS;
Example
UNIX / Windows NT/2000
IBDDIHND ddiHnd;
{
IBDDIRET ddiRet;
T_DDI_DTI_ACCESS dtiReadAcc;
T_DDI_DTI_ACCESS dtiWriteAcc
USIGN8 oBuf[512];
USIGN8 iBuf[512];
dtiWriteAcc.length = 512;
dtiWriteAcc.address = 0;
dtiWriteAcc.data = oBuf;
dtiWriteAcc.dataCons = DTI_DATA_BYTE;
dtiReadAcc.length = 512;
dtiReadAcc.address = 0;
dtiReadAcc.data = iBuf;
dtiReadAcc.dataCons = DTI_DATA_BYTE;
oBuf[0]= 0x12
oBuf[1]= 0x34
ddiRet=DDI_DTI_ReadWriteData (ddiHnd,
&dtiWriteAcc, &dtiReadAcc);
if (ddiRet!=ERR_OK)
{
/* Error treatment */
}
.
}
3-28
9499-040-69311
VARIO BK ETH
DDI_MXI_SndMessage
Task:
The DDI_MXI_SndMessage function is used to send a message to the bus
coupler. The function receives a node handle and a pointer to a
T_DDI_MXI_ACCESS data structure as parameters. The
T_DDI_MXI_ACCESS structure contains all the parameters that are
needed to send the message.
These parameters are transmitted to the bus couplers via the network
without a plausibility check, which means that invalid parameters are first
detected at the bus coupler and acknowledged with an error message. The
IBDDIHND nodeHd parameter specifies the bus coupler in the network to
which the request is to be sent.
The node handle must be assigned to a mailbox interface data channel,
otherwise an appropriate error message is generated by the bus coupler.
Syntax:
IBDDIRET IBDDIFUNC DDI_MXI_SndMessage (IBDDIHND nodeHd,
T_DDI_MXI_ACCESS *mxiAcc);
Parameters:
IBDDIHND nodeHd
Node handle (MXI) for the connection via which
a message is to be written to the mailbox
interface. The node handle also determines the
bus coupler, which is to be accessed.
T_DDI_MXI_ACCESS *dtiAcc
Pointer to a T_DDI_MXI_ACCESS data
structure. This structure contains all the
parameters needed for access.
Return value:
IBDDIRET
Format of the
T_DDI_MXI_ACCESS
structure
typedef struct {
USIGN16 msgType;
/* Message type (see DDI description) */
USIGN16 msgLength;
/* Length of the message in bytes */
USIGN16 DDIUserID;/* Message ID */
USIGN8 *msgBlk;
/* Pointer to the message data */
} T_DDI_MXI_ACCESS;
9499-040-69311
If the function is executed successfully, the value
0 (ERR_OK) is returned. Otherwise the return
value is an error code.
3-29
VARIO BK ETH
Example
UNIX / Windows NT/2000
IBDDIHND mxiHnd;
{
IBDDIRET ddiRet;
T_DDI_MXI_ACCESS mxiAcc;
USIGN8 oBuf[256];
mxiAcc.msgLength = 4;
mxiAcc.userID = 0;
mxiAcc.msgType = 0;
mxiAcc.msgBlk = oBuf;
IB_SetCmdCode (oBuf, S_CREATE_CFG_REQ);
IB_SetParaCnt (oBuf, 1);
IB_SetParaN (oBuf, 1, 1);
ddiRet = DDI_MXI_SndMessage (mxiHnd, &mxiAcc);
if (ddiRet!=ERR_OK)
{
/* Error treatment */
.
.
.
}
.
.
.
}
3-30
9499-040-69311
VARIO BK ETH
DDI_MXI_RcvMessage
The DDI_MXI_RcvMessage function reads a message from the bus
coupler. The function receives a node handle and a pointer to a
T_DDI_MXI_ACCESS data structure as parameters. The
T_DDI_MXI_ACCESS structure contains all the parameters that are
needed to read the message.
These parameters are transmitted to the bus couplers via the network
without a plausibility check, which means that invalid parameters are first
detected at the bus coupler and acknowledged with an error message. The
nodeHd parameter specifies the bus coupler in the network to which the
request is to be sent. The node handle must be assigned to a mailbox
interface data channel, otherwise an appropriate error message is
generated by the bus coupler.
The function does not wait until a message is received in the MPM, instead
it returns immediately. If no message is present, the error code
ERR_NO_MSG is returned.
To prevent excessive mailbox interface requests, special modes can be
activated for reading the message, which enable the system to wait for a
message from the bus coupler.
Syntax:
IBDDIRET IBDDIFUNC DDI_MXI_RcvMessage(IBDDIHND nodeHd,
T_DDI_MXI_ACCESS *mxiAcc);
Parameters:
IBDDIHND nodeHd
Node handle (MXI) for the connection via which
a message is to be read from the mailbox
interface. The node handle also determines the
bus coupler, which is to be accessed.
T_DDI_MXI_ACCESS *dtiAcc
Pointer to a T_DDI_MXI_ACCESS data
structure. This structure contains all the
parameters needed for access.
Return value:
IBDDIRET
Format of the
T_DDI_MXI_
ACCESS structure
typedef struct {
USIGN16 msgType;
/* Message type */
USIGN16 msgLength;
/* Length of the message in bytes */
9499-040-69311
If the function is executed successfully, the value
0 (ERR_OK) is returned. Otherwise the return
value is an error code.
3-31
VARIO BK ETH
USIGN16 DDIUserID;
/* Message ID */
USIGN8 *msgBlk;
/* Pointer to the message data */
} T_DDI_MXI_ACCESS;
Example
UNIX / Windows NT/2000
IBDDIHND mxiHnd;
{
IBDDIRET ddiRet;
T_DDI_MXI_ACCESS mxiAcc;
USIGN8 iBuf[256];
USIGN16 msgCode;
USIGN16 paraCounter;
USIGN16 parameter[128];
unsignet int i;
mxiAcc.msgLength = 256;
mxiAcc.DDIUserID = 0;
mxiAcc.msgType = 0;
mxiAcc.msgBlk = iBuf;
ddiRet = DDI_MXI_RcvMessage (mxiHnd, &mxiAcc);
if (ddiRet != ERR_OK)
{
/* Evaluation of the message */
msgCode = IB_GetMsgCode (iBuf);
paraCounter = IB_GetParaCnt (iBuf);
for (i=0; i<paraCounter; i++)
{
parameter[i] = IB_GetParaN (iBuf, i);
}
}
}
3-32
9499-040-69311
VARIO BK ETH
GetIBSDiagnostic
Task:
The DDI_GetIBSDiagnostic function reads the diagnostic bit register and
the diagnostic parameter register. The function receives a valid node
handle and a pointer to a T_IBS_DIAG data structure as parameters. After
the function has been called successfully, the structure components
contain the contents of the diagnostic bit register and the diagnostic
parameter register in processed form.
Syntax:
IBDDIRET IBDDIFUNC DDI_GetIBSDiagnostic(IBDDIHND nodeHd,
T_IBS_DIAG *infoPtr);
Parameters:
IBDDIHND nodeHd
Node handle (MXI or DTI) of the bus coupler
from which the diagnostic bit register and
diagnostic parameter register are to be read.
T_IBS_DIAG *infoPtr Pointer to a T_IBS_DIAG data structure. The
contents of the register are entered in this structure.
Format of the
T_IBS_DIAG
structure
typedef struct {
USIGN16 state;/* Status of the local bus*/
USIGN16 diagPara;
/* Type of error (controller,
user, etc.) */
} T_IBS_DIAG;
Return value:
IBDDIRET
Example
UNIX / Windows NT/2000
If the function is executed successfully, the value 0 (ERR_OK)
is returned. Otherwise the return value is an error code.
IBDDIHND ddiHnd;
{
T_IBS_DIAG infoPtr;
IBDDIRET ddiRet;
USIGN16 stateAB;
USIGN16 diagAB;
{
Sleep (20) /* Depends on operating system */;
ddiRet = GetIBSDiagnostic (ddiHnd, &infoPtr);
stateAB = infoPtr.state;
diagAB = infoPtr.diagPara;
9499-040-69311
3-33
VARIO BK ETH
} while (...)
}
3-34
9499-040-69311
VARIO BK ETH
3.8
Monitoring Functions
So that the outputs are reset in the event of an error on the network line
(e.g., faulty cable) or at the client (system crash or TCP/IP protocol stack
disconnected), one of the monitoring mechanisms
–
connection monitoring or Data Interface (DTI) monitoring
must be activated. If neither monitoring mechanism is activated, the last
process data item remains unchanged in the event of an error.
When and which monitoring function is used depends on the application
program and the safety requirements.
Monitoring Mechanisms
Monitoring mechanisms require a correctly operating network. To prevent
excessive network loads or to avoid using unreliable network operating
modes, operation in separate automation networks or connection to
another network via a firewall is recommended.
3.8.1
Connection Monitoring
Application
Connection monitoring can be used to determine whether there is still a
connection between the bus coupler (server) and the computer (client) and
whether this computer responds to requests. With this monitoring it is also
possible to detect the following error causes:
9499-040-69311
–
Cable broken, not connected or short circuited.
–
Transceiver faulty.
–
Errors or faults in the Ethernet adapter of the bus coupler or
in the client.
–
System crash of the client (workstation).
–
Error in the TCP/IP protocol stack.
3-35
VARIO BK ETH
Activating Monitoring
The ETH_SetHostChecking function activates the mode for monitoring the
connection and the status of the client. The function is assigned a valid
node handle (DTI or MXI data channel) and a pointer (time) to a variable
with the timeout time.
This mode can be activated for all clients (workstations) with a DDI
connection. A connection to a client, which only uses Ethernet
management cannot be monitored. If several connections to a client are
activated simultaneously, the client is only addressed once during a cycle.
If the connection no longer exists, monitoring is also reset.
Echo Port
Monitoring uses the echo port, which is provided on all systems that
support TCP/IP. Each data telegram to this port is sent back from the
receiver to the sender. The port is used for both connection-oriented TCP
and connectionless UDP. In the case of the bus coupler, the echo port is
used with UDP, to keep the resources used to a minimum.
Detecting an Error
Connection monitoring sends a short data telegram to a client every 500
ms. This interval is predefined and does not change according to the
number of clients that are addressed. This means that the frequency with
which each client is "addressed" decreases with the number of connected
clients. After the data telegram has been sent, the Inline bus coupler waits
for a user-defined time for the reply to be received. If the reply is not
received within this time, the bus coupler sends another data telegram to
the relevant client. This process is repeated a maximum of three times.
Connection monitoring then assumes that a serious error has occurred and
sets the SysFail signal (outputs are set to zero).
Deactivating Monitoring
If connection monitoring is no longer required, it can be deactivated using
the ETH_ClearHostChecking function. Monitoring is only deactivated for
the client and the connection, which are specified by the node handle. If the
same client has additional DDI connections to the bus coupler and
connection monitoring was also activated for these connections, this client
is still monitored via the other connections.
If a DDI connection is closed using DDI_DevCloseNode, monitoring for this
client is also deactivated. Additional connections are treated as above; they
are not reset and monitoring for these connections is not deactivated.
3-36
9499-040-69311
VARIO BK ETH
Devices Without an Echo Port
For systems that do not have an echo port available as standard, the
source code for a system-specific echo server is provided. This program
can then be adapted to the specific system and can be started as a
separate process before the actual application. The user must ensure that
the echo server answers within 500 ms in every operating state.
The echo server that is implemented in Windows 2000 does not meet these
requirements. Thus you need to use DTI monitoring.
9499-040-69311
3-37
VARIO BK ETH
ETH_SetHostChecking
Task:
After the ETH_SetHostChecking function has been called successfully, the
client (user workstation) is addressed by the bus coupler at regular
intervals.
If the client does not respond within the predefined time (timeout time),
three additional attempts are made to address the client. If there is still no
response, the SysFail signal is set and the TCP connection is aborted by
the bus coupler.
Syntax:
IBDDIRET IBDDIFUNC ETH_SetHostChecking (IBDDIHND nodeHd,
USIGN16 *time);
Parameters:
IBDDIHND nodeHd
Node handle (MXI or DTI) for the bus coupler
that is to be monitored.
USIGN16 *time
Pointer to a variable, which contains the desired
timeout time when called. If the function has
been called successfully, the actual timeout time
is then entered in this variable. The shortest
value for the timeout time is 330 ms, the longest
value tor the timeout time is 65,535 ms. If a
shorter value is entered, the error code
ERR_INVLD_PARAM is returned and "Host
Checking" is not activated.
IBDDIRET
If the function is executed successfully, the value
0 (ERR_OK) is returned. Otherwise the return
value is an error code.
Return value:
3-38
9499-040-69311
VARIO BK ETH
Example
Unix / Windows NT/2000
IBDDIHND ddiHnd;
{
void CAU00yxDlg::OnButtonSetHostCheckingOn()
{
IBDDIRET ddiRet;
USIGN16 hcTime = 1000;
.
.
.
{
ddiRet = ETH_SetHostChecking
(ddiHnd, &hcTime);
if (ddiRet == ERR_INVLD_PARAM)
{
/*hcSelected time is too short
(330 ms, minimum)*/
.
.
.
}
}
UpdateData (FALSE)
}
9499-040-69311
3-39
VARIO BK ETH
ETH_ClearHostChecking
Task:
The ETH_ClearHostChecking function deactivates the node used to
monitor the client. This function only receives the node handle as a
parameter, which is also used to activate monitoring with
ETH_SetHostChecking. After the function has been called successfully,
monitoring via this channel and for this client is deactivated. Other
activated monitoring channels are not affected.
Syntax:
IBDDIRET IBDDIFUNC ETH_ClearHostChecking (IBDDIHND nodeHd);
Parameters:
IBDDIHND nodeHd
Node handle (MXI or DTI) for the bus coupler for
which monitoring is to be deactivated. The same
node handle that was used for activating
monitoring must also be used here.
Return value:
IBDDIRET
If the function is executed successfully, the value
0 (ERR_OK) is returned. Otherwise the return
value is an error code.
3-40
9499-040-69311
VARIO BK ETH
3.8.2
Data Interface (DTI) Monitoring
Error Detection and Response
Client monitoring using connection monitoring can only determine whether
a client can still be addressed. It is not possible to determine whether the
process that controls the bus coupler (application program) is still operating
correctly. An extremely serious error occurs when the controlling process
is no longer operating correctly, i.e., the bus coupler is no longer supplied
with up-to-date process data and as a result incorrect output data is sent to
the local bus devices.
DTI monitoring can detect if a message to the Data Interface of the bus
coupler has failed to arrive and the appropriate safety measures can be
implemented. In this case, the failure of the DTI data telegram sets the
SysFail signal and resets the output data for the local bus devices to zero.
Activating Monitoring
Monitoring of the Data Interface (DTI) is not activated immediately after the
ETH_SetDTITimeoutCtrl has been called, but only after data is written to or
read from the DTI for the first time using the node handle, which was also
used when activating monitoring. Writing to or reading from the DTI via a
connection or a node handle for which no monitoring is set does not
therefore enable monitoring for another connection.
Once access has been enabled for the first time, all subsequent access
must be enabled within the set timeout time, otherwise the SysFail signal
is activated.
Deactivating Monitoring
Monitoring is deactivated by calling the ETH_ClearDTITimeoutCtrl function
or by closing the relevant DTI node using the DDI_DevCloseNode function.
If a connection is interrupted by the bus coupler as a result of DTI
monitoring, the monitoring mode for this connection is deactivated and the
corresponding DDI node is closed.
If the bus coupler detects that a connection has been interrupted without
the node having been closed, the SysFail signal is set. This applies
especially if the controlling process (application program) is closed with an
uncontrolled action (e.g., pressing Ctrl+C) and all the open data channels
are closed by the operating system.
9499-040-69311
3-41
VARIO BK ETH
Status of the SysFail Signal
The user can read the status of the SysFail signal using the
ETH_GetNetFailStatus function. In addition to the status of the SysFail
signal, a second parameter is returned, which indicates the reason if the
SysFail signal has been set. An additional function for the controlled setting
of the SysFail signal is provided for test purposes. This enables the
behavior of the system in the event of a SysFail to be tested, especially
during program development. The ETH_SetNetFail function only needs a
valid node handle as a parameter, so that the corresponding module can
be addressed in the network.
The SysFail signal can only be reset by calling the ETH_ClrSysFailStatus
function or by executing a reset on the bus coupler.
3-42
9499-040-69311
VARIO BK ETH
ETH_SetDTITimeoutCtrl
Task:
The ETH_SetDTITimeoutCtrl function activates the node for monitoring the
DTI data channel specified by the node handle. After this function has been
called, monitoring checks whether process data is received regularly. The
function is assigned a valid node handle for a DTI data channel and a
pointer (*time) to a variable with the desired timeout time. After the function
has been called, the timeout time calculated by the bus coupler can be
found in the USIGN16 *time variable.
Syntax:
IBDDIRET IBDDIFUNC ETH_SetDTITimeoutCtrl (IBDDIHND nodeHd,
USIGN16 *time);
Parameters:
IBDDIHND nodeHd
Node handle (DTI) for the bus coupler that is to
be monitored.
USIGN16 *time
Pointer to a variable, which contains the desired
timeout time when called. If the function has
been called successfully, the actual timeout time
is then entered in this variable. The timeout time
can be set to a value within the range of 110 ms
to 65,535 ms.
IBDDIRET
If the function is executed successfully, the value
0 (ERR_OK) is returned. Otherwise the return
value is an error code.
Return value:
9499-040-69311
3-43
VARIO BK ETH
ETH_ClearDTITimeoutCtrl
Task:
The ETH_ClearDTITimeoutCtrl function deactivates the node for
monitoring process data activity. This function only receives the node
handle as a parameter, which is also used to activate monitoring. After the
function has been called successfully, monitoring via this channel and for
this client is deactivated. Other activated monitoring channels are not
affected.
Syntax:
IBDDIRET IBDDIFUNC ETH_ClearDTITimeoutCtrl(IBDDIHND nodeHd);
Parameters:
IBDDIHND nodeHd
Node handle (DTI) for the bus coupler for which
monitoring is to be deactivated. The same node
handle that was used for activating monitoring
must also be used here.
Return value:
IBDDIRET
If the function is executed successfully, the value
0 (ERR_OK) is returned. Otherwise the return
value is an error code.
Example
Unix / Windows NT/2000
IBDDIHND ddiHnd;
{
IBDDIRET ddiRet;
.
.
.
ddiRet = ETH_ClearDTITimeoutCtrl (ddiHnd);
.
.
.
}
3-44
9499-040-69311
VARIO BK ETH
3.9
Handling the SysFail Signal for the
Ethernet/Inline Bus Coupler
The SysFail signal is set by writing a register in the coupling memory of the
bus coupler. As soon as this signal is detected by the bus coupler, all local
bus device outputs are reset and the PCP connections to the devices are
interrupted.
Once the SysFail signal has been set to zero, process data can be output
again. The SysFail signal is always set if the connection to the client is
interrupted, the bus coupler does not write data to the DTI within the
specified time or a general malfunction has been detected on the bus
coupler, which prevents safe operation.
The setting of the SysFail signal is indicated by setting the SysFail bit in the
control word of each data telegram, which is sent by the bus coupler. The
SysFail signal can be reset using the appropriate command or, if this is no
longer possible, by executing a power up.
ETH_SetNetFail
Task:
The ETH_SetNetFail function sets the SysFail signal on the bus coupler
and thus prevents the further output of process data to the local bus
devices. The function is assigned a node handle for a DTI or mailbox data
channel of the relevant bus coupler as a parameter.
Syntax:
IBDDIRET IBDDIFUNC ETH_SetNetFail (IBDDIHND nodeHd);
Parameters:
IBDDIHND nodeHd
Node handle (MXI or DTI) for the bus coupler on
which the SysFail signal is to be executed.
Return value:
IBDDIRET
If the function is executed successfully, the value
0 (ERR_OK) is returned. Otherwise the return
value is an error code.
9499-040-69311
3-45
VARIO BK ETH
Example
Unix / Windows NT/2000
IBDDIHND ddiHnd;
{
IBDDIRET ddiRet;
.
.
.
ddiRet = ETH_SetNetFail (ddiHnd);
.
.
.
}
3-46
9499-040-69311
VARIO BK ETH
ETH_GetNetFailStatus
Task:
The ETH_GetNetFailStatus function sends the SysFail status to the user,
which is determined by the node handle of the bus coupler. The function is
assigned a node handle for an open DTI or MXI data channel and a pointer
to a T_ETH_NET_FAIL structure as parameters. After the function has
been called successfully, the structure components contain the status
(status) of the SysFail signal and an error code (reason) if the SysFail
signal has been set.
If the SysFail signal is not set, the status structure component has the value
0. Otherwise status has the value 0xFFFF. The reason structure
component is only valid if the SysFail signal is set. The possible values for
reason can be found in the IOCTRL.H file.
Syntax:
IBDDIRET IBDDIFUNC ETH_GetNetFailStatus (IBDDIHND nodeHd,
T_ETH_NET_FAIL *netFailInfo);
Parameters:
IBDDIHND nodeHd
Node handle (MXI or DTI) for the bus coupler on
which the SysFail status is to be read.
T_ETH_NET_FAIL *netFailInfo
Pointer to a structure, which contains the SysFail
status and the reason for the SysFail, if
applicable.
Return value:
IBDDIRET
Format of the
T_ETH_NET_FAIL
structure
typedef struct {
USIGN16 status; /* SysFail status */
USIGN16 reason; /* Reason for the SysFail */
} T_ETH_NET_FAIL;
Possible values for
the status structure
component:
ETH_NET_FAIL_ACTIVE
0xFFFF
/* SysFail signal triggered */
ETH_NET_FAIL_INACTIVE
0x0000
/* SysFail signal not triggered */
9499-040-69311
If the function is executed successfully, the value
0 (ERR_OK) is returned. Otherwise the return
value is an error code.
3-47
VARIO BK ETH
Example
Unix / Windows NT/2000
IBDDIHND ddiHnd;
{
IBDDIRET ddiRet;
T_ETH_NET_FAIL netFailInfo
USIGN16 nfStatus;
USIGN16 nfReason;
.
.
.
ddiRet = ETH_GetNetFailStatus (ddiHnd,
&netFailInfo);
if (ddiRet == ERR_OK)
{
nfStatus = netFailInfo.status
nfReason = netFailInfo.reason;
}
.
.
.
}
3-48
9499-040-69311
VARIO BK ETH
Possible values for
the reason structure
component:
9499-040-69311
ETH_NF_NO_ERR
0x0000
/* No error */
ETH_NF_TASK_CREAT_ERR
0x0001
/* Error when starting a task */
ETH_NF_LISTENER_ERR
0x0002
/* Listener task error */
ETH_NF_RECEIVER_ERR
0x0003
/* Receiver task error */
ETH_NF_ACCEPT_ERR
0x0004
/* Accept error */
ETH_NF_ECHO_SERVER_ERR
0x0005
/* Echo server task error */
ETH_NF_HOST_CONTROL_ERR
0x0006
/* Workstation controller task error */
ETH_NF_DTI_TIMEOUT
0x0007
/* DTI timeout occurred */
ETH_NF_HOST_TIMEOUT
0x0008
/* Workstation timeout occurred */
ETH_NF_USER_TEST
0x0009
/* Set by user */
ETH_NF_CONN_ABORT
0x000A
/* Connection aborted */
ETH_NF_INIT_ERR
0x000B
/* Initialization error */
3-49
VARIO BK ETH
ETH_ClrNetFailStatus
Task:
The ETH_ClrNetFailStatus function resets the SysFail signal. This means
that process data can be output again and the status of the SysFail signal
is set to 0. The function is assigned a valid node handle for a DTI or MXI
data channel as a parameter.
Syntax:
IBDDIRET IBDDIFUNC ETH_ClrNetFailStatus (IBDDIHND nodeHd);
Parameters:
IBDDIHND nodeHd
Return value:
IBDDIRET
Example
Unix / Windows NT/2000
Node handle (MXI or DTI) for the bus coupler on
which the SysFail status is to be reset.
If the function is executed successfully, the value 0 (ERR_OK)
is returned. Otherwise the return value is an error code.
IBDDIHND ddiHnd;
{
IBDDIRET ddiRet;
ddiRet = ETH_ClrNetFailStatus (ddiHnd);
}
3-50
9499-040-69311
VARIO BK ETH
3.10
3.10.1
Programming Support Macros
Introduction
The macros described in this section make it easier to program the
application program. These macros also support data transfer (commands,
messages, and data) between Intel format and Motorola 68xxx format if a
workstation with Intel format is used to create an application program.
The Inline local bus numbers words (16-bit) according to the conventional
counting method of the Programmable Logic Controller (PLC). Because
consecutive words start on even byte addresses (1 byte = 8 bits), they are
also numbered according to the even byte addresses. For example,the
word, which contains bytes 6 and 7 is assigned the number 4.
The process data is sent to the computer as bytes. Because the data on
the bus coupler is in Motorola format, it is also received in this format on
the computer. If the processor on the computer is in BigEndian format
(Motorola), the data can also be processed further in a word-oriented way
without conversion. In a processor in LittleEndian format (Intel), the data
must be converted accordingly (word-oriented).
IN T E R B U S
W o rd m
H ig h
L o w
B y te
B y te
n
R e c h n e r
n
W o rd m + 1
H ig h
L o w
B y te
B y te
n + 1
n + 2
n + 3
n + 1
n + 2
n + 3
5 6 9 1 A 0 0 1
Figure 3-11
9499-040-69311
Assignment of the process data between the local bus and
the computer systems
3-51
VARIO BK ETH
H o s t/C o p ro z e s s o rk a rte
A n s c h a ltb a u g r u p p e
A n w e n d u n g s p ro g ra m m
P u ffe r fü r
K o m m a n d o s
u n d
M e ld u n g e n
IN T E L
F o rm a t
M a k ro s fü r
K o m m a n d o s
M a k ro s fü r
M e ld u n g e n
S e n d e p u ffe r
M O T O R O L A
F o rm a t
E m p fa n g s p u ffe r
M O T O R O L A
F o rm a t
IB S M a s te rb o a rd
D D I_ M X I_
S n d M e s s a g e
D D I_ M X I_
R C V M e s s a g e
M P M
M O T O R O L A
F o rm a t
P ro z e s s a b b ild
IN T E L
F o rm a t
M a k ro s fü r
A u s g a n g s d a te n
M a k ro s fü r
E in g a n g s d a te n
A u s g a n g s p u ffe r
M O T O R O L A
F o rm a t
E in g a n g s p u ffe r
M O T O R O L A
F o rm a t
D D I_ D T I_
W r ite D a ta
D D I_ D T I_
R e a d D a ta
5 6 9 1 A 0 0 2
Figure 3-12
Using the macros for programming support
The macros are available for both processor types. For processors in
Motorola format, the macros have no function.
3-52
9499-040-69311
VARIO BK ETH
3.11
Table 3-4
Description of the Macros
Driver software macros
Macro
Task
Page
IB_SetCmdCode
Enters the command code (16-bit) in the specified transmit
buffer
3-55
IB_SetParaCnt
Enters the parameter count (16-bit) in the specified transmit
buffer
3-55
IB_SetParaN
Enters a parameter (16-bit) in the specified transmit buffer
3-55
IB_SetParaNHiByte
Enters the high-order byte (bit 8 to 15) of a parameter in the
specified transmit buffer
3-55
IB_SetParaNLoByte
Enters the low-order byte (bit 0 to 7) of a parameter in the
specified transmit buffer
3-56
IB_SetBytePtrHiByte
Returns the address of a parameter entry starting with the
high-order byte (bit 8 to 15)
3-56
IB_SetBytePtrLoByte
Returns the address of a parameter entry starting with the
low-order byte (bit 0 to 7)
3-56
IB_GetMsgCode
Reads a message code (16-bit) from the specified receive
buffer
3-57
IB_GetParaCnt
Reads the parameter count (16-bit) from the specified
receive buffer
3-57
IB_GetParaN
Reads a parameter (16-bit) from the specified receive buffer
3-57
IB_GetParaNHiByte
Reads the high-order byte (bit 8 to 15) of a parameter from
the specified receive buffer
3-57
IB_GetParaNLoByte
Reads the low-order byte (bit 0 to 7) of a parameter from the
specified receive buffer
3-58
IB_GetBytePtrHiByte
Returns the address of a parameter entry starting with the
high-order byte (bit 8 to 15)
3-58
IB_GetBytePtrLoByte
Returns the address of a parameter entry starting with the
low-order byte (bit 0 to 7)
3-58
9499-040-69311
3-53
VARIO BK ETH
Table 3-4
Driver software macros
Macro
Task
Page
IB_PD_GetLongDataN
Reads a double word (32-bit) from the specified position in
the input buffer
3-59
IB_PD_GetDataN
Reads a word (16-bit) from the specified position in the input
buffer
3-59
IB_PD_GetDataNHiByte
Reads the high-order byte (bit 8 to 15) of a word from the
input buffer
3-59
IB_PD_GetDataNLoByte
Reads the low-order byte (bit 0 to 7) of a word from the input
buffer
3-60
IB_PD_GetBytePtrHiByte
Returns the address of a word starting with the high-order
byte (bit 8 to 15)
3-61
IB_PD_GetBytePtrLoByte
Returns the address of a word starting with the low-order
byte (bit 0 to 7)
3-61
IB_PD_SetLongDataN
Writes a double word (32-bit) to the output buffer
3-62
IB_PD_SetDataN
Writes a word (16-bit) to the output buffer
3-62
IB_PD_GetDataNHiByte
Writes the high-order byte (bit 8 to 15) of a word to the output
buffer
3-62
IB_PD_GetDataNLoByte
Writes the low-order byte (bit 0 to 7) of a word to the output
buffer
3-62
IB_PD_GetBytePtrHiByte
Returns the address of a word starting with the high-order
byte (bit 8 to 15)
3-63
IB_PD_GetBytePtrLoByte
Returns the address of a word starting with the low-order
byte (bit 0 to 7)
3-63
The macros are defined for different operating systems and compilers in
the Device Driver Interface so that they can be used universally.
3-54
9499-040-69311
VARIO BK ETH
3.11.1
Macros for Converting the Data Block of a
Command
IB_SetCmdCode (n, m)
Task:
This macro converts a command code (16-bit) into Motorola format and
enters it in the specified transmit buffer.
Parameters:
n(USIGN8 *):
Pointer to the transmit buffer
m(USIGN16):
Command code to be entered
IB_SetParaCnt (n, m)
Task:
This macro converts the parameter count (16-bit) into Motorola format and
enters it in the specified transmit buffer. The call is only necessary when
dealing with a command with parameters. The parameter count specifies
the number of subsequent parameters in words.
Parameters:
n(USIGN8 *):
Pointer to the transmit buffer
m(USIGN16):
Parameter count to be entered
IB_SetParaN (n, m, o)
Task:
This macro converts a parameter (16-bit) into Motorola format and enters
it in the specified transmit buffer. The call is only necessary when dealing
with a command with parameters.
Parameters:
n(USIGN8 *):
Pointer to the transmit buffer
m(USIGN16):
Parameter number (starts with 1)
o(USIGN16):
Parameter value to be entered
IB_SetParaNHiByte (n, m, o)
Task:
9499-040-69311
This macro converts the high-order byte (bit 8 to 15) of a parameter into
Motorola format and enters it in the specified transmit buffer.
3-55
VARIO BK ETH
Parameters:
n(USIGN8 *):
Pointer to the transmit buffer
m(USIGN16):
Parameter No.
o(USIGN8):
Parameter to be entered (byte)
IB_SetParaNLoByte (n, m, o)
Task:
This macro converts the low-order byte (bit 0 to 7) of a parameter into
Motorola format and enters it in the specified transmit buffer.
Parameters:
n(USIGN8 *):
Pointer to the transmit buffer
m(USIGN16):
Parameter No.
o(USIGN8):
Parameter to be entered (byte)
IB_SetBytePtrHiByte (n, m)
Task:
This macro returns the address of a parameter entry starting with the highorder byte (bit 8 to 15). The address is a USIGN8 * data type.
Parameters:
n(USIGN8 *):
Pointer to the transmit buffer
m(USIGN16):
Parameter No.
(USIGN8 *):
Address of the high-order byte of the parameter
in the transmit buffer.
Return value:
IB_SetBytePtrLoByte (n, m)
Task:
This macro returns the address of a parameter entry starting with the loworder byte (bit 0 to 7). The address is a USIGN8 * data type.
Parameters:
n(USIGN8 *):
Pointer to the transmit buffer
m(USIGN16):
Parameter No.
(USIGN8 *):
Address of the low-order byte of the parameter in
the transmit buffer.
Return value:
3-56
9499-040-69311
VARIO BK ETH
3.11.2
Macros for Converting the Data Block of a
Message
IB_GetMsgCode (n)
Task:
This macro reads the message code (16-bit) from the specified receive
buffer and converts it into Intel format.
Parameters:
n(USIGN8 *):
Pointer to the receive buffer
Return value:
(USIGN16):
Message code
IB_GetParaCnt (n)
Task:
This macro reads the parameter count (16-bit) from the data block of the
message and converts it into Intel format. The parameter count specifies
the number of subsequent parameters in words.
Parameters:
n(USIGN8 *):
Pointer to the receive buffer
Return value:
(USIGN16):
Parameter count
Remark:
This macro only reads the parameter count for messages that also have
parameters.
IB_GetParaN (n, m)
Task:
This macro reads a parameter value (16-bit) from the data block of the
message and converts it into Intel format.
Parameters:
n(USIGN8 *):
Pointer to the receive buffer
m(USIGN16):
Parameter No.
Return value:
(USIGN16):
Parameter value
Remark:
This macro only reads the parameter value for messages that also have
parameters.
IB_GetParaNHiByte (n, m)
Task:
9499-040-69311
This macro reads the high-order byte (bit 8 to 15) of a parameter from the
specified receive buffer and converts it into Intel format.
3-57
VARIO BK ETH
Parameters:
n(USIGN8 *):
Pointer to the receive buffer
m(USIGN16):
Parameter No.
Return value:
(USIGN8):
Parameter value (byte)
Remark:
This macro only reads the parameter value for messages that also have
parameters.
IB_GetParaNLoByte (n, m)
Task:
This macro reads the low-order byte (bit 0 to 7) of a parameter from the
specified receive buffer and converts it into Intel format.
Parameters:
n(USIGN8 *):
Pointer to the receive buffer
m(USIGN16):
Parameter No.
Return value:
(USIGN8):
Parameter value (byte)
Remark:
This macro only reads the parameter value for messages that also have
parameters.
IB_GetBytePtrHiByte (n, m)
Task:
This macro returns the address of a parameter entry starting with the highorder byte (bit 8 to 15). The address is a USIGN8 * data type.
Parameters:
n(USIGN8 *):
Pointer to the receive buffer
m(USIGN16):
Parameter No.
(USIGN8 *):
Address of the high-order byte of a parameter in
the receive buffer.
Return value:
IB_GetBytePtrLoByte (n, m)
Task:
This macro returns the address of a parameter entry starting with the
low-order byte (bit 0 to 7). The address is a USIGN8 * data type.
Parameters:
n(USIGN8 *):
Pointer to the receive buffer
m(USIGN16):
Parameter No.
(USIGN8 *):
Address of the low-order byte of a parameter in
the receive buffer.
Return value:
3-58
9499-040-69311
VARIO BK ETH
3.11.3
Macros for Converting Input Data
The IBS_MACR.H file contains macros for converting double words,
words, and bytes from Motorola to Intel format. Addressing is always
word-oriented here.
IB_PD_GetLongDataN (n, m)
Task:
This macro reads a double word (32-bit) from the specified position in the
input buffer and converts it into Intel format. The word index in the input
buffer is used as a position. The macro reads the double word starting from
the specified word address over two words.
Parameters:
n (USIGN8 *)
Pointer to the input buffer
m (USIGN16)
Word number
IB_PD_GetDataN (n, m)
Task:
This macro reads a word (16-bit) from the specified position in the input
buffer and converts it into Intel format, if necessary.
Parameters:
n(USIGN8 *):
Pointer to the input buffer
m(USIGN16):
Word number
(USIGN16):
Process data (16-bit)
Return value:
IB_PD_GetDataNHiByte (n, m)
Task:
This macro reads the high-order byte (bit 8 to 15) of a word from the input
buffer and converts it into Intel format.
Parameters:
n(USIGN8 *):
Pointer to the input buffer
m(USIGN16):
Word number
(USIGN8):
Process data (8-bit)
Return value:
9499-040-69311
3-59
VARIO BK ETH
IB_PD_GetDataNLoByte (n, m)
Task:
3-60
This macro reads the low-order byte (bit 0 to 7) of a word from the input
buffer and converts it into Intel format.
9499-040-69311
VARIO BK ETH
Parameters:
Return value:
n(USIGN8 *):
Pointer to the input buffer
m(USIGN16):
Word number
(USIGN8):
Process data (8-bit)
IB_PD_GetBytePtrHiByte (n, m)
Task:
This macro returns the address of a word starting with the high-order byte
(bit 8 to 15).
Parameters:
n(USIGN8 *):
Pointer to the input buffer
m(USIGN16):
Word number
(USIGN8 *):
Address of the high-order byte of a word in the
input buffer.
Return value:
IB_PD_GetBytePtrLoByte (n, m)
Task:
This macro returns the address of a word starting with the low-order byte
(bit 0 to 7).
Parameters:
n(USIGN8 *):
Pointer to the input buffer
m(USIGN16):
Word number
(USIGN8 *):
Address of the low-order byte of a word in the
input buffer.
Return value:
9499-040-69311
3-61
VARIO BK ETH
3.11.4
Macros for Converting Output Data
The IBS_MACR.H file contains macros for converting double words,
words, and bytes from Intel to Motorola format. Addressing is always
word-oriented here.
IB_PD_SetLongDataN (n, m, o)
Task:
This macro converts a double word (32-bit) to Motorola format and writes
it to the specified position in the output buffer. The word index in the output
buffer is used as a position. The macro writes the double word starting from
the specified word address over two words.
Parameters:
n (USIGN8 *)
Pointer to the output buffer
m (USIGN16)
Word number
o (USIGN32)
Process data (32-bit)
IB_PD_SetDataN (n, m, o)
Task:
This macro converts a word (16-bit) to Motorola format and writes it to the
specified position in the output buffer.
Parameters:
n(USIGN8 *):
Pointer to the output buffer
m(USIGN16):
Word number
o(USIGN16):
Process data (16-bit)
IB_PD_SetDataNHiByte (n, m, o)
Task:
This macro converts the high-order byte (bit 8 to 15) of a word to Motorola
format and writes it to the specified position in the output buffer.
Parameters:
n(USIGN8 *):
Pointer to the output buffer
m(USIGN16):
Word number
o(USIGN8):
Process data (8-bit)
IB_PD_SetDataNLoByte (n, m, o)
Task:
This macro converts the low-order byte (bit 0 to 7) of a word to Motorola
format and writes it to the specified position in the output buffer.
Parameters:
n(USIGN8 *):
3-62
Pointer to the output buffer
9499-040-69311
VARIO BK ETH
m(USIGN16):
Word number
o(USIGN8):
Process data (8-bit)
IB_PD_SetBytePtrHiByte (n, m)
Task:
This macro returns the address of a word starting with the high-order byte
(bit 8 to 15).
Parameters:
n(USIGN8 *):
Pointer to the output buffer
m(USIGN16):
Word number
(USIGN8 *):
Address of the high-order byte of a word in the
output buffer.
Return value:
IB_PD_SetBytePtrLoByte (n, m)
Task:
This macro returns the address of a word starting with the low-order byte
(bit 0 to 7).
Parameters:
n(USIGN8 *):
Pointer to the output buffer
m(USIGN16):
Word number
(USIGN8 *):
Address of the low-order byte of a word in the
output buffer.
Return value:
9499-040-69311
3-63
VARIO BK ETH
3.12
Diagnostic Options for Driver Software
3.12.1
Introduction
The driver software diagnostics uses error messages and error codes for
the individual functions. These error codes can be used to precisely define
the cause of an error. To every code mentioned here an Offset
(ERR_BASE) depending on the operating system is added. This offset has
already been heeded when applying the error message definitions.
Table 3-5
Driver software messages
Code
Error Message
Cause
Page
0000hex
ERR_OK
The function has been executed successfully
3-66
0085hex
ERR_INVLD_NODE_HD
Invalid node handle specified
3-67
0086hex
ERR_INVLD_NODE_STATE
Node handle of a data channel that is already
closed specified
3-67
0087hex
ERR_NODE_NOT_READY
Required node not ready
3-67
0088hex
ERR_WRONG_DEV_TYP
Incorrect node handle
3-67
0089hex
ERR_DEV_NOT_READY
Local bus master not ready yet
3-68
008Ahex ERR_INVLD_PERM
Access mode not enabled for channel
3-68
008Chex ERR_INVLD_CMD
Utility function is not supported by driver Version
0.9
3-68
008Dhex ERR_INVLD_PARAM
Command contains invalid parameter
3-68
0090hex
ERR_NODE_NOT_PRES
Node not present
3-69
0091hex
ERR_INVLD_DEV_NAME
Unknown device name used
3-69
0092hex
ERR_NO_MORE_HNDL
Device driver resources used up
3-69
0096hex
ERR_AREA_EXCDED
Access exceeds limit of selected data area
3-73
0097hex
ERR_INVLD_DATA_CONS
Specified data consistency is not permissible
3-73
3-64
9499-040-69311
VARIO BK ETH
Table 3-5
Code
Driver software messages
Error Message
Cause
Page
009Ahex ERR_MSG_TO_LONG
Message or command contains too many
parameters
3-70
009Bhex ERR_NO_MSG
No message present
3-70
009Chex ERR_NO_MORE_MAILBOX
No further mailboxes of size requested free
3-70
009Dhex ERR_SVR_IN_USE
Send vector register in use
3-71
009Ehex ERR_SVR_TIMEOUT
Invalid node called
3-71
009Fhex ERR_AVR_TIMEOUT
Invalid node called
3-71
00A9hex ERR_PLUG_PLAY
Invalid write access to process data in P&P
mode
3-73
0100hex
ERR_STATE_CONFLICT
This service is not permitted in the selected
operating mode of the controller
3-74
0101hex
ERR_INVLD_CONN_TYPE
Service called via an invalid connection
3-74
0102hex
ERR_ACTIVATE_PD_CHK
Process IN data monitoring could not be
activated
3-74
0103hex
ERR_DATA_SIZE
The data volume is too large
3-74
0200hex
ERR_OPT_INVLD_CMD
Unknown command
3-74
0201hex
ERR_OPT_INVLD_PARAM
Invalid parameter
3-74
1010hex
ERR_IBSETH_OPEN
The IBSETHA file cannot be opened
3-75
1013hex
ERR_IBSETH_READ
The IBSETHA file cannot be read
3-75
1014hex
ERR_IBSETH_NAME
The device name cannot be found in the file
3-75
1016hex
ERR_IBSETH_INTERNET
The system cannot read the computer name/
host address
3-75
9499-040-69311
3-65
VARIO BK ETH
3.13
Positive Messages
ERR_OK
0000hex
Meaning:
After successful execution of a function, the driver software generates this
message as a positive acknowledgment.
Cause:
No errors occurred during execution of the function.
3-66
9499-040-69311
VARIO BK ETH
3.14
Error Messages
If the Device Driver Interface (DDI) generates one of the following error
messages as a negative acknowledgment, the function called previously
was not processed successfully.
3.14.1
General Error Messages
These error messages can occur when calling any DDI function.
ERR_INVLD_NODE_HD
0085hex
Cause:
An invalid node handle was used when calling the function.
Remedy:
Use the valid node handle of a successfully opened data channel.
ERR_INVLD_NODE_STATE
0086hex
Cause:
An invalid node handle was used when calling the function. This is the
handle of a data channel that has already been closed.
Remedy:
Open the data channel or use one that is already open.
ERR_NODE_NOT_READY
0087hex
Cause:
The node to be used has not yet indicated it is ready, i.e., the node ready
bit has not been set in the status register of the coupling memory. The
cause of this may, for example, be a hardware fault.
Remedy:
Check whether the bus coupler has been started up.
ERR_WRONG_DEV_TYP
Cause:
9499-040-69311
0088hex
Incorrect node handle. An attempt has been made, e.g., to access the
mailbox interface with a node handle for the Data Interface.
3-67
VARIO BK ETH
ERR_DEV_NOT_READY
0089hex
Cause:
The local bus master was addressed, even though it was not ready
("READY" LED).
Remedy:
Request a reset of the local bus master using the GetIBSDiagnostic()
function on the ready bit in the diagnostic bit register. Once this bit is set,
the local bus master can be addressed.
ERR_INVLD_PERM
008Ahex
Cause:
An attempt has been made to execute a function on a channel for which
the relevant access rights were not logged in when opening the data
channel. This error occurs, e.g., if you want to write to the Data Interface,
but read-only rights were specified on opening the channel (DDI_READ
constant).
Remedy:
Close the channel and open it again with modified access rights
ERR_INVLD_CMD
008Chex
Cause:
This error message is generated when certain new help functions of the
new DDI_TSR.LIB or a new DLL are used with an old driver.
Remedy:
Use a more up-to-date driver.
ERR_INVLD_PARAM
008Dhex
Cause:
This error message is displayed if invalid parameters are used in the
command.
Remedy:
Check the validity of the parameters used.
3-68
9499-040-69311
VARIO BK ETH
3.14.2
Error Messages When Opening a Data Channel
ERR_NODE_NOT_PRES
0090hex
Cause:
An attempt was made to open a data channel to a node, which is not
present.
Remedy:
Select the following node.
IBS ETH:
Node 1 = Local bus master
ERR_INVLD_DEV_NAME
0091hex
Cause:
An unknown device name was specified as a parameter on opening a data
channel.
Remedy:
Select a correct device name.
ERR_NO_MORE_HNDL
0092hex
Cause:
Device driver resources used up. No further data channels can be opened.
If you exit a program without closing the data channels in use, they will stay
open. Additional data channels will be opened the next time the program is
started. After this program has been started a number of times, the
maximum permitted number of data channels that can be opened
simultaneously will be reached and no more will be available.
Remedy:
Close a data channel that is not required or reinstall the device driver.
Always close all data channels used when exiting a program.
9499-040-69311
3-69
VARIO BK ETH
3.14.3
Error Messages When Transmitting Messages/
Commands
ERR_MSG_TO_LONG
009Ahex
Cause 1:
If an error message occurs when sending a command, then the length of
the command exceeds the maximum number of permitted parameters.
Remedy:
Reduce the number of parameters.
Cause 2:
If an error message occurs when receiving a message, then the length of
the message exceeds the length of the receive buffer specified.
Remedy:
Increase the length of the receive buffer.
ERR_NO_MSG
Cause:
009Bhex
This message occurs if an attempt has been made to retrieve a message
using the DDI_MXI_RcvMESSAGE function, but no messages are present
for the node specified by the node handle.
ERR_NO_MORE_MAILBOX
009Chex
Cause 1:
You have requested too many mailboxes within a short space of time.
Remedy:
Increase the time interval between individual mailbox requests and try
again.
Cause 2:
No further mailboxes of the required size are available. Note the maximum
mailbox size that can be used (1020 bytes).
Remedy:
Select a smaller mailbox or wait until a mailbox of the required size is free
again.
Cause 3:
An attempt was made to address the coprocessor board (COP), but it is
faulty.
Remedy:
Please contact Phoenix Contact.
3-70
9499-040-69311
VARIO BK ETH
ERR_SVR_IN_USE
009Dhex
Cause:
The send vector register for the node is in use.
Remedy:
Address the register again or wait until the register is available again.
ERR_SVR_TIMEOUT
009Ehex
Meaning:
If a message placed in the MPM by the local bus master is not retrieved by
the MPM node addressed, this node does not reset the acknowledge
message bit set by the local bus master, i.e., the MPM node addressed
does not indicate Message detected. After a specific time has elapsed
(timeout), the local bus master generates the error message
ERR_SVR_TIMEOUT. If this error message occurs repeatedly, it must be
assumed that the node being addressed is no longer ready to accept the
message.
Cause:
Invalid node called:
An attempt was made, for example, to address the coprocessor board
(COP), which is faulty.
Remedy:
Please contact Phoenix Contact.
ERR_AVR_TIMEOUT
009Fhex
Meaning:
An acknowledge message bit is set when reading a message to indicate to
the communication partner that a message has been processed and the
mailbox is free again. This bit must be reset by the communication partner
to indicate that it has recognized that the mailbox is free again. If this reset
does not take place within a set time, an error message is generated.
Cause:
Invalid node called, e.g.:
An attempt was made to address a coprocessor board (COP), which is
faulty or not present.
9499-040-69311
3-71
VARIO BK ETH
Remedy:
3-72
Please contact Phoenix Contact.
9499-040-69311
VARIO BK ETH
3.14.4
Error Messages When Transmitting Process Data
These errors only occur when accessing the Data Interface (DTI).
ERR_AREA_EXCDED
0096hex
Meaning:
Access exceeds the upper limit of the selected data area.
Cause 1:
The data record to be read or written is too large. The function can read a
maximum of 4 kbytes in one call.
Remedy:
Only read or write data records with a maximum size of 4 kbytes.
Cause 2:
The upper area limit (4 kbytes over the start of the device area) has been
exceeded.
Remedy:
Make sure that the total of address offset, relative address, and data length
to be read does not exceed the upper area limit.
ERR_INVLD_DATA_CONS
0097hex
Cause:
An invalid value was entered for data consistency (1, 2, 4 or 8 bytes).
Remedy:
Specify a permissible data consistency with one of the following constants:
DTI_DATA_BYTE
: Byte data consistency (1 byte)
DTI_DATA_WORD
: Word data consistency (2 bytes)
DTI_DATA_LWORD
: Double word data consistency (4 bytes)
DTI_DATA_64BIT
: 64-bit data consistency (8 bytes)
ERR_PLUG_PLAY
00A9hex
Cause:
An attempt was made to gain write access to process data in plug & play
mode. This is not permitted for security reasons.
Remedy:
Deactivate plug & play mode using the "Set_Value" command with the
value"0" or switch to read access.
9499-040-69311
3-73
VARIO BK ETH
ERR_STATE_CONFLICT
0100hex
Cause:
A service was called, which is not permitted in this operating mode.
Remedy:
Switch to an operating mode in which the desired call can be executed.
ERR_INVLD_CONN_TYPE
0101hex
Cause:
A service was called, which cannot be executed via the selected
connection.
Remedy:
Select a connection type via which the service can be executed.
ERR_ACTIVE_PD_CHK
Cause:
0102hex
Process IN data monitoring failed to activate.
Remedy:
ERR_DATA_SIZE
0103hex
Cause:
The data volume to be transmitted exceeds the maximum permissible size.
Remedy:
Transmit the data in several cycles.
ERR_OPT_INVLD_CMD
0200hex
Cause:
An attempt was made to execute an unknown (invalid) command.
Remedy:
Select a valid command.
ERR_OPT_INVLD_PARAM
Cause:
3-74
0201hex
An attempt was made to execute a command with unknown (invalid)
parameters.
9499-040-69311
VARIO BK ETH
Remedy:
Enter permitted parameters.
ERR_ETH_RCV_TIMEOUT
1001hex
Cause:
The time limit for receiving a data telegram was exceeded.
Remedy:
The Ethernet connection was interrupted or an incorrect IP address was
entered.
ERR_IBSETH_OPEN
Cause:
The IBSETHA file cannot be opened.
Remedy:
The IBSETHA file does not exist or is in the wrong directory.
ERR_IBSETH_READ
1010hex
1013hex
Cause:
The IBSETHA file cannot be read.
Remedy:
The file exists but cannot be read. You may not have read access.
ERR_IBSETH_NAME
1014hex
Cause:
The device name cannot be found in the file.
Remedy:
The name, which was transferred to the DDI_DEVOPEN_NODE ()
function, is not in the IBSETHA file.
ERR_IBSETH_INTERNET
1016hex
Cause:
The system cannot read the computer name/host address.
Remedy:
The IP address entered in the IBSETHA file is incorrect or the symbolic
name cannot be found in the host file.
9499-040-69311
3-75
VARIO BK ETH
3.15
Example Program
The following diagram illustrates the structure of the station to which the
example program refers. One module with 8 digital outputs (IB IL DO 8,
Order No. 27 26 26 9) and one module with 8 digital inputs (IB IL DI 8,
Order No. 27 26 22 7) are connected to the FL IL 24 BK-B. All the inputs
are individually jumpered to all the outputs. The ground potential is created
by the internal potential jumper.
F L IL 2 4 B K -B
IB IL D O
8
IB IL D I 8
U S
U M
F L IL 2 4 B K -B
O rd .-N o .: 2 8 3 3 0 0 0
U L
P P
1
1
2
2
1
2
1
2
1
2
1
2
1
2
1
2
1
2
F A IL
1
1
2
2
1 0 0
X M T
1 1
1 1
1 1
1 1
1 1
1 1
1 1
1
2
2 2
2 2
2 2
2 2
2 2
2 2
2 2
2
3
3 3
3 3
3 3
3 3
3 3
3 3
3 3
3
4
4 4
4 4
4 4
4 4
4 4
4 4
4 4
4
R C V
1
3
L IN K
3
1 0 /1 0 0
4
4
6 5 4 4 0 0 1 0
Figure 3-13
3-76
Structure of the station for the example program
9499-040-69311
VARIO BK ETH
3.15.1
Demo Structure Startup
The user is first prompted to specify the bus coupler on which the program
is to be executed. This is specified using the registry entries (position 01 to
99). The entry must always be two digits.
Function:
First, the status of plug & play mode is read. If P&P mode is activated
(value = 1) the program is terminated with the error message 00A9hex
(ERR_PLUG_PLAY), because process data cannot be written in P&P
mode for security reasons.
A check then determines whether the local bus in the station is running. If
not, the program is also terminated.
If both conditions are met, data items 1 to 255 are output from the output
module. Jumpering between the outputs and inputs enables the output
data to be read in again. The read data is compared with the output data.
If they are the same, "Comparison: OK" is output and if they are different,
"Comparison: FAILED" is output.
After the process data item "255" has been output, the program is
terminated after a 3-second waiting time.
The following figure is a screenshot of the program.
Figure 3-14
9499-040-69311
Screenshot of the example program
3-77
VARIO BK ETH
3.15.2
Example Program Source Code
/
*======================================================================*/
/* INCLUDE FILES AND CONSTANT DEFINITION */
/
*======================================================================*/
#include <stdio.h>
#include <stdlib.h>
#include <time.h>
#include <string.h>
/***********************************************************
* Include files for the CLIENT library UNIX version
************************************************************/
#include "ethwin32.h"
#define MAX_MSG_LENGTH 100
#define MXI_RCV_TIMEOUT 9
/************************************/
/*
GLOBAL VARIABLES
*/
/************************************/
char OPEN_MXI[20] = "IBETH";
char OPEN_DTI[20] = "IBETH";
IBDDIRET ret;
IBDDIHND mxiHnd,
T_DDI_MXI_ACCESS
T_DDI_DTI_ACCESS
T_DDI_DTI_ACCESS
dtiHnd, manHnd;
mxiAcc;
dtiAcc;
readAcc;
/
************************************************************************/
3-78
9499-040-69311
VARIO BK ETH
/* CreateConnection FUNCTION */
/*
*/
/* Parameters:
NONE */
/* Return value: INTEGER (0 for OK, 111 for error) */
/*
*/
/
************************************************************************/
int CreateConnection(void)
{
IBDDIRET ret;
/*Mailbox connection*/
ret = DDI_DevOpenNode(OPEN_MXI,DDI_RW,&mxiHnd);
if ( ret != ERR_OK )
{
printf("\nError creating mailbox connection. Error code: %d", ret);
printf("\n TEST ABORTED");
fflush(stdout);
return 111;
}
else
{
printf("\nMailbox connection...OK
Handle: %d",mxiHnd);
}
/*Data channel connection*/
ret = DDI_DevOpenNode(OPEN_DTI,DDI_RW,&dtiHnd);
if ( ret != ERR_OK )
{
printf("\nError creating data channel connection. Error code: %d",
ret);
printf("\n TEST ABORTED");
fflush(stdout);
return 111;
}
else
{
printf("\nData channel connection...OK Handle: %d",dtiHnd);
}
return 0;
} /
9499-040-69311
3-79
VARIO BK ETH
************************************************************************/
/* DeleteConnection FUNCTION */
/*
*/
/* Parameters:
NONE */
/* Return value: INTEGER (0 for OK, 111 for error) */
/*
*/
/
************************************************************************/
int DeleteConnection(void)
{
IBDDIRET ret;
/* Close mailbox channel */
ret = DDI_DevCloseNode(mxiHnd);
if ( ret != ERR_OK )
{
printf("\nError closing mailbox channel.
fflush(stdout);
return 111;
}
else
{
printf("\nClose mailbox channel...OK");
}
/* Close data channel */
ret = DDI_DevCloseNode(dtiHnd);
if ( ret != ERR_OK )
{
printf("\nError closing data channel.
fflush(stdout);
return 111;
}
else
{
printf("\nClose data channel...OK");
}
Error code: %d",ret);
Error code: %d",ret);
return 0;
}
/
3-80
9499-040-69311
VARIO BK ETH
*======================================================================*/
/
*======================================================================*/
/* M A I N */
/
*======================================================================*/
/
*======================================================================*/
int main(void)
{
IBDDIRET locRet = 0;
char Number[2];
USIGN8 locMsgBlk[MAX_MSG_LENGTH];
USIGN8 locReadBlk[MAX_MSG_LENGTH];
int loci,i;
USIGN16 ReadData = 0;
USIGN16 anzahl = 255;
USIGN16 PlugPlayModus = 111;
T_IBS_DIAG infoPtr;
time_t ltime;
time_t starttime;
USIGN16 Read1, Read2, Read3, Read4;
// Display bus configuration
printf("\n\nRequired bus configuration:
8\n");
IB IL 24 DI 8 || IB IL 24 DO
// Entry of the controller number
printf("\nController number: [Format xx] >> ");
scanf ("%2s",Number);
strcat(OPEN_MXI,Number);
strcat(OPEN_DTI,Number);
strcat(OPEN_MXI,"N1_M");
strcat(OPEN_DTI,"N1_D");
printf("\nOPEN_MXI: %s OPEN_DTI: %s",OPEN_MXI,OPEN_DTI);
printf("\n ========================================= \n");
9499-040-69311
3-81
VARIO BK ETH
// Create connections (DTI and MXI channels) to FL IL 24 BK-B
locRet = CreateConnection();
if(locRet != 0){
printf("\nNo DTI/MXI connection -> Test aborted");
exit(0);
}
Sleep(500);
// Read plug & play mode
mxiAcc.msgLength = 8;
mxiAcc.msgBlk = locMsgBlk;
IB_SetCmdCode (locMsgBlk, 0x0351);
IB_SetParaCnt (locMsgBlk, 0x0002);
IB_SetParaN (locMsgBlk, 0x01,0x0001);
IB_SetParaN (locMsgBlk, 0x02,0x2240);
locRet = DDI_MXI_SndMessage (mxiHnd, &mxiAcc);
if (locRet != ERR_OK)
{
printf(" FAÍL Error code %x", locRet);
}
// Get service confirmation
mxiAcc.msgLength = 128;
time(&starttime);
locRet = 555;
do
{
locRet = DDI_MXI_RcvMessage (mxiHnd, &mxiAcc);
time(<ime);
}
while (((ltime - starttime) < MXI_RCV_TIMEOUT) && (locRet != ERR_OK));
if (locRet != ERR_OK)
{
printf("\n\n Incorrect confirmation received,
locRet);
}
else
3-82
Error code 0x%04X",
9499-040-69311
VARIO BK ETH
{
PlugPlayModus = IB_GetParaN(locMsgBlk, 0x04);
printf("\nPlug & Play mode: %d",PlugPlayModus);
}
// If plug & play mode is active, no data can be written
// -> End of test
if(PlugPlayModus != 0) {
printf("\nPlug & play mode is active -> End of test\n");
exit(0);
}
//Read IBS status
locRet = GetIBSDiagnostic(dtiHnd, &infoPtr);
if (locRet != ERR_OK)
{
printf("\nError reading INTERBUS status. Error code:
0x%04X",locRet);
}
else
{
if(infoPtr.state == 0x00E0) {
printf("\nIBS status: RUNNING");
} else {
printf("\nIBS status: 0x%04X",infoPtr.state);
}
}
// Reading and writing only permitted when the bus is running
if(infoPtr.state != 0x00E0) {
printf("\nIBS not in RUN state. -> Abort");
exit(0);
}
// Write zero to the DI8 module
loci = 1;
printf("\nWrite, read, and compare data:
\n");
// Set buffer to ZERO
9499-040-69311
3-83
VARIO BK ETH
dtiAcc.length = MAX_MSG_LENGTH;
dtiAcc.address = 0;
dtiAcc.dataCons = DTI_DATA_WORD;
consistency here
dtiAcc.data = locMsgBlk;
// Specify data consistency, word
for(i = 0;i < MAX_MSG_LENGTH;i++)
{
locMsgBlk[i]=0;
}
locRet = DDI_DTI_WriteData(dtiHnd,&dtiAcc);
if(locRet != ERR_OK){
printf("\nError resetting buffer. Error code: 0x%04X",locRet);
}
Sleep(100);
//Loop for reading and writing 255 data items
do
{
//Write data
dtiAcc.length = MAX_MSG_LENGTH;
dtiAcc.address = 0;
dtiAcc.dataCons = DTI_DATA_WORD; //Specify data consistency
dtiAcc.data = locMsgBlk;
//DO8 is the first DO module
IB_PD_SetDataN(locMsgBlk,0,loci);
locRet = DDI_DTI_WriteData(dtiHnd,&dtiAcc);
if(locRet != ERR_OK){
printf("\nError writing data. Error code: 0x%04X",locRet);
}
Sleep(500);
// Read data from module 1 (DI8)
readAcc.length = MAX_MSG_LENGTH;
readAcc.address = 0;
readAcc.data = locReadBlk;
3-84
9499-040-69311
VARIO BK ETH
locRet = DDI_DTI_ReadData(dtiHnd,&readAcc);
if(locRet != 0){
printf("\nError reading data. Error code: 0x%04X", locRet);
}
ReadData = IB_PD_GetDataN(locReadBlk,0x00);
if (ReadData == loci) {
printf("\rWritten: %3d Read: %3d
Comparison: OK
",loci,
ReadData);
}
else {
printf("\rWritten: %3d Read: %3d
Comparison: FAILED",loci,
ReadData);
}
loci++;
}
while(loci < 256);
Sleep(500);
// Close channels to FL IL 24 BK-B again
locRet = DeleteConnection();
printf("\nEND\n");
Sleep(3000);
return 0;
}
9499-040-69311
3-85
VARIO BK ETH
3-86
9499-040-69311
Chapter 4
This section informs you about
–
firmware functions
Firmware Services ................................................................................................4-3
4.1
Overview .....................................................................................4-3
4.2
Notes on Service Descriptions ....................................................4-5
4.3
Services for Parameterizing the Controller Board.......................4-8
4.3.1
"Control_Parameterization" Service...............................4-8
4.3.2
"Set_Value" Service.....................................................4-10
4.3.3
"Read_Value" Service..................................................4-12
4.3.4
"Initiate_Load_Configuration" Service .........................4-14
4.3.5
"Load_Configuration" Service ......................................4-16
4.3.6
"Terminate_Load_Configuration" Service....................4-20
4.3.7
"Read_Configuration" Service .....................................4-22
4.3.8
"Complete_Read_Configuration" Service ....................4-29
4.3.9
"Delete_Configuration" Service....................................4-32
4.3.10 "Create_Configuration" Service ...................................4-34
4.3.11 "Activate_Configuration" Service .................................4-36
4.3.12 "Control_Device_Function" Service .............................4-38
4.3.13 "Reset_Controller_Board" Service...............................4-40
4.4
4.5
4.6
9499-040-69311
Services for Direct INTERBUS Access .....................................4-42
4.4.1
"Start_Data_Transfer" Service.....................................4-42
4.4.2
"Alarm_Stop" Service...................................................4-44
Diagnostic Services...................................................................4-46
4.5.1
"Get_Error_Info" Service..............................................4-46
4.5.2
"Get_Version_Info" Service .........................................4-49
Error Messages for Firmware Services:....................................4-53
4.6.1
Overview ......................................................................4-53
4.6.2
Positive Messages .......................................................4-54
4.6.3
Error Messages............................................................4-54
4-1
VARIO BK ETH
4-2
9499-040-69311
VARIO BK ETH
4
Firmware Services
As it is not necessary to use each firmware service in both operating
modes, the following table indicates the assignment of the services to the
operating modes. If the services are not used as specified in the table, this
may cause the firmware to behave as follows:
–
The service is not permitted in this mode and is rejected with a negative
acknowledgment
–
The service is executed and terminated with a positive
acknowledgment, the effect of this service is removed by the firmware.
Please ensure that only one of the two modes (expert or P&P) is active.
4.1
Table 4-1
Code
Overview
Overview of services (according to command codes)
Services
Page
P&P Mode
Expert Mode
0306hex Initiate_Load_Configuration
4-14
Not used
Used
0307hex Load_Configuration
4-16
Not used
Used
0308hex Terminate_Load_Configuration
4-20
Not used
Used
0309hex Read_Configuration
4-22
Always used
030Bhex Complete_Read_Configuration
4-29
Always used
030Chex Delete_Configuration
4-32
Not used
Used
030Ehex Control_Parameterization
4-8
Not used
Used
0316hex Get_Error_Info
4-46
Always used
032Ahex Get_Version_Info
4-49
Always used
0351hex Read_Value
4-12
Always used
0701hex Start_Data_Transfer
4-42
Not used
Used
0710hex Create_Configuration
4-34
Not used
Used
0711hex Activate_Configuration
4-36
Not used
Used
0714hex Control_Device_Function
4-38
9499-040-69311
Always used
4-3
VARIO BK ETH
Table 4-1
Code
Overview of services (according to command codes)
Services
Page
P&P Mode
Expert Mode
0750hex Set_Value
4-10
Always used
0956hex Reset_Controller_Board
4-40
Always used
1303hex Alarm_Stop
4-44
4-4
Not used
Used
9499-040-69311
VARIO BK ETH
4.2
Use of
services
Notes on Service Descriptions
The use of a service involves sending a service request and evaluating the
service confirmation.
The codes of a service request and the subsequent service confirmation
only differ in binary notation in bit 15. Bit 15 of a service confirmation is
always set.
Thus, in hexadecimal notation, the code of a service confirmation is always
8000hex higher than the code of the service request which it follows.
Example
"Start_Data_Transfer"
Request:
"Start_Data_Transfer_Request" 0701hex
Confirmation:
"Start_Data_Transfer_Confirmation" 8701hex = 0701hex +
8000hex
– Result
parameter = 0000hex
Þ Service executed
successfully
– Result
parameter ¹ 0000hex
Þ Error during service execution
The service confirmation indicates the successful execution of a service via
a positive message and provides data, if requested. The service
confirmation indicates an error that occurred during service execution via a
negative message.
The Result parameter of the service confirmation indicates if the service
was executed successfully (Result parameter = 0000hex) or if an error
occurred (Result parameter ¹ 0000hex describes the error cause).
Structure of a
service description
9499-040-69311
A service request/confirmation consists of a block of data words. The
parameters that are contained in this block are given in hexadecimal (hex)
or binary (bin) notation.
4-5
VARIO BK ETH
The structure of all service descriptions is as follows:
4.x.x "Name_of_the_Service" Service
Task:
Describes the functions of the service.
Prerequisite:
All conditions, which must be met before a service is called to enable
successful processing.
Syntax:
Name_of_the_Service_Request
Codehex
Word 1
Code
Word 2
Parameter_Count
Word 3
Parameter
Word 4
Parameter
Word 5
Parameter
...
...
Parameter
Bit
Key:
15 ......................................................................... 0
Code:
0xxxhex
Parameter_Count:
Number of subsequent words
0000hex
xxxxhex
4-6
Command code of the service request
(hexadecimal notation)
If the service request does not have
parameters.
Otherwise, length of the parameter
data record (number of data words).
Parameter:
Parameters are described individually.
Parameters that are organized byte by byte are
separated by a vertical line. If a parameter
extends over several data words, this is
indicated by a line with three dots.
Parameter blocks:
Parameter blocks are marked in bold outline.
The individual parameters are described in the
following section.
9499-040-69311
VARIO BK ETH
Syntax:
Name_of_the_Service_Confirmation
Codehex
Positive message
Word 1
Code
Word 2
Parameter_Count
Word 3
Result
Negative message
Word 1
Code
Word 2
Parameter_Count
Word 3
Result
Word 4
Add_Error_Info
Bit
Key:
15 ................................................................................. 0
Message code of the service
confirmation
Code:
8xxxhex
Parameter_Count:
Number of subsequent words
with a positive message:
xxxxhex
Number of parameter words that are
transferred with a positive message
with a negative message:
xxxxhex
9499-040-69311
Number of parameter words that are
transferred with a negative message
Result:
Result of the service processing
0000hex Indicates a positive message.
The controller board executed the
service successfully.
xxxxhex Indicates a negative message.
The controller board could not execute
the service successfully. The Result
parameter indicates why the service
could not be executed.
Add_Error_Info:
Additional information on the error cause
4-7
VARIO BK ETH
4.3
4.3.1
Services for Parameterizing the Controller
Board
"Control_Parameterization" Service
Task:
This service initiates or terminates the parameterization phase. This is
necessary in order to ensure a defined startup behavior for the Inline
system. During the parameterization phase, for example, the validity of
read objects is not ensured. Once the parameterization phase has been
terminated, the MPM_Node_Parameterization_Ready bit is set in the
MPM. This means that during startup the host system (computer/PLC) can
recognize when the parameterization sequence that is stored on the
memory card has been successfully processed.
Syntax:
Control_Parameterization_Request
Word 1
Code
Word 2
Parameter_Count
Word 3
Control_Code
Bit
Key:
15 ................................................................................. 0
Code:
030Ehex Command code of the service request
Parameter_Count:
Number of subsequent words
0001hex
Control_Code:
1 parameter word
Function of the service
0001hex
0000hex
4-8
030Ehex
Initiate the parameterization phase
Terminate the parameterization phase
9499-040-69311
VARIO BK ETH
Syntax:
Control_Parameterization_Confirmation
830Ehex
Positive message
Word 1
Code
Word 2
Parameter_Count
Word 3
Result
Negative message
Word 1
Code
Word 2
Parameter_Count
Word 3
Result
Word 4
Add_Error_Info
Bit
Key:
15 ................................................................................. 0
Code:
830EhexMessage code of the service
confirmation
Parameter_Count:
Number of subsequent words
with a positive message:
0001hex
1 parameter word
with a negative message:
0002hex
9499-040-69311
2 parameter words
Result:
Result of the service processing
0000hex Indicates a positive message.
The controller board executed the
service successfully.
xxxxhex Indicates a negative message.
The controller board could not execute
the service successfully. The Result
parameter indicates why the service
could not be executed.
Add_Error_Info:
Additional information on the error cause
4-9
VARIO BK ETH
4.3.2
Task:
"Set_Value" Service
This service assigns new values to INTERBUS system parameters
(variables). A new value is only accepted if no error was detected when the
value range was checked.
The following system parameters are defined:
Table 4-2
System parameters
Variable ID
2240hex
System Parameter
Value/Comment
Plug & play mode
0: Plug & play mode inactive
1: Plug & play mode active
Expert mode
2275hex
0: Expert mode inactive
1: Expert mode active
Syntax:
Set_Value_Request
Word 1
Code
Word 2
Parameter_Count
Word 3
Variable_Count
Word 4
Variable_ID
Word 5
Value
Bit
Key:
4-10
0750hex
1st parameter
15 ................................................................................. 0
Code:
0750hex
Parameter_Count:
Number of subsequent words, 0x0003
Command code of the service request
Variable_Count:
Number of system parameters to which new
values are to be assigned, 0x0001
Variable_ID:
ID of the system parameter to which new values
are to be assigned (see Table 4-2), 2240hex
Value:
New value of the system parameter, 0 or 1
9499-040-69311
VARIO BK ETH
Syntax:
Set_Value_Confirmation
8750hex
Positive message
Word 1
Code
Word 2
Parameter_Count
Word 3
Result
Negative message
Word 1
Code
Word 2
Parameter_Count
Word 3
Result
Word 4
Add_Error_Info
Bit
Key:
15 ................................................................................. 0
Message code of the service
confirmation
Code:
8750hex
Parameter_Count:
Number of subsequent words
with a positive message:
0001hex
1 parameter word
with a negative message:
0002hex
9499-040-69311
2 parameter words
Result:
Result of the service processing
0000hex Indicates a positive message.
The controller board executed the
service successfully.
xxxxhex Indicates a negative message.
The controller board could not execute
the service successfully. The Result
parameter indicates why the service
could not be executed.
Add_Error_Info:
Additional information on the error cause
4-11
VARIO BK ETH
4.3.3
Task:
"Read_Value" Service
This service can be used to read INTERBUS system parameters
(variables).
For a list of defined system parameters (variables), please refer to the
description of the "Set_Value" service (Table 4-2 on page 4-10).
Syntax:
Read_Value_Request
Word 1
Code
Word 2
Parameter_Count
Word 3
Variable_Count
Word 4
Variable_ID
Bit
Key:
4-12
0351hex
1st parameter
15 ................................................................................. 0
Code:
0351hex
Command code of the service request
Parameter_Count:
Number of subsequent words, 0x002
Variable_Count:
Number of system parameters to be read,
0x0001
Variable_ID:
ID of the system parameter to be read, 0x2240
0x2275
9499-040-69311
VARIO BK ETH
Syntax:
Read_Value_Confirmation
8351hex
Positive message
Word 1
Word 2
Word 3
Word 4
Word 5
Word 6
Code
Parameter_Count
Result
Variable_Count
Variable_ID
Value
1st system
parameter
Negative message
Word 1
Code
Word 2
Parameter_Count
Word 3
Result
Word 4
Add_Error_Info
Bit
Key:
15 ................................................................................. 0
Code:
8351hex
Parameter_Count:
Number of subsequent words
Message code of the service
confirmation
with a positive message: 0004hex
with a negative message:
0002hex
Result:
Result of the service processing
0000hex
xxxxhex
9499-040-69311
2 parameter words
Indicates a positive message. The
controller board executed the service
successfully.
Indicates a negative message. The
controller board could not execute the
service successfully. The Result
parameter indicates why the service
could not be executed.
Variable_Count:
Number of read system parameters, 0x0001
Variable_ID:
ID of the read system parameter, 0x2240
Value:
Value of the system parameter
Add_Error_Info:
Additional information on the error cause
4-13
VARIO BK ETH
4.3.4
Task:
"Initiate_Load_Configuration" Service
The "Initiate_Load_Configuration" service prepares the controller board to
transmit a configuration to the INTERBUS master via the following
services:
- "Load_Configuration" (0307hex)
- "Complete_Load_Configuration" (030Ahex)
To transmit a new configuration frame (New_Config parameter = 0001hex),
specify the Frame_Reference and Device_Count (total number of devices)
parameters.
Prerequisite:
The parameterization phase must have been initiated with the
"Control_Parameterization" (030Ehex) service before.
Syntax:
Initiate_Load_Configuration_Request
Word 1
Word 2
Word 3
Word 4
Word 5
Word 6
...
Bit
Key:
Code
Parameter_Count
New_Config
Frame_Reference
Device_Count
Extension_Length
Extension
...
Extension
15 ................................... 8 7 ..................................... 0
Code:
0306hex
Parameter_Count:
Number of subsequent words
xxxxhex
= 3 + (Extension_Length + 1)/2
New_Config:
0001hex
The configuration frame is created
again. The existing configuration
frame is overwritten.
Updates the existing configuration
frame.
0000hex
4-14
0306hex
Command code of the service request
Frame_Reference:
0x0001hex
Device_Count:
Number of INTERBUS devices, which are
included in the existing configuration frame or
the new one to be loaded.
Extension_Length:
0x0000
Extension:
Not supported. Entries are ignored.
9499-040-69311
VARIO BK ETH
Syntax:
Initiate_Load_Configuration_Confirmation
8306hex
Positive message
Word 1
Code
Word 2
Parameter_Count
Word 3
Result
Negative message
Word 1
Code
Word 2
Parameter_Count
Word 3
Result
Word 4
Add_Error_Info
Bit
Key:
15 ................................................................................. 0
Message code of the service
confirmation
Code:
8306hex
Parameter_Count:
Number of subsequent words
with a positive message:
0001hex
1 parameter word
with a negative message:
0002hex
9499-040-69311
2 parameter words
Result:
Result of the service processing
0000hex Indicates a positive message.
The controller board executed the
service successfully.
xxxxhex Indicates a negative message.
The controller board could not execute
the service successfully. The Result
parameter indicates why the service
could not be executed.
Add_Error_Info:
Additional information on the error cause
4-15
VARIO BK ETH
4.3.5
Task:
"Load_Configuration" Service
The configuration frame describes each of the specified INTERBUS
devices in a separate numbered entry. The order and the numbering of the
entries corresponds to the physical bus configuration.
This service transfers the configuration data to the controller board in the
form of a list. Use the Used_ Attributes parameter to determine which
attributes the list should contain.
The "Load_Configuration" service does not check the consistency among
the attributes but only whether this data is permitted in principle, e.g.,
whether it is within the value range.
Prerequisite:
Syntax:
Ensure that the controller board has been prepared for transmission with
the following services:
–
"Control_Parameterization" (030Ehex)
–
"Initiate_Load_Configuration" (0306hex)
Load_Configuration_Request
0307hex
Word 1
Code
Word 2
Parameter_Count
Word 3
Used_Attributes
Word 4
Start_Entry_No
Word 5
Entry_Count
Word 6
Configuration_Entry
...
1st device
...
Configuration_Entry
Bit
Key:
15 ................................................................................. 0
Code:
0307hex
Parameter_Count:
Number of subsequent parameter words
xxxxhex
4-16
nth device
Command code of the service request
The value depends on the
Entry_Count parameter and the
Used_Atrributes parameter.
9499-040-69311
VARIO BK ETH
Used_Attributes:
Choice of add-on attributes.
The parameter is a 16-bit field in which every bit
corresponds to an attribute. Set the
corresponding bit to 1 on the attribute that you
want to transmit (see the "Configuration_Entry"
syntax on page 4-17).
Settings for the Used_Attributes parameter:
Bit 0
Bit 1
Device number
Device code
Example:
If the entries only consist of the device code,
enter the value 0002hex for the Used_Attributes
parameter (bit 1 is set).
Start_Entry_No:
Number of the first device for which attributes are
to be transmitted
Entry_Count:
Number of devices for which attributes are to be
transmitted
Configuration_Entry:
Attribute values of the individual devices to be
transmitted according to their order in the
physical bus configuration (see syntax on
page 4-17)
According to the following syntax, enter attributes in the
"Configuration_Entry" parameter block that have been enabled with the
Used_ Attributes parameter (disabled attributes are not entered).
When several entries with several attributes are loaded at the same time,
first all the attributes of one entry are loaded, then those of the next entry.
Syntax
"Configuration_Entry"
Word x
Word x+1
Bit
Attributes:
9499-040-69311
Attribute
Bus_Segment_No
Position
Device
number
Length_Code
ID_Code
Device code
15 ................................... 8 7 ..................................... 0
Bus_Segment_No:
Number of the bus segment where the device is
located
Value range: 01hex
4-17
VARIO BK ETH
Position:
Physical location in the bus segment.
Value range:
00hex ... 3Fhex (63dec) for an Inline station
The Bus_Segment_No and Position parameters
together form the device number.
Length_Code:
The length code refers to the address space
required by the device in the host.
ID_Code:
The ID code indicates the device type. It is
printed as Module Ident in decimal notation on
the modules.
The Length_Code and ID_Code parameters
together form the device number.
4-18
9499-040-69311
VARIO BK ETH
Syntax:
Load_Configuration_Confirmation
8307hex
Positive message
Word 1
Code
Word 2
Parameter_Count
Word 3
Result
Negative message
Word 1
Code
Word 2
Parameter_Count
Word 3
Result
Word 4
Add_Error_Info
Bit
Key:
15 ................................................................................. 0
Message code of the service
confirmation
Code:
8307hex
Parameter_Count:
Number of subsequent words
with a positive message:
0001hex
Always 1 parameter word
with a negative message:
0002hex
9499-040-69311
Always 2 parameter words
Result:
Result of the service processing
0000hex Indicates a positive message.
The controller board executed the
service successfully.
xxxxhex Indicates a negative message.
The controller board could not execute
the service successfully. The Result
parameter indicates why the service
could not be executed.
Add_Error_Info:
Additional information on the error cause
4-19
VARIO BK ETH
4.3.6
"Terminate_Load_Configuration" Service
Task:
This service terminates the loading of the configuration data in segments.
The service also checks the loaded configuration data for permissibility and
consistency. If no error is detected, the controller board stores the data in
the configuration directory under the Frame_Reference given with the
"Initiate_Load_Configuration" (0306hex) service. If an error is detected, the
service is followed by a negative confirmation.
Remark:
The Default_Parameter parameter can also be used to specify whether the
process data channel (PD channel) and/or the PCP channel are to be
parameterized according to the loaded configuration frame. In this case the
firmware automatically creates the process data reference list ("physical
addressing") and/or a communication relationship list (CRL).
The "Terminate_Load_Configuration" service does not activate the newly
loaded configuration immediately. It is only activated with the
"Activate_Configuration" service (0711hex).
Syntax:
Terminate_Load_Configuration_Request
Word 1
Word 2
Word 3
Bit
Key:
0308hex
Code
Parameter_Count
Default_Parameter
15 ................................................................................ 0
Code:
0308hex Command code of the service request
Parameter_Count:
Number of subsequent words
Default_Parameter:
Indicates whether a default parameterization of the
PCP and/or PD channel is to be carried out for the
loaded configuration:
0001hex 1 parameter word
0000hex No automatic parameterization
0001hex Automatic parameterization of the
process data channel through the
generation of the process data reference
list
0002hex Automatic parameterization of the PCP
channel through the generation of the
communication relationship list
0003hex Automatic parameterization of the
process data and PCP channel
4-20
9499-040-69311
VARIO BK ETH
Syntax:
Terminate_Load_Configuration_Confirmation
8308hex
Positive message
Word 1
Code
Word 2
Parameter_Count
Word 3
Result
Negative message
Word 1
Code
Word 2
Parameter_Count
Word 3
Result
Word 4
Add_Error_Info
Bit
Key:
15 ................................................................................. 0
Code:
8308hexMessage code of the service
confirmation
Parameter_Count:
Number of subsequent words
with a positive message:
0001hex
1 parameter word
with a negative message:
0002hex
Result:
Result of the service processing
0000hex
xxxxhex
Add_Error_Info:
9499-040-69311
2 parameter words
Indicates a positive message.
The controller board executed the
service successfully.
Indicates a negative message.
The controller board could not execute
the service successfully. The Result
parameter indicates why the service
could not be executed.
Additional information on the error cause
4-21
VARIO BK ETH
4.3.7
Task:
"Read_Configuration" Service
This service reads various entries of the configuration directory depending
on the Frame_Reference and Start_Entry_No parameters.
Frame_
Reference
Start_
Entry_No
Entries Read by the Service
0001hex
0000hex
Header information of the configuration frame
(CFG_Header) selected with the
Frame_Reference parameter.
0001hex
Syntax:
> 0000hex Entries of the configuration frame selected with
the Frame_Reference parameter (CFG_Entry).
Either the entire configuration frame or only one
part, e.g., a single INTERBUS device
description can be read.
Read_Configuration_Request
Word 1
0309hex
Code
Word 2
Parameter_Count
Word 3
Frame_Reference
Word 4
Used_Attributes
Word 5
Start_Entry_No
Word 6
Entry_Count
Bit
Key:
15 ................................................................................. 0
Code:
0309hex
Parameter_Count:
Number of subsequent words
0004hex
Frame_Reference:
Command code of the service request
4 parameter words
Number of the configuration frame
0001hex Reads the reference configuration
0002hexReads the physical bus
configuration
Only used if
Frame_Reference
> 0000hex
4-22
Used_Attributes:
Attributes to be read.
The parameter is a 16-bit field in which every bit
corresponds to an attribute. Set the
corresponding bit to 1 on the attributes to be
read.
Settings for the Used_Attributes parameter:
9499-040-69311
VARIO BK ETH
Bit 0
Bit 1
Device number
Device code
Start_Entry_No:
Position of the first entry
0000hex Reads only the header information of
the configuration frame
xxxxhex Reads the entries from the
configuration directory from this
number onwards
Entry_Count:
Number of entries to be read
The positive message transmits the requested entries from the
configuration directory. Depending on the Frame_Reference and
Start_Entry_No parameters in the service request, it has one of the
following three structures.
9499-040-69311
4-23
VARIO BK ETH
Syntax
Read_Configuration_Confirmation
1st structure
Positive message during service request with:
–
Frame_Reference
= 0000hex
– Start_Entry_No
not used (= 0000hex)
Word 1
Code
Word 2
Parameter_Count
Word 3
Result
Word 4
More_Follows
Word 5
Frame_Reference
Word 6
Current_Configuration
Word 7
Configuration_Count
Word 8
Frame_Reference 1
2nd structure
8309hex
= 0000hex
Positive message during service request with:
–
Frame_Reference
> 0000
– Start_Entry_No
= 0000
hex
hex
4-24
Word 1
Code
Word 2
Parameter_Count
Word 3
Result
Word 4
More_Follows
Word 5
Frame_Reference
> 0000hex
Word 6
Used_Attributes
Not used
Word 7
Start_Entry_No
= 0000hex
Word 8
Frame_Device_Count
Word 9
Active_Device_Count
Word 10
Frame_IO_Bit_Count
Word 11
Active_IO_Bit_Count
Word 12
Frame_PCP_Device_Count
9499-040-69311
VARIO BK ETH
Word 13
Active_PCP_Device_Count
Word 14
Frame_PCP_Word_Count
Word 15
Active_PCP_Word_Count
Bit
3rd structure
15 ................................................................................. 0
Positive message during service request with:
–
Frame_Reference
> 0000
– Start_Entry_No
> 0000
hex
hex
Word 1
Code
Word 2
Parameter_Count
Word 3
Result
Word 4
More_Follows
Word 5
Frame_Reference
Word 6
Used_Attributes
Word 7
Start_Entry_No
Word 8
Entry_Count
Word 9
Configuration_Entry
...
1st device
...
Configuration_Entry
nth device
Negative message
Word 1
Code
Word 2
Parameter_Count
Word 3
Result
Word 4
Add_Error_Info
Bit
Key:
9499-040-69311
15 ................................................................................. 0
Message code of the service
confirmation
Code:
8309hex
Parameter_Count:
Number of subsequent words
4-25
VARIO BK ETH
with a positive message and if Frame_Reference
= 0000hex:
xxxxhex
= 5 + Configuration_Count
with a positive message and if Frame_Reference
> 0000hex and Start_Entry_No = 0000hex:
000Dhex 12 parameter words
with a positive message and if Frame_Reference
> 0000hex and Start_Entry_No > 0000hex:
xxxxhex
The value depends on the number of
devices in the configuration frame and
the number of enabled attributes.
with a negative message:
0002hex
Result:
Result of the service processing
0000hex
xxxxhex
Indicates a positive message. The
service request has been executed
successfully. The data is available in
the following parameters.
Indicates a negative message.
The controller board could not execute
the service successfully. The Result
parameter indicates why the service
could not be executed (see also
Add_Error_Info).
Add_Error_Info:
Additional information on the error cause
More_Follows:
0000hex
0001hex
4-26
2 parameter words
Indicates that all requested entries are
contained in the service confirmation.
Indicates that the service confirmation
does not contain all requested entries
since the amount of data is larger than
the mailbox (MXI) that is available for
the services. Call the service again to
read the remaining data.
Frame_Reference:
Number of the read configuration frame.
The parameter contains the value that was
entered with the service request.
Current_Configuration:
Number of the currently activated configuration
frame
Configuration_Count:
Number of stored configuration frames
9499-040-69311
VARIO BK ETH
Frame_Reference x:
Numbers of all stored configuration frames in
ascending order
Frame_Device_Count:
Number of configured INTERBUS devices in the
selected configuration frame
Active_Device_Count:
Number of active INTERBUS devices in the
selected configuration frame
Frame_IO_Bit_Count:
Number of configured I/O bits in the selected
configuration frame
Active_IO_Bit_Count:
Number of active I/O bits in the selected
configuration frame
Frame_PCP_Device_Count:
Number of configured PCP devices in the
selected configuration frame
Active_PCP_Device_Count:
Number of active PCP devices in the selected
configuration frame
Frame_PCP_Word_Count:
Number of configured PCP words in the selected
configuration frame
Active_PCP_Word_Count:
Number of active PCP words in the selected
configuration frame
Used_Attributes:
Read attributes.
The parameter contains the value that was
entered with the service request.
Start_Entry_No:
Position of the first entry or 0000hex if only the
header information was read
Entry_Count:
Number of entries that are transferred by the
service confirmation.
The More_Follows parameter indicates if there
are further entries.
Configuration_Entry:
Selected entries in the order of the physical bus
configuration.
The attributes contained in every entry are
enabled in the service request by the
Used_Attributes parameter (see the
"Configuration_Entry" syntax on page 4-28).
A configuration entry for a device does not have to contain all attributes. If
an attribute is not enabled in the service request by the Used_Attributes
parameter, the configuration entry is reduced by the relevant data words.
9499-040-69311
4-27
VARIO BK ETH
In the following, the structure of a configuration entry is shown where all
attributes are enabled.
Syntax
"Configuration_Entry"
Word x
Word x+1
Bit
Key:
Attribute:
Bus_Segment_No
Position
Device
number
Length_Code
ID_Code
Device code
15 ................................... 8 7 ..................................... 0
Attribute: Device Number
Bus_Segment_No:
Number of the bus segment where the
INTERBUS device is located.
Value: 00hex
Position:
Physical location in the bus segment.
Value range:
00hex to 40hex for an Inline station
Attribute: Device code
Length_Code:
The length code refers to the address space
required by the INTERBUS device in the host.
ID_Code:
The ID code describes the INTERBUS device
function. It is printed as Module Ident in decimal
notation on the modules.
4-28
9499-040-69311
VARIO BK ETH
4.3.8
"Complete_Read_Configuration" Service
Task:
This service reads entries in the configuration directory in the form of one
or more columns which have been selected with the Used_Attributes
parameter. It is specially adapted to the PLC programming requirements.
Remark:
This service can be understood as a meta service for the
"Read_Configuration" service (0309 hex). The Start_Entry_No parameter
does not need to be specified, since this service reads all entries of the
configuration frame (Start_Entry_No = "1").
Syntax:
Complete_Read_Configuration_Request
Word 1
Code
Word 2
Parameter_Count
Word 3
Used_Attributes
Bit
Key:
15 ................................................................................. 0
Code:
030Bhex Command code of the service request
Parameter_Count:
Number of subsequent words
0001hex
Used_Attributes:
Always 1 parameter word
The parameter is a 16-bit field in which every bit
corresponds to an attribute. Set the
corresponding bit to 1 on the attribute that you
want to read.
Settings for the Used_Attributes parameter:
Bit 0
Bit 1
9499-040-69311
030Bhex
Device number
Device code
4-29
VARIO BK ETH
Syntax:
Complete_Read_Configuration_Confirmation
830Bhex
Positive message
Word 1
Code
Word 2
Parameter_Count
Word 3
Result
Word 4
More_Follows
Word 5
Frame_Reference
Word 6
Used_Attributes
Word 7
Start_Entry_No
Word 8
Entry_Count
Word 9
Configuration_Entry
0001hex
1st device
...
...
Configuration_Entry
nth device
Negative message
Word 1
Code
Word 2
Parameter_Count
Word 3
Result
Word 4
Add_Error_Info
Bit
Key:
15 ................................................................................. 0
Code:
830BhexMessage code of the service
confirmation
Parameter_Count:
Number of subsequent words
with a positive message:
xxxxhex
The value depends on the number of
entries and the number and type of
attributes that you want to read.
with a negative message:
0002hex
Result:
4-30
2 parameter words
Result of the service processing
0000hex Indicates a positive message.
The controller board executed the
service successfully.
9499-040-69311
VARIO BK ETH
xxxxhex
Indicates a negative message.
The controller board could not execute
the service successfully. The Result
parameter indicates why the service
could not be executed.
Add_Error_Info:
Additional information on the error cause
More_Follows:
0000hex
0001hex
Indicates that all requested entries are
contained in the service confirmation.
Indicates that the service confirmation
does not contain all requested entries
since the amount of data is larger than
the mailbox (MXI) that is available for
the services. Call the
"Read_Configuration" service
(0309hex) to read the remaining data.
Frame_Reference:
Number of the active configuration frame
Used_Attributes:
Read attributes.
The parameter contains the value that was
entered with the service request.
Start_Entry_No:
Number of the first entry.
0001hex With this service all entries are read
out, starting with the first entry.
9499-040-69311
Entry_Count:
Number of entries that are transferred by the
service confirmation.
Configuration_Entry:
Entries in the order of the physical bus
configuration.
The attributes contained in every entry are
enabled in the service request by the
Used_Attributes parameter. For the description
of the Configuration_Entry parameters see
"Read_Configuration" service (0309hex) on
page 4-22.
4-31
VARIO BK ETH
4.3.9
"Delete_Configuration" Service
Task:
This service deletes an inactive configuration frame from the configuration
directory.
Syntax:
Delete_Configuration_Request
Word 1
Code
Word 2
Parameter_Count
Word 3
Frame_Reference
Bit
Key:
15 ................................................................................. 0
Code:
030Chex Command code of the service request
Parameter_Count:
Number of subsequent words
0001hex
Frame_Reference:
4-32
030Chex
1 parameter word
0001hex
9499-040-69311
VARIO BK ETH
Syntax:
Delete_Configuration_Confirmation
830Chex
Positive message
Word 1
Code
Word 2
Parameter_Count
Word 3
Result
Negative message
Word 1
Code
Word 2
Parameter_Count
Word 3
Result
Word 4
Add_Error_Info
Bit
Key:
15 ................................................................................. 0
Code:
830Chex Message code of the service
confirmation
Parameter_Count:
Number of subsequent words
with a positive message:
0001hex
1 parameter word
with a negative message:
0002hex
9499-040-69311
2 parameter words
Result:
Result of the service processing
0000hex Indicates a positive message.
The controller board executed the
service successfully.
xxxxhex Indicates a negative message.
The controller board could not execute
the service successfully. The Result
parameter indicates why the service
could not be executed.
Add_Error_Info:
Additional information on the error cause
4-33
VARIO BK ETH
4.3.10
Task:
"Create_Configuration" Service
This service causes the controller board to automatically generate a
configuration frame from the currently connected configuration and to
activate it in order to start the bus. After the execution of the service the
controller board is in the Active state.
The new configuration frame and the active configuration are stored in the
configuration directory under the number specified in the
Frame_Reference parameter. If there is already a configuration frame
under this number, this frame is overwritten. In addition, the controller
board generates default process data description lists, a default process
data reference list, and a default communication relationship list (CRL)
according to the currently connected bus configuration. In the device
descriptions the attributes are initialized as follows:
Device_Number:
According to the current configuration
Length_Code:
According to the current configuration
ID_Code:
According to the current configuration
Device_Level:
According to the current configuration
Group_Number:
For all INTERBUS devices FFFFhex
(i.e., no group number)
Device_State:
All INTERBUS devices are active
Syntax:
Create_Configuration_Request
Word 1
Code
Word 2
Parameter_Count
Word 3
Frame_Reference
Bit
Key:
15 ................................................................................. 0
Code:
0710hex
Parameter_Count:
Number of subsequent words
0001hex
Frame_Reference:
4-34
0710hex
Command code of the service request
1 parameter word
0001hex
9499-040-69311
VARIO BK ETH
Syntax:
Create_Configuration_Confirmation
8710hex
Positive message
Word 1
Code
Word 2
Parameter_Count
Word 3
Result
Negative message
Word 1
Code
Word 2
Parameter_Count
Word 3
Result
Word 4
Add_Error_Info
Bit
Key:
15 ................................................................................. 0
Message code of the service
confirmation
Code:
8710hex
Parameter_Count:
Number of subsequent words
with a positive message:
0001hex
1 parameter word
with a negative message:
0002hex
Result:
Result of the service processing
0000hex
xxxxhex
Add_Error_Info:
9499-040-69311
2 parameter words
Indicates a positive message.
The controller board executed the
service successfully.
Indicates a negative message.
The controller board could not execute
the service successfully. The Result
parameter indicates why the service
could not be executed.
Additional information on the error cause
4-35
VARIO BK ETH
4.3.11
Task:
"Activate_Configuration" Service
This service enables the controller board to check the configuration data of
the configuration frame for
–
Conformance with the currently connected configuration
–
Address overlaps
If no errors are detected, the controller board activates this configuration
frame and runs ID cycles at regular intervals. The number of the
configuration frame is indicated to the controller board by the
Frame_Reference parameter.
Prerequisite:
If you want to activate a configuration frame, another configuration frame
cannot be active at the same time. The "Deactivate_Configuration" is not
supported.
Syntax:
Activate_Configuration_Request
Word 1
Code
Word 2
Parameter_Count
Word 3
Frame_Reference
Bit
Key:
15 ................................................................................. 0
Code:
0711hex
Parameter_Count:
Number of subsequent words
0001hex
Frame_Reference:
4-36
0711hex
Command code of the service request
1 parameter word
0001hex
9499-040-69311
VARIO BK ETH
Syntax:
Activate_Configuration_Confirmation
8711hex
Positive message
Word 1
Code
Word 2
Parameter_Count
Word 3
Result
Negative message
Word 1
Code
Word 2
Parameter_Count
Word 3
Result
Word 4
Add_Error_Info
Bit
Key:
15 ................................................................................. 0
Message code of the service
confirmation
Code:
8711hex
Parameter_Count:
Number of subsequent words
with a positive message:
0001hex
1 parameter word
with a negative message:
0002hex
Result:
Result of the service processing
0000hex
xxxxhex
Add_Error_Info:
9499-040-69311
2 parameter words
Indicates a positive message.
The controller board executed the
service successfully.
Indicates a negative message.
The controller board could not execute
the service successfully. The Result
parameter indicates why the service
could not be executed.
Additional information on the error cause
4-37
VARIO BK ETH
4.3.12
"Control_Device_Function" Service
Task:
This service can be used to send control commands to one or more
devices, for example to acknowledge device status errors or an alarm
output.
Syntax:
Control_Device_Function_Request
Word 1
Code
Word 2
Parameter_Count (n)
Word 3
Device_Function
Word 4
Entry_Count
Word 5
Device_No
Word 6
Device_No
Word n+2
Device_No
0714hex
List of devices
...
Bit
Key:
15 ................................................................................. 0
Code:
0714hex
Command code of the service request
Parameter_Count:
Number of subsequent words
Device_Function:
0004hexConf_Dev_Err_All:
Confirming the peripheral faults (PF) of all
devices. Set Entry_Count =
0000hex. The list of devices
is not required.
Entry_Count:
4-38
0000hex
If Device_Function = 0004hex
9499-040-69311
VARIO BK ETH
Syntax:
Control_Device_Function_Confirmation
8714hex
Positive message
Word 1
Code
Word 2
Parameter_Count
Word 3
Result
Negative message
Word 1
Code
Word 2
Parameter_Count
Word 3
Result
Word 4
Add_Error_Info
Bit
Key:
15 ................................................................................. 0
Message code of the service
confirmation
Code:
8714hex
Parameter_Count:
Number of subsequent words
with a positive message:
0001hex
1 parameter word
with a negative message:
0002hex
Result:
Result of the service processing
0000hex
xxxxhex
Add_Error_Info:
9499-040-69311
2 parameter words
Indicates a positive message.
The controller board executed the
service successfully.
Indicates a negative message.
The controller board could not execute
the service successfully. The Result
parameter indicates why the service
could not be executed.
Additional information on the error cause
4-39
VARIO BK ETH
4.3.13
"Reset_Controller_Board" Service
Task:
This service can be used to initiate a controller board reset.
Prerequisite:
Before calling this service, ensure that the state of your system permits a
controller board reset.
Syntax:
Reset_Controller_Board_Request
Word 1
Code
Word 2
Parameter_Count
Word 3
Frame_Reference
Bit
Key:
15 ................................................................................. 0
Code:
0956hex
Parameter_Count:
Number of subsequent words
0001hex
Reset_Type:
4-40
0956hex
Command code of the service request
1 parameter word
Always cold restart
9499-040-69311
VARIO BK ETH
Syntax:
Activate_Configuration_Confirmation
8956hex
Positive message
Word 1
Code
Word 2
Parameter_Count
Word 3
Result
Negative message
Word 1
Code
Word 2
Parameter_Count
Word 3
Result
Word 4
Add_Error_Info
Bit
Key:
15 ................................................................................. 0
Message code of the service
confirmation
Code:
8956hex
Parameter_Count:
Number of subsequent words
with a positive message:
0001hex
1 parameter word
with a negative message:
0002hex
Result:
Result of the service processing
0000hex
xxxxhex
Add_Error_Info:
9499-040-69311
2 parameter words
Indicates a positive message.
The controller board executed the
service successfully.
Indicates a negative message.
The controller board could not execute
the service successfully. The Result
parameter indicates why the service
could not be executed.
Additional information on the error cause
4-41
VARIO BK ETH
4.4
4.4.1
Services for Direct INTERBUS Access
"Start_Data_Transfer" Service
Task:
This service activates the cyclic data traffic on the bus. After the execution
of the service the controller board is in the Run state.
Prerequisite:
Before the service is called, the controller board must be in the Active state,
i.e., a configuration frame has been activated and ID cycles are already
being run at regular intervals.
Syntax:
Start_Data_Transfer_Request
Word 1
Code
Word 2
Parameter_Count
Bit
Key:
15 ................................................................................. 0
Code:
0701hex
Parameter_Count:
Number of subsequent words
0000hex
4-42
0701hex
Command code of the service request
No parameter word
9499-040-69311
VARIO BK ETH
Syntax:
Start_Data_Transfer_Confirmation
8701hex
Positive message
Word 1
Code
Word 2
Parameter_Count
Word 3
Result
Negative message
Word 1
Code
Word 2
Parameter_Count
Word 3
Result
Word 4
Add_Error_Info
Bit
Key:
15 ................................................................................. 0
Code:
8701hexMessage code of the service
confirmation
Parameter_Count:
Number of subsequent words
with a positive message:
0001hex
1 parameter word
with a negative message:
0002hex
Result:
Result of the service processing
0000hex
xxxxhex
Add_Error_Info:
9499-040-69311
2 parameter words
Indicates a positive message.
The controller board executed the
service successfully.
Indicates a negative message.
The controller board could not execute
the service successfully. The Result
parameter indicates why the service
could not be executed.
Additional information on the error cause
4-43
VARIO BK ETH
4.4.2
"Alarm_Stop" Service
Task:
This service causes a long reset on the bus. Data traffic is stopped.
Modules with process data set their outputs to the value 0. The command
is executed directly after the current data cycle has been completed. After
the execution of the service the controller board is in the Ready state.
Syntax:
Alarm_Stop_Request
Word 1
Code
Word 2
Parameter_Count
Bit
Key:
1303hex
15 ................................................................................. 0
Code:
1303hex
Parameter_Count:
Number of subsequent words
0000hex
4-44
Command code of the service request
No parameter word
9499-040-69311
VARIO BK ETH
Syntax:
Alarm_Stop_Confirmation
9303hex
Positive message
Word 1
Code
Word 2
Parameter_Count
Word 3
Result
Negative message
Word 1
Code
Word 2
Parameter_Count
Word 3
Result
Word 4
Add_Error_Info
Bit
Key:
15 ................................................................................. 0
Message code of the service
confirmation
Code:
9303hex
Parameter_Count:
Number of subsequent words
with a positive message:
0001hex
1 parameter word
with a negative message:
0002hex
Result:
Result of the service processing
0000hex
xxxxhex
Add_Error_Info:
9499-040-69311
2 parameter words
Indicates a positive message.
The controller board executed the
service successfully.
Indicates a negative message.
The controller board could not execute
the service successfully. The Result
parameter indicates why the service
could not be executed.
Additional information on the error cause
4-45
VARIO BK ETH
4.5
4.5.1
Diagnostic Services
"Get_Error_Info" Service
Task:
This service can be used to read out the exact error cause and location
after a bus error has been indicated. A maximum of ten errors are
analyzed.
Syntax:
Get_Error_Info_Request
Word 1
Code
Word 2
Parameter_Count
Bit
Key:
0316hex
15 ................................................................................. 0
Code:
0316hex
Parameter_Count:
Number of subsequent words
0000hex
4-46
Command code of the service request
No parameter word
9499-040-69311
VARIO BK ETH
Syntax:
Get_Error_Info_Confirmation
8316hex
Positive message, as long as error localization is not yet terminated
Word 1
Code
Word 2
Parameter_Count
Word 3
Result
Word 4
Entry_Count
= 0001hex
Word 5
Error_Code
Word 6
Add_Error_Info
= 0BDFhex
= FFFFhex
Positive message, if error localization is terminated
Word 1
Code
Word 2
Parameter_Count
Word 3
Result
Word 4
Entry_Count
Word 5
Error_Code
Word 6
Add_Error_Info
1st error
Add_Error_Info
Negative message
Word 1
Code
Word 2
Parameter_Count
Word 3
Result
Word 4
Add_Error_Info
Bit
9499-040-69311
15 ................................................................................. 0
4-47
VARIO BK ETH
Key:
Code:
8316hexMessage code of the service
confirmation
Parameter_Count:
Number of subsequent words
with positive message (during error localization):
0004hex
4 parameter words
with positive message (after error localization):
00xxhex
= 2 + 2 ´ Entry_Count
(20 words, maximum)
with a negative message:
0002hex
Result:
Result of the service processing
0000hex
xxxxhex
4-48
Always 2 parameter words
Indicates a positive message.
The controller board executed the
service successfully.
Indicates a negative message.
The controller board could not execute
the service successfully. The Result
parameter indicates why the service
could not be executed.
Entry_Count:
0001hex
Error_Code:
Information on the error type
Add_Error_Info:
with positive message:
Error location (Bus segment . Position), if it could
be located.
with negative message:
Additional information on the error cause
9499-040-69311
VARIO BK ETH
4.5.2
"Get_Version_Info" Service
Task:
This service can be used to read the type, version, manufacturing date, etc.
of the hardware and firmware of your controller board.
Syntax:
Get_Version_Info_Request
032Ahex
Word 1
Code
Word 2
Parameter_Count
Bit
Key:
15 ................................................................................. 0
Code:
032Ahex Command code of the service request
Parameter_Count:
Number of subsequent words
0000hex
Syntax:
No parameter word
Get_Version_Info_Confirmation
832Ahex
Positive message
Word 1
Code
Word 2
Parameter_Count
Word 3
Result
Words 4 +5
Words 6 ... 8
Words 9 ... 11
Words 12 ... 14
Words 15 ... 24
Words 25 +26
Words 27 ... 29
9499-040-69311
FW_Version (byte 1)
FW_Version (byte 2)
FW_Version (byte 3)
FW_Version (byte 4)
FW_State (byte 1)
...
...
FW_State (byte 6)
FW_Date (byte 1)
...
...
FW_Date (byte 6)
FW_Time (byte 1)
...
...
FW_Time (byte 6)
Host_Type (byte 1)
...
...
Host_Type (byte 20)
Host_Version (byte 1)
Host_Version (byte 2)
Host_Version (byte 3)
Host_Version (byte 4)
Host_State (byte 1)
...
...
Host_State (byte 6)
4-49
VARIO BK ETH
Words 30 ... 32
Host_Date (byte 1)
...
...
Host_Date (byte 6)
Words 33 ... 35
Host_Time (byte 1)
...
...
Host_Time (byte 6)
Words 36 +37
Start_FW_Version (byte 1) Start_FW_Version (byte 2)
Start_FW_Version (byte 3) Start_FW_Version (byte 4)
Words 38 ... 40
Start_FW_State (byte 1)
...
...
Start_FW_State (byte 6)
Words 41 ... 43
Start_FW_Date (byte 1)
...
...
Start_FW_Date (byte 6)
Words 44 ... 46
Start_FW_Time (byte 1)
...
...
Start_FW_Time (byte 6)
Words 47 ... 50
HW_Art_No (byte 1)
...
...
HW_Art_No (byte 8)
Words 51 ... 65
HW_Art_Name (byte 1)
...
...
HW_Art_Name (byte 30)
HW_Motherboard_ID
(byte 1)
HW_Motherboard_ID
(byte 2)
HW_Motherboard_ID
(byte 2)
HW_Motherboard_ID
(byte 4)
HW_Version (byte 1)
HW_Version (byte 2)
HW_Vendor_Name
(byte 1)
...
...
HW_Vendor_Name
(byte 20)
Words 66 + 67
Word 68
Words 69 ... 78
Words 79 ... 84
Words 85 ... 87
Bit
4-50
HW_Serial_No (byte 1)
...
...
HW_Serial_No (byte 12)
HW_Date (byte 1)
...
...
HW_Date (byte 6)
15 ................................................................................. 0
9499-040-69311
VARIO BK ETH
Negative message
Word 1
Code
Word 2
Parameter_Count
Word 3
Result
Word 4
Add_Error_Info
Bit
Key:
15 ................................................................................. 0
Code:
832AhexMessage code of the service
confirmation
Parameter_Count:
Number of subsequent words
with a positive message:
0055hex
55 parameter words
with a negative message:
0002hex
Result:
0000hex
xxxxhex
Add_Error_Info:
2 parameter words
Result of the service processing
Indicates a positive message.
The controller board executed the
service successfully.
Indicates a negative message.
The controller board could not execute
the service successfully. The Result
parameter indicates why the service
could not be executed.
Additional information on the error cause
Version information on the hardware and firmware. Every byte indicates
the ASCII code for a character:
9499-040-69311
FW_Version:
Version of the firmware kernel
(4 bytes)
(e.g., 33 2E 39 37hex for "Version 3.97")
FW_State:
Firmware status
(6 bytes)
(e.g., 62 65 64 61 00 00hex for "beta" with
preliminary version)
FW_Date:
Creation date of the firmware
(6 bytes)
(e.g., 31 37 30 33 30 31hex for 17.03.01)
FW_Time:
Creation time of the firmware
(6 bytes)
(e.g., 31 34 31 30 32 30hex for 14:10:20)
4-51
VARIO BK ETH
Host_Type:
Type of the host-specific firmware interface
(e.g., FL IL 24 BK-B)
(20 bytes)
Host_Version:
Version of the host-specific firmware interface
(4 bytes)
Host_State:
Status of the host-specific firmware interface
(6 bytes)
Host_Date:
Creation date of the host-specific
firmware interface
(6 bytes)
Creation time of the host-specific
firmware interface
(6 bytes)
Version of the start firmware
(4 bytes)
Start_FW_State:
Status of the start firmware
(6 bytes)
Start_FW_Date:
Creation date of the start firmware
(6 bytes)
Start_FW_Time:
Creation time of the start firmware
(6 bytes)
HW_Art_No:
Order number of the controller board
(8 bytes)
HW_Art_Name:
Order Designation of the controller board
(30 bytes)
HW_Motherboard_ID:
Identification of the motherboard
(e.g., 32 43hex for "2C")
(4 bytes)
HW_Version:
Version of the hardware
(2 bytes)
HW_Vendor_Name:
Manufacturer of the controller board (20 bytes)
HW_Serial_No:
Serial number of the controller board
HW_Date:
Creation date of the controller board
Host_Time:
Start_FW_Version:
(12 bytes)
(6 bytes)
4-52
9499-040-69311
VARIO BK ETH
4.6
4.6.1
Table 4-3
Code
9499-040-69311
Error Messages for Firmware Services:
Overview
Overview of error messages (according to error codes)
Services
Page
0905hex INCORRECT_PARAMETER
4-54
0907hex NO_OBJECT
4-54
0918hex UNKNOWN_CODE
4-54
0922hex ACTION_HANDLER_CONFLICT
4-54
090Ahex INCORRECT_PARACOUNT
4-55
091Dhex ACTION_HANDLER_OVERLAP
4-55
0A02hex INCORRECT_STATE
4-55
0A18hex INCORRECT_ATTRIB
4-55
0A19hex FRAME_NOT_SO_BIG
4-55
0A22hex INCORRECT_TN_NUMBER
4-55
0A2Fhex DEVICE_ZERO
4-56
0A51hex INCORRECT_FRAME_REF
4-56
0E22hex INTERNAL_TIMEOUT
4-56
0E23hex FUNCTION_REG_NOT_FREE
4-56
0E24hex ACTION_ERROR
4-56
4-53
VARIO BK ETH
4.6.2
Positive Messages
ERR_OK
0000hex
Meaning
After successful execution of a function, the firmware generates this
message as a positive acknowledgment.
Cause
No errors occurred during execution of the function.
4.6.3
Error Messages
If the firmware generates one of the following codes as an
acknowledgment, this indicates that an error occurred during execution,
and the called function could not be executed successfully.
INCORRECT_PARAMETER
0905hex
Cause
Incorrect parameters were entered when calling the function.
Remedy
Check the parameters entered.
NO_OBJECT
Cause
The object called does not exist.
Remedy
Check the object called or select another.
0907hex
UNKNOWN_CODE
Cause
This service is not supported by this device.
Remedy
Select another service.
0918hex
ACTION_HANDLER_CONFLICT
Cause
0922hex
An internal firmware error has occurred.
Additional info 0031hex:The error_type and/or error_location registers
cannot be read.
Additional info FFFFhex:Incorrect parameters detected during
Read_Configuration.
4-54
9499-040-69311
VARIO BK ETH
INCORRECT_PARACOUNT
Cause
The number of parameters is incorrect.
Remedy
Correct the number of parameters.
ACTION_HANDLER_OVERLAP
Cause
090Ahex
091Dhex
Cannot read from or write to the EEPROM.
Additional info 0001hex:Write error
Additional info 0002hex:Read error
INCORRECT_STATE
0A02hex
Cause
The called service is not permitted in the current status of the device.
Remedy
Select another service or change the status of the device, so that the
desired service can be called.
INCORRECT_ATTRIB
Cause
An invalid bit was activated in the Used_Attributes parameter.
Remedy
Check that the selected attributes are permitted.
FRAME_NOT_SO_BIG
0A18hex
0A19hex
Cause
When accessing the configuration frame, the end of the frame was
exceeded.
Remedy
Modify access to the configuration frame.
INCORRECT_TN_NUMBER
Cause
Inconsistent device numbers were specified.
Remedy
Enter the device numbers again.
9499-040-69311
0A22hex
4-55
VARIO BK ETH
DEVICE_ZERO
0A2Fhex
Cause
The Initiate_Load_Configuration service could not be executed. The
number of connected Inline modules is either zero or greater than 63.
Remedy
Change the number of connected Inline modules.
INCORRECT_FRAME_REF
Cause
The Frame_Reference value is not one (1).
Remedy
Change the Frame_Reference to 1.
0A51hex
INTERNAL_TIMEOUT
Cause
0E22hex
The function_start_reg was not reset within the timeout.
Additional info xxxxhex:Timeout in hex
FUNCTION_REG_NOT_FREE
Cause
0E23hex
The function_start_reg is not empty.
ACTION_ERROR
Cause
4-56
0E24hex
The service could not be executed successfully.
Additional info 0005hex:Bus data could not be detected.
Additional info 00A5hex: The configuration could not be activated.
9499-040-69311
Chapter 5
This section informs you about
–
technical data and
–
ordering data
Technical Data......................................................................................................5-3
5.1
9499-040-69311
Ordering Data............................................................................5-11
5-1
VARIO_BK ETH
5-2
9499-040-69311
VARIO_BK ETH
5
Technical Data
General Data
Function
Ethernet bus coupler
Housing dimensions (width x height x depth)
90 mm x 72 mm x 116 mm
(3.543 x 2.835 x 4.567 in.)
Permissible operating temperature (EN 60204-1) 0°C to 55°C (32°F to 131°F)
Permissible storage temperature (EN 60204-1)
-25°C to 85°C (-13°F to +185°F)
Degree of protection
IP 20, DIN 40050, IEC 60529
Class of protection
Class 3 VDE 0106; IEC 60536
Humidity (operation) (EN 60204-1)
5% to 90%, no condensation
Humidity (storage) (EN 60204-1)
5% to 95%, no condensation
Air pressure (operation)
80 kPa to 108 kPa, 2000 m (6562 ft.) above sea
level
Air pressure (storage)
70 kPa to 108 kPa, 3000 m (9843 ft.) above sea
level
Preferred mounting position
Perpendicular to a standard DIN rail
Connection to protective earth ground
The functional earth ground must be connected
to the 24 V DC supply/functional earth ground
connection. The contacts are directly connected
with the potential jumper and FE springs on the
bottom of the housing. The terminal is grounded
when it is snapped onto a grounded DIN rail.
Functional earth ground is only used to discharge
interference.
Environmental compatibility
Free from substances that would hinder coating
with paint or varnish (according to VW
specification)
Resistance to solvents
Standard solvents
Weight
270 g, typical
9499-040-69311
5-3
VARIO_BK ETH
24 V Main Supply/24 V Segment Supply
Connection method
Spring-clamp terminals
Recommended cable lengths
30 m (98.43 ft.), maximum; do not route cable
through outdoor areas
Voltage continuation
Through potential routing
Special demands on the voltage supply
The supplies UM/US and the bus coupler supply
UBK do not have the same ground potential
because they are supplied by two separate
power supply units.
Behavior in the event of voltage fluctuations
Voltages (main and segment supply) that are
transferred from the bus coupler to the potential
jumpers follow the supply voltages without delay.
Nominal value
24 V DC
Tolerance
-15%/+20% (according to EN 61131-2)
Ripple
±5%
Permissible range
19.2 V to 30 V
Current carrying capacity
8 A, maximum (total current of US and UM)
Safety measures
Surge voltage
Input protective diodes (can be destroyed by
permanent overload)
Pulse loads up to 1500 V are short circuited by
the input protective diode.
Polarity reversal
Parallel diodes against polarity reversal; in the
event of an error the high current through the
diodes causes the preconnected fuse to blow.
This 24 V area must be fused externally. The power supply unit must be able to supply
4 times the nominal current of the external fuse, to ensure that the fuse blows safely in
the event of an error.
5-4
9499-040-69311
VARIO_BK ETH
24 V Bus Coupler Supply
Connection method
Spring-clamp terminals
Recommended cable lengths
30 m (98.43 ft.), maximum; do not route cable
through outdoor areas
Voltage continuation
Through potential routing UL, UANA
Safety measures
Surge voltage
Input protective diodes (can be destroyed by
permanent overload)
Pulse loads up to 1500 V are short circuited by
the input protective diode.
Polarity reversal
Serial diode in the lead path of the power
supply unit; in the event of an error only a low
current flows. In the event of an error the fuse
in the external power supply unit does not trip.
Ensure a 2 A fuse protection to the external
power supply unit.
Observe the current consumption of the modules
Observe the logic current consumption of each device when configuring an Inline station.
This information is given in every module-specific data sheet. The current consumption
may differ depending on the individual module. The permissible number of devices that
can be connected depends on the specific station structure.
Nominal value
24 V DC
Tolerance
-15%/+20% (according to EN 61131-2)
Ripple
±5%
Permissible range
19.2 V to 30 V
Minimum current consumption at nominal voltage
92 mA
(At no-load operation, i.e., Ethernet
connected, no local bus devices are
connected, bus inactive)
Maximum current consumption at nominal voltage
1.5 A
(loading the 7.5 V communications power with
2 A, the 24 V analog voltage with 0.5 A)
9499-040-69311
5-5
VARIO_BK ETH
24 V Module Supply
- Communications Power (Potential Jumper)
Nominal value
7.5 V DC
Tolerance
±5%
Ripple
±1.5%
Maximum output current
2 A DC (observe derating)
Safety measures
Electronic short-circuit protection
- Analog Supply (Potential Jumper)
Nominal value
24 V DC
Tolerance
-15%/+20%
Ripple
±5%
Maximum output current
0.5 A DC (observe derating)
Safety measures
Electronic short-circuit protection
Derating of the Communications Power and the Analog Terminal Supply
1 0 0
9 0
8 0
7 0
P [% ]
6 0
5 0
4 0
3 0
2 0
1 0
0
0
5
1 0
1 5
2 0
2 5
T
U
3 0
[° C ]
3 5
4 0
4 5
5 0
5 5
6 1 5 5 0 0 0 9
P [%]
Loading capacity of power supply unit for communications power and analog supply in %
TU [°C]
Ambient temperature in °C
5-6
9499-040-69311
VARIO_BK ETH
Power Dissipation
Formula to Calculate the Power Dissipation of the Electronics
PTOT = PBUS + PPERI
P
E L
= 2 ,6 W
+ (1 ,1 W
A
a
x ΣILn) + (0 ,7 W
n = 0
b
A
x ΣILm )
m
= 0
Where
PTOT
PBUS
PPERI
Total power dissipation of the terminal
Power dissipation for bus operation without I/O load (permanent)
Power dissipation with I/O connected
ILn
n
a
Current consumption of device n from the communications power
Index of the number of connected devices (n = 1 to a)
Number of connected devices (supplied with communications power)
a
Total current consumption of the devices from the 7.5 V communications power
(2 A, maximum)
ΣIL
n
n = 0
ILm
m
b
Current consumption of device m from the analog supply
Index of the number of connected analog devices (m = 1 to b)
Number of connected analog devices (supplied with analog voltage)
b
m
ΣIL
= 0
n
9499-040-69311
Total current consumption of the devices from the 24 V analog supply
(0.5 A, maximum)
5-7
VARIO_BK ETH
Power Dissipation/Derating
Using the maximum currents 2 A (logic current) and 0.5 A (current for analog terminals) in the
formula to calculate the power dissipation when the I/O is connected gives the following result:
PPERI = 2.2 W + 0.35 W = 2.55 W
2.55 W corresponds to 100% current carrying capacity of the power supply in the derating curves
on page 5-6.
Make sure that the indicated nominal current carrying capacity in the derating curve is not exceeded
when the ambient temperature is above 40°C (104°F). According to the formula, the total load of the
connected I/O is relevant (PPERI). If, for example, no current is drawn from the analog supply, the
percentage of current coming from the communications power can be increased.
Example:
Ambient temperature: 55°C (131°F)
1. Nominal current carrying capacity of the communications power and analog supply: 50%
according to the diagram
ILLogic = 1 A, ILAnalog = 0.25 A
PPERI = 1.1 W +0.175 W
PPERI = 1.275 W (equals 50% of 2.55 W)
2. Possible logic current if the analog supply is not loaded:
PPERI = 1.1 W/A x ILLogic + 0 W
PPERI/1.1 W/A = ILLogic
ILLogic = 1.275 W/1.1 W/A
ILLogic = 1.159 A
5-8
9499-040-69311
VARIO_BK ETH
Safety Measures
Surge voltage
(segment supply/main supply/bus coupler
supply)
Input protective diodes (can be destroyed by
permanent overload)
Polarity reversal
(segment supply/main supply)
Parallel diodes against polarity reversal; in the
event of an error the high current through the
diodes causes the preconnected fuse to blow.
Polarity reversal
(bus coupler supply)
Serial diode in the lead path of the power supply
unit; in the event of an error only a low current
flows. In the event of an error the fuse in the
external power supply unit does not trip. Ensure
a 2 A fuse protection to the external power
supply unit.
Pulse loads up to 1500 V are short circuited by
the input protective diode.
Bus Interface of the Lower-Level System Bus
Interface
Inline local bus
Electrical isolation
No
Number of Inline terminals that can be connected
Limitation through software
Limitation through power supply unit
63, maximum
Maximum logic current consumption of the
connected local bus modules: Imax £ 2 A DC
Observe the current consumption of the modules
Observe the logic current consumption of each device when configuring an Inline station.
This information is given in every module-specific data sheet. The current consumption
may differ depending on the individual module. The permissible number of devices that
can be connected depends on the specific station structure.
Interfaces
Ethernet interface
Number
One
Connection method
8-pos. RJ-45 female connector on the bus
coupler
Connection medium
Twisted pair cable with a cross section of
0.14 mm2 to 0.22 mm2 (35 AWG to 31 AWG)
9499-040-69311
5-9
VARIO_BK ETH
Interfaces
Cable impedance
100 W
Transmission rate
10/100 Mbps
Maximum network segment expansion
100 m (328.084 ft.)
Protocols/MIBs
Supported protocols
TCP/UDP
BootP
Mechanical Tests
Shock test according to IEC 60068-2-27
Operation: 25g, 11 ms period, half-sine shock
pulse
Storage/transport: 50g, 11 ms period, half-sine
shock pulse
Vibration resistance according to IEC 60068-2-6 Operation/storage/transport: 5g, 150 Hz,
Criterion A
Free fall according to IEC 60068-2-32
1 m (3.281 ft.)
Conformance With EMC Directives
Developed according to IEC 61000-6.2
IEC 61000-4-2 (ESD)
Criterion B
6 kV contact discharge
6 kV air discharge (without labeling field)
8 kV air discharge (with labeling field in place)
IEC 61000-4-3 (radiated-noise immunity)
Criterion A
IEC 61000-4-4 (burst)
Criterion B
IEC 61000-4-5 (surge)
Criterion B
IEC 61000-4-6 (conducted noise immunity)
Criterion A
IEC 61000-4-8 (noise immunity against
magnetic fields)
Criterion A
EN 55011 (noise emission)
Class A
Warning: Portable radiotelephone equipment (P ³ 2W) must not be operated any closer than
2 m (6.562 ft). There should be no strong radio transmitters or ISM (industrial scientific and
medical) devices in the vicinity.
5-10
9499-040-69311
VARIO_BK ETH
5.1
Ordering Data
Description
Designation
Order No.
Ethernet bus coupler
with connector and labeling field
VARIO BK ETH
KSVC-101-00031
9499-040-69311
5-11
VARIO_BK ETH
Technical modifications reserved
PMA Prozess- und Maschinen-Automation GmbH
Miramstrasse 87
34123 Kassel
Germany
+49 - (0)561 505 - 1307
+49 - (0)561 505 - 1710
www.pma-online.de
5-12
9499-040-69311