1
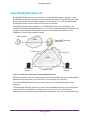
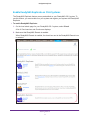
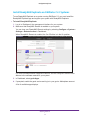
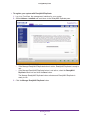
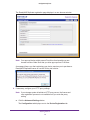
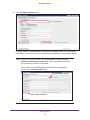
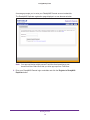
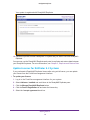
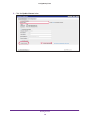
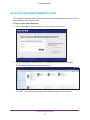
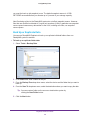
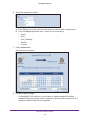
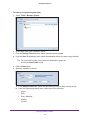
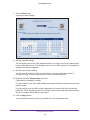
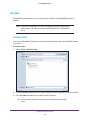
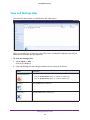
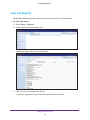
ReadyNAS Replicate User M anual February 2014 202-10774-04 350 East Plumeria Drive San Jose, CA 95134 USA ReadyNAS Replicate Support Thank you for purchasing this NETGEAR product. After installing your device, locate the serial number on the label of your product and use it to register your product at https://my.netgear.com. You must register your product before you can use NETGEAR telephone support. NETGEAR recommends registering your product through the NETGEAR website. For product updates, additional documentation, and support, visit http://support.netgear.com. Phone (US & Canada only): 1-888-NETGEAR. Phone (Other Countries): Check the list of phone numbers at http://support.netgear.com/general/contact/default.aspx. Trademarks NETGEAR, the NETGEAR logo, and Connect with Innovation are trademarks and/or registered trademarks of NETGEAR, Inc. and/or its subsidiaries in the United States and/or other countries. Information is subject to change without notice. © NETGEAR, Inc. All rights reserved. 2 Contents Chapter 1 Getting Started About ReadyNAS Replicate . . . . . . . . . . . . . . . . . . . . . . . . . . . . . . . . . . . . . . . . . . . . 5 Set Up ReadyNAS Replicate on Your System . . . . . . . . . . . . . . . . . . . . . . . . . . . . . . 6 License . . . . . . . . . . . . . . . . . . . . . . . . . . . . . . . . . . . . . . . . . . . . . . . . . . . . . . . . . . . 6 ReadyNAS Remote Account. . . . . . . . . . . . . . . . . . . . . . . . . . . . . . . . . . . . . . . . . . 6 Enable ReadyNAS Replicate on OS 6 Systems . . . . . . . . . . . . . . . . . . . . . . . . . . 7 Install ReadyNAS Replicate on RAIDiator 5.3 Systems . . . . . . . . . . . . . . . . . . . 9 Install ReadyNAS Replicate on RAIDiator 4.2 Systems . . . . . . . . . . . . . . . . . . 13 Update Licenses for RAIDiator 4.2 Systems . . . . . . . . . . . . . . . . . . . . . . . . . . . 19 Chapter 2 Replicate and Restore Data Access the ReadyNAS Replicate Portal. . . . . . . . . . . . . . . . . . . . . . . . . . . . . . . . . . Back Up and Replicate. . . . . . . . . . . . . . . . . . . . . . . . . . . . . . . . . . . . . . . . . . . . . . . . Full and Incremental Backups . . . . . . . . . . . . . . . . . . . . . . . . . . . . . . . . . . . . . . . Snapshots. . . . . . . . . . . . . . . . . . . . . . . . . . . . . . . . . . . . . . . . . . . . . . . . . . . . . . . . Back Up or Replicate Data . . . . . . . . . . . . . . . . . . . . . . . . . . . . . . . . . . . . . . . . . . Replicate a System . . . . . . . . . . . . . . . . . . . . . . . . . . . . . . . . . . . . . . . . . . . . . . . . Restore . . . . . . . . . . . . . . . . . . . . . . . . . . . . . . . . . . . . . . . . . . . . . . . . . . . . . . . . . . . . Restore Data . . . . . . . . . . . . . . . . . . . . . . . . . . . . . . . . . . . . . . . . . . . . . . . . . . . . . Restore a System . . . . . . . . . . . . . . . . . . . . . . . . . . . . . . . . . . . . . . . . . . . . . . . . . Chapter 3 22 23 23 23 24 26 30 30 31 Manage Replication Jobs Monitor the Network . . . . . . . . . . . . . . . . . . . . . . . . . . . . . . . . . . . . . . . . . . . . . . . . View and Manage Jobs . . . . . . . . . . . . . . . . . . . . . . . . . . . . . . . . . . . . . . . . . . . . . . . Monitor Jobs . . . . . . . . . . . . . . . . . . . . . . . . . . . . . . . . . . . . . . . . . . . . . . . . . . . . . . . View Job Reports. . . . . . . . . . . . . . . . . . . . . . . . . . . . . . . . . . . . . . . . . . . . . . . . . . . . 3 33 34 35 36 1. 1 Getting Started ReadyNAS Replicate allows you to create an on-demand virtual private connection between two or more ReadyNAS systems. Establishing this connection is simpler than with a traditional VPN application. Just add your ReadyNAS system to your ReadyNAS Remote virtual network and register the system with the ReadyNAS Replicate. After the connection is formed, your devices act as if they are on the same LAN. This chapter covers the following topics: • About ReadyNAS Replicate • Set Up ReadyNAS Replicate on Your System For more information about the topics covered in this manual, visit the support website at http://support.netgear.com. Firmware updates with new features and bug fixes are made available from time to time on downloadcenter.netgear.com. If the features or behavior of your product does not match what is described in this guide, you might need to update your firmware. 4 ReadyNAS Replicate About ReadyNAS Replicate ReadyNAS Replicate lets you copy data from one ReadyNAS system to another. It uses ReadyNAS Remote as its underlying communication technology. ReadyNAS Remote allows devices to communicate with each remotely over the Internet. For more information about ReadyNAS Remote, see the ReadyNAS Remote User Manual. ReadyNAS Replicate allows data from one ReadyNAS system to be replicated to and restored from another ReadyNAS system. You use the centralized ReadyNAS Replicate web portal to create, manage, and monitor backup and restore tasks that operate across ReadyNAS systems from multiple locations. Web browser WAN ReadyNAS Replicate web portal Gather reports Dispatch job WAN ReadyNAS system Peer-to-peer ReadyNAS system Figure 1. Create and manage jobs using ReadyNAS Replicate Although replication and restore tasks happen between ReadyNAS systems, the ReadyNAS Replicate web portal gives you full control over every aspect of the process. Use the ReadyNAS Replicate portal to control data on your ReadyNAS systems from anywhere. The ReadyNAS Replicate portal runs in the cloud and dispatches tasks to your ReadyNAS systems, where the replication or restore job runs. You can use it to schedule jobs, immediately store and restore data, disable and resume jobs, and view consolidated reports. Getting Started 5 ReadyNAS Replicate Set Up ReadyNAS Replicate on Your System ReadyNAS Replicate is compatible with ReadyNAS storage systems running the following operating systems: • ReadyNAS OS 6 • RAIDiator 5.3 • RAIDiator 4.2 Note: The system backup or replicate and system restore features are available only to ReadyNAS systems running RAIDiator 4.2. To use ReadyNAS Replicate, you need the following: • Two or more ReadyNAS systems on your network • ReadyNAS Remote software • A ReadyNAS Remote account • A valid license key for ReadyNAS Replicate (RAIDiator 4.2 only) License ReadyNAS Replicate is free to use on ReadyNAS OS 6 and RAIDiator 5.3 systems. If your system is running ReadyNAS OS 6 or the latest version of RAIDiator 5.3, you do not need a license to run ReadyNAS Replicate. If your system is running RAIDiator 4.2, you need a license to run ReadyNAS Replicate. You can obtain a ReadyNAS Replicate license key from a reseller or through a link in the ReadyNAS Replicate add-on. If you do not have a license key, you can register for a 45-day trial period. If you do not have a valid license key after the 45-day trial period, you are denied access to ReadyNAS Replicate. ReadyNAS Remote Account To use ReadyNAS Replicate, you must have a ReadyNAS Remote account. You can create a ReadyNAS Remote account when you install the ReadyNAS Remote client on your computer. You can also create a ReadyNAS Remote account when you install or enable ReadyNAS Remote on your storage system. For more information about ReadyNAS Remote, see the ReadyNAS Remote User Manual or the software manual for your system. Getting Started 6 ReadyNAS Replicate Enable ReadyNAS Replicate on OS 6 Systems The ReadyNAS Replicate feature comes preinstalled on your ReadyNAS OS 6 system. To use this feature, you must enable it on your system and register your system with ReadyNAS Replicate. To enable ReadyNAS Replicate: 1. On the local admin page for your ReadyNAS OS 6 system, select Cloud. A list of Cloud services and Cloud users displays. 2. Make sure that ReadyNAS Remote is enabled. When ReadyNAS Remote is enabled, the check box next to the ReadyNAS Remote icon is selected. Getting Started 7 ReadyNAS Replicate For more information about ReadyNAS Remote, see the ReadyNAS Remote User Manual or the software manual for your system. 3. Enable ReadyNAS Replicate and register your system. a. Select the check box below ReadyNAS Replicate. A pop-up screen displays and prompts you to register your system with ReadyNAS Replicate. b. Enter your ReadyNAS Remote login credentials and click the Register button. Your system is registered with ReadyNAS Replicate and the ReadyNAS Replicate feature is enabled on your system. 4. Repeat this process on each ReadyNAS OS 6 system that you want to use with ReadyNAS Replicate. You can now use the ReadyNAS Replicate web portal to replicate and restore data between your ReadyNAS systems. For more information, see Chapter 2, Replicate and Restore Data. Getting Started 8 ReadyNAS Replicate Install ReadyNAS Replicate on RAIDiator 5.3 Systems To use ReadyNAS Replicate on a system running RAIDiator 5.3, you must install the ReadyNAS Replicate app and register your system with ReadyNAS Replicate. To install ReadyNAS Replicate: 1. Log in to Dashboard, the management interface for your system. 2. Make sure that ReadyNAS Remote is enabled on your system. You can view your ReadyNAS Remote settings by selecting Configure > System > Settings > Remote Access in Dashboard. When ReadyNAS Remote is enabled, the On-Off slider is in the On position. For more information about ReadyNAS Remote, see the ReadyNAS Remote User Manual or the software manual for your system. 3. In Dashboard, select genie Apps. 4. If prompted, enable the genie service and log in to your genie+ Marketplace account. A list of available apps displays. Getting Started 9 ReadyNAS Replicate 5. Scroll down to the ReadyNAS Replicate app and click the Buy button. A message informs you that your system is installing the app. NETGEAR genie+ Marketplace displays in a new browser window and asks you to confirm your purchase. Getting Started 10 ReadyNAS Replicate Note: Your pop-up blocker might prevent Dashboard from launching a new browser window. Make sure that you allow pop-ups from Dashboard. 6. Confirm your purchase. Note: The ReadyNAS Replicate app is free for systems running the latest version of RAIDiator 5.3. An email receipt is sent to the address associated with your genie+ Marketplace account. After a few minutes, the free ReadyNAS Replicate app is installed on your system. 7. Register your ReadyNAS system with ReadyNAS Replicate. a. In Dashboard, select genie Apps > Installed. b. Scroll down to ReadyNAS Replicate and click the Manage ReadyNAS Replicate button. The ReadyNAS Replicate registration page displays in a new browser window. Getting Started 11 ReadyNAS Replicate Note: Your pop-up blocker might prevent Dashboard from launching a new browser window. Make sure that you allow pop-ups from Dashboard. c. Enter your ReadyNAS Remote login credentials and click the Register to ReadyNAS Replicate button. Your system is registered with ReadyNAS Replicate. 8. Repeat this process on each ReadyNAS 5.3 system that you want to use with ReadyNAS Replicate. You can now use the ReadyNAS Replicate web portal to replicate and restore data between your ReadyNAS systems. For more information, see Chapter 2, Replicate and Restore Data. Getting Started 12 ReadyNAS Replicate Install ReadyNAS Replicate on RAIDiator 4.2 Systems To use ReadyNAS Replicate on a system running RAIDiator 4.2, you must install the ReadyNAS Replicate add-on and register your system with ReadyNAS Replicate. To install ReadyNAS Replicate: 1. Log in to FrontView, the management interface for your system. 2. Make sure that the ReadyNAS Remote add-on is installed on your ReadyNAS system. For more information, see the ReadyNAS Remote User Manual or the software manual for your system. 3. Install the ReadyNAS Replicate add-on. a. Select Add-ons > Available. b. Scroll down to the ReadyNAS Replicate pane and click the Install button. A progress bar shows the download process. When the download completes, a pop-up screen notifies you. c. Click the OK button. The ReadyNAS Replicate add-on is installed on your system. After you install ReadyNAS Replicate on your system, you must register your system with ReadyNAS Replicate. Getting Started 13 ReadyNAS Replicate To register your system with ReadyNAS Replicate: 1. Log in to FrontView, the management interface for your system. 2. Select Add-ons > Installed and scroll down to the ReadyNAS Replicate pane. • If the Manage ReadyNAS Replicate button is active, ReadyNAS Replicate is ready to use. • If the Manage ReadyNAS Replicate button is not active, select the ReadyNAS Replicate check box and click the Save button. The Manage ReadyNAS Replicate button activates and ReadyNAS Replicate is ready to use. 3. Click the Manage ReadyNAS Replicate button. Getting Started 14 ReadyNAS Replicate The ReadyNAS Replicate registration page displays in a new browser window. Note: Your pop-up blocker might prevent FrontView from launching a new browser window. Make sure that you allow pop-ups from FrontView. A message informs you that registering your device requires you to purchase a ReadyNAS Replicate license or use the 45-day trial version. 4. If necessary, configure your HTTP proxy settings. Note: If your storage system is behind an HTTP proxy server, the license and user registration process is not available until you enter the proxy setting. a. Click the Advanced Settings button. The Configuration tab displays next to the Device Registration tab. Getting Started 15 ReadyNAS Replicate b. Click the Configuration tab. c. In the appropriate fields, enter your HTTP proxy settings. d. Click the Apply Settings button. The settings are saved. 5. Click the Device Registration tab. 6. On the Device registration screen, enter the license key. 7. Select the I accept agreement check box. Getting Started 16 ReadyNAS Replicate 8. Click the Update License button. A valid license key auto-populates the Customer Information fields with your account information. This account is used to administer the application on the storage system. Note: If you do not have a license, you can purchase a license using the Click here to purchase a license link. When you purchase a license, the license key is sent to you by email. If you want to use the ReadyNAS Replicate without purchasing a license, click the 45-day trial button. Click to purchase license. Click to begin 45-day trial. The trial lets you use ReadyNAS Replicate for free for 45 days. Getting Started 17 ReadyNAS Replicate A message prompts you to enter your ReadyNAS Remote account credentials. The ReadyNAS Replicate registration page displays in a new browser window. Note: Your pop-up blocker might prevent FrontView from launching a new browser window. Make sure that you allow pop-ups from FrontView. 9. Enter your ReadyNAS Remote login credentials and click the Register to ReadyNAS Replicate button. Getting Started 18 ReadyNAS Replicate Your system is registered with ReadyNAS Replicate. 10. Repeat this process on each ReadyNAS 4.2 system that you want to use with ReadyNAS Replicate. You can now use the ReadyNAS Replicate web portal to replicate and restore data between your ReadyNAS systems. For more information, see Chapter 2, Replicate and Restore Data. Update Licenses for RAIDiator 4.2 Systems If you purchased a ReadyNAS Replicate license after using a trial license, you can update your license from the FrontView management interface. To update your license: 1. Log in to the FrontView management interface for your system. 2. Select Add-ons > Installed and scroll down to the ReadyNAS Replicate pane. 3. Click the Manage ReadyNAS Replicate button. 4. Click the Device Registration tab and enter the license key. 5. Select the I accept agreement check box. Getting Started 19 ReadyNAS Replicate 6. Click the Update License button. Getting Started 20 2. Replicate and Restore Data This chapter covers the following topics: • Access the ReadyNAS Replicate Portal • Back Up and Replicate • Restore 21 2 ReadyNAS Replicate Access the ReadyNAS Replicate Portal The ReadyNAS Replicate portal is a centralized web-based management interface for all of your replication and restoration jobs. To log in to ReadyNAS Replicate: 1. Visit the ReadyNAS Replicate portal at www.replicate.readynas.com. 2. Log in to ReadyNAS Replicate using your ReadyNAS Remote account credentials. The ReadyNAS Replicate home screen displays. From here, you can see and manage all the registered devices on the network. Replicate and Restore Data 22 ReadyNAS Replicate Back Up and Replicate ReadyNAS Replicate allows you to easily copy data from one ReadyNAS system to another. Note: You can use RAIDiator 4.2 to do full system backups or replications and restores. You cannot do these with RAIDiator 5.3 or ReadyNAS OS 6. Full and Incremental Backups The first time you back up (or replicate) your data, ReadyNAS Replicate always performs a full backup job. A full backup makes a copy of all of the selected data stored on the source system. The amount of time a full backup takes depends on the amount of data that you are backing up. The next time the job runs, ReadyNAS Replicate performs an incremental backup job. An incremental backup copies only the data that changed since your last backup process. An incremental backup job takes much less time than a full backup job. If you are backing up large amounts of data from your source ReadyNAS system, breaking up a large backup job into smaller pieces and staggering the schedule is recommended. Perform the initial backup job and also the first few incremental backup jobs on the same LAN to get an idea of how long your incremental backup jobs take to complete. Snapshots Snapshots ensure that the data copied to the destination system is consistent with the data on the source system at the time that the backup (or replication) job runs. If you enable snapshots for a job, a snapshot of the source data is taken at the time of the job. The snapshot is stored on the source system and is deleted when the job is complete. If you do not use snapshots, files in use during the backup job are not updated on the destination ReadyNAS system. If that happens, the job is shown to have failed but the logs show that only files in use were not replicated. Typically, most files are copied and in the next run of the job, the files that were not copied are included in the backup job. Note: Systems running RAIDiator 5.3 do not support snapshots. If your system is running ReadyNAS OS 6, you do not need to allocate space for backup job snapshots. On RAIDiator 4.2 systems, each volume has a snapshot reserve, a limited amount of disk space reserved for snapshots. Snapshots on a volume take up snapshot reserve space. If your system is running RAIDiator 4.2, you must specify how much of the snapshot reserve Replicate and Restore Data 23 ReadyNAS Replicate you want the back up job snapshot to use. The default snapshot reserve is 10 GB. NETGEAR recommends that you allocate up to 5 percent of your storage capacity. New files being written to the ReadyNAS system do not affect snapshot reserve. However, files that are modified or deleted do. Logical unit numbers (LUNs) in particular use snapshot reserve space because any data written to the LUN, including new files, use snapshot reserve space. Back Up or Replicate Data You can use ReadyNAS Replicate to back up or replicate individual folders from one ReadyNAS system to another. To back up or replicate folder data: 1. Select Tools > Backup Data. 2. In the Name field, enter a name for the job. 3. From the Backup From drop-down menu, select the device and the folder that you want to back up. 4. From the Save To drop-down menu, select the destination where you want to copy the data. Tip: You can create a folder on the source or destination system by clicking the New Folder button. 5. Click the Next button. Replicate and Restore Data 24 ReadyNAS Replicate 6. Specify the schedule for the job. a. In the Effective from field, select the date when you want to start running the job. b. From the Repeat drop-down menu, select one of the following: • Hourly • Daily • Every Weekday • Monthly • Custom 7. Click the Next button. A preview screen displays. 8. Edit the Snapshot settings. • On ReadyNAS OS 6 systems, you can enable or disable snapshots. Enabling snapshots allows the system to take a snapshot of the data when the job runs. The snapshot is deleted when the job completes. Replicate and Restore Data 25 ReadyNAS Replicate • On RAIDiator 4.2 systems, you can specify how much of the snapshot reserve you want to use for the snapshot that is taken when the job runs. The Snapshot size is set to 10 GB by default. The snapshot is deleted when the job completes. 9. Edit the Limit revisions setting. You can save all versions of files in your backup or you can specify the number of revisions to keep. The Limit revisions field is set to unlimited by default. 10. (Optional) Clear the Compression check box. Compression is enabled by default. For jobs running on the same LAN, disable compression because compression slows the transfer speed. For jobs running over the WAN, enable compression to keep the link from becoming a bottleneck. When scheduling jobs over the WAN, make sure that the link speed can allow the job to complete before the next job begins. 11. Click the Apply button. Your changes are saved and the job is added to the list of scheduled jobs. You can view the list of scheduled by selecting Views > Jobs. Replicate a System ReadyNAS Replicate 1.2.0 or later and RAIDiator 4.2 allow you to back up or replicate an entire system. This feature is not available with RAIDiator 5.3 or ReadyNAS OS 6. The process is similar to backing up individual folders. For a complete list of supported operating systems, see Set Up ReadyNAS Replicate on Your System on page 6. Replicate and Restore Data 26 ReadyNAS Replicate To back up or replicate system data: 1. Select Tools > Backup System. 2. In the Name field, enter a name for the job. 3. From the Backup From drop-down menu, select the source system. 4. From the Save To drop-down menu, select the destination where you want to copy the data. Tip: You can create a folder on the source or destination system by clicking the New Folder button. 5. Click the Next button. 6. Specify a schedule for the job. a. In the Effective from field, select the date when you want to start running the job. b. From the Repeat drop-down menu, select one of the following: • Hourly • Daily • Every Weekday • Monthly • Custom Replicate and Restore Data 27 ReadyNAS Replicate 7. Click the Next button. A preview screen displays. 8. Edit the Snapshot settings. You can specify how much of the snapshot reserve you want to use for the snapshot that is taken when the job runs. The Snapshot size is set to 10 GB by default. The snapshot is deleted when the job completes. 9. Edit the Limit revisions setting. You can save all versions of files in your backup or you can specify the number of revisions to keep. The Limit revisions field is set to unlimited by default. 10. (Optional) Clear the Compression check box. Compression is enabled by default. For jobs running on the same LAN, disable compression because compression slows the transfer speed. For jobs running over the WAN, enable compression to keep the link from becoming a bottleneck. When scheduling jobs over the WAN, make sure that the link speed can allow the job to complete before the next job begins. 11. Click the Apply button. Your changes are saved and the job is added to the list of scheduled jobs. Replicate and Restore Data 28 ReadyNAS Replicate You can view the list of scheduled by selecting Views > Jobs. Replicate and Restore Data 29 ReadyNAS Replicate Restore ReadyNAS Replicate allows you to easily restore data from one ReadyNAS system to another. Note: You can use RAIDiator 4.2 to do full system backups or replications and restores. You cannot do these with RAIDiator 5.3 or ReadyNAS OS 6. Restore Data You can use ReadyNAS Replicate to restore individual folders from one ReadyNAS system to another. To restore data: 1. Select Tools > Restore Data. 2. From the Restore drop-down menu, select the device with the data that you want to restore. 3. From the Data drop-down menu, select the job to restore. Tip: You can select a different device from the Alternative drop-down menu. Replicate and Restore Data 30 ReadyNAS Replicate 4. Click the Apply button. The data is restored. Restore a System ReadyNAS Replicate 1.2.0 or later and RAIDiator 4.2 allow you to restore an entire system. This feature is not available with RAIDiator 5.3 or ReadyNAS OS 6. For a complete list of supported operating systems, see Set Up ReadyNAS Replicate on Your System on page 6. To restore system data: 1. Select Tools > Restore System. 2. From the Restore drop-down menu, select the device with the data you want to restore. 3. From the Data drop-down menu, select the backup job to restore. Tip: You can select a different device from the Alternative drop-down menu. 4. Click the Apply button. The system data is restored. Replicate and Restore Data 31 3. Manage Replication Jobs This chapter covers the following topics: • Monitor the Network • View and Manage Jobs • Monitor Jobs • View Job Reports 32 3 ReadyNAS Replicate Monitor the Network The ReadyNAS Replicate home screen lists each system registered on the network. Figure 2. ReadyNAS Replicate home screen The top panel shows the following information for each device: • Device name • Volumes on each device • Total size of each volume on the device • Amount of space used on each volume The bottom panel shows the following information: • Device name • Firmware version • Device model • Free space on the device • Total size of all volumes on the device • Total space used on all volumes on the device Manage Replication Jobs 33 ReadyNAS Replicate View and Manage Jobs You can easily add, delete, or edit jobs from the Jobs screen. When you create a job, it displays on the Jobs screen. ReadyNAS Replicate runs that job based on the schedule that you specified. To view and manage jobs: 1. Select Views > Jobs. A list of jobs displays. 2. (Optional) Manage the jobs using the buttons next to each job, as follows: Button Description Enable/Disable button • • Click the Enable/Disable button to disable an enabled job. Click the Enable/Disable button to enable a disabled job. Edit button Click the Edit button to edit a job. Delete button Click the Delete button to delete a job. Manage Replication Jobs 34 ReadyNAS Replicate Monitor Jobs You can view the status of pending and active jobs from the Monitor screen. Active jobs are currently running. Pending jobs are the next occurrences of scheduled jobs. If you want, you can run a job immediately from the Monitor view To monitor jobs: 1. Select Views > Monitor. A list of active and pending jobs displays. Active jobs are currently running, while pending jobs are the next occurrences of scheduled jobs. 2. (Optional) Manage active and pending jobs using the buttons next to each job, as follows: Button Enable/Disable button Description • • Run button Click the Enable/Disable button to skip the next occurrence of a scheduled job. Click the Enable/Disable button to return a skipped job to an enabled state. Click the Run button to immediately run a job. Manage Replication Jobs 35 ReadyNAS Replicate View Job Reports ReadyNAS Replicate generates reports that show the outcome of a scheduled job. To view a job report: 1. Select Views > Reports. 2. Select a job from the drop-down menu. A detailed progress report runs automatically. 3. Click a + icon to see details about the job. If a job fails, a generated report shows where the problem occurred. Manage Replication Jobs 36


![[PDF版:13.4MB] (日)](http://vs1.manualzilla.com/store/data/006537897_2-bdc033a127f4fc7c5a7cbb1be387ee25-150x150.png)