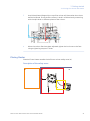
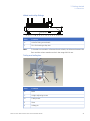
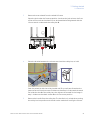
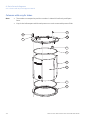
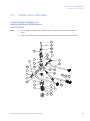
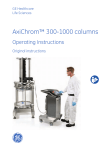
1
GE Healthcare
Life Sciences
AxiChrom™ 300-1000 columns
User Manual
Table of Contents
Table of Contents
1
Introduction ..........................................................................................................
1.1
1.2
1.3
1.4
1.5
1.6
1.7
1.8
1.9
1.10
2
3
4
5
General introduction ...........................................................................................................................
Scope of this User Manual ................................................................................................................
Important user information .............................................................................................................
Regulatory information ......................................................................................................................
Intended use of the columns ..........................................................................................................
Safety precautions ...............................................................................................................................
Emergency stop procedures ...........................................................................................................
Resetting the system after an emergency stop .....................................................................
Disconnecting the power ..................................................................................................................
Labels .........................................................................................................................................................
5
6
8
10
12
13
20
21
22
22
Specifications and characteristics ....................................................................
26
2.1
2.2
2.3
2.3.1
2.3.2
2.3.3
2.3.4
2.4
2.5
2.5.1
Principles of column function .........................................................................................................
Overview of the column and parts ...............................................................................................
Primary specifications ........................................................................................................................
Weights, volumes and related dimensions .............................................................................
Heights in different operating states .........................................................................................
Operating conditions ........................................................................................................................
Pressure and time out limits ..........................................................................................................
Materials ...................................................................................................................................................
Chemical resistance ............................................................................................................................
Resistance to sodium chloride ......................................................................................................
26
28
32
32
33
33
34
35
36
39
Getting started .....................................................................................................
40
3.1
3.2
3.3
3.4
3.5
3.6
3.7
3.7.1
3.7.2
3.7.3
3.8
3.9
Unpacking the crates and cleaning a new column ............................................................
Placing the column and Master .....................................................................................................
Wheel kits .................................................................................................................................................
Connections ............................................................................................................................................
Rupture discs ..........................................................................................................................................
Column and system setup ................................................................................................................
Using the Master ...................................................................................................................................
Start Master and calibrate column .............................................................................................
User interface .......................................................................................................................................
Column and Master setup ..............................................................................................................
Cleaning the column ...........................................................................................................................
Ambient temperature changes ......................................................................................................
40
42
46
59
66
68
75
75
76
78
85
86
Preparations before packing the column ........................................................
89
4.1
4.2
4.3
4.4
4.4.1
89
90
91
93
93
Packing Factor and Compression Factor ..................................................................................
Preparation of the slurry ...................................................................................................................
Determining the slurry concentration ........................................................................................
Priming the column .............................................................................................................................
Short description of the priming procedure ...........................................................................
AxiChrom 300-1000 columns User Manual 28-9562-89 AD
3
Table of Contents
4.4.2
4.4.3
4.4.4
4.4.5
5
108
110
117
120
135
137
138
Choice of test samples for columns .............................................................................................
HETP and asymmetry calculation .................................................................................................
141
142
After the packing .................................................................................................. 144
7.1
7.2
7.3
7.3.1
7.3.2
7.3.3
7.3.4
7.4
A
Intelligent Packing ................................................................................................................................
Creating a UNICORN method ..........................................................................................................
Packing using a UNICORN method ..............................................................................................
Packing using the Master Wizard .................................................................................................
Creating custom packing methods in the Master .................................................................
Packing stainless steel column tubes ........................................................................................
Post packing modifications ............................................................................................................
Evaluating column performance ...................................................................... 141
6.1
6.2
7
94
94
97
99
Packing the column ............................................................................................. 108
5.1
5.2
5.3
5.4
5.5
5.5.1
5.5.2
6
Wetting plastic bed supports ........................................................................................................
Creating a UNICORN method ........................................................................................................
Using UNICORN method .................................................................................................................
Using Master wizard .........................................................................................................................
Cleaning-in-place (CIP) .......................................................................................................................
Sanitization-in-place ...........................................................................................................................
Unpacking the column .......................................................................................................................
Short description of the unpacking procedure ......................................................................
Creating a UNICORN method ........................................................................................................
Unpacking acrylic column tubes .................................................................................................
Unpacking stainless steel column tubes ..................................................................................
System shutdown procedure ..........................................................................................................
144
144
145
146
146
150
162
163
Parts list and diagrams ....................................................................................... 167
A.1
A.2
A.3
A.4
A.5
Part numbers and names .................................................................................................................
Columns with any bed support material ...................................................................................
Columns with plastic bed supports ..............................................................................................
Columns with stainless steel bed supports ..............................................................................
Media valve and tubes .......................................................................................................................
167
172
177
179
181
B
Packing buffer information ................................................................................ 183
C
Accessories and additional literature .............................................................. 187
D
Crate weights and dimensions .......................................................................... 192
E
Column and AxiChrom Master weights and dimensions .............................. 193
F
Decontamination report ..................................................................................... 195
4
AxiChrom 300-1000 columns User Manual 28-9562-89 AD
1 Introduction
1
Introduction
1.1
General introduction
AxiChrom process column family has been designed to deliver reproducible results from
process development to production scales. This is facilitated by the innovative Intelligent
Packing where UNICORN™ software, ÄKTA™ systems and AxiChrom columns work together to facilitate a convenient operation for packing of the bed via axial compression.
The AxiChrom family of process column comprises the following columns:
•
AxiChrom 300
•
AxiChrom 400
•
AxiChrom 450
•
AxiChrom 600
•
AxiChrom 800
•
AxiChrom 1000
The collective name AxiChrom 300-1000 refers to all columns in the family.
Columns are available in two tube lengths, allowing maximum bed heights of 300 and
500 mm, respectively. The columns are validatable and the construction materials
comply with the ASME BPE standards. They are fully traceable back to the source for
biopharmaceutical production. All wetted polymer and elastomeric parts are classified
according to USP Class VI, 21 CFR Part 177 and are animal origin free, or comply with
the conditions in the CPMP Note for Guidance (EMEA/410/01).
AxiChrom 300-1000 columns User Manual 28-9562-89 AD
5
1 Introduction
1.1 General introduction
The images below show a 600 column (left) and an AxiChrom Master unit (right).
1.2
Scope of this User Manual
This User Manual is designed as a general introduction and guide to using AxiChrom 3001000 columns. It is recommended that the user reads the complete Operating Instructions
before using the column. Information concerning safety precautions is presented in this
manual in conjunction with general information about the features and operation of the
column.
Specifically, the instructions cover:
6
Chapter 1
General introduction, intended use of the columns, safety instructions, and labeling.
Chapter 2
AxiChrom 300-1000 columns specifications, including principles
of column function and column specifications.
Chapter 3
Preparation of a column for use, including unpacking, installation, column and system setup, use of AxiChrom Master and
instructions for cleaning the column before use.
AxiChrom 300-1000 columns User Manual 28-9562-89 AD
1 Introduction
1.2 Scope of this User Manual
Chapter 4
Preparations required before packing the column, including
slurry preparation and priming the column.
Chapter 5
Overview of the Intelligent Packing procedure and instructions
on how to pack the column using UNICORN or AxiChrom Master
interface.
Chapter 6
Guidance how to evaluate the performance of the column and
perform HETP calculations.
Chapter 7
Instructions for performing CIP, Sanitization-in-place (SIP), unpacking the column using UNICORN or Master interface and
shutting down the column and Master.
Appendices
Spare parts information and exploded diagrams.
Tubing kits and connections. Packing buffers and recommended
packing factors. Column and crate weights and dimensions.
Decontamination report.
Associated documentation
The following documentation is provided with the AxiChrom 300-1000 columns.
Manual name
Document number
Description
AxiChrom 300-1000
columns User Manual
28-9562-89
This manual
AxiChrom 300-1000
columns Operating Instructions
28-9562-90
Safety information and instructions for installation, operation and
maintenance. Includes a CD with
translations into local languages
AxiChrom columns Site
Preparation Guide
Configured for
individual
columns
Guidelines and requirements regarding the installation site and
how to place the column
AxiChrom 300-1000
columns Read Me First
28-9562-91
Instructions on how to unpack the
column from the delivery package
Product documentation in
binder and on a CD
Configured for
individual
columns
A CD containing spare parts lists,
diagrams, material certificates,
etc.
AxiChrom 300-1000 columns User Manual 28-9562-89 AD
7
1 Introduction
1.2 Scope of this User Manual
Additional documentation on request
•
Additional printed versions of documentation available electronically: spare part
lists, diagrams and material certificates, etc.
•
Packing recommendations, applications and Sanitization-in-place studies, and other
supporting documentation
Other reference documents
Other documents that should be referred to before using the column:
•
ÄKTAprocess User Manual
•
ÄKTAprocess Operating Instructions
•
UNICORN User Reference Manual for ÄKTAprocess
NOTICE
Ensure that the product file is kept updated and together with the
product documentation. The file should contain information about
inspections, performed maintenance, exchanged spare parts and
any other important information for safe operation.
1.3
Important user information
Read this before using AxiChrom
columns
All users must read the entire AxiChrom 300-1000 columns Operating Instructions
before installing, using, or maintaining the instrument. Always keep the Operating
Instructions at hand when using AxiChrom 300-1000 columns.
Do not operate AxiChrom 300-1000 columns in any other way than described in the
user documentation. If you do, you may be exposed to hazards that can lead to personal
injury, and you may cause damage to the equipment.
8
AxiChrom 300-1000 columns User Manual 28-9562-89 AD
1 Introduction
1.3 Important user information
Intended use
The AxiChrom family of process columns has been designed for low pressure chromatographic separation of biomolecules such as proteins, peptides and oligonucleotides in
GMP-regulated environments. AxiChrom columns are intended for production use only
and should not be used for diagnostic purposes in any clinical or in vitro procedures.
The columns are not suitable for operation in a potentially explosive atmosphere or for
handling flammable liquids. If the columns are used for purposes other than those
specified in the user documentation, safe operation and the protection provided by the
system may be impaired.
Safety notices
This user documentation contains WARNINGS, CAUTIONS and NOTICES concerning the
safe use of the product. See definitions below.
Warnings
WARNING
WARNING indicates a hazardous situation which, if not avoided,
could result in death or serious injury. It is important not to proceed
until all stated conditions are met and clearly understood.
Cautions
CAUTION
CAUTION indicates a hazardous situation which, if not avoided,
could result in minor or moderate injury. It is important not to proceed until all stated conditions are met and clearly understood.
Notices
NOTICE
NOTICE indicates instructions that must be followed to avoid
damage to the product or other equipment.
AxiChrom 300-1000 columns User Manual 28-9562-89 AD
9
1 Introduction
1.3 Important user information
Notes and tips
Note:
A Note is used to indicate information that is important for trouble-free and
optimal use of the product.
Tip:
A tip contains useful information that can improve or optimize your procedures.
Typographical conventions
Software items are identified in the text by bold italic text. A colon separates menu levels,
thus File:Open refers to the Open command in the File menu. Hardware items are
identified in the text by bold text (e.g., Power switch).
1.4
Regulatory information
This section describes the directives and standards that are fulfilled by the AxiChrom 3001000 columns and AxiChrom Master.
Manufacturing information
Name of manufacturer
Address of manufacturer
GE Healthcare Bio-Sciences AB
GE Healthcare Bio-Sciences AB
Björkgatan 30, SE-751 84 Uppsala, Sweden
Other regulatory information may be found in the Declaration of Conformity supplied
with the product.
CE Conformity
This product complies with the European directives listed in the table, by fulfilling the
corresponding harmonized standards. A copy of the Declaration of Conformity is supplied
with the product.
10
Directive
Title
2006/42/EC
Machinery Directive (MD)
2006/95/EC
Low Voltage Directive (LVD)
2004/108/EC
ElectroMagnetic Compatibility (EMC) Directive
97/23/EC
Pressure Equipment Directive (PED)
AxiChrom 300-1000 columns User Manual 28-9562-89 AD
1 Introduction
1.4 Regulatory information
International standards
This product is designed in accordance with the requirements of the following standards
and regulations:
Standard
Description
Notes
EN 61010-1,
IEC 61010-1, UL
61010-1, CAN/CSA
C22.2 No 61010-1
Safety requirements for electrical equipment for measurement, control, and laboratory use
EN standard is
harmonized with
EU directive
2006/95/EC
EN 61326-1 (Emission according to
CISPR 11, Group 1,
class A)
EMC emissions and immunity requirements for electrical equipment for measurement, control and laboratory use
EN standard is
harmonized with
EU directive
2004/108/EC
EN ISO 12100
Safety of machinery, General principles
for desgn, Risk assessment and risk reduction.
EN ISO standard is
harmonized with
EU directive
2006/42/EC
ASME BPVC
VIII, div 1
Boiler and Pressure Vessel Code (BPVC)
Applies only to
stainless steel
columns
ASME BPE
Bioprocessing equipment
UL 508a
UL standard for Safety for Industrial
Control Panels
EMEA/410/01,
CPMP Note
All wetted polymer and elastomeric parts
are animal origin-free or comply with the
conditions in the standard, and are also
classified according to USP Class VI, 21
CFR Part 177
AxiChrom 300-1000 columns User Manual 28-9562-89 AD
11
1 Introduction
1.4 Regulatory information
CE Marking
The CE marking and the corresponding Declaration of Conformity is valid for the instrument when it is:
•
used as a stand-alone unit, or
•
connected to other CE-marked products recommended or described in the user
documentation, and
•
used in the same state as it was delivered from GE Healthcare, except for alterations
described in the user documentation.
The Declaration of conformity is valid only for systems that are marked with the
CE-marking.
Regulatory compliance of
connected equipment
Any equipment connected to the AxiChrom 300-1000 columns and AxiChrom Master
should meet the safety requirements of IEC EN 61010-1/ IEC 61010-1 or relevant harmonized standards. Within EU, connected equipment must be CE marked.
1.5
Intended use of the columns
AxiChrom columns are designed for process scale chromatographic separation of
biomolecules such as proteins, peptides and oligonucleutides. AxiChrom columns can
be operated at pressures up to 4 bar.
The columns must be used in accordance with the instructions and technical specifications in this manual and AxiChrom 300-1000 columns Operating Instructions to minimize
the risk for injuries and damage to the columns or other equipment.
12
AxiChrom 300-1000 columns User Manual 28-9562-89 AD
1 Introduction
1.5 Intended use of the columns
Approved operator
The use of interactive guides in AxiChrom Master and in the Intelligent Packing wizard
allows consistent performance with reproducible quality.
To use the column safely and correctly, the operator must have read, understood and
be fully acquainted with AxiChrom 300-1000 columns User Manual and AxiChrom 3001000 columns Operating Instructions. Improper operation of the column may result in
property damage as well as personal injury.
1.6
Safety precautions
Introduction
Before installing, operating or maintaining the AxiChrom column, you must be aware of
the hazards described in this manual. Follow the instructions provided to avoid personal
injury or damage to the equipment.
The warnings and cautions in the user documentation shall in no way take precedence
over more restrictive local regulations and policies.
For your personal safety it is important that you have a proper knowledge of the entire
system that the column is part of. Study any complementary safety instructions and use
appropriate personal protection equipment for the specific application and operation
environment.
Risk assessment
AxiChrom columns have been designed and manufactured to provide a high level of
personal safety. However, the residual risk is highly dependent on the application and
environment in which the column is operated. In order to determine the safe operation
of the equipment a risk assessment must be made. This risk assessment, in combination
with local regulations and policies, will result in specific safety instructions for installation,
operation and maintenance, use of proper personal protective equipment, or other arrangements that are needed to operate your process safely.
AxiChrom 300-1000 columns User Manual 28-9562-89 AD
13
1 Introduction
1.6 Safety precautions
General precautions
WARNING
The customer must ensure that all installation, maintenance,
operation and inspection is carried out by qualified personnel who
are adequately trained, understand and adhere to local regulations
and the operating instructions, and have a thorough knowledge
of AxiChrom 300-1000 columns and the entire process.
WARNING
AxiChrom columns must NOT be used for any other purposes than
chromatographic separations. They must not be used as:
•
Storage tanks for chemicals etc.
•
General pressure vessels
•
Fermentation vessels
•
Gas storage tanks
The column must never contain air or gas under pressure.
Using flammable liquids
WARNING
AxiChrom columns are not designed to handle flammable fluids.
AxiChrom is not approved for work in a potentially explosive atmosphere, in areas classified as Zone 0 to Zone 2 according to IEC
60079-10 2002.
14
AxiChrom 300-1000 columns User Manual 28-9562-89 AD
1 Introduction
1.6 Safety precautions
Personal protection
WARNING
Always use protective glasses and other personal protective
equipment appropriate to the current application, to ensure personal safety during operation.
WARNING
Disconnection of pressurized air supply tubes can cause loud
noises. Ear protection is recommended.
Note:
No ear protection is required during normal operation. The noise from AxiChrom
is low (below 55 dB).
Installing and moving the
columns and Master
WARNING
Move transport crates. Ensure that the forklift has capacity to
safely lift the crate weight. Ensure that the crate is properly
balanced so that it will not accidentally tip when moved.
WARNING
Move column. Ensure that the column's center of gravity is well
balanced over the forklift's lifting arms, otherwise the column may
tip off the forklift.
WARNING
All electrical installations must be performed by authorized
personnel only.
AxiChrom 300-1000 columns User Manual 28-9562-89 AD
15
1 Introduction
1.6 Safety precautions
CAUTION
Ensure that all tubing, hoses and cables are placed so that the risk
for tripping accidents is minimized.
NOTICE
Disconnect all tubing, hoses and cables before moving the column.
System operation
WARNING
The working pressure of the column should never exceed 4 bar,
otherwise there is a risk of personal injury and damage to the column. Always use appropriate pressure alarms, pressure vents or
rupture discs, and safety equipment.
WARNING
Do not block access to the power switch. The power switch must
always be easy to access.
CAUTION
Do not touch the motor on the column during operation since the
motor might be hot and there is a risk of burning injury.
CAUTION
Do not stand on the column base to reach the top parts of the
column (e.g. top inlet/outlet). Always use proper equipment for
climbing and standing when reaching the top parts of the column.
16
AxiChrom 300-1000 columns User Manual 28-9562-89 AD
1 Introduction
1.6 Safety precautions
CAUTION
Remove any spillage on the floor immediately to minimize the risk
of slipping accidents.
CAUTION
Use a pressure gauge, pressure relief valve, rupture disc or other
pressure safety equipment to ensure that the maximum operating
pressure of the column is not exceeded.
NOTICE
Do not operate the column at temperatures outside the operating
temperature range.
NOTICE
Ensure that the column and system is primed, that is, free from air,
and that the inlet is open before the process run is started.
NOTICE
Do not use chemicals not listed in the Chemical Resistance information.
The wetted parts of AxiChrom may be damaged by chemicals not
listed in the Chemical Resistance information. Contact your GE
Healthcare representative before using chemicals that are not
listed.
NOTICE
Ensure that any liquids used with the column is particle-free (down
to 1 μm), as particles can block and damage the bed support.
AxiChrom 300-1000 columns User Manual 28-9562-89 AD
17
1 Introduction
1.6 Safety precautions
NOTICE
Chlorides and low pH can cause corrosion on stainless steel. Rinse
thoroughly with clean water after use.
Inspect the column regularly for signs of corrosive attacks, which
may cause column damage if untreated. Note that the stainless
steel bed supports are especially vulnerable to corrosion.
NOTICE
If there is air in the column, ensure that there is an unrestricted
flow path for evacuation through an open valve before the adapter
is moved or liquid is pumped into the column.
NOTICE
Ensure that the pressure does not exceed the operating pressure
of the media packed in the column.
NOTICE
The acrylic column tube has limited resistance to organic solvents.
Refer to the Chemical resistance section for more information.
Maintenance
WARNING
Follow all safety instructions displayed in the AxiChrom Master
when performing maintenance on the column.
18
AxiChrom 300-1000 columns User Manual 28-9562-89 AD
1 Introduction
1.6 Safety precautions
WARNING
Ensure that no body parts are caught between the column tube
assembly and the column frame when using the swing out function
for maintenance work on the column. Due to the weight of the
column tube assembly, it is not advisable to try to stop the momentum of the assembly by hand when it is set in motion.
WARNING
There must not be any residues of harmful substances left in the
column during maintenance. Make sure that the column is properly
cleaned before maintenance, and that cleaning is documented in
the Decontamination Report.
NOTICE
Lifting the top unit with incorrectly placed lock blocks may damage
the column.
NOTICE
Inspect all connections and tubing before use and replace any
defective parts. Also inspect the column tube thoroughly before
use to verify that there are no cracks or other visible signs of
damage.
NOTICE
Perform a leakage test whenever any of the wetted parts have
been re-fitted or changed.
NOTICE
Always wear latex gloves (or gloves of other suitable material) when
handling the bed support to prevent grease from unprotected fingers coming into contact with the bed support.
AxiChrom 300-1000 columns User Manual 28-9562-89 AD
19
1 Introduction
1.6 Safety precautions
NOTICE
To avoid spillage, do not open the bottom valve while the column
is filled with liquid, unless there are hoses connected to the outlets.
NOTICE
Handle stainless steel parts, especially the bed supports, with care.
Damage to surfaces may lead to corrosion.
1.7
Emergency stop procedures
EMERGENCY STOP buttons
AxiChrom Master is equipped with an EMERGENCY STOP button which can be used to
stop the movement of the adapter in case of an emergency during operation of the
column. When the EMERGENCY STOP button is pressed, the adapter movement stops.
The process that is in progress in AxiChrom Master (for example an Intelligent Packing)
will be aborted and the interface will display the MAIN MENU. The EMERGENCY STOP
button locks in place until it is released manually.
The EMERGENCY STOP button is located on the AxiChrom Master. The EMERGENCY
STOP label is yellow with black text and the button is red.
WARNING
Ensure that the EMERGENCY STOP button can always be reached
while working with the column.
20
AxiChrom 300-1000 columns User Manual 28-9562-89 AD
1 Introduction
1.7 Emergency stop procedures
WARNING
The EMERGENCY STOP button will not shut off the electrical power
to the motor of column. Use the power switch on the connector
panel of AxiChrom Master to shut off the electrical power.
EMERGENCY STOP buttons on
ÄKTAprocess systems
The EMERGENCY STOP buttons on the system must be used in case of an emergency
when the pumps have to be stopped. There are two EMERGENCY STOP buttons on an
ÄKTAprocess system, one on each side, and only one needs to be pressed in order for
the pumps to stop. Refer to the Operating instructions for more information about the
emergency procedures for ÄKTAprocess.
1.8
Resetting the system after an emergency stop
WARNING
The column may still be pressurized when the process has been
stopped using the EMERGENCY STOP button. Ensure that the
pressure is released before disconnecting any tubing.
The EMERGENCY STOP button will abort the process that is currently in progress in AxiChrom Master, for example Intelligent Packing. The process has to be restarted from the
beginning after the emergency has been resolved.
If the EMERGENCY STOP is pressed during the MAINTENANCE wizard or MANUAL
CONTROL wizard, the MAIN MENU is displayed. When the assembly or disassembly
process is launched again, the software returns to the same state as when the button
was pressed.
The EMERGENCY STOP button is released by turning the button counter-clockwise. If
the column was being packed, the column must be emptied using MANUAL CONTROL
or UNPACKING in AxiChrom Master or the unpacking method in UNICORN before the
Intelligent Packing wizard can be started again.
AxiChrom 300-1000 columns User Manual 28-9562-89 AD
21
1 Introduction
1.9 Disconnecting the power
1.9
Disconnecting the power
The power to the AxiChrom column, AxiChrom Master and/or the system can also be
shut off in an emergency by disconnecting the power supply using the system power
switch. Note that disconnecting the power this way from an ÄKTAprocess system will
cause valves to close immediately and not in a proper sequence. Ensure that the system
and column is fully depressurized before disconnecting any tubing or removing components that are part of the flow path.
WARNING
It is essential that access to EMERGENCY STOP buttons, master
power switch, system power switch and power cable connections
are kept free. Do not block any of these items with other equipment,
or position the column so that they become unreachable.
WARNING
A disconnecting system power switch must be installed, such as a
branch circuit protection and disconnect switch installed at your
facility. The system power switch should be installed at the wall to
cut the power to AxiChrom Master. Always use this power switch
(located on the back on the AxiChrom Master unit) and the system
power switch for safe disconnection of AxiChrom Master.
1.10 Labels
This section describes the identification labels, safety labels and labels concerning hazardous substances that are attached to the AxiChrom columns and AxiChrom Master.
22
AxiChrom 300-1000 columns User Manual 28-9562-89 AD
1 Introduction
1.10 Labels
Column label
Label placement
Example label
Label text
Meaning
Dimension
Dimensions of the column
Serial number
Serial number for the individual column
Year of manufacturing
Year when the column was manufactured
Tare mass
Weight of the empty column
Operating temperature TS
Operating temperature range
Max column volume V
Maximum column bed volume
Design pressure PS
Design pressure for the column
Test pressure PT
Pressure at which the column has been tested in
manufacturing
Date
Date of test
Maximum filling mass
Maximum weight of column contents
(media and eluent)
PED fluid group / cat.
Pressure Equipment Directive fluid group / category
AxiChrom 300-1000 columns User Manual 28-9562-89 AD
23
1 Introduction
1.10 Labels
AxiChrom Master label
The illustration below shows an example of an AxiChrom Master label.
24
Label text
Meaning
Code Number
Product code number for AxiChrom Master
Serial Number
Serial number for the individual AxiChrom Master
Manufacturing Year
Year when the AxiChrom Master was manufactured
Supply Voltage Range (CE)
Permissible supply voltage range (Europe)
Max Voltage (NA)
Maximum permissible supply voltage (North America)
Frequency
Supply voltage frequency
Max Power Consumption
Maximum power consumption
Enclosure
Enclosure rating according to EN 61326-1
Largest Motor Current (FLA)
Highest current used by the motor (Full Load Ampere)
Max Current
Highest current used by the AxiChrom Master
Pneumatic Supply
Required pressure for pressurized air supply
Short Circuit Rating
Maximum tolerated short circuit current
Protection Class
Protection class rating according to EN60529
AxiChrom 300-1000 columns User Manual 28-9562-89 AD
1 Introduction
1.10 Labels
Symbols used in safety labels
Label
Meaning
Warning! Read the user documentation before using the system. Do not
open any covers or replace parts unless specifically stated in the user
documentation.
The system complies with the requirements for electromagnetic compliance
(EMC) in Australia and New Zealand.
The system complies with applicable European directives.
Labels concerning hazardous
substances
Label
Meaning
This symbol indicates that waste electrical and electronic equipment must
not be disposed as unsorted municipal waste and must be collected separately. Please contact an authorized representative of the manufacturer
for information concerning decommissioning of equipment.
This symbol indicates that the product contains hazardous materials in
excess of the limits established by the Chinese standard SJ/T11363-2006
Requirements for Concentration Limits for Certain Hazardous Substances
in Electronics.
AxiChrom 300-1000 columns User Manual 28-9562-89 AD
25
2 Specifications and characteristics
2
Specifications and characteristics
2.1
Principles of column function
Intelligent packing
Intelligent Packing uses interactive guides to ensure an optimized compression of the
bed. Intelligent Packing will pack the column with minimal manual intervention to ensure
reproducible results.
Intelligent Packing is controlled from AxiChrom MasterMaster, either as a stand-alone
unit or controlled in turn from an ÄKTAprocess™ instrument running UNICORN™ software.
Axial compression
AxiChrom columns are packed using axial compression , achieved by an electric motor
driving the adapter downwards through the column tube until the required packing is
achieved.
Filling the column
To fill the column, the adapter is raised to draw media slurry through the media valve
inlet into the process chamber, i.e. the space between the adapter bed support and
bottom bed support.
The correct slurry volume to draw into the column is calculated using
26
•
the target bed height
•
the slurry concentration
•
a Packing Factor for optimal packing (defined later)
•
the volume added by the tube leading from the slurry tank to the column.
AxiChrom 300-1000 columns User Manual 28-9562-89 AD
2 Specifications and characteristics
2.1 Principles of column function
Packing the column
To pack the column, the adapter moves downwards, pushing down the slurry and forcing
the liquid out through the bottom bed support and further out through the Bottom mobile
phase. Media particles are retained by the bed support and a bed is formed. This is called
the consolidation stage. The pressure is monitored in the closed Top mobile phase flow
path. The pressure gradually increases while the bed is being consolidated. After the
bed is fully consolidated the adapter will eventually meet with the newly formed bed.
When this occurs, the pressure drops momentarily in the column. When the consolidated
bed is detected, either by the decrease in pressure or manually, the operator is given an
option to:
•
Ignore if the detection was false. Result: The consolidation continues. If no detection
occurs the adapter stops at the defined Low bed height limit.
•
Confirm the detection. Result: If the final bed height is calculated to be within the
selected bed height range with the defined Packing Factor, the adapter will continue
to compress the bed. When the defined Packing Factor has been achieved, the operator ends the packing procedure. If the selected bed height range cannot be met
the packing will be aborted. The compressed bed should be within the defined
compression range within the set bed height range to assure optimal compression
and performance of the packed bed.
Unpacking the media from the
column
The unpacking of the media from the column is performed in three steps:
•
expansion
•
collapse
•
slurry push out
The expansion is performed by lifting the bed by moving the adapter up at the same
time as flow comes from the bottom bed support. When the bed has expanded the flow
is reversed to collapse the bed by pushing it down. When the collapsed bed has fallen
to the bottom of the column the Media valve opens and the slurry can be pushed out
from the column by having a low upwards flow into the column and at the same time
lower the adapter to the bottom position.
AxiChrom 300-1000 columns User Manual 28-9562-89 AD
27
2 Specifications and characteristics
2.2 Overview of the column and parts
2.2
Overview of the column and parts
1
3
7 12
2
4
13
14
10
5
6
11
8
9
28
Part
Function
Part
Function
1
Top unit
8
Bottom bed support and distributor plate
2
Worm gear and bellows
9
Column stand
3
Servo motor
10
Process chamber
4
Top mobile phase inlet/outlet
11
Column tube
5
Adapter
12
Slurry inlet
6
Adapter bed support and distributor plate
13
Bottom mobile phase inlet/outlet
7
Media valve assembly
14
Rinse inlet
AxiChrom 300-1000 columns User Manual 28-9562-89 AD
2 Specifications and characteristics
2.2 Overview of the column and parts
For information on column weights and dimensions, see AppendixE Column and AxiChrom
Master weights and dimensions, on page 193.
Inlet and outlet system
•
The tubing connection at the Top mobile phase on the adapter is the only liquid
connection at the top of the column.
•
At the bottom the center inlet/outlet is the bottom mobile phase.
•
The Slurry inlet is connected to the slurry tank from where the media slurry is drawn
into the column. Inside the Media valve under the column, the Slurry inlet has a liquid
connection with the Rinse inlet.
•
The Rinse inlet is used to flush the Media valve, the Slurry inlet and the tube to the
slurry tank free from residual media after filling and unpacking the column. When a
filling process has ended, the Media valve closes and a pump connected to the Rinse
inlet pumps the liquid through the Media valve, and then through the Slurry inlet to
the slurry tank.
•
The Slurry inlet and Rinse inlet have no connection to the Bottom mobile phase
flowpath. When the Media valve is open, the Slurry inlet and Rinse inlet lead directly
to the process chamber. Liquid in the mobile phases, on the other hand, has to flow
through the bed supports to reach the process chamber.
Connection flanges
•
Tri-clamp 25 is used for the 300, 400, 450 and 600 columns.
•
Tri-clamp 50 is used for the 800 and 1000 columns.
Valve holder (accessory)
The valve holder accessory is useful for fixing components to the column assembly,
particularly when a number of serially connected valves and sensors are used. The valve
holder is clamped on the front stand tube with a U-rod and holds the components with
3-pronged clamps. One valve holder carries two clamps. Different sizes of U-rod are
used for AxiChrom 300-600 columns and AxiChrom 800-1000 columns respectively.
AxiChrom 300-1000 columns User Manual 28-9562-89 AD
29
2 Specifications and characteristics
2.2 Overview of the column and parts
Valve holder accessory (inset) and mounted with valves and sensors on front stand tube.
30
AxiChrom 300-1000 columns User Manual 28-9562-89 AD
2 Specifications and characteristics
2.2 Overview of the column and parts
AxiChrom Master
AxiChrom Master is a self-contained operator console featuring interactive guides for
work procedures such as packing, unpacking and maintenance. The user interface is a
touch screen panel.
The interactive firmware guides the user and reduces the risk of making mistakes. The
operator has control over the workflow, and can use manual control for adapter movement and open or close the Media valve.
One AxiChrom Master unit can be used to control up to ten columns (one at a time).
Note:
Always use the same AxiChrom Master to control a given column. The motor
will be recalibrated automatically if you change to a different Master.
AxiChrom Master specifications
Parameter
Value
Weight
Approximately 73 kg (161 lbs)
Length × width × height
670 × 590 × 1090 mm
Material
Stainless steel, ASTM 316 and ASTM316L (EN
1.4401/1.4436 and EN 1.4404/1.4432/1.4435)
AxiChrom 300-1000 columns User Manual 28-9562-89 AD
31
2 Specifications and characteristics
2.3 Primary specifications
2.3
Primary specifications
2.3.1
Weights, volumes and related dimensions
D
A
B
C
Column
300
400
450
600
800
1000
Tube inner diameter (A)
(mm)
300
400
450
600
800
1000
Footprint (B×C) (mm)
1110 ×
1110 ×
1110 ×
1180 ×
1470 ×
1720 ×
520
600
620
780
1080
1300
3200 ×
3200 ×
3200 ×
3200 ×
3500 ×
3800 ×
2600
2600
2700
2800
3100
3300
Column cross section (cm2)
707
1257
1590
2827
5027
7854
Max bed volume,
short/long tube (liters)
21/35
36/63
48/80
85/141
151/251
236/393
Weight of empty column,
short/long column,
stainless steel bed support
(kg)
420/440
460/480
710/760
835/900
2150/2240
2560/2680
Weight of empty column,
short/long column, plastic
bed support (kg)
414/434
451/471
699/749
818/883
2122/2212
2517/2637
Safety zone (mm)
32
AxiChrom 300-1000 columns User Manual 28-9562-89 AD
2 Specifications and characteristics
2.3 Primary specifications
2.3.2 Heights in different operating states
2.3.2
Heights in different operating states
Note:
The letters in parentheses refer to the image on page 32. All dimensions are
given in millimeters.
Column
Tube
Max height 1 (D)
Short 2
450
600
800
1000
2200
2230
2340
2630
2650
Long 3
2720
2750
2860
3150
3170
Height (D) when adapter is at max bed
height
Short
1740
1760
1870
2160
2170
Long
2200
2220
2330
2620
2630
Min height (delivery height)
Short
1450
1460
1480
1590
1880
1890
Long
1710
1720
1740
1850
2140
2150
Max slurry filling height
Max operating height (D) during priming
Max adapter stroke height for filling
2.3.3
300
400
Short
2040
2060
2185
2335
2490
Long
2555
2580
2700
2850
3005
Short
2060
2080
2190
2480
2490
Long
2580
2600
2710
3000
3010
Short
570
578
Long
830
838
1
Refers to the height (height of casters excluded) of the column when the adapter is in its highest
position, for example for working and service.
2
Bed height 100 to 300 mm
3
Bed height 100 to 500 mm
Operating conditions
Parameter
Value
Maximum operating pressure 1
4 bar
Operating temperature 2
2ºC to +30ºC
Operating pH 3
1 to 14
1
Refers to the maximum allowed pressure over the bed during normal chromatographic
operation.
2
See Section 3.9 Ambient temperature changes, on page 86.
3
Due to corrosion, low pH values are unsuitable for solutions containing chlorides. See Section 2.5
Chemical resistance, on page 36.
AxiChrom 300-1000 columns User Manual 28-9562-89 AD
33
2 Specifications and characteristics
2.3 Primary specifications
2.3.4 Pressure and time out limits
2.3.4
Pressure and time out limits
Description
The Master uses several different pressure limits during operation. When a limit is reached
the adapter will stop (if moving) and an alarm text will be displayed. The limits are summarized in the table below.
Sequence
Manual
Priming
Filling
Limit
Low pressure
-0.5 bar
High pressure
4 bar
Low pressure
-0.5 bar
High pressure
4 bar
Low pressure
-0.30 bar
The adapter stops automatically at the limit and
continues again when pressure rises above 0.25 bar
Packing
Unpacking
High pressure
4 bar
Low pressure
-0.5 bar
Overpacking
Overpacking safety stop 15 seconds after PF±0.03
is reached
Bed detection
10 mbar pressure drop for more than 2 seconds
(editable)
Low pressure
-0.5 bar
Bed expansion
-0.30 bar
The adapter stops automatically at the limit and
continues again when pressure rises above 0 bar
High pressure I
Regular unpacking for Capto™, Fast Flow and
MabSelect™ media; Bead size > 50 µm: 0.5 bar
The adapter stops automatically at the limit and
continues again if the pressure falls below 0.2 bar
High pressure II
Advanced unpacking for High Performance media; Bead size < 50 µm: 1.0 bar
The adapter stops automatically at the limit and
continues again if the pressure falls below 0.5 bar
34
AxiChrom 300-1000 columns User Manual 28-9562-89 AD
2 Specifications and characteristics
2.3 Primary specifications
2.3.4 Pressure and time out limits
Sequence
Maintenance
2.4
Limit
Low pressure
-0.5 bar
High pressure
4 bar
Materials
Background information
The materials used to manufacture AxiChrom columns have been chosen for their biological and chemical compatibility with the solvents used during operation and cleaningin-place (CIP) procedures. The columns have also been designed to comply with the
varying hygienic requirements at the different stages of development and production.
Polymer materials in AxiChrom columns in contact with process liquids have been selected
for their biological compatibility according to the United States Pharmacopeia (USP) Biological Reactivity Tests, In vivo and conform to USP class VI requirements, compliance
with Code of Federal Regulations (CFR), Food and Drug Administration, Title 21, Part 177
and being animal free or complies with the conditions in the CPMP Note for Guidance
(EMEA/410/01 Rev.2).
Column tubes for AxiChrom 300-1000 columns are available in acrylic plastic or stainless
steel. Use and maintenance of AxiChrom columns with stainless steel column tubes differs
from that for acrylic plastic column tubes in two major respects:
•
Stainless steel column tubes are not transparent, so the bed cannot be observed
directly. This affects packing and unpacking procedures.
•
Stainless steel column tubes are manufactured in a single piece, with no removable
tie rods, top or bottom flanges or corresponding O-rings. This does not affect normal
operation or maintenance procedures but results in a spare parts and accessories
list that differs from that of acrylic columns.
Parts list and materials
Component
Material
In contact
with process
stream
Adapter backing plate
Stainless steel ASTM 316 or ASTM
S32205
No
Adapter seals and snap
ring
UHMWPE (ultra high molecular weight
polyethylene)
Yes
AxiChrom 300-1000 columns User Manual 28-9562-89 AD
35
2 Specifications and characteristics
2.4 Materials
2.5
Component
Material
In contact
with process
stream
Bed support
Stainless steel ASTM 316L and ASTM
S32205 or PE (polyethylene) or UHMWPE
Yes
Column tube
PMMA (polymethyl methacrylate) or
Stainless steel ASTM 316L
Yes
Distributor
PP (polypropylene)
Yes
Dynamic seals
FFPM (full fluorinated propylene
monomer) or UHMWPE
Yes
Media valve body
PP
Yes
Static seals
EPDM (ethylene propylene diene
monomer)
Yes
Top mobile phase
PP
Yes
Bottom backing plate
Stainless steel ASTM 316
No
Lid
Stainless steel ASTM 316
No
Stand
Stainless steel ASTM 316
No
Chemical resistance
AxiChrom columns are resistant to chemical agents used in protein recovery, including
buffer solutions for adsorption, elution and washing, and to solutions effective in cleaning,
sanitization and storage. Table lists chemicals that may or may not be used with
AxiChrom columns. The concentrations listed are not normally exceeded during an
operating cycle.
CAUTION
Do not use chemicals with temperatures above the specified limits.
36
AxiChrom 300-1000 columns User Manual 28-9562-89 AD
2 Specifications and characteristics
2.5 Chemical resistance
NOTICE
Chlorides and low pH can cause corrosion on stainless steel. Rinse
thoroughly with clean water after use.
Inspect the column regularly for signs of corrosive attacks, which
may cause column damage if untreated. Note that the stainless
steel bed supports are especially vulnerable to corrosion.
Note:
The information in Table has been collected from several published sources,
not from individual tests on column components. It should be used only as a
guide. The effect of chemicals will generally be more severe at higher temperatures. Note also that the combined effects of agents have not been taken into
account in this table. The applicable chemical resistance depends on the configuration of the column and the associated materials of construction.
Chemical
Concentration 1
Time/cycle
restrictions
Comments
Operating
temperature
CAS no. 2
Acetic acid
25%
3h
Cleaning-In-Place
(CIP)
2°C to 30°C
64-19-7
Acetone
2%
1h
Efficiency test
2°C to 30°C
67-64-1
Ammonium
sulphate
2 M3
5h
Adsorption
2°C to 30°C
7783-20-2
Benzyl alcohol
2%
12 months
Storage
2°C to 30°C
100-51-6
Ethanol
20%
12 months
and max. 0.5
bar
Storage
2°C to 30°C
64-17-5
Ethanol
70% 4
3h
CIP
2°C to 30°C
64-17-5
Ethanol/
acetic acid
20%/ 10%
3h
CIP
2°C to 30°C
64-17-5/
64-19-7
Guanidinium
hydrochloride
6 M5
5h
CIP
2°C to 30°C
50-01-1
Hydrochloric
acid
0.1 M
(pH = 1) 6
1h
CIP
2°C to 30°C
7647-01-0
Isopropanol
30% 7
1h
CIP
2°C to 30°C
67-63-0
AxiChrom 300-1000 columns User Manual 28-9562-89 AD
37
2 Specifications and characteristics
2.5 Chemical resistance
Chemical
Concentration 1
Time/cycle
restrictions
Comments
Operating
temperature
CAS no. 2
Phosphoric
acid
5%
8h
For passivation of
stainless steel
bed supports
2°C to 30°C
7664-38-2
Sodium
chloride
0 to 3 M3, 6, 8
3h
Purification, CIP
2°C to 30°C
7647-14-5
Sodium
hydroxide
1M
(pH = 14)
24 h, room
temp. to 30°C
CIP
2°C to 30°C
1310-73-2
Sodium
hydroxide
0.01 M
(pH = 12)
12 months
Storage
2°C to 30°C
1310-73-2
Sodium
hydroxide/
ethanol
1 M/ 20%
3h
CIP
2°C to 30°C
1310-732/ 64-17-5
Sodium
sulphate
1 M3
3h
Adsorption
2°C to 30°C
7757-82-6
Urea
8 M3
5h
Purification, CIP
2°C to 30°C
57-13-6
Commonly
used aqueous
buffers for
chromatographic use
10 to 250
mM,
pH 2 to 10
24 h
Equilibration, adsorption, elution
2°C to 30°C
38
1
When a concentration is given as a percentage, this is v/v.
2
CAS no.: Registration number assigned by the Chemical Abstract Services (CAS), American
Chemical Society.
3
pH in these solutions depends on the pH of the buffer, which can vary between 3 and 13.
4
On stainless steel column parts only. Exposure of other column parts to ethanol at higher
concentrations than 20% can damage the column.
5
Not for use with columns contaning wetted components of stainless steel.
6
pH below 4 for stainless steel is not recommended.
7
Applies only to acrylic column tubes.
8
For columns containing wetted stainless steel components max 1.0 M NaCl is recommended.
For additional important information, see Section 2.5.1 Resistance to sodium chloride, on page 39.
AxiChrom 300-1000 columns User Manual 28-9562-89 AD
2 Specifications and characteristics
2.5 Chemical resistance
2.5.1 Resistance to sodium chloride
Avoid using the following
chemicals in AxiChrom columns:
2.5.1
•
Extreme oxidizers
•
Fluorine and halogenated compounds
•
Chlorinated solvents (such as methylene chloride)
•
Esters
•
Aromatic hydrocarbons (such as toluene)
•
Alcohols at concentrations higher than those specified in the table above
•
Salt in combination with pH below 4. Always wash the column with at least five column volumes of pH-neutral solution (water) between and after use of salt and low
pH buffers.
Resistance to sodium chloride
Depending on configuration, AxiChrom columns can be equipped with wetted components of stainless steel and must therefore be appropriately maintained when exposed
to sodium chloride (NaCl) during chromatographic processes. Since the bed supports
are made of stainless steel and have a high degree of resistance to corrosion, they are
susceptible. The degree of susceptibility is largely due to conditions of use. Low pH in
combination with NaCl, high temperature and surface damage all increase risk of corrosion. If a stainless steel surface is damaged (scratches, impact marks etc.) is has to be
cleaned and passivated prior to taken into operation. Your GE Healthcare representative
can provide guidance on suitable cleaning and passivation procedures if required.
To clean the column from chloride ions, it is recommended that a water rinse of at least
five column volumes is used. Water is the preferred rinse solution due to the solubility
properties of sodium chloride in water compared to other possible rinsing solutions, for
example ethanol solutions.
Columns should be stored with solutions free from chloride ions.
AxiChrom 300-1000 columns User Manual 28-9562-89 AD
39
3 Getting started
3
Getting started
3.1
Unpacking the crates and cleaning a new column
Unpacking the crates
The following manuals contain information about how to unpack a new column:
•
Read Me First contains specific instructions on how to unpack the column and AxiChrom Master from their crates. The instructions are attached to the outside of the
packing crates upon delivery. Refer to those instructions when unpacking the products
from their crates.
•
AxiChrom columns Site Preparation Guide provides guidelines and requirements regarding how to place the column.
Note:
The column is delivered partially filled with 20% isopropyl alcohol/ethanol for
conservation. Make sure that this solution is washed out according to the instructions below.
WARNING
Only personnel with appropriate training may move and unpack
the delivery crates. All movements and unpacking must be performed in adherence with local regulations.
Even if the instructions in the Safety Instructions and User Manual
are followed, it is the customers' responsibility to guarantee the
safety of the personnel working with AxiChrom columns.
WARNING
The column packing crate is marked with the center of gravity.
Ensure that the crate is properly balanced so that it will not accidentally tip when moved.
40
AxiChrom 300-1000 columns User Manual 28-9562-89 AD
3 Getting started
3.1 Unpacking the crates and cleaning a new column
Cleaning a new column
The column is delivered partially filled with 20% (v/v) ethanol (storage solution) for conservation. The column must be unpacked from the crate and washed as soon as possible
after delivery, preferably within 3 months. Please make sure that the column is in correct
condition and free from damage according to the instructions in Read Me First.
WARNING
Always use protective glasses and other personal protective
equipment appropriate to the current application, to ensure personal safety during operation.
If...
Then...
The column is to be
used soon
Follow the instructions in Section 3.8 Cleaning the column,
on page 85
The column is to be
used at a later time
(within 3 months from
delivery)
Unpack the column from the crate, check it and clean it
according to the instructions below
Note:
If the column is not cleaned, there is a substantial risk of
mold and corrosion attacks.
Cleaning procedure
1
Remove the tri-clamp blind cap from the Bottom mobile phase inlet/outlet, note
that the column may be under slight pressure.
2
Connect a pump to the Bottom mobile phase inlet/outlet.
•
Ensure that the tube from the pump is primed, that is completely filled with
liquid, before it is connected to the Bottom mobile phase inlet/outlet.
•
The pump must be switched off during installation, so that the column does
not get pressurized.
3
Remove the tri-clamp blind cap from the tube at the Top mobile phase and
connect a tube that leads to waste.
4
Flush the column with at least 6 column volumes (calculated from an adapter
position of 1 to 2 cm at delivery) of 20% ethanol.
5
Prepare the column for storage, according to AxiChrom Operating Instructions.
AxiChrom 300-1000 columns User Manual 28-9562-89 AD
41
3 Getting started
3.1 Unpacking the crates and cleaning a new column
NOTICE
If the column is filled and should be moved, plug the Top mobile
phase and Bottom mobile phase inlets with tri-clamp blind caps,
diaphragms or other suitable valves.
Note:
3.2
The tube installed on the Top mobile phase at delivery is only intended for
storage solution conditioning and should be discarded once the column is installed. The maximum operating pressure of the tube is 1 bar.
Placing the column and Master
Placing the column
NOTICE
Relieve the pressure from the column legs with a pallet jack or a
lever while adjusting the legs, or else the screw threads may get
damaged.
NOTICE
Make sure that the column stands exactly level after it has been
moved. If the column is not level, this can impact column operations
such as packing and the resulting bed efficiency.
42
1
Use a pallet jack or the lever (used for assembling wheel kits) to relieve the
pressure from the column legs while adjusting them.
2
Carefully check for wobble. Make sure there is even load on all 4 feet.
AxiChrom 300-1000 columns User Manual 28-9562-89 AD
3 Getting started
3.2 Placing the column and Master
3
A spirit level placed diagonally on top of the column will show when the column
stands horizontal. Ensure that the column is level in all directions by measuring
with the spirit level on different places of the column.
4
When the column feet have been adjusted, tighten the lock nuts on the feet
using a tightening torque of 70 Nm.
Placing Master
Place AxiChrom Master outside the AxiChrom column safety zone (A).
Description of the safety zones
D
B
A
1m
C
1m
AxiChrom 300-1000 columns User Manual 28-9562-89 AD
43
3 Getting started
3.2 Placing the column and Master
Zone
Description
A
AxiChrom column Safety zone (red)
B
Service access area (blue)
C
Off limit zone (yellow) which is an area where cables and tubes are located
D
Approximate location (orange) of a connected ÄKTAprocess system (optional). Note that there will be more off limit zones with cables and tubing when
an ÄKTAprocess system is connected.
Safety zone dimensions
Column size, mm
300
400
Safety zone length (A), mm
Safety zone width (B), mm
450
600
3200
2600
2700
2800
800
1000
3500
3800
3100
3300
WARNING
To avoid injury, no persons are allowed to be present inside the
safety zone when the column adapter is in motion during maintenance procedures, see figure on page 43. The operator in charge
is responsible for keeping the safety zone free from unauthorized
personnel and unnecessary equipment.
WARNING
To avoid injury, no persons are allowed to be present inside the
yellow zone: the area around cables and tubing running between
the column to the Master, see image on page 43.
WARNING
Move Master so that it is always close to where the work is performed. The EMERGENCY STOP button on Master should always
be in reach.
44
AxiChrom 300-1000 columns User Manual 28-9562-89 AD
3 Getting started
3.2 Placing the column and Master
Moving the column without
wheels
All columns can be ordered with wheels as accessories. Columns without wheels must
be moved with a forklift, pallet lift, or lifted by a hoist or crane attached to the adapter
rods. A forklift or pallet lift with a distance of about 670 mm between the outer edges of
the forks is recommended.
WARNING
Ensure that the forklift has capacity to safely lift the column weight.
The column weight is shown on the rating plate.
WARNING
When lifting with forklifts, pallet lifters or similar devices, the column
must be lifted from the long sides. Do not try to lift the column from
the back (the short side).
WARNING
Ensure that the column's center of gravity is well balanced over
the lifting forks, otherwise the column may tip off the forklift.
NOTICE
When moving the column using a forklift or pallet lifter, make sure
that the media valve under the bottom of the column is not damaged. Close the media valve so that it protrudes less.
NOTICE
If the column is to be moved when it is filled, plug the top and bottom mobile phase inlets with tri-clamp blind caps, diaphragms or
other suitable valves.
AxiChrom 300-1000 columns User Manual 28-9562-89 AD
45
3 Getting started
3.2 Placing the column and Master
Forklift placing
Always place the forks of the forklift or pallet lifter under the bottom of the column. Make
sure that the forks are properly placed in relation to the center of gravity label on the
column stand.
Correct (side view)
3.3
Correct (top view)
Incorrect
Wheel kits
WARNING
Columns in swing-out or any kind of maintenance mode must not
be moved. This may cause personal injury or damage to the column.
CAUTION
To avoid accidental collisions, use caution when moving columns
equipped with wheels by hand. Two or more people may be required to move the column safely.
46
AxiChrom 300-1000 columns User Manual 28-9562-89 AD
3 Getting started
3.3 Wheel kits
NOTICE
To avoid damage to the wheels and possible tipping when the
column or AxiChrom Master is moved, ensure that the wheels do
not run into objects (for example thresholds or tubing).
NOTICE
Columns equipped with casters must be levelled properly with the
casters removed before the column is used.
Wheel kits on AxiChrom 300-600
columns
The wheels for 300-600 columns are delivered in a kit containing rear wheels, lever,
trolley bar and trolley. Different column sizes use different wheel kits.
NOTICE
While transporting a 300-600 column, do not pull the handle upward, as the trolley knob may fall out of its position. Lifting the
handle will not work as a brake.
AxiChrom 300-1000 columns User Manual 28-9562-89 AD
47
3 Getting started
3.3 Wheel kits
Wheel kit components
4
3
1
2
48
Part
Function
1
Lever
2
Trolley
3
Trolley bar
4
Rear wheels
AxiChrom 300-1000 columns User Manual 28-9562-89 AD
3 Getting started
3.3 Wheel kits
Wheel and trolley fittings
F
A
90-110 mm
Part
Function
A
Hole for fitting rear wheels
F
Pins for locating trolley bar
Note:
To be able to assemble or disassemble the wheels, the distance between the
floor and the column stand must be in the range 90-110 mm.
Trolley and trolley bar
S
B
D
Part
Function
B
Bolts
C
Height adjusting screw
D
Trolley knob
E
Slots
S
Safety pin
AxiChrom 300-1000 columns User Manual 28-9562-89 AD
C
E
49
3 Getting started
3.3 Wheel kits
Assembling the wheels on AxiChrom 300-600 columns
1
Place the lever close to one of the rear feet and lift the column by lowering the
lever arm. Screw the foot pads in completely.
If needed for work in restricted spaces, the lever can be mirrored by changing
the attachment of the lever arm.
50
2
Fit the rear wheels in the hole in the column stand (A, Wheel and trolley fittings,
on page 49). Ensure that the washer and safety pin are correctly placed, to secure the rear wheels.
3
Lower the column by lifting the lever arm. Ensure that the column stands firmly
on the wheels before removing the lever.
4
Fit the second pair of rear wheels on the other rear foot by repeating steps 1
to 3 above.
AxiChrom 300-1000 columns User Manual 28-9562-89 AD
3 Getting started
3.3 Wheel kits
5
Attach the trolley bar to the front of the column stand. Make sure that the pins
underneath the stand (F, Wheel and trolley fittings, on page 49 are properly fitted
into the slots E of the trolley bar (Trolley and trolley bar, on page 49), before
tightening the bolts B to the column stand.
6
Place the trolley knob D (Trolley and trolley bar, on page 49) vertically under the
adjusting screw C, and adjust the height adjusting screw so it rests on the trolley
knob.
7
When the height adjusting screw is adjusted, secure it with the safety pin S.
8
Lift the front of the column by lowering the handle on the trolley. Turn the trolley
so it faces forward.
9
Ensure that the column fully rests upon the wheels. Screw the foot pads in
completely.
The column can now be moved.
Disassembling the wheels on AxiChrom 300-600 columns
1
Adjust all feet until they have the same distance between the floor and stand,
90 to 110 mm.
AxiChrom 300-1000 columns User Manual 28-9562-89 AD
51
3 Getting started
3.3 Wheel kits
2
Turn the trolley to one of the sides as the following image shows.
Lower the front of the column, by raising the handle on the trolley. The handle
should now stand vertically.
3
If necessary, remove the safety pin and loosen the height adjusting screw to
be able to relieve the weight from the trolley knob D. Remove the trolley.
S
B
D
52
C
E
4
Unscrew the bolts B and remove the trolley bar from the front of the column
stand.
5
Place the lever close to one of the rear feet and wheels, and lift the column by
lowering the lever arm. If needed in narrow spaces, the lever can be mirrored
by changing the attachment of the lever arm.
AxiChrom 300-1000 columns User Manual 28-9562-89 AD
3 Getting started
3.3 Wheel kits
6
Remove the washer and safety pin from the wheels, and disassemble the wheels
from the hole A in the column stand.
A
F
90-110 mm
7
Lower the column by lifting the lever arm. Remove the lever.
8
Repeat steps 4 to 6 on the other rear foot.
9
Ensure that the column stands firmly on all feet.
10
Ensure that the column is level, see Placing the column, on page 42.
Wheel kits on AxiChrom 800 and
1000 columns
The wheels for 800 and 1000 columns are delivered in a kit containing a jack, trolley bar,
bracket and tools. Different column sizes use different wheel kits. All equipment needed
for fitting and removing the wheels and trolley bar is stored in the box on the trolley.
Assembling the wheels on
AxiChrom 800 and 1000 columns
Note:
To be able to use the jack when assembling/disassembling the wheels, the
distance between the floor and the column stand must be between 95-135
mm for AxiChrom 800 and 1000 columns.
Note:
The distance between the floor and the column stand is 122 mm when the
wheels are assembled.
AxiChrom 300-1000 columns User Manual 28-9562-89 AD
53
3 Getting started
3.3 Wheel kits
A
95-135 mm
1
Mount the wheels (2) on the underside of the wheel kit beam. Mount the trolley
handle.
2
Use the handle on the trolley bar to steer it in between the front feet of the column. The top B of the trolley bar should hang on the column stand when positioned.
B
E
C
D
54
Part
Function
B
Trolley bar top
C
Lower part
D
Slot
E
Screw
AxiChrom 300-1000 columns User Manual 28-9562-89 AD
3 Getting started
3.3 Wheel kits
3
Remove the rear wheels from the wheel kit frame.
Place the jack under the frame at position I, and use the jack to lever the front
of the column so that the wheel kit can be assembled and tightened with the
16 mm wrench underneath the trolley bar G.
I
4
Place the bracket between the column stand and the trolley bar, as in H.
H
F
G
Steer the wheel kit with the trolley handle and lift up until part C reaches the
lower surface of the column stand. Make sure that the pin underneath the stand
fits inside the slot D of the trolley bar, then tighten the screw E in the image in
step 1. Make sure that both screws E are in the correct position.
5
Remove the handle from the trolley bar. The handle is only a help when putting
the trolley bar into position and should not be used when moving the column.
AxiChrom 300-1000 columns User Manual 28-9562-89 AD
55
3 Getting started
3.3 Wheel kits
6
Lower the column front again and remove the jack. The column should now
stand on the front wheels of the trolley bar, and the front feet should not touch
the ground. Both wheels should be locked facing the direction of the frame legs
before continuing to the next step.
7
Place the jack J under the frame at the reinforced pad towards the rear wheel
and lift.
J
8
Fit the rear wheels in the hole A in the column stand (see illustration on page
54. Ensure that the washer and safety pin are correctly placed, to secure the
rear wheels.
9
Lower the column again and remove the jack. Make sure that the front feet do
not touch the ground.
10
Fit the second pair of rear wheels on the other side of the column by repeating
steps 7 to 9.
11
Ensure that the column rests fully on the wheels.
The column can now be moved using a MasterMover connected to the fitting
on the front of the trolley bar.
Disassembling the wheels on
AxiChrom 800 and 1000 columns
1
56
Adjust all feet until they have the same distance between the floor and stand,
95-135 mm.
AxiChrom 300-1000 columns User Manual 28-9562-89 AD
3 Getting started
3.3 Wheel kits
2
Place the jack J under the frame at the reinforced pad towards the rear wheel
and lift.
J
Lever the back of the column using the jack.
3
Remove the rear wheels from the hole on the column stand.
4
Lower the column again and remove the jack.
5
Remove the second pair of rear wheels on the other side of the column by repeating steps 1 to 4.
6
Place the jack at position I in the figure. Use the jack to lever the front of the
column so that the wheel kit can be removed from underneath the trolley bar
G. Lower the column front again and remove the jack. The column should now
stand on its front feet.
G
G
I
AxiChrom 300-1000 columns User Manual 28-9562-89 AD
57
3 Getting started
3.3 Wheel kits
7
Fit the trolley bar wheels in the trolley bar storage positions as the figure shows.
H
F
8
Fit the rear wheels in the trolley bar storage positions F.
9
Attach the handle to the trolley bar.
10
Unscrew the screw E on one of the trolley bar sides and insert the bracket H
between the trolley bar and the column stand. Use the bracket to carefully
lower the trolley bar down until the trolley bar rests upon the column stand.
E
58
G
H
11
Repeat step 10 to release the other side of the trolley bar.
12
Use the handle to retract the trolley bar from the column stand.
13
Ensure that the column stands firmly on all feet.
14
Ensure that the column is level, see Placing the column, on page 42.
AxiChrom 300-1000 columns User Manual 28-9562-89 AD
3 Getting started
3.4 Connections
3.4
Connections
Connections on Master and
column
The illustrations below show the AxiChrom Master connector panel and the connection
points on a column.
1
8
7
2
3
4
5
6
Part
Description
Part
Description
1
Pneumatic air supply
5
Motor feedback
2
Power switch
6
Pressure sensor connector
3
Power supply cable
7
Profibus signal cable connector
4
Motor power cable
8
Two air outlet connectors
AxiChrom 300-1000 columns User Manual 28-9562-89 AD
59
3 Getting started
3.4 Connections
14
13
Part
Description
9
Slurry inlet
10
Bottom mobile phase inlet/outlet
11
Rinse inlet
12
Top mobile phase inlet/outlet
13
Motor power and motor feedback
14
Pressure sensor (PIS_119, mounted on
hose to system)
15
Pneumatic inlets with 2 connectors
12
9 15
10 11
Connect column, Master, and
external system
The table below shows how to connect the column, Master and an external system.
Numbers in parentheses refer to the illustration Connections on Master and column, on
page 59.
CAUTION
Use a pressure gauge, pressure relief valve, rupture disc or other
pressure safety equipment to ensure that the maximum operating
pressure of the column is not exceeded.
60
AxiChrom 300-1000 columns User Manual 28-9562-89 AD
3 Getting started
3.4 Connections
From
To
Pneumatic air supply (1) on the Master
Wall socket air outlet (5.5-7 bar)
Motor power cable (4) on the Master
Motor power (the right connector) on the
column (13)
Motor feedback (5) on the Master
Motor feedback (the left connector) (13)
on the column
Pressure sensor connector (6) on the
Master
Pressure sensor mounted on system (14)
Profibus signal cable (7) on the Master
Profibus connection on an ÄKTAprocess
system
Two air outlet connectors (8) on the
Master
Pneumatic inlets with 2 valves (15) on
the column
Slurry inlet (9) on the column
Slurry tank
Bottom mobile phase (10) on the column
Bottom mobile phase on a system (Column1 bottom valve on the ÄKTAprocess
system)
Rinse inlet (11) on the column
A system (CIP2 Inlet on the ÄKTAprocess
system)
Top mobile phase (12) on the column
Mobile phase on a system (CIP1 Inlet on
the ÄKTAprocess system)
Protection ground cable on the column
stand
Ground
(See Grounding the column, on page 65)
Power supply cable (3) on the Master
Power supply connector (380-400 VAC,
50-60 Hz) with protective ground
(The AxiChrom Master is delivered with
CE or UL approved cables.)
AxiChrom 300-1000 columns User Manual 28-9562-89 AD
61
3 Getting started
3.4 Connections
Recommended mobile phase
tubing inner diameters
Note:
•
All dimensions are given in millimeters.
•
A dash (-) means that the combination is not compatible with Intelligent
Packing.
•
TC25 connectors do not have the same inner diameters as the tubing. See
Tubings, on page 187 for details.
Table 3.1: Tubing inner diameters recommended for top and bottom mobile phase
connections for different column inner diameters.
ÄKTAprocess
dimension
300
400
450
6.4
6.4
6.4
9.4
9.4
9.4
6.4
6.4
6.4
9.4
9.4
9.4
6.4
6.4
6.4
9.4
9.4
9.4
9.4
12.7
12.7
12.7
12.7
19.1
6.4
6.4
6.4
9.4
9.4
9.4
9.4
12.7
12.7
12.7
12.7
19.1
6 mm PP
3/8" SS
10 mm PP
1/2" SS
600
800
1000
-
-
-
-
-
-
-
-
-
-
25.4
25.4
34.7
34.7
9.4
1" PP and SS
-
-
-
12.7
19.1
Use narrower tubing for packing gel filtration or polishing media. Use the widest tubing
compatible with the system for high flow media such as Capto.
62
AxiChrom 300-1000 columns User Manual 28-9562-89 AD
3 Getting started
3.4 Connections
Power requirements and
connections
The general requirements are:
Requirement
Value
Supply voltage
380-400 VAC
Nominal current
10-15/16 A NTD (Non-Time Delay) (min. -max.)
Frequency
50 - 60 Hz
Max voltage (North America)
480 Y/277 VAC
Max current
6A
Max power consumption
2400 VA
Short circuit rating
5 kA
Note:
Detailed requirements may vary for different column configurations. Refer to
the column documentation for the applicable requirements for your specific
column and AxiChrom Master.
The power cables for both the AxiChrom Master and for the adapter control motor are
delivered attached to the AxiChrom Master.
The system shall be connected to a 400 V supply voltage system or a 480 V supply voltage
system with a maximum voltage of 277 V between phase and ground. A suitable connector has to be selected and assembled on the AxiChrom Master by the customer to
comply with the supply voltage system and local regulations.
The Motor Power cable for the adapter control motor is permanently installed on the
AxiChrom Master. The motor feedback communication cable is connected to Motor
Feedback. Both these cables must be connected to the control motor before AxiChrom
Master is connected to the power outlet.
Color coding of cable conductors
Conductor
Color
Protective ground (earth)
Green/yellow
Live 1
No 1 or Black
Live 2
No 2 or Brown
Live 3
No 3 or Grey
The black, brown and grey conductors may be connected to any of Live 1, 2 and 3. The
phase connection is detected automatically.
AxiChrom 300-1000 columns User Manual 28-9562-89 AD
63
3 Getting started
3.4 Connections
WARNING
Ensure that the EMERGENCY STOP button can always be reached
while working with the column.
WARNING
Electrical installations must be performed by authorized personnel
only.
WARNING
Only authorized personnel are allowed to open the cabinet of AxiChrom Master. There are no user-serviceable parts inside the
cabinet.
WARNING
Always connect AxiChrom Master to a power supply with protective
grounding.
WARNING
Connection to wrong power supply voltage may cause injury to
personnel and damage to the system.
WARNING
The power cables must be replaced only by cables of the same
type or equivalent, fitted with the same type of connectors.
Power cables and connectors must be replaced or repaired by
properly trained personnel, authorized by GE Healthcare.
WARNING
The power connection must be easily accessible to enable the user
to disconnect the power in case of an emergency.
64
AxiChrom 300-1000 columns User Manual 28-9562-89 AD
3 Getting started
3.4 Connections
NOTICE
Connect the communication cable and power cable for the adapter
control motor on the column to AxiChrom Master before AxiChrom
Master is connected to power.
Note:
This is a class A product, input power >1 kW, intended for professional use. In
a domestic environment it may cause radio interference, in which case the
user might be required to take appropriate measures.
Note:
This equipment complies with FCC part 15 (2004): Radio frequency device
subpart B: Unintentional radiators, Class A. Operation is subject to the following
two conditions:
1
This equipment may not cause harmful interference.
2
This equipment must accept any interference received, including interference that may cause undesired operation.
Grounding the column
The column should always be connected to ground using a ground cable kit. Use the
connection point on the inside of the column stand, to ground the column to a suitable
grounding point.
The illustration below shows the connection point for protective ground cable on the
column frame.
Figure 3.1: Connection point on the column frame for protective ground cable.
AxiChrom 300-1000 columns User Manual 28-9562-89 AD
65
3 Getting started
3.4 Connections
Compressed air requirements
It is important for personal safety and safe operation to use the correct pressure and
quality of compressed air for the pneumatic valve control. The basic requirements are:
•
Free of oil and particles
•
-30ºC dew point
•
5.5 to 7 bar
The pneumatic air supply connections on AxiChrom Master are illustrated in Connections
on Master and column, on page 59.
3.5
Rupture discs
To secure equipment and personal safety, rupture discs are available as accessories.
Note:
Installation of rupture discs will change the maximum operating pressure for
the column from 4 to 3.8 bar (g) due to rupture disc characteristics.
For column sizes 300-600 there is a special T-junction provided for use with rupture
discs. Use this junction only with rupture discs recommended by GE Healthcare.
For column sizes 800-1000 use a standard 1" T-junction (part no. 28938170).
Part
Description
Part
Description
1
T-junction
3
Vent
2
Rupture disc
4
Clamp
Figure 3.2: Rupture disc assembly
66
AxiChrom 300-1000 columns User Manual 28-9562-89 AD
3 Getting started
3.5 Rupture discs
Installing rupture discs
NOTICE
Rupture discs should be installed at both mobile phases.
To install rupture discs, do as follows:
1
Connect the T-junctions to the column mobile phases according to Section 3.6 Column
and system setup, on page 68.
2
Choose appropriate hose or pipe with a TC50 ferrule as vent.
CAUTION
Do not place rupture disc vent towards an area where it would
endanger personnel.
3
Verify and ensure that all ferrule and clamp working surfaces are clean, dry, and free
of nicks, dents, gouges, and wear.
4
Inspect gasket position and ensure that gasket ID is centered on the dome of the
disc, then place the rupture disc into the ferrules with the flow arrow on the rupture
disc tag pointing in the same direction as the desired vented flow after rupture.
NOTICE
Always handle rupture discs with extreme caution.
5
Install the clamp around the ferrules so that the gap between the two clamp halves
is centered on the rupture disc tag.
6
Hand-tighten the wing nut until the clamp is fully engaged with the ferrules and the
rupture disc is securely in position. The nut will turn freely until it becomes snug with
the clamp. Tighten another 1 to 1.25 turns.
7
Perform column and system setup according to the relevant instructions in Section 3.6
Column and system setup, on page 68.
AxiChrom 300-1000 columns User Manual 28-9562-89 AD
67
3 Getting started
3.5 Rupture discs
CAUTION
Double check the orientation of the rupture disc. Verify that the
flow arrows on the disc tags are pointed in the same direction
as the desired vented flow after rupture.
3.6
Column and system setup
In this section
This section describes how to connect the AxiChrom column to tanks, pumps and for
example an ÄKTAprocess system, for priming, packing and unpacking sequences in the
AxiChrom Master.
WARNING
A pressure relief valve, rupture disc or a similar over pressure protector must be installed at both of the mobile phases, before the
column is used. Pressure relief valves and rupture discs can be ordered as accessories from GE Healthcare. Ensure that any liquid
that is ejected by the over pressure protection equipment is connected to a waste outlet.
68
AxiChrom 300-1000 columns User Manual 28-9562-89 AD
3 Getting started
3.6 Column and system setup
Manual configuration
The following manual setup makes it possible to perform all processes available in the
AxiChrom Master: PRIMING, INTELLIGENT PACKING and UNPACKING. The setup comprises two way valves and shut-off valves to utilize different flow paths for the different
procedures.
To waste
5
Slurry
3
4
Buffer
Column
Slurry inlet
Rinse inlet
To waste
1
2
6
To waste
Symbol
Function
Pressure relief valve, rupture disc or similar
S
T-piece
S
2-way membrane valve/shutoff valve
S
2-way membrane valve/shutoff valve with bleed, can be replaced with
two 2-way membrane valves and a T-piece
S
AxiChrom 300-1000 columns User Manual 28-9562-89 AD
69
3 Getting started
3.6 Column and system setup
Possible flowpaths for different column operations
Process
Flow path alternatives (from > to)
Pump > bottom mobile phase > waste (valve 5)
Priming
Column > bottom mobile phase > waste (valve 6)
Packing
Column > bottom mobile phase > waste (valve 6)
Rinse
pump > valve 2 > valve 4 > rinse > slurry tank
Unpacking
"upflow"
pump > bottom mobile phase > top mobile phase > waste
(valve 6)
Unpacking "media push out and
down flow"
70
pump > bottom mobile phase > top mobile phase > closed >
media valve open to slurry tank
pump > valve 2 > top mobile phase > bottom mobile phase >
waste (valve 6)
AxiChrom 300-1000 columns User Manual 28-9562-89 AD
3 Getting started
3.6 Column and system setup
Manual configuration: minimal
setup
The following manual setup makes it possible to perform the PRIMING and INTELLIGENT
PACKING procedures available in the AxiChrom Master. The setup comprises two way
valves and shut-off valves to utilize different flow paths for the different procedures. For
symbol explanations, see the table on page 69.
5
Slurry
Buffer
Column
Slurry inlet
Rinse inlet
S
2
To waste
6
To waste
Possible flowpaths for different column operations
Process
Flow path alternatives (from > to)
Pump > bottom mobile phase > top mobile phase > waste (valve 5)
Priming
Column > bottom mobile phase > waste (valve 6)
Packing
Column > bottom mobile phase > waste (valve 6)
Rinse
Pump > valve 2 > rinse > slurry tank
AxiChrom 300-1000 columns User Manual 28-9562-89 AD
71
3 Getting started
3.6 Column and system setup
Automatic configuration
connecting ÄKTAprocess
The following setup makes it possible to perform all procedures that are available in the
Method wizard in UNICORN: Priming, Intelligent Packing and Unpacking. The setup is
simplified by using ÄKTAprocess controlling the pump and valves for flow directions. For
symbol explanations, see the table on page 69.
Outlet 1/waste
Outlet 2 (blocked by
valve/blind flange)
Column 1 bottom valve
Column 1 top valve
Slurry
Buffer
Column
S
ÄKTAprocess
system
P
A
B
Rinse inlet
Slurry inlet
S
CIP 1 inlet
CIP 2 inlet
Bottom mobile phase
Column 1 top valve
Profibus connection
Column 1 bottom valve
CIP 1 inlet
Side port of CIP/Column
Pack Valve block
CIP 2 inlet
72
AxiChrom 300-1000 columns User Manual 28-9562-89 AD
3 Getting started
3.6 Column and system setup
Connecting to an ÄKTAprocess
system
To simplify automated priming, column packing with HETP evaluation or column unpacking procedure, the AxiChrom column has to be connected to a ÄKTAprocess system
(equipped with the optional CIP/Column Packing valve block) as described below. For
connections on AxiChrom Master and column, see Section 3.4 Connections, on page 59.
Note:
•
Use the Column1 valves If the ÄKTAprocess system is equipped with two
column valve blocks.
•
During priming a membrane valve should be attached to the top mobile
phase.
Procedure
1
Connect a short piece of tubing of suitable length and the same inner diameter
as the system, from Column1 top valve to Side port of the CIP/Column Pack
valve block.
2
Connect the AxiChrom Master pressure transmitter PIS_119 to INLET CIP1.
3
Connect a pressure relief valve or similar to PIS_119.
4
Connect a tube of suitable length and inner diameter, from the column Top
mobile phase to the pressure relief valve on AxiChrom Master pressure transmitter PIS_119. For tube diameter recommendations see Recommended mobile
phase tubing inner diameters, on page 62.
5
Connect a tube of suitable length and inner diameter from CIP2 on the process
system CIP/Column Pack valve block to the Rinse inlet on the column.
6
Connect a tube of suitable length and inner diameter from Bottom mobile
phase on the column to a pressure relief valve, rupture disc or similar and then
to Column1 bottom valve on the process system.
7
Connect the profibus cable from the Profibus connection situated under the
electrical cabinet of the ÄKTAprocess system to the Profibus connection on the
AxiChrom Master, see Connecting AxiChrom Master to ÄKTAprocess via Profibus,
on page 73.
Connecting AxiChrom Master to
ÄKTAprocess via Profibus
Connect the Profibus cable
1
Power down the ÄKTAprocess and Master units.
AxiChrom 300-1000 columns User Manual 28-9562-89 AD
73
3 Getting started
3.6 Column and system setup
2
CAUTION
Make sure that the ÄKTAprocess unit is powered off before
the following step is performed.
Remove the Profibus termination plug from the ÄKTAprocess bulkhead connector.
3
Connect the Profibus cable to the ÄKTAprocess bulkhead connector. Make sure
that the cable barrel is straight and engages correctly in the threads of the
connector.
4
Remove the protective cap from the Profibus connector of the Master unit.
5
Connect the Profibus cable to the Profibus connector of the Master unit.
Power on and set up the system
1
Power on the ÄKTAprocess unit and allow 5 to 10 seconds for the boot process
to finish.
2
Power on the Master unit.
3
Log in to UNICORN.
4
In system control in UNICORN, disconnect ÄKTAprocess.
5
In administration:system setup in UNICORN, select the component AxiChrom
300-1000 for the ÄKTAprocess system.
6
In system control in UNICORN, connect the ÄKTAprocess system.
7
On the screen of AxiChrom Master, select the appropriate column to be used
and confirm the bed height.
8
Exit to the MAIN MENU in the AxiChrom Master unit. The system is now ready
to use.
Disconnecting ÄKTAprocess from
AxiChrom Master
74
1
In system control in UNICORN, disconnect ÄKTAprocess.
2
Power down the ÄKTAprocess unit.
AxiChrom 300-1000 columns User Manual 28-9562-89 AD
3 Getting started
3.6 Column and system setup
3
CAUTION
Make sure that the ÄKTAprocess unit is powered off before
the following step is performed.
Power down the AxiChrom Master unit with the Power Off button in the MAIN
MENU.
4
Disconnect the Profibus cable from the ÄKTAprocess unit.
5
Place the Profibus termination plug on the connector of the ÄKTAprocess unit.
6
Remove the Profibus cable from the connector of AxiChrom Master unit and
replace the protective cap.
7
Power on the ÄKTAprocess unit and log in.
3.7
Using the Master
3.7.1
Start Master and calibrate column
Description
Every time the AxiChrom Master is started, the column list is shown. When a column has
been chosen, the Calibration page is displayed and the driver will automatically be calibrated to the column motor. After calibration the Verify adapter position page is displayed. Enter the adapter position as read on the column scale.
Firmware installation
AxiChrom Master comes fully installed with the firmware needed. To support new GE
Healthcare media for Intelligent Packing or improved functionality (including new column
models), AxiChrom columns ordered as separate units after AxiChrom Master delivery
may have later firmware versions enclosed including compatibility information and installation instructions. Please contact your GE Healthcare representative for further information.
AxiChrom 300-1000 columns User Manual 28-9562-89 AD
75
3 Getting started
3.7 Using the Master
3.7.2 User interface
3.7.2
User interface
Master wizards
The MAIN MENU is the starting point for wizards for PRIMING, INTELLIGENT PACKING,
UNPACKING, MANUAL CONTROL and MAINTENANCE.
Buttons and explanations
76
Button
General interface functions
MAIN MENU
or MENU
Closes the ongoing operation and opens the MAIN MENU dialog.
The button is active when it is grey.
•
PRIMING—guides the user through safe priming of the column.
•
INTELLIGENT PACKING—with pre-programmed packing methods it guides the user through packing of the column to achieve
optimal compression and bed efficiency.
•
UNPACKING—guides the user through safe unpacking of media
from the column.
•
MANUAL CONTROL—enables the user to control the adapter
movement and open or close the Media valve.
•
MAINTENANCE—guides the user to set the column into Maintenance mode, from where safe service of the column can be
performed. See AxiChrom Operating Instructions.
•
POWER OFF—from this fail-safe mode it is safe to turn off AxiChrom Master without loss of information.
AxiChrom 300-1000 columns User Manual 28-9562-89 AD
3 Getting started
3.7 Using the Master
3.7.2 User interface
Button
General interface functions
HELP
Opens contextual help texts/information for the current dialog.
From the HELP dialogs it is possible to open a Flow converter, for
conversion of linear to volumetric flow. The HELP button is normally
grey when it is active. In the column list the HELP button turns blue
if the marked column has corrupt column information.
BACK
Opens the previous dialog. The BACK button is blue when it is active.
CONTINUE
Opens the next dialog in the workflow. This button is only active
(blue) when all mandatory information has been entered in the active
dialog. In some wizards it is possible to press the blue active
CONTINUE button before the time bars have been filled. This is to
make it possible to speed up the specific process step, but if nothing
is done the procedure will continue as normal.
CONFIRM
Opens the next dialog in the workflow, after the stated prerequisites
are fulfilled. This button is active (blue) only when all mandatory information has been entered in the active dialog.
SAVE
Saves the entered information and continues to the next dialog.
This button is active (blue) only when all mandatory information has
been entered in the active dialog.
START
Starts a process (the adapter may move). This button is active (blue)
only when all mandatory information has been entered in the active
dialog.
Stop
Stops the process manually.
End Filling
Ends the filling step manually and continues with the consolidation
phase. Active during the filling when it is grey. If End Filling is used
entered parameters might not be met and the packing might fail.
END PACKING
Stops the adapter during the final compression of the bed. END
PACKING should be pressed when optimal Packing Factor or desired
bed height within given range have been met. This button is green
when active.
PAUSE
Stops the process temporarily. Subsequent options are either to
abort the process permanently or to continue. Active when it is blue.
ABORT
Aborts the current process and opens MAIN MENU. Active when it
is light grey.
Virtual keypad
The virtual keypad is used to enter input for text and figure fields.
AxiChrom 300-1000 columns User Manual 28-9562-89 AD
77
3 Getting started
3.7 Using the Master
3.7.2 User interface
Information in progress dialogs
During packing, unpacking and priming, the progress can be monitored in progress dialogs. They display:
•
the remaining time and a graphical progress bar
•
the adapter position, shown both graphically in the column drawing and in the
adapter position box
•
actual pressure in the column
•
the state of the bottom Media valve
•
the packing process steps, shown in text and checked when completed.
•
new status messages.
The action buttons will change functions depending on the specific status of the packing
process. The status message may call for some action from the user, for example to
open the Bottom mobile phase valve or clean the valve and tube. The action will then
require a confirmation before the process is resumed.
3.7.3
Column and Master setup
Select column
78
•
If the column to be used can be seen in the list, select it with the arrow buttons.
•
If the column to be used can not be seen in the list, press Add to add a column to
the list. No column will be listed when Master is delivered.
•
Press Edit to change the parameters of the chosen column or the column name.
•
Press Delete to remove the chosen column from the list.
AxiChrom 300-1000 columns User Manual 28-9562-89 AD
3 Getting started
3.7 Using the Master
3.7.3 Column and Master setup
•
Press CONTINUE when a column is chosen in the list.
•
Press CONFIGURATION to enter the Configuration wizard from where it is possible
to view system settings, system specifications and test the system.
If the settings are corrupted
If the HELP button turns blue when a column is chosen 1 in the list, the settings for the
column have been corrupted. It is not possible to continue using the settings for this
column when they are corrupted. This situation can occur when the AxiChrom Master
system was last shut down and was not allowed to save the data completely before the
Power switch was turned off. If this happens, follow the instructions below to recreate
the column settings. Press the HELP button for more information.
Recreating column settings
1
Press Delete to remove the corrupted column settings.
2
Press Add and create new column settings.
3
Choose the column parameters for the deleted column in the list. Type a name
and press CONTINUE.
4
Verify the column parameters according to the wizard instructions.
5
Calibrate the motor according to the instructions in the Master.
6
Verify the adapter position according to the wizard instructions.
1
The button also turns blue when the selected line is empty.
AxiChrom 300-1000 columns User Manual 28-9562-89 AD
79
3 Getting started
3.7 Using the Master
3.7.3 Column and Master setup
Add or edit a column
The dialog is reached after pressing Add in the previous dialog. Settings for a column
can be created here.
•
The column diameter and maximum bed height can be found on the column label.
It is located on the lower front part of the frame on the column.
•
Select the correct column diameter and maximum bed height in the dialog by using
the arrow buttons. The chosen column will be highlighted.
•
Select the type of bed support fitted in the column to be used. The options are Steel
and Plastic.
•
Press Set to open the on-screen keyboard where a unique column name can be
written. This name can contain a maximum of 30 characters.
Note:
80
It is recommended that a label with the column name (that was given by
the operator in the AxiChrom Master), is placed on the column. The Serial
number is a good unique name.
•
Press SAVE to save the chosen settings for the column and to continue.
•
Press BACK to return to the Select column dialog without saving. Editing the column
name is possible even when the column has been saved.
AxiChrom 300-1000 columns User Manual 28-9562-89 AD
3 Getting started
3.7 Using the Master
3.7.3 Column and Master setup
Motor calibration
The Calibration page will synchronize the Master unit with the motor. The column may
not function with the Master unit if the motor is not calibrated. A calibration is therefore
always performed when a new column is selected.
Calibration will start automatically and will normally take less than one minute to complete.
When the calibration is completed the CONTINUE and BACK buttons will turn blue.
•
Press CONTINUE to proceed to the position verification page.
•
Press BACK to return to the column selection page
Note:
If several columns are to be calibrated in a row, the Master unit must be shut
down and restarted between calibrations.
AxiChrom 300-1000 columns User Manual 28-9562-89 AD
81
3 Getting started
3.7 Using the Master
3.7.3 Column and Master setup
Verify the adapter position
The actual adapter position on the column has to be entered in the AxiChrom Master.
Follow the procedure below to correctly read and enter the correct adapter position in
the dialog.
0
1
Verify the actual distance read from the level scale on the adapter rod. Observe
that the scale has increasing figures running downwards.
5
10
15
20
25
30
35
40
45
50
55
60
Note:
The level scale indicator differs between columns with different bed support
material (plastic or stainless steel). Make sure that the correct level scale indicator
is fitted.
82
2
Press Set to change the dialog value Last known adapter position if it differs
from the actual adapter position, read from the level scale. Set the value to a
tolerance of one decimal in centimeters.
3
Press CONTINUE to enter the MAIN MENU.
AxiChrom 300-1000 columns User Manual 28-9562-89 AD
3 Getting started
3.7 Using the Master
3.7.3 Column and Master setup
Verify the factory calibration
value for the level display
1
Connect the column and the Master.
2
Start the Master.
3
Verify that the adaptor value in the master correspond to the value on the
Level display label.
4
Check the factory Master calibration value (cm) in the functional test records in
the column product documentation.
5
Move the adaptor upwards using a low speed (30 cm/h) to the end of the stroke.
Use the current limitation to stop the adaptor.
6
Verify that the adaptor height on the level display scale corresponds to the test
record (Height difference < 0.2cm).
Master configuration
Description
To access the configuration wizards, press the Configuration button on the Select column
page.
Use the configuration wizards to
•
run startup tests and access the Panel view (only accessible by a GE Healthcare
service operator)
•
view system settings (only accessible by a GE Healthcare service operator)
•
view system information and specifications
AxiChrom 300-1000 columns User Manual 28-9562-89 AD
83
3 Getting started
3.7 Using the Master
3.7.3 Column and Master setup
System Info
This dialog displays serial numbers and firmware revisions. Press CONTINUE to proceed.
Note:
The above image is an example. Other firmware and application revisions may
apply.
Necessary adjustments
If...
Then...
The column is new
•
The column has been
moved from a room
with a different temperature
Adjust the tightening torque of the bolts on the tie rods,
see Tightening torques, on page 87
Adjust the tightening torque of the bolts on the tie
rods, see Tightening torques, on page 87
The room temperature
has changed
significantly
The column tube or
other major parts have
been replaced
84
Contact GE Healthcare to have a service technician perform an adapter position calibration
AxiChrom 300-1000 columns User Manual 28-9562-89 AD
3 Getting started
3.7 Using the Master
3.7.3 Column and Master setup
Leakage test
Perform a leakage test as described in the AxiChrom 300-1000 Operating Instructions
when:
3.8
•
the column is new
•
the column has been shipped
•
the o-rings have been replaced
•
other parts that may cause leakage have been replaced
•
maintenance has been performed
Cleaning the column
The cleaning should be performed before the bed is packed or when the column is new
(that is, when the column is empty or filled with transportation/storage solution).
Cleaning procedure
Note:
1
Parts made from non-plastic materials may be autoclaved.
For more information about cleaning methods, see the User Manual.
Clean the outside of the acrylic tube with for example water and/or 20% (v/v)
ethanol to remove any surface residues from the packaging.
NOTICE
Do not use ethanol stronger than 20% (v/v) for cleaning
the acrylic tube, since this may damage the column tube.
2
Steel surfaces can be cleaned with a wetted cloth and 70% (v/v) isopropanol or
70% (v/v) ethanol.
3
Ensure that the adapter seals and o-rings are clean from particles and waste,
since these may damage the adapter and tube when the adapter is moving.
4
Perform a priming according to the instructions in the PRIMING wizard, in the
AxiChrom Master MAIN MENU. This procedure will clean the column and its
tubes and remove any air from the column.
5
Ensure that the cleaning solution is completely flushed out and replaced by an
appropriate storage solution after priming the column.
Result: The column is now primed and cleaned.
AxiChrom 300-1000 columns User Manual 28-9562-89 AD
85
3 Getting started
3.8 Cleaning the column
Cleaning the Master
Turn off the AxiChrom Master before it is cleaned with water and/or 20% (v/v) ethanol.
3.9
Ambient temperature changes
Effects of temperature changes
If the temperature surrounding the column is changed significantly, the acrylic tube will
shrink or expand. This will cause unwanted tension in the acrylic tube, in the dome nuts
on the adapter, the bolts of the tie rods, and the bottom bed support nuts—i.e. they will
become tightened or loosened.
The tightening torque of the adapter dome nuts, tie rod bolts and bottom bed support
nuts must be checked whenever the temperature has changed, see Tightening torques,
on page 87. The bolts should be tightened crosswise in small intervals. Make sure that
the torque wrench is calibrated and that the correct socket is used.
General guidelines
86
•
The column should not be placed in direct sunlight, since this could affect the column
temperature.
•
The column should preferably be packed and run in a room without significant
temperature changes.
•
Check the tightening torques of the adapter dome nuts, tie rod bolts and bottom
bed support nuts when the column is new and has been placed in its first location.
If the column is
moved...
Then...
From cold to warm surroundings
The adapter dome nuts, the tie rod bolts and the bottom
bed support nuts should first be loosened to finger-tight
in the colder room and then moved to the warmer room.
When the column is properly tempered, after about 24
hours, the adapter dome nuts, the tie rod bolts and the
bottom bed support nuts should be tightened according
to the tightening torques below.
From warm to cold surroundings
Ensure that the column is properly tempered, after about
24 hours. Then tighten the adapter dome nuts, the tie rod
bolts and the bottom bed support nuts according to the
tightening torques below.
AxiChrom 300-1000 columns User Manual 28-9562-89 AD
3 Getting started
3.9 Ambient temperature changes
Tightening torques
Tie rod bolts
Tightening torques for tie rod bolts
Column
Tightening torque
300, 400 and 450
20 Nm
600
28 Nm
800
42 Nm
1000
66 Nm
AxiChrom 300-1000 columns User Manual 28-9562-89 AD
87
3 Getting started
3.9 Ambient temperature changes
Adapter dome nuts and bottom bed support nuts
Location of dome nuts
Location of bottom bed support nuts
Tightening torques for adapter dome nuts and bottom bed support nuts
88
Column
Tightening torque
300-600
10 Nm
800-1000
15 Nm
AxiChrom 300-1000 columns User Manual 28-9562-89 AD
4 Preparations before packing the column
4
Preparations before packing the
column
4.1
Packing Factor and Compression Factor
Introduction
During a standard AxiChrom packing procedure the media is first settled under a low
flow, induced by the adapter moving downwards. This is what we refer to as consolidation.
The Top mobile phase is closed and the Bottom mobile phase is open during packing,
and the excess liquid is expelled through the Bottom bed support on which the bed will
start to form. When all media has settled and formed a bed at the bottom of the column,
the bed is consolidated (still under influence of a low flow) until the adapter hits the bed.
Adapter movement then continues, compressing the media until the required packed
bed height is reached based on the packing factor used. The Packing Factor (PF) is calculated as follows.
packing factor PF = (consolidated bed height) / (packed bed height)
The Packing Factor takes the settling speed of media into account. The Compression
Factor (CF) is defined as the ratio when no flow through the bed is applied.
compression factor CF = (gravity settled bed height) / (packed bed height)
There is a difference between Packing Factor and Compression Factor. The definition of
Packing Factor involves flow through the bed which in some cases leads to a more
compressed bed and lower consolidated bed height, while in other cases the gravity
settled bed height is lower since the bed packs more densely if given more time to do
so. Mabselect SuRe™, for example, has a significantly lower gravity settled height than
its consolidated height and this has to be considered when calculating the amount of
media to be packed in the column.
About default packing values
The default values in the Master software are tested and verified parameters for packing
in water/20% ethanol. Packing Factor is allowed to vary around the optimal value (±0.03),
which has also been verified.
•
For HIC media the default values are defined for packing in 10% to 20% ethanol in
the AxiChrom 300 to 1000 columns.
AxiChrom 300-1000 columns User Manual 28-9562-89 AD
89
4 Preparations before packing the column
4.1 Packing Factor and Compression Factor
•
For some media packed in salt-containing solution a higher Packing Factor has to
be used. This is due to different settling conditions in solutions other than water and
ethanol.
•
Note that all S and SP ligand media are shipped and stored in 0.2 M sodium acetate
and any decanted solution will contain salt.
For detailed information about which Packing Factor to be used depending on packing
buffer, see Appendix B Packing buffer information, on page 183.
Bed support porosity
The bed support porosity should be less than or equal to 1/3 of the average particle size
of the media. This ensures that all particles are larger than the holes in the bed support.
Using a bed support with a larger porosity results in particles passing or getting caught
in the screen, leading to poor bed efficiency and, for a clogged screen, high pressure.
4.2
Preparation of the slurry
Note:
Prepare the slurry at least 2 hours before usage in order for it to properly degas
after shaking. The slurry can be prepared up to 1 day ahead.
Tip:
In the case of packing short beds, in the range of 10 to 15 cm, it is often suitable
to first reduce the slurry concentration to about 30% to 35%. Further it is recommended to increase the Packing Factor from the set value in the Master by
0.02 or 0.03 (2% to 3%). Using either or both of these modifications often leads
to improved results.
Procedure
1
Calculate the amount of media using the formula
media volume = target bed height × PF × column cross-section.
2
Decant the supernatant and replace with recommended packing buffer according to the tables on page 183 until a suitable slurry concentration is reached.
•
Short column tube: at least 30% for 100 mm bed height and 65% for 300
mm bed height
•
Long column tube: at least 30% for 100 mm bed height and 74% for 500
mm bed height
Note:
Minimum concentration = (bed height × PF or CF) / max fill height
3
90
Determine the slurry concentration, see Section 4.3 Determining the slurry concentration, on page 91.
AxiChrom 300-1000 columns User Manual 28-9562-89 AD
4 Preparations before packing the column
4.2 Preparation of the slurry
4
Prepare a sufficient amount of slurry in the slurry tank to be able to pack the
desired bed height. The required amount of slurry is also automatically calculated
in the AxiChrom Master Intelligent Packing wizard and displayed in the summary
page before the packing is started. Use CF for gravity settled media.
Slurry volume = (target bed height × PF × column cross-section) / slurry concentration
5
Prime the media valve.
6
Make sure that all valves in the slurry tank are closed and that the gel can not
flow into any tubing (where it will sediment). Use a media stirrer to make homogenous slurry in the tank before packing.
Tip:
4.3
For Manual operation:
•
Max fill height for short column tubes (bed height 100 to 300):
570 mm
•
Max fill height for long column tubes (bed height 100 to 500): 830 mm
Determining the slurry concentration
Choice of methods
Two methods are presented here for determining the slurry concentration:
•
Forced settling
•
Gravity settling
Forced settling
To achieve the most accurate result, a general determination method for slurry concentration has been developed. The method utilizes a laboratory column, preferably XK16
or HiScale™ 16, and a small pump that can deliver 100 cm/h for the specific column.
Preparations
1
Mount an end piece/adapter with a filter to the bottom of the column.
2
Carefully place a transparent ruler on the side of a clean and empty labscale
column so that the zero mark on the ruler coincides with the surface of the
bottom filter.
3
Make sure that there is a stopper at the bottom outlet of the column.
4
Secure the column in an upright position.
AxiChrom 300-1000 columns User Manual 28-9562-89 AD
91
4 Preparations before packing the column
4.3 Determining the slurry concentration
Sampling
5
Prepare the slurry in a tank of appropriate size.
6
Make sure the gel slurry is homogenous. The best way to achieve this is by stirring. Stir from all directions, with varying tilt. Allow at least 5 minutes for stirring.
This is the largest source of error in the method.
7
Take a sample from the middle (depth and width) of the batch, preferably using
a Falcon 25 ml pipette.
Column filling
8
If the sample has an appreciably high concentration (>60%), dilute it by first
adding 2 cm of water to the column. The accuracy of the method is higher for
lower concentrations.
9
Add thoroughly mixed gel slurry to the column until the right volume (about the
height of 100 mm) is obtained. Use a Falcon (or Pasteur) pipette (25 ml) to avoid
resin on the column wall above the 100 mm marking.
10
Add water until the glass body is filled.
11
Secure the end piece/adapter and the filter on the top of the column.
Washing and settling steps
12
Connect the column to a pump that can deliver a flow of 100 cm/h for the
specific column used.
13
Wash the media up-flow with pure water for 5 column volumes.
14
Change flow-direction from up-flow to down-flow.
15
Let the media consolidate in 1 column volume of pure water, at 100 cm/h.
Determining the slurry concentration
92
16
Let the gel bed stabilize for 30 minutes without any flow and then read the bed
height.
17
Convert the bed height to slurry concentration: slurry concentration(%)=bed
height/slurry height*100 (e.g. a bed height of 58 mm obtained from slurry filled
to 100 mm gives a slurry concentration of 58%. Remember to adjust for dilution
(step 8) if required (e.g. if 20 mm water is added to the column first, and slurry
is added to a final level of 100 mm, divide the calculated slurry concentration
by 0.8).
AxiChrom 300-1000 columns User Manual 28-9562-89 AD
4 Preparations before packing the column
4.3 Determining the slurry concentration
Gravity settling
Gravity settling in a graduated cylinder is one of the most commonly used methods. It
is best to use fairly large cylinders for process scale columns, at least 1 liter of slurry.
1
Stir the sample so that all media is suspended and the slurry is completely homogenous.
2
Quickly remove a sample using a container, for example a beaker.
3
Pour it immediately into the cylinder.
4
Place it on a flat surface and cover the opening with for example Parafilm, to
minimize evaporation.
5
Allow to stand at least overnight.
6
Read the total volume and the media volume and calculate the slurry concentration (media volume/total volume).
•
4.4
Carefully tilt the cylinder and check the media surface.
-
If the surface does not sway, the media is settled well enough.
-
If the surface is not sufficiently settled, it is recommended to allow the
sample to stand longer. This occurs for some media, especially small
particles such as Sepharose High Performance but also for media that
is settled in salt-containing solutions.
Priming the column
In this section
This section first gives an overview of the column priming procedure. Later in this section
there is a more detailed, stepwise description of how to create and use a UNICORN
method or Master to prime the column. The procedure is described for columns with
acrylic column tubes, with deviations for stainless steel column tubes where appropriate.
4.4.1
Short description of the priming procedure
During the priming procedure the adapter will go to priming position at the top of the
column. The column is then filled with priming liquid. When the priming liquid comes out
from the column top, the Seal flush valves (see page 98) are opened and the pressure
in the column is increased with the connected membrane valve. When the pressure has
been increased the adapter will move downwards past the priming groove, expelling
air from inside the column through the rinse channel out through the Seal flush valves.
AxiChrom 300-1000 columns User Manual 28-9562-89 AD
93
4 Preparations before packing the column
4.4 Priming the column
4.4.1 Short description of the priming procedure
When the adapter stops, the Seal flush valves are closed and the membrane valve fully
opened. The adapter then starts to move and the top bed support is primed. When the
adapter passes 30 cm from the bottom bed support the priming direction changes and
the bottom bed support is primed. When the adapter comes to the bottom of the column
and stops, the priming procedure is finished.
Priming is performed either using UNICORN on an ÄKTAprocess system or from the AxiChrom Master directly. The workflows are described in Section 4.4.4 Using UNICORN
method, on page 97 and Section 4.4.5 Using Master wizard, on page 99.
4.4.2
Wetting plastic bed supports
Follow the instructions below if the column is fitted with plastic bed supports.
Note:
4.4.3
Before priming the column, mount the bed supports dry and assemble the
column as described in the AxiChrom 300-1000 Operating Instructions. Connect
membrane valves on the column top and bottom mobile phases.
Step
Action
1
Prime the column according to the AxiChrom Master priming instructions
or a UNICORN priming method.
2
Perform a leakage test.
3
With the adapter at 1 cm from the bottom bed support, equilibrate the column with 20% v/v 1-propanol at 30 cm/h under a pressure of 1 bar for five
column volumes.
4
Pause the flow. Use the membrane valves to seal the column mobile phases
and incubate for 2 hours at 1 bar.
5
Carefully release the pressure on the membrane valves.
6
Flush the column with at least five column volumes of deionized water or
packing buffer.
7
Pack the column according to the AxiChrom Master or a UNICORN packing
method.
Creating a UNICORN method
The Method Wizard in UNICORN simplifies creation of a Priming method. The methods
require an initial selection of a column dimension. Thereafter the user makes appropriate
selections to complete the creation of the method. This section describes the creation
of a UNICORN Priming method.
Procedure
1
94
Start the Method Wizard in the Method Editor window and choose the system
in the pop up window.
AxiChrom 300-1000 columns User Manual 28-9562-89 AD
4 Preparations before packing the column
4.4 Priming the column
4.4.3 Creating a UNICORN method
2
Select Priming.
Setting
Description
Column
Select AxiChrom xxx/yyy (xxx = column diameter in millimeter, yyy = max bed height for short and long column
tube, 300 or 500 mm respectively). The column size can
be found on a label located on the lower front part of the
frame of the column tube.
Column
material
Select the material of the column tube.
AxiChrom 300-1000 columns User Manual 28-9562-89 AD
95
4 Preparations before packing the column
4.4 Priming the column
4.4.3 Creating a UNICORN method
3
96
Click Next. The wizard page Priming Parameters opens. Select the appropriate
inlet.
Setting
Description
Prime media valve and slurry
hose
Leave checked to prime the media valve
during the priming process.
Inlet for mobile phase
Select the appropriate inlet.
AxiChrom 300-1000 columns User Manual 28-9562-89 AD
4 Preparations before packing the column
4.4 Priming the column
4.4.3 Creating a UNICORN method
4
Click Next to display the wizard page Priming Summary.
This page provides a summary of the options selected in the previous wizard
pages. The summary page also gives information on buffer volumes and instruction for how to connect the column to the ÄKTAprocess system.
4.4.4
5
Click Finish. The column packing summary can then be viewed under View/Run
Setup/Notes/Method Notes in the Method Editor module of UNICORN.
6
Choose an appropriate result file folder, result name and save the method.
Using UNICORN method
The Media valve, column and system are primed using UNICORN and ÄKTAprocess.
The priming sequence using a UNICORN method is the same as when priming using the
Master wizard from Step 5. The difference is that during UNICORN control, manual interactions are minimized to control the Seal flush valves and to perform some confirmations.
The ÄKTAprocess system controls other valves, flows and rinsing procedures.
Preparations before running the method
Connect the column using the automatic configuration for ÄktaProcess as described in
Section 3.6 Column and system setup, on page 68.
AxiChrom 300-1000 columns User Manual 28-9562-89 AD
97
4 Preparations before packing the column
4.4 Priming the column
4.4.4 Using UNICORN method
WARNING
Ensure that nobody is present within the safety zone when the
adapter is moving. The operator in charge is responsible for keeping
the safety zone free from unauthorized personnel and unnecessary
equipment.
Running the method
1
Start the priming method.
Result: The system performs a wash procedure. The Media valve and the slurry
tubing/tank are then primed (if selected in the Method Wizard dialog).
2
Click Continue when prompted to do so when the stated conditions have been
fulfilled.
Result: When the Media valve has been primed the column is filled with priming
solution and the adapter moves to the priming position. If the adapter does not
move it is already in the correct position.
Note:
With stainless steel column tubes, it is not possible to see when liquid has passed
the priming groove. Verify instead that the adapter is in the top position and that
buffer flows out of the top mobile phase outlet before clicking Continue.
3
When prompted to do so, increase the pressure in the column by tightening the
membrane valve to approximately 0.3 bar, open the Seal flush valves and then
click Continue. (This will happen when the adapter is in priming position above
the priming groove, the column has been filled and priming solution comes out
in waste through the system and through the Seal flush valves, and the flow is
lowered.)
Result: The adapter then moves down at 40 cm/h to a position under the priming
groove expelling the air below the scraper seals as the adapter passes the
groove.
4
98
During the priming, direct the Seal flush valve to waste or to a vessel.
AxiChrom 300-1000 columns User Manual 28-9562-89 AD
4 Preparations before packing the column
4.4 Priming the column
4.4.4 Using UNICORN method
5
The adapter stops below the priming groove. When prompted to do so, open
the membrane valve slowly to release pressure in the column, close the Seal
flush valves, and click Continue.
Result: The adapter automatically moves down to 30 cm at a velocity of 300 cm/h
expelling air and priming solution through the top bed support and the Top
mobile phase. At 30 cm the flow direction in the system is automatically changed
so that the bottom bed support and bottom mobile phase are primed while the
adapter moves down to the bottom position of 1.0 cm.
4.4.5
6
The priming of the Media valve, column and system is now complete.
7
Exchange the liquid in between the scraper seals to 20% ethanol.
Using Master wizard
The Priming procedure described in the wizard guides the operator through a number
of steps to prime the column with a standalone pump. Follow the instructions in the
PRIMING wizard, found in the MAIN MENU in AxiChrom Master.
For further explanation of the buttons used in the wizard, refer to Buttons and explanations, on page 76. For tubing connections, see Manual configuration, on page 69.
Note:
Before the column is primed, the column must also be calibrated (page 75)
and cleaned (page 85), also when priming with UNICORN.
WARNING
Ensure that nobody is present within the safety zone when the
adapter is moving. The operator in charge is responsible for keeping
the safety zone free from unauthorized personnel and unnecessary
equipment.
CAUTION
Always open and close external valves slowly. Sudden changes of
pressure in combination with air in the column might cause damage
to the column.
For further explanations of the progress dialogs in the wizards, see Information in progress
dialogs, on page 78.
Step 1: prime the media valve manually
If the column is primed with the guidance from the Master and a standalone pump, the
Media valve has to be primed manually. Follow the procedure below to prime the Media
valve manually.
AxiChrom 300-1000 columns User Manual 28-9562-89 AD
99
4 Preparations before packing the column
4.4 Priming the column
4.4.5 Using Master wizard
1
Connect a pump to the Rinse inlet.
2
Connect the slurry tubing/tank to the Slurry inlet.
3
Open the slurry tubing/tank.
4
Close the Bottom mobile phase and the Media valve.
5
Start a flow through the Rinse inlet and further into the slurry tubing/tank, at
approximately
•
200 l/h for 300, 400, 450 and 600 columns
•
800 l/h for 800 and 1000 columns.
6
When the tubing is free of air: make sure the Top mobile phase is open, and
then open and close the Media valve from MANUAL CONTROL in the Master a
couple of times. To make sure no more air comes from the Media valve, continue
to pump liquid through the valve, filling the bottom of the column and covering
the bottom bed support with liquid (for example 1 cm). (If the column is packed,
avoid opening the Media valve during the valve priming.)
7
When no more air comes up from the Media valve, close it.
8
Stop the pump and close the slurry tank.
9
The Media valve has now been primed.
10
If applicable, calculate the new slurry concentration by adding the amount of
packing buffer pumped into the slurry tank to the total volume in the tank.
Note:
To minimize the dilution of the slurry in the slurry container, prime the Media
valve and slurry tubing with packing buffer before the slurry container is connected. Then prime the connection with a minimal amount of packing buffer
but enough to get rid of any air in the connection.
Step 2: select PRIMING from the MAIN MENU
The column is primed when there is no air inside the column and connected tubing. To
achieve this, follow the instructions in the PRIMING wizard, in the AxiChrom Master. Press
CONTINUE to start the priming procedure.
Note:
If the column has not been used for some time add or change the 20% ethanol
between the scraper seals.
Preconditions for priming are:
100
•
A pump or a system (e.g. ÄKTAprocess system) is connected to the Bottom mobile
phase.
•
Both the Top mobile phase and Bottom mobile phase are open.
•
The Seal flush valves are open and directed to waste.
AxiChrom 300-1000 columns User Manual 28-9562-89 AD
4 Preparations before packing the column
4.4 Priming the column
4.4.5 Using Master wizard
•
A membrane valve is connected on the outlet of the system used during priming, or
on the Top mobile phase between the system and the AxiChrom Master pressure
transmitter PIS_119. The membrane valve shall be open.
•
The tubing on the Top mobile phase is directed to waste.
Note:
During the priming procedure, the adapter pushes the liquid out through the
mobile phases at up to 300 cm/h. If a system is connected, make sure that it
can handle this flow and that the pressure drop in the system is not too high
at that flow. The flow deviation alarm and the air alarm in UNICORN (or alarms
of equal functionality in other systems) must be disabled, since they may be
triggered by a velocity higher than that the system is designed for, or by air
bubbles flowing through the system.
Do not disable the pressure alarms on the system! If an alarm is triggered on
the system, the adapter must be stopped immediately, otherwise the adapter
will continue to move and increase the pressure in the column up to 4 bar, at
which the AxiChrom Master pressure alarm goes off.
Step 3: enter pump capacity
1
Enter the flow that will be used for filling the column by pressing Set. The maximum recommended liquid velocity for an unsupported bed support is 400cm/h.
Enter the value in liters/hour (l/h), the entered value will then automatically be
converted to cm/h.
2
Press the CONTINUE button to proceed.
Step 4: check preconditions
Check precondition boxes when the conditions have been fulfilled. The priming can then
be initiated by pressing START. The preconditions are the same as when selecting
PRIMING from the MAIN MENU.
AxiChrom 300-1000 columns User Manual 28-9562-89 AD
101
4 Preparations before packing the column
4.4 Priming the column
4.4.5 Using Master wizard
Step 5: wait for the adapter to move up
The adapter will now move upward to priming position above the priming groove. If the
movement needs to be stopped temporarily, press PAUSE.
The priming wizard can also be terminated from here.
102
AxiChrom 300-1000 columns User Manual 28-9562-89 AD
4 Preparations before packing the column
4.4 Priming the column
4.4.5 Using Master wizard
Step 6: start the pump upflow
1
Start an upward flow (i.e. from the bottom to the top) through the column at
the stated flow (displayed in the dialog). The time on the time bar will start when
the first box has been checked.
2
Run the pump for the stated time (displayed in the dialog) or until liquid comes
out through the tubing on the Top mobile phase.
3
Check the boxes and press CONFIRM to continue.
Step 7: wait for the buffer to pass the priming groove
1
Check the dialog box when the liquid is above the priming groove (found on the
inside in the top of the column tube).
2
Press CONFIRM to continue.
AxiChrom 300-1000 columns User Manual 28-9562-89 AD
103
4 Preparations before packing the column
4.4 Priming the column
4.4.5 Using Master wizard
Step 8: reduce the flow
1
Set the flow to the value stated in the dialog (100 cm/h).
2
Check the box when completed.
3
Press CONFIRM to proceed.
Step 9: create back pressure
104
1
Create back pressure by tightening the membrane valve on the Top mobile
phase until the pressure is approximately the value stated in the dialog.
2
Check the box when completed.
3
Press CONFIRM to proceed.
AxiChrom 300-1000 columns User Manual 28-9562-89 AD
4 Preparations before packing the column
4.4 Priming the column
4.4.5 Using Master wizard
Step 10: wait for the adapter to move down past the priming groove
The adapter now moves down at 40 cm/h passing the priming groove, expelling the air
under the adapter through the Seal flush valves. Press PAUSE to stop the movement
temporarily or to terminate the priming wizard.
Step 11: release the pressure
1
Close the Seal flush valves.
2
Stop the pump.
3
Slowly open the valve on the Top mobile phase tubing to release the column
pressure. It is important to open the valve slowly when the column is pressurized.
When the valve has been opened direct the Top mobile phase to waste.
4
Check the boxes and press CONFIRM when all the conditions are fulfilled. The
adapter will then start moving at a high speed to prime the top bed support,
expelling liquid through the Top mobile phase.
AxiChrom 300-1000 columns User Manual 28-9562-89 AD
105
4 Preparations before packing the column
4.4 Priming the column
4.4.5 Using Master wizard
Step 12: wait for the adapter to move down
The adapter now moves down. The remaining time is displayed in a time bar. Press
PAUSE to stop the movement temporarily or to terminate the priming wizard.
Step 13: prime the bottom mobile phase
106
1
Close the Top mobile phase valve.
2
Open the Bottom mobile phase and direct its tubing to waste.
3
Press CONFIRM when all the conditions have been fulfilled and all the boxes
are checked. The adapter will then start moving at a high speed to prime the
bottom bed support, expelling liquid through the Bottom mobile phase.
AxiChrom 300-1000 columns User Manual 28-9562-89 AD
4 Preparations before packing the column
4.4 Priming the column
4.4.5 Using Master wizard
Step 14: wait for the adapter to move down
The adapter now moves down to bottom position. The remaining time is displayed in a
time bar. Press PAUSE to stop the movement temporarily or to terminate the priming
wizard.
Step 15: close the bottom mobile phase valve
1
Close the Bottom mobile phase and then check the box in the dialog.
2
Press CONFIRM to finalize the priming procedure.
Step 16: finalize the priming
1
The column is now primed. Press MAIN MENU to end the priming wizard.
2
Exchange the liquid in between the scraper seals to 20% ethanol.
AxiChrom 300-1000 columns User Manual 28-9562-89 AD
107
5 Packing the column
5
Packing the column
In this chapter
This section contains a brief overview of Intelligent Packing and stepwise descriptions
of how to create and use a UNICORN method or AxiChrom Master wizard to pack media
in the column. Columns are packed according to Intelligent Packing procedures regardless
of whether a UNICORN method or Master wizard is used. General instructions deal with
packing acrylic column tubes: procedures for stainless steel column tubes are described
in Section 5.5.1 Packing stainless steel column tubes, on page 137.
5.1
Intelligent Packing
Introduction
Intelligent Packing allows for convenient and precise control of the column packing using
an AxiChrom column together with an ÄKTA system, UNICORN software, and media with
verified packing methods. Several media are available from GE Healthcare that have
verified packing methods for use with AxiChrom column and Intelligent Packing. These
are found in a list of media in the Method Wizard for Intelligent Packing and in the AxiChrom Master.
For media not included in the Method Wizard, it is possible to create a new packing
method in UNICORN (see page 110) or in the AxiChrom Master (see page 135).
Intelligent Packing procedure
Intelligent Packing uses interactive guides to ensure an optimized compression of the
bed. Intelligent Packing will pack the column with minimal manual intervention to reproducible results. When the bed has been detected the adapter will proceed to compress
the bed until the user is guided to stop the adapter at a specific Packing Factor, which
is determined to provide the best results for the selected BioProcess media.
108
AxiChrom 300-1000 columns User Manual 28-9562-89 AD
5 Packing the column
5.1 Intelligent Packing
NOTICE
In the Intelligent Packing tests, performed by GE Healthcare on its
base media selection, the default Packing Factor for each media
has been used and verified. The user is therefore recommended
to select the default Packing Factor.
For information change the default packing factor, see Section 4.1 Packing Factor and
Compression Factor, on page 89.
Prerequisites for Intelligent
Packing
•
The column is connected to an Axichrom Master unit
•
The column is properly connected to an ÄKTAprocess system or has a manual configuration (see page 68)
•
The start-up instructions on page 75 have been followed
•
The column is primed (see page 93).
•
The slurry concentration has been determined (see page 91).
Short description of the packing
procedure
The packing procedure starts with filling of the column with slurry from the slurry tank.
When the correct amount has been filled the adapter starts to go down consolidating
the bed on the bottom bed support. When all media have consolidated and the adapter
meets the bed surface, the bed contact is detected and the operator shall confirm the
detection within 30 seconds. After the detection the compression continues until the
desired Packing Factor and/or bed height has been reached. The operator is then
prompted to end the packing.
AxiChrom 300-1000 columns User Manual 28-9562-89 AD
109
5 Packing the column
5.2 Creating a UNICORN method
5.2
Creating a UNICORN method
Background
The Method Wizard in UNICORN simplifies creation of an Intelligent Packing method. The
verified methods require an initial selection of a listed medium. Thereafter the user makes
appropriate selections to complete the creation of the method. This section describes
the creation of a UNICORN Intelligent Packing method. If a custom medium is selected
in the Method Wizard media list, wider range of variables are allowed to be defined to
optimize the method, see Creating a packing method based on custom media, on page115.
For information concerning low bed heights, see Section 4.2 Preparation of the slurry, on
page 90.
Note:
Default values for variables in the Method Wizard may be changed to optimize
an Intelligent Packing method. Changes using the variables page in the Method
Editor module should only be made by advanced users.
Procedure
1
110
Start the Method Wizard in the Method Editor window and choose a system in
the pop up window.
AxiChrom 300-1000 columns User Manual 28-9562-89 AD
5 Packing the column
5.2 Creating a UNICORN method
2
Select whether to create a method for Column Packing, Packing Test, or both
combined.
Setting
Description
Column
Select AxiChrom <xxx>/<yyy> (xxx = column diameter
in millimeter, yyy = max bed height for short and long
column tube, 300 or 500 mm respectively). The column
size can be found on a label located on the lower front
part of the frame of the column.
Column material
Select the material of the column tube.
Show medium
type
Select the appropriate medium type.
Medium
Select the appropriate medium. For custom medium,
see 5.2.1 Creating a packing method based on custom
medium.
Set Default
Sets the default values used in the Method Wizard.
AxiChrom 300-1000 columns User Manual 28-9562-89 AD
111
5 Packing the column
5.2 Creating a UNICORN method
3
112
Click Next to display the Packing Parameters 1 Method Wizard page. Select the
appropriate variables.
Setting
Description
Target bed height
Enter a value within the designated range.
Inlet for mobile phase
Select the appropriate inlet that will be used
for equilibration buffer when evaluating the
efficiency of the packed bed in the column.
Inner diameter of slurry
hose
Select the appropriate diameter.
Length of slurry hose
Select the appropriate length.
AxiChrom 300-1000 columns User Manual 28-9562-89 AD
5 Packing the column
5.2 Creating a UNICORN method
4
Click Next to display the Packing Parameters 2 Method Wizard page.
Setting
Description
Min bed height limit
Enter the appropriate height.
Inlet for mobile
phase
Enter the appropriate height.
Use default Packing
Factor
This box is checked automatically, which means
that the medium will be packed using a predetermined Packing Factor. Unless specifically stated in
the instructions for a particular medium, it is recommended to use the default Packing Factor.
Unchecking this option allows the Packing Factor
to be changed.
Note:
Over-compression during packing can damage the medium. The default Packing
Factor for each medium has been tested and verified by GE Healthcare.
AxiChrom 300-1000 columns User Manual 28-9562-89 AD
113
5 Packing the column
5.2 Creating a UNICORN method
5
114
Click Next to display the Slurry and Packing Test Parameters wizard page.
Make the appropriate selections.
Setting
Description
Slurry concentration
Enter the estimated slurry concentration.
(The measured concentration is entered later,
in the start protocol.)
Equilibration volume
Enter an equilibration volume (measured in
CV) within the designated range.
Use default liquid velocity
during equilibration/packing test
Leave checked to use the suggested default
liquid velocity.
Packing test upflow and
Packing test downflow
Select whether to perform packing tests upflow, downflow or both. Both are selected by
default.
Inlet for sample
Select the appropriate inlet for sample solution.
AxiChrom 300-1000 columns User Manual 28-9562-89 AD
5 Packing the column
5.2 Creating a UNICORN method
6
Click Next to display the Column Packing Summary Method Wizard page.
This page provides a summary of the options selected in the previous wizard
pages, containing for example:
•
estimated slurry volume, based on the entered estimated concentration
•
estimated consumption of buffer and sample
•
instructions on how to connect the AxiChrom column to the ÄKTAprocess
system
7
Click Finish. The column packing summary can then be viewed under View/Run
Setup/Notes/Method Notes in the Method Editor module of UNICORN.
8
Choose an appropriate result file folder, result name and save the method.
Creating a packing method
based on custom media
Intelligent Packing methods may also be developed for custom media using the Method
Wizard. The wizard facilitates this by providing an extended range of variables that may
be modified to optimize the method. For example, it is possible to:
•
Select filling speed in a defined range.
AxiChrom 300-1000 columns User Manual 28-9562-89 AD
115
5 Packing the column
5.2 Creating a UNICORN method
•
Pack according to a desired Packing Factor. The custom method utilizes the same
sequence for packing as the regular method. The adapter must be stopped in the
overlap of defined min/max bed height interval and the Packing Factor range.
•
Edit detection limits.
•
Select flow conditioning with associated variables. Flow conditioning is always performed down flow, unless the flow direction is changed in the variables page.
•
Specify desired adapter velocity during packing within defined range.
•
Select sample volume within defined range.
Procedure
1
Start the Method Wizard in the Method Editor window and choose a system in
the pop up window.
2
Select whether to create a method for Column Packing, Packing Test, or the two
combined.
3
Select the appropriate AxiChrom column.
4
Select All or Other media type, and then select Custom under Medium.
5
Click Next to continue in the Method Wizard.
Note:
116
Over-compression during packing can damage the medium. The default
Packing Factor for each medium has been tested and verified by GE Healthcare.
AxiChrom 300-1000 columns User Manual 28-9562-89 AD
5 Packing the column
5.3 Packing using a UNICORN method
5.3
Packing using a UNICORN method
Prerequisites
This procedure assumes that slurry preparation and column priming have been performed
according to the information on pages 90 and 93. The ÄKTAprocess system controls
valves, flows and rinsing procedures.
Note:
Ensure that the liquid levels in the containers are lower than the system outlet,
to avoid siphoning flow.
Note:
Ensure that the air trap is filled with mobile phase liquid. This is because the
methods created using the Method Wizard for priming are constructed so that
the air trap is inline with the column when equilibration and testing operations
are being performed. The packing method is built to bypass the air trap.
Note:
During the packing procedure it is not possible to pause the process when the
consolidation phase has started. The packing procedure can be ended by
pressing End in UNICORN or by using the Emergency stop. If a packing procedure is ended, the procedure will be aborted and the medium has to be unpacked from the column.
WARNING
Ensure that nobody is present within the safety zone when the
adapter is moving. The operator in charge is responsible for keeping
the safety zone free from unauthorized personnel and unnecessary
equipment.
Running the method
1
Run the created packing method.
AxiChrom 300-1000 columns User Manual 28-9562-89 AD
117
5 Packing the column
5.3 Packing using a UNICORN method
2
In the Variables page, enter the Measured slurry concentration, see the figure
below and the information in Section 4.3 Determining the slurry concentration,
on page 91.
Click Next, answer the questions and enter a result name. Ensure that the
Master is in MAIN MENU before continuing.
3
Click Start to start the method.
4
When prompted to, open the slurry tank and then click Continue. Keep the
media homogeneously suspended throughout the entire fill step.
Result: The column is filled automatically with slurry from the slurry tank by
raising of the adapter. The filling stops automatically and the Media valve closes
when correct amount of slurry is filled into the column. The maximum filling
speed is 300 cm/h. After the filling, the system rinses the Media valve from
slurry back into the slurry tank.
5
When the slurry tube is free from slurry, click Continue.
6
Close the slurry tank valve and click Continue.
Result: The bed consolidates as the adapter moves down in the column. A
warning dialog is displayed three or six minutes before the calculated consolidated bed is reached, depending on media. The warning dialog should be closed
before detection of the bed occurs.
118
AxiChrom 300-1000 columns User Manual 28-9562-89 AD
5 Packing the column
5.3 Packing using a UNICORN method
7
Pay attention as the adapter approaches the consolidated bed surface. When
the bed is detected, a confirmation dialog appears.
Note:
When the adapter comes into contact with the consolidated bed there will be a
lag (default 2 seconds) to sense if the detection has occurred or not. When the
detection has occurred the operator confirms that the detection has taken place.
8
If the detection of the consolidated bed surface is correct, click Continue and
be prepared to end the packing.
Result: The bed compresses and the End Packing figure in the UNICORN flow
scheme is colorized.
The compression can be followed as the colored boxes light up in brighter red
or green color depending on the position of the adapter. When the position of
the adapter is within the approved bed height range and Packing Factor range,
the Goto End Pack button lights up green.
AxiChrom 300-1000 columns User Manual 28-9562-89 AD
119
5 Packing the column
5.3 Packing using a UNICORN method
9
When the desired Packing Factor is approaching, double-click the Goto End
Pack button.
Result: The manual control-pump command window is opened, with End-Pack
command highlighted.
Note:
Goto End Pack can be selected by double-clicking at any time during the compression step.
10
To stop the adapter when the optimal Packing Factor or desired bed height is
reached, click on Execute to execute the End-Pack command.
Result: The adapter stops and the system closes the Bottom mobile phase to
prevent the column from draining. If a packing test was chosen in the Method
Wizard dialog, it starts automatically.
Note:
Ending packing early or late will result in a too low or too high Packing Factor,
respectively.
11
5.4
When the packing test is completed, open the Evaluation module of UNICORN
and perform an integration of the peak using the packed bed height value.
Packing using the Master Wizard
Description
The Packing procedure described in the Master wizard guides the operator through a
number of steps to pack the column with manual valves and a standalone pump. Follow
the instructions in the Intelligent Packing wizard, found in the MAIN MENU in AxiChrom
Master.
WARNING
Ensure that nobody is present within the safety zone when the
adapter is moving. The operator in charge is responsible for keeping
the safety zone free from unauthorized personnel and unnecessary
equipment.
120
AxiChrom 300-1000 columns User Manual 28-9562-89 AD
5 Packing the column
5.4 Packing using the Master Wizard
Step 1: Select INTELLIGENT
PACKING in the MAIN MENU
The AxiChrom Master Intelligent Packing wizard starts with a welcome dialog where all
necessary preparations before packing are listed. You can step back and forth in the
wizard until the START button has been pressed (step 8). The preconditions for packing
are:
•
The system/pump is primed.
•
All tubing leading to the column are primed.
•
The column is primed.
•
A slurry tank is connected to the Slurry inlet.
•
A tube from the pump/system is connected to the Rinse inlet.
•
The adapter is in its bottom position.
Press the CONTINUE button to proceed.
AxiChrom 300-1000 columns User Manual 28-9562-89 AD
121
5 Packing the column
5.4 Packing using the Master Wizard
Step 2: Select the media type
Select a medium type for a certain chromatography technique using the arrow buttons.
The selection All types will list all available media regardless of their applications.
Press the CONTINUE button to proceed.
Step 3: Select the medium
Select an available medium for the selected chromatography technique that was chosen
in the previous dialog. A scrollbar will appear on the right side of the list if it is too long
to fit on the screen. All lists include a selection called Other which is to be used for media
other than GE Healthcare BioProcess media.
Press the CONTINUE button to proceed.
122
AxiChrom 300-1000 columns User Manual 28-9562-89 AD
5 Packing the column
5.4 Packing using the Master Wizard
Step 4: Enter the hose
dimensions
•
Enter the slurry tube inner diameter in millimeters, by pressing Set if the current
value is wrong.
•
Enter the slurry tube length in meters, by pressing Set if the current value is wrong.
Note:
If the wrong tubing parameter is set, the bed height can be affected.
Press the CONTINUE button to proceed.
Step 5: Enter the target bed
height and the slurry
concentration
AxiChrom 300-1000 columns User Manual 28-9562-89 AD
123
5 Packing the column
5.4 Packing using the Master Wizard
•
Press Set if the current value is wrong, and enter the measured slurry concentration
in percent. If a slurry concentration above 70% is entered the default filling speed
will be decreased to 200 cm/h.
•
Enter the target bed height in centimeters, by pressing Set if the current value is
wrong. The value is set to one decimal place accuracy.
•
The deviation from the desired target bed height is automatically suggested by Intelligent Packing bed height limits. The default range is ±1 cm of the target bed
height. Press Set to adjust the values.
Note:
The more accurate the slurry concentration is, the closer the bed height will
be to the nominal target bed height. Set a range for the bed height limit to allow
some tolerance in slurry concentration.
Press the CONTINUE button to proceed.
Step 6: Confirm the packing
settings
Confirm the packing settings. Use the recommended default values for Packing Factor,
Filling speed and Packing speed. These have been verified for GE Bioprocess media.
124
•
Press the CONTINUE button to use the default settings that have been verified to
give well-packed beds.
•
Press Edit to change any of the values (not recommended other than for reasons
stated in Section 4.2 Preparation of the slurry, on page 90). Then, press Set in the next
dialog to change:
-
Target Packing Factor
-
Filling speed [cm/h]
-
Packing speed [cm/h]
AxiChrom 300-1000 columns User Manual 28-9562-89 AD
5 Packing the column
5.4 Packing using the Master Wizard
Note:
The recommended filling speed is 300 cm/h for optimal mixing in the column
during the filling step. However, if the slurry concentration is high (>70%) or if
the slurry viscosity is high (for example in a cold room <10°C), the filling speed
should be reduced to 200 cm/h. If the filling speed is too high, cavitation may
occur, leading to formation of air bubbles inside the column.
The following settings are used for bed detection and may be changed for packing media
not in the list on page 183:
•
Bed detection delay [s]
•
Bed detection level [mbar]
Press the CONTINUE button to save the changed settings, or press BACK to return
without saving.
Step 7: Verify the settings
Verify the settings. The Summary dialog displays all selections made in the previous dialogs and also the calculated required slurry volume in liters.
Press the CONTINUE button to confirm the settings, or press BACK to return without
saving.
AxiChrom 300-1000 columns User Manual 28-9562-89 AD
125
5 Packing the column
5.4 Packing using the Master Wizard
Step 8: Check the preconditions
for packing
Check the preconditions for packing.
•
The tubing, system, column, and Media valve are primed.
•
The Rinse inlet is connected to a pump and is closed.
•
Both the Top and Bottom mobile phase valves are closed.
•
A slurry tank is connected to the Slurry inlet on the column.
•
The valve on the slurry tank is opened.
•
The media is kept homogeneously suspended throughout the filling process.
•
The slurry volume is at least the specified value.
Check the boxes and press START to initiate the packing process.
126
AxiChrom 300-1000 columns User Manual 28-9562-89 AD
5 Packing the column
5.4 Packing using the Master Wizard
Step 9: Fill the column
•
The adapter moves upwards.
•
Keep the media homogeneously suspended.
•
The adapter stops and the Media valve closes automatically when the filling is finished.
•
If the pressure falls below -0.30 bar g, the filling will stop until the pressure has risen
above -0.25 bar again.
•
The adapter speed can be controlled using the arrow buttons. If the adapter stops
repeatedly, the slurry concentration is too high and the adapter filling speed needs
to be lowered. The speed range limit is 100 to 300 cm/h.
•
If the filling for some reason needs to be ended earlier, press the END FILLING button
to proceed using the pre-defined values—with the risk of ending with a result that
is out of range for the defined bed height. END FILLING can also be used to abort
the packing.
•
Press PAUSE to temporarily pause the procedure. In the next dialog, press ABORT
to quit packing or CONTINUE to proceed.
AxiChrom 300-1000 columns User Manual 28-9562-89 AD
127
5 Packing the column
5.4 Packing using the Master Wizard
Step 10: Rinse the media valve
1
Keep the valve on the slurry tank open.
2
Start the pump at the stated flow, through the rinse tube and back into the slurry
tank.
3
When the slurry tube has been rinsed free from slurry:
4
•
Stop the pump.
•
Close the valve on the slurry tank.
When all above conditions are fulfilled and their boxes have been checked, press
CONFIRM to proceed to the next step.
Step 11: Open the bottom mobile
phase valve
128
AxiChrom 300-1000 columns User Manual 28-9562-89 AD
5 Packing the column
5.4 Packing using the Master Wizard
1
Ensure that the Top mobile phase valve is kept closed.
2
Open the Bottom mobile phase valve and check the box in the dialog.
3
Press CONFIRM to proceed with packing.
Step 12: Consolidation phase
The consolidation starts. An approximate total time to the low bed height limit and to
the calculated bed detection are displayed in the right frame. The current position and
the speed of the moving adapter are displayed in the left frame.
Bed detection
Waiting for detection
AxiChrom 300-1000 columns User Manual 28-9562-89 AD
129
5 Packing the column
5.4 Packing using the Master Wizard
This dialog will automatically open 3 to 6 minutes before the calculated bed detection
occurs. The time depends on the media, with longer time for High Performance media.
When the adapter reaches the bed, the user has two options:
•
Let the AxiChrom Master detect the contact between the adapter and the gel bed.
•
Manually detect, that is, visually verify that the adapter has contacted the bed by
pressing Detect to proceed to the next step in the packing procedure.
Note:
Manual detection should only be used if the user is certain that the adapter
has indeed come into contact with the consolidated bed, but no automatic
detection was executed.
The Axichrom wizard will apply the compression specified for the selected medium
starting from the point of execution of the selected option.
Bed is detected
There will be a 2 second delay before the bed detection dialog appears. A consolidated
bed has been detected automatically or manually.
130
•
Press Confirm to acknowledge the detection and continue to the next step. If not
confirmed, the process will stop automatically in 30 seconds.
•
Press Ignore if the adapter is not in full contact with the bed. The bed search will
continue.
AxiChrom 300-1000 columns User Manual 28-9562-89 AD
5 Packing the column
5.4 Packing using the Master Wizard
Unconfirmed detection
The adapter has stopped automatically since the bed detection not was confirmed
manually. The actual Packing Factor is displayed.
No bed was detected
The adapter has stopped at the low bed height limit without finding any bed. This may
happen if the wrong slurry concentration has been set.
Press Abort to end the Intelligent Packing wizard and return to the MAIN MENU.
AxiChrom 300-1000 columns User Manual 28-9562-89 AD
131
5 Packing the column
5.4 Packing using the Master Wizard
Bed height out of limit
The specifications for bed height range and Packing Factor range can not be met. That
is, the bed was detected but the specified bed height range is out of limits from the
Packing Factor range, optimal Packing Factor ±0.03.
Press Abort to end the Intelligent Packing wizard and return to the MAIN MENU.
Step 13: Monitor the compression
132
AxiChrom 300-1000 columns User Manual 28-9562-89 AD
5 Packing the column
5.4 Packing using the Master Wizard
The compression of the bed has now started. The accepted Packing Factors are shown
on the left side of the animation and the bed height limits are shown on the right side
of the animation. The area in which these two criteria overlap, shown as green in the
animation, is where an approved packed bed can be achieved. The adapter, shown as
the black horizontal line, is moving down in the animation, closing in on the green approved range of Packing Factor and bed height.
Note:
If the picture for some reason does not resemble this example above, press
Reset to refresh the picture.
Step 14: Finish the packing
When the adapter is within the limits (within the green area) the new button End packing
will appear. Press End packing to stop the adapter as close to the target Packing Factor
(the static black line in the green area) as possible, for optimal compression.
AxiChrom 300-1000 columns User Manual 28-9562-89 AD
133
5 Packing the column
5.4 Packing using the Master Wizard
If the adapter is not stopped
If the adapter is not stopped, a dialog like the following is displayed:
The adapter stops automatically
•
15 seconds after the optimal Packing Factor(PF)±0.03 is reached, or
•
at the low bed height limit.
In the first case the bed has been over-compressed. Press Confirm to proceed. Press
Abort to end the wizard and return to the MAIN MENU. See Method 2, on page 139 for
help about over-compression.
Step 15: Review the process
summary
This dialog summarizes the packing process and displays these values:
134
AxiChrom 300-1000 columns User Manual 28-9562-89 AD
5 Packing the column
5.4 Packing using the Master Wizard
•
Resulting bed height and target bed height.
•
Column volume. The column volume is calculated using several decimal place’s
precision in both the value of Pi and adapter position. This may lead to a discrepancy
in the displayed volume compared to that which can be calculated from the figures
shown.
•
Resulting Packing Factor and target Packing Factor.
•
Height where the consolidated bed was detected.
Press the MAIN MENU button to leave the AxiChrom Master Intelligent Packing wizard.
5.5
Creating custom packing methods in the Master
Methodology for choosing
packing parameters
Using the Intelligent Packing wizard, the factors that can be varied to optimize the
packing results for a particular media are mainly Packing Factor and packing speed.
The packing buffer may sometimes also play a significant role. For more information
about packing factors and buffers, see Section 4.1 Packing Factor and Compression
Factor, on page 89 and Appendix B Packing buffer information, on page 183.
•
Investigate what parameters are suitable for the media. Check literature with the
manufacturer, or data from smaller scale columns. It is very likely that the Packing
Factor, packing buffer or the compression can be found or at least estimated.
•
In the standard Packing wizard (see Section 5.3 Packing using a UNICORN method,
on page 117), enter the known Packing Factor or a low value where it is known that
there is no damage incurred to the media.
•
The packing speed is mainly dictated by the size of the media particles, and potentially also their density and rigidity. In general, smaller and less rigid media in the
range from 15 to 40 µm in diameter are suitable to pack at 30 cm/h while larger
particles around 100 µm are best packed at 60 cm/h. Very large, rigid and dense
particles can be packed at 90 cm/h, even though 60 cm/h often works well.
AxiChrom 300-1000 columns User Manual 28-9562-89 AD
135
5 Packing the column
5.5 Creating custom packing methods in the Master
Changing parameter settings
If the parameter settings for the media are known (Packing Factor, packing speed and
filling speed), use the wizard for Intelligent Packing.
Procedure
1
In the Select media type dialog: if the separation technique is known, choose
the technique, otherwise choose All types.
2
In the Select media dialog, choose Other.
3
In dialog no. 6/15, press Edit to reach the template parameter settings. They
are deliberately set rather low for most media. Press Set and enter the parameter settings found for the media.
4
Proceed as usual according to the instructions in Section 5.4 Packing using the
Master Wizard, on page 120.
Manual packing
Note:
This method is recommended for advanced users only.
If the standard method does not fulfill the requirements, the MANUAL CONTROL wizard
can be used for packing, either as it is or with the help of a standalone pump. All interactions need to be performed manually and without the help of the software interface.
Through manual control, the following can be performed:
136
•
Open or close the Media valve (press OPEN or CLOSE).
•
Control adapter movement (press Jog Up or Jog Down).
AxiChrom 300-1000 columns User Manual 28-9562-89 AD
5 Packing the column
5.5 Creating custom packing methods in the Master
5.5.1 Packing stainless steel column tubes
•
Set an adapter position (press Set and then RUN to start the adapter movement.
Press STOP to stop the movement). The position can be changed again while the
adapter moves. If the position is changed during adapter movement the RUN button
will be lit up. To verify that the position is to be changed press the RUN button.
•
Change the speed (press Set). The adapter speed can be varied from 10 to 600 cm/h.
There are two height limits in the manual mode for the adapter. The lower limit is at 1
cm from the bottom. The upper limit is the priming position above the priming groove,
which should be used for priming the column. Maximum filling heights are listed in the
table below. If the adapter is forced past a limit the adapter will stop automatically. When
filling the column manually pay attention not to move the adapter past the priming
groove.
5.5.1
300-600 columns
800-1000 columns
Short column tubes
(bed height 100-300 mm)
570 mm
578 mm
Long column tubes
(bed height 100-500 mm)
830 mm
838 mm
Packing stainless steel column tubes
Packing the column using a
UNICORN method
For the general packing procedure using a UNICORN method, see Section 5.3 Packing
using a UNICORN method, on page 117.
With stainless steel column tubes, it is not possible to see when the adapter is approaching the consolidated bed surface (step 7). In order to verify bed detection, observe the
pressure on sensor PRESS_119. Set the vertical scale on the pressure graph for PRESS_119
to minimum 0.1 bar, maximum 0.5 bar and make sure that the horizontal axis displays
time. Automatic bed detection is triggered by a drop in pressure by 0.01 bar for a duration
of at least 2 seconds. Manual bed detection is indicated by a corresponding drop in the
pressure graph.
AxiChrom 300-1000 columns User Manual 28-9562-89 AD
137
5 Packing the column
5.5 Creating custom packing methods in the Master
5.5.1 Packing stainless steel column tubes
Figure 5.1: The blue trace shows the pressure recorded at PRESS_119 during column
packing. Bed detection is indicated by a transient pressure drop (arrow).
Packing the column using the
Master wizard
For the general packing procedure using the Master wizard, see Section 5.4 Packing using
the Master Wizard, on page 120.
With stainless steel column tubes, it is not possible to see when the adapter is approaching the consolidated bed surface (step 12). For manual bed detection, verify that the
adapter has reached the consolidated bed by watching the pressure indication in the
Master dialog. Automatic bed detection is triggered by a drop in pressure by 0.01 bar
for a duration of at least 2 seconds. Manual bed detection is indicated by a corresponding
drop in the pressure graph.
5.5.2
Post packing modifications
Method 1
If there is reason to believe that the bed needs further compression, for example if the
asymmetry factor is high or the bed stability is insufficient, the packed bed can be further
compressed manually. This is providing that the resulting lower bed height is allowed.
Procedure
138
1
Enter the MANUAL CONTROL wizard from the MAIN MENU.
2
Determine how much further to compress the bed. Note that over-compressing
the bed may cause damage to the particles. As a general recommendation, the
bed should not be compressed more than 0.05 higher than the recommended
default value in the Master.
3
Enter a low adapter speed, 30 cm/h is suggested.
AxiChrom 300-1000 columns User Manual 28-9562-89 AD
5 Packing the column
5.5 Creating custom packing methods in the Master
5.5.2 Post packing modifications
4
Open the Bottom mobile phase pathway. The Top mobile phase shall be closed.
5
Enter the lower target bed height and press return in the numeric pad.
6
Press RUN and the adapter will move down to the set height at the set speed,
expelling excess liquid through the Bottom mobile phase valve.
7
When the adapter stops, close the bottom mobile phase pathway.
8
Evaluate the column performance, see Chapter6 Evaluating column performance,
on page 141.
Method 2
If the bed was over-compressed it can often be expanded in a controlled way. Results
are normally good, but cannot be guaranteed.
Procedure
1
Start a liquid flow upflow through the column, at least two times higher than
the adapter speed in step 2 (that is, >60 cm/h).
2
Enter a low adapter speed, 30 cm/h is recommended.
3
Enter the target height, higher than the current height but within the earlier
applied compression range.
4
The adapter will move to the target height.
5
When the adapter stops, stop the liquid flow through the column.
6
Close the inlet.
7
Evaluate the column performance, see Chapter6 Evaluating column performance,
on page 141.
Method 3
Another post packing modification is flow conditioning, suitable if
•
the bed shows signs of over-compression at one end, such as markedly different
HETP and As results in the upflow and downflow directions
•
there are cracks in the bed
•
HETP test results indicate a bed with insufficient efficiency. Flow conditioning can
sometimes correct this
•
there are shoulders on the HETP peak, which indicates poor packing
AxiChrom 300-1000 columns User Manual 28-9562-89 AD
139
5 Packing the column
5.5 Creating custom packing methods in the Master
5.5.2 Post packing modifications
For more information about HETP calculation, see Chapter 6 Evaluating column performance, on page 141.
To flow condition the bed it is important to have a pump that can supply a flow high
enough to create a slight head space of clear liquid above or below the bed. If this cannot
be achieved, run the pump, media and column at the highest flow they can withstand.
Procedure
140
1
Start the pump in one direction through the column and slowly increase the
flow to at least the operating velocity of the process, but preferably more.
2
Continue to slowly increase the flow until a small head space is formed in the
top or bottom of the column. Make sure that the pressure rating of the column
or the media is not surpassed.
3
Maintain this velocity for 3 column volumes and then slowly lower the velocity
again. Make sure that there is no sudden decrease in the flow, since this may
damage the structure of the bed.
4
If necessary reverse the flow and repeat the procedure.
AxiChrom 300-1000 columns User Manual 28-9562-89 AD
6 Evaluating column performance
6
Evaluating column performance
Introduction
The efficiency of a column depends on, for example, how well it is packed. A poorly
packed column gives rise to uneven flow, resulting in zone broadening and reduced
resolution. It is therefore important to have a method by which the column can be tested
before it is put into operation. Such a method should be simple, quantitative and should
not introduce contaminating materials. It is also an advantage if the same method can
be used to monitor column performance over its working life so that it is easy to determine
when the medium should be repacked or replaced.
Experience has shown that the best method of expressing the efficiency of a packed
bed is in terms of the height equivalent to a theoretical plate (HETP) and the peak
asymmetry factor (As). These values can be determined easily by applying a sample of
for example acetone or salt solution to the column.
It is important that the column is properly equilibrated before the packing is evaluated.
6.1
Choice of test samples for columns
A solution of either acetone or salt solution, for example NaCl, can be used to give a
good indication of the column packing quality. The eluate is monitored by measuring
the UV absorption at 280 nm or the conductivity. The resulting elution profile is used to
calculate the HETP value and asymmetry.
Both acetone and NaCl may interact with the matrix. Do not use acetone together with
the techniques HIC and RPC. If using NaCl on charged media such as ion exchangers,
the bed must first be equilibrated with an eluent containing NaCl to a conductivity of
about 35-40 mS/cm before applying a higher concentration NaCl sample. The sample
is eluted by the equilibration eluent. Consider the instructions for each specific media.
Alternatively, the running buffer concentration can be increased 3-fold and used as
sample solution, provided that the running buffer contains salt to a concentration high
enough that the sample does not interact with the matrix. See Appendix for additional
literature.
AxiChrom 300-1000 columns User Manual 28-9562-89 AD
141
6 Evaluating column performance
6.2 HETP and asymmetry calculation
6.2
HETP and asymmetry calculation
General guidelines
The sample volume should be approximately 1 to 2% of the total bed volume, and 1 to
2% v/v acetone can be used. Alternatively 0.8 M sodium chloride, or equivalent can be
applied to a 0.4 M NaCl elution buffer, depending on the media that is used. Use a fluid
velocity 30 to 40 cm/h for 34 µm and 50 µm media and 20 cm/h for 75 and 90 µm media.
Running the HETP test at a higher velocity or using a larger sample volume will affect
both HETP and AS values. The airtrap and any filters should be bypassed during the
sample application to avoid back-mixing.
An application note describing column testing is available from GE Healthcare.
HETP calculation
Calculate the height equivalent of a theoretical plate (HETP) and asymmetry factor (AS)
from the chromatogram as follows:
HETP = L/N
N=5.54 (VR/wh)2
Variable
Meaning
L
Bed height
N
Plate number
VR
Retention volume
wh
Peak width at half peak height
VR and wh are in the same units
To facilitate comparison of column performance, the concept of reduced plate height
(h) is often used. Reduced plate height is calculated as:
h = HETP/dp
where dp is the mean diameter of the beads.
As a guideline, a value of h<3 is normally well acceptable at the optimal test conditions
presented above.
142
AxiChrom 300-1000 columns User Manual 28-9562-89 AD
6 Evaluating column performance
6.2 HETP and asymmetry calculation
Asymmetry calculation
The peak should be symmetrical and the asymmetry factor as close to 1 as possible
(values between 0.8 and 1.8 are usually acceptable). A change in the shape of the peak
is usually the first indication of bed deterioration.
The asymmetry factor As describes the deviation from an ideal Gaussian peak shape
and is calculated from the peak width at 10% of peak height:
As = b/a
The following test chromatogram shows the parameters used to calculate peak broadening and peak symmetry.
Concentration
(measured by Absorbance or Conductivity)
0
0
0
0
wh-296
20
0
0.85
a
--253
-
b
VR
AxiChrom 300-1000 columns User Manual 28-9562-89 AD
50%
10%
Eluted Volume
143
7 After the packing
7
After the packing
7.1
Cleaning-in-place (CIP)
Description
Efficient cleaning methods should be developed as an integral part of the complete
process to maximize the working life of the medium. CIP removes precipitated material,
strongly bound substances and other contaminants from the medium without the need
to disassemble the column. Regular CIP between batches helps assure the desired
product quality and the expected working life of the medium and equipment.
For more information about which chemicals to use for CIP, see the table on page 37.
Note:
7.2
Ensure that the media and the column withstands the chemicals used for CIP.
Sanitization-in-place
Description
Sanitization is the use of chemical agents to minimize microbial contamination.
A sanitization procedure is used when there is a need to ensure microbial reduction, for
example before changing a product or when there has been unwanted microbial contamination.
Low fluid velocity (60 cm/h) is used for the whole process.
Note:
Before the sanitization method is started, check that the media withstands
1.0 M NaOH.
Regular cleaning
Regularly wipe the outside of the column using a cloth moist with an antibacterial agent.
This reduces the risk of microbial growth.
144
AxiChrom 300-1000 columns User Manual 28-9562-89 AD
7 After the packing
7.2 Sanitization-in-place
General method for
sanitization-in-place
1
It is recommended to rinse the column and Media valve with purified water, 2
column volumes upflow at a flow velocity of 60 cm/h.
2
Clean the Media valve by filling it through the Rinse inlet and out through the
Slurry inlet with 1 M NaOH. Let stand for 4 hours before neutralization. Meanwhile, continue with the next step.
3
Flush the column upflow with 2 column volumes of 1.0 M NaOH at a velocity of
60 cm/h.
4
Flush the column downflow with 2 column volumes of 1.0 M NaOH at a velocity
of 60 cm/h.
5
Recirculate 5 column volumes of 1.0 M NaOH, upflow for 4 hours at a velocity
of 60 cm/h.
6
Wash the column and Media valve with buffer or water of desired quality to
achieve a neutral pH.
7
Re-equilibrate the column with storage or starting buffer.
An application note on sanitization is available from GE Healthcare.
7.3
Unpacking the column
Section contents
This section first gives an overview of the unpacking procedure. Later in this section
there is a more detailed, stepwise description of how to use a UNICORN method or the
Master to unpack the media from the column.
Recommended unpacking solution
The recommended unpacking solution is water. If the media is to be stored, unpack in
appropriate storage solution such as 20% ethanol, 0.2 M sodium acetate in 20% ethanol
or 10 mM NaOH.
AxiChrom 300-1000 columns User Manual 28-9562-89 AD
145
7 After the packing
7.3 Unpacking the column
7.3.1 Short description of the unpacking procedure
7.3.1
Short description of the unpacking procedure
There are two unpacking procedures that can be used for unpacking media from the
column. If unpacking a Bioprocess media listed in UNICORN or the Master the correct
method is chosen automatically. The different procedures are the regular procedure
described below used for e.g. MabSelect, Capto and Fast Flow media, and the advanced
method for e.g. gel filtration and High Performance media. The difference between the
methods is flow direction in the expansion step and number of repetitions of media push
out steps. If custom media is to be unpacked see Creating a custom unpacking method,
on page 149.
The regular unpacking procedure consists of three steps; expansion, collapse and slurry
push out. The expansion is performed by lifting the bed by moving the adapter up at the
same time as flow comes from the bottom bed support. When the bed has expanded
the flow is reversed to collapse the bed by pushing it down. When the collapsed bed has
fallen to the bottom of the column the Media valve opens and the slurry can be pushed
out from the column by having a low upwards flow into the column and at the same
time lower the adapter to the bottom position.
Unpacking is performed either using UNICORN on an ÄKTAprocess system or from the
AxiChrom Master directly. The workflows for unpacking acrylic and stainless steel column
tubes are described in Section 7.3.3 Unpacking acrylic column tubes, on page 150 and
Section 7.3.4 Unpacking stainless steel column tubes, on page 162 respectively.
7.3.2
Creating a UNICORN method
The Method Wizard in UNICORN simplifies creation of an Unpacking method. The
methods require an initial selection of a listed medium. Thereafter the user makes appropriate selections to complete the creation of the method. This section describes the
creation of a UNICORN unpacking method. If a custom medium is selected in the Method
Wizard media list, a wider range of variables are allowed to be defined to optimize the
method for two different unpacking procedures that can be used, see Creating a packing
method based on custom media, on page 115).
Procedure
1
146
Start the Method Wizard in the Method Editor window and choose a system in
the pop up window.
AxiChrom 300-1000 columns User Manual 28-9562-89 AD
7 After the packing
7.3 Unpacking the column
7.3.2 Creating a UNICORN method
2
Select Column Unpacking.
Option
Description
Column
Select AxiChrom <xxx>/<yyy> (xxx = column diameter
in millimeter, yyy = max bed height for short and long
column tube, 300 or 500 mm respectively). The column
size can be found on a label located on the lower front
part of the frame of the column.
Column material
Select the material of the column tube.
Show medium type
Select the appropriate medium type.
Medium
Select the appropriate medium.
AxiChrom 300-1000 columns User Manual 28-9562-89 AD
147
7 After the packing
7.3 Unpacking the column
7.3.2 Creating a UNICORN method
3
148
Click on Next to display the Unpacking Parameters Method Wizard page. Select
the appropriate variables.
Option
Description
Measured bed height
Enter measured value.
Inlet for unpacking liquid
Select the appropriate inlet.
Capped outlet
Select the appropriate outlet blocked with a
blind cap.
AxiChrom 300-1000 columns User Manual 28-9562-89 AD
7 After the packing
7.3 Unpacking the column
7.3.2 Creating a UNICORN method
4
Click on Next to display the Unpacking Summary Method Wizard page.
This page provides a summary of the options selected in the previous wizard
pages. An estimated buffer consumption is given and how to connect the column
to the system is described.
5
Click on Finish. The unpacking summary can be viewed under Notes/Method
Notes in the Method Editor module of UNICORN.
6
Choose an appropriate result file folder, result name and save the method.
Creating a custom unpacking method
Unpacking methods may also be developed for custom media using the Method Wizard.
The wizard facilitates this by providing an extended range of variables that may be
modified to optimize the method.
1
Start the Method Wizard in the Method Editor window and choose a system in
the pop up window.
2
Select the appropriate AxiChrom column.
3
Select All or Other media type, and then select Custom medium.
4
Click Next to continue in the wizard.
For custom media, it is possible to choose from two unpacking modes: regular or advanced.
AxiChrom 300-1000 columns User Manual 28-9562-89 AD
149
7 After the packing
7.3 Unpacking the column
7.3.2 Creating a UNICORN method
•
Regular unpacking method should be used for media with a medium particle size
(dp) from approximately 50 μm and above. The method consists of a bed collapse
part and a slurry push out part.
•
Advanced mode should be used for media with dp less than 50 μm. The method
consists of several bed collapse parts and several slurry push out parts. The sequence
for advanced mode is repeated two or three times depending on bed height. A bed
height below 25 cm is unpacked with two slurry push outs and a bed height above
25 cm is unpacked with three slurry push outs.
Regular unpacking is the fastest method. If the unpacking behavior is unknown, try the
regular method.
7.3.3
Unpacking acrylic column tubes
Unpacking acrylic column tubes using UNICORN method
This procedure assumes that the column, system and tubing between the system and
the column are primed. The unpacking sequence is the same as for the AxiChrom Master
in Unpacking acrylic column tubes using Master wizard, on page 151 from Step 7 "Start
the pump upflow". When UNICORN controls the unpacking all valves and flow path are
automatically changed. The only operation controlled by the operator is to open the
Slurry valve and make some confirmations.
The recommended unpacking solution is water. If the media is to be stored, unpack in
appropriate storage solution such as 20% ethanol or 10 mM NaOH.
Note:
One outlet should be capped during the unpacking to block the Top mobile
phase outlet during the media push out step when the Media valve is open to
the slurry tank.
WARNING
Ensure that nobody is present within the safety zone when the
adapter is moving. The operator in charge is responsible for keeping
the safety zone free from unauthorized personnel and unnecessary
equipment.
Before running the method
Connect the column using the automatic configuration for ÄktaProcess as described in
Section 3.6 Column and system setup, on page 68.
Running the method
Ensure that the liquid levels in the containers are lower than the system outlet. This is
to avoid siphoning flow.
150
AxiChrom 300-1000 columns User Manual 28-9562-89 AD
7 After the packing
7.3 Unpacking the column
7.3.3 Unpacking acrylic column tubes
1
Start the Unpacking method.
Result: The bed expands and collapses. To speed up the bed expansion sequence,
increase the adapter speed with Pump:Increase_Adapter_Speed under Manual
Instructions. The adapter speed can be increased in increments of 30 cm/h up
to 240 cm/h. Note that the pump flow velocity should always be higher than
the adapter speed.
If the bed collapses and comes to the bottom of the column earlier, the command Next breakpoint in Manual/Other in UNICORN can be used to speed up
the process.
2
When prompted to do so, open the slurry tank.
Result: The System will flow upwards and unpack the media through the Media
valve to the slurry tank as the adapter moves downwards. During the last push
out step, it is possible to change the adapter speed in
Pump:Increase_Adapter_Speed under Manual Instructions to speed up the
unpacking procedure. It is not possible to change adapter speed if the pressure
is too high, >1 bar or >0.5 bar, depending on media. When the pressure comes
below the limit for the media it is possible to change the adapter speed again.
The maximum unpacking adapter speed is 240 cm/h.
3
When the adapter is at the bottom position a flush of remaining media in the
column is initiated. When the bed support is free from media, click Continue.
Result: The Media valve closes and a rinse of the valve and slurry tube is started.
4
When the slurry tube is free from slurry, click Continue.
5
Close the slurry tank valve and click Continue.
Unpacking acrylic column tubes using Master wizard
The unpacking procedure described in the Master wizard guides the operator through
a number of steps to unpack the column with manual valves and a standalone pump.
Follow the instructions in the Unpacking wizard, found in the MAIN MENU in AxiChrom
Master.
For tubing connections see Manual configuration, on page 69.
Note:
This wizard changes depending on the media type and media chosen. The
method described below is a general method for the unpacking of Capto and
Fast Flow media. A different unpacking method is used for High Performance
media. The number of slurry push-out cycles in the High Performance unpacking method depends on the bed height to be unpacked. Two media push out
cycles are used for beds lower than 25 cm, and three cycles for beds higher
than 25 cm.
Note:
Always prime the Media valve before operation.
AxiChrom 300-1000 columns User Manual 28-9562-89 AD
151
7 After the packing
7.3 Unpacking the column
7.3.3 Unpacking acrylic column tubes
WARNING
Ensure that nobody is present within the safety zone when the
adapter is moving. The operator in charge is responsible for keeping
the safety zone free from unauthorized personnel and unnecessary
equipment.
Step 1: Enter the Master unpacking wizard
152
1
Select UNPACKING in the MAIN MENU to enter the AxiChrom Master UNPACKING wizard.
2
Ensure that all preconditions are fulfilled before pressing CONTINUE:
•
All tubing leading to the column is primed.
•
A pump or a tube from the system is connected to the Rinse inlet.
•
Both mobile phases are opened.
•
A slurry tank is connected to the Slurry inlet.
AxiChrom 300-1000 columns User Manual 28-9562-89 AD
7 After the packing
7.3 Unpacking the column
7.3.3 Unpacking acrylic column tubes
Step 2: Select media type
1
Select a media type for the chromatography technique that is packed in the
column, using the arrow buttons. The selection All types will list all available
media regardless of their applications.
2
Press the CONTINUE button to proceed.
Step 3: Select media
1
Select the packed media for the selected chromatography technique that was
picked in the previous dialog. A scroll-bar will appear on the right side of the
list, if it is too long to fit on the screen. All lists include a selection called Other
which is to be used for media other than Bioprocess media from GE Healthcare.
2
Press the CONTINUE button to proceed.
AxiChrom 300-1000 columns User Manual 28-9562-89 AD
153
7 After the packing
7.3 Unpacking the column
7.3.3 Unpacking acrylic column tubes
Step 4: Verify bed height
1
Check that the bed height is correct. The bed height is the same as the adapter
position and should always be read from the level scale located on the adapter
rod.
0
5
10
15
20
25
30
35
40
45
50
55
60
Note:
The level scale indicator differs between columns with different bed support
material (plastic or stainless steel). Make sure that the correct level scale indicator
is fitted.
If the value is incorrect, change it by pressing MENU and then in the MAIN MENU.
Press BACK to reach the Verify adapter position dialog and see Section 3.7.1
Start Master and calibrate column, on page 75 for more information about
changing the bed height.
2
154
When the values have been confirmed, press CONTINUE to proceed to the next
step.
AxiChrom 300-1000 columns User Manual 28-9562-89 AD
7 After the packing
7.3 Unpacking the column
7.3.3 Unpacking acrylic column tubes
Step 5: Connect the pump
Connect a pump to the Bottom mobile phase valve.
Ensure that the pump can be used for both upflow and downflow (connected to either
the Top or Bottom mobile phase valves, see Section 3.6 Column and system setup, on
page 68). It must also provide the velocities in the expansion phase stated in the dialog
(listed in the table below).
Table 7.1: Conversion of flow velocities to volumetric flow rates for 30 and 75 cm/h
Column diameter (mm)
Area (cm2)
L/h
30 cm/h
75 cm/h
300
707
21
53
400
1257
38
94
450
1590
48
119
600
2827
85
212
800
5027
151
377
1000
7845
236
589
Step 6: Fulfill the conditions before unpacking
Before the unpacking is started, the following preconditions need to be fulfilled.
AxiChrom 300-1000 columns User Manual 28-9562-89 AD
155
7 After the packing
7.3 Unpacking the column
7.3.3 Unpacking acrylic column tubes
The required buffer volume is displayed in this dialog. Make sure that this volume is
available. Ensure that
•
The external system/pump is primed. Ensure that the pump can be used for both up
and downflow (connected to either the Top or Bottom mobile phase valves).
•
All tubing to the column is primed.
•
The flowpath to the column is primed.
•
A slurry tank is connected to the Slurry inlet.
Check the boxes in the dialog and press START to proceed.
Step 7: Start the pump upflow
156
1
Start the pump upflow through the column at the flow stated in the dialog.
2
When the pump has reached a flow of at least the stated value, check the box
and press CONFIRM to start the unpacking.
AxiChrom 300-1000 columns User Manual 28-9562-89 AD
7 After the packing
7.3 Unpacking the column
7.3.3 Unpacking acrylic column tubes
Step 8: Wait for bed expansion
•
Increase the pump flow velocity before increasing the adapter speed. The pump flow
velocity should always be higher than the adapter speed. The adapter speed can be
increased in increments of 30 cm/h up to 240 cm/h.
•
If the vacuum for some reason is below -0.4 bar, the adapter will stop. The flow can
be increased in steps of 25 cm/h until the adapter starts to move again. It is then
possible to increase the flow to over 75 cm/h until the pressure has reached the
target pressure. Use the arrow buttons to control the adapter speed.
•
Press PAUSE to temporarily stop the action or to terminate the UNPACKING wizard
and return to the MAIN MENU.
Step 9: Reverse the pump flow when the bed is expanded
The bed is now expanded.
AxiChrom 300-1000 columns User Manual 28-9562-89 AD
157
7 After the packing
7.3 Unpacking the column
7.3.3 Unpacking acrylic column tubes
1
Reverse the flow through the column and run it at the flow stated in the dialog.
This will move the expanded bed towards the bottom of the column. It is possible
to continue the unpacking before the time has elapsed if the bed already has
collapsed to the bottom of the column.
2
Run the pump for the time stated in the dialog.
3
Check the boxes and press CONFIRM to proceed.
Step 10: Stop the pump
1
Stop the pump.
2
Check the box and press CONFIRM to continue to the next dialog.
Step 11: Empty the column
1
158
Open the slurry tank valve.
AxiChrom 300-1000 columns User Manual 28-9562-89 AD
7 After the packing
7.3 Unpacking the column
7.3.3 Unpacking acrylic column tubes
2
Close the Top mobile phase inlet/outlet.
3
Start an upwards flow through the column at the flow stated in the dialog.
4
When this flow has been reached, check the boxes and press CONFIRM to
proceed.
Step 12: Wait for unpacking to the slurry tank
•
Use the arrow buttons to reduce the adapter speed if the adapter comes too close
to the bed. Make sure the distance between the bed and the adapter is at least 2 cm.
The adapter speed range depends on the media that is unpacked. The largest range
is from 30 cm/h to 240 cm/h.
•
If the adapter movement stops due to the electric current in the motor rising too
high, the method is aborted and an alarm is raised. The unpacking must then be
restarted from the beginning or be continued manually.
•
If the pressure exceeds the maximum allowed, the adapter movement will temporarily stop until the pressure has dropped.
-
When unpacking bead size dp >50 µm e.g. Capto, Fast Flow or MabSelect media,
the adapter will stop if the pressure reaches 0.5 bar and start to move again
when pressure falls below 0.2 bar.
-
When unpacking bead size dp <50 µm e.g. High Performance media, the adapter
will stop if the pressure reaches 1.0 bar and start to move again when pressure
falls below 0.5 bar.
The pressure will decrease automatically when the adapter movement has stopped.
If the pressure does not drop automatically, ensure that:
-
The valve on the slurry tank is open.
-
The slurry tube is not clogged.
-
The flow is not too high.
AxiChrom 300-1000 columns User Manual 28-9562-89 AD
159
7 After the packing
7.3 Unpacking the column
7.3.3 Unpacking acrylic column tubes
•
If the adapter has stopped due to high pressure it is not possible to change the
adapter speed. The speed can be changed again when the adapter starts to move.
Press PAUSE to stop the movement temporarily or to terminate the UNPACKING wizard.
Step 13: Stop the pump
1
Stop the pump when the adapter is in its bottom position. If the pump is not
stopped, the slurry will be diluted.
2
Press CONFIRM to acknowledge.
Step 14: Flush out the remaining media
If there is media left in the column when the adapter has come to the bottom position
it can be flushed out. Use longer flushing times for more efficient media removal. Collect
the flushing liquid in a separate vessel to avoid diluting the previously unpacked slurry.
Press SKIP if you do not want to flush out the remaining media.
Follow the steps below to flush out the remaining media.
160
AxiChrom 300-1000 columns User Manual 28-9562-89 AD
7 After the packing
7.3 Unpacking the column
7.3.3 Unpacking acrylic column tubes
1
Start the pump upflow (from the Bottom mobile phase) using the flow stated in
the dialog.
2
When the column is empty and the pump has been stopped, press CONFIRM
to continue to the next step.
Step 15: Rinse the media valve and slurry tubing
Rinsing the Media valve will clean the valve and slurry tube from media after the unpacking.
1
Ensure that the valve on the slurry tank is open.
2
Start the pump at the flow stated in the dialog, through the rinse tube, and back
into the slurry tank.
3
When the slurry tank tube is emptied of gel, stop the pump.
4
Close the valve on the slurry tank.
5
Check the boxes and press CONFIRM.
AxiChrom 300-1000 columns User Manual 28-9562-89 AD
161
7 After the packing
7.3 Unpacking the column
7.3.3 Unpacking acrylic column tubes
Step 16: Exit the wizard
7.3.4
1
The unpacking is now completed. Measure the slurry concentration before the
column is repacked, see Section 4.3 Determining the slurry concentration, on
page 91.
2
Press MAIN MENU to leave the UNPACKING wizard.
Unpacking stainless steel column tubes
Unpacking stainless steel column tubes using a UNICORN method
Columns in stainless steel column tubes are unpacked using a UNICORN method in the
same way as for acrylic column tubes (see Section 7.3 in the AxiChrom 300-1000 User
Manual, edition AB).
Unpacking stainless steel column tubes using the Master wizard
For the general unpacking procedure using a UNICORN method, see Section 7.3 in the
AxiChrom 300-1000 User Manual, edition AB.
With stainless steel column tubes, it is not possible to see when the column bed expands
(step 8-9). The unpacking progress can however be followed from the pressure on sensor
PRESS_119. The pressure drops when adapter starts to move upwards and the bed expands under upflow, then rises again abruptly when the adapter is in the top position
and the flow is reversed. There will be a further slower increase in pressure as media
settles on the bottom bed support. Go to the next breakpoint in the unpacking method
when the pressure increase indicates that medium is accumulating on the bed support.
162
AxiChrom 300-1000 columns User Manual 28-9562-89 AD
7 After the packing
7.3 Unpacking the column
7.3.4 Unpacking stainless steel column tubes
Figure 7.1: 1. The pressure (blue trace) drops as the adapter moves upwards under upflow.
2. The pressure rises again abruptly when the adapter is in the top position and the flow
is reversed. 3. The pressure rises further as media settles on the bottom bed support.
7.4
System shutdown procedure
Background
The AxiChrom Master should always be turned off, disconnected and removed after
packing, unpacking, maintenance procedures, and before the column is used for separation runs.
Note:
If UNICORN has been used to control the Master, make sure that the component
in UNICORN System setup/Edit/Component for Intelligent Packing "AxiChrom 300-1000" is unticked before disconnecting the Profibus cable as the
following image shows.
AxiChrom 300-1000 columns User Manual 28-9562-89 AD
163
7 After the packing
7.4 System shutdown procedure
Disconnecting ÄKTAprocess from
AxiChrom Master
Follow the instructions on page 74.
Shutdown procedure for
AxiChrom Master
Use this procedure to shut off and disconnect the Master safely.
WARNING
Disconnect the power cable from the power outlet to AxiChrom
Master before disconnecting the power cable between the Master
and column. There is still lethal voltage present in AxiChrom Master
when it is shut off using the power switch on the Master.
164
AxiChrom 300-1000 columns User Manual 28-9562-89 AD
7 After the packing
7.4 System shutdown procedure
WARNING
Ensure that the power cable is disconnected or that the power is
shut off at the outlet whenever maintenance work is performed in
the Master, to avoid the risk of electrocution.
WARNING
A disconnecting system power switch must be installed, such as a
branch circuit protection and disconnect switch installed at your
facility. The system power switch should be installed at the wall to
cut the power to AxiChrom Master. Always use both the Master
power switch (located on the back on the Master unit) and the
system power switch for safe disconnection of AxiChrom Master.
Note:
When disconnecting the pneumatic pressure leading to AxiChrom Master, a
pop can occur. Avoid this by first shutting off the pressure leading to the
Master.
Procedure
1
Press the POWER OFF button in the MAIN MENU. The dialog Saving data with
progress bars is displayed briefly as in the following image.
AxiChrom 300-1000 columns User Manual 28-9562-89 AD
165
7 After the packing
7.4 System shutdown procedure
2
When the following dialog is displayed, use the power switch on the back of the
Master to turn off the power.
CAUTION
If the power switch is turned off before the Saving data
dialog has finished, the saved data for the columns may
become corrupted and will have to be recreated according
to the instructions in Section 3.7.1 Start Master and calibrate column, on page 75.
166
3
Disconnect the Master power cable.
4
Disconnect the motor power cable.
5
Disconnect the motor feedback cable.
6
Disconnect the pneumatic air supply.
7
Optionally, dismount the Master pressure transmitter from the flow path.
AxiChrom 300-1000 columns User Manual 28-9562-89 AD
A Parts list and diagrams
Appendix A Parts list and diagrams
Note:
A.1
Diagrams showing AxiChrom 600 main column components. The appearance
may differ between different column sizes. The table below lists the main parts
of the column. See product documentation for full listing.
Part numbers and names
Position
Name
104
Tube holder 400 to 1000
105
Tube holder bracket
106
Holder
109
Locking part
111
Fastener, adaptor
115
Fastener, Tube holder 300 to 600
116
Flushing connection
117
Flushing connection nut
126
Plate
127
Shock absorber, lower
128
Top plate
129
Level display
132
Tube Roller, asm
133
Flexible tube 3/4in, TC25
134
Lid support, complete
136
Locking pin, asm
137
Flushing Inlet Tubing L1000
143
Hex Head Screw ISO 4017 M6x25 A4-70
144
Screw M6S-H M5X14
AxiChrom 300-1000 columns User Manual 28-9562-89 AD
167
A Parts list and diagrams
A.1 Part numbers and names
168
Position
Name
145
Screw M10 X 25
146
Hex Head Screw ISO 4017 M12x45 A4-70
148
Hex Head Screw ISO 4017 M16x40 A4-70
149
Hex Head Screw ISO 4017 M16x45 A4-70
150
Hex Head Screw M12x45
151
Hex Head Screw M12x45
152
Hex Head Screw M12x45
154
Parallel Pin ISO 2338 12m6x60 A2
155
Foot M30
157
Hex Nut ISO 4032 M30 A4-70
159
Domed Cap Nut M10
160
Hex Head Screw ISO 4017 M6x16 A4-70
161
Washer ISO 7089 6.4x12x1.6 A4
163
Washer ISO 7089 13x24x2.5 A4
165
Washer 21x37
169
Washer Nylon 13x24x2.5
170
Washer Nylon 10.5x21x2.5
171
Motor
172
Hex Head Screw ISO 4017 M24x60 A4-70
173
M6S M20x200 A4-70
174
Hex Head Bolt ISO 4014 M16x80 A4-70
175
Hex Socket Head Cap Screw ISO 4762 M10x30 A4-70
178
Hex Socket Head Cap Screw ISO 4762 M8x30 A4-70
181
Hex Nut ISO 4032 M16 A4-70
182
Hex Nut ISO 4032 M8 A4-70
193
Pneumatic Connection Plug
194
Pneumatic Connection Plug
AxiChrom 300-1000 columns User Manual 28-9562-89 AD
A Parts list and diagrams
A.1 Part numbers and names
Position
Name
196
O-ring 54x3
197
O-ring 6.02x2.62
198
O-ring 26.64x2.62
201
Column tube
202
Tie rod
203
Flange, bottom
204
Flange, top
211
O-ring 673.1x9.525
213
Hex Head Screw M20x60
221
Hinge lower asm
231
Hex head screw ISO 4017 M16x45 A4-70 (SSl column tube)
232
Hex head screw ISO 4017 M16x50 A4-70 (SS column tube)
301
Bed support bottom 600, 10 or 20 μm
302
Bed support adapter 600, 10 or 20 μm
401
Distributor bottom 600
402
Distributor adaptor 600
403
Bed support screw bottom 300-600
404
Bed support screw adaptor 300-600
405
Distributor adaptor ring 600
406
Snap ring 600
409
Fastener, bottom
411
T-piece, 3TC, ASME BPE DT- 18, 1/2in, SF5
412
Pressure Transmitter
413
O-ring 26.7x1.78
414
O-ring 600x10
415
O-ring 556.86x6.985
416
O-ring 506.86x6.985
AxiChrom 300-1000 columns User Manual 28-9562-89 AD
169
A Parts list and diagrams
A.1 Part numbers and names
170
Position
Name
417
O-ring 30x3.5
421
Hex Socket Head Cap Screw ISO 4762 M8x25 A4-70
422
Washer ISO 7089 8.4x16x1.6 A4
423
Parallel Pin ISO 2338 6m6x16 A2
431
Hex Nut ISO 4032 M10 A4-70
432
Washer ISO 7089 10,5x20x2 A4
501
Tube Mobile Phase, bottom
502
Tube Slurry inlet/outlet, bottom
503
Tube Rinse, bottom
504
Connector top inlet
505
End cap
506
TC clamp for TC 25
507
TC-gasket, TC25 ID15, EPDM
508
Inner Connector Rinse (only used with PP tubes on 300-600 columns)
509
O-ring (only used with PP tubes on 300-600 columns)
511
Top Inlet/outer body
512
O-ring 16x3 EPDM70
513
Parallel Pin ISO 2338 4M6x16 A2
516
Valve body, outer
517
Valve body, inner
518
O-ring holder
519
Piston
521
Pneumatic cylinder
537
Washer
541
O-ring 125x5
542
Top inlet
543
Valve
AxiChrom 300-1000 columns User Manual 28-9562-89 AD
A Parts list and diagrams
A.1 Part numbers and names
Position
Name
601
O-ring 14x3
602
O-ring 48x3.5
603
O-ring 21.2x3
604
O-ring 27x4
607
O-ring 48x3.5
611
O-ring 48x3.5
612
O-ring 27x4
614
O-ring 48x3.5
616
O-ring 14x1.78
617
O-ring 14x1.78
618
O-ring 8x3
624
O-ring 14x3
628
O-ring 565x11
641
Scraper
710
Bellows
711
Screw and gear
712
Adapter rod with level scale
713
Adapter rod
801
Hex Head Bolt M20×110
802
Hex Head Bolt M24×300
803
Hex Nut M24
811
Bottom backing plate
812
Adapter backing plate
813
Lid
814
Adapter stop
904
Level display label
AxiChrom 300-1000 columns User Manual 28-9562-89 AD
171
A Parts list and diagrams
A.2 Columns with any bed support material
A.2
Columns with any bed support material
Note:
•
The numbers correspond to position numbers in Material Conformity and Spare
Parts.
•
Grey circles indicate parts which retain pressure or are in contact with process fluids.
Parts 411 and 412 are mounted on the system.
Part 133 (Storage solution fill hose) is dismounted after commissioning.
172
AxiChrom 300-1000 columns User Manual 28-9562-89 AD
A Parts list and diagrams
A.2 Columns with any bed support material
Note:
•
The numbers correspond to position numbers in Material Conformity and Spare
Parts.
•
Grey circles indicate parts which retain pressure or are in contact with process fluids.
No.
Number corresponds to Pos. no. in Material conformity and Spare part list.
Illustrating parts in contact with process fluids and/or that are pressure retaining.
507
505
506
533
535
531
534
532
504
617
536
511
541
614
512
611
612
Part 536 is not included in newer inlet/outlets.
AxiChrom 300-1000 columns User Manual 28-9562-89 AD
173
A Parts list and diagrams
A.2 Columns with any bed support material
Columns with acrylic tubes
Note:
•
The numbers correspond to position numbers in Material Conformity and Spare
Parts.
•
Grey circles indicate parts which retain pressure or are in contact with process fluids.
No.
Number corresponds to Pos. no. in Material conformity and Spare part list.
Illustrating parts in contact with process fluids and/or that are pressure retaining.
150
213
204
212
109
211
202
201
211
203
174
AxiChrom 300-1000 columns User Manual 28-9562-89 AD
A Parts list and diagrams
A.2 Columns with any bed support material
Columns with stainless steel
tubes
Note:
•
The numbers correspond to position numbers in Material Conformity and Spare
Parts.
•
Grey circles indicate parts which retain pressure or are in contact with process fluids.
172
174
128
178
181
182
713
171
132
712
173
710
711
813
129
904
232
802
136
148
803
196
231
221
412
Mounted on system
157
411
155
133
Storage solution fill hose.
Dismounted after
commissioning.
Mounted on system
Parts 411 and 412 are mounted on the system.
Part 133 (Storage solution fill hose) is dismounted after commissioning.
AxiChrom 300-1000 columns User Manual 28-9562-89 AD
175
A Parts list and diagrams
A.2 Columns with any bed support material
Note:
•
The numbers correspond to position numbers in Material Conformity and Spare
Parts.
•
Grey circles indicate parts which retain pressure or are in contact with process fluids.
150
109
201
176
AxiChrom 300-1000 columns User Manual 28-9562-89 AD
A Parts list and diagrams
A.3 Columns with plastic bed supports
A.3
Note:
Columns with plastic bed supports
•
The numbers correspond to position numbers in Material Conformity and Spare
Parts.
• Grey circles indicate parts which retain pressure or are in contact with process fluids.
No.
Number corresponds to Pos. no. in Material conformity and Spare part list.
Illustrating parts in contact with process fluids and/or that are pressure retaining.
146
163
127
137
814
169
126
117
159
116
162
197
170
198
641
175
628
423
111
145
421
106
422
812
144
405
641
628
402
302
406
404
AxiChrom 300-1000 columns User Manual 28-9562-89 AD
413
177
A Parts list and diagrams
A.3 Columns with plastic bed supports
Note:
•
The numbers correspond to position numbers in Material Conformity and Spare
Parts.
•
Grey circles indicate parts which retain pressure or are in contact with process fluids.
No.
Number corresponds to Pos. no. in Material conformity and Spare part list.
Illustrating parts in contact with process fluids and/or that are pressure retaining.
801
165
624
414
403
301
413
401
144
154
163
106
151
145
811
104
152
165
115
803
143
105
194
161
193
178
160
AxiChrom 300-1000 columns User Manual 28-9562-89 AD
A Parts list and diagrams
A.4 Columns with stainless steel bed supports
A.4
Columns with stainless steel bed supports
Note:
•
The numbers correspond to position numbers in Material Conformity and Spare
Parts.
•
Grey circles indicate parts which retain pressure or are in contact with process fluids.
No.
Number corresponds to Pos. no. in Material conformity and Spare part list.
127
Illustrating parts in contact with process fluids and/or that are pressure retaining.
163
146
137
814
169
126
117
159
116
162
197
198
170
812
641
145
628
106
175
144
402
417
641
416
628
302
111
404
AxiChrom 300-1000 columns User Manual 28-9562-89 AD
413
179
A Parts list and diagrams
A.4 Columns with stainless steel bed supports
Note:
•
The numbers correspond to position numbers in Material Conformity and Spare
Parts.
•
Grey circles indicate parts which retain pressure or are in contact with process fluids.
801
165
624
414
403
301
413
409
417
415
401
144
154
163
106
151
432
145
431
811
152
165
115
803
143
105
194
161
193
160
104
180
AxiChrom 300-1000 columns User Manual 28-9562-89 AD
A Parts list and diagrams
A.5 Media valve and tubes
A.5
Media valve and tubes
Columns with stainless steel
tubes and 800 and 1000 columns
with PP tubes
Note:
•
The numbers correspond to position numbers in Material Conformity and Spare
Parts.
•
Grey circles indicate parts which retain pressure or are in contact with process fluids.
No.
Number corresponds to Pos. no. in Material conformity and Spare part list.
Illustrating parts in contact with process fluids and/or that are pressure retaining.
603
519
604
607
517
537
601
528
518
523
537
528
616
503
602
516
526
616
524
507
523
502
618
505
506
537
527
525
501
554
521
553
523
551
522
AxiChrom 300-1000 columns User Manual 28-9562-89 AD
552
181
A Parts list and diagrams
A.5 Media valve and tubes
300-600 columns with PP tubes
Note:
•
The numbers correspond to position numbers in Material Conformity and Spare
Parts.
•
Grey circles indicate parts which retain pressure or are in contact with process fluids.
603
519
604
607
517
601
513
518
528
537
537
523
509
528
616
503
508
602
516
526
618
616
524
507
523
502
505
506
537
527
525
501
554
521
553
523
551
522
182
552
AxiChrom 300-1000 columns User Manual 28-9562-89 AD
B Packing buffer information
Appendix B Packing buffer information
Packing buffers and packing
factors
Packing values
Note:
The Packing Factor range used in the verified packing procedure in the Master or UNICORN is PF
±0.03. The range has been verified to give stable efficient packed beds. Media not listed here may
be available in UNICORN or AxiChrom Master.
Packing
velocity
(cm/h)
Type
Media
Packing buffer
Packing
factor
Affinity
Blue Sepharose™ Fast Flow
Water/
1.15
60
1.15
60
1.15
60
1.15 1
60
1.151
60
1.15
60
0-20% EtOH
Heparin Sepharose 6 Fast Flow
Water/
0-20% EtOH
MabSelect
Water/
0-20% EtOH
MabSelect SuRe
Water/
0-20% EtOH
MabSelect SuRe LX
Water/
0-20% EtOH
MabSelect Xtra™
Water/
0-20% EtOH
1
When calculating the amount of media to be packed use the Compression Factor 1.1 instead
of the Packing Factor above which is used during packing.
AxiChrom 300-1000 columns User Manual 28-9562-89 AD
183
B Packing buffer information
Packing
velocity
(cm/h)
Type
Media
Packing buffer
Packing
factor
Anion
exchange
Capto adhere
Water/
1.10
60
1.10
60
0-20% EtOH
Capto DEAE
Water/
0-20% EtOH
Capto DEAE
Any salt solution
1.15
60
Capto Q
Water/
1.10
60
0-20% EtOH
Capto Q
Any salt solution
1.15
60
DEAE Sepharose Fast Flow
Water/
1.15
60
1.18
60
1.15
60
1.15
60
1.15
60
0-20% EtOH
Q Sepharose Big Beads
Water/
0-20% EtOH
Q Sepharose Fast Flow
Water/
0-20% EtOH
Q Sepharose High Performance
Water/
0-20% EtOH
Q Sepharose XL
Water/
0-20% EtOH
184
AxiChrom 300-1000 columns User Manual 28-9562-89 AD
B Packing buffer information
Packing
velocity
(cm/h)
Type
Media
Packing buffer
Packing
factor
Cation
exchange
Capto MMC
Water/
1.13
60
0-20% EtOH
Capto MMC
Any salt solution
1.16
60
Capto S
Water/
1.10
60
0-20% EtOH
Capto S
Any salt solution
1.20
60
CM Sepharose Fast Flow
Water/
1.15
60
1.18
60
0-20% EtOH
SP Sepharose Big Beads
Water/
0-20% EtOH
SP Sepharose Big Beads
Any salt solution
1.20
60
SP Sepharose Fast Flow
Water/
1.15
60
0-20% EtOH
SP Sepharose Fast Flow
Any salt solution
1.15
60
SP Sepharose High performance
Water/
1.15
30
0-20% EtOH
Hydrophobic
interaction
SP Sepharose High performance
Any salt solution
1.17
30
SP Sepharose XL
Water
1.15
60
SP Sepharose XL
Any salt solution
1.15
60
Butyl -S Sepharose 6 Fast Flow
10-20% EtOH
1.15
60
Butyl Sepharose High Performance
10-20% EtOH
1.15
30
Phenyl Sepharose High Performance
10-20% EtOH
1.15
30
AxiChrom 300-1000 columns User Manual 28-9562-89 AD
185
B Packing buffer information
Packing
velocity
(cm/h)
Type
Media
Packing buffer
Packing
factor
Metal
affinity
Chelating Sepharose Fast Flow
Water/
1.15
60
1.15
60
1.15
60
1.15
30
1.0
30
0-20% EtOH
IMAC Sepharose 6 Fast Flow
Water/
0-20% EtOH
Ni Sepharose 6 Fast flow
Water/
0-20% EtOH
Size
exclusion
Superdex™
Water/
Custom
Custom (default settings)
0-20% EtOH
Custom
Unpacking values
All values are in cm/h.
Media
Expand flow
Unpacking
expand speed
Unpacking
flow
Adapter unpacking
speed
Capto, MabSelect, Fast Flow,
XL, Big Beads
75
60
30
60
High Performance, Superdex
40 (cycle 1)
30
30
60 (cycle 1)
60 (cycle 2)
Custom (default settings)
186
75
30 (cycle 2)
60
30
60
AxiChrom 300-1000 columns User Manual 28-9562-89 AD
C Accessories and additional literature
Appendix C Accessories and additional
literature
Tubings
Article name
Code no.
Tube S-Cor 3/8" (ID=9.5), TC25 ID=7.75, 2000 mm
28-9377-58
Tube S-Cor 3/8" (ID=9.5), TC25 ID=7.75, 5000 mm
28-9381-24
Tube S-Cor 1/2" (ID=12.7), TC25 ID=9.4, 2000 mm
28-9381-25
Tube S-Cor 1/2" (ID=12.7), TC25 ID=9.4, 5000 mm
28-9381-26
Tube U-Cor 3/4" (ID=19.1), TC25 ID=15.75, 2000 mm
28-9381-27
Tube U-Cor 3/4" (ID=19.1), TC25 ID=15.75, 5000 mm
28-9381-29
Tube U-Cor 1" (ID=25.4), TC50 ID=22.1, 2000 mm
28-9381-36
Tube U-Cor 1" (ID=25.4), TC50 ID=22.1, 5000 mm
28-9381-37
Tube U-Cor 1½" (ID=38.1), TC50 ID=34.8, 2000 mm
28-9381-38
Tube U-Cor 1½" (ID=38.1), TC50 ID=34.8, 5000 mm
28-9381-39
Article name
Code no.
Tee 3/8" (3xTC25) ID=7.75
28-9381-67
Tee 1/2" (3xTC25) ID=9.4
28-9381-68
Tee 3/4" (3xTC25) ID=15.75
28-9381-69
Tee 1" (3xTC50) ID=22.1
28-9381-70
Tee 1½" (3xTC50) ID=34.8
28-9381-71
T-junctions
AxiChrom 300-1000 columns User Manual 28-9562-89 AD
187
C Accessories and additional literature
Reducers
Article name
Code no.
Reducer (TC25/ID=7.75 - TC25/ID=9.4)
28-9381-73
Reducer (TC25/ID=9.4 - TC25/ID=15.75)
28-9381-74
Reducer (TC25/ID=15.75 - TC50/ID=22.1)
28-9381-75
Reducer (TC50/ID=22.1 - TC50/ID=34.8)
28-9381-76
Article name
Code no.
TC-Gasket 25 / ID=10.5 (For tube ID=7.75)
28-9381-86
TC-Gasket 25 / ID=12 (For tube ID=9.4)
28-9381-87
TC-Gasket 25 / ID=15.8 (For tube ID=15.75)
28-9381-88
TC-Gasket 50 / 22.1 (For tube ID=22.1)
28-9668-86
TC-Gasket 50 / 34.9 (For tube ID=34.8)
28-9381-89
Article name
Code no.
Clamp TC25
28-9381-90
Clamp TC50
28-9381-91
TC gaskets
Clamps
188
AxiChrom 300-1000 columns User Manual 28-9562-89 AD
C Accessories and additional literature
Wheel kits
Article name
Code no.
AxiChrom 300 wheel kit
28-9381-92
AxiChrom 400 wheel kit
28-9381-93
AxiChrom 450 wheel kit
28-9554-29
AxiChrom 600 wheel kit
28-9381-94
AxiChrom 800 wheel kit
28-9381-96
AxiChrom 1000 wheel kit
28-9381-97
Article name
Code no.
Grounding kit
18-1157-87
Article name
Code no.
Tool kit Axichrom 300-1000
28-9382-03
Plastic mallet
28-9820-32
Removal tool
28-9820-31
Article name
Code no.
Safety Valve 4bar ID=9.4
28-9382-00
Safety Valve 4bar ID=15.75
28-9382-01
Safety Valve 4bar ID=22.1
28-9382-02
Grounding kit
Toolkit
Safety valves
AxiChrom 300-1000 columns User Manual 28-9562-89 AD
189
C Accessories and additional literature
Rupture disc and holder
Article name
Code no.
Rupture disc kit 4.2 bar for AxiChrom 300-600
29-0139-97
(contains one special T-junction and one rupture disc)
Rupture disc 4.2 bar, TC50
29-0139-98
For rupture discs used on AxiChrom 800-1000 the T-junction 28-9381-70 can be used.
Gemü valves
Article name
Code no.
Gemü-valve, ID=7.75, 2xTC25
28-9382-05
Gemü-valve, ID=9.4, 2xTC25
28-9382-06
Gemü-valve, ID=15.75, 2xTC25
28-9382-07
Gemü-valve, ID=22.1, 2xTC50
28-9382-08
Gemü-valve, ID=34.8, 2xTC50
28-9382-09
Valve holder kit
Article name
Code no.
Valve holder kit
29-0137-10
Article name
Code no.
Media stirrer 80 mm
28-9191-03
Media stirrer 150 mm
28-9191-04
Media stirrer
190
AxiChrom 300-1000 columns User Manual 28-9562-89 AD
C Accessories and additional literature
Additional literature
Article name
Code no.
Sanitization and endotoxin clearance in AxiChrom columns
28-9290-42
Application note
Column efficiency testing
28-9372-07
Application note
AxiChrom 300-1000 columns User Manual 28-9562-89 AD
191
D Crate weights and dimensions
Appendix D Crate weights and dimensions
Typical weights and dimensions for the different crate sizes are listed in the table below.
Column
diameter
[mm]
Column bed
heights
[mm]
Crate
height
[mm]
Crate
length
[mm]
Crate
width
[mm]
Empty
crate
weight
[kg]
Total weight
(crate+column) 1 [kg]
300
100 to 300
1920
970
1495
160
574/580
300
100 to 500
2180
970
1495
165
599/605
400
100 to 300
1920
970
1495
160
611/620
400
100 to 500
2180
970
1495
165
636/645
450
100 to 300
1920
1090
1480
180
879/890
450
100 to 500
2180
1090
1480
185
934/945
600
100 to 300
1875
1100
1395
195
1013/1030
600
100 to 500
2135
1100
1395
205
1088/1105
800
100 to 300
2190
1440
1800
350
2472/2500
800
100 to 500
2450
1440
1800
360
2572/2600
1000
100 to 300
2240
1650
2040
440
2957/3000
1000
100 to 500
2500
1650
2040
450
3087/3130
1300
770
700
65
140
Master
1
Weights are given for columns with plastic bed support/stainless steel bed support
Note:
192
Some crate weights are estimates.
AxiChrom 300-1000 columns User Manual 28-9562-89 AD
E Column and AxiChrom Master weights and dimensions
Appendix E Column and AxiChrom
Master weights and dimensions
The actual weight and dimensions for the individual column is given in the documentation. Typical weights
and dimensions for the different column sizes are listed in the table below. The min. and max. heights refer
to the height of the column with the adapter in its lowest position for transportation, and with the adapter
in its highest position, for example for maintenance work.
Column weights and dimensions
(acrylic column tube)
Column
diameter
[mm]
Column bed
heights
[mm]
Footprint
(length × width)
[mm]
Min.
height
[mm]
Max.
height
[mm]
Weight of empty
column 1
[kg]
300
100 to 300
1110 × 520
1450
2220
414/420
300
100 to 500
1110 × 520
1710
2720
434/440
400
100 to 300
1110 × 600
1425
2220
451/460
400
100 to 500
1110 × 600
1685
2720
471/480
450
100 to 300
1110 × 620
1470
2330
699/710
450
100 to 500
1110 × 620
1730
2750
749/760
600
100 to 300
1180 × 780
1570
2340
818/835
600
100 to 500
1180 × 780
1830
2860
883/900
800
100 to 300
1470 × 1080
1720
2630
2122/2150
800
100 to 500
1470 × 1080
1980
3150
2212/2240
1000
100 to 300
1720 × 1300
1875
2650
2517/2560
1000
100 to 500
1720 × 1300
2135
3170
2637/2680
1
Weights are given for columns with plastic bed support/stainless steel bed support
AxiChrom 300-1000 columns User Manual 28-9562-89 AD
193
E Column and AxiChrom Master weights and dimensions
Column weights and dimensions
(stainless steel column tube)
The table below lists column tube weights and the weights of empty columns and
crate+column for columns with stainless steel tubes. All weights are given in kg.
Column
Column tube
Empty column 1
Crate+column 2
300 short tube
73
431/437
591/597
300 long tube
89
454/460
619/625
400 short tube
92
481/490
641/650
400 long tube
113
508/518
674/683
450 short tube
106
730/741
910/921
450 long tube
130
786/797
971/982
600 short tube
178
864/881
1059/1076
600 long tube
209
930/947
1135/1152
800 short tube
351
2231/2259
2581/2609
800 long tube
394
2318/2346
2678/2706
1000 short tube
584
2738/2781
3178/3221
1000 long tube
637
2841/2884
3291/3334
1
Weights are for columns with plastic bed support/stainless steel bed support.
2
Weights are for columns with plastic bed support/stainless steel bed support.
Some crate weights are estimates.
AxiChrom Master weights and
dimensions
194
Parameter
Value
Weight [kg]
73
Length [mm]
670
Width [mm]
590
Height [mm]
1090
AxiChrom 300-1000 columns User Manual 28-9562-89 AD
F Decontamination report
Appendix F Decontamination report
Decontamination Report
______________________________________________________________________
1. Equipment that is returned, for service or any other reason when personnel connected to GE Healthcare must handle
the equipment (at any location), should be cleaned.
2. This form must be used to log the decontamination of the equipment.
3. A completed copy of this form should be faxed or sent by first class post to the person who will come in contact with
the equipment, to ensure that he/she has the information before handling the equipment.
4. Failure to complete the form or comply with the procedure will lead to costs for decontamination and delays in handling the equipment.
5. Company:................................................................................................
Address: .......................................................................................................
Phone:.......................................................................................................
Fax number:...............................................................................................
6. Please complete the following sections
6.1 Equipment type....................................................................................
6.2 Serial number ....................................................................................
6.3 Details of substances used on the inside/outside of the equipment
6.3.1
Substance name(s):
.......................................................................................................................................................................
.......................................................................................................................................................................
6.3.2
Precautions to be taken in handling these substances:
...........................................................................................................................................................................................................................................
...........................................................................................................................................................................................................................................
6.3.3
Action to be taken in the event of human contact:
...........................................................................................................................................................................................................................................
...........................................................................................................................................................................................................................................
6.3.4
Cleaning fluid to be used if residue of chemicals is found during handling:
...........................................................................................................................................................................................................................................
...........................................................................................................................................................................................................................................
6.4
Any further relevant information:
...........................................................................................................................................................................................................................................
7. If any substances used in the system are hazardous or toxic, these must be highlighted under 6.3.1.
I hereby confirm that the equipment has been thoroughly cleaned, whether or not the equipment has been in contact
with toxic and hazardous substances, and that the equipment has been filled with a suitable solution. I have also attached a description of the cleaning method.
Storage solution in equipment:...........................................................................................................................................................................................
Signed:..............................................................................................
Name: .......................................................................................................................
Position:............................................................................................
Date: ..........................................................................................................................
Document number: 04-0051-11
Edition: AA
AxiChrom 300-1000 columns User Manual 28-9562-89 AD
195
For local office contact information, visit
www.gelifesciences.com/contact
GE Healthcare Bio-Sciences AB
Björkgatan 30
751 84 Uppsala
Sweden
www.gelifesciences.com/axichrom
GE, imagination at work and GE monogram are trademarks of General Electric
Company.
Äkta, ÄKTAprocess, AxiChrom, Capto, DropDesign, HiScale, MabSelect, MabSelect
SuRe, MabSelect Xtra, Sepharose, Superdex and UNICORN are trademarks of
GE Healthcare companies.
© 2009-2012 General Electric Company – All rights reserved.
First published Sept. 2009
All goods and services are sold subject to the terms and conditions of sale of
the company within GE Healthcare which supplies them. A copy of these terms
and conditions is available on request. Contact your local GE Healthcare representative for the most current information.
UNICORN: Any use of this software is subject to GE Healthcare Standard Software
End-User License Agreement for Life Sciences Software Products. A copy of this
Standard Software End-User License Agreement is available on request.
GE Healthcare Europe GmbH
Munzinger Strasse 5, D-79111 Freiburg, Germany
GE Healthcare UK Limited
Amersham Place, Little Chalfont, Buckinghamshire, HP7 9NA, UK
GE Healthcare Bio-Sciences Corp.
800 Centennial Avenue, P.O. Box 1327, Piscataway, NJ 08855-1327, USA
GE Healthcare Japan Corporation
Sanken Bldg. 3-25-1, Hyakunincho Shinjuku-ku, Tokyo 169-0073, Japan
imagination at work
28-9562-89 AD 06/2012