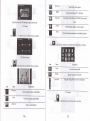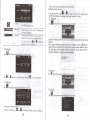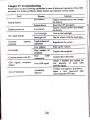
1
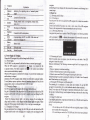
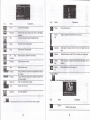
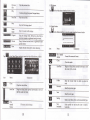
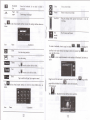
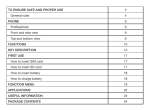
User Manual
GPST
Thanksforuing
a
a
Q
a
CPS 84H-3!
JTD resenes the dghts of final interpretation of the mmul.
The product is subject to chmge without notice. Pleme accept
for yow inconvenience.
a
apology
Please back up you infomation in the CPS navigator. JTDssumes no
responsibility for my loss caused by material loss.
'fhe mmu! might contain a few mistakes though it has been checked. If
mistakes are found please conlact the JTD customer seryice
a
ou
cent*
the iNtructions in this manml md use only accessories of JTD
instructions will
invalidate wmanty md might endanger persomel safety, for[Which .fTD
\
ssmes no responsibility.
Data ofnavigation electronic maps might be inconsistent with actual traffic
signals due to transportation deYelopment. Plmse follow trafftc regulations
Ptease read
to avoid mpredicted dmage. Failure to follow the
and signs and drive according to road situation. Op€rating the GPS naYigator
device while driving migltt cause setious accidents. JTD assumes no
responsibility for accidents
The pictures in the manual
ile
and
loss due
to improper use.
subject to the mateial object.
Welcome
r'
/
/
r'
MSB252lPCBA CpU with high perfomance and low power consumption
Friendly user interface for sim-pli operation
Power managemenl for longer and more stable operation
Data transmission with compulers via Mini USB
q"!i? reception for accurate positioning and satisfactory navigation
"
/
serutce
Leisure partner with audioivideo/amusemenf
y-:ln:
GPS navigator
_".:11.,::tor cycltng. Its navigation
watkmg
work!
functions
.exampte
anywhere. for
white driving.
amusement functions will wich your life an-d
oyime
ild
To fully exert the functions of GpS 84H-3 and to undersland the operation
detaits,
please read the manual carefully.
You may see the following supplemenml infomation in the manual.
[Note]: Explmation of relevant subjects
IRelevant Infomation] : Extra information of relevaot subjects
fA-nentionl: Preca-utions or wamings ofrelevant subjects. please pay attenrion to this
rnfomation and fbllow the instructions to avoid devastating inhuince on yourself
and others.
[*j: Optional function
This mmual is applicable only to the GpS 84H-3.
Chapter
This
I Beginning
-chapter
84H-3.
l.l
Use
introduces the appearance, components and basic operations of GpS
Appearance
The effect figure below is
w
E
-
z'
S Compone
N nt
I lndicator
' light
oen
,- Touch
;;,-"'-"
ExPlanation
lndicating the opemting state
of
external power
suoply
Location ofthe touch pren
Speaker
)-
kev
Eamhone
,'
tack
6
-
MlNl
USB pon
-
Batterv
cover
8
SIM
9
Reset
slot
key
Powering on/ off md sleep
Lonnected wlth the stereophone
navrgatoL
[Note] Plug in the car charger after the automobile is started to avoid damage due to
cutrent surge.
1.3 Basic Use.
1.3.1 Powering or/off & Sleep
2.3. I.l Powering on
Press the power key on the top side of the GpS navigator for at least two seconds to
power it on.
[Note] Great humidity fluctuation may lead to short circuit of the GpS navigaror.
Power on the navigator after it has accommodated to new environment.
2.3. L2. Powering off& Sleep
Long press the power key to power offthe CpS navigator the following interface
Communicating with PC via MINI USB cable md'
used as the charging pon
Banerv lnslde
SIM cild inside
Restafi the system
1.2 Power Supply & Charging
Chuge the GPS navigator futly with the charger before firet use.
L2. I Power Supply
The GPS 84H-3 can be powered by the built-in battery or extemal power supply.
When the GPS navigator is uconnected to the charger, it is powered by the
Li-polymer battery. The battery capacity icon E in L. ,yu.* main interface
shows curent residual battery capacity.
When the GPS nayigator is connected to the chilger, it is powered by extemal power
and the banery is charged.
lAttention] The GPS navigator adopts intemal non-removable Li-polymer battery.
To avoid battery rupture, explosion, release of hmdous substance or bum, do not
unpack, pierce, strike on or discard the battery in fire or water.
1.2.2 Charging by Charger
The GPS navigator must be chtrged with the chrger before first use.
Plug the USB teminal of the chuger into the USB port on the left side of the OPS
navigator and the other to the power socket to supply power and charge the GPS
navigator
lNote] The charging indicator light is red duing charging. Do not unplug rhe
chuge until the battery is fully chilged md the indicator light tums green. Please
charge the GPS navigator when the battery is low or used up in succeeding use.
1.2.3 Chuging by Ca Charger
Plug one terminal of the cu chilger into the USB port on the left side of the GPS
navigator and the other to the charging pon to supply power and charge the GPS
1.3.2 Restarting the System
When the system does not response, press the reset key on the back of the GpS
navigator to restart the system.
fRelevant Information] The following situations might lead to no response of the
system.
l. Delay or stagnancy in interface switching;
2. Failure offunction activation with overlong execution;
3. Failure to power on/offthe GPS navigator by pressing the power key
fNote] Restarting the system by pressing the reset key will result in loss of unsaved
data. Please backup your data regularly.
1.3.3 Fixing the GPS Navigator with Mounting Kir
The mounting kit is composed of a back splint and a bracket. To use the GpS
navigator in an automobile, fix it on the dashboard under the front windshield.
lNote] Do not place the GPS navigator in positions obstucting the driver,s vision.
Do not place it without fixing it, or in the place ofair bag or the area after the air bag
is inflated,
1.3.4 Using T-FLASH Card
Copy mapping applications, map data and media files in a ?FLASH card. Insen the
card in the corresponding slor.
INote]
L Do not take our the T-FLASH card while an navigation program is being
run or a media file is being played.
2. To avoid drop or crash of the IFLASH card, do not exen heavy pressure
5
on it or bend it.
3. Avoid using or storing rhe T-FLASH cud in high temperature, hi6h
humidity or direct sunlight. Kep the crd away from liquid or conosive
substince.
4. Mind the direction while insening the T-FLASH card to avoid damaging.
the slot or the card.
1.4 System Main Interface and Maior Functions
Long press the power key on the top side of the GPS navigator to enter the system
main interface shom below-
supported;
md
them.
WMV, ASF md AVI files
of
playing
progress,
supponed
FM channel to
GIF,
GPS
2.1 Map
Due to tmsportation development, inconformity between products and real traffic
infomation will occur a period after product release. please drive according to road
condition and abide by traffic regulations.
2.2 Navigation
Navigation paths are for reference only, and the user may decide whether to follow
PS
Music player
Adjustment
II
Vilious narigation mapping applications can be installed in the GpS navigatot such
as CARELAND and RITU intelligent navigation systems, which position rhe
navigator via the satellite receiver md display it on the map. Set a desiination, and
the syst€m will automatically work out the best path to help the user reach the
destination safely md quickly.
The main functions are listed as below.
player
Chapter
and full-screen play
2.3 Reception
High. and crowded structures (such as inside of tunnels, space between high
buildings, undergroud car park md under viaducts), weathei change or satellite
signals tumoff.may influence signal reception, resulring in positioning failue,
inaccurate positioning, navigation failue or system function abnomity.
With stereoscopic maps, instmt animation, voice prompt and text prompt of the
navigation syslem, you will appreciate its unique cham and enjoy a great trip.
Different navigation maps may have different operation m;thods. pleasi follow
instructions of conesponding navigation mapping applications.
[Note] Before using the GPS navigatot please purchase and insull mapping
applications and appoint file paths. For setting methods please refe, to 6.tO Siiin|
Navigation Path.
BMPand PNG files supported;
Chapter
III
Interface and Operation
3.1 Music Plaver
,* I
in tf,.
.y.t"* .rln
interface to enter the music interface as shown below.
7
Icon
g
Close the music player
[E
crose
Minimize the music player and retum to the Media
Drag it upward/ downward to view all music
interface.
Continue playing the paused/ stopped music.
Add a piece of music on the left list to the plai list on the
Stop
S"t
Select sequence, random or cycle play
!
Play the previous music
E
sequenc€
P*d*
Next
Play the next music.
Volume
Drag it leftward to tum down or rightward to tum up
the volume.
Drag it leftward or rightwrd to play from a previous
Progress
Close the Music List
E
Add
all
3;"j"-
3i'""
Add all the music on the left list to the play list on the right
Select one piece of music in the play list and tap the icon to
delete it.
Delete all the music in the play list.
Enter it to select music to play.
Display the run time.
Enter the equalizer
Tup
f
lcon
in the interface Music Play to enter the Music list shown as below.
I
Close the video player
Previous
Play the previous film.
film
Play
I
r
Stop
Stop the film being played.
li,l';
Enter it to select a film to play.
t-ffi
Progress
lEllf:
Volume
fup
E
in
tt. u"dia
intedace to enter the reader interface shown as below
Drag the sliding block leftward-to play from a
previous moment or rightward coming moment.
Drag it leftward to turn down or rightward to tum
up the
@isplay
3.4 E-book Reader
yoltJm
the play time and rhe music duration.
in the Video Pliyer interface to enter the video folder shown as below.
Icon
Explanation
Elltitilltig
File
EL
Clme
name&
fomat
Curent file name and format
Close the reader
Drag the sliding
all content ofthe e-book
Name
Explanation
Close the video folder
the sliding block upward./
the files inside the folder
I
I
E
Film name and its format
l0
I
Read the previous page.
Next
Read the next page.
Setting
Select a text theme, font, word size and bold type.
New
Select partial text and tap the icon to create a
bciokmark
bookmark.
1I
GT
_@_
Bookmark
Enter the bookmark list to select or delete
list
Page/
Close current folder
a
bookmark.
total
pages
Cllmt
Return to the previous
page/ total pages
downward to view all
rup
E
in the e-book reader ifierface to enter the setting interface. shown
as
below.
Explanation
KT
g*t
@
@
E
-
To create a bookmark, locate a page Uy tuping
f
o,
I
or dragging the
dcroll bar in the reader interface and drag to select text content. Tap
is on. Tao OK to finish.
Exit the setting interface
rup
Save
Save the setting.
E
f
*tren it
ro view created bookmarks in the interface of Bookmark List shown as
below
Theme
T"p
I
to
r.l."t
u theme
Tup
I
to
rel..t
u
for the e-book.
Font
font forthe e-book
Tap to enable bold type. Tap it again to cancel.
l
I
Explanation
t2
Drag the scroll bar and select a bookmark
page
with rhe bookmrrt
;tH:
or,rp
E
"*" "t *.
Tup
to delete the bookmark.
m
thi photo browser interface shown
l3
as below.
Eil
to go to the
3.6 Wallpaper
,", m
3.8 Calculator
in
,", m
the photo browser interface shown as betow
in
the photo browser interface shown as below.
3.9 Unit
,", n
in
the photo browser interface shown as berow
,r, H
in
Exit the FM Setting.
I
ry
HI
Save
the photo browser interface sho*.n as belo*.
3.10 GPS info
cment setting.
,r, fl
Use FM
in
the photo brosser interface shorvn as belorv.
Tick in the box to enable FM function.
Drag the slide block rightward (or tap
Frequen
cy
E,
,o
increase the freqgency and
leftward (or ,uo
E,
to reduce
rhe
fiequency. The frequency range is 88,00
T"o
I
to prompt a dialog as berow.
Mhz-108.00 Mhz.
14
l5
Zoom out
Rotate cment photo
Tap
OK to reset the GPS satellile or tap Cancel to exit.
3.1
,", f
in
E
Auto play
the photo browser interface shoqn as belos.
Folder
I
Trp
clockwise.
Enter the photo folder to select a photo.
Close the browser and retum to the Media interface
!t
ffi
in the browser interface to enter the photo folder shown as below
3.12 Photo Browser
,", LC
90'
Cycle play all the photos in the folder from,cunenl
photo.
EI
I Theme
Scale down curent photo.
Explanal
in the photo bros,ser interface shown as betow.
Ktr
Close the cunent folder.
E
Retm
to the previous folder
Drag the sliding btock to view all
I
I
E
Explmation
View the preview photo in the folder
View the next photo in the folder
Zoom in
Scale up
t6
3. I 3
,ro E
Explore
in rhe photo browser interface shown as belou
cunent photo
t7
3.lTNavpath
,"0
f,
in,r,"
hoto browser interface show as below
Select a map addres,
"na
tup
B
to save the setting.
Tap to select a map address.
Tick in the box to run the set navigation map when the
,r, n
navigator is powered on,
in the photo browser interface shom as below.
Volune
3. I 8
rhoto browser interface shown as below
Exit the volume setring.
Yolume grades (from mute to
maximum) available. Tap to decrease the
3.16 Snake
Power-on
muslc rapl
@
orltoselecrpower-onmusic
3.19 Backlisht
,"0 E
,,
*"
onoto browser interface shown as below
l9
or disable it,
lNote]: Time format options are 12-hour and 24-hour
Setting the system time zoile
ln the above interface. rap I ro select a rime zone. For example. select
", Hong Kong, Urumqi" for China.
"(GMT+08:00) Bei.jing, Chongqing,
3.22 Calibration
,* t
Exit the backlight setting.
Backlight
f};lffi
Drag leftward to turn down
u
rightward to
penod. The options are always On, l0s, 30s.
lm, 2m and:m. tap
I
or
I
to view the
options in cycle or select one.
3.20Language
a", KX
in the photo browser interface shown as below
Tap yes to execute calibration or no to cancel calibration md go back to the setting
interface.
Tap no, and the following calibration inledace is prompted. Click the center ofcross
cursor with the touch pen and the cursor shifts from the center, upper left, lower
left, upper right md lower right to hnish the calibration and the interface will
closed automaticaliy to go back to the setting interface.
in the photo browser interface shown as below.
'a
3.23 Factorv
rup
rup Y
o, f
to select a system language and tap
B
[,il
ln
tt.
pt oto browser interface shown as
to save the selection.
3.21 Date time
,r, t
in rhe photo browser inrerface shown as below.
Setting the system date and time
In the above interface, tap
E
",
E
to set the year, month, day, hour and minute
20
2t
be
3.25 USB
rup
Hl
in tt
.
pt oto browser inrerface shown as below.
,
6.9 USB Setting
Connect the GPS navigator to PC via the MINI USB port to transmit data, or back
up data from the navigator data to PC.
you may select
The GPS navigator provides MASS STORAGE and MS STOMGE modes. Select
one in the USB setting.
5.
I
,o
"n,"r
rrB
charging mode and the system main interface
After communication, unplug rhe MINI USB cable.
6.9.2 MS ACTIVESYNC
6.9,I MASS STORAGE
l.
Have the GPS navigator in operation status aird the SD cad plugged in the slot;
,.
,"0 fl
l. T"p
fl
in the settmg interface to enter USB Option as shown below.
in the setting interfrce to enter USB Option as shom below.
Select MASS ACTIVESYNC and tap EI
to save the s"ttirg. .
2. Instatl the application Mobile Device in a drive of PC. Then the following icon
will appear in the drive selection.
Select MASS STORAGE md tap
B
ro
,ur" it.
3. Connect the MINI USB terminal of the USB cord to the MINI USB port of the
GPS navigator and the standrd USB teminal to the USB Hosr port of pC. Then, the
navigator stop the curent progrm and switch to the following interface,
+. S"te"t
tr
to connect the GPS navigator to PC. The PC will recognize the
navigator and prompt the following interface.
22
[f .*...,.-".
3. Connect th€ MINI USB teminal of the USB cable to the MINI USB port of the
GPS navigator and the standud USB teminal to the USB Host port of PC.
4. After the PC finds new hardware, double click the Mobile Device drive in the
selection area to enter the memory of GPS navigator for data aansmission.
5. After transnission, unplug the USB cable.
lAttention] For data safety back up the navigator data
[Note] If MASS STORAGE is selecred while the GPS navigator is connected with
PC, other operations will be suspended.
[Attention] The following operations will stop suspend the communication of the
system and PC and unsaved data will be lost.
1. Unplugging the MINI USB cablet
2. Powering offthe GPS navigaton
3. Resetting the system;
4. Tap the on close button on the top dght.
23
Chapter IV Troubleshooting
case of abnomal operation of the GPS
nayigatoi For further problems, pleas'@ntact ou cstomer seilice c€nter
Plemi cany out the followirig operatiotr in
Solution
,Ri:amn
Low battery
Supply extemal power and charge
the baftery.
Startup failwe
dom
Sudden power cut
Supply extemal power
Low battery
Low backlight
No/ vague display
Inconect
taPpins
response
No sounds
Backlight
off
srem with
the touch Pan.
Riialibmtethe*reen.
Lowrohme
Turn up the
Poor-tqntact of
GPS signals reception pmr
Loss ofmap data
up the backlight
Tap the
ffi*m""
CommuicationwithPC I^T-**
comefllm
failure
Tm
GpS
"u
charge
volme
Connect the earphone.
ComecttheusBcable
signal low interoity of local
..raltir. d6rl
you
GPS
agent or distributor.
after
rcovering the GPS data.
Contact
Accidental
Input a new password
deletion
I
24