1
Promote Control User Manual
Firmware Version 3.15
© 2014 Promote Systems
Manual Revision 23
Promote Control User Manual
© 2014 Promote Systems
All rights reserved. No parts of this work may be reproduced in any form or by any means graphic, electronic, or mechanical, including photocopying, recording, taping, or information
storage and retrieval systems - without the written permission of the publisher.
Products that are referred to in this document may be either trademarks and/or registered
trademarks of the respective owners. The publisher and the author make no claim to these
trademarks.
While every precaution has been taken in the preparation of this document, the publisher and
the author assume no responsibility for errors or omissions, or for damages resulting from the
use of information contained in this document or from the use of programs and source code
that may accompany it. In no event shall the publisher and the author be liable for any loss of
profit or any other commercial damage caused or alleged to have been caused directly or
indirectly by this document.
Contents
3
Table of Contents
6
Part I Warranty & Product Information
7
Part II FCC/CE Compliance
8
Part III For Your Safety
Part IV Compatibility & Version
Part V Introduction
10
11
1 Overview
................................................................................................................................... 11
2 Box Contents
................................................................................................................................... 11
3 Controls
................................................................................................................................... 12
4 Interfaces
................................................................................................................................... 13
Part VI Quick Start Guide
14
1 Connections
................................................................................................................................... 14
2 Promote
...................................................................................................................................
Control Setup
15
3 Camera
...................................................................................................................................
Setup
16
4 Performing
...................................................................................................................................
Basic Operations
16
Part VII Detailed User Guide
18
1 One Shot
...................................................................................................................................
Mode
18
2 Time-Lapse
...................................................................................................................................
Mode
19
3 High Dynamic
...................................................................................................................................
Range Mode
21
4 Bulb HDR
................................................................................................................................... 25
5 Bulb Ramping
................................................................................................................................... 26
6 Focus...................................................................................................................................
Stacking
32
7 Video ...................................................................................................................................
Control
34
8 Manual
...................................................................................................................................
Shutter Hold
37
9 Hyperfocal
...................................................................................................................................
Calculator
38
Part VIII Advanced Operations
40
1 High Dynamic
...................................................................................................................................
Range Time-Lapse
40
2 Advanced
...................................................................................................................................
Bulb Ramping
41
3 Setup...................................................................................................................................
Menu
45
Screen
...................................................................................................................................
Contrast
Use
...................................................................................................................................
a Separate Cable for Shutter Release
Shutter
...................................................................................................................................
Cable Release Frame Delay
USB
...................................................................................................................................
Cable Release Frame Delay
© 2 0 1 4 P romote Sys tems
45
45
46
47
4
Promote Control 3.15 User Manual Rev 23
Lumix
...................................................................................................................................
USB cable release frame delay
Time-Lapse
...................................................................................................................................
exposure setting mode
Enable
...................................................................................................................................
Time-Lapse schedule/repeat
Save/restore
...................................................................................................................................
camera settings
Enable
...................................................................................................................................
exposures below 1/4000
Enable
...................................................................................................................................
1/3 EV ISO steps
Bulb
...................................................................................................................................
ramping mode live mods are applied
Keep
...................................................................................................................................
bulb ramp length on start time change
Enable
...................................................................................................................................
Advanced Bulb ramping
Lowest
...................................................................................................................................
Auto ISO for adv. bulb ramping
Highest
...................................................................................................................................
Auto ISO for adv. bulb ramping
Force
...................................................................................................................................
ISO ramp down on short exposures
Limit
...................................................................................................................................
bulb ramping longest exposure
Bulb
...................................................................................................................................
ramping long exposure limit mode
Auto
...................................................................................................................................
bulb ramping interval extension
Bulb
...................................................................................................................................
ramping live mod step size
Bulb
...................................................................................................................................
ramping interval measured as
Bulb
...................................................................................................................................
ramp / bulb HDR image buffer time
Use
...................................................................................................................................
assist cable for bulb ramp / bulb HDR
Shutter
...................................................................................................................................
close delay safety margin
Shutter
...................................................................................................................................
close delay
Auto
...................................................................................................................................
Power-Off
Mirror
...................................................................................................................................
Lock-Up Delay
Automatic
...................................................................................................................................
Exposure Mode Control
HDR
...................................................................................................................................
Start Point
HDR
...................................................................................................................................
Exposure Order
Shift
...................................................................................................................................
HDR brackets
Enable
...................................................................................................................................
camera settings check/sync
Enable
...................................................................................................................................
post-sequence image check
Focus
...................................................................................................................................
stacking step delay
Video
...................................................................................................................................
focus step size
Video
...................................................................................................................................
focus step delay
Left+Mode
...................................................................................................................................
shortcut
Right+Mode
...................................................................................................................................
shortcut
Up+Mode
...................................................................................................................................
shortcut
Down+Mode
...................................................................................................................................
shortcut
Center+Mode
...................................................................................................................................
shortcut
Backlight
...................................................................................................................................
timeout
Backlight
...................................................................................................................................
R channel
Backlight
...................................................................................................................................
G channel
Backlight
...................................................................................................................................
B channel
Backlight
...................................................................................................................................
on any button
Remove
...................................................................................................................................
backlight when exposing
Global
...................................................................................................................................
sound enable
Beep
...................................................................................................................................
on every button
Beep
...................................................................................................................................
every second in manual hold mode
Force
...................................................................................................................................
legacy USB mode (disable USB 3.0)
Distance
...................................................................................................................................
units
Reset
...................................................................................................................................
to defaults
Firmware
...................................................................................................................................
Info
47
47
48
48
48
48
48
48
49
49
49
49
50
50
51
51
51
51
52
52
52
53
53
53
54
54
54
55
55
55
56
56
56
56
56
57
57
57
57
57
58
58
58
58
58
58
59
59
59
59
4 Mirror...................................................................................................................................
Lock-Up Operation
59
5 Long Exposure
...................................................................................................................................
Noise Reduction Operation
61
6 Using ...................................................................................................................................
Remote Sensors
61
© 2 0 1 4 P romote Sys tems
Contents
5
7 Using ...................................................................................................................................
Motorized Panoramic Heads with Promote Control
62
8 Using ...................................................................................................................................
an AC adapter
63
9 Performing
...................................................................................................................................
a Firmware Update
63
Part IX Troubleshooting
65
1 Resetting
...................................................................................................................................
the Device
65
2 Recovering
...................................................................................................................................
from a Failed Firmware Update
65
3 Error Messages
................................................................................................................................... 66
"Manual"
...................................................................................................................................
exposure mode could not be set
A "Bulb"
...................................................................................................................................
exposure is required. Please allow and connect an optional shutter cable
Exposure
...................................................................................................................................
time could not be set. Enable "Auto Exposure Mode" or set camera to "Manual" exposure
Exposure
...................................................................................................................................
time could not be set
Camera
...................................................................................................................................
cannot be recognized
Please
...................................................................................................................................
set camera USB connection mode to "PTP" and reconnect the camera
Programmed
...................................................................................................................................
sequence falls out of exposure range
Exposure
...................................................................................................................................
out of range
Device
...................................................................................................................................
battery may go low during exposure sequence
LOW
...................................................................................................................................
BATTERY
66
66
66
67
67
67
67
67
67
68
4 Troubleshooting
...................................................................................................................................
Q&A
68
5 Support
................................................................................................................................... 69
Part X Addendum A: Software Applications
70
1 High Dynamic
...................................................................................................................................
Range Software
70
2 Time-Lapse
...................................................................................................................................
and Bulb Ramping Software
70
3 Focus...................................................................................................................................
Stacking Software
70
4 Panoramic
...................................................................................................................................
Software
70
© 2 0 1 4 P romote Sys tems
6
1
Promote Control 3.15 User Manual Rev 23
Warranty & Product Information
Promote Systems, LLC (PS, LLC) warrants this hardware product against defects in materials and
workmanship for a period of ONE (1) YEAR from the date of original retail purchase. If a defect exists, at
its option PS, LLC will exchange the product with a product that is new or which has been manufactured
from new or serviceable used parts and is at least functionally equivalent to the original product. A
replacement product/part assumes the remaining warranty of the original product or ninety (90) days
from the date of replacement, whichever provides longer coverage for you. When a product or part is
exchanged, any replacement item becomes your property and the replaced item becomes PS, LLC’s
property. To obtain product support for the Promote Control device, visit our website
www.promotesystems.com.
© 2 0 1 4 P romote Sys tems
FCC/CE Compliance
2
7
FCC/CE Compliance
This device complies with part 15 of the FCC Rules. Operation is subject to the following two conditions:
(1) This device may not cause harmful interference, and
(2) this device must accept any interference received, including interference that may cause undesired
operation.
This equipment has been tested and found to comply with the limits for a Class B digital device, pursuant
to part 15 of the FCC Rules. These limits are designed to provide reasonable protection against harmful
interference in a residential installation. This equipment generates, uses and can radiate radio frequency
energy and, if not installed and used in accordance with the instructions, may cause harmful interference
to radio communications. However, there is no guarantee that interference will not occur in a particular
installation. If this equipment does cause harmful interference to radio or television reception, which can
be determined by turning the equipment off and on, the user is encouraged to try to correct the
interference by one or more of the following measures:
Reorient or relocate the receiving antenna.
Increase the separation between the equipment and receiver.
Connect the equipment into an outlet on a circuit different from that to which the receiver is connected.
Consult the dealer or an experienced radio/TV technician for help
© 2 0 1 4 P romote Sys tems
8
3
Promote Control 3.15 User Manual Rev 23
For Your Safety
In order to prevent damage to the Promote Control and/or a personal injury, please read and observe
the following important security precautions.
1. Do not disassemble the unit
This unit is a complex electronic device and contains no user-serviceable parts, except for userreplaceable batteries. An unauthorized disassembly or modification may void service warranty on the
unit.
2. Keep the unit dry
Avoid exposing the unit to the excess water or rain. Always keep weather protection seals in place where
possible. Exposing unit’s internal circuitry to water may result in fire and/or electric shock.
3. Do not operate in the event of malfunction
In case of a smoke or an unusual smell coming from the unit, please immediately turn the unit off,
remove batteries (batteries may be hot, take care to avoid burns) and unplug an optional AC adapter if
connected. Discontinue further use and forward the unit to an authorized service center. Continued use
of a malfunctioning unit may result in an injury.
4. Do not expose to fire or high temperatures
When subject to high temperatures such as fire or a closed compartment exposed to the sun, the unit
may be damaged. Particularly, do not leave the unit in a closed vehicle under the sun.
5. Avoid extreme temperature changes
Electronic devices may be damaged by sudden and extreme changes in environment temperature. Just
like your digital camera, the Promote Control should not be used immediately after bringing it from subfreezing temperatures into a warm environment. Please allow for at least 2 hours of slow warm-up in a
closed bag before using the Promote Control again after bringing it in from the cold.
6. Keep out of reach of children
This unit contains small parts which may be choken on. If a child swallows or chokes on any part of the
unit, consult a physician immediately.
7. Use only Promote® approved accessories
Using accessories not approved by Promote® may void your Promote Control warranty, may cause
© 2 0 1 4 P romote Sys tems
For Your Safety
malfunction and/or fire and/or electric shock, and may result in an injury.
© 2 0 1 4 P romote Sys tems
9
10
4
Promote Control 3.15 User Manual Rev 23
Compatibility & Version
The Promote Control allows for advanced control of camera functions via USB interface as well as via an
optional shutter cable. In order to allow full Promote Control functionality, the camera has to support
PTP/MTP protocol for controlling camera functions over USB. The leading camera brands are known to
support PTP protocol in their latest camera series.
The list of compatible cameras is constantly extended as new camera models appear on the market, and
new Promote Control firmware is released. Please consult our website for the latest Promote Control
compatibility information:
http://www.promotesystems.com/
This manual applies to Promote Control firmware update version 3.15. If your Promote Control firmware
has a lower version than 3.15, please update your Promote Control firmware. Promote Control firmware
updates are available at http://support.promotesystems.com/.
© 2 0 1 4 P romote Sys tems
Introduction
5
Introduction
5.1
Overview
11
Thank you for purchasing Promote Control, the most advanced digital camera remote control solution. To
get started with your Promote Control unit, please read the "Introduction", "Quick Start Guide" and
"Detailed User Guide" sections. In order to get the most of your Promote Control, it is recommended to
read the "Advanced Operations" section as well.
The Promote Control is an advanced, microprocessor-controlled portable unit, capable of automatically
calculating complex exposure sequences, and providing extended control over your camera’s functions.
The unit is powered from 2 AA batteries, is equipped with an easy-to-read backlit liquid crystal display, a
keypad suitable for use while wearing gloves, and comes with a neckstrap for carrying it in the field.
5.2
Box Contents
1.
Promote Control unit
2.
Carrying case
3.
This manual
4.
Neckstrap
5.
Black USB cable (for connecting Promote Control to your camera)
6.
White USB cable (for updating Promote Control firmware from a personal computer)
7.
AA batteries
© 2 0 1 4 P romote Sys tems
12
5.3
Promote Control 3.15 User Manual Rev 23
Controls
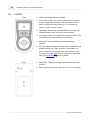
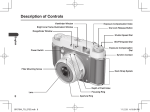
1.
Liquid Crystal Display with color backlight.
2.
Power button. Press to turn on the Promote Control, then press
briefly to toggle display backlight on and off. Press and hold to
pause currently active image sequence, or if no sequence is
active, turn off the Promote Control.
3.
Mode button. Press to cycle through available modes. Hold "Left"
navigation button to cycle mode list in reverse direction.
4.
Focus button. Requires an optional shutter cable to function. Press
and hold to pre-focus the camera lens on the subject.
5.
Start button. Press to activate the selected photography
sequence.
6.
Four-way navigation keypad with center button. Navigates through
available settings. Left / Right: switch the current setting. Up /
Down: change the current setting value. Center button: confirm
the change. Press Left and Right at the same time to enter Setup
Menu (see Setup Menu 45 section for details).
1.
Reset button. Sealed with a rubber cover to protect from water
and dust.
2.
Battery compartment thumb screw lock. Use a coin to lock/unlock.
© 2 0 1 4 P romote Sys tems
Introduction
5.4
13
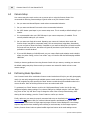
Interfaces
1. USB connector (for camera control / device
firmware update)
© 2 0 1 4 P romote Sys tems
2.
Shutter cable port
3.
Remote sensor port
4.
DC power input
14
Promote Control 3.15 User Manual Rev 23
6
Quick Start Guide
6.1
Connections
Promote Control is an easy to use device that adapts to your preferences and lets you move easily from
basic operations to advanced functionality as needed.
Use the following workflow to get started:
1.
Turn your camera on.
2.
If your Promote Control is on, turn it off by pressing and holding "Power" button.
3.
If your camera setup menu has an option for choosing different USB connection protocols (mostly
called "USB"), set it to "PTP", "Print/PTP" or "PTP/MTP" (depending on your camera model). These
options are most commonly found on legacy Nikon cameras (D70 through D3), but may be present
on other cameras. Cameras without these options may be already set up by the manufacturer. If
your camera does not have this option, skip this step.
4.
Use the supplied black USB cable to connect the Promote Control to your camera. Connect the
rounded USB cable plug marked "P" to the Promote Control. Connect the other rectangular plug
marked "C" to your Camera.
5.
If you purchased an optional shutter cable, it's time to connect it. When Promote Control is set up to
use shutter cable, it needs to be connected every time you use your Promote Control. Connect the
3.5mm headphone stereo plug to the Promote Control shutter cable port located next to its USB port
(see Interfaces 13 ). Connect the camera plug to the camera shutter release port. You may want to
consult your camera user manual on where the shutter release port is located.
6.
If you plan on using Bulb Ramping or Bulb HDR feature, an optional Bulb Ramp Assist cable also
needs to be connected. Connect the thin 2.5mm plug to Promote Control remote sensor port (see
Interfaces 13 ). Connect the other plug to your camera flash sync port (normally used for
synchronizing external flash units). If you camera has no flash sync port, use hot shoe adapter
supplied with the Bulb Ramp Assist kit to connect the cable via your camera flash hot shoe.
IMPORTANT NOTE 1: If you use Bulb Ramping or Bulb HDR mode, set your camera flash
synchronization mode to default setting. Any other setting, such as "rear curtain" sync, will interfere
with the Bulb Ramping and Bulb HDR mode.
IMPORTANT NOTE 2: When using any mode other than Bulb Ramping or Bulb HDR, please make
sure to disconnect the Bulb Ramp Assist Cable. Leaving this cable connected in other modes may
lead to improper sequence timing, taking extra images, or result in skipped frames.
7.
Press the Promote Control "Power" button briefly to turn the unit on.
8.
Press the "Power" button again briefly to toggle the display backlight on and off, as required.
© 2 0 1 4 P romote Sys tems
Quick Start Guide
6.2
15
Promote Control Setup
Your Promote Control is an easy to use device that adapts to your preferences and lets you move easily
from basic operations to advanced functionality as needed. In this section we will only set up the basic
functionality needed to get started. All settings will be stored into Promote Control's internal memory
every time you turn it off (or when it powers down automatically).
With your Promote Control on, press "Left" and "Right" buttons simultaneously to enter Promote Control
Setup menu. "Left" and "Right" buttons scroll through available settings, while "Up" and "Down" buttons
change setting values. To get started, we will set up the following:
1.
If you purchased and connected a shutter cable, scroll to "Use a separate cable for shutter release",
and set it to Yes. When this setting is enabled, you will need to keep the shutter cable connected
when you use your Promote Control.
2.
If your camera supports exposures shorter 1/4000 sec (normally down to 1/8000 sec), scroll to
"Enable exposures below 1/4000" setting and set that to Yes.
3.
If your camera supports ISO steps of 1/3 EV (most mid and pro grade digital SLR cameras allow
that), scroll to "Enable 1/3 EV ISO steps" setting and set that to Yes.
If you plan on using Bulb Ramping or Bulb HDR modes and have a Bulb Ramp Assist cable connected, it
is essential to calibrate the Shutter Close Delay. This calibration is specific to each camera model, and
calibration process needs to be repeated if you change your camera model.
Use the following workflow to calibrate the shutter close delay.
1.
Scroll to "Shutter close delay" setting.
2.
Make sure your camera is on and both shutter cable and Bulb Ramp Assist cables are connected.
3.
Insert a memory card into your camera and make sure it has enough space for at least three
images.
4.
Set your camera to manual focus.
5.
Set your camera to manual exposure mode.
6.
Set your camera to Bulb exposure.
7.
Press "Up" button on the Promote Control to start calibration process. Promote Control will take three
consecutive images and complete the calibration process.
When done, press "Center" button to return to your previously activated mode screen.
© 2 0 1 4 P romote Sys tems
16
6.3
Promote Control 3.15 User Manual Rev 23
Camera Setup
Your camera may also require a minor set up process prior to using the Promote Control. We
recommend the following camera settings to get the most out of your Promote Control:
1.
Set your camera to Manual Exposure mode unless recommended otherwise.
2.
Set your camera to Manual Focus mode unless recommended otherwise.
3.
Set 1/3EV shutter speed steps in your camera setup menu. This is normally a default setting for your
camera.
4.
It is recommended to also set 1/3EV ISO steps in your camera setup menu, if available. This is
normally a default setting for your camera.
5.
Set your camera to Single drive mode. Operating your camera in Continuous drive mode with
Promote Control may lead to unexpected results, such as extra pictures being taken. Alternatively,
you can use Quiet or Silent drive mode, if available on your camera. With Quiet or Silent drive mode
the frame rate may be slower, but shutter will generally sound more quiet and soft, which may be
preferable in certain situations.
6.
If you use Bulb Ramping or Bulb HDR mode, set your camera flash synchronization mode to default
setting. Any other setting, such as "rear curtain" sync, will interfere with the Bulb Ramping and Bulb
HDR mode.
Should you have any problems when using Promote Control with your camera, resetting your camera to
the default settings may help. Please consult your camera user manual for details on how to reset
camera settings.
6.4
Performing Basic Operations
Your Promote Control offers a multitude of camera control modes that will help in your daily photography
needs. You can easily navigate through available camera control modes using the "Mode" button. Hold
the "Left" navigation key while pressing the "Mode" button to switch through the available modes in the
reverse direction. Refer to following sections to learn more about each mode.
To get started, use "Mode" button to scroll to the "High Dynamic Range" mode. Use the four way
navigation keypad to change settings. First, select a setting to be changed using the "Left" and "Right"
keys, then use the "Up" and "Down" keys to change the value of the currently selected setting. After
altering all desired settings, press the "Center" button to confirm your choices.
Finally, make sure your camera is properly connected and set up as described in the Connections 14 and
Camera Setup 16 chapters. With your camera in Manual exposure and Manual focus, press "Start"
button on the Promote Control to begin capturing images. Promote Control displays the current image
sequence step and the time remaining, before moving to each next step. As each image sequence
finishes, Promote Control emits an optional audible signal and returns to the mode settings screen.
© 2 0 1 4 P romote Sys tems
Quick Start Guide
17
If an error condition is encountered before or while taking pictures, Promote Control stops and prints an
error message on the display, and optionally, emits an audible sound. Press the "Center" button to
dismiss the error message and return to the mode settings screen. If there is not enough available light
to read the error message, briefly press the "Power" button to activate the display backlight. Promote
Control temporarily disables the display backlight during exposure sequences to avoid interfering with the
exposure. The display backlight also turns off automatically after a user-configurable timeout period.
Reactivate the display backlight any time by briefly pressing the "Power" button.
If you want to cancel an exposure sequence before it completes, press and hold the "Power" button while
the exposure sequence is active. Promote Control will pause the current exposure sequence and offer an
option to resume it by pressing "Start" button, or return to the mode settings screen by pressing any
other button. When finished using the Promote Control, press and hold the "Power" button to turn the
unit off. Promote Control memorizes your current settings as it powers off and restores them the next
time it powers back on.
© 2 0 1 4 P romote Sys tems
18
Promote Control 3.15 User Manual Rev 23
7
Detailed User Guide
7.1
One Shot Mode
Use "One Shot" mode when you only need to take a single picture. Depending on the settings, the
Promote Control either simply instructs the camera to release the shutter with the current in-camera
settings, or attempts to preset a chosen shutter speed, aperture and/or ISO sensitivity before taking the
picture.
By default Promote Control will release camera shutter with no changes to the camera settings. In this
case, every setting will read "[ On Cam ] Keep". This means that the setting value will be the one
currently set in camera, and the control mode is "Keep". With all settings in "Keep" mode, you may use
any exposure mode on the camera, including fully automatic exposure modes. Please note that Manual
focus mode should still be used.
Usage
1.
Switch your Promote Control to the "One Shot" mode.
2.
Make sure your camera is connected
3.
Press "Start" button on the Promote Control to take a picture.
14
and set up
16
.
If you would like to alter one or more settings before taking a shot, change its control mode from the
default setting of "Keep" to "Set", and alter the setting value as desired.
Shutter Speed
The shutter speed can be set either in 1/3EV increments, or, with an optional shutter cable connected 14
and enabled 15 , in HH:MM:SS (hours, minutes and seconds). HH:MM:SS setting cannot be used without
the shutter cable.
To use 1/3EV preset mode:
1.
Set your camera to the Manual or Shutter Priority exposure mode.
2.
Change "Exp" control mode from "Keep" to "Set"
3.
Set the desired shutter speed on the Promote Control.
4.
Press "Start" button to take a picture.
To use HH:MM:SS preset mode:
1.
Set your camera to the Bulb exposure mode.
© 2 0 1 4 P romote Sys tems
Detailed User Guide
2.
Make sure an optional shutter cable is connected
3.
Change "Exp" control mode to "Bulb"
4.
Set the desired shutter speed on the Promote Control in hours, minutes and seconds.
5.
Press "Start" button to apply changes and take a picture.
14
and enabled
19
15 .
Aperture / F-Number
The aperture or F-Number can be set in 1/3EV increments. Please note that your camera and/or lens
may limit the range of available aperture settings. Specifying an unavailable aperture setting in the
Promote Control may prevent the picture from being taken.
1.
Set your camera to the Manual or Aperture Priority exposure mode.
2.
Change "F" control mode from "Keep" to "Set".
3.
Set the desired F-Number value on the Promote Control.
4.
Press "Start" button to apply changes and take a picture.
ISO
The ISO can be set in 1/3EV or 1EV increments depending on the Promote Control Setup 15 routine.
Please note that your camera may limit the range of available ISO settings. Specifying an unavailable ISO
setting in the Promote Control may prevent the picture from being taken.
7.2
1.
Make sure your camera ISO is not set to automatic control, and shows a certain ISO sensitivity value
instead. When your camera has automatic ISO control enabled, Promote Control will not be able to
affect the ISO setting on camera.
2.
Change "ISO" control mode from "Keep" to "Set".
3.
Set the desired ISO value on the Promote Control.
4.
Press "Start" button to apply changes and take a picture.
Time-Lapse Mode
Use "Time Lapse" mode to take a number of pictures separated by a preset time interval with an optional
delay before starting the sequence. The resulting pictures can be used to create a fast motion video.
The Time-Lapse mode will use your camera exposure settings. If you use an optional shutter cable (see
Connections 14 section), you can optionally set your camera to Bulb mode and instruct Promote Control
to time an arbitrary exposure. Using a shutter cable is highly recommended when using Time-Lapse
mode with interval shorter than 2 seconds.
© 2 0 1 4 P romote Sys tems
20
Promote Control 3.15 User Manual Rev 23
Connections - in-camera exposure settings
1.
Switch your Promote Control to the "Time-Lapse" mode.
2.
Set your camera to any desired exposure mode other than Bulb exposure.
Connections - arbitrary exposure times in hours, minutes, seconds
1.
Set your camera to Bulb exposure mode.
2.
Make sure "Time-Lapse exposure setting mode
(Bulb mode)".
3.
The shutter cable is required for this mode. Connect the shutter cable as described in Connections
14 section. USB cable is not required.
4.
Set your desired exposure in HH:MM:SS format.
47 "
Promote Control Setup setting is set to "Arbitrary
Usage
1.
Use "Interval" setting on Promote Control to specify how often a picture should be taken. The interval
is specified in hours, minutes, seconds and tens of second. IMPORTANT: your camera may not be
able to take images as fast as the interval setting may suggest. The maximum frame rate is
determined by the image type/size selected in the camera, memory card speed, presence of shutter
cable and other factors. If your camera cannot keep up with the Time-Lapse interval you set, some
images may be skipped. Using a shutter cable is highly recommended for any intervals shorter than 2
seconds.
2.
Specify how many "Frames", or images should be taken in total.
3.
Use "Start In" setting if you wish to delay the beginning of the Time-Lapse image sequence. This
setting uses HH:MM:SS format (Hours:Minutes:Seconds).
4.
Press "Start" button on Promote Control. If you specified a start delay above, a countdown will begin,
otherwise Promote Control will take the first image and continue with the sequence as programmed.
5.
While Time-Lapse is running, if at any moment you need to take a number of images inside the
preset interval, simply press "Center" button on your Promote Control. Every time you press "Center"
button, Promote Control will take an picture. This may be useful if you see certain action in your
Time-Lapse scene that you need recorded, but you do not want to stop the Time-Lapse program in
order to do so.
NOTE: An optional AC adapter is recommended when performing long Time Lapse sequences in order to
avoid depleting Promote Control batteries before the sequence finishes.
Time-Lapse mode can be optionally used to create High Dynamic Range Time-Lapse sequences. This
© 2 0 1 4 P romote Sys tems
Detailed User Guide
21
mode will take several images instead of at each Time-Lapse interval. See High Dynamic Range TimeLapse 40 section for more information.
Repeated Time-Lapse
By default a Time-Lapse sequence can be delayed - but your use case may favor starting the Time-Lapse
immediately, and then repeating in after a certain time has elapsed. In that case set "Enable Time-Lapse
schedule/repeat" 48 Setup setting to "Yes". You will then be able to run Time-Lapse sequences e.g.
every 24 hours, or any other period expressed in HH:MM:SS, just like your Time-Lapse start delay. Note
that when you enable repeated Time-Lapse, the "Start in" setting in Time-Lapse mode screen changes to
"Rpt each", so you cannot delay the start of Time-Lapse sequence - it will always start immediately, and
then restart every HH:MM:SS as set in your Time-Lapse mode screen. For example, if you set your "Rpt
each" to 24:00:00 (24 hours), and start your first Time-Lapse at 9:00am, your Promote Control will finish
the Time-Lapse sequence you just started, and then restart the same sequence next day at 9:00am.
With Time-Lapse schedule/repeat enabled, Promote Control will repeat Time-Lapse sequences until you
stop it. Stopping a repeated Time-Lapse is done the same way as with any other sequence - hold down
the "Power" button on your Promote Control, and then confirm sequence cancellation.
Please note that Time-Lapse will not repeat if you choose "Infinite" for the number of frames for your
Time-Lapse. An Infinite Time-Lapse never finishes until stopped manually, and thus cannot be repeated.
Optimizing Power Management
Your camera battery may not be able to withstand a long term Time-Lapse without being powered by an
AC adapter. However, you can minimize camera power draw by enabling automatic meter-off timeout in
your camera settings. The camera will then go to sleep between Time-Lapse sequences. When needed,
Promote Control will wake it up and continue its work. However, for that feature to work, it is important
to use the shutter cable connection (having enabled shutter cable in your Promote Control settings).
Some cameras cannot be pulled out of sleep mode via USB, and thus a shutter cable connection is
needed. With a properly chosen camera meter time-out, you may be able to run hundreds of frames
through your camera before its battery is depleted.
NOTE: If you plan on running repeated Time-Lapse sequences for more than a day, you may want to
power your Promote Control from an optional AC adapter. Unlike camera, your Promote Control cannot
afford to sleep between Time-Lapse sequences, and thus requires a source of external power for long
Time-Lapse sessions.
7.3
High Dynamic Range Mode
Use "High Dynamic Range" mode to create a series of bracketed images with different shutter speeds.
These multiple images may later be combined, using many standard image editing programs, to create a
more realistic image with well defined shadows and highlight areas.
© 2 0 1 4 P romote Sys tems
22
Promote Control 3.15 User Manual Rev 23
Creating a High Dynamic Range image from series of bracketed images requires an optional third party
software program. Many software applications are available to create High Dynamic Range images in
manual or batch modes. See High Dynamic Range Software Applications 70 section for more
information.
Promote Control automatically calculates High Dynamic Range (or HDR) image sequences for you
depending on a number of easy to use settings. Promote Control varies the camera shutter speed to
achieve different exposures on each image taken. The aperture always remains the same because this is
important in obtaining the correct HDR image sequences. This procedure is also known as "exposure
bracketing". The Promote Control allows you to completely and remotely control exposure bracketing
parameters without manually operating the camera controls.
By default, the Promote Control takes a "middle" shutter speed as a start, and then takes the requested
number of pictures with the shutter speed stepped under and over the "middle" exposure, thereby
creating an increasingly brighter sequence of images. You can optionally choose to build the sequence
starting from the longest or shortest exposure, allowing for better shadow or highlight control
respectively. Refer to HDR Start Point 54 Setup setting description for more details.
Usage
1.
Switch your Promote Control to the "High Dynamic Range" mode.
2.
Mount your camera on a tripod to avoid camera movement or shake between or during image
capture.
3.
Make sure your camera is connected
4.
Disable automatic focus on your camera.
5.
If your camera has "Automatic" setting for ISO control, make sure to disable it and set your camera
ISO to a fixed setting. Failure to do so will allow camera to compensate for bracketing changes
introduced by Promote Control, and this will negate the effect of bracketing.
6.
Use your camera exposure metering, or other exposure metering methods, to determine start
exposure parameters. Normally this will be a shutter speed/aperture/ISO speed combination that
yields a well exposed image. As a rule of thumb, set the exposure compensation to zero and pick
automatically metered exposure parameters from your camera exposure meter. You will be able to
easily change it later if required.
14
and set up
16
.
Alternatively, you may set your camera to "Manual" exposure mode, and manually adjust exposure
settings until the exposure compensation indicator shows zero. Consult your camera manual for the
details of exposure metering in "Manual" exposure mode.
7.
After measuring the exposure set your camera to Manual exposure mode unless it's already set.
8.
Enter the exposure from the step 3 using the "Mid" setting. This setting can also read "Lo Exposure"
or "Hi Exposure", depending on the choice for the HDR Start Point 54 in the Setup Menu 45 . In those
© 2 0 1 4 P romote Sys tems
Detailed User Guide
23
cases please do not use the average scene metering from step 3, and instead set the exposure value
as appropriate for scene shadows or scene highlights respectively.
9.
Set the "Step" setting on the Promote Control to 1.0EV for general HDR photography. You may want
to use a smaller "Step" value for a fine-grained tonal control.
10. Begin with a "Total Exposures" setting set to "05" or "07", depending on the subject contrast and
tonal range to be covered. The more contrast the subject exhibits, the more steps or total exposures
will be needed to sufficiently cover the subject tonal range. For example, setting this value to "07"
with a step of "1.0EV" will result in 7 images taken as follows:
-3 EV steps from the "Mid Exposure" shutter speed
-2 EV steps from the "Mid Exposure" shutter speed
-1 EV step from the "Mid Exposure" shutter speed
The "Mid Exposure" shutter speed
+1 EV step from the "Mid Exposure" shutter speed
+2 EV steps from the "Mid Exposure" shutter speed
+3 EV steps from the "Mid Exposure" shutter speed
With "Shadows" chosen for the "HDR Start Point" and the same set of exposure values, the following
7 images will be taken:
The "Lo Exposure" shutter speed
+1 EV step from the "Lo Exposure" shutter speed
+2 EV steps from the "Lo Exposure" shutter speed
+3 EV steps from the "Lo Exposure" shutter speed
+4 EV steps from the "Lo Exposure" shutter speed
+5 EV steps from the "Lo Exposure" shutter speed
+6 EV steps from the "Lo Exposure" shutter speed
Similarly, with "Highlights" chosen for the "HDR Start Point" and the same set of exposure values, the
following 7 images will be taken:
-6 EV steps from the "Hi Exposure" shutter speed
-5 EV steps from the "Hi Exposure" shutter speed
-4 EV steps from the "Hi Exposure" shutter speed
-3 EV steps from the "Hi Exposure" shutter speed
-2 EV steps from the "Hi Exposure" shutter speed
-1 EV step from the "Hi Exposure" shutter speed
The "Hi Exposure" shutter speed
Generally choosing more steps is better, because you are then able to select the images you need
from the resulting sequence. However, taking more than 11 total exposures with a step of 1.0EV or
higher is rarely useful, and should only be used for very high contrast scenery, or when there is no
time to reliably measure a start exposure.
© 2 0 1 4 P romote Sys tems
24
Promote Control 3.15 User Manual Rev 23
NOTE: You may want to reverse the High Dynamic Range bracketing order, so that the longest
exposures are taken first. See "HDR Exposure Order" Setup setting 54 for more information.
11. Preview the resulting bracketing sequence displayed by the Promote Control in the bottom of the
screen. If the entered parameters result in a bracketing sequence that is out of available exposure
range, Promote Control will display an "[Invalid Settings]" message.
12. Press "Start" button on the Promote Control to take a series of images.
Setting the camera to manual focus is important because otherwise the camera attempts to refocus
before taking each picture. Obtaining focus may take time depending on the subject, lighting conditions,
type of the lens currently used, as well as a number of other considerations. Additional and unexpected
automatic camera focusing activity interferes with the exposure sequence and may prevent some images
from being taken.
When the current image sequence is finished, review the resulting images on your camera screen. To
get the best looking High Dynamic Range images, make sure the darkest image of the sequence has a
good definition of highlights, and the brightest image of the sequence contains all the shadows. You may
want to use the image histogram display of your camera to get a better idea on the tonal range of every
image.
If the darkest image does not have well defined highlights, but the brightest image has more than
enough shadows, decrease the starting exposure by one or two steps, and press the "Start" button to
take another sequence. Similarly, if the darkest image has enough well defined highlights, but the
brightest image has some lost shadows, increase the starting exposure setting and press the "Start"
button to take another sequence. In some cases you may find that neither the darkest nor the brightest
image have well defined highlights or shadows. In this case try increasing the "Total Exposures" setting
until you get a well defined tonal range across the resulting image sequence. Overall, a combination of
1.0EV step with 7 total exposures works well for most situations.
If a High Dynamic Range sequence requires an exposure longer than 30 seconds, the optional shutter
cable will be required to complete the exposure sequence. If no shutter cable is available, try increasing
your camera ISO
speed and/or use a larger aperture, and set a proportionally faster shutter speed until it is shorter than
30 seconds. See Connections 14 section for more information about the shutter cable.
With shutter cable and exposures longer than 30 seconds your Promote Control will use Bulb exposure to
complete the sequence. Subject to camera support, Promote Control will attempt to enable Bulb mode
automatically. With other cameras, including Canon 5D Mark III, 6D and 60D, the Promote Control will
prompt you to manually engage the Bulb mode on your camera before continuing with the image
sequence. Note that with these camera models, Manual and Bulb exposure modes may each have a
different aperture setting. When switching to Bulb manually and back, make sure your aperture remained
the same, and adjust it if required.
High Dynamic Range mode can be optionally used to create High Dynamic Range Time-Lapse sequences.
© 2 0 1 4 P romote Sys tems
Detailed User Guide
25
This mode will take several images instead of at each Time-Lapse interval. See High Dynamic Range
Time-Lapse 40 section for more information.
7.4
Bulb HDR
The Bulb HDR mode is provided as a backup to the fully functional High Dynamic Range mode 21 . Bulb
HDR can work without USB connection to the camera, and is useful for cameras that are not supported
by Promote Control via USB. If your camera is supported using a USB connection, you may skip using this
mode.
Bulb HDR Mode has more limitations than the fully functional High Dynamic Range mode 21 . Due to using
Bulb mode, the shortest exposure that can be used in Bulb HDR is limited depending on your camera
model. In addition to that, exposure close to the shortest limit may be slightly less accurate and may vary
in brightness.
Usage
1.
Switch your Promote Control to the "Bulb HDR" mode.
2.
Connect
3.
Connect an optional Bulb Ramping / Bulb HDR Assistant Kit available from Promote Systems.
4.
Set your camera to Bulb exposure mode.
5.
Set your camera flash synchronization mode to default setting. Any other setting, such as "rear
curtain" sync, will interfere with the Bulb HDR mode.
6.
Disable Mirror Lock-Up mode on your camera. Promote Control cannot ensure correct exposure
timing in Bulb HDR mode with Mirror Lock-Up enabled.
7.
Disable automatic focusing on your camera. You may also need to set it to Single drive mode. Quiet
or Silent mode is also acceptable, if available on your camera.
8.
Calibrate camera shutter close delay as described in Promote Control Setup
9.
Follow High Dynamic Range mode 21 recommendations for choosing the Mid Exposure and other
sequence parameters. As you make your changes to the settings, Promote Control will display the
resulting range of image exposures below. However, in Bulb HDR mode extra care needs to be
taken. If any exposure from the Bulb HDR sequence falls out of possible range, Promote Control will
display "[ Invalid Settings ]". With select cameras it may happen even if any exposure is faster than
1/5 second. This exposure time may not be suitable for daylight photography and other bright
scenery. In that case ND filters may be used on your camera to darken the scene and make the
resulting exposures longer.
14
and enable
15
an optional shutter cable compatible with your camera.
15
section.
10. Press "Start" on Promote Control and a series of images will be taken.
If Promote Control displays an error about missing Bulb HDR Assistant Cable, please verify the Bulb HDR
© 2 0 1 4 P romote Sys tems
26
Promote Control 3.15 User Manual Rev 23
Assistant Cable connection. It may not be fully inserted into the Promote Control sensor port.
7.5
Bulb Ramping
The Bulb Ramping mode is intended for Time-Lapse users who would like to take Time-Lapse videos in
changing light conditions, such as a sunset or a sunrise. It works by varying camera Bulb exposure in
very small increments, achieving a nearly flicker-free exposure transition from bright to dark, or dark to
bright. This material assumes familiarity with basic Time-Lapse concepts.
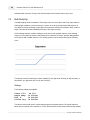
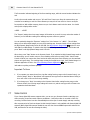
A bulb ramping sequence consists of taking a set of pictures with constant exposure, then changing
exposure in very small increments or decrements for a certain period of time, and then taking another
set of pictures with constant exposure. The resulting exposure set can be visualized by the following
curve:
The exposure can be increased (as in above example) if your light levels will drop (as with a sunset), or
decreased if your light levels will rise (as with a sunrise).
Settings
The following settings are available:
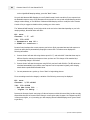
Start 1/20
Begin Ramp
End 2”
Finish Seq
ea 10s
in 01h00m
in 01h30m
in 02h00m
The above screen would result in a bulb ramping sequence that starts with a 1/20 second exposures
taken every 10 seconds. This continues for 1 hour. After that time Promote Control starts slowly ramping
© 2 0 1 4 P romote Sys tems
Detailed User Guide
27
the exposure to 2", and will arrive there in 1 hour 30 minutes from now, so the exposure ramping
changes will take 30 minutes. It will then continue taking 2" exposures until 2 hours from current moment
elapse.
Usage
Bulb ramping may greatly benefit from additional preparation work before you start. If you can, get
exposure metering of a scene at a time of day when you bulb ramping is planned to be finished. For
example, if you plan a sunset session, get an exposure of the same scene the night before. Do NOT use
ND filters when metering, and set your camera ISO setting to a fixed value. Remember the final exposure
time and the ISO value used.
Use the following workflow to prepare for bulb ramping:
1.
Switch your Promote Control to the "Bulb Ramping" mode.
2.
Setup your camera on a tripod and connect the Promote Control as described in the Connections
section. Make sure Bulb Ramping Assistant Cable is also connected.
3.
Disable automatic focusing on your camera, choose a fixed aperture and set ISO to the same fixed
value you used when measuring your end exposure as described above. If you did not pre-meter
your end exposure, use any ISO setting such as 200. Do NOT use automatic ISO feature, if available
in your camera.
4.
Set your camera flash synchronization mode to default setting. Any other setting, such as "rear
curtain" sync, will interfere with the Bulb Ramping mode.
5.
Disable Mirror Lock-Up mode on your camera. Promote Control cannot ensure correct exposure
timing in Bulb Ramping mode with Mirror Lock-Up enabled.
6.
Perform "Shutter close delay" calibration as described in Promote Control Setup
skip this step if you have previously calibrated it for this particular camera.
7.
Take ND filters off if you plan on using them in Advanced Bulb Ramping
8.
Set your camera to Manual exposure mode, take a few test pictures and and pick a shutter speed
that yields an acceptable picture. IMPORTANT: if you plan on using ND filter handling in Advanced
Bulb Ramping, make sure to meter without ND filters. Otherwise ND filters will be taken into account
twice and this will result in an incorrect exposure.
9.
Specify the current shutter speed as "Start".
41
15
14
section. You may
.
10. Use interval of 10 seconds for general bulb ramping. Lower interval values will result in slower timelapse videos. Note that too short of an interval may limit your exposure range. Higher interval values
will result in faster time-lapse videos.
11. Specify a delay to start the exposure ramping using "Begin Ramp in" setting. If you work on a sunset,
this delay would be the time from now to when the sunset starts, plus 5 minutes to allow yourself to
complete this setup. You can obtain sunset start times using various tables and/or weather reports.
© 2 0 1 4 P romote Sys tems
28
Promote Control 3.15 User Manual Rev 23
NOTE: You may optionally enable a Setup setting called "Keep bulb ramp length on start time
change". With this setting enabled, changing bulb ramping start delay will simultaneously and change
bulb end delay and sequence delay, keeping the total bramp and sequence duration the same. This
may be useful if you want to memorize a currently set ramping duration and simply change the
moment when the ramping starts.
12. Enter the "End" exposure using "End" setting. If you pre-metered the end exposure as described
above, enter that exposure time here.
13. Use the next setting to set a delay to end the exposure ramping period. Most sunsets/sunrises take
about 30 minutes, so this delay should be "Begin Ramp" delay + 30 minutes.
14. Finally, specify when to end the complete sequence. For best results you may want to use "Begin
Ramp" delay + 2-3 hours here.
As you change the values, Promote Control calculates and displays how many total images will be taken.
Make sure your memory card can fit that many images before you proceed.
In many circumstances your start exposure will be shorter than what Promote Control allows you to
choose. For example, you set your aperture to F/8 with ISO 100, and your camera says you need to use
exposure of 1/100 second. However, Promote Control will only allow going as short as 1/20 second (this
may vary depending on camera model). This case would require installing and keeping ND filters in front
of your camera lens to make exposures longer than 1/20 second, or enabling Advanced Bulb Ramping.
The Advanced Bulb Ramping mode, available exclusively with the Promote Control, allows for automatic
ISO changes, as well as dynamic ND filter calculations and usage. See Advanced Bulb Ramping 41
section for more details.
Pre-Flight Checklist
Once everything is setup, go through the following steps before you begin:
1.
Make sure your camera ISO is not set to "Auto". Doing so may interfere with bulb ramping.
2.
Set camera exposure mode to Bulb.
3.
Disable automatic focusing on your camera.
4.
If your camera is set at an angle, and your lens is prone to unexpected zoom/focus changes due to
gravity, for example of Canon EOS 28-135 USM lens, you may want to use scotch tape to fix the
zoom/focus rings. On ultrasonic lenses focus setting will not move, but zoom setting may change.
5.
If your memory card allows, set your camera to RAW image format. This will make post-processing
much easier. If you find yourself changing image quality setting at this time, re-check that your
camera can still fit the planned number of images as pre-calculated by the Promote Control.
6.
If you plan on using ND filters in Advanced Bulb Ramping
41
, and your ND filters require a holder
© 2 0 1 4 P romote Sys tems
Detailed User Guide
29
(such as Cokin series), mount your ND filter holder now.
7.
If your pre-flight checklist took more than a few minutes, make sure that "Begin Ramp" and "End"
delays are still valid.
8.
Press "Start" on Promote Control. Depending on your settings, one or more prompts may be shown,
clarifying the next step. Otherwise, the image sequence will begin immediately.
Depending on your camera model, you may be able to preview the images as they are taken on your
camera rear LCD. Note that current Nikon cameras currently will not be able to provide image previews if
Advanced Bulb Ramping is used.
If a particular set of settings eventually fills your camera buffer, it means the images are being taken too
fast, and your camera cannot write them to the memory card quickly enough. In that circumstance, use
Promote Control Setup setting called "Bulb ramp / bulb HDR image buffer time". Promote Control uses
this setting to safeguard bulb HDR and bulb ramping exposure sequences from overfilling the buffer. Its
default value of 1800ms is adequate for most cameras. You may try increasing that setting if you
experience symptoms described above.
Using Live Modifications
The Live Modifications (or Live Mod) feature is useful when you realize that the ramping settings were
not correct. You do not want to stop the ramping sequence to readjust your settings - this will result in
an abrupt exposure change that we are trying to avoid.
Instead, use the Live Modification, or Live Mod feature. It is only available when the bulb ramping
sequence is active, and offers a way to gradually shift the complete ramping curve up or down as
necessary. When you apply a Live Modification, the whole set of exposures is shifted, including constant
zones. If you were to apply a Live Mod in the very beginning of your sequence, it would slowly go from
"Original" curve below to the "Modified" curve:
© 2 0 1 4 P romote Sys tems
30
Promote Control 3.15 User Manual Rev 23
The change will not applied at once - this would result in an unpleasant flicker in your final time-lapse
video. Instead, Promote Control will automatically and gradually apply the change across a number of
frames, so that in the final video this change looks like a smooth transition. You can vary the number of
frames used to spread the Live Mod by changing the corresponding Setup setting called "Bulb ramping
live mods are applied 48 " (see Setup Menu 45 section for more details). With a default setting of 30
frames the change will be take about 1 second of a final video in NTSC format (~30 frames per second),
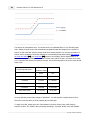
or 1.2 seconds in PAL format (25 frames per second). Use the following table to set the live mode spread
frame count:
Live Mod spread across...
Transition
Duration in Video
NTSC
PAL
25 frames
~0.83 seconds
1 second
30 frames
1 second
1.2 second
50 frames
~1.67 seconds
2 seconds
60 frames
2 seconds
2.4 seconds
600 frames (max)
20 seconds
24 seconds
You may optionally set this Setup setting to "Immediate" - this will apply the complete amount of Live
Mod to the next frame after you finish changing the Live Mod value.
To apply a Live Mod, simply press Up or Down buttons on Promote Control when a bulb ramping
sequence is active. The "Modify" value will change accordingly - a positive "Modify" value will gradually
© 2 0 1 4 P romote Sys tems
Detailed User Guide
31
make your sequence brighter, while negative "Modify" value will gradually make it darker. The Promote
Control will wait until you finish changing this setting, and then start applying it. When it is being applied,
"ACT" will be indicated next to Live Mod amount. As the Live Mod is applied, the amount will get closer to
0 unless you start changing it again.
Note that Live Modifications may not always be possible - such as when you are trying to modify an
exposure sequence curve past the limits defined by shortest obtainable exposure and your interval.
Promote Control will not let you enter a Live Mod that violates the above constraints.
Using Live Ramp Shifting
Live Ramp Shifting is similar to the Live Modifications, but instead of shifting your curve up or down, it
shifts the actual ramping left or right - moving the moment when the ramping begins closer or farther in
time. It is only available when the bulb ramping sequence is active, and only until the ramping has
started. This may be useful if e.g. the sunset started kicking in, and you realize that you delayed your
ramp start too far into the future. In this case, press or hold Left button on Promote Control to reduce the
time before the ramp starts. On the contrary, if you feel like your ramping is about to start too early,
press or hold Right button on Promote Control to increase the time before the ramp starts.
When using Live Ramp Shifting, you will see "Ramp .. in" timer countdown change as you press Left/
Right buttons. You cannot make the ramp start immediately - the quickest the ramp can be brought back
is 1 (one) minute from now. This is intentional, and is made that way to ensure that you have that 1
minute to rethink your decision - and, if required, delay the ramp by pressing Right button again. So if
you need the ramp to start as soon as possible - press/hold Left until you have it start in 1 minute from
now, and then let that time pass. Note that once the ramping part starts, Live Ramp Shifting cannot be
used any more.
Using Live Ramp Shifting will impact both ramp start and end times simultaneously. In other words, it will
only make the ramp start earlier or later - it will not affect the duration of the ramping part of the
exposure curve, or the remaining duration of your previously programmed sequence.
Pausing Ramp
If you feel like the light stopped changing, you may want to pause your ramping. This will NOT pause
shooting - images will still be taken, but the exposures will not be changed while ramping is paused.
When the ramping is resumed, exposures will continue ramping towards the same end exposure that you
set earlier. Pausing your ramping will extend the total time your bulb ramping sequence takes for the
duration of the pause.
To pause or resume your exposure ramping, press Left+Right buttons at the same time while Bulb
Ramping sequence is under way. Please note that ramping pause/resume is only available before the
ramping portion of the exposure curve above is completed.
© 2 0 1 4 P romote Sys tems
32
Promote Control 3.15 User Manual Rev 23
Packing Up
A bulb ramping session can take as long as a few hours and may require extra items to bring with you.
The following checklist may be followed when you pack for a bulb ramping trip:
1.
Promote Control, Bulb Ramping Assist Kit, shutter cable, USB cables.
2.
An optional Promote Control Tripod Case may be useful (available from Promote Systems).
3.
ND filters with holders & adapter rings if required (Advanced Bulb Ramping
4.
Backup memory cards. We recommend cleaning them in advance.
5.
Backup batteries for camera and Promote Control (2x AA).
6.
Tripod, camera tripod mount plate. You may want to check the plate you pick fits both the tripod and
your camera well.
7.
A portable GPS navigator may be useful to mark locations.
8.
Mini flash light.
9.
Scotch tape.
41
only).
10. Drinks, snacks, coat / blanket (if required by upcoming weather conditions).
11. Permission paperwork if required for restricted locations.
We highly recommend trying the Bulb Ramping mode for a few times prior to planning an actual field
trip. Getting yourself familiar with all the exciting possibilities of Time-Lapse videography in changing
light. When you are ready to step up, make sure to read Advanced Bulb Ramping 41 section to even
further extend your creative horizons with Promote Control.
7.6
Focus Stacking
Sometimes you need to take a picture with an extremely large depth of focus. A common technique for is
to stop down lens aperture - however this leads to using a slower shutter speed, and may require using
a tripod.
Focus Stacking is a technique that allows you to take multiple images of the same scene, focusing on
different parts of it. These multiple images are later merged into a single image on a computer. The
resulting image will have all objects in focus, creating an extremely large depth of field without sacrificing
available light.
Promote Control provides an easy to use Focus Stacking mode. It is currently compatible with Canon and
Nikon digital SLR cameras that have Live View mode, such as Canon 5D Mark II or 7D, or Nikon D7100.
With Nikon cameras, the rear LCD Live View will not be available while tethered via USB, and therefore
Focus Stacking will have to be set up using the distance scale on the attached lens. Focus Stacking
© 2 0 1 4 P romote Sys tems
Detailed User Guide
33
support for Nikon cameras depends on your camera model (out of Live View enabled Nikon cameras,
Nikon D3 is not supported due to camera limitations).
Usage
Use the following workflow to get the most out of Focus Stacking with the Promote Control:
1.
Switch your Promote Control to the "Focus Stacking" mode.
2.
Connect your camera to the Promote Control using a black USB cord as described in the Connections
14 section. Shutter cable connection is not required.
3.
Turn your camera on.
4.
Enable automatic focus on your camera. This will allow Promote Control to drive lens focusing
mechanism as required.
5.
Make sure your camera lens focusing range covers the entire focus stacking range required by your
subject. Some lenses may have a focus range limiting switch that may need to be set to the "Full"
position.
6.
Disable Mirror Lock-Up mode on your camera. Promote Control cannot ensure correct functionality
in Focus Stacking mode with Mirror Lock-Up enabled.
7.
If your Canon camera is set up to enable automatic image preview when images are being taken,
please set the image preview duration to no longer than 2 seconds. You may also need to completely
turn off image preview when using Focus Stacking mode. A long image preview may interfere with
image acquisition in Focus Stacking mode. The Promote Control will warn you if this is the case, and
prompt to set Image Preview to a shorter time. On Nikon cameras this should not be an issue.
8.
IMPORTANT: If your camera has a Live View specific "AF Mode" setting (such as Canon 5D Mark III
in its "SHOOT4" setting bank), make sure it is NOT set to "Face detection Live Mode". Either regular
"Live Mode" or "Quick Mode" should work fine for Focus Stacking.
9.
Change "Step" setting on Promote Control from "None/Reset" to "Small". You may use a different
focusing step size if appropriate. You may want to experiment with the step size to pick the ideal
step for the currently used lens.
10. Your camera will activate its Live View mode. A Canon EOS camera will display the currently framed
image on its rear LCD, while a Nikon camera will not (this is a limitation of the Nikon camera
firmware).
11. Use your camera lens focusing ring to pre-focus the camera where you want to begin focus
stacking.
The Promote Control shows a focusing range in the following form:
+000...+000
© 2 0 1 4 P romote Sys tems
34
Promote Control 3.15 User Manual Rev 23
The first number indicates beginning of the focus stacking range, while the second number indicates the
end.
Scroll to the second number and use your "Up" and "Down" keys to pre-focus the camera where you
want the focus stacking to end. On Canon cameras you may use the rear LCD Live View to verify the
focus positions. With a Nikon camera, please use your lens' distance scale to do the same. You should
end up with a display similar to this:
+000...+025
The "Frames" setting shows how many images will be taken as a result. You may reduce the number of
frames if you feel that the resulting focus stacking sequence will be too gradual.
You can optionally change the "Exposure" setting from "<On Camera>" to "<HDR>". This will allow
taking not one but multiple images per every focus stacking stop. Promote Control will use settings from
the High Dynamic Range mode screen for the HDR. See High Dynamic Range Mode 21 section for more
information on HDR settings. To switch to the High Dynamic Range mode faster, hold "Left" button and
press "Mode" until High Dynamic Range mode is shown.
When done, press "Start" button on the Promote Control. If you switched to High Dynamic Range mode in
the above step, you will need to return to Focus Stacking mode before pressing "Start". Now Promote
Control will drive your camera lens focus back to the start point, then start refocusing your lens and take
pictures as it goes along. The resulting image set may be merged into a single, focus-stacked image in a
software application of choice. See Focus Stacking Software Applications 70 section for more
information on picking a software package.
Important To Know
7.7
1.
If you operate your camera lens focus ring after setting focusing range on the Promote Control, you
need to change "Step" to "None/Reset" and repeat the set up process as described above. Failing to
do so will result in incorrect focus range tracking.
2.
If you change your "Step" size setting on the Promote Control after setting focusing range on the
Promote Control, the focusing range settings will revert to 0, and the set up process will have to be
repeated as described above.
Video Control
If your Canon digital SLR camera supports video, you can use your Promote Control to start/stop your
video recording, as well as control exposure parameters - both before video is recorded or while it is
recording. Promote Control can also automatically time video clips of certain length, and stop recording
after a preset period of time has elapsed. At this time this feature is only available with Canon digital SLR
cameras (Nikon digital SLR cameras disable the rear LCD Live View and HDMI output while tethered via
USB, and therefore do not allow framing the video).
© 2 0 1 4 P romote Sys tems
Detailed User Guide
35
Usage
Use the following workflow to get the most out of Video Control mode with the Promote Control:
1.
Switch your Promote Control to the "Video Control" mode.
2.
Connect a compatible camera via USB. No other connections are required in this mode.
3.
Switch your camera to Live View Video recording mode. This is usually done with a switch on your
camera (Canon 5D Mk II has this function assigned to a button). Please note that if you camera has a
"Photo" Live View mode separate from "Video" Live View mode, you may need to use "Video" mode
only for Promote Control to be able to operate your camera.
4.
We recommend switching your camera to the Manual exposure mode. Other exposure modes may
not allow controlling all the camera properties.
5.
If you want to have control over your camera focus with your Promote Control, switch your camera
to Automatic Focus.
6.
Promote Control will display the current values of aperture, ISO and shutter speed on your camera.
Using Left, Right, Up and Down buttons on your Promote Control you can change those values (within
the limits allowed by your camera and lens combination). When "Focus" setting is selected, use Up
and Down buttons on your Promote Control to drive your camera focus point farther and closer
respectively.
7.
You may also change your camera settings on the camera directly. Promote Control will
automatically update its display to match your changes after a short delay.
8.
If you want your Promote Control to automatically recording stop after a certain time, use "Clip"
setting. Default setting is "Inf", which stands for "Infinite" - this means your camera will keep
recording until you stop it, or until your camera battery or memory card space runs out.
When ready, press "START" button on the Promote Control to start recording. A new screen will be
displayed, and you will see a running time counter. You can control all the same camera settings during
recording by pressing Left/Right/Up/Down buttons. Please note that some cameras (e.g. Canon 5D Mk II)
do not allow remote control over camera settings while a video clip is recorded. ^/v stand for Up/Down,
</> stand for Left and Right button respectively. You can also hold "Mode" button down during pressing
navigational buttons to control even more settings. For example, when you see "<+M" displayed on the
screen, holding Mode button down and then pressing Left button will change the corresponding setting.
You may choose to change your camera settings using your camera controls while recording (e.g. with
cameras that do not allow remote control of camera settings during recording). Just like when idle,
Promote Control will automatically update its display to match the changes you have introduced using
camera controls. If your camera supports remote control during recording, we recommend using
Promote Control to change your camera functions in order to avoid camera shake.
© 2 0 1 4 P romote Sys tems
36
Promote Control 3.15 User Manual Rev 23
When a clip of a suitable duration has been recorded, press "START button on your Promote Control to
stop recording. If you used "Clip" duration limit as described above, your Promote Control will stop
recording automatically as appropriate. After recording has been stopped, the Promote Control will
return to the basic "Video Control" screen.
Focus Transitions
You can use your Promote Control to perform a focus transition while recording a clip. A focus transition
is an effect that gradually changes your focus from one point to another while clip is being recorded. This
is done by marking up to two preset focus locations on your Promote Control, and then commanding
camera to refocus to those locations while recording a clip.
NOTE: focus transitions are being performed using a camera/lens defined steps. A perfectly smooth
focus transition is currently not possible due to camera protocol limitations. However, focus transition
steps can be selected from a number of options (just like in Focus Stacking mode 32 ).
Use the following workflow to perform a focus transition while recording a clip:
1. Activate Video Control mode on your Promote Control as described above.
2. Scroll to the "Focus" setting using Left/Right navigation keys on your Promote Control, then use Up/
Down buttons on your Promote Control to set the initial focus point. At this point you can also use your
lens focusing ring to do the same.
3. When ready, hold "Center" button down on your Promote Control, and press "Up" or "Down". A small
dot will appear on the "up" or "down" arrow on your Promote Control screen, and a beep will sound,
confirming the preset.
4. Use Up/Down buttons on your Promote Control to change the focus to another position. You can press
and hold those buttons to switch focus faster. Please note that as soon as you preset at least one
focus position, lens focusing ring cannot be used, as this will affect internal calculations.
5. You can now hold "Center" button and press Up or Down button again to save another focus point
preset. A confirmation beep will sound, and a dot will appear on "up" or "down" arrow respectively.
6. You can continue using Up/Down buttons to keep changing focus position to where it needs to be
before you begin the actual recording.
7. Press "START" button to begin recording. While recording, you can use Up/Down buttons to move
focus around as you need. At this time please do not use your lens focusing ring to change focus (it
will affect internal calculations and save presets just like before).
8. When ready, hold "Center" button down and press Up or Down button to have your camera lens shift
its focus to the corresponding preset you have just saved. Your camera will start shifting focus to the
© 2 0 1 4 P romote Sys tems
Detailed User Guide
37
previously remembered position. You can track the progress by observing your camera distance scale
- when it stops moving, the focus transition is complete. Please note that the actual focus transition
can only be done while recording the clip. When the clip is not being recorded, "Center" + Up/Down
combinations are reserved for saving focus presets.
9. After the clip recording has been finished, you may want to erase your previously recorded focus
presets and start over. Simply press Up and Down buttons at the same time while changing the
focus setting in the Video Control mode - a confirmation beep will sound, and dots on "up"/"down"
arrows will disappear. Your focus presets are now erased and you can begin saving new focus presets
by using the procedure above.
The following checklist should be considered while using focus transitions with the Promote Control:
1. Once a focus preset has been saved, do not operate your lens focus ring. These changes in focus are
not communicated back to Promote Control, and when you recall a previously saved focus position
from Promote Control, it may not arrive to the position you actually saved. If you accidentally shifted
the focus using your lens focus ring, press Up and Down buttons on your Promote as described above
to erase previously saved focus presets and start over.
2. When using Up/Down buttons to move focus position while preparing your preset, take care not to hit
the focusing limits of your lens. If you do, Promote Control will not know the lens in fact did not move
past the limit, and again, resulting calculations may be incorrect.
3. Connecting an external HDMI monitor to your camera may assist in focusing your lens more precisely
using this manual method.
If for any reason you are not satisfied with the default focus change step size, you can change that using
Promote Control Setup settings. The "Video focus step size" 56 setting can be set to "Small", "Medium"
or "Large". The actual step size will depend on your lens focal length, aperture used while recording and
distance to the subject. Please note that with "Large" step, your lens may not have enough time to
refocus before the next focus shift command is sent, and the transition may not execute correctly. In that
case change "Video focus step delay" 56 Setup Setting to a higher value. Normally 200-300ms is enough
for most lenses even with the "Large" step.
NOTE: smaller focus transition steps usually provide a smoother transition, but lead to a slower transition
effect. The default setting of "Medium" works fine for most lenses. With telephoto lenses or other lenses
with shallow depth of field a "Small" setting may yield a smoother result, while still maintaining an
acceptable transition speed.
7.8
Manual Shutter Hold
Use "Manual Hold" mode to time exposures manually using an external timer. The camera shutter opens
when the "Start" button is pressed on the Promote Control, and closes on releasing the "Start" button.
This mode is intended to mimic the behavior of a basic remote shutter release cord.
© 2 0 1 4 P romote Sys tems
38
Promote Control 3.15 User Manual Rev 23
This mode requires the optional shutter cable. Please see Connections
14
chapter for details.
Usage
1.
Switch your Promote Control to the "Manual Shutter Hold" mode.
2.
Set your camera exposure mode to "Manual".
3.
Set your camera shutter speed to "Bulb".
4.
Connect the Promote Control to camera via an optional shutter cable. No USB connection is required
in this mode.
5.
If you prefer to hold the button down for the duration of the exposure, set "Control" setting to "Hold
Down" (default). If you would like to press and release the "Start" button and keep the shutter open,
set it to "Toggle" instead.
6.
Press the "Start" button on the Promote Control to open the camera shutter. The Promote Control
shows the elapsed exposure time, and optionally, emits an audible signal every second the shutter is
open. See Beep every second in manual hold mode 58 setting description in Setup Menu 45 to
deactivate the audible feedback in "Manual Hold" mode.
If Mirror Lock-Up functionality is required in "Manual Hold" mode, press the "Start" button briefly to lock
the mirror in the raised position, wait until the camera stops shaking, and then press the "Start" button
again to start the actual exposure. If "Control" is set to "Toggle", you may need to press the "Start"
button twice to raise the mirror and then press it for the third time to open the shutter.
7.9
Hyperfocal Calculator
Use the "Hyperfocal Calculator" mode to compute an F-number required for a desired hyperfocal
distance, or compute a hyperfocal distance from a desired F-number.
Computing an F-number required for a desired hyperfocal distance
1.
Switch your Promote Control to the "Hyperfocal Calculator" mode.
2.
Set the desired hyperfocal distance.
3.
Choose your lens focal length from the list. If your lens' focal length is not in the list, choose the
closest higher focal length from the list.
4.
Choose your camera sensor crop factor from the list:
2x - for Four Thirds standard cameras.
1.6x - for Canon DX cameras.
© 2 0 1 4 P romote Sys tems
Detailed User Guide
39
1.5x - for Nikon DX cameras.
1.3x - for Canon 1D series cameras.
1x (FF) - for full frame (35mm) cameras.
645 - for 6x4.5cm medium format film cameras.
6x6 - for 6x6cm medium format film cameras.
6x7 - for 6x7cm medium format film cameras.2
The required F-number is updated to reflect your settings. If specified settings require an F-number
beyond F/32, "32+" will be displayed for the F-number.
Computing a hyperfocal distance from a given F-number
1.
Choose your lens focal length from the list. If your lens' focal length is not in the list, choose the
closest higher focal length from the list.
2.
Choose your camera sensor crop factor as described above.
3.
Choose a desired F-number from the list. If the desired F-number is not in the list, choose the
closest lower number from the list.
4.
The resulting hyperfocal distance is updated to reflect your settings.
You can choose the distance unit to be meters, feet, or yards using the "Distance units" Setup setting.
See Setup Menu 45 section for more information.
© 2 0 1 4 P romote Sys tems
40
Promote Control 3.15 User Manual Rev 23
8
Advanced Operations
8.1
High Dynamic Range Time-Lapse
Promote Control has a feature that allows you to repeatedly take a series of bracketed image sequences
known as Time-Lapse High Dynamic Range imaging, or "Time-Lapse HDR". Every bracketed sequence is
merged into an HDR image and then the series of resulting HDR images is used to create a High Dynamic
Range Time-Lapse movie. The Time-Lapse portion of the "Time-Lapse HDR" functionality is controlled via
"Time-Lapse" mode and the HDR portion is controlled via the "High Dynamic Range" mode screen.
Use the following workflow to get the most of Time-Lapse HDR imaging:
1.
Make sure your camera is connected via USB – this type of connection is required for all work related
to High Dynamic Range imaging.
2.
Switch to "Time-Lapse" mode - the most convenient way is to hold "Left" button down while pressing
"Mode".
3.
Specify an "Interval" to wait between HDR bracketed sequences.
4.
Set "Frames" to the number of HDR series you would like to acquire. Press and hold the "Up" or
"Down" navigation buttons to accelerate the changes. Note that you can set this number to "Infinite".
In this case, Promote Control will keep on taking images until you stop it by holding the "Power"
button down.
5.
Optionally use the "Start In" setting to wait before starting the Time-Lapse HDR sequence.
6.
Switch to "High Dynamic Range" mode.
7.
Set "High Dynamic Range" settings as described in High Dynamic Range Mode on page 26. Note that
Promote Control will take multiple HDR bracketed sequences according to the number of "Frames"
specified in the "Time-Lapse" mode screen. The total number of images taken by the "Time-Lapse
HDR" technique will be "Frames" of "Time-Lapse" multiplied by "Frames" of "High Dynamic Range"
mode. For example, if you specify 20 frames in the "Time-Lapse" mode screen and then request 7
bracketed frames to be taken in the "High Dynamic Range" mode screen, the total number of images
taken will be 20 x 7 or 140. Using a large memory card is recommended to make sure all the images
can fit.
8.
Enable the "T-Lapse" setting.
9.
Promote Control will display the "Time-Lapse" interval that will be used to separate HDR sequences
from each other. If you would like to change this interval, return to the "Time-Lapse" mode screen.
You can hold the "Left" navigation button while pressing the "Mode" button to return to the "TimeLapse" mode screen from the "High Dynamic Range" mode. Also note that the Promote Control
screen will read "HDR/T-LAPSE" at the top, mentioning the number of bracketed HDR sets that will
be taken. If you would like to change that number, return to the "Time-Lapse" screen.
10. Press the "START" button to begin. Promote Control will display the progress of the sequence.
© 2 0 1 4 P romote Sys tems
Advanced Operations
41
11. To stop the sequence before it is completed, or if you used the value of "Infinite" for the "Frames" in
the "Time-Lapse" mode screen, press and hold the "Power" button. Promote Control will then return
to the mode settings screen and await further instructions.
Taking images in "Time-Lapse HDR" mode may take a long time to complete. Make sure to use a fresh
set of batteries in both Promote Control and your camera and use a large memory card. You may also
consider using an optional AC adapter for the Promote Control and/or your camera.
8.2
Advanced Bulb Ramping
If you feel limited by the original Bulb Ramping mode 26 , you may decide to try Advanced Bulb Ramping.
It greatly extends exposure range limitations and allows for seamless bulb ramping from broad daylight
straight to night time, often with little to no manual intervention during a sequence.
Initial Setup
Use the following workflow to set up your Promote Control for Advanced Bulb Ramping:
1.
Make sure your Promote Control is set up as described in the Promote Control Setup
2.
Enable Advanced Bulb Ramping in Promote Control Setup menu
3.
Set "Lowest Auto ISO for adv. bulb ramping" Setup setting to the lowest ISO setting available with
your camera. On most cameras this would be ISO 100, while some other cameras may go as low as
ISO 50 (often referred to as "Lo"). Some cameras may have ISO 200 as their minimum. Consult your
camera user manual for details.
4.
Set "Highest Auto ISO for adv. bulb ramping" Setup setting to the highest ISO setting your camera
can offer without introducing too much image noise. With most modern cameras, ISO 3200 would be
a good choice, while some on advanced, low noise cameras such as Canon EOS 5D Mark III an ISO
of 6400 or even higher may still be usable. Note that the wider the ISO range you set between
"Lowest" and "Highest", the more flexibility Promote Control can offer in Advanced Bulb Ramping
mode.
5.
As always with Bulb-related modes, make sure you calibrate "Shutter close delay".
45
15
section.
.
Usage
Use the following workflow to use Advanced Bulb Ramping mode in the field:
1.
Complete original Bulb Ramping Usage checklist 27 . Note that when specifying start and end
exposures you are no more limited - you can use the full range of exposures.
2.
Press "Start" button on Promote Control to set Advanced Bulb Ramping mode options.
3.
Promote Control will display an "Advanced Bulb Ramping" screen. If at any time you need to go back
© 2 0 1 4 P romote Sys tems
42
Promote Control 3.15 User Manual Rev 23
to the original Bulb Ramping settings, press the "Mode" button.
Our goal with Advanced Bulb Ramping is to verify that Promote Control was able to fit our sequence into
the attainable exposure range. If the attempt was unsuccessful we can go back to Bulb Ramping mode to
change certain settings, or use ND filters in Advanced Bulb Ramping screen to rectify the issue. Promote
Control will try to suggest a suitable solution, making your choice easier.
The "Advanced Bulb Ramping" screen looks similar to the one below. Note that depending on your bulb
ramping settings, the actual values will differ:
ND: none
Shutter: 1.5" ->2"
ISO: 100->800
+ Parameters are OK +
+ START to continue +
Promote Control analyzes the current sequence, and tries to fit the requested start and end exposure to
what it can safely time by automatically ramping the camera ISO. The above screen displays the
following information:
1.
Promote Control will start with using shutter speed of 1.5", and end with 8". Note that these may be
different from the start and end exposure times you have set. This change will be matched by a
corresponding change in ISO values.
2.
Promote Control will start the sequence using ISO 100, and end it with ISO 800. The ISO values are
calculated automatically to provide the same exposure level as requested originally, while keeping
actual shutter speeds within allowable limits.
3.
Current parameters are good to go. Press "Start" to begin taking pictures.
If current settings need to be changed, a variation of the following screen may be displayed:
ND: none
Shutter: 1/20->LONG
ISO: 100->HIGH
- Set Max Auto ISO - higher in Setup It means the Promote Control was trying to fit the end exposure within the interval limit, but the currently
allowed Max Auto ISO in Promote Control Setup is not enough to make it happen. Set "Highest Auto ISO"
in Setup menu higher, or try increasing your bulb ramping interval in Bulb Ramping screen (press "Mode"
to get there).
© 2 0 1 4 P romote Sys tems
Advanced Operations
43
ND: none
Shutter: SHORT->2"
ISO: LOW->800
- Add ND filters to - start ramp with It means the current sequence cannot be completed without using ND filters. Read below on how to use
ND filters.
ND filters
In many cases Promote Control will be unable to accommodate a bright daylight scene without using ND
filters. For these cases Promote Control provides a way to handle ND filters while doing bulb ramping
photography.
To let Promote Control you plan on using ND filters, change the default setting of "ND" above to anything
except "none". The following values are available:
"start" means you plan on starting with ND filters, and remove them when Promote Control asks you
to do so.
"end" means you plan on starting without ND filters, and add them when Promote Control asks you to
do so, ending the sequence with ND filters put on.
"keep" means you'd like to add them in the beginning, and keep them on during the complete image
sequence. This option is often preferred if you plan on leaving your camera rig unattended during the
bulb ramping image sequence.
If Promote Control calculation shows that ND filters are needed, it will suggest to either "start" or "end"
with ND filters. You may either follow the advice, or try the "keep" option instead. If you decide to "keep"
ND filters, Promote Control will try to use ISO ramping to correct for ND filter presence, doing all
necessary calculations automatically. If it succeeds, it will prompt to you proceed.
ND Filter Usage
When prompted to use an ND filter, use the following workflow:
1.
Choose a setting for "ND" filter policy as advised by Promote Control ("start" or "end"). You may also
try using a setting of "keep".
2.
Now you can specify up to two separate ND filters to be used. Enter one or more non-zero filter
values according to filters you have on hand. If a filter value is set to 0 (zero), that value will be not
be used and is equal to no filter at all. All non-zero filter values will be used simultaneously.
Read below to know more when Promote Control will apply those values.
© 2 0 1 4 P romote Sys tems
44
Promote Control 3.15 User Manual Rev 23
When ND filter policy is set to "start", a similar line appears:
ND: start 1.0EV+2.0EV
The above line indicates that you would like to "start" with a set of two ND filters - first filter of 1EV,
another one of 2EV. Promote Control then does the following:
1.
Recalculates the start exposure accordingly. If all exposures can be done safely, it will allow you to
proceed.
2.
When you press "Start", it will prompt you to put the filters on, and press 'Start" again to continue.
3.
It will expect you to be around to remove specified filters one by one when prompted by a message
on the Promote Control screen.
When ND filter policy is set to "end", a similar line appears:
ND: end
1.0EV+2.0EV
The above line indicates that you would like to "end" with a set of two ND filters - first filter of 1EV,
another one of 2EV. Promote Control then does the following:
1.
Recalculates the end exposure accordingly. If all exposures can be done safely, it will allow you to
proceed.
2.
When you press "Start", it will prompt you to take the filters off, and press 'Start" again to continue.
3.
It will expect you to be around to add specified filters one by one when prompted by a message on
the Promote Control screen.
When ND filter policy is set to "keep", the following line appears:
ND: keep
1.0EV+2.0EV
The above line indicates that you would like to "keep" a set of two ND filters through the complete
sequence - first filter of 1EV, another one of 2EV. Promote Control then does the following:
1.
Recalculates both start and end exposures accordingly. If all exposures can be done safely, it will
allow you to proceed.
2.
When you press "Start", it will prompt you to put the filters on, and press 'Start" again to continue.
3.
It will NOT expect you to be around for filter handling. The "keep" setting is therefore handy when
you do not want to closely watch Promote Control screen for filter handling messages.
IMPORTANT: ND filter handling routine assumes the start and end exposures were metered without ND
© 2 0 1 4 P romote Sys tems
Advanced Operations
45
filters. If you did meter with ND filters, you must use "none" setting for ND filters in Advanced Bulb
Ramping mode - otherwise ND filters will be applied twice, and the resulting exposures will be incorrect.
8.3
Setup Menu
Promote Control is an advanced, highly functional remote control solution that offers the flexibility to
meet all your remote control needs. The Promote Control "Setup Menu" allows you to configure the unit
and setup the workflow to match your unique situations.
To access the Promote Control "Setup Menu", press and hold the "Left" button, and simultaneously press
the "Right" button. You may also enter "Setup Menu" by pressing and holding "Left" and "Right" buttons
simultaneously.
The "Setup Menu" is a series of screens each of which controls one setup value. Use the "Left" and
"Right" keys to move between setup screens. Use the "Up" and "Down" keys to change values displayed
on the screens. When finished making changes, press the "Center" key to return to the mode setting
screens.
As with all Promote Control settings, the "Setup Menu" values are saved whenever the Promote Control
powers down, and are restored each time it powers back on. Most "Setup Menu" values default to
settings that work well in standard applications. Before changing any "Setup Menu" value, be sure to
read the rest of this chapter to learn about all of Promote Control’s possibilities. The information in this
chapter will help you can get the most from your unit.
8.3.1
Screen Contrast
Default: 10
Use this setting to adjust the unit display contrast when needed. Adjusting the contrast may be required
when using the device in extremely low temperatures. No adjustment should be required under normal
operating conditions.
If the contrast value has been set too high, or too low, it may become difficult to even see the display to
correct the setting. In this situation, try looking at the display from different angles.
8.3.2
Use a Separate Cable for Shutter Release
Default: No
Set this value to "Yes" if you plan on using an optional shutter cable. This adds additional functionality to
your Promote Control and makes the shutter release faster.
If this value is set to "Yes", and a shutter cable is not connected, the camera may not take pictures when
requested. Make sure the shutter cable is connected and is fully inserted.
© 2 0 1 4 P romote Sys tems
46
8.3.3
Promote Control 3.15 User Manual Rev 23
Shutter Cable Release Frame Delay
Default: Off (fastest)
This setting only applies when "Use a separate cable for shutter release" is set to "Yes".
Change this setting to fit your image settings and camera model when using a shutter cable. The default
setting is "Off", this equates to no extra delay and allows Promote Control to provide the fastest
operation. However, depending on the combination of camera settings and camera processor speed,
certain camera models may not be able to record images quickly enough. If you experience lost frames
in "High Dynamic Range" mode when using a shutter cable, choosing a longer delay setting may help. If
you experience lost frames only after a certain number of shots are taken, the probable cause is the
camera image buffer is not large enough to hold all the images at once. In this case, use
an adaptive delay setting as described below. If you experience lost frames starting from the first
exposure or frames are missing before 5 shots are taken, use a constant delay option from the list
below. Start with a lower delay setting and increase it until all the images are taken successfully.
Available options are listed below in order of fastest to slowest:
Off - This is the default setting. It disables any extra delay and attempts to take pictures as fast as
possible.
Adaptive on >11 shots - This will slow down image capture after taking 11 shots. Use this setting
when you experience lost frames at some point after 11 frames are taken.
Adaptive >7 shots - This will slow down image capture after taking 7 shots. Use this setting when
you experience lost frames at some point after 7 frames are taken.
Adaptive >5 shots - This will slow down image capture after taking 5 shots. use this setting when
you experience lost frames at some point after 5 frames are taken.
Constant – 500ms - This setting adds a constant delay of 500 milliseconds (0.5 seconds) when using
a shutter cable. Use this when you experience randomly lost frames.
Constant – 1000ms - This setting adds a constant delay of 1000 milliseconds (1 second) when using
a shutter cable. Use this when you experience randomly lost frames and other settings do not
provide sufficient delay.
Constant – 1500ms - This setting adds a constant delay of 1500 milliseconds (1.5 seconds) when
using a shutter cable. Use this when you experience randomly lost frames and other settings do not
provide sufficient delay.
Constant – 2000ms - This setting adds a constant delay of 2000 milliseconds (2 seconds) when using
a shutter cable. Use this when you experience randomly lost frames and other settings do not
provide sufficient delay.
Constant – 2500ms - This setting adds a constant delay of 2500 milliseconds (2.5 seconds) when
© 2 0 1 4 P romote Sys tems
Advanced Operations
47
using a shutter cable. Use this when you experience randomly lost frames and other settings do not
provide sufficient delay.
8.3.4
USB Cable Release Frame Delay
Default: 1500 ms
This setting only applies when "Use a separate cable for shutter release" is set to "No".
Change this setting to fit your camera model when working solely with a USB cable (i.e., without a
shutter cable). Shorter delays allow Promote Control to complete its work faster, but some cameras do
not respond to USB shutter release commands as fast as others.
Do not change this setting unless Promote Control needs to take pictures faster, especially in "High
Dynamic Range" mode. Use the following guidelines as a starting point:
Some newer digital cameras may work well with 500 ms delay.
Most newer digital cameras need at least 1000 ms delay.
Older Nikon cameras need 1500 ms delay.
When this setting is too low, Promote Control may not be able to successfully take all the needed pictures
in "High Dynamic Range" mode. If the camera take fewer pictures than expected in this mode, try
increasing the setting.
8.3.5
Lumix USB cable release frame delay
Default: 100 ms
This setting only applies to Panasonic Lumix cameras.
Change this setting to fit your camera settings. Shorter delays allow Promote Control to complete its
work faster, but with certain settings your camera might respond slower to USB shutter release
commands. When this setting is too low, Promote Control may not be able to successfully take all the
needed pictures in "High Dynamic Range" mode. If the camera take fewer pictures than expected in this
mode, try increasing the setting.
8.3.6
Time-Lapse exposure setting mode
Default: On camera / Auto
This setting only applies to the Time-Lapse 19 mode. The default value of "On camera / Auto" will send
simple shutter release commands to the camera. If you would like to choose arbitrary Bulb-based
© 2 0 1 4 P romote Sys tems
48
Promote Control 3.15 User Manual Rev 23
exposures, change this setting to "Arbitrary (Bulb mode)". Then you will be able to specify exposures
from 1 second and up in hours, minutes in seconds. Please note that this setting requires a connected
and enabled 15 shutter cable.
8.3.7
14
Enable Time-Lapse schedule/repeat
Default: No
Set this setting to "Yes" in order to be able to run Time-Lapse sequences e.g. every 24 hours, or any
other period expressed in HH:MM:SS, just like your Time-Lapse start delay. See Time-Lapse Mode 21
chapter for more information on this feature.
8.3.8
Save/restore camera settings
Default: Yes
Normally it is not required to change this setting. This setting controls whether Promote Control will
attempt to save camera settings it tries to alter in order to perform the requested operation, and restore
them when done. By default Promote Control will try to return the camera to the same state it was in
before an exposure sequence was started. If you prefer to have the camera settings remain at values
after exposure sequence is done, disable this setting. Normally it is not required to change this setting.
8.3.9
Enable exposures below 1/4000
Default: No
Set this option to "Yes" when using Promote Control with a camera that allows exposures faster than
1/4000 (normally down to 1/8000).
8.3.10 Enable 1/3 EV ISO steps
Default: No
Set this option to "Yes" when using Promote Control with a camera that supports 1/3 EV ISO
adjustments. E.g. if you can set ISO 250 or ISO 500 on your camera, this option may be enabled.
8.3.11 Bulb ramping mode live mods are applied
Default: Across 30 frames
Use this setting to control how fast Promote Control will apply Bulb Ramping Live Modifications. See Bulb
Ramping 29 section for more information on how to use Live Modifications.
8.3.12 Keep bulb ramp length on start time change
Default: No
© 2 0 1 4 P romote Sys tems
Advanced Operations
49
Use this setting to let Promote Control automatically shift bulb ramping end delay and bulb ramping
sequence end delay when start delay is changed. See Bulb Ramping 27 section for more information on
how this affect Bulb Ramping operation.
8.3.13 Enable Advanced Bulb ramping
Default: No
Set this setting to "Yes" to enable Advanced Bulb Ramping mode. This will allow automatic ISO ramping,
using ND filters and more in Bulb Ramping mode. See Advanced Bulb Ramping 41 section for more
details.
8.3.14 Lowest Auto ISO for adv. bulb ramping
Default: 100
When using Advanced Bulb Ramping 41 , you will want to change this setting to the lowest ISO supported
by your camera. Most cameras support ISO down to 100, some may go as low as 50, while others
feature the lowest ISO of 200.
Setting this value too low may lead to Promote Control being unable to continue with Advanced Bulb
Ramping. Please consult your camera manual for the lowest supported ISO setting.
8.3.15 Highest Auto ISO for adv. bulb ramping
Default: 3200
When using Advanced Bulb Ramping 41 , you will want to change this setting to the maximum ISO you
feel comfortable using in Bulb Ramping, but not higher than a maximum ISO supported by your camera.
Most modern digital SLR cameras offer good image quality on default setting of 3200. With some
professional grade cameras this value may be increased to 6400 or even higher.
Setting this value too high may lead to Promote Control being unable to continue with Advanced Bulb
Ramping. Please consult your camera manual for the highest supported ISO setting.
8.3.16 Force ISO ramp down on short exposures
Default: No
This setting applies only to Advanced Bulb Ramping
Advanced Bulb Ramping logic will check if:
1.
41
mode. If optionally set to "Yes", Promote Control
The current ISO is higher than the Lowest Auto ISO
© 2 0 1 4 P romote Sys tems
49
Promote Control Setup setting, and
50
Promote Control 3.15 User Manual Rev 23
2.
The current Bulb Ramping exposure time is close to the shortest limit.
If both conditions above are true, then Promote Control will attempt to lower the camera ISO down to
the Lowest Auto ISO 49 Setup setting, while also making Bulb Ramping exposure time longer to keep the
originally requested exposure. This serves two purposes:
1.
Lowering total image noise - generally, the lower the ISO, the lower the noise is.
2.
Making the current Bulb Ramping exposure time longer - the longer the exposure time is, the more
precisely Promote Control can time it.
However, this logic may unexpectedly change exposure durations preset for Start and End in Bulb
Ramping. If this behavior is not desired, leave this setting at the default value of "No".
8.3.17 Limit bulb ramping longest exposure
Default: Up to interval time
This setting only applies to Bulb Ramping mode 26 . Normally Promote Control will allow Bulb Ramping
exposures to be almost as long as the Bulb Ramping interval that they have to fit. With Advanced Bulb
Ramping 41 , Promote Control will ramp up the camera ISO, trying to fit all exposure durations within the
preset interval. However, if you need all exposures to be considerably shorter than the frame interval,
you can set this limit using "Limit bulb ramping longest exposure" setting.
Example: with Bulb Ramping interval of 10", Promote Control Bulb Ramping will allow exposures of up to
approximately 8 seconds. However, this setting may lead to significant motion blur. Using this setting, you
may limit the longest exposure in Bulb Ramping, to 2" to keep the image motion blur reasonable.
The bulb ramping interval limitation will still apply. Example: with Bulb Ramping interval of 5", and this
setting set to 10", Promote Control logic will hit the interval first, and the limitation set by "Limit bulb
ramping longest exposure" setting will not apply.
Note that this limitation will require Promote Control to match shorter exposure times with higher ISO
ramps. Therefore, when using this setting, consider setting Highest Auto ISO 49 Setup setting to a
higher value (possibly up to your camera maximum ISO value). Please see Advanced Bulb Ramping 41
for more details on how automated ISO ramping works.
NB: When "Bulb ramping interval measured as" 51 is set to "Exp end - exp start", default value of this
setting will read as "No limit" instead. This is because with the aforementioned setting, interval is not
participating in the process of determining the longest available exposure.
8.3.18 Bulb ramping long exposure limit mode
Default: Hard, never exceed
© 2 0 1 4 P romote Sys tems
Advanced Operations
51
This setting only applies to Bulb Ramping mode 26 . The previous setting, "Limit bulb ramping longest
exposure" 50 allows putting a cap on the longest exposure Promote Control will be allowed to do.
However, sometimes this cap may severely limit Promote Control functionality. If you encounter a
situation where the longest exposure limit mode may have to be pushed, set "Bulb ramping long
exposure limit mode" setting to "Soft, allow step over". This will instruct Promote Control to stay within
the preset longest exposure for as long as possible, but still allow it to do longer exposures if necessary
to maintain the programmed Bulb Ramping sequence.
8.3.19 Auto bulb ramping interval extension
Default: No
This setting only applies to Bulb Ramping mode 26 . It provides one more remedy for Promote Control to
try to keep Bulb Ramping exposures running as instructed. Normally Bulb Ramping exposures would be
calculated so as not to hit the Bulb Ramping exposure interval - but if sequence is manually adjusted midway, exposures may change and the interval may become too tight. Set this option to "Yes" to allow
Promote Control to extend exposure interval in Bulb Ramping in extreme cases.
8.3.20 Bulb ramping live mod step size
Default: 0.05 EV
This setting controls how much of the live modification is entered every time you click Up/Down buttons
while a Bulb Ramping sequence is active. Read Bulb Ramping 29 section for more information on Live
Modification feature.
8.3.21 Bulb ramping interval measured as
Default: Exp start - exp start
By default Promote Control measures Bulb Ramping intervals from start of one exposure to the start of
the next exposure. This ensures constant speed for the resulting video. However, in some circumstances
it may be easier to use "Exp end - exp start" intervals. In that mode Promote Control will measure the
Bulb Ramping interval you set from the end of an exposure to the start of the next exposure. This
eliminates interval overrun problem (since the exposure time is not subtracted from the interval time),
but may lead to faster resulting video playback as your shutter speeds become longer.
8.3.22 Bulb ramp / bulb HDR image buffer time
Default: 1800 ms
This setting only applies to Bulb HDR 25 and Bulb Ramping 26 modes. Promote Control knows that your
camera needs time to record an image that has just been taken. But cameras' and memory cards' write
speeds may vary, and image quality settings may affect the image recording time. Use this setting to tell
Promote Control how long your camera takes to record an image.
© 2 0 1 4 P romote Sys tems
52
Promote Control 3.15 User Manual Rev 23
Bulb HDR and Bulb Ramping exposures must fit the currently set frame interval and yet still have time to
be recorded to the memory card. Promote Control will use this information calculate the longest
exposure time that can be used. The default setting of 1800 ms (1.8 seconds) should be adequate for
most cameras.
If your Bulb Ramping sequences are interrupted and your camera LCD indicates that its temporary image
buffer is full, you may want to increase this setting and seeing if that helps. A value that is too high will
not have overly dramatic consequences, but may limit Promote Control ability to complete an Advanced
Bulb Ramping sequence.
You may also try decreasing this setting when you are absolutely certain that under no circumstances
your current camera settings will lead to images that take longer to be recorded. However note that
setting this value too low may lead to camera inability to take images in Bulb HDR or (especially) Bulb
Ramping modes.
If everything works as expected, it is recommended to leave this setting at default value of 1800 ms.
8.3.23 Use assist cable for bulb ramp / bulb HDR
Default: Yes
By default Promote Control will expect an optional Bulb Ramp / Bulb HDR Assist cable connected in Bulb
Ramping / Bulb HDR mode. If your camera is incompatible with Bulb Ramping assist cable, change this
setting to No. Please note that without a Bulb Assist cable, Promote Control will be unable to achieve as
fast a shutter speed in Bulb mode as with that cable connected and enabled via this setting.
8.3.24 Shutter close delay safety margin
Default: Normal
This setting is only used for Bulb HDR 25 or Bulb Ramping 26 modes. This setting controls how much of
a safety margin Promote Control will apply when doing Bulb Ramping and Bulb HDR on exposures close
to the shutter closing limit. All cameras have different shutters, and some higher end cameras (such as
Canon 5D Mark III) may have shutter close times that are more consistent than others. If your camera is
a higher end type, you may try changing this setting to "Minimal". This may offer a shorter Bulb
Ramping / Bulb HDR exposure that can be obtained without having to resort to ISO ramping / ND filters.
However on cameras with less consistent shutters, "Minimal" setting may lead to less consistent
exposures. If in doubt, leave at default.
8.3.25 Shutter close delay
Default: 40 ms
This setting is only used for Bulb HDR 25 or Bulb Ramping 26 modes. This setting must be calibrated
before using any of the modes above. Default value of 40 milliseconds is adequate for some cameras,
but introduce exposure inaccuracy in Bulb HDR / Bulb Ramping modes.
© 2 0 1 4 P romote Sys tems
Advanced Operations
53
Calibration requires a compatible shutter cable and a Bulb Ramping / Bulb HDR Assist cable to be
connected. See Promote Control Setup 15 section for more information on how to calibrate this value.
If you change the camera model for Bulb HDR or Bulb Ramping, this value will need to be recalibrated.
Changing your camera lens will not affect this setting though - so simply changing your lens will NOT
require recalibration.
The calibration process takes just a few seconds, and is therefore recommended to be performed before
starting a Bulb HDR or Bulb Ramping session.
8.3.26 Auto Power-Off
Default: 5 min
Specifies the maximum idle period before Promote Control powers off to conserve the batteries. Choose
"Disabled" to deactivate Promote Control power saving.
8.3.27 Mirror Lock-Up Delay
Default: 2 sec
Specifies the time interval to wait for the camera to stop shaking after raising the mirror. Increase this
value if your camera tripod does not provide adequate support for the camera and lens.
NOTE: Using the "Mirror Lock-Up" feature requires the optional shutter cable. See Connections
section for more information on connecting a shutter cable.
14
8.3.28 Automatic Exposure Mode Control
Default: No
By default, Promote Control assumes your camera exposure mode is set to "Manual" whenever you
connect it to Promote Control. Change this setting to "Yes" to tell Promote Control to use the USB
connection to reset your camera exposure mode to "Manual" when Promote Control is connected. This
feature is disabled by default because it is not compatible with all cameras.
On some cameras, including Canon 5D Mk II, 5D Mk III, 7D, 60D and some others exposure mode may
only be set with a manual dial and cannot be set electronically. If Promote Control fails to change your
camera exposure mode, it displays an error message and you should return this setting to "No".
© 2 0 1 4 P romote Sys tems
54
Promote Control 3.15 User Manual Rev 23
8.3.29 HDR Start Point
Default: Mid Exposure
Use this setting to control the way Promote Control will calculate your HDR image sequences.
Available options are:
Mid Exposure (default) – When you set a middle exposure, Promote Control builds an image
sequence around the preset exposure.
Shadows – Use this option for better control over shadows in your HDR image. Set the longest
exposure to be used and Promote Control will use the remaining settings to build the image
sequence.
Highlights – Use this option for better control over highlights in your HDR image. Set the shortest
exposure to be used and Promote Control will use the remaining settings to build the image
sequence.
8.3.30 HDR Exposure Order
Default: Short -> Long
Use this setting to change how your High Dynamic Range exposure brackets are taken. Default setting of
"Short -> Long" will start with shortest exposures, and proceed towards the longest ones. You may
prefer the reverse order, with longest exposures taken first - in that case change this setting to "Long ->
Short". In either mode, the total time to take a High Dynamic Range bracket sequence will be the same.
8.3.31 Shift HDR brackets
Default: No shift
In HDR mode Promote Control steps an equal number of steps up and down from your Mid/Hi/Lo
exposure as specified. Sometimes you may find it useful to shift your HDR brackets towards shadows or
highlights. As an example, HDR bracket of 7 exposures with a step of 2.0EV will result in 7 images taken
as follows:
-6 EV steps from the "Mid Exposure" shutter speed
-4 EV steps from the "Mid Exposure" shutter speed
-2 EV step from the "Mid Exposure" shutter speed
The "Mid Exposure" shutter speed
+2 EV step from the "Mid Exposure" shutter speed
+4 EV steps from the "Mid Exposure" shutter speed
+6 EV steps from the "Mid Exposure" shutter speed
If you change this settings to e.g. "1 step(s) to shadows", the same settings will define another
© 2 0 1 4 P romote Sys tems
Advanced Operations
55
sequence:
-8 EV steps from the "Mid Exposure" shutter speed
-6 EV steps from the "Mid Exposure" shutter speed
-4 EV steps from the "Mid Exposure" shutter speed
-2 EV step from the "Mid Exposure" shutter speed
The "Mid Exposure" shutter speed
+2 EV step from the "Mid Exposure" shutter speed
+4 EV steps from the "Mid Exposure" shutter speed
Promote Control will still take 7 images total, but they will be shifted 1 step towards shadows. Note that
"steps" used in this setting is not the EV step - it's whichever step you define in your HDR settings. In
example above, the sequence was shifted 1 step to shadows - and since your HDR bracketing was set to
2EV between images, the sequence was shifted down 1 step of 2EV.
8.3.32 Enable camera settings check/sync
Default: Yes
This setting allows Promote Control to verify your camera settings before beginning an image sequence.
If any setting (such as focus mode or exposure mode) is not set as required, Promote Control will display
a message prompting to resolve the issue.
This setting should only be set to "No" by expert users who are confident that the current camera
settings will allow Promote Control to function as intended. We recommend keeping this setting "On"
unless directed otherwise.
8.3.33 Enable post-sequence image check
Default: Yes
If Promote Control is set up to use a shutter cable (see Use a Separate Cable for Shutter Release 45
Setup setting), but shutter cable is not connected, no images will be taken as a result. This setting allows
Promote Control to check the number of images when done, and if no new images have been recorded,
show a message prompting to connect a shutter cable.
If your camera model implements a non-standard protocol, this function may work incorrectly, displaying
above message when it's not required. If you would like to disable the above message, this setting
should be changed to "No".
8.3.34 Focus stacking step delay
Default: 400 ms
Promote Control Focus Stacking involves changing your camera lens focal point via commands sent over
© 2 0 1 4 P romote Sys tems
56
Promote Control 3.15 User Manual Rev 23
USB. With select lens models, focusing may take longer than usual (commonly on some legacy close-up
and macro lens models). If your Promote Control does not always successfully refocus when performing
a Focus Stacking sequence, try increasing this setting until the problem is resolved.
This setting can also be set to a number lower than 400 milliseconds. Doing so is only recommended for
very fast lenses with ultrasonic focus mechanism. If Focus Stacking starts having issues refocusing as
intended, change this setting back to default value of 400 milliseconds, or higher as required.
8.3.35 Video focus step size
Default: Medium
This setting only applies to focus transitions in the Video Control 34 mode. You can choose from "Small",
"Medium" or "Large" step size. Please note that with "Large" steps, a default "Video focus step delay" 56
may not be enough for your lens to complete the "Large" step. In that case, please increase "Video focus
step delay" 56 to a higher value.
8.3.36 Video focus step delay
Default: 100ms
This setting only applies to focus transitions in the Video Control 34 mode. You can set this setting from
100ms to 2000ms. Normally a default value of 100ms should be sufficient, however, if a "Large" setting is
chosen for "Video focus step size" 56 , your lens may not have enough time to properly refocus during
this delay. In that case, set this delay to a higher value. Usually 200-300 ms works for all lenses.
8.3.37 Left+Mode shortcut
Default: Default (prev mode)
Using this option you can control what will happen if you hold Left button down while pressing Mode
button. By default this will scroll the mode list backwards - with this option you can assign a direct switch
to any of the modes that Promote Control supports. Subsequent Setup settings also allow similar
shortcuts for other combinations.
8.3.38 Right+Mode shortcut
Default: Default (next mode)
Choose a Promote Control to be activated when you hold Right button while pressing Mode button. By
default it will not change the behavior of Mode button (it will switch to the next mode). You can change
this setting to one of the modes you use the most often, if desired.
8.3.39 Up+Mode shortcut
Default: Default (next mode)
Choose a Promote Control to be activated when you hold Up button while pressing Mode button. By
© 2 0 1 4 P romote Sys tems
Advanced Operations
57
default it will not change the behavior of Mode button (it will switch to the next mode). You can change
this setting to one of the modes you use the most often, if desired.
8.3.40 Down+Mode shortcut
Default: Default (next mode)
Choose a Promote Control to be activated when you hold Down button while pressing Mode button. By
default it will not change the behavior of Mode button (it will switch to the next mode). You can change
this setting to one of the modes you use the most often, if desired.
8.3.41 Center+Mode shortcut
Default: Default (next mode)
Choose a Promote Control to be activated when you hold Center button while pressing Mode button. By
default it will not change the behavior of Mode button (it will switch to the next mode). You can change
this setting to one of the modes you use the most often, if desired.
8.3.42 Backlight timeout
Default: 10 sec
Specifies the idle period after which the display backlight is powered off to conserve the batteries.
Choose "Infinite" to disable display backlight timeout. You may turn the display backlight on and off at any
time by briefly pressing the "Power" button.
8.3.43 Backlight R channel
Default: 10
Intensity of the display backlight red channel.
Promote Control’s liquid crystal display has an RGB color backlight. You can choose any color or intensity
for the display backlight by varying the intensity of the R (red), G (green), or B (blue) backlight
components.
Choosing a lower backlight intensity results in a longer battery life. To keep the current backlight color,
and vary only the backlight intensity, change the R, G, and B components proportionally until you obtain
the desired backlight intensity. Changing any component without changing the others changes the color.
Note that the button backlight color does not change.
8.3.44 Backlight G channel
Default: 16
Intensity of display backlight green channel.
© 2 0 1 4 P romote Sys tems
58
Promote Control 3.15 User Manual Rev 23
8.3.45 Backlight B channel
Default: 16
Intensity of display backlight blue channel.
8.3.46 Backlight on any button
Default: Yes
Specifies whether Promote Control activates the display backlight when a button is pressed. When set to
"No", only the "Power" button turns the backlight on.
8.3.47 Remove backlight when exposing
Default: Yes
By default, Promote Controls automatically disables its display backlight before starting any exposure so
the backlight does not interfere with the camera exposure. If the display backlight is on when the "Start"
button is pressed, the backlight is automatically restored after all exposures are completed. Set this value
to "No" to keep the display backlight on even when exposures are in progress.
8.3.48 Global sound enable
Default: Yes
Promote Control has a number of audible notifications to help in your work. Setting this value to "No"
disables all audible notifications from Promote Control. You can fine tune which audible notifications are
active using the following settings.
8.3.49 Beep on every button
Default: No
Promote Control can make a sound every time any button is pressed. Set this value to "Yes" to make
every button press generate a sound.
8.3.50 Beep every second in manual hold mode
Default: Yes
Set this value to "No" to stop Promote Control from beeping every second the shutter is open in Manual
Hold 37 mode.
© 2 0 1 4 P romote Sys tems
Advanced Operations
59
8.3.51 Force legacy USB mode (disable USB 3.0)
Default: No
Promote Control is compatible with USB 3.0 enabled cameras via an optional PCT-USB-OTG adapter. In
an unlikely event your camera fails to connect via USB, try changing this value to "Yes". Note that this
may render Promote Control incompatible with newer cameras, including Nikon D800.
8.3.52 Distance units
Default: meters
Use this setting to change the distance unit used in "Hyperfocal Calculator" mode. You can choose from
meters, feet, or yards.
8.3.53 Reset to defaults
This option resets all settings to their factory default values, including both "Setup Menu" and "Mode"
settings. To restore the defaults, hold the "Up" button and press the "Down" button; Promote Control
powers off. The next time it powers on, all settings are reset to their defaults.
Restoring factory defaults cannot be reversed. It may be helpful to record all current settings before
using this feature.
8.3.54 Firmware Info
This screen shows the current version of Promote Control’s internal software. New software versions
may be released from time to time to add new features and support newer camera models.
Visit Promote Control page on our website at http://www.promotesystems.com/ to check for new
software versions.
8.4
Mirror Lock-Up Operation
When using your camera on a tripod, it may shake mildly when the shutter is released because the
camera must move its internal mirror to take a picture. Most professional cameras have a feature known
as "Mirror Lock-Up" that locks the mirror until the camera stops shaking before taking a picture. Normally
you must press the shutter release button twice – first to lock the mirror and second to actually take the
picture. Promote Control can do both steps automatically with a configurable delay between locking the
mirror and taking the picture.
"Mirror Lock-Up" is also known as "M-Up" or "MLU". The Promote Control display has an "MLU" setting to
facilitate activation and deactivation of this feature. The "MLU" setting is not available in select operation
modes.
© 2 0 1 4 P romote Sys tems
60
Promote Control 3.15 User Manual Rev 23
Not all cameras support "Mirror Lock-Up". Promote Control cannot use its "Mirror Lock-Up" feature with
these cameras. Check your camera manual to determine if your camera supports "Mirror Lock-Up".
Some cameras may support Mirror Lock-Up only for the purpose of sensor cleaning. Promote Control
Mirror Lock-Up feature is incompatible with the Mirror Lock-Up that is intended for sensor cleaning.
Using "Mirror Lock-Up" with Promote Control requires an optional shutter cable. See Connections
section for more information on connecting a shutter cable.
14
Observe the following workflow when using the "Mirror Lock-Up" feature:
1.
Connect your camera as described in the Connections 14 section. If you never used a shutter cable
before, do not forget to tell Promote Control you are using the shutter cable, as described on that
same page.
2.
Turn on your camera and enable the camera’s "Mirror Lock-Up" feature. See your camera manual
for details on enabling this feature.
3.
Press the Promote Control "Power" button to turn it on.
4.
Promote Control will attempt to check if camera has its Mirror Lock-Up enabled, and will reflect it in
its own "MLU" setting found on the bottom of the Promote Control screen. Note that you may disable
Promote Control from doing this check, and you will then have to manually control the "MLU" setting
on the Promote Control. See Setup Menu 45 section for more information on the Enable camera
settings check/sync 55 Setup setting.
If the "MLU" setting displays "N/A", it means the "Mirror Lock-Up" functionality is not available with
the current mode and settings. If the Promote Control "MLU" setting reads "N/A", please
make sure your camera has Mirror Lock-Up feature disabled, as it may affect correct
Promote Control functionality.
5.
Configure the rest of Promote Control operation as described in the appropriate chapters of this
manual.
6.
Press the "Start" button on the Promote Control. This instructs the camera to lock the mirror and
wait a pre-defined time interval before actually taking the picture. The mirror lock interval may be
configured using the "Mirror Lock-Up delay" in the Setup Menu 45 .
Using "Mirror Lock-Up" functionality in the Manual Hold
37
mode differs from the rest.
1.
Press the "Start" button on Promote Control to lock the mirror.
2.
Wait for a few seconds to let the camera stop shaking.
3.
Press the "Start" button again to take the picture.
© 2 0 1 4 P romote Sys tems
Advanced Operations
8.5
61
Long Exposure Noise Reduction Operation
If your camera supports Long Exposure Noise Reduction function, it affects camera operating timing.
When this feature is On and your camera is taking images with shutter speeds slower than approximately
1 second, a special noise reducing procedure will be applied. This procedure will take approximately as
long as the preceding exposure time.
Using this feature may interfere with exposure timing. However, your Promote Control is capable of
determining when your camera has Long Exposure Noise Reduction turned on. In that case, your
Promote Control will wait after taking every image that is longer than 1 second. A message on the
Promote Control screen will read: "Long Exposure NR", and a time remaining to complete this step will
be displayed.
Promote Control will attempt to check if camera has its Long Exposure Noise Reduction setting enabled,
and will reflect it in its own "LeNR" setting found on the bottom of the Promote Control screen. Note that
you may disable Promote Control from doing this check, and you will then have to manually control the
"LeNR" setting on the Promote Control. See Setup Menu 45 section for more information on the Enable
camera settings check/sync 55 Setup setting.
If the "LeNR" setting displays "N/A", it means the "Long Exposure Noise Reduction" functionality is not
available with the current mode and settings. If the Promote Control "LeNR" feature reads "N/A",
please make sure your camera has Long Exposure Noise Reduction feature disabled, as it
may affect correct Promote Control functionality.
8.6
Using Remote Sensors
Promote Control can start taking pictures by receiving commands from optional external remote sensors.
This allow image captures activated by a manual remote signal, noise, light, crossing an invisible path, or
other remote activation events.
Promote Control is compatible with any type of sensor that can trigger shutter of a Canon EOS Rebel
digital camera. The Promote Control Remote Sensor Port is a 2.5mm stereo plug with a pin out equal to
that of a Canon EOS Rebel remote shutter release port. Please consult Promote Systems Support for
more information on connecting your custom devices to the Promote Control Remote Sensor Port.
Use the following workflow with remote sensors:
1.
Connect Promote Control to the camera as described in Connections
2.
Connect the remote sensor to the remote sensor port described in Interfaces
setup is required.
3.
If the remote sensor activation is expected to take a long time, increase or disable the Auto PowerOff 53 option in the Setup Menu 45 to prevent Promote Control from turning itself off before the
sensor can activate.
© 2 0 1 4 P romote Sys tems
14
section.
13
section. No further
62
Promote Control 3.15 User Manual Rev 23
4.
Position the remote sensor as appropriate. When a connected remote sensor is activated, the
Promote Control acts as if the "Start" button was pressed.
Remote sensors can be used in all modes except Bulb Ramping and Bulb HDR, where the remote sensor
port is occupied by a Bulb Ramping / Bulb HDR Assistant Kit.
8.7
Using Motorized Panoramic Heads with Promote Control
You can use a motorized panoramic head (such as Gigapan Epic Pro) together with a Promote Control to
take a series of images suitable for creating a high dynamic range panorama. The motorized panoramic
head sets your camera to a number of positions to take images. Then instead of signaling your camera
directly, it will signal the Promote Control to start a High Dynamic Range sequence at every panoramic
position. The resulting image set can be merged into a High Dynamic Range panorama using manual or
batched processing. See Panoramic Software 70 section for more information on finding a software
application for processing high dynamic range panoramas.
Usage
Use the following workflow to create a high dynamic range panorama image series with a Promote
Control and a motorized panoramic head:
1.
Set up your camera on the motorized panoramic head.
2.
Your panoramic head should come with a release cord compatible with a Canon EOS Rebel camera,
such as XTi, T1i etc. Connect this panoramic head release cord to the panohead release port and
then to the Promote Control remote sensor port. See Interfaces 13 section for more details on the
sensor port.
3.
Set up your camera and Promote Control as described in High Dynamic Range Mode
4.
Press "Start" on Promote Control to test the high dynamic range image sequence. Note how long the
image sequence takes to complete.
5.
Set up your motorized head as described in the head manual.
6.
Use your motorized head settings to specify a delay between shots equal to the time it takes Promote
Control to complete the sequence. Add 2-3 seconds extra for safety.
7.
If your motorized head allows choosing an exposure time, set it to anything longer than 0.1 seconds.
A value of 1 second is perfectly suitable.
8.
Start your motorized head as described in its user manual.
21
section.
You may want to attach your Promote Control to your motorized head for convenience while the images
are being taken. A Promote Control Tripod Case (P/N PCTRL1-TR-CASE) may be used for this purpose.
© 2 0 1 4 P romote Sys tems
Advanced Operations
8.8
63
Using an AC adapter
Promote Control can be powered from an optional external AC adapter. When the AC adapter is
connected, Promote Control does not use its internal batteries and will work even if no batteries are
installed. Promote Control will not recharge the internal batteries when the AC adapter is connected.
The AC adapter should be connected to the DC power input port as described in Interfaces 13 chapter.
The Promote Control uses 6V / 300mA of DC power with a positive center connection. An adapter with 5
to 9 volts output can be used.
Use only AC adapter units approved by Promote Systems. Using any other power supply units may void
the warranty, cause Promote Control to malfunction, and may result in an electric shock, fire, and/or a
personal injury.
8.9
Performing a Firmware Update
The Promote Control internal software (also known as "firmware") may be updated from a personal
computer. This allows Promote Control to add the latest functionality updates and work with the most
recent camera models.
Firmware update is an advanced procedure that should be performed with care. An incorrect firmware
update can render the Promote Control non-functional until a valid firmware is installed.
You may also optionally review an instructional video available on Promote Systems Support website.
Before updating Promote Control firmware, check if you already have the newest version installed. To
check the version of your Promote Control firmware, press both side arrows at the same time to enter
Setup Mode, and then press the left arrow to display the firmware version in use.
Use the following workflow to update the Promote Control firmware:
1.
Download the latest firmware update file from http://www.promotesystems.com/
2.
Download the latest version of the Promote Control firmware update application for your computer
from http://www.promotesystems.com/ and install it on your computer. Firmware Update
applications are available for both PC and Mac computers.
3.
Install a fresh set of batteries in Promote Control and/or connect an optional AC adapter.
4.
IMPORTANT! Make sure Promote Control is turned off before proceeding to the next step. Also
make sure to leave it turned off until the update is completed.
5.
Connect Promote Control to the computer using the supplied white USB cable while holding down the
"Mode" button on the Promote Control. The Promote Control display will remain empty.
6.
If the Promote Control display shows a mode settings screen after connection, disconnect it from the
© 2 0 1 4 P romote Sys tems
64
Promote Control 3.15 User Manual Rev 23
computer, power down the Promote Control, and then connect it again as described in the step
above.
7.
Launch the Promote Control firmware update application.
8.
Select the firmware update file downloaded in Step 1.
9.
Click the "Update" button in the firmware update application to start the firmware update. This
process will take a few moments. Do not close the firmware update application, do not reboot or
power off your computer, and do
10. not disconnect Promote Control from the computer until the update is finished.
11. After the firmware update has finished, disconnect Promote Control from the computer.
Promote Control will try to keep previously configured settings and apply them to the new version of the
firmware where possible. To restore all configurable settings to their default values please refer to Reset
to defaults 59 setting in the Setup menu 45 section.
DO NOT disconnect and DO NOT operate Promote Control and/or your computer while the firmware
update is in progress. Doing so may render Promote Control non-functional until a valid and complete
firmware update is performed.
If for any reason the firmware update process fails and Promote Control does not power on when the
"Power" button is pressed, refer to Recovering From a Failed Firmware Update 65 section for
instructions on how to restore your Promote Control functionality.
© 2 0 1 4 P romote Sys tems
Troubleshooting
9
Troubleshooting
9.1
Resetting the Device
65
As with any complex electronic device, a strong external static charge may rarely cause Promote Control
to become unresponsive or show random characters on its screen. This situation requires a device reset.
To reset Promote Control, use either of the following options:
1.
Remove the batteries from Promote Control, wait a few seconds, and replace the batteries. If an
optional AC adapter is used, disconnect it as well.
2.
Use the hidden RESET button on the back of Promote Control. First remove the button’s protective
cap (see, Controls on page 13 for details). Then use a straightened paper clip to press the RESET
button. Be sure to replace the protective cap to protect Promote Control from water and dust.
All previously saved settings are retained when Promote Control is reset. Settings changed since the last
time Promote Control was powered on are not kept.
If the problem persists, contact http://www.promotesystems.com/ for support.
9.2
Recovering from a Failed Firmware Update
If a firmware update fails to complete, Promote Control may become inoperable. To restore Promote
Control, a complete and valid firmware must be applied – and if Promote Control is completely
inoperable, the method described in Performing a Firmware Update 63 will not work.
In this situation, use the following emergency workflow:
1.
Download the latest firmware update file from http://www.promotesystems.com/
2.
Download the latest version of the Promote Control firmware update application from http://
www.promotesystems.com/ and install it on your computer.
3.
Install a fresh set of batteries in Promote Control and/or connect the optional AC adapter as
described in Using an AC Adapter 63 .
4.
Remove the protective cap from the RESET button located on the back of Promote Control (see
Controls 12 section for details).
5.
Connect Promote Control to your computer using the supplied white USB cable.
6.
Hold down the Promote Control "Mode" button and use a straightened paper clip to press the RESET
button.
7.
Launch the firmware update application and proceed with the regular firmware update from Step 6
© 2 0 1 4 P romote Sys tems
66
Promote Control 3.15 User Manual Rev 23
as described in Performing a Firmware Update
8.
63
section.
Allow the firmware installation to finish before disconnecting or using the unit.
After the firmware update is finished, disconnect Promote Control from the computer and press the
"Power" button to confirm correct operation. Promote Control will attempt to restore all saved settings
even after a firmware update failure. In the unlikely event that settings are not restored, re-enter them
manually.
9.3
Error Messages
This section details the possible error messages and descriptions Promote Control may display.
9.3.1
"Manual" exposure mode could not be set
Promote Control could not set the camera to "Manual" exposure mode as required by the current
operation. The camera is likely incompatible with the exposure mode automation used by Promote
Control, but it may still be used with a minor manual intervention. Use the camera controls to set the
camera to "Manual" exposure, then disable the Automatic Exposure Mode control setting 53 in the Setup
Menu 45 section.
9.3.2
A "Bulb" exposure is required. Please allow and connect an optional shutter cable
The current operation requires the optional shutter cable to be connected. See Connections
on how to connect a shutter cable.
9.3.3
14
section
Exposure time could not be set. Enable "Auto Exposure Mode" or set camera to
"Manual" exposure
Promote Control could not set the shutter speed required by the current operation. This may happen due
to a number of reasons.
First, check if you set Enable camera settings check/sync
"Yes". This helps diagnosing most of the problems.
55
Setup setting to "No", and set it back to
If the problem persists, there are a few possible reasons:
Problem: Promote Control tried setting an exposure time before camera was ready.
Solution: If you are using a shutter cable, use Shutter cable release frame delay 46 Setup setting to add
more delay before shots. If you are NOT using a shutter cable and only use USB connection, use USB
cable release frame delay 47 Setup setting to add more delay betwen shots.
Problem: Camera has not been set to "Manual" exposure mode.
Solution: Set the camera to "Manual" exposure mode using the camera controls.
© 2 0 1 4 P romote Sys tems
Troubleshooting
9.3.4
67
Exposure time could not be set
Make sure your camera is set to "Single" drive mode, as opposed to "Continuous". Quiet or Silent mode
is also acceptable, if available on your camera.
Make sure your camera is set to "Manual Focus" mode.
Make sure your camera is set to "Manual Exposure" mode.
If you enabled "Long Exposure Noise Reduction" setting on your camera, make sure Promote Control has
its LeNR 61 setting set to "On". Promote Control will try to match those settings for you, but if this
attempt fails, an error may be shown.
Make sure that the "Mirror Lock-Up" (MLU) settings on your camera and Promote Control are matched both need to be either "On" or "Off". Promote Control will try to match those settings for you, but if this
attempt fails, an error may be shown.
9.3.5
Camera cannot be recognized
The device connected to the Promote Control USB port is using an unknown, non-camera protocol or is
not a camera. Verify you have a compatible camera connected and it is appropriately configured as
described in Camera Setup 16 section.
An up-to-date list of compatible cameras can be obtained from our website at http://
www.promotesystems.com/.
9.3.6
Please set camera USB connection mode to "PTP" and reconnect the camera
The camera connected needs to be reconfigured to use the PTP protocol for USB communications. See
Camera Setup 16 section for more details.
9.3.7
Programmed sequence falls out of exposure range
One or more scheduled exposures of the current operation are outside the range available with your
camera and Promote Control. This error message may be seen when using High Dynamic Range mode
21 and one or more required exposures is faster than 1/4000 and the Setup setting named Enable
exposures below 1/4000 48 is not enabled (subject to camera support). See High Dynamic Range Mode
21 section for more information about how to continue.
9.3.8
Exposure out of range
One or more shutter speed in a High Dynamic Range sequence cannot be set. Choose another value for
the "Mid Exposure" setting to continue.
9.3.9
Device battery may go low during exposure sequence
This message is shown when Promote Control senses the battery charge is low and may become fully
depleted before the current operation completes. You may proceed if the current operation is an
unusually short one. However, you should replace the batteries as soon as possible when this message
© 2 0 1 4 P romote Sys tems
68
Promote Control 3.15 User Manual Rev 23
appears.
9.3.10 LOW BATTERY
Promote Control determined the battery charge is too low for normal operation and will automatically
power off to prevent being damaged from excess battery discharge. Replace the batteries with a fresh
set before continuing.
9.4
Troubleshooting Q&A
Problem: An error message is shown.
Solution: See Error Messages 66 section for explanations and remedies.
Problem: Promote Control firmware update application does not recognize the Promote Control
connected to the computer.
Solution: Make sure Promote Control is off before connecting to the computer with the "Mode" button
held down. Also make sure that after being connected, the Promote Control screen remains clear. If the
Promote Control screen displays anything, disconnect Promote Control from your computer, power it off
by pressing and holding the Power button, and repeat the connection procedure.
Problem: Camera does not take all expected pictures in "Time Lapse" or "High Dynamic Range" mode.
Solution: If using the shutter cable, try increasing the value of "Shutter cable release frame delay"
Setup setting. If you are only using the USB cable, try increasing the value of the "USB cable release
frame delay" Setup setting.
Problem: Promote Control does not recognize the camera connected via USB.
Solution:
Verify the camera is in the supported camera list published at http://www.promotesystems.com/
Make sure the camera is configured to use "PTP", "Print/PTP" or "PTP/MTP" mode. See, Performing
Basic Operations on page 18 for more information.
Problem: Promote Control is not responding to any buttons.
Solution: Refer to Resetting the Device 65 section.
Problem: Promote Control does not turn on.
Solution:
Replace the batteries with a fresh set.
Connect an optional AC adapter.
If a firmware update has been performed and did not complete, refer to Recovering from a Failed
Firmware Update 65 section to restore the firmware.
© 2 0 1 4 P romote Sys tems
Troubleshooting
69
Problem: Using Promote Control results in twice as many images as requested.
Solution: Make sure that "Mirror Lock-Up" is either enabled or disabled on both your camera and
Promote Control. If camera "Mirror Lock-Up" is disabled and Promote Control "Mirror Lock-Up" is
enabled, this will result in duplicate images when using a shutter cable.
Problem: Using the Promote Control results in more images than requested.
Solution: Make sure that your camera is in "Single shot" drive mode. Do not use "Continuous" drive
mode with Promote Control unless specifically recommended. Quiet or Silent mode is also acceptable, if
available on your camera.
Problem: Promote Control does not always take the first picture out of a sequence. Other images are
taken successfully.
Solution: Certain camera models need some time to re-initialize after they enter power-down mode. If
you experience the issue described above, half-press the shutter button on your camera to wake it
before pressing the "Start" button on the Promote Control.
Problem: In Focus Stacking mode, Promote Control successfully controls lens focus, but no images are
taken.
Solution: If your camera is set up to enable automatic image preview when images are being taken,
please set the image preview duration to no longer than 2 seconds. You may also need to completely
turn off image preview when using Focus Stacking mode.
Problem: A problem appeared and it is not described in the above Q&A list.
Solution: Contact http://support.promotesystems.com/ for advanced support.
9.5
Support
Support and maintenance for Promote Control is available at http://support.promotesystems.com/.
If your Promote Control needs to be returned for service, visit http://support.promotesystems.com/ for
current information on authorized service center locations and contact information.
© 2 0 1 4 P romote Sys tems
70
Promote Control 3.15 User Manual Rev 23
10
Addendum A: Software Applications
10.1
High Dynamic Range Software
The following Windows/Mac applications may be considered for merging High Dynamic Range bracketed
image series:
Photomatix (commercial)
HDR Efex Pro (commercial)
HDR Darkroom (commercial)
Picturenaut (freeware, Windows only)
10.2
Time-Lapse and Bulb Ramping Software
The following Windows / Mac applications may be considered for creating Time-Lapse videos (with or
without Bulb Ramping):
Pre-processing
Adobe Lightroom + LRTimeLapse
Final rendering
Adobe After Effects (commercial) - Windows, Mac
10.3
Focus Stacking Software
The following Windows / Mac applications may be considered for merging Focus Stacking image series:
Adobe Photoshop CS5 or higher (commercial)
Helicon Focus (commercial)
10.4
Panoramic Software
The following Windows / Mac applications may be considered for stitching panoramas made with
Promote Control:
PTGui Pro (free/commercial)
© 2 0 1 4 P romote Sys tems
Addendum A: Software Applications
Hugin (free)
© 2 0 1 4 P romote Sys tems
71