1
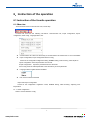
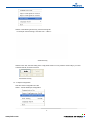
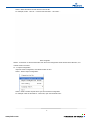
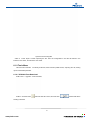
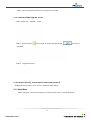
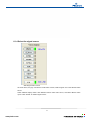
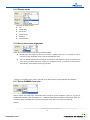
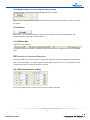
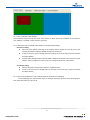
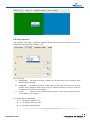
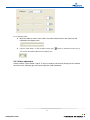
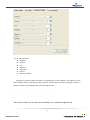
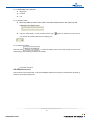
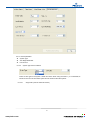
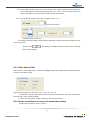
 VPU3400 SOFTWARE
USER’S MANUAL
Version:1.1
Pledco LED Display Ltd.
Revision history
Date of
Version
Explanation
Revise by
revision
1.1
2009-04-18
1st edition
Luoning
2
www.pledco.com
Table of contents
1.DEFINITION ................................................................................................................ 1
2.FEATURES OF THE SOFTWARE .............................................................................. 1
3.OPERATION SYSTEM................................................................................................ 1
3.1 SYSTEM REQUIREMENT ............................................................................................... 1
3.2 CONNECTION ............................................................................................................. 1
4.INSTALLATION AND START-UP................................................................................ 1
4.1 PREPARATION BEFORE INSTALLATION ............................................................................ 1
4.2 START UP AND COMMUNICATION SETTING ...................................................................... 5
5.INSTRUCTION OF THE SOFTWARE INTERFACE ................................................... 6
5.1 VPU 3400 .............................................................................................................. 6
6.INSTRUCTION OF THE OPERATION ........................................................................ 7
6.1 INSTRUCTION OF THE FAVORITE OPERATION ................................................................... 7
6.1.1Menu bar............................................................................................................ 7
6.1.2Tool bar ............................................................................................................ 10
6.1.3Help menu........................................................................................................ 12
6.1.4 Select the signal source .................................................................................. 13
6.1.5 Display mode .................................................................................................. 14
6.1.6 Set up the screen brightness .......................................................................... 14
6.1.7 Set up GAMMA Correction.............................................................................. 14
6.1.8 Shortcut button for recovering the factory settings.......................................... 15
6.1.9 Refresh ........................................................................................................... 15
6.1.10 Statu bar........................................................................................................ 15
6.2 INSTRUCTION OF ADVANCED OPERATIONS ........................................................ 15
6.2.1 Window parameter setting .............................................................................. 15
6.2.2 Color Adjustment ................................................................................................. 17
6.2.3 Video ajustment ..............................................................................................18
6.2.4 Device parameter.............................................................................................20
6.2.5 Video Aspect Ratio.......................................................................................... 23
6.2.6 Quick Launch Button to restore the saved video setting ................................. 23
3
www.pledco.com
1.Definition
z
VPU3400:Video Process Unit
z
LDU3000: LED Distribute Unit
2.Features of the software
2.1
Options of the video source
2.2
6 display modes: DVI、video、Layover —DVI on top、Layover—video on top、commix and、caption.
2.3
6 Video zooming modes: full screen; 16:10、16:9、5:4、4:3、3:2
2.4
Adjust the size and position of the Video window and DVI window
2.5
Adjust the color temperature of the LED display
2.6
Adjust the brightness, contrast, color tone,sharpness, and single adjustment of the invalid data.
2.7
Test the connecting situation and read back the VPU version. Test the status of the light sensor
2.8
Save and resume all the parameters
3.Operation system
3.1 System requirement
•
Intel Pentium or Celeron MAX 533 MHz CPU or higher or compatible system
•
Memory: 128M or higher
•
USB PORT / ETHERNET
•
CD-ROM driver
•
Windows 2000, windows XP, or windows 2003 or higher version
•
Display mode: 1027x768, 16 bits true color
•
Font: small font
3.2 Connection
Please be sure that the following parts are well connected and in normal status before your operate our
software.:
VPU3400, LDU3000, video source( eg :CD、DVD player etc),DVI input
4.Installation and start-up
4.1 Preparation before installation
Usually, the VPU 3400 is connected to the computer by Ethernet. If the users would like to connect by
USB, please be sure that the USB driver has already installed.
4.1.1 Install USB driver
1
www.pledco.com
STEP1: My computerÆ Right key of the mouseÆ PropertyÆ HardwareÆ Device manager
STEP2:USB Device→ Right key of the mouse→ Hardware update wizardÆ install from a list or specific
location Æ next
STEP3: Press BrowseÆInclude this location in the search (Choose the path )Æ Next;
2
www.pledco.com
STEP4: Press
;
3
www.pledco.com
STEP5: Press Finish. The USB driver program installation is ok now.
4
www.pledco.com
4.2 Start up and communication setting
4.2.1 Choose “Start\Program\ Imposa software\ VideoControl.exe. Or double clicks C:\Program
Files\Pledco\Imposa Software\ VideoControl.exe . Users will see the following interface as Fig 1.
FIG 1 VideoControl.exe
st
Communication setting. Usually, if it is the 1 time that the user communicate the sign or the last
4.2.2
communication setting is invalid, users will receive the following interface to re-set the communication..
FIG 2 Communication set
Users can choose from the Com Port from the pull-down menu by USB communication. Or input the
missing IP address 169.254.10.49 by Ethernet communication. Then press
to see if the
communication between the sign and the VPU 3400 is normal or not.
Users will get the reply window as FIG 3 if communicating with the sign successfully. Otherwise, users will
receive the information window as FIG 4 shows. Under this situation, please check if USB driver is
installed or if the com port is correct.
FIG 3 Successful communication
FIG 4 Failed communication
5
www.pledco.com
5.Instruction of the software interface
5.1 VPU 3400
After starting VPU 3400, users will see the following interface(FIG 5):
FIG 5 VPU 3400 Main interface
1) Menu bar
2) Video source
3) Display mode
4) Brightness setting
5) Gamma setting
6) Save the parameter
7) Refresh
8) Status bar
9) Window setting
10) Color adjustment
11) Video parameter setting
12) Device parameter setting
13) DVI、Video window
14) Video aspect ratio setting
15) Video config (save the video parameter setting)
6
www.pledco.com
6.Instruction of the operation
6.1 Instruction of the favorite operation
6.1.1Menu bar
There are three menus in the menu bar: File, Tool & Help.
In Menu File, there are the following sub-menus: communication set; import configuration; Export
configuration; Save config; Language select; Exit.
z
Communication set. Users can set the way of communication here. Please see 4.2.2 for more details
z
Import configuration; Export configuration & Save config;
Content of the configuration: Brightness setting, GAMMA setting, Video zooming, Color adjust etc
Import configuration: Save the parameter as a new file.
Export configuration: Export the parameter from the saved file
Save config: Save the setted parameter to the shortcut key of saved parameter
z
Language select: English /German available
z
Exit: exit the software VPU3400
Import and Export Configuration
Content of the configuration: brightness control, GAMMA setting, Video Zooming. Adjusting color
temperature
6.1.1.1 Save configuration
STEP1: Choose File\Save Config
7
www.pledco.com
STEP2: In the following shortcut key, name the Config File
For example: Choose Config1, and name it as “HELLO”
Set shortcut key
STEP3: Press “OK”, then the setting of the config will be saved. You can press the shortcut key if you need
to transfer this file, as shown in FIG 20
Saved short-cut key
6.1.1.2 Export Configuration
Save the current configuration as a file.
STEP 1: Choose File\Export configuration
8
www.pledco.com
STEP 2: Name the file and choose where to save the file.
For example, the file “HELLO” is saved under the folder “VPU 3400”.
Save config files
STEP 3:Press“Save ”to save the whole file. Then the current configuration will be saved into the file“hello”, and
could be used in the future.
6.1.1.3 Import Configuration
Import the saved configuration, and refresh the files to VPU.
STEP 1: Select “Import Configuration”
STEP 2: STEP 2: Select the path where you have saved the configuration
For example: under the file folder of “ VPU 3400”, open the saved file “hello”.
9
www.pledco.com
Open the saved config files
STEP 3: Press “Open” to finish importing the file. Then the configuration in this file will review in the
interface “VPU 3400”, and refresh to VPU 3400.
6.1.2 Tools Menu
This tool menu includes: font library download, CPU & FPGA update service, acquiring VPU ID, setting
up VPU authorized password.
6.1.2.1 VPU3400 Font Download
STEP1:Tool → Upgrade →Font Download;
STEP2:Click the button
,select the font file LCD.fnt, and then click
. Please wait till the
sending is finished.
10
www.pledco.com
STEP3:Upgrade is completed
6.1.2.2 VPU3400 CPU Upgrade service
Notes:
1. Please use Ethernet only to upgrade the CPU.
2. Please be sure that you keep pressing “Exit” button to turn on the power before you do the upgrading.
Please do not upgrade until VPU3400 controller panel until it gets into the interface of UPDATING CPU.
STEP1:Tool → Upgrade →CPU;
STEP2:Click the button
and select CPU file “CPU_App_Ver3404.bin”,then click
,wait
until it is completed.
11
www.pledco.com
STEP3:After the upgrade is finished, you can reboot the VPU 3400
6.1.2.3 VPU3400 FPGA Upgrade service
STEP1: Select Tool → Upgrade → FPGA
STEP2:Click this button
,select FPAG file FPGA1_Ver1002.rbf,click
,wait until it is
completed.
STEP3: Upgrade is finished。
6.1.2.4 Acquire VPU ID,and set up VPU authorized password
Please reassure yourself to use it, since it is authorized before delivery.
6.1.3 Help Menu
Select “help\about”, to review the instruction of software version. Shown in the following figure:
12
www.pledco.com
6.1.4 Select the signal source
Switching the video source.
As shown above, the grey ones are the invalid video sources, while the green one is the selected video
source.
Switch different display modes. Click different buttons under video source, and select different video
inputs. Click “refresh” to redetect signal source.。
13
www.pledco.com
6.1.5 Display mode
There are six display modes:
z
DVI
z
VIDEO Only
z
DVI On Top
z
Video On Top
z
Blending
z
Title Generator
6.1.6 Set up the screen brightness
There are two control modes for the screen brightness settings:
z
Manual: input the brightness value for the screen, ranging from10-100. For example “30”,which
means the screen brightness is 30% of the whole brightness value
z
Auto: the screen brightness is automatically processed by the brightness sensor connected to the
LDU. When you select auto mode, if there is no brightness sensor, it will switch to manual mode
automatically, and reveal the warning sign as follow:
If there is no connection to the sensor, users will not be able to have the auto brightness control feature..
6.1.7 Set up GAMMA Correction
Gamma reflects the human eyes’ perceivable effect towards the screen brightness. There are 4 groups of
GAMMA data available, which are GAMMA 1 to 4. Different gamma data has different reveal effects. When you
choose one group of GAMMA data, the software will send out the data to the screen automatically.
Gamma.
14
www.pledco.com
6.1.8 Shortcut button for recovering the factory settings
Shortcut button for recovering saved settings;As FIG 5, area 6
Select one of the buttons, take out the parameters which have been set and saved into the button, and refresh
the window.
6.1.9Refresh
Click “refresh”. VPU 3400 will redetect VPU signal source, read the value of the screen brightness with
GAMMA correction, and reveal to software interface.
6.1.10 Status Bar
Status bar as FIG 5, area 14
Reveal VPU’s firmware information, for example, CPU and FPGA versions, serial number and communicational
state.
6.2 Instruction of Advanced Operations
Advanced operation only can be used by the person who knows the system, and inappropriate operation will
lead to abnormal display.
So, before operation, please follow the process of 6.1.4.2, and save the current
configuration into a file, so that it can be used in the future.
6.2.1 Window parameter setting
Set up the coordinate and size of the DVI window and video window in the screen
15
www.pledco.com
.
6.2.1.1 The coordinate of two windows
The coordinate’s origin is the top left corner of the screen. As shown above, the coordinate of DVI window is
(0,0), while the coordinate of video window is (100,100)
6.2.1.2 Dimension and Coordinate of DVI Window and Video Window setting
Dimension setting
z
Move the mouse pointer to the edge of the window, when it changes to a two-way arrow, click
and drag the pointer to adjust a suitable dimension of the window.
z
In Area 13 of FIG 5, input a suitable value into the input box of the W and H of the DVI Window
and Video Window.
z
It will be hard to drag the window when the width or height of the window is no more than 4.At this
situation, users can adjust the value in Area C to change the dimension of the window.
Coordinate setting
z
Click and drag the mouse pointer to adjust to a suitable location.
z
In Area 13 of FIG 5, input a suitable value into the input box of the X and Y of the DVI Window
and Video Window.
6.2.1.3 How to set the dimension and coordinate when the windows are overlapping.
In the overlapping area, right-click the mouse, a message will prompt, as shown in the following figure.
Then select the window you want to set.
.
16
www.pledco.com
6.2.2 Color Adjustment
Click the button “Color Adjust” in advanced settings column and change into the window as shown in the
following figure and then adjust the display color.
6.2.2.1 Color type
6500(Reddish)
z
The display color will be a reddish color, this value which is set in the LDU by other
software can’t be amended.
9300(Bluish)
z
The display color will be a bluish color, this value which is set in the LDU by other
software can’t be amended. Select this color type, the software will send the color type to the LDU
automatically and the value can’t be changed,
Custom
z
Adjust the color by adjust R,G,B in proportion. Only if we select the custom type,
can we adjust the color in Area B.
6.2.2.2 Adjustable color parameter
z
R The display proportion of red
z
G The display proportion of green
z
B The display proportion of blue
17
www.pledco.com
6.2.2.3 Adjusting mode
z
Move the slider to set the color value, the value will be shown in the input box and
reflected to the display soon.
z
Input the value directly, or click the button shown right
.increase or decrease the value one by
one and the value will be reflected to the display soon.
6.2.3 Video adjustment
Click the button “Video Param. Adjust” in advanced settings column and change into the window
as shown in the following figure and then adjust the video parameter.
18
www.pledco.com
6.2.3.1 Video parameter:
z
Brightness
z
Contrast
z
Hue
z
Saturation
z
Sharpness
z
Bad Cut
z
Restore to Default
VPU3400 can adjust the video parameter to suit preferences for the customers. The display can have
different display effects by adjusting the video parameter. VPU3400 has the function of restoring to default. In
general, it will have a good display effect by using the default value.
The function of Bad Cut can remove the invalid data. e.g.: extra black edges around
19
www.pledco.com
6.2.3.2 Adjustable video parameter
z
Brightness
z
Contrast
z
hue
6.2.3.3 Adjusting mode
z
Move the slider to set the color value, the value will be shown in the input box and
reflected to the display soon.
.
z
Input the value directly, or click the button shown right
,increase or decrease the value one by
one and the value will be reflected to the display soon.
6.2.3.4 Restore to Default
Click this button,
to restore the default value. There will be a reply as shown in the
following figure after restoring the default successfully.
Successful restoration
6.2.4 Device Parameter
Click the button “Device parameter” in advanced settings column and change into the parameter window(e.g.
FIG26) to set the device parameter.
20
www.pledco.com
6.2.4.1 Device parameter
z
System Type
z
Auto Bright Parameter
z
LDU Amount
6.2.4.2
System Type: Slave or Master
There are two types in the system--master and slave .When using more than 1 pc of VPU3400,we
should set one VPU as the master system and the others as the slave system.
6.2.4.2.1
Single VPU (controls 1920*768 screen)
21
www.pledco.com
6.2.4.2.1
High Definition Solutions (controls 1920*1080 screen)
22
www.pledco.com
6.2.4.3 Auto bright parameter setting: user should set the value of bright parameter when selecting the
type of Auto brightness: minimum(10-50%),maximum(30~100%),the min and max value is the
range of adjustment, notes: the minimum should less than the maximum.
6.2.4.4 LDU parameter setting: LDU amount, coordinate of LDU(X,Y)
LDU amount setting。
Coordinate setting of each LDU
6.2.4.5 Device parameter setting is used for the first adjustment, once the first setting is suitable, the user
do not need to reset.
Click the button
after ajusting the suitable parament,and will prompt a message
shows “set successfully”.
。
6.2.5 Video Aspect Ratio
Click the button “Video Aspect Ratio” in advanced settings column and change into the parameter window,
as shown in the following figure.
.
Type of the video aspect ratio: fill window, 16:10,16:9,5:4,4:3,3:2
1)Fill Window: The video signal will be zoomed according to the dimension of the video window and it
will shown in the video window completely.
2)Others: the video will be zoomed according the ratio the user selected.
6.2.6 Quick Launch Button to restore the saved video setting
Four Quick Launch Button: Video 1 to Video 4
23
www.pledco.com
Quick Launch Button to restore the saved video setting 6.2.6. 1 Save the setting of the video content:
z
dimension of the video window
z
coordinate of the video window
z
type of the video zooming
6.2.6.2 Save video setting
STEP 1: Select
, the window as shown in the following figure will shown up.
Save the video setting
STEP 2: Select a quick launch button, e.g. Video 1
STEP 3: Click
, then the currrent video setting will be saved, if the user need to use the
saved video config can click the quick launch button to change the setting
24
www.pledco.com
.
Quick Launch Button of the saved video setting
25
www.pledco.com