1
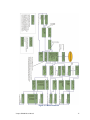
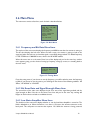
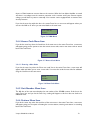
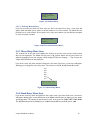
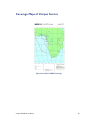
SD100R L Band Demodulator User Manual For use with the Veripos DGPS service Part Number Date: Revision: 875-0129-000 January 2004 000 Veripos SD100R User Manual ii Copyright Notice Copyright 2004 CSI Wireless Inc. All rights reserved. No part of this manual may be stored in a retrieval system, transmitted, or reproduced by any means, including, but not limited to photocopy, photograph, digitizing, or otherwise, without the prior written permission from CSI Wireless Inc. Trademarks The CSI Wireless logo is a trademark of CSI Wireless Inc. All other trademarks are the property of their respective owners. FCC Notice This device complies with Part 15 of the FCC Rules. Operation is subject to the following two conditions: (1) This device may not cause harmful interference, and (2) This device must accept any interference received, including interference that may cause undesired operation. Veripos SD100R User Manual iii CSI Wireless Limited Warranty CSI Wireless Inc. (“CSI”) hereby warrants solely to the end purchaser of the Products, subject to the exclusions and procedures set forth herein below, that the Products sold to such end purchaser shall be free, under normal use and maintenance, from defects in material and workmanship for a period of 12 months from delivery to such end purchaser. Repairs and replacement components are warranted, subject to the exclusions and procedures set forth below, to be free, under normal use and maintenance, from defects in material and workmanship for 90 days from performance or delivery, or for the balance of the original warranty period, whichever is greater. Purchaser’s Exclusive Remedy The end purchaser’s exclusive remedy under this warranty shall be limited to the repair or replacement, at the option of CSI Wireless, of any defective Products or components thereof. The end user shall notify CSI Wireless or a CSI Wireless approved service center immediately of any claimed defect. Repairs shall be made through a CSI Wireless approved service center only. Exclusions CSI Wireless does not warrant damage occurring in transit or due to misuse, abuse, improper installation, neglect, lightning (or other electrical discharge) or fresh/salt water immersion of Products. Repair, modification or service of CSI Wireless Products by any party other than a CSI Wireless approved service center shall render this warranty null and void. CSI Wireless does not warrant claims asserted after the end of the warranty period. CSI Wireless does not warrant or guarantee the precision or accuracy of positions obtained when using Products. Products are not intended for primary navigation or for use in safety of life applications. The potential accuracy of Products as stated in CSI Wireless literature and/or Product specifications serves to provide only an estimate of achievable accuracy based on: • Specifications provided by the US Department of Defense for GPS Positioning, • GPS OEM Receiver specifications of the appropriate manufacturer (if applicable), and • DGPS service provider performance specifications. CSI Wireless reserves the right to modify Products without any obligation to notify, supply or install any improvements or alterations to existing Products. Veripos SD100R User Manual iv No Other Warranties THE FOREGOING WARRANTY IS EXCLUSIVE OF ALL OTHER WARRANTIES, WHETHER WRITTEN, ORAL, IMPLIED OR ARISING BY STATUTE, COURSE OF DEALING OR TRADE USAGE, IN CONNECTION WITH THE DESIGN, SALE, INSTALLATION, SERVICE OR USE OF ANY PRODUCTS OR ANY COMPONENTS THEREOF, INCLUDING, BUT NOT LIMITED TO, ANY WARRANTY OF MERCHANTABILITY OR FITNESS FOR A PARTICULAR PURPOSE. Limitation of Liability THE EXTENT OF CSI WIRELESS’S LIABILITY FOR DAMAGES OF ANY NATURE TO THE END PURCHASER OR ANY OTHER PERSON OR ENTITY WHETHER IN CONTRACT OR TORT AND WHETHER TO PERSONS OR PROPERTY SHALL IN NO CASE EXCEED, IN THE AGGREGATE, THE COST OF CORRECTING THE DEFECT IN THE PRODUCT OR, AT CSI WIRELESS’S OPTION, THE COST OF REPLACING THE DEFECTIVE ITEM. IN NO EVENT WILL CSI WIRELESS BE LIABLE FOR ANY LOSS OF PRODUCTION, LOSS OF PROFITS, LOSS OF USE OR FOR ANY SPECIAL, INDIRECT, INCIDENTAL, CONSEQUENTIAL OR CONTINGENT DAMAGES, EVEN IF CSI WIRELESS HAS BEEN ADVISED OF THE POSSIBILITY OF SUCH DAMAGES. WITHOUT LIMITING THE FOREGOING, CSI WIRELESS SHALL NOT BE LIABLE FOR ANY DAMAGES OF ANY KIND RESULTING FROM INSTALLATION, USE, QUALITY, PERFORMANCE OR ACCURACY OF ANY PRODUCTS. Governing Legislation To the greatest extent possible, this warranty shall be governed by the laws of the State of Arizona. In the event that any provision hereof is held to be invalid by a court of competent jurisdiction, such provision shall be severed from this warranty and the remaining provisions shall remain in full force and effect. Veripos SD100R User Manual v Veripos SD100R User Manual vi Table of Contents List of Figures ...........................................................................................................................................................................viii List of Tables ..............................................................................................................................................................................ix 1. 2. Introduction...................................................................................................................................................................1 1.1 Customer Service...................................................................................................................................................1 1.2 World Wide Web Site..........................................................................................................................................1 1.3 Access to Veripos Signals .....................................................................................................................................1 1.4 Document Conventions .......................................................................................................................................1 1.5 Notes, Cautions, and Warnings ..........................................................................................................................2 1.6 Unpacking Your Veripos SD100R System ........................................................................................................2 Installation......................................................................................................................................................................3 2.1 Cable Connections ................................................................................................................................................3 2.1.1 Signal Cable Selection..............................................................................................................................4 2.1.2 Routing and Securing the Cables ..........................................................................................................4 2.2 Configuring the Veripos SD100R Receiver ......................................................................................................5 2.3 Environmental Requirements ..............................................................................................................................5 2.4 Powering the Veripos SD100R Receiver ..........................................................................................................5 2.5 Antenna Placement ................................................................................................................................................6 2.6 Serial Port Interface ...............................................................................................................................................6 2.6.1 3. RD1 Data Message...................................................................................................................................7 Operation.......................................................................................................................................................................9 3.1 RTCM SC-104 Protocol .......................................................................................................................................9 3.2 Navigating the Menu System................................................................................................................................9 3.3 Menu Access Icon ..................................................................................................................................................9 3.4 Fix Status Icon...................................................................................................................................................... 10 3.5 Configuring Veripos SD100R............................................................................................................................ 10 3.6 Main Menu ............................................................................................................................................................ 12 3.6.1 Frequency and Bit Rate Menu Item................................................................................................... 12 3.6.2 Bit Error Rate and Signal Strength Menu Item................................................................................ 12 3.6.3 Low Noise Amplifier Menu Item ....................................................................................................... 12 3.6.4 Access Code Menu Item ..................................................................................................................... 13 3.6.5 Unit Number Menu Item..................................................................................................................... 13 3.6.6 Stations Menu Item............................................................................................................................... 13 Veripos SD100R User Manual vii 3.6.7 Menu Sleep Menu Item ........................................................................................................................ 14 3.6.8 Baud Rates Menu Item ......................................................................................................................... 14 3.6.9 About Menu Item.................................................................................................................................. 15 3.6.10 Software Version Menu Item.............................................................................................................. 15 3.7 4. Saving Veripos SD100R Configuration ........................................................................................................... 15 Specifications .............................................................................................................................................................. 17 Appendix A – Veripos DGPS Information ......................................................................................................................... 19 Appendix B – Factors Affecting DGPS Positioning Accuracy ........................................................................................ 23 Index ....................................................................................................................................................................................... 24 List of Figures Figure 2-1 Cable Interface ........................................................................................................................................................3 Figure 2-2 Back Panel Interface ...............................................................................................................................................4 Figure 2-3 DB9 Socket Numbering ........................................................................................................................................7 Figure 3-1 Menu Access Icon ................................................................................................................................................ 10 Figure 3-2 Signal Lock Icon.................................................................................................................................................... 10 Figure 3-3 Menu Flowchart .................................................................................................................................................. 11 Figure 3-4 Main Menu ............................................................................................................................................................. 12 Figure 3-5 Tuning Menu ......................................................................................................................................................... 12 Figure 3-6 LNA Menu............................................................................................................................................................. 13 Figure 3-7 Access Code Menu.............................................................................................................................................. 13 Figure 3-8 New Code Menu ................................................................................................................................................. 13 Figure 3-9 Stations Menu ....................................................................................................................................................... 14 Figure 3-10 Enter New Stations Menu................................................................................................................................ 14 Figure 3-11 Menu Sleep Menu .............................................................................................................................................. 14 Figure 3-12 Baud Rates Menu ............................................................................................................................................... 15 Figure 3-13 About Menu........................................................................................................................................................ 15 Figure 3-14 Software Version Menu.................................................................................................................................... 15 Figure A-1 Africa DGPS Coverage ...................................................................................................................................... 20 Figure A-2 North America DGPS Coverage ..................................................................................................................... 21 Figure A-3 South America DGPS Coverage ...................................................................................................................... 22 Figure A-4 Western Europe DGPS Coverage .................................................................................................................. 22 Veripos SD100R User Manual viii List of Tables Table 2-1 Power Requirements...............................................................................................................................................5 Table 2-2 Serial Port Pin-out, RS-232C Interface Level .....................................................................................................6 Table 2-3 RD1 Data Message Defined...................................................................................................................................7 Table 4-1 SD100R Receiver and Power Supply Specifications ...................................................................................... 17 Veripos SD100R User Manual ix Veripos SD100R User Manual 0 1. Introduction Welcome to the Veripos SD100R User Manual. The SD100R has been designed to work with the Veripos differential global positioning service. The SD100R demodulator provides a high level of performance, delivering corrections to any RTCM ready GPS receiver. We have written this document to assist the customer in becoming familiar with the SD100R demodulator functionality and system operation. The chapters that follow provide installation details, operation information and technical specifications on the SD100R receiver. 1.1 Customer Service If you encounter problems during the installation or operation of this product, or cannot find the information you need please contact your supplier. Veripos Helpdesk Telephone number: E-mail address: +44 1224 877993 [email protected] Support Available - Continuously 1.2 World Wide Web Site Veripos maintains a World Wide Web home page at the following address: www.veripos.com A corporate profile, product information, application news, GPS and DGPS literature are available at this site. 1.3 Access to Veripos Signals The Veripos Service is a commercial enterprise operated by Subsea7 Ltd. Where signals services are required please contract the following. Email: Telephone number: [email protected] +44 1224 877993 1.4 Document Conventions Veripos SD100R User Manual 1 Bold is used to emphasize certain points. This font indicates information presented on the display of the demodulator. This icon indicates that you should press the up arrow button of the receiver keypad. This icon indicates that you should press the Enter button of the receiver keypad. This icon indicates that you should press the down arrow button of the receiver keypad. 1.5 Notes, Cautions, and Warnings Notes, Cautions, and Warnings stress important information regarding the installation, configuration, and operation of the Veripos SD100R demodulator. Note - Notes outline important information of a general nature. Cautions - Cautions inform of possible sources of difficulty or situations that may cause damage to the product. Warning - Warnings inform of situations that may cause harm to you. 1.6 Unpacking Your Veripos SD100R System When you unpack your Veripos SD100R system, please ensure that it is complete by comparing the parts received against the packing slip. Unless your system has been equipped differently than a standard SD100R system, you should find the following parts in your system: • • • One Veripos SD100R Receiver (P/N 803-0028-01A) One Power Cable (P/N 726-1035-00A) One power supply unit Note the provision of antennae is a client specific option. Note - If, for some reason, you find a discrepancy between your packing slip and the contents of your shipment, please contact your supplier immediately. Veripos SD100R User Manual 2 2. Installation 2.1 Cable Connections The power connector on the SD100R is a miniature 2-pin, circular locking connector and the RF connector is a TNC socket. The power connector is labeled ’12V DC IN’ and the RF input connector is labeled ‘L-Band Antenna’. There is a power switch ‘ON/OFF’ to turn on the receiver. Once the proper voltage input is applied to the connector and the power switch is pressed, the system will start up. To receive data from the SD100R receiver, both DB9 socket connectors available on the back panel, labeled ‘MAIN’ and ‘AUX’, give access to the RTCM data from the receiver. Caution - By default, the SD100R receiver offers 12 VDC across its RF connector to power an active antenna’s low noise amplifier (LNA). Connection to an antenna that doesn’t support a 12 VDC input could damage the antenna. The following figure shows the various connections required for the SD100R receiver. Figure 2-1 Cable Interface Veripos SD100R User Manual 3 2.1.1 Signal Cable Selection It is recommended that connection to antenna is via LDF250 cable 2.1.2 Routing and Securing the Cables When choosing a route for SD100R cables. • • • • • • Avoid running cables in areas of excessive heat Keep antenna cables away from corrosive chemicals Do not run the extension cable through door or window jams Keep the cable away from rotating machinery Be careful not to apply tension to the cable Remove unwanted slack from the cable at the opposite end to the antenna • Secure the cable route using plastic tie wraps Warning - Improperly installed cables near machinery can be dangerous. Antenna GPS RECEIVER GPS RECEIVER In Line Fuse Power Supply 100V-240Vac Figure 2-2 Back Panel Interface Veripos SD100R User Manual 4 2.2 Configuring the Veripos SD100R Receiver The Veripos SD100R receiver can be fully configured through the menu system on the front panel of the receiver. Please refer to Chapter 3 for more detailed instructions. 2.3 Environmental Requirements The Veripos SD100R system has specific environmental limits that you should ensure are met when storing and using the system. The SD100R receiver is designed to be stored between -40°C and +85°C. The operating temperature range is -32°C and +74°C. The SD100R is specified to operate with relative humidity up to 95% non-condensing. 2.4 Powering the Veripos SD100R Receiver The SD100R receiver is powered via the supplied power cable that plugs into an AC outlet and the other end of the cable interfaces to the enclosure’s ’12V DC IN’ connector. The AC outlet must be between 100-240V and 50-60Hz. For best performance, the supplied power should be continuous and clean. The following table details the power specifications of the SD100R receiver. Table 2-1 Power Requirements Input Voltage Input Current Input Power 9 to 36 VDC < 300 mA @ 12 VDC < 3.6 W Nominal A 1.0A fast-blow fuse, situated in-line of the power input of the extension cable and protects the SD100R receiver from power surges. The fuse container should remain accessible after installation. Caution - Do not operate the SD100R receiver with the fuse bypassed. modification will void the product warranty. Veripos SD100R User Manual Such a 5 2.5 Antenna Placement The L-band antenna you use should be mounted pursuant to the following requirements: • Mount the antenna in the location that has an open, unobstructed view of the sky for the sake of tracking L-band communication satellites. • It is important to locate any transmitting antennas away from the antenna by several feet or more. This will help to ensure that tracking performance of the SD100R is not compromised, giving you the best performance possible. • Make sure that there is sufficient length of the antenna extension cable available in order to be able to connect it to the SD100R enclosure. Do not locate the antenna where environmental conditions exceed those specified in Section 2.3. 2.6 Serial Port Interface The Veripos SD100R receiver has two primary communication ports referred to as MAIN and AUX. The MAIN and AUX ports are fully independent. Both ports are compatible with the RS232C interface level to provide RTCM corrections to a GPS receiver or to communicate with a PC. These serial ports are accessible via the rear panel of the SD100R enclosure. You can interface most devices to the SD100R directly with a serial cable, accommodating any gender changes necessary, or with the addition of a null modem as necessary. The MAIN port outputs RTCM data at all times when the receiver is locked on to a signal. The AUX port outputs RTCM data only when the menu system is in sleep mode. When the menu system is active, the AUX port outputs RD1 diagnostic messages. You are encouraged to use whichever port best suits your needs. Note – The pin-out for both female DB9 connectors is provided in Table 2-2. The MAIN port should be used for firmware updates. assignments for both serial ports. The following table provides the pin Table 2-2 Serial Port Pin-out, RS-232C Interface Level Pin Signal Description 2 TXD NMEA 0183 and/or RTCM output for the MAIN/AUX port 3 RXD NMEA 0183 input for the MAIN port 5 Sig. Ground Signal return Veripos SD100R User Manual 6 Figure 2-2 displays the numbering scheme for extension cable’s DB9 socket connectors (female). The associated numbering for the plug connector (male) is a mirror reflection of scheme showed in this figure. 54 32 1 987 6 Figure 2-3 DB9 Socket Numbering Note - For successful communications, the baud rate of the Veripos SD100R serial ports must be set to match that of the devices to which they are connected. The baud rate can be changed through the menu system. Please refer to Chapter 3 for more information. 2.6.1 RD1 Data Message The RD1 data message is output by the AUX port when the menu system is active. The RD1 Data message contains a variety of information, and has the following format: $RD1,s,w,f.f,l,ber,agc,dds,dop,dsp,arm,diff,nav<CR><LF> Table 2-3 summarizes the contents of this message. Table 2-3 RD1 Data Message Defined Field Veripos SD100R User Manual Description s GPS seconds w GPS week f.f Current frequency (MHz) l Lock Indicator (1 = lock, 0 = no lock) ber BER agc AGC dds DDS in Hz dop Doppler in Hz dsp DSP status arm ARM status diff Differential status nav Navigation condition *cc Checksum <CR><LF> Carriage return and line feed 7 Veripos SD100R User Manual 8 3. Operation This chapter introduces the general operational features of the Veripos SD100R system, operating modes, and receiver default operating parameters. 3.1 RTCM SC-104 Protocol RTCM SC-104 is a standard that defines the data structure for differential correction information for a variety of differential correction applications. It has been developed by the Radio Technical Commission for Maritime services (RTCM) and has become an industry standard for communication of correction information. RTCM is a binary data protocol and is not readable via a terminal program. It appears as ‘garbage’ data on-screen since it is a binary format and not ASCII text. The following is an example of how the RTCM data appears on-screen: mRMP@PJfeUtNsmMFM{nVtIOTDbA^xGh~kDH`_FdW_yqLRryrDuhcB\@}N`ozbSD@O^}nr GqkeTlpLLrYpDqAsrLRrQN{zW|uW@H`z]~aGxWYt@I`_FxW_qqLRryrDCikA\@Cj]DE]| E@w_mlroMNjkKOsmMFM{PWDwW@HVEbA^xGhLJQH`_F`W_aNsmMFM[WVLA\@S}amz@ilIu Pqx~_IZhTCpLLrYpdP@kOsmMFM[kVDHwVGbA^P{WWuNt_SW_yMsmMnqdrhcC\@sE^ZfC@ }vJmNGAHJVhTCqLRryrdviStW@H_GbA^P{wxu[K Note - RTCM is a local area data standard. This means that when positioning with external correction input from the SD100R to another GPS receiver, performance will degrade as a function of distance from the base station. The additional degradation will depend on the difference in observed orbit and ionospheric errors between the reference station and the remote unit. A general rule of thumb would be an additional 1 m error per 100 miles. This error is often seen as a bias in positioning, resulting in a position offset. The scatter of the receiver is likely to remain close to constant. 3.2 Navigating the Menu System The keypad on the front of the SD100R allows you to navigate through the intuitive menu system, configuring operating parameters and viewing status information. The top line of the display is the active Focus Line for keypad operations. Menu items that are being accessed must be on the top line of the display for the desired effect to occur. Note - The top line of the SD100R display is the Focus Line. The field of interest must be ‘in focus’ for keystrokes to have the desired effect. 3.3 Menu Access Icon The icon shown in Figure 3-1 indicates that you may access the current item in focus by pressing the (enter) key. Veripos SD100R User Manual 9 @ Figure 3-1 Menu Access Icon 3.4 Fix Status Icon The SD100R indicates satellite signal lock status on the right hand side of the frequency and bit rate line in the main menu. The lock symbol, illustrated in Figure 3-2, remains in the closed position when the SD100R is locked to a valid satellite signal, and open, when no broadcast is available for the specified frequency and/or MSK bit rate. # $ No Lock Lock Figure 3-2 Signal Lock Icon Note – RTCM corrections will not be output unless the SD100R has a signal lock. 3.5 Configuring Veripos SD100R All aspects of SD100R operation may be configured through the menu system with the use of the up ) to navigate the menu and the button to select the top ‘focus’ line and down arrow keys ( on the display. The following items are user-configurable: • • • • • • Tuning manually to a certain frequency, or tuning by service by choosing the satellite from a list To turn on or off LNA (low noise amplifier) for the antenna To enter or change the access code To update the reference stations that are used to compute the corrections To change the timeout for the menu to sleep Setting the baud rate of the MAIN and AUX ports Below is a flow chart of the entire menu system. Each section is then described in detail. Veripos SD100R User Manual 10 Figure 3-3 Menu Flowchart Veripos SD100R User Manual 11 3.6 Main Menu The main menu consists of ten lines, each of which is described below. 1 535.1 750/12 00@$ B ER?00 1 _118 dBm L NA@ O N A ccess Code@ U nit N um xxx S tatio ns@ M enu S leep@2 0s B aud R ates@ A bout@ S W Ver sion@ Figure 3-4 Main Menu 3.6.1 Frequency and Bit Rate Menu Item The top line of the main menu displays the frequency and MSK bit rate that the receiver is tuning to. This line also displays the lock icon. When the lock is open, the receiver is trying to lock to the signal, and when the lock icon is closed the signal is successfully being tracked. The default frequency is 1535.175MHz at a 1200 MSK bit rate, which is the HP AORE satellite. When this menu item is in the active Focus Line of the display and you hit the enter key, another menu appears giving you the choice of tuning by frequency, tuning by service, or canceling back to the main menu. Tune by Freq @ Tune by Serv ice@ Cancel@ Figure 3-5 Tuning Menu From this tuning menu, if you choose to tune by frequency, you will be asked to enter the frequency in MHz. If you choose to tune by service, you will be given the choice of the following satellites: ‘HP 25East’, ‘HP AORW’ or ‘LP AORE’. 3.6.2 Bit Error Rate and Signal Strength Menu Item The second line of the main menu displays the bit error rate of the signal being tracked and the signal strength in dBm. If this line is the active Focus Line and you hit the enter key, nothing will happen as this line does not lead to an additional menu. 3.6.3 Low Noise Amplifier Menu Item The third line of the main menu displays whether or not the Low Noise Amplifier is turned on. The LNA is defaulted to on. When this feature is on, there is 12V across the antenna connector on the back panel. This will power an antenna that requires 12V. While the antenna is being powered, Veripos SD100R User Manual 12 there is a 50mA maximum current draw on the receiver. When the Low Noise Amplifier is turned off, there is no voltage across the antenna connector on the receiver and if your antenna requires voltage, you will have to power it externally. Your receiver comes equipped with an antenna short circuit protection. If you hit the enter key while this line is the active Focus Line, a new menu will appear where you can turn the LNA on or off or you can cancel back to the main menu. Turn LN A OFF @ Turn LN A ON@ Cancel@ Figure 3-6 LNA Menu 3.6.4 Access Code Menu Item If you hit the enter key when the fourth line of the main menu is the active Focus Line, a new menu will appear giving you the option to view the current access code, enter a new access code or cancel back to the main menu. Current code @ Enter n ew co de@ Cancel@ Figure 3-7 Access Code Menu 3.6.4.1 Entering a New Code If you hit the enter key when the ‘Enter new code’ line is the active Focus Line, a new menu will appear which will allow you to enter a new code. You must then send the new code for validation using the ‘Send’ line in the same menu. New Cod e@2667 Send@ Cancel@ Figure 3-8 New Code Menu 3.6.5 Unit Number Menu Item The fifth line of the main menu displays the unit number of the SD100R receiver. If this line is the active Focus Line and you hit the enter key, nothing will happen as this line does not lead to an additional menu. 3.6.6 Stations Menu Item If you hit the enter key when the sixth line of the main menu is the active Focus Line, a new menu will appear giving you the option of viewing the current stations, entering new stations or canceling back to the main menu. Veripos SD100R User Manual 13 Current stns @ Enter n ew st ns@ Cancel@ Figure 3-9 Stations Menu 3.6.6.1 Entering New Stations If you hit the enter key when the ‘Enter new stns’ line is the active Focus Line, a new menu will appear which will allow you to either use all the stations or use some stations. The default for this parameter is to use all stations. If you choose to use only some stations, you will then be prompted to enter the station numbers. Use all stns @ Use som e stn s@ Cancel@ Figure 3-10 Enter New Stations Menu 3.6.7 Menu Sleep Menu Item The seventh line of the main menu displays the amount of time the menu system remains active after the last keystroke. The default for this timer is 30 seconds. When the amount of time has elapsed, the display shows this message “AUX sending RTCM menu sleeping…”. This resumes the output of RTCM data from the AUX port. If you hit the enter key when the Menu Sleep line is the active Focus Line, a new menu will appear allowing you to change the menu sleep timer. The choices are 10, 20, 30, 40, 50 and 60 seconds. 10 s 20 s 30 s 40 s 50 s 60 s M enu Sl eep@ 20s Figure 3-11 Menu Sleep Menu 3.6.8 Baud Rates Menu Item If you hit the enter key when the eighth line of the main menu is the active Focus Line, a new menu will appear displaying the current baud rates of the MAIN and AUX ports and giving you the option of changing them. The options for baud rates for each of the ports are: 4800, 9600, 19200, 38400. The default baud rate for the MAIN port is 19200 and the default for the AUX port is 9600. Veripos SD100R User Manual 14 4800 9600 19200 38400 Ma in@ 9 600 AU X@ 9 600 Ca ncel@ Figure 3-12 Baud Rates Menu 3.6.9 About Menu Item If you hit the enter key when the ninth line of the main menu is the active Focus Line, the Veripos Contact information will be displayed. The bottom line of the display scrolls across the screen showing the email address ([email protected]) and the telephone number (+44 (0) 1224 877993) that provide help. To speed up or slow down the rate at which the message scrolls across the screen, press the up or down arrow keys several times. To return to the main menu, press the enter key. VERIPO S Contact: To acc ess VERIPOS Figure 3-13 About Menu 3.6.10 Software Version Menu Item If you hit the enter key when the tenth line of the main menu is the active Focus Line, the software versions for the menu, DSP and ARM will be displayed. M enu: 1.02 D SP: 35 A RM: 6.3 D one@ Figure 3-14 Software Version Menu 3.7 Saving Veripos SD100R Configuration Each time that you change the configuration of the SD100R, the configuration is saved and will survive a power cycle. This means that the receiver does not have to be reconfigured again for the next power cycle. Veripos SD100R User Manual 15 Veripos SD100R User Manual 16 4. Specifications This chapter provides the operational, mechanical, electrical, physical, and environmental specifications for the Veripos SD100R receiver and its power supply. Table 4-1 SD100R Receiver and Power Supply Specifications Serial Interface Specifications Item Specification Serial Port Interface Level MAIN Connector AUX Connector MAIN Baud Rate AUX Baud Rate MAIN Output Protocol MAIN Input Protocol RS-232C DB9 Socket DB9 Socket 4800, 9600, 19200 or 38,400 Baud 4800, 9600, 19200 or 38,400 Baud NMEA 0183 NMEA 0183 Power Specifications Item Specification Input Voltage Power Consumption Power Connector 9-36 VDC <3.6 W Nominal Circular 2-pin Locking Plug Power Supply Specifications Item Input Voltage to AC/DC switching power supply Line Frequency Mechanical Characteristics Item Enclosure Length Width Height Weight Antenna Connector Specification 100-240 VAC 50 -60 Hz Specification Extruded aluminum with aluminum front and back plates. 203 mm (8.0”) 125 mm (4.9”) 53 mm (2.0”) 0.8 kg (1.76 lb.) TNC Socket Environmental Specifications Item Specification Storage Temperature Operating Temperature Humidity -40°C to 85°C -32°C to 74°C 95% Non-Condensing Veripos SD100R User Manual 17 Veripos SD100R User Manual 18 Appendix A – Veripos DGPS Information Veripos is a DGPS delivery service based upon the delivery of Differential GPS corrections through an Inmarsat communications satellite link. The service was established in 1994 and has grown from its North Sea roots to an operator of global scale with coverage extending to the Gulf of Mexico, Brazil, Mediterranean, Middle East and Caspian. Veripos Technical Specifications The system consists of a dense network of remote reference stations at which pseudo-range corrections are derived for each satellite in view. This along with other pertinent monitoring data is transmitted to the network HUB and control centre in Aberdeen using the latest high-speed data communication networks. The integrity of the correction data is verified prior to being sent via a robust multi-route communications link to the up-link earth station at Goonhilly for transmission to users via both the Inmarsat Atlantic East and Atlantic West communications satellites. This long journey takes only 1.5 seconds on average and is repeated for each station every 3 seconds thereby ensuring that the all-important "age of correction" is kept to a minimum; average correction age is typically better than 4 seconds. The format in which the corrections are broadcast is RTCM V2.1. System Performance The low age and fast update rate of Veripos corrections ensures extremely high position precision. To ensure a similarly high level of absolute position accuracy the Veripos-i network is tied to the ITRF96 geodetic reference frame to an accuracy of better than 5cm, in all dimensions, using GPS precise point positioning techniques. The reliability of the correction service is maintained at a high level with each element of the system being completely redundant. The accuracy of the system when using a receiver such as the SD100R is normally 1-3 metres (2DRMS) when within 1000Km of a reference station and better than 5m up to 2000Km. Summary of System Performance Item Specification Transmission Rate Update Rate Latency Age of Correction (typical) Accuracy (typical using DSNP hardware) up to 1000km Accuracy (typical using DSNP hardware) up to 2000km Absolute Accuracy of Reference Stations (ITRF 96) 1200 bps 3-4 seconds < 1.5 seconds < 5 seconds 1-3 m (2DRMS) < 5 m (2DRMS) < 5 cm (2DRMS) Veripos SD100R User Manual 19 Coverage Maps of Veripos Service Figure A-1 Africa DGPS Coverage Veripos SD100R User Manual 20 Figure A-2 North America DGPS Coverage Veripos SD100R User Manual 21 Figure A-3 South America DGPS Coverage Figure A-4 Western Europe DGPS Coverage Veripos SD100R User Manual 22 Appendix B – Factors Affecting DGPS Positioning Accuracy Many factors affect the positioning accuracy that a user may expect from a DGPS system. The most significant of these influences include: • • • • • • Proximity of the remote user to the reference station Age of the received differential corrections Atmospheric conditions at the beacon and remote user locations Satellite geometry, often expressed as a Dilution of Precision (DOP) Magnitude of multipath present at the remote station Quality of the GPS receiver being used at both the reference and remote stations. When operating away from the reference stations in the Veripos network, accuracy may degrade, as correction data may not model errors in your geographic area as thoroughly. The latency of differential corrections to a lesser extent affects the achievable positioning accuracy at the remote receiver since the magnitude of SA was turned to zero in year 2000. Latency is a function of the following: • • • • • The time it takes the base station to calculate corrections The data rate of the radio link The time it takes the signal to reach the user The time required for the remote differential receiver to demodulate the signal and communicate it to the GPS receiver. Any data loss that occurs through reception problems Most of these delays require less than a second, though in some instances, depending upon the amount of information being transferred, overall delays of three to five seconds may occur. Although ionospheric errors are normally removed through differential positioning, the state of the ionosphere can differ between the base station and remote user over large distances. As the base station calculates corrections based on local ionospheric conditions, they may not completely account for the errors observed at the remote user’s location. This causes part of the spatial decorrelation that may be observed over large distances between base station and remote receivers. Veripos SD100R User Manual 23 Index Absolute Accuracy, 19 Access Code, 13 Accuracy, 19, 23 AUX Baud Rate, 17 Connector Type, 17 Port, 6 Baud Rate, 7, 14 Bit Error Rate, 12 Bit Rate, 12 Cable Connections, 3 Cable Interface, 3 Cables Routing and Securing, 4 Connectivity, 6 Coverage Maps, 20 Customer Service, 1 DATA Pin-out, 6 DB9 Connector, 7 DGPS Errors, 23 Age of Correction, 23 Atmosphere, 23 Ionosphere, 23 Latency, 23 Proximity, 23 Environmental Specifications, 17 Frequency, 12 Input Voltage, 17 Installation Antenna Placement, 6 Connecting to External Devices, 6 Environmental Considerations, 5 Humidity, 5 Veripos SD100R User Manual Temperature, 5 Power Considerations, 5 Latency, 19 Line Frequency, 17 Low Noise Amplifier (LNA), 12 MAIN Baud Rate, 17 Connector Type, 17 Input Protocol, 17 Output Protocol, 17 Port, 6 Main Menu, 12 Menu Sleep, 14 Menu System Fix Status Icon, 10 Menu Access Icon, 9 Menu System Navigation, 9 Power Connector, 17 Power Consumption, 17 Range, 23 RD1 Data Message, 7 RTCM Protocol, 6, 9 Satellite HP 25East, 12 HP AORW, 12 LP AORE, 12 Selective Availability (SA), 23 Serial Port Pin-out, 6 Signal Strength, 12 Software Version, 15 Stations, 13 Unit Number, 13 Update Rate, 19 www.veripos.com, 1 24