1
FB203 USER MANUAL
Table of Contents
Basic Information ................................................................................................. 3
Brief Introduction ......................................................................................................3
Safety Notice.............................................................................................................3
Cleaning and Maintaining ........................................................................................3
Before Using ......................................................................................................... 4
SIM ............................................................................................................................4
Phone Unlock ............................................................................................................4
SIM Unlock ................................................................................................................4
Function menu Introduction ................................................................................. 5
File manager .............................................................................................................6
Phonebook ................................................................................................................6
Internet service ....................................................................................................7
Call center .................................................................................................................7
Call history ............................................................................................................8
Call settings ..........................................................................................................9
Messaging ..............................................................................................................11
Inbox ...................................................................................................................11
Drafts ..................................................................................................................12
Outbox ................................................................................................................12
Sent messages ....................................................................................................12
SMS settings .......................................................... Error! Bookmark not defined.
Multimedia .............................................................................................................12
Camera ...............................................................................................................12
Image viewer ......................................................................................................13
Video recorder....................................................................................................13
Video player........................................................................................................13
Audio palyer .......................................................................................................13
Sound recorder .......................................................................................................14
FM radio .............................................................................................................14
Oganizer .................................................................... Error! Bookmark not defined.
Electric torch.......................................................................................................14
Shortcuts ............................................................................................................14
Calculator............................................................................................................15
Calendar .............................................................................................................15
Alarm ..................................................................................................................15
Settings ...................................................................................................................15
Duad SIM settings ...............................................................................................15
Phone settings ....................................................................................................15
Network settings ................................................................................................17
Security settings .................................................................................................17
Restore factory settings......................................................................................18
Volume setting ........................................................................................................18
Basic Information
Introduction
Thank you for choosing the Social™ Micro world phone. Please read
this manual to further familiarize you with the Social™ Micro world phone.
The Micro supports 2 SIM cards in addition to basic call functions. The
Micro also provides the following features: phonebook, personalized ring
tones, alarm, camera, image viewer, video recorder, video player, audio
player, FM Radio, Micro SD card slot, calculator, calendar, torch
(flashlight) and others.
Note: Our Company reserves without any prior notice the right to
make changes on the contents of this manual.
Safety Notice
If your phone is lost or stolen, immediately notify your service provider
to disable/disconnect your SIM card.
To further secure your phone please take precautionary measures, such
as:
- Setting up a phone password.
- Setting up a SIM lock code.
Cleaning and Maintenance
Remember to keep the phone clean and avoid any dirty or dusty areas.
To clean the screen please use approved cell phone screen cleaners.
3
Before Using
SIM
Before using your phone you must insert a valid SIM card.
NOTE: Make sure your SIM cards are installed properly; simply
align the grooves of the SIM card to the SIM card slot.
Phone Unlock
In order to prevent illegal use of your phone, you can set a phone password. This
function makes you enter the phone password in order to use the phone.
Enter the phone password; press the OK key to confirm. For example, if the
phone lock password is set to 1122, then the following input: 1122 OK.
SIM Unlock
In order to prevent illegal use of your SIM card you can set a PIN (Personal
Identification Number) password. This function will block your SIM card from
making any calls unless you input your password.
Enter the PIN password, and press the OK key to confirm. For example, if the PIN
is set to 1234, then the following input: 1234 OK
if you input the wrong password 3 times then your SIM will be locked
by your network provider.
Note: If your SIM card is locked be sure to contact your network
provider for solutions.
Inserting and Removing the SD memory Card
Use approved and compatible SD Memory cards.
1. Turn off the phone, remove the back cover and take out the battery.
2. Slide the SD card clip and unlock it.
3. Lift the clip, and insert the card into it with the side of golden contacts
4
facing down.
4. Put down the clip and slide it back to the locked in position.
5. Put in the battery and apply the back cover.
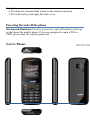
Powering On and off the phone
Startup and Shutdown: Press the power key (end call button) to start up
or shut down the mobile phone. If you are prompted to input a PIN or
UPIN, please enter the required password.
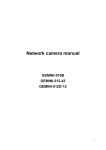
You’re Phone:
5
Main Menu Introduction
File manager
The File Manager allows you to play music or video files, view
photo, copy/move/delete files, remame files and also send the files
through the Bluetooth option
In the File manager, the screen will display two options; Phone and
Memory card.
Select "Phone", and press the OK key to enter. The available options
are as follows:
Open-This option will open/launch a specific file.
Format- This option will permanently delete all contents from the memory
card.
Details- This option will display the specifics of a file such as: Name, size.
.
Phonebook
The phonebook allows you to store and edit contacts information.
The following is a list of options for the contacts in the phonebook:
View: View the details of a contact.
Send SMS message: Send SMS (Text message) to this contact.
Call: Call this contact.
Edit: Edit and save an existing contact.
Delete: Delete the contact.
Copy: Copy the current record to Phone/SIM.
Mark: Mark several or all contacts to send a text message to.
The following, is a list of options in the Phonebook settings:
6
Preferred storage: This option allows you to select where you would
prefer to store your contacts.
Speed dial: This option allows you to set up speed dialing.
Extra numbers: This option allows you to set your voicemail number.
Memory status: View the usage and free Phonebook capacity information.
Copy contacts: This option allows you to copy your contacts in order to
transfer them.
Move contacts: This option will allow you to move your contact list
between SIM cards and the memory card.
Delete all contacts: This option allows you to delete all contacts from a
SIM card or the phone.
Internet service
The Internet Service allows you to access the internet through mobile
websites.
NOTE: When accessing websites you should enter an M. before
the sites name in order to access a mobile version of that site. For
example: m.yahoo.com, m.google.com, m.espn.com, etc.
The following, is a list of options in the Internet Settings:
Home page- This option will open your default.
Bookmarks- This option will display you bookmarked websites.
Input URL- This option allows you to enter the website address you want
to visit.
Recent pages- This option will display the recent websites you have
visited.
Settings- This option allows you to adjust the settings of the internet
service, this includes: homepage, data account, browser options,
preferences settings.
Call center
The call center will display all incoming, outgoing, and missed calls.
7
Call history: Missed calls
This menu will display all missed calls from both SIM 1 and SIM 2.
The following is a list options in the missed call list:
View- This option will allow you to view the details of a missed call.
Call- This option will allow you to call back the number of the missed call.
Send SMS message- This option will allow you to send a text message to
the number of the missed call.
Save to Phonebook- This option allows you to add the number of the
missed call to your phonebook.
Edit before call- This option will allow you to edit the number from the
missed call before you call it back.
Delete- This option will allow you to delete the missed call from your call
history.
Delete all- This option will allow you to delete your entire missed call
history.
Advanced- This option will allow you to display the call time.
Call history: Dialed calls
This option will display all of your outgoing calls.
The following is a list options in the dialed call list:
View- This option will allow you to view the details of a dialed call.
Call- This option will allow you to call back the number of the dialed call.
Send SMS message- This option will allow you to send a text message to
the number of the dialed call.
Save to Phonebook- This option allows you to add the number of the
dialed call to your phonebook.
Edit before call- This option will allow you to edit the number from the
dialed call before you call it back.
Delete- This option will allow you to delete the dialed call from your call
history.
Delete all- This option will allow you to delete your entire dialed call
history.
8
Advanced- This option will allow you to display the call time.
Call history: Received calls
This option will display all of your incoming calls.
The following is a list of options in the incoming call list:
View- This option will allow you to view the details of a received call.
Call- This option will allow you to call back the number of the received
call.
Send SMS message- This option will allow you to send a text message to
the number of the received call.
Save to Phonebook- This option allows you to add the number of the
received call to your phonebook.
Edit before call- This option will allow you to edit the number from the
received call before you call it back.
Delete- This option will allow you to delete the received call from your call
history.
Delete all- This option will allow you to delete your entire received call
history.
Advanced- This option will allow you to display the call time.
Call settings
The call settings option will allow you to adjust the following settings
as you like:
Call waiting
This option allows you to adjust the status of your call waiting.
NOTE: For more information on call waiting, please contact your
service provider for more information.
Activate- This allows you to turn on the call waiting feature.
Deactivate- This allows you to turn off the call waiting feature.
Query status- This allows you to see the current on/off status of the call
waiting feature.
9
Call divert
This option allows you to enable a call forwarding feature.
Note: Not all service providers support a call forwarding function,
so please contact your service provider for more information on this.
Activate- This option will allow you to set the number you would like
your calls forwarded to, and also lets you turn this function on.
Deactivate- This option allows you to turn the call divert feature off.
Query status- This option allows you to see the status of the call diver
feature.
Call barring
This option will allow you to add phone numbers to a block list, which
will completely block all calls from that number.
NOTE: Some service providers may not provide this service, please
contact your service provider for information on this feature.
Line switching
This option allows you to switch between calls on either SIM card.
Advanced settings
Auto redial: This option allows the phone to automatically redial a failed
call. This feature will automatically redial that number 10 times
Call time reminder: This option allows you to have an audio call time
reminder during a call. You can set the reminder to beep anywhere
between every 1- 300seconds while on a call.
So for example if you set this to 60 seconds, and you are on a 3 minute call
then you will hear a beep 3 times during the call to remind you how long
you have been talking. The following I the option list for this feature:
Off- This allows you to turn this function off.
10
Single- This option will allow you to have a single reminder to up to 3
minutes.
Periodic- This is the option that you can set to have the call time reminder
throughout your entire call, you can set the reminder hear to up to every 3
minutes.
Messaging
The messaging feature will display all of your outgoing and incoming
text and picture messages.
The following is a list of options in the messaging feature:
Messaging-Write message
This option allows you to compose a new text message (SMS).
Send to- After composing the text message, this option will allow you to
choose who you want to send it to.
Input method- This option allows you to choose the text when composing
a text or picture message.
Messaging-Inbox
The inbox will display all of your received messages SMS and MMS.
The following is the list of options in this menu:
View- This option allows you to open a message and view it.
Reply-This option allows you to reply to the sender of that message.
Call sender- This option allows you to call the message sender.
Forward- This option allows you to forward the message.
Delete- This option allows you to delete the message from the list.
Delete all- This option allows you to permanently delete all of your
messages
Save to Phonebook- This option allows you to save the senders number to
your phonebook
Sort by- This option allows you to sort messages by sender, subject,
unread/read, or message size.
Filter by- This option allows you to filter messages by SIM1, or SIM2.
Mark several- This option allows you to select more than one message to
11
be edited as you please.
MMS (Multi Media Messaging)
This feature allows you to send pictures, videos, or music in an MMS
message. You may also send the MMS to any email address or any cell
phone number. If the MMS size is oversized, the cell phone may fail to
send or receive it.
Note: Consult with the local service provider for details about
MMS sending and receiving restrictions.
Messaging-Drafts
This option allows you to see any of your messages that were composed
but not sent.
Messaging-Outbox
This option allows you to see messages that are waiting to be sent.
Messaging-Sent messages
This option allows you to view all messages that you have sent.
Multimedia
Multimedia-Camera
This option allows you to use the built in camera to take photos and
videos.
The following is a list of options in the camera feature:
Switch to video record: This option allows you to switch between still
photos and videos.
Photos: This option allows you to view all of the photos you have taken
Camera settings: This option allows you to adjust the technical aspects of
the camera.
It includes:
Anti-flicker- This option allows you to set the anti-flicker to the way you
would like it.
12
Image settings: This option allows you to adjust the size and resolution of
the photos you are going to take.
White balance: This option allows you to adjust the white balance on
photos.
Scene mode: This option allows you to adjust the scene mode which
includes Auto and Night modes.
Storage: This option allows you to choose where to save your photos; the
options are on the Phone or the Memory card.
NOTE: This phone contains limited memory, so we recommend you
purchase a memory card and use it.
Restore default: This option allows you to restore the default setting of
the camera.
Multimedia-Image viewer
The Image Viewer allows you to view and edit all the photos you have
taken and saved.
Multimedia-Video recorder
Camcorder settings: This option allows you to adjust the camcorder
settings, please see the camera settings above for more information.
Video settings: This option allows you to adjust the video quality.
Storage: This option allows you to choose where to save your photos, the
options are on the Phone or the Memory card.
Multimedia-Video player
The Image Viewer allows you to view and edit all the videos you have
taken and saved.
Multimedia-Audio player
The Audio Player feature allows you to listen to your music files.
The following is a list of options in this feature:
Playlist: This option allows you to choose where your default playlist will
be loaded from, your phone or memory card.
Repeat: This option allows you to set a music file on repeat.
Shuffle: This option allows you to automatically shuffle your songs in a
13
random order.
Background play: This option allows you to set music to play when not in
the audio player feature.
Multimedia-Sound recorder
The Sound Recorder feature allows you to record audio clips and play
them back.
The following is a list of options in this feature:
New record - This option allows you to start a new audio recording.
List- This option allows you to view a list of all the audio files you have
recorded.
Settings- This option allows you to set your storage preference for audio
recordings and also allows you to adjust the quality of these recordings.
Multimedia-FM radio
The FM radio feature allows you to listen to your favorite FM radio
stations.
NOTE: you must connect headphones in order to use this feature.
The following is a list of options in the FM radio feature:
Channel list: This option allows you to view a channel list of avail be FM
radio stations.
Manual input: This option allows you to manually input the radio station
number you would like to listen to.
Auto search: This option allows you to automatically search for available
FM radio stations near you, after they will be displayed in the channel list.
Settings: This option allows you to adjust the setting of the FM radio
feature as you like.
Organizer
Organizer-Electric torch
The Torch feature is a built in flashlight. In this feature you can turn the
flashlight on or off.
Organizer-Shortcuts
14
The shortcut feature allows you to set a shortcut to the directional pad. Up,
down, left and right can be set to the feature of your choice.
Organizer-Calculator
This feature allows you to use the built in calculator.
Organizer-Calendar
This feature allows you to browse the built in calendar.
The list below shows the options in this feature:
Jump to date: This option allows you to jump to a specific date.
Go to today: This option allows you to return to today’s date.
Organizer-Alarm
This feature allows you to set an Alarm clock, the Alarm Clock can hold
up to 5 alarm times.
Settings
The settings menu allows you to adjust the following settings on the
phone:
Dual SIM settings
This option allows you to enable or disable available SIM cards.
Phone settings
The following list details the settings you can change:
Phone Settings-Time and Date
In this menu, you can adjust the phone time and date settings. The
menu consists of three sub-menus:
Time Zone: This option allows you to choose and select your current time
zone.
Set time/date: This option allows you to set the current Time and date.
Set format: This option allows you to set the format of the Time and date
on the main screen.
15
Phone Settings-Language
This option allows you to set the main language of the phone to one of the
following options English, French, Spanish, and Portuguese
Phone Settings-Input method
This option allows you to set the default typing font and format.
Import Methods and Their Symbols
ABC
Complete capital letter typing.
abc
Complete lowercase typing.
PT/pt
Portuguese typing.
ES/es
Spanish typing Capital and lowercase respectfully.
123
Number and symbol typing.
Changing the Input Method: In any typing function, press the “*” key to
change the input method.
Phone Settings-Display
Wallpaper: This option allows you to set the wallpaper on the main screen,
you can choose from a list or load your own.
Power on display: This option allows you to change the Power On
animation.
Power off display: This option allows you to change the Power Off
animation.
Show date and time: This option allows you to choose whether you would
like the Time and Date shown on the main screen.
16
Phone Settings-Airplane mode
The Airplane feature allows you to power down all of the phones signals
so do not interfere while on an airplane.
Phone Settings-Brightness
This feature allows you to set the brightness on the screen.
Network settings
Network settings-Network selection
This option allows you to see and choose which network you are
currently connected to and which networks are available.
The following list shows the options in this menu:
New search: This option allows you to search for available networks.
Select Network: This option allows you to choose from a list of networks.
Selection mode: This option allows you to select from the options Manual
or Automatic.
NOTE: We recommend you keep the selection mode on automatic.
Security settings
This option allows you to set the security on your phone by setting
passwords.
Security Settings-SIM security settings
SIM lock- This option allows you to set a SIM lock Password.
Change PIN: This option allows you to change the password on SIM 1
Change PIN2: This option allows you to change the password on SIM 2
Security Settings-Phone security
Phone lock: This option allows you to set a phone password, which the
phone will prompt you for before being able to use it.
Change password: This option allows you to change the password.
NOTE: Phone default password is 1122.
17
Security Settings-Auto keypad lock
This option allows you to set the time interval before the keypad
automatically locks itself.
NOTE: TO UNLOCK THE KEYPAD PRESS AND HOLD THE “*”
(Star) BUTTON
Security Settings-Restore factory settings
This option allows you to reset the phone to the manufacturer settings. In
order to reset the phone you will need the phone password.
NOTE: The default password is 1122.
Volume settings
This option allows you adjust all of the volume settings on the phone. The
phone lists 4 categories of volume settings that are preset and available for
you to use, they are:
General: This profile is perfect for everyday phone use.
Silent: This profile will change the phone to silent mode.
Meeting: This profile will change the phone to a vibrate mode.
Outdoor: This profile is perfect for the outdoors because it will raise the
volume on all audio notifications.
Press the left soft key "Options":
Activate: This option allows you to activate one of the preset Audio
profiles.
NOTE: To adjust the actual settings of any these profiles simply
choose the profile and select customize.
Customized settings
Alert type: Available options are Ring only, Vibrate. Only, Vibrate. And
ring, Vibrate.
Ring type: Available options are Repeat or Beep once.
Incoming call-: This option allows you to choose a ringtone from the
preset list and also allows you to choose your own custom ring tone.
18
Ringtone volume: This option allows you to increase and decrease the
ringtones volume.
Message: This option allows you to choose a message notification tone
from a preset list and also allows you to choose your own custom ring
tone.
Message volume: This option allows you to increase and decrease the
message notification tone volume.
Keypad: This option allows you to choose from three available keypad
tones.
Keypad volume: This option allows you to increase and decrease the
volume of the keypad volume.
PC Connection
Use your SD Memory card or the internal phone memory as a Mass
Storage Device (U-Disk) by simply connecting it to your computer via a
micro USB Cable. On the Phones Screen select “Mass Storage” and now
you can transfer music, videos, games and other files from your phone to
your computer and vice versa.
Original Parts
Contact Social™ for supply of original parts. Here are some
precautions you can take to keep the phone in good condition:
1. Keep the phone out of children's reach.
2. Regularly check the mobile equipment in your car to see
whether it is correctly installed and are working normally.
NOTE: Only use batteries, chargers and accessories approved by
the Social™. Use of other types of batteries, chargers and accessories
may cause damage to the phone and will result in a voided warranty.
19
Standard Limited Warranty
What is Covered and For How Long? SOCIALMOBILE
TELECOMMUNICATIONS ("SMT") warrants to the original purchaser
("Purchaser") that SMT's Phones and accessories ("Products") are free
from defects in material and workmanship under normal use and service for
the period commencing upon the date of purchase and continuing for the
following specified period of time after that date:
Phone: 60 days from purchase date
Batteries: 60 days from purchase date
Other Phone Accessories: 60 days from purchase date
What is Not Covered? This Limited Warranty is conditioned upon proper
use of Product by Purchaser. This Limited Warranty does not cover: (a)
defects or damage resulting from accident, misuse, abnormal use,
abnormal conditions, improper storage, exposure to moisture or dampness,
neglect, unusual physical, electrical or electromechanical stress, or defects
in appearance, cosmetic, decorative or structural items, including framing,
and any non-operative parts unless caused by SMT; (b) defects or damage
resulting from excessive force or use of a metallic object when pressing on
a touch screen; (c) equipment that has the serial number or the
enhancement data code removed, defaced, damaged, altered or made
illegible; (d)
.
Note: Original proof of purchase is required for any warranty
claims
Please send all warranty or information requests to
[email protected]
20