1
%ZOBEKVTU5SBJOJOH.BOVBM
XXX0SUIP/FVSPDPN
Table of Contents
I.
History and Mission____________________________1
II.
Preparation and Testing (P.A.T.) Program___________4
III.
Dynadjust Tutorial & Navigation__________________6
IV.
Users Tips____________________________________12
V.
Student Scenario_______________________________16
VI.
Appliance ____________________________________20
VII.
Plyometrics___________________________________23
VIII.
Introduction to the Dynadjust Rudimentary Exercise
Programs (D.R.E.P.) & Ancillary Conditioning Exercises (A.C.E.) _27
a.
D.R.E.P. Chapter 1 ________________________31
b.
D.R.E.P. Chapter 2 ________________________33
c.
D.R.E.P. Chapter 3 ________________________37
d.
D.R.E.P. Chapter 4 ________________________39
e.
D.R.E.P. Chapter 5 ________________________41
f.
D.R.E.P. Chapter 6 ________________________43
g.
D.R.E.P. Suggestions ______________________45
IX.
X.
Ancillary Conditioning Exercises (A.C.E.) _________46
Introduction to Catalog of Exercise Assignments ________48
a.
Catalog Chapter 1_________________________53
b.
Catalog Chapter 2 ________________________58
c.
Catalog Chapter 3 ________________________66
d.
Catalog Chapter 4 ________________________71
XI.
12 Standard Exercises_________________________76
XII.
Suggested Goal Metrics for Beginning Exercises____77
XIII.
Research and Supporting Links _________________84
XIV.
Glossary ___________________________________86
!
The Dynadjust History & Mission
!
Play History & Mission Video
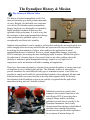
The history of spinal manipulation in all of its
many incarnations goes back perhaps thousands
of years. Happily, for the health care consumer,
over the last few decades spinal manipulation
therapy has been very thoroughly researched by
highly qualified scientists from across the
spectrum of the professions. It is safe to say that
the consensus is that spinal manipulation therapy
when performed by qualified experts is an
exceptionally useful and safe modality.
Students and practitioners can be taught to perform their orthopedic and neurological tests
utilize imaging when necessary and with time and experience develop excellent instincts
for making the determination of where, when and how the application of spinal
manipulation therapy is indicated. However, spinal manipulation therapy, especially
HVLA techniques, are among the most challenging skills to master. Whether the goal is
the reduction of a fixation legion of a synovial joint or any other problem where the
modality is indicated, spinal manipulation therapy requires a very high level of
competence and is not without risk both in training and application.
There have been many attempts by scientists from various disciplines to create some type
of simulator device to address this problem. The difficulty is that it is impossible to
provide simulators for each different body type or treatment scenario, even if this was
possible its simply not feasible for each individual student to have adequate lab time and
technical assistance necessary for them to develop their required skills. In the early
development of the Dynadjust system it was quickly recognized that the path of the
anatomical analog was not a feasible solution.
11
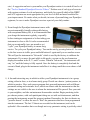
Published research on exactly what
comprises the essential elements of safe
and effective HVLA procedures have
emerged. Many studies, including
published research that is specific to the
Dynadjust Instrument, have clearly
demonstrated that training on biofeedback
machines does translate into lasting
increases in the specific skills required in
the treatment of human beings. In
approximately 2007, computer gaming systems such as the Wii were introduced. These
toys utilize miniaturized gyro and accelerometer technology for measuring motion and
force. The advent of these new powerful electronic components was the impetus for
further development of the Dynadjust spinal manipulation training system. These
components have made it possible for the Dynadjust instrument to accurately measure
every aspect of the dynamics of the manipulative thrust and to do so safely and
effectively, in any treatment posture. This virtually eliminates the potential for student on
student in class as well as injury to the students resulting from old fashion training
exercises. Another significant advantage to utilizing the new technology is that it is
relatively inexpensive. Thanks to the success of the computer toys these components are
readily available and quite versatile in their compatibility with other necessary electronic
components. These attributes have made it possible for every student to have access to
their own Dynadjust training equipment.
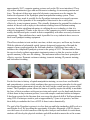
This allows students to train on their own time, at their own pace, and from any location.
With the infusion of substantial capital, intense design and engineering effort and the
support of many professionals in the field and educators, OrthoNeuro was ready to
introduce the completed Dynadjust systems in the spring of 2012. The instrument allows
the user to closely replicate appropriate treatment postures so that the exercises isolate
specific anatomy of the user for training. The instrument utilizes four basic principles of
effective exercise: Dynamic resistance training, isometric training, Plyometric training,
and biofeedback training.
For the first time in history of spinal manipulation training, we now have an affordable
and comprehensive system, which combines these proven exercise principles for the rapid
development and enhancement of not only the body but the central nervous system of the
trainee. The Dynadjust system allows the trainee to quickly acquire the ability to modulate
the force of their procedures with great precision and control over the depth and direction
of their thrust in any treatment posture, even with complex combined motion techniques.
It has been reported in the literature that on average the physical skill of field practitioners
using HVLA techniques tends to peak at approximately 5 years in to practice, and that
their ability to modulate the force of HVLA thrust varies dramatically.
The goal of the Dynadjust systems is to close that gap and help standardize skill levels at a
much higher level. By providing the opportunity to produce thousands of HVLA thrusts
over the course of several semesters with objective analysis and feedback for each thrust,
students will develop the physical attributes and skills needed to master the art far sooner
22
and in a much safer and more effective manner. By incorporating the Dynadjust system
into the curricula of our colleges we believe that the physical acumen of our students in
force modulation, coordination, accuracy and control for the full spectrum of HVLA
procedures will be radically improved in just 2 to 3 semesters of study. The program is
designed to be easily and economically incorporated into any existing palpation or
introductory to manipulation course. While this enhancement to the curriculum requires
almost no change to the existing program, it will immeasurably enhance the ability of the
instructors to track the progress of individual students, identify areas of weakness in skill
and provide custom regimens to effectively address and correct any deficit in
performance.
33
The Dynadjust Preparation and Testing
(PAT) Subscription Program
Play PAT Video
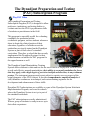
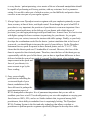
The Dynadjust Preparation and Testing
Subscription Program (PAT) is designed to allow
professors, institutions, and testing bodies to
evaluate and test the HVLA psychomotor skills
of students or practitioners in the field.
This program is especially useful for evaluating
candidates for promotion within
a scholastic program, such as students whom are
about to begin the clinical portion of their
education, regardless of whether or not the
student has previously trained on the Dynadjust
System as part of their school’s standard
curriculum. Therefore, a school that has recently
implemented the Dynadjust Systems for their
underclassmen can utilize the PAT program for
the upperclassmen as well.
The Dynadjust Spinal Manipulation Training
System allows students to train and test for the most critical of all physical skills involved
in safe and effective manual manipulation, their ability to accurately modulate the forces
that they apply, with a high degree of precision in depth and direction, in any treatment
posture. The instrument measures and reports objective metrics on every aspect of the
actual dynamics of the HVLA thrust. It provides comprehensive empirical analysis of
skill, identifies weaknesses in technique, and custom training regimens for the
development and enhancement of those skills.
Dynadjust PAT subscriptions are available as a part of the Dynadjust System Scholastic
Implementation Program, and even for schools
where the Dynadjust System is not yet a part of
the standard curriculum.
The PAT subscriptions are easily administered.
When a group of students is ready to move up to
their clinic experience:
44
1) The institution orders the appropriate number of Dynadjust kits and subscriptions to the
OrthoNeuro Service Center.
2) The administrating professor has the choice of utilizing the standard program, which is
available on-line from ONT, or they can design their own program.
3) The students are introduced to the instrument via the on-line ONT PAT Subscription
Introduction Videos.
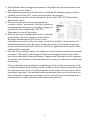
4) The instructor describes the set of manipulation
scenarios, and the “goal metrics” that they consider are
most appropriate for this group of students. Suggested
goal metrics can be found on the ONT PAT
Subscription section of the website.
5) After the instrument familiarization work is completed
by the student, they have 30 days to work with the
Dynadjust Instrument and ONT Service Center
subscription to practice for the test at home, and at their own pace. (In the interim, the
administrating professor has the option of using the system for the students to perform
and up-load exercises that will become the “base-line”, against which the results of their
training will be compared.
6) After the 30-day training regimen, the students are tested within a controlled environment
on campus. The results of this testing will objectively identify any weak points which
may exist in individual student performance. Supplemental Dynadjust exercise regimens,
for students who need them, can be implemented to remedy any deficiencies in individual
performance.
This revolutionary and comprehensive evaluation protocol provides a permanent record
of empirical analytical data, and thus instills confidence for the student and professor that
the student possesses the level of skill needed for advancement to the next phase of their
educational experience. The individual student performance data can be reviewed at any
time, and used to compare new performance levels, such as for an exit examination for a
clinical rotation, or other milestone in the educational experience.
!
55
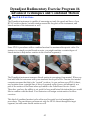
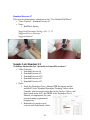
The Dynadjust Tutorial
Play Tutorial Video
The following is a step-by-step tutorial of the various screens you will encounter while
using the Dynadjust. This section is divided into two parts:
Part I - Device Navigation, Part II – Exercising.
Part I - Device Navigation
1. Start-Up Screen
• Device name, Software
Version, Serial Number,
Subscription Expiration
Date
2. Welcome Screen
• Choose “New Parameters”
with button #1.
• If the device has exercises
stored, you will have the
option to start a new
parameter (button #1) or to
use the last parameter
(button #2).
66
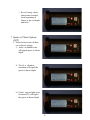
3. Custom/Pre-Programmed
• The “Custom” feature is
currently reserved for
research. Please select “PreProgrammed,” (button #2)
for one of the twelve
parameters settings.
4. Parameter Select
• Select one of the twelve
parameters. Cycle through
the parameters with button
#1, select the parameter with
button #2.
5. Spring Select
• Install the appropriate spring
in the Dynadjust (Yellow,
Red or Black) Select the
corresponding spring with
button #1; continue with
button #2. (The Yellow spring is
the lightest, the Red spring is 20%
stiffer than the Yellow spring, and the
Black spring is 20% stiffer than the
Red spring).
6. Timing
• Choose between Standard or
Recoil timing.
o Standard timing: time
is measured from the
moment the user
begins to thrust until
they cross the depth of
thrust distance.
77
o Recoil timing: entire
thrust time recorded;
from beginning of
thrust, to pre-set depth,
and back.
7. Queue to Thrust Options
(Q2T)
• Select between one of three
cue to thrust options
i. Audio: an audible tone
will signal queue to thrust
depth.
ii. Tactile: a vibration
sensation will signal the
queue to thrust depth.
iii. Visual: a green light (next
to button #2) will signal
the queue to thrust depth.
88
8. Exercise Review
• Review of the selected
parameter and the thrusts
to be performed; 6 warm
up & 12 recorded.
9. Parameter Review
• Line 1: Parameter #, Timing
option (S= Standard, R=
Recoil), Spring color.
• Line 2: Queue to Thrust
depth and Margin for Error
• Line 3: Depth of Thrust and
Margin for Error
• Line 4: Ready to begin.
Part II – Exercising
10. A successful thrust is
one that falls inside the
parameters.
• Line 1:
o Dwell= the time
from when the user
crosses the Depth of
Thrust distance until
they stop and reverse
direction.
• Line 2:
o T= Time of thrust; either standard or recoil.
o R= reaction time; the time spent holding at the queue to thrust depth.
o F= Force, displayed in Newton / acceleration units; this calculation is
based on the spring selection and speed of the thrust (Force = Mass x
Acceleration) See the Math Calculations Video for details.
99
• Line 3:
o LOD= Line of Drive (deviation from straight) reported in percentages.
o Rot= Rotation (around the longitudinal axis of the instrument) reported in
degrees.
11.
Failure to Pause at
Queue Depth
• This screen reports a
failure to pause at the
Queue to thrust Depth.
12. Insufficient Depth
• This screen reports a
thrust that was too shallow
in depth and did not reach
the Depth of Thrust
Parameters.
13. Excessive Depth
• This screen reports a
thrust that was too deep in
depth and went past the
Depth of Thrust
Parameters.
10
10
14. Loss of PreManipulative Tension
• This screen reports a loss
of Pre-Manipulative
tension at the Queue to
Thrust depth.
15. Session Complete
• After finishing a complete
set, you can now connect
the Dynadjust to a
computer to upload
exercise data via Sync
software, or continue
exercising with the device
by pressing button #2 (this
will take you back to the
welcome screen).
16. Memory Full
• The Dynadjust can store
up to 16 sets of exercise
data. Upon reaching this
limit you have two
options:
o Connect to the
computer to upload
the data
o Hold both buttons
#1 & #2 for 12 seconds to erase the data.
11
11
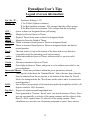
Dynadjust User’s Tips
Legend of screen information:
Par. Set “X” =
Spring “X” =
Parameter Setting (1-12)
Y for Yellow (lightest resistance)
R for Red (medium resistance, 20% stronger than the yellow spring)
B for Black (heaviest resistance, 20% stronger than the red spring)
Q2T =
Queue to thrust (at designated tissue pull setting)
MFEQ=
Margin for Error of Queue to Thrust
DOT=
Depth of Thrust (from queue to thrust to designated depth.
MFET=
Margin for Error for Depth of Thrust
Standard= Thrust is measured from Queue to Thrust to designated depth.
Recoil =
Thrust is measured from Queue to Thrust to designated depth, and back to
neutral position.
Dwell =
The time it takes to stop at the bottom of the thrust and reverse direction
(especially useful for measuring recoil style acumen).
Audio =
Audio tones indicate Queue to Thrust, and successful vs. un-successful
thrusts.
Tactile = Vibration sensation at Queue to Thrust
Visual =
Green light at Queue to Thrust, and green or red to indicate successful vs. unsuccessful thrust.
Successful Thrust = Thrust was performed within the preset parameters selected.
T=
Time (speed) of the thrust (In “Standard Mode”, this is the time from when the
thrust is initiated from the pre-tension, to the bottom of the thrust. In “Recoil
Mode, the timing includes the “Dwell time and the time it takes to return to the
neutral position.)
LOD =
Line of Drive in percentage of deviation from perfectly straight line of drive (45
degrees would be 100% deviation.
Deg Rot = Degrees of rotation around longitudinal axis.
F=
Force generated in “Newton / Speed” units. (not actual newtons of force). Force
goes up exponentially, as a factor of the spring constant, and the velocity of the
thrust. F= KxV squared times 30, where kx is the spring constant. These
calculations are used for ease of reporting comparative speed / force metrics.
12
12
User’s Tips:
1) Form is everything. Without the proper form, with regard to your posture and positioning of
your own body and the Dynadjust instrument, you will not reap the maximum benefits of the
Dynadjust training regimens. Your professor will demonstrate the proper form for each
exercise, and explain the importance of the subtleties of doctor / patient simulation postures.
Maintaining the proper form will ensure that the correct muscle groups are being developed and
enhanced with the exercises. It is better to do a few sets of exercises with the proper form, than
to do many sets with sloppy form. Your professor will explain the desired effects and goals of
training. If you perform the exercises as prescribed, the benefits of this system will begin to
show very quickly, and you will soon possess the physical attributes of a master.
2) The Dynadjust instrument has a long-life rechargeable battery. It is more than sufficient for
nearly any training session, but should be re-charged between sessions to ensure accurate data
reporting, and to prevent loss of data.
3) The Dynadjust instrument is a very sophisticated electronic device. If the instrument is on, and
a partial, or random thrust is performed, it could confuse the internal computer, resulting in an
error message or a “freeze”. This usually causes the instrument to emit a continuous tone or
vibration, which indicates that the unit needs to be re-set. To re-set the unit, simply depress the
unit fully, one time, from neutral to full depression. This will allow the instrument to re-set.
Usually no data will be lost with this kind of re-set of the instrument. If the instrument does not
respond to this procedure, press and hold button #1 until the “Welcome Screen” appears. All
stored data should be retained, and you can start a new set. If the unit still does not respond, you
may need to clear the existing data by pressing and holding both buttons for 12 seconds, or until
the screen goes black. When the screen goes black, release the buttons, and the unit will
automatically return to the “Welcome Screen”. This “re-boot” will erase any stored data.
4) The Dynadjust Instrument holds 16 sets of 18 thrusts. The instrument will not record partial
sets. You must complete any set (all 18 thrusts) that you intend to up-load to the Service Center.
You may turn the unit off at any point, even if the instrument is not full, by depressing and
holding button #1 until the Welcome Screen appears. At the welcome screen, simply press and
hold button #1 until the screen goes black. The first six thrusts of any set are for “warm-up”, to
help you find the “groove” of the parameter setting chosen for the exercise, and they are not
stored. The last 12 thrusts of any set of thrusts are stored for up-load to the Service Center. If
you perform exercises that you do not intend to up-load to the Service Center, you can use the
“re-boot” function to erase all stored sets. You do not need to “fill” the instrument with all 16
sets before you re-boot.
13
13
5) You need not fill the instrument with all 16 sets before you up-load your exercises. You can upload any stored exercises at any time. The Welcome Screen shows how many sets are stored.
When you up-load sets to the service center, it is important to use the “Notes” window to
describe your exercise. If your exercise is one that has been chosen from the Catalog of
Exercises, or if it is one that has been assigned by your professor, you may label it as such. Be
sure to note any variations that you employ, and to indicate if it was done with the dominant or
non-dominant hand, where applicable.
6) When exercising with the instrument, it is important to take your time, and not to rush through
the thrusts. Holding “pre-tension” for three to five seconds is an important component of the
isometric training aspect of Dynadjust exercises. Hold the pre-tension, just as if you were
working on an actual patient. Simulate waiting for your patient to relax, as you consider the
angle, depth, and speed of the thrust that you intend to impart. Be sure to consider your form
with every thrust. If you find that you are losing your form, you may be experiencing fatigue,
and should stop and rest.
7) While holding pre-tension, concentrate on flexing the muscles involved with the thrust you are
about to perform. This is an important component of the plyometric aspect of the training. (See
Plyometric portion of this guide.)
8) When starting a new exercise for the first time, emphasis should first be placed on performing
the thrusts within the parameter settings chosen. Start with parameter settings with liberal
margins for error, and gradually move up to the more challenging parameter settings. Once
good depth control is achieved, move up to the stiffer springs and work to maintain depth
control with the heavier springs. As you increase the spring tension, you will find that control
over your line of drive will be more difficult. An exception to this rule is with some sideposture or body-drop exercises, in which it is sometimes easier to perform the exercise with the
stiffer springs. For these exercises, the user should start with the stiffer springs and work toward
being able to perform as well with the lighter springs.
9) Be sure to master depth and directional control before you begin practicing for speed and force
increases. Mastering any particular exercise means being able to maintain your form, and to
control the depth and direction of the thrust with any level of resistance, and being able to
modulate the force / speed of your thrusts at will. (See the suggested goal metrics to be
achieved in the Catalog of Exercises Chapter). The user should strive to master any particular
exercise before moving on to the next doctor / patient positioning technique, and before
utilizing the exercise enhancement techniques, such as the resistance tubing or supplemental
appliances, etc.
10) During the course of your exercises, if you find that you experience soreness of joints or soft
tissue, simply take appropriate action in terms of first-aid, and back off on the frequency and
14
14
intensity of your training. One of the most beneficial aspects of the Dynadjust Training System
is that it is customizable for any level of experience and physical development. Of course it is
normal for there to be some level of muscle soreness in the groups involved with the Dynadjust
exercises. Use your own judgment, based on past experience with other new physical activities,
to train for your goals, at your own pace, and to avoid injury from overtraining.
15
15
!
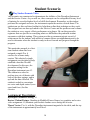
Student Scenario
Play Student Scenario Video
This scenario was constructed to demonstrate the abilities of the Dynadjust Instrument
and the Service Center. As you will see, these concepts can be extrapolated for any level
of training for even the highest levels of skill development. Remember, as the student
performs the assigned exercises, the instrument reports the metrics of each thrust. The
student can use this real-time feedback to help them refine their technique as they work.
The assigned sets are then up-loaded to the Service Center and the professor can evaluate
the student on every aspect of their performance at a glance. He can then prescribe
regimens that are specific to remedying whatever difficulties the particular student
encounters with their training. This system provides a permanent private record of
achievement for the student, with which to compare future accomplishments and to be
used to determine when the student is ready to move forward and progress through the
program.
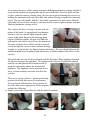
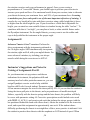
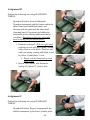
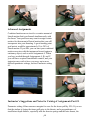
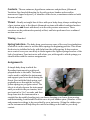
This particular example is a firstterm student whom has been
assigned a simple P to A
exercise for a home-study
session. This relatively simple
assignment was designed to help
establish a baseline for skill
development. In this case, the
parameter setting for the
Dynadjust instrument was #3.
The student was asked to
perform two sets of thrusts with
each of the three springs, and to
up-load the data collected. The
student is asked to concentrate
on vector and depth control (over
speed and force) for this
exercise.
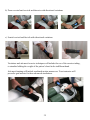
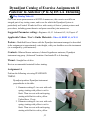
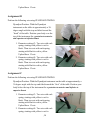
Assignment Description:
Dynadjust Parameter Setting: #3
Doctor / Patient Posture: Standing in Modified Fencer Stance (see graphics and review
video assignment #1) Maintain your lordotic lumbar curve during the exercise.
Thrust Vector: P to A, with the Dynadjust instrument tangential to the table, and the top
of the instrument at approximately naval level.
16
16
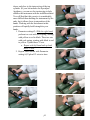
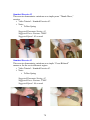
Contact: Bilateral Thenar Eminence with fingers pointing toward the head of the
“patient.”
Primary Student Muscle Involvement: Triceps; bilaterally.
Thrust Focus: Straight line of drive within the parameters of Dynadjust Setting #3.
Notes: Please perform two sets of thrusts with each of the three springs, yellow to red to
black. Rest for five minutes between sets. Concentrate on isometric flexing of the triceps
muscles during the pre-tension phase. Hold pre-tension for at least 3 seconds. Up-load
exercise data (a total of six sets) to your ONT account for evaluation.
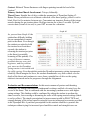
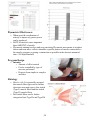
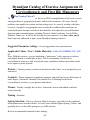
!"#$%&'(&
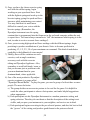
As you see from Graph #1 the
student has difficulty holding
the pre-manipulative tension
prior to the thrust. Even though
the student was asked to hold
the tension for at least three
seconds, the student is
releasing the tension just prior
to the thrust (essentially,
bouncing off the patient). This
is one of the most common
problems that are seen with
beginners, and the problem
gets worse as the Dynadjust
spring tension is increased with
the stiffer springs. Even though this particular Dynadjust parameter setting incorporates
relatively liberal margins for error, the student demonstrates very little control over the
depth of the thrust and continues to waver from a straight line of drive as the spring
tension is increased and as he progresses through the assignment.
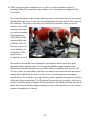
Evaluation and Recommendations: In this most common of posture and thrusting
techniques, the student demonstrates fundamental weakness and lack of control over the
vector of the thrust. This is confirmed with the increasingly random scores with higher
spring settings. This finding could be confirmed by asking the student to perform the
same exercises, but reversing or alternating the order of the spring tension settings (black
to red to yellow). The simple prescription for improvement would be PRACTICE and
strength training of the triceps muscles using the exercise tubing and accessories provided
in the Dynadjust Kit. A practical prescription for this student would be to practice this
technique without trying for increased speed until the control and strength issues are
17
17
resolved, and the student can perform the exercise within parameters with increased
vector control. Expectation is for rapid improvement with practice and strength training.
Moving forward, the instructor will introduce more complex postures and more
challenging Dynadjust settings and margins for error.
Areas of Consideration
1) If you observe that the student is losing “tissue pull” prior to the thrust, it is
likely that he is not holding the tissue pull for the recommended 3 to 5
seconds, prior to the thrust (This is easily checked by reviewing the data uploaded by the student). A preponderance of thrusts in which the tissue pull is
lost prior to the thrust would indicate that the student is either using a
resistance setting that is too high, or they are rushing through the exercise. It
is important to remind students that the Dynadjust instrument is a training
device versus a simulator. The tissue pull phase of the thrust is designed to
provide beneficial isometric exercise of the specific muscle groups involved
with particular maneuvers. The ultimate goal of the exercise is for the
student to develop the strength and coordination needed for a vast
range of patient body types in any doctor / patient positioning. Remind
the student that in a real-life scenario, the doctor may need to hold the tissue
pull in pre-manipulative tension for some time, as the wait for the patient to
relax for the thrust.
2) If the student is consistently failing to thrust within the designated parameter
settings, with regard to depth of thrust, this would indicate that the student
has not yet developed sufficient control over their thrusts. To address this
issue, you might consider using a more “gross motion parameter setting”
with higher margins for error, and advise the student to endeavor to gain
depth control before he begins increasing this speed / force. The student
would use the new setting until they become more consistent with their
depth control, then move back to the more challenging parameter settings,
and gradually work up through the resistance settings until they refine their
command over depth control.
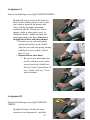
3) If the student has trouble with “line of drive” control, it is usually a strength
issue. A good prescription for this type of deficiency is to ask the student to
brace the Dynadjust either with one end secured against a surface, or by
using the appliances to hold the device steady in position (depending on the
doctor / patient position being used).
4) It is generally best for students to start building their strength and
coordination using the lighter springs in the beginning, and working through
the stiffer springs as their skill improves. The exception to this rule is sideposture or body-drop maneuvers. In most cases, it is actually easier to
18
18
perform the maneuvers with the stiffer springs, as they lend some support for
the set-up. For most side-posture work, it is recommended that the students
start with the stiffest spring, and move through the lighter resistance levels
as their strength and coordination improves.
!
Key Words for Cross-Training: Modified Fencer Stance, lordotic, lumbar, thenar
emminence, triceps
!
!
19
19
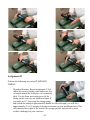
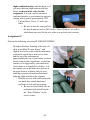
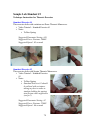
The Dynadjust Appliance
OrthoNeuro Technologies has introduced a new
appliance designed to be used with the Dynadjust
Instrument to further enhance the functionality and
utility of the Dynadjust System as a whole.
This new appliance is the result of some very important
feedback, which we have received from both students
and professors at colleges where the technology is
presently implemented, or under investigation, and we
are very appreciative of their advice and help in the
basic design.
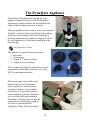
!"#$%&''"(#)*+%,(-+.
The appliance consists of four components.
1. Base plate
2. Tension ring
3. Length of 2” nylon webbing
4. Length of exercise tubing.
These components allow for much more accurate
juxtaposition of the hands of the user in a verity
HVLA manipulation postures.
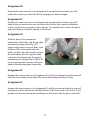
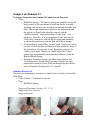
The tension ring is used to allow the
hands of the user to be positioned
closer together for a more realistic
simulation of many cervical spinal
procedures. It is especially useful in
early training for students whom have
yet to develop sufficient strength in
their hands, which is needed to grip the
instrument as if holding the weight of
the head of a patient with the
“indifferent” hand. The tension knob
20
20
can be gradually loosened as strength
develops, and very quickly the student
will find that he or she no longer needs
the additional help for delivering
precise cervical procedures. In the
cervical spinal simulations the
appliance can be attached to the
Dynadjust unit in two different ways
depending on the desired hand
placement.
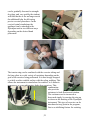
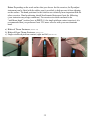
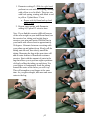
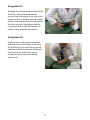
The tension ring can be combined with the exercise tubing and
the base-plate in a wide variety of variations depending on the
goal of the exercise being performed. It is then snugly strapped
to a table or other suitable surface with the nylon webbing. This
allows the instrument to stand-alone for certain P to A thoracic
maneuvers, or even rudimentary body-drop exercises. This
combination
also provides
resistance in both flexion and rotation.
The resistance can be increased or
decreased simply by moving the ring up
or down on the housing of the Dynadjust
instrument. This type of exercise can be
introduced at any point in the program,
first as a stabilizing feature for assisting
21
21
the user in developing their precision in depth
control and later for advanced maneuvers
requiring combined motion in rotation and
flexion of the thrust, such as in a prone thoracic
maneuver. Of course, the instrument records and
displays the metrics of the thrust. Therefore, an
instructor may assign an exercise in which he
requests that a certain degree of rotation or
torque is to be applied simultaneously with the
posterior to anterior thrust. This arrangement is
also very useful for practicing “recoil” style
maneuvers, as it prevents the unit from falling
off the table when the user releases tension in the
recoil portion of the maneuver. A slight variation of the arrangement of the tension ring
and base-plate allows the user to practice thrusts using a table that is not ideal in height
for the particular exercise.
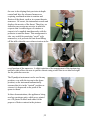
The Dynadjust instrument can be used in any
position, even with the top cap in the down
position, as the instrument automatically
assumes that it is in the “neutral” position as
soon as it is depressed to the point of the
queue to thrust.
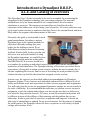
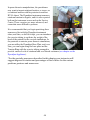
In these demonstrations, the appliances being
used are prototype units, which were printed
on a 3D printer in black and white for the
purpose of better contrast in the pictures.
!
22
22
Plyometrics
Plyometric Principles, as they apply to the Dynadjust Spinal Manipulation Training
System by OrthoNeuro Technologies
Play Plyometrics Video
What is Plyometrics?
Plyometrics (also known as "plyos") is a type of exercise training designed to produce
fast, powerful movements, and improve the functions of the nervous system, generally
for the purpose of improving performance in sports.
Main purpose – heighten the excitability of the nervous system for improved reactive
ability of the neuromuscular system
• Popularized in the 1970s by state sports trainers in the former East Germany.
• Benefits range from injury prevention, power development and sprint performance.
• Doubled vertical jump
• Sources for Resistance
o Body weight
o External forces
o Elastic tubing
o Elastic bands (Theraband)
Neurological & Biomechanical Influences
• Muscles have a natural tendency to rebound when stretched rapidly (e.g. rubber
band)
o Theoretically, the more rapid the eccentric contraction, the more likely the
stretch reflex is activated
• Plyometric training can promote changes within the neuromuscular system that
allow the person to have better control of
the contracting muscles.
• Plyometrics is used to increase the speed
or force of muscular contractions,
providing explosiveness for a variety of
sport-specific activities.
Dynadjust Research Results
• Males 9X increase in speed
• Females 18X increase in speed
23
23
Plyometric Effectiveness
• When speed & coordination of
activity is improved, greater power
can be produced
• RATE of stretch is more important
than AMOUNT of stretch
• Plyometric training involves and uses practicing Plyometric movements to toughen
tissues and train nerve cells to stimulate a specific pattern of muscle contraction so
the muscle generates as strong a contraction as possible in the shortest amount of
time. (105 mph Baseball)
Program Design
• Intensity
o Amount of effort exerted
o Can be controlled by type of
exercise performed
o Progress from simple to complex
activities
Histology
• Muscle cells: It is generally accepted
that muscle fiber types can be broken
down into two main types: slow twitch
(Type I) muscle fibers and fast twitch
(Type II) muscle fibers.
• Fast twitch fibers can be further
categorized into Type IIa and Type IIb
24
24
1. Type II A Fibers
o These fibers, also called fast twitch or fast oxidative fibers, contain very
large amounts of myoglobin, very many mitochondria and very many
blood capillaries. Type II A fibers are red, have a very high capacity for
generating ATP by oxidative metabolic processes, split ATP at a very
rapid rate, have a fast contraction velocity and are resistant to fatigue.
2. Type II B Fibers
o Type II B fibers are geared to
generate ATP by anaerobic metabolic
processes, split ATP at a fast rate, and
have a fast contraction velocity. Such
fibers are found in large numbers in
the muscles of the arms.
Benefit of Selected Hypertrophy
• The Type IIA fast twitch muscle fibers move 5 times faster than the slow twitch,
and the super-fast Type IIB muscle fibers move 10 times faster than the slow
twitch fiber.
Selected Hypertrophy Goal
• Plyometric exercise provides the most powerful contraction in the body targeting
the type IIB super-fast twitch muscle fibers. This is done by eccentrically
contracting or elongating the muscle followed by an explosive concentric
contraction. This powerful contraction recruits and strengthens the Type IIB
super-fast twitch muscle fibers.
Maximizing Plyometric Principles
• The muscle-stretch, and eccentric contraction components of traditional Plyometric
exercise are accomplished with the Dynadjust instrument through modification of
the Doctor / Patient positioning and stretchable rubber tubing Dynadjust
accessories.
Conversion
• Conversion? Although the type of fiber cannot be changed from one to another,
training can change the amount of area taken up by the fiber type in the muscle. In
other words, there can be a selective hypertrophy of fibers based on the type of
training.
• Depending on the specific intensity used in training, the muscle may change to a
75% fast twitch area and a 25% slow twitch area. So, when more fast twitch
muscle fibers are recruited the mass of fast twitch fibers will be greater than that of
slow twitch fibers.
25
25
Classification of Individuals
•
•
•
•
Beginner
Intermediate
Advanced
Master / Doctor
o The Dynadjust System allows
anyone to develop an
individualized program to
dramatically enhance and
maintain professional HVLA
skill
To Gain Optimal Benefits of a
Plyometric Program
• Individual should:
o Be well conditioned with sufficient strength & endurance
o Exhibit athletic abilities
o Exhibit coordination & proprioceptive abilities
o Free of pain from any injury or condition
Guidelines for Plyometric Programs
• Sound technical foundation
• Should be specific to the goals of the
athlete
• Quality of work is more important than
quantity of work
• Activities should be progressive in
nature
• Test dynamically to provide
progression & motivational feedback
26
26
!"#$%&'(#)%"*#%*+,"-&.'/#*+01020304***
506020*-"&*6-#-7%8*%9*:;:$()/:/*
This Dynadjust User’s Guide is intended to be used as a template for customizing the
integration of the Dynadjust technology into your unique program. The materials
included here are by no means intended to be a comprehensive list of treatment
simulations or exercises. The maneuvers presented here are listed based on the
experience of the authors as a result of many years of practice. Of course, professors may
opt to omit certain exercises or maneuvers that they deem to be contraindicated, and more
likely add to the program with enhancements of their own.
Obviously, this guide is not intended to teach
spinal manipulation, but rather to instruct
Dynadjust users on the optimal methods for
safely and efficiently training their own
bodies for the challenges ahead. We at
OrthoNeuro are always interested in hearing
feedback from the field. In the event that you
discover a new and useful method of using
the Dynadjust instrument, we would like hear
about it for possible inclusion in this guide.
The DREP and ACE exercises should serve
as a template for working up individual exercise routines, based on the strengths and
weaknesses of individual users. The Dynadjust Catalog of Exercises was created for the
convenience of being able to assign certain exercises without the need to spend a lot of
lab time explaining the exercise, and for ease of describing the work performed by the
student when they up-load the data from their assigned exercise sessions.
In most cases, the exercises are described without recommendations for Dynadjust
Parameter Settings. This is because each individual student will have different levels of
ability and different needs and expectations for their exercise programs and assignments.
You will notice that the twelve pre-programmed parameter settings are not necessarily in
the order of difficulty. It is recommended that each time you plan an exercise session or
assignment, review the settings and perhaps even test out the ones that you believe are
best suited for that particular exercise. Of course, in real-life treatment each patient will
be different in terms of the stiffness of their anatomy and the problem that you are
addressing. It takes a great deal of experience in palpation and diagnosis to decide on
what type of manipulation is optimal for any given treatment. For the purpose of training
for actual practice, the Dynadjust allows the user to experience a wide variety of depth
settings and resistance levels.
27
27
The most important aspect of training
with the Dynadjust is learning to
modulate your force and to be able to
control your vector and depth. For this
reason, mixing up your settings and
keeping track of your daily regimens to
discern where you might be in need of
extra control is very important for
maximum results from your work.
For the purpose of learning to modulate
and control your force, vector, and
depth, it is important to train to
produce your thrusts with variations in
these metrics from the very beginning.
1)
2)
3)
4)
It is recommended to follow the sequence below:
Select a treatment posture and be sure that you have the posture as close to the real
treatment scenario as possible with the Dynadjust exercise equivalent, and to protect your
own back. Viewing and emulating the twelve standard exercise videos will provide a
great starting point. Your instructor will inevitably want to add to these suggested
exercises, possibly even delete some or extrapolate on the instructions provided in the
videos.
Select parameter settings that seem appropriate, based on advice from your instructor.
Try to find three settings that, for this exercise could be considered an “easy” one, a
“medium” one, and a “challenge” setting. (For instance, a cervical break exercise with the
black spring and the exercise tubing simulating the weight of the head of the patient on
the “indifferent” wrist, and using parameter setting #5 or #6, and seeing speed in the .04
range with 3500N or better in force, combined with good vector control is “master’s
level” work which will take a tremendous amount of practice.
Begin practicing with the lightest spring selection at first (the exception being sideposture and some body-drop exercises), and check to see where your weak points may
exist. For example, are you having trouble holding pre-tension? Is the depth metric
difficult to hit with this posture and setting? Are you straying from a straight line-ofdrive? Each of these problems can be overcome with practice, and sometimes by
changing one or more of the settings and resistance levels.
Once you begin to see a preponderance of “Success” with your thrusts, the first
enhancement to your regimens should be to increase the spring tension and start over.
Don’t worry about speed and force until you have the other metrics under control, and see
at least an 80% successful thrust rate with good vector control.
28
28
5) Once you have the chosen exercise going
well with the stiffest spring, begin
working on your speed and force. Start
with the lightest spring and work up to the
heaviest spring, going for speed and force
increases while maintaining your control.
You may find that it is much more
difficult to control your vector with the
heavier springs. (Remember, the
Dynadjust instrument uses the spring
constant that is programmed into the firmware in the on-board computer within the unit
to report force. You must always remember to “tell” the instrument which spring is in the
unit, in order to receive accurate force readings!)
6) Once you are seeing high speed and force readings with the different springs, begin
practicing to produce modulations of your thrusts. Strive to become proficient in
producing 1/3, 1/2, 2/3, 3/4 of your maximum on command. This kind of modulation
capability is the hallmark of a true master!
7) Finally, there will be variations on each
exercise, such as angle variations,
accessory work with the exercise
tubing and Dynadjust Appliance. Also,
remember to work both hands / arms so
that you become just as proficient with
your non-dominant hand as your
dominant hand, where applicable.
8) One of the most productive Dynadjust
exercise regimens is a game called
“Dynadjust Round Robin”. To play the game, you need a group of at least three or more
people. The more the better.
a) The group decides on an exercise posture to be used for the game. It is helpful to
watch the other participants to observe their posture, and make helpful suggestions
where appropriate.
b) Each participant sets his Dynadjust Instrument to a random parameter setting, and
spring selection. Then they do one thrust so that the description of the setting is not
visible, and you pass your instrument to your neighbor, and receive one in kind.
c) Each participant begins exercising in the pre-selected posture, and does his best to find
the “groove” of the setting, and produce good thrusts in the posture selected.
29
29
d) When each person has completed one set, they re-set the instrument, either by
pressing button #2 to repeat the same settings, or by choosing new settings for the
next round.
If you take this game to the extreme, and keep track of who did what sets, you can upload the data after up to 16 sets have been loaded into each unit, and see the results of
the challenge. This game is fun and very beneficial. Remember, when you are in
practice, you will be
moving from room
to room and treating
different patients
with different body
types and different
problems. This is a
fun way to get used
to the challenge of
real practice! This
game is also a
terrific lab exercise!
Research has shown that most chiropractic practitioners do not reach their peak
physical abilities until they have been in practice for five years! Another study
showed the most practitioners have very little ability to modulate their force at will.
Of course these are generalities, and there are many in our profession who possessed
natural talent right from the start. For the rest of us, the Dynadjust was designed
specifically to close that five-year gap, and to produce graduates who possess superior
skills when they start practice! The Dynadjust System not only provides a safe way to
practice actual thrusting techniques with instantaneous beneficial feedback, but also to
make actual beneficial physiological changes in our bodies that will serve us, and our
patients, throughout our careers!
!
*
30
30
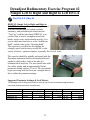
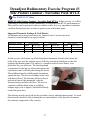
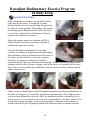
Dynadjust Rudimentary Exercise Program #1
Posterior to Anterior HVLA
Play D.R.E.P. #1 Video
The Dynadjust HVLA Training System is designed to develop, maintain and enhance
skill in delivering HVLA therapies.
The Dynadjust Rudimentary Exercise Program (DREP) consists of sets of relatively
generic exercises, which can be performed as supplementation or adjuncts to the more
specific instructor-assigned exercises. Your instructors will gradually introduce these
exercises as your Dynadjust HVLA Training Program progresses. As with all technique
exercises, your posture and form are essential. Your instructor will advise you of the
proper variations in posture and form in order to maximize the benefits of the training
regimens and to protect yourself from injury.
DREP #1: Posterior to Anterior HVLA Thrust Training: This exercise is performed with
the Dynadjust instrument positioned on a treatment table or other appropriate surface,
with several variations.
Suggested Parameter Settings & Goal Metrics
Parameter Setting
Parameter #1
Parameter #2
Challenge #4
Yellow Spring
Speed
Force (Nu)
.04 sec
7800
.04 sec
5700
Red Spring
Speed
Force (Nu)
.04 sec
9500
.03 sec
9500
Black Spring
Speed
Force (Nu)
.03 sec
9800
.04 sec
9600
.04 sec
7500
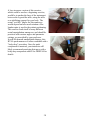
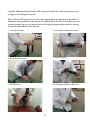
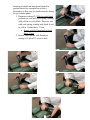
a) Dynadjust instrument positioned vertically (90-degree angle) to the table with the thrust
being straight down (Picture 1.1)
b) Dynadjust instrument positioned at approximately a 30-degree angle to the table for an
inferior to superior thrust. (Picture 1.2)
c) Dynadjust instrument positioned at approximately a 30-degree angle to the table for a
superior to inferior thrust. (Picture 1.3)
Picture(1.1(
Picture(1.2(
Picture(1.3(
31
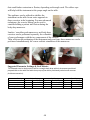
Notes: Depending on the work surface that you choose for this exercise, the Dynadjust
instrument can be fitted with the rubber cap(s) provided, to help prevent it from slipping
on the surface. The hand positions for this exercise are relatively more important than for
other exercises. Hand positioning should be alternated between at least the following
(your instructor may assign variations). For exercises in which one hand is the
“indifferent hand” (such as here in DREP #1, the single pisiform contact exercises) it is
recommended that you perform at least 25% more exercise with your non-dominant
hand.
a) Bilateral Thenar Eminance (Picture 1.4)
b) Bilateral Hypo-Thenar Eminance (Picture 1.5)
c) Single reinforced pisiform contact (right and left) (Picture 1.6)
Picture(1.4(
Picture(1.5(
Picture(1.6(
!
32
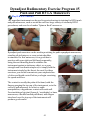
Dynadjust Rudimentary Exercise Program #2
Simple Left to Right and Right to Left HVLA
Play D.R.E.P. Video #2
DREP #2: Simple Left to Right and Right to
Left HVLA training. This exercise is performed
with one hand holding the bottom cylinder
stationary, and performing the thrust into the
“Top Cap” with the other hand. DREP #2 is an
exercise that is used to strengthen mostly the
hands, wrists, arms, and pectoralis muscles. It is
one in which one hand serves as the “indifferent
hand”, and the other as the “thrusting hand”.
This exercise is excellent for developing the
strength, speed, and accuracy needed for a wide
variety of doctor / patient scenarios, especially for cervical work.
This exercise should be initially performed with the
Dynadjust instrument held in one hand and braced
against a solid surface, such as the side of a
treatment table head-rest. The user should start with
the yellow spring, and an appropriately liberal
parameter setting, such as #3 or #4. The user should
begin exercising with the focus on a straight line-ofdrive within the parameter settings.
Suggested Parameter Settings & Goal Metrics !
This!example!exercise!body!position!will!be!with!the!unit!held!in!each!hand!at!approximately!
chest!level!(without!accessory!ring!attached).!
Parameter Setting
Parameter #1
Parameter #2
Challenge #5
Yellow Spring
Speed
Force (Nu)
.04 sec
7000
.03 sec
8500
Red Spring
Speed
Force (Nu)
.04 sec
9000
.03 sec
9500
33
Black Spring
Speed
Force (Nu)
.04 sec
9500
.04 sec
9000
.04 sec
4500
As accuracy increases, stiffer springs and more challenging parameter settings should be
used, and the student can begin practicing for speed and force. Once the depth and lineof-drive control acumen is coming along, the user can begin performing the exercise by
holding the instrument with only the hands, and without bracing it against the stationary
object. The user will usually find this “free-hand” approach to be much more difficult,
especially for line-of-drive accuracy, and may need to return to lighter springs and more
forgiving parameter settings at first.
The contacts for these exercises can start with the
palms of the hands. As strength and coordination
increases, the user should begin using the radial
aspect of the index finger for the thrusting hand
contact (With this contact, the user will find that
utilizing the soft rubber cap will ease the transition).
For some students, there will be a need to proceed
slowly through the exercises and resistance settings,
in order to “work-harden” the fingers, hands, and wrists.) The user should alternate the
indifferent hand between palm up and palm down, to further enhance the effects of the
exercise.
This particular exercise can be performed with the Dynadjust Ring Appliance attached
for increased support for beginners. The tension on the ring can be gradually reduced
until the user has gained the strength needed to
grasp the instrument without the need for the
appliance. The Appliance can be attached in two
ways, to lend variation, and extra benefit to the
exercise.
There are a variety of doctor / patient positioning
postures for which this exercise is appropriate.
Your professor will introduce these postures in
the order that is most appropriate for the program. The most common postures would
include the following:
a) Supine cervical break and first rib with directional variations
34
b) Prone cervical and cervical and thoracic with directional variations
c) Seated cervical and first rib with directional variations
Variations and advanced exercise techniques will include the use of the exercise tubing,
to simulate holding the weight of the patient’s head in the indifferent hand.
Advanced training will include combined motion maneuvers. Your instructor will
prescribe goal metrics for these advanced simulations.
35
Mastering the ability to modulate force / speed, and extremely precise directional
and depth control are especially important for these techniques. It is also of
paramount importance that you are able to perform these techniques as well with
your non-dominant hand as you can with your dominant hand. As a general rule, it is
recommended that the user practice approximately 25% more with the non-dominant
hand as the “thrusting hand.”
!
!
!
36
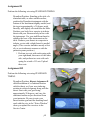
Dynadjust Rudimentary Exercise Program #3
Side Posture Lumbar / Sacroiliac Push HVLA
Play D.R.E.P. #3 Video
DREP #3: Side Posture Lumbar / Sacroiliac Push HVLA. In this exercise, we will be
simulating a side-posture lumbar mammillary or sacroiliac joint HVLA push maneuver.
This exercise can be practiced with our without a table. It is very important to maintain
excellent form and posture, in order to protect your own lumbar spine.
Suggested Parameter Settings & Goal Metrics
This%example%exercise%body%position%will%be%the%“beginners%stance”%with%the%base%of%the%
Dynadjust%is%stabilized%against%the%Hip%of%the%Doctor.%%
Parameter Setting
Parameter #10
Parameter #11
Challenge #9
Yellow Spring
Speed
Force (Nu)
.05 sec
3700
.06 sec
4500
Red Spring
Speed
Force (Nu)
.05 sec
4900
.07 sec
4700
Black Spring
Speed
Force (Nu)
.06 sec
4800
.07 sec
5800
.05 sec
3200
In this exercise, the bottom cap of the Dynadjust instrument is firmly braced into the
body of the user near the anterior aspect of the hip, near the acetabulum, on the side
opposite the thrusting hand. The stance is a variation on the Fencer Stance, or as
prescribed by your professor. The thrusting hand
is positioned on the top cap of the instrument with
a pisiform contact with the palm facing the doctor.
The indifferent hand is stabilizing the instrument
against the hip. The doctor is bending at the waist
with knees flexed. The thrusting elbow is flexed,
and out in front of the instrument, with the
forearm nearly parallel to the floor. The wrist is
extended, with the thrust being in a slightly
oblique angle (low to higher), and almost directly
toward the groin area.
The primary muscles involved are the pectoralis, triceps, and latissimus groups. As usual,
these muscles should be flexed during the pre-tension phase of the thrust to accentuate
the isometric component of the exercise.
37
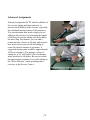
A less strenuous version of this exercise,
which could be used as a beginning exercise,
would be to anchor the base of the instrument
between the leg and the table, using the table
as a stabilizing support for your body. The
actual “real-life” angles for this maneuver
would depend on how much rotation of the
lumbar spine is used in the patient positioning.
This exercise lends itself to many different
actual manipulation maneuvers, and should be
practiced with various angles and parameter
settings, as prescribed by your professor.
In real-life manual manipulation therapy, this
HVLA push maneuver is often combined with a
“body-drop” procedure. Once the push
component is mastered, your instructor will
likely recommend practicing this move with a
body-drop component added. See DREP #4 for
details.
%
38
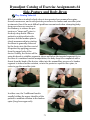
Dynadjust Rudimentary Exercise Program
#4 Body Drop
Play D.R.E.P. #4 Video
Many manipulative procedures are performed with a
body-drop by the doctor. For example, a supine
thoracic maneuver involves positioning the patient on
the table in various postures. Depending on the patient
positioning, proper hand placement and a body-drop,
by the doctor, will result in mobilization of thoracic
segments into flexion or extension.
Many side-posture maneuvers combine an HVLA
thrust from the hand with a body-drop designed to
mobilize the spine into rotation. Using the Dynadjust instrument for body-drop
exercises is a relatively straight forward methodology.
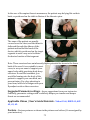
The instrument can be positioned between the body of
the doctor and the table for a variety of variations.
Generally, the parameter settings used with the
instrument involve more pre-tension and thrust depth. Unlike most Dynadjust exercises,
starting with the stiffer resistance settings, such as the black or red springs will be easier.
This is because it is actually more difficult to control your body in this position with the
lighter springs in use.
Supine exercises should begin with the Dynadjust instrument positioned perpendicular to
the table at 90 degrees. It is especially important to maintain proper form, and to protect
your own back during these exercises. Since the hands and arms are essentially free for
these exercises, it is acceptable to use your arms to help stabilize your back, just as if you
would with a patient in supine or side-posture positions. Variations on this maneuver
would include having the Dynadjust positioned at different angles to simulate motions
39
that would induce extension or flexion, depending on the angle used. The rubber caps
will help hold the instrument at the proper angle on the table.
The appliance can be utilized to stabilize the
instrument on the table for an easier approach to
these exercises in the beginning. For more advanced
techniques, the exercise tubing can be used to
simulate holding a patient into flexion during the
body-drop maneuver.
Lumber / sacroiliac push maneuvers, and body-drop
exercises can be performed separately for evaluation
of your performance with the two components of the exercise.
Then, with careful positioning of the instrument and your form, these maneuvers can be
performed simultaneously for a more realistic simulation of the maneuvers. !
Suggested Parameter Settings & Goal Metrics!
This%example%exercise%body%position%will%be%a%straight%body%drop%with%the%instrument%positioned%
perpendicular%to%the%table%and%with%the%top%cap%of%the%device%positioned%just%below%the%sternum%
(without%accessories).%%
%
Parameter Setting
Parameter #10
Parameter #11
Challenge #9
%
Speed
.11 sec
.10 sec
Yellow Spring
Force (Nu)
900
1600
Speed
.10 sec
.10 sec
%
40
Red Spring
Force (Nu)
1400
2300
Speed
.09 sec
.09 sec
.09 sec
Black Spring
Force (Nu)
2500
3300
825
Dynadjust Rudimentary Exercise Program #5
Push and Pull HVLA Maneuvers
Play D.R.E.P. Video #5
The$Dynadjust$instrument$can$be$used$to$great$advantage$in$training$for$HVLA$push$
and$pull$maneuvers,$such$as$would$be$used$in$a$large$variety$of$extremity$HVLA$
procedures,$and$even$for$a$lumbar$“Spinous$Hook”$maneuver.$$
$
$
$
$$
$
$
$
$
$
$
Dynadjust$push$exercises$can$be$used$in$practicing$for$pubic$symphysis$maneuvers,$
standing$rib$techniques,$or$even$certain$shoulder$
treatments.$For$this$maneuver,$it$is$a$good$idea$to$
practice$with$your$right$and$left$hands$separately,$
using$the$nonGthrusting$hand$to$stabilize$the$
instrument$against$a$stationary$object,$or$as$your$
strength$and$coordination$improve,$to$simply$hold$the$
instrument$steady$for$the$thrust.$As$usual,$for$these$
exercises,$you$should$concentrate$your$emphasis$lineG
ofGdrive$and$depth$control$before$you$begin$exercising$
for$speed$and$force.$
$
The$contact$is$usually$the$palm$of$the$hand,$with$the$
fingers$grasping$the$top$cap$of$the$instrument,$or$in$the$
case$of$a$pull$maneuver$for$a$foot$or$ankle$
manipulation,$a$hypothenar$contact$will$work$well.$
For$simulating$a$hip$joint$(femoral$/$acetabular)$or$knee$$
maneuvers,$a$double$handed$pull$thrust,$with$fingers$
interlaced$over$the$top$cap$of$the$instrument$will$
produce$good$results.$$
$
$
41
For$the$lumbar$spinous$hook$maneuver,$you$will$utilize$a$posture$similar$to$the$
other$sideGposture$exercises,$with$the$finger$tips$of$the$active$hand$holding$the$top$
cap$of$the$instrument,$and$the$base$of$the$instrument$held$against$your$chest.$Be$
sure$to$protect$your$lower$back$by$utilizing$the$correct$posture,$and$/$or$bracing$
your$body$against$a$treatment$table.$$
*Experiment$with$the$instrument$with$a$variety$of$parameter$settings$starting$
with$parameter$settings$#1,$2,$3$for$each$of$the$postures$described$in$this$
chapter.$
!
42
Dynadjust Rudimentary Exercise Program #6
Advanced Techniques and Combined Motion
Play D.R.E.P. #6 Video
The Dynadjust instrument is capable of measuring not only the speed and force of you
HVLA exercise thrusts, but also rotation around the long axis of the instrument, and
lateral motion of the instrument as well.
Some HVLA procedures utilize combined motion for maximum therapeutic value. For
instance, in a simple cervical-break exercise, you might combine a certain degree of
lateral motion to help induce rotation in the vertebral segment(s).
The Dynadjust instrument measures lateral motion in percentage from neutral. When you
load and hold the instrument with your simulated tissue-pull or Pre-Tension, the internal
computer assumes that this is the “neutral” position. As you perform your HVLA thrust,
any variation from a straight line of drive is reported on the screen, and ultimately as a
part of the metrics of the thrust when up-loaded to the OrthoNeuro Service Center.
Therefore, you have the ability to set goals for how much lateral deviation that you would
like to combine with the thrust. Your instructor will assign certain metrics for these
exercises.
This kind of combined motion is also often used in seated cervical manipulation
procedures. The practitioner performs not only the HVLA thrust through the target
segment, but adds some lateral motion as well.
43
In prone thoracic manipulations, the practitioner
may want to impart rotational motion, or torque, as
a combined motion with his posterior to anterior
HVLA thrust. The Dynadjust instrument measures
rotational motion in degrees, and it is also reported
both on the instrument screen and on the Service
Center. These exercises are more advanced, and
somewhat more difficult to perform.
It is recommended that you begin practicing these
maneuvers first with the Dynadjust instrument
alone, and later, as skill develops, you can introduce
the exercise tubing to replicate the weight of the
head of the patient for the cervical simulations. In
the posterior to anterior prone thoracic simulations,
you can utilize the Dynadjust Base-Plate, and even
later, you can begin using the base-plate and the
Tension Ring with the exercise tubing arranged to
provide various levels of rotational and even lateral resistance (see chapter on the
Dynadjust Appliance).
*For%the%specialty%maneuvers%described%in%this%chapter%your%instructor%will%
suggest%degrees%of%rotation%and%percentages%of%line%of%drive%for%the%various%
positions,%postures%and%maneuvers.%%
!
44
Dynadjust Rudimentary Exercise Program
(D.R.E.P.) Video Enhancement Suggestions
!
In the course of participating in your laboratory classes and performing your
home-study work, the Dynadjust Rudimentary Exercise Program can be
greatly enhanced by viewing the videos which correspond to the DREP
assignment on which you are working.
Here is a list of the selections from the Twelve Standard Dynadjust Tutorial
Videos that most closely correspond to the individual DREP lessons.
Watching these videos will help to give you a solid foundation for perfecting
your postures and techniques. They will also help you to decide on what
emphasis should be placed on specific exercises to match your abilities and
goals as your skills increase.
DREP #1: Video #4
DREP #2: Videos #2 and #3
DREP #3: Videos #5 and #6
DREP #4: Videos #5 and #6
DREP #5: Videos #2, 4, 6, 7, 8, 9, 10, 11, and 12
DREP #6: Videos #1, 4, 6, 8, 9, and Combined Motion Compilation Video
!
45
44
!"#$%%&'()*+",$-$+"$".)/01'#$212)3!*/4)
!
!"#$%&/0/1/%,(-+.%
!
"#$!%&'()*+,-!.',-/+0$'-!1('!2$!+,$)!34/!(!0&/.()!43!$5$/1.,$!-$1#'.6+$,!7#.1#!)4!
'4-!'$1$,,(/.8&!/$,$028$!4/!,.0+8(-$!(1-+(8!)41-4/!9!:(-.$'-!:4,.-.4'.';!4/!
-#$/(:$+-.1!<=>?!-#/+,-,@!"#$,$!$5$/1.,$,!(/$!)$,.;'$)!-4!-(/;$-!(')!-/(.'!,:$1.3.1!
0+,18$!;/4+:,!34/!,-/$';-#!(')!144/).'(-.4'@!"#$&!7.88!(8,4!$'#('1$!-#$!3(,-A-7.-1#!
0+,18$!3.2$/!,-/$';-#!(')!/$1/+.-0$'-!7.-#.'!-#$!;/4+:,!2$.';!-/(.'$)@!!!
!
"#$,$!(/$!$5$/1.,$,!-#(-!1('!+,+(88&!2$!:$/34/0$)!7.-#4+-!-#$!'$$)!34/!(!-/$(-0$'-!
-(28$!4/!4-#$/!,:$1.(8!$6+.:0$'-B!(')!,#4+8)!2$140$!(!:(/-!43!&4+/!,-(')(/)!
-/(.'.';!/4+-.'$@!"#$&!,#4+8)!2$!:$/34/0$)!7.-#!/$;+8(/.-&B!(')!4'!(!,:$1.3.1!
,1#$)+8$@!"#$&!,#4+8)!2$!+,$)!(,!('!()*+'1-!-4!&4+/!(,,.;'$)!$5$/1.,$,B!(')!-#$!
$5$/1.,$!2(/B!-+2.';!(')!7(-$/!2(;!$5$/1.,$,@!
!
"#$!%&'()*+,-!C,$/,!(')!.',-/+1-4/,!,#4+8)!,-+)&!-#$!:(/(0$-$/!,$--.';,!34/!-#$!
.',-/+0$'-B!(')!)$1.)$!4'!7#.1#!:(/(0$-$/,!2$,-!,+.-!-#$,$!/4+-.'$!$5$/1.,$,@!D-(/-!
7.-#!,$--.';,!7.-#!04/$!8.2$/(8!0(/;.',!34/!$//4/B!(')!;/()+(88&!74/E!-47(/)!-#$!
04/$!1#(88$';.';!,$--.';,!(')!/$,.,-('1$!8$F$8,@!C,$!-#$!D$/F.1$!G$'-$/!-4!$F(8+(-$!
&4+/!:/4;/$,,!7.-#!&4+/!/4+-.'$B!(')!-4!42,$/F$!-#$!).33$/$'1$,!2$-7$$'!&4+/!
:$/34/0('1$,!7.-#!&4+/!)40.'('-!#(')!4F$/!&4+/!'4'A)40.'('-!#(')B!(')!()*+,-!
&4+/!/4+-.'$!(114/).';8&@!!
!
H)$(88&B!(!0(,-$/!43!<=>?!0('.:+8(-.4'!:/41$)+/$,!,#4+8)!2$!(28$!-4!:$/34/0!('&!
%&'()*+,-!$5$/1.,$!7.-#!('&!:(/(0$-$/!,$--.';!(')!/$,.,-('1$!8$F$8B!7.-#!(!#.;#!
)$;/$$!43!14'-/48!4F$/!-#$!)$:-#!(')!8.'$A43A)/.F$B!(')!2$!(28$!-4!04)+8(-$!&4+/!
34/1$!(')!,:$$)!(-!7.88@!G4'-.'+(88&!1#(88$';$!&4+/,$83!7.-#!#(/)$/!(')!#(/)$/!
/4+-.'$,!(')!;4(8,@!%4!(-!8$(,-!,$F$/(8!,$-,!43!$(1#!$5$/1.,$!4'!(!,1#$)+8$!-#(-!,+.-,!
&4+/!8$F$8!43!3.-'$,,@!?8-$/'(-$!)(&,!-4!)4!$5-/(!,$-,!4'!4'$!4/!-74!$5$/1.,$,!3/40!
-#.,!2(,.1!,$8$1-.4'!.'!()).-.4'!-4!&4+/!(,,.;'$)!$5$/1.,$,@!I/()+(88&!2+.8)!+:!&4+/!
(2.8.-.$,!(')!$')+/('1$!8$F$8,@!J4+/!.',-/+1-4/!0(&!7.,#!-4!())!-4!&4+/!?GK!
/$;.0$'B!4/!(,E!&4+!-4!341+,!4'!:(/-.1+8(/!?GK!$5$/1.,$,B!$.-#$/!.'!('-.1.:(-.4'!43!+:A
140.';!(,,.;'0$'-,B!4/!(,!(!3+'1-.4'!43!#.,!4/!#$/!47'!$5:$/.$'1$!.'!-/(.'.';!
/$;.0$',!.'!;$'$/(8@!?87(&,!/$0$02$/!-4!14'1$'-/(-$!4'!0(.'-(.'.';!-#$!14//$1-!
34/0!(')!:4,-+/$!-4!(F4.)!.'*+/&@!
!
H3!(!,:$1.3.1!$5$/1.,$!.,!:/$,1/.2$)!2&!&4+/!.',-/+1-4/B!7#.1#!184,$8&!/$,$028$,!4'$!43!
-#$,$!?GK!$5$/1.,$,B!4/!.'14/:4/(-$,!,:$1.3.1!0+,18$!;/4+:,!.'F48F$)B!&4+!0.;#-!
46
45
14',.)$/!)$8$-.';!-#(-!:(/-.1+8(/!?GK!$5$/1.,$!34/!-#(-!)(&B!(')!14'1$'-/(-$!&4+/!
$'$/;&!4'!-#$!(,,.;'$)!$5$/1.,$@!
!
L4,-!43!-#$,$!?GK!$5$/1.,$,!:/4F.)$!$5-/(!4::4/-+'.-&!34/!:8&40$-/.1!2$'$3.-,@!"4!
0(5.0.M$!-#$!:4-$'-.(8!34/!:8&40$-/.1!)$F$84:0$'-!43!-#$!3(,-A-7.-1#!3.2$/,!.'!-#$!
F(/.4+,!;/4+:,B!2$!,+/$!-4!14'1$'-/(-$!4'!38$5.';!-#$!(::/4:/.(-$!0+,18$,!)+/.';!
-#$!:/$A-$',.4'!:#(,$!43!-#$!-#/+,-,@!
!
2. Pectoralis Isolation Exercise
1. Triceps Isolation
!
Exercise
!
3. Body Drop Exercise
4. Push Exercise
5. Pull Exercise
6. Latissimus Isolation Exercise
47
46
Introduction to Dynadjust Catalog of Exercises
The Dynadjust Catalog of Exercises is provided as a means for instructors to assign
specific Dynadjust exercises to be performed by the students as home-study or classroom
routines. The exercises are not in any particular order, and can be assigned based on the
order in which different techniques are introduced within the classroom or lab.
These exercises are by no means a comprehensive list of manipulative procedures or
simulations. There are literally hundreds of variations in technique, and professors are
free to introduce different exercises or variations on those presented herein, as well as to
omit any exercise that they might consider to be inappropriate.
Of primary concern to any student or instructor are the safety of the students and the
efficacy of the exercises. Here is a list of tips to help ensure that each student receives the
maximum benefit of training with the Dynadjust HVLA Training System.
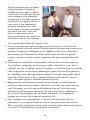
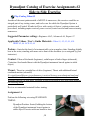
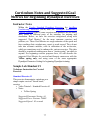
1) The Dynadjust Instrument is a spring-loaded device.
As such, when the instrument is compressed, the
spring within is storing potential energy. The
locking lugs on the bottom cap of the instrument are
designed to be easy to use for changing the springs,
and to securely hold the spring in place during use.
Always be sure that both of the lugs snap into place
when the cap is replaced after a spring change. In
most exercises, the bottom cap is supported, either with a hand, or against another object.
In exercises where this is not the case, be sure that the bottom cap is not pointed directly
at another person, in case of a failure of the locking mechanism.
2) Always pay close attention to your instructor as he or she describes the proper posture for
each exercise. It is very important to protect your own body from injury by utilizing
postures that minimize stress to your low back, etc. Be sure to always utilize appropriate
postures during your exercise sessions. Remember, in many instances, inappropriate
postures will prevent you from receiving maximum benefit from your exercises.
3) Resist the temptation to rush through your exercises. As you continually challenge your
body to perform at higher levels, you will want to achieve a certain level of fatigue in
order to develop the strength and conditioning needed to perform at professional levels.
48
47
However, when you begin to fatigue you will notice that your accuracy will diminish and
you will produce fewer “successful” thrusts. For maximum benefit from your training
exercise with the heavier springs toward the end of your routines and when you begin to
fatigue replace the spring with a lighter one and continue for “a few more sets.”
Instructors generally recommend that the pre-tension or “tissue-pull” simulation phase of
your thrusts be held for a minimum of 3 to 5 seconds prior to each thrust. This done in
order for you to gain maximum benefit from the isometric aspects of Dynadjust training.
However, you may decide to hold pre-tension for even longer, in order to benefit from
even more challenging routines. It is also
important for you to think about which
muscles of your body are the “primary
movers” for any given exercise. In order
for you to receive maximum benefit from
your exercises, concentrate on flexing
these muscles during the pre-tension phase
of the thrust. The harder you flex, the
more muscle fibers will be recruited into
the thrust. Research shows that flexing
these muscles prior to the “explosive” burst of speed in the thrust will result in very
beneficial physiological changes in your body. This is the plyometric principle in play.
The musculature of the arms and shoulders in the human body contain a much higher
proportion of “fast-twitch” muscle fibers. The ultimate goal of Dynadjust training is for
you to develop your fast-twitch fibers to be recruited more completely and earlier in the
thrust, resulting in expert-level speed of your HVLA treatments. (For a more
comprehensive explanation of the Plyometric benefits of Dynadjust training, please see
the Plyometrics chapter).
4) Of course, a student need not upload every set performed. You are welcome to upload as
many as you choose, but many students reserve the upload feature for assigned exercises
only. Instructors may discern which data are assigned uploads, and which are not, by
observing the date of the exercise, which is recorded on the Service Center. Therefore,
an instructor may ask the students to up-load only assigned exercises on specific dates,
in order to make it easier to evaluate the performance on the assignments. Students
may exercise as much as they like or need, and simply erase stored sets from their
instruments whenever they like, or especially before performing assigned sets of
exercises! (See the Dynadjust Tutorial chapter for information on how to delete stored
49
48
sets.) A suggestion on how to personalize your Dynadjust routine is to watch all twelve of
the “Twelve Standard Dynadjust Exercise Videos.” Perform sets of each type of exercise
with various resistance levels and postures, and decide for yourself which of the DREP
and ACE regimens are most appropriate for your level of skill and most beneficial for
your improvement. No matter what you decide, in terms of personalizing your Dynadjust
regimens, be sure to make Dynadjust exercises a part of your daily routine.
5) Even though the Dynadjust instrument comes with
an environmentally friendly rechargeable battery
with exceptional battery life, it is recommended that
you charge the instrument regularly, especially
before starting an assignment or before taking your
instrument to class or lab. It is also recommended
that you occasionally (once per month or so)
“cycle” your Dynadjust battery to ensure long
service. To cycle your Dynadjust battery: Turn on the unit by pressing button #1. As soon
as the first screen is visible, press and hold button #1 again until you see another screen.
This will put the instrument in “lab mode” which is used by the factory to calibrate the
instruments. If you move the unit while in lab mode, you can see the accelerometers
display the motion in the X, Y, and Z vectors. When in “lab mode,” the instrument will
stay “on” until the battery is fully expired. Once the battery is completely dead and the
screen is blank, plug in the instrument and allow it to charge until the screen shows a full
charge.
6) A fun and interesting way in which to utilize your Dynadjust instruments is in a group
setting, either in class, or in a home-study group. Decide on a doctor / patient posture, in
which to practice. Have each person program their personal instrument with a different
parameter setting and resistance level, and do one thrust with the instrument so that the
settings are not visible to the user to whom the instrument will be passed. Pass your unit
to your neighbor, and take an instrument from another student. Begin practicing in the
pre-chosen posture, with each participant doing one set with each instrument, and then
passing the instruments around the group at random. Remember, the first six thrusts are
“practice thrusts” to allow the user to “find” the parameters that have been programmed
into the instrument. The last 12 thrusts are recorded on the instrument, and can be
uploaded. Also remember that even though not every parameter setting is perfectly suited
50
49
to every doctor / patient posturing, a true master of the art of manual manipulation should
be capable of performing well in any position, with any resistance level or parameter
setting. It is useful to take note of which exercises you find difficult, and practice those
exercises as an extra part of your regular regimen.
7) Always begin a new Dynadjust exercise regimen with your emphasis primarily on your
form, accuracy in line-of-drive, and depth control. Even though the speed of an HVLA
procedure is very important, the precision of your thrusts is even more important. Once
you have gained proficiency in the delivery of your thrusts with a high degree of
precision, you can begin practicing to add speed and force. In most cases, it is best to start
with lighter springs for lower resistance in practicing for your thrusts. As you gain
control over your vectors, increase the tension with stiffer springs. Finally, as your body
develops the coordination needed for the doctor / patient simulation that is the focus of
your work, you should begin to increase the speed of your delivery. On the Dynadjust
instrument screen, speed is reported to three decimal points, such as “T=0.13”. This
shows that the thrust speed was 13 hundredths of a second. However, the force of the
thrust is reported to four decimal points. Therefore, since the force of the thrust goes up
exponentially with the speed of the thrust, you can have a significant difference in force
delivered within the span of one tenth of a second. For this reason, when judging your
improvement in the speed and
force of your thrusts, it is
more accurate to go by the
Force reading.
8) Once you are highly
proficient in controlling the
vectors and depth of your
thrusts, modulation of the
force delivered is perhaps the
most important aspect of
HVLA manipulative therapies. It is of paramount importance that you are able to
modulate your force at will. You should practice your sets with emphasis on varying your
force between 100%, 50%, and so on. Studies indicate that, in general among field
practitioners, their ability to modulate force is surprisingly lacking. The Dynadjust
HVLA Training System is the first and only technology that allows a student or
practitioner to perform practice regimens specifically designed to develop these skills.
51
50
With the intrinsic instantaneous feedback from the screen on the instrument, coupled with
the “breakdown” of your performance metrics on the OrthoNeuro Technologies Service
Center, we now have the ability to identify weaknesses in performance, and the tools
needed to quickly and efficiently remedy these deficiencies.
9) The Dynadjust instrument requires very
little maintenance. It is a good idea to
occasionally wipe any oil or dirt from the
actuator rod, when you change springs.
Use a soft damp cloth to wipe the outside
of the unit when needed. Be sure to never
remove the top cap, or the faceplate of the
device. If your instrument fails in any way
please contact your school for a
replacement unit. If you are not affiliated
with a school, please contact OrthoNeuro
Technologies directly. We will send you a replacement unit immediately.
!
52
51
Dynadjust Catalog of Exercise Assignments #1
Posterior to Anterior (P to A) HVLA Thrusting
Play Catalog Video #1
One of the most quintessential of all HVLA maneuvers, this exercise would be an
integral part of any testing venue, and is one for which the Dynadjust System is
particularly well suited. It lends itself to a wide variety of doctor / patient postures and
procedures, including prone thoracic and prone sacroiliac joint maneuvers.
Suggested Parameter settings - Beginner: #4, #3. Advanced: #5, #6, Expert: #7
Applicable Videos / User’s Guide Materials - Video #4, DREP #1, ACE #1
Posture - Modified Fencer Stance with the Dynadjust instrument arranged as described
in the assignment at approximately waist height, with your shoulders over the instrument
(or as assigned by your instructor).
Contacts - Bilateral thenar eminence, bilateral hypothenar eminence, Dynadjust
instrument cap grasp. (Advanced Variation: One-handed P to A thrusting)
Thrust - Straight line of drive
Review recommended materials before starting.
Assignment A
Perform the following sets using STANDARD
TIMING
Dynadjust position: Dynadjust instrument
perpendicular to the table.
1. Parameter setting #3: two sets with each
spring, starting with yellow to red to
black. Then two sets with each spring,
starting with black to red to yellow.
Upload these 12 sets.
2. Parameter setting #4: two sets with each
spring, starting with yellow to red to
black. Then two sets with each spring,
starting with black to red to yellow.
53
52
Upload these 12 sets.
Assignment B
Perform the following sets using STANDARD TIMING.
Dynadjust Position: With the Dynadjust
instrument on the table at approximately a 30degree angle with the top end tilted toward the
“head” of the table. Position your body over the
top of the instrument for a posterior to anterior
and superior to inferior thrust.
1. Parameter setting #3: Two sets with each
spring, starting with yellow to red to
black. Then two sets with each spring,
starting with black to red to yellow.
Upload these 12 sets.
2. Parameter setting #4: Two sets with each
spring, starting with yellow to red to
black. Then two sets with each spring,
starting with black to red to yellow.
Upload these 12 sets.
Assignment C
Perform the following sets using STANDARD TIMING.
Dynadjust Position: With the Dynadjust instrument on the table at approximately a
30 degree angle with the top end tilted toward the “foot” of the table. Position your
body below the top of the instrument for a posterior to anterior and inferior to
superior thrust.
1. Parameter setting #3: Two sets with each
spring, starting with yellow to red to
black. Then two sets with each spring,
starting with black to red to yellow.
Upload these 12 sets.
2. Parameter setting #4: Two sets with each
spring, starting with yellow to red to
54
53
black. Then two sets with each spring,
starting with black to red to yellow.
Upload these 12 sets.
Assignment D
Perform the following sets using STANDARD TIMING.
Dynadjust Position: With the Dynadjust
instrument perpendicular to the table at a 90degree angle. Position your body over the top of
the instrument for a posterior to anterior thrust.
Perform the P to A thrusts and simultaneously
incorporate approximately 30 degrees of
rotation with the thrust.
1. Parameter setting #3: Two sets with each
spring, starting with yellow to red to black
with the rotation alternating between
right and left with each thrust. Then two
sets with each spring, starting with black
to red to yellow. Upload these 12 sets.
2. Parameter setting #4: Two sets with each
spring, starting with yellow to red to
black, and alternating right and left
rotation. Then two sets with each spring,
starting with black to red to yellow.
Upload these 12 sets.
Note: It is acceptable to grasp the top cap with your
fingers to aid in the rotation. Even though this would
not be exactly the hand contact that you would use on a
patient, it will help strengthen your fingers. The Dynadjust is a trainer, not a simulator.
While we strive to replicate the postures to closely resemble actual doctor / patient
positioning, in some cases, for training purposes, a variation on the contact with the
Dynadjust instrument is beneficial. If you find that you are becoming quite proficient
with these exercises, increase the challenge by using more demanding parameter settings,
and by varying your goals for the amount of rotation you impart with your thrust. As you
up-load your exercises to the OrthoNeuro Service Center, take note of your accuracy in
55
54
the rotation exercises and your performance in general. Once you are seeing a
preponderance of “successful” thrusts, you should begin to perform your exercises in
increase your speed and force. For maximum benefit from your sessions, train to alternate
your thrusts between your maximum force, and 50% of your maximum force. Learning
to modulate your force and speed is one of the most important objectives of training. It
can also be very beneficial to train with these exercises using a table height that is lower
or higher than the ideal height for you. If you do not have a table that is adjustable for
height, you can stand on some suitable fixture to simulate having the table “too low”. To
simulate a table that is “too high”, you can place a book, or other suitable fixture under
the Dynadjust instrument. For the angled thrusts, you may want to use the rubber endcaps to help stabilize the instrument at the proper angle.
Assignment E
Advanced “master’s level” exercises. Perform the
above assignments with the instrument positioned at
the 30 degree angles AND simultaneously incorporate
the rotation, right and left, with your angled thrusts. For
more advanced variation, try isolating your triceps
muscles while doing the exercises as in ACE #1.
Instructor’s Suggestions and Notes for
Catalog of Assignments Part #1
As you demonstrate set-up postures and discuss
indications for treatment, the palpation skills and
anatomy involved with a particular maneuver, you can
assign Dynadjust exercise work to help establish
baseline skill levels for each student. Parameter setting
#4 has narrower margins for error for the tissue-pull by 50%. If you see that the student is
losing the tissue-pull prior to the thrusts, and a preponderance of insufficient depth
failures, especially with the heavier springs and the later thrusts, the problem will likely
be worse with parameter setting #4. Corrective prescriptions would include extra work
with DREP #1, ACE #1, and exercise rod work that isolates the triceps groups (with the
bar positioned behind the head with elbows bent). Advise the student to do the corrective
work, and repeat this assignment in approximately one week. If the student shows
difficulty performing the thrusts in a straight line of drive, more practice is indicated. Ask
the student to practice these thrusts with the emphasis on LOD instead of speed. When
56
55
the student is getting close to 80% successful thrusts, it is time to focus on speed / force
modulation. Speed / force modulation exercises are usually performed with the black
spring, for training purposes, as it is a fair expectation that if they can achieve good
modulation with the heavier springs, they should have little trouble doing even better
with the lighter springs. For this particular exercise, with the black spring, and parameter
setting #3, the student should be able to consistently produce successful thrusts
approaching 2000 N, and should be able to modulate back and forth between 50% and
100% of their maximum on command.
Once the student has mastered these metrics, you may choose to assign this type of
exercise using more advanced thrusting techniques, such as various angles (instead of
perpendicular). Advanced exercises would incorporate combined motion. Suggested
metrics for rotation combined motion thrusts would be approximately 30 degrees, in both
directions, and for lateral combined motion thrusts, approximately 10% in forward and
back, and side-to-side. Even more advanced work would involve using the Dynadjust
Appliance to provide resistance in the rotation and lateral direction combined motion
thrusts. The Tension Ring component of the Dynadjust Appliance can be used with
exercise to accommodate nearly any table height. Simply secure the Tension Ring onto
the lower cylinder with the concave side down (toward top cap). Slide the ring up or
down on the cylinder to accommodate table height. This configuration is useful for
bilateral thenar, hypothenar, or pisiform contacts.
!
57
56
Dynadjust Catalog of Exercise Assignments #2
Side to Side Exercise
Play Catalog Video #2
Another of the most quintessential of all HVLA maneuvers, this exercise would be an
integral part of any testing venue, and is also one for which the Dynadjust System is
particularly well suited. It lends itself to a wide variety of doctor / patient postures and
procedures, including supine cervical, prone cervical, seated cervical and some extremity
maneuvers.
Suggested Parameter settings - Beginner: #4 #3, Advanced: #6, Expert: #7
Applicable Videos / User’s Guide Materials - Video #1, #2, #3, #9, #10.
DREP #2, #6. ACE #2, #4
Posture - Seated at the head of a treatment table or in an armless chair. Standing slightly
bent at the waist, standing with arms out in front of the shoulders (or as assigned by your
instructor).
Contact - Palms of the hands (beginners), radial aspect of index finger (advanced),
(Variation: One-handed thrust with the Dynadjust instrument braced against a stable
object)
Thrust - Thrust in a straight line of drive (beginner). Thrust with additional lateral
combined motion (advanced)
If a significant difference in performance is noticed between your dominant hand and
your non-dominant hand, be sure to perform extra sets with your non-dominant hand.
With this exercise, as with most, you must be able to perform as well with either hand as
the thrusting hand.
Review recommended materials before starting.
Assignment A
Perform the following sets using STANDARD
TIMING.
Dynadjust Position: Seated, holding the bottom
of the Dynadjust instrument braced against a
stable object. Exercise with one hand at a time,
58
57
focusing on depth and directional control to
produce thrusts in a straight line of drive.
Remember to flex your pectoralis muscles during
the pre-tension phase.
1. Parameter setting #3: With the right hand,
perform two sets with each spring, starting
with yellow to red to black. Then two sets
with each spring, starting with black to red
to yellow. Upload these 12 sets.
a. Repeat with left hand and up-load
these 12 sets.
2. Repeat same routine with Parameter
setting #4, Upload 12 sets at a time.
59
58
Assignment B
Perform the following sets using STANDARD
TIMING.
Dynadjust Position: Seated, holding the
Dynadjust instrument with the bottom end in the
palm of one hand (indifferent hand), and
thrusting with the palm with the other hand
(thrusting hand). Concentrate on holding the
instrument steady with the indifferent hand as
you thrust. Remember to flex your pectoralis
muscles during the pre-tension phase.
1. Parameter setting #3: With the right hand,
perform two sets with each spring, starting
with yellow to red to black. Then two sets
with each spring, starting with black to red
to yellow. Upload these 12 sets.
a. Repeat with left hand and up-load
these 12 sets.
2. Repeat same routine with Parameter
setting #4, Upload 12 sets at a time.
Assignment C
Perform the following sets using STANDARD
TIMING.
Dynadjust Position: Repeat Assignment B, but
hold the instrument by the lower cylinder palm
60
59
down, and close to the intersection of the top
cylinder. (If your kit includes the Dynadjust
Appliance, you can use the tension ring to help
stabilize the instrument with the indifferent hand.
You will find that this exercise is considerably
more difficult than holding the instrument by the
ends, but it allows closer juxtaposition of the
hands. Working with the instrument in this
position will rapidly build strength in your
hands.
1. Parameter setting #3: With the right hand,
perform two sets with each spring, starting
with yellow to red to black. Then two sets
with each spring, starting with black to red
to yellow. Upload these 12 sets.
a. Repeat with left hand and up-load
these 12 sets.
2. Repeat same routine with Parameter
setting #4, Upload 12 sets at a time.
61
60
Assignment D
Perform the following sets using STANDARD
TIMING.
Dynadjust Position: Repeat assignment C, but
utilize the exercise tubing either under one foot
or looped around the head-piece on a treatment
table. Use the foam wrist protector to fit the
tubing on the wrist of your indifferent hand. If
you make an 18” loop using the tubing clamp,
and stretch the tubing to approximately double the flaccid length, you will have
approximately 10 to 12 pounds of downward tension on your indifferent hand. This
will simulate the weight of the head of the average patient, and provide a more
realistic challenge for your exercises.
62
61
1. Parameter setting #3: With the right hand,
perform two sets with each spring, starting
with yellow to red to black. Then two sets
with each spring, starting with black to red
to yellow. Upload these 12 sets.
a. Repeat with left hand and up-load
these 12 sets.
2. Repeat same routine with Parameter
setting #4, Upload 12 sets at a time.
Note: If you find this exercise difficult because
of the extra weight on your indifferent hand, use
the exercise bar, tubing, and weight bag to
exercise your arms and wrists. Hold the bar in
your hands with elbows bent to approximately
90 degrees. Alternate between exercising with
your palms up and palms down. Slowly roll the
tubing onto the rod, then slowly unroll the
tubing. Bouncing the bag at the same time will
add an extra element of beneficial resistance
exercise. Start with the amount of water in the
bag that allows you to perform eight repetitions
of slowly rolling the tubing up and down. Use
your fingers to continuously work the tubing
toward the center of the bar as you roll it up.
This will strengthen your fingers at the same
time. As you gain strength, add more and more
water to the bag.
63
62
Advanced Assignments
Combined motion moves involve a certain amount of
lateral motion that is performed simultaneously with
the thrust. Your professor may want to assign certain
metrics for the amount of lateral motion that you will
incorporate into your thrusting. A good starting point
goal metric would be approximately 10 to 20% of
lateral motion. If you like, you can start your combined
motion exercises with the instrument braced against a
stationary object, such as with Assignment A. When
you have worked through Assignments A, B, and C,
you will have acquired considerable control, and your
instructor may wish to have you move up to more
difficult parameter settings, such as Parameter setting
#6.
Instructor’s Suggestions and Notes for Catalog of Assignments Part #2:
Parameter setting #4 has narrower margins for error for the tissue-pull by 50%. If you see
that the student is losing the tissue-pull prior to the thrusts, and a preponderance of
insufficient depth failures, especially with the heavier springs and the later thrusts, the
64
63
problem will likely be worse with parameter setting #4. Corrective prescriptions would
include extra work with DREP #2 and #6, ACE #2 and #4, and exercise rod work for
strengthening and work-hardening the wrists and fingers (Note that as the student winds
the rubber tubing onto the rod, they must continually work the tubing toward the center of
the rod. This builds up the wrists, forearms, and fingers). Advise the student to do the
corrective work, and repeat this assignment in approximately one week. If the student
shows difficulty performing the thrusts in a straight line of drive, more practice is
indicated. Ask the student to practice these thrusts with the emphasis on LOD instead of
speed. When the student is getting close to 80% successful thrusts, it is time to focus on
speed / force modulation. Speed / force modulation exercises are usually performed with
the black spring, for training purposes, as it is a fair expectation that if they can achieve
good modulation with the heavier springs, they should have little trouble doing even
better with the lighter springs. For this particular exercise, with the black spring, and
parameter setting #3, the student should be able to consistently produce successful thrusts
approaching 2000 N, and should be able to modulate back and forth between 50% and
100% of their maximum on command.
Once the student has mastered these metrics, you may choose to assign this type of
exercise using more advanced thrusting techniques, such as various angles (instead of
perpendicular). Advanced exercises would incorporate combined motion. Suggested
metrics for rotation combined motion thrusts would be approximately 30 degrees, in both
directions, and for lateral combined motion thrusts, approximately 10% in forward and
back, and side to side. Even more advanced work would involve using the Dynadjust
Appliance to provide resistance in the rotation and lateral direction combined motion
thrusts. The Tension Ring component of the Dynadjust Appliance can be used with
exercise to accommodate nearly any table height.
!
65
64
Dynadjust Catalog of Exercise Assignments #3
Cervicothoracic and First Rib Maneuvers
Play Catalog Video #3
There are a multitude of maneuvers for use in HVLA manipulations of the lower cervical
and upper thoracic zygapophyseal joints, and first-rib treatments. Of course, first-rib
problems can manifest in various and interesting ways. As a part of working with these
exercises, it might be an appropriate time to study the conditions that sometimes are
treated with these therapies, and those that should be investigated for your differential
diagnosis and contraindications, including Thoracic Outlet Syndrome, Cervical Ribs,
Pancoast Tumor, etc. It will be the decision of your instructor, as to how, when, and if
these topics are addressed as part of your Dynadjust training exercises.
Suggested Parameter settings - As per suggestions from your instructor.
Applicable Videos / User’s Guide Materials - Video #1 #3, DREP #1 #2, ACE
#4
Note: With this exercise, you are simulation a “push move” with a superior to inferior,
and slightly lateral to medial line of drive. This is a simulation of a first rib or
cervicothoracic maneuver, and is nearly the same simulation whether the patient would
be in supine or prone position.
Posture - Various postures as shown in the pictures and videos. (or as assigned by your
instructor).
Contacts - Thenar eminence, hypothenar eminence and pisiform, lower radial aspect of
index finger, (Advanced Variation: One-handed P to A thrusting for the Prone
cervicothoracic exercises, as per pictures and videos)
Thrust - Usually a straight line of drive. Advanced versions with added combined
motion laterally.
Timing - Standard
Spring Selection - This is a relatively difficult exercise, especially for the combined
motion maneuvers described below. As usual, start with the lightest spring (Yellow), and
gradually move to the stiffer springs as you skills increase.
Review recommended materials before starting.
66
65
Assignment A
Perform the following sets using STANDARD TIMING.
Dynadjust Position: Seated at the head of a
table or other suitable posture, such as with
just a chair as shown in the pictures and
video, with the Dynadjust instrument
positioned with the “bottom cap” braced
against a table or other surface, and / or
stabilized with the “indifferent hand, and
nearly horizontal to the floor. Strive for a
straight line-of-drive with these thrusts.
1. Perform two sets with each spring,
starting with yellow to red to black.
Then two sets with each spring, starting
with black to red to yellow. Upload
these 12 sets.
2. Repeat with the other hand
a. Be sure to note which hand was
used for which exercises when
you up-load to the OrthoNeuro
Service Center.) Upload these 12
sets. (A total of 24 sets, 12 sets
with each hand).
Assignment B
Perform the following sets using STANDARD
TIMING.
Dynadjust Position: Perform the same
exercises as in Assignment A, and add a
67
66
slight combined motion with the thrust, as if
you were inducing slight rotation with the
thrust, as shown in the video for this
assignment. You can vary the amount of
combined motion, as your instructor suggests,
starting with a goal of approximately 20%
1. Up-load these 24 sets, 12 with each
hand.
a. Be sure to describe your goal for
the lateral motion (such as 20%) in the “Notes Window”, as well as
which hand was used for the sets, when you up-load your exercises.
Assignment C
Perform the following sets using STANDARD TIMING.
Dynadjust Position: Standing at the side of a
table in modified “Fencer Stance”, and
slightly bent at the waist, with the instrument
positioned vertical on an arm-rest or chair,
and the top of the instrument at
approximately the top of your femur, perform
thrusts using a palm, hypothenar, or pisiform
contact (or as suggested by your instructor)
Concentrate on a straight line-of-drive, as if
the contact was on the transverse process of
an upper thoracic segment, and you were
inducing a posterior to anterior thrust and
inducing slight rotation in the segment.
1. Perform two sets with each spring with
one hand, then switch hands and
perform two sets with each spring.
a. Be sure to record which sets are
performed with which hand in
the “Notes Window” on the
service center.
68
67
Assignment D
Perform the following sets using STANDARD TIMING.
Dynadjust Position: Standing at the side of a
treatment table, or other suitable surface,
position the Dynadjust instrument with the
bottom of the instrument slightly medial, and
the top at approximately a 30 degree angle
laterally, and slightly elevated from the table.
Position your body for a superior to inferior
thrust with your forearm nearly in line with
the instrument. Use your indifferent hand to
stabilize the base of the instrument on the
table. Produce your thrusts in a superior to
inferior vector with a slight lateral to medial
angle. (This exercise simulates mostly a first
rib, or cervicothoracic maneuver with the
patient in prone position.)
1. Perform two sets with each spring with
your right hand, then move to the other
side, and perform two sets with each
spring for a total of 12 sets. Upload
these sets.
Assignment D2
Perform the following sets using STANDARD
TIMING
Dynadjust Position: Repeat Assignment D
with the addition of a combined motion
with the thrust, as if you were inducing
rotation in selected segment along with the
thrust. Start with your goal being
approximately 20 degrees, and vary the
combined motion as per directions from
your instructor. Be sure to note your
lateral motion goal and the thrusting hand
used with the sets, in the “Notes Window”
when you upload the exercises to the
Service Center.
69
68
Advanced Assignments
Perform Assignments B, D2 with the addition of
the exercise tubing and foam protector to
increase the difficulty of the exercise, especially
the combined motion portion of the maneuver.
You can determine how much weight you are
adding to the exercise, by measuring the length
of the loop of exercise tubing with and without
the water bag. For instance, you can add a
certain amount of water to the bag, and measure
how much stretch you need in the tubing to
create the desired amount of resistance. A
suggested starting point would be approximately
10 lbs of resistance. (For instance, a loop of
tubing the is 24” will yield 10 lbs of resistance
when stretched to 40 inches. Be sure to include
the approximate resistance level of the tubing in
the “Notes Window” when uploading these
exercises to the Service Center.)
!
70
69
Dynadjust Catalog of Exercise Assignments #4
Side-Posture and Body-Drop
Play Catalog Video #4
!"#$%&'()*+,'*-%./%01.)1%2%3(+45+'(&%.-%./)('&('26*+%2'*%)(77(/%8('%-,&./*%
61('2).)%72/*,9*'-:%2/+%./%-.+*5&(-6,'*%&'()*+,'*-%8('%;,732'%2/+%-2)'(.;.2)%<(./6%
6'*267*/6-=%>/*%(8%61*%7(-6%+.88.),;6%&'(3;*7-%*/)(,/6*'*+%01*/%266*7&6./?%3(+45
+'(&%&'()*+,'*-%('%*@*').-*-%.-%
61*%6*/+*/)4%6(%'*;*2-*%61*%&'*5
6*/-.(/%('%A6.--,*5&,;;B%&'.('%6(%
61*%3(+45+'(&%61',-6=%C1*/%2%
&26.*/6%.-%&(-.6.(/*+%./6(%-.+*5
&(-6,'*:%2/+%61*%;,732'%-&./*%.-%
-;(0;4%72/*,9*'*+%./6(%'(626.(/:%
61*%61',-6%.-%?*/*'2;;4%+*;.9*'*+%
34%61*%+()6('%./6(%61*%.;.2)%)'*-6%(8%
61*%&26.*/6%34%2&&;4./?%&'*--,'*%
8'(7%61*%,&&*'%3(+4%(8%61*%
+()6('=%D-,2;;4:%61*%+()6('%0.;;%3*%
,-./?%1.-%12/+-%6(%-623.;.E*%-*?7*/6-%23(9*%2/+%3*;(0%61*%62'?*6*+%-*?7*/6=%>':%./%
61*%)2-*%(8%2%)(73./*+%7(6.(/%72/.&,;26.(/:%61*%3(+4%+'(&%.-%2))(7&2/.*+%0.61%2%
61',-6%8'(7%61*%12/+%(8%61*%+()6(':%*.61*'%./6(%61*%7277.;;2'4%&'()*--%(8%2%;,732'%
-*?7*/6%6(%./+,)*%8,'61*'%'(626.(/:%('%./6(%61*%&(-6*'.('%-,&*'.('%.;.2)%-&./*:%./%
('+*'%6(%?2&%61*%-2)'(.;.2)%<(./6=%
%
%
%
%
%
%
%
%
%
%
F/%*.61*'%)2-*:%61*%A./+.88*'*/6%12/+%.-%
,-,2;;4%1(;+./?%61*%,&&*'%-1(,;+*'%(8%61*%
&26.*/6%6(%72./62./%'(626.(/%./%61*%;,732'%
-&./*%G;(/?5;*9*'%2&&'(2)1H=%%
%
%
%
%
71
70
%
%
%
F/%61*%)2-*%(8%61*%-,&./*%61('2).)%72/*,9*'-:%61*%&26.*/6%724%3*%;4./?%8;26%(/%61*.'%
32)I:%('%&(-.6.(/*+%(/%61*%623;*%./%8;*@.(/%(8%61*%61('2).)%-&./*%%
J1*%2'7-%(8%61*%&26.*/6%2'*%,-,2;;4%
)'(--*+%(9*'%61*%)1*-6:%2/+%61*%61',-6%.-%
+*;.9*'*+%61'(,?1%61*%*;3(0-%(8%61*%
&26.*/6%2/+%6(02'+%61*%12/+%(8%61*%
+()6(':%01.)1%.-%&(-.6.(/*+%(/%61*%62'?*6%
-*?7*/6%./%-,)1%2%024%2-%6(%82).;.626*%
61*%+*-.'*+%7(6.(/%(8%6126%-*?7*/6=%%
%
%
K(6*L%J1*-*%*@*').-*-%129*%2/%./1*'*/6;4%1.?1*'%&(6*/6.2;%8('%-6'*--%6(%61*%;(0*'%
32)I%(8%61*%,-*'=%F6%.-%2))*&623;*:%./%7(-6%
)2-*-:%6(%,-*%4(,'%2'7-%6(%-,&&('6%4(,'%
,&&*'%3(+4%01.;*%&'2)6.)./?%3(+45+'(&%
*@*').-*-=%F/%'*2;5;.8*%6'*267*/6:%4(,%
0(,;+%3*%;*2/./?%(/6(%61*%3(+4%(8%61*%
&26.*/6%6(%-,&&('6%4(,'%(0/%32)I:%2/+%
&'*9*/6%./<,'4=%M24%);(-*%266*/6.(/%6(%
4(,'%8('7:%2/+%;*9*;%(8%826.?,*%0.61%4(,'%
N4/2+<,-6%0('I%(/%61*-*%*@*').-*-=%
!
"#$$%&'%(!)*+*,%'%+!&%''-.$&!/!$-%&*'%-,??*-6.(/-%8'(7%4(,'%./-6',)6('=%
O*/*'2;;4:%&2'27*6*'%-*66./?-%0.61%2%'*;26.9*;4%+**&*'%&'*56*/-.(/%2/+%+**&*'%
61',-6%2'*%'*)(77*/+*+=%
!
0112-3*42%!5-(%6&!7!8&%+9&!:#-(%!;*'%+-*2&!/%5-(%6!<=!<>?!@AB)!<C?!0DB!
<E?!<C?!<=F!
!
)6&'#+%!/!"2'.(,-%&(-6,'*-%2-%-1(0/%./%61*%&.)6,'*-%2/+%9.+*(-=%G>'%2-%2--.?/*+%34%
4(,'%./-6',)6('H=%%
72
71
!
D6.'*3'&!/%J1*/2'%*7./*/)*:%14&(61*/2'%*7./*/)*%2/+%&.-.8('7:%G$+92/)*+%
"2'.26.(/L%>/*512/+*+%61',-6./?%8('%61*%-.+*5&(-6,'*%;,732'%2/+%-2)'(.;.2)%
72/*,9*'-=%D&&*'%3(+4%2/+%P%('%-1(,;+*'%(8%61*%+()6(':%-(7*6.7*-%'*./8(')*+%0.61%
61*%2'7%('%12/+=%
!
GH+#&'!/!D-,2;;4%2%-6'2.?16%;./*%(8%+'.9*%0.61%4(,'%3(+45+'(&:%2;024-%29(.+./?%;(--%
(8%&'*56*/-.(/%&'.('%6(%61*%61',-6=%$+92/)*+%9*'-.(/-%0.61%2++*+%)(73./*+%7(6.(/%
(8%3(+45+'(&%*.(%61',-6%0.61%12/+:%2-%./%61*%-.+*5&(-6,'*%72/*,9*'-=%J1*-*%
*@*').-*-%)2/%3*%&*'8('7*+%-*&2'26*;4%26%8.'-6:%2/+%;26*'%&*'8('7*+%2-%2%)(73./*+%
7(6.(/%*@*').-*=%
!
G-,-.$!/!Q62/+2'+%
!
"1+-.$!"%2%3'-6.!/%J1*%3(+45+'(&%*@*').-*-%2'*%-(7*%(8%61*%9*'4%8*0%-.7,;26.(/-%
./%01.)1%.6%)2/%3*%*2-.*'%6(%,-*%61*%-6.88*'%-&'./?-%8('%3*?.//./?%&'2)6.)*=%J1.-%2;;(0-%
61*%+()6('%6(%-623.;.E*%1.-%3(+4:%0.61%1*;&%8'(7%61*%-6.88*'%-&'./?=%F6%2;-(%'*R,.'*-%
7('*%)(/6'(;%(9*'%4(,'%(0/%3(+4%6(%61',-6%2?2./-6%61*%;.?16*'%-&'./?-%3*)2,-*%(8%61*%
;2)I%(8%'*-.-62/)*=%S(,'%./-6',)6('%0.;;%2+9.-*%4(,:%0.61%'*?2'+%6(%01.)1%-&'./?-%4(,%
-1(,;+%,6.;.E*%0.61%61*%92'.(,-%2--.?/7*/6-=%
!
0&&-$.,%.'!0!
!
$%-.7&;*%3(+45+'(&%./%01.)1%61*%
N4/2+<,-6%./-6',7*/6%.-%&(-.6.(/*+%
&*'&*/+.),;2'%6(%61*%623;*=%J1*%12/+-%
)2/%3*%,-*+%6(%-623.;.E*%61*%./-6',7*/6%
2/+%-,&&('6%4(,'%;(0*'%32)I%+,'./?%61*%
61',-6=%Q62'6%0.61%61*%3;2)I%-&'./?:%2/+%
?'2+,2;;4%7(9*%61'(,?1%61*%'*+%2/+%
4*;;(0%-&'./?-%2-%4(,%?2./%)(/6'(;=%J1*%
.+*2%.-%6(%-;(0;4%+*&'*--%61*%./-6',7*/6%
,/6.;%4(,%2)1.*9*%61*%&'*56*/-.(/:%1(;+%
&'*56*/-.(/%8('%T%6(%U%-*)(/+-:%2/+%61*/%
+'(&%+(0/%./6(%61*%./-6',7*/6%./%2%
-6'2.?16%;./*%34%'2&.+;4%3*/+./?%<,-6%4(,'%I/**-:%I**&./?%4(,'%;(0*'%8'(7%7(9./?:%
2/+%72./62././?%2%)(78('623;*%;('+(6.)%),'9*%./%4(,'%;,732'%-&./*=%GK,73*'%(8%-*6-%
2/+%&2'27*6*'%-*66./?-%6(%3*%&'*-)'.3*+%34%4(,'%./-6',)6('=H%D-./?%61*%',33*'%)2&-%
(/%61*%./-6',7*/6%0.;;%1*;&%I**&%61*%,/.6%8'(7%-;.+./?%(/%61*%623;*%('%4(,'%3(+4%
)(/62)6=%
!
!
73
72
0&&-$.,%.'!I!!
!
M*'8('7%61*%-27*%*@*').-*%2-%./%$--.?/7*/6%$:%*@)*&6%./%61.-%92'.26.(/:%4(,%0.;;%
3*/+%26%61*%02.-6%6(%&'(+,)*%61*%61',-6:%I**&./?%4(,'%I/**-%-6'2.?16=%
!
0&&-$.,%.'!D!!
M*'8('7%61*%-27*%*@*').-*%2-%./%$--.?/7*/6%$:%*@)*&6%./%61.-%92'.26.(/:%4(,%0.;;%
3*/+%3(61%4(,'%I/**-%2/+%02.-6%6(%&'(+,)*%61*%61',-6-=%!29*%2/(61*'%./+.9.+,2;%
026)1%4(,'%8('7%2-%4(,%&'(+,)*%61*-*%61',-6-=%S(,%-1(,;+%-6'.9*%6(%129*%61*%I/**-%
2/+%02.-6%8;*@.(/%)(/6'.3,6*%*R,2;;4%6(%61*%61',-6=%
%
0&&-$.,%.'!@%%
%
C.61%61*%32-*%(8%61*%./-6',7*/6%
&(-.6.(/*+%(/%61*%623;*:%2/+%61*%,&5'.?16%
./-6',7*/6%26%2&&'(@.726*;4%2%VW%
+*?'**%2/?;*%2024%8'(7%4(,'%3(+4:%1(;+%
61*%32-*%(8%61*%./-6',7*/6%0.61%(/*%
12/+:%2/+%&;2)*%61*%(61*'%12/+%(/%6(&%(8%
61*%./-6',7*/6=%D-*%61*%-,&*'.('%12/+%
6(%&'(+,)*%61*%61',-6-%./6(%61*%2/?;*+%
./-6',7*/6%./%2%-6'2.?16%;./*5(85+'.9*=%X*%
-,'*%6(%&*'8('7%61.-%*@*').-*%0.61%*2)1%
12/+%2-%61*%61',-6./?%12/+%-*&2'26*;4=%%
!
0&&-$.,%.'!B%%
%
$--,7*%61*%-27*%&(-6,'*%2-%./%$--.?/7*/6%N:%0.61%61*%92'.26.(/%3*./?%6126%4(,%0.;;%
1(;+%61*%2'7-%-6*2+4:%2/+%&'(+,)*%61*%61',-6%34%3*/+./?%26%61*%I/**-%(/;4=%%
!
0&&-$.,%.'!J!
!
$--,7*%61*%-27*%&(-6,'*%2-%./%$--.?/7*/6%N:%0.61%61*%92'.26.(/%3*./?%6126%4(,%0.;;%
266*7&6%6(%&'(+,)*%61*%61',-6%0.61%3(61%8;*@.(/%(8%61*%I/**-%2/+%26%61*%02.-6=%J'4%6(%
&'(+,)*%61*%61',-6-%0.61%*R,2;%)(/6'.3,6.(/%6(%61*%61',-6%0.61%61*%I/**-%2/+%02.-6=%
!
!
!
!
!
!
!
74
73
0&&-$.,%.'!:%%
%
$''2/?*%61*%./-6',7*/6%&(-.6.(/*+%0.61%
61*%32-*%(8%61*%./-6',7*/6%8.'7;4%
&'*--*+%./6(%61*%'*?.(/%26%61*%6(&%(8%61*%
8*7,'%(/%61*%;*?%8,'61*-6%8'(7%61*%623;*:%
2/+%61*%./-6',7*/6%2;7(-6%1('.E(/62;%6(%
61*%8;((':%&'(+,)*%61*%61',-6%0.61%61*%
2'7%&(-.6.(/*+%-(%6126%61*%8('*2'7%.-%
/*2';4%./%;./*%0.61%61*%./-6',7*/6=%%
!
!
0&&-$.,%.'!K%%
%%
M*'8('7%61*-*%-.+*%&(-6,'*-%0.61%61*%
2++.6.(/%(8%*@*').-*%6,3./?%6(%./)'*2-*%
61*%+.88.),;64%;*9*;:%2/+%6(%7('*%);(-*;4%
-.7,;26*%'*2;5;.8*%6'*267*/6%)12;;*/?*-=%
S(,'%./-6',)6('%0.;;%2+9.-*%4(,%(/%
92'.26.(/-%./%&(-6,'*-%2/+%6,3./?%
6*/-.(/:%*6)=%%
%
%
%
%
%
%
%
75
74
12 Standard Exercises
Exercise #1
Supine Cervical
Exercise #2
Prone Cervical Thumb-Move
Exercise #3
Prone Cervical Cross-Bilateral
Exercise #4
Prone Thoracic
Exercise #5
Supine Thoracic
Exercise #6
Side-Posture Lumbar of Sacroiliac Body Drop
Exercise #7
Two handed Pull Move
Exercise #8
Seated Cervical
Exercise #9
Seated Cervical Rotation, From Front
Exercise #10
Seated Cervical and First Rib
Exercise #11
Pubic Symphysis Adjustment
Exercise #12
Lower Extremity Adjusting
!
76
75
Curriculum(Notes(and(Suggested(Goal(
Metrics(for(Beginning(Dynadjust(Exercises(
(
Instructor Notes
Within the Twelve Standard Dynadjust Exercises, the Ancillary
Conditioning Exercises (ACE) and the Dynadjust Rudimentary
Exercise Program (DREP) some exercises and postures are obviously
more suited to different parts of the anatomy for training and
simulation. Below, we have the exercises categorized, along with
suggested “Goal Metrics” for the more common exercises and
postures, etc. These Goal Metrics are rough estimates of the speed and
force readings that a student may expect to work toward. They do not
take into account variables, such as utilization of the accessories,
which are sometimes used to enhance the various exercises. This data
should be considered nothing more than a “starting point” on which to
expand. For beginning exercise purposes here, we will describe the
suggested Goal Metrics for cervical and thoracic maneuvers with the
Yellow spring only, and using some of the more appropriate
Dynadjust Parameter Setting for beginning Dynadjust training.
Sample Lab Handout #1
Technique Instruction for Cervical
Exercises
Standard Exercise #1
This exercise demonstrates variations on a
simple supine cervical “lateral break,”
exercise.
• Video Tutorial – Standard Exercise #1
• Notes
• Yellow Spring
Suggested Parameter Setting: #4
Suggested Force Newtons: 2400N
Suggested Speed: .05 seconds
77
Standard Exercise #2
This exercise demonstrates variations on a simple prone “Thumb Move,”
exercise.
• Video Tutorial – Standard Exercise #2
• Notes
• Yellow Spring
Suggested Parameter Setting: #3
Suggested Force Newtons: 1800N
Suggested Speed: .05 seconds
Standard Exercise #3
This exercise demonstrates variations on a simple “Cross-Bilateral”
maneuver for the cervical/thoracic region.
• Video Tutorial – Standard Exercise #3
• Notes
• Yellow Spring
Suggested Parameter Setting: #2
Suggested Force Newtons: 5700N
Suggested Speed: .04 seconds
78
Sample Lab Handout #2
Technique Instruction for Thoracic Exercises
Standard Exercise #4
This exercise deals with variations on Prone Thoracic Maneuvers.
• Video Tutorial – Standard Exercise #1
• Notes
• Yellow Spring
Suggested Parameter Setting: #10
Suggested Force Newtons: 5000N
Suggested Speed: .05 seconds
Standard Exercise #5
This exercise deals with Supine Thoracic Maneuvers.
• Video Tutorial – Standard Exercise
#5
• Notes
• Yellow Spring
• Standard Exercise #5 should
be utilized with resistance
tubing in place in order to
simulate holding the patient
into flexion where applicable
(see pic*)
Suggested Parameter Setting: #2
Suggested Force Newtons: 2200N
Suggested Speed: .06 seconds
79
Sample Lab Handout #3
Technique Instruction for Lumbar & Lumbo-Sacral Exercises
• Notes
• Red/Black Spring – The heavier springs are needed because the
body posture of the practitioner is such that he/she is usually
applying some of their own weight to the patients shoulder and
knee. This weight transference stabilizes the practicioner and
the patient -as found in the shoulder contact with the
“indifferent hand,” when performing a “body-drop,” style
maneuver. Therefore, it is recommended to start exercises in
“body drop” maneuvers with the Black spring and gradually
work toward proficiency with the Red and Yellow springs.
• For Sacroiliac or mammillary process “push” maneuvers, where
one side of the Dynadjust instrument is held against the body of
the practitioner, the opposite is true. Beginning exercises for
“lumbo-sacral push” maneuvers should utilize the Yellow
spring first, and gradually work towards proficiency with the
Red and Black springs.
• Dynadjust Parameter Settings for side-posture lumbar and
sacral maneuvers should usually be those with the most premanipulative tension (Tissue Pull) and deepest depth of thrust,
such as Parameter Settings #10, #11, and #12.
Standard Exercise #6
This exercise demonstrates variations on Side-Posture Lumbar or Sacroiliac
Body Drop.
• Video Tutorial – Standard Exercise #6
• Notes
• Red/Black Spring
Suggested Parameter Setting: #10, 11, 12
Suggested Force Newtons:
Suggested Speed:
80
Standard Exercise #7
This exercise demonstrates variations on the “Two Handed Pull Move”.
• Video Tutorial – Standard Exercise #7
• Notes
• Red/Black Spring
Suggested Parameter Setting: #10, 11, 12
Suggested Force Newtons:
Suggested Speed:
Sample Lab Handout #4
Technique Instruction for “Specialty/Advanced Procedures”
• Video Tutorials
1. Standard Exercise #8
2. Standard Exercise #9
3. Standard Exercise #10
4. Standard Exercise #11
5. Standard Exercise #12
• Notes
• Study the Dynadjust User’s Manual PDF document and the
included Twelve Standard Dynadjust Training Videos often.
Consider which exercises described in the Twelve Videos, and
those listed under ACE and DREP in the Dynadjust User’s
Manual, are appropriate for your
present training regimen and
assignments.
• Remember to practice each
exercise with both hands, where
81
applicable, and to note whether the exercise was performed
with your dominant hand, or your non-dominate hand in your
ONT Service Center “notes” windows.
• Every thrust counts! Proceed with your exercises as if each
thrust was being delivered to a live patient. Avoid the tendency
to rush through the six “Warm-Up” thrusts at the beginning of
each set.
• Experiment with your exercises by using Dynadjust Instrument
Parameter Settings that may not be perfectly suited to any
particular patient positioning. (*Editors Note- Ideally, a
“Master” would be able to perform any thrust with any
Parameter Setting, and in any posture or resistance level)
Sample Lab Handout #5
“Round Robin” Home Study Program
Study in groups when possible.
This way, students can help
each other maintain the proper
posture and Dynadjust
Instrument positioning for their
exercises. Experiment with
“Round-Robin” group
exercises, in which a group of
students each set their
Dynadjust Instruments to a
different Parameter Setting and spring resistance level. Next, select a
particular posture and positioning to
perform together.
Perform at least one “Set” with each Dynadjust Instrument, switching
instruments with the next person after each set is complete. This is a
very effective confidence building exercise!
It is of paramount importance to remember that your first goal, with
every Dynadjust exercise, is to find the “groove” of the Parameter
Setting. Speed and force are important, but the ability to
MODULATE your speed and force is far more important in your
training regimens.
82
On any particular exercise, in any posture or positioning, start by
slowly finding the right depth of the “tissue-pull”, and the depth of the
thrust. Once you have practiced enough to be able to keep the
majority of your thrusts within the chosen Parameter Setting, you
should begin to gradually bring up the speed and force of your thrusts,
while staying within the chosen Parameter Setting. Each thrust brings
you closer to your goal of being able to modulate your thrusts with
any given setting or posture.
• Notes
• A “Set” of Dynadjust exercises (18 thrusts) takes approximately
three minutes to perform.
• A “Deck” of Dynadjust exercises (16 Sets of 18 thrusts) fills the
memory of the Dynadjust Instrument and takes approximately
45 minutes to perform.
• A complete “Deck” of exercises is 288 thrusts.
• These estimates include the time needed for the student to
properly perform the assignment, and to up-load the data
collected to the OrthoNeuro Service Center.
• It is suggested that assigned “homework” Dynadjust exercises,
with the posture of the body of the student and the positioning
and Parameter Settings of the Dynadjust Instrument, should be
conducted in “Decks”.
• The student does not need to perform the entire assignment in a
single session - the Dynadjust Instrument will store the “sets”
performed until they are up-loaded or erased.
• For the sake of compliance, any combination of “Sets” or
“Decks” can be up-loaded to the OrthoNeuro Service Center
only once.
(
83
Research and Supporting Links
This list of links to scientific journal abstracts is a small but significant sampling of
“Dynadjust Specific” research articles, and some of the most “on point” articles,
demonstrating the transferability of skills developed on machines and apparatus, to actual
clinical application on human patients.
This is an exciting and presently emerging science, and we at OrthoNeuro Technologies
are dedicated to advancing this science, and to continuing to support the research efforts
at the various institutions, and in the field as well. Be sure to monitor this page regularly,
as we continue to work together with you, your peers, and the top bio-mechanical
research scientists, on a global scale.
It is an important part of our mission to keep you informed of the incredible advances in
bio-mechanical sciences, and their educational and clinical applications.
Published Research
1. Quantitative feedback versus standard training for cervical and thoracic
manipulation
Journal of Manipulative and Physiological Therapeutics
Volume 26, Issue 3 , Pages 131-138, March 2003
2. Developing skilled performance of lumbar spine manipulation
Journal of Manipulative and Physiological Therapeutics
Volume 25, Issue 6 , Pages 353-361, July 2002
3. Biomechanics: Review of approaches for performance training in spinal
manipulation
"How we perform spinal manipulation makes a difference (See Cleland et al 2009)
to the right group of patients. Feedback is a key component that hones the central
nervous system, increasing its adaptability and the functionality necessary to apply
treatment safely to patients with pain involving complex pathology." John J.
Triano, DC, PhD
84
76
Supporting Research
1. Does Treatment Force Matter? A Look at Manipulation Skill in Patient Contexts
Referring to the latest research, Dr. Triano will discuss the benefits of rehearsed
practice and quantifiably measuring the complex physical forces involved in the
chiropractic adjustment, as well as strategies for practitioners to assess their
personal skill in manual technique. He will also explore the benefits and risks of
the inaccurate, excessive or moderate application of force in manipulation, to both
the patient and the practitioner's practice.
!
85
77
Glossary
Terms
Plyometrics - Plyometrics, also known as “plyos” is a type exercise designed to produce
fast and powerful movements. It is generally used by athletes to improve performance in
sports, especially those that involve speed, quickness and power.
HVLA – High Velocity Low Amplitude
Links
Quantitative feedback versus standard training for cervical and thoracic
manipulation
Developing skilled performance of lumbar spine manipulation
Dr. Triano Webinar “Does treatment force matter? A look at manipulation skill in
patient contexts”
Biomechanics: Review of approaches for performance training in spinal
manipulation
Videos
ACE
Appliance
Catalog #1
Catalog #2
Catalog #3
Catalog #4
Combined Motion Superimpositions
D.R.E.P. #1
D.R.E.P. #2
D.R.E.P. #3
D.R.E.P. #4
D.R.E.P. #5
D.R.E.P. #6
86
78
Dr. Triano Presenting @ TCC
Dynadjust Instrument & Kit
Dynadjust Instrument Tutorial
Dynadjust Users Tips
History & Mission
Math Calculations
P.A.T. Program
Plyometrics
Student Skill Evaluation Scenario & Review of ONT Service Center
Spring Change
Twelve Standard Exercises
Exercise #1
Exercise #2
Exercise #3
Exercise #4
Exercise #5
Exercise #6
Exercise #7
Exercise #8
Exercise #9
Exercise #10
Exercise #11
Exercise #12
Water Bag Exercises
!
!
!
!
!
!
!
!
!
!
!
87