1
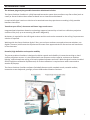
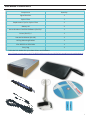
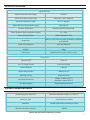
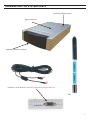
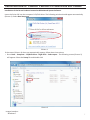
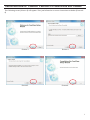
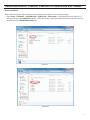
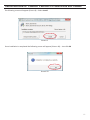
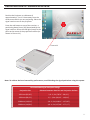
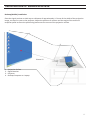
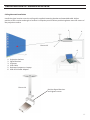
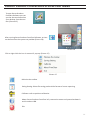
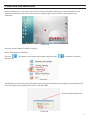
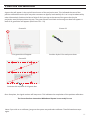
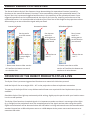
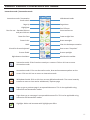
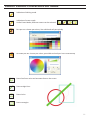
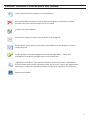
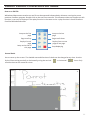
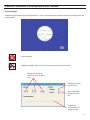
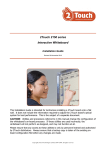
IW1000
USER MANUAL FOR PARROT PRODUCTS
INTERACTIVE WHITEBOARD SYSTEM
CONTENTS
Introduction
Package Contents
Specifications
System Requirements
Assembling the System Parts
Installation of Parrot Products FreeClass Software
Installation of Signal Receiver
Parrot Products FreeClass Tray
Position Calibration
Parrot Products Stylus E-Pen
Operations of the Parrot Products Stylus E-Pen
Parrot Products FreeClass Software
Contact Us
3
4
5
5
6
7-8
9-13
14
15-16
17
17
18-23
24
2
INTRODUCTION
The ultimate plug and play portable interactive whiteboard solution
The Parrot Products FreePoint is a fully featured interactive system that transforms any flat surface (such as
a wall) or Parrot Products Non-reflective Board into an interactive whiteboard.
It requires NO signal receiver or device to be attached onto the projection area making it fully portable
between classrooms.
Transform your office / classroom wall into a huge touch screen
Integrated optical position detection technology supports interactivity on hard non-reflection projection
surfaces of any size, up to an amazing 3,8 meters diagonally!
No battery is required for the USB signal receiver and the unit can be mounted to the ceiling if a permanent
solution is required.
Working with the Parrot Products Stylus E-Pen, you and your students can explore internet websites, use
digital e-Content, build interactive flipcharts and create more opportunities for discussions and interaction
in the classroom.
Powerful, high definition and superior stability
The parrot products FreePoint is designed to deliver superb and reliability in interactive writing on hard
surface projection screens. It is also packed with new features such as superior resistance to ambient
lighting, sophisticated new styling, and newly updated software and tools. With the signal receiver installed
and first position calibration implemented, no further calibration is required even when connected to
another PC/Laptop.
The Parrot Products FreeClass software (included) features quick notebook mode, movable toolbar,
interactive screen keyboard, spotlight, screen shade and annotation functions.
3
PACKAGE CONTENTS
Component
Quantity
Signal Receiver
1
Stylus E-Pen
1
Replacement Tips for Stylus E-Pen
2
Battery AA
2
Parrot Products FreeClass Software (On CD) *
1
Driver (On CD) *
1
Instruction Manual (On CD)
1
Ceiling Mounting Bracket
1
15m RS-232 to USB Cable
1
Carry Bag
1
*Visit the link below for up to date drivers and Software
http://www.parrotproducts.biz/(S(t43032ezs34euvmvb1yvayja))/default.aspx#interactivewhiteboards
4
SPECIFICATIONS
Signal Receiver
Optical Detection Technology
Infrared
Active Area (max project size)
3,8meters / 150" diagonal
Horizontal Reception Angle
38 +/- 2 degrees
Adjustable Vertical Reception Angle
0-30 degrees
Position Calibration
Optical Indication Positioning
Active Distance (from projection screen)
1.5 - 4.5m
Connectivity Interface
USB2.0 (3m) & RS-232
Resolution
Within 1 pixel jitter at centre for display resolution
of 1024x768
Power Consumption
Less than 800mW
Weight
200g
Dimension
150x105x32mm (5,91"x4,13"x1,26")
Stylus E-Pen
Light Emitted
Infrared
Pen Tip Trigger Switch
Pressure Sensing
Control buttons
1 Button
Power Requirement
Battery AA x2
Working Current
40-50 milli Amp
Pen Body Dimension
Length: 172mm (6,77")
Diameter: 19mm (0,75")
Pen Body Weight
60g (excluding batteries)
System Requirements
Operating System Required
Microsoft Windows 2000 / XP / Vista / 7
Processor Type
Intel Pentium or above
RAM Size
512MB (1GB Recommended) or above
Minimum Hard Drive Space
100MB
Works with 32 & 64-bit operating systems
5
ASSEMBLING THE SYSTEM PARTS
Positioning Beam button
Signal Indicator
Angle adjustable front panel
B
A
Connect A to PC and B to Interactive Whiteboard Signal Receiver
E-Pen Assembly
6
INSTALLATION OF PARROT PRODUCTS FREECLASS SOFTWARE
Installation of the Parrot Products Interactive Whiteboard System Software
Insert the Driver CD into the computer’s CD/DVD drive. The following window should appear automatically
(Picture 1). Select Run Setup.exe
Picture 1
If the screen (Picture 1) does not automatically appear, follow these instructions
• Go to Start – Computer – CD/DVD Drive – Right Click – Select open – The following screen (Picture 2)
will appear. Select the Setup file and double click
Picture 2
Images based on
Windows 7
7
INSTALLATION OF PARROT PRODUCTS FREECLASS SOFTWARE
The Following screen (Picture 3) will appear. Then just follow the on screen instructions as below (Picture 46)
Picture 3
Picture 4
Picture 5
Picture 6
8
INSTALLATION OF PARROT PRODUCTS FREECLASS SOFTWARE
Driver Installation
Before Connecting the signal receiver to the computer you have to run the driver setup.
• Go to Start – Computer – CD/DVD Drive – Right Click – Select open – The following screen (Picture 7)
will appear. Open the USB Driver folder – Once the folder is open you should see the screen (Picture 8) –
Double click the CP210xVCPInstaller file
Picture 7
Picture 8
9
INSTALLATION OF PARROT PRODUCTS FREECLASS SOFTWARE
The following screen will appear (Picture 9) – Select Install
Picture 9
Once installation is completed the following screen will appear (Picture 10) – Just click OK
Picture 10
10
INSTALLATION OF SIGNAL RECEIVER
Position the Projector at a distance of
approximately 1.2 to 1.5 times away from the
surface onto which you are projecting. Place the
signal receiver next to the projector.
Press the red button on top of the receiver; a
positioning beam (Laser) will be emitted by the
signal receiver. Direct the LED light (Laser) to the
point at the centre of the projection surface (as
shown in Picture 11)
Picture 11
Note: To achieve the best interactivity performance, avoid blocking the signal path when using the system
Recommended Signal Reception Range
Projection Size
Distance between Receiver and Projection Surface
1625mm (63,98")
2,0 - 2,5m (78,74" - 98,43")
2500mm (98,43")
2,5 - 3,0m (98,43" - 118,11")
3000mm (118,11")
3,0 - 3,5m (118,11" - 137,80")
3800mm (149,61")
4,0 - 4,5m (157,48" - 177,17")
11
INSTALLATION OF SIGNAL RECEIVER
Desktop (Mobile) Installation
Place the signal receiver on desk top at a distance of approximately 1.5 times of the width of the projection
image, on top of or next to the projector. Adjust the position of receiver and the angle of the receiver’s
reception panel to direct the positioning beam onto the centre of the projection surface
1
2
3
Picture 12
1.
2.
3.
4.
Projection Surface
Signal Receiver
Projector
Desktop Computer or Laptop
4
12
INSTALLATION OF SIGNAL RECEIVER
Ceiling Mounted Installation
Install the signal receiver onto the ceiling with supplied mounting bracket and extended cable. Adjust
position of the receiver and angle of receiver’s reception panel to direct positioning beam onto the centre of
the projection surface
3
Picture 13
4
2
6
1
1.
2.
3.
4.
5.
6.
Projection Surface
Signal Receiver
Projector
VGA Cable
Desktop Computer or Laptop
USB-Serial Cable Adapter
Picture 14
5
Position Signal Receiver
and tighten screws
13
PARROT PRODUCTS FREECLASS SYSTEM TRAY MENU
To open Parrot Products
FreeClass Software you can
you the shortcut located on
your desktop. See shortcut
Icon (Picture 15)
Picture 15
After running Parrot Products FreeClass Software, an Icon ‘
can be found on the system tray toolbar (Picture 16)
‘
Picture 16
Click or right click the icon. A menu will pop up. (Picture 17)
Picture 17
Minimize the toolbar
Saving Setting: Select file saving path and the format of screen capturing
Calibrate: refer to position calibration
About: Parrot Products FreeClass info, connection status and system hardware’s
serial numbers HSN
Exit
14
POSITION CALIBRATION
Position calibration is necessary for the first use of Parrot Products FreeClass or when calibration is not
accurate in subsequent use. Check the reception range of signal receiver before executing position
calibration
Picture 18
Start the Parrot Products FreeClass Program
Start > All Programs > FreeClass
The icon ‘
(Picture 19)
‘ will appear in the system tray toolbar. Right click the ‘
‘, and select ‘Calibrate’
Picture 19
The following screen (Picture 20) will appear. By pressing the red button on the signal receiver position the
red (laser) light in the middle of the screen. Then press OK
Centre red (laser) light here
Picture 20
15
POSITION CALIBRATION
A green dot will appear in the top left hand corner of the projection area. This indicated the start of the
position calibration routine (this may take a moment to appear, look carefully for it as it may be obscured by
other information). Position the Parrot Stylus E-Pen’s pen tip at the centre of the green dot (on the
projection area) and press down the pen. The green dot will turn black and more green dots will appear. A
total of 12 green dots will appear. (See Picture 21 – 23)
Picture 21
First green dot will appear
Picture 22
Position Stylus E-Pen and press down
Picture 23
Continue this step with all 12 green dots
Once Complete, the signal receiver will beep once. This indicates the completion of the position calibration.
The Parrot Products Interactive Whiteboard System is now ready for use
Note: If you wish to re-calibrate, just go to the system tray and select calibrate. Then follow above steps
again.
16
PARROT PRODUCTS STYLUS E-PEN
The Parrot Products Stylus E-Pen features a large button design for operational function (normally it
functions as the mouse left button). Function is to be executed by pressing the operational button. The
Stylus E-Pen’s tip is pressured triggered and functions in the same way as the operational button. Once
triggered, operations can be implemented via the stylus E-Pen’s pen tip, requiring no further use of the
operational button. It is recommended to hold the stylus E-Pen at a certain angle to the projection surface
when writing so as not to block the signal with your hand.
Interactive Mode
Pen tip works
as a Left mouse
click
Button works as
a mouse Right
click *
* Please note that on older version
of FreeClass the button can work
as a double click.
Annotation Mode
Whiteboard Mode
Pen tip now
work as a
writing pen or
as the function
you selected
Pen tip now
work as a
writing pen or
as the function
you selected
Button has no
use **
Button has no
use **
** Please note that on older
version of FreeClass the button can
work as a air write button
OPERATION OF THE PARROT PRODUCTS STYLUS E-PEN
The Stylus E-Pen is pressure triggered and functions as a mouse left click when pressed
Hold the Stylus E-Pen at an angle of 30 – 45° to the projection surface to implement annotation
The pen tip of the Stylus E-Pen is very delicate and will wear over a period of time. Replacement tips are
available
Should the Stylus E-Pen light up continuously while writing, slightly tap the pen the with your hand to return
it to its normal position
The Stylus E-Pen functions via optical signals. It is important to make sure there is no strong or direct light
(e.g. sunlight) on the projection area or the reception panel of the signal receiver when using the system.
Signal communication can be abnormal when the USB cable is to long and extends over the communication
standard. Instead use a USB with power source or a USB adapter with a power source and connect to an
extension USB cable.
17
PARROT PRODUCTS FREECLASS SOFTWARE
The Parrot Products FreeClass program brings superb interactivity to the Parrot Products Interactive
Whiteboard System by performing various versatile functions under the Interactive mode
,
Annotation mode
, and Whiteboard mode
Interactive mode:
The Stylus E-Pen functions as a mouse on the projection area with function like double click, single click and
drag and drop. To use, simply click on the Interactive mode
button on the toolbar menu.
The interactive mode allows you to browse the internet, work on Microsoft Office (Word, Excel, PowerPoint)
and any other software by just using the Stylus E-Pen
Parrot Products FreeClass offers you an On-Screen keyboard, for typing, making only use of the Stylus E-Pen
Annotation mode:
Parrot Products FreeClass offer powerful writing and annotating tools such as drawing, highlighting, lines and
shapes such as rectangles and circles. This allows the user to highlight key points, record, and write with ease
at any time. Users can also write on media graphics including video and flash. Annotation mode is a real time
operation, screen function can still be operated, e.g. page scroll functions. All writings, annotations and
drawing generated on the screen can be saved in image format for record.
Whiteboard mode:
Whiteboard mode offers the same powerful writing tools like drawing, highlighting, lines and shapes, etc.
added to this. Whiteboard mode integrates real time recording function. All contents generated on the
whiteboard mode are recorded simultaneously for replay anytime. To save your recording you can save it as
an .exe file format for replay without having to open FreeClass. It can be saved in different image or file
formats. Whiteboard mode also provides different background pictures for selection, including current
desktop background. It also offer different types of lines and music lines. Maps and your own pictures can
also be uploaded into your background. ‘Undo’, ‘Redo’ and ‘View List’ are the new powerful features for easy
use.
All three working modes provide various accessory tools such as screen shade, spotlight etc., enabling users
to conveniently highlight key points, making teaching much more interactive.
18
PARROT PRODUCTS FREECLASS SOFTWARE
Interactive mode / Annotation mode
Interactive mode / Annotation
mode switch
Page Up
Highlighter
Fast Pen set – Standard Colours
and pen thickness
Draw free lines
Draw circles
Undo
Virtual On-Screen keyboard
Screen Shade
Right button simulation
Whiteboard mode
Page down
Pen & Eraser
Accurate Pen set
Draw straight lines
Draw rectangles
Clear the desktop annotation
Save screen “Snapshot”
Screen spotlight
Minimize the toolbar
Interactive mode: E-Pen functions exactly as a mouse. Click on this icon to enter
Annotation mode.
Annotation mode: E-Pen can be used to write, draw and annotate anywhere on the
screen. Click on this icon to return to Interactive mode
Whiteboard mode: Click on this icon to enter Whiteboard mode. The screen instantly
transforms onto an inter active whiteboard / flipchart page
Page up: go to previous page in an opened document. This is also applicable using
Interactive and Annotation modes
Page down: go to next page in an opened document file. This is also applicable using
Interactive and Annotation modes
Highlight: Write and annotate with highlight pen effect
19
PARROT PRODUCTS FREECLASS SOFTWARE
Indication of Writing mode
Indication of eraser mode
Under Eraser Mode, different erasers can be selected
Fast pen set: choose pen colour, line width and soft pen quickly
Accurate pen set: choose pen colour, pen width and soft pen in an accurate way
Draw free lines: write and annotate free on the screen
Draw straight lines
Draw circles
Draw rectangles
20
PARROT PRODUCTS FREECLASS SOFTWARE
Undo: Cancel the last annotation or erase operation
Clear the desktop annotation: clear all desktop annotation and written contents
Contents cannot be recovered after screen is cleared
Virtual On-Screen keyboard
Save screen: Capture current screen and save as an image file
Screen shade: Use to cover up the screen, the shaded area and direction is free to
change anytime
Screen Spotlight: Emphasize page content with spotlight effect – colour and
transparency outside the spotlight zone can be customized
Right Button Simulation: The operational button of the Stylus E-Pen is defaulted as
the left mouse button under Interactive mode. Use E-Pen to click on the ‘Right button
simulation’ to switch the operational button to right click instead for one click only.
Minimize the toolbar
21
PARROT PRODUCTS FREECLASS SOFTWARE
Whiteboard mode
Open/Close the Whiteboard
Browse menu & Replay options
Switch back to interactive mode
Fast pen set
Accurate pen set
Highlighter
Pen & Eraser
Draw free lines
Draw straight lines
Draw circles
Draw rectangles
Clear the desktop annotation
Delete the current page
Open Background File
Background toggle switch
Copy drawings from previous
page
New Page
Open fbd documents
Save as fbd/bmp/jpg/exe
document
Undo
Redo
View page list
More
Print Preview
Jump to the first
page
Page scroll up
Replay Current
page
Jump to the end of
this page
Jump to the last
page
Page scroll down
Replay from current
page to last page
Stop Replaying
print
Screen Shade
Spot light
Display date/time
22
PARROT PRODUCTS FREECLASS SOFTWARE
Save as an EXE file
Whiteboard documents saved as an exe file can be executed independently whiteout running the parrot
products FreeClass program. Double click on the exe file to execute. This document does not support an edit
function, it can only be replayed. The replay function is the same as the replay function in Parrot Products
FreeClass Whiteboard mode
Jump to the first
page
Page scroll up
Replay Current
page
Jump to the end of
this page
Jump to the last
page
Page scroll down
Replay from current
page to last page
Stop Replaying
Screen Shade
Use to cover up the screen. The shaded area and direction of shade can be changed at any time. Use the
Stylus E-Pen to drag vertically or horizontally, using the vertical ‘
‘ or horizontal ‘
‘ icons. Only
one direction can be moved at a time.
23
PARROT PRODUCTS FREECLASS SOFTWARE
Screen Spotlight
Emphasize page content with spotlight effect – colour and transparency levels outside the spotlight zone are
customizable.
Close spotlight
Spotlight settings. Click on the icon and the menu pop up as below:
Change the shape by
clicking on one of these
icons
Change the colour
with this icon
Reset to default
setting with this
icon
Change the
transparency by
sliding the bar
24
CONTACT US
Thank you for purchasing the Parrot Products
Interactive Whiteboard System
For all Frequently Asked Questions please see
the FAQ document on your Parrot Products
FreeClass CD
For up to date drivers / software / Manuals /
FAQ’s please visit our website @
www.parrotproducts.biz
For further information, training and sales please contact
South Africa
André Van Der Merwe
Cell: 076-756-1342
Email: [email protected]
22 Cleveland Road
Cleveland
Johannesburg
South Africa
P.O. Box 40745
Cleveland
2022
South Africa
Tel +27 11 607 7600
Fax +27 11 615 2502
www.parrotproducts.biz
Namibia
Cnr Nickel & Ongoporo Streets
Prosperita
Windhoek
Tel +264 61 240 163
Fax +264 61 308 980
25