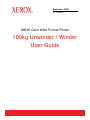
1
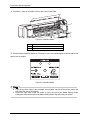
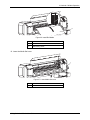
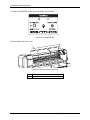
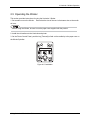
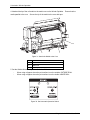
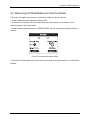
September 2008
701P49052
8264E Color Wide Format Printer
100kg Unwinder / Winder
User Guide
1
Table of Contents
1
Safety and Warning Label Information.................................................................. 1
1.1 Safety Considerations ...................................................................................... 1
1.2 Warning Labels ................................................................................................. 1
1.2.1 Warning Label Locations and Types ............................................................ 2
1.3 Operating Instructions Labels ......................................................................... 3
1.3.1 Instruction Label Locations and Types ......................................................... 3
2
Unwinder / Winder Operation................................................................................. 5
2.1 Location of Major Components ....................................................................... 5
2.1.1 Unwinder Components ................................................................................. 5
2.1.2 Winder Components..................................................................................... 6
2.1.3 Unwinder Control Panel................................................................................ 7
2.1.3.1 Switches / Button ................................................................................... 7
2.1.3.2 Indicators................................................................................................ 7
2.1.4 Winder Control Panel ................................................................................... 8
2.1.4.1 Switches................................................................................................. 8
2.1.4.2 Indicators................................................................................................ 8
2.2 Connecting the Power Cable ........................................................................... 9
2.3 Turning the Power ON and OFF .................................................................... 10
2.3.1 Turning the Power ON................................................................................ 10
2.3.2 Turning the Power OFF .............................................................................. 10
2.4
2.5
2.6
Loading Roll Media onto the Unwinder ........................................................ 11
Operating the Winder ..................................................................................... 21
Removing a Printed Media Core from the Winder ....................................... 23
100kg Unwinder / Winder User Guide
i
This page has been intentionally left blank.
ii
100kg Unwinder / Winder User Guide
1 Safety and Warning Label Information
1.1 Safety Considerations
Various procedures throughout this user guide may list 2 levels of safety indicators that need to be
adhered to during the performance of a procedure.
These indicators take into account the level of
danger or the size of the potential incidence that can occur while performing a step in a procedure.
Below is a list of these indicators and their meaning as they apply to this user guide.
Used for a potentially dangerous situation that could lead to small to medium-sized
damage, or when a part or the entire product may be damaged
Used for information that should be noticed or emphasized
1.2 Warning Labels
This section explains the different types of warning labels and where they are located. Warning
labels are applied to the product in places where special attention is required.
Please ensure that
you understand the exact locations of such parts and the contents of the danger before operating this
product.
Make sure you can read all the contents on a warning label.
If some of words or diagrams cannot be read, please clean the label.
To remove dirt from the warning labels, please use a cloth, water, and mild detergent.
Do not use organic solvents or gasoline to clean the labels.
Warning labels must be replaced if damaged, lost, or cannot be read.
Contact your local Xerox Representative if an warning label needs to be replaced.
100kg Unwinder / Winder User Guide
1
1 Safety and Warning Label Information
1.2.1 Warning Label Locations and Types
The figures below indicate the locations of the warning labels.
1
1
Figure 1. Front Warning Label Locations
1
1
Figure 2. Rear Warning Label Locations
No.
Types of warning label
1
2
100kg Unwinder / Winder User Guide
1 Safety and Warning Label Information
1.3 Operating Instructions Labels
This section explains the different types of operating instructions labels and where they are located.
The operating instruction labels are used in this product to briefly explain the operation method for
procedures that may require special attention when operating this product. Please ensure you
understand the exact locations and the contents of the labels before operating this product.
Make sure you can read all the contents on the operating instruction label.
If some of words or diagrams cannot be read, please clean the label.
To remove dirt from the operating instruction label, please use a cloth, water, and mild
detergent.
Do not use organic solvents or gasoline to clean the labels.
Operating instructions labels must be replaced if damaged, lost, or cannot be read.
Contact your local Xerox Representative if an warning label needs to be replaced.
1.3.1 Instruction Label Locations and Types
The figures below indicate the locations of the operating instruction labels.
1
Figure 3. Operating Instruction Label Location
No.
Types of operating instruction labels
1
100kg Unwinder / Winder User Guide
3
1 Safety and Warning Label Information
This page has been intentionally left blank.
4
100kg Unwinder / Winder User Guide
2 Unwinder / Winder Operation
2.1 Location of Major Components
This section will explain the names and functions of the major components of the Unwinder / Winder.
2.1.1 Unwinder Components
3
2
1
1
Figure 4. Location of Major Components (Unwinder)
No.
Part name
Function
1
Unwinder Spindles
Feeds paper into the printer.
2
Unwinder Tension Bar Roller
Used to guide the paper after printing to the roll-in
device. Tension Roller activates the Unwinder
Motor to feed paper into the printer.
3
Unwinder / Winder Power
Used to turn the Unwinder / Winder power ON and
Switch
OFF.
100kg Unwinder / Winder User Guide
5
2 Unwinder / Winder Operation
2.1.2 Winder Components
4
2
1
3
1
Figure 5. Location of Major Components (Winder)
No.
Part name
Function
1
Winder Spindles
Rolls in the media after printing
2
Winder Tension Bar Roller
Used to guide the media after printing to the roll-in
device. Tension Roller also activates the Winder
motor to take up slack in the media.
6
3
Media Core
Used to roll in the media after printing.
4
Unwinder / Winder Control
Used to set the operating condition and to display
Panel
the status of the product.
● 2.1.3 Unwinder Control Panel
● 2.1.4 Winder Control Panel
100kg Unwinder / Winder User Guide
2 Unwinder / Winder Operation
2.1.3 Unwinder Control Panel
The Unwinder Control Panel is used to set the operating mode and to display the status of the
Unwinder.
4
5
1
2
3
Figure 6. Unwinder Control Panel
2.1.3.1 Switches / Button
No.
1
Part name
Automatic
Operation
Switch
2
Manual
Operation
Switch
3
Initialize Button
Function
● OUTSIDE ROLL: Used when using paper rolled in the
outward direction.
● OFF: Feeding device does not operate.
● INSIDE ROLL: Used when using roll paper rolled in the
inward direction.
● NORMAL DRIVE: Feeding device operates in the
forward direction.
● REVERSAL: Feeding device operates in the reverse
direction.
Used to move the position of the tension roller to where
paper can be fed out.
2.1.3.2 Indicators
No.
4
5
Part name
Power Lamp
Error Lamp
State
Function
● Power is ON.
● Stand-by.
During
feeding
Blinking
Lit
Off
Power is OFF.
Lit
Over-current error in feeding motor.
Blinking Time-out error.
Off
100kg Unwinder / Winder User Guide
No error.
7
2 Unwinder / Winder Operation
2.1.4 Winder Control Panel
The Winder Control Panel is used to set the operating mode and to display the status of the Winder.
3
4
1
2
Figure 7. Winder Control Panel
2.1.4.1 Switches
No.
1
Part name
Automatic
Operation
Switch
2
Manual
Operation
Switch
Function
● OUTSIDE ROLL: Used when the roll paper is rolled in
the outward direction.
● OFF: Roll-in device is not being operated.
● INSIDE ROLL: Used when the roll paper is rolled in the
inward direction.
● NORMAL DRIVE: Roll-in device turns in the forward
direction.
● REVERSAL: Roll-in device turns in the reverse
direction.
2.1.4.2 Indicators
No.
3
Part name
Power Lamp
State
Lit
Function
● Power is ON.
● Stand-by.
Blinking During roll-in operation.
4
Error Lamp
Off
Power is OFF.
Lit
Over-current error in roll-in motor.
Blinking Time-out error.
Off
8
No error.
100kg Unwinder / Winder User Guide
2 Unwinder / Winder Operation
2.2 Connecting the Power Cable
This section describes the procedure for connecting the power cable.
z DO NOT use a damaged power cable.
If the power cable is damaged, contact your local Xerox
Customer Service Representative for a replacement.
Use the following instructions to install the power cable.
1. Make sure the Unwinder / Winder power switches are set to OFF.
1
Figure 8. Setting Power Switch to OFF
No.
1
Part name
Power Switch
2. Plug the AC power cable into the AC inlet on the circuit board box unit.
1
2
Figure 9. Connect Power Cable to Rear of Printer
No.
Part name
1
AC inlet
2
Power cable
3. Insert the AC power cable plug to an AC power outlet.
100kg Unwinder / Winder User Guide
9
2 Unwinder / Winder Operation
2.3 Turning the Power ON and OFF
The following section provides procedures for setting the Unwinder / Winder power ON and OFF.
2.3.1 Turning the Power ON
Turn the power ON by following the instructions below.
1. Set the Unwinder / Winder power switch to the ON position.
The operation lamp will light.
1
Figure 10. Set the Power Switch to the ON Position
No.
1
Part name
Unwinder / Winder Power Switch
2.3.2 Turning the Power OFF
1. Ensure that the printer is stand-by.
2. Set the power switch to the OFF position.
The operation lamp will turn off.
1
Figure 11. Set the Power Switch to the OFF Position
No.
1
10
Part name
Unwinder / Winder Power Switch
100kg Unwinder / Winder User Guide
2 Unwinder / Winder Operation
2.4 Loading Roll Media onto the Unwinder
The following section describes how to load roll media on the Unwinder.
Media core size 3 inch:Maximum media width 1625mm, Minimum media width 1000mm,
media outside diameter less than 250mm, weight less than 100kg.
Roll media must be loaded in the center of the of printer.
1. Set the Unwinder / Winder Power Switch to ON.
2. Set the Automatic Operation Switch to OFF.
Figure 12. Set Unwinder Automatic Operation Switch to OFF
3. Loosen the Left and Right Unwinder Spindle Locking Handles and move the spindles so that the
distance between the left and right spindles is wider than the roll media width that will loaded.
4
4
1
2
3
Figure 13. Install Roll Media
No.
Part name
1
Left Unwinder Spindle
2
Right Unwinder Spindle
3
Roll Media
4
Unwinder Spindle Locking Handles
100kg Unwinder / Winder User Guide
11
2 Unwinder / Winder Operation
4. Place the roll media on top of the rear rail.
1
2
Figure 14. Install Roll Media
No.
Part name
1
Rear Rail
2
Roll Media
5. Set the roll media on the Left Unwinder Spindle and tighten the Left Unwinder Spindle Locking
Handle.
3
1
2
Figure 15. Install Roll Media
No.
12
Part name
1
Left Unwinder Spindle
2
Roll Media
3
Left Spindle Locking Handle
100kg Unwinder / Winder User Guide
2 Unwinder / Winder Operation
6. Set the roll media on the Right Unwinder Spindle and tighten the Right Spindle Locking Handle.
3
2
1
Figure 16. Install Roll Media
No.
Part name
1
Right Unwinder Spindle
2
Roll Media
3
Right Spindle Locking Handle
7. Loosen the Left and Right Unwinder Spindle Locking Handles and move the roll media to the
center of the rail so that the media is aligned with the center of the printer.
Tighten the Left and Right
Unwinder Spindle Locking Handles.
1
2
4
4
2
3
1
Figure 17. Install Roll Media
No.
Part name
1
Right Unwinder Spindle
2
Left Unwinder Spindle
3
Roll Paper
4
Spindle Locking Handles
100kg Unwinder / Winder User Guide
13
2 Unwinder / Winder Operation
8. Set the Printer Power Switch to ON.
After an short initialization period the Printer Control Panel
will display “No Media”.
9. Raise the Media Set Lever.
The Printer Control Panel will display “Please Set Media”.
1
Figure 18. Install Roll Media
No.
1
Part name
Media Set Lever
10. Open the Printer Front Cover.
1
Figure 19. Open the Printer Front Cover
No.
1
14
Part name
Printer Front Cover
100kg Unwinder / Winder User Guide
2 Unwinder / Winder Operation
11. Set the Unwinder Automatic Operation Switch as described below:
・
If the paper will be printed on the outside of the roll media: OUTSIDE ROLL
・
If the paper will be printed on the inside of the roll media: INSIDE ROLL
Figure 20. Set the Automatic Operation Switch
12. Raise the tension roller located on the rear of the product with your hands.
Roll media will
automatically be fed out.
2
1
Figure 21. Raise the Tension Roller
No.
Part name
1
Roll Media
2
Tension Roller
100kg Unwinder / Winder User Guide
15
2 Unwinder / Winder Operation
13. Insert the roll media into the tension roller, and then into the Rear Printer Platen.
Media can be
inserted either with the print surface on the outside (Figure 22) or with the print surface on the inside
(Figure 23).
a. When using roll paper where the print surface is on the outside.
3
3
2
2
1
1
Figure 22. Insert Paper into Tension Roller
No.
16
Part name
1
Roll Media
2
Unwinder Tension Bar Roller
3
Rear Printer Platen
100kg Unwinder / Winder User Guide
2 Unwinder / Winder Operation
b. When using a roll paper where the print surface is on the inside.
Damage and problems that occur because of the use of roll media where the print surface is
on the inside are not covered by the warranty.
3
3
2
2
1
1
Figure 23. Install Roll Media
No.
Part name
1
Roll Media
2
Unwinder Tension Bar Roller
3
Rear Printer Platen
100kg Unwinder / Winder User Guide
17
2 Unwinder / Winder Operation
14. Pull about 1 meter of roll media out from the Front Printer Plate.
2
1
Figure 24. Install Roll Media
No.
Part name
1
Roll Media
2
Front Printer Platen
15. Set the Manual Operation Switch to “Reversal” to roll in the media slightly so that the paper has
tension and is straight.
Figure 25. Install Roll Media
●
●
18
If you let go while rolling in the roll paper, the roll paper may fall off the printer platen and
may fall to the rear of the product.
Ensure the right edge of the roll media is not to the right of the Media Setting Guide.
Setting the media to the right of the Media Setting Guide may affect the print quality.
100kg Unwinder / Winder User Guide
2 Unwinder / Winder Operation
2
1
1
Figure 26. Install Roll Media
No.
Part name
1
Roll Media
2
Media Setting Guide
16. Lower the Media Set Lever.
1
Figure 27. Lower Media Set Lever
No.
1
Part name
Media Set Lever
100kg Unwinder / Winder User Guide
19
2 Unwinder / Winder Operation
17 Push the “INITIALIZE” button on the Unwinder Control Panel.
Figure 28. Push INITIALIZE
18 Close the Printer Front Cover.
1
Figure 29. Close the Printer Front Cover
No.
1
20
Part name
Printer Front Cover
100kg Unwinder / Winder User Guide
2 Unwinder / Winder Operation
2.5 Operating the Winder
This section provides instructions for using the Unwinder / Winder.
1. Set a media core on the Winder.
Ensure that the size of the core is that same size as the media
roll core.
● When using the Winder, be sure to use the paper core supplied with the product.
2. Install the roll media onto the Unwinder and printer.
3. On the Printer Control Panel, push the key [Forward] to feed out the media tip to the paper core on
the Winder Spindles.
Figure 30. Feed Media
100kg Unwinder / Winder User Guide
21
2 Unwinder / Winder Operation
4. Attached the tip of the roll media to the media core on the Winder Spindles.
media parallel to the core.
Ensure that the
Secure the tip of the media to the core with tape.
3
1
2
Figure 31. Attach the Media to the Core
No.
Part name
1
Roll Media
2
Media Core
3
Winder Tension Bar Roller
5. Set the Winder Automatic Operation Switch as follows:
・
When using roll paper where the print surface is on the outside: OUTSIDE ROLL
・
When using roll paper where the print surface is on the inside: INSIDE ROLL
Figure 32. Set Automatic Operation Switch
22
100kg Unwinder / Winder User Guide
2 Unwinder / Winder Operation
2.6 Removing a Printed Media Core from the Winder
This section will explain the procedure to remove the media core from the Winder.
1. Set the Winder Automatic Operation Switch to OFF.
2. If the media core being removed is partially filled with printed media, cut the media from the
remaining media in the Printer Platen.
3. Set the Manual Operation Switch to “NORMAL DRIVE” and roll in the remaining printer media on
the core.
Figure 33. Set Manual Operation Switch
4. Remove the printer media core from the Winder and install a new empty media core on the Winder
Spindles.
100kg Unwinder / Winder User Guide
23
2 Unwinder / Winder Operation
This page has been intentionally left blank.
24
100kg Unwinder / Winder User Guide
Prepared by:
XEROX Corporation
Global Knowledge and Language Services
800 Phillips Road, Bldg. 0218-01A
Webster, New York 14580-9791
USA
©2008 by XEROX Corporation. All rights reserved.
Copyright protection claimed includes all forms and matters of copyrightable material and information
now allowed by statutory judicial law or hereinafter granted, including without limitation, material
generated from the software programs which are displayed on the screen such as icons, screen
displays, looks, etc.
Printed in the United States of America.
XEROX® and all XEROX product names mentioned in this publication are trademarks of XEROX
CORPORATION. Other company trademarks are also acknowledged.
PANTONE is a registered trademark of Pantone, Inc.
Changes are periodically made to this document. Changes, technical inaccuracies, and typographic
errors will be corrected in subsequent editions.
26
100kg Unwinder / Winder User Guide