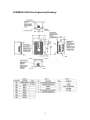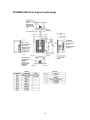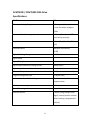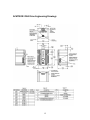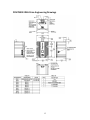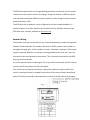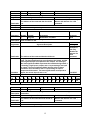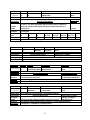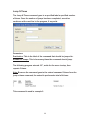
1
IDEATM PROGRAMMABLE STEPPER
MOTOR DRIVE MANUALS
CONTENTS:
HARDWARE MANUAL
COMMUNICATIONS MANUAL
SOFTWARE MANUAL
IDEA Drive Hardware Manual www.haydonkerk.com All Rights Reserved 4‐2013
1
Table of Contents Revision History .................................................................................................................. 3 Introduction ........................................................................................................................ 4 ACM4806E & PCM4806E Specifications ............................................................................ 5 ACM4806E Drawing ........................................................................................................ 6 PCM4806E Drawing ........................................................................................................ 7 ACM4826E & PCM4826E pecifications .............................................................................. 8 ACM4826E Drawing ........................................................................................................ 9 PCM4826E Drawing ...................................................................................................... 17 ACM7539E & PCM7539E pecifications ............................................................................ 11 ACM7539E Drawing ...................................................................................................... 17 PCM7539E Drawing ...................................................................................................... 17 Connections ...................................................................................................................... 14 Connections Digram ..................................................................................................... 17 Accessories ....................................................................................................................... 15 RS‐485 Pin Descriptions ................................................................................................... 16 Encoder Inputs .................................................................................................................. 17 Encoder Wiring ............................................................................................................. 17 Digital I/O Pin Descriptions .............................................................................................. 19 Digital I/O Wiring ......................................................................................................... 20 Digital Output Wiring Examples .................................................................................. 21 Digital Input Wiring Examples ..................................................................................... 21 2
Revision History Date Description September 2011 Initial version January 2012 Added digital input wiring examples March 2013 Manuals combined Wiring examples revised 3
Introduction This manual is intended to provide basic hardware specifications for the Haydon Kerk IDEA drive. Several styles of the IDEA drive are available. For detailed information on use and programming of the drive, please refer to the IDEA Drive User’s Manual, available at idea‐drive.com. 4
ACM4806E / PCM4806E IDEA Drive Specifications Attribute Value
Drive Input Voltage Range 12‐48Vdc Maximum Drive Current (per phase) 0.6Arms (Plus optional 30% boost during ramping) Step Modes Full, Half, ¼, 1/8, 1/16, 1/32, 1/64 Communications USB (Mini B connector) RS‐485 Digital I/O Voltage Range 5‐24Vdc Digital Inputs 4 Digital Sinking Outputs 4 Digital Output Maximum Sinking Current 200mA (each) Digital Input Maximum Current 8mA (each) Maximum Temperature 70ºC (Measured at heat sink) Program Storage Size‐Type 85 Kbytes‐Flash Maximum Number of Stored Programs 85, Referenced by 10 character program names Position counter range 64bit Type of Ramping Trapezoidal Interrupt sources 4 inputs (rising, falling or both edges), internal position counter (when reaching a programmed position). 5
ACM4806E IDEA Drive Engineering Drawings 6
PCM4806E IDEA Drive Engineering Drawings 7
ACM4826E / PCM4826E IDEA Drive Specifications Attribute Value
Drive Input Voltage Range 12‐48Vdc Maximum Drive Current (per phase) 2.6Arms (Plus optional 30% boost during ramping) Step Modes Full, Half, ¼, 1/8, 1/16, 1/32, 1/64 Communications USB (Mini B connector) RS485 Digital I/O Voltage Range 5‐24Vdc Digital Inputs 4 Digital Sinking Outputs 4 Digital Output Maximum Sinking Current 200mA (each) Digital Input Maximum Current 8mA (each) Maximum Temperature 70ºC (Measured at heat sink) Program Storage Size‐Type 85 Kbytes‐Flash Maximum Number of Stored Programs 85, Referenced by 10 character program names Position counter range 64bit Type of Ramping Trapezoidal Interrupt sources 4 inputs (rising, falling or both edges), internal position counter (when reaching a programmed position). 8
ACM4826E IDEA Drive Engineering Drawings 9
PCM4826E IDEA Drive Engineering Drawings 10
ACM7539E / PCM7539E IDEA Drive Specifications Attribute Value
Drive Input Voltage Range 12Vdc up to the lesser of: 8 times the motor voltage or 75Vdc. Maximum Drive Current (per phase) 3.85Arms (Plus optional 30% boost during ramping) Step Modes Full, Half, ¼, 1/8, 1/16, 1/32, 1/64 Communications USB (Mini B connector) RS‐485 Digital I/O Voltage Range 5‐24Vdc Digital Inputs 4 Digital Sinking Outputs 4 Digital Output Maximum Sinking Current 200mA (each) Digital Input Maximum Current 8mA (each) Maximum Temperature 70ºC (Measured at heat sink) Program Storage Size‐Type 75 Kbytes‐Flash Maximum Number of Stored Programs 75, Referenced by 10 character program names Position counter range 64bit Type of Ramping Trapezoidal Interrupt sources 4 inputs (rising, falling or both edges), internal position counter (when reaching a programmed position). 11
ACM7539E IDEA Drive Engineering Drawings 12
PCM7539E IDEA Drive Engineering Drawings 13
Connections Basic Wiring: To connect power to the drive and control it with the IDEA Drive User Interface you will need the following: •
A power supply, minimum of 12VDC. •
A PC •
Power cable ( available from Haydon Kerk p/n 56‐1348) •
Haydon motor terminated with Molex connector 39‐01‐2040 (4806 & 4826 drives only) o 7539 drive has screw terminals for a motor connection •
10 wire I/O cable (available from Haydon Kerk p/n 56‐1352 ). Note: this cable is only required if the drive is interacting with an external device. PCM (USB version) •
USB to Mini B USB cable ( available from Haydon Kerk p/n 56‐1346 ) ACM (RS‐485 version) •
USB to Mini B USB cable ( available from Haydon Kerk p/n 56‐1346 ) •
RS‐485 cable (available from Haydon Kerk p/n 56‐1536‐4) •
USB to RS‐485 converter (available from Haydon Kerk p/n UTR4852) The following page contains the proper wiring diagram for the IDEA drive, power supply and PC. The I/O and encoder cables are omitted. 14
Basic Wiring Diagram Accessories Accessories Part No. USB Cable (A to Mini B), 2 meters 56‐1346 Power Cable, 1 meter 56‐1348 I/O Cable, 1 meter 56‐1352 RS‐485 Cable, 1 meter 56‐1536‐4 Software Installation Disk 55‐010 Motor Connector Assembly 56‐1453 USB to RS‐485 Adapter UTR4852 Encoder Cable with flying leads, 1 foot 56‐1715 Encoder Harness to E4 encoder, 1 meter 56‐1639‐4 Encoder harness to E5/E6 encoder, 1 meter 56‐1621‐4 15
RS‐485 Pin Descriptions RS‐485 pins are often referred to by their read/write functionality Y = Rx+ Z = Rx‐ A = Tx+ B = Tx‐ Encoder Inputs The IDEA drive is equipped with inputs for a single‐ended, Quadrature encoder attached to the motor it drives. Quadrature encoders have 2 output signals, A and B, which are nominally 90 electrical degrees out of phase. On each rising or falling edge, the relative logic levels of the two phases can be used to determine the direction of rotation. The decoder within the drive interprets A leading B as motion in the clockwise direction, as viewed from the front face of the motor. This means that if a rising edge is detected on phase A, and phase B is at a logical high, then the motor just rotated counter‐clockwise. 16
The IDEA drive watches for and rising and falling transitions on phase A, and increments or decrements the position counter accordingly. Using this method, a 1000 line optical rotary encoder would have 2000 counts per revolution, and a change in position would be detected every 0.18º. The IDEA drive line of products can be configured to use the encoder feedback in a number of ways. For further detail on the encoder functions available, please see the IDEA Drive user’s manual, available at idea‐drive.com. Encoder Wiring The encoder connector can be wired to any 2 channel quadrature encoder that operates between 3.3Vdc and 5Vdc. For encoders that work on 5VDC, power to the encoder can be supplied through pin 1 of the encoder connector, otherwise a separate 3.3Vdc power supply is required. Whether or not power is being supplied by the drive, pin 2 must be connected to the same ground as the encoder. This is internally connected to the IDEA drive’s ground connection. Pin 3 is for encoders with an index signal. This may be left unconnected, and is for future revisions which may make use of the index signal. Pins 4 and 5 are the B and A connections, respectively. When the output shaft of the motor is rotating clockwise as viewed from the front of the motor phase A should lead phase B. Check your encoder’s documentation to check if A and B need to be swapped. 17
Digital I/O Pin Descriptions Open Collector Output Pin Description Input Pin Description 18
Digital I/O Wiring The IDEA drive has four optically isolated inputs and four optically isolated open‐
collector outputs. A power supply is necessary to activate the opto‐isolators with a voltage range of 5‐24VDC. As the outputs are open‐collector, they will need a pull‐up resistor tied to the + I/O supply if a high level voltage is required. The outputs are capable of sinking up to 200mA each. Note: The inputs can be used in two ways. They can be connected to logic levels that swing between I/O supply ground and + I/O supply, or they can be attached to a switch connected to I/O supply ground. In the second configuration, when the switch is open, the drive will see this as a logic high, when the switch is closed, and the input is connected to I/O supply ground, the drive will see this as a logic low. Note: When an input is connected to a mechanical switch or relay, a phenomenon called “bounce” can occur. When the switch contact is almost closed, several electrical arcs can form. If an input is being used as an interrupt, each arc will be seen as a rising and falling edge, causing several false interrupts to trigger. Any input being used as an interrupt source should only be attached to solid state devices or a switch with debounce circuitry. Digital Output Wiring Examples 19
Digital Input Wiring Examples 20
™
IDEA Drive
Communications Manual
www.haydonkerk.com
All Rights Reserved
4-2013
1
Table of Contents
Revision History ......................................................................................................................... 4
IDEA Drive Communications Basics .................................................................................... 5
Commands ................................................................................................................................... 7
Abort .......................................................................................................................................... 8
Assign Drive Number ............................................................................................................ 8
Check Password..................................................................................................................... 8
Comment .................................................................................................................................. 8
Configure Encoder................................................................................................................. 9
Configure Input Interrupts ................................................................................................... 9
E-Stop...................................................................................................................................... 10
Execute Program.................................................................................................................. 10
Go At Speed........................................................................................................................... 11
Goto ......................................................................................................................................... 12
Goto If...................................................................................................................................... 12
Goto Sub................................................................................................................................. 12
Index ........................................................................................................................................ 13
Interrupt on Position ........................................................................................................... 14
Jump N Times ....................................................................................................................... 14
Label ........................................................................................................................................ 14
Move To Position ................................................................................................................. 15
No-op ....................................................................................................................................... 15
Program .................................................................................................................................. 16
Read Current Position ........................................................................................................ 16
Read Drive Number ............................................................................................................. 16
Read Encoder Settings ....................................................................................................... 17
Read Executing..................................................................................................................... 17
Read Faults ............................................................................................................................ 17
Read Firmware Version ...................................................................................................... 17
Read IO ................................................................................................................................... 18
Read Max Current ................................................................................................................ 18
Read Moving.......................................................................................................................... 18
Read Program Names ......................................................................................................... 18
Read Startup Program ........................................................................................................ 19
Recall Program ..................................................................................................................... 19
Remove Password ............................................................................................................... 19
Remove Program ................................................................................................................. 19
Restore Factory Defaults ................................................................................................... 20
Return...................................................................................................................................... 20
Return To................................................................................................................................ 20
Run Program ......................................................................................................................... 20
Set Outputs ............................................................................................................................ 21
2
Set Password ........................................................................................................................ 21
Set Position As ..................................................................................................................... 21
Set Startup Program............................................................................................................ 21
Software Reset...................................................................................................................... 22
Stop.......................................................................................................................................... 22
Wait For Move ....................................................................................................................... 23
Wait Time................................................................................................................................ 23
3
Revision History
Date
Description
October 2010
Initial release
January 2011
Added “Execute Program” command.
May 2011
Corrected response from Program command
September 2011
Added information about faults
Added Read Moving command
Updated configure encoder command
Alphabetized commands
December 2011
Corrected configure encoder example
April 2013
Corrected program description
Corrected table of contents
4
IDEA Drive Communications Basics
The IDEA drive line of products are commanded through the use of an
Ascii based language developed by Haydon Kerk. Each command consists of a
character identifying the command, followed by between 0 and 12 parameters
separated by commas, and then followed by a carriage return. One difference
between this language and those used by competing products is that each
motion command encapsulates all parameters needed by the move; there are no
parameters to set before a move command is issued. While this makes manual
entry of commands into a terminal cumbersome, this is not the intended use of
the language. Creation of these commands can be done simply in the software of
the controller used to command the drives.
The IDEA drive adheres to a master/slave communications model. The
master controller initiates all communications. If information is required from the
drive, as in the case of requesting the drive’s current position, the controller first
sends the command requesting the drive’s position, then the drive responds with
the requested information, enclosed by several characters to identify the
response. The extra characters can then be parsed, and the response read.
For the RS-485 communication option, several drives can be daisy chained
together on a single bus. This allows a single controller to send commands to all
the drives at once. In this configuration, for each drive to be controlled
separately, they must each be given a unique identifier, a number between 0 and
255. This must be done with only one drive attached. The user interface has a
function built in to make this process simple. Once each drive on the bus has its
own identifier, any command that is sent starting with the ‘#” character followed
by an identifier, followed by the normal command, will be ignored by any drive
whose identifier does not match the provided identifier. For example, to send an
abort command to the drive whose identifier is 123, the controller would send
“#123A” followed by a carriage return. If a command should be executed by all
drives at once, the controller would omit the pound and identifier. It is important
5
that the controller never request a response from all the drives at once, as this
will cause a data collision when all the drives attempt to respond at once.
One major difference between using this command set to control the drive,
and using the IDEA drive user interface is, there are no protections when using
the command language. The user interface ensures that based upon the part
number entered, no improper values are sent to the drive; with this command set,
it is the responsibility of the user to ensure that no damage is done to the drive,
motor, or other equipment through the incorrect use of commands.
The parameters for serial communication are as follows:
Bits per Second: 57600
Data bits: 8
Parity: none
Stop Bits: 1
Flow Control: None
6
Commands
The following describes the commands that make up the IDEA drive
communications language, as well as the format for any response required from
the drive. When quotation marks are present, the text in between the quotation
marks is the important string, and the quotation marks themselves should not be
included. When [cr] is shown, it is referring to the Ascii carriage return character,
not to be confused with a line feed character. When [parameter] is shown, where
parameter is the name of a parameter, it is representing some variable with that
name, and the brackets will not be part of the string.
The contexts listed below indicate when each command can be used.
Realtime commands can only be executed by direct command to the drive, such
as requesting the current position. Program commands can only be a part of a
program, and are generally branching or similar commands, such as Goto.
Realtime/Program commands can be used anytime, and are generally motion
related commands, such as Index. For further explanation of the commands, refer
to the IDEA drive users’ manual.
7
Command
Abort
Description
Arguments
none
Example
Command
Symbol
Context
Arguments
Response
A
Realtime/Program
none
None
This command causes the drive to immediately stop, and ends the execution and of
any programs.
Valid Values
Argument Description
or Range
You want to stop all drive activity.
"A" followed by a carriage return.
Command
Assign
Drive
Number
Symbol
Context
Arguments
Response
y
Realtime
Identifier
None
Description
Arguments
Identifier
Example
Command
This command assigns the drive an identifier.
Argument Description
The number that should be associated with the drive.
You want to set the drive's identifier to 136.
"y136" followed by a carriage return.
Command
Check
Password
Description
Arguments
Password
Example
Command
Command
Comment
Symbol
Context
Arguments
Valid Values or Range
0 to 255
Response
"`cYES[cr]`c#[cr]" or
c
Realtime
Password
"`cNO[cr]`c#[cr]"
This command checks to see if a password is the correct password.
Argument Description
Valid Values or Range
The password in question.
A string, exactly 10 characters long
You want to check if the password is "password ".
"cpassword " followed by a carriage return.
Symbol
Context
Arguments
Description
C
Program
Comment
This command creates a comment in the program.
Arguments
Comment
Example
Command
Argument Description
A string, must be exactly 10 characters long.
You want to add a comment that says "Extend 1in".
"CExtend 1in" followed by a carriage return.
8
Response
None
Valid Values
or Range
Command
Configure
Encoder
Description
Arguments
Symbol
Context
Arguments
DeadBand, StallHunts,
z
Realtime/Program Destination, Priority
This command configures the encoder.
Argument Description
th
DeadBand
Stall Hunts
Destination
Priority
Encoder
Resolution
Motor
Resolution
Example
Command
Command
Configure
Input
Interrupts
Description
Arguments
Config
Destination
Priority
Example
Command
The number of 1/64 steps away from the desired location
where the drive will begin to correct.
The number of attempts at a given move the drive will
make.
Response
None
Valid Values or Range
1 to 65535, or 0 to
disable
0 to 255
0 to 86012, multiples of
four only. Must be the
address of a valid
command.
The address of the subroutine that should be run after all
stall hunts are exhausted, if desired.
The priority of the interrupt for when the stall hunts are
exhausted.
0 to 4, 10 to disable
The resolution of the encoder being used in pulses per
Motor resolution to
channel per revolution.
10000
The resolution of the motor being used, in full steps per
revolution.
20 to 400
You have a 1000 line encoder, a 1.8º motor, and you want the drive to correct for
position errors greater than 1 full step, retry moves twice, and do not want to trigger
an interrupt after the second failure.
"z64,2,0,10,1000,200" followed by a carriage return.
Symbol
Context
i
Program
Arguments
Input1 config, input2 config, input3
config, input4 config, intput1
destination, input2 destination, input3
destination, input4 destination, input1
priority, input2 priority, input3 priority,
input4 priority
Response
None
This command is used to configure the interrupt settings for in inputs.
Valid Values or
Argument Description
Range
What kind of interrupt the input should be. 1 for Falling edge,
2 for rising edge, 3 for both edges, 0 for disabled.
0,1,2,3
0 to 87036,
The address of the subroutine that should handle the
multiples of four
interrupt.
only.
The priority of the interrupt; lower numbered priorities are
handled first.
0 to 4
You want to set a rising edge interrupt on input 2, whose destination is address 512
and priority is 1, and all other input interrupts disabled.
"i0,2,0,0,0,512,0,0,4,1,4,4" followed by a carriage return.
9
Command
E-Stop
Description
Arguments
Decel
Current
Hold
Current
Delay
Example
Command
Command
Execute
Program
Description
Arguments
Program
Name
Example
Command
Symbol
Context
Arguments
Decel Current, Hold
E
RealTime/Program Current, Delay Time
This command stops the motor without decelerating.
Argument Description
Response
None
Valid Values or
Range
0 to 5005,
dependant on Drive
0 to 3850,
dependant on Drive
The rms current, in milliamps, used to stop the motor.
The rms current, in milliamps, for after the motor has
stopped.
The time, in milliamps, between the last step of a move and
when the current is set to the hold current.
50 to 300
You wish to immediately stop the motor with a decel current of 2.0 Arms, and
waiting .05 seconds between the last step and changing to a hold current of 0.5
Arms.
"E2000,500,50" followed by a carriage return
Symbol
Context
Arguments
Response
m
Realtime
Program name
None
This command begins the execution of a program without changing the state of
the outputs or motor.
Argument Description
Valid Values or Range
A string, exactly 10
The name of the program to run.
characters long
You want to run a program named "program 1 ", without returning to the default
state.
"mprogram 1 " followed by a carriage return.
10
Command
Go At
Speed
Description
Arguments
Run Speed
Start
Speed
End Speed
Accel Rate
Decel Rate
Run
Current
Hold
Current
Accel
Current
Decel
Current
Delay
Step Mode
Example
Command
Symbol
Context
Arguments
Response
Speed, Start Speed, End Speed,
Accel, Decel, Run Current, Hold
Current, Accel Current, Decel
Q
RealTime/Program Current, Delay Time, Step Mode
None
This command moves the motor to a position, with the given parameters.
Valid Values or
Argument Description
Range
0 or -50 to The number of steps per second the motor should move at the
75000 or 50 to
top speed, in the given step mode.
75000
0 or 50 to 75000
Must be less
The number of steps per second the motor should move when
than Run
starting the move, in the given step mode.
Speed
0 or 50 to 75000
Must be less
The number of steps per second the motor should move when
than Run
ending the move, in the given step mode.
Speed
Rate at which the speed should rise from the Start Speed to the
0, or 500 to
Run Speed.
16777215
Rate at which the speed should fall from the Run Speed to the
0, or 500 to
Final Speed.
16777215
0 to 3850,
dependant on
The rms current, in milliamps for the move.
Drive
0 to 3850,
dependant on
The rms current, in milliamps, for after the move has completed.
Drive
0 to 5005,
The rms current, in milliamps, for the acceleration portion of the
dependant on
move.
Drive
0 to 5005,
The rms current, in milliamps, for the deceleration portion of the
dependant on
move.
Drive
The time, in milliseconds, between the last step of a move and
when the current is set to the hold current.
50 to 300
Defines the step size, where 1 is a full step, 2 is a half step, and
so on.
1,2,4,8,16,32,64.
Desired move backwards, in 1/8th step mode, at a speed of 3200 1/8th steps per
second, starting at 1200 1/8th steps per second, accelerating at a rate of 40000 1/8th
steps per second per second, decelerating at a rate of 100000 1/8th steps per
second per second to an end speed of 2000 1/8th steps per second, with a run
current of 1.6 Arms, accel current of 1.9 Arms, decel current of 2.0 Arms, and
waiting .05 seconds between the last step and changing to a hold current of 0.5
Arms.
"Q-3200,1200,2000,40000,100000,1600,500,1900,2000,50,8" followed by a carriage
return.
11
Command
Goto
Symbol
Context
Arguments
Response
Destination
G
Program
Destination
None
This command causes the program to continue execution at the specified address.
Argument Description
Valid Values or Range
0 to 86012, multiples of four only.
The address of the command that should be
Must be the address of a valid
run
command.
Example
Command
You want to continue execution at address 1024.
"G1024" followed by a carriage return.
Command
Goto If
Symbol
Command
Goto Sub
Symbol
Description
Arguments
Context
Arguments
Response
L
Program
Destination, Condition
None
This command causes the program to continue execution at the specified address
Description if the condition is met.
Valid Values
Arguments
Argument Description
or Range
0 to 86012,
multiples of
four only.
Must be the
address of a
valid
Destination The address of the command that should be run.
command.
2 bytes indicating which I/O are tested, and the test values for
each. The least significant byte corresponds to the inputs, and the
most significant byte corresponds to the outputs. For each byte,
the least significant nibble represents the condition being tested, a
1 meaning a high input or output, and a 0 representing a low input
or output. The more significant nibble decides which of those
conditions are to be tested, with a 1 representing an input or
output should be tested. The least significant bit corresponds to
Condition
input1, the next to input 2, and so on.
0 to 65535
Example
You want to continue execution at address 1024 if input 2 is high.
Bit Bit Bit Bit Bit Bit Bit Bit Bit Bit Bit Bit Bit Bit Bit Bit
16
15
14
13
12
11
10
9
8
7
6
5
4
3
2
1
Total
0
0
0
0
0
0
0
0
0
0
1
0
0
0
1
0
34
Command
"L1024, 34" followed by a carriage return.
Description
Arguments
Destination
Example
Command
Context
Arguments
Response
S
Program
Destination
None
This command causes the program to execute the subroutine at the given
destination.
Argument Description
Valid Values or Range
0 to 86012, multiples of four only.
The address of the subroutine that should be
Must be the address of a valid
run.
command.
You want to run a subroutine at address 1024.
"S1024" followed by a carriage return.
12
Command
Index
Description
Arguments
Distance
Run Speed
Start
Speed
End Speed
Accel Rate
Decel Rate
Run
Current
Hold
Current
Accel
Current
Decel
Current
Delay
Step Mode
Example
Command
Symbol
Context
Arguments
Response
Distance, Speed, Start
Speed, End Speed, Accel,
Decel, Run Current, Hold
Current, Accel Current,
Decel Current, Delay Time,
I
RealTime/Program Step Mode
None
This command moves the motor forward or backwards a defined number of steps,
with the given parameters.
Argument Description
Valid Values or Range
-18446744073709551616
The positive or negative number of 1/64th steps the
to
motor should move.
18446744073709551615
The number of steps per second the motor should move
at the top speed, in the given step mode.
0 or 50 to 75000
The number of steps per second the motor should move
0 or 50 to 75000 Must
when starting the move, in the given step mode.
be less than Run Speed
The number of steps per second the motor should move
0 or 50 to 75000 Must
when ending the move, in the given step mode.
be less than Run Speed
Rate at which the speed should rise from the Start Speed
to the Run Speed.
0, or 500 to 16777215
Rate at which the speed should fall from the Run Speed
to the Final Speed.
0, or 500 to 16777215
0 to 3850, dependant on
The rms current, in milliamps for the move.
Drive
The rms current, in milliamps, for after the move has
0 to 3850, dependant on
completed.
Drive
The rms current, in milliamps, for the acceleration portion 0 to 5005, dependant on
of the move.
Drive
The rms current, in milliamps, for the deceleration portion 0 to 5005, dependant on
of the move.
Drive
The time, in milliseconds, between the last step of a
move and when the current is set to the hold current.
50 to 300
Defines the step size, where 1 is a full step, 2 is a half
step, and so on.
1,2,4,8,16,32,64.
Desired move is backwards 9600 1/64th steps, in 1/8th step mode, at a speed of
3200 1/8th steps per second, starting at 1200 1/8th steps per second, accelerating at
a rate of 40000 1/8th steps per second per second, decelerating at a rate of 100000
1/8th steps per second per second to an end speed of 2000 1/8th steps per second,
with a run current of 1.6 Arms, accel current of 1.9 Arms, decel current of 2.0 Arms,
and waiting .05 seconds between the last step and changing to a hold current of 0.5
Arms.
"I-9600,3200,1200,2000,40000,100000,1600,500,1900,2000,50,8" followed by a
carriage return.
13
Command
Interrupt
on Position
Description
Arguments
Position
Destination
Priority
Example
Command
Command
Jump N
Times
Description
Arguments
Destination
Jumps
Example
Command
Command
Label
Description
Arguments
Label
Name
Example
Command
Symbol
Context
Arguments
Response
T
Program
Position, Destination, Priority None
This command sets an interrupt to occur at a given position.
Argument Description
Valid Values or Range
-18446744073709551616
The position where the interrupt should be triggered.
to 18446744073709551615
0 to 86012, multiples of
four only. Must be the
The address of the subroutine to be run when the
address of a valid
interrupt is triggered.
command.
The priority of the interrupt; lower values are a higher
priority.
0 to 4, 10 to disable
You want to set a trip point at position 0, that runs a subroutine at address 1024,
and has the highest priority.
"T0,1024,0" followed by a carriage return
Symbol
Context
Arguments
Response
Destination,
J
Program
Jumps
None
This command causes the program to continue execution at the specified address a
specified number of times.
Argument Description
Valid Values or Range
0 to 86012, multiples of four only.
The address of the command that should be
Must be the address of a valid
run.
command.
The number of times execution should branch
to the destination address.
0 to 65535
You want to continue execution at address 1024, and do so 3 times.
"J1024, 3" followed by a carriage return.
Symbol
Context
Arguments
B
Program
Label name
This command creates a label in the program.
Argument Description
A string, must be exactly 10 characters long.
You want to add a label called "Start".
"BStart " followed by a carriage return.
14
Response
None
Valid Values
or Range
Command
Move To
Position
Description
Arguments
Position
Run Speed
Start
Speed
End Speed
Accel Rate
Decel Rate
Run
Current
Hold
Current
Accel
Current
Decel
Current
Delay
Step Mode
Example
Command
Command
No-op
Description
Arguments
none
Example
Command
Symbol
Arguments
Response
Position, Speed, Start
Speed, End Speed,
Accel, Decel, Run
Current, Hold Current,
Accel Current, Decel
Current, Delay Time,
M
RealTime/Program
Step Mode
None
This command moves the motor to a position, with the given parameters.
Argument Description
Valid Values or Range
-18446744073709551616
The positive or negative position, based on 1/64th steps,
to
the motor should move to.
18446744073709551615
The number of steps per second the motor should move
at the top speed, in the given step mode.
0 or 50 to 75000
The number of steps per second the motor should move
0 or 50 to 75000 Must
when starting the move, in the given step mode.
be less than Run Speed
The number of steps per second the motor should move
0 or 50 to 75000 Must
when ending the move, in the given step mode.
be less than Run Speed
Rate at which the speed should rise from the Start Speed
to the Run Speed.
0, or 500 to 16777215
Rate at which the speed should fall from the Run Speed
to the Final Speed.
0, or 500 to 16777215
0 to 3850, dependant on
The rms current, in milliamps for the move.
Drive
The rms current, in milliamps, for after the move has
0 to 3850, dependant on
completed.
Drive
The rms current, in milliamps, for the acceleration portion 0 to 5005, dependant on
of the move.
Drive
The rms current, in milliamps, for the deceleration portion 0 to 5005, dependant on
of the move.
Drive
The time, in milliseconds, between the last step of a
move and when the current is set to the hold current.
50 to 300
Defines the step size, where 1 is a full step, 2 is a half
step, and so on.
1,2,4,8,16,32,64.
Desired move is to position 0, in 1/8th step mode, at a speed of 3200 1/8th steps per
second, starting at 1200 1/8th steps per second, accelerating at a rate of 40000 1/8th
steps per second per second, decelerating at a rate of 100000 1/8th steps per
second per second to an end speed of 2000 1/8th steps per second, with a run
current of 1.6 Arms, accel current of 1.9 Arms, decel current of 2.0 Arms, and
waiting .05 seconds between the last step and changing to a hold current of 0.5
Arms.
"M0,3200,1200,2000,40000,100000,1600,500,1900,2000,50,8" followed by a carriage
return.
Symbol
Context
Context
Arguments
Response
w
Program
none
None
This command is used to insert an extra line in a program.
Argument Description
Valid Values or Range
This command would be used in a custom user interface.
"w" followed by a carriage return.
15
Command
Program
Description
Arguments
Program
Name
Start
Location
Length
Example
Command
Command
Read
Current
Position
Description
Arguments
None
Example
Command
Command
Read Drive
Number
Description
Arguments
None
Example
Command
Symbol
Context
Arguments
P
Realtime
(Program Name, Start Location,
Length) or none
Response
None or
“`P[Program
size][CR]`P#[CR]”
This command starts and ends the process of writing a program.
Valid Values or
Argument Description
Range
A string; must be
The name for the program, if it is the same as a program
exactly 10
already on the drive, the old program will be removed.
characters.
The page number where the program should begin. If the
program overlaps with any other program, the old program
will be deleted. Each page has 1024 bytes of space.
1 to 85
The number of pages the program will take up.
1 to 85
You want to write a program name program 1, on the first page of memory.
"Pprogram 1 , 1,1" followed by a carriage return. Then followed by the commands
that make up the program, each separated by a carriage return, followed by "P"
followed by a carriage return.
Symbol
l
Context
Realtime
Arguments
Response
None
"`l[value][cr]`l#[cr]" where
value represents the
motor position.
This command requests the position of the motor either theoretical, or actual if an
encoder is enabled.
Argument Description
Valid Values or Range
You want to check the position of the drive.
"l" followed by a carriage return.
Symbol
Context
Arguments
k
Realtime
None
This command requests drive identifier.
Argument Description
You want to read the drive's identifier.
"k" followed by a carriage return.
16
Response
"`k[value][cr]`k#[cr]" where
[value] is a number.
Valid Values or Range
Command
Read
Encoder
Settings
Symbol
Context
Arguments
Response
b
Realtime
None
"`b[deadband],[stallhunts][cr]`b#[cr]"
Description
Arguments
None
Example
Command
This command requests the encoder configuration of the drive.
Argument Description
Valid Values or Range
Command
Read
Executing
Symbol
Description
Arguments
None
Example
Command
Command
You want to check the encoder settings on the drive.
"b" followed by a carriage return.
Context
Arguments
Response
"`rYES[cr]`r#[cr]" or
r
Realtime
None
"`rNO[cr]`r#[cr]"
This command requests whether the drive is actively running a program.
Argument Description
Valid Values or Range
You want to check if the drive is executing a program.
"r" followed by a carriage return.
Symbol
Context
Arguments
Read Faults
Response
"`f[value][cr]`f#[cr]" where
value represents the errors
present. Each bit
represents a specific error,
as defined below.
f
Realtime
None
Description This command requests the error status of the drive.
Arguments
Argument Description
Valid Values or Range
None
Example
You want to check the error status of the drive.
Command
"f" followed by a carriage return.
Bit 8
Bit 7
Bit 6
Bit 5
Bit 4
Bit 3
Bit 2
Bit 1
Bit 0
Int
Over
Bad
Current
Loop
Queue Encoder
Stack
Stack
Speed Checksum
Limit
Overflow
Full
Error
Temperature Overflow Underflow
Command
Read
Firmware
Version
Symbol
Description
Arguments
None
Example
Command
This command requests the firmware version of the drive.
Argument Description
Valid Values or Range
v
Context
Realtime
Arguments
Response
None
"`v[value][cr]`v#[cr]"
where [value] is a
number.
You want to check the firmware version on the drive.
"v" followed by a carriage return.
17
Command
Read IO
Description
Arguments
Symbol
Context
:
Realtime
Arguments
none
Response
"`:[value][CR]`:#[CR]", Where [value] is a number
between 0 and 255, formed from 1 byte, with ones
being highs, zeros being lows, the most
significant bit corresponding to output4, and the
least significant bit corresponding to input1.
This command requests the status of the inputs and outputs.
Argument Description
Valid Values or Range
none
Want to know the status of the input and outputs. For this example, outputs 1 and 2
Example
will be high, and inputs 2, 3, and 4 will be high, all others will be low.
Command
":" followed by a carriage return.
Output4 Output 3 Output 2 Output 1 Input 4
Input 3
Input 2
Input 1
Value
0
0
1
1
1
1
1
0
62
Command
Read Max
Current
Description
Arguments
None
Example
Command
Symbol
Command
Read
Moving
Symbol
Description
Arguments
None
Example
Command
Command
Read
Program
Names
Description
Arguments
none
Example
Command
Context
Arguments
Response
"`j[value][cr]`j#[cr]" where
j
Realtime
None
[value] is a number.
This command requests the maximum current setting of the drive.
Argument Description
Valid Values or Range
You want to check the maximum current of the drive.
"j" followed by a carriage return.
Context
Arguments
o
Realtime
None
This command requests whether the drive is moving.
Argument Description
Response
"`oYES[cr]`o#[cr]" or
"`oNO[cr]`o#[cr]"
Valid Values or Range
You want to check if the drive is moving.
"o" followed by a carriage return.
Symbol
Context
Arguments
Response
"`N[program1 name],[start page],[end
page][CR]`N[program2 name],[start
page],[end page][CR]`N#[CR]" More
N
Realtime none
programs would have more entries.
This command requests that all program names and addresses be sent.
Argument Description
Valid Values or Range
You want to know what programs are residing on the drive.
"N" followed by a carriage return.
18
Command
Read
Startup
Program
Symbol
Description
Arguments
This command requests the name of the startup program.
Argument Description
Valid Values or Range
none
Example
Command
Want to know what program is set to run on power up.
"K" followed by a carriage return.
Command
Symbol
Recall
Program
K
Context
Realtime
@
Arguments
Response
none
"`K[program name][CR]`K#[CR]" If there is no
startup program, [program name] will be an
empty string.
Context
Arguments
Realtime
Password,
Program
Name
Response
The commands that make up the
program, unless the password was
incorrect, in which case there is no
response.
Description
Arguments
Password
Program
Name
Example
This command requests the program be read back.
Argument Description
Valid Values or Range
The password for the drive
A string; must be exactly 10 characters.
The name of the program to be read
back.
A string; must be exactly 10 characters.
Want to read back a program named "program 1" from the drive, with no password.
Command
"@
Command
Remove
Password
Description
Arguments
Symbol
Password
Example
Command
The current password
You want to remove the password "password ".
"qpassword " followed by a carriage return.
,program 1 " followed by a carriage return.
Context
Arguments
q
Realtime
Password
This command removes a password.
Argument Description
Command
Remove
Program
Symbol
Context
Arguments
Response
None
Valid Values or Range
A string, exactly 10 characters
long
Response
Description
Arguments
D
Realtime Program name
This command removes a program.
Argument Description
Program Name
Example
Command
A string, exactly 10
The name of the program to be deleted.
characters long
You want to remove a program named "program 1 " from the drive.
"Dprogram 1 " followed by a carriage return.
19
None
Valid Values or Range
Command
Restore
Factory
Defaults
Descriptio
n
Arguments
None
Example
Command
Symbol
Command
Return
Description
Symbol
Arguments
none
Example
Command
Command
Return To
Context
Arguments
Response
a
Realtime
None
None
This command removes the drive password and deletes all the programs on the
drive.
Argument Description
Valid Values or Range
You want to remove the password on a drive, but forgot that password.
"a" followed by a carriage return.
Context
Arguments
Response
X
Program
none
This command returns from a subroutine.
None
Valid Values
or Range
Argument Description
You want to return from a subroutine to where the subroutine was called from.
"X" followed by a carriage return.
Symbol
Context
Arguments
Response
V
Program
Destination
None
Example
This command exits a subroutine, branches to a location, and clears all pending
interrupts, the return stack and the loop counters.
Argument Description
Valid Values or Range
0 to 87036, multiples of four
The address to which the program should branch. only.
You want to exit a subroutine and continue execution somewhere other than where
the subroutine was called from, in this case, address 32.
Command
"V32" followed by a carriage return.
Description
Arguments
Destination
Command
Run Program
Symbol
Context
Arguments
Response
Description
Arguments
Y
Realtime
Program name
None
This command begins the execution of a program, first returning to step 0 and
setting all outputs low.
Argument Description
Valid Values or Range
Program
Name
Example
Command
A string, exactly 10
The name of the program to run.
characters long
You want to run a program named "program 1 ", starting from the default state.
"Yprogram 1 " followed by a carriage return.
20
Command
Set
Outputs
Description
Arguments
Output
Value
Example
Bit 8 =
128
0
Command
Symbol
Arguments
Response
Realtime/Progra
O
m
Output Value
This command sets the state of the outputs.
None
Valid Values
Argument Description
or Range
1 byte indicating which outputs should be set and what they should
be set to. The most significant nibble indicates which outputs are
being set, and the least significant nibble controls what they are
being set to.
0 to 255
You want to set output 3 high, output 2 low, and want to leave outputs 1 and 4
unchanged.
Bit 7 =
Bit 6 =
Bit 5 =
Tota
64
32
16
Bit 4 = 8
Bit 3 = 4
Bit 2 = 2
Bit 1 = 1
l
1
1
0
0
1
0
0
100
"O100" followed by a carriage return.
Command
Set Password
Description
Arguments
Password
Example
Command
Command
Set
Position As
Context
Symbol
Context
Arguments
Response
p
Realtime
Password
None
This command sets a password, if none exists.
Argument Description
Valid Values or Range
The desired password.
A string, exactly 10 characters long
You want to set the password as "password ".
"ppassword " followed by a carriage return.
Symbol
Context
Arguments
Response
Z
Realtime/Program New Position
This command adjusts the position counter.
Argument Description
The position, as 1/64th steps, you would like the
current position to become.
After homing, you want to set the current location to 0.
"Z0" followed by a carriage return.
None
Command
Set Startup
Program
Symbol
Context
Arguments
Response
U
Realtime
Program name
None
Description
Arguments
This command sets a program as the startup program.
Argument Description
Program
Name
Example
Command
A string, exactly 10
The name of the program to start on power up or reset.
characters long
You want to set a program named "program 1 " as the startup program.
"Uprogram 1 " followed by a carriage return.
Description
Arguments
New
Position
Example
Command
21
Valid Values or Range
-18446744073709551616
to 18446744073709551615
Valid Values or Range
Command
Software
Reset
Symbol
Context
Arguments
Response
R
Realtime/Program
none
None
Description
This command causes the drive to restart, acts the same as cycling power.
Valid Values or
Argument Description
Range
Arguments
none
Example
Command
Command
Stop
You want to restart the drive.
"R" followed by a carriage return.
Symbol
Context
H
RealTime/Program
Arguments
End Speed, Decel rate, run
current, decel current, hold
current, delay time, step
mode
Response
None
Description
This command stops the motor using an optional deceleration ramp.
Arguments
Argument Description
The number of steps per second the motor should move
when ending the move, in the given step mode.
Rate at which the speed should fall from the current
speed to the end speed.
Valid Values or Range
0 or 50 to 75000 Must
be less than Run Speed
The rms current, in milliamps for the deceleration, if too
long to use boosted decel current for the entire ramp.
The rms current, in milliamps, for after the move has
completed.
The rms current, in milliamps, for the deceleration portion
of the move.
The time, in milliamps, between the last step of a move
and when the current is set to the hold current.
0 to 3850, dependant
on Drive
0 to 3850, dependant
on Drive
0 to 5005, dependant
on Drive
End Speed
Decel Rate
Run
Current
Hold
Current
Decel
Current
Delay
Step Mode
Example
Command
0, or 500 to 16777215
50 to 300
Defines the step size, where 1 is a full step, 2 is a half
step, and so on.
1,2,4,8,16,32,64.
You wish to stop the motor, in 1/8th step mode, decelerating at a rate of 100000
1/8th steps per second per second to a end speed of 2000 1/8th steps per second,
with a run current of 1.6 Arms, decel current of 2.0 Arms, and waiting .05 seconds
between the last step and changing to a hold current of 0.5 Arms.
"H2000,100000,1600,2000,500,50,8" followed by a carriage return
22
Command
Wait For
Move
Description
Arguments
Symbol
Context
Arguments
Response
F
Program
none
None
This command causes the program to delay execution of the next command until
the motor has stopped moving.
Argument Description
Valid Values or Range
none
Example
Command
Command
Wait Time
Description
Arguments
Time
Example
Command
You have started a move command and do not want the next command to execute
until the move has finished.
"F" followed by a carriage return.
Symbol
Context
Arguments
Response
W
Program
Time
None
This command causes the program to delay execution of the next command for a
specified time.
Valid Values
Argument Description
or Range
The amount of time, in milliseconds, that the command should be
delayed.
0 to 65535
You have started a move command and do not want the next command to execute
for 1 second.
"W1000" followed by a carriage return.
23
™
IDEA Drive
Software User Manual
www.haydonkerk.com
All Rights Reserved
4-2013
1
Table of Contents
Revision History ............................................................................................................. 4
Introduction ..................................................................................................................... 5
Part Numbers .................................................................................................................. 5
IDEA DRIVE and Software Basics ............................................................................. 6
Realtime Mode ............................................................................................................ 6
Program Mode............................................................................................................. 7
Startup............................................................................................................................... 9
Installing the Application ......................................................................................... 9
Getting Started.......................................................................................................... 10
Drive Startup ............................................................................................................. 11
Features and Concepts .............................................................................................. 12
Unit conversion ........................................................................................................ 12
Communications Modes ........................................................................................ 12
Maximum Speed ....................................................................................................... 13
Ramping ..................................................................................................................... 13
Saving Programs to the Drive .............................................................................. 15
Removing Programs ............................................................................................... 15
Table of Contents ..................................................................................................... 15
Startup Program ....................................................................................................... 16
Saving/Loading/Combining Programs ............................................................... 16
Autosave..................................................................................................................... 16
Over Current Protection ......................................................................................... 17
Accel/Decel Current Boost .................................................................................... 17
Password Protection ............................................................................................... 19
Inputs and Outputs .................................................................................................. 19
Simulating Inputs ................................................................................................. 20
Debugger .................................................................................................................... 21
Encoder....................................................................................................................... 22
Subroutines ............................................................................................................... 24
Interrupts .................................................................................................................... 25
Errors........................................................................................................................... 26
View Command String ............................................................................................ 28
Explanation of Commands ........................................................................................ 30
Extend ......................................................................................................................... 30
Retract ......................................................................................................................... 32
Move To ...................................................................................................................... 34
Go At Speed............................................................................................................... 36
Stop .............................................................................................................................. 38
E-Stop.......................................................................................................................... 39
Jump N Times ........................................................................................................... 40
Goto ............................................................................................................................. 41
Goto If.......................................................................................................................... 42
Return.......................................................................................................................... 43
Return To.................................................................................................................... 44
2
Goto Sub..................................................................................................................... 45
Wait .............................................................................................................................. 46
Wait For Move ........................................................................................................... 47
Int on Pos ................................................................................................................... 48
Int on Input ................................................................................................................. 49
Encoder....................................................................................................................... 51
Set Outputs ................................................................................................................ 52
Set Position ............................................................................................................... 53
Reset............................................................................................................................ 54
Abort ............................................................................................................................ 54
Comment .................................................................................................................... 55
Programming Examples ............................................................................................. 56
Example One ............................................................................................................. 56
Example Two ............................................................................................................. 60
Example Three .......................................................................................................... 62
Example Four ............................................................................................................ 66
Example Five ............................................................................................................. 69
Example Six ............................................................................................................... 74
The IDEA Drive Menu Items....................................................................................... 78
File................................................................................................................................ 78
Edit ............................................................................................................................... 78
Mode ............................................................................................................................ 78
Drive Commands ...................................................................................................... 79
Communications Mode........................................................................................... 79
Programs on Drive ................................................................................................... 79
Help .............................................................................................................................. 80
Glossary ......................................................................................................................... 81
3
Revision History
Date
Description
January 2010
Initial version
February 2010
Save debug output
Goto if updated for outputs
Interrupt and encoder configuration update
January 2011
Added detail to the behavior of interrupts
Added detail to the IO wiring diagram
Stand alone IO wiring diagram
RS-485 wiring
Communications features
May 2011
Added RS-485 Pin descriptions
Added minimum time between resets
July 2011
Removed model specific information
August 2011
Added information about command strings
September
Updated for 2.0 firmware and software changes
2011
Added introduction and part number information
December 2011
Clarified Goto if explanation Updated
March 2013
Clarified part number entry
4
Introduction
This manual is intended to provide information on using the IDEA family of
products from Haydon Kerk Motion Solutions. For information pertaining to
a specific product, see the appropriate hardware manual, available at ideadrive.com
Part Numbers
This manual covers the following part numbers; where (S) is a place holder
for stack length and step angle options, (X) is a place holder for resolution
options, (V) is a place holder for coil voltage options, and (XXX) is a place
holder for custom configuration options. When entering a part number into
the software, the motor part number needs to be entered as the software
automatically recognizes what type of drive is connected.
Motors with integrated drives:
x
43(S)G(X)-(V)-(XXX)
x
57(S)G(X)-(V) -(XXX)
x
43(S)J(X)-(V)-(XXX)
Examples Part Numbers:
x
43MJC-2.33 Size 17, double stack with a C resolution and coil voltage of 2.33V
x
28F41-5
Size 117, single stack with a 1 resolution and coil voltage of 5V
x
57K4B-12
Size 17, double stack with a B resolution and coil voltage of 12V
5
IDEA Drive Software Basics
The Haydon Kerk Motion Solutions IDEA drive and associated
software are a complete package for the easy control of stepper motor
based linear actuators. This solution provides advanced features for both
immediate execution as well as user written programs in an extremely user
friendly way. All basic commands are used through intuitively named
buttons, and each button and input field is further clarified through tooltips.
Realtime Mode
Below is a screenshot of the User interface in the Realtime mode. This
mode is only available when a drive is connected and communicating.
In the Realtime mode, each command executed from the “Commands for
immediate execution” section elicits an immediate action from the drive.
The program area can display any program currently on the drive. These
programs can be run or aborted using the “Run Control” section.
6
The I/O and position section provides constant feedback from the drive
pertaining to the current state of the drive. This area can also be used to
control the state of the outputs, as well as the inputs if in simulation mode.
The IDEA software provides a powerful debugging feature, which allows
the user to enter debug mode, which causes every command in the
program to be displayed in the “Debug Output” section as is it executed.
This debugger can be run in two ways, manually telling the drive to execute
one command at a time (“Single-stepping”), or executing multiple
commands in a row until reaching one of the user programmed labels
(“Run to Label”). Through this feature the ease of debugging complex
programs is greatly increased.
Program Mode
Below is a screenshot of the user interface in Program Mode. This mode is
available even without a drive attached.
7
The I/O and position section provides constant feedback from the drive
pertaining to the current state of the drive. This area can also be used to
control the state of the outputs, as well as the inputs if in simulation mode.
The “Run Control” area can be used to execute or stop any program on the
drive.
The “Program Edit” area contains buttons used to edit the program as well
as gather information about individual commands. The download button is
also in this area.
The “Program Area” contains the command that make up the program
currently being viewed or edited. Commands in the program are executed
sequentially, starting at action 1 and moving onto action 2 and so on,
unless a branching command is used, which would send execution instead
to a specified label. The different commands available are covered in depth
below.
The size of the current program is displayed in both bytes and pages in the
“Program Length” area. Each page is 1024 bytes long, and the number of
pages used is always rounded up.
8
Startup
Installing the Application: (This is a one time activity): The IDEA
drive has a CD ROM disk that is to be installed into your PC. Please
perform the following instructions: ( Note, this is to be performed without
the actuator being attached via the USB cable )
x
Insert the disk into the CD ROM drive.
x
“Welcome to the IDEA Software setup wizard” will appear on screen.
If this does not appear, go to “My Computer” and double click on the
cd-rom drive. Click “next”
x
“Select installation folder” will appear on screen. You may change
the location of the installation if you wish. Click next.
x
“Confirm installation” will appear on screen. Click next.
x
“Installing IDEA Software” will appear on screen. This may take a few
moments.
x
“Installation complete” will appear on screen. A black function
window will also appear behind the “Installation complete” dialogue
box. This is normal. Do not close this window, it will close
automatically. After a few moments the “Installation complete”
dialogue box will show a “close” button. Click close.
x
Installation is now complete and the IDEA Icon resides on your
desktop and in your start menu under All Programs > Haydon Kerk.
9
Getting Started: Let us assume that the GUI software and drivers have
been loaded into your PC and the drive is connected and powered up.
Please proceed as follows:
x
Start your PC.
x
Double-Click the IDEA Icon on your desktop. This brings you to the
initial screen. Screen shot is below:
x
Enter part number of the actuator.
Note: this entry is not case sensitive.
x
Select inches, mm or steps. Click OK.
1. After clicking OK many parameters have been placed into
memory for this particular actuator.
x
Select the Communication mode
10
1. This will most likely be “Single”. The communications options
are explained in the “Communications Modes” section of
“Features and Concepts”.
Note: The com number will most likely be different from that shown above.
x
The “Realtime” display now appears. This mode allows the program
execute immediate actions such as extend, retract, go at speed, etc.
If the drive is not connected, or not turned on, you will not be able to select
a drive, and when the program is entered, you will be forced into the
program mode. If this happens when the drive is connected and powered
up, try disconnecting and reconnecting the usb cable.
Drive Startup
When the drive first starts up, either by turning the power on, or using the
“Reset” command on a drive that was already powered, the following
occurs:
1. Input simulation is turned off.
2. All outputs are set low.
3. The position counter is set to zero.
4. The hold current is set to zero.
5. All interrupts are disabled
6. The encoder is disabled.
7. If a startup program is selected, that program is now begun.
When a program is started, the following occurs:
1. All outputs are set low.
2. The position counter is set to zero.
3. All interrupts are disabled
11
Features and Concepts
Unit conversion
When starting the program, a part number and measurement unit must be
selected. From this information, the number of steps for each command is
calculated. This allows the user to write programs in their preferred units
instead of having to calculate the number of steps. As with any conversion,
some rounding error may be present. With a motor that was a .01” per step
resolution, you cannot move .015” forward in full step mode. The user
interface rounds this value down to the nearest microstep in the given step
resolution. So if you wish to move .015” forward with a step resolution of
.01”, a step mode of ½ or finer must be selected. The program area will
reflect the rounded value.
Note: In the case that the motor has been moved to a position between
steps, if a new extend or retract is done from the position in a coarser step
mode, the extend or retract will end on a position that is valid for the new
step mode, and the distance traveled may not exactly match the desired
distance. For example: If the motor has a resolution of .01” per step, and is
moved to .015” using the half step mode, then a new extend of .02” is used
in full step mode, the motor will extend .015” to the .03” position, which is a
full step position.
Communications Modes
There are four different modes that the user interface can be in for
communications between it and any attached drives, these being offline,
single, addressed and broadcast. You can change from one of these modes
to any other, assuming the correct bus configuration is present, through
the “Comm Mode” menu item in either the “Realtime” or “Program”
screens.
12
x
Offline: In this mode, no communication is present, so the
“Realtime” screen is unavailable, as well as the drive commands and
ability to program.
x
Single: This is the simplest communication mode. In this mode, only
1 drive should be attached per USB port. All functions are available.
x
Addressed: This mode is available for the command of one drive on
a bus with multiple additional IDEA drives. This mode will behave the
same as single mode, but can be used with multiple drives on a
single bus, so long as each drive has a different identifier. Addresses
can be set through the “Set Drive Address” menu item in the “Drive
Commands” menu.
x
Broadcast: In this mode, many drives can be on the same bus,
regardless of their identifiers. This mode is more limited than single
or addresses, as commands will be sent to the drives, but no
messages will be received from the drives. All drives will execute any
commands sent.
Maximum Speed
The maximum speed of the drive is 25000 full steps per second. This limit
is due to the amount of time it takes the processor to calculate the time to
the next step while ramping. When microstepping, the time between each
step is even less, so to allow for microstepping and a maximum speed of
25000 steps per second, the drive will change step modes while
accelerating. So if a top speed of 10000 steps per second is entered, as
well as 1/64th step mode, the move will start and end in 64th step mode, but
will switch to coarser step modes as the speed increase, and switch back
to finer step modes while decelerating.
Ramping
The IDEA Drive provides easy to use acceleration and deceleration ramps.
A trapezoidal move profile can be created by entering a speed, start speed,
13
end speed, acceleration rate and deceleration rate. The drive automatically
calculates a move profile to approximate the desired parameters. For a
picture of what the calculated ramp will look like, use the plot function on
any “Extend”, “Retract”, “Move To”, or “Go At Speed” command.
14
Saving Programs to the Drive
After a program has been written, saving the program to the drive is
simple. The program needs to be named, using the Program Name textbox.
The program name may be up to 10 characters long, and cannot contain
the “,” character. Any spaces at the end of the program name will not be
saved, so “Program1” is the same as “Program1 ”. No two programs may
have the same name, so attempting to download a program with the same
name as an existing program will result in a warning, and continuing will
cause the existing program to be overwritten.
When the download button is pressed, the user interface automatically
finds the first area on the drive that can fit the program. If there is no place
on the drive where the program can fit, the user is responsible for either
moving or removing some programs. In order to move a program to free up
larger blocks of free space, simply save the program to the drive again
under the same name, and the program will be moved to the first page
where it can be fit.
Removing Programs
Programs can be removed from the IDEA drive in one of two ways. Either
use the “Display Table of Contents” option under “Drive Commands”, then
select the program to be removed in the list, then press “Remove” in the
bottom left corner; or use the “Delete Program From Drive” option under
“Drive Commands”, then select the program to be removed in the drop
down menu and press “Ok”.
Table of Contents
The IDEA Drive user interface provides a list of all programs on the drive,
the pages being used by said programs, and a graphical representation of
the contents and free space of the drive. This feature is accessed through
the “Display Table of Contents” option under “Drive Commands”. This
15
feature can be helpful in freeing up space for additional programs, or
seeing which programs could be moved to decrease fragmenting free
space.
Startup Program
In real world applications, the controller will need to start execution once
power is applied, as opposed to being started through the user interface. In
order to set a program to start on power up, the “set Startup Program”
option under “Drive Commands” is used. In the associated window, the
current startup program is displayed in bold, and a new startup program
can be selected using the drop down menu of all programs currently on the
drive. If it is desired to not have a startup program, “No Startup Program”
should be selected.
Saving/Loading/Combining Programs
The IDEA user interface allows for programs to be saved to your computer
or other drives. To do this, once the program is complete, go to “Save” in
the “File” menu. This will open a save file dialog box. It is recommended
that programs be backed up using the save function, to protect your work
incase the program on the drive is overwritten.
To open a saved file, go to “Open” in the “File” menu. This will open an
open file dialog box.
The IDEA user interface also provides the ability to combine two or more
different programs. With a program open, go to “Add File” in the “File”
menu. This will open an open file dialog. The file you select will be added to
the end of the current program. This can be done multiple times to combine
multiple programs.
Autosave
The IDEA user interface provides an autosave feature to protect against
losing all of your work. Once every minute, if the program is non-empty, the
16
user interface automatically saves the file. If the program crashes, or is
accidentally erased, the program can be recovered through the “Recover
Autosave” option under the “File” menu. This will restore the most recently
autosaved program.
Note: If you lose a program and wish to recover it through this feature, be
sure not to open any other programs first. If this is done, the autosave
feature may overwrite the file you wish to recover.
Over Current Protection
The IDEA drive and user interface provide protection against overdriving
the current in the actuator. When the user interface is opened, the part
number entered for the motor provides the necessary information to
calculate the maximum current of the motor. The user interface uses this to
prevent the user from entering values that would be damaging to the
motor.
When the user interface is started with a drive attached, the drive informs
the user interface of the maximum current of the drive. The user interface
then prevents the user from entering values that would be damaging to the
drive.
The drive also has internal protections, so that if a program that was
written for a larger drive is downloaded to a drive that cannot handle the
current values in the program, and that program is run, the drive will abort
the program and raise a drive current limit error.
Accel/Decel Current Boost
The IDEA Drive provides the ability to boost the current for the acceleration
ramp and deceleration ramp independently. If the acceleration current
boost option is set to yes, then the current per phase will be 30% greater
than the set run current during the acceleration ramp, if the ramp is 300ms
or less in duration. For longer ramps, the current per phase will be
increased for the first 300ms, and will be the set run current for the
17
remainder of the ramp. The same is true for the deceleration ramp if the
deceleration current boost is chosen, except that in the case of a ramp over
300ms, it will be the last 300ms of the ramp to be boosted.
Note: It is important for the user to ensure that the current boost feature is
not over used. Repeated long ramp without rest can damage the motor if
the boosted current is above the rated current of the motor.
18
Password Protection
The IDEA drive has a password protection feature. When enabled, this
feature prevents any program from being read back without the correct
password. Passwords can be up to 10 characters in length and cannot
contain the “,” character. Spaces at the end of the password are ignored,
so “Password1” is the same as “Password1 ”.
Password protection does not prevent programs from being erased from or
written to the drive. This feature is only meant to ensure that programs on
password protected drives can not be copied by a third party.
Note: If a drive has been password protected and the password has been
lost, there are two options. The first is to send the drive back to Haydon
Kerk Motion Solutions, where the password can be recovered for a fee. The
second option is to use the “Restore Factory Defaults” option under the
“Drive Commands” menu. This will remove the password protection, but all
programs on the drive will also be lost.
Inputs and Outputs
The IDEA drive has four optically isolated inputs and four optically isolated
open-collector outputs. The voltage range for these is 5-24VDC. As the
outputs are open-collector, they will need a pull-up resistor tied to the
Opto-supply. The outputs are capable of sinking up to 200mA each.
Note: When an input is not connected to anything, it is seen as logic high.
This allows connecting two IDEA drives without the use of pull-up
resistors.
Note: The inputs can be used in two ways. They can be connected to logic
levels that swing between opto ground and opto supply, or they can be
attached to a switch connected to opto ground. In the second
configuration, when the switch is open, the drive will see this as a logic
19
high, when the switch is closed, and the input is connected to opto ground,
the drive will see this as a logic low.
Note: When an input is connected to a mechanical switch or relay, a
phenomenon called “bounce” can occur. When the switch contact is
almost closed, several electrical arcs can form. If an input is being used as
an interrupt, each arc will be seen as a rising and falling edge, causing
several false interrupts to trigger. Any input being used as an interrupt
source should only be attached to solid state devices or a switch with
debounce circuitry.
In many cases, it is desirable to test a program that uses the inputs and
outputs without actually connecting the hardware. In the bottom right hand
corner of the user interface, there are eight circles, each representing one
of the I/O. These show the current state of all the inputs and outputs, with a
green filled circle representing logic high, and an empty circle representing
logic low. While a program is not running, or while a program is being used
in the debug mode, these output circles can be clicked to toggle the state
of the outputs.
Simulating Inputs
Since the inputs are controlled externally, under normal circumstances, the
user does not control them through the user interface. If it is desired to
control the inputs through the user interface, the “simulate Inputs” feature
can be accessed through the “Drive Commands” menu. When this feature
is turned on, the actual states of the inputs are ignored and the user
interface tells the drive what state to consider the inputs to be.
Note: The simulate inputs feature cannot be turned on or off while a
program is running.
20
Debugger
The IDEA user interface has a debugger to help in troubleshooting
programs. The debugger is available in the Realtime mode. Once in the
Realtime mode, the program to be debugged is selected either by the
“Program to Run” drop down or through the “Programs on Drive” menu.
Once the program is selected, the debug feature is started by pressing the
“Start Debug” button. So long as the drive is in debug mode, each program
line executed by the drive is displayed in the debug window. This window
can be cleared at any time by using the “Clear Debug” button. The most
recently executed command is also highlighted in the program area. Debug
mode is exited by either pressing the red “Stop” button, or when the
program ends.
There are two ways of advancing through programs in debug mode, single
step and running to a label. Each time the “Single Step” button is pressed,
the drive executes one command. If the button is pressed multiple times
while the drive is on a “Wait” or “Wait For Move” command, the drive will
not execute multiple commands after the completion of the wait.
When the “Run To Label” button is pressed, the drive begins to execute the
program normally, until the label in the textbox to the right of the “Run To
Label” button is reached. If this label does not exist in the program,
execution will continue until the red “Stop” button is pressed or execution
ends on its own.
Note: When the drive is executing many commands in a row without any
“Wait” or “Wait For Move” commands, the user interface may be slowed
due to the constant communication between the computer and the drive.
In order to aide in readability, as well as documentation, the debug output
can be saved as a text file using the “Save Debug” button.
21
Encoder
Some versions of the IDEA drive come with an integrated encoder, or can
be interfaced with an external encoder. The IDEA drive offers several
features related to the use of the encoder.
When the encoder feature is in use, the current position in the bottom right
hand corner of the User interface is based upon the encoder, not the
theoretical position based upon the number of steps taken.
The encoder has two modes of operation, “Stall Compensation” and
“Position Verification”. The “Stall Compensation” feature works by keeping
track of how many steps the drive has taken in any given move, and
comparing that with the actual travel based on the encoder feedback. If the
encoder feedback shows that the rotor of the motor is four full steps
behind the theoretical position, the move will be stopped and restarted.
This allows the drive to recover from a stall and complete the assigned
move. Under this option the number of attempts must be entered. For any
given move, the drive keeps track of how many times it has stopped and
retried after a stall condition. The drive will only stop and retry a move as
many times as are specified in the “Correction Attempts” textbox. The user
can choose to have an interrupt trigger if the number of correction
attempts is exhausted and the drive detects another stall. Interrupts are
explained on page 24.
The second mode of operation with the encoder is “Position Verification”.
With this feature, the user specifies some distance called a “Dead Band”.
When this feature is enabled, whenever the motor is at a standstill, the
drive checks to see if the rotor is in within the dead band distance from the
desired position. If within this distance, no action is taken, if outside this
distance, the drive automatically moves to correct the error. This feature is
constantly active, so if the drive has stopped, and something hits the
product, causing it to move out of position, this feature will automatically
correct for the movement.
22
The minimum size of the dead band equates to +/- 1/8th of a full step. This is
because it is impractical to attempt to accurately position the motor more
precisely than this. What tends to happen with very small dead band
settings is the motor cannot be posited to a position exactly enough to
satisfy the dead band setting, causing a constant vibration in the motor as
the drive tries to seek the correct position. In some applications, 1/8th of a
step may be too precise and result in vibration; in these applications the
dead band will need to be increased.
Both encoder features can be active at once, the stall compensation feature
being used during moves, and the position verification be used at
standstill.
23
Subroutines
A subroutine is a sequence of commands that can be used from anywhere
in the program. When a subroutine is called, the address of the next
command that was going to be executed is stored on what is called a stack.
When the subroutine is exited using the “Return” command, execution of
the program resumes at the address that was stored on the stack. A
maximum of 10 addresses can be held in the stack. If there are 10
addresses on the stack, and another subroutine is called without a
subroutine completing, a “Stack Overflow” error will be asserted and
program execution will abort. It is up to the user to ensure that stack
overflows do not occur.
Subroutines are exited using one of two commands, “Return” or “Return
to”. When “Return” is used, program execution resumes at the address
stored on the stack. When “Return To” is used, a destination address is
specified. Execution now resumes at the label specified, and the stack is
emptied. The use of “Return to” exits all subroutines at once.
If a “Return” or “Return To” command is used when the stack is empty, a
“Stack Underflow” error will be asserted and execution of the program will
halt. It is the responsibility of the user to ensure that stack underflows do
not occur.
There are two ways in which a subroutine can be called; the simplest is the
“Goto Sub” command. A “Goto Sub” command is used to call a subroutine
from within the program, usually to complete a sequence of commands
which is used repeatedly in the program. The address stored on the stack
when a “Goto Sub” command is used is the address immediately after the
“Goto Sub”.
24
The second way to call a subroutine is through interrupts. Interrupts can
occur at any time, and are explained in the interrupts section, page 24.
When a subroutine is called by an interrupt, the address stored in the stack
is the address of the command which would have next been executed. If
the interrupt is triggered during a “Wait” or “Wait For Move” command, the
address of the “Wait” or “Wait For Move” command is stored, and if the
subroutine is exited by the “Return” command, the wait is resumed until
it’s completion. Note: If a “Wait” command is interrupted, the time spent
executing the interrupt or interrupts counts toward the “Wait” command’s
delay time.
Interrupts
The IDEA drive has three different types of interrupts, input triggered,
position triggered and encoder triggered. All three operate in the same
fashion, the difference being only how they are triggered.
When an interrupt is triggered, it branches to a subroutine with a specific
priority. All interrupts need two parameters, the label of the subroutine to
be run when triggered and the priority. For more information on
subroutines, see Subroutines, page 22.
The priority of the interrupt determines the order in which any pending
interrupts are serviced. If an interrupt is triggered while a lower priority
interrupt is being serviced, the program immediately begins servicing the
new interrupt. If an interrupt is triggered while an interrupt or equal or
higher priority is being serviced, the new interrupt is put into a queue of
pending interrupts and will be serviced when all higher priority interrupts
have been serviced and any interrupts of the same priority which were
triggered first have been serviced.
25
There are 5 interrupt queues, one for each priority level, each being 10
interrupts long at most. If there are 10 interrupts in one queue, and another
interrupt of that priority is triggered, the new interrupt will be ignored and
an “Interrupt queue full” error will be asserted.
If an interrupt is reconfigured to trigger a new subroutine when there is an
instance of that interrupt in a queue, the interrupt in the queue will still
execute, but will execute the new subroutine, not the subroutine that the
interrupt was originally configured to jump to. Care should be taken when
programming ensure this does not occur.
Input Triggered: Each input can be configured to trigger an interrupt
through the “Int on Input” button. The “INT” radio button should be
selected for any input which is to be used as an interrupt source.
The trigger type should also be selected. The types are:
Rising edge: Occurs when the input level goes from low to high.
Falling edge: Occurs when the input level goes from high to low.
Both edges: Occurs anytime the input changes state.
Position triggered: Using the “Int On Position” command in a program, an
interrupt can be set to trigger when the motor reaches a specific position.
Encoder triggered: When the “Stall Detection” encoder feature is used, an
interrupt can be triggered when the number of “Correction attempts” has
been exceeded.
Errors
During operation, the user interface may report an error, below is an
explanation of each of these errors.
26
IO Error: An error occurred when attempting to update the IO: This error
occurs when communications between the drive and user interface is
interrupted. This may happen on occasion when the drive is busy with a
task and temporarily does not respond to the user interface. Press “Retry”.
If the message continues to appear, check all connections.
Stack Underflow: This error occurs when a running program runs to a
“Return” command while not within a subroutine. Check the running
program for ways that the program could get to a “Return” without having
used a “Goto Sub” or an interrupt.
Stack Overflow: This error occurs when 10 or more subroutines are called
without returning. Check the running program to ensure that all
subroutines end with either a “Return” or “Return To”, and that you are not
nesting too many subroutines.
Driver Overtemp: This error occurs when the internal temperature of the
drive exceeds a safe level. Consider moving the drive to a cooler location,
reducing the hold and/or run currents, adding additional heat sinking, or
adding active cooling.
Encoder Error: This error occurs when the encoder encounters a problem,
or when the encoder feature is used without an encoder attached. If you do
not have a unit with an encoder, do not turn on the encoder features. If you
do have a unit with an encoder, and this error continues to occur, contact
Haydon Kerk.
Interrupt Queue Full: This error occurs when a running program
encounters more than 10 interrupts of the same priority without having
serviced any. This could occur due to an interrupt source causing multiple
extraneous interrupts, or by one interrupt subroutine not returning, thus
27
preventing execution of any other interrupts. Check your interrupt sources,
and ensure that all interrupt subroutines end in a “Return” or “Return To”
command.
Loop Overflow: This error occurs when a running program is in more than
10 “Jump N Times” commands at once. Ensure that the running program
does not nest more than 10 “Jump N Times” commands.
Drive Current Limit: This error occurs when the drive is given a command
with a current setting higher than its capability. Check that when you
entered the user interface you set the correct part number for the motor,
and that the drive you are using is appropriate for that motor.
Bad Checksum, update aborted: This error is most likely caused by
communications being interrupted during a firmware update. Hit “OK” and
attempt to update the firmware again. If the problem persists, contact
Haydon Kerk.
Unknown Error: If you ever receive this error, make a note of what you were
doing at the time, and contact Haydon Kerk.
View Command String
The IDEA drive can be used without the GUI, by sending serial commands
to it directly from your own programs or devices. In order to help in the
development of these applications, a feature has been created that will
show you the string that will be sent for a given command.
To access this feature, select the “File” menu, then the “Preferences” item,
then “Enable Command Strings”. Once this is enabled, when you are
editing parameters for commands, the string that would be sent to the drive
will appear near the bottom of the window.
28
For some commands, such as “Goto” and “Goto Sub”, there will be values
that cannot be displayed, because the location of the program on the drive
is not yet known. These values will appear as [Address] and will need to be
calculated based upon where in the final program the destination will
reside, as well as the start page of the program.
29
Explanation of Commands
Extend/Index CW
The extend command moves the actuator shaft a specified distance
forwards from its current location. When using a rotary motor, this
command rotates the motor clockwise, as viewed from the output shaft.
Parameters
Distance: This is the distance that the actuator will extend.
Speed: This is the top speed at which the actuator will extend.
Run Current: This is the unboosted RMS current per phase that will be
applied to the windings while the actuator extends.
Hold Current: This is the RMS current per phase that will be applied to the
windings when the actuator finishes extending.
Delay Time: This is the time in between when the actuator reaches the last
step in the extend, and when the current is changed to the hold current.
Step Mode: This is the step resolution to be used for this extend.
30
Accel Rate: This is the rate at which the actuator will be ramped from the
start speed to the run speed. If this is set to 0, then the extend will start at
the run speed.
Decel Rate: This is the rate at which the actuator will be ramped from the
run speed to the end speed. If this is set to 0, then the extend will end at the
run speed.
Start Speed: This is the speed at which the move will start, if an
acceleration ramp is used.
End Speed: This is the speed at which the move will end, if a deceleration
ramp is used.
Accel Boost: If set to yes, during acceleration, the current per phase
applied to the windings will be 30% higher than the set run current, for a
maximum of 300ms.
Decel Boost: If set to yes, during deceleration, the current per phase
applied to the windings will be 30% higher than the set run current, for a
maximum of 300ms.
The following program extends the actuator 1”, and waits for the move to
complete before executing any commands which may follow:
This command is used in example 1.
31
Retract/Index CCW
The retract command moves the actuator shaft a specified distance
backwards from its current location. When using a rotary motor, this
command rotates the motor counter-clockwise, as viewed from the output
shaft.
Parameters
Distance: This is the distance that the actuator will retract.
Speed: This is the top speed at which the actuator will retract.
Run Current: This is the unboosted RMS current per phase that will be
applied to the windings while the actuator retracts.
Hold Current: This is the RMS current per phase that will be applied to the
windings when the actuator finishes retracting.
Delay Time: This is the time in between when the actuator reaches the last
step in the retract, and when the current is changed to the hold current.
Step Mode: This is the step resolution to be used for this retract.
32
Accel Rate: This is the rate at which the actuator will be ramped from the
start speed to the run speed. If this is set to 0, then the retract will start at
the run speed.
Decel Rate: This is the rate at which the actuator will be ramped from the
run speed to the end speed. If this is set to 0, then the retract will end at the
run speed.
Start Speed: This is the speed at which the move will start, if an
acceleration ramp is used.
End Speed: This is the speed at which the move will end, if a deceleration
ramp is used.
Accel Boost: If set to yes, during acceleration, the current per phase
applied to the windings will be 30% higher than the set run current, for a
maximum of 300ms.
Decel Boost: If set to yes, during deceleration, the current per phase
applied to the windings will be 30% higher than the set run current, for a
maximum of 300ms.
The following program retracts the actuator 1”, and waits for the move to
complete before executing any commands which may follow:
This command is used in examples 1, 2, 3, 4, 5 and 6.
33
Move To
The move to command moves the actuator shaft to a specific location,
based upon the internal position counter or encoder.
Parameters
Position: This is the position to which the actuator will move.
Speed: This is the top speed at which the actuator will move.
Run Current: This is the unboosted RMS current per phase that will be
applied to the windings while the actuator moves.
Hold Current: This is the RMS current per phase that will be applied to the
windings when the actuator finishes moving.
Delay Time: This is the time in between when the actuator reaches the last
step in the move, and when the current is changed to the hold current.
Step Mode: This is the step resolution to be used for this move.
Accel Rate: This is the rate at which the actuator will be ramped from the
start speed to the run speed. If this is set to 0, then the move will start at
the run speed.
34
Decel Rate: This is the rate at which the actuator will be ramped from the
run speed to the end speed. If this is set to 0, then the move will end at the
run speed.
Start Speed: This is the speed at which the move will start, if an
acceleration ramp is used.
End Speed: This is the speed at which the move will end, if a deceleration
ramp is used.
Accel Boost: If set to yes, during acceleration, the current per phase
applied to the windings will be 30% higher than the set run current, for a
maximum of 300ms.
Decel Boost: If set to yes, during deceleration, the current per phase
applied to the windings will be 30% higher than the set run current, for a
maximum of 300ms.
The following program moves the actuator to a point 1” forward from where
the motor was at the beginning of the program, and waits for the move to
complete before executing any commands which may follow:
This command is used in examples 4, 5, and 6.
35
Go At Speed
The Go At Speed command moves the actuator shaft in a specified
direction at a specified speed.
Parameters
Direction: This is the direction in which the actuator will move.
Speed: This is the top speed at which the actuator will move.
Run Current: This is the unboosted RMS current per phase that will be
applied to the windings while the actuator moves.
Hold Current: This is the RMS current per phase that will be applied to the
windings when the actuator finishes moving.
Delay Time: This is the time in between when the actuator reaches the last
step in the move, and when the current is changed to the hold current.
Step Mode: This is the step resolution to be used for this move.
Accel Rate: This is the rate at which the actuator will be ramped from the
start speed to the run speed. If this is set to 0, then the move will start at
the run speed.
36
Decel Rate: This is the rate at which the actuator will be ramped from the
run speed to the end speed. If this is set to 0, then the move will end at the
run speed.
Start Speed: This is the speed at which the move will start, if an
acceleration ramp is used.
End Speed: This is the speed at which the move will end, if a deceleration
ramp is used.
Accel Boost: If set to yes, during acceleration, the current per phase
applied to the windings will be 30% higher than the set run current, for a
maximum of 300ms.
Decel Boost: If set to yes, during deceleration, the current per phase
applied to the windings will be 30% higher than the set run current, for a
maximum of 300ms.
The following program moves the actuator for 1 second.
This command is used in example 6.
37
Stop
The Stop command brings the actuator to a stop with an optional
deceleration ramp. This does not halt program execution.
Parameters
End Speed: This is the speed at which the move will end, if a deceleration
ramp is used.
Decel Rate: This is the rate at which the actuator will be ramped from the
run speed to the end speed. If this is set to 0, then the move will end at the
run speed.
Delay Time: This is the time in between when the actuator reaches the last
step in the move, and when the current is changed to the hold current.
Decel Current: This is the unboosted RMS current per phase that will be
applied to the windings while the actuator stops.
Hold Current: This is the RMS current per phase that will be applied to the
windings when the actuator finishes moving.
Step Mode: This is the step resolution to be used for this move.
Decel Boost: If set to yes, during deceleration, the current per phase
applied to the windings will be 30% higher than the set decel current, for a
maximum of 300ms.
38
The following program starts a move at 1” per second, waits 0.5 seconds,
and the stops the actuator.
This command is used in example 5.
E-Stop
The E-Stop command brings the actuator to an immediate stop. This does
not halt program execution.
Parameters
Decel Current: This is the unboosted RMS current per phase that will be
applied to the windings while the actuator stops.
Hold Current: This is the RMS current per phase that will be applied to the
windings when the actuator finishes moving.
Delay Time: This is the time in between when the actuator reaches the last
step in the move, and when the current is changed to the hold current.
The following program starts a move at 1” per second, waits 0.5 seconds,
and the stops the actuator.
39
Jump N Times
The Jump N Times command goes to a specified label a specified number
of times. Once the number of jumps has been completed, execution
continues at the next line in the program, if any exist.
Parameters
Destination: This is the label of the command that should be jumped to.
Number of Jumps: This is how many times the command should jump.
The following program extends .25”, waits for the move to stop, then
repeats 3 times.
Note: Because the command goes to the extend command 3 times from the
jump n times command, the extend is performed a total of 4 times.
This command is used in example 2.
40
Goto
The Goto command goes to a specified label.
Parameters
Destination: This is the label of the command to which the program will go.
The following program extends .25”, waits for the move to stop, then
repeats until the program is aborted.
This command is used in examples 1, 5 and 6.
41
Goto If
The Goto If command goes to a specified label if the current states of the
inputs match the specified conditions, and goes to the mext line in the
program otherwise.
Parameters
Destination: This is the label of the command that should be jumped to.
Inputs/Outputs: Each I/O can be specified as High, Low, or not tested. Any
I/O set to "Not Tested" will be ignored; the state of the I/O when the
command is executed must match all settings of high or low in order to go
to the specified label, otherwise, the next line of the program is executed.
The following program extends .25”, waits for the move to stop, then
repeats so long as input 1 is high and input 2 is low.
This command is used in example 5.
42
Return
The return command ends a subroutine and returns execution to the
location from which the subroutine was called. For further explanation of
subroutines, see Subroutines, page 22.
Parameters
This command has no parameters.
The following program runs a subroutine starting at label extend, which
extends the actuator 0.25”, waits for the move to complete, then returns,
then repeats.
This command is used in example 3.
43
Return To
The return to command ends a subroutine, clears the stack, clears any
pending interrupts, clears any “Jump N Times” commands, and goes to a
specified label. For further explanation of subroutines, see Subroutines,
page 22.
Parameters
Destination: The label of the command that should be executed next.
The following program runs a subroutine starting at label extend, which
extends the actuator 0.25”, waits for the move to complete, then exits the
subroutine, goes to the abort command, and aborts the program.
This command is used in example 6.
44
Goto Sub
The Goto Sub command goes to a subroutine starting with the specified
label. For further explanation of subroutines, see Subroutines, page 22.
Parameters
Destination: This is the label of the command that is the start of the
subroutine.
The following program runs a subroutine starting at label extend, which
extends the actuator 0.25”, waits for the move to complete, then returns,
then repeats.
This command is used in example 3.
45
Wait
The wait command delays execution of the next command in the program
for a specified time.
Parameters
Delay Time: The amount of time that the program should wait.
The following program begins moving the actuator at 1” per second, waits
0.5 seconds, then stops the actuator.
This command is used in examples 1, 3, and 4.
46
Wait For Move
The Wait For Move command delays execution of the next command in the
program until a move has completed. This command is automatically
added after every Extend, Retract, and Move To, but can be removed if
necessary.
Parameters
This command has no parameters.
The following program extends the actuator 1”, and waits for the move to
complete before executing any commands which may follow:
This command is used in examples 1, 2, 3, 4, 5, and 6.
47
Int on Pos
The int on pos command sets an interrupt to be triggered when the
actuator reaches a specified position. For further explanation of interrupts,
see Interrupts, page 24.
Parameters
Position: The position, based upon the position counter of the drive, at
which the interrupt should be triggered.
Destination: The label of the subroutine that should be executed when the
position is reached.
Priority: The priority of the interrupts.
Note: If an interrupt is set for a position, and the position counter is
adjusted through the use of the “Set Position” command, the interrupt will
still occur at the same point.
Example: The drive is turned on, and an interrupt is set on position 0.5”.
The “set Position” command is then used, changing what was the 0”
position to the 1” position. The interrupt will now trigger when the drive’s
position counter reaches 1.5”.
48
The following program sets an interrupt at position 1”, and then begins
extending. When the actuator reaches the 1” position, the interrupt is
triggered and the program aborts.
This command is used in example 6.
Int on Input
The Interrupt on Input command allows an interrupt to be triggered when
any of the inputs are changed. For further explanation of interrupts, see
Interrupts, page 24.
49
Parameters
Each input has the same parameters.
Disabled/Enabled: Select “Enabled” if the input should cause an interrupt,
select “Disabled” otherwise.
Destination: This is the label for the subroutine associated with the
interrupt.
Trigger Type: If “Falling Edge” is selected, the interrupt will be triggered
when the input goes from a logic high to a logic low. If “Rising Edge” is
selected, the interrupt will trigger when the input goes from logic low to
logic high. If “Both Edges” is selected, the interrupt will trigger any time
the state of the input changes.
The following program sets an interrupt for the rising edge of input 1, and
then loops continuously. When input one changes to logic high, output 1is
set to high.
50
Encoder
The Encoder command sets the encoder configuration. For more
information on the encoder feature, see Encoder, page 21.
Parameters
Encoder Enabled: If any of the encoder features are to be used, this must
be selected.
Encoder Resolution: This is the resolution of the encoder to be used, in
pulses per channel per revolution, which is equivalent to optical lines when
using an optical encoder.
Stall Compensation: If this is selected, any time the motor stall during a
move, the drive will stop and the move and try again, up to the number of
times specified in Correction attempts.
Correction Attempts: The number of times the drive should attempt any
given move.
51
Interrupt: Select this if you want an interrupt to be triggered when the drive
has exhausted the correction attempts.
Destination Label This is the label of the subroutine that should be called
when the correction attempts are exhausted.
Priority: This is the priority of the interrupt
Position verification: This should be selected if the position verification
feature is to be used.
Maximum Error: This is the allowable distance from the desired position. If
the drive is farther from the desired position, it will move to correct.
The following program configures the encoder and then extends.
Set Outputs
The Set Outputs command sets the logic state of the outputs.
Parameters
Outputs: Each output is individually set as either high, which will bring the
outputs to the opto-supply voltage, low, which brings the output to the
opto-ground voltage, or no change, which will leave the output in its
current state.
52
The following program sets output 1 high, waits 0.5 seconds, and then sets
output 1 low. During this outputs 2 3 and 4 are unchanged.
This command is used in example 3.
Set Position
The Set Position command sets the position counter of the drive to the
specified value.
Parameters
Position: The value to which the current position of the drive should be set.
The following program retracts the actuator 1”, sets the position to 0”, and
then moves to the 0.5” position, which causes a 0.5” extend.
This command is used in examples 4, 5, and 6.
53
Reset
The Reset command restarts the drive, similar to turning the drive off and
on. If used in a program, this command will not be executed less than 1/10th
of a second after the drive has seen a reset, in order to prevent an
uninterruptible cycle of resets.
Parameters
This command has no parameters.
The following program resets the drive.
Abort
The abort command immediately stops any moves without deceleration,
applies the last specified holding current and halts execution of any
running program.
Parameters
This command has no parameters.
The following program aborts the program
54
This command is used in examples 3 and 6.
Comment
The comment command performs no action. This command is used to add
extra information into a program for better documentation. Each comment
line affords an additional 30 characters of comments. This command can
also be used to add breaks between sections of code, making it more
readable.
Parameters
This command has no parameters.
The following program performs no actions.
55
Programming Examples
Because of the variety of actuators that this product can be used with,
examples for every product, or a general example for all products cannot
be achieved. All of the following examples assume the use of a Haydon
Kerk 43MGC-2.33 double-stack captive linear actuator with 1 inch stroke.
Speeds, distances and other parameters will need to be changed for your
particular actuator.
Note: For simplicity, most examples assume the actuator starts in the full
retract position.
Example One: Extend the actuator 0.4 inches, wait one second, retract
the actuator 0.2 inches, wait one second, extend the actuator 0.6 inches,
wait 1 second, retract the actuator 0.8 inches, wait 1 second, and repeat
from the first extend indefinitely. Let the linear speed for each move be 1
inch per second.
We first want to extend 0.4 inches.
x
Click the “Extend” button.
x
Input the distance as 0.4 inches.
x
Input the speed as 1 inch per second.
x
All other parameters can be left as the defaults.
x
Enter “Start” as the label.
x
You can add a comment in the comment line if you wish.
x
Click the “Add At End” button. This places the command in program.
Note: You will notice that when the extend command populates in
the program field on the screen, that it is followed by a second
command that states “Wait For Move“. This is also true when using
the Retract and Move To commands. This is a command to allow the
move to finish before execution of the next command.
56
We now want to wait 1 second before moving again.
x
Click the “Wait” button.
x Input the delay time as 1 second. No label or comment is necessary.
x Click “Add At End”. This places this command into the program.
We now want to retract 0.2 inches.
x
Click the “Retract” button.
x
Input the distance as 0.2 inches
x
Input the speed as 1 inch per second
x
No Label is required.
x
You can add a comment in the comment line if you wish.
x
Click the “Add At End” button. This places the command in program.
We now want to wait another second.
x
Click the “Wait” button.
x The delay time will be 1 second, as previously entered. No label or
comment is necessary.
x Click “Add At End”. This places this command into the program.
We now want to extend 0.6 inches.
x
Click the “Extend” button. As before, many items are already
populated. This time the distance and speed are also populated.
x
Input the distance as 0.6 inches
x
No Label is required.
x
You can add a comment in the comment line if you wish.
x
Click the “Add At End” button. This places the command in program.
We now want to wait one second.
x
Click the “Wait” button.
57
x The delay time will be 1 second as previously entered. No label or
comment is necessary.
x Click “Add At End”. This places this command into the program.
We now want to make the final move of retracting 0.8 inches.
x
Click the “Retract” button.
x
Input the distance as 0.8 inches
x
No Label is required.
x
You can add a comment in the comment line if you wish.
x
Click the “Add At End” button. This places the command in program.
We now want to wait one second.
x
Click the “Wait” button.
x The delay time will be 1 second as previously entered. No label or
comment is necessary.
x Click “Add At End”. This places this command into the program.
We now want to repeat.
x
Click the “Goto” button.
x Enter the destination as “Start”.
x Click “Add At End”. This places this command into the program.
The completed program looks as follows:
58
59
Example Two: This example will extend the actuator .5”, retract the
actuator .5”, then repeat those two moves 4 more times. Once the
repetitions are complete, the actuator will extend 1”. Let the linear speed
for each move be 1 inch per second.
We first want to extend 0.5”.
x
Click the “Extend” button.
x
Input the distance as 0.5 inches.
x
Input the speed as 1 inch per second.
x
All other parameters can be left as the defaults.
x
Enter “Start” as the label.
x
You can add a comment in the comment line if you wish.
x
Click the “Add At End” button. This places the command in program.
Note: You will notice that when the extend command populates in the
program field on the screen, that it is followed by a second command that
states “Wait For Move“. This is also true when using the Retract and Move
To commands. This is a command to allow the move to finish before
execution of the next command.
We now want to retract 0.5”.
x
Click the “Retract” button.
x
Input the distance as 0.5 inches
x
Input the speed as 1 inch per second
x
No Label is required.
x
You can add a comment in the comment line if you wish.
x
Click the “Add At End” button. This places the command in program.
We now want to repeat the first two moves four times.
60
x
Click the “Jump N Times” button.
x
Enter the destination as “Start”
x
Enter the number of jumps as 4.
x Click “Add At End”. This places this command into the program.
We now want to extend 1”.
x
Click the “Extend” button.
x
Input the distance as 1”.
x
Input the speed as 1 inch per second.
x
All other parameters can be left as the defaults.
x
No Label is required
x
You can add a comment in the comment line if you wish.
x
Click the “Add At End” button. This places the command in program.
The completed program looks as follows:
61
Example Three: This example will extend the actuator .5”, turn all four
outputs high, wait .5 seconds, turn all outputs low, retract the actuator .5”,
turn all four outputs high, wait .5 seconds, turn all outputs low, then end
the program. We will accomplish this by using a subroutine.
We first want to extend 0.5”.
x
Click the “Extend” button.
x
Input the distance as 0.5 inches.
x
Input the speed as 1 inch per second.
x
All other parameters can be left as the defaults.
x
No Label is required.
x
You can add a comment in the comment line if you wish.
x
Click the “Add At End” button. This places the command in program.
62
Note: You will notice that when the extend command populates in the
program field on the screen, that it is followed by a second command that
states “Wait For Move“. This is also true when using the Retract and Move
To commands. This is a command to allow the move to finish before
execution of the next command.
We now want to use a subroutine to toggle the outputs on and off.
x
Click the “Goto Sub” button.
x
Enter the destination as “Toggle”
x
No label is required.
x
You can add a comment in the comment line if you wish.
x
Click the “Add At End” button. This places the command in program.
We now want to retract 0.5”.
x
Click the “Retract” button.
x
Input the distance as 0.5 inches
x
Input the speed as 1 inch per second
x
No Label is required.
x
You can add a comment in the comment line if you wish.
x
Click the “Add At End” button. This places the command in program.
We now want to use a subroutine to toggle the outputs on and off.
x
Click the “Goto Sub” button.
x
Enter the destination as “Toggle”
x
No label is required.
x
You can add a comment in the comment line if you wish.
x
Click the “Add At End” button. This places the command in program.
We now want to stop the program.
x
Click the “Abort” button.
63
x
Input the distance as 1”.
x
Input the speed as 1 inch per second.
x
All other parameters can be left as the defaults.
x
No Label is required
x
You can add a comment in the comment line if you wish.
x
Click the “Add At End” button. This places the command in program.
Now we have the main body of the program, but we still need the “Toggle”
subroutine.
x
Click the “Set Outputs” button.
x
Select “High” for each of the four outputs.
x
Enter “Toggle” as the label
x
You can add a comment in the comment line if you wish.
x
Click the “Add At End” button. This places the command in program.
Now we need to wait 0.1 seconds.
x
Click the “Wait” button.
x
Enter 0.5 seconds as the delay time
x
No Label is required.
x
You can add a comment in the comment line if you wish.
x
Click the “Add At End” button. This places the command in program.
Now we need to set the outputs low.
x
Click the “Set Outputs” button.
x
Select “Low” for each of the four outputs.
x
No label is required.
x
You can add a comment in the comment line if you wish.
x
Click the “Add At End” button. This places the command in program.
64
Now we need to return to the main body of the program. To go back to
where the subroutine was called from, we use a “Return” command.
x
Click the “Return” button.
x
No label is required.
x
You can add a comment in the comment line if you wish.
x
Click the “Add At End” button. This places the command in program.
The completed program looks as follows:
65
Example Four: This example is different in that the actuator does not
need to start in the fully retracted position. We will perform a homing
routine, to find the fully retracted position, and then move to 0.5” from that
point, wait 1 second, and then return to the fully retracted position.
We first want to retract the full stroke of the actuator.
x
Click the “Retract” button.
x
Input the distance as 1 inch.
x
Input the speed as 0.5 inch per second.
x
Select “1/4” as the step mode.
x
All other parameters can be left as the defaults.
x
No Label is required.
x
You can add a comment in the comment line if you wish.
x
Click the “Add At End” button. This places the command in program.
Note: You will notice that when the retract command populates in the
program field on the screen, that it is followed by a second command that
states “Wait For Move“. This is also true when using the Extend and Move
To commands. This is a command to allow the move to finish before
execution of the next command.
We are now at the fully retracted position; to keep track of this we will use
the “Set Position” command.
x
Click the “Set Position” button.
x Enter a position of 0”.
x
No Label is required.
x
You can add a comment in the comment line if you wish.
x Click “Add At End”. This places this command into the program.
66
We now want to move to the 0.5” position.
x
Click the “Move To” button.
x
Enter a position of 0.5”.
x
Enter a speed of 1” per second.
x
No Label is required.
x
You can add a comment in the comment line if you wish.
x
Click the “Add At End” button. This places the command in program.
We now want to wait 1 second.
x
Click the “Wait” button.
x Enter a delay time of 1 second.
x
No Label is required.
x
You can add a comment in the comment line if you wish.
x Click “Add At End”. This places this command into the program.
We now want to move back to the 0” position.
x
Click the “Move To” button.
x
Enter a position of 0”.
x
All other parameters are populated.
x
No Label is required.
x
You can add a comment in the comment line if you wish.
x
Click the “Add At End” button. This places the command in program.
The completed program looks as follows:
67
68
Example Five: In this example, we will first find the fully retracted
position of the actuator, then the actuator will move to the 0” position if
input 1 is high and input 2 is low, move to the 1” position if input 1 is low
and input 2 is high, or stop if inputs 1 and 2 are both high, or both low.
We first want to retract the full stroke of the actuator.
x
Click the “Retract” button.
x
Input the distance as 1".
x
Input the speed as 0.5 inch per second.
x
Select “1/4” as the step mode.
x
All other parameters can be left as the defaults.
x
No Label is required.
x
You can add a comment in the comment line if you wish.
x
Click the “Add At End” button. This places the command in program.
Note: You will notice that when the retract command populates in the
program field on the screen, that it is followed by a second command that
states “Wait For Move“. This is also true when using the Extend and Move
To commands. This is a command to allow the move to finish before
execution of the next command.
We are now at the fully retracted position; to keep track of this we will use
the “Set Position” command.
x
Click the “Set Position” button.
x Enter a position of 0”.
x
No Label is required.
x
You can add a comment in the comment line if you wish.
x Click “Add At End”. This places this command into the program.
We now move based on the input status. Set up the first “Goto If”
69
x
Click the “Goto If” button.
x
Enter “Retract” as the destination.
x
Set Input 1 is “High”
x
Set Input 2 as “Low”
x
Set Inputs 3 and 4 as “Not Tested”
x
Enter “Test” as the label.
x
You can add a comment in the comment line if you wish.
x
Click the “Add At End” button. This places the command in program.
Set up the second “Goto If”
x
Click the “Goto If” button.
x
Enter “Extend” as the destination.
x
Set Input 1 is “Low”
x
Set Input 2 as “High”
x
Set Inputs 3 and 4 as “Not Tested”
x
No Label is required.
x
You can add a comment in the comment line if you wish.
x
Click the “Add At End” button. This places the command in program.
If we reach this line, then either both inputs are high, or both inputs are
low. So we want to stop the actuator.
x
Click the “Stop” button.
x
All parameters can be left at the defaults.
x
No Label is required.
x
You can add a comment in the comment line if you wish.
x
Click the “Add At End” button. This places the command in program.
We now want to check if the input conditions have changed, so we go back
to the Goto Ifs.
x
Click the “Goto” button.
70
x
Enter “Test” as the destination.
x
No Label is required.
x
You can add a comment in the comment line if you wish.
x
Click the “Add At End” button. This places the command in
program.
We now need the commands that will be used to move the actuator. We will
start with the “Retract” move.
x
Click the “Move To” button.
x Enter a position of 0”.
x
Enter “Retract” as the label.
x
You can add a comment in the comment line if you wish.
x Click “Add At End”. This places this command into the program.
We now want to check if the input conditions have changed, so we go back
to the Goto Ifs. We don’t want the move to finish before we check the
inputs again, so we will remove the “Wait For Move” command.
x
Click the line that holds the “Wait For Move” command
x
Click the “Remove” button
x
Click “Yes” to confirm the removal of the command.
x
Click the “Goto” button.
x
Enter “Test” as the destination.
x
No Label is required.
x
You can add a comment in the comment line if you wish.
x
Click the “Add At End” button. This places the command in
program.
We will next add the “Extend” move.
x
Click the “Move To” button.
71
x Enter a position of 1”.
x
Enter “Extend” as the label.
x
You can add a comment in the comment line if you wish.
x Click “Add At End”. This places this command into the program.
We now want to check if the input conditions have changed, so we go back
to the Goto Ifs. We don’t want the move to finish before we check the
inputs again, so we will remove the “Wait For Move” command.
x
Click the line that holds the “Wait For Move” command
x
Click the “Remove” button
x
Click “Yes” to confirm the removal of the command.
x
Click the “Goto” button.
x
Enter “Test” as the destination.
x
No Label is required.
x
You can add a comment in the comment line if you wish.
x
Click the “Add At End” button. This places the command in program.
The completed program looks as follows:
72
73
Example Six: In this example, we will first find the fully retracted position
of the actuator. The actuator will continuously move in the extend
direction, until getting 0.9” from the fully retracted position. When the 0.9”
position is reached, the actuator will retract back to the 0” position, and
resume the extend. If at any time during the program, input 1 changes
state, the program will abort.
We first need to set up the interrupt triggered by the input.
x
Click the “Int on Input” Button.
x
Select “Enabled” for Input 1 Interrupt
x
Enter “Abort” as the destination.
x
Select “Both Edges” as the trigger type.
x
Select “0-Highest” as the priority.
x
Click the “Add At End” button. This places the command in
program.
We now want to retract the full stroke of the actuator.
x
Click the “Retract” button.
x
Input the distance as 1".
x
Input the speed as 0.5 inch per second.
x
Select “1/4” as the step mode.
x
All other parameters can be left as the defaults.
x
No Label is required.
x
You can add a comment in the comment line if you wish.
x
Click the “Add At End” button. This places the command in program.
Note: You will notice that when the retract command populates in the
program field on the screen, that it is followed by a second command that
states “Wait For Move“. This is also true when using the Extend and Move
74
To commands. This is a command to allow the move to finish before
execution of the next command.
We are now at the fully retracted position; to keep track of this we will use
the “Set Position” command.
x
Click the “Set Position” button.
x Enter a position of 0”.
x
No Label is required.
x
You can add a comment in the comment line if you wish.
x Click “Add At End”. This places this command into the program.
In order to force the actuator to go back to the 0” position when the 0.9”
position is reached, we will use an interrupt based on position.
x
Click the “Int On Pos” button.
x Enter a position of 0.9”.
x Enter “Retract” as the destination.
x Select “1” as priority.
x
No Label is required.
x
You can add a comment in the comment line if you wish.
x Click “Add At End”. This places this command into the program.
We now want to begin moving.
x
Click the “Go at Speed” button.
x
Select “Extend” as the direction
x
Enter 1” per second as the speed.
x
Enter “Extend” as the label.
x
You can add a comment in the comment line if you wish.
x
Click the “Add At End” button. This places the command in program.
We now want to continuously loop onto the “Go At Speed” command.
75
x
Click the “Goto” button.
x
Enter “Extend” as the destination.
x
No Label is required.
x
You can add a comment in the comment line if you wish.
x
Click the “Add At End” button. This places the command in program.
We now need the interrupt subroutines. We will start with the interrupt
subroutine for the interrupt based on position.
x
Click the “Move To” button.
x
Enter a position of 0”.
x
Enter a speed of 1” per second.
x
Enter “Retract” as the label.
x
You can add a comment in the comment line if you wish.
x
Click the “Add At End” button. This places the command in program.
We now need to exit the subroutine.
x
Click the “Return To” button.
x
Enter “Extend” as the destination.
x
No Label is required.
x
You can add a comment in the comment line if you wish.
x
Click the “Add At End” button. This places the command in
program.
We now need a subroutine for the interrupt based on the input.
x
Click the “Abort” button.
x
Enter “Abort” as the label.
x
You can add a comment in the comment line if you wish.
x
Click “Add At End”. This places this command into the program.
The completed program looks as follows:
76
77
The IDEA Drive Menu Items:
x
File: This menu gives access to functions for manipulation of
program files and the User interface itself.
1. New: Clears the current program so a new program can be
written.
2. Open: Opens a previously saved program file.
3. Save: Saves the current program to a file.
4. Add File: Adds a previously saved program file to the end of the
current program.
5. Recover Autosave: Opens the most recently autosaved file.
6. Print: Prints the current program
7. Preferences: Contains options for GUI behavior.
8. Restart: Exits the user interface and opens a new user interface.
9. Exit: Closes the user interface.
x
Edit: This menu gives access to functions for manipulating the
current program.
1. Undo: Restores the program to what it was before the last action.
2. Redo: Restores the program to what it was before an undo.
3. Cut: Removes a selected line or lines from the program and
copies them to be pasted later.
4. Copy: Copies a selected line or lines to be pasted later.
5. Paste: Inserts previously copied lines into a program.
6. Select all: Selects all lines of the program.
x
Mode: The third menu item toggles between the Realtime Mode and
Program Mode.
78
x
Drive Commands: This menu allows access to various drive
functions.
1. Display Table of Contents: Gives a listing of the programs on
the drive and their page locations. Also provides a graphical
representation of the used space in the drive.
2. Set Startup Program: Used to choose what program, if any,
should begin execution when the drive starts up.
3. Delete Program: Used to remove programs from the drive.
4. Input Simulation: This item toggles the drive between using
the true input status, or the simulated status through the user
interface
5. Set Drive Address: Used to change the address of the current
drive.
6. Set/Change Password: Used to configure the password of the
drive.
7. Restore Factory Defaults: Removes password protection from
the drive, and removes all programs on the drive.
8. Firmware Version: Used to find the firmware version of the
drive.
9. Update Firmware: Used to reprogram the drive with the
firmware version that was most recent when the user interface
was installed.
x
Communications Mode: Opens the communications mode dialog
box. This allows for switching between the for communications
modes.
x
Programs on Drive: Shows a list of the programs that are on the
drive. Clicking on a program loads that program to the program area.
The startup program, if one exists, appears in bold on this list.
79
x
Help: Allows access to information about the user interface and
drives.
1. About: Displays a brief description of Haydon Kerk and its
products.
2. User’s Manual: Displays this manual.
3. Communications Manual: Opens the communications manual.
4. Hardware Manuals: Manuals for individual products.
80
Glossary:
Abort: Stops movement of the actuator with holding current and ends any
running program.
Accel Boost: When set to “Yes”, the move profile will include a 30%
increase in RMS current per phase during the beginning of the acceleration
ramp.
Accel Rate: The acceleration rate to be used with a move.
Clear: Clear the entire program from the program screen
Comment: Allows the user to insert comments within the program
Copy: Allows the user to copy a given program line or lines and insert them
elsewhere in the program
Current position box: Indicates the current position of the motor
Decel Boost: When set to “Yes”, the move profile will include a 30%
increase in RMS current per phase during the end of the deceleration ramp.
Decel Rate: The deceleration rate to be used with a move.
Delay Time (in reference to a move): The time between when the last step in
a move profile is taken, and when the current it set to the hold current.
Delay Time (in reference to a “Wait” command): The amount of time that
the wait command should delay execution of the next command.
Destination: The address to which the program should branch.
Distance: How far a move should go.
Download: Allows the program to be downloaded into drive
E-Stop: Abruptly stops the actuator without any deceleration
Encoder: A feedback device that converts position data to an electronic
signal that the drive keeps track of.
End Speed: The speed at the end of a move profile; determines the time
between the last and second to last step.
Extend: Extends the actuator shaft forward. The user inputs the distance
and speed. Items such as run current and hold current are auto populated
based on the part number of the actuator. These values can be over ridden
provided the inserted value does not exceed the devices limitations.
81
Go at Speed: Extends or retracts the actuator at a given speed.
Goto: Branching statement for programming. Branches to a destination
label.
Goto if: Branching statement for programming. Branches to a destination
label if the input conditions are met.
Goto Sub: Branching statement for programming that navigates the
program to a subroutine.
Hold Current: The RMS current per phase that should be applied to the
motor windings when the motor is at a standstill.
I/O box: Displays the state of each general purpose I/O.
Int on Input: Interrupt on Input. This is an interrupt tha occurs when an
input changes state.
Int on Pos: Interrupt on Position. This is an interrupt that occurs when the
actuator reaches a specific position.
Interrupt: An asynchronous event that causes the execution of a
subroutine.
Jump N times: Allows the program to jump N times to a specified label
Label: A string that identifies a command. Used to branch to the command.
Move to: Moves the actuator to a specified position.
Paste: Used in conjunction with the copy or cut functions. After one or
more commands are selected, another location in the program is then
highlighted by the user. The paste button is then pressed and the line or
lines are inserted above the highlighted line.
Plot: Any move can be shown as a plot of speed vs time. Highlight the
move command of interest then press the plot button.
Position: A location based upon the drive’s internal position counter, or
encoder counter, when enabled.
Priority: The determining factor in which interrupts are serviced first.
Program name box: This is the location on the screen where the name of
the program is inputted by the user. The program is stored in the drive
under this name.
82
Program to run box: This is a drop down menu that list the programs
stored on the drive. Double clicking on a given name populates the
program into the program screen and creates that program as the active
program in the drive.
Remove: This is used to remove one or more lines from a program.
Highlight the lines to be removed. Then click the remove button.
Reset: This command simulates turning the drive off and on again.
Retract: Retracts the actuator shaft. The user inputs the distance and
speed. Items such run current and hold current are auto populated based
on the part number of the actuator. These values can be over ridden
provided the inserted value does not exceed the devices limitations.
Return: Used in conjunction with the goto sub command or interrupts. At
the end of a subroutine the “return” command returns to the program to
the very next line after the Goto sub line command, or the command that
was going to be executed before the interrupt was triggered.
Return to: Used in conjunction with the goto sub command or interrupts. At
the end of a subroutine the “return to” command returns to the command
at a specified label location.
Run Current: The RMS current per phase to be applied to the motor
windings during a move.
Set outputs: Allow the programmer to set general purpose outputs.
Set position: Used to change the current position. Using this command the
position counter can be adjusted, usually after a homing routine. Then
other commands such as “move to” or “interrupt on position” can be used
in relationship with this set position.
Speed: The desired top speed for a move.
Start (Large green button): Starts running a program.
Start Speed: The speed that a move profile should start at; determines the
time between the first and second step.
Step Mode: Sets how many microsteps are taken for each full step of the
motor.
83
Stop: Stops the movement of the actuator with a specified deceleration
Stop (Large red button): Immediately stops the motor and program when
pressed.
Subroutine: A section of code used that is entered by using an interrupts,
or the “Goto Sub” command. Subroutines must end with a “Return” or
“Return To” command.
View / Edit: After highlighting a specific line in a program, the “View / Edit”
button can be pressed causing the details for that line to display. These
details can then be modified and updated.
Wait: Allows the programmer to put in a time specific time delay.
Wait for move: Delays execution of the next line of the program until the
motor has come to a stop.
84