1
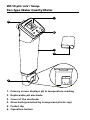
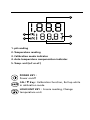
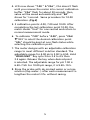
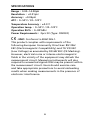
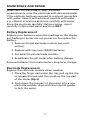
WT-10
pH / mV / Temp. Pen-Type
Water Quality Meter
Users Manual
• Mode d’emploi
• Bedienungshandbuch
• Manual d’Uso
• Manual de uso
pH / mV / Temp. Pen-Type
Water Quality Meter
Users Manual
September 2009, Rev.1
©2009 Amprobe Test Tools.
All rights reserved. Printed in China
English
WT-10
Limited Warranty and Limitation of Liability
Your Amprobe product will be free from defects in material
and workmanship for 1 year from the date of purchase. This
warranty does not cover fuses, disposable batteries or damage
from accident, neglect, misuse, alteration, contamination, or
abnormal conditions of operation or handling. Resellers are not
authorized to extend any other warranty on Amprobe’s behalf.
To obtain service during the warranty period, return the product
with proof of purchase to an authorized Amprobe Test Tools
Service Center or to an Amprobe dealer or distributor. See Repair
Section for details. THIS WARRANTY IS YOUR ONLY REMEDY.
ALL OTHER WARRANTIES - WHETHER EXPRESS, IMPLIED OR
STAUTORY - INCLUDING IMPLIED WARRANTIES OF FITNESS FOR
A PARTICULAR PURPOSE OR MERCHANTABILITY, ARE HEREBY
DISCLAIMED. MANUFACTURER SHALL NOT BE LIABLE FOR ANY
SPECIAL, INDIRECT, INCIDENTAL OR CONSEQUENTIAL DAMAGES
OR LOSSES, ARISING FROM ANY CAUSE OR THEORY. Since some
states or countries do not allow the exclusion or limitation of an
implied warranty or of incidental or consequential damages, this
limitation of liability may not apply to you.
Repair
All test tools returned for warranty or non-warranty repair or
for calibration should be accompanied by the following: your
name, company’s name, address, telephone number, and proof of
purchase. Additionally, please include a brief description of the
problem or the service requested and include the test leads with
the meter. Non-warranty repair or replacement charges should be
remitted in the form of a check, a money order, credit card with
expiration date, or a purchase order made payable to Amprobe®
Test Tools.
In-Warranty Repairs and Replacement – All Countries
Please read the warranty statement and check your battery before
requesting repair. During the warranty period any defective test
tool can be returned to your Amprobe® Test Tools distributor
for an exchange for the same or like product. Please check the
“Where to Buy” section on www.amprobe.com for a list of
distributors near you. Additionally, in the United States and
Canada In-Warranty repair and replacement units can also be sent
to a Amprobe® Test Tools Service Center (see below for address).
Non-Warranty Repairs and Replacement – US and Canada
Non-warranty repairs in the United States and Canada should be
sent to a Amprobe® Test Tools Service Center. Call Amprobe® Test
Tools or inquire at your point of purchase for current repair and
replacement rates.
In USA Amprobe Test Tools Everett, WA 98203 Tel: 877-AMPROBE (267-7623) Fax: 425-446-6390 In Canada
Amprobe Test Tools
Mississauga, ON L4Z 1X9
Tel: 905-890-7600
Fax: 905-890-6866
Non-Warranty Repairs and Replacement – Europe
European non-warranty units can be replaced by your Amprobe®
Test Tools distributor for a nominal charge. Please check the
“Where to Buy” section on www.amprobe.com for a list of
distributors near you.
Amprobe® Test Tools Europe
In den Engematten 14
79286 Glottertal, Germany
Tel.: +49 (0) 7684 8009 - 0
*(Correspondence only – no repair or replacement available from
this address. European customers please contact your distributor.)
WT-10 pH / mV / Temp.
Pen-Type Water Quality Meter
1
5
6
2
3
4
1. Primary screen displays pH & temperature reading
2. Replaceable pH electrode
3. Cover of the electrode
4. Glass bulb (protected by transparent plastic cap)
5. Pocket clip
6. Operation button
1
3
4
5
2
1. pH reading
2. Temperature reading
3. Calibration mode indicator
4. Auto temperature compensation indicator
5. Temp. unit (oC or oF )
POWER KEY :
Power on/off
CAL/ q Key : Calibration function, Roll up while
in calibration mode.
HOLD/UNIT KEY : Freeze reading, Change
temperature unit.
WT-10 pH / mV / Temp.
Pen-Type Water Quality Meter
CONTENTS
SYMBOLS........................................................................... 2
UNPACKING AND INSPECTION ........................................ 2
INTRODUCTION................................................................. 3
Features......................................................................... 3
OPERATION........................................................................ 3
Auto Power Off ............................................................ 4
Calibration Mode ........................................................ 4
SPECIFICATION ................................................................. 6
MAINTENANCE AND REPAIR............................................ 7
Battery Replacement ................................................... 7
Electrode Replacement . .............................................. 7
TROUBLE SHOOTING ....................................................... 8
1
SYMBOLS
�
Caution! Refer to the explanation in this Manual
�
Conforms to relevant Australian standards
�
Complies with European Directives
=
Do not dispose of this clamp meter as unsorted
municipal waste. Contact a qualified recycler for
disposal.
�WARNING and PRECAUTIONS
• Please always keep the pH glass bulb wet by
using the cap to protect and store the electrode.
• Always rinse the pH electrode and reference
junction in de-ionized water before next use.
• Never touch or rub glass bulb to lengthen pH
electrode life.
• Recommend soak the electrode for at least 30
minutes before using, especially if the electrode
dries out between uses or after long time unuses.
Unpacking and Inspection
Your shipping carton should include:
1
WT-10 meter
2
CR2032 battery
1
Manual
1 Soft pouch
If any of the items are damaged or missing, return
the complete package to the place of purchase for an
exchange.
2
INTRODUCTION
Congratulations on your purchase of WT-10 pH/Temp.
pen-type water quality meter. A convenient instrument
to measure water pH value and temperature.
Features
•
•
•
•
•
•
•
IP66 Waterproof housing.
Easy to read 45° angle display
Dual display with ATC (°C / °F switchable)
Data hold to freeze display
Replaceable pH electrode
Auto power off
One touch only for calibration
Operation
1. Remove the cover to expose the electrode.
Electrode is protected by a small transparent
plastic cap. It is normal if white crystals are present
on the electrode assembly. Rotate the small
transparent plastic cap in clockwise direction to
expose the electrode glass bulb. DON’T pour out
the liquid in the small cap, the liquid is used to
keep electrode wet.
2. Press “POWER” button to turn on the meter. Dip
the electrode into the test solution and gently stir
it to get a stable reading.
3. A small dot “ ” is flashing while the meter
is working, the screen shows pH value and
temperature (ATC) with unit °C or °F (Fig.1)
4. Press “HOLD” button to freeze the current
reading. The small dot stops flashing.
5. The meter is capable of taking measurements with
Automatic Temperature Compensation. “ATC”
shows at the left corner of the screen.
3
6. Turn off the meter by pressing “POWER” button.
7. Put back the transparent plastic cap and outer
cover to protect the electrode.
8. Easy to change the temperature unit. When meter
is off, press “POWER” & “CAL/q” at the same
time and then release the “POWER” key to enter
unit setting. Press “HOLD/UNIT” to select °C or °F
(Fig. 2). Then, press “CAL/q”to store the setting,
the display shows “SA” for one second and then
return to normal measurement mode.
Auto Power Off
This instrument will shut off automatically in approx. 20
minutes for every power on. For recording or operating
over longer period of time, disable the sleep mode by
pressing “POWER” and “HOLD/UNIT” at the same time
before power on and then release the “POWER” key.
An “n” will appear in the middle of the screen for one
second (Fig.3) and return to the normal measurement
mode.
Calibration Mode (Cal)
Calibration is necessary and should be done regularly.
Recommend every day if the meter is used very often.
1. Power on the meter.
2. Press “CAL/q” to enter calibration mode, “4.00 “
&”CAL” will display on the LCD.
NOTE: If the buffer is incorrectly inserted or the
probe is damaged, “CAL” will not flash.
3. After about 60 seconds, the value will be
automatically saved. “SA” shows for one second
and then entering next calibration point.
4
4. LCD now shows “7.00 “ &”CAL”, CAL doesn’t flash
until you remove the meter into correct calibration
buffer. “CAL” flash for about 30 seconds, then,
value will be saved automatically and “SA”
shows for 1 second. Same procedure for 10.00
calibration. (Fig.4)
5. 3 calibration points: 4.00, 7.00 and 10.00. After
completing the last calibration point 10.00, the
meter shows “End” for one second and return to
normal measurement mode.
6. To calibrate “7.00” before “4.00”, press “CAL/
q”KEY to select the desired calibration point.
“CAL” should be kept at non-flash status while
selecting the calibration point.
7. The meter designs with an adjustable calibration
range to meet different solution standard. The
adjustable range for 4.00 pH is 3.50 to 4.50. Hold
“HOLD/UNIT” key cycle from 3.5 to 4.5 then
3.5 again. Release the key when desired point
is selected. The adjustable range for pH 7.00 is
6.50~7.50. For 10.00 pH range, it is 9.50~10.5.
8. Rinse the probe with de-ionized water or a rinse
solution (tap water...) after each measurement to
lengthen the meter’s life. without saving.
5
SPECIFICATIONS
Range : 0.00~14.00pH
Resolution : +0.01pH
Accuracy : +0.05pH
ATC : 0~50°C / 32~122°F
Temperature Accuracy : ±0.5°C
Operation temp. : 0~50°C / 32~122°F
Operation RH% : 0~80%RH
Power Requirements : 2pcs 3V (Type: CR2032)
� - EMC: Conforms to EN61326-1.
This product complies with requirements of the
following European Community Directives: 89/ 336/
EEC (Electromagnetic Compatibility) and 73/ 23/ EEC
(Low Voltage) as amended by 93/ 68/ EEC (CE Marking).
However, electrical noise or intense electromagnetic
fields in the vicinity of the equipment may disturb the
measurement circuit. Measuring instruments will also
respond to unwanted signals that may be present within
the measurement circuit. Users should exercise care
and take appropriate precautions to avoid misleading
results when making measurements in the presence of
electronic interference.
6
MAINTENACE AND REPAIR
Make sure the electrode is clean! Between
measurements, rinse the electrode with deionised water.
If the eletrode has been exposed to a solvent immiscible
with water, clean it with a solvent miscible with water
e.g. ethanol or acetone and rinse carefully with water.
Store the electrode carefully! Before storing, rinse it
carefully in deionized water and store WET.
Battery Replacement
Replace your batteries when the readings on the display
are flashing or meter can not power on. To replace the
battery:
1. Remove the pH electrode module (see next
section).
2. Replace with two new CR2032 batteries.
3. Put back the pH electrode module.
4. Recalibrate the pH meter after battery change.
Remove batteries from meter before long term storage.
Electrode Replacement
Replace the electrode module when needed.
1. Place the finger nail under the clip, pull up the clip
to release the lock and then push up the top part
of the meter.(Fig.5)
2. Push down the top part of the meter into a new
electrode module, align with the internal guides
to lock the meter.
7
TROUBLESHOOTING
Power on but no display
Check the batteries are in place and making good
contact and correct polarity. Replace a new battery if
needed.
Slow response
Clean probe by immersing the electrode in tap water for
10-15 minutes, then thoroughly rinse with distilled water
or use a general purpose electrode cleaner.
---Out of pH range. Too acidic or too alkaline or the
electrode is not immersed in the water.
Figer 1.
Figer 2.
Figer 3.
Figer 4.
Figer 5
8