1
~
Zilog
Introduction to
RIO Text Processing
July 1979
03-3010-02
July 1979
Copyright 1979 by Zilog, Inc. All rights reserved. No part of
this publication may be reproduced, stored in a retrieval system,
or transmitted, in any form or by any means, electronic,
mechanical, photocopying, recording, or otherwise, without the
prior written permission of Zilog.
Zilog assumes no responsibility for the use of any circuitry
other than circuitry embodied in a Zilog product. No other
circuit patent licenses are implied.
lalroduelioB 10
RIO .Texl ProeessiDg
July 1979
COlftBiftS
SECTION 1
INTRODUCTION •••••••••••••••••••••••••••••••••••••••• 1
SECTION 2
GETTING STARTED ••••••••••••••••••••••••••••••••••••• 3
2.1
2.2
2.3
2.4
2.5
2.6
SECTION 3
3.6
3.7
3.8
3.9
3.10
3.11
3.12
Introduction ••••••••••••••••••••••••••••••••••
Getting into Edit •••••••••••••••••••••••••••••
Locating a String: The ilL" Command ••••••••••••
Making a Change: The "c" Command ••••••••••••••
Locating a String: The "p" and "U" Command ••••
Replacing a· Line: The "R" Command •••••••••••••
Locating a String: The "T" and "N" Command ••••
Deleting Text: The "DE" Command •••••••••••••••
Locating a String: The "B" Command ••••••••••••
Adding Text: The "I" Command ••••••••••••••••••
Routine Editing Session Wrap up •••••••••••••••
Summary •••••••••••••••••••••••••••••••••••••••
11
11
11
12
13
13
14
14
15
15
16
17
DISK AND FILE KNOW-HOW • • • • • • • • • • • • • • • • • • • • • • • • • • • • • • 19
4.1
4.2
4.3
4.4
4.5
SECTION 5
3
5
6
6
8
8
USING THE RIO TEXT EDITOR ••••••••••••••••••••••••••• 11
3.1
3.2
3.3
3.4
3.5
SECTION 4
The Computer System •••••••••••••••••••••••••••
Getting the Computer System Ready •••••••••••••
Getting Information into the Computer (Files) ••
Creating a File ••••••••••••••••••••••••••••••••
Closing a File ••••••••••••••••••••••••••••••••
Creating a Backup for Files •••••••••••••••••••
Formatting a New Disk •••••••••••••••••••••••••
Copying a Disk ••••••••••••••••••••••••••••••••
Copying a File ••••••••••••••••••••••••••••••••
Listing the Directory of Files ••••••••••••••••
Deleting a File •••••••••••••••••••••••••••••••
19
20
20
21
21
GOOD THINGS TO KNOW ••••••••••••••••••••••••••••••••• 23
5.1
5.2
5.3
5.4
RIO Editor Command Summary ••••••••••••••••••••
Command Abbreviations •••••••••••••••••••••••••
* Option ••••••••••••••••••••••••••••••••••••••
String Delimiters •••••••••••••••••••••••••••••
23
23
23
24
SECTION 6
GLOSSARY •••••••••••••••••••••••••••••••••••••••••••• 25
SECTION 7
OTHER ZILOG MANUALS YOU WILL FIND HELPFUL
-iii-
........... 27
SBC'1'ION 1
IN'l'RODUCTION
Using a computer text editor to prepare a document is
similar to using a typewriter. The difference is that with the
computer, making changes to text is much easier.
The purpose of this document is to give a general overview
of how to use the RIO text editor. RIO is an interactive
computer system, meaning you and the system can communicate with
each other by means of a keyboard terminal electronically
connected to the computer.
This document has been designed with the beginner in mind.
Those already familiar with text editing may wish to start with
the Z-80 RIO Text Editor User's Manual (see Section 5). After
you have learned the fundamentals of RIO text editing, refer to
other Zi10g ~ocuments (~ee Section 5), which have been designed
for the more experienced user.
Learning to use the RIO text editor is like learning
anything else -- once you become familiar with it, it will seem
easy. Try to spend a few uninterrupted hours getting to know
your system. As you read through this manual, put into practice
what you learn. Don't just read about it, try it.
-1-
-2-
SECTION 2
GETTING STARTED
2.1
The Computer System
The first step in learning about RIO text editing is to
become familiar with your computer system.
There are three basic parts:
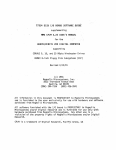
1. The computer: The basic unit of your computer system
(see Figure 1) is where all the information is processed
-- it is the "brain" of your system.
The information necessary for the computer's operation is
stored on magnetic disks. These are housed in
protective, square coverings with window cut-outs that
expose the disk. The disks are inserted into two "disk
drives" to receive information from, or supply
information to, the computer. The disk that contains
information necessary to run RIO is called the System
Disk, and usually goes into the rightmost drive (Drive
0). The disk on which your data is stored is called the
User Disk. It is inserted into the left drive, which is
Drive 1 or 2, depending on your system.
The type of system you have appears on the front panel of
your computer. In a Microcomputer Zilog (MCZ) , the left
drive is called Drive 2. In a Zilog Development System
(ZDS), the left drive is called Drive 1. In this manual
the left drive will always be referred to as Drive 2. If
you have a ZDS, don't forget to always use "1" when "2"
is specified.
CAUTION
When handling disks, be sure not to touch
the exposed window areas. This could damage
information stored on the disk.
2. The keyboard: A keyboard similar to a typewriter is used
to enter information into the computer. Note that the
numerical keys "0" and "1" (zero and one) can never be
interchanged with the uppercase letter "0" and lower case
letter "1"; respectively when giving commands to the
system.
-3-
The key marked RETURN is the carriage return. After a
command to the computer is given, this key must be
pressed to execute the command.
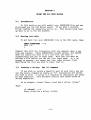
Pigure 1.
Zilog Caaputer Systea
The CAPS ONLY key is similar to the shift lock on a
typewriter keyboard. The difference is that when the
CAPS ONLY light is on, only letters are capitalized. To
type special symbols (1, ", %, $, etc.) you must still
press SHIFT while pressing the appropriate key.
To correct a typing mistake press the BACKSPACE key.
Th~s deletes the last character typed.
On keyboards
without the BACKSPACE key, the last character is deleted
by holding down the CNTL (control) key while striking the
"Hn key.
-4-
Pressing the DEL (or RUBOUT) key, erases the entire
current line. The current line is the last line typed.
3. The console: As you type on the keyboard, what you type
is displayed on a console. This is either a
television-like video screen or a printed paper output
device (line printer). The video screen is sometimes
referred to as the CRT, (which stands for Cathode-Ray
Tube), the terminal screen, or sometimes simply the
terminal. "Terminal" actually refers to both the
keyboard and the console.
2.2
Getting the Coaputer Systea Ready
There are four simple steps to take before you can
use the text editor:
1. Turn your system on: There are on/off switches on the
console and the computer. If there is a LINE key on your
keyboard, make sure the indicator on the key is lit1 if
not, press the key.
2. Load the disks: Obtain newly formatted system and user
disks. Formatted disks have fixed, addressable segments
-- i.e., they are usable. The formatting procedure will
be discussed later in Section 4. Insert the System Disk
into Drive 0 by sliding it in with the seamed side facing
left and the notch in the upper corner (see Figure 1).
When it has clicked into place, close the drive door by
sliding it to the left. In the same manner, insert the
User Disk into Drive 2.
3. Bootstrap: Bootstrapping gets the computer ready to
accept commands. Do this by pressing the RESET button on
the computer and the RETURN on the keyboard. A
successful Bootstrap results in a "%" on the terminal
screen. This is called a "prompt", and means the
'computer is ready to accept commands.
4. Initialize: Type an "I" after the prompt and strike the
carriage return.
NOTE: The' Initialize command should always be the first command
entered after you insert a disk. This step will not be
indicated throughout the manual, so it is important to
get into the habit of typing an "I", followed by a
carriage return, each time you insert a disk.
-5-
2.3
Getting Information into the Coaputer (Piles)
Information is stored on the disks in files. Imagine files
as individual documents, which you call forth at will to change
or print into a hard-copy (computer slang for the actual
ink-on-paper representation of what a file contains). Each file
has its own name, so it can be easily located by the computer.
Creating a new file on the computer is like creating a new
document on a typewriter. The disk holds the information you
enter on the keyboard just as a piece of paper in a typewriter
holds what you type.
You can easily obtain a hard-copy of a file with a line
printer. Most systems are not connected to a printer, but there
is usually one somewhere close by. There are many kinds of
printers; so when you are ready to use one you will need to
consult your local electronics wizard to learn how.
2.4
Creating a Pile
You are now ready to create a file. The first one you
create, by following the steps in the manual, will be simple and
short, but it will give you a good idea of how to create your own
files in the future. The name of this file will be APHORISMS.
Make sure the prompt (%) sign is visible on your screen; if
not, Bootstrap.
There will be two things going on in all of the following
instructions -- you will be typing on the keyboard to the
computer, and the computer will be answering you on your console.
In all of these instructions, what you are supposed to type
will be in boldface, what the computer responds is not boldfaced,
and a right arrow (----)-) will represent a carriage return.
Most commands to the computer are typed in uppercase letters.
With all of this in mind, type:
%EDIT APHORISMS
EDIT 1.6
NEW FILE
INPUT
--->
-6-
When you type EDIT APHORISIMS, you are specifying an-action
and naming a file. The computer searches its memory (searches
through all the pre-existing files), and, in this case, because
it cannot locate a file named APHORISMS, it states that APHORISMS
is a new file. Don't be concerned if your computer responds with
some number other than 1.6 after EDIT, as this is simply a
release number for your System Disk.
When you create a file, you use the RIO Text ~ditor. "Edit"
is a function on your RIO system that makes it easy to prepare
written material for presentation or publication. To edit a
file, you must be in "Edit mode".
When you type "EDIT APHORISMS" you are put in Edit mode.
When the file you are editing is a new file, as in this case, the
computer goes one step further and puts you in "Input mode".
Input means that you may now add text to a file. The computer
tells you that you are in Input mode by nQt issuing a prompt. If
the last line on your console contains a ">", type "INPUT" and a
carriage return.
CA1rI'IOR
Percent-Sign proapt (') has disappeared
fro. the last line, so do not reaove your
disks. Only reaove thea when the -,pro.pt is present and the red lights on
the disk release bars are off. Reaoving
disks at the wrong tiae can cause file damage.
~e
When entering the aphorisms that follow, insert carriage
returns so your aphorisms look the same as those in this manual.
Carriage returns will not be indicated here for the straight
input of text.
Type into the computer:
A penny saved
is a penny earned.
You will often want_to skip spaces between paragraphs or
sections when inputting text. You can't, however, accomplish
this by rep~atedly pressing the carriage return. Instead, for
each additional blank line you want, press the carriage return
once, touch the long space bar (character space) at the bottom of
the keyboard, and then press the carriage return again. If you
type two successive carriage returns you will go out of Input
_
mode. Ifa ">" appears before you are done inputting, type -I",
carriage return, and continue where you left off. Typing "I"
after a right angle bracket prompt (» means "put me in I~put
mode". Note that this is different from typing an "I" after a
percent sign prompt (%), which means "Initialize".
-7-
Double-space after your last aphorism, and add these golden
words to your collection:
A stitch in tiae saves nine.
Into each life a little rain .uat fall.
Every cloud has a silver lining.
A rolling stone
gathers no .oss.
You can lead a horse to vater,
but you canlt .ake it drink.
2.5
Closing a Pile
To close the aphorisms file, you must go from Input mode
back into Edit mode. You entered Edit mode when you opened the
file. The ">" prompt indicates that you are in Edit. Close your
file by hitting a carriage return twice. On your console will
appear:
EDIT
>
To get out of Edit mode, type:
>QOI~
--->
%
When the prompt is present and the red lights on the disk
release bars are off, remove the disks by pressing the bars -the disks will pop out.
This is a good time to make a hard-copy of your APHORISMS
file if you have a printer available.
2.6
Creating a Backup for Piles
You will shortly make changes to your APHORISMS file, but
before doing so, you should make a backup disk. Keep this disk
only for backing up files. In this way you will have an exact
copy of your files on hand in case anything happens to the
originals. It is a good idea to back-up frequently. At some
point (like when you've worked for days on a deadline project and
then accidently erased your entire file), you will be very glad
you did.
~8-
Making a back-up is simple. First obtain a user disk.and
label it "BACK-UP". Make sure there is a silver "Write Protect"
tab on the notch in the disk (see Figure 1).
If you removed your System Disk to make a hard copy, put it
back into Drive 0 and Bootstrap. The "%" prompt should be
present. Put your back-up disk into Drive 2. If you can give
the Initialize command without the computer responding with an
"Error C4" message, your user disk is formatted, therefore it is
usable. If you can't initialize without receiving an error
message, type:
%PORIIAT 0=2
--->
DISK ID: BACKUP
READY? Y
Wait until the red lights on the disk release bars are out and
the "%" prompt is present before continuing.
You are now ready to move a copy of the Aphorisms file to
the back-up disk. Type the following command, making sure not to
leave out the comma:
%1I0VB,
%
-->
Remove the System Disk and put the disk with your Aphorisms file
into Drive O. Tell the computer to copy your file by typing:
%X
X
*
*
8=0 D=2 APBORISIIS
S=O D=2 APHORISMS
FILENAME
APHORISMS
-->
DRIVE
o
%
S stands for source, and D stands for destination. If your
system gave a "Destination Device Not Ready" message, you
probably have a ZDS system and didn't change "D=2 to "D=l".
When the red lights stop flashing and the prompt sign
appears, the file has been copied. Put the System Disk back into
Drive 0 and the disk with the Aphorisms file back into Drive 2.
Don't forg.et' to Ini tia1ize.
There is also a way to copy an entire disk if you wish.
This is covered later in Section 4.
-9-
-10-
SECTION 3
USING THE RIO TEXT EDITOR
3.1
Introduction
In this section you will modify your APHORISMS file and see
first-hand how the RIO Editor works.
If you make a mistake,
finish reading the subsection you're in. This should help clear
up what to do to fix the mistake.
3.2
Getting into Edit
To get back into your APHORISMS file in the Edit mode, type:
%EDIT APHORISMS
EDIT 1.6
--->
>
Compare this with the interaction with the computer when a new
file was created.
Since APHORISIMS already. exists, the system
'doe~ not inform you that it is a new file, nor does it
automatically put you in Input mode.
Note that you must be
editing a file before you can get into Input mode.
If a "%"
prompt is present, you cannot get into Input without first
specifying the file you wish to input text to.
3.3
Locating a String:
The wL w Co.mand
If you wi$h to locate a specific part of your text, you can
use the Locate command by typing an "L", followed by the string
you wish to find.
A string is a sequence of characters set aside
by some separator.
This document usually uses slash marks as
string separators.
.
As an example, locate "Every cloud has a silver lining."
Type:
>L /cloud/ --->
Every cloud has a silver lining.
-11-
The computer searches the Aphorisms file from its current
location downward, until it comes to the first occurrence of what
is contained within the slash marks.. Since you just started this
editing session, the current location of the Editor (before you
gave the Locate command) was the top of the file, or the first
line of the first page.
When giving the Locate command, use strings that are unique
(in this case, "cloud"); otherwise, your search will be
inefficient, as RIO stops at the first occurrence of the desired
string. If there are many occurrences of the given stringt you
might have to repeat the command several times before you find
the desired line.
The computer will locate only exactly what you ask it to
locate. If the computer responds with "EOF", it is at the end of
the file, and hasn't found your string. If so, type "T" and
carriage return, then try again. Make sure you haven't added an
extra space, misspelled something, or capitalized when you
shouldn't have.
3.4
Making a Change:
The ·C· Ca.mand
The Change command instructs RIO to change what is contained
within one set of string separators to that which is contained
within the next set -- C /change this/to this/. Make sure to
leave a space after the "Ca.
The following line should be on your console:
Every cloud has a silver lining.
>
Change this line by typing:
>C /cloud./Rolls Royce/ --->
Every Rolls Royce has a silver lining.
Note that you can use the Change command to delete a string.
Do this by not specifying anything between the last set of
separators. For example, if you want to delete the word "Royce",
you could type "C / Royce//".
-12-
3.5
Locating a String:
~he
.p. and
·0· Command
There is more than one way to locate a string. This time
you will locate "gathers no moss", but by using the Print and Up
commands.
The Print command writes a specified number of lines on the
console, starting from the current line. Because you are
approximately five lines from "gathers no moss", type:
>P
5
--->
Every Rolls Royce has a silver lining.
A rolling stone
gathers no moss.
>
Note that your current line, (the line above the ">"
prompt), is a blank line, and the line you are looking for is the
line above your current line. Use the Up command to get there by
typing:
>0 I --->
gathers no moss.
3.6
Replacing a Line:
The ·R· Co. .and
To change an entire line, it is easier to use the Replace
command than the Change command. Typing "R new line" will delete
your current line, and replace it with the specified new line.
Type:
>R must stop soaett.e.
>
--->
Now "gathers no moss" has been deleted, and "must stop sometime"
has taken its place.
If you wish to replace a single line with more than one
line, type "R", followed-by a carriage return. The Editor will
put you into Input mode, and replace your current line with
everything you type while in Input mode.
As an example, to put "Into each life a little rain must
fall" on two lines, first locate the aphorism:
>0 5 -->
Into each life a little rain must fall.
-13-
Replace this with 2 lines:
>R --->
Input
Into each life
a little rain .ost fall.
Give two carriage returns to get out of Input and back in Edit.
3.7
Locating a String:
~e
-T- and -.- Ca.aands
If you wish to locate the first aphorism (A penny saved ••• ),
you can't use "L" or "P" because these commands only work
downward from your current line. You could use the Up command,
but since you know you're going to the top of the file, its
easiest to use the Top command.
Type:
>T --->
T>
and you'll be at the top of the file.
If you want to see the next line, use the Next command by
typing:
T>. --->
A penny saved
The following line is where the next change is to be made, so
give the Next command again.
"The line "is a penny earned" should now be on your console.
Change this to "doesn't add up to much" using the Replace
command:
>R doesn't add up to .och.
>
--->
Note: If you specify a number after "N" the Editor will execute
"Next" that many times, but will only print the current
line after completion.
3.8
Deleting Text:
The -DB- Co. .and
Locate, using any method you wish, "A stitch in time saves
nine."
-14-
To get rid of this aphorism, use the Delete command •. Make
sure the line you wish deleted is above your ">" prompt, and
type:
>DB
--->
The aphorism is deleted and the Editor automatically closes
up the blank line where the aphorism was.
If you wish to erase more text, simply specify the number of
lines to delete, e.g., to delete 4 lines, type DE 4.
If you specify a string after DE, the editor will delete all
lines down to, but not including, the first line containing that
string. For example, if you later wish to delete all the
aphorisms but the last one, you could go to the top of the file
and type "DE /horse/".
3.9
Locating a String:
The -B- Co. .and
The Bottom command is another method of line location.
get to the bottom of the file, type:
To
>B --->
but you can't make it drink.
If you get a blank line instead·of "but you can't make it
drink," you added a few carriage returns at the end when
originally inputting the file. If so, use the Up command (Up
/but/), and the line will appear. Note that Up is like DElete,
in that you can specify a string that you wish to reach instead
of a number of times to repeat the command. This is true of Next
and Print as well.
3.10
Adding Text:
The -I- Ca.aand
To insert text after your current line, you must get into
Input. Add to your file the line, "(It probably will, though)",
by typing:
>1 --->
INPUT
(It probably viiI, though).
Exit Input with two carriage returns. Remember to enter
Input only when you are at the place in your file where
you want text inserted.
-15-
3.11
Routine Editing Session Wrap up
1. Get out of Edit using the QUIT command.
2. Back-up the APHORISMS file.
3. Make a hard copy if a printer is available.
The end results of all your editing efforts should look like
this:
A penny saved
doesn't add up to much.
Into each life
a little rain must fall.
Every Rolls Royce has a silver lining.
A rolling stone
must stop sometime.
You can lead a horse to water,
but you can't make it drink.
(It probably will, though).
Any time you are in Edit, you can see what your file looks
like by going to the top of the file (type "T", carriage return),
and using the Print command to print out any number of lines.
Typing IIp *" will print the entire file, starting from your
current line, on the console.
If your aphorisms file looks drastically different than the
file listed above, change it, add to it, delete from it, etc.,
until it matches. See Section 3.12, Summary, for assistance.
-16-
3.12
$Ullllar:r
There is more to the RIO Text Editor, but the commands you
know now are enough to start with. Here is a summary of what you
have learned so far for easy reference:
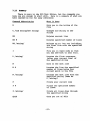
Command AbpreviatiQn
What it Does
B
Gets you to the bottom of the
file
C /old string/new string/
Changes old string to new
string
DE
Deletes current line
DE •
Deletes specified number of lines
DE /atring/
Deletes up to, but not including,
the first line with the specified
string
I'
Puts you in Input mode so that
you may add text to your file.
L /string/
Locates the first occurence
(after your current line) of
the specified string
N
Goes to the next line
N t
Locates the line the specified
number of lines below your
current point in the file
N /string/
Locates the next line with the
specified string (same as
L /string/)
p
Prints your current line
P #
Prints the specified number
of lines.
P /string/
Prints all lines down through
the specified string
QUIT
Gets you out of Edit
-17-
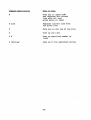
Command Abbreviation
What it Does
R
Puts you ~n Input mode
and replaces the current
line with all ~ext
given while in Input
R line
Replaces current line with
the given line
T
Gets you to the top of the file
u
Goes up one line
U #
Goes up specified number of
lines
U /string/
Goes up to the specified string
-18-
SBCrIOR 4
DISK ABO PILB KROW-BOW
4.1
Por.aatting a Bev Disk
Every disk must be formatted before it can be used. In most
cases, the disk to be formatted should have a silver tab placed
over the notch (see Figure 1). Put a tab on the disk unless
otherwise specified. This tab should cover the front and back of
the notch. Its purpose is to let you write on the disk ~ia the
keyboard.
Put a System Disk into Drive 0 and bootstrap if the "%"
prompt is not present.
If you are formatting a System Disk, type:
%PORMAT S
DRIVE: 2
--->
DISK ID: Egret
READY?Y
--->
(At this point, insert disk
to be formatted into Drive 2)
(Give it any name you like)
It is important to type "S" after "Format". This directs
special System Disk information to its proper place on the disk.
When the computer issues a prompt, the disk is formatted.
Now move all the programs from the Master System Disk in Drive 0
to the disk in Drive 2 by typing:
%ROVE P=&
--->
When the red lights stop flashing and the prompt appears, you may
remove and label the disk in Drive 2.
The procedure for formatting a User Disk is much the same,
but even easier:
%POBRAT --->
Drive: 2
Disk ID: BerOD
Ready?Y
(Insert disk to be
formatted)
(Can be any name)
--->
When the lights stop flashing and the prompt appears, you
may remove the disk and label it. Don't type "S" after "Format"
or give the Move Command, as this is only necessary for System
Disks.
-19-
4.2
Copying a Disk
To make a copy of an entire disk, put the System Disk into
Drive 0, bootstrap if the "%" is not present, and type:
%COPY.DISK --->
DRIVES READY?
Before continuing, remove the System Disk. Note that this
i$ a safe exception to the rule about removing disks when the"%"
prompt is not present. Put the disk you want to copy fro. into
Driv~ 0, the disk you want to copy to into Drive 2, and continue:
Drives Ready?Y
VERIFICATION COMPLETE
%
If any errors are listed on your console, it could mean that
the disk you used in Drive 2 was bad, or that some minor
electrical mishap occurred during copying. Try again.
4.3
Copying a Pile
The procedure for copying a file is the same as the
procedure you used to create a back-up disk.
Type:
%lIove,
-->
%
Remove the System Disk. Insert the disk with the file you
wish to copy into Drive 2. Insert the disk you wish to copy the
file onto, into Drive 0, and continue:
%X
*
S-2 D=O Yourfile
FILENAME
YOURFILE
--->
DRIVE
2
%
If you want to copy more than one file, you can list them
all at once, leaving a space between each name:
%X
*
PILI I PILB 2 PILB 3
--->
If you leave out "S=2" and "D=O" in this command, the computer
assumes your source is Drive 2 and destination is Drive O.
-20-
4.4
Listing the Directory of Pile8
To see what files are on the disk in Drive 2, type:
%CA'r 0=2
--->
D=2 means "list the contents of Drive 2 only."
To see what files are on the disk in Drive 0, type:
%CAT »=0 P==&:
-->
p=& means "properties equals anything". The system will list
everything on the disk in Drive 0, including the special programs
it contains if it is a System Disk.
4.5
Deleting a Pile
List the directory for Drive 2 and decide which file or
files you want deleted. Now type "DELETE", followed by a list of
the file(s) you want erased. For example, to delete three files
called TRASH, JUNK and GARBAGE, you'd type:
%DBLftB 'tRASH JOB GARBAGB
DELETE 2/JUNK (Y/N/A/Q)?
--->
The computer's question is to make sure you don't accidently
delete a desired file. You should give one of the listed answers
-- Y,N,A or·Q. nyu means yes; "N" means no; "A" means all
(delete all of the files listed and don't ask me again); and "Q"
means quit (don't delete any files and stop the whole procedure).
If you type nyu or "Nn, the computer will ask you one by one
whether you want a file deleted.
In the above example, RIO didn't forget the TRASH file. The
computer deletes a series of files in the order that they were
created, as opposed to the order in which you specify them.
Therefore, JUNK must have been created before TRASH.
-21-
-22-
SEC'lIOIl 5
GOOD mIBGS 1ft) omt
5.1
RIO Editor Ca.mand Su.aary
Because the purpose of this document has been to give a
quick overview of RIO, some unnecessary (but convenient) commands
and options have been left out. The following is a complete list
of RIO Editor Commands:
Again
Bottom
Brief
Change
DElete
Find
GEt
Goto
Input
Join
LIneno
Locate
Macro
Next
Print
PUt
PUTD
QUIT
Replace
Top
Up
Verify
Window
Xecute
The RIO Text Editor User's Manual, which describes these
commands in detail, may be obtained from Zilog. See Section 7
for details.
5.2
Ca.-and Abbreviations
·In the Command Summary above, some commands have only the
first letter capitalized, while others have two or more. The
capitalized letters indicate the minimum set of letters necessary
to make the command, e.g., to use the Replace Command, only an
"R" is necessary, while to use the DElete command, DE is
necessary. If you wish, you can always use more letters.
While in Edit, (when the ")" prompt is present), you may
give commands in lower case. This is not true outside of Edit
mode; the "%" prompt requires capitalized commands.
5.3
* Option
The DElete, Next, Print, and Up commands can be issued with
a number to specify the number of times to execute the command.
If no number is specified, I is assumed. This is the "default
value". An asterisk (*) can be used in place of a number·to mean
"as many times as possible". For example, "DE *" would delete
-23-
all the lines from the current one to the end of the file, and "P
*" means "print all lines until the end of the file".
The * option also occurs in the change command. If you wish
to change all remaining occurrences of String I to String 2, type
"C /string l/string 2/* *". See the RIO Text Editor User's
Manual for more details of the change command, other commands
with the * option, and other uses of *.
5:.4
String Deliaiters
This manual uses slash marks for string delimiters.
Occasionally, however, you will need to change a string that
contains a slash, e.g., change "in/out" to "out/in". Whenever a
string is specified, the Editor considers the first non-numeric,
non-blank character as the string delimiter. Therefore, to make
the above change, pick one of your favorite symbols -- how about
$ -- and use it where you would normally use a slash:
C $in/out$out/in$
out/in
---)
Note also that the last string delimiter in a command is
optional. As an example, the above command can also be typed as
"C $in/out$out/in". "L /horse/" can be written in short-cut form
as "L /horse", etc.
-24-
SECTION 6
GLOSSARY
BOOTSTRAPPING: Getting the computer to a command input
environment (%) by pressing the reset button and then a
carriage return.
CONTROL H (or BACKSPACE): You may correct single-character typing
mistakes by pressing the "Control" and "H" keys
simultaneously. The last character typed will be erased.
CONTROL I: If you want to indent toward the middle or right-hand
margin, the Control I saves you tim~ getting there. Tabs
are set eight spaces apart, so the first Control I will
bring you to the next tab; each Control I thereafter will
.bring you eight spaces to the right.
DEFAULT: Often when a desired value is not specified, the
computer specifies its own value. This is the default
value.
DELETE: You may correct an entire line simply by hitting the DEL
key (on some terminals it will be called RUBOUT); the entire
line will be erased.
DISK: The data input into the computer is recorded on disks.
EOF: When this si.gn appears on your screen or printer, it means
you've reached the End of File. To get back to the
beginning, type a "T", for Top.
FORMATTING: A process each disk must undergo before it can be
used in the computer. Formatting is a way the computer has
of segmenting the disk into fixed parts.
INITIALIZING: This command reads the memory space allocation map
into memory. Failure to initialize can cause loss of files,
as the system may write over preallocate~ memory.
Initializing should be done each time you insert a disk.
Simply type "I", then carriag~ return.
RIO: Stands for Re10catable Module and I/O Management. RIO is an
interactive computer system. It consists of a collection of
programs (an "operating system"), which supervise all other
progra~s that run on the machine.
-25-
-26-
SEC'J.'IOR 7
OTHER ZILOG MAHUALS YOU WILL FIND HELPFUL
Here are two other manuals about RIO which you might find
helpful:
RIO OPERATING SYSTEM USER'S MANUAL
RIO TEXT EDITOR USER'S MANUAL
There is a charge for each Qf these manuals.
an 6rder blank by writing to:
Publications Department
Zilog, Inc
10460 Bubb Road
Cupertino, California 95014
-27-
You may obtain
'I'
-28-
~
Zilog
READER COMMENTS
Your comments concerning this publication are important to us.
Please take the time to complete this questionnaire and return it to
Zilog.
Title of Publication: _ _ _ _ _ _ _ _ _ _ _ _ _ _ _ _ _ _ _ _ _ _ _ _ _ _ __
Document Number: __________________________________
Your Hardware Model and Memory Size: _ _ _ _ _ _ _ _ _ _ _ _ _ _ _ _ _ _ __
Describe your likes/dislikes concerning this document:
Technical Information:
------------------------------------------------------
Supporting Diagrams:
. Ease of Use: _____________________________________________________________
Your Name: ________________________________________
Company and Address: ___________________________________
Y~ur
Position/Department _____________________________~
r.F-I031-02
..•...•....................................................................................................... ,
111111
NO POSTAGE
NECESSARY
IF MAILED
IN THE
UNITED STATES
BUSINESS REPLY MAIL
FIRST CLASS PERMIT NO. 475, CUPERTINO, CA.
POSTAGE WILL BE PAID BY ADDRESSEE
Zilog
Manager, Systems Publications
10460 Bubb Road
Cupertino, California 95014
•.•••••.•.•.•...•••.•..•....................................................................................••
Zilog, Inc .
10460 Bubb Road,
Cupertino, California
95014
Telephone (408)446-4666
TWX 910-338-7621
Printed in USA