1
User Manual
ViewRNA™ eZ Assay
For Leica BOND RX Instrument
P/N 15891 Rev. C 140910
For research use only.
Not for use in diagnostic procedures.
Trademarks
Affymetrix® and
are trademarks of Affymetrix, Inc.
All other trademarks are the property of their respective owners.
Limited License
Subject to the Affymetrix terms and conditions that govern your use of Affymetrix products, Affymetrix grants you a nonexclusive, non-transferable, non-sublicensable license to use this Affymetrix product only in accordance with the manual and
written instructions provided by Affymetrix. You understand and agree that, except as expressly set forth in the Affymetrix
terms and conditions, no right or license to any patent or other intellectual property owned or licensable by Affymetrix is
conveyed or implied by this Affymetrix product. In particular, no right or license is conveyed or implied to use this Affymetrix
product in combination with a product not provided, licensed, or specifically recommended by Affymetrix for such use.
Citing ViewRNA eZ in Publications
When describing a procedure for publication using this product, please refer to it as the ViewRNA eZ Assay.
Disclaimer
Affymetrix, Inc. reserves the right to change its products and services at any time to incorporate technological developments.
This manual is subject to change without notice.
Although this manual has been prepared with every precaution to ensure accuracy, Affymetrix, Inc. assumes no liability for
any errors or omissions, nor for any damages resulting from the application or use of this information.
Copyright
© 2014 Affymetrix Inc. All rights reserved.
Contents
Chapter 1
Introduction . . . . . . . . . . . . . . . . . . . . . . . . . . . . . . . . . . . . . . . . . . . . . . . . . . . 1
About This Manual . . . . . . . . . . . . . . . . . . . . . . . . . . . . . . . . . . . . . . . . . . . . . . . . . . . . . . . . 1
Assay Overview . . . . . . . . . . . . . . . . . . . . . . . . . . . . . . . . . . . . . . . . . . . . . . . . . . . . . . . . . . . 1
General Assay Workflow . . . . . . . . . . . . . . . . . . . . . . . . . . . . . . . . . . . . . . . . . . . . . . . . . .1
Chapter 2
Safety . . . . . . . . . . . . . . . . . . . . . . . . . . . . . . . . . . . . . . . . . . . . . . . . . . . . . . . . 3
General Precautions . . . . . . . . . . . . . . . . . . . . . . . . . . . . . . . . . . . . . . . . . . . . . . . . . . . . . . . 3
Operating Leica BOND RX . . . . . . . . . . . . . . . . . . . . . . . . . . . . . . . . . . . . . . . . . . . . . . . . . . . 3
Chapter 3
Reagents, Consumables, and Equipment Required. . . . . . . . . . . . . . . . . . . . 5
Affymetrix Reagents Required . . . . . . . . . . . . . . . . . . . . . . . . . . . . . . . . . . . . . . . . . . . . . . . . 5
Leica Biosystems Reagents and Consumables Required . . . . . . . . . . . . . . . . . . . . . . . . . . . . .6
Additional Reagents and Consumables Required . . . . . . . . . . . . . . . . . . . . . . . . . . . . . . . . . . 7
Equipment Required . . . . . . . . . . . . . . . . . . . . . . . . . . . . . . . . . . . . . . . . . . . . . . . . . . . . . . . 7
Chapter 4
Best Practices . . . . . . . . . . . . . . . . . . . . . . . . . . . . . . . . . . . . . . . . . . . . . . . . . . 9
Sample Preparation . . . . . . . . . . . . . . . . . . . . . . . . . . . . . . . . . . . . . . . . . . . . . . . . . . . . . . . . 9
FFPE Tissue Block Preparation . . . . . . . . . . . . . . . . . . . . . . . . . . . . . . . . . . . . . . . . . . . . . . 9
FFPE Tissue Slide Preparation . . . . . . . . . . . . . . . . . . . . . . . . . . . . . . . . . . . . . . . . . . . . . . . 9
Experiment Design . . . . . . . . . . . . . . . . . . . . . . . . . . . . . . . . . . . . . . . . . . . . . . . . . . . . . . . 10
Assay Controls . . . . . . . . . . . . . . . . . . . . . . . . . . . . . . . . . . . . . . . . . . . . . . . . . . . . . . . . 10
Heat Treatment and Proteinase Digestion Optimization . . . . . . . . . . . . . . . . . . . . . . . . . . . .10
Pretreatment Lookup Table . . . . . . . . . . . . . . . . . . . . . . . . . . . . . . . . . . . . . . . . . . . . . . . . .10
Time-Preserving Pretreatment Optimization Procedure . . . . . . . . . . . . . . . . . . . . . . . . . . 11
Tissue-Preserving Pretreatment Optimization Procedure . . . . . . . . . . . . . . . . . . . . . . . . . . 11
Leica BOND RX Cleaning and Maintenance . . . . . . . . . . . . . . . . . . . . . . . . . . . . . . . . . . . . . 12
Chapter 5
ViewRNA eZ Assay Protocol . . . . . . . . . . . . . . . . . . . . . . . . . . . . . . . . . . . . . 13
Step 1: Getting Started . . . . . . . . . . . . . . . . . . . . . . . . . . . . . . . . . . . . . . . . . . . . . . . . . . . .13
Step 2: Create a Study and Add Slides . . . . . . . . . . . . . . . . . . . . . . . . . . . . . . . . . . . . . . . . 13
Creating a Study . . . . . . . . . . . . . . . . . . . . . . . . . . . . . . . . . . . . . . . . . . . . . . . . . . . . . . . 13
Adding Slides to a Study . . . . . . . . . . . . . . . . . . . . . . . . . . . . . . . . . . . . . . . . . . . . . . . . .14
Step 3: Prepare and Load Reagents and BOND Research Detection 2 System . . . . . . . . . . . . 21
BOND Research Detection 2 System . . . . . . . . . . . . . . . . . . . . . . . . . . . . . . . . . . . . . . . . 21
Ancillary Reagents . . . . . . . . . . . . . . . . . . . . . . . . . . . . . . . . . . . . . . . . . . . . . . . . . . . . . . 23
Step 4: Label and Process Slides on Leica BOND RX . . . . . . . . . . . . . . . . . . . . . . . . . . . . . . . 26
Label and Load Slides . . . . . . . . . . . . . . . . . . . . . . . . . . . . . . . . . . . . . . . . . . . . . . . . . . . 26
Unload Slides and Reagents . . . . . . . . . . . . . . . . . . . . . . . . . . . . . . . . . . . . . . . . . . . . . . 29
Contents
ii
Step 5: Mount and View Slides . . . . . . . . . . . . . . . . . . . . . . . . . . . . . . . . . . . . . . . . . . . . . . 30
Mounting Slides . . . . . . . . . . . . . . . . . . . . . . . . . . . . . . . . . . . . . . . . . . . . . . . . . . . . . . . 30
Assessing Pretreatment Conditions . . . . . . . . . . . . . . . . . . . . . . . . . . . . . . . . . . . . . . . . . 31
Analyzing Target Expression . . . . . . . . . . . . . . . . . . . . . . . . . . . . . . . . . . . . . . . . . . . . . . 33
Chapter 6
Troubleshooting . . . . . . . . . . . . . . . . . . . . . . . . . . . . . . . . . . . . . . . . . . . . . . 35
Contacting Technical Support . . . . . . . . . . . . . . . . . . . . . . . . . . . . . . . . . . . . . . . . . . . . . . . 35
Weak or No Signals . . . . . . . . . . . . . . . . . . . . . . . . . . . . . . . . . . . . . . . . . . . . . . . . . . . . . .35
Poor Cell Morphology/Weak Hematoxylin Staining . . . . . . . . . . . . . . . . . . . . . . . . . . . . . . . 37
Tissue Detachment From Slide . . . . . . . . . . . . . . . . . . . . . . . . . . . . . . . . . . . . . . . . . . . . . . 37
Areas of Tissue Devoid of Red or Hematoxylin Staining . . . . . . . . . . . . . . . . . . . . . . . . . . . .38
Diffused Signals . . . . . . . . . . . . . . . . . . . . . . . . . . . . . . . . . . . . . . . . . . . . . . . . . . . . . . . . . 38
High Background or Nuclear Staining . . . . . . . . . . . . . . . . . . . . . . . . . . . . . . . . . . . . . . . . . 39
High Non-Specific Binding on Glass Slide . . . . . . . . . . . . . . . . . . . . . . . . . . . . . . . . . . . . . . 40
Hematoxylin and/or Red Stain on Covertile . . . . . . . . . . . . . . . . . . . . . . . . . . . . . . . . . . . . . 40
Appendix A
Additional Optimization Strategies . . . . . . . . . . . . . . . . . . . . . . . . . . . . . . . 41
Appendix B
Registering a ViewRNA eZ Detection Kit . . . . . . . . . . . . . . . . . . . . . . . . . . . 43
ViewRNA eZ Assay Reagents . . . . . . . . . . . . . . . . . . . . . . . . . . . . . . . . . . . . . . . . . . . . . . . . 43
Registering BOND Research Detection 2 Reagents . . . . . . . . . . . . . . . . . . . . . . . . . . . . . . . . 44
Registering Ancillary Reagents . . . . . . . . . . . . . . . . . . . . . . . . . . . . . . . . . . . . . . . . . . . . . . 46
Pairing a Staining Protocol With BOND Research Detection 2 . . . . . . . . . . . . . . . . . . . . . . . 47
Appendix C
Creating a New Enzyme Protocol . . . . . . . . . . . . . . . . . . . . . . . . . . . . . . . . . 49
Appendix D
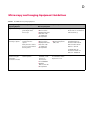
Microscopy and Imaging Equipment Guidelines . . . . . . . . . . . . . . . . . . . . 51
Appendix E
Reagent Preparation Volumes . . . . . . . . . . . . . . . . . . . . . . . . . . . . . . . . . . . 53
1
Introduction
About This Manual
This manual provides basic instructions for automating the in situ detection of RNA in formalin-fixed
paraffin-embedded (FFPE) samples using the ViewRNA™ eZ Assay and the Leica BOND RX instrument.
It also covers guidelines on sample preparation, pretreatment optimization, and assay protocol setup.
Please refer to the Leica BOND RX User Manual (Rev. A01 issued August 2011) for detailed instructions
on operating the Leica BOND RX instrument and using the Leica BOND RX software.
Assay Overview
In situ hybridization (ISH) techniques are often used to visualize DNA or localize RNAs within cells and
tissues. However, these assays are usually cumbersome as well as time-consuming, and when performed
manually, are not amenable to high-throughput processing and are prone to inconsistencies due to
operational errors.
The ViewRNA eZ Assay—an ISH assay based on highly specific third generation branched DNA signal
amplification technology and automated on the Leica BOND RX instrument—provides improved slideto-slide and run-to-run reproducibility while offering higher throughput capability with the convenience
of walk away automation.
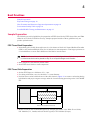
General Assay Workflow
Figure 1.1 illustrates the assay workflow and Table 1.1 explains the assay steps.
Figure 1.1 ViewRNA eZ Assay Workflow
2
ViewRNATM eZ Assay Manual
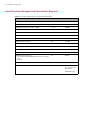
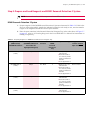
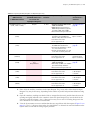
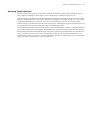
Table 1.1 ViewRNA eZ Assay Workflow
Assay Step
Typical Schedule
Prepare reagents and samples.
Start at 1:00 PM
Day 1
Description
Start overnight run on BOND RX.
Start at 4:00 PM
Day 1
End of run on BOND RX.
8:00 AM
Day 2
Bake FFPE tissue sections at 60 °C to increase adhesion to glass slide.
Pre-warm. ViewRNA eZ Detection reagents.
Check Leica BOND RX bulk reagents.
Prepare freshly made probes, proteinase K, and AMP 4.
Create or select saved user-specific ViewRNA eZ protocol.
Insert ViewRNA eZ Detection reagents.
Select delay start time and note when the run will end.
Start run.
Run finished.
Remove samples within 30 minutes of run end.
Rinse slides with water and air dry to 30 minutes at room
temperature.
Coverslip tissue sections.
9:00 AM
Day 2
Coverslip slides using the recommended organic or aqueous
mounting solution.
View samples.
10:00 AM
Day 2
View and analyze samples at 10 – 40x on a standard pathology grade
microscope.
Table 1.2 Performance Highlights
Specification
Description
Sample Types
Formalin-fixed paraffin-embedded (FFPE) sections.
19 x 46 mm assay area on a standard 25 x 75 mm glass slide.
FFPE tissue thickness: 5 ± 1 μM
FFPE tissue microarray (TMA): > 1 mm diameter and 5 ± 1 μM thickness
Sensitivity
Single RNA molecule per dot
RNA Stain
Red dot
Nuclear Stain
Hematoxylin
Instruments
Leica BOND RX instrument
Bright-field microscope or scanner.
2
Safety
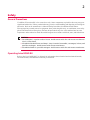
General Precautions
ViewRNA eZ Detection Kit is for research use only. Some components required for this assay may pose
significant health risks. Follow prudent laboratory practices when handling and disposing of carcinogens
and toxins. Refer to the manufacturer’s Material Safety Data Sheet for additional information.
Wear appropriate personal protective equipment when performing this assay. At a minimum, wear safety
glasses and chemical resistant gloves. Perform all procedural steps in a well-ventilated area at room
temperature unless otherwise noted. Discard all reagents in accordance with local, state, and federal laws.
CAUTION:
Formaldehyde is a poison and an irritant. Avoid contact with skin and mucous membranes.
Use in a fume hood.
ViewRNA eZ Probe Diluent and Amp 1– Amp 3 contain formamide, a teratogen, irritant, and
possible carcinogen. Avoid contact with mucous membranes.
ViewRNA eZ DAPI is a possible mutagen. Avoid contact with skin and mucous membranes.
Operating Leica BOND RX
Refer to the Leica BOND RX User Manual for information about chemical and mechanical hazards,
electrical hazards, and additional cautionary information.
4
ViewRNATM eZ Assay Manual
3
Reagents, Consumables, and Equipment Required
Affymetrix Reagents Required
Leica Biosystems Reagents and Consumables Required on page 6
Additional Reagents and Consumables Required on page 7
Equipment Required on page 7
The ViewRNA™ eZ Assay is intended for use on the Leica BOND RX instrument ONLY. The assay
protocol has been optimized and validated using the reagents, consumables, and equipment listed in this
chapter. For optimal results, we strongly recommend that you adhere to the described protocol without
any deviations, and when specified, do not substitute materials or suppliers.
Affymetrix Reagents Required
The ViewRNA eZ Detection Kit–1-Plex is compatible with TYPE 1 Probe Sets (sold separately) and is
configured for processing 90 slides in five experimental runs. If the kit is used for more than five
experimental runs, its capacity will be less than 90 slides. Table 3.1 lists the kit components and their
recommended storage conditions.
Refer to the Package Insert for quantities of individual components supplied. The kit is shipped in one
box and has a shelf life of six months from the date of delivery when stored as recommended.
Table 3.1 Affymetrix Reagents Required
Item
Storage
ViewRNA eZ Detection Kit–1-Plex (90 slides)
Part Number
QVR0001
Amp 1
2 – 8 °C
Amp 2
2 – 8 °C
Amp 3
2 – 8 °C
Amp 4, 500X
2 – 8 °C
Amp 4 Diluent
2 – 8 °C
Red 1
2 – 8 °C
Red 2
2 – 8 °C
Rinse
2 – 8 °C
Probe Diluent
2 – 8 °C
Color-coded Labels
ViewRNA TYPE 1 Probe
–20 °C
Various*
ViewRNA eZ Probes
–20 °C
Various*
ViewRNA eZ DAPI (optional for fluorescence detection only)
2 – 8 °C
QVR0502
ViewRNA eZ Control Kit (optional)
See product insert.
QVR0503
ViewRNA eZ Check (optional)
–20 °C
Various*
*Visit our website at www.affymetrix.com to view available probes or to order probes custom-made to your target.
6
ViewRNATM eZ Assay Manual
Leica Biosystems Reagents and Consumables Required
Table 3.2 Leica Biosystems Reagents and Consumables Required
Item
Storage
Part Number
BOND Dewax Solution
2 – 8 °C
AR9222
BOND Epitope Retrieval Solution 1 (ER1)
2 – 8 °C
AR9961
BOND Epitope Retrieval Solution 2 (ER2)
2 – 8 °C
AR9640
BOND Enzyme Pretreatment Kit
2 – 8 °C
AR9551
BOND Wash Solution 10X Concentrate
2 – 8 °C
AR9590
Novocastra Hematoxylin (two bottles)
2 – 8 °C
RE7107-CE
BOND Aspirating Probe Cleaning Kit
2 – 8 °C
CS9100
BOND Universal Covertiles
RT
S21.2001
BOND Slide Trays
RT
S21.0304
BOND Reagent Trays
RT
S21.1003
BOND Open Containers – 30 ml
RT
OPT309700
BOND Mixing Stations
RT
S21.1971
BOND Research Detection 2
Six standard 30 mL BOND Open Containers in reagent
tray
Barcode
RT
DS9777
BOND Slide Labels and Printer Ribbon
RT
S21.4564
White X-tra® Slides Case, 1mm
RT
3800200
(U.S., Canada, and
Asia Pacific)
3800210 (Europe)
Chapter 3 | Reagents, Consumables, and Equipment Required
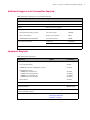
Additional Reagents and Consumables Required
Table 3.3 Additional Reagent and Consumables Required
Item
Supplier
Part Number
10% Neutral Buffered Formalin (NBF)
Fisher Scientific
SF98-4
100% Ethanol
VWR
89125-188
Xylene
Major Laboratory Supplier
Mounting Media
HistoMount Mounting Solution
Life Technologies
00-8030
Fluoromount/Plus™
Diagnostic BioSystems
K048
ADVANTAGE Mounting Media
Innovex Biosciences
NB300
Affymetrix
QVC05001
VWR
48382-138
Cover Glass, 24 x 55 mm
Double-Distilled Water (ddH20)
Major Laboratory Supplier
Equipment Required
Table 3.4 Equipment Required
Equipment
Supplier
Leica BOND RX Instrument
Leica Biosystems
Part Number
Processing Module(s)
21.2701
BOND RX Controller with BDZ 6.0 Software
S21.4574
Handheld ID Scanner
BOND Sys Cont Add Kit–US
BOND Sys Cont Add Kit–AUS
BOND Sys Cont Add Kit–UK
BOND Sys Cont Add Kit–EUR
21.1997.F
21.1995.G
21.1996.G
21.1998.G
Slide Labeler
S21.2012
Fume Hood
Major Laboratory Supplier
Dry incubator or oven capable of maintaining 60 °C
(for baking slides)
Affymetrix or equivalent
Water Bath, capable of maintaining 40 °C
(for pre-warming reagents)
Major Laboratory Supplier
Microscope and Imaging Equipment
See Appendix D, Microscopy
and Imaging Equipment
Guidelines on page 51.
QS0704 (120V)
QS0714 (220V)
7
8
ViewRNATM eZ Assay Manual
4
Best Practices
Sample Preparation
Experiment Design on page 10
Heat Treatment and Proteinase Digestion Optimization on page 10
Pretreatment Lookup Table on page 10
Leica BOND RX Cleaning and Maintenance on page 12
Sample Preparation
The following are critical guidelines for preparation of FFPE tissue blocks, FFPE tissue slides, and TMA
slides for use with the ViewRNA eZ Assay. Samples prepared outside of these guidelines may not
produce optimal results.
FFPE Tissue Block Preparation
Immediately place freshly dissected tissues in ≥ 20 volumes of fresh 10% Neutral Buffered Formalin
(NBF) or 4% paraformaldehyde (PFA) for 16-24 hours at room temperature. Trim larger specimens to
≤ 3 mm thickness to ensure faster diffusion of the fixative into the tissue.
NOTE: Fix dissected tissue immediately to prevent RNA degradation. If this is not possible, it
is critical that the tissue be placed on dry ice or in liquid nitrogen until fixation.
Rinse, dehydrate, and embed in paraffin block.
Store FFPE tissue blocks at room temperature.
FFPE Tissue Slide Preparation
Section FFPE tissue to a thickness of 5 ± 1 µm.
If working with TMAs, core size should be > 1.0 mm diameter.
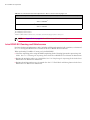
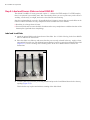
Position tissue sections within the area of the slide shown in Figure 4.1 to ensure even heating during
hybridization and proper reagent coverage under the Covertile during processing on the Leica BOND
RX.
Figure 4.1 Correct Tissue Section Placement on Glass Slide
3 mm
12 mm
7 mm
3 mm
Place tissue sections in this area
Mount sections on the recommended positively-charged glass slides: Leica White X-tra® Slides,
P/N 3800200 (U.S., Canada, and Asia Pacific regions) or P/N 3800210 (Europe).
10 ViewRNATM eZ Assay Manual
Air dry freshly mounted sections at room temperature overnight or at 37 °C for five hours.
Bake slides at 60 °C for one hour to immobilize tissue sections.
Short-term storage – Store sections in a slide box at room temperature for up to two weeks.
Long term storage – Store sections in a slide box at -20 °C for up to one year.
Slides can be shipped at the same temperature as their storage temperature.
Experiment Design
Assay Controls
In addition to using biological controls during assay implementation, we recommend running positive
and negative assay control slides , based on your sample type, in every ViewRNA eZ Assay (Table 4.1).
This will allow you to qualify and interpret your results with greater confidence.
Table 4.1 Recommended Assay Controls
Assay Control
Uses
Negative Control
Assess assay background (typically,
less than 1 dot per 3 cells).
Choose one of the following negative control options:
Run bacterial gene dapB.
Run no probe.
Run probe set known NOT to be present in your tissue samples.
Positive Control 1
Check RNA integrity.
Check for proper unmasking within a
run.
Optimize tissue pre-treatment,
particularly when expression of the
gene of interest is not known.
Run ViewRNA eZ Check. These products, available separately from
Affymetrix, provide a pooled panel of probes for housekeeping
genes (encoding GAPDH, cyclophilin B, and beta-actin) and are
available for human, mouse or rat. Follow the instructions in the
package insert.
Check Leica BOND RX performance
for the ViewRNA eZ Assay.
Check operator proficiency at
running the ViewRNA eZ Assay on
Leica BOND RX.
Check ViewRNA eZ Detection Kit
during a run.
Run ViewRNA eZ Control Kit. This product, available separately
from Affymetrix, provides certified FFPE rat kidney tissue sections
on microscope slides and ViewRNA TYPE 1 probes for rat Spp1, rat
Arbp, and B subtilis dapB. The package insert includes instructions
for use and example expected results.
Positive Control 2
Recommended Action
Heat Treatment and Proteinase Digestion Optimization
The pretreatment of tissue sections is critical for the success of all in situ assays. For the ViewRNA eZ
Assay, pretreatment consists of heat treatment and proteinase digestion. These pretreatment steps help
unmask the RNA targets, allowing for better probe accessibility and thereby increasing assay signal.
However, excessive pretreatment can have a negative effect on tissue morphology. Thus, we recommend
using either the tissue- or time-preserving approach below, to optimize the pretreatment conditions on
the Leica BOND RX when:
Changing from the manual ViewRNA ISH Tissue Assay to the automated ViewRNA eZ Assay.
Performing the ViewRNA eZ Assay with a new tissue type.
Once optimal pretreatment conditions are determined for a particular tissue, they can generally be used
for most targets within that tissue. If the transcript is very rare or expressed at an extremely low level,
the optimal pretreatment condition may need to be one that favors signal over morphology.
Pretreatment Lookup Table
Please visit our website and refer to the View RNA eZ Assay Pretreatment Lookup Table for an updated
list of heat treatment and proteinase conditions. These conditions are optimal for several tissue types
prepared according to the recommended guidelines in this manual using 10% NBF.
Chapter 4 | Best Practices
11
Time-Preserving Pretreatment Optimization Procedure
Use this optimization procedure if tissue sample is abundant and time is a limiting factor.
1. Obtain 12 FFPE tissue sections. See Sample Preparation on page 9 for guidelines.
2. Process slides using the ViewRNA eZ Assay on the Leica BOND RX with the Heat and Proteinase
Treatments shown in Table 4.2. See Appendix C on page 49 for instructions on creating a custom
Enzyme protocol.
For each condition, run both a negative and a positive control. See Chapter 5, ViewRNA eZ Assay
Protocol on page 13 for processing instructions.
3. Evaluate results and determine the pretreatment conditions that yield optimal assay signal and tissue
morphology (as assessed by good hematoxylin staining) with minimal background or artifacts (see
Table 5.5 on page 32).
Table 4.2 Recommended Pretreatment Optimization Grid for Time-Preserving Approach
Heat Treatment
(10 minutes)
ViewRNA HIER1
at 95 °C with
ER12
ViewRNA HIER at
90 °C with ER23
1HIER
Proteinase Treatment (20 minutes)
ViewRNA Enzyme 1
(1:500 dilution recommended)
ViewRNA Enzyme 2
(1:1000 dilution recommended)
ViewRNA Enzyme 3
(1:2000 dilution recommended)
Slide 1 – No Probe
Slide 3 – No Probe
Slide 5 – No Probe
Slide 2 – HKG Mix4
Slide 4 – HKG Mix
Slide 6 – HKG Mix
Slide 7 – No Probe
Slide 9 – No Probe
Slide 11 – No Probe
Slide 8 – HKG Mix
Slide 10 – HKG Mix
Slide 12 – HKG Mix
– Heat-induced epitope retrieval
2ER1
– BOND Epitope Retrieval Solution 1
3ER2
– BOND Epitope Retrieval Solution 2
4HKG
Mix – ViewRNA eZ Check for human, mouse, or rat samples, pooled housekeeping gene probes for other species.
Tissue-Preserving Pretreatment Optimization Procedure
Use this optimization procedure if tissue sample is a limiting factor.
1. Obtain four FFPE tissue sections. See Sample Preparation on page 9 for guidelines.
2. Process slides using the ViewRNA eZ Assay on the Leica BOND RX with the Heat and Proteinase
Treatments shown in Table 4.3. See Appendix C on page 49 for instructions on creating a custom
Enzyme protocol.
For each condition, run both a negative and a positive control. See Chapter 5, ViewRNA eZ Assay
Protocol on page 13 for processing instructions.
3. Evaluate results and determine the pretreatment conditions that yield optimal assay signal and tissue
morphology (as assessed by good hematoxylin staining) with minimal background or artifacts.
12 ViewRNATM eZ Assay Manual
Table 4.3 Recommended Pretreatment Optimization Grid for Tissue-Preserving Approach
Heat Treatment (10 minutes)
Proteinase Treatment (10 minutes, 1:1000 dilution recommended)
ViewRNA HIER1 at 95 °C with ER12
Slide 1 – No Probe
Slide 2 – HKG Mix4
ViewRNA HIER at 90 °C with ER23
Slide 3 – No Probe
Slide 4 – HKG Mix
1HIER
– Heat-induced epitope retrieval
2ER1
– BOND Epitope Retrieval Solution 1
3ER2
– BOND Epitope Retrieval Solution 2
4HKG
Mix – ViewRNA eZ Check for human, mouse, or rat samples, pooled housekeeping gene probes for other species.
NOTE: See Appendix A on page 41 for additional optimization strategies.
Leica BOND RX Cleaning and Maintenance
Perform cleaning and maintenance tasks, including refilling and emptying bulk containers, as instructed
in 11.1 Cleaning and Maintenance Schedule in the Leica BOND RX User Manual.
When performing ViewRNA eZ Assay on Leica BOND RX:
Clean the aspirating probe using the BOND Aspirating Probe Cleaning System after processing 100
slides. See 11.6.1 Cleaning the Aspirating Probe in the Leica BOND RX User Manual for instructions.
Replace the aspirating probe every 1000 slides. See 11.6.2 Replacing the Aspirating Probe in the Leica
BOND RX User Manual for instructions.
Replace the mixing station every six months. See the 11.7 Wash Block and Mixing Station in the Leica
BOND RX User Manual for instructions.
5
ViewRNA eZ Assay Protocol
This chapter provides instructions for automating the ViewRNA™ eZ Assay on the Leica BOND RX. The
workflow steps include:
Step 1: Getting Started
Step 2: Create a Study and Add Slides
Step 3: Prepare and Load Reagents and BOND Research Detection 2 System on page 21
Step 4: Label and Process Slides on Leica BOND RX on page 26
Step 5: Mount and View Slides on page 30
Step 1: Getting Started
1. Bake slides at 60 °C for one hour.
2. Pre-warm Probe Diluent , Amp 1, Amp 2, Amp 3, and Amp 4 Diluent from the ViewRNA eZ
Detection Kit to 40 °C.
3. Confirm Leica BOND RX cleaning and maintenance tasks have been performed, including refilling
and emptying bulk containers.
4. Turn on the Leica BOND RX processing module (instrument), log onto the computer, and initialize
the Leica BOND RX software.
5. Ensure that the Slider Labeler has labels.
6. Ensure that the new ViewRNA eZ Detection Kit has been configured and registered into inventory
before proceeding to Step 2. See Appendix B, Registering a ViewRNA eZ Detection Kit on page 43
for instructions.
Step 2: Create a Study and Add Slides
Creating a Study
See 6.3 Working With Studies in the Leica BOND RX User Manual for additional information about
creating and managing studies.
1. Start the Leica BOND RX software.
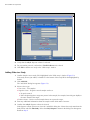
2. Click the
icon to open the "Slide setup" window (Figure 5.1).
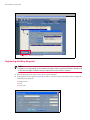
3. Click Add study and enter information relevant to the experiment (Figure 5.1):
Study ID – required.
Study name – optional.
Study comments – optional.
Select a researcher name – optional.
To add a new name to the Researcher list:
A. Click Researchers list and select New.
B. Enter the new researcher Name in the "Edit Researcher" window that appears. Click Save and OK.
14 ViewRNATM eZ Assay Manual
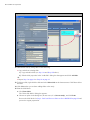
Figure 5.1 Add a Study
4. Verify that the 150 µL dispense volume is selected.
5. For preparation protocol, confirm that *ViewRNA Dewax 1 is selected.
6. Click OK to add the new study to the "Slide setup" window.
Adding Slides to a Study
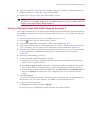
1. Confirm that the correct study ID is highlighted in the "Slide setup" window (Figure 5.2).
If the study ID was just added, it should be at the bottom of the study ID list and highlighted by
default.
2. Click Add slide.
The "Add slide" dialog box appears (Figure 5.2).
3. Select a tissue type.
Test tissue – Test samples.
Negative tissue – Negative control samples such as a:
No probe control.
Probe designed against a target not present in the sample (for example, bacterial gene dapB) or
the sense strand of the target.
Positive tissue – Positive control sample known to express the target.
4. Enter any additional information about the sample on this slide under Comments.
5. Confirm that 150 µL dispense volume is selected.
If the dispense volume is incorrect, close the "Add slide" dialog box. Choose the study name from the
Study ID list and click Edit Study. Select the 150 µL dispense volume in the dialog box that appears.
Restart at Step 2.
Chapter 5 | ViewRNA eZ Assay Protocol
15
Figure 5.2 Slide Setup Window
Slides will be added
to the selected study
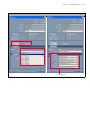
6. For Staining mode, select Single from the drop-down list (Figure 5.4).
7. For Process, choose ISH and select a Probe (Affymetrix) to be applied on this slide from the Marker
drop-down list (for example, HKG Pan shown in Figure 5.4).
16 ViewRNATM eZ Assay Manual
To add a custom probe name to the Marker List:
A. Click the
icon to open the "Reagent setup" window (Figure 5.3).
B. Click Add to open the "Add reagent" window. Enter the Name of the probe and enter "Affymetrix"
for Supplier. Choose RNA for Probe Type.
C. Choose the Staining and Hybridization protocols to be associated with the probe. See Table 5.1
on page 18 for options and descriptions. Click Save.
NOTE: Once entered and saved, the protocols associated with a specific probe are the
defaults that appear during the slide setup process, unless changed.
Figure 5.3 Adding a Custom Probe Name to the Marker List
8. Select the appropriate protocols for Staining, Preparation, HIER (Heat-induced epitope retrieval),
Enzyme (proteinase), and Hybridization (Figure 5.4). See Table 5.1 on page 18 for information about
the protocols. See Appendix Con page 49 for instructions on creating a custom Enzyme protocol.
Chapter 5 | ViewRNA eZ Assay Protocol
Figure 5.4 Select Probe (Affymetrix) Protocol
Processing steps
17
18 ViewRNATM eZ Assay Manual
Table 5.1 ViewRNA eZ Processing Step Protocols on Leica BOND RX
Processing Step
Select
Description
Staining
*ViewRNA 1 - FFPE
Affymetrix® ViewRNA eZ Assay, FFPE protocol 1.a
*ViewRNA 2
Affymetrix® ViewRNA eZ Assay, Alternate 2.b
*ViewRNA 3
Affymetrix® ViewRNA eZ Assay, Alternate 3.b
*ViewRNA Dewax 1
Dewax protocol for Affymetrix ViewRNA eZ Assay (15 min
drying). This is the default and recommended protocol for FFPE
sections.
*ViewRNA Dewax 2
Dewax protocol for Affymetrix ViewRNA eZ Assay (5 min drying);
for TMA or small FFPE sections.
*ViewRNA Dewax 3
Dewax protocol for Affymetrix ViewRNA eZ Assay (20 min
drying); for larger sections requiring longer drying time.
*ViewRNA 10 min, ER1 (95)
10 minute heat treatment using ER1 at 95 °C for Affymetrix
ViewRNA eZ Assay.
*ViewRNA 10 min with ER2 (90)
10 minute heat treatment using ER2 at 90 °C for Affymetrix
ViewRNA eZ Assay.
*ViewRNA enzyme 1 (20)
20 minute proteinase pretreatment for Affymetrix ViewRNA eZ
Assay.
*ViewRNA enzyme 2 (20)
20 minute proteinase pretreatment for Affymetrix ViewRNA eZ
Assay.
*ViewRNA enzyme 3 (20)
20 minute proteinase pretreatment for Affymetrix ViewRNA eZ
Assay.
Denaturation
*_ _ _ _
The Denaturation step is never used in the ViewRNA eZ Assay.
Hybridization
*ViewRNA Probe Hybridization (3hr)
3 hour probe hybridization.
Preparation
HIER (heat-induced
epitope retrieval)
Enzyme
aThe
default protocol for FFPE sections that is detailed in this manual.
bThe
use of this protocol will be addressed in an Application Note.
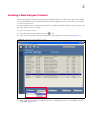
9. Verify once more that the correct processing protocols have been selected, based on your sample type.
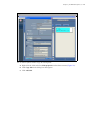
10. Click Add slide.
The slide appears in the "Slide setup" window (Figure 5.5).
Chapter 5 | ViewRNA eZ Assay Protocol
Figure 5.5 Slide Added to the Selected Study
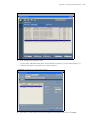
11. To add a replicate slide or copy an existing slide:
A. Right-click the slide and select Slide properties on the shortcut menu (Figure 5.6).
B. Click Copy slide in the dialog box that appears.
C. Click Add slide.
19
20 ViewRNATM eZ Assay Manual
Figure 5.6 Copy a Slide
12. Add another slide by doing either of the following:
Copy and edit an existing slide:
1) Copy and add a slide (see Step 11A and Step 11B above).
2) Edit the slide properties in the "Add slide" dialog box that appears and click Add slide.
OR
Repeat Step 2 on page 14 to Step 10 on page 18.
13. To delete a slide, right-click the slide and select Delete slide on the shortcut menu. Click Yes to delete
the slide.
14. Click Close when you are done adding slides to the study.
15. Print the slide labels:
A. Click Print labels.
The "Print slide labels" dialog box appears.
B. Choose an option in the dialog box (in most cases, it is Current study), and click Print.
Reserve the slide labels for Step 4: Label and Process Slides on Leica BOND RX on page 26 and
proceed to reagent preparation.
Chapter 5 | ViewRNA eZ Assay Protocol
21
Step 3: Prepare and Load Reagents and BOND Research Detection 2 System
NOTE: Do not mix and match kit components from different lots.
BOND Research Detection 2 System
1. Prepare reagents for the BOND Research Detection 2 System as instructed in Table 5.2. If this is the
first use of the registered kit, transfer the indicated volume for each ready-to-use, one-time transfer
reagent to its designated and labeled 30 mL Open container.
2. Place the open containers in the Research Detection 2 Reagent Tray in the order shown in Figure 5.7
on page 22. Also see 8.5 Loading Reagents in the Leica BOND RX User Manual for instructions on
loading a reagent tray.
Table 5.2 Preparing Reagents for BOND Research Detection 2 Reagent Tray
Reagent Name
(Abbreviation)
in BOND RX Software
Reagent Name
(ViewRNA eZ Detection
Kit Includes the
Highlighted Reagents)
Label Name
and Color
Position in
BOND
Research
Detection 2
Tray
*ViewRNA Amp 1
(*VA1)
Amp 1
A1 – Black
1
Preparation /Usage
*ViewRNA Amp 2
(*VA2)
Amp 2
A2 – Black
2
*ViewRNA Amp 3
(*VA3)
Amp 3
A3 – Black
3
*ViewRNA Hematoxylin
(*VHx)
Hematoxylin
H – Blue
4
Reagent Volume to
Transfer to 30 mL
Open Container
Entire content
Ready to use, onetime transfer.
Pre-warm to 40 °C
for one hour, invert
gently to mix before
transfer.
Store capped at 4 °C.
Entire content
Ready to use, onetime transfer.
Pre-warm to 40 °C
for one hour, invert
gently to mix before
transfer.
Store capped at 4 °C.
Entire content
Ready to use, onetime transfer.
Pre-warm to 40 °C
for one hour, invert
gently to mix before
transfer.
Store capped at 4 °C.
Ready to use, one30 mL
time transfer.
Store capped at 4 °C.
22 ViewRNATM eZ Assay Manual
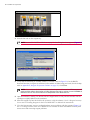
Figure 5.7 Research Detection 2 Tray – ViewRNA eZ Kit Reagents
3. Scan the bar code on the reagent tray.
NOTE: Do not click "Refill" or "Mark as empty" in the dialog box that appears (Figure 5.8)
Figure 5.8 Reagent System Inventory Details
4. Verify that the remaining or available volume ("Vol (ml)" value in Figure 5.8) for the BOND
Research Detection 2 reagents is sufficient for the number of slides being processed. (See the lookup
table in Appendix E, Reagent Preparation Volumes on page 53.) Click Close.
NOTE: If the volume of the Research Detection 2 system is low or insufficient, you will
need to either reduce the number of slides being processed or register a new ViewRNA eZ
Detection Kit. Do not refill and/or mix components from different kits.
5. Open all containers, making sure that the lids are snapped back securely and the barcodes near the
openings are tightly adhered to the containers.
6. Insert the reagent tray into the deck for the system to verify the volumes. See 8.3 Reagent Inventory
Screen and 8.5 Loading Reagents in the Leica BOND RX User Manual for instructions.
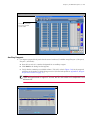
7. View the System status screen to confirm that there are no problems with the reagents (Figure 5.9).
See 5.1.3 Reagent Status in the Leica BOND RX User Manual for more information on the System
status screen and correcting reagent problems.
Chapter 5 | ViewRNA eZ Assay Protocol
23
Figure 5.9 System Status Screen
Click a tab to view the
processing module
system status
Ancillary Reagents
1. For reagents prepared fresh just before the start of each run (ViewRNA Amp4, Enzyme 1, Enzyme 2,
Enzyme 3, and Probe):
A. Scan the bar code of a container designated for an ancillary reagent.
B. Click Refill in the dialog box that appears.
C. Verify that the remaining or available volume ("Vol (ml)" value in Figure 5.10) for the reagent is
sufficient for the number of slides being processed. (See the lookup table in Appendix E, Reagent
Preparation Volumes on page 53.)
NOTE: If the volume is low or insufficient, you will need to either reduce the number of
slides being processed or register a new kit. Do not refill and/or mix components from
different kits.
Figure 5.10 Reagent Inventory Details
24 ViewRNATM eZ Assay Manual
D. Repeat Step A to Step C for each reagent prepared fresh before each run. Click Close in the dialog
box after all of the reagent volumes are verified.
2. For ready-to-use, one-time transfer reagents (ViewRNA Fix, Rinse, Red 1, Red 2, and DAPI):
A. Scan the bar code of a container designated for an ancillary reagent.
B. Do not click Mark as empty or Refill in the dialog box that appears (Figure 5.10).
C. Verify that the remaining or available volume ("Vol (ml)" value in Figure 5.10) for the reagent is
sufficient for the number of slides being processed. (See the lookup table in Appendix E, Reagent
Preparation Volumes on page 53.)
NOTE: If the volume is low or insufficient, you will need to either reduce the number of
slides being processed or register a new kit. Do not refill and/or mix components from
different kits.
D. Repeat Step A to Step C for each ready-to-use, one-time transfer reagent. Click Close in the dialog
box after all of the reagent volumes are verified.
3. Prepare and transfer the reagents to BOND containers following the instructions in Table 5.3 on
page 25. If this is the first use of the registered kit, transfer the indicated volume for each ready-touse, one-time transfer reagent to its designated and labeled 30 mL Open container. See the lookup
table in Appendix E, Reagent Preparation Volumes on page 53 for the required volumes of of
proteinase, Amp 4, and probe, based on the number of slides being processed.
Chapter 5 | ViewRNA eZ Assay Protocol
25
Table 5.3 Preparing Ancillary Reagents for Open Reagent Tray
Reagent or Container Name
Reagent Name
(Abbreviation)
(ViewRNA eZ Detection
in BOND RX Software
Kit includes the
Highlighted Reagents)
*ViewRNA Enzyme 1, 2, or 3
(*VA1, *VA2 or *VA3)
Enzyme
Label Name Preparation/Usage
and Color
E – Red
*ViewRNA Fix
(*VFix)
Fix
F – Blue
*ViewRNA Probe 1
(*VP1)
ViewRNA Probe
P – Green
*ViewRNA Rinse
(*VRinse)
Rinse
R – Blue
*ViewRNA Amp 4
(*VA4)
Amp 4, 500X
and
Amp 4 Diluent
A4 – Red
*ViewRNA Red 1
(*VR1)
Red 1
R1 – Blue
*ViewRNA Red 2
(*VR2)
Red 2
R2 – Blue
*ViewRNA DAPI
(*DAPI)
DAPI (optional)
D – Blue
Reagent Volume
to Transfer to a
Container
Prepare fresh just before the See Appendix E on
page 53.
start of each run.
BOND Enzyme Concentrate in
BOND Enzyme Diluent (typically
at 1:500, 1:1000, and 1:2000).
Discard unused reagent after run.
Ready to use 10% NBF (not
20 mL to a 30 mL
included in the ViewRNA eZ
Open container.
Detection Kit). One-time transfer.
Use within six months.
Store capped at 4 °C.
Dilute 1:20 in pre-warmed
ViewRNA eZ Probe Diluent.
Pre-warm Probe Diluent to 40 °C
for one hour before use.
Prepare working dilution on day
of use and avoid using leftover.
See Appendix E on
page 53.
Ready to use, one-time transfer.
Use within six months.
Store capped at 4 °C.
Entire content
(fill three 30 mL
Open containers).
Prepare fresh just before the See Appendix E on
start of each run.
page 53.
Dilute Amp 4, 500X stock 1:500 in
pre-warmed Amp 4 Diluent.
Discard unused reagent after run.
Ready to use, one-time transfer.
Use within six months.
Store capped at 4 °C.
Entire content to
a 30 mL Open
container.
Ready to use, one-time transfer.
Use within six months.
Store capped at 4 °C.
Entire content to
a 30 mL Open
container.
Ready to use, one-time transfer.
Use within six months.
Store capped at 4 °C.
Entire content to
a 30 mL Open
container.
4. Place all of the ancillary containers in the Open Reagent Tray, in any order. More than one Open
Reagent Tray may be necessary, depending on the number of probes and proteinase dilutions being
used.
5. Open all containers, making sure that the lids are snapped back securely and the barcodes near the
openings are tightly adhered to the containers. Insert the Open Reagent Tray into the deck for the
system to verify the volumes. See 8.3 Reagent Inventory Screen and 8.5 Loading Reagents in the
Leica BOND RX User Manual for instructions.
6. View the System status screen to confirm that there are no problems with the reagents (Figure 5.9 on
page 23). See 5.1.3 Reagent Status in the Leica BOND RX User Manual for more information on the
System status screen and correcting reagent problems.
26 ViewRNATM eZ Assay Manual
Step 4: Label and Process Slides on Leica BOND RX
The default ViewRNA eZ Assay protocols require 9 – 10 hours for FFPE samples. For FFPE samples,
there is an optional "system delay start" that conveniently allows you to set up the assay at the end of a
workday, run the assay overnight, and retrieve the slides the next morning.
Start the run immediately or use the “System Delay Start” feature to ensure that processed slides can be
removed within 30 minutes of assay completion. Please schedule the run so that the:
Run delay is no longer than six hours.
Processed slides can be removed within 30 minutes after assay completion to avoid deterioration of the
hematoxylin signal and tissue morphology.
Label and Load Slides
1. Apply the printed labels to the frosted area of the slides. See 6.5 Slide Labeling in the Leica BOND
RX User Manual for instructions.
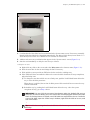
2. Place the slides in a slide tray and ensure that they are correctly oriented in the tray. Apply a clean,
unscratched Covertile over each slide and ensure that the Covertile is correctly positioned on the slide
(Figure 5.11). See 6.6 Loading and Unloading Slides in the Leica BOND RX User Manual for
instructions.
Figure 5.11 Correct Placement of Covertile Over Slide
3. Load the slide tray(s) into the processing module and press the Load/Unload button below the tray
opening (Figure 5.12).
This locks the tray in place and initiates scanning of the slide labels.
Chapter 5 | ViewRNA eZ Assay Protocol
27
Figure 5.12 Processing Module – Load/Unload Button
4. Confirm that all of the slides have been identified in the System status screen. If necessary, manually
identify slides that failed to be identified automatically. See Manual Slide Identification under 5.1.4
Slide Identification in the Leica BOND RX User Manual for instructions.
5. Address and correct any notification that appears in the "System status" screen (Figure 5.14).
6. Start the run immediately or delay the start for up to 6 hours:
To delay the run start:
A. Right-click any slide on the screen and select Delay start on the shortcut menu (Figure 5.13).
B. Enter the start time for the run and change the date if necessary.
C. Wait until the system provides an END time for the run before walking away.
D. If the END times does not enable the slides to be removed within 30 minutes of assay completion,
adjust the Delay start.
1) To change the start time which was set as Delay start, push the Load/Unload button below the
tray to reset the Delay start time.
When the tray is uplifted, the set time for Delay start will be canceled. Do not remove the tray
from the instrument.
2) Reload the tray by pushing the Load/Unload button below the tray. After the system
recognizes the tray, go to Step A above.
IMPORTANT: Do not click the on-screen Stop button under the loaded slide tray to
cancel the set time for Delay start. This cancels the run and program linked to the slide
labels. If the Stop button is clicked, new slide labels are required for the run. To obtain
a new slide label, open the “Slide setup” window, right-click the slide to be run, and
click “Print Label“.
TIP: Schedule the starting time for each SSA 10 – 15 minutes apart to avoid scheduling
difficulty.
28 ViewRNATM eZ Assay Manual
Figure 5.13 System Status Screen – Delayed Start
To start the run immediately (optional):
A. Click
under each loaded slide tray in the System status screen (Figure 5.14).
B. Wait until the system provides an END time for the run before walking away (Figure 5.14).
Figure 5.14 System Status Screen – Start Run Immediately
End time
Notification icon – Right-click to get more information.
Chapter 5 | ViewRNA eZ Assay Protocol
29
Unload Slides and Reagents
1. Remove the Open Reagent and Research Detection 2 trays after the run is complete. Store or discard
the reagents as specified in Table 5.2 on page 21 and Table 5.3 on page 25, according to the colorcoded label on the Open containers.
2. Press the Load/Unload button on the processing module and remove the slide tray.
3. Remove and clean the Covertiles. See 11.3 Covertiles in the Leica BOND RX User Manual for
instructions.
4. Rinse slides in ddH2O, air dry for 30 minutes at room temperature, then cover slip with aqueous or
organic mounting medium as outlined in Step 5: Mount and View Slides.
30 ViewRNATM eZ Assay Manual
Step 5: Mount and View Slides
NOTE: Slides must be removed from the instrument within 30 minutes of the end of the run.
Table 5.4 lists the recommended mounting media. Choose the mounting medium that is most appropriate
for your application, based on type of signal (chromogenic or fluorescent) you will be viewing.
Table 5.4 Recommended Mounting Media
Mounting Medium
Type
Application
Disadvantages
Histomount Mounting Solution
Organic
Chromogenic
Incompatible with DAPI.
Fluoromount/Plus
Aqueous
ADVANTAGE Mounting Media
Aqueous
Chromogenic
Fluorescent
Chromogenic
Bubble formation at room temperature.
4 °C long term storage required.
Autofluorescence.
Mounting Slides
If Using HistoMount Mounting Solution
NOTE: Perform Step 1 to Step 4 under a fume hood. Red signal is soluble in ethanol,
therefore, we do not recommend incorporating the alcohol dehydration steps before the
xylene clearing.
1. Dip slides in xylene at room temperature.
2. Pipet ~75 µL of HistoMount solution onto each tissue section without creating any bubbles, and
immediately place a cover glass on the mounting medium.
3. Allow the slides to air dry for 15 minutes at room temperature.
4. Mounted slides can be viewed and imaged at this point, or stored at room temperature.
If Using Using Fluoromount/Plus
1. Dab the first 2 – 3 drops of medium on a paper towel to remove bubbles.
2. Add a minimum of 2 – 4 drops of Ultramount to the tissue section without creating any bubbles. If
necessary, use a pipette tip to draw out any air bubbles in the drops.
3. Slowly place the cover glass on the specimen at an angle.
4. Dab the edges of the slide on a laboratory wipe to remove any excess mounting medium. Allow the
slides to air dry for 5 minutes at room temperature.
5. Mounted slides can be viewed and imaged at this point, or stored at 4 °C to prevent bubble formation
over time.
If Using ADVANTAGE Mounting Media
1. Place a cover glass on a clean, flat surface.
2. Dab the first 2 – 3 drops of mounting medium on a paper towel to remove bubbles.
3. Add 2 – 3 drops of mounting medium directly onto the middle of the cover glass. Use a pipette tip to
draw out any air bubbles in the drops.
4. Invert the specimen slide and slowly place it on the mounting medium at an angle.
5. Flip the slide over and dab the edges of the slide on a laboratory wipe to remove any excess mounting
medium.
Chapter 5 | ViewRNA eZ Assay Protocol
31
6. Allow slides to air dry for 15 minutes at room temperature.
7. Mounted slides can be viewed and imaged at this point, or stored at room temperature.
Assessing Pretreatment Conditions
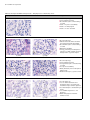
Table 5.5 shows example images obtained from the ViewRNA eZ Assay performed on rat kidney tissue.
The assay results illustrate the effects of optimal and suboptimal pretreatment conditions on Arbp signal
strength versus morphology, and demonstrate how to evaluate data from the in situ assay to qualitatively
determine target expression.
32 ViewRNATM eZ Assay Manual
Table 5.5 Example ViewRNA eZ Assay Results – Arbp Expression in Rat Kidney Tissue
Example Results
Description
Untreated Reference Morphology Slide
Good morphology
Intact cellular structures
Good hematoxylin counterstaining
of nuclei
Little or no probe accessibility
Little to no Arbp signals
Little to no dots observed
Optimal Pretreatment and Sample Preparation
(+ ) Arbp
Good morphology
Cellular structures and boundaries
are retained and still identifiable
Good hematoxylin counterstaining
of nuclei
Optimal accessibility
Strong, punctated, and ubiquitous
signals in (+) Arbp sample and clean
background in (–) probe sample
(–) Arbp
Insufficient Pretreatment or Over Fixation of Tissue
(+) Arbp
Good morphology
Intact cellular structures
Strong hematoxylin counterstaining
of nuclei
Poor probe accessibility
Weak, diffused, and non-ubiquitous
Arbp signals
Nuclear staining in (–) probe control
(–) Arbp
Over Pretreatment or Under Fixation
(+) Arbp
(–) Arbp
Poor morphology
Loss of cellular structures and
boundaries due to excessive heat
treatment and proteinase digestion
Poor hematoxylin counterstaining of
nuclei
Loss of RNA target due to over
digestion
Weak Arbp signals and fewer
number of dots
Chapter 5 | ViewRNA eZ Assay Protocol
33
Analyzing Target Expression
Each observable dot represents a single RNA molecule within the cell that the ViewRNA eZ Assay is
able to detect, assuming the RNA target is intact and properly unmasked for probe access.
The dots are typically uniform in size, but smaller than average size dots can also be present. This usually
indicates that the transcript is not properly unmasked, resulting in the binding of only one or a few pairs
of oligonucleotides from the probe set. Conversely, a larger than average size dot can occur when
multiple targets are found clustered in the same physical area. All things being equal, an RNA target with
low expression will yield fewer dots than a target with high expression.
It is important to consider the pattern and number of dots in the negative control (e.g. bacterial dapB or
sense strand of the target) to confidently differentiate between low expressing targets and non-specific
background dots when assessing RNA target expression. The average background of the ViewRNA eZ
Assay is usually less than 1 dot/3 cells. Consequently, as long as your target consistently shows an
expression level above the negative control threshold, the detection is reliable and real, even if the RNA
target expression is extremely low, such as 2 dots/ cell.
34 ViewRNATM eZ Assay Manual
6
Troubleshooting
Contacting Technical Support
Weak or No Signals
Poor Cell Morphology/Weak Hematoxylin Staining on page 37
Tissue Detachment From Slide on page 37
Areas of Tissue Devoid of Red or Hematoxylin Staining on page 38
Diffused Signals on page 38
High Background or Nuclear Staining on page 39
High Non-Specific Binding on Glass Slide on page 40
Hematoxylin and/or Red Stain on Covertile on page 40
Contacting Technical Support
For technical support, contact the appropriate resource provided below based on your geographical
location. Visit our website at www.affymetrix.com/panomics for an updated list of FAQs and product
support literature.
Table 6.1 Technical Support Contact Information
Location
Affymetrix
Leica
North America
Tel: 1.877.726.6642 option 1, then option 3
E-mail: [email protected]
1700 Leider Lane
Buffalo Grove, IL 60089
USA
Tel: 1.800.248.0123 or 1.847.405.0123
Fax: 1.847.405.0164
Europe
Tel: +44 1628-552550
E-mail: [email protected]
Visit Leica website and select your country.
Asia
Tel: +81 3 6430 430
E-mail: [email protected]
Visit Leica website and select your country.
Weak or No Signals
Table 6.2 Troubleshooting Weak or No Signals
Probable Cause
Recommended Action
Incorrect pretreatment conditions.
Under-pretreatment yields good
morphology but poor signal due to
insufficient unmasking of target.
Over-pretreatment yields poor
morphology and loss of signal resulting
from release of mRNA from the sample
due to heat over-treatment or
proteinase over-digestion.
Probe not added.
Check to make sure that the correct probe was selected during slide
setup.
Repeat pretreatment assay optimization procedure to determine
optimal heat treatment and proteinase digestion that will strike a
balance between morphology and signal.
Use ViewRNA eZ Check to optimize pretreatment.
36 ViewRNATM eZ Assay Manual
Table 6.2 Troubleshooting Weak or No Signals (Continued)
Probable Cause
Recommended Action
Reagents applied in the wrong sequence. Be sure to transfer the correct reagents to the assigned BOND Open
containers.
Target of interest is not expressed.
Incorrect storage or preparation of
reagents.
Reagents not freshly prepared.
Verify expression using other tissue lysate methods such as
QuantiGene® 2.0, QuantiGene Plex Assay, or Affymetrix® Array.
Run the same probe set on known samples that have been validated
to express the target of interest.
Store the components at the recommended storage conditions.
Prepare reagents according to the recommended protocol, including
temperature and dilution.
Be sure that the ancillary reagents (Enzyme, Amp 4) are freshly
prepared just before the start of the run.
Verify that the delayed start is not set for longer than six hours from
the time the reagents are loaded onto the Leica BOND RX.
RNA in tissue is degraded.
Verify tissue fixation:
Ensure that the tissue is freshly harvested, but to a thickness of 3 – 5
mm, and immediately fixed in 10% neutral buffered formalin or 4%
paraformaldehyde for 16-24 hours.
If fixation cannot be performed immediately, be sure that the tissue
is placed on dry ice or in liquid nitrogen to prevent RNA degradation.
Use ViewRNA eZ Check to assess RNA integrity.
Sample preparation.
Ensure that freshly-dissected tissues are fixed in 10% neutral buffered
formalin or 4% paraformaldehyde for the recommended 16 – 24
hours.
Ensure that the tissue section falls within the recommended area on
the glass slide (see Figure 4.1 on page 9).
Over-fixation of tissue after proteinase
digestion.
Make sure the tissue sections are not fixed more than 5 minutes in
ViewRNA Fix after proteinase digestion.
Slides were exposed to alcohol during
processing.
Avoid:
Mounting medium containing alcohol.
Alcohol dehydration when using organic mounting medium.
Tissue dries up during processing.
Small targets, splice variants, or RNA
fusions.
Ensure that Covertiles are correctly placed on the glass slide.
Ensure that the tissue section falls within the recommended area on
the glass slide.
Increasing ViewRNA eZ Probe concentration by diluting target probe
1:10 instead of 1:20 and hybridizing for 3 hours may increase sensitivity,
but note that there is always a general trade-off between specificity
and sensitivity. Do not use View RNA eZ Probe at a dilution higher than
1:10.
Samples not promptly removed after run. Remove samples from Leica BOND RX within 30 minutes of assay
completion to prevent deterioration of morphology and hematoxylin
stain.
BOND RX errors in run event log.
Contact your Leica Microsystems representative (contact information is
available at www.leica-microsystems.com).
BOND RX probe is misaligned.
Verify instrument function by running the ViewRNA eZ Control Kit.
BOND Dewax Solution, BOND Wash
Solution, Alcohol, ER1, ER2 or Enzyme
(proteinase K) is expired.
Replace with new BOND Dewax Solution, BOND Wash Solution,
Alcohol, ER1, ER2 or Enzyme (proteinase K).
Chapter 6 | Troubleshooting
37
Poor Cell Morphology/Weak Hematoxylin Staining
Table 6.3 Troubleshooting Cell Morphology/Hematoxylin Staining
Probable Cause
Recommended Action
Incorrect pretreatment conditions.
Perform full pretreatment optimization procedure to determine
optimal heat treatment and proteinase digestion time.
Tissue sample not fixed properly.
Make sure that freshly dissected tissues are fixed in 10% buffered
formalin or 4% paraformaldehyde for 16 – 24 hours.
Section thickness is variable or not
optimal.
Make sure the microtome is calibrated and tissue are sectioned at
5 ± 1 μm.
Samples not promptly removed after run. Remove samples from Leica BOND RX within 30 minutes of assay
completion to prevent deterioration of morphology and hematoxylin
stain.
BOND RX errors in run event log.
Contact your Leica Microsystems representative (contact information is
available at www.leica-microsystems.com).
BOND RX probe is misaligned.
Verify instrument function by running the ViewRNA eZ Control Kit.
BOND Dewax Solution, BOND Wash
Solution, Alcohol, ER1, ER2, Enzyme
(proteinase K), or Novocastra
Hematoxylin is expired.
Replace with new BOND Dewax Solution, BOND Wash Solution,
Alcohol, ER1, ER2, Enzyme (proteinase K), or Novocastra Hematoxylin.
Tissue Detachment From Slide
Table 6.4 Troubleshooting Tissue Detachment From Slide
Probable Cause
Recommended Action
Improper tissue preparation.
Make sure that the sample preparation is as recommended in
Chapter 4, Best Practices on page 9, including:
Fixation time and reagent
Section thickness
Brand of positively charged glass slide
Placement of section on glass slide
Baking of the sections at 60 °C for one hour before storing at –20 °C.
Insufficient baking of slides.
Verify that the baking step 60 °C for 60 minutes at was performed prior
to storage of slides at –20 °C and again just before the
deparaffinization step to ensure adhesion of tissue to slide.
Incorrect pretreatment conditions.
Perform full pretreatment optimization procedure to determine
optimal heat treatment and proteinase digestion time.
Temperature of pretreatment condition
too high.
Use the *ViewRNA HIER 10 min, ER2 (90 °C) heat treatment condition
when samples are delicate such as colon or breast tissues.
Proteinase treatment is too long or at too
high of a concentration.
Reduce proteinase concentration and/or incubation time.
BOND RX errors in run event log.
Contact your Leica Microsystems representative (contact information is
available at www.leica-microsystems.com).
BOND RX probe is misaligned.
Verify instrument function by running the ViewRNA eZ Control Kit.
BOND Dewax Solution, BOND Wash
Solution, Alcohol, ER1, ER2, Enzyme
(proteinase K), or Novocastra
Hematoxylin is expired.
Replace with new BOND Dewax Solution, BOND Wash Solution,
Alcohol, ER1, ER2, Enzyme (proteinase K), or Novocastra Hematoxylin.
38 ViewRNATM eZ Assay Manual
Areas of Tissue Devoid of Red or Hematoxylin Staining
Table 6.5 Troubleshooting Staining
Probable Cause
Recommended Action
Bubbles in assay reagents.
Do not vigorously mix or vortex the reagents as many of them contain
detergent. Gently invert to mix well.
Incomplete drying of tissue section after
the alcohol rinse in the dewax step.
Use ViewRNA Dewax 3 (20 minute drying) instead of ViewRNA
Dewax 1.
Tissue section mounted outside the
recommended area on glass slide.
Mount tissue section within the recommended area on the glass slide
to ensure full reagent coverage under the Covertile during processing
(see Figure 4.1 on page 9).
BOND RX errors in run event log.
Contact your Leica Microsystems representative (contact information is
available at www.leica-microsystems.com).
BOND RX probe is misaligned.
Verify instrument function by running the ViewRNA eZ Control Kit.
Diffused Signals
Table 6.6 Troubleshooting Diffused Signals
Probable Cause
Recommended Action
Suboptimal pretreatment conditions.
Perform the pretreatment optimization procedure to determine the
optimal heat treatment and proteinase digestion time.
Tissue dries up during processing.
Reagents not freshly prepared.
Ensure that Covertiles are correctly placed on the glass slide. See 6.6
Loading and Unloading Slides in the Leica BOND RX User Manual.
Ensure that the tissue section falls within the recommended area on
the glass slide (see Figure 4.1 on page 9).
Be sure that the ancillary reagents (Enzyme and ViewRNA Amp 4) are
freshly prepared.
Verify that the delayed start is not set for longer than 6 hours from
the time the reagents are loaded onto the Leica BOND RX.
Mounting solution contained alcohol.
Avoid any mounting medium containing alcohol or any cover slipping
method requiring alcohol dehydration.
BOND RX errors in run event log.
Contact your Leica Microsystems representative (contact information is
available at www.leica-microsystems.com).
BOND RX probe is misaligned.
Verify instrument function by running the ViewRNA eZ Control Kit.
BOND Dewax Solution, BOND Wash
Solution, Alcohol, ER1, ER2, Enzyme
(proteinase K), or Novocastra
Hematoxylin is expired.
Replace with new BOND Dewax Solution, BOND Wash Solution,
Alcohol, ER1, ER2, Enzyme (proteinase K), or Novocastra Hematoxylin.
Chapter 6 | Troubleshooting
39
High Background or Nuclear Staining
Table 6.7 Troubleshooting High Background
Probable Cause
Recommended Action
Suboptimal pretreatment
conditions.
Perform the pretreatment optimization procedure to determine the
optimal heat treatment and proteinase digestion time.
Increase proteinase digestion time or concentration to improve background
from nuclear staining.
Concentration of Amp 4 too high.
Double-check calculations and ensure that Amp 4 is diluted 1:500.
Endogenous alkaline phosphatase
activity.
Tissue dries up during processing.
Verify by manually incubating a dewaxed FFPE sample with the Red
Substrate (three parts Red 1 and one part Red 2) at room temperature for
40 minutes. If endogenous alkaline phosphatase activity is present, diffused
signals (which can be weak or strong) will appear.
Manually inactivate endogenous alkaline phosphatase activity in a
dewaxed FFPE sample with 0.2 M HCl/300 mM NaCl for 15 minutes at room
temperature. Wash samples twice with 1X PBS before proceeding with the
pretreatment on the Leica BOND RX.
Ensure that Covertiles are correctly placed on the glass slide. See 6.6
Loading and Unloading Slides in the Leica BOND RX User Manual.
Ensure that the tissue section is within the recommended area on the glass
slide (see Figure 4.1 on page 9).
Bubbles in reagents.
Do not vigorously shake or vortex reagents; instead, invert gently to mix.
Failure to properly clean and
maintain BOND RX.
Perform cleaning and maintenance tasks, including refilling and emptying
bulk containers, as instructed in the Leica BOND RX User Manual. See 11
Cleaning and Maintenance in the Leica BOND RX User Manual.
Clean the aspirating probe.
Replace the mixing station every six months.
Replace the aspirating probe after 1000 slides.
Clean the Covertiles as instructed in the Leica BOND RX User Manual and
discard any scratched ones. See 11.3 Covertiles in the Leica BOND RX User
Manual.
Incomplete removal of paraffin.
Manually dewax FFPE sample with xylene and process sample on Leica BOND
RX starting with the heat treatment step.
BOND RX errors in run event log.
Contact your Leica service representative.
BOND RX probe is misaligned.
Verify instrument function by running the ViewRNA eZ Control Kit.
BOND Dewax Solution, BOND
Replace with new BOND Dewax Solution, BOND Wash Solution, Alcohol, ER1,
Wash Solution, alcohol, ER1, ER2,
ER2, Enzyme (proteinase K), or Novocastra Hematoxylin.
Enzyme (proteinase K), or
Novocastra Hematoxylin is expired.
BOND RX errors in run event log.
Contact your Leica Microsystems representative (contact information is
available at www.leica-microsystems.com).
BOND RX probe is misaligned.
Verify instrument function by running the ViewRNA eZ Control Kit.
BOND Dewax Solution, BOND
Replace with new BOND Dewax Solution, BOND Wash Solution, Alcohol, ER1,
Wash Solution, Alcohol, ER1, ER2,
ER2, Enzyme (proteinase K), or Novocastra Hematoxylin.
Enzyme (proteinase K), or
Novocastra Hematoxylin is expired.
40 ViewRNATM eZ Assay Manual
High Non-Specific Binding on Glass Slide
Table 6.8 Troubleshooting Non-specific Binding on Glass Slide
Probable Cause
Recommended Action
Incompatible glass slide.
Use Leica Non-Clipped X-tra Slide, 1 mm White P/N 3800200 or 3800210
Pre-validate each new batch of slides by running the entire assay, including
probe set, on slides without tissue to determine if the slides are suitable for
the assay.
High concentration of probe set.
Check and make sure that the probe set dilution is correct. A dilution of 1:40
may be sufficient for very high expressing targets .
Over pretreatment of tissue (with
very high expressing target).
Reduce proteinase treatment to avoid over-unmasking of high expressing
targets and their subsequent non-specific binding to glass slides.
Incomplete removal of paraffin.
Manually dewax FFPE sample with xylene and process sample on Leica BOND
RX starting with the heat treatment step.
Polymerization of poor quality
paraffin.
Do not bake the slides at temperatures higher than 60 °C
BOND RX errors in run event log.
Contact your Leica Microsystems representative (contact information is
available at www.leica-microsystems.com).
BOND RX probe is misaligned.
Verify instrument function by running the ViewRNA eZ Control Kit.
BOND Dewax Solution, BOND
Replace with new BOND Dewax Solution, BOND Wash Solution, Alcohol, ER1,
Wash Solution, Alcohol, ER1, ER2,
ER2, Enzyme (proteinase K), or Novocastra Hematoxylin.
Enzyme (proteinase K), or
Novocastra Hematoxylin is expired.
Hematoxylin and/or Red Stain on Covertile
.
Table 6.9 Troubleshooting Hematoxylin and/or Red Staining
Probable Cause
Recommended Action
BOND RX errors in run event log.
Contact your Leica Microsystems representative (contact information is
available at www.leica-microsystems.com).
BOND RX probe is misaligned.
Verify instrument function by running the ViewRNA eZ Control Kit.
A
Additional Optimization Strategies
If none of the conditions for the ViewRNA eZ Assay in Table 4.2 on page 11 or Table 4.3 on page 12
yield acceptable results on the first run, you may need to go through an iterative process, varying the heat
treatment and/or proteinase digestion to find the optimal pretreatment conditions. As a general guideline,
the factors to consider in order of importance are: assay signal, morphology, and nuclear background.
Table A.1 shows possible results and further optimization actions. Table A.2 outlines the expected trends
in assay signal, morphology, and nuclear background as a function of increasing or decreasing proteinase.
Table A.1 Possible Results and Further Optimization
Results Assessment
Action
One heat treatment condition yields signal and the other
does not.
Choose the heat treatment condition that gives signal.
Both heat treatment conditions give comparable signal.
Neither heat treatment condition gives signal.
First check morphologies and choose the heat
treatment condition that gives better morphology.
If morphologies for the two heat treatment
conditions are comparable, choose the heat
treatment condition that gives a lower nuclear
background.
Look at the morphology for both heat treatment
conditions:
If morphology is good for both ER1 and ER2, choose
ER1 and increase concentration/time of proteinase
treatment.
If morphology is good with ER1 and bad with ER2,
choose ER1 and increase concentration/time of
proteinase treatment.
If morphology is bad with ER1 and good with ER2,
choose ER2 and increase concentration/time of
proteinase treatment.
If morphology is bad with both ER1 and ER2, choose
ER2 and decrease concentration/time of proteinase
treatment.
Table A.2 Expected Trends in Assay Signal, Morphology, and Nuclear Background With Increasing or Decreasing
Enzyme
Factor
Increasing Proteinase (Time/Concentration)
Decreasing Proteinase (Time/Concentration)
Assay Signal
For under-digested sample, assay signal will
gradually increase with more proteinase
treatment before decreasing due to overdigestion.
For over-digested sample, assay signal will
increase with less proteinase treatment before
decreasing due to insufficient unmasking.
Morphology
Poorer morphology.
Better morphology.
Nuclear
Background
Lower nuclear background.
Higher nuclear background.
42 ViewRNATM eZ Assay Manual
B
Registering a ViewRNA eZ Detection Kit
ViewRNA eZ Assay Reagents
Registering BOND Research Detection 2 Reagents
Registering Ancillary Reagents on page 46
Pairing a Staining Protocol With BOND Research Detection 2 on page 47
ViewRNA eZ Assay Reagents
Prior to use, the components of each new ViewRNA™ eZ Detection Kit need to be registered and
configured in the Leica BOND RX software, some as the BOND Research Detection 2 reagents and
others as ancillary reagents (see Table B.1).
Table B.1 BOND RX Research Detection 2 and Ancillary Reagents
Type of Reagent
Research Detection 2 Reagents
These reagents are collectively
assigned to a unique barcode
label and configured as the
BOND Research Detection 2.
Ancillary Reagents
Stand-alone reagents, each
with its own barcode label.
Reagent or Container Name
(Abbreviation)
in BOND RX Software
Reagent Name
(ViewRNA eZ Detection Kit
Includes the Highlighted Items)
Label Name
and Color
*ViewRNA Amp 1
(*VA1)
Amp 1
A1 – Black
*ViewRNA Amp 2
(*VA2)
Amp 2
A2 – Black
*ViewRNA Amp 3
(*VA3)
Amp 3
A3 – Black
*ViewRNA Hematoxylin
(VHx)
Hematoxylin
H – Blue
*ViewRNA Enzyme 1, 2, or 3
(*VE1, *VE2 or *VE3)
Enzyme
E – Red
*ViewRNA Fix
(*VFix)
Fix
F – Blue
*ViewRNA Probe 1
(*VP1)
ViewRNA Probe
P – Green
*ViewRNA Rinse
(*VRinse)
Rinse
R – Blue
*ViewRNA Amp 4
(*VA4)
Amp 4 Diluent
and
Amp 4, 500X
A4 – Red
*ViewRNA Red 1
(*VR1)
Red 1
R1 – Blue
*ViewRNA Red 2
(*VR2)
Red 2
R2 – Blue
*ViewRNA DAPI
(*VDAPI)
ViewRNA eZ DAPI (optional)
D – Blue
44 ViewRNATM eZ Assay Manual
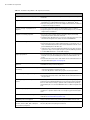
Registering BOND Research Detection 2 Reagents
1. Apply a new barcode label to a reagent tray as shown in Figure B.1. The new label may be placed
over an old barcode label if necessary.
NOTE: A barcode number is unique and it can only be associated with one ViewRNA eZ
Detection Kit.
Figure B.1 BOND Research Detection 2 Reagent Tray
Place barcode
label on side of
reagent tray
2. Scan the barcode on the reagent tray. In the "Add reagent system" dialog box that appears
(Figure B.2), fill in:
Name – Name of interest, for example, "BOND Research Detection 2".
o
Lot N – the ViewRNA eZ Detection Kit lot number
Expiry date – the ViewRNA eZ Detection Kit expiration date.
Figure B.2 Add Reagent System Dialog Box
3. Scan the barcode on the side of a new 30 mL Open container and select Amp 1 from the Reagent drop-
down list for Position (Pstn) 1 (Figure B.3). Apply the appropriate color-coded label (supplied in the
ViewRNA eZ Detection Kit) to the assigned container. See Table B.1 on page 43.
Appendix B | Registering a ViewRNA eZ Detection Kit
45
Figure B.3 Registering and Assigning Kit Reagents to Open Containers in BOND Research Detection2
4. Repeat Step 3 to register and assign "Amp 2", "Amp 3", "ViewRNA Hematoxylin" to positions 2 –
4, respectively (Figure B.4). Apply the appropriate color-coded label (supplied in the in the
ViewRNA eZ Detection Kit) to the assigned Open containers (see Table B.1 on page 43). Click OK.
This completes the registration process.
Figure B.4 Add Reagent System Dialog Box
5. Check the Reagent inventory screen to confirm successful registration:
A. Click the
icon, then click the Inventory tab (Figure B.5). Sort Package type by Research
systems.
B. Double-click "BOND Research Detection 2" in the inventory list. Alternatively, select "BOND
Research Detection 2" and click Details.
46 ViewRNATM eZ Assay Manual
Figure B.5 Reagent Inventory
Package type – Choose Research Systems
Registering Ancillary Reagents
NOTE: For the life of the kit, three 30 mL open containers are needed for the Rinse ancillary
reagent. Also, depending on the number of probes and/or proteinase dilutions being used,
more than one Open container may be required for these ancillary reagents.
1. Scan the barcode on the side of a new 30 mL Open container.
2. In the dialog box that appears (Figure B.6), make a selection from the drop-down lists to assign the
following to the barcode:
Reagent name
o
Lot N
Expiry date
Figure B.6 Adding a BOND 30 mL Open Container
Appendix B | Registering a ViewRNA eZ Detection Kit
47
3. Apply the appropriate color-coded label (supplied in the in the ViewRNA eZ Detection Kit) to the
assigned containers (see Table B.1 on page 43). Click OK.
4. Repeat Step 2 to Step 3 to register the other ancillary reagents.
NOTE: See 8.2.1 Adding and Editing a Reagent in the Leica BOND RX User Manual for
instructions on managing reagents in the Reagent Setup screen (for example, add new
reagents, edit reagent details, delete reagents).
Pairing a Staining Protocol With BOND Research Detection 2
After reagent containers have been registered, the default protocol will need to be copied and paired with
the BOND Research Detection 2 before proceeding to slide setup (Step 2: Create a Study and Add Slides
on page 13).
To prepare the default staining protocol and pair it with BOND Research Detection 2:
1. Click the
icon to open the "Protocol setup" window.
2. Click once to highlight the "*ViewRNA 1 - FFPE". Select Copy (Figure B.7).
3. In the "New protocol properties" window that opens, remove the "*" from the Name and Abbreviated
name. If necessary, give the protocol a new name and a new abbreviated name (Figure B.7).
4. Select from the drop-down menu the "Preferred detection system" that you want to use or the one that
you just registered (i.e. "BOND Research Detection 2" unless a different name was used)
(Figure B.7).
5. If not using DAPI staining, go to Step 7.
6. To insert the DAPI counterstaining steps (optional):
A. Click [Show wash steps] to expand the protocol. Scroll down and highlight the last step of the
protocol which is "Deionized water".
B. Click Insert reagent and Above, then select "ViewRNA eZ DAPI" from the Reagent drop-down
menu to insert the DAPI counterstaining step. Enter [1:00] minute for Incubation time (min).
C. To insert deionized water wash after the DAPI step, click Insert wash, select Deionized water for
Reagent, and [0:00] for Incubation time (min). Repeat this step twice to add a total of three
washes.
7. Click Save protocol.
The system will display the message: "The protocol you are saving has not been validated by Leica
Microsystems. Do you want to continue?" Click OK to save the modified protocol.
8. Verify each step in the protocol:
A. Highlight the saved protocol and click Report.
B. Review the steps, including the reagents, incubation time, and temperature.
48 ViewRNATM eZ Assay Manual
Figure B.7 Pairing a Staining Protocol With BOND Research Detection 2
C
Creating a New Enzyme Protocol
The Enzyme protocol specifies the proteinase incubation parameters. If the Enzyme protocols available
on Leica BOND RX do not include the optimal proteinase digestion time for your tissue, you will need
to create a new protocol.
Factory-loaded protocols, denoted by an asterisk (*), cannot be modified. Instead, copy a protocol, edit
the copy, and save it to a new name.
To Create a New Enzyme Protocol:
1. Go to the Protocol setup window (click the
icon).
2. Select Prestaining for Protocol group and Enzyme pretreatment for Procotol type (Figure C.1).
Figure C.1 Select Protocol Group and Protocol Type
3. Select a protocol to modify: *ViewRNA enzyme 1, *ViewRNA enzyme 2, or *ViewRNA enzyme 3.
Click Copy (Figure C.2).
Appendix C | Creating a New Enzyme Protocol
Figure C.2 Select a Protocol to Modify
4. In the dialog box that appears, enter:
A new name and abbreviated name. Do not include an asterisk (*) in the name (Figure C.3).
Edit the description to match the new enzyme protocol.
Figure C.3 Enter New Protocol Name and Description
5. Select Step 3 of the enzyme protocol and change the Incubation time (min). Click Save.
50
D
Microscopy and Imaging Equipment Guidelines
Table D.1 ViewRNA eZ Assay Imaging Options
Viewing and Digital
Capturing Options
Microscope Type
Recommended
Microscope/System
Bright field viewing
Standard pathology
grade bright field
microscope
Fluorescence viewing
and image capture
Microscope with camera
and fluorescence
options.
Verify that the camera
does not have infrared
blocking filter.
Optics Required
Recommended Filter
Leica DM Series
Nikon E Series
Olympus BX Series
Zeiss Axio Lab/
Scope/Imager
Or equivalent
20 and 40X objectives
Requires neutral density
filters and/or color filters for
white balancing.
Leica DM Series
Nikon E Series
Olympus BX Series
Zeiss Axio Lab/
Scope/Imager
Or equivalent
20 and 40X objectives
Numerical Aperture
(NA) > 0.5
For Fast Red Substrate, use
Cy3/TRITC filter set:
Excitation 530 ± 20 nm
Emission 590 ± 20 nm
Dichroic: 562 nm
For DAPI filter set:
Excitation: 387/11 nm
Emission: 447/60 nm
Automated image
capture in bright
field and/or
fluorescence modes
Digital pathology
scanner system
Aperio ScanScope
AT/XT/CS, use FL
version for
fluorescence
Leica SCN400-F
Olympus
Nanozoomer RS
Or equivalent
Scanning at 40X is
recommended when
expression is low.
Compatible with the above.
52 ViewRNATM eZ Assay Manual
E
Reagent Preparation Volumes
Table E.2 on page 54 is a lookup table that provides a quick way to determine the volume of each reagent
needed for a run, based on the number of slides being processed. The volumes in Table E.2 do not include
the dead volume for BOND containers.
Take into account the dead volume when:
Determining the total volume of Enzyme, Amp 4, or probe to prepare.
Choosing a container (see Table E.1).
Table E.1 Dead Volumes for BOND Containers
Type of Container
Dead Volume
Combined Usable
and Dead Volume
BOND Open Container, 7 mL
2 mL
7 mL
BOND Open Container, 30 mL
2.5 mL
30 mL
BOND Titration Container
550 μL
6 mL
54 ViewRNATM eZ Assay Manual
Table E.2 Lookup Table – Volume of Each Reagent Needed for a Run
Number
of Slides
Research
Detection 2
(μL)
Ancillary Reagents
(μL)
Fix
Rinse
Probe
Red 1
Red 2
DAPI
Amp 4
Enzyme
5
1500
750
4500
1100
1125
375
750
1500
1000
6
1800
900
5400
1320
1350
450
900
1800
1200
7
2100
1050
6300
1540
1575
525
1050
2100
1400
8
2400
1200
7200
1760
1800
600
1200
2400
1600
9
2700
1350
8100
1980
2025
675
1350
2700
1800
10
3000
1500
9000
2200
2250
750
1500
3000
2000
11
3300
1650
9900
2420
2475
825
1650
3300
2200
12
3600
1800
10800
2640
2700
900
1800
3600
2400
13
3900
1950
11700
2680
2925
975
1950
3900
2600
14
4200
2100
12600
3080
3150
1050
2100
4200
2800
15
4500
2250
13500
3300
3375
1125
2250
4500
3000
16
4800
2400
14400
3520
3600
1200
2400
4800
3200
17
5100
2550
15300
3740
3825
1275
2550
5100
3400
18
5400
2700
16200
3960
4050
1350
2700
5400
3600
19
5700
2850
17100
4180
4275
1425
2850
5700
3800
20
6000
3000
18000
4400
4950
1500
3000
6000
4000
21
6300
3150
18900
4620
5175
1575
3150
6300
4200
22
6600
3300
19800
4840
5400
1650
3300
6600
4400
23
6900
3450
20700
5060
5625
1725
3450
6900
4600
24
7200
3600
21600
5280
5850
1800
3600
7200
4800
25
7500
3750
22500
5500
6075
1875
3750
7500
5000
26
7800
3900
23400
5720
6300
1950
3900
7800
5200
27
8100
4050
24300
5940
6525
2025
4050
8100
5400
28
8400
4200
25200
6160
6750
2100
4200
8400
5600
29
8700
4350
26100
6380
6975
2175
4350
8700
5800
30
9000
4500
27000
6600
7200
2250
4500
9000
6000
NOTE: Add a dead volume to the volumes in Table E.2 as follows:
2.5 mL dead volume when using a BOND 30 mL Open container.
2 mL dead volume when using a BOND 7 mL Open container.
550 μL when using a BOND Titration container,