1
Transactionware™ GM
version 9.5
Store Manager User Guide
Store Manager User Guide
Copyright
© Copyright 2006 SAP AG. All rights reserved.
SAP Library document classification: PUBLIC
No part of this publication may be reproduced or transmitted in any form or for any purpose without the express
permission of SAP AG. The information contained herein may be changed without prior notice.
Some software products marketed by SAP AG and its distributors contain proprietary software components of
other software vendors.
Microsoft, Windows, Outlook, and PowerPoint are registered trademarks of Microsoft Corporation.
IBM, DB2, DB2 Universal Database, OS/2, Parallel Sysplex, MVS/ESA, AIX, S/390, AS/400, OS/390, OS/400,
iSeries, pSeries, xSeries, zSeries, z/OS, AFP, Intelligent Miner, WebSphere, Netfinity, Tivoli, and Informix are
trademarks or registered trademarks of IBM Corporation in the United States and/or other countries.
Oracle is a registered trademark of Oracle Corporation.
UNIX, X/Open, OSF/1, and Motif are registered trademarks of the Open Group.
Citrix, ICA, Program Neighborhood, MetaFrame, WinFrame, VideoFrame, and MultiWin are trademarks or
registered trademarks of Citrix Systems, Inc.
HTML, XML, XHTML, and W3C are trademarks or registered trademarks of W3C®, World Wide Web
Consortium, Massachusetts Institute of Technology.
Java is a registered trademark of Sun Microsystems, Inc.
JavaScript is a registered trademark of Sun Microsystems, Inc., used under license for technology invented and
implemented by Netscape.
MaxDB is a trademark of MySQL AB, Sweden.
SAP, R/3, mySAP, mySAP.com, xApps, xApp, SAP NetWeaver, and other SAP products and services mentioned
herein as well as their respective logos are trademarks or registered trademarks of SAP AG in Germany and in
several other countries all over the world. Transactionware, POS Xpress, Store Manager, and Configurator are all
registered trademarks of SAP-Triversity. All other product and service names mentioned are the trademarks of
their respective companies. Data contained in this document serves information purposes only. National product
specifications may vary.
These materials are subject to change without notice. These materials are provided by SAP AG and its affiliated
companies ("SAP Group") for informational purposes only, without representation or warranty of any kind, and
SAP Group shall not be liable for errors or omissions with respect to the materials. The only warranties for SAP
Group products and services are those that are set forth in the express warranty statements accompanying such
products and services, if any. Nothing herein should be construed as constituting an additional warranty.
SAP - Important Disclaimers
SAP Library document classification: PUBLIC
This document is for informational purposes only. Its content is subject to change without notice, and SAP does
not warrant that it is error-free. SAP MAKES NO WARRANTIES, EXPRESS OR IMPLIED, OR OF
MERCHANTABILITY, OR FITNESS FOR A PARTICULAR PURPOSE.
Coding samples
Any software coding and/or code lines / strings ("Code") included in this documentation are only examples and
are not intended to be used in a productive system environment. The Code is only intended better explain and
visualize the syntax and phrasing rules of certain coding. SAP does not warrant the correctness and completeness
of the Code given herein, and SAP shall not be liable for errors or damages caused by the usage of the Code,
except if such damages were caused by SAP intentionally or grossly negligent.
2
Internet hyperlinks
The SAP documentation may contain hyperlinks to the Internet. These hyperlinks are intended to serve as a hint
where to find supplementary documentation. SAP does not warrant the availability and correctness of such
supplementary documentation or the ability to serve for a particular purpose. SAP shall not be liable for any
damages caused by the use of such documentation unless such damages have been caused by SAP's gross
negligence or willful misconduct.
Accessibility
The information contained in the SAP Library documentation represents SAP's current view of accessibility
criteria as of the date of publication; it is in no way intended to be a binding guideline on how to ensure
accessibility of software products. SAP specifically disclaims any liability with respect to this document and no
contractual obligations or commitments are formed either directly or indirectly by this document. This document
is for internal use only and may not be circulated or distributed outside your organization without SAP's prior
written authorization.
3
4
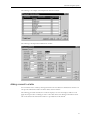
Table of Contents
Chapter 1
Getting Started
About the Store Manager .....................................................................................11
The Store Manager and Configurator association ....................................12
Parameter files from the Configurator .......................................................13
About the navigation system ................................................................................14
Main Menu .............................................................................................14
3rd Party Software Menu .....................................................................14
Relationship between tables and windows ................................................14
Adding a record to a table ............................................................................15
Modifying a record in a table .......................................................................17
Deleting a record from a table .....................................................................17
Performing a query in a selection window ................................................19
Completing the fields in a window .............................................................20
Chapter 2
Customizing Store Manager
Defining the Store Manager system parameters ...............................................22
Changing the text in the Store Manager .............................................................24
Changing a text for a single object ..............................................................24
Changing the text for all the objects in a category ...................................25
Changing all the text in the Store Manager ...............................................26
Translation window ..............................................................................26
Using the Single-text Translation window .................................................28
Using security features ..........................................................................................28
Changing a user’s password .........................................................................28
Restricting access to selected windows and functions .............................29
Cash management security ...................................................................31
Changing a user’s authority level .................................................................33
Adding third-party application buttons to windows ........................................34
Sorting table records in selection windows ........................................................36
Configuring the sort options .......................................................................36
Sorting by clicking a column header ...........................................................36
Sorting using the Specify Sort Columns window .....................................37
Chapter 3
Managing the POS Terminals
Monitoring and controlling the POS terminals .................................................42
Monitoring a POS terminal ..........................................................................42
Opening or closing a POS terminal ............................................................43
Opening or closing all POS terminals ........................................................45
Opening and closing the store .............................................................................49
Opening the store ..........................................................................................49
Closing the store ............................................................................................51
1
Table of Contents
Changing the customer display ............................................................................52
Changing headers and trailers on receipts ..........................................................53
Preparing to open a new store .............................................................................53
Rebuilding local files ..............................................................................................55
Chapter 4
Managing Personnel
Maintaining employee files ...................................................................................57
Adding an employee record .........................................................................58
Modifying an employee’s record .................................................................59
Deleting an employee’s record ....................................................................60
Employee profiles and overtime calculations ............................................60
The Employee Maintenance window .................................................61
Chapter 5
File Maintenance Features
Populating drop-down lists ..................................................................................63
Setting up the product hierarchy .........................................................................65
Defining categories ........................................................................................65
Adding a category ..................................................................................66
Modifying a category .............................................................................66
Deleting a category ................................................................................67
Defining groups .............................................................................................67
Adding a group ......................................................................................67
Modifying a group .................................................................................68
Deleting a group ....................................................................................69
Defining departments ...................................................................................69
Adding a department ............................................................................70
Assigning taxes to a department .........................................................73
Modifying a department .......................................................................75
Deleting a department ..........................................................................75
Configuring the print options ..............................................................75
Defining user flags .........................................................................................77
Creating a new user flag option ...........................................................77
Modifying a user flag option ................................................................78
Deleting a user flag option ...................................................................79
Setting up taxes ......................................................................................................80
Adding a tax ....................................................................................................80
Modifying a tax ..............................................................................................82
Deleting a tax ..................................................................................................82
Tax Maintenance Print Options tab ...................................................82
Setting up Step Taxes ....................................................................................83
Setting up product vendors ..................................................................................84
Adding a vendor ............................................................................................84
Modifying a vendor’s information ..............................................................85
Deleting a vendor ..........................................................................................86
The Vendor Maintenance window .....................................................87
Setting up tare weights ..........................................................................................88
Adding a tare weight .....................................................................................89
Modifying a tare weight ................................................................................89
Deleting a tare weight ...................................................................................90
The Tare Weight Maintenance window .............................................90
Entering another store’s information .................................................................91
Adding a new store ........................................................................................92
2
Viewing a store’s information ......................................................................92
Modifying a store’s information ..................................................................93
Deleting a store’s record ...............................................................................93
The Store Maintenance window .........................................................94
Setting up customers .............................................................................................95
Creating a new customer record ..................................................................95
Maintaining a customer record ....................................................................96
Deleting a customer record ..........................................................................97
Customer Maintenance window - Demographic tab .......................98
Customer Maintenance window - Loyalty Points tab ......................99
Maintaining extended customer fields ................................................................99
Adding extended options and details .......................................................100
Modifying extended options ......................................................................101
Deleting extended options .........................................................................102
The Extended Field Options Maintenance window ......................103
Applying extended field options to customers .......................................103
Chapter 6
Tender Management
Safe and non-safe options ..................................................................................105
Performing a loan (float) .....................................................................................106
Entering a new loan .....................................................................................106
Completing a loan ........................................................................................109
Modifying a loan ..........................................................................................110
Voiding a loan ..............................................................................................110
Viewing a loan’s details ...............................................................................110
Performing a pickup ............................................................................................111
Entering a new pickup ................................................................................111
Completing a pickup ...................................................................................112
Modifying a pickup ......................................................................................112
Voiding a pickup ..........................................................................................113
Viewing a pickup’s details ...........................................................................113
POS Pickup to Safe Maintenance window ......................................114
Balancing a cash drawer ......................................................................................116
Entering a new balance ...............................................................................116
Completing a balance ..................................................................................117
Modifying a balance .....................................................................................118
Voiding a balance .........................................................................................118
Viewing a balance’s details .........................................................................119
POS Balance Maintenance window ..................................................119
Depositing tenders into the safe ........................................................................121
Entering a new deposit into the safe ........................................................121
Completing a deposit into the safe ...........................................................122
Modifying a deposit into the safe ..............................................................122
Voiding a deposit into the safe ..................................................................123
Viewing details of a deposit into the safe ................................................123
The Safe Deposit Maintenance window ..........................................124
Processing a safe withdrawal (bank deposit) ...................................................126
Entering a new safe withdrawal (bank deposit) ......................................126
Modifying a safe withdrawal (bank deposit) ............................................128
Voiding a safe withdrawal (bank deposit) ................................................128
Viewing details of a safe withdrawal (bank deposit) ..............................129
Safe transfers and balances .................................................................................129
Transferring tenders between safes ..........................................................129
3
Table of Contents
Balancing the safe ................................................................................................131
Entering a new safe balance .......................................................................131
Completing a safe balance ..........................................................................131
Modifying a safe balance ............................................................................132
Voiding a safe balance .................................................................................132
Viewing the details of a safe balance ........................................................133
The Safe Balance Maintenance window ...........................................133
Viewing the contents of the safe .......................................................................135
Viewing detailed safe transactions .....................................................................136
Performing a query on safe transactions ..................................................137
Chapter 7
Managing Price Look Ups
Using the PLU Search window ..........................................................................140
Maintaining PLUs ................................................................................................142
Adding a PLU ..............................................................................................143
Modifying a PLU’s information ................................................................146
Deleting a PLU ............................................................................................147
The PLU Maintenance window - User Flags, Taxes & Itemizers tab 147
The PLU Maintenance window - Vendor/SKU tab .....................149
The PLU Maintenance window - Labels tab ...................................151
The PLU Maintenance window - Inventory Control tab ..............152
The PLU Maintenance window - Future Prices tab ......................153
Maintaining PLU extended fields ......................................................................153
Adding extended options ...........................................................................154
Modifying extended options ......................................................................155
Deleting extended options .........................................................................156
The Extended Field Options Maintenance window ......................156
Applying extended field options to PLUs ...............................................157
Generating an export file ............................................................................158
Creating update export files ...............................................................159
Making global changes to PLUs ........................................................................160
Defining the PLUs to be changed .............................................................160
Defining the fields to be changed .............................................................161
The Global PLU Change Maintenance window .............................161
Using price batch management functionality ..................................................162
Applying a batch ..........................................................................................163
Creating a new batch ...................................................................................163
Editing a batch .............................................................................................165
Selecting a batch ..................................................................................165
Adding an item to a batch ..................................................................166
Modifying a batch item’s information ..............................................166
Deleting a batch item ..........................................................................167
Auditing product price changes .........................................................................167
The Retail Price Update Audit window ...........................................168
Defining a PLU cross reference ........................................................................169
Adding a cross reference ............................................................................169
Modifying a cross reference .......................................................................171
Deleting a cross reference ..........................................................................171
Setting up a quantity or level pricing scheme ..................................................172
Adding a quantity or level pricing scheme ...............................................173
Modifying a quantity or level pricing scheme ..........................................175
Deleting a quantity or level pricing scheme .............................................175
Setting up linked items ........................................................................................175
4
Adding a new linked item ...........................................................................176
Modifying a linked item ..............................................................................178
Deleting a linked item .................................................................................178
Reviewing mix match pricing schemes .............................................................179
Viewing a mix match pricing scheme .......................................................179
The Mix Match Maintenance window .............................................180
Common Mix Match scenarios .........................................................183
Combining mix match, promotion, and discount transactions ............184
Setting up promotional pricing ..........................................................................185
Adding a promotion ....................................................................................185
Modifying a promotion ...............................................................................189
Deleting a promotion ..................................................................................189
Defining an exception to a promotion .....................................................189
Chapter 8
Performing Inventory Control Functions
Configuring the inventory parameters ..............................................................191
Inventory Parameters Maintenance window ...................................192
Linking a vendor’s SKU to a PLU ....................................................................194
Vendor’s SKU Maintenance window ...............................................195
Ordering, receiving, and transferring inventory ..............................................196
Ordering inventory ......................................................................................196
Manual purchase orders using PLU or vendor’s SKU ..................196
Modifying a purchase order ...............................................................197
Creating a purchase order from a suggested order ........................198
Purchase Order Maintenance window .............................................199
Issuing a purchase order .....................................................................204
Printing a Purchase Order report ......................................................204
Voiding a purchase order ...................................................................205
Duplicating a purchase order .............................................................206
Creating an order guide for licensee transactions ...................................206
Viewing displayed information about the order .............................209
Entering an order from an order guide ....................................................209
Receiving inventory .....................................................................................211
Converting purchase orders into receiving orders .........................211
Receiving inventory by PLU or vendor’s SKU ...............................211
Receiving window ................................................................................213
Receiving inventory by case ...............................................................218
Receiving by Case window .................................................................219
Receiving a partial order .....................................................................222
Completing a receiving transaction ...................................................223
Printing a Receiving report ................................................................223
Voiding a receiving transaction .........................................................224
Transferring inventory ................................................................................224
Transferring inventory using PLUs ..................................................225
Store Transfer by PLU window ........................................................226
Transferring inventory in and out by the case ................................229
Store Transfer by Case window ........................................................230
Completing a transfer .........................................................................232
Printing a transfer report ....................................................................232
Voiding a transfer ................................................................................233
Viewing inventory information ..........................................................................234
About the Inventory Information window ..............................................234
Inventory History information window ...........................................236
5
Table of Contents
Uploading inventory information to the corporate office ....................237
Performing a physical inventory count .............................................................240
Printing a count sheet .................................................................................240
Maintaining inventory shelf location codes .............................................242
Adjusting on-hand inventory quantities ...........................................................243
Adjusting the on-hand quantities after a count .......................................243
Creating an inventory count PLU list ...............................................244
Entering new on-hand quantities ......................................................244
Physical Inventory Maintenance window ........................................245
Adjusting the on-hand inventory quantities ............................................248
Inventory Adjustment window .........................................................249
Controlling inventory packages .................................................................250
About controlled inventory transport permits ........................................251
Chapter 9
Printing Shelf Labels and Stickers
Configuring sticker and label parameters .........................................................253
Defining system parameters .......................................................................253
Label Parameter Details Maintenance window ...............................254
Creating label and sticker formats .............................................................255
Modifying a label and sticker format ........................................................256
Deleting a label and sticker format ...........................................................256
Standard Labels Format Maintenance window ..............................257
Defining sticker and label parameters ......................................................259
General Label Parameters Maintenance window ...........................259
Printing price stickers ..........................................................................................261
Creating a price sticker queue ....................................................................261
Modifying a price sticker queue .................................................................262
Deleting a price sticker queue ....................................................................262
Printing a price sticker queue .....................................................................263
Printing shelf labels ..............................................................................................264
Creating a shelf label queue ........................................................................264
Modifying a shelf label queue ....................................................................265
Deleting a shelf label queue .......................................................................266
Printing a shelf label queue ........................................................................266
Print Queue Maintenance window ...................................................267
Designing and printing stickers and labels .......................................................269
Creating new types of stickers and labels .................................................269
Adding a new type of sticker or label ...............................................269
Modifying a sticker or label type .......................................................270
Deleting a sticker or label type ..........................................................270
Design Label Definition window ......................................................272
Designing a new sticker or label ................................................................274
Creating a new design for a sticker or label .....................................274
Modifying a sticker or label you defined ..........................................275
Deleting a sticker or label you defined .............................................276
Printing the stickers or labels you defined .......................................277
The Designed Label Maintenance window .....................................278
Chapter 10
Journals and Journal Files
Reading the journal files ......................................................................................283
Setting up the electronic journal ................................................................283
Selecting a journal ........................................................................................285
6
Updating the Electronic Journal Viewer ..........................................285
Opening a journal file .................................................................................287
Searching for transactions in a journal .....................................................287
The Electronic Journal Viewer ..........................................................288
Viewing log files ...................................................................................................290
Chapter 11
Reporting
Defining report macros .......................................................................................291
Creating a new report macro .....................................................................293
Modifying a report macro ...........................................................................294
Deleting a report macro ..............................................................................294
Report Macro Maintenance window ................................................295
Compiling a report ...............................................................................................296
Choosing report criteria ..............................................................................296
Generating reports .......................................................................................297
Printing a report ...................................................................................................297
Exporting a report ...............................................................................................298
E-mailing a report ................................................................................................298
Using the report template designer ...................................................................300
Designing a new report template ..............................................................300
Template design options ....................................................................301
Template Designer fields ....................................................................302
Previewing a report .....................................................................................303
Using standard reports ........................................................................................303
Item Movement ...........................................................................................303
Item Movement Report Criteria window ........................................304
Item Movement Report ......................................................................305
Sales ...............................................................................................................306
Sales Report Criteria window ............................................................306
Sales Report ..........................................................................................307
Sales Analysis ................................................................................................308
Sales Tax Report ..........................................................................................308
Sales Tax Report Criteria window ....................................................308
Sales Tax Report ..........................................................................................310
Non-merchandise Summary ......................................................................310
Non-merchandise Report Criteria window .....................................311
Non-merchandise Summary Report .................................................311
Non-merchandise Detail Report ...............................................................311
Non-merchandise Detail Report .......................................................312
Tender ...........................................................................................................312
Tender Report Criteria window ........................................................312
Tender Report ......................................................................................313
Tender Detail Report ..........................................................................314
Payroll Clock In/Out Summary Report ...................................................314
Payroll Clock In/Out Report Criteria window ...............................315
Payroll Clock In/Out Summary report ............................................316
Payroll Clock In/Out Detail ......................................................................316
Payroll Clock In/Out Detail report ..................................................316
Department ...................................................................................................317
Department Report Criteria window ...............................................317
Department Report .............................................................................318
Department Report Detail .................................................................318
Group report ........................................................................................320
7
Table of Contents
Category report ....................................................................................321
Loss Prevention Summary .........................................................................321
Loss Prevention Report Criteria window ........................................321
Loss Prevention Summary report .....................................................324
Loss Prevention Detail ...............................................................................324
Loss Prevention Detail report ...........................................................325
Salesperson ...................................................................................................325
Salesperson Report Criteria window ................................................325
Salesperson report ...............................................................................326
Hourly Sales Summary ................................................................................327
Hourly Sales Report Criteria window ...............................................327
Hourly Sales Summary report ............................................................328
Average Hourly Sales ..................................................................................329
Average Hourly Sales report ..............................................................329
POS Balance .................................................................................................330
Balance Report Criteria window .......................................................330
Balance report ......................................................................................331
Macro .............................................................................................................331
Using inventory reports ......................................................................................332
Inventory Adjustment .................................................................................332
Inventory Adjustment Report Selection Criteria window .............332
Inventory Adjustment Report ...........................................................334
Inventory Adjustment Report ...........................................................335
Inactive PLU ................................................................................................335
Inactive PLU Report Selection Criteria window ............................336
Inactive PLU report ............................................................................337
Current Inventory ........................................................................................338
Current Inventory Report Selection Criteria window ....................338
Current Inventory Reports .................................................................339
Gross Profit ..................................................................................................340
Gross Profit Report Selection Criteria window ..............................340
Gross Profit Report ............................................................................343
Performance Summary ...............................................................................344
Performance Report Selection Criteria window .............................344
Performance Summary report ...........................................................345
Performance Detail .....................................................................................345
Performance Detail report .................................................................345
Pending Transactions ..................................................................................346
Pending Transactions Report Criteria window ...............................347
Pending Transactions Report ............................................................348
The Pending Transaction Details Report ........................................349
Pending Transactions By Item Report .............................................350
Chapter 12
Processing The Payroll
Configuring payroll parameters .........................................................................353
Payroll Parameters Maintenance window ........................................354
Configuring payroll periods .......................................................................355
Preparing clock in/out information for export ...............................................356
Editing clock in/out times .........................................................................356
Payroll Clock In/Out Detail window ...............................................357
Confirming clock in/out times ..................................................................360
Exporting clock in/out files to head office .............................................361
8
Chapter 13
Viewing the Server State
Accessing server information .............................................................................363
9
Table of Contents
10
Getting Started
This section provides general information about the Store Manager application and its relationship to
other Triversity products. In addition, it describes how to use fields, drop-down lists and buttons in the
Store Manager windows.
This section covers the following topics:
About the Store Manager
Store Manager menu windows
Relationship between tables and windows
About the Store Manager
The Store Manager is a store level management tool that provides back office processing functions.
You can use the Store Manager to perform many of your store management tasks, such as: maintaining
employee and customer records, managing PLUs, printing reports, reviewing employees work hours,
ordering inventory, and tracking on-hand inventory quantities.
Three versions of the Transactionware store level software are available:
POS Manager: Has all of the basic back office functions listed above, but does not include
inventory management functions
Store Manager: Includes all the features of the POS Manager, plus inventory management
functions
Store Manager Deluxe: Includes all the features of the basic Store Manager, plus full perpetual
inventory control, ordering, and receiving functions
Throughout this manual, the generic term Store Manager will refer to the complete Transactionware
Store Manager Deluxe product.
The Store Manager works in conjunction with the POS Xpress point of sale software and the
Configurator head office application. For information about the relationship between the Store
Manager and the Configurator, see “The Store Manager and Configurator association” next.
11
Getting Started
The Store Manager and Configurator association
Your head office uses theConfigurator to tailor the POS Xpress application to meet your specific
requirements and to download changes to the server in your store.
The information that your head office downloads to your store is stored as records in tables. It is used
by both the Store Manager and the POS Xpress. You can use the Store Manager to add information to
tables at the store level.
Although the Store Manager is a store level management tool and theConfigurator is a head office tool,
they can both add or modify the information in some common tables.
WARNING! B ecause your head office is not notified of the changes that you make to the common
tables using the Store Manager, it is very important that your head office clearly define the areas for
which you are responsible at the store. To avoid entering conflicting information, your store or your
head office should update the information in each table. You can use the Store Manager’ssecurity
function to restrict access to tables in the Store Manager. For information about security, “Using
security features” on page 28.
Both the Store Manager and the Configurator can update the following tables:
12
Employee
Category
Group
Department
Tare weight
ID/Code
Vendor
Store
User flag
PLU
PLU cross reference
Quantity and level pricing
Link items
Promotion
Taxes
About the Store Manager
Parameter files from the Configurator
Your head office must download three sets of parameters so that the Store Manager can function
properly. They are:
Register parameters
Tender parameters
Layaway parameters
For information about downloading information from the Configurator, refer to the Configurator
User Guide.
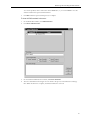
You can view information about the status of the three mandatory sets of parameters in the
Configurator Parameters window. This window also displays information about other parameters that
are downloaded from the Configurator. You cannot edit the information in the window.
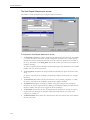
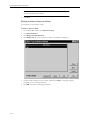
To access the Configurator Parameters window:
1.
On the Main Menu window, click Parameters Setup.
2.
On the Store Manager Parameters Menu window, click Configurator Parameters.
13
Getting Started
About the navigation system
The Store Manager includes a translation feature that allows you to change menu button names, field
names, window titles and message box text. The procedures in this manual assume that the default text
is used.
The following windows contain the default menu button names.
Main Menu
The Main Menu window contains the buttons that open other Store Manager menu windows. This is
the menu you see immediately after you log onto the Store Manager.
To access the menus associated with the icons on the Main Menu, click on the icon that contains the
menu that you want to display.
3rd Party Software Menu
The buttons that appear in this menu window are determined by the applications you set up in the 3rd
Party Software Maintenance window.
Relationship between tables and windows
The Store Manager stores information in tables. Each table contains records, and each record contains
fields. For example, employee information is stored in the Employee table. Each employee’s
information is stored in a record in the table, and the employee’s last name is stored in a field in the
record.
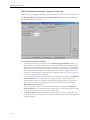
Every table has the following:
14
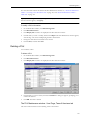
Selection window: This window displays selected fields from each of the records in the table. It
allows you to select the specific record you want to open.
Maintenance window: This window displays all fields in the record. It allows you to add, modify,
or delete the information in the table. You change the information stored in a record in the
maintenance window. Some maintenance windows contain tabs to organize the fields. Click on a
tab to open it.
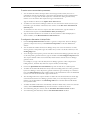
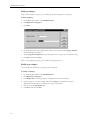
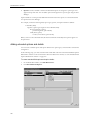
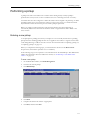
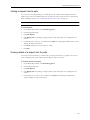
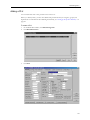
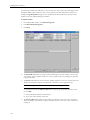
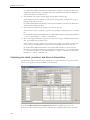
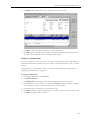
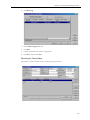
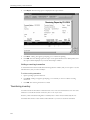
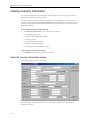
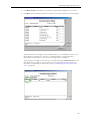
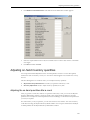
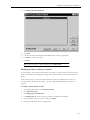
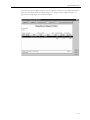
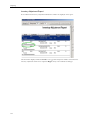
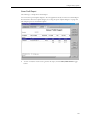
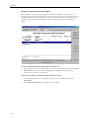
About the navigation system
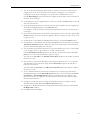
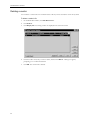
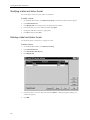
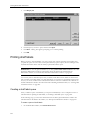
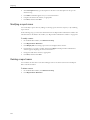
The following is an example of the Departments Selection window:
The following is the Department Maintenance window:
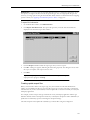
Adding a record to a table
You can add records to a table by entering information into the fields in its maintenance window. You
can open the maintenance window from the table’s selection window.
The following procedure describes how to add an employee record to the employee table. You can
apply the same procedure to adding records to other tables in the Store Manager. Information about
each of the fields in the maintenance windows is provided later in this manual.
15
Getting Started
To add an employee record:
16
1.
On the Main Menu window, click Administration.
2.
On the Administration Menu window, click Employee Maintenance.
3.
Click New.
4.
Complete the fields in the window as appropriate. Refer to the section “Maintaining employee
files” on page 57. for information about what you should enter into each of the fields in the
maintenance window.
5.
Click Save, and then click Close. Once you have added a record to a table, you can modify or
delete it.
About the navigation system
Modifying a record in a table
You can modify records in a table by entering information into the fields in its maintenance window.
You select the appropriate record in the table’s selection window and open the maintenance window.
When a table contains many records, it can be difficult to locate the record you want to modify. There
are two functions you can use in the Store Manager to help you locate the record you want:
You can change the order in which the records are displayed in the selection window. For
information about changing the sort order of records, see “Sorting table records in selection
windows” on page 36.
You can perform a query to search for a specific record. For information about searching for
records in a table, See “Performing a query in a selection window” on page 19. Alternatively, you
can display all the records in the table, and choose the record you want to modify.
The following procedure describes modifying an employee record in the employee table. You can
apply the same procedure to modifying records in other tables in the Store Manager. Information
about each of the fields in the maintenance windows is provided in this manual, in the appropriate
sections.
To modify an employee record:
1.
On the Main Menu window, click Administration.
2.
On the Administration Menu window, click Employee Maintenance.
3.
On the Employee Selection window, click Display All to display a list of all of the records in the
table, or click Query to initiate a search for a specific record.
4.
Click the employee record that you want to modify.
5.
Click Open.
6.
Change the information in the fields as appropriate.
7.
Click Save, and then click Close. The changes take effect immediately.
Deleting a record from a table
You can delete records in a table from the table’s selection window.
When a table contains many records, it can be difficult to locate the record you want to delete. There
are two functions you can use in the Store Manager to help you locate the record you want:
You can change the order in which the records are displayed in the selection window. For
information about changing the sort order of records, “Sorting table records in selection
windows” on page 36.
You can perform a query to search for a specific record. For information about searching for
records in a table, See “Performing a query in a selection window” on page 19. Alternatively, you
can display all the records in the table, and choose the record you want to delete.
The following procedure describes deleting a record in the employee table. You can apply the same
procedure to deleting records in other tables in the Store Manager.
17
Getting Started
To delete an employee record:
18
1.
On the Main Menu window, click Administration.
2.
On the Administration Menu window, click Employee Maintenance.
3.
On the Employee Selection Window, click Display All to display a list of all the records in the
table, or click Query to initiate a search for a specific record.
4.
Click the employee record you want to delete.
5.
Click Delete. A dialog box appears, prompting you to confirm the deletion.
6.
Click OK. The employee’s record is deleted.
About the navigation system
Performing a query in a selection window
Selection windows display selected fields from the records in a table. The records are displayed in the
order in which they are created. You can perform a query to quickly find the record you want.
Before you begin the steps below, you must open a selection window.
To perform a query:
1.
Click Query. The button’s name changes to Search.
2.
Cli ck the column in the selection window that contains the information that you want to use as
the base for the search. The query drop-down list appears.
3.
Click the first column of the drop-down list. A list of operators appears.
4.
Select an operator from the list.
5.
Click the second column of the drop-down list and type a value.
19
Getting Started
6.
Click Search. The Store Manager searches the records in the table, and displays the matching
records in the selection window.
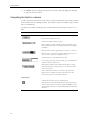
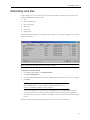
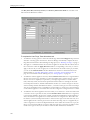
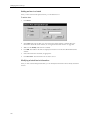
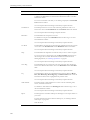
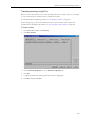
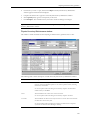
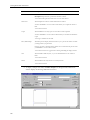
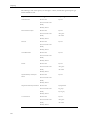
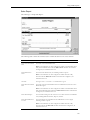
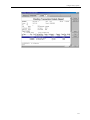
Completing the fields in a window
To add or modify the information stored in a table, you must enter information into or make selections
from the fields in the Store Manager windows. The windows contain several different types of fields
that are used differently.
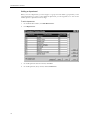
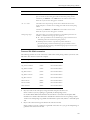
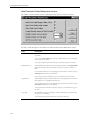
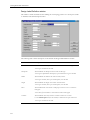
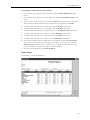
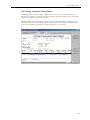
The table below describes the different types of fields and information and shows you how to use
them.
Field
How to use it
Buttons: Initiate actions.
Click a button to initiate the action.
Checkboxes: Enable or disable an option.
Click a checkbox to enable or disable an option. Checkboxes toggle
between being checked (option is enabled) and being cleared (option
is disabled).
Drop-down lists: Contain a predefined list of options, you select one.
Click the arrow to open the list of options. Click an option to select it.
Once you select an option, it is displayed in the list.
Fields: Require you to type information into them.
Use the keyboard to type a string or number, up to a predetermined
number of characters, into the box.
Radio buttons: Enable an option. Radio buttons appear in groups,
each button represents a related option, you can only select 1 radio
button in each group.
Click a radio button to enable it. A solid dot in the radio button
indicates that it is enabled. If you click a radio button, the other
buttons in the group are automatically deselected.
Window fields
Calendar button: Opens a pop-up calendar window.
Click the button to open the calendar window. Click arrow buttons to
select a month, then click a date in the calendar. Click OK to close the
calendar window. The date you selected is displayed in the field beside
the button.
20
Customizing Store Manager
This section provides information about customizing the Store Manager application. Customization
options that affect the entire Store Manager application include system parameters, language, security,
and third-party applications. The first time you use the Store Manager, the customization options must
be configured, afterwards the options are saved and recalled automatically each time the Store Manager
application starts. You can also customize the order in which the table records are displayed in each of
the Store Manager selection windows.
This section covers the following topics:
Defining the Store Manager system parameters
Changing the text in the Store Manager
Using security functions
Adding third-party application buttons to menu windows
Sorting table records in selection windows
21
Customizing Store Manager
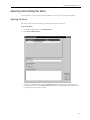
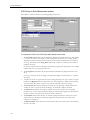
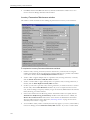
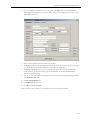
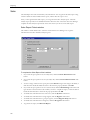
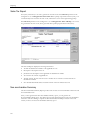
Defining the Store Manager system parameters
You must define the Store Manager general options before you define options for more specific
functions.
To define system parameters:
1.
On the Main Menu window, click Parameters Setup.
2.
On the Store Manager Parameters Menu window, click General Parameters.
3.
On the Security Menu, click General Security.
To define the general company and store information:
22
1.
Type the name of the company in the Company field. This field is limited to 50 characters.This is
the name that appears on reports.
2.
To enable the system to locate the store logo, type the full path and file name of the store logo in
the Logo field.
3.
Type the name of the store in the Store Name field. This field is limited to 50 characters. This is
the name that appears on reports.
4.
The store’s address is split into two sections. Type the street portion of the address in the Address
1 field, and type the remainder of the address in the Address 2 field. These fields are limited to 50
characters each. This is the address that appears on reports.
Defining the Store Manager system parameters
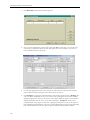
To set the server communication parameters:
1.
You can define the minutes that elapse before the message window, used by the server to
communicate with the Store Manager, is shut down and communication is aborted.Ensure that
the interval is no longer than the time required for communication during the End of Day
function or for the function that requires the longest communication.
Type the number of minutes in the Update Term. Interval field.
2.
To define how often the Store Manager searches for new electronic documents sent from your
head office, type the number of minutes between searches in the Elec. Doc. Search Interval
(minutes) field.
3.
To determine how often the server requests each POS terminal status, type the number of
seconds between requests in the Status Refresh Time (seconds) field.
4.
Type the maximum number of records that can be retrieved from a table and displayed in a
selection window, in the Maximum Retrieve Threshold field.
To configure the Generation of Unique PLUs:
1.
Click the Unique PLU Generation checkbox to generate a unique PLU. The Store Manager
generates a unique PLU when you click Generate Unique PLU on the PLU Maintenance
window.
2.
You can define the number that the Store Manager always uses as the first character of a PLU
when it generates a unique PLU. Type the number that you want to be the first character, in the
Leading Digit field.
3.
To set the length of the sequence portion of the PLUs that the Store Manager generates when you
use the unique PLU generation function, type the number in the No of Digits in Sequence field.
The sequence number follows the merchant ID, and increments each time the Store Manager
generates a PLU.
For example, if you type 2 into this field, the Store Manager generates a PLU comprised of a
leading character, merchant ID, 2 character sequence number, and check digit.
4.
Click on the Quick PLU New Item Default drop-down list and choose a default option.
5.
To define the merchant ID number that always follows the leading character in a PLU generated
by the Store Manager via the unique PLU generation function, type a number up to 5 characters
long in the Merchant ID field. This number appears in all generated PLUs. Leave the field blank
if you do not want the merchant ID to appear in the PLUs.
6.
The check digit follows the sequence number. To define the rule that determines the check digit
used in the PLUs that the Store Manager generates when you use the unique PLU generation
function, type an ID number in the Check Digit ID field. You should obtain the ID number
from your head office.
7.
To define the default vendor that is automatically entered into fields when you have not selected a
vendor, click the Default Vendor drop-down list and select a vendor from the list.
8.
To automatically print price stickers, click the Auto-Print Price Sticker Labels checkbox.
9.
To automatically print shelf labels, click the Auto-Print Shelf Labels checkbox.
23
Customizing Store Manager
To configure the Cash/Safe Management parameters:
1.
You can set the maximum amount that the cashier or register’s actual tender amount can be above
or below the system amount during balancing. Type a dollar amount, including decimals, in the
POS Balance Threshold field. If you require the cashiers and registers to balance exactly, leave
this field blank.
If the difference is larger than the threshold, the cashier or register is not balanced. The balance
transaction cannot be completed until the actual amount and the system amount are balanced to
within the threshold.
Your head office uses the Configurator to define whether balancing is performed by a cashier or a
register.
2.
You can set the maximum amount that the safe’s actual tender amount can be above or below the
system amount during balancing. Type a dollar amount, including decimals, in the Safe Balance
Threshold field. If you require the safe to balance exactly, leave this field blank.
If the difference is larger than the threshold, the safe is not balanced. The balance transaction
cannot be completed until the actual amount and the system amount are balanced to within the
threshold.
3.
To enable the EOD Pickup button on the POS Balance Maintenance window, click the Enable
EOD Pickup checkbox. The EOD Pickup button creates and completes a pickup to safe
transaction for the tenders in the POS balance transaction.
4.
Click the Retrieve System Amounts on Pickup checkbox.
5.
Click the Hide System Amounts (Blind Pickup) checkbox.
6.
Click the Issue Warnings on Over-the-Limit Pickups checkbox.
7.
Under Mandatory Reasons, click each checkbox to enable the corresponding option.
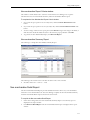
Changing the text in the Store Manager
You can change the text of all the headers, labels, and messages in the Store Manager from the default
english text into another language or into alternate english text. Whenever you enter new text for an
object, the original text is saved so you can recall it later.
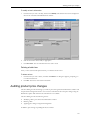
You can translate text by:
Opening the Translation window
Pressing the Ctrl key and right-clicking over a window item to open the Single-text Translation
window.
Both methods use categories and object groups to organize the original text and make it easier for you
to find the text that you want to change. Categories contain the types of items containing the text (for
example, command buttons, menu windows, messages). Object groups are specific windows or
buttons (for example, Administration Menu window). You can choose to change a single text within an
object group, all the text in a category, or all the text in the Store Manager.
For example, if you want to change the text of the Display All button that appears on the selection
windows, you can find it in the Command Button category and the Display All object group. If you
want to change the text of the message “Do you really want to CLOSE ALL terminals?”, you can find
it in the Messages category, Messages object group.
Changing a text for a single object
You can change the text for a single object.
24
Changing the text in the Store Manager
In the following steps, you are required to enter information and make selections in the Translation
window. For information about the fields in the window, see “Translation window” on page 26.If
WARNING!
If the text you are editing has double-slash separators (\\) in the original text, you
must make sure you maintain the pattern when you type the new text.
For example, menu text contains the option text, help text, short toolbar text, and
long toolbar text separated by the double-slash separators. You must use the same
pattern when you type the new text.
To change a single text:
1.
On the Main Menu window, click Administration.
2.
Click Translation.
3.
Click Category drop-down list. A list of categories appears.
4.
Click the appropriate category.
5.
Click the Object drop-down list. A list of objects in the category appears.
6.
Click the appropriate object. An alphabetical list of the text in the object appears in the bottom
half of the window.
7.
Click the text you want to change, and then type the new text into the field on the right side of the
window.
8.
Click Save, and then click Exit.
Tip: When you select text belonging to a button, window title, checkbox, tab,
field, radio button, or other window item, you can see immediately what the
new text looks like in the preview area at the bottom of the Translation
window.
Changing the text for all the objects in a category
The process of changing all the text in a category is very similar to the process for changing one text.
In the following steps, you are required to enter information and make selections in the Translation
window. For information about the fields in the window, see “Translation window” on page 26.
To change the text of all the objects in a category:
1.
On the Main Menu window, click Administration.
2.
Click Translation.
3.
Click the Category drop-down list. A list of categories appears.
4.
Click the appropriate category.
5.
Click Translate Selected Category. An alphabetical list of all the text in the category appears in
the bottom half of the window.
6.
Click the first text you want to change, and then type the new text into the field on the right side
of the window.
7.
Click the next text you want to change and type the new text into the field.
8.
Repeat the previous step until you have typed new text for all the text in the category.
9.
Click Save, and then click Exit.
25
Customizing Store Manager
Changing all the text in the Store Manager
You can change the text of all the objects in the Store Manager, regardless of their category.
In the following steps you are required to enter information and make selections in the Translation
window. For information about the fields in the window, see “Translation window” on page 26.
To change the text of all the objects in the Store Manager:
1.
On the Main Menu window, click Administration.
2.
Click Translation.
3.
Click Translate All Objects. An alphabetical list of all the text in the Store Manager appears in
the bottom half of the window.
4.
Click the first text you want to change, and then type the new text into the field on the right side
of the window.
5.
Repeat the previous step until you have typed new text for all the text in the Store Manager.
6.
Click Save, and then click Exit.
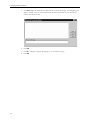
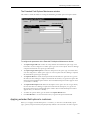
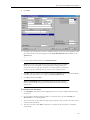
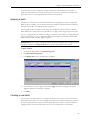
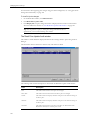
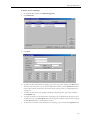
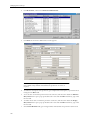
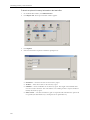
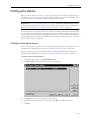
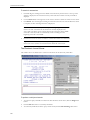
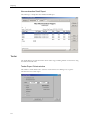
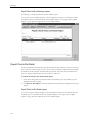
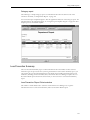
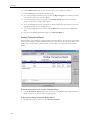
Translation window
This window contains the fields used for changing the text in the Store Manager.
26
1.
To display only unedited text in the list in the bottom half of the window, click the Not
Translated Texts Only checkbox. Text that has been edited is hidden. Clear the checkbox to
display all text.
2.
To list additional text related to the object you selected in the Single-text Translation window,
click Translate Ancestor Object.
3.
To define the new text, type an alphanumeric string in the Translated Text field. The new text
can be alternate English text, or another language.
Changing the text in the Store Manager
4.
To adjust the size of the field in which the text you selected appears, click the arrows in the Spin
Box.
Note: The Original Text field defines the original default English text. No action is required. The
Store Manager automatically completes this field.
27
Customizing Store Manager
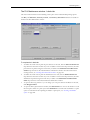
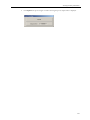
Using the Single-text Translation window
You can change most of the text that appears in the Store Manager in the Single-text Translation
window. You cannot translate text in messages, menu options, and system codes in the window.
To translate an individual text:
1.
Open the window that contains the text you want to change.
2.
Place your cursor over the text you want to change.
Note: To change the text of a window’s title bar or a tab name, place your
cursor over a free area of the window or tab.
3.
Press the Ctrl key and right-click simultaneously.
4.
Type the new text in the New Text field.
5.
Click OK. The text change is immediately applied.
Tip: You can click Shortcut to Translation to open the Translation window
from the Single-text Translation window. By default the category and object
that the original text belongs to are selected for you, so that all the options in
the same category and object are displayed for editing.
Using security features
The Store Manager has several security features that allow you to restrict access to the Store Manager,
and more specifically, who can access specific windows in the Store Manager.
Passwords restrict an employee’s access to the Store Manager, and authority levels assigned to
employees and to windows restrict an employee’s access to specific windows.
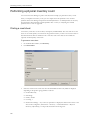
Changing a user’s password
Before they can access the Store Manager, employees must enter their user name and password. You
can change an employee’s password either in the Change Password window, or the Employee
Maintenance window (where you set up new employees). For more information about the Employee
Maintenance window, see “Maintaining employee files” on page 57.
To change an employee’s password:
1.
28
On the Main Menu, click Administration.
Using security features
2.
Click Change Password.
3.
In the Current Password field, type the employee’s password.
4.
In the New Password field, type the employee’s new password. The characters you type are
encoded and displayed as asterisks.
5.
In the Verify New Password field, type the new password again. The characters you type are
encoded and displayed as asterisks.
6.
Click OK. If the passwords you typed into the New Password and the Verify New Password
fields are not the same, a warning message displays requiring you to retype the password. If they
match, the password is saved.
7.
Click Exit.
Restricting access to selected windows and functions
You can assign authority levels to the Store Manager windows so that only authorized employees can
access them. You can define separate authority levels for viewing the information, and for updating the
information in windows. Window level security configuration is performed on the Worksheets Security
Setup window.
In addition, you can ensure that user’s with an inappropriate authority level do not gain access to an
active Store Manager session that has been left unattended. This is achieved by setting the appropriate
password and automatic logoff parameters in the General Parameter Setup window.
There are six levels of authority. Level zero is the lowest level, five is the highest level. Level six is used
to lock access to the window or function regardless of the user’s authority. If an employee has an
authority level lower than the level that you assign to a window or function, the window’s button or the
function is not visible to them in the menu windows.
You assign an employee an authority level in the Employee Maintenance window when you set them
up, but you can change that level at any time. For information about changing an employee’s authority
level, see “Changing a user’s authority level” on page 33.
WARNING! If the Backdoor Window Security Only parameter is turned on, only the backdoor user
has access to security maintenance, otherwise you must have an authority level of five to view and
update the information in the Worksheets Security Setup window. If you have an authority level less
than five, the Worksheets Security Setup window is not visible in the Store Manager Parameters Setup
Menu window.
To restrict access to a window:
1.
On the Main Menu, click Parameters Setup.
29
Customizing Store Manager
2.
On the Parameters Setup Menu, click Worksheets Security.
3.
If a list of the Store Manager windows is not visible in the window, click Add New Windows.
You only need to do this the first time you access this window after installing a new version of the
Store Manager software.
Note: The Window Description describes the window name; no action is
required. The Store Manager automatically completes this field.
30
4.
To assign the minimum authority level that an employee needs in order to edit information in the
corresponding window, click the Update Level drop-down list and choose an authority level
from the list.
5.
To assign the minimum authority level that an employee needs in order to open and view
information in the corresponding window, click the View Level drop-down list and choose an
authority level from the list.
6.
Click Save, and then click Exit.
Using security features
To restrict access to reports:
1.
On the Main Menu, click Parameters Setup.
2.
On the Parameters Setup Menu, click Report Mngmt Security.
Note: Report Design, and Report Export are automatically displayed in the
Function Description column.
3.
To prevent the Reports Design On and Reports Export buttons from displaying to the user, and
therefore disable that user from using these functions, click the Authority Level drop-down list
and select 6-Disabled.
4.
Click Save, and the Exit.
Cash management security
Cash management authority levels are assigned separately from all of the other features that require a
security setup. You can define view and update authority levels for each safe and each applicable
transaction type. Once the setup is complete, it is exported from the Store Manager as the cmsecur.asc
file. The file is then applied by the Xpress Server and can be downloaded to the POS terminals.
Note: Each safe is configured separately in the Configurator application. You can have access to five
safes.
31
Customizing Store Manager
To assign authority levels for each safe and transaction type:
1.
On the Main Menu, click Parameters Setup.
2.
On the Security Menu, click Cash Mngmt Security.
3.
To choose the safe that you want to set authority levels for, click the Safe drop-down list and
choose a safe from the list.
Note: The Transaction/Option column describes the name of the transaction
or option. No action is required, the Store Manager automatically completes
this field.
32
4.
To assign the minimum authority level that an employee needs in order to perform the
transactions shown in the Transaction/Option column, click the Update Level drop-down list
and choose an authority level from the list.
5.
To assign the minimum authority level that an employee needs in order to view information in the
corresponding window, click the View Level drop-down list and choose an authority level from
the list.
6.
Click Save, and then click Exit.
Using security features
Changing a user’s authority level
There are six authority levels that you can assign to an employee. Zero is the lowest level, five is the
highest level. You assign an employee an authority level when you set them up in the Employee
Maintenance window, and you can change the authority level later in the same window.
WARNING! By default, all of the Store Manager’s windows are restricted to employees with authority
levels of one or higher. An employee with an authority level of zero is not able to access any of the
windows in the Store Manager.
To change a user’s authority level:
1.
On the Main Menu window, click Administration.
2.
Click Employee Maintenance.
3.
On the Employee Selection window, click the appropriate employee’s record in the selection
window.
4.
Click Open. The Employee Maintenance window appears containing the employee’s information.
5.
Click the Authority Level drop-down list and select a new level from the list.
6.
Click Save, and then click Exit.
33
Customizing Store Manager
Adding third-party application buttons to windows
During a Store Manager session, you can launch and use a third-party application by clicking a button
on a menu window. To use this feature, you must customize the selection of third-party applications
that you want to be available, and place buttons for launching them on the Store Manager windows. In
addition, you can define in what state an application opens and assign authority levels to it to restrict
the employees who can use it.
Before you complete the following steps, you must know the name and path of the third-party
application’s executable. If you want a specific bitmap on the application’s button, you must know the
name and path of the .bmp (bitmap) file.
To add a third-party application button to a menu window:
34
1.
On the Main Menu window, click Parameters Setup.
2.
Click 3rd Party Parameters.
3.
Click the Store Manager menu window that you want to contain the third-party application’s
button from the menu list.
Adding third-party application buttons to windows
4.
Click Open.
Note: The Store Manager automatically completes the Menu field with the
name of the window that you choose in the selection window. No further
action is required.
5.
To assign a name to the third-party application’s button in the menu window, type the name of
the button in the Label field.
6.
To sort the order of the applications, type a number in the Picture checkbox to indicate the order
in which this particular application will appear. To locate the bitmap that appears in the third-party
applications’ button in the menu window, type the full path and name of the bitmap file in the
Picture field.
7.
Type the full name of the third-party applications’ executable file, in the Program Name field.
8.
To locate the third-party applications’ executable file, type the full path and name of the file in the
Program Path field.
9.
You can set the default state in which the third-party applications’ window opens. Click the
Maximized, Regular, or Minimized radio button.
10. To set the minimum authority level that an employee needs to launch the third-party application,
click the Authority drop-down list and choose an option from the list.
11. To designate the third-party application as the open and active application, click the Enabled
checkbox. Leave the checkbox clear and the Store Manager remains active when you launch the
third-party application.
12. Click Save, and then click Exit.
35
Customizing Store Manager
Sorting table records in selection windows
You can change the order in which a selection window displays a table’s records, so that it displays
information in an order that is useful to you.
There are two ways to change the sort order used in a selection window: by using the Specify Sort
Columns window, and by clicking the column header in the window. Both options base their sorting
on the values in the window’s columns.
Configuring the sort options
Before you can click a column header to change the sort order, you must enable sorting. In addition, to
save a sort order you define with the Specify Sort Columns window, you must configure the save
options. You can configure sorting options in the Sort Maintenance window.
To configure the sort options:
1.
On the Main Menu window, click Parameters Setup.
2.
From the Store Manager Parameters Menu window, click Sort Setup.
3.
Click the Allow Sorting checkbox to change the sort order when you click the column header.
You can also save the sort order that you define in the Specify Sort Columns window.
4.
To save the new sort order defined in the Specify Sort Maintenance window, click the Save Sort
Order checkbox. This checkbox is not available unless you enable the Allow Sorting checkbox in
this window.
5.
To save the sort order that you defined using the Specify Sort Columns window and link it to your
employee number, click the Save Sort by User ID checkbox. Each employee can have their own
sort settings that are triggered based on the employee number they used to log into the Store
Manager. This field is not available unless you enable the Allow Sorting checkbox in this window.
6.
Click Save, and then click Exit.
Sorting by clicking a column header
You can sort the table records in a selection window using the values in one of the window’s columns.
The change you make to the sort order using this method is not saved after you close the window.
Before you can sort by clicking the column header, you must click the Allow Sorting checkbox in the
Sort Maintenance window to enable sorting. For information about configuring sort options, see
“Configuring the sort options” on page 36.
36
Sorting table records in selection windows
To sort based on a column:
1.
On a menu window, click a button to open a selection window.
2.
Click the header of the column by which you want to sort the records. The records change order.
For example, in the File Maintenance Menu window, click Department Categories to open the
Category Selection window. The Category table’s records are sorted by category number.
3.
Click the Description column header to sort the records alphabetically by description.
Sorting using the Specify Sort Columns window
If you clicked the Save Sort Order or Save Sort by User ID checkboxes in the Sort Maintenance
window, the sort order you select in the following steps is saved and used the next time you open the
selection window.
37
Customizing Store Manager
To perform a sort:
1.
On a menu window, click a button to open a selection window. The selection window appears.
2.
Click Sort.
3.
From the Source Data area on the left side of the window, click and drag the first column by
which you want the records sorted, to the Order By area on the right side. The column is listed at
the top of the Order By area.
4.
If required, from the Source Data area, click and drag a second column to the Order By area.
The column is listed second in the Order By area. When you select more than one column to sort
by, the table records are sorted based on the first column, then by the second. You can have more
than two columns selected.
5.
Clear the Ascending checkbox if you want to sort the records in descending order.
Note: By default, the Ascending checkbox is checked and the records are
sorted in ascending order.
6.
38
Click OK. The table’s records are sorted in the new order.
Sorting table records in selection windows
Tip: To remove a column from the Order By area and therefore remove it
from the sort order, click and drag it into the Source Data area.
39
Customizing Store Manager
40
Managing the POS Terminals
This chapter provides information about controlling and customizing the store’s POS terminals using
the Store Manager. Control options include monitoring, opening and closing terminals, and opening
and closing the store. Customization options include changing the customer display at the POS
terminals, and changing the header and trailer text on customer receipts. In addition to controlling and
customizing options, this chapter describes how you can rebuild local files.
This chapter covers the following topics:
Monitoring and controlling POS terminals
Opening and closing the store
Changing the customer display
Changing the header and trailer information printed on receipts
Rebuilding local files
41
Managing the POS Terminals
Monitoring and controlling the POS terminals
You can monitor a POS terminal, open a POS terminal, and close a POS terminal using the Store
Manager. During the POS terminal opening and closing functions you can monitor a POS terminal
status.
When you close a POS terminal, its information is transferred to the server. When you open a POS
terminal, information is automatically transferred from the server to the POS terminal.
Monitoring a POS terminal
The information about the POS terminal you are monitoring, appears in the XPS Server Message box
in the Terminal Administration window.
To monitor a POS terminal:
42
1.
On the Main Menu window, click Administration.
2.
Click Store Administration.
3.
Click Monitor Terminal(s).
4.
Click the checkbox beside each POS terminal you want to monitor.
5.
Click Exit when the Open Store process is complete.
Monitoring and controlling the POS terminals
Tip: You can print a hard copy of the messages that appear in the XPS Server
Message Box by clicking Print Log. The log is printed on the default printer.
Opening or closing a POS terminal
The POS terminal status must be closed before you initiate the Open Terminal function. Its status
must be open before you initiate the Close Terminal function.
To open a POS terminal:
1.
On the Main Menu window, click Administration.
2.
Click Store Administration.
3.
Click the checkbox beside each POS you want to open.
4.
Click Open Terminal(s). The Open Terminal function begins. You can monitor the process in
the XPS Server Message Box. When the function is complete, the POS terminal status is open.
Note: If the Open Terminal function cannot be completed for any reason, the
following Terminal Admin Exception Handler window appears, providing a
reason for the failure.
43
Managing the POS Terminals
To solve the problem, click a radio button in the Action box, or you can click Exit to close the
window and abort the Open Terminal function.
5.
Click Exit when the Open Terminal process is complete.
To close a POS terminal:
44
1.
On the Main Menu window, click Administration.
2.
Click Store Administration.
3.
Click the checkbox beside each POS terminal you want to close.
Monitoring and controlling the POS terminals
4.
Click Close Terminal(s). The Close Terminal function begins. You can monitor the process in
the XPS Server Message Box. When the function is complete, the POS status is closed.
Note: If the Close Terminal function cannot be completed for any reason, the
following Terminal Admin Exception Handler window appears, providing a
reason for the failure.
To solve the problem, click a radio button in the Action box, or you can click Exit to close the
window and abort the Close Terminal function.
5.
Click Exit when the Close Terminal process is complete.
Tip: You can print a hard copy of the messages that appear in the XPS Server
Message Box by clicking Print Log. The log is printed on the default printer.
Opening or closing all POS terminals
You must close all POS terminals before you initiate the Open All Terminals function. You must open
all POS terminals before you initiate the Close All Terminals function.
To open all POS terminals in the store:
1.
On the Main Menu window, click Administration.
45
Managing the POS Terminals
2.
Click Store Administration.
3.
On the Terminal Administration window, click Open Terminals.
4.
The Open Terminals function begins. You can monitor the process in the XPS Server Message
Box. When the function is complete, the POS terminal status is open.
Note: If the Open Terminals function cannot be completed for any reason, the
following Terminal Admin Exception Handler window appears, providing a
reason for the failure.
46
Monitoring and controlling the POS terminals
To solve the problem, click a radio button in the Action box, or you can click Exit to close the
window and abort the Open Terminal function.
5.
Click Exit when the Open Terminal process is complete.
To close all POS terminals in the store:
1.
On the Main Menu window, click Administration.
2.
Click Store Administration.
3.
On the Terminal Administration window, click Close Terminals.
4.
The Close Terminal function begins. You can monitor the process in the XPS Server Message
Box. When the function is complete, the POS terminal status is closed.
47
Managing the POS Terminals
Note: If the Close Terminal function cannot be completed for any reason, the
following Terminal Admin Exception Handler window appears, providing a
reason for the failure.
To solve the problem, you can click a radio button in the Action box, or you can click Exit to
close the window, and then abort the Close Terminal function.
5.
Click Exit when the Close Terminal process is complete.
Tip: You can print a hard copy of the messages that appear in the XPS Server
message box by clicking Print Log. The log is printed on the default printer.
48
Opening and closing the store
Opening and closing the store
You can open the store or run the End of Day function to close the store in the Store Manager.
Opening the store
The store’s status must be closed before you initiate the Open Store function.
To open the store:
1.
On the Main Menu window, click Administration.
2.
Click Store Administration.
3.
On the Store Administration window, click Open Store.The Open Store function begins. You
can monitor the process in the Store Status and the XPS Server Message Box. When the function
is complete, the store’s status is opened.
49
Managing the POS Terminals
Note: If the Open Store function cannot be completed for any reason, a
Terminal Admin Exception Handler window appears, providing a reason for
the failure.
To solve the problem, click a radio button in the Action box, or click Exit to close the window
and terminate the Open Store function.
4.
Click Exit when the Open Store process is complete.
Tip: You can print a hard copy of the messages that appear in the XPS Server
Message Box by clicking Print Log. The log is printed on the default printer.
50
Opening and closing the store
Closing the store
All POS terminals must be closed before you initiate the End of Day function to close the store. If
your store is open 24 hours, POS terminals can be running, but they must be closed for the current
business date and re-opened under the next business date.
To close the store:
1.
On the Main Menu window, click Administration.
2.
Click Store Administration.
3.
On the Store Administration window, click run EOD.
4.
The End of Day function begins. You can monitor the process in the Store Status and the XPS
Server Message Box. When the function is complete, the store’s status is closed.
Note: If the End of Day function cannot be completed for any reason, the
following Terminal Admin Exception Handler window appears, providing a
reason for the failure.
51
Managing the POS Terminals
To solve the problem, click a radio button in the Action box, or click Exit to close the window
intermediate the End of Day function.
5.
Click Exit when the End of Day process is complete.
Tip: You can print a hard copy of the messages that appear in the XPS Server
Message Box by clicking Print Log. The log is printed on the default printer.
Changing the customer display
You can customize the messages that are shown on the customer display at the POS terminal. You can
choose the type of message that is displayed and you can define the text that appears.
In the following steps, you must enter information and make selections in the Customer Display
Maintenance window. For information about the fields in the window, See “Click Customer Display.”
on page 52.
To change the customer display:
52
1.
On the Main Menu window, click Parameters Setup.
2.
Click Customer Display.
3.
To determine whether the type of message shown on the POS terminal is fixed or scrolling, select
an option from the Message Type drop-down list.
4.
If you selected Fixed from the Type drop-down list, type an alphanumeric string up to 20
characters long, in the Fixed Message field.
5.
If you selected Scroll from the Type drop-down list, type an alphanumeric string up to 50
characters long, in each Scroll Message field.
6.
To define the message that is displayed when the POS terminal is closed, type an alphanumeric
string up to 20 characters long, in the Closed Message field.
7.
To define the message that is displayed when there is no cashier signed on at the POS terminal,
type an alphanumeric string up to 20 characters long, in the Sign-Off Message field.
8.
To define the message that is displayed when the POS terminal is locked, type an alphanumeric
string up to 20 characters long, in the Locked Message field.
9.
Click Save, and then click Exit.
Changing headers and trailers on receipts
Changing headers and trailers on receipts
You can customize the text that is printed in the header and trailer portions of the customer receipt at
the POS terminal.
You can define up to five lines of header text, and five lines of trailer text. The header and trailer text is
centered on the receipt when it is printed.
To change the header and trailer text:
1.
On the Main Menu window, click Parameters Setup.
2.
Click Receipt Logo.
3.
On the Receipt Logo Maintenance window, edit the text in the Header Lines fields to the way in
which you want it to appear on the customer’s receipt. Each string of text can be up to 20
characters long.
4.
Edit the text in the Trailer Lines fields to the way in which you want it to appear on the
customer’s receipt. Each string of text can be up to 20 characters long.
5.
Click Save, and then click Exit.
Tip: For the line of text to appear bold, type a backslash (\) before the first
character in the string.
Preparing to open a new store
During the installation of new store management and POS terminal software, unwanted data is
collected during testing and training. Before you begin to use the software in a live environment, you
must purge all of this data and clean up the system.
In the following steps you are required to perform an End of Day (Manager code 250), and a New
Store Reset (Manager Code 418) on a POS terminal. More information about manager codes, and
specifically Manager Codes 250 and 418, is available in the POS Xpress User Manual.
There are three major tasks that must be completed when you are preparing to open a store:
Perform an End of Day function on a POS terminal
Perform the New Store Reset function on a POS terminal
Perform the Final Clean Up in the Store Manager
Before you complete any of the following steps, all the store’s POS terminals must be closed. For
information about closing a POS terminal, see “Opening or closing all POS terminals” on page 45.
To clean up the system:
1.
Perform the End of Day function (Manager Code 250) on a POS terminal. Refer to the POS
XPress User Manual for more information about using manager codes to perform functions on a
POS terminal, and for more information about Manager Code 250.
2.
Perform the New Store Reset function (Manager Code 418) on every POS terminal. Refer to the
POS Xpress User Manual for more information about using manager codes to perform functions
on a POS terminal, and for more information about Manager Code 418.
53
Managing the POS Terminals
54
3.
Click Clean Up on the Administration Menu window of the Store Manager. A warning dialog box
appears notifying you that totals are deleted with this function, and that the New Store Reset
function must be performed.
4.
Click OK.
5.
Click Go. A dialog box appears, prompting you to confirm the clean up.
6.
Click OK.
Rebuilding local files
Rebuilding local files
A file containing the exact content of each of the following tables is created by selecting them in the
Local File Rebuild maintenance window:
PLU
PLU Cross Reference
Qty Level Pricing
Link Items
Promotions
Departments
Regularly scheduled rebuilds are configured in the Configurator, consult the Configurator User Guide
for more information.
Note: A parameter download will not occur during a rebuild
To perform a local file rebuild:
1.
On the Main Menu window, click Administration.
2.
Click Local File Rebuild.
3.
On the Local File Rebuild window, click the checkboxes beside the files that you want to rebuild.
4.
Click Start.
Note: The Abort button is active only when a rebuild is in progress. You must
click the Abort button to stop the regularly scheduled rebuild in order to
perform an immediate rebuild in the Store Manager.
5.
To abort the rebuild process of each file, click the Abort button on the Rebuilding Local File
pop-up window that shows the name of the file being rebuilt and the progress of the rebuild.
6.
To confirm the abort request, click Yes, or click No to cancel the request and continue the rebuild
process.
When the local file rebuild is complete the files are saved in the xps\txnsave directory.
55
Managing the POS Terminals
56
Managing Personnel
This section describes the employee maintenance tasks that can be performed using the Store Manager.
Administrative and personnel maintenance options including maintaining employee files.
Maintaining employee files
You can add, modify, delete, or deactivate employee records in the Store Manager. For an employee to
use the Store Manager, they must have a record. Employee records include names and addresses, but
they also include an authority level, password, employee discount rate, status (for example, full or
part-time), and commission rate. The values you enter into an employee’s record are used during a
Store Manager session for logging in and for security functions. They are also used at the POS terminal
during transactions such as employee sales.
Before you create an employee record, you must define the selections in the Employee Type,
Employee Status, and State/Province drop-down lists in the Employee Maintenance window. For
information about populating drop-down lists, see “Populating drop-down lists” on page 63.
To add or modify an employee’s record, you must enter information into the Employee Maintenance
window.
WARNING! Your head office can also set up employees and send the files to your store. As a result,
you can not only create new employee records, and modify or delete them, you can also modify and
delete the ones sent from your head office.
57
Managing Personnel
Adding an employee record
You need to add an employee record for all new employees. If an employee already has a record you
can modify it. Do not create a new record.
Before you complete the following steps, you must define the selections in the Employee Type,
Employee Status, and State/Province drop-down lists in the Employee Maintenance window. For
information about populating drop-down lists, “Populating drop-down lists” on page 63.
To add an employee record:
1.
On the Main Menu window, click Administration.
2.
Click Employee Maintenance. The Employee Selection window appears. This selection window
displays all the employees who have this store set as their home store, or who may be borrowed
from other stores.
Note: The Home/Borrowed parameter can be set in the Employee
Maintenance parameters section of the Administration settings in the
Configurator application. Additionally, in order to display only employees
affiliated with this store in the Employee Selection window, you will need to set
the Show Only Employees For This Store parameter to Yes in the
Backoffice parameters section of the Code Maintenance settings in the
Configurator.
58
Maintaining employee files
3.
Click New.
4.
On the Employee Maintenance window, complete the fields in the window, as required.
5.
Click Save, and then click Close.
Modifying an employee’s record
If an employee already has a record, you can modify it whenever necessary.
To modify an employee record:
1.
On the Main Menu window, click Administration.
2.
Click Employee Maintenance.
3.
Click Display All. This displays all the employees who have this store set as their home store, or
who may be borrowed from other stores.
4.
Click the employee record you want to modify, and then click Open.
5.
On the Employee Maintenance window, change the information in the fields, as required.
6.
Click Save, and then click Close. The new information in the employee’s record takes effect
immediately.
59
Managing Personnel
Deleting an employee’s record
You can delete an employee’s record from the database.
To delete an employee record:
1.
On the Main Menu window, click Administration.
2.
Click Employee Maintenance.
3.
Click Display All. This window displays all the employees who have this store set as their home
store, or who may be borrowed from other stores.
4.
Click the employee record you want to delete, and then click Delete. A dialog box appears,
prompting you to confirm the deletion.
5.
Click OK. The employee’s record is deleted.
Employee profiles and overtime calculations
Employee profiles are created and maintained in the Employee Selection window. You must first
enable the use of employee profiles in the Configurator application. See Chapter 12, “Managing
Personnel and Vendor Records” in “The Configurator User Guide” for further information.
To configure the hourly rate of pay and the automatic calculation of the overtime rate:
60
1.
On the Main Menu window, click Administration.
2.
Click Employee Maintenance.
3.
On the Employee Selection window, click to highlight an employee, and then click the Profiles
tab.
4.
Click New to create a new profile, or click Display All and then Open an existing profile.
5.
Type a unique number in the Profile ID field to identify this profile.
6.
Type a description in the Description field. For example Overtime.
7.
Type a number in the Overtime Factor field to represent the amount that is multiplied by the
hourly wage amount, to equal the hourly overtime rate of pay. For example, if the hourly rate is
$5.00, and the overtime factor is 1.5, then the hourly overtime rate of pay is $7.50.
8.
Click Save.
Maintaining employee files
9.
Click Open to open an employee profile.
10. Select Overtime from the Employee Profile drop-down list.
11. Type the hourly rate of pay in the Hourly Pay Rate field.
12. Click Save, and then click Exit.
The Employee Maintenance window
The following list of steps describes how to fill out the fields in the Employee Maintenance window.
1.
To identify the employee, type a unique number, up to 13 characters long, into the Employee ID
field.
Note: The Store Number is automatically displayed.
2.
Type the employee’s first name into the First Name field. The first name is limited to 17
characters.
3.
Type the employee’s last name into the Last Name field. The last name is limited to 17 characters.
4.
Type the employee’s street and unit address in the Address field. This field is limited to 30
characters.
5.
Type the city in which the employee lives in the City field. This field is limited to 20 characters.
6.
Select the state or province in which the employee lives from the State/Province drop-down list.
The states and provinces that appear in this drop-down list are defined in the Code Table
Maintenance window.
7.
Type the employee’s zip/postal code in the Zip/Postal Code field.
8.
Type the employee’s phone number, minus the hypens and brackets, in the Phone Number field.
9.
Type the employee’s Social Security or Social Insurance number in the SSN/SIN field.
10. To set the percentage discount amount that the employee receives during an employee sale, type
the percentage in the Employee Discount field. Leave this field empty if the default discount is
to be used.
61
Managing Personnel
11. To assign a number that identifies the employee as a salesperson, type an identification number in
the Sales Person Num field. You can generate sales reports and calculate commissions using this
identification number. This field is limited to 13 characters. If the employee is not a salesperson,
leave this field blank.
12. If the employee is a cashier, type a number in the Cashier Number field. This is the number that
they will use to log on to a POS terminal. This field is limited to 13 characters. If the employee is
not a cashier, leave this field blank.
13. To set the rate of commission, as a percentage, that the employee receives, type the percentage
amount in the Commission % field. Leave this field blank if the employee does not receive
commission.
14. Each PLU can have price levels defined. To determine which price level the employee pays during
employee sales, type the number that corresponds to the assigned price level, in the Price Level
field.
If price levels are used, a regular customer may pay one dollar for an item, while the employee pays
seventy cents. You can define price levels for each PLU in the Quantity Level Pricing window.
15. To select the type of employment (for example full-time or part-time), click the Employee Type
drop-down list and select an option.
The selection of employee types is defined in the Code Table Maintenance window.
16. To select the employment status (for example, permanent, temporary), click the Employee Status
drop-down list and select an option.
The selection of employee status’ is defined in the Code Table Maintenance window.
17. To allow a cashier to override the employee discount rate that you entered in the Employee Disc.
% field, click the Force Preset Emp. Discount checkbox. Leave this checkbox blank to override
the employee discount rate at the POS terminal.
18. Type a region number, that defines the location of the store in which the employee works, in the
Region Number field.
19. Select a number from the Authority Level drop-down list to allow the employee to perform
certain functions. Authority levels range from 1 (lowest) to 5 (highest).
Authority levels can be linked to POS terminal functions and to the Store Manager’s windows, so
that only authorized staff can perform certain functions.
20. To assign a password to an employee, type an alphanumeric string, up to 6 characters long, in the
Password field. The password is used to log on to the POS terminal and the Store Manager.
21. To verify the employee’s password, type the exact same string of characters in the Verify
Password field as you did in the Password field. When you click Save, if the two strings are not
the same, verification fails, and a warning dialog box appear.
62
File Maintenance Features
This section provides information about entering the basic information that is used by other functions
and windows in the Store Manager.
Basic information you can enter includes definitions of the categories, groups, departments, and user
flags used to classify items, selections in drop-down lists, tax rates, product vendors, and customer
files.
This section covers the following topics:
Populating drop-down lists
Setting up the product hierarchy
Setting up taxes
Setting up product vendors
Setting up tare weights
Entering another store’s information
Setting up customers
Maintaining extended customer fields
Populating drop-down lists
In many of the Store Manager ’s windows, you must make selections from drop-down lists. For several
of these boxes, you must define the selections that appear. If you do not define selections, the box’s
drop down lists remain empty.
You can define selections for the following drop-down lists:
Clock In/Out Adjustment Reasons (Payroll Clock In/Out Detail window)
Clock In/Out Display Worked Hours Type (Payroll Parameters Maintenance window)
Customer Status (Customer Maintenance window)
Customer Type (Customer Maintenance window)
Employee Status (Employee Maintenance window)
Employee Type (Employee Maintenance window)
Province/State Codes (Employee Maintenance window, Store Maintenance window, Vendor
Maintenance window, Customer Maintenance window)
Vendor Types (Vendor Maintenance window)
Reason Code (all tender management maintenance windows)
Adjustment Reason (Physical Inventory Maintenance window)
63
File Maintenance Features
Order Type (Purchase Order Maintenance window)
Physical Inventory Locations (Physical Inventory Maintenance window)
Physical Inventory Reasons (Physical Inventory Maintenance window)
Receiving Type (Receiving window)
Ship Type (Receiving window)
Short/Over Reasons (Receiving window)
Transfer Reasons (Store Transfer by PLU window, Store Transfer by Case window)
WARNING! Your head office can also define selections and send the files to your store. As a result,
you can not only create new selections, and modify or delete them, you can also modify and delete the
ones sent from your head office.
To add selections to a drop-down list:
64
1.
On the Main Menu window, click File Maintenance.
2.
Click ID/Codes.
3.
On the Code Table Maintenance window, click the Code Table drop-down list and select the list
that you want to populate. The existing selections for the drop-down list you select are displayed
in the lower part of the window.
4.
Click New. A blank line is added to the list of selections.
5.
In the Code field, type a number. The number should follow sequentially the ID number of the
selection above this one. Type 1, if this is the first selection for the drop-down list.
Setting up the product hierarchy
Note: You must type a number in the Code field. If you type letters into the
field, an error message appears when you try to use the drop-down list.
6.
Type an alphanumeric string, up to 30 characters long, in the Description field. This text appears
as the selection in a drop-down list.
7.
Click Save, and then click Exit.
Tip: To modify a selection that is already entered, click the selection, and edit
the text in the Description field. To delete a selection, click the selection, and
click Delete.
Once you have populated a drop-down list with selections, the selections appear when you click the
drop-down list in the maintenance window where it is located.
Setting up the product hierarchy
All items sold in your store have PLU numbers to identify them. Before you can set up a PLU, you
must define the product hierarchy that classifies PLUs.
The product hierarchy is as follows, from the highest level to the lowest level. You must define the
hierarchy in this same order, from highest to lowest. The order is listed below:
Categories
Groups
Departments
User Flags
You must create a category before you can assign groups to it and you must create a group before you
can assign departments to it. User flags allow you to further classify items by creating divisions in a
department.
WARNING! Your head office can also create categories, groups, departments, and user flags and send
the files to your store. You can modify or delete the ones created by your head office as well as the
ones you define.
Defining categories
Categories are highest in the product hierarchy. Categories contain groups.The Category table has a
selection and a maintenance window.
You can add, modify, or delete category records in the Store Manager. You must create categories
before you can assign groups to them.
To add or modify a category, you must enter information into the Department Category Maintenance
window.
65
File Maintenance Features
Adding a category
After you have defined a category, you can define groups and assign them to the category.
To add a category:
1.
On the Main Menu window, click File Maintenance.
2.
Click Department Categories.
3.
Click New.
4.
On the Department Category Maintenance window, type a number in the Category Number
field that identifies the category.
5.
In the Category Description field, type a description of the category up to 40 characters long.
6.
Click Save, and then click Exit.
Once you have defined a category, you can define and assign groups to it.
Modifying a category
You can modify the description of a category after it is defined.
To modify a category:
66
1.
On the Main Menu window, click File Maintenance.
2.
Click Department Categories.
3.
Click Display All. The existing categories are displayed in the selection window.
4.
Click the category you want to modify, and then click Open. The Department Category
Maintenance window appears, containing the category’s information.
5.
Edit the text in the Description field.
6.
Click Save, and then click Exit.
Setting up the product hierarchy
Deleting a category
You should only delete a category if there are no groups assigned to it.
To delete a category:
1.
On the Main Menu window, click File Maintenance.
2.
Click Department Categories.
3.
From the Department Categories Selection window, click Display All. The existing categories are
displayed in the selection window.
4.
Click the category you want to delete, and then click Delete. A dialog box appears, prompting you
to confirm the deletion.
5.
Click OK. The category is deleted.
Defining groups
Groups are the second highest level in the product hierarchy. Groups are in categories and, in turn,
groups contain departments.
You can add, modify, or delete group records in the Store Manager. You must create groups before
you can assign departments to them.
Adding a group
When you create a group, you must assign it to a category. You must define a category before you can
assign groups to it. After you have defined a group, you can define departments and assign them to the
group.
To add a group:
1.
On the Main Menu window, click File Maintenance.
2.
Click Department Groups.
67
File Maintenance Features
3.
On the Department Groups Selection window, click New.
4.
On the Department Group Maintenance window, assign a unique number to identify the group, in
the Group Number field.
5.
Type a description of the group, in the Group Description field.
6.
Click the Category Description drop-down list and select the category to which the group
belongs.
Note: The Category Number appears automatically with the identification
number of the category that you selected in the Category Description
drop-down list.
7.
Click Save, and then click Exit.
Once you have created a group, you can create and assign departments to it.
Modifying a group
You can modify a group after it is defined.
To modify a group:
68
1.
On the Main Menu window, click File Maintenance.
2.
Click Department Groups.
3.
On the Department Groups Selection window, click Display All.
4.
Click the group you want to modify, and then click Open. The Department Group Maintenance
window displays the group’s information.
5.
Change the information in the fields, as appropriate.
6.
Click Save, and then click Exit.
Setting up the product hierarchy
Deleting a group
You should only delete a group if there are no departments assigned to it.
To delete a group:
1.
On the Main Menu window, click File Maintenance.
2.
Click Department Groups.
3.
On the Departments Selection window, click Display All. The existing groups are displayed in the
selection window.
4.
Click the group you want to delete, and then click Delete. A dialog box appears, prompting you to
confirm the deletion.
5.
Click OK. The group is deleted.
Defining departments
Departments are the third level in the product hierarchy. Departments are assigned to groups and, in
turn, departments contain PLUs.
You can add, modify, or delete department records in the Store Manager. You must create
departments before you can assign PLUs to them. You can also further separate a department with
user flags.
To add or modify a department, you must enter information into the Department Maintenance
window.
69
File Maintenance Features
Adding a department
When you create a department, you must assign it to a group. You must define a group before you can
assign departments to it. After you have defined a department, you can assign PLUs to it. You can also
further separate a department with user flags.
To add a department:
70
1.
On the Main Menu window, click File Maintenance.
2.
Click Departments.
3.
On the Departments Selection window, click New.
4.
On the Department (New) window, click the General tab.
Setting up the product hierarchy
WARNING! Some options that you can define in the Department
Maintenance window are also defined on an item-by- item basis in the PLU
Maintenance window. If you click the Use Department checkbox in the PLU
Page 1 tab of the PLU Maintenance window, the tax, itemizer, discount, return,
and scale item options you define in this window are used for the item. If you
leave the Use Department checkbox clear, the options you define in the PLU
Maintenance window are used for the item
5.
In the General tab, type a number in the Department field that identifies the department.
6.
Type a description of the department in the field adjacent to the Department number. This field is
limited to 40 characters.
7.
Click the Dept. Group drop-down list and select the group that the department belongs to.
8.
You can define the price of all the PLUs in the department. Type an amount, including decimal
places, in the Preset Amount field. All of the items are then sold at the same price. Use the Force
Preset option to prevent the cashier from changing the price of an item at the POS. Leave this
field blank if you do not want all the PLUs in the department to have the same price.
9.
To make the preset price of an item unalterable at the POS, click the Force Preset checkbox.
Clear the checkbox to allow the cashier to change the preset price of an item in this department.
10. To define the minimum price that a PLU in this department can have, type an amount, including
decimal places, in the Min Price field.
11. To define the maximum price that a PLU in this department can have, type an amount in the Max
Price field.
12. To allow an item in this department to be sold for a 0 price, click the Allow Zero Price checkbox.
13. Type a description of the amount in the Add. Amt Desc. field. This description is printed on the
customer’s receipt. This field is limited to 50 characters.
14. To determine the additional amount that is charged when a PLU in this department is purchased,
type an amount, including the decimal places, in the Add. Amount field. For example, a bottle
deposit is charged whenever a customer purchases soda pop. Leave this field blank if you do not
want to assign an additional amount.
71
File Maintenance Features
15. To assign a minimum authority level that a cashier needs to sell an item in this department, click
the Auth Level drop-down list and select a level from the list. The lowest authority level is 1, the
highest is 5.
You can assign authority levels to cashiers in the Employee Maintenance window.
16. To determine on which menu this department appears at the POS terminal, type a menu
identification number in the Menu No field. Menus are defined by your head office in the
Configurator. You can obtain the menu identification number from your head office. Type a 0 in
this field if you do not want the department to appear on a menu.
17. The prompt ID defines the prompt sequence that is triggered when a cashier enters an item in this
department into a transaction. Type a prompt identification number in the Prompt ID field.
Prompts are defined by your head office in the Configurator. You can obtain the prompt ID
number from your head office.
18. To ensure that the prices of the items in this department are positive, click the Positive Dept
checkbox. Clear this checkbox to allow negative prices. For example, if the items in the
department were bottle returns and steam cleaner deposit refunds, you would define the prices as
negative.
19. If a PLU is required for a cashier to sell an item in this department, click the PLU Required
checkbox. Clear the checkbox to allow department sales. If a PLU is not required, the cashier can
sell an item by selecting a department and entering a price at the POS terminal.
20. Click on the Cost Required drop-down list and select an option.
21. Type a tare weight identification number in the Tare Weight field to define the weight of the
packaging used for items in this department. The weight is deducted from the item’s total weight
to calculate the price. The tare weight is only applied to items that are weighed. If the tare weight
is different for various items in this department, use the Tare Weight field in the PLU Page 1 tab
on the PLU Maintenance window to assign tare weights on an item-by-item basis.
22. If the items in this department are weighed, click the Scale Item checkbox. If only some items in
the department need to be weighed, enable weighing on an item-by-item basis by checking the Use
Scale checkbox in the PLU Page 1 tab on the PLU Maintenance window.
23. To allow the cashier to enter quantities for items, click the Qty Mode checkbox. If you allow the
cashier to enter quantities, you can enable the Allow Decimal Qty checkbox in this window to
allow decimal quantities. If you require the cashier to type a quantity for items in this department,
enable the Qty Required checkbox in this window.
24. To describe the unit of measurement that prints on a receipt when a cashier sells an item (for
example, grams, liters, lbs) in this department, type a description in the Qty Desc field. This field
is limited to 15 characters.
25. If cashiers are allowed to enter partial quantities for items in this department (for example 1/2 lb),
click the Allow Dec. Qty checkbox. This feature is only enabled if you click Allow Quantity or
Qty Required in this window.
26. To enable a cashier to make discount transactions for items in this department, click the Allow
Discount checkbox.
27. Type a discount identification number in the Auto Disc ID field to define the automatic discount
applied to items in this department. Type a 0 in this field if you do not want an automatic discount
applied. Discounts are defined by your head office in the Configurator. You can obtain the
Discount ID number from your head office.
28. To enable employee discounts on items in this department during an employee sale transaction,
click the Allow Empl Disc checkbox.
29. Type an amount that represents the % discount that is allowed on employee sale transactions, in
the Empl Disc % field.
72
Setting up the product hierarchy
30. To enable a cashier to enter items in this department in to a regular sale transaction, click the
Allow Sale checkbox.
31. To enable a cashier to enter items in this department in to an exchange transaction, click the
Allow Exchange checkbox.
32. To enable a cashier to enter items in this department in to a return transaction, click the Allow
Returns checkbox.
33. To enable a cashier to enter items in this department in to a return transaction without a receipt,
click the Allow Rtn w/o Rcpt checkbox.
34. To allow pending transactions on items in this department, click the Allow Pend. Trans.
checkbox.
35. Click Save, and then click Exit.
Assigning taxes to a department
The Taxes tab contains the fields used for defining the taxes that can be assigned to departments.
To assign taxes to a department:
1.
On the Main Menu window, click File Maintenance.
2.
Click Departments.The existing departments are displayed in the selection window
3.
Click Open to open the department to which you want to apply the taxes.
4.
Click the Taxes tab.
5.
Click the Itemizer 1-4 checkboxes that define the itemizers applied to items in this department.
You can use up to 4 itemizers to restrict the tenders that a customer can use to pay for the items.
You do not explicitly set up itemizers, you simply assign itemizers to tenders and to departments,
and if they match, the items in the department can be purchased with the tender. Itemizers can
also be used to restrict discounts and items in addition to tenders.
For example, if the tender food stamps has itemizer ID 2, and department 3 has itemizer ID 2, a
customer can pay for an item in the department with food stamps. If department 4 has itemizer
ID 1, a customer cannot pay for items in it with food stamps.
73
File Maintenance Features
Note: Itemizers are assigned to tenders in the Configurator by your head
office.
6.
Click the Itemizer Taxes 1-4 checkboxes in this window to assign taxes to the itemizers applied
to the department.These checkboxes define the taxes that are applied to items in this department
when you use itemizers to restrict the tenders that a customer can use to purchase them.
For example, assume department 3 is assigned itemizers 1 and 3, and itemizer 1 is assigned taxes 1
and 2, and itemizer 3 is assigned tax 2. The tender cash has itemizer 1, and food stamps has
itemizer 3. If the customer pays for an item in department 3 with cash, tax 1 and 2 is applied. If the
customer pays for the item with food stamps, only tax 2 is applied.
If you want to assign taxes to items in the department based on the tender the customer uses to
pay for them, you can use these checkboxes.
For more information about defining taxes, see “Setting up taxes” on page 80.
For more information about itemizers, see the description for the Itemizer 1-4 checkboxes above.
74
Setting up the product hierarchy
Modifying a department
You can modify a department after it is defined.
To modify a department:
1.
On the Main Menu window, click File Maintenance.
2.
Click Departments.
3.
Click Display All. The existing departments are displayed in the selection window.
4.
Click the department you want to modify, and then click Open.
5.
Change the information in the fields, as appropriate.
6.
Click Save, and then click Exit.
Deleting a department
You should only delete a department if there are no PLUs assigned to it.
To delete a department:
1.
On the Main Menu window, click File Maintenance.
2.
Click Departments.
3.
Click Display All.
4.
Click the department you want to delete, and then click Delete. A dialog box appears, prompting
you to confirm the deletion.
5.
Click OK. The department is deleted.
Configuring the print options
To configure the department’s printing options.
1.
On the Main Menu window, click File Maintenance.
2.
Click Departments.
3.
Click Open to open the department to which you want to apply the print options.
75
File Maintenance Features
4.
Click the Print Options tab.
5.
If the regular prices of items in this department are printed on customer receipts, click the Print
Reg. Retail Price checkbox. For more information about defining PLUs, see “Maintaining
PLUs” on page 142.
6.
Click the Print Slip checkbox if receipts are printed on a slip printer when the cashier sells an item
in this department. You can define other characteristics of slip printing using the Slip Advanced
Lines, and Slip Total Lines fields in this window.
7.
To define the number of lines to advance before printing begins, if receipts for items in this
department are printed on a slip printer, type then number of lines in the Slip Advanced Lines
field. You can define if the receipts are printed on a slip printer using the Print Slip checkbox in
this window.
8.
To define the number of lines of text that can be printed on each receipt, type the number of lines
in the Slip Total Lines field.
9.
Type the number of spaces the printing is indented on each receipt, in the Slip Indent field.
10. To set the number of validations that the cashier must perform when they sell an item in this
department, type the number of required validations in the Number of Validations field.
11. Type the remote printer number in the Remote Printer Number field.
12. Select a type of remote print control option from the Remote Printer Control drop-down box.
76
Setting up the product hierarchy
Defining user flags
User flags provide you with a way to further classify items. You can define up to six user flags and
options for each flag. After you have defined user flag options, you can assign them to PLUs and you
can assign options from user flags 1 and 2 to promotions. Different PLUs can be in the same
department, but you can assign different user flag options to them.
For example, assume that you define the following options to User Flag 1 (Seasonal): Christmas,
Easter, and Valentine’s. You can assign different options to three PLUs in the floral department:
PLU 58962247 (christmas tree) Christmas option
PLU 45846317 (daffodils) Easter option
PLU 78271249 (rose bouquet) Valentine’s option
For information about assigning user flag options to PLUs, see “The PLU Maintenance window - User
Flags, Taxes & Itemizers tab” on page 147. For information about assigning user flag options to
promotions, see “Setting up promotional pricing” on page 185.
You can also use the user flag options to generate the Item Movement report using the user flag
options as criteria to track the sales of the items you assign the options to. For information about the
Item Movement report, “Item Movement” on page 303.
Creating a new user flag option
You can create user flag options for six user flags.
Tip: You can name a user flag by clicking the UserFlag No drop-down list and selecting the flag, then
typing a name into the UserFlag Name field. The name can be up to 10 characters long.
To add a user flag option to a user flag:
1.
On the Main Menu window, click File Maintenance.
77
File Maintenance Features
2.
Click User Flags.
3.
From the User Flags Maintenance window, click the UserFlag No drop-down list and select a
user flag from the list. The existing options for the user flag are displayed in the lower part of the
window.
4.
Click New. A blank line is added to the bottom of the window.
5.
Click the Code ID field and type a code ID number. The Code ID must follow sequentially the
Code ID of the option above it. If there are no other options defined for the user flag, type 1 into
the Code ID field.
6.
Click the Code Name field and type a short name for the option, up to 10 characters long. The
code name appears in drop-down lists when you apply the options in the PLU Maintenance
window and the Promotions Maintenance window.
7.
Click the Description field and type a description for the option, up to 20 characters long. The
description appears in drop-down lists when you apply the options in the PLU Maintenance
window and the Promotions Maintenance window.
8.
Click Save, and then click Exit.
Modifying a user flag option
You can modify the code names and descriptions of existing user flag options.
To modify a user flag option:
78
1.
On the Main Menu window, click File Maintenance.
2.
Click User Flags.
3.
Click the UserFlag No drop-down list and select the user flag that contains the option you want
to modify. The existing options for the user flag are displayed in the lower part of the window.
4.
Click the option that you want to modify.
Setting up the product hierarchy
5.
Click the Code Name field or the Description field and type the new information. The code
name can be up to 10 characters long and the description can be up to 20 characters long.
6.
Click Save, and then click Exit.
Deleting a user flag option
You cannot delete a user flag, but you can delete the options you have created for it. If you have
assigned an option to a PLU or promotion, you should not delete it.
To delete a user flag option:
1.
On the Main Menu window, click File Maintenance.
2.
Click User Flags.
3.
Click the UserFlag No drop-down list and select the user flag that contains the option you want
to delete. The existing options for the user flag are displayed in the lower part of the window.
4.
Click the option that you want to delete, and then click Delete. A dialog box appears, prompting
you to confirm the deletion.
5.
Click OK. The option is deleted from the user flag.
79
File Maintenance Features
Setting up taxes
When you define departments and PLUs, you can assign the taxes that are charged to the customer
when items are sold at the POS terminal. You can define the characteristics of up to 16 taxes and you
can assign taxes 1-4 to items in the Store Manager. Your head office can use the Configurator to assign
taxes 5-16 to items, if necessary.
You can define standard types of taxes and step taxes. Step taxes result in the customer paying a
different tax rate based on the price of the item. To set up a step tax, you must define price ranges and
the corresponding tax rate for each range.
WARNING! Your head office can also set up taxes and send the files to your store. As a result, you
can create new taxes, modify or delete them, and you can also modify and delete the ones sent from
your head office.
Adding a tax
You can set up a maximum of 16 taxes.
To set up a tax:
80
1.
On the Main Menu window, click File Maintenance.
2.
Click Taxes.
3.
Click New.
4.
On the Tax Maintenance window, click the General tab.
5.
Tax ID is the unique number that identifies the tax. Type a number, between 1 and 16 in the Tax
ID field.
6.
Type a description of the tax in the Description field. This description is printed on the
customer’s receipt.
7.
You can define the character that is printed beside each taxable item on the customer’s receipt.
Type a single character in the Print Chr field.
8.
To determine the tax rate that is used to calculate the amount in a basic flat tax, type a percentage,
up to 3 decimal places, in the Tax Rate field.
Setting up taxes
9.
You can set the third decimal place threshold above which the tax amount is rounded up. For
example, if the tax amount is calculated at $1.543 and the round digit is 3, the tax amount is
rounded up to $1.55. If the round digit is 5, the tax amount is rounded down to $1.54.
Click the Round Digit drop-down list and select a digit from the list. Select All if you want the tax
amount to always round up.
10. To determine how the tax is applied relative to other taxes, click the Tax Class drop-down list and
select a class from the list.
11. To set the minimum amount that a transaction subtotal must reach before the tax is applied, type
an amount, including decimal places, in the Min Tax field.
For example, if a transaction subtotal is $10.99 and the minimum tax amount is $12.00, the tax is
not charged.
12. If the tax is calculated based on the transaction subtotal plus the other tax amounts, click the Tax
On Tax checkbox. If you have several taxes applied to an item or transaction, only 1 can be set-up
to apply tax on tax.
13. To make the tax a value added tax embedded in the items price, click the Use VAT checkbox.
14. To make the tax a value added tax that should be embedded in the item’s price and is not, click the
Add VAT To Item Price checkbox. When the cashier enters the item into a transaction, the tax
amount is calculated and added to the item’s price.
15. You can define how information about this tax is presented in Sales reports, if it is a value added
tax. It can appear in the tax, gross reduction, or other reduction section.
Click the Sales Report Location drop-down list and select an option from the list. Select No
print if you do not want the information to appear on reports.
You must use the Use VAT or the Add VAT to Item Price checkbox in this window to indicate
that the tax is a VAT.
16. You can choose to print the tax description, the description and the amount, or to not print the
VAT information on the customer’s receipt. Click the Print Style drop-down list and select a
print option from the list.
You must enable the Use VAT or the Add VAT to Item Price fields in this window to indicate
that the tax is a VAT.
17. To set a threshold transaction amount below which the tax is not charged, type and amount,
including decimal places, in the Threshold Amount field. If you do not click either the Use On
Item Amount or Use On Differential checkboxes, the threshold amount is applied to the
transaction total. The tax is applied to the entire transaction if the transaction amount is higher
than the threshold amount.
18. To apply tax to items with prices exceeding the threshold amount that you define in the Tax
Threshold Amount field, click the Use On Item Amount checkbox.
19. To apply tax to the difference between the threshold amount and the item’s price, click the Use
On Differential checkbox.
20. Click Save, and then click Exit.
81
File Maintenance Features
Modifying a tax
You can modify an existing tax.
To modify a tax:
1.
On the Main Menu window, click File Maintenance.
2.
Click Taxes.
3.
Click Display All. The existing taxes are displayed in the window.
4.
Click the tax you want to modify, and then click Open. The Tax Maintenance window displays the
tax’s information.
5.
Change the fields in the window, as appropriate.
6.
Click Save, and then click Exit.
Deleting a tax
Unless you want to stop the tax from being charged, you should only delete a tax if it is not assigned to
any items or departments.
To delete a tax:
1.
On the Main Menu window, click File Maintenance.
2.
Click Taxes.
3.
On the Tax Selection window, click Display All. The existing taxes are displayed in the window.
4.
Click the tax you want to delete, and then click Delete. A dialog box appears, prompting you to
confirm the deletion.
5.
Click Yes. The tax is deleted.
Tax Maintenance Print Options tab
This window contains the fields used for setting up how tax information is printed on receipts and
reports. The field descriptions follow.
82
Setting up taxes
To set the Tax Print Options parameters:
1.
To print the tax description on the customer’s receipt, even if the tax is not charged, click the On
Receipt checkbox.
2.
To print the tax description on the sales report, even if the tax is not charged, click the On Sales
Reports checkbox.
3.
To print the manual tax description when the cashier applies a manual tax, but a zero tax amount
is calculated, click the If Manual checkbox to print the manual tax description when the tax is not
charged.
4.
To add the total of this tax to the total of another tax, and to print the combined total on the
receipt, type the ID number of the other tax in the Sum Tax ID for Receipt field.
5.
To add the total of this tax to the total of another tax, and to print the combined total on the sales
report, type the ID number of the other tax in the Sum Tax ID for Report field.
Setting up Step Taxes
The Tax Steps tab contains the fields used for setting up step taxes.
The Store, Region, Type, Description, and Print Character fields are accessible on all the tabs in
the Tax Maintenance window. These fields are described in “Tax Maintenance Print Options tab” on
page 82.
Tax steps are the tax amounts charged for items or transactions priced lower than, or equal to, the
amounts in the step fields. For example, if you enter the following into fields 1-3
1 .25
2 .30
3 .35
the following taxes are applied:
$.01 is charged on purchases between $.01 and $.25
$.02 is charged on purchases between $.26 and $.30
$.03 is charged on purchases between $.31 and $.35
83
File Maintenance Features
1.
Type a currency amount, including decimal places, into each step box. Steps 1 to 52 define tax
amounts that correspond to the 52 tax steps. You do not need to define amounts for all 52 steps.
2.
The Break Point field defines the amount where the tax step fields repeat. Type a currency
amount, including decimal places, in the Break Point field.
The pattern you define in the Steps 1-52 fields is used to calculate the taxes for higher amounts.
For example, if you enter the following into fields 1-3:
1 .25
2 .30
3 .35
Break point: .35
$.01 is charged on purchases between $.01 and $.25
$.02 is charged on purchases between $.26 and $.30
$.03 is charged on purchases between $.31 and $.35
$.04 is charged on purchases between .$36 and $.40
$.05 is charged on purchases between $.41 and $.45
Setting up product vendors
Vendors are the suppliers of the products you sell in your store. You can maintain vendor records in
the Store Manager. When you create a vendor’s record, the vendor is added to the selections in
drop-down lists where you are required to select a vendor, such as in the General Parameters
Maintenance window and the Purchase Order Maintenance window.
Before you create a vendor record, you must define the selections in the Vendor Type and State/
Province drop-down lists. For information about populating drop-down lists, see “Populating
drop-down lists” on page 63.
To add or modify a vendor’s record, you must enter information and make selections in the Vendor
Maintenance window. For information about the fields in the window, see “The Vendor Maintenance
window” on page 87.
Adding a vendor
When you create a vendor’s record, the vendor is added to the selections in drop-down lists where you
are required to select a vendor, such as in the General Parameters Maintenance window and the
Promotions Maintenance window.
Before you complete the following steps, you must define the selections in the Vendor Type and
State/Province drop-down lists. For information about populating drop-down lists, see “Populating
drop-down lists” on page 63.
In the following steps, you must enter information and make selections in the Vendor Maintenance
window. For information about the fields in the window, see “The Vendor Maintenance window” on
page 87.
To create a vendor’s record:
1.
84
On the Main Menu window, click File Maintenance.
Setting up product vendors
2.
Click Vendors button.
3.
Click New button.
4.
Complete the fields in the window, as appropriate.
5.
Click Save, and then click Exit.
Modifying a vendor’s information
You can modify the information in an existing vendor file.
In the following steps you are required to enter information and make selections in the Vendor
Maintenance window. For information about the fields in the window, see “The Vendor Maintenance
window” on page 87.
To modify a vendor’s record:
1.
On the Main Menu window, click File Maintenance.
2.
Click Vendors.
3.
Click Display All. The existing vendors are displayed in the selection window.
4.
Click Open. The Vendor Maintenance window appears containing the vendor’s information.
5.
Change the fields in the window, as appropriate.
6.
Click Save, and then click Exit.
85
File Maintenance Features
Deleting a vendor
You can delete a vendor’s file. You should not delete a file if you have selected the vendor in any fields.
To delete a vendor’s file:
86
1.
On the Main Menu window, click File Maintenance.
2.
Click Vendors.
3.
Click Display All. The existing vendors are displayed in the selection window.
4.
Click the vendor whose file you want to delete, and then click Delete. A dialog box appears,
prompting you to confirm the deletion.
5.
Click OK. The vendor’s file is deleted.
Setting up product vendors
The Vendor Maintenance window
This window contains fields used for creating vendor records.
To set the Vendor Maintenance window parameters:
1.
Type a unique number in the Vendor ID field that identifies the vendor.
2.
The Vendor Name field contains the vendor’s name. The text you type into this field appears in
drop-down lists where you select a vendor. Type an alphanumerical string, up to 35 characters
long, into the field.
3.
Type the number and street portion of the vendor’s address in the Address field.
4.
Type the city portion of the vendor’s address in the City field.
5.
Click the State/Province drop-down list and select the vendor’s state or province. You define the
selection of states and provinces that appear in this drop-down list in the Code Table Maintenance
window. For more information about populating the drop-down list, see “Populating drop-down
lists” on page 63.
6.
Type the zip (United States) or postal code (Canada) portion of the vendor’s address in the Zip/
Postal field.
7.
To defines the type of products the vendor supplies to your store, click the Vendor Type
drop-down list and select a type from the list. You define the selection of vendor types that appear
in this drop-down list in the Code Table Maintenance window. For more information about
populating the drop-down list, see “Populating drop-down lists” on page 63.
8.
Type the vendor’s fax number, without hyphens or brackets, in the Fax field. You can type up to
10 characters.
9.
To define the name of the store’s first contact person in the vendor company, type the contact
name in the Contact 1 field.
10. Type the phone number, without hyphens or brackets, of the store’s first contact, in the Phone
(Contact 1) field.
87
File Maintenance Features
11. Type the fax number, without hyphens or brackets, of the store’s first contact, in the Fax
(Contact 1) field.
12. To define the name of the store’s second contact person in the vendor company, type the contact
name in the Contact 2 field.
13. Type the phone number, without hyphens or brackets, of the store’s second contact, in the Phone
(Contact 2) field.
14. Type the fax number, without hyphens or brackets, of the store’s second contact, in thefts
(Contact 2) field.
15. To define the store’s account number with the vendor, type an alphanumeric string, up to 20
characters long, in the Account Number field.
16. Type the vendor’s electronic mail address in the Email Address field.
17. To define the number of days that elapse between the time you place an order with the vendor,
and the time you receive the order, type the number of days in the Order Lag Days field.
18. To set the minimum amount the order must reach before the store places an order from the
vendor, type a currency amount, including decimal place, in the Min Order field.
19. To record information about vendor discounts for which the store is eligible, type a description,
up to 30 characters long, in the Vendor Discount field.
20. To record information about payment terms the store must follow with the vendor, type a
description, up to 30 characters long, in the Terms field.
21. To record any notes about the vendor, type the notes in the Notes field.
22. To record the vendor’s web site address, type the address in the Web Site field.
23. To define the days on which orders are placed with the vendor, click the Order Days (Monday
to Sunday) that correspond with days of the week that an order is placed.
Setting up tare weights
A tare weight is the weight of an item’s packaging that must be deducted from the total weight of the
item before the retail price is calculated. For example, the price of the container is deducted from the
weight of a salad sold by the gram before the price is calculated. You can define tare weights in the
Store Manager.
You assign tare weights to individual PLUs in the PLU Maintenance window, or to departments in the
Department Maintenance window. The unit of measurement that is used at the POS terminal to
interpret the weight is defined in the setup of your scale hardware.
For example, assume you define a tare weight to be 5 and you assign it to PLU 457975276 (salad). If
your scale uses grams as its unit of measurement, then 5 grams are deducted from the weight of PLU
457975276.
To add or modify a tare weight record, you must enter information into the Tare Weight Maintenance
window. For information about the fields in the window, see “The Tare Weight Maintenance window”
on page 90.
WARNING! Your head office can also create tare weights and send the files to your store. As a result,
you can create new tare weights, modify or delete them, and you can also modify and delete the ones
sent from your head office.
88
Setting up tare weights
Adding a tare weight
You can add new tare weights.
In the following steps you are required to enter information into the Tare Weight Maintenance
window. For information about the fields in the window, see “The Tare Weight Maintenance window”
on page 90.
To add a tare weight:
1.
On the Main Menu window, click File Maintenance.
2.
Click Tare Weight.
3.
Click New.
4.
Complete the fields in the window, as appropriate.
5.
Click Save, and then click Exit.
Modifying a tare weight
You can modify the weight and description in a tare weight.
In the following steps, you are required to enter information into the Tare Weight Maintenance
window. For information about the fields in the window, see “The Tare Weight Maintenance window”
on page 90.
To add a tare weight:
1.
On the Main Menu window, click File Maintenance.
2.
Click Tare Weight.
3.
Click Display All. The existing tare weights are displayed in the window.
4.
Click the tare weight you want to modify, and then click Open. The Tare Weight Maintenance
window appears, displaying the weight’s information.
5.
Complete the fields in the window, as appropriate.
6.
Click Save, and then click Exit.
89
File Maintenance Features
Deleting a tare weight
If you delete a tare weight that is assigned to a PLU, the item’s weight is not deducted before the price
is calculated.
To delete a tare weight:
1.
On the Main Menu window, click File Maintenance.
2.
Click Tare Weight.
3.
Click Display All. The existing tare weights are displayed in the window.
4.
Click the tare weight you want to delete, and then click Delete. A dialog box appears, prompting
you to confirm the deletion.
5.
Click OK. The tare weight is deleted.
The Tare Weight Maintenance window
This window contains the fields used for creating a tare weight.
90
Entering another store’s information
To set the parameters in theTare Weight Maintenance window:
1.
To identify the tare weight, type an identification number in the Tare ID field.
2.
To define the weight of the packaging, type a number in the Weight field. The unit of
measurement that is used to interpret the number entered in this field is determined by your scale.
3.
To describe the tare weight, type text that describes the tare weight in the Description field.
Entering another store’s information
You can create records for the other stores in the Store Manager so you can refer to them later for
information such as phone, address, contact, and email address. Before you create a store record, you
must define the selections in the State/Province drop-down list. For information about populating
drop-down lists, see “Populating drop-down lists” on page 63.
To add or modify a store record, you must enter information into the Store Maintenance window. For
information about the fields in the window, see “The Store Maintenance window” on page 94.
91
File Maintenance Features
Adding a new store
You can create a new store record.
Before you complete the following steps, you must define the selections in the State/Province
drop-down list. For information about populating drop-down lists, see “Populating drop-down lists”
on page 63.
In the following steps you are required to enter information into the Store Maintenance window. For
information about the fields in the window, see “The Store Maintenance window” on page 94.
To create a new store record:
1.
On the Main Menu window, click File Maintenance.
2.
Click Stores.
3.
Click New.
4.
Complete the fields in the window, as appropriate.
5.
Click Save, and then click Exit.
Viewing a store’s information
After you have entered a store’s information into a record, you can view it at any time.
To open a store’s record:
92
1.
On the Main Menu window, click File Maintenance.
2.
Click Stores.
3.
Click Display All. The store records are displayed in the window.
4.
Click the store whose information you want to see, and then click Open. The Store Maintenance
window appears with the store’s information displayed.
5.
Click Exit when you are finished viewing the information.
Entering another store’s information
Modifying a store’s information
You can modify the information in a store’s record.
In the following steps, you must enter information into the Store Maintenance window. For
information about the fields in the window, see “The Store Maintenance window” on page 94.
To modify a store’s information:
1.
On the Main Menu window, click File Maintenance.
2.
Click Stores.
3.
Click Display All. The store records are displayed in the window.
4.
Click the store whose information you want to modify, and then click Open. The Store
Maintenance window appears with the store’s information displayed.
5.
Change the fields in the window, as appropriate.
6.
Click Save, and then click Exit.
Deleting a store’s record
You can delete a store’s record.
To delete a store’s record:
1.
On the Main Menu window, click File Maintenance.
2.
Click Stores.
3.
Click Display All. The store records are displayed in the window.
4.
Click the store whose information you want to delete, and then click Delete. A dialog box
appears, prompting you to confirm the deletion.
5.
Click OK. The store’s record is deleted.
93
File Maintenance Features
The Store Maintenance window
The fields in this window are used for creating records that contain information about other stores.
To set the parameters in the Store Maintenance window:
1.
To assign an identification number to a store, type the number in the Store Number field.
2.
To assign a name to a store, type the name in the Store Name field.
3.
To record the number and street portion of the store’s address, type the address in the Address
field.
4.
To record the city portion of the store’s address, type the address in the City field.
5.
To define the ID number of the district where the store is located, type a number in the District
Number field.
6.
To select the state or province portion of the store’s address, click the State/Province
drop-down list and select and option. You define the selection of states and provinces that appear
in this drop-down list in the Code Table Maintenance window. For more information about
populating the drop-down list, see “Populating drop-down lists” on page 63
7.
To record the zip code (United States) or postal code (Canada) portion of the store’s address, type the zip/
postal code in the Zip/Postal Code field.
8.
To record the name of the first contact person in the store, type a name in the Contact 1 field.
9.
To record the name of the second contact person in the store, type a name in the Contact 2 field.
10. To record the store’s account number, type a number in the Account Number field.
11. To record the store’s phone number, type a phone number, without hyphens or brackets, in the
Phone field. You can type up to 10 characters.
12. To record the store’s fax number, type a phone number, without hyphens or brackets, in the Fax
field. You can type up to 10 characters.
13. To record the store’s email address, type the address in the Email Address field.
14. To record the store’s web site address, type the address in the Web Site field.
94
Setting up customers
Setting up customers
You can gather a customer’s information at the POS terminal by prompting the cashier to enter the
customer’s name, address, and phone number, or you can create the customer’s record in the Store
Manager. You can enter more information about the customer if you create the file in the Store
Manager. Regardless of how the customer’s file is created, it is available both at the POS terminal and
in the Store Manager.
This section discusses creating a customer’s record in the Store Manager. Your head office can use the
Configurator application to determine the customer information that the cashier can enter or review at
the POS terminal.
Once you have created a customer record, you can track specific characteristics such as buying habits
and you can use extended fields. Extended fields are customized fields that you can define to contain a
type of information and then attach to a customer’s record. For information about extended fields, see
“Maintaining extended customer fields” on page 99.
Before you create a customer record, you must define the selections in the Customer Type,
Customer Status, and State/Province drop-down lists. For information about populating
drop-down lists, see “Populating drop-down lists” on page 63.
To add or modify a customer’s record, you must enter information in the Customer Maintenance
window. For information about the fields in the window, see “Customer Maintenance window Demographic tab” on page 98.
Creating a new customer record
When you create a customer record, you can enter demographic information, and some information
about purchasing habits. Once you create a customer’s record, it is available at the POS terminal. The
cashier can search for the customer’s information instead of re-entering it.
Before you complete the following steps, you must define the selections in the Customer Type,
Customer Status, and State/Province drop-down lists. For information about populating
drop-down lists, see “Populating drop-down lists” on page 63
In the following steps you are required to enter information and make selections in the Customer
Maintenance window. For information about the fields in the window, see “Customer Maintenance
window - Demographic tab” on page 98.
95
File Maintenance Features
To create a new customer record:
1.
On the Main Menu window, click File Maintenance.
2.
Click Customers.
3.
Click New.
4.
Complete the fields in the window, as appropriate.
5.
Click Save, and then click Exit.
Maintaining a customer record
You can edit the information in a customer’s file you create in the Store Manager or one that is created
from prompts at the POS. A file that contains only information from prompts at the POS terminal has
fewer completed fields.
In the following steps you are required to enter information and make selections in the Customer
Maintenance window. For information about the fields in the window, see “Customer Maintenance
window - Demographic tab” on page 98.
To m odify a customer’s record:
96
1.
On the Main Menu window, click File Maintenance.
2.
Click Customers. The Customer Selection window appears.
3.
Click Display All. The existing customers are displayed in the selection window.
4.
Click the customer record you want to modify, and then click Open. The Customer Maintenance
window appears, containing the customer’s information.
5.
Change the fields in the window, as appropriate.
6.
Click Save, and then click Exit.
Setting up customers
Deleting a customer record
If you delete a customer’s record it is no longer available at the POS terminal or for any reports that
access the customer table. The next time a cashier is prompted for the customer’s information, they
will have to re-enter it.
To delete a customer’s record:
1.
On the Main Menu window, click File Maintenance.
2.
Click Customers.
3.
Click Display All. The existing customers are displayed in the selection window.
4.
Click the customer record you want to delete, and then click Delete. A dialog box appears,
prompting you to confirm the deletion.
5.
Click OK. The customer’s record is deleted.
97
File Maintenance Features
Customer Maintenance window - Demographic tab
The fields in this window are used for creating customer records.
To set the parameters in the Demographic tab:
1.
To define the customer number, type a number, up to 14 characters in length, in the Customer #
field.
2.
To record the customer’s last name, type their name in the Last Name field.
3.
To record the customer’s first name, type their name in the First Name field.
4.
To record the customer’s middle name, type their name in the Middle Name field.
5.
To record the customer’s title (for example, Mrs., Miss, Mr.), click the Title drop-down list and
select a title.
6.
To record the customer’s gender, click the Gender drop-down list and select a gender.
7.
To record the customer’s birthday, click the button beside the Birthdate field to open the pop-up
calendar. Click a date in the calendar and then click OK.
Alternatively, you can type a date in the Birthdate field.
8.
To record the first line of the customer’s address, type the address in the Address 1 field.
9.
To record the second line of the customer’s address, type the address in the Address 2 field.
10. To record the city portion of the customer’s address, type the name of the city in the City field.
11. To record the state or province portion of the customer’s address, click the State/Province
drop-down list and select an option. You define the selection of states and provinces that appear
in this drop-down list in the Code Table Maintenance window. For more information about
populating the drop-down list, see “Populating drop-down lists” on page 63.
12. To record the zip (United States) or postal code (Canada), type the code in the Zip/Postal field.
13. To record the country portion of the customer’s address, type the country name in the Country
field.
14. To record the customer’s primary telephone number, type the phone number, without hypens or
brackets, in the Phone #1 field.
98
Maintaining extended customer fields
15. To record the customer’s alternate telephone number, type the phone number, without hypens or
brackets, in the Phone #2 field
16. To assign a type to the customer, click the Type drop-down list and select an option. You define
the selection of customer types that appear in this drop-down list in the Code Table Maintenance
window. For more information about populating the drop-down list, see “Populating drop-down
lists” on page 63.
17. To assign a status to the customer, click the Status drop-down list and select a customer status
from the list of options. You define the selection of customer statuses that appear in this
drop-down list in the Code Table Maintenance window. For more information about populating
the drop-down list, see “Populating drop-down lists” on page 63.
18. To record reference information about the customer, type the information in the Reference #1
field.
19. To record reference information about the customer, type the information in the Reference #2
field.
20. To open the Extended Customer Fields window, click Extended Fields. This button is only
available after you save any changes you have made to the customer’s record. For more
information about extended fields, see “Maintaining extended customer fields” on page 99.
Customer Maintenance window - Loyalty Points tab
To complete the customer Loyalty Points parameters:
1.
Type the customer’s number, last name, and first name in the appropriate fields.
2.
Price levels are defined by your head office using the Configurator application. Type the number
that is associated with the customer’s price level in the Price Level field.
3.
Automatic discounts are defined by your head office using the Configurator application.Type the
number associated with the customer’s automatic discount status in the Automatic Discount #
field.
4.
Click Save and then Exit.
Maintaining extended customer fields
You can use extended fields to record additional customer information that is not available in the
Customer table by creating customized fields and applying the fields to customer records. The
customer information in the extended fields is stored in the database and can be extracted to an ASCII
file for use by a third-party application, if required.
Your head office uses the Configurator to define Fields, option types, options, and option details. You
can also define options and option details using the Store Manager. For example, your head office can
define a Frequency field, and you can define three options: weekly, biweekly, monthly. You can assign
a frequency option to a customer.
Extended fields can have option types and options assigned to them, or they can be defined to prompt
you to type information into them. Your head office defines extended fields and how you can complete
them.
Option types: Created by your head office and assigned to extended fields. Option types contain
options for you to choose from to complete the field. The same option type can be assigned to
several fields.
99
File Maintenance Features
Options: Choices available to fill the extended field. Options are assigned to option types and
appear in drop-down lists. You can define options and assign them to option types using the Store
Manager.
Option details are text that provide additional information about the options. You can define details
for options in the Store Manager.
For example, assume the following field, option types, options, and option details are defined:
Collectibles (field)
Figurines (option type assigned to the Collectibles field)
Precious Moments (option)
porcelain figurines (option details)
Teddy bears (option)
wooden, carved bears (option details)
When you choose the Collectibles field, the Precious Moments and Teddy bears options appear in a
drop-down list.
Adding extended options and details
You can create extended options and option details for the option types your head office created in the
Configurator.
In the following steps, you must enter information and make selections in the Extended Field Options
Maintenance window. For more information about the fields in the window, see “The Extended Field
Options Maintenance window” on page 103.
To create extended field options and option details:
100
1.
On the Main Menu window, click File Maintenance.
2.
Click Extended Field Options.
Maintaining extended customer fields
3.
Click the option type to which you want to add the option.
4.
Click New. The Extended Field Option window appears, containing fields for option ID and
description.
5.
Type an option ID number and a description into the fields.
6.
Click OK. The Extended Field Option window closes. The new option ID and description are
displayed in the Options fields.
7.
Click the option to which you want to add details.
8.
In the Option Details box, type text.
9.
Click Save Details, and then click Exit.
Modifying extended options
You can modify the description portion of options that you create in the Store Manager, or that your
head office created in the Configurator.
In the following steps you are required to enter information and make selections in the Extended Field
Options Maintenance window. For more information about the fields in the window, see “The
Extended Field Options Maintenance window” on page 103
To modify an option:
1.
On the Main Menu window, click File Maintenance.
2.
Click Extended Field Options.
3.
Click the option you want to modify, and then click Modify. The Extended Field Option window
appears, containing a Description field.
101
File Maintenance Features
4.
Type the new option description into the field.
5.
Click OK. The Extended Field Option window closes. The new option description is displayed in
the Options-Description field.
6.
Click Exit.
7.
Once you have selected the option you want to modify, you can change the option description by
editing the text in the Option Details field and clicking Save Details.
Deleting extended options
You should not delete an extended option if you have applied it to a customer.
In the following steps you are required to enter information and make selections in the Extended Field
Options Maintenance window. For more information about the fields in the window, see “The
Extended Field Options Maintenance window” on page 103.
To delete an option:
1.
On the Main Menu window, click File Maintenance.
2.
Click Extended Field Options. The Extended Field Options Maintenance window appears.
3.
Click the option you want to delete, and then click Delete. A dialog box appears, prompting you
to confirm the deletion.
4.
Click OK. The option and its details are deleted.
Tip: To delete the option details only, click the option and delete the text from
the Option Details box. Once all the text is deleted, click Save Details.
102
Maintaining extended customer fields
The Extended Field Options Maintenance window
This window contains the fields for creating and maintaining extended options and option details.
To configure the parameters in the Extended Field Options Maintenance window:
1.
The Option Types-ID field contains the unique number that identifies the option type. Your
head office uses the Configurator to define option types. No action required. The Store Manager
completes this field with the option type’s ID number.
2.
The Option Types-Description contains the description of the option type. Your head office
uses the Configurator to define option types. No action required. The Store Manager completes
this field with the option type’s description.
3.
The Options-ID field contains the unique number that identifies the option. Do not type into
this field. The Store Manager completes this field with the number you typed in the Option ID
field in the Extended Field Option window. The Extended Field Option window appears when
you click New or Modify.
4.
The Options-Description field defines the description of the option. You do not type directly
into this field. The Store Manager completes this field with the description you type into the
Description field in the Extended Field Option window. The Extended Field Option window
appears when you click New or Modify.
5.
To define the option’s details, type the details in the Option Details field.
6.
Click Save Details to save the information that you typed in the Option Details field.
Applying extended field options to customers
Before you can apply extended field options to customers, you must have extended fields, option
types, options, and option details (if required) already defined. Your head office can either assign an
103
File Maintenance Features
option type to a field, or define the characteristics of text (date, string, decimal quantity) you can type
into the field.
Fields, option types, options, and option details are defined in the Configurator by your head office.
You can also define options and option details using the Store Manager. For information about
defining options and option details, see “Adding extended options and details” on page 100.
You can assign several options to one customer.
To assign an option to a customer:
104
1.
Open a customer record so the Customer Maintenance window appears with the customer’s
information displayed.
2.
Click Extended Fields.
3.
Click a field in the Extended Field field.
4.
Click the Value box beside the extended field and either select an option from the drop-down list,
or type information into the box. If you select an option from a drop-down list, the option details
are displayed at the bottom of the window.
5.
Click Save, and then click Exit.
Tender Management
This section provides information about managing the tender in your store. It also describes tender
management functions using the safe option.
The Store Manager can include tender management options that involve the store’s safes, or it can
include tender management options that do not involve the safes. Your head office also uses the
Configurator to determine whether the safes are involved in tender management functions.
The tender management options involve the cashier’s drawer and the store’s safes and include pickups,
balancing, transferring, and deposits. You can also track the contents and balance the store’s safes.
This section covers the following topics:
Performing a loan
Performing a pickup
Balancing a cashier’s drawer
Depositing tenders into the safe
Performing multiple safe procedures
Processing a bank deposit
Balancing the safe
Viewing the contents of the safe
Viewing detailed safe transactions
Safe and non-safe options
There are two tender management configurations: safe and non-safe. Your head office uses the
Configurator to determine whether your Store Manager includes the safes during tender management.
Using the safe option during tender management allows you to balance the safes, perform a bank
deposit to the safes, and view the contents of the safes in addition to standard tender management
functions. All of the tender management functions you perform affect the amount of the tenders in the
safes. For example, if you perform a pickup of $500.00 from a cashier’s drawer, the $500.00 is added to
the amount in the safe. When you perform a deposit to the bank, the $500.00 is removed from the
amount in the safe.
Tip: Remember that the store must be open to handle transactions, otherwise the view only mode is
enforced.
105
Tender Management
The example below is the Safe Management Menu window.
Performing a loan (float)
A loan is the amount of a tender that is removed from the store’s safe and placed in a cash drawer
during the day or shift so that the cashier can make change. A loan is often referred to as a float.
Your head office uses the Configurator to define the tenders that are eligible to be loaned, and which
accounts are affected. For example, if loan transactions are performed on behalf of the cashier or the
register.
When you complete a loan transaction, the loaned amount is automatically added to the cashier or
register system amount and is removed from the safe’s contents.
Entering a new loan
A new loan has a pending status until you complete it. You can modify the amounts in a pending loan
transaction. Pending loan amounts are not applied to the cashier’s or register’s system tender totals
during balancing and are not subtracted from the safe’s contents. For information about completing a
loan, see “Completing a loan” on page 109.
Before you complete the following steps, you must define the selections in the Reason Code
drop-down list, if the Reason parameter is set to mandatory in the General Parameters.
To enter a new loan:
1.
On the Main Menu window, click Cash Management.
2.
Click the safe in which the loan is to come from.
Note: If there is only one safe, the single safe menu appears immediately.
There are no safes to choose.
3.
106
Click POS Loan.
Performing a loan (float)
4.
Click New.
To complete the POS Loan Safe Maintenance window:
1.
The Txn Num. field defines a unique number that identifies the loan transaction. This number is
a counter that reflects the number of tender management transactions (for example, pickups and
balances) that have been performed. This is not the transaction number that is recorded on the
TLog. The number in the T-Log Num. field, in this window, is recorded as the transaction
number in the TLog.
No action is required. The Store Manager automatically completes this field with the next available
number when you save the loan transaction.
2.
The T-Log Num. field defines the unique number that identifies the loan transaction in the
TLog.
No action is required. The Store Manager automatically completes this field when you complete
the loan.
3.
To define the cashier or register that the tender is being loaned to, type a cashier or register
number in the Register field. Your head office uses the Configurator to define whether loans are
performed by the cashier or register. Note that the field name reflects the setting.
4.
The Txn Status field indicates the loan transaction’s status (pending, completed, deleted, or
voided). No action is required. The Store Manager automatically completes this field.
5.
The Operator field displays the employee number of the person that processes the loan
transaction. No action is required.The Store Manager automatically completes this field with the
employee number of the person who last dealt with the transaction.
6.
The Txn Date field contains the date on which the loan transaction is created. No action is
required. The Store Manager automatically completes this field with the system date of the
computer it is running on.
7.
The Business Date field contains the current business date. Note that this date can be different
than the system date.
107
Tender Management
8.
If a reason is mandatory, select the reason that you are performing the loan from safe transaction,
from the Reason drop-down list.
You define the selection of reasons that appear in this drop-down list on the Code Table
Maintenance window.
9.
You can define any notes that you want to record about the loan transaction. Type an
alphanumeric string, up to 40 characters in length, in the Notes field.
10. The Tender field contains the tenders that you can include in the loan. A tender is actually
included in the loan if you enter a value in the corresponding Amount field on this window.Your
head office uses the Configurator to define the tenders that are available for loan. This field
contains a list of the tenders that are eligible. No action is required. The Store Manager
automatically completes this field with the tenders that are eligible for loan.
To enter a loan amount for a tender, click the tender and complete the fields on the right side of
this window.
11. The Amount field indicates the amounts of the tenders included in the loan. To enter a loan
amount for a tender, click the tender in the Tender field, and complete the fields in the right side
of this window. No action is required. The Store Manager automatically completes this field with
the total of the amounts you enter in the fields on the right side of the window.
12. The Total Tenders field displays the totals of the amounts in the Amount field. No action is
required. The Store Manager automatically completes this field.
13. The Lump Sum/Denomination button allows you to switch between entering the lump sum
amounts or denominations. If you are entering the loan amount by denomination, the tender
denominations are listed in this field.
Your head office uses the Configurator to define denominations for a tender. If no denominations
are defined for the tender, the denomination button is disabled. Use the Denomination button
on this window to enter amounts by denomination. Once in denomination mode, the button’s
label changes to lump sum.
14. To define the amount of the selected tender being removed from the safe and placed in the cash
drawer, type an amount, including the decimal places, in the Lump Sum Amount field. To select
a tender, click the tender in the Tender field.
15. The Total Lump Sums field displays the total of the lump sum amounts that you enter in the
Lump Sum Amount field. No action is required. The Store Manager automatically completes this
field.
Note: If the sum of the Lump Sum Amount column falls within the warning
threshold set in the Configurator, a message displays warning you that the
amount entered is too high. You can choose to continue until the total amount
reaches the rejection threshold, then you must re-enter a smaller amount.
16. The Total Denominations field displays the total of the amounts that you enter in the Amount
field when you enter amounts by denomination. Your head office uses the Configurator to define
denominations for a tender. If no denominations are defined for the tender, the denomination
fields are not available. Click the Denomination button in this window to enter amounts by
denomination. No action is required. The Store Manager automatically completes this field.
17. To change the loan’s status to completed, click Complete.
18. To change the loan’s status to void, click Void. This button is only enabled if the loan’s status is
completed.
Note: A loan can be voided on the same business day only.
19. Click Save, and then click Exit.
108
Performing a loan (float)
Tip: The Amount boxes on the left side of the window only display the
amounts you enter for the loan. You cannot edit these fields directly. To enter
an amount, click the tender row on the left side of the window, and enter the
amount in the fields on the right side of the window.
Completing a loan
A loan has a pending status until you complete it. Completed loan amounts are added to the cashier’s
or register’s system amounts and are subtracted from the safe’s contents.
You cannot modify a completed loan, but you can void it. If you find an error in a completed loan, you
must void it and create a new one. For information about voiding a loan, see “Voiding a loan” on
page 110.
To complete a loan:
1.
On the Main Menu window, click Cash Management.
2.
Click the chosen safe.
3.
Click POS Loan. The pending, completed, deleted, and voided loans are displayed in the window.
4.
Click the loan you want to complete, and then click Open. The POS Loan Safe Maintenance
window displays the loan information.
5.
Click Complete. The loan’s status changes to completed.
6.
Click Exit.
109
Tender Management
Modifying a loan
You can only modify a pending loan. Once you have entered the final information for a loan, you can
complete it. For information about completing a loan, see “Completing a loan” on page 109.
You cannot modify a completed loan. To make a change to a completed loan, you must void it and
create a new one. For information about voiding a loan, see “Voiding a loan” on page 110.
To modify a pending loan:
1.
On the Main Menu window, click Cash Management.
2.
Click the safe with the loan.
3.
Click POS Loan. The pending, completed, deleted, and voided loans are displayed in the window.
4.
Click the loan you want to modify, and then click Open. The POS Loan Safe Maintenance
window displays the loan information.
5.
Change the fields in the window as appropriate.
6.
Click Save, and then click Exit.
Voiding a loan
You can only void a completed loan, and it must be voided on the same Business Day. Voided loans
are visible in the POS Loan Selection window. They cannot be modified and they do not affect the
cashier’s or register’s system tender amount during balancing of the safe’s contents. Amounts are
subtracted from and added to the safe. For information about completing a loan, see “Completing a
loan” on page 109
To void a loan:
1.
On the Main Menu window, click Cash Management.
2.
Click the safe with the loan.
3.
Click POS Loan. The pending, completed, deleted, and voided loans are displayed in the window.
4.
Click the loan that you want to void, and then click Open. The POS Loan Safe Maintenance
window displays the loan information.
5.
Click Void. The loan’s status is void.
6.
Click Exit.
Viewing a loan’s details
You can review the information you entered into a loan transaction, regardless of its current status.
Voided loans remain visible in the POS Loan from Safe Selection window.
To view the details of a loan:
110
1.
On the Main Menu window, click Cash Management.
2.
Click the safe with the loan.
3.
Click POS Loan. The pending, completed, deleted, and voided loans are displayed in the window.
4.
Click the loan you want to review, and then click Open. The POS Loan Safe Maintenance window
displays the loan information.
Performing a pickup
Performing a pickup
A pickup is the removal of tender from a cashier’s drawer during the day. Usually a pickup is
performed for security reasons so that a cash drawer does not contain large amounts of currency.
Your head office uses the Configurator to define the tenders that are eligible to be picked up, to define
if pickup transactions are processed by the cashier or by the register, and to set a threshold amount
beyond which transactions cannot be processed until a pickup is performed.
When you complete a pickup transaction using the Store Manager, the amount picked up is
automatically added to the actual amount when the cashier or register balances and is added to the
safe’s contents.
Entering a new pickup
A new pickup has a pending status until you complete it. You can modify the amounts in a pending
pickup transaction. Pending pickup amounts are not applied to the cashier’s or register’s actual tender
totals during balancing or added to the safe’s contents. For information about completing a pickup, see
“Completing a pickup” on page 112.
Before you complete the following steps, you must define the selections in the Reason Code
drop-down list, if the Reason parameter is set to mandatory.
In the following steps you are required to enter information into the POS Pickup to Safe Maintenance
window. For information about the fields in the window, see “POS Pickup to Safe Maintenance
window” on page 114.
To enter a new pickup:
1.
On the Main Menu window, click Cash Management.
2.
Click the safe with the pickup.
3.
Click POS Pickup.
4.
Click New.
5.
Complete the fields in the window as appropriate.
6.
Click Save, and then click Exit.
111
Tender Management
Completing a pickup
A pickup has a pending status until you complete it. Completed pickup amounts are subtracted from
the cashier’s or register’s actual amounts during balancing and added to the safe’s contents.
You cannot modify a completed pickup, but you can void it. If you find an error in a completed pickup,
you must void the pickup and create a new one. For information about voiding a pickup, see “Voiding
a pickup” on page 113.
To complete a pickup:
1.
On the Main Menu window, click Cash Management.
2.
Click the safe with the pickup.
3.
Click POS Pickup. The pending, completed, deleted, and voided pickups are displayed in the
window.
4.
Click the pickup you want to complete, and then click Open. The POS Pickup to Safe
Maintenance window displays the pickup information.
5.
Click Complete. The pickup’s status changes to completed.
6.
Click Exit.
Modifying a pickup
You can only modify a pending pickup. Once you have entered the final information for a pickup, you
can complete it. For information about completing a pickup, see “Completing a pickup” on page 112
You cannot modify a completed pickup. If you need to make a change to a completed pickup, you
must void it and create a new one. For information about voiding a pickup, see “Voiding a pickup” on
page 113
In the following steps you are required to enter information into the POS Pickup to Safe Maintenance
window. For information about the fields in the window, see “POS Pickup to Safe Maintenance
window” on page 114
112
Performing a pickup
To modify a pending pickup:
1.
On the Main Menu window, click Cash Management.
2.
Click the safe with the pickup.
3.
Click POS Pickup. The pending, completed, deleted, and voided pickups are displayed in the
window.
4.
Click the pickup you want to modify, and then click Open. The POS Pickup to Safe Maintenance
window displays the pickup information.
5.
Change the fields in the window as appropriate.
6.
Click Save, and then click Exit.
Voiding a pickup
You can only void a completed pickup and it must be voided on the same Business Date. Voided
pickups are visible in the POS Pickup to Safe Selection window. They cannot be modified and they do
not affect the cashier’s or register’s actual tender amount during balancing or the safe’s contents. For
information about completing a pickup, see “Completing a pickup” on page 112.
To void a pickup:
1.
On the Main Menu window, click Cash Management.
2.
Click the safe with the pickup.
3.
Click POS Pickup. The pending, completed, deleted, and voided pickups are displayed in the
window.
4.
Click the pickup you want to void, and then click Open. The POS Pickup to Safe Maintenance
window displays the pickup information.
5.
Click Void. The pickup’s status changes to voided.
6.
Click Exit.
Viewing a pickup’s details
You can review the information you entered in a pickup transaction, regardless of its current status.
Voided pickups remain visible in the POS Pickup to Safe Selection window.
To view the details of a pickup:
1.
On the Main Menu window, click Cash Management.
2.
Click the safe with the pickup.
3.
Click POS Pickup. The pending, completed, deleted, and voided pickups are displayed in the
window.
4.
Click the pickup you want to review, and then click Open. The POS Pickup to Safe Maintenance
window displays the pickup information.
113
Tender Management
POS Pickup to Safe Maintenance window
This window contains the fields for performing pickup transactions.
To complete the fields in the POS Pickup Safe Maintenance window:
1.
The Txn Num. field defines a unique number that identifies the pickup transaction. This number
is a counter that reflects the number of tender management transactions (for example, pickups
and balances) that have been performed. This is not the transaction number that is recorded on
the TLog. The number in the T-Log Num. field, in this window, is recorded as the transaction
number in the TLog.
No action is required. The Store Manager automatically completes this field with the next available
number when you save the pickup transaction.
2.
The T-Log Num. field defines the unique number that identifies the pickup transaction in the
TLog.
No action is required. The Store Manager automatically completes this field when you complete
the pickup.
114
3.
To define the cashier or register that the tender is being picked up from, type a cashier or register
number in the Register field. Your head office uses the Configurator to define whether pickups
are performed by the cashier or register. Note that the field name reflects the setting.
4.
The Txn Status field indicates the pickup transaction’s status (pending, completed, deleted, or
voided). No action is required. The Store Manager automatically completes this field.
5.
The Operator field displays the employee number of the person that processes the pickup
transaction. No action is required.The Store Manager automatically completes this field with the
employee number of the person who last dealt with the transaction.
6.
The Txn Date field contains the date on which the pickup transaction is created. No action is
required. The Store Manager automatically completes this field with the system date of the
computer it is running on.
7.
The Business Date field contains the current business date. Note that this date can be different
than the system date.
Performing a pickup
8.
Select the reason that you are performing the pickup from safe transaction from the Reason
drop-down list.
You define the selection of reasons that appear in this drop-down list on the Code Table
Maintenance window.
9.
You can define any notes that you want to record about the pickup transaction. Type an
alphanumeric string, up to 40 characters in length, in the Notes field.
10. The Tender field contains the tenders that you can include in the pickup. A tender is actually
included in the loan if you enter a value in the corresponding Amount field on this window.Your
head office uses the Configurator to define the tenders that are available for pickup. This field
contains a list of the tenders that are eligible. No action is required. The Store Manager
automatically completes this field with the tenders that are eligible for pickup.
To enter a pickup amount for a tender, click the tender and complete the fields on the right side of
this window.
11. The Amount field indicates the amounts of the tenders included in the pickup. To enter a pickup
amount for a tender, click the tender in the Tender field, and complete the fields in the right side
of this window. No action is required. The Store Manager automatically completes this field with
the total of the amounts you enter in the fields on the right side of the window.
12. The Total Tenders field displays the totals of the amounts in the Amount field. No action is
required. The Store Manager automatically completes this field.
13. The Lump Sum/Denomination button allows you to switch between entering the lump sum
amounts or denominations. If you are entering the pickup amount by denomination, the tender
denominations are listed in this field.
Your head office uses the Configurator to define denominations for a tender. If no denominations
are defined for the tender, the denomination button is disabled. Use the Denomination button
on this window, to enter amounts by denomination. Once in denomination mode, the button’s
label changes to lump sum.
14. To define the amount of the selected tender being removed from the safe, type an amount,
including the decimal places, in the Lump Sum Amount field. To select a tender, click the tender
in the Tender field.
15. The Total Denominations field displays the total of the amounts that you enter in the Amount
field when you enter amounts by denomination. Your head office uses the Configurator to define
denominations for a tender. If no denominations are defined for the tender, the denomination
fields are not available. Click the Denomination button in this window to enter amounts by
denomination. No action is required. The Store Manager automatically completes this field.
Note: If the sum of the Lump Sum Amount column falls within the warning
threshold set in the Configurator, a message displays warning you that the
amount entered is too high. You can choose to continue until the total amount
reaches the rejection threshold, then you must re-enter a smaller amount.
16. The Total Lump Sums field displays the total of the lump sum amounts that you enter in the
Lump Sum Amount field. No action is required. The Store Manager automatically completes this
field.If the sum of the Lump Sum Amount column falls within the warning threshold set in the
Configurator, a message displays warning you that the amount entered is too high. You can
choose to continue until the total amount reaches the rejection threshold, then you must re-enter
a smaller amount.
17. To change the pickup status to complete, click Complete.
18. To change the pickup status to void, click Void. This button is only enabled if the pickup status is
complete.
115
Tender Management
Note: A pickup can be voided on the same business day only.
19. Click Save, and then click Exit.
Tip: The Amount boxes on the left side of the window only display the
amounts you enter for the pickup. You cannot edit these fields directly. To
enter an amount, click the tender row on the left side of the window, and enter
the amount in the fields on the right side of the window.
Balancing a cash drawer
Balancing ensures the amount of tender in a cash drawer matches the tender that should be there based
on the sales and other transactions at the POS terminal, including completed loans, and completed
pickups.
Your head office uses the Configurator to define the tenders that are eligible to be balanced, and if
balance transactions are processed by the cashier or by the register.
The Store Manager calculates the system amount of a tender. You enter the actual amount. The Store
Manager compares the two figures and determines if the cashier or register are balanced. You can
define a maximum amount that the system and actual amounts can differ by in the POS Balance
Threshold field on the General Parameters Setup window.
You can print a Balance report that provides details about the balance transactions you perform in your
store. For information about the Balance report, see “Balance report” on page 331.
Entering a new balance
A new balance has a pending status until you complete it. You can modify the amounts in a pending
balance transaction. For information about pickups, see “Performing a pickup” on page 111. For
information about loans, see “Performing a loan (float)” on page 106.
Before you complete the following steps, you must define the selections in the Reason Code
drop-down list, if the Reason parameter is set to mandatory.
In the following steps, you must enter information in the POS Balance Maintenance window. For
information about the fields in the window, see “POS Balance Maintenance window” on page 119.
To enter a new balance:
116
1.
On the Main Menu window, click Cash Management.
2.
Click the appropriate safe.
Balancing a cash drawer
3.
Click POS Balance.
4.
Click New.
5.
Complete the fields in the window, as appropriate.
6.
Click Save, and then click Exit.
Tip: The Actual fields on the left side of the POS Balance Maintenance
window only display the amounts you enter for balance. You cannot edit these
fields directly. To enter an amount, click the tender’s row on the left side of the
window, and enter the amount in the fields on the right side of the window.
Completing a balance
A balance has a pending status until you c ompleteit.
You cannot modify a completed balance, but you can void it. If you find an error in a completed
balance you must void the balance and create a new one, however you must ensure that you perform
the void on the same Business Date. For information about voiding a balance, see “Voiding a balance”
on page 118.
To complete a balance:
1.
On the Main Menu window, click Cash Management.
2.
Click the appropriate safe.
3.
Click POS Balance. The pending, completed, deleted, and voided balances are displayed in the
window.
4.
Click the balance you want to complete, and then click Open. The POS Balance Maintenance
window displays the balance information.
5.
Click Balance.
6.
Click Complete, and then click Exit.
117
Tender Management
Modifying a balance
You can only modify a pending balance. Once you have entered the final information for a balance,
you can complete it. For information about completing a balance, see “Completing a balance” on
page 117.
You cannot modify a completed balance. If you need to make a change to a completed balance, you
must void it and create a new one. For information about voiding a balance, see “Voiding a balance”
on page 118.
In the following steps you are required to enter information in the POS Balance Maintenance window.
For information about the fields in the window, see “POS Balance Maintenance window” on page 119.
To modify a pending balance:
1.
On the Main Menu window, click Cash Management.
2.
Click the appropriate safe.
3.
Click POS Balance. The pending, completed, deleted, and voided balances are displayed in the
window.
4.
Click the balance you want to modify, and then click Open. The POS Balance Maintenance
window displays the balance information.
5.
Change the fields in the window, as appropriate.
6.
Click Save, and then click Exit.
Voiding a balance
You can only void a completed balance and it must be performed on the same Business Date. Voided
balances are visible in the POS Balance Selection window, but they cannot be modified. For
information about completing a balance, see “Completing a balance” on page 117.
To void a balance:
1.
On the Main Menu window, click Cash Management.
2.
Click the appropriate safe.
3.
Click POS Balance. The pending, completed, deleted, and voided balances are displayed in the
window.
4.
Click the balance you want to void, and then click Open. The POS Balance Maintenance window
displays the balance information.
5.
Click Void. The balance’s status changes to voided.
6.
Click Exit.
Tip: If you clicked EOD Pickup on the POS Balance Maintenance window
when you completed the balance, a Pickup transaction was automatically
created and completed. If you void the balance, a dialog box appears, giving
you the option to void the corresponding pickup transaction.
118
Balancing a cash drawer
Viewing a balance’s details
You can review the information you entered into a balance transaction, regardless of its current status.
Voided balances remain visible in the POS Balance Selection window.
To view the details of a balance:
1.
On the Main Menu window, click Cash Management.
2.
Click the appropriate safe.
3.
Click POS Balance. The pending, completed, deleted, and voided balances are displayed in the
window.
4.
Click the balance you want to review, and then click Open. The POS Balance Maintenance
window displays the balance information.
POS Balance Maintenance window
This window contains the fields used for performing a balance transaction.
To complete the POS Balance Maintenance window:
1.
The Txn Num. field defines a unique number that identifies the balance transaction. This number
is a counter that reflects the number of tender management transactions (for example, pickups
and balances) that have been performed. This is not the transaction number that is recorded on
the TLog. The number in the T-Log Num. field, in this window, is recorded as the transaction
number in the TLog.
No action is required. The Store Manager automatically completes this field with the next available
number when you save the transaction.
2.
The T-Log Num. field defines the unique number that identifies the balance transaction in the
TLog.
No action is required. The Store Manager automatically completes this field when you complete
the balance.
119
Tender Management
3.
To define the cashier or register that the tender is being balanced for, type a cashier or register
number in the Register field. Your head office uses the Configurator to define whether balances
are performed by the cashier or register. Note that the field name reflects the setting.
4.
The Txn Status field indicates the balance transaction’s status (pending, completed, or voided).
No action is required. The Store Manager automatically completes this field.
5.
The Operator field displays the employee number of the person that processes the balance
transaction. No action is required.The Store Manager automatically completes this field with the
employee number of the person who logged into the Store Manager.
6.
The Txn Date field contains the date on which the balance transaction is created. No action is
required. The Store Manager automatically completes this field with the system date of the
computer it is running on.
7.
The Business Date field contains the current business date. Note that this date can be different
than the system date. This field defaults to the current business day, however a balance can also be
done for previous business days.
8.
Select the reason that you are performing the balance from safe transaction from the Reason
drop-down list.
You define the selection of reasons that appear in this drop-down list on the Code Table
Maintenance window.
9.
You can define any notes that you want to record about the transaction. Type an alphanumeric
string, up to 40 characters in length, in the Notes field.
10. The Tender field contains the tenders that you can include in the balance. A tender is actually
included in the balance if you enter a value in the corresponding Amount field on this
window.Your head office uses the Configurator to define the tenders that are available for
balance. This field contains a list of the tenders that are eligible. No action is required. The Store
Manager automatically completes this field with the tenders that are eligible for balance.
To enter a balance amount for a tender, click the tender and complete the fields on the right side
of this window.
11. To enter an actual amount for a tender, click Actual and complete the fields on the right side of
this window
12. The System field indicates the amounts of the tenders that are expected in the cash drawer. This
field is not visible if your head office has used the Configurator to enable blind balancing. During
a blind balance, you do not know the system amount. After clicking Balance, the Store Manager
compares the actual amount with the system amount and alerts you if they do not match. No
action is required. When you click Balance in this window, the Store Manager automatically
completes this field with the amount of tender that is expected in the cash drawer.
13. The Short/Over field indicates the difference between the actual balance amounts you enter into
the fields on the right side of the window, and system amounts. This field is not visible if your
head office has used the Configurator to enable blind balancing. The Store Manager compares the
actual amount with the system amount and alerts you if they do not match. No action is required.
When you click Balance in this window, the Store Manager automatically completes this field with
the difference between the actual and system amounts.
14. The Total Tenders field displays the totals of the amounts in the Amount field. No action is
required. The Store Manager automatically completes this field.
120
Depositing tenders into the safe
15. The Lump Sum/Denomination button allows you to switch between entering the lump sum
amounts or denominations. If you are entering the balance amount by denomination, the tender
denominations are listed in this field.
Your head office uses the Configurator to define denominations for a tender. If no denominations
are defined for the tender, the denomination button is disabled. Use the Denomination button
on this window, to enter amounts by denomination. Once in denomination mode, the button’s
label changes to lump sum.
Note: If the sum of the Lump Sum Amount column falls within the warning
threshold set in the Configurator, a message displays warning you that the
amount entered is too high. You can choose to continue until the total amount
reaches the rejection threshold, then you must re-enter a smaller amount.
16. To define the amount of the selected tender, type an amount, including the decimal places, in the
Lump Sum Batch # field. To select a tender, click the tender in the Tender field.
17. The Total Lump Sums field displays the total of the lump sum amounts that you enter in the
Lump Sum Amount field. No action is required. The Store Manager automatically completes this
field.
18. The Total Denominations field displays the total of the amounts that you enter in the Amount
field when you enter amounts by denomination. Your head office uses the Configurator to define
denominations for a tender. If no denominations are defined for the tender, the denomination
fields are not available. Click the Denomination button in this window to enter amounts by
denomination. No action is required. The Store Manager automatically completes this field.
19. To change the balance status to complete, click Complete.
20. To change the balance status to void, click Void. This button is only enabled if the pickup status is
complete.
Note: A balance can be voided on the same business day only.
21. Click Save, and then click Exit.
Depositing tenders into the safe
Your head office uses the Configurator to define the tenders that are eligible to be deposited.
Entering a new deposit into the safe
A new deposit has a pending status until you complete it. You can modify the amounts in a pending
deposit transaction. Pending deposit amounts are not applied to the safe contents. For information
about completing a deposit, see “Completing a deposit into the safe” on page 122.
Before you complete the following steps, you must define the selections in the Reason Code
drop-down list.
To enter a new deposit into the safe:
1.
On the Main Menu window, click Cash Management.
2.
Click the Safe that is to receive the deposit.
3.
Click Safe Deposit.
4.
Click New.
121
Tender Management
5.
Complete the fields in the window, as appropriate.
6.
Click Save, and then click Exit.
Tip: The Amount fields on the left side of the Safe Deposit Maintenance
window only display the amounts you enter for deposit. You cannot edit these
fields directly. To enter an amount, click the tender’s row on the left side of the
window, and enter the amount in the fields on the right side of the window.
Completing a deposit into the safe
A deposit has a pending status until you complete it. Completed deposit amounts are added to the
safe’s contents.
You cannot modify a completed deposit, but you can void it. Note that it must be voided on the same
business day. If you find an error in a completed deposit, you must void it and create a new one. For
information about voiding a deposit, see “Voiding a deposit into the safe” on page 123.
To complete a deposit into the safe:
1.
On the Main Menu window, click Cash Management.
2.
Click the appropriate Safe.
3.
Click Safe Deposit. The pending, completed, deleted, and voided deposits are displayed in the
window.
4.
Click the deposit you want to complete, and then click Open. The Safe Deposit Maintenance
window displays the deposit information.
5.
Click Complete, and then click Exit.
Modifying a deposit into the safe
You can only modify a pending deposit. Once you have entered the final information for a deposit, you
can complete it. For information about completing a deposit, see “Completing a deposit into the safe”
on page 122.
You cannot modify a completed deposit. If you need to make a change to a completed deposit, you
must void it and create a new one. For information about voiding a deposit, see “Voiding a deposit
into the safe” on page 123.
To modify a pending deposit:
122
1.
On the Main Menu window, click Cash Management.
2.
Click the appropriate Safe.
3.
Click Safe Deposit.
4.
Click Display All. The pending, completed, deleted, and voided deposits are displayed in the
window.
5.
Click the deposit you want to modify, click Open. The Safe Deposit Maintenance window
displays the deposit information.
6.
Change the fields in the window, as appropriate.
7.
Click Save, and then click Exit.
Depositing tenders into the safe
Voiding a deposit into the safe
You can only void a completed deposit. Voided deposits are visible in the Safe Deposit Selection
window. They cannot be modified and they do not affect the safe’s system amount. For information
about completing a deposit, see “Completing a deposit into the safe” on page 122.
Note: To void a deposit it must be performed on the same business day.
To void a deposit:
1.
On the Main Menu window, click Cash Management.
2.
Click the appropriate Safe.
3.
Click Safe Deposit.
4.
Click Display All. The pending, completed, deleted, and voided deposits are displayed in the
window.
5.
Click the deposit you want to void, and then click Open. The Safe Deposit Maintenance window
displays the deposit information.
6.
Click Void. The deposit’s status changes to voided.
7.
Click Exit.
Viewing details of a deposit into the safe
You can review the information you entered into a safe deposit transaction, regardless of its current
status. Voided deposits remain visible in the Safe Deposit Selection window.
To view the details of a deposit:
1.
On the Main Menu window, click Cash Management.
2.
Click the appropriate Safe.
3.
Click Safe Deposit.
4.
Click Display All. The pending, completed, deleted, and voided deposits are displayed in the
window.
5.
Click the deposit you want to review, and then click Open. The Safe Deposit Maintenance
window displays the deposit information.
123
Tender Management
The Safe Deposit Maintenance window
This window contains the fields for processing safe deposit transactions.
To complete the Safe Deposit Maintenance window:
1.
The Txn Num. field defines a unique number that identifies the deposit transaction. This number
is a counter that reflects the number of tender management transactions (for example, pickups
and balances) that have been performed. This is not the transaction number that is recorded on
the TLog. The number in the T-Log Num. field, in this window, is recorded as the transaction
number in the TLog.
No action is required. The Store Manager automatically completes this field with the next available
number when you save the transaction.
2.
The T-Log Num. field defines the unique number that identifies the deposit transaction in the
TLog.
No action is required. The Store Manager automatically completes this field when you complete
the balance.
124
3.
The Txn Status field indicates the deposit transaction’s status (pending, completed, or voided).
No action is required. The Store Manager automatically completes this field.
4.
The Operator field displays the employee number of the person that processes the deposit
transaction. No action is required.The Store Manager automatically completes this field with the
employee number of the person who logged into the Store Manager.
5.
The Txn Date field contains the date on which the deposit transaction is created. No action is
required. The Store Manager automatically completes this field with the system date of the
computer it is running on.
6.
The Business Date field contains the current business date. Note that this date can be different
than the system date.
Depositing tenders into the safe
7.
Select the reason that you are performing the deposit from safe transaction from the Reason
drop-down list.
You define the selection of reasons that appear in this drop-down list on the Code Table
Maintenance window.
8.
You can define any notes that you want to record about the transaction. Type an alphanumeric
string, up to 40 characters in length, in the Notes field.
9.
The Tender field contains the tenders that you can include in the deposit. A tender is actually
included in the balance if you enter a value in the corresponding Amount field on this
window.Your head office uses the Configurator to define the tenders that are available for deposit.
This field contains a list of the tenders that are eligible. No action is required. The Store Manager
automatically completes this field with the tenders that are eligible for deposit.
To enter a deposit amount for a tender, click the tender and complete the fields on the right side
of this window.
10. The Amount field indicates the amounts of the tenders included in the deposit. To enter a deposit
amount for a tender, click the tender in the Tender field, and complete the fields in the right side
of this window. No action is required. The Store Manager automatically completes this field with
the total of the amounts you enter in the fields on the right side of the window.
11. The Total Tenders field displays the totals of the amounts in the Amount field. No action is
required. The Store Manager automatically completes this field.
12. To define the amount of the selected tender, type an amount, including the decimal places, in the
Lump Sum Batch # field. To select a tender, click the tender in the Tender field.
13. The Total Lump Sums field displays the total of the lump sum amounts that you enter in the
Lump Sum Amount field. No action is required. The Store Manager automatically completes this
field.
14. The Total Denominations field displays the total of the amounts that you enter in the Amount
field when you enter amounts by denomination. Your head office uses the Configurator to define
denominations for a tender. If no denominations are defined for the tender, the denomination
fields are not available. Click the Denomination button in this window to enter amounts by
denomination. No action is required. The Store Manager automatically completes this field.
Note: If the sum of the Lump Sum Amount column falls within the warning
threshold set in the Configurator, a message displays warning you that the
amount entered is too high. You can choose to continue until the total amount
reaches the rejection threshold, then you must re-enter a smaller amount.
15. To change the deposit status to complete, click Complete.
16. To change the deposit status to void, click Void. This button is only enabled if the pickup status is
complete.
Note: A deposit can be voided on the same business day only.
17. Click Save, and then click Exit.
125
Tender Management
Processing a safe withdrawal (bank deposit)
You must transfer tender out of the store’s safe (a safe withdrawal) and into the bank (a bank deposit).
When you process a safe withdrawal/bank deposit using the Store Manager, the tender amounts are
removed from the safe’s contents.
Your head office uses the Configurator to define the tenders that are eligible for this transaction.
Note: If you are using the non-safe option for tender management, deposits are made by default into
the bank. To perform a deposit under the non-safe option, click Deposit in the Cash Management
Menu window. For information about the differences between the safe and non-safe tender
management configurations, see “Safe and non-safe options” on page 105.
Entering a new safe withdrawal (bank deposit)
A new withdrawal has a pending status until you complete it. You can modify the amounts in a
pending transaction. Pending withdrawal/deposit amounts are not subtracted from the safe’s contents.
For information about completing a deposit, see “Modifying a safe withdrawal (bank deposit)” on
page 128.
Before you complete the following steps, you must define the selections in the Reason Code
drop-down list, if the Reason parameter is set to mandatory.
Tender verification, of non-zero tender amounts, is required for safe withdrawals if the tenders are
marked for verification in the Configurator. Verification is enabled in the Configurator by checking the
Verify for Bank Deposit checkbox in the Tender Maintenance window. Verification by lump sum is
performed after each individual entry; verification by denomination is performed after clicking Done at
the end of a batch of entries.
To remove funds from a safe, it must be configured, via the Configurator, to allow withdrawals.
Tender verification is also set in the Configurator to ensure that a second user double-checks the type
and amount of each tender that is removed from the safe. The authority level of the second user must
be equal to or higher than the initial user performing the withdrawal.
To perform a withdrawal from a safe:
126
1.
Click Cash Management.
2.
Click the safe that you want to make a withdrawal from.
3.
Click Safe Withdrawal.
Processing a safe withdrawal (bank deposit)
4.
Click New.
5.
Click each type of tender that you want to withdraw and type the amount of the withdrawal. Click
the tender once more; the amount appears in the Lump Sum Batch # field in addition to the
Amount field.
or
6.
For any tender with denominations, click Denomination.
Note: If the sum of the Lump Sum Amount column falls within the warning
threshold set in the Configurator, a message displays warning you that the
amount entered is too high. You can choose to continue until the total amount
reaches the rejection threshold, then you must re-enter a smaller amount.
7.
Click Qty. and type a quantity for each denomination. The Amount field is automatically filled in
with the correct value after a second click in the Tender Amount field.
8.
Click Save, and then click Exit.
Note: The Verified By field is automatically filled in by the Store Manager
with the operator number of the person that double-checked the tender types
and amounts.
To complete a safe withdrawal:
1.
Click Complete. The tender amounts disappear from view to ensure a blind verification by the
second user.
2.
On the Tender Verification Required window, a second user must type their User ID and
Password in the corresponding fields.
3.
The second user must then click each tender type, and type the same amount in the same order to
verify the initial withdrawal.
4.
After the second user clicks Done, verification is complete and the transaction is completed
automatically.
127
Tender Management
Note: Tender verification is the only activity that the second user can perform
during their subsession. No other Store Manager functions can be accessed via
the verification process.
Tip: The Amount fields on the left side of the Maintenance window only
display the amounts you enter for withdrawal/deposit. You cannot edit these
fields directly. To enter an amount, click the tender’s row on the left side of the
window, and enter the amount into the fields on the right side of the window.
Modifying a safe withdrawal (bank deposit)
You can only modify a pending withdrawal/deposit. Once you have entered the final information for a
withdrawal/deposit, you can complete it.
You cannot modify a completed withdrawal/deposit. If you need to make a change to a completed
withdrawal/deposit, you must void it and create a new one.
To modify a pending withdrawal/deposit:
1.
On the Main Menu window, click Cash Management.
2.
Click the appropriate safe.
3.
Click Safe Withdrawal.
4.
Click Display All. The pending, completed, deleted, and voided withdrawals/deposits are
displayed in the window.
5.
Click the one you want to modify, and then click Open.
6.
Change the fields in the window, as appropriate.
7.
Click Save, and then click Exit.
Voiding a safe withdrawal (bank deposit)
You can only void a completed withdrawal/deposit. Voided withdrawals/deposits are visible but they
cannot be modified, and they do not affect the safe’s system amount.
To void a withdrawal/deposit:
128
1.
On the Main Menu window, click the Cash Management.
2.
Click the appropriate safe.
3.
Click Safe Withdrawal.
4.
Click Display All. The pending, completed, deleted, and voided withdrawals/deposits are
displayed in the window.
5.
Click the one you want to void, and then click Open.
6.
Click Void. The status changes to voided.
7.
Click Exit.
Safe transfers and balances
Viewing details of a safe withdrawal (bank deposit)
You can review the information you entered into a safe withdrawal/bank deposit transaction,
regardless of its current status. Voided withdrawals/deposits remain visible.
To view the details of a withdrawal/deposit:
1.
On the Main Menu window, click Cash Management.
2.
Click the appropriate safe.
3.
Click Safe Withdrawal.
4.
Click Display All. The pending, completed, deleted, and voided deposits are displayed in the
window.
5.
Click the one you want to review, and then click Open. The Maintenance window appears,
containing the withdrawal/deposit information.
Safe transfers and balances
Cash management transactions, such as safe deposits and withdrawals to and from one safe can be
performed while, at the same time, performing other types of cash management transactions on
another safe.
Note: You must have an authority level of 5 to perform any operations on multiple safes.
Depending on the safe configuration, cash management security setup, and your authority level, you
can access the Safe Management menu directly from the Main menu, or if you are authorized to
interact with multiple safes, you must first select the safe from the Safe menu.
Transferring tenders between safes
The safe transfer transaction enables you to transfer tenders between safes. If there is more than one
potential destination safe, you can select it from the safe choice list. A transaction involving a particular
safe, as the source or destination, is displayed on the Safe Transfer Selection and Safe Transactions
windows.
To transfer tenders between safes:
1.
Click Cash Management.
2.
Click the Safe that you have determined to be the source safe. The destination safe is always the
default when only two safes exist.
3.
On the Safe Management menu, click Safe Transfer.
4.
If more than two safes exist, select the destination safe from the Safe drop-down list.
129
Tender Management
5.
Click New.
6.
The name of the safe that the funds are being transferred from displays automatically in the From
field. No action is required.
7.
If there is more than one potential destination safe, select the destination safe that the funds are
being transferred to, in the To field. If there is only one potential destination safe, then it is
automatically selected.
8.
Click the Reason drop-down list and select the reason that you are performing the safe transfer.
You define the selection of reasons that appear in this drop-down list on the Code Table
Maintenance window.
9.
You can define any notes that you want to record about the transfer. Type an alphanumeric string,
up to 40 characters in length, in the Notes field.
10. Click the Amount field beside each tender type, and type the amount of each tender that is being
transferred. Note that you must click in the same amount field a second time after typing the
amount in the field.
11. To define the amount of the selected tender, type an amount, including the decimal places, in the
Lump Sum Batch # field. To select a tender, click the tender in the Tender field.
Note: If the sum of the Lump Sum Amount column falls within the warning
threshold set in the Configurator, a message displays warning you that the
amount entered is too high. You can choose to continue until the total amount
reaches the rejection threshold, then you must re-enter a smaller amount.
12. Click Save, and then click Exit.
130
Balancing the safe
Balancing the safe
Balancing ensures the amount of tender in the safe matches the amount of tender that should be in the
safe based on the completed loans, pickups, withdrawals, and deposits that have been performed.
Your head office uses the Configurator to define the tenders that are eligible to be balanced.
The Store Manager calculates the system amount of a tender that should be in the safe, and you enter
the actual amount. The Store Manager compares the two figures and determines if the safe is balanced.
You can define the maximum amount that the system and actual tender amounts can differ by, and still
be considered balanced, in the Safe Balance Threshold field in the General Parameters Maintenance
window.
Entering a new safe balance
A new safe balance has a pending status until you complete it. You can modify the amounts in a
pending balance transaction. Completed pickups, loans, withdrawals and deposits are applied to the
system tender totals during balancing.
Before you complete the following steps, you must define the selections in the Reason Code
drop-down list, if the Reason parameter is set to mandatory.
In the following steps, you are required to enter information into the Safe Balance Maintenance
window. For information about the fields in the window, see “The Safe Balance Maintenance window”
on page 133.
To enter a new safe balance:
1.
On the Main Menu window, click Cash Management.
2.
Click the safe that you are attempting to balance.
3.
Click Safe Balance.
4.
Click New.
5.
Complete the fields in the window, as appropriate.
6.
Click Save, and then click Exit. The Safe Balance Maintenance window closes.
Tip: The Actual fields on the left side of the Safe Balance Maintenance
window only display the amounts you enter for balance. You cannot edit these
fields directly. To enter an amount, click the tender’s row on the left side of the
window, and enter the amount into the fields on the right side of the window.
Completing a safe balance
A safe balance has a pending status until you complete it. You cannot modify a completed balance, but
you can void it. If you find an error in a completed balance, you must void it and create a new one.
To complete a safe balance:
1.
On the Main Menu window, click Cash Management.
2.
Click the safe that you are attempting to balance.
3.
Click Safe Balance.
4.
Click Display All. The pending, completed, deleted, and voided balances are displayed in the
window.
131
Tender Management
5.
Click the balance you want to complete, and then click Open. The Safe Balance Maintenance
window displays the balance information.
6.
Click Complete, and then click Exit.
Modifying a safe balance
You can only modify a pending balance. Once you have entered the final information for a balance,
you can complete it. For information about completing a balance, see “Completing a safe balance” on
page 131.
You cannot modify a completed balance. If you need to make a change to a completed balance, you
must void it and create a new one. For information about voiding a balance, see “Voiding a safe
balance” on page 132.
To modify a pending safe balance:
1.
On the Main Menu window, click Cash Management.
2.
Click the safe that you are attempting to balance.
3.
Click Safe Balance.
4.
Click Display All. The pending, completed, deleted, and voided balances are displayed in the
window.
5.
Click the balance you want to modify, and then click Open.
6.
Change the fields in the window, as appropriate.
7.
Click Save, and then click Exit. The Safe Balance Maintenance window closes.
Voiding a safe balance
You can only void a completed balance. Voided balances are visible in the Safe Balance Selection
window, but they cannot be modified.
To void a safe balance:
132
1.
On the Main Menu window, click Cash Management.
2.
Click the safe that you are attempting to balance.
3.
Click Safe Balance.
4.
Click Display All. The pending, completed, deleted, and voided balances are displayed in the
window.
5.
Click the balance you want to void, and then click Open. The Safe Balance Maintenance window
displays containing the balance information.
6.
Click Void. The balance’s status changes to voided.
7.
Click Exit.
Balancing the safe
Viewing the details of a safe balance
You can review the information you entered into a balance transaction, regardless of its current status.
Voided balances remain visible in the Safe Balance Selection window.
To view the details of a balance:
1.
On the Main Menu window, click Cash Management.
2.
Click the safe that has the balance details that you want to view.
3.
Click Safe Balance.
4.
Click Display All. The pending, completed, deleted, and voided balances are displayed in the
window.
5.
Click the balance you want to review, and then click Open. The Safe Balance Maintenance
displays containing the balance information.
The Safe Balance Maintenance window
This window contains the fields used for performing a safe balance transaction.
To complete the Safe Balance Maintenance window
1.
The Txn Num. field defines a unique number that identifies the safe balance transaction. This
number is a counter that reflects the number of tender management transactions (for example,
pickups and balances) that have been performed. This is not the transaction number that is
recorded on the TLog. The number in the T-Log Num. field, in this window, is recorded as the
transaction number in the TLog.
No action is required. The Store Manager automatically completes this field with the next available
number when you save the transaction.
2.
The T-Log Num. field defines the unique number that identifies the safe balance transaction in
the TLog.
No action is required. The Store Manager automatically completes this field when you complete
the balance.
133
Tender Management
3.
The Txn Status field indicates the safe balance transaction’s status (pending, completed, or
voided). No action is required. The Store Manager automatically completes this field.
4.
The Operator field displays the employee number of the person that processes the safe balance
transaction. No action is required.The Store Manager automatically completes this field with the
employee number of the person who logged into the Store Manager.
5.
The Txn Date field contains the date on which the safe balance transaction is created. No action
is required. The Store Manager automatically completes this field with the system date of the
computer it is running on.
6.
The Business Date field contains the current business date. Note that this date can be different
than the system date.
7.
Select the reason that you are performing the safe balance transaction from the Reason
drop-down list.
You define the selection of reasons that appear in this drop-down list on the Code Table
Maintenance window.
8.
You can define any notes that you want to record about the transaction. Type an alphanumeric
string, up to 40 characters in length, in the Notes field.
9.
The Tender field contains the tenders that you can include in the safe balance. A tender is actually
included in the balance if you enter a value in the corresponding Amount field on this
window.Your head office uses the Configurator to define the tenders that are available for safe
balance. This field contains a list of the tenders that are eligible. No action is required. The Store
Manager automatically completes this field with the tenders that are eligible for deposit.
To enter a safe balance amount for a tender, click the tender and complete the fields on the right
side of this window.
10. To enter an actual amount for a tender, click Actual and complete the fields on the right side of
this window
11. The System field indicates the amounts of the tenders that are expected in the safe. This field is
not visible if your head office has used the Configurator to enable blind balancing. During a blind
safe balance, you do not know the system amount. The Store Manager compares the actual
amount with the system amount and alerts you if they do not match. No action is required. When
you click Balance in this window, the Store Manager automatically completes this field with the
amount of tender that is expected in the cash drawer.
12. The Short/Over field indicates the difference between the actual safe balance amounts you enter
into the fields on the right side of the window, and system amounts. This field is not visible if your
head office has used the Configurator to enable blind balancing. During a blind safe balance, the
Store Manager compares the actual amount with the system amount and alerts you if they do not
match. No action is required. When you click Balance in this window, the Store Manager
automatically completes this field with the difference between the actual and system amounts.
13. The Total Tenders field displays the totals of the amounts in the Amount field. No action is
required. The Store Manager automatically completes this field.
14. To define the amount of the selected tender, type an amount, including the decimal places, in the
Lump Sum Batch # field. To select a tender, click the tender in the Tender field.
15. The Total Lump Sums field displays the total of the lump sum amounts that you enter in the
Lump Sum Amount field. No action is required. The Store Manager automatically completes this
field.
134
Viewing the contents of the safe
Note: If the sum of the Lump Sum Amount column falls within the warning
threshold set in the Configurator, a message displays warning you that the
amount entered is too high. You can choose to continue until the total amount
reaches the rejection threshold, then you must re-enter a smaller amount.
16. The Total Denominations field displays the total of the amounts that you enter in the Amount
field when you enter amounts by denomination. Your head office uses the Configurator to define
denominations for a tender. If no denominations are defined for the tender, the denomination
fields are not available. Click the Denomination button in this window to enter amounts by
denomination. No action is required. The Store Manager automatically completes this field.
17. To change the status to complete, click Complete.
18. To change the status to void, click Void. This button is only enabled if the status is complete.
19. Click Save, and then click Exit.
Viewing the contents of the safe
Tenders that are picked up, deposited, loaned, and transferred affect the total amount of tenders in the
store’s safe.
The Store Manager updates the system amounts for the store’s safe whenever you complete a tender
management transaction. You can review these figures and print a report from the Safe Contents
window. You cannot edit the information in the window, it is for information only.
To access the Safe Contents window:
1.
On the Main Menu window, click Cash Management.
2.
Click the safe that you want to view.
3.
Click Safe Content.
135
Tender Management
To print the Safe Content report:
1.
Click Report.
2.
Click Print.
3.
Click OK. The Store Manager prints the report. The report remains displayed in the report
window.
Tip: The report is linked to the report template designer, so you can customize
its appearance or export its data to a file for use by another application.
Viewing detailed safe transactions
The Store Manager maintains a master record of the completed, voided, and pending tender
maintenance transactions you enter into the Store Manager. The list includes detailed information
about every tender management transaction, including the type of transaction, the person who
processed it, the amount, and the date. You can review the master record in the Transaction List
window; you cannot edit the information directly in the window, it is for information only.
To access the Transaction List window:
136
1.
On the Main Menu window, click Cash Management.
2.
Click the safe that you want to list the transactions for.
Viewing detailed safe transactions
3.
Click Transaction List. The Transaction List window has five tabs, each listing transactions of a
different status.
Tip: You can review and edit an individual transaction by clicking the
transaction and then clicking Open. The transaction appears in the appropriate
tender maintenance window (for example, Safe Deposit Maintenance window).
You can use fields in the maintenance window to modify, complete, or void the
transaction.
Performing a query on safe transactions
You can perform a query in the Transaction List window to search for the transaction or transaction
type you want to review.
To perform a query in the Transaction List window:
1.
Click Query. The fields at the top of the transactions window are activated.
2.
Type your search criteria into the fields at the top of the window.
3.
Click Search. The tender management transactions that match your criteria are displayed in the
window. You may have to click a tab to see them, depending on their status.
To complete the fields in the Transaction List window:
1.
To select a tender management function, click the Txn Type drop-down list and select a type
from the list.
2.
The Txn Date field contains the date on which the transaction is created. It does not need to
match the business date. For example, you can create a deposit transaction for the previous day.
a) Click the button beside the field to open the pop-up calendar. Click a date in the calendar and
then click OK.
b) Type a time, using the format HH:MM:SS.
c) Edit the AM/PM indicator if required, by typing over the existing indicator.
137
Tender Management
138
3.
The Business Date field contains the range of business dates for the transaction that you are
looking for.
4.
The Operator field displays the employee number of the person that processes the transaction.
Type a cashier number in the Operator field.
5.
To search for transactions that were processed by a particular register, click the Register # field
and type a register number.
6.
To search for all tenders, click the All Tenders radio button.
7.
To search for a specific tender, click the Selected Tender radio button, then select an option
from the drop-down list.
8.
The Audit tab shows, chronologically, how the contents of the safe has changed. It shows
transaction types, increases and decreases, and other transaction tender amounts. For example,
what was in the safe once a transaction was completed and verified.
Managing Price Look Ups
This section provides information about managing the prices of the items that you sell in your store.
The items in the store are identified by unique codes called PLUs (Price Look Ups).
You can use the Store Manager to define PLUs and set up different pricing schemes involving linked
items and promotions.
This section covers the following topics:
Using the PLU Search window
Maintaining PLUs
Maintaining PLU extended fields
Making global changes to PLUs
Using price batch management functionality
Auditing product price changes
Defining a PLU cross reference
Setting up a quantity or level pricing scheme
Setting up linked items
Reviewing mix match pricing schemes
Setting up promotional pricing
Exporting local PLU database information
WARNING! Your head office can complete most PLU management functions and download the files
to your store. As a result, you can create new PLU management records, modify or delete them, and
you can also modify and delete the ones sent from your head office.
139
Managing Price Look Ups
Using the PLU Search window
The PLU Search window is linked to the PLU Number fields in several of the Store Manager’s
windows. The window allows you to browse through the PLU list and select a PLU so that you do not
have to remember it.
The PLU Search window is linked to the PLU Number fields in the following windows:
PLU Maintenance window
Cross Reference Maintenance window
Global PLU Change Maintenance window
Price Batch Maintenance window
Quantity Level Pricing Maintenance window
Link Item Maintenance window
Purchase Order Maintenance window
Receiving Maintenance window
Store Transfer Maintenance window
Physical Inventory Define window
Inventory Adjustment window
Vendor’s SKU Maintenance window
Print Queue Maintenance window
Price Tag Maintenance window
Item Movement Report Criteria window
Inventory Adjustment Report Selection Criteria window
Inactive PLU Report Selection Criteria window
Current Inventory Report Selection Criteria window
Gross Profit Report Selection Criteria window
Before you complete the following steps, you must have a maintenance window open and your cursor
positioned in the PLU number field.
140
Using the PLU Search window
To use the PLU search window to find a PLU:
1.
Press F12 to display the PLU Search window.
2.
Double-click the category to which the PLU belongs, from the list on the left side of the window.
A list of groups opens below the category.
3.
Double-click the group to which the PLU belongs, from the list on the left side of the window. A
list of departments opens below the group.
4.
Double-click the department to which the PLU belongs. The department’s PLUs and their
descriptions are listed on the right side of the window.
5.
Click the PLU.
6.
Click OK. The PLU you selected is entered into the PLU Number field in the maintenance
window.
141
Managing Price Look Ups
Maintaining PLUs
The Store Manager and other Triversity applications use PLU (Price Look Up) numbers to identify
products in the store. Other methods of identifying items with which you may be familiar include
SKUs (Stock Keeping Unit), bar codes, item numbers, and product numbers.
Your head office must define a PLU’s configuration before you can add PLUs to the PLU table in the
Store Manager.
After you have defined PLUs, you can link them together into packages, create promotional pricing
and mix match pricing schemes, and create short, easy to remember cross reference numbers. Before
you create any PLU records, you must define the product hierarchy of categories, groups, and
departments. For information about defining the hierarchy, see “Setting up the product hierarchy” on
page 65.
Tip: You can type a unique PLU number into the PLU field, or you can click Generate Unique PLU
to have the Store Manager create a unique PLU for you and enter it into the field. The PLU that the
Store Manager creates follows the rules you define in the Leading Digit, Merchant ID, No of Digits
in Sequence, and Check Digit ID fields in the General Parameters Maintenance window.
142
Maintaining PLUs
Adding a PLU
You can add a PLU when a new product arrives in the store.
Before you add any PLUs, you must have defined the product hierarchy of categories, groups, and
departments. For information about defining the hierarchy, see “Setting up the product hierarchy” on
page 65.
To create a PLU:
1.
On the Main Menu window, click PLU Management.
2.
Click PLU Maintenance.
3.
Click New.
143
Managing Price Look Ups
Note: Some options that you can define in the PLU Maintenance window are
also defined on a department basis on the Department Maintenance window.
WARNING! Use Department is also setup in the Configurator. If you click
the Use Dept checkbox in this window, the tax, itemizer, discount, return, and
scale item options you define in the Department Maintenance window are used
for the item. If you leave the Use Dept checkbox clear, the options you define
in this window are used.
4.
To define an item’s unique PLU number, type a number in the PLU field. Your head office must
define the configuration that the PLU must conform to, in the Configurator application.
5.
Type a description, up to 40 characters in length in the PLU Desc field, that describes the item.
The description can appear on the customer display and customer receipt.
6.
To assign the department to which the item belongs, click the Dept Number drop-down list and
select an option.
7.
The Dept Desc field contains the description of the department that you select in the Dept
Number drop-down list, on this window. No action is required. The Store Manager automatically
completes this field.
8.
To set the price that is charged for the item at the POS, type a currency amount, including decimal
places, in the Retail Price field.
9.
To prompt the cashier to verify the item’s price when they enter this item into a transaction, click
the Verify PLU checkbox. The default price is the amount you enter into the Retail Price field in
this window. The cashier can change the price while the prompt is displayed.
10. To set the vendor’s suggested retail price for the item, type a currency amount, including decimal
places, in the Sugg. Price field.
11. If the original price of the item is different from the retail or suggested price, type the original
price in the Original Price field.
12. If you want the item to be returnable, click the Allow Returns checkbox. If it cannot be returned,
the cashier cannot enter it into a return transaction.
13. If you want the item to be returnable without a receipt, click the Allow Rtn w/o Rcp checkbox.
If it cannot be returned without a receipt, the cashier cannot enter it into a return without receipt
transaction.
14. To allow the cashier to enter this item into a regular sale transaction, click the Allow Sale
checkbox.
15. To allow the item to be exchanged for another item, click the Allow Exchange checkbox. If the
item cannot be exchanged, the cashier cannot enter it into an exchange transaction.
16. To allow an item to be included in a layaway sale or other type of pending transaction, click the
Allow Pend. Trans. checkbox.
17. To allow a cashier to apply discounts to this item, click the Allow Discount checkbox.
18. If an employee discount is allowed on this item during an employee sale transaction, click the
Allow Empl. Discount checkbox. You can define an employee’s discount rate using the Emp
Discount field in the Employee Maintenance window.
19. If an item is linked to other items, click the Link Item checkbox. The Link Item table is checked
each time the cashier enters this item into a transaction.
For example, a package of skis, poles, boots, and bindings could all be linked to one PLU called
Ski Package.
144
Maintaining PLUs
20. To define an item as a coupon, click the Coupon Item checkbox. If the item is a coupon, it
returns a negative price when the cashier enters it into a transaction.
21. If this item is eligible for special quantity pricing, click the Qty Pricing checkbox. For example, if
soda is eligible for quantity pricing a single can of soda, a 6 pack of soda, and a case of soda have
different prices. For information about defining special quantity pricing, see “Setting up a quantity
or level pricing scheme” on page 172.
22. If this item has multiple price levels defined for it, click the Price Lev. Flg checkbox. For
example, a book has one price for regular customers, and another price for book club members.
For information about defining level pricing schemes, see “Setting up a quantity or level pricing
scheme” on page 172.
23. If this item must be weighed when the cashier enters it into a transaction, click the Scale Item
checkbox.
24. To ensure that the item uses the options defined for the department in which it belongs, click the
Use Dept checkbox. Leave the checkbox empty if the item should use the options defined in this
window for taxes, itemizers, discounts, returns, and scale item.
Note: The Match Mfg. and Gen. Coupon checkboxes are not configurable in
the Store Manager.
25. To define the number of the item sold in a package, type a number in the Sell Qty. field.
26. To set the maximum number of this item that can be sold in 1 transaction, type a number in the
Limited Qty. field. Leave the checkbox empty if there is no limit on the number that can be sold
in 1 transaction.
27. To set the description of the unit of measurement that prints on a receipt when a cashier sells this
item (for example, grams, liters, pounds), type a description up to 15 characters in length, in the
Qty Desc.
28. To define the prompt sequence that is automatically initiated when the item is entered into a
transaction, type an ID number in the Prompt Id field. Your head office uses the Configurator to
define profile prompts. Obtain the prompt’s ID number from your head office.
29. To define the discount that is automatically applied to the item when it is entered into a
transaction, type a discount ID number in the Auto Disc. ID field. Your head office uses the
Configurator to define discounts. Obtain the discount’s ID number from your head office.
30. To specify the number of items that are packed together per shipment, type a number in the
Ordering Pkg Qty field. This field is used to round up the quantity required when preparing a
purchase order.
31. To define the tare weight that is used when this item is entered in the transaction, type an ID
number in the Tare Weight field. Tare weight is the weight of a container or any packaging that
must be deducted from the total weight of the item. To require the item to be weighed, you must
click Scale Item in this window. The unit of measurement used to interpret the tare weight is
determined by your scale. For example, if your scale is set up to use grams, the tare weight is
measured in grams. For information about defining tare weights, see “Setting up tare weights” on
page 88.
32. To define the mix match pricing schemes for which this item is eligible, type a mix match ID
number in each Mix Match 1-4 field. Each item can be eligible for up to 4 mix match schemes.
You can review the mix match pricing schemes that is setup by your head office in the Mix Match
Maintenance window. For information about the fields in the window, see “The Mix Match
Maintenance window” on page 180.
33. Click the Allow Merch Type MM checkbox to enable a mix match pricing scheme by
merchandise type.
145
Managing Price Look Ups
34. Type the store’s cost of the item in the Default Cost field. Be sure to include decimal places.
35. If the item requires weighing, click the Measurement drop-down list and select an option. To
require the cashier to weigh the item, click Scale Item on this window.
36. To assign a unique number that is used to track the item during order, receive, and transfer
inventory transactions, type a number in the Ordering Num field.
Note: The Used By Days and Commission ID fields are not applicable in
the Store Manager application.
37. To define the size of a PLU, type a number that represents the weight or volume of the item in the
Size field. For example, if an item weighs 250 lbs, then type 250 in the Size field and lbs in the Size
Unit field.
38. After defining the size of the PLU, type the unit of measurement of the item in the Size Unit
field. For example lbs, g., oz. Note that you can use metric or imperial units.
39. The Allow PLU Upd checkbox indicates if you, at the store level, can modify any of the PLU’s
information. You cannot, at the store level, change the setting in this checkbox. You can change
the PLU’s retail price if this checkbox is checked, and the Allow Price Upd checkbox, on this
window, is also checked. If the Allow Price Upd checkbox is not checked, you can change any of
the PLU’s information except for the price. Your head office uses the Configurator to define
whether PLUs can be updated. If you are defining a new PLU in the Store Manager, this checkbox
is checked (÷) by default to enable PLU updates. No action is required.
40. The Allow Price Upd checkbox indicates if you, at the store level, can modify the PLU’s price.
You cannot, at the store level, change the setting in this checkbox. In order for you to be able to
change the PLU’s price, the Allow PLU Upd checkbox in this window, must be checked. Your
head office uses the Configurator to define whether prices can be updated. If you are defining a
new PLU in the Store Manager, this checkbox is checked by default to enable price updates. No
action is required.
41. The Local Price Chg field indicates if you have changed the retail price of the PLU at store level.
No action is required. The Store Manager automatically completes this field with a checkbox when
you change the PLU’s retail price.
42. If a store has the ability to change the Department setting associated with a PLU, the Allow Dept
Upd checkbox will be checked. Note that this feature is enabled in the Configurator application;
this checkbox is for information purposes only and cannot be enabled or disabled in the Store
Manager.
43. If checked, the Local Dept Chg checkbox indicates that a manual update to the Department
setting associated with a PLU has been performed. This is an indicator only and can not be
enabled or disabled in the Store Manager.
44. To activate the PLU generation function, click Generate Unique PLU. The Store Manager
creates a unique PLU following the rules you define on the General Parameters Maintenance
window, and enters it into the PLU field.
45. To open the Extended Fields window, click Extended Fields. For more information about
extended fields, see “Maintaining PLU extended fields” on page 153.
46. Click Save, and then click Exit.
Modifying a PLU’s information
You can modify a PLU’s information.
146
Maintaining PLUs
For more information about the fields in the PLU Maintenance window, see, “The PLU Maintenance
window - User Flags, Taxes & Itemizers tab” on page 147, and “The PLU Maintenance window Labels tab” on page 151.
Tip: If you have a large PLU table, you can perform a query to find the PLU you want. When the PLU
Selection window appears, click Query.
To modify a PLU’s information:
1.
On the Main Menu window, click PLU Management.
2.
Click PLU Maintenance.
3.
Click Display All. The PLUs are displayed in the PLU Selection window.
4.
Click the PLU you want to modify, and then click Open. The PLU Maintenance window appears,
with the Page 1 tab active and displaying the PLU’s information.
5.
Change the information in the fields in the window.
6.
Click the Save, and then click Exit.
Deleting a PLU
You can delete a PLU.
To delete a PLU:
1.
On the Main Menu window, click PLU Management.
2.
Click PLU Maintenance.
3.
Click Display All. The PLUs are displayed in the PLU Selection window.
4.
Click the PLU you want to delete, and then click Delete. A dialog box appears, prompting you to
confirm the deletion.
5.
Click OK. The PLU is deleted.
The PLU Maintenance window - User Flags, Taxes & Itemizers tab
This tab contains the fields used for defining a PLU’s information.
147
Managing Price Look Ups
The PLU, PLU Desc, Inventory Control, and Inventory Information fields are accessible on all
tabs in the PLU Maintenance window.
To complete the User Flags, Taxes & Itemizers tab:
148
1.
To define the user flag options to which the item belongs, click the User Flags 1-6 drop-down list
and select a user flag option from the list. The Store Manager automatically completes the User
Flags field. For information about defining user flag options, see “Defining user flags” on page 77.
2.
The apply tax 1-4 fields determine the taxes that are applied to the item when the cashier enters it
into a transaction. Click the Apply Tax 1-16 checkboxes corresponding to the taxes you want to
apply to the item. If you want to apply taxes to items based on the tenders used to pay for them,
you can use the Itemizer fields in the PLU Maintenance window. For information about the
Itemizer fields, see “The PLU Maintenance window - User Flags, Taxes & Itemizers tab” on
page 147. For information about defining taxes, see “Setting up taxes” on page 80.
3.
To define the itemizers applied to the item, click the Itemizer 1-4 checkboxes to assign the IDs to
the item. You can use up to 4 itemizers to restrict the tenders that a customer can use to pay for
the item. You do not explicitly set up itemizers, you simply assign itemizers to tenders and to
items, and if they match, the item can be purchased with the tender. For example, if the tender
food stamps has itemizer 2, and PLU 456953545 has itemizer 2, a customer can pay for the item
with food stamps. If PLU 35687458 has itemizer 1, a customer cannot pay for it with food stamps.
You can use the Itemizer Taxes 1-4 checkboxes on this window to assign taxes to the item based
on the itemizer applied to it. Your head office uses the Configurator to assign itemizers to tenders.
4.
To define the taxes that are applied to the item f when you use itemizers to restrict the tenders that
a customer can use to purchase the item, click the Itemizer Taxes 1-4 checkboxes to assign taxes
to the itemizers applied to the item. For example, assume PLU 456953545 is assigned itemizers 1
and 3, and itemizer 1 is assigned taxes 1 and 2, and itemizer 3 is assigned tax 2. The tender cash
has itemizer 1, and food stamps has itemizer 3. If the customer pays for the item with cash, tax 1
and 2 is applied. If the customer pays for the item with food stamps, only tax 2 is applied. If you
want to assign taxes to items in the department based on the tender the customer uses to pay for
them, you can use these fields. If you want to apply the same taxes to the items, regardless of the
tender used to pay for them you can click Tax 1-4 in the PLU maintenance window. For
Maintaining PLUs
information about defining taxes, see “Setting up taxes” on page 80. For information about
itemizers, see the description for the Itemizer group of fields above.
The PLU Maintenance window - Vendor/SKU tab
This tab contains the fields used for defining a PLU’s vendor information.
The PLU, PLU Desc, Inventory Control, and Inventory Information fields are accessible on all
tabs in the PLU Maintenance window.
WARNING! This tab in the PLU Maintenance window is only visible if you check the Maintain
Vendor/SKU checkbox in the Inventory Parameters Maintenance window. For information about the
fields in the Inventory Parameters Maintenance window, see “Inventory Parameters Maintenance
window” on page 192.
To complete the Vendor/SKU tab:
1.
To set the ID number of the primary vendor of the item, click the Primary Vendor drop-down
list and select a vendor. For information about setting up vendors, see “Setting up product
vendors” on page 84.
2.
You can assign several vendors for an item. To assign an ID number of a vendor of the item, click
the Vendor ID drop-down list and select a vendor.
3.
To define the unique number that the vendor uses to identify the item, type a SKU number into
the Vendor/SKU field.
4.
To define the cost of the item to the store from the vendor, type the cost of the item in the Cost
field.
5.
To define the number of units of the item in each shipping case, type a number into the Pack
Factor field. For example, a pack factor of 4 indicates that the item is shipped from the vendor in
cases of 4. The number you enter into this field is used as the package size when you order or
receive the item. For information about purchase orders, see “Ordering inventory” on page 196.
For information about receiving, see “Receiving inventory” on page 211.
149
Managing Price Look Ups
150
6.
To add a blank line to the list of vendors, click Add.
7.
To remove the selected vendor from the list, click Remove.
Maintaining PLUs
The PLU Maintenance window - Labels tab
This tab contains the fields used for defining a PLU’s price sticker and shelf label printing options.
The PLU, and PLU Desc, Inventory Control, and Inventory Information fields are accessible on
all tabs in the PLU Maintenance window.
To complete the Labels tab:
1.
To define the format used to print the price stickers for the item, click the Price Sticker Format
drop-down list and select a format. If you do not define a format in this drop-down list, the item’s
price stickers are printed using the format that you define in the Default Format ID for Price
Sticker drop-down list on the Label Parameters Maintenance window. For information about
creating formats, see “Creating label and sticker formats” on page 255.
2.
To define the format used to print the shelf labels for the item, click the Shelf Label Format
drop-down list and select a format. If you do not define a format in this drop-down list, the item’s
shelf labels are printed using the format that you define in the Default Format ID for Shelf
Label drop-down list on the Label Parameters Maintenance window.
3.
To open the Price Tag window so you can design your own price stickers and labels for the item,
click Designed Label.
4.
To open the Print Queue Selection window, click Price Sticker. You can use this window to send
the items price stickers to a print queue. Click Shelf Label to send the items shelf labels to a print
queue. For information about printing the labels in a print queue, see “Creating a shelf label
queue” on page 264.
151
Managing Price Look Ups
The PLU Maintenance window - Inventory Control tab
This tab is used for defining the minimum and maximum amount of the PLU that can be in the store.
The PLU, PLU Desc, Inventory Control, and Inventory Information fields are accessible on all
tabs in the PLU Maintenance window.
To complete the Inventory Control tab:
152
1.
To include the item in suggested orders, click the Include in Suggested Orders checkbox. A
suggested order contains a list of items whose on-hand quantity is below the minimum allowed,
and a suggested order amount that brings the on-hand quantity of the item up to the maximum
allowed. You can enter the minimum, maximum, and current on-hand quantity into the Minimum
Stock on Hand, and Maximum Stock On Hand fields in this window. A suggested order can be
turned into a purchase order. For information about suggested orders, see “Creating a purchase
order from a suggested order” on page 198.
2.
To set the minimum number of the item that is allowed on-hand, type a number in the Minimum
Stock On Hand field. If you include the item in suggested orders, the item is added to a
suggested order whenever its on-hand amount falls below the number that you enter into this
field. An amount is ordered to bring the item’s on-hand amount to the level entered in the
Maximum Stock On Hand field.
3.
To set the maximum number of the item allowed on-hand, type a number in the Maximum
Stock on Hand field. If you include the item in suggested orders, an amount is suggested to bring
the item’s on-hand amount to the level is entered in this field.
4.
The Reorder Point field displays the number at which a flag is generated to indicate that new
inventory needs to be ordered. No action is required, the Store Manager automatically displays the
number in this field.
Maintaining PLU extended fields
The PLU Maintenance window - Future Prices tab
The Future Price tab is used to inquire about a PLU’s price on a specific date in the future. If a PLU’s
price is going to change, the effective date and retail price display in this window. Note that this tab is
for viewing only.
Maintaining PLU extended fields
You can use extended fields to record additional PLU information that is not available in the PLU table
by creating customized fields and applying the fields to PLUs. The PLU information in the extended
fields is stored in the database and can be exported to a file for use by a third-party application.
Your head office uses the Configurator to define fields, option types, options, and option details. You
can also define options and option details using the Store Manager. For example, your head office can
define a color field, and you can define three options: white, black, green. You can assign a color
option to a PLU.
Extended fields can have option types and options assigned to them, or they can be defined to require
you to type information into them. Your head office defines extended fields and how you can complete
them.
Option types: Created by your head office and assigned to extended fields. They contain options
from which you can choose to complete the field. The same option type can be assigned to several
fields.
Options: Choices available to fill the extended field. They are assigned to option types and appear
in drop-down lists. You can define options and assign them to option types using the Store
Manager.
Option details: Text that provides additional information about the options. You can define
details for options in the Store Manager.
For example, assume the following field, option types, options, and option details are defined:
153
Managing Price Look Ups
Recipes (field)
Vegetable recipes (option type, assigned to the Recipes field)
Caesar Salad (option)
recipe ingredients and instructions (option details)
Green Beans with Onions (option)
recipe ingredients and instructions (option details)
When you choose the Recipes field, the Caesar salad and Green beans options appear in a drop-down
list.
After you assign an extended option to a PLU, you can export the information to a file for use by the
third-party application using the file export function. For information about the file export function,
see “Generating an export file” on page 158.
Adding extended options
You can create extended options and option details for the options that your head office created in the
Configurator.
To create extended field options and option details:
154
1.
On the Main Menu window, click File Maintenance.
2.
Click Extended Field Options.
3.
On the Extended Field Options Maintenance window, click the Option Type to which you want
to add the option.
Maintaining PLU extended fields
4.
Click New. The Extended Field Option window displays the fields for option ID and description.
5.
Type an option ID number and a description in the fields.
6.
Click OK. The new option ID and description are displayed in the Options fields.
7.
Click the option to which you want to add details.
8.
In Options Details, type text.
9.
Click Save Details, and then click Exit.
Modifying extended options
You can modify the descriptions for options that you create in the Store Manager, or that your head
office created in the Configurator.
To modify an option:
1.
On the Main Menu window, click File Maintenance.
2.
Click Extended Field Options.
3.
Click the option you want to modify, and then click Modify. The Extended Field Option window
displays a Description field.
4.
Type the new option description in the Description field.
5.
Click OK. The new option description is displayed in the Options field.
6.
Click Exit.
Tip: Once you select the option that you want to modify, you can change the
option description by editing the text in Option Details and clicking Save
Details.
155
Managing Price Look Ups
Deleting extended options
You should not delete an extended option if you have applied it to a PLU.
To delete an option:
1.
On the Main Menu window, click File Maintenance.
2.
Click Extended Field Options.
3.
Click the option that you want to delete, and then click Delete. A dialog box appears, prompting
you to confirm the deletion.
4.
Click OK. The option and its details are deleted.
Tip: To delete the option details only, click the option and delete the text from
the Option Details field. Once all the text is deleted, click Save Details.
The Extended Field Options Maintenance window
This window contains the fields for creating and maintaining extended options and option details.
To complete the Extended Field Options Maintenance window:
156
1.
The Option Types-ID field contains the unique number that identifies the option type. Your
head office uses the Configurator to define option types. No action is required, the Store Manager
automatically completes this field with the option type’s ID number.
2.
The Option Types-Description field contains the description of the option type. Your head
office uses the Configurator to define option types. No action is required, the Store Manager
automatically completes this field with the option type’s description.
3.
The Options-ID field contains the unique number that identifies the option. You do not type
directly in this field. The Store Manager automatically completes this field with the number you
Maintaining PLU extended fields
type in the Option ID field on the Extended Field Option window. The Extended Field Option
window appears when you click New or Modify.
4.
The Options-Description field defines the description of the option. You do not type directly in
this field. The Store Manager automatically completes this field with the description you type in
the Description field on the Extended Field Option window. The Extended Field Option
window appears when you click New or Modify.
5.
To define the option’s details, type an alphanumeric string in the Option Details field.
6.
To save the Option Details, click Save Details.
Applying extended field options to PLUs
Before you can apply extended field options to PLUs, you must have extended fields, option types,
options, and option details (if required) already defined. Your head office can either assign an option
type to a field, or define the characteristics of text (date, string, decimal quantity) you can type into the
field when you apply the option to the PLU.
Your head office uses the Configurator to define fields, option types, options, and option details. You
can also define options and option details using the Store Manager. For information about defining
options and option details, see “Adding extended options” on page 154.
WARNING! To export a PLU’s information and extended field information to a third-party
application, one of the options you assign to it must be an export file type. For information about
generating export files, see “Generating an export file” on page 158.
You can assign several options to one PLU.
To assign an option to a PLU:
1.
Open a PLU record so the PLU Maintenance window appears with the PLU’s information
displayed. For information about opening a PLU record, see “Modifying a record in a table” on
page 17.
157
Managing Price Look Ups
2.
Click Extended Fields.
3.
Click a field listed under Extended Field.
4.
Click the Value field beside the extended field and type the information in the field. For example,
for color you could type Blue.
5.
Click Save, and then click Exit.
Generating an export file
Export files contain extended field and PLU information that is required by a third-party application,
in a format the application can use. The exported extended field information contains the option you
select and other characteristics of the field that your head office defined in the Configurator. Each
third-party application requires a different export file type.
Your head office uses the Configurator to define export file types. The export file’s definition includes
the file name, path, and layout. It also defines the PLU fields and extended field information that is
included.
Before the extended field and PLU information can be exported, you must assign the appropriate
export file type to the PLU. You can assign export file types the same way you assign options in the
Extended PLU Fields window. They appear in the Value field list when you click the extended field in
the Extended PLU Fields window.
After you assign extended options to PLUs, you must export the information for the third-party
applications to use it.
158
Maintaining PLU extended fields
WARNING! To export the PLU and extended field information to a third-party application, one of
the options you assign to the PLU must be an export file type. You can assign export file types the
same way you assign options using the Extended PLU Fields window. For information about assigning
options to PLUs, see “Applying extended field options to PLUs” on page 157.
To export PLU information:
1.
On the Main Menu window, click Administration.
2.
Click Export Files Generation. The export file types that your head office has defined are
displayed in the Generate Export Files window.
3.
Click the Export checkbox beside the export type that you want to export.
4.
Click Go. A dialog box appears, indicating the file is being exported. The dialog box closes when
the export is complete. The export’s status is done.
5.
Click Exit.
Tip: The file export process can take several seconds to complete. To stop the
export process in progress, click Stop.
Creating update export files
When your head office defines a file export type, they choose fields from the PLU Maintenance
window to be included in the file. If you assign a file export type to a PLU, each time you change the
information in any of these selected fields, a one line update file is created automatically for use by the
third-party application.
For example, assume an export file type is defined for use by a third-party application and the type
definition includes a PLU’s description in the file. If you modify the description of PLU 456692471, an
update file is automatically exported containing the description change.
The name and path of the update file is defined by your head office using the Configurator.
159
Managing Price Look Ups
Making global changes to PLUs
If there are changes that you want to make to a group of items, such as applying a user flag option to all
of them, or allowing the items to be eligible for an employee discount, you can use the global PLU
change function.
To use the global change function to change fields for PLUs, you must first define the criteria that
identifies the PLUs you want the change applied to, then you must define the change.
Defining the PLUs to be changed
You must define the criteria that identifies the PLUs to be changed. Only PLUs that match all the
criteria you choose are changed.
To define the PLU criteria:
160
1.
On the Main Menu window, click PLU Management.
2.
Click Global Change.
3.
Click the Change Criteria tab.
4.
To define the date range within which the PLUs were created, click the box beside each of the
Date Added/To fields to open a popup calendar, and select a date. Click OK. Alternatively, type
dates into the fields.
5.
To define a range of PLUs, type numbers in the PLU/To fields.
6.
To define the category to which the PLUs belong, click the Category drop-down list and select a
category.
7.
To define the group to which the PLUs belong, click the Group drop-down list and select a group.
8.
To define the department to which the PLUs belong, click the Department drop-down list and
select a department.
Making global changes to PLUs
9.
To define the user flag options that are assigned to the PLUs, click the User Flag 1-6 drop-down
lists and select user flag options from the lists.
10. To define the vendor who supplies the items, click the Vendor drop-down list and select a vendor.
11. To clear all existing entries from the tab, click Clear Criteria.
Defining the fields to be changed
Once you have defined the PLUs that you want to be affected by the change, you must define the
changes.
The fields that appear on the Change Fields tab are the same as those in the PLU Maintenance
window, and you enter information into them the same way. For example, the Allow Empl. Disc field
is a checkbox on both the Change Fields tab and the PLU Maintenance window. If you click the
checkbox, the PLU is eligible for an employee discount. If you clear the checkbox, the PLU is not
eligible for an employee discount.
To define the fields and initiate the changes:
1.
Click Change Fields.
2.
Complete the fields in the tab as appropriate. You can change the information in several fields at
one time. Click the checkbox to the right of the field to indicate the field is marked for change,
then complete the field with the new value.
3.
Click Global PLU Change. A dialog box appears asking you to confirm the changes.
4.
Click Yes.
The Global PLU Change Maintenance window
This tab contains the fields used to enter the new information you want applied to a group of PLUs.
161
Managing Price Look Ups
To complete the Change Fields tab:
1.
To define the new department you are assigning the PLUs to, click the Department checkbox,
and select a department from the drop-down list.
2.
To set the taxes that you are applying to the PLUs, click the applicable Tax 1-16 checkboxes.
Leave the checkboxes empty for the taxes that you do not want to apply to the PLUs. For
information about setting up taxes, see “Setting up taxes” on page 80.
3.
To set the user flag options that you are applying to the PLUs, click the User Flag 1-6 drop-down
lists and select the user flag options.
4.
To define the new vendor that you are assigning to the PLUs, click the Vendor ID drop-down list
and select a vendor from the list.
5.
To define the new format for price stickers that you are assigning to the PLUs, click the Price
Sticker drop-down list and select a format.
6.
To define the new loyalty programs that the PLUs are eligible for, type the ID numbers into the
Loyalty ID fields. A PLU can be eligible for up to 4 loyalty programs. Obtain the loyalty program
ID numbers from your head office. Your head office sets up loyalty programs outside the
Triversity software.
7.
To allow the PLUs to be eligible for discounts, click the Allow Discount checkbox. Your head
office uses the Configurator to define discounts.
8.
To allow the PLUs to be eligible for employee discounts during employee sale transactions, click
the Allow Employee Disc. checkbox. For information about assigning employee discount rates
to employees, see “Maintaining employee files” on page 57.
9.
If the PLUs are under inventory control, click the Inventory Controlled checkboxes.
10. Click the Min. Stock checkbox and select one of the following three radio buttons:
% Change
Qty Change
New Qty
11. To include the PLUs in suggested orders, click Include in Sugg. Order checkboxes.
12. Click the Max. Stock checkbox and select one of the following three radio buttons:
% Change
Qty Change
New Qty
Using price batch management functionality
Your head office can send your store files containing batches of new PLU information that will be
effective on a certain date at a certain time. Commonly, this new information consists of new prices,
but it can consist of other information, such as taxes. You can also create a batch yourself, so that a
series of price updates can be implemented at once. You can view, edit, and apply the information in
the batches using the batch management function.
Each time the batch management function is used to change the price of a PLU, the information is
tracked and you can review it using the retail price audit function. For more information on the price
audit function, see “Auditing product price changes” on page 167.
Each batch you receive has a unique batch number consisting of your store number and a sequential
number. A batch contains a list of PLUs, fields, current values for the fields from the PLU table, and
new values for the fields.
162
Using price batch management functionality
Your head office uses the Configurator to define the fields that can be affected in the batches of
updates, and determines if you can edit the information at the store level in the Store Manager. The
batch does not need to contain updated information for all of the fields.
Applying a batch
The files that contain batches of new PLU information have a pending status until you apply them.
While the files are pending, you can edit the information in them. For information about editing the
information in the files, see “Editing a batch” on page 165.
You can apply the batch of changes in a file using the Price Batches Selection window, or the Price
Batch Maintenance window. This section describes how to apply a batch using the selection window.
If you try to apply batches out of order according to their effective date and time, a warning dialog box
appears. For example, if you try to apply batch 52003 effective March 15 1999, before batch 52002
effective March 1 1999, a warning dialog box appears.
WARNING! The PLU changes contained in a batch take effect immediately after you apply the batch,
regardless of the date in the Effective Date field in the Price Batch Maintenance window.
To apply a batch:
1.
On the Main Menu window, click PLU Management.
2.
Click Price Batch Management.
3.
Click Display All. The list of pending files is displayed.
4.
Click the batch you want to apply, and then click Apply. The batch of changes in the file are
applied. The batch’s status changes to applied.
5.
Click Exit.
Creating a new batch
You can create a new batch. Before you can apply the batch that you create, you must exit the Price
Batch Maintenance window. You can then apply the batch from the Price Batches Selection window or
the Price Batch Maintenance window. The Price Batch Maintenance window contains the fields for
editing the batches of new PLU information sent to the store in files from your head office.
163
Managing Price Look Ups
Your head office defines the fields that you can use when you create a batch. The fields appear in the
Price Batch Maintenance window the same way they appear in the PLU Maintenance window. For
example, the Qty Required field appears as a checkbox in the PLU Maintenance window, and as a
checkbox in the Price Batch Management window.
To create a batch:
1.
On the Main Menu window, click PLU Management.
2.
Click Price Batch Management.
3.
Click New.
4.
The Batch ID field defines the unique number identifying this file. The number consists of the
store number, and a sequential number. No action is required. The Store Manager automatically
completes this field.
5.
The Status field defines the status of the file (pending, applied). No action is required. The Store
Manager automatically completes this field based on whether you have applied the file.
Note: The changes in the file take effect immediately after you apply it.
a) Click the box beside the Effective Date field to open a pop-up calendar, and select a date
b) Click OK
c) Click in the field and delete the default time
d) Type a new time, including AM or PM.
6.
164
The Creation Date field defines the date and time of the file’s creation. No action is required.
The Store Manager automatically completes this field with the system time of the computer it is
running on.
Using price batch management functionality
7.
The Last Change Date field defines the date and time of the last instance when the PLU
information in the file was modified. No action is required. The Store Manager automatically
completes this field with the system time of the computer it is running on.
8.
The Op field indicates that the line has been added or modified. No action is required. The Store
Manager automatically completes this field with “Mod” (modified) when you modify or insert a
line in the file.
9.
The PLU field defines the item whose information is being modified. You do not type directly in
this field. When you click Insert, the Choose PLU and Operation type window displays a PLU
field. Type a number into this field.
Note: The fields you see displayed to the right of the PLU field depend on the
definition. Your head office uses the Configurator to create the fields that can
be included in the file.
10. To open the selected line for editing, click Modify and edit the information displayed in the fields
in the bottom of the window.
11. To open the Choose PLU and Operation Type window, where you can enter a PLU, click Insert.
12. To delete the selected item from the file, click Remove.
13. To save the item you just added or modified as part of the file, click Save Item.
14. Click Insert to add an item to the batch.
15. Click Save Item when you are finished entering the information for each PLU. Once you have
created the batch, it has a status of pending. Before you can apply the batch you must close the
Price Batch Maintenance window. For information about applying a batch, see “Applying a batch”
on page 163.
Editing a batch
Your head office uses the Configurator to define the fields that can be included in a batch. If the field
is marked as store updatable, you can edit the information in it before you apply the batch.
When you are in edit mode, the fields appear as they do in the PLU Maintenance window. For
example, the Allow Discount field appears as a checkbox in the PLU Maintenance window, and as a
checkbox in the Price Batch Management window.
WARNING! If a checkbox field is grey, there is no change to the field indicated in the batch. If the
checkbox is white, the option is disabled. If the checkbox is checked, the option is enabled.
Selecting a batch
You must select and open a batch before you can edit the information in it.
To select a batch to edit:
1.
On the Main Menu window, click PLU Management.
2.
Click Price Batch Management.
3.
Click Display All. The list of batches is displayed.
4.
Click the batch you want to edit, and then click Open. The Price Batch Maintenance window
displays the information in the batch.
165
Managing Price Look Ups
Adding an item to a batch
Once you have selected and opened a batch, you can add items to it.
To add an item:
1.
Click Insert.
2.
In the PLU field, type the PLU. You can use the PLU Search window to find the PLU. For
information about the search window, see “Using the PLU Search window” on page 140.
3.
Make sure the Modify radio button is enabled.
4.
Click OK. The fields for the PLU are displayed at the bottom of the Price Batch Maintenance
window.
5.
Enter information into the fields, as appropriate.
6.
Click Save Item. The information for the item is saved.
Modifying a batch item’s information
Once you have selected and opened a batch, you can modify the information that is already entered for
an item.
166
Auditing product price changes
To modify an item’s information:
1.
Click the item you want to modify, and then click Modify. The fields for the item are displayed at
the bottom of the Price Batch Maintenance window.
2.
Edit the information in the fields, as appropriate.
3.
Click Save Item. The new information for the item is saved.
Deleting a batch item
Once you have selected and opened a batch, you can delete items from it.
To delete an item:
1.
Click the item you want to delete, and then click Remove. A dialog box appears, prompting you
to confirm the deletion.
2.
Click Yes. The item is removed from the batch.
Auditing product price changes
The Store Manager tracks the changes you make to prices through the PLU Maintenance window and
the price batch management function. You can review information about the price changes using the
Retail Price Update Audit function. The information is not editable.
The Store Manager tracks the following actions:
Modifying a PLU’s price in the PLU Maintenance window
Deleting a PLU
Applying price changes using batch management
In addition, price changes in pending batches are tracked.
167
Managing Price Look Ups
For information about applying price changes using price batch management, see “Using price batch
management functionality” on page 162.
To view PLU price changes:
1.
On the Main Menu window, click Administration.
2.
Click Retail Price Update Audit.
3.
Click Display All. The price change information is displayed in the window. For information
about the fields in the window, see “The Retail Price Update Audit window” on page 168.
Tip: You can perform a query to locate price change information about a
specific PLU, or for records matching other criteria.
The Retail Price Update Audit window
This window contains fields that display information about changes made to prices using the Store
Manager.
The information in these fields is for reference only and cannot be edited.
The following table contains descriptions of the fields in the Retail Price Update Audit window:
168
Field
Description
PLU
This field contains the PLU whose price was changed.
Date/Time
This field contains the date and time the PLU’s price was changed.
Cashier
This field contains the employee number of the person who made the change to
the PLU’s price.
Old Price
This field contains the employee number of the person who made the change to
the PLU’s price.
New Price
This field contains the PLU’s new price. If the PLU was deleted in the PLU
Maintenance window, the new PLU price is 0.00.
Defining a PLU cross reference
Field
Description
Pending
This field indicates that the price change is pending. The price change takes
effect when you apply the batch.
For information about using the price batch management function to change a
PLU’s price, see “Using price batch management functionality” on page 162.
The checkbox is clicked (√) if the price change is pending.
Batch ID
This field contains the unique number that identifies a batch.
This field is completed only if the price change is related to a batch. For
information about using the price batch management function to change a
PLU’s price, see “Using price batch management functionality” on page 162.
Defining a PLU cross reference
Cross reference numbers are linked to PLUs. You can enter cross reference numbers instead of PLUs
into PLU number fields in the Store Manager, and the cashier can enter them into transactions at the
POS terminal. A cross reference number can represent a single PLU, or multiple PLUs that each have
the same retail price.
Before you define a cross reference number for a PLU, the PLU must be defined in the PLU
Maintenance window, and your head office must enable the cross reference feature in the
Configurator.
Adding a cross reference
The PLU must be defined before you can create a cross reference number to represent it. For
information about defining a PLU, see “Adding a PLU” on page 143.
In the following steps you are required to enter information and make selections in the Cross
Reference Maintenance window. For information about the fields in the window, see “Click New.” on
page 170.
To add a cross reference number for a PLU:
1.
On the Main Menu window, click PLU Management.
169
Managing Price Look Ups
170
2.
Click PLU X-Reference
3.
Click New.
4.
To define a cross reference number that represents the PLU, type a number into the X-Reference
field. The number in this field is the number that can be used in place of the PLU.
5.
To define the PLU to which the cross reference number represents, type a PLU number in the
PLU field. The Store Manager automatically completes the description field.
6.
To capture and print the PLU’s information on the receipt, click the Capture PLU checkbox to
capture the PLU’s information and print the PLU on the receipt. Leave the checkbox unchecked
to capture the cross reference number’s information and print the cross reference number on the
receipt.
7.
To set the number of items that make up a package, type the number in the Package Quantity
field. For more information on configuring inventory as packages, see “Controlling inventory
packages” on page 250.
Defining a PLU cross reference
8.
The type of package can be anything you want, for example a case, package, or bundle. To define
the type of package, click the Package Type drop-down list. The type of package is configured in
Code Maintenance in the Configurator.
9.
Click Save.
To complete the Inventory Control ltab:
1.
To display the Inventory Control tab, click the Inventory Control checkbox.
2.
Click the Include in Suggested Orders checkbox.
3.
Click Save, and then click Exit.
Modifying a cross reference
You can modify a cross reference.
To modify a cross reference number for a PLU:
1.
On the Main Menu window, click PLU Management.
2.
Click PLU Xref.
3.
Click Display All. All of the cross references are displayed.
4.
Click the cross reference that you want to modify, and then click Open. The X-Reference
Maintenance window displays the information.
5.
Change the fields in the window, as appropriate.
6.
Click Save, and then click Exit.
Deleting a cross reference
You can delete a cross reference.
To delete a cross reference:
1.
On the Main Menu window, click PLU Management.
2.
Click PLU Xref.
171
Managing Price Look Ups
3.
Click Display All. All of the cross references are displayed.
4.
Click the cross reference you want to delete, and then click Delete. A dialog box appears,
prompting you to confirm the deletion.
5.
Click OK. The cross reference is deleted.
Setting up a quantity or level pricing scheme
A quantity pricing scheme defines a special price if a customer buys a specific quantity of an item. A
level pricing scheme defines different prices for the same item. Once you have defined a scheme,
different customers can pay different prices.
To use the level pricing schemes you created, you must enter the level number, from the Level field in
the Quantity Level Pricing Maintenance window into the Price Level field in the Employee
Maintenance window or the Customer Maintenance window.
You can define multiple schemes for a PLU. For example, you can create a level 1 pricing scheme for
PLU 456987268, at $4.55. Preferred customers pay the level 1 price. You can also create a level 2
pricing scheme for the same PLU, at $3.99. Gold customers pay the level 2 price.
WARNING! You cannot define a quantity pricing scheme for a PLU unless you have checked the
Qty Pricing checkbox in the PLU Maintenance window. You cannot define a level pricing scheme for
a PLU unless you check the Price Level checkbox in the PLU Maintenance window.
172
Setting up a quantity or level pricing scheme
Adding a quantity or level pricing scheme
You can define one quantity or level scheme each time you open the Quantity Level Pricing
Maintenance window, but you can define multiple schemes for a PLU. For example, you can complete
the steps below, and create a level 1 pricing scheme for PLU 456987268, at $4.55. Preferred customers
pay the level 1 price. You can repeat the steps below and create a level 2 pricing scheme for the same
PLU, at $3.99. Gold customers pay the level 2 price.
Head office can define a different price for an item which would be effective for a defined period at
some point in the future. This information is updated through a file upload at the end of day. If a future
price has been set up for an item, you can view the future price in the Quantity Level Pricing window.
To create a quantity or level pricing scheme:
1.
On the Main Menu window, click PLU Management.
2.
Click Qty Level Pricing.
3.
Click New.
Note: You must open the Quantity Level Pricing window each time you want
to view a quantity or level pricing scheme.
173
Managing Price Look Ups
4.
To define the PLU to which you are assigning a quantity or level pricing scheme, type a PLU
number in the PLU field. The Store Manager automatically completes the Description field.
5.
To define the price level scheme setup, type a number in the Level field. You can define multiple
schemes for the same PLU, as long as you enter different numbers in this field. You cannot define
a level pricing scheme for a PLU unless you have checked the Price Lev Flag checkbox in the
PLU Page 1 tab of the PLU Maintenance window. To use the level scheme, you must enter this
number in the Price Level field on the Employee Maintenance window or the Customer
Maintenance window.
6.
To define the quantity of the item that must be purchased to qualify for this quantity pricing
scheme, type a number in the Quantity field. If you are defining a level pricing scheme, type 0
into the field. You cannot define a quantity pricing scheme for a PLU unless you have checked the
Qty Pricing checkbox in the PLU Page 1 tab of the PLU Maintenance window.
7.
To define the price for the items under this quantity or level pricing scheme, type a currency
amount, including decimal places, in the Price field.
8.
To assign a description of the quantity or level pricing scheme, type an alphanumeric description,
up to 40 characters long, in the Description field.
9.
To define the taxes that are only applied to the item when it is purchased under this level or
quantity pricing scheme, click the Tax 1-16 checkboxes for the taxes that you want to apply to the
item. When the item does not qualify for the quantity or level pricing scheme, the taxes you define
on the PLU Maintenance window are applied.
10. Click Save, and then click Exit.
To view the future price for an item:
With a PLU item selected in the Quantity Level Pricing window, click the Future Price tab. The
PLU number, description, level and quantity information for the selected item appear in the PLU
and PLU Desc fields.
Information on an item’s future price is displayed in the Effective Date and Future Price fields.
This information is sent from head office.
174
Setting up linked items
Modifying a quantity or level pricing scheme
You can modify an existing quantity or level pricing scheme.
To modify an existing quantity or level pricing scheme:
1.
On the Main Menu window, click PLU Management.
2.
Click Quantity Level Pricing.
3.
Click Display All. All of the quantity or level pricing schemes are displayed.
4.
Click the scheme you want to modify, and then click Open. The Quantity Level Pricing
Maintenance window displays the information.
5.
Change the fields in the window, as appropriate.
6.
Click Save, and then click Exit.
Deleting a quantity or level pricing scheme
You can delete an existing quantity or level pricing scheme.
To delete an existing quantity or level pricing scheme:
1.
On the Main Menu window, click PLU Management.
2.
Click Qty Level Pricing.
3.
Click Display All. All of the quantity or level pricing schemes are displayed.
4.
Click the scheme you want to delete, and then click Delete. A dialog box appears, asking you to
confirm the deletion.
5.
Click OK. The quantity level pricing scheme is deleted.
Setting up linked items
A linking scheme allows several PLUs to be grouped and sold as a package using one PLU.
To use the package that you create, you must click the Link Item checkbox in the PLU Maintenance
window for the package PLU, and for each PLU included in the package. If you do not, the Link Item
table is not checked when a cashier enters the package’s PLU in a transaction at the POS terminal.
175
Managing Price Look Ups
WARNING! If you type check the Use Parent field in the Link Item Maintenance window, the Store
Manager uses the price and description of the package PLU when the package is sold. If you do not
check the Use Parent field, the Store Manager uses the prices and descriptions that you enter in the
Price and Description fields on the Link Item Maintenance window for each of the items in the
package.
Adding a new linked item
You can add an item to a package. The PLU that is used to identify the package must be set up in the
PLU Maintenance window. A package is created as soon as you link an item to the package PLU.
WARNING! If you check the Use Parent field in the Link Item Maintenance window, the Store
Manager uses the price and description of the package PLU when the package is sold. If you do not
check the Use Parent field, the Store Manager uses the prices and descriptions that you enter in the
Price and Description fields on the Link Item Maintenance window for each of the items in the
package.
176
Setting up linked items
To add an item to a package:
1.
On the Main Menu window, click PLU Management.
2.
Click Link Items.
3.
Click New.
4.
To define the PLU that identifies the package of products, type a PLU number in the PLU field.
This PLU must already be set up on the PLU Maintenance window, and the Link Item checkbox
in the window must be checked. For information about creating a PLU, see “Maintaining PLUs”
on page 142.
5.
To define the item that is in the package and linked to the package PLU, type a PLU number in
the Link PLU field.
6.
To assign a description of the linked item in the package, type an alphanumeric description, up to
40 characters long, in the Description field. The description is printed on the customer receipt if
the Use Parent checkbox is checked in this window.
7.
To determine the quantity of the linked item in the package, type a number in the Quantity field.
177
Managing Price Look Ups
8.
To assign a price to the linked item in the package, type a currency amount, including decimal
places, in the Price field. The price of each linked item in the package is added to make the total
package price if you check the Use Parent checkbox in this window.
9.
If the price of each item in the package is added to make the total package price, click the Use
Parent checkbox to use the package PLU’s description and price. Leave the Use Parent
checkbox unchecked to use the individual items’ price and description. The description of each
item is printed on the receipt, and the taxes assigned to each item are applied. If the individual
item details are not used, the price of the package PLU is used and only the package description is
printed. If the item’s price and description are used, prices are taken from the Price and
Description fields, and the Tax 1-16 checkboxes on this window.
10. To determine if the price of each item in the package is added to make the total package price, the
description of each item is printed on the receipt, and the taxes assigned to each item are applied.
Click the Use Parent checkbox to use the package PLU’s description and price. Leave the Use
Parent checkbox unchecked to use the individual items’ price and description. If the individual
item details are not used, the price of the package PLU is used and only the package description is
printed. If the item’s price and description are used, prices are taken from the Price and
Description fields, and the Tax 1-16 checkboxes in this window.
11. To define the department to which the package belongs, click the Department drop-down list
and select a department.
12. To assign the taxes that are applied to the item in the package, click the Tax 1-16 checkboxes for
the taxes you want to apply to the item. Taxes are applied individually to each item in the package
if you do not check the Use Parent field in this window. When the item does not qualify for the
package, the taxes you define on the PLU Maintenance window are applied.
13. Click Save, and then click Exit.
Tip: If you want to add another item to a package immediately after you create
one, you do not need to close the Link Item Maintenance window. Refresh the
window by clicking New.
Modifying a linked item
You can modify an item in a package.
To modify an item in a package:
1.
On the Main Menu window, click PLU Management.
2.
Click Link Items.
3.
Click Display All. All of the link item schemes are displayed.
4.
Click the scheme you want to modify, and then click Open. The Link Item Maintenance window
displays the information.
5.
Change the fields in the window, as appropriate.
6.
Click Save, and then click Exit.
Deleting a linked item
You can delete an item from a package. If you delete all the items from a package, the package is also
deleted. The PLU that represents the package is still valid.
178
1.
On the Main Menu window, click PLU Management.
2.
Click Link Items.
Reviewing mix match pricing schemes
3.
Click Display All. All of the link item schemes are displayed.
4.
Click the scheme you want to delete, and then click Delete. A dialog box appears, prompting you
to confirm the deletion.
5.
Click OK. The link item scheme is deleted.
Reviewing mix match pricing schemes
A mix match pricing scheme defines different prices when certain combinations of items are sold.
Your head office uses the Configurator to create mix match pricing schemes. You can review the
information in the schemes and apply them to PLUs. You cannot edit the fields on the Mix Match
Maintenance window, they are for information purposes only.
You apply mix match pricing schemes to PLUs using the Mix Match (1-4) fields in the PLU Page 1 tab
in the PLU Maintenance window.
Some examples of mix match pricing schemes are:
Buy any 2 items of the same price, and get the third same priced item for free
Buy 2 of the same item and get the third of the same item for free
Buy 2 different items to total a specified dollar amount, and get another different item for free
Buy 1 item and get another item of equal or lesser value for 25% off
Buy 1 item and get another item of equal or lesser value for 25% off, get an additional item and
save 40%, get an additional item and save 50%
For more information on the above examples, see “Common Mix Match scenarios” on page 183.
It is also possible to combine a mix match sale with promotions and discounts. For examples of a
combined transaction involving promotions, discounts, and mix matches, see “Combining mix match,
promotion, and discount transactions” on page 184. For instructions on how to set up promotions, see
“Setting up promotional pricing” on page 185.
Viewing a mix match pricing scheme
You can review the mix match pricing schemes that your head office sets up.
To review a mix match pricing scheme:
1.
On the Main Menu window, click PLU Management.
179
Managing Price Look Ups
2.
Click Mix-Match.
3.
Click Display All. The existing mix matches are listed in the window.
4.
Click the mix match pricing scheme you want to review, and then click Open. The Mix Match
Maintenance window displays the mix match’s information.
5.
Click Exit.
The Mix Match Maintenance window
This window displays information about the mix match pricing schemes.
180
Reviewing mix match pricing schemes
The following table contains a description of the fields in the Mix Match Maintenance window:
Field
Description
MM ID
This field contains the unique number that identifies the mix match pricing
scheme.
You type this number in the Mix Match 1-4 fields in the PLU Page 1 tab of the
PLU Maintenance window to link eligible PLUs to the pricing scheme. For
information about the Mix Match 1-4 field, see the field description on page 148.
MM Desc
This field contains the description of the mix match and is used for searching for
mix matches in the Store Manager.
Start Date
This field contains the date the mix match pricing scheme becomes effective.
Stop Date
This field contains the last date the mix match pricing scheme is effective.
Discount Desc
This field contains the description that is printed on the receipt. If there is no
description in this field, the description in the MM Desc field in this window is
printed on the customer’s receipt.
Report Group Qty.
These fields specify which mix match quantities are tracked through reporting. If
quantities are entered, a Mix Match Transaction Summary record is created in
the register’s TLOG.
Apply Discount To Alt #
This field contains the number of the item to which the price change is applied
in the TLog.
For example, assume the mix match scheme is for a can of soda, entered into the
Alt 1 line in the maintenance window, and a bag of chips, entered into the Alt 2
line. The price of the chips is discounted by $.50. If you enter Alt 1 into this
field, the discount is applied to the chips when the transaction is recorded in the
TLog.
Complete MM
This field indicates if every mix match criteria in this window must be satisfied
before the transaction is eligible for the mix match.
Match PLU
This field indicates the mix match is applied only when all the items are the
same.
For example, assume a mix match pricing scheme sells 3 items that normally
cost $.35 each, for 1.00. If the Match PLU checkbox is checked, the customer
must purchase 3 of the same item to qualify for the special price. If you clear the
Match PLU checkbox, the customer can purchase 3 different items normally
costing $.35 each and still qualify for the special mix match price.
Recalc. Promos and
Discounts
This field specifies that promotions and item discounts are recalculated after a
mix match is realized.
Unique PLU
This field indicates if the mix match is applied only when every item is different.
For example, assume a mix match pricing scheme that sells 3 items that normally
cost $.35 each, for 1.00. If you check the Unique PLU checkbox, the customer
must purchase 3 different items costing $.35 to qualify for the special price. If
you clear the Unique PLU checkbox, the customer can purchase 3 of the same
item and still qualify for the special mix match price.
Match User Flag 1
This option specifies that all items in the mix match be the same as user flag 1.
Unique User Flag 1
This option specifies that user flag 1 is required for the mix match definition to
be unique.
181
Managing Price Look Ups
Field
Description
Calculation at Total Time
This checkbox indicates that mix match calculations are processed at the end of
a transaction when the Total key is pressed at the POS. If left unchecked, the
mix match is processed as the items are scanned at the POS.
Discount on Lowest
Price
This checkbox indicates that the discount is given on the lower priced item in
the mix match transaction. For example, buy one item and get another item of
equal or lesser value at a discount.
Policy ID
This field identifies the policy that is part of the mix match.
Match by Merchandise
Type
If enabled, this checkbox indicates that mix match pricing criteria is one or more
of Vendor, User Flag 1, Department, Dept. Group, or Category.
Vendor
This field identifies the vendor in the mix match scheme.
User Flag 1
If more than one classification is entered, an item is considered for mix match
pricing when all specified classifications are matched.
Department
This field identifies the department in the mix match scheme.
Dept. Group
This field further identifies the department, by group, in the mix match.
Category
This field identifies the category to which the merchandise belongs in the mix
match.
Alt. 1-9 - Buy Quantity
This field indicates the quantity of the item that must be purchased to qualify for
the special price. The price for the quantity of the item is defined in the Sell
Price, $Off, or %Off fields in this window.
For example, in a mix match pricing scheme that sells 3 candy bars for $1.00,
you would see:
1 in the Alt 1 buy quantity field, price $.34
1 in the Alt 2 buy quantity field, price $.33
1 in the Alt 3 buy quantity field, price $.33
Total 3
$1.00
If the mix match pricing scheme requires the customer to purchase several
different items, quantities must be entered for each.
For example, if you want to set up a mix match pricing scheme for selling 1 soda
and 2 candy bars for $2.00 you would see:
1 in the Alt 1 buy quantity field, price $.75
2 in the Alt 2 buy quantity field, price $1.25
Alt. 1-9 - OP
This field indicates how the price of the items purchased must compare to the
price in the Match Price field in this window.
Alt. 1-9 -Match Price
This field contains the regular retail price of the items that must be purchased to
qualify for the mix match pricing scheme. The price in this field is compared
with the price of the item being purchased based on the operator in the OP
field.
Alt. 1-9 - Sell Price
This field contains the new selling price of the items with the special mix match
pricing.
Alternatively, the $Off or the %Off fields in this window can be used to define
the way that the new selling price is calculated.
182
Reviewing mix match pricing schemes
Field
Description
Alt. 1-9 - $Off
This field contains the flat amount that is deducted from the item’s regular retail
price to calculate the new selling price under the mix match pricing scheme.
Alternatively, the Sell Price or the %Off fields in this window can be used to
define the way that the new selling price is calculated.
Alt. 1-9 - %Off
This field contains the percentage amount that is deducted from the item’s
regular retail price to calculate the new selling price under the mix match pricing
scheme.
Alternatively, the Sell Price or the $Off fields in this window can be used to
define the way that the new selling price is calculated.
Pricing Target Type
This option allows you to indicate whether all or some defined promotions are
available to a defined customer group. The options are:
All— This option indicates that the defined target group is entitled to receive
all defined promotions and mixmatch pricing schemes.
Defined promotion scheme— Specifies the specific mixmatch or
promotional pricing scheme the defined target group is entitled to receive.
Customers who do not belong to the defined target group do not receive the
defined promotional price.
Common Mix Match scenarios
The following scenarios are some of the more common mix match pricing schemes you will see. The
table below lists the PLUs used in the examples.
PLU Description
Price
Options
Pkg. Orange Golf Balls
$10.00
Discountable Enabled
Pkg. Green Golf Balls
$10.00
Discountable Enabled
Pkg. While Golf Balls
$10.00
Discountable Enabled
Pkg. Red Golf Tees
$15.00
Discountable Enabled
Pkg. White Golf Tees
$15.00
Discountable Enabled
Pkg. Blue Golf Tees
$15.00
Discountable Enabled
Black Golf Hat
$20.00
Discountable Enabled
Brown Golf Hat
$20.00
Discountable Enabled
White Golf Hat
$20.00
Discountable Enabled
Buy any 2 items of the same price, and get the third same priced item for free
In this scenario if you buy 2 packages of golf balls, the third package is free.
On the Mix Match Maintenance Window the Calculation at Total Time and Complete MM
checkboxes are checked. The Match Price and Sell Price fields for the first two packages equals
10.00. For the third package of golf balls the Match Price equals 10.00, and the % Off field equals
100.
Buy 2 of the same item and get the third of the same item for free
In this scenario if you buy 2 packages of golf balls of the same color, you get the third package of
golf balls of the same color for free.
183
Managing Price Look Ups
On the Mix Match Maintenance Window the Match PLU checkbox is checked. The Match Price
and Sell Price fields for the first 2 packages equal 10.00. The Match Price field for the third item
equals 10.00, and the % Off field is 100.
Buy 2 different items equal to $15.00, and get another different item for free
In this scenario if you buy 1 package of white golf tees and 1 package of red golf tees, you get a
package of blue golf tees for free.
On the Mix Match Maintenance Window the Unique PLU checkbox is checked, the Match Price
and the Sell Price fields equal 15.00.
Buy 1 item and get another item of equal or less value for 25% off
In this scenario if you buy 1 golf hat, you get 25% off a package of golf balls, golf tees, or another
hat.
On the Mix Match Maintenance Window the Complete MM checkbox is checked. The OP field is
=>, the second OP field is <=, and the % Off field is 25.
Buy 1 item and get another item of equal or less value for 25% off, get an additional item and save
40%, get an additional item and save 50%
In this scenario if you buy 1 golf hat you get another hat, a package of golf balls or tees for 25%
off. You also get an additional 40% of any other item, and another 50% off your next item.
On the Mix Match Maintenance Window the Complete MM, Calculation at Total Time and
Discount on Lowest Price checkboxes are checked. The first OP field is =>, the second OP field
is =< and the % Off field is 25. The third OP field is =<, and the % Off field is 40. The fourth
OP field is =<, and the % Off field is 50.
Combining mix match, promotion, and discount transactions
The Mix Match window shown below is an example of a mix match that allows for promotions and
discounts to be applied to the sale in addition to the mix match.
Notice that the Recalculate Promos and Discounts checkbox is enabled, if this item is on
promotion, or discounted, then the promotion and discount is recalculated based on the mix match
184
Setting up promotional pricing
price. For example, the mix match price is $2.97 and the promotion is 10% off, then $2.97 less $0.30
would bring the sell price down to $2.67. If a discount of 20% is applied to the item in addition to the
mix match, then the discount is also recalculated on the mix match price. Therefore $2.97 less $0.59
brings the sale price down to $2.38. If the same promotion and discount scheme is applied to the mix
match, then the receipt will show the mix match price of the item, less the promotion, less the
discount.
Another example of a mix match pricing scheme would be an item whose regular price is $6.50 each,
but is reduced to $5.00 each if the customer purchases 3 or more of the same item. In this case the Sell
Price field is set to $15.00, the Buy Quantity drop-down list is set to or more (unit price), and the Alt.
1: field is set to 3.
Setting up promotional pricing
Promotions contain special prices that are in effect for a predetermined period of time. You can create
promotions in the Store Manager.
You can add new promotions that are effective for the period you choose. You can select the items on
promotion by PLU or by merchandise types such as department, vendor, or user flag option.
To search for a specific promotion by PLU:
1.
On the Main Menu window, click PLU Management.
2.
Click Promotions, and then click Promotion Maintenance.
3.
Click PLU Promotion Lookup.
4.
Type the PLU # in the PLU field.
5.
Click the Promotions Effective Between radio button to select To and From dates.
6.
On the Select Date window, select the date and time when the promotion is active and click Ok,
or click the All Promotions radio button to display a list of all of the promotions.
7.
Click Query.
Adding a promotion
You can add new promotions that are effective for the period you choose. You can select the items on
promotion by PLU or by merchandise types such as department, vendor, or user flag option.
To create a promotion:
1.
On the Main Menu window, click PLU Management.
185
Managing Price Look Ups
2.
Click Promotions, and then click Promotion Maintenance.
3.
Click New. The Promotion Maintenance window appears.
Note: The Store Manager automatically completes the Promo # field with the
next available unique number that identifies the promotion. No action is
required.
186
4.
To define the description of the promotion, type an alphanumeric description, up to 40 characters
in length, in the Desc field.
5.
To set the date on which the promotion becomes effective, click the button beside the Effective
Date/Time field to open a pop-up calendar. Select a date and click OK. Alternatively, type a date
into the field.
6.
To define the last date on which the promotion is effective, click the button beside the Expiry
Date/Time field to open a pop-up calendar. Select a date and click OK. Alternatively, type a date
into the field.
7.
In the Promo Detail # field, type an 8 digit number that identifies the promotion detail record.
Setting up promotional pricing
8.
To set the date on which the promotion is to end, click the button beside the Expiry Date field to
open a pop-up calendar. Select a date and click OK. Alternatively, type a date in to the field.
9.
For promotional prices that are defined for individual PLUs, click the By PLU radio button. If
you click this radio button, use the PLU field to identify the PLUs. You can click By Merch.
Type if you want to define a promotional price for a broader range of PLUs, such as all PLUs in a
department or all PLUs supplied by a specific vendor.
10. To define the PLU for which you are setting a promotional price, type a PLU number in the PLU
field.You can only use this field if you click By PLU in this window.
11. The Description field contains the description of the PLU for which you are setting a
promotional price. You can only use this field if you click By PLU in this window. No action is
required. The Store Manager automatically completes this field when you type a PLU into the
PLU field.
12. If you are defining promotional prices for an entire group of PLUs, click the By Merch. Type
radio button. If you click this radio button, use the Department, Vendor, Group, Category, or
User Flag 1-6 fields to identify the group. You can click By PLU in this window, if you want to
define a promotional price for individual PLUs.
13. To define the department for which you are setting promotional prices, click the Department
drop-down list and select an option.You can only use this field if you click By Merch Type in this
window.
14. To define the vendor that supplies the items for which you are setting promotional prices, click
the Vendor drop-down list and select a vendor. You can only use this field if you click By Merch
Type in this window..
15. To define the group for which you are setting promotional prices, click the Group drop-down list
and select a group. You can only use this field if you click the By Merch Type radio button in this
window.
16. To define the category for which you are setting promotional prices, click the Category
drop-down list and select a category. You can only use this field if you click By Merch Type in
this window.
17. To define the user flag option for which you are setting promotional prices, click the User Flag
(1-6) drop-down list and select an option. If you click the User Flag 1 drop-down list, you can
select User Flag 1 options. If you click the User Flag 2-6 drop-down lists, you can select User
Flag 2-6 options. The PLU’s that are assigned the user flag option you select in this drop-down list
are affected by the promotional price. You can select from the user flag options assigned to user
flags 1-6. You can only use this field if you click By Merch Type in this window. You can assign
user flag options to PLUs using the User Flags 1-6 drop-down lists in the PLU Maintenance
window. For information about the fields in the window, see “The PLU Maintenance window User Flags, Taxes & Itemizers tab” on page 147.
18. You can set a price range so that the promotion affects only those products within the set range.
Click the first Price Point field and type a from price, then click the second Price Point field and
type a to price.
19. To qualify the item for more than 1 active promotion, click the Accumulate checkbox to allow
more than 1 promotion to be applied to a single PLU. You must click this radio button if the item
is an exception to a promotion or if the merchandise type contains exceptions. For information
about defining exceptions to promotions, see “Defining an exception to a promotion” on
page 189.
20. Click the Promo Method Applied To drop-down list and select the pricing method that you
want applied to the promotion. Promotions can be setup such that the items original price is used
to calculate the price instead of its Retail Price.
187
Managing Price Look Ups
21. If the merchandise type has an exception to the promotion, click the Exception checkbox to
mark this item as having an exception to the promotional pricing. For example, ladies accessories
(merchandise type) are on promotion, except for 1 type of glove (exception). If you check this
field, you must also complete the Exception ID field in this window. For information about
defining exceptions to promotions, see “Defining an exception to a promotion” on page 189.
22. To define a unique number that identifies a promotion that you created containing items that are
exceptions to the promotion, type a promotion ID number in the Exception ID field. Obtain the
ID number of the exception promotion in the Promotions Selection window. If you enter an ID
in this field, you must also click Exception. For more information about defining exceptions to
promotions, see “Defining an exception to a promotion” on page 189.
23. To calculate the promotional price of the item by discounting a percentage off the regular retail
price, click the Percent Off radio button to calculate the price by a percentage discount. If you
click this radio button, you must enter the percentage rate into the % field in this window.
24. To calculate the promotional price of the item by deducting a flat amount from the regular retail
price, click the Markdown radio button to calculate the promotional price by a flat amount
discount. If you click this radio button, you must enter the flat discount amount into the $ field.
25. To define the promotional price as a new price, click the New Price radio button. If you click this
radio button, you must enter the new price into the $ field.
26. To define the discount amount or the new price of the item on promotion, type a number or a
currency amount, including decimal places, in the %/$ field. If the item is an exception to a
promotion, do not type anything in this field. The name of the field is % when you click Percent
Off, and $ when you click Markdown.
27. To determine if the method of pricing is printed on the sales receipt, click the Printing Method
drop-down list and select an option.
28. To indicate whether all or some defined promotions are available to a defined customer group, in
the Pricing Target Type drop-down list, select the required option.
All— This option indicates that the defined target group is entitled to receive all defined
promotions and mixmatch pricing schemes.
Defined promotion scheme— Specifies the specific mixmatch or promotional pricing scheme
the defined target group is entitled to receive. Customers who do not belong to the defined
target group do not receive the defined promotional price.
29. To display the information for the next item in the promotion, click Next.
30. To display the information for the previous item in the promotion, click Previous.
31. To clear the screen so you can enter information for an item that you want to add to the
promotion, click Add.
32. To delete the item from the promotion, click Remove.
33. To add PLUs to the promotion, click Add.
34. Click Save, and then click Exit.
188
Setting up promotional pricing
Modifying a promotion
You can modify a promotion. If you modify a promotion while it is effective, the change you make is
immediately reflected in how the promotion is applied.
To modify a promotion:
1.
On the Main Menu window, click PLU Management. The PLU Management Menu window
appears.
2.
Click Promotion.
3.
Click Display All. The existing promotions are displayed in the window.
4.
Click the promotion that you want to modify, and then click Open. The Promotion Maintenance
window displays the promotion’s information.
5.
Change the fields in the window, as appropriate.
6.
Click Save, and then click Exit.
Tip: To scroll through the items in the promotion, click Previous and Next.
Deleting a promotion
You should not delete a promotion during its effective period unless you want stop applying the
promotional pricing.
To delete a promotion:
1.
On the Main Menu window, click PLU Management.
2.
Click Promotion.
3.
Click Display All. The existing promotions are displayed in the window.
4.
Click the promotion you want to delete, and then click Delete. A dialog box appears, prompting
you to confirm the deletion.
5.
Click OK. The promotion is deleted and the promotional pricing is no longer applied.
Defining an exception to a promotion
You may want to exclude items from a promotion. For example, if you want to put all the items in the
women’s accessories department on sale with a 5% discount, except for leather gloves by ABC Inc.,
you can define a promotion for the accessories department, and an exception for the gloves.
Before you create an exception for a promotion, you must create the promotion.
To create an exception:
1.
Create a new promotion for the merchandise that you want excluded from the promotion. Do not
define a discount method, or enter a discount, or a new price.
2.
Click Save, and then click Exit.
3.
Open the main promotion, and scroll to the first item or merchandise type that has an exception.
4.
Click the Accumulate checkbox, and then click the Except checkbox.
5.
Type the ID number of the promotion you created in step 1 into the Exception ID field.
6.
Scroll to the next item or merchandise type that has an exception.
189
Managing Price Look Ups
190
7.
In the Exception ID field, click the Except checkbox, and type the promotion number. Repeat
steps 5, 6, and 7 until you have identified the exceptions where appropriate.
8.
Click Save.
Performing Inventory Control
Functions
This section provides information about the inventory control functions available in the Store
Manager.
Inventory control includes ordering, receiving, transferring inventory, preparing a sheet for inventory
counts, and adjusting inventory levels after the counts. You can identify items using an item’s PLU or
the SKU number assigned by the vendor.
If you click Inventory Control in the PLU Maintenance window when you add or modify a PLU
record, the Store Manager tracks the on-hand quantity of the item. Tracking accounts for sales,
receiving, transfers, and any adjustments you make manually. You can see current inventory
information about the item in the Inventory Information window.
This section covers the following topics:
“Configuring the inventory parameters” on page 191
“Linking a vendor’s SKU to a PLU” on page 194
“Ordering, receiving, and transferring inventory” on page 196
“Viewing inventory information” on page 234
“Performing a physical inventory count” on page 240
“Adjusting on-hand inventory quantities” on page 243
“About controlled inventory transport permits” on page 251
Configuring the inventory parameters
You must define the Store Manager’s inventory options before you perform other inventory control
functions.
In the following steps you are required to enter information into the Inventory Parameters
Maintenance window. For information about the fields in the window, see “Inventory Parameters
Maintenance window” on page 192.
To define inventory parameters:
1.
On the Main Menu window, click Parameters Setup. The Store Manager Parameters Menu
window appears.
2.
Click Inventory Parameters. The Inventory Parameters Maintenance window appears.
3.
Complete the fields in the window as appropriate.
191
Performing Inventory Control Functions
4.
Click Save, and then click Exit. The Inventory Parameters Maintenance window closes. You
return to the Store Manager Parameters Menu window.
Inventory Parameters Maintenance window
This window contains the fields used for defining the parameters for inventory control functions.
To complete the Inventory Parameters Maintenance window:
192
1.
Purchase orders, receiving transactions, transfers and inventory count PLU lists are assigned
numbers automatically by the Store Manager.To enable modification of a purchase order number
or document number, click the Modify PO/Doc Number checkbox.
2.
To allow a PLU to appear multiple times on a purchase order, receiving transaction, or transfer,
click the Include Store Num. in PO/Doc Num. checkbox.
3.
To allow a vendor’s SKU to appear multiple times on a purchase order, receiving transaction, or
transfer, click the Allow Duplicate Vendor/SKU checkbox.
4.
If a PLU you enter into a purchase order, receiving transaction, or transfer must have a record in
the PLU table, click the PLU Must Exist checkbox. If you do not require the PLU record to
exist, the Store Manager accepts any number you type into the PLU/XREF fields in the Purchase
Order, Receiving, or Transfer windows.
5.
If the receive all function in the Receiving window and Transfer window is required, click the
Allow Receive All (Receiving and Transfers) checkbox. If the function is not available, the
Receive All and Receive None radio buttons on the windows are disabled. For information
about the fields used in the receive all function, “Receiving window” on page 213 and “Store
Transfer by PLU window” on page 226
6.
To record SKUs used by vendors to identify the items they supply to your store (vendor’s SKUs)
in the Store Manager, click the Maintain Vendor/SKU checkbox. If you enter a vendor’s SKU
Configuring the inventory parameters
for an item into the Store Manager, you can either use the item’s SKU number or PLU in purchase
orders, receiving transactions, and transfers.
7.
If a vendor’s SKU must have a record in the Vendor/SKU table, click the Vendor/SKU must
exist checkbox. If you do not require the vendor’s SKU to exist in the Vendor/SKU table, the
Store Manager accepts any number you type into the Vendor/SKU fields in the Purchase Order
window or Receiving window.
8.
If cross reference numbers are used instead of PLU numbers in purchase orders, receiving
transactions, and transfers, click the Xreference only checkbox. If you use cross reference
numbers instead of PLUs, you cannot enter PLUs into the PLU/Xref fields in the Purchase
Order window or Receiving window. For information about defining cross reference numbers,
see “Defining a PLU cross reference” on page 169.
9.
To define the minimum authority level an employee must have to delete a purchase order,
receiving transaction, or transfer using the Delete button on the appropriate selection window,
click the Delete Inv. Transaction Authority drop-down list and select an option. If you select 6,
inventory transactions cannot be deleted.
10. If you must complete the Order Type drop-down list in the Purchase Order window, click the
Order Type Required checkbox.
11. To display the By Case tab, click the Activate ‘By Case’ Tab checkbox. When enabled, this
feature allows the receipt of inventory by the case.
12. If the quantity you enter into the Act Qty field must match the quantity you enter into the Hash
Qty field in the Receiving Maintenance window, click the Received Qty and Hash Qty Have to
Match checkbox. The hash quantity is the total number of pieces you expect to receive in the
order. If you click this checkbox, and the quantity you receive does not match the hash quantity,
you cannot complete the receiving transaction.
13. To capture all the items in receiving transactions individually, click the Capture All Line Items
checkbox.
14. To automatically generate a receiving transaction when a purchase order is issued, click the
Generate Receiving Trans. for Issued P.O. checkbox.
15. To restrict the number of decimal positions that are allowed when a Quantity Received value is
entered, type a number between 0 and 3 in the Received Quantity Decimals field. The default
setting is 3 decimal places.
16. To require a reason from the Reason drop-down list in the Receiving window when there is a
discrepancy between the expected and actual quantities of an item received, click the Receive
Reason Required checkbox. If you click this checkbox, you cannot complete the receiving
transaction until you select a reason.
17. If entering a discrepancy number into the Discrepancy No. field in the Receiving window is
required whenever there is a discrepancy during receiving, click the Receive Discrepancy
Number Required checkbox. If you click this checkbox, you cannot complete the receiving
transaction until you enter a discrepancy number.
18. To require a receiving type from the Receiving Type drop-down list in the Receiving window,
click the Receiving Type Required checkbox. If you click this checkbox, you cannot complete
the receiving transaction until you select a type.
19. To require a ship type selection from the Ship Type drop-down list in the Receiving window, click
the Shipping Type Required checkbox. If you click this checkbox, you cannot complete the
receiving transaction until you select a ship type.
20. To control the percentage of the allowed difference between the expected quantity and the actual
quantity, type a value in the Short/Over Qty Threshold Percent field. If the actual quantity
entered is not within the given percentage of the expected quantity, a warning is issued.
193
Performing Inventory Control Functions
21. To require a ship via selection from the Ship Via drop-down list in the Transfer window, click the
Ship Via Required checkbox. If you click this checkbox, you cannot complete the receiving
transaction until you select a ship via.
22. To require a selection from the Reason drop-down list in the Physical Inventory Maintenance
window, click the Physical Inventory Reason Required checkbox. If you click this checkbox,
you cannot complete the transaction until you select a reason.
23. To define the frequency with which inventory is tracked, click the Period Type drop-down list
and select Monthly or Daily.
24. To define what is included when the Store Manager traces changes to the on-hand quantities of
inventory controlled items, click the Trace Type drop-down list and select a trace type. A Basic
trace includes manual adjustments, receiving and transfers. An All Changes to QOH traces
includes all activity that affects on-hand quantities.
25. To determine whether the Store Manager uses the order days as defined in the Vendor
Maintenance window when it is generating a suggested order, click the Suggested Order - Use
Vendor Ordering Days checkbox. For information about suggested orders, see “Creating a
purchase order from a suggested order” on page 198.
26. To automatically generate suggested orders as part of the end of day process, click the Generate
Suggested Orders during the EOD process checkbox.
Linking a vendor’s SKU to a PLU
The Store Manager uses PLUs to identify items. These PLUs do not necessarily match the SKU
numbers the vendors use to identify the same items. Once you have defined vendor’s SKUs for PLUs,
you can create purchase orders or receiving transactions using vendor’s SKUs to identify items instead
of PLUs.
Before you can link a vendor’s SKU to a PLU, both the PLU and the vendor must already be defined.
For information about defining a PLU, see “Maintaining PLUs” on page 142. For information about
defining vendors, see “Setting up product vendors” on page 84.
To add or modify a vendor’s SKU record, you must enter information into the Vendor’s SKU
Maintenance window.
WARNING! You can only assign vendor’s SKUs to PLUs if you have checked (√) the Maintain
Vendor/SKU checkbox in the Inventory Parameters Maintenance window.
194
Linking a vendor’s SKU to a PLU
Vendor’s SKU Maintenance window
This window contains the fields used for linking a vendor’s SKU for an item to its corresponding PLU.
To complete the Vendor’s SKU Maintenance window:
1.
To define the ID number of the item’s vendor, click the Vendor ID drop-down list and select a
vendor from the list. For information about defining vendors, see “Setting up product vendors”
on page 84.
2.
The Store Manager automatically completes the Vendor Name field with the description of the
vendor you select in the Vendor ID drop-down list.
3.
To define the vendor’s unique identification number for the item, click the Vendor/SKU field and type a
number, up to 18 characters in length.
4.
To define the item’s PLU, type a number into the PLU/X-Ref field.
5.
The PLU Description field defines the description of the item. The Store Manager automatically
completes this field with the description of the PLU you enter into the PLU/X-Ref field.
6.
To define the store’s cost for the item from the vendor, click the Cost field and type an amount
into the field.
7.
Type an alphanumeric string, up to 100 characters long, into the Note field. This string is related
to the vendor’s SKU that you are defining
8.
To define the number of the item in each shipping case, click the Pack Factor field and type a
number into the field that represent the number of the items in each shipping case. If you
complete this field, this number is used as the package size in purchase orders and receiving
transactions.
Tip: To find a PLU, click in the PLU/X-Ref field, and press the F12 key. The PLU Search window
appears.
195
Performing Inventory Control Functions
Ordering, receiving, and transferring inventory
You can order, receive, and transfer inventory items using the Store Manager. If an item is inventory
controlled, its on-hand amount is updated when you complete a receiving transaction or transfer into
your store.
You can create purchase orders, receiving transactions, and transfers yourself. You can open the
documents in the appropriate window, modify the information in them, and issue or complete them.
Ordering inventory
You can create and issue manual purchase orders using PLUs or vendor’s SKUs to identify the items.
You can use vendor’s SKUs to identify items if the vendor’s SKUs for the items are defined.
Once you issue a purchase order, it can be converted into a receiving order that you use to record items
that you receive into the store’s inventory.
Manual purchase orders using PLU or vendor’s SKU
After you create a manual purchase order, it has a status of pending. You must issue the purchase order
to make it available to be converted into a receiving order.
For information about issuing a purchase order, see “Issuing a purchase order” on page 204.
In the following steps, you must enter information into the Purchase Order Maintenance window. For
information about the fields in the window, see “Purchase Order Maintenance window” on page 199.
To create a purchase order:
196
1.
On the Main Menu window, click Inventory. The Inventory Menu window appears.
2.
Click Purchase Orders. The Purchase Order Selection window appears.
3.
Click New. A dialog box appears, prompting you to confirm if you want to identify the items by
PLU or vendor’s SKU.
Ordering, receiving, and transferring inventory
Tip: To skip this step and avoid displaying the dialog box below, ensure that the
Maintain Vendor/SKU parameter is disabled in the Inventory Parameters
section of Parameters Setup.
4.
Click either By PLU/X-Ref or By Vendor/SKU.
5.
Complete the fields in the window as appropriate.
6.
Click Save, and then click Exit.
Tip: You can view inventory information about each item you add to the
purchase order by clicking Details on the Purchase Order Maintenance
window. The item entry portion of the maintenance window is replaced with a
detail window.
Modifying a purchase order
You can only modify a purchase order before it is issued when it has a status of pending. If you need to
change a purchase order after you have issued it, you must void it and create a new one.
In the following steps you are required to enter information into the Purchase Order Maintenance
window. For information about the fields in the window, see “Purchase Order Maintenance window”
on page 199.
To modify a purchase order:
1.
On the Main Menu window, click Inventory. The Inventory Menu window appears.
2.
Click Purchase Orders.
3.
Click Display All. The existing purchase orders are displayed in the selection window.
4.
Click the purchase order you want to modify, and then click Open. A dialog box appears,
prompting you to confirm if you want to identify the items by PLU or vendor’s SKU.
5.
Click a radio button in the dialog box. The Purchase Order Maintenance window appears.
6.
Change the fields in the window as appropriate.
7.
Click Save, and then click Close.
197
Performing Inventory Control Functions
WARNING! You can delete a purchase order by clicking Delete on the
Purchase Order Selection window only if you have a sufficient authority level.
You can define the minimum authority level required to delete a purchase order
using the Delete Inventory Transaction Authority drop-down list in the
Inventory Parameters Maintenance window. For information about defining
inventory options, see “Configuring the inventory parameters” on page 191.
Creating a purchase order from a suggested order
The Store Manager can create a purchase order for you, containing items whose current on-hand
amount is below the minimum acceptable on-hand amount. The Store Manager only includes items in
the suggested order that you have not already placed on another order.
After you create a purchase order from a suggested order, you can modify and issue it. For information
about modifying a purchase order, see “Modifying a purchase order” on page 197. For information
about issuing a purchase order, see“Issuing a purchase order” on page 204.
To generate a suggested order and create a purchase order:
198
1.
On the Main Menu window, click Inventory.
2.
Click Suggested Orders. A dialog box appears asking you to confirm how you want to create the
order.
3.
Click a radio button. If you click Department, you must select a department from the
corresponding drop-down list.
4.
Click OK. The dialog box closes. The Suggested Order Statistics window appears.
5.
Click OK. A purchase order is generated.
Ordering, receiving, and transferring inventory
Purchase Order Maintenance window
This window contains the fields used for creating purchase orders.
The following table contains descriptions of the fields in the Purchase Order Maintenance window:
Field
Description
Txn. Number
This field defines the unique number that identifies the inventory transaction. The
inventory transaction number sequence is used for purchase orders, receiving
transactions, transfers, and inventory count PLU lists.
No action required. The Store Manager automatically completes this field with a
number after you save the purchase order.
P.O. Number
This field defines the unique number that identifies the purchase order.
You can modify the purchase order number if you have clicked Modify PO/Doc
Number in the Inventory Parameters Maintenance window.
No action required. The Store Manager completes this field.
Vendor
This field defines the vendor that supplies the items you are ordering.
You must complete this drop-down list before you can add items to the purchase
order.
Click the drop-down list and select a vendor from the list.
Txn. Date
This field defines the date the inventory transaction is created. The transaction date
can differ from the order date.
No action required. The Store Manager completes this field with the system date of
the computer the Store Manager is running on.
199
Performing Inventory Control Functions
Field
Description
Order Date
This field defines the purchase order date.
The Store Manager automatically completes this field, but you can edit the
information in it.
Click the button beside the field to open the pop-up calendar window. Click a date
and click OK.
Alternatively, type a date into the field.
Exp. Delivery
This field defines the expected delivery date.
The Store Manager automatically completes this field with a date calculated using
the value you enter into the Order Lag Days field in the Vendor Maintenance
window, but you can edit it.
Click the button beside the field to open the pop-up calendar window. Click a date
and click OK.
Alternatively, type a date into the field.
Cancel Date
This field defines the date after which the purchase order should be cancelled. The
Store Manager does not automatically cancel any inventory transactions, the date in
this field is for your information only.
Click the button beside the field to open the pop-up calendar window. Click a date
and click OK.
Status
This field indicates the current status of the purchase order.
Pending: The order has not been issued, and can be modified.
Issued: The order is complete and cannot be modified.
Void: The order has been issued and then voided.
No action required. The Store Manager automatically completes this field.
Origin
This field indicates whether the purchase order is based on an electronic document,
suggested order, or manual order.
Action: No action required. The Store Manager automatically completes this field.
Order Type
This field defines the type of purchase order you are creating.
If you click Order Type Required in the Inventory Parameters Maintenance
window, you must complete this drop-down list before you can issue the purchase
order.
You can define the selection of order types that appear in this drop-down list in the
Code Table Maintenance window..
Click the drop-down list and select an order type from the list.
Vnd. Terms
This field defines the vendor’s payment terms.
You define the vendor’s payment terms using the Terms field in the Vendor
Maintenance window.
No action required. The Store Manager automatically completes this field.
Transmit
This field indicates whether the purchase order has been issued.
No action required. The Store Manager automatically completes this field.
200
Ordering, receiving, and transferring inventory
Field
Description
Note
This field defines any notes regarding the purchase order.
Type an alphanumeric string, up to 40 characters long, into the field.
Min Order
This field contains the minimum dollar amount that must be ordered from the
vendor.
The data in this field is for information only. If the items on the purchase order total
less than the amount in this field, the order can still be processed.
No action required. The Store Manager automatically completes this field.
Over Min Order
This field indicates whether the amount of the items on the purchase order is more
than the amount in the Min Order field in this window.
No action required. The Store Manager automatically completes this field.
PLU/XREF
This field defines the unique number that identifies the item you are ordering.
Type a number into the field.
If you click By PLU/Xref in the Select Display Type dialog box, you must enter the
item’s PLU or cross reference number. If you want to use cross reference numbers
only, you must click Xreference Only in the Inventory Parameters Maintenance
Window. For information about defining cross reference numbers, see “Defining a
PLU cross reference” on page 169.
Description
This field contains the item’s description as you defined in the PLU Maintenance
window when you defined the PLU.
No action required. The Store Manager automatically completes this field.
Required Qty.
This field defines the quantity of the item you are ordering.
Type a number into the field.
Pkg. Qty.
This field defines the number of the item that is shipped in each case.
For example, if the number 4 is in this field, the item is shipped in cases of 4.
No action required. The Store Manager automatically completes this field with the
number in the Pack Factor field in the Vendor’s SKU Maintenance window if
vendor’s SKUs are being used. If you do not enter a number into the Pack Factor
field, the Store Manager enters the number “1” into this field.
Pkg. Count
This field defines the number of packages being ordered, based on the values you
enter into the Required Qty. field, and the number in the Pkg. Qty. field.
If you order an odd number of items, the Store Manager calculates the number of
packages required to fill the order. For example, if you enter 7 into the Required
Qty. field, and there is a package size of 6, then 2 packages are ordered. The second
package is ordered to accommodate the seventh item.
No action required. The Store Manager calculates the number of packages required,
and completes the field.
Extended Units
This field defines the total number of the items you are ordering. The total number
is based on the package size, and the package count.
No action required. The Store Manager calculates the number of items and
completes this field.
201
Performing Inventory Control Functions
Field
Description
Cost Price
This field defines the cost to the store of the item you are ordering. The item’s cost
is defined in the Cost field in the Vendor’s SKU Maintenance window or the PLU
Maintenance window.
The cost for the number of the item you are ordering is displayed in the Extended
Cost field in this window.
No action required. The Store Manager automatically completes this field.
Extended Cost
This field represents the total cost of the items being ordered. The total cost is
based on the values in the Extended Unit and the Cost Price fields in this window.
No action required. The Store Manager completes this field.
Retail Price
This field defines the retail price for the item.
You define the retail price in the Retail Price field in the PLU Page 1 tab of the
PLU Maintenance window.
No action required. The Store Manager automatically completes this field.
Ext. Retail
This field defines the retail price for the items being ordered. The total price is based
on the values in the Extended Unit and the Retail Price fields in this window.
No action required. The Store Manager automatically completes this field.
Dept.
This field defines the department to which the item you want to order is assigned.
You can assign PLUs to departments using the Dept. Number drop-down list in
the PLU Page 1 tab of the PLU Maintenance window. For information about
defining departments, see “Defining departments” on page 69.
No action required. The Store Manager automatically completes this field.
Gross Mrg.
This field defines the gross margin the store earns on the item. The calculation is
based on the difference between the values in the Retail Price and the Cost Price
fields.
No action required. The Store Manager automatically completes this field.
Seq.
This field indicates the line that is highlighted in the purchase order. The Retail
Price, Ext. Retail, Dept, Gross Mrg., Seq., and Order Number fields contain the
information for the line that is highlighted in the purchase order.
No action required. The Store Manager automatically completes this field.
Order Number
This field contains a unique number that is used to track the item during order,
receive, and transfer transactions.
You define the order number in the Ordering No. field in the PLU Page 1 tab of
the PLU Maintenance window.
No action required. The Store Manager automatically completes this field.
Report
This field generates a Purchase Order report and displays it in the report window on
your screen.
For more information about the Purchase Order report, see “Printing a Purchase
Order report” on page 204.
Click the button.
202
Ordering, receiving, and transferring inventory
Field
Description
Inventory Information
This field opens the Inventory Information window. The window contains
information about the item in the line you highlighted in the purchase order. The
item in the highlighted line must be inventory controlled.
For more information about the Inventory Information window, see “Viewing
inventory information” on page 234.
Click the button.
Issue
This field issues the purchase order. You cannot modify a purchase order after you
issue it. The order’s status becomes issued.
For information about issuing a purchase order, see “Issuing a purchase order” on
page 204.
Click the button.
Void
This field voids the issued purchase order. You cannot void a purchase order until
you have issued it.
For information about voiding a purchase order, see “Voiding a purchase order” on
page 205.
Click the button.
Details
This field opens a detail screen which contains information about the item in the
line of the purchase order that you have highlighted.
The information in the detail window cannot be edited.
Click the button.
Duplicate
This field creates a new purchase order.
For information about duplicating a purchase order to create a new order, see
“Duplicating a purchase order” on page 206.
Click the button.
203
Performing Inventory Control Functions
Issuing a purchase order
A purchase order has a status of pending until you issue it. You can void a purchase order but you
cannot modify a purchase order after you issue it. Issuing a purchase order makes it available to be
converted into a receiving order.
For information about converting the purchase order into a receiving order, see “Converting purchase
orders into receiving orders” on page 211.
To issue a purchase order:
1.
On the Main Menu window, click Inventory.
2.
Click Purchase Orders.
3.
Click Display All. The existing purchase orders are displayed in the selection window.
4.
Click the purchase order you want to issue, and then click Open. A dialog box appears, prompting
you to confirm if you want to identify the items by PLU or vendor’s SKU.
5.
Click a radio button in the dialog box. The dialog box closes. The Purchase Order Maintenance
window appears.
6.
Click Issue. A dialog box appears, prompting you to confirm if you want to issue the purchase
order.
7.
Click OK. The purchase order’s status changes to issued.
Printing a Purchase Order report
You can print a purchase order report containing the information from the purchase order displayed in
the Purchase Order Maintenance window.
The Purchase Order report is linked to the report template designer. You can use the report template
designer to alter the appearance and layout of the Purchase Order report.
To print a purchase order report:
204
1.
On the Main Menu window, click Inventory.
2.
Click Purchase Orders.
3.
Click Display All. The existing purchase orders are displayed in the selection window.
4.
Click the purchase order you want to use to form the basis of the report, and then click Open
button. A dialog box appears, prompting you to confirm if you want to identify the items by PLU
or vendor’s SKU.
5.
Click a radio button in the dialog box. The dialog box closes.
Ordering, receiving, and transferring inventory
6.
Click Report. The Purchase Order report is displayed in the report window.
7.
Click Print. A dialog box appears asking you to confirm the printing.
8.
Click OK. The Store Manager prints the report on the printer defined as the default printer, and
the report remains displayed on your screen in the report window.
Voiding a purchase order
You can void a purchase order if it has a status of issued. A voided purchase order remains visible in
the Purchase Order Selection window, and you can open it to see the information in it, but you cannot
modify it.
You can duplicate a voided purchase order. For information about duplicating a purchase order, see
“Duplicating a purchase order” on page 206.
To void a purchase order:
1.
On the Main Menu window, click Inventory.
2.
Click Purchase Orders.
3.
Click Display All. The existing purchase orders are displayed in the selection window.
4.
Click the purchase order you want to void, and then click Open. A dialog box appears, prompting
you to confirm if you want to identify the items by PLU or vendor’s SKU.
5.
Click a radio button in the dialog box. The dialog box closes.
6.
Click Void. A dialog box appears, prompting you to confirm you want to void the purchase order.
7.
Click OK. The purchase order is voided.
205
Performing Inventory Control Functions
Duplicating a purchase order
You can create a new purchase order by duplicating an existing order. The new purchase order has a
status of pending, regardless of the status of the original order.
To duplicate a purchase order:
1.
On the Main Menu window, click Inventory.
2.
Click Purchase Orders.
3.
Click Display All. The existing purchase orders are displayed in the selection window.
4.
Click the purchase order you want to duplicate, and then click Open. A dialog box appears,
prompting you to confirm if you want to identify the items by PLU or vendor’s SKU.
5.
Click a radio button in the dialog box. The dialog box closes. The Purchase Order Maintenance
window appears.
6.
Click Duplicate. The new purchase order is displayed in the Purchase Order Maintenance
window. The new order is identical to the original order.
7.
Change the information in the fields as appropriate.
8.
Click Save, and then click Exit.
Creating an order guide for licensee transactions
When dealing with corporate customers on a regular basis, you may need to repeat an order for the
same inventory items on an ongoing basis. For example, if you are running a liquor store you would
service a number of hospitality-type customers with the same products every week. Items in the order
typically do not change except for minor adjustments to the quantities required.
Store Manager provides a feature for maintaining an order guide and an order entry screen to process
repeat orders. The order guide allows you to create a specific standing order for each customer that
pre-orders product. The order entry screen allows you to create a new order using the pre-defined
order list and view the current selling prices for that customer. You can also see on-hand quantity and
on-order quantity for each product in your store. Once complete, the order acquires a pending status
for payment processing at a later date — typically when the customer picks up their merchandise.
Before you can set up an order guide for a customer, you must complete the following configurations.
Create a record for the customer.
Ensure that the price level value is set to 1 (in the Customer Maintenance window. > Loyalty
Points tab.) This applies any discount schemes the customer may be entitled to such as discounts
for bulk-purchases and so forth.
Create an order guide and link it to the customer.
Note: You may create several order guides for one customer to reflect seasonal or other variations in
their order requirements.
To set up a customer to use the order guide feature:
206
1.
On the Main Menu, click File Maintenance.
2.
Click Customer. The Customer Menu appears.
3.
Click Customers. The Selection window appears.
Ordering, receiving, and transferring inventory
4.
If you are adding a new customer to the order guide, click New. The Customer Maintenance
window appears. (Otherwise, if you need to make a change to an existing customer record, you can
simply open that record.)
5.
Enter contact information for the customer as required.
6.
The Type field specifies the user-defined customer type. Select the required type. (Customer types
are maintained in the Code Table Maintenance window for Licensee types.)
7.
The Status field specifies the customer status. The options are active or inactive. Select the
required status type. (Customer status types are maintained in the Code Table Maintenance
window for Licensee status.)
8.
You can create a custom reference number for the customer by entering an identifying number in
either Reference #1 or #2.
9.
Click the Loyalty Points tab.
10. Set the Price Level value to 1.
11. Click Save and then click Exit.
Once you have set up a customer, you can begin to create an order guide for them.
207
Performing Inventory Control Functions
To set up an order guide for a customer:
1.
In the Customer Menu, click Order Guides. The Order Guide Selection window appears.
2.
If you are opening an existing order guide, select it from the displayed list and click Open, or click
New to create a new order guide for a customer.
3.
You must assign the order guide to the customer by entering their identifying number in the
Customer # field. If you do not know the customer number, you can look it up by clicking the
question mark icon.
Note: You may create an order guide for licensees with several locations
ordering the same group of products by creating a copy of an existing order
guide for one licensee and then assigning a new customer number to it.
208
4.
In the Guide ID field, enter an identifier to uniquely identify the order guide.
5.
Enter each item to appear in the order guide by clicking the Item field and entering the PLU
Number and PLU Description for the item.
Ordering, receiving, and transferring inventory
Current Price/Future Price displays the item’s prices based on the current date. Future price
represents the price that is effective on the earliest configured date after the current date. If an
item does not appear in the customer price list, the current retail price from the PLU database is
displayed in both the current price and future price.
6.
When you have entered all the items for the order, click Save to save the order guide.
7.
If required, you can also print the order guide.
Viewing displayed information about the order
When an order guide is complete, the P/T ID field shows the configured pending transaction type,
such as Layaway, for the order. After that order is settled and picked up, the status changes to
Complete.
You can sort the item list by clicking on any item column header in the order guide maintenance
window. The list of items is automatically redisplayed in the new sort order. Clicking on the same
column again toggles the sort between descending and ascending order. The sort order for a specific
order guide is maintained in the picking list report and pending transaction.
Item numbers are automatically sequenced by default. You may manually renumber the sequence.
Entering an order from an order guide
When you choose the option to enter an order from a defined order guide, the order entry window
displays items from the order guide according to the item sort order defined for the guide. You can
specify a pickup date and enter item quantities as required. When all order items have been entered,
you can print a picking list from the order.
You can use the search feature in the summary window to look for a specific order by searching on any
of the following fields: Customer #, Customer Name, Status or Guide ID. You can then choose an
existing order from the list of orders displayed in the window. You can also generate a new order entry
or delete an existing one from the selection window.
To enter an order from an order guide:
1.
On the Main Menu, click File Maintenance.
2.
Click Customer. The Customer Menu appears.
209
Performing Inventory Control Functions
210
3.
Click Order Entry. The Selection window appears.
4.
Once you have identified the required order guide, click New to add a new row to the list. The
order items are displayed from the selected order guide and sorted according to the item sort
order established with the order guide.
5.
For each item appearing in the list, enter the amount ordered by the customer in the Quantity
Ordered field. Continue entering the order until all items are entered.
6.
Click Complete to generate the order. Initially, the order will be assigned a status of Pending. The
order can still be modified in this state. You can also print a picking list and an Order Guide by
clicking the appropriate options at the bottom of the window. When the order is converted into a
Pending Transaction Sale, the status of the order will change to Completed. At this point a
completed order can no longer be altered nor a picking list printed but you will see an option to
print a Pending Transaction Report. This report contains final pricing for the transaction including
taxes and mix match discounts. The option to print an Order Guide will still be available.
Ordering, receiving, and transferring inventory
7.
Click Exit to exit the Order Entry Maintenance window.
Receiving inventory
You can receive inventory into your store by recording the items and quantities in a receiving
transaction. You can also create and complete receiving transactions using PLUs.
The receiving transaction compares the actual quantity of items you receive to the quantity you ordered
and indicates discrepancies. Partial shipments of items can also be received from the same order at
different times.
Converting purchase orders into receiving orders
Once you issue a purchase order it becomes available to be used as a receiving transaction. For
information about issuing a purchase order, see “Issuing a purchase order” on page 204.
A purchase order is converted into a receiving transaction the first time you open it in the Receiving
Selection window. Before it has been converted, it is only visible in the P.O.’s to be Received tab. After
it is converted it is visible in the Receiving Transactions tab only.
To convert a purchase order into a receiving order:
1.
On the Main Menu window, click Inventory.
2.
Click Receiving.
3.
Click the appropriate tab.
4.
Click Display All. The issued purchase orders are displayed in the window.
5.
Click the purchase order you want to convert into a receiving transaction, and then click Open.
The Receiving Maintenance window appears, containing the information you entered when you
created the purchase order.
Once you open a purchase order as a receiving order you can immediately enter receiving information
into the Receiving window, or you can save it and close it. For information about the fields in the
Receiving window, see “Receiving window” on page 213.
Receiving inventory by PLU or vendor’s SKU
When you create a new receiving transaction it has a status of pending. The items received are not
added to your on-hand inventory quantities until you complete the receiving transaction.
For information about completing a receiving transaction, see “Completing a receiving transaction” on
page 223.
In the following steps you are required to enter information into the Receiving window. For
information about the fields in the window, see “Receiving window” on page 213.
To create a receiving transaction:
1.
On the Main Menu window, click Inventory.
211
Performing Inventory Control Functions
2.
Click Receiving.
3.
Click the Receiving Transactions tab.
4.
Click New. A dialog box appears, prompting you to confirm if you want to identify the items by
PLU or vendor’s SKU.
5.
Click either By PLU/X-REF or By Vendor/SKU in the dialog box.
6.
Complete the fields in the window as appropriate.
7.
Click Save, and then click Exit.
Tip: You can view inventory information about each item you add to the
receiving transaction by clicking Details on the Receiving window. The item
entry portion of the window is replaced with a detail window.
212
Ordering, receiving, and transferring inventory
Receiving window
This window contains the fields used for creating receiving transactions.
The following table contains description of the fields in the Receiving window:
Field
Description
Txn. Number
This field defines the unique number that identifies the inventory transaction. The
inventory transaction number sequence is used for purchase orders, receiving
transactions, transfers, and inventory count PLU lists.
No action required. The Store Manager automatically completes this field with a
number after you save the receiving transaction.
Status
This field indicates the current status of the receiving transaction.
Pending: The transaction has not been completed, and can be modified.
Received: The transaction is complete and cannot be modified.
Partial: Some of the items in the transaction have been received, more items on the
transaction can be received.
Void: The transaction has been completed and then voided.
No action required. The Store Manager automatically completes this field.
Txn. Date
This field defines the date the inventory transaction is created. The transaction date
does not need to be the same as the receive date.
No action required. The Store Manager completes this field with the system date of
the computer the Store Manager is running on.
213
Performing Inventory Control Functions
Field
Description
Document Number
This field defines the unique number that identifies the receiving transaction.
You can modify the document number if you click Modify PO/Doc Number in
the Inventory Parameters Maintenance window.
The Store Manager automatically completes this field, but you can edit the
information in it.
Type a number into the field.
Vendor
This field defines the vendor that supplies the items you are receiving.
You must complete this drop-down list before you can add items to the receiving
transaction.
Click the drop-down list and select a vendor from the list.
Receive Date
This field defines the date the items are received into your store.
The Store Manager automatically completes this field, but you can edit the
information in it.
Click the button beside the field to open the pop-up calendar window. Click a date
and click OK.
Alternatively, type a date into the field.
P.O. Number
This field defines the unique number that identifies the purchase order this receiving
transaction is based on.
For information about converting an issued purchase order into a receiving
transaction, see “Converting purchase orders into receiving orders” on page 211.
No action required. The Store Manager automatically completes this field.
Ship Type
This field defines how the items are shipped to your store.
You must complete this drop-down list if you click Shipping Type Required in the
Inventory Parameters Maintenance window.
You can define the selection of ship types that appear in this drop-down list in the
Code Table Maintenance window. For information about populating drop-down
lists, see “Populating drop-down lists” on page 63.
Click the drop-down list and select a ship type from the list.
Receiving Type
This field defines the type of receiving transaction you are creating.
You must complete this drop-down list if you click Receiving Type Required in
the Inventory Parameters Maintenance window.
You can define the selection of receiving types that appear in this drop-down list in
the Code Table Maintenance window.
Click the drop-down list and select a receiving transaction type from the list.
Discrepancy Number
This field defines a unique number that identifies a discrepancy between the quantity
of items expected in the transaction and the quantity of items actually received.
You must complete this field before you complete the transaction if you click
Receive Discrepancy Number Required in the Inventory Parameters
Maintenance window.
Type a number, up to 17 characters long, into the field.
214
Ordering, receiving, and transferring inventory
Field
Description
Number of Cases
This field defines the number of cases of items shipped to your store.
Type a number into the field.
Total Inv. Cost
This field defines the total cost to the store of the items shipped to your store.
Type a currency amount into the field.
Note
This field defines any notes regarding the receiving transaction.
Type an alphanumeric string, up to 40 characters long, into the field.
Hash Qty
This field defines the total number of items that the store expects to receive.
The actual quantity received must match the number you enter into this field if you
click Receive Quantity Match Hash Quantity in the Inventory Parameters
Maintenance window.
Type a number into the field.
Origin
This field indicates the origin of the receiving transfer (purchase order, electronic
document, manual).
Action: No action required. The Store Manager automatically completes this field.
PLU/XREF
This field defines the unique number that identifies the item you are receiving.
Type a number into the field.
If you click By PLU/Xref in the Select Display Type dialog box, you must enter the
item’s PLU or cross reference number. If you want to use cross reference numbers
only, you must click Xreference Only in the Inventory Parameters Maintenance
window.
Description
This field defines the item’s description.
No action required. The Store Manager automatically completes this field.
Expected Qty
This field defines the quantity of the item the store expects to receive.
If the transaction is based on an issued purchase order, the number in this field is
from the Extended Unit field in the Purchase Order Maintenance window.
No action required. The Store Manager automatically completes this field.
Actual Qty
This field defines the quantity of the item the store actually receives.
If you click Receive Discrepancy Number Required in the Inventory Parameters
Maintenance window, and the number in the Exp. Qty field is not zero and does not
match the quantity you actually receive, then you must type a number into the
Discrepancy No. field in this window.
Type a number into the field.
Short/Over
This field defines the difference between the actual quantity of the item the store
receives, and the expected quantity.
If the number in this field is not 0, and if you click Receive Discrepancy Number
Required in the Inventory Parameters Maintenance window, you must type a
number into the Discrepancy No. field in this window. If you click Receive
Reason Required in the Inventory Parameters Maintenance window, you must
select a reason in the Reason drop-down list, in this window.
No action required. The Store Manager automatically completes this field.
215
Performing Inventory Control Functions
Field
Description
Reason
This field defines the reason the quantity of the item the store receives is different
from the expected amount.
If you click Receive Reason Required in the Inventory Parameters Maintenance
window, you must complete this field whenever the values in the Exp. Qty and Act.
Qty fields do not match.
You can define the selection of reasons that appear in this drop-down list in the
Code Table Maintenance window.
Click the drop-down list and select a reason from the list.
B/O
This field indicates whether the item is back ordered.
The Store Manager automatically completes this checkbox, but you can change the
entry.
Click the checkbox to change the entry in the checkbox. When the checkbox is
checked (√), the item is back ordered.
Received (T/D)
This field indicates the total quantity of the item received.
No action required. The Store Manager automatically completes this field.
Pkg. Qty.
This field defines the number of the item that is shipped in each case.
For example, if the number 4 is in this field, the item is shipped in cases of 4.
No action required. The Store Manager automatically completes this field with either
the number in the Pack Factor field in the Vendor’s SKU Maintenance window. If
you don’t enter a number into the Pack Factor field, the Store Manager enters the
number 1 into this field.
Retail Price
This field defines the retail price for the item.
You define the retail price in the Retail Price field in the PLU Page 1 tab of the PLU
Maintenance window.
No action required. The Store Manager automatically completes this field.
Ext. Retail
This field defines the retail price for the number of the item you receive. The total
price is based on the values in the Act.Qty and the Retail Price fields in this
window.
No action required. The Store Manager automatically completes this field.
Cost
This field defines the cost to the store of the item you are receiving. The item’s cost
is defined in the Cost field in the Vendor’s SKU Maintenance window, or the PLU
Maintenance window.
The total cost for the actual quantity of the item you receive is displayed in the Ext.
Cost field in this window.
No action required. The Store Manager automatically completes this field.
Ext. Cost
This field represents the total cost of the items you are receiving. The total cost is
based on the values in the Extended Unit and the Cost Price fields in this window.
No action required. The Store Manager completes this field.
216
Ordering, receiving, and transferring inventory
Field
Description
Seq.
This field indicates the line that is highlighted in the receiving transaction. The
information in the Pkg. Size, Retail Price, Ext. Retail, Cost Price, Ext. Cost,
Sequence No., Labels Printed, and Ordering No. fields contain the information
for the line that is highlighted in the receiving transaction.
No action required. The Store Manager completes this field.
Labels Count
This field indicates how many price stickers and shelf labels you have sent to queues
for printing.
You can send price stickers or shelf labels to a queue by clicking Price Label or
Shelf Label in this window.
No action required. The Store Manager automatically completes this field.
Ordering Num.
This field contains a unique number that is used to track the item during order,
receive, and transfer transactions.
You define the order number in the Ordering No. field in the PLU Page 1 tab of
the PLU Maintenance window.
No action required. The Store Manager automatically completes this field.
Designed Label
This field opens the Price Tag window. You can use the Price Tag window to design
price stickers or shelf labels for the item.
Click the button.
Price Sticker
This field opens the Print Queue Selection window. You can use the Print Queue
Selection window to create a price sticker queue that you can print.
Click the button.
Shelf Label
This field opens the Print Queue Selection window. You can use the Print Queue
Selection window to create a shelf label queue that you can print.
Click the button.
Report
This field generates a Receiving report and displays it in the report window on your
screen.
For more information about the Receiving report, see “Printing a Receiving report”
on page 223.
Click the button.
Inventory Information
This field opens the Inventory Information window. The window contains
information about the item in the line of the receiving transaction that you have
highlighted. The item in the highlighted line must be inventory controlled.
For more information about the Inventory Information window, see “Viewing
inventory information” on page 234.
Click the button.
Complete
This field completes the receiving transaction. You cannot modify a receiving
transaction after you complete it. The transaction’s status becomes complete.
For information about completing a receiving transaction, see “Completing a
receiving transaction” on page 223.
Click the button.
217
Performing Inventory Control Functions
Field
Description
Void
This field voids the completed receiving transaction. You cannot void a transaction
until you have completed it.
For information about voiding a receiving transaction order, see “Voiding a
receiving transaction” on page 224.
Click the button.
Details
This field opens a detail screen which contains information about the item in the line
of the receiving transaction that you have highlighted.
The information in the detail window cannot be edited.
Click the button.
Partial
This field saves the items and information you have added to the receiving
transaction, but does not complete the transaction. You can open the receiving
transaction again and add additional items to it.
The Rcvd. TD field displays a total of the item received.
For information about receiving a partial shipment, see “Receiving a partial order”
on page 222.
Click the button.
Tip: To find a PLU, click in the PLU/XREF field, and press the F12 key. The PLU Search window
appears.
Receiving inventory by case
You can use the receiving by case function to record the receipt of items in your store that do not have
a corresponding purchase order, and that are shipped in cases only.
When you create a new receiving by case transaction it has a status of pending. For information about
completing a receiving by case transaction, see “Completing a receiving transaction” on page 223.
In the following steps, you are required to enter information into the Receiving by case window. For
information about the fields in the window, see “Receiving by Case window” on page 219.
WARNING! Items that you receive into your store through a receiving by case transaction are not
added to your on-hand inventory. You must perform an inventory adjustment to have the Store
Manager reflect the receipt of these items. For information about performing an inventory adjustment,
see “Adjusting the on-hand inventory quantities” on page 248.
To create a receiving by case transaction:
1.
218
On the Main Menu window, click Inventory.
Ordering, receiving, and transferring inventory
2.
Click Receiving.
3.
Click the Receiving by Case tab.
4.
Click New.
5.
Complete the fields in the window as appropriate.
6.
Click Save, and then click Exit.
Receiving by Case window
This window contains the fields used for creating receiving transactions.
219
Performing Inventory Control Functions
The following table contains descriptions of fields in the Receiving by Case window
Field
Description
Txn Number
This field defines the unique number that identifies the inventory transaction. The
inventory transaction number sequence is used for purchase orders, receiving
transactions, transfers, and inventory count PLU lists.
No action required. The Store Manager automatically completes this field with a
number after you save the transaction.
Status
This field indicates the current status of the receiving transaction.
Pending: The transaction has not been completed, and can be modified.
Received: The transaction is complete and cannot be modified.
Partial: Some of the items in the transaction have been received, more items on the
transaction can be received.
Void: The transaction has been completed and then voided.
No action required. The Store Manager automatically completes this field.
Txn Date
This field defines the date the inventory transaction is created. The transaction date
does not need to be the same as the receive date.
No action required. The Store Manager completes this field with the computer’s
system date on which the Store Manager is running.
Document Num
This field defines the unique number that identifies the receiving transaction.
You can modify the document number if you click Modify PO/Doc Number in
the Inventory Parameters Maintenance window.
The Store Manager automatically completes this field, but you can edit the
information in it.
Type a number into the field.
Vendor
This field defines the vendor that supplies the items you are receiving.
You must complete this drop-down list before you can add items to the receiving
transaction.
Click the drop-down list and select a vendor from the list.
Receive Date
This field defines the date the items are received into your store.
The Store Manager automatically completes this field, but you can edit the
information in it.
Click the button beside the field to open the pop-up calendar window. Click a date
and click OK.
Alternatively, type a date into the field
P.O. Number
This field defines the unique number that identifies the purchase order this receiving
transaction is based on.
Type a number into the field.
220
Ordering, receiving, and transferring inventory
Field
Description
Ship Type
This field defines how the items are shipped to your store.
You must complete this drop-down list if you click Shipping Type Required in the
Inventory Parameters Maintenance window.
You can define the selection of ship types that appear in this drop-down list in the
Code Table Maintenance window.
Click the drop-down list and select a ship type from the list.
Receiving Type
This field defines the type of receiving transaction you are creating.
You must complete this drop-down list if you click Receiving Type Required in
the Inventory Parameters Maintenance window.
You can define the selection of receiving types that appear in this drop-down list in
the Code Table Maintenance window.
Click the drop-down list and select a receiving transaction type from the list.
Discrepancy Num
This field defines a unique number that identifies a discrepancy between the quantity
of items expected in the transaction, and the quantity of items actually received.
You must complete this field if you click Receive Discrepancy Number Required
in the Inventory Parameters Maintenance window.
Type a number, up to 17 characters long, into the field.
Number of Cases
This field defines the number of cases of items shipped to your store.
Type a number into the field.
Total Inv. Cost
This field defines the total cost to the store of the items shipped to your store.
Type a currency amount into the field.
Note
This field defines any notes regarding the receiving transaction.
Type an alphanumeric string, up to 40 characters long, into the field.
Hash Qty
This field defines the total number of items that the store expects to receive.
The actual quantity received must match the number you enter into this field if you
click Receive Quantity Match Hash Quantity in the Inventory Parameters
Maintenance window.
Type a number into the field.
Origin
This field indicates the origin of the receiving transfer (purchase order, electronic
document, manual).
No action required. The Store Manager automatically completes this field.
Case Number
This field defines the unique number that identifies the case of items.
Type a number into the field.
Quantity
This field defines the number of cases you receive in your store.
Type a number into the field.
221
Performing Inventory Control Functions
Field
Description
Shr/Ovr
This field defines the difference between the number of cases you actually received,
and the number you expected.
Type a number into the field. If the shipment was short cases, type a negative sign
before the number.
Receive All/None
This field is not available in the Receiving by Case window of the Store Manager.
Designed Label
This field is not available in the Receiving by Case window of the Store Manager.
Price Label
This field is not available in the Receiving by Case window of the Store Manager.
Shelf Label
This field is not available in the Receiving by Case window of the Store Manager.
Report
This field generates a Receiving report and displays it in the report window on your
screen.
For more information about the Receiving report, see “Printing a Receiving report”
on page 223.
Click the button.
Inventory Information
This field is not available in the Receiving by Case window of the Store Manager.
Complete
This field completes the receiving by case transaction. You cannot modify a
receiving transaction after you complete it. The transaction’s status becomes
complete.
For information about completing a receiving transaction, see “Completing a
receiving transaction” on page 223.
Click the button.
Void
This field voids the completed receiving transaction. You cannot void a transaction
until you have completed it.
For information about voiding a receiving transaction order, see “Voiding a
receiving transaction” on page 224.
Click the button.
Details
This field is not available in the Receiving by Case window of the Store Manager.
Partial
This field accepts the items you have added to the receiving by case transaction, but
does not complete the transaction. You can open the receiving transaction again and
add additional items to it.
For information about receiving a partial shipment, see “Receiving a partial order”
below.
Click the button.
Receiving a partial order
You can receive a portion of your shipment with the rest to arrive later, record the items you do receive
in a receiving transaction and mark the transaction as a partial order. The items you receive are added
to your on-hand inventory quantities. You can open a receiving transaction with a status of partial and
add items to it. The receiving transaction has a status of partial until you complete it.
222
Ordering, receiving, and transferring inventory
Tip: You can see the quantity of an item that your store has already received by highlighting the line
containing the item and clicking Detail on the Receiving window.
To receive a partial order:
1.
Create a new receiving transaction or open an existing pending or partial transaction.
2.
Complete the fields as appropriate for the items and quantities you receive.
3.
Click Partial. The partial receiving transaction is saved.
Completing a receiving transaction
A receiving transaction has a status of pending or partial until you complete it. You cannot modify a
receiving transaction after you complete it.
To complete a receiving transaction:
1.
Create a new receiving transaction or open an existing pending or partial transaction.
2.
Click Complete. A dialog box appears, prompting you to confirm if you want to complete the
receiving transaction.
3.
Click OK. The dialog box closes. The receiving transaction’s status changes to complete.
Printing a Receiving report
You can print a receiving report containing the information from the receiving transaction displayed in
the Receiving window.
The Receiving report is linked to the report template designer. You can use the report template
designer to alter the appearance and layout of the Receiving report.
To print a receiving report:
1.
Create a new receiving transaction or open an existing pending or partial transaction.
223
Performing Inventory Control Functions
2.
Click Report. The Receiving report is displayed in the report window.
3.
Click Print. A dialog box appears, prompting you to confirm the printing.
4.
Click OK. The Store Manager prints the report on the printer defined as the default printer, and
the report remains displayed on your screen in the Report window.
Voiding a receiving transaction
A voided transaction remains visible in the Receiving Selection window, and you can open it to see the
information in it, but you cannot modify it.
To void a receiving transaction:
1.
Open a pending or partial transaction.
2.
Click Void. A dialog box appears, prompting you to confirm you want to void the receiving
transaction.
3.
Click OK. The receiving transaction is voided.
Transferring inventory
A transfer records the movement of items between stores or the store and warehouse. You can create
transfers to record the movement of inventory into or out of your store.
Inventory can be transferred using PLUs to identify items or items can be transferred by the case.
Your head office can also create transfers and send them to your store as electronic documents.
224
Ordering, receiving, and transferring inventory
Transferring inventory using PLUs
When you create a new transfer it has a status of pending. The items you ship or receive are not added
to your on-hand inventory quantities until you complete the transfer.
For information about completing a transfer, see “Completing a transfer” on page 232.
In the following steps, you must enter information into the Store Transfer by PLU window. For
information about the fields in the window, see “Store Transfer by PLU window” on page 226.
To create a transfer:
1.
On the Main Menu window, click Inventory.
2.
Click Store Transfer.
3.
Click the Transfer In By PLU tab or the Transfer Out By PLU tab.
4.
Click New.
5.
Complete the fields in the Transfer In By PLU window as appropriate.
6.
Click Save, and then click Exit.
225
Performing Inventory Control Functions
Store Transfer by PLU window
This window contains the fields used for creating store transfers in or out of the store using PLUs to
identify items. The field descriptions follow.
The following table contains description of the fields in the Store Transfer by PLU window:
Field
Description
Txn Num
This field defines the unique number that identifies the inventory transaction. The
inventory transaction number sequence is used for purchase orders, receiving
transactions, transfers, and inventory count PLU lists.
No action required. The Store Manager automatically completes this field with a
number after you save the transfer.
Doc Number
This field defines the unique number that identifies the transfer. You can modify the
document number if you click Modify PO/Doc Number in the Inventory
Parameters Maintenance window.
The Store Manager automatically completes this field, but you can edit the
information in it.
Type a number into the field.
Status
This field indicates the current status of the transfer.
Pending: The transfer has not been completed and can be modified.
Complete: The transfer is complete and cannot be modified.
Void: The transfer has been completed and then voided.
No action required. The Store Manager automatically completes this field.
226
Ordering, receiving, and transferring inventory
Field
Description
Origin
This field indicates if the transfer is based on an electronic document from your head
office or if you create it.
No action required. The Store Manager automatically completes this field.
Txn Date
This field defines the date the inventory transaction is created. The transaction date
does not need to be the same as the order date.
No action required. The Store Manager completes this field with the system date of
the computer the Store Manager is running on.
Transfer Date
This field defines the transfer date.
The Store Manager automatically completes this field, but you can edit the
information in it.
Click the button beside the field to open the pop-up calendar window. Click a date
and click OK.
Alternatively, type a date into the field.
Ship Via
This field defines how the items are shipped to or from your store.
You can define the selection of ship via types that appear in this drop-down list in
the Code Table Maintenance window..
If you click Ship Via Required in the Inventory Parameters Maintenance window,
you must complete this drop-down list before you can complete the transfer.
Click the drop-down list and select a ship via type from the list.
Carton Count
This field defines the number of cases included in this transfer.
Type a number into the field.
Vendor
This field defines the vendor of the items included in the transfer.
You must complete this drop-down list before you can add items to the transfer.
Click the drop-down list and select a vendor from the list.
To/From Store
This field defines the store the items are being transferred to or from.
You must complete this drop-down list before you can save or complete the transfer.
The selection of stores that appears in this drop-down list comes from the Stores
table.
Click the drop-down list and select a store from the list.
Hash Qty
This field defines the total number of items that the store expects to receive.
Type a number into the field.
Reason
This field defines the reason the transfer of items is being performed.
You can define the selection of reasons that appears in this drop-down list in the
Code Table Maintenance window.
Click the drop-down list and select a reason from the list.
227
Performing Inventory Control Functions
Field
Description
Out
This field indicates whether the items are being transferred into or out of your store.
The entry in this field is based on whether you choose the Transfer in by PLU or the
Transfer out by PLU tab in the Store Transfer Selection window.
No action required. The Store Manager automatically completes this field.
Note
This field defines any notes regarding the transfer.
Type an alphanumeric string, up to 70 characters long, into the field.
PLU/XREF
This field defines the unique number that identifies the item that is being transferred.
If you want to use cross reference numbers to identify items instead of PLU
numbers, you must click Xreference Only in the Inventory Parameters Maintenance
Window.
Type a number into the field.
Description
This field contains the item’s description.
No action required. The Store Manager automatically completes this field.
Expected Qty.
This field defines the number of the item the receiving store expects to receive in the
transfer.
If you are creating a transfer in, you cannot edit the information in this field.
If you are creating a transfer out, type the number of items the receiving store
expects into the field.
Received Qty.
This field defines the actual quantity of the item you receive.
Type a number into the field
Short/Over
This field indicates the amount of discrepancy between the quantity of the item you
expect to send or receive, and the quantity of the item that is actually sent or
received.
No action required. The Store Manager automatically completes this field.
Receive All/None
This field determines the default number that the Store Manager enters into the
Quantity Received field in this window.
You can change the value from the default entry made by the Store Manager.
This field is only available if you click Allow Receive All for Receiving and
Transfers in the Inventory Parameters Maintenance window.
Click All to automatically enter the expected quantity into the Quantity Received
field. Click None to automatically enter 0 into the Quantity Received field.
Report
This field generates a Transfer report and displays it in the report window on your
screen.
For more information about the Transfer report, see “Printing a transfer report” on
page 232.
Click the button.
228
Ordering, receiving, and transferring inventory
Field
Description
Inventory Information
This field opens the Inventory Information window. The window contains
information about the item in the line of the transfer that you have highlighted. The
item in the highlighted line must be inventory controlled.
For more information about the Inventory Information window, see “Viewing
inventory information” on page 234.
Click the button.
Complete
This field completes the transfer. You cannot modify a transfer after you complete it.
The transfer’s status becomes complete.
For information about completing a transfer, see “Completing a transfer” on
page 232.
Click the button.
Void
This field voids the completed transfer. You cannot void a transfer until you have
completed it.
For information about voiding a transfer, see “Voiding a transfer” on page 233.
Click the button.
Transferring inventory in and out by the case
You can use the transfer by case function to record the receipt of items in your store that are shipped in
cases only.
When you create a new transfer it has a status of pending. For information about completing a transfer
by case, see “Completing a transfer” on page 232.
In the following steps, you must enter information into the Inventory Transfer by Case window.
Items that you receive into your store, or ship from your store through a transfer by case are not added
to or deleted from your on-hand inventory. You must perform an inventory adjustment to have the
Store Manager reflect the movement of these items. For information about performing an inventory
adjustment, see “Adjusting the on-hand inventory quantities” on page 248.
To create a transfer:
1.
On the Main Menu window, click Inventory.
2.
Click Store Transfer.
3.
Click the Transfer In By Case tab or the Transfer Out By Case tab.
4.
Click New.
5.
Complete the fields in the window as appropriate.
6.
Click Save, and then click Exit.
229
Performing Inventory Control Functions
Store Transfer by Case window
This window contains the fields used for creating store transfers of cases of items in or out of the store.
The field descriptions follow.
The following table contains descriptions of the fields in the Store Transfer by Case window:
Field
Description
Txn. Num
This field defines the unique number that identifies the inventory transaction. The
inventory transaction number sequence is used for purchase orders, receiving
transactions, transfers, and inventory count PLU lists.
No action required. The Store Manager automatically completes this field with a
number after you save the transfer.
Doc Number
This field defines the unique number that identifies the transfer.
You can modify the document number if you click Modify PO/Doc Number in
the Inventory Parameters Maintenance window.
The Store Manager automatically completes this field, but you can edit the
information in it.
Type a number into the field.
Status
This field indicates the current status of the transfer.
Pending: The transfer has not been completed and can be modified.
Complete: The transfer is complete and cannot be modified.
Void: The transfer has been completed and then voided.
No action required. The Store Manager automatically completes this field.
230
Ordering, receiving, and transferring inventory
Field
Description
Origin
This field indicates if the transfer is based on an electronic document from your
head office, or if it is manual.
No action required. The Store Manager automatically completes this field.
Transfer Date
This field defines the date the inventory transaction is created. The transaction date
does not need to be the same as the order date.
No action required. The Store Manager completes this field with the system date of
the computer the Store Manager is running on.
Ship Via
This field defines how the items are shipped to or from your store.
You can define the selection of ship via types that appear in this drop-down list in
the Code Table Maintenance window.
If you click Ship Via Required in the Inventory Parameters Maintenance window,
you must complete this drop-down list.
Click the drop-down list and select a ship via type from the list.
Carton Count
This field defines the number of cases included in this transfer.
Type a number into the field.
Vendor
This field defines the vendor of the items included in the transfer.
You must complete this drop-down list before you can add items to the transfer.
Click the drop-down list and select a vendor from the list.
To/From Store
This field defines the store from/to which the items are being transferred.
You must complete this drop-down list before you can save or complete the transfer.
The selection of stores that appears in this drop-down list comes from the Stores
table.
Click the drop-down list and select a store from the list.
Hash Qty
This field defines the total number of cases that the store expects to ship or receive
in this transfer.
Type a number into the field.
Reason Code
This field defines the reason the transfer of items is being performed.
You can define the selection of reasons that appears in this drop-down list in the
Code Table Maintenance window.
Click the drop-down list and select a reason from the list.
Note
This field defines any notes regarding the transfer.
Type an alphanumeric string, up to 40 characters long, into the field.
Case Number
This field defines the unique number that identifies the case of items being
transferred.
Type a number into the field.
Quantity
This field defines the number of cases that have the case number you enter into the
Case Number field in this window.
Type a number into the field.
231
Performing Inventory Control Functions
Field
Description
Short/Over
This field indicates whether there is a discrepancy between the actual quantity of
cases shipped or received and the quantity expected.
Type a number into the field.
Receive All/None
This field determines the default number that the Store Manager enters into the
Quantity Received field in this window.
You can change the value from the default entry made by the Store Manager.
This field is only available if you click Allow Receive All for Receiving and
Transfers in the Inventory Parameters Maintenance window.
Click All to automatically enter the expected quantity into the Quantity Received
field. Click None to automatically enter 0 into the Quantity Received field.
Report
This field generates a Transfer report and displays it in the report window on your
screen.
For more information about the Transfer report, see “Printing a transfer report”
below.
Click the button.
Inventory Information
This field is not available in the Store Transfer by Case window.
Complete
This field completes the transfer. You cannot modify a transfer after you complete it.
The transfer’s status becomes complete.
For information about completing a transfer, see “Completing a transfer” below.
Click the button.
Void
This field voids the completed transfer. You cannot void a transfer until you have
completed it.
For information about voiding a transfer, see “Voiding a transfer” on page 233.
Click the button.
Completing a transfer
An inventory transfer has a status of pending until you complete it. You cannot modify a transfer after
you complete it.
To complete a transfer:
1.
Create a new transfer or open a pending transfer.
2.
Click Complete. A dialog box appears, prompting you to confirm if you want to complete the
transfer.
3.
Click OK. The dialog box closes. The transfer’s status changes to complete.
Printing a transfer report
You can print a transfer report containing the information from the transfer displayed in the Inventory
Transfer by PLU window or the Inventory Transfer by Case window.
The Transfer report is linked to the report template designer. You can use the report template designer
to alter the appearance and layout of the Transfer report.
232
Ordering, receiving, and transferring inventory
To print a Transfer report:
1.
Create a new transfer or open a pending transfer.
2.
Click Report. The Transfer report is displayed in the report window.
3.
Click Print. A dialog box appears, prompting you to confirm the printing.
4.
Click OK. The Store Manager prints the report on the printer defined as the default printer, and
the report remains displayed on your screen in the report window.
Voiding a transfer
You can void a transfer if it has a status of complete. A voided transfer remains visible in the Store
Transfer Selection window. You can open it to see the information in it, but you cannot modify it.
To void a transfer transaction:
1.
Create a new transfer or open a pending transaction.
2.
Click Void. A dialog box appears, prompting you to confirm you want to void the transfer.
3.
Click OK. The transfer is voided.
233
Performing Inventory Control Functions
Viewing inventory information
You can review detailed inventory information about the items in your store using the Inventory
Information and Inventory History windows.
To review an item’s information, the item must be inventory controlled. You can mark an item as
inventory controlled by clicking Inventory Control in the PLU Maintenance window, and you can
enter the initial on-hand inventory information for the item in the Inventory Control tab of the PLU
Maintenance window.
To open the Inventory Information window:
Click Inventory Information on any of the following windows:
PLU Maintenance window
Purchase Order Maintenance window
Receiving window
Store Transfer by PLU window
Inventory Adjustment window
Physical Inventory Maintenance window
To open the Inventory History window:
Click History on the Inventory Information window.
About the Inventory Information window
This window displays inventory information.
The following list describes the fields used to set the inventory information in the Inventory
Information window:
234
Viewing inventory information
PLU — This field contains the item’s PLU number. The adjacent field describes the item
associated with the PLU number. You can define the item’s description when you define its PLU.
Ordering Number — This field contains a unique number that is used to track the item during
inventory transactions. You define the order number in the Ordering No. field in the PLU Page 1
tab of the PLU Maintenance window. No action required. The Store Manager completes this field.
Department — This field contains the ID number of the department to which the item belongs.
The adjacent field describes the group in which the item belongs. You can define the item’s
department in the Dept Number drop-down list in the PLU Page 1 tab of the PLU Maintenance
window.
Retail Price — This field contains the item’s retail price. You can define the item’s retail price in
the Retail Price field in the PLU Page 1 tab of the PLU Maintenance window.
Use Dept Settings — This field indicates whether item or department settings are used for
determining the item’s prices. You can define whether the Store Manager uses item or department
settings using the Use Department in the PLU Page 1 tab of the PLU Maintenance window.
Sugg. Retail Price — This field contains the item’s suggested retail price. You can define the
suggested retail price in the Sugg. Price field in the PLU Page 1 tab of the PLU Maintenance
window.
Package Qty — This field indicates how many of the item are in a package. You can define the
package size in the Package Qty field in the PLU Page 1 tab of the PLU Maintenance window.
Cost — This field contains the item’s cost. You can define the item’s cost in the Default Cost
field in the PLU Page 1 tab of the PLU Maintenance window.
User Flags 1-6 — These fields indicate the user flags to which the item belongs. You can assign
the item to user flags using the User Flags 1-6 drop-down lists in the PLU Page 2 tab of the PLU
Maintenance window.
Vendor — This field contains the ID number of the item’s vendor. The adjacent field contains the
name of the item’s vendor. You can define the product’s vendor using the Vendor ID field in the
Vendor/SKU tab of the PLU Maintenance window. You can define the product’s vendor using the
Vendor ID field in the Vendor/SKU tab of the PLU Maintenance window.
Include in Suggested Orders — This field indicates whether the on-hand quantities of this item
are selected when the Store Manager generates a suggested order. You can define whether the
Store Manager includes the item in suggested orders clicking Include in Suggested Orders in
the Inventory Control tab of the PLU Maintenance window.
Min Stock Qty — This field contains the minimum on-hand quantity of the item. The minimum
stock amount is used to generate a suggested order. You can define the minimum stock on-hand
for the item using the Minimum Stock on Hand field in the Inventory Control tab of the PLU
Maintenance window.
Max Stock Qty — This field contains the maximum on-hand quantity of the item. The maximum
stock amount is used to generate a suggested order. You can define the maximum stock on-hand
for the item using the Maximum Stock on Hand field in the Inventory Control tab of the PLU
Maintenance window.
Quantity On Hand — This field contains the current on-hand quantity of the item in your store.
The Store Manager maintains a perpetual count of the item’s on-hand quantity, including sales,
receiving, and transfers.
Qty Preissued — This field contains the quantity of the item that is currently reflected on
pending purchase orders. The Store Manager maintains this value automatically.
Qty On Order — This field contains the quantity of the item that is currently reflected on issued
purchase orders. The Store Manager maintains this value automatically.
235
Performing Inventory Control Functions
Last Sold Date — This field contains the most recent date on which the item was sold. The Store
Manager maintains this value automatically.
Last Returned Date — This field contains the most recent date on which a customer returned
the item to the store. The Store Manager maintains this value automatically.
Last Ordered Date — This field contains the most recent date on which your store issued a
purchase order containing this item. The Store Manager maintains this value automatically.
Last Rcvd Date — This field contains the most recent date that you received the item in your
store. The Store Manager maintains this value automatically.
Last Vendor ID — This field contains the ID number of the vendor that most recently supplied
the item to your store. The Store Manager maintains this value automatically.
Last Cost — This field contains the amount the vendor charges the store for the item. You can
define the cost to the store using the Cost field in the Vendor/SKU tab of the PLU Maintenance
window.
List of Orders — This field generates the List of Orders report. The List of Orders report
provides information about purchase orders and receiving transactions. The List of Orders report
is linked to the report template designer. You can use the report template designer to alter the
appearance and layout of the List of Orders report. For information about the template designer,
see “Using the report template designer” on page 300. Click the button.
Inventory History — This button opens the Inventory History Information window. For
information about the fields in the window, see “Inventory History information window” on
page 236. Click the button.
Report — To generate a report for this item, click Report.
Inventory History information window
You can review the item’s historical inventory information in this window, but you cannot edit the
information.
The following list describes the headings in the Inventory History information window:
236
Period — This field contains the date at the start of the period and the end period. You can define
the type of time period the Store Manager uses to organize the historical information using the
Period Type drop-down list in the Inventory Parameter Maintenance Window.
Viewing inventory information
Quantity Sold — This field contains the total quantity of the item that the store sold during the
period. The Store Manager automatically maintains this value.
Quantity Returned — This field contains the total quantity of the item that customers returned
to the store. The Store Manager automatically maintains this value.
Quantity Adjusted — This field contains the quantity of the item involved in manual on-hand
inventory adjustments you made during the period. The Store Manager automatically maintains
this value.
In Stock Quantity Closing — This field contains the on-hand quantity of the item at the period
end date. Click on the Closing button to display the closing quantity. The Store Manager
automatically maintains this value.
In Stock Quantity Minimum — This field contains the lowest on-hand quantity of the item
during the period. Click on the Minimum button to display the minimum quantity. The Store
Manager automatically maintains this value.
In Stock Quantity Maximum — This field contains the highest on-hand quantity of the item
during the period. Click on the Maximum button to display the maximum quantity. The Store
Manager automatically maintains this value.
Quantity Ordered — This field contains the quantity of the item that was reflected on purchase
orders you issued during the period. The Store Manager automatically maintains this value.
Quantity Received — This field contains the quantity of the item that was received into the store
during the period. The Store Manager automatically maintains this value.
Transfer In — This field shows the number of items that were transferred into the store from
another store.
Transfer Out — This field shows the number of items that were transferred out of the store to
another store.
Net Sales Total — This field contains the total net sales amount for this item.
Received Cost — This field shows the cost of the items received into inventory.
Uploading inventory information to the corporate office
Knowing the inventory levels of the stores in your chain allows your corporate or head office to make
better buying decisions for your overall organization. You can send your head office a snapshot of the
inventory levels in your store at a specified time using the Inventory Upload feature. This feature works
by allowing you to define a triggering date on which an inventory upload file is created. This file is
activated at the end of the defined day at store closing. Information in the upload file provides your
head office with an up-to-the-minute overview of the inventory levels in your store. To be fully
configured, this feature requires the following additional configurations outside the Store Manager
application:
Configure the Upload Trigger file — See the Download File Formats section of the Technical
Reference Guide.
Configure a generic inventory file — See the TLog Data Capture Formats section of the Technical
Reference Guide.
Ensure that the ‘Period Type’ option in Configurator is set to Daily (Transactions > Inventory >
General Parameters > General tab). Any other setting will not support the upload feature.
Upon configuration, the inventory upload feature is launched in Store Manager.
Note: It is not recommended to run this function while the store is open as it may use considerable
processing resources to produce the upload file.
237
Performing Inventory Control Functions
To launch an upload of inventory information to the head office:
238
1.
On the Main Menu window, click Administration.
2.
Click Export File. The Export File Menu window appears.
3.
Click Upload.
4.
Enter the information required to launch the upload process:
From Date — Enter the first date for the inventory report.
To Date — Enter the last date for the inventory report.
Identifier — Enter an identifier for the inventory report. The length of the identifier field
must not exceed 4 characters. This value and the store number produce a sequence number to
identify the inventory report.
File Location — The drive and directory path of output file. This information is optional. If
not specified, the default directory is the Xpress Server upload directory.
Viewing inventory information
5.
Click Upload. The process begins. A window showing the process elapsed time is displayed.
239
Performing Inventory Control Functions
Performing a physical inventory count
You can use the Store Manager to print count sheets that can help you perform inventory counts.
Once you complete an inventory count, you can compare the actual quantities to the on-hand
quantities in the Store Manager and perform manual adjustments to on-hand quantities as necessary.
For information about adjusting on-hand quantities after a count, see “Adjusting the on-hand
quantities after a count” on page 243.
Printing a count sheet
An inventory count sheet is a list of PLUs, descriptions, and blank fields. The store staff can use the
sheets to record the quantity of each item as they perform inventory counts. You can enter criteria to
determine the PLUs that are included on the count sheet. The count sheets do not include the
expected on-hand quantity of the items.
To generate a count sheet:
240
1.
On the Main Menu window, click Inventory.
2.
Click Count Sheet.
3.
Enter the criteria for the count sheet into the fields. Different data entry fields are displayed
depending on the product group parameter selected.
Product Hierarchy
PLU Range
Primary Vendor
User Flag 1
Shelf Location Range — If you have set parameters to display the shelf location on the count
sheet in the Configurator (Transactions > Inventory > General Parameters > Physical
Inventory/Adjustment) you can provide the shelf location range here.
Performing a physical inventory count
4.
Click Generate Sheet. The Inventory Count Sheet is generated and displayed on your screen.
5.
Click Print. The Store Manager prints the count sheet on the printer defined as the default printer.
Parameters which control display of the On Hand Inventory count and Shelf Location are set in
the Configurator (Transactions > Inventory > General Parameters > Physical Inventory/
Adjustment). If the parameters are not set, these headings will not be displayed.
The following is an example of the Inventory Count Sheet showing the Shelf Location. You can
click ‘Shelf Location’ header to sort the inventory items by shelf location (then by PLU). For
information on maintaining the shelf location codes, see “Maintaining inventory shelf location
codes” on page 242.
241
Performing Inventory Control Functions
The following is an example of the Inventory Count Sheet showing the Quantity On Hand for a
PLU item.
Tip: To enter new criteria for the count sheet, click Search Mode on the count
sheet. You return to the Count Sheet window.
Maintaining inventory shelf location codes
This feature allows you to define the shelf location codes for the Inventory Count Sheet.
To maintain the inventory shelf location codes:
1.
242
On the Main Menu window, click Inventory.
Adjusting on-hand inventory quantities
2.
Click Shelf Location Maintenance. The Shelf Location Maintenance window appears.
3.
Enter the required shelf location codes for each PLU item. Location codes can have a maximum
of six digits.
4.
Click Save and then click Exit.
Adjusting on-hand inventory quantities
You can perform manual adjustments of the on-hand quantities of items to correct discrepancies
found as the result of inventory counts, or to account for items shipped or received into the store by
the case.
The Store Manager has two windows where you can adjust inventory quantities:
Physical Inventory Maintenance: Used after you perform an inventory count.
Inventory Adjustment: Used to adjust inventory quantities at any time.
Adjusting the on-hand quantities after a count
After you generate a count sheet and use it to perform an inventory count, you can use the Physical
Inventory Maintenance window to check the actual counts against the Store Manager’s on-hand
quantities. You can adjust the on-hand quantities in the Store Manager to match the actual quantities in
your store, if required.
For each inventory count you perform, you can create and save a list of PLUs. You create inventory
count PLU lists using the Physical Inventory Define window. You can open each PLU list and adjust
on-hand quantities in the Physical Inventory Maintenance window.
243
Performing Inventory Control Functions
Creating an inventory count PLU list
If you use a count sheet to help you with your inventory, you can choose the same criteria in the
Physical Inventory Define window so that the PLU list matches the items you counted.
Once you create a PLU list, you can open it and adjust the on-hand quantities of the items in it. For
information about making the adjustment to on-hand inventories, see “Entering new on-hand
quantities” on page 244.
In the following steps, you must enter information into the Physical Inventory Define window.
To create a PLU list:
1.
On the Main Menu window, click Inventory.
2.
Click Physical Inventory.
3.
Click New.
4.
Enter the criteria for the PLU list into the fields.
5.
Click Generate Transaction. The Physical Inventory Maintenance window displays the PLU list.
6.
Click Save.
Entering new on-hand quantities
Once you create a PLU list, you can open it and adjust the on-hand quantities of the items in it. For
information about creating a PLU list, see “Creating an inventory count PLU list” on page 244.
The Physical Inventory Maintenance window displays the expected on-hand quantities of each item in
the PLU list. You can compare these amounts to the actual amount you count in your store. The
on-hand quantities in the Store Manager are not updated until you complete the adjustment
transaction.
To enter new on-hand quantities:
244
1.
On the Main Menu window, click Inventory.
2.
Click Physical Inventory.
3.
Click Display All. All of the count PLU lists are displayed.
Adjusting on-hand inventory quantities
4.
Click the list you want to open, and then click Open. The Physical Inventory Maintenance
window appears with the PLU list displayed.
5.
Complete the fields in the top portion of the Physical Inventory Maintenance window.
6.
In the Quantity field, type the actual quantity of the items.
7.
Click Complete. The on-hand inventory amounts in the Store Manager are changed.
Tip: You can add items to the PLU list after it has been generated by clicking New in the Physical
Inventory Maintenance window.
Physical Inventory Maintenance window
This window contains the fields used for adjusting on-hand inventory quantities after a count.
The following table contains descriptions of fields in the Physical Inventory Maintenance window:
Field
Description
Txn Number
This field defines the unique number that identifies the inventory transaction. The
inventory transaction number sequence is also used for purchase orders, receiving
transactions, and transfers.
No action required. The Store Manager automatically completes this field with a
number when you click Save.
Status
This field indicates the current status of the transaction.
No action required. The Store Manager automatically completes this field.
Txn. Date
This field defines the date the inventory transaction is created. The transaction date
can differ from the inventory date.
No action required. The Store Manager completes this field with the computer’s
system date on which the Store Manager is running.
245
Performing Inventory Control Functions
Field
Description
Doc. Number
This field defines the unique number that identifies the transaction.
You can modify the document number if you click Modify PO/Doc Number in
the Inventory Parameters Maintenance window.
The Store Manager automatically completes this field, but you can edit the
information in it.
Type a number into the field.
Inv. Bucket
This field shows the bucket in which the inventory item is assigned to.
No action required. The Store Manager completes this field.
Reason
This field defines the reason the inventory count is being performed.
You must complete this drop-down list if you click Physical Inventory Reason
Required in the Inventory Parameters Maintenance window.
You can define the selection of reasons that appear in this drop-down list in the
Code Table Maintenance window.
Click the drop-down list and select a reason from the list.
Department
This field defines the department to which the items in the list belong. This
department field is not related to the Department table that you define as part of the
product hierarchy.
Type an alphanumeric string, up to 14 characters long, into the field.
Location
This field defines the location of the items in the store.
You can define the selection of locations that appear in this drop-down list in the
Code Table Maintenance window.
Click the drop-down list and select a location from the list.
Inv. Date
This field defines the inventory count date.
The Store Manager automatically completes this field, but you can edit the
information in it.
Click the button beside the field to open the pop-up calendar window. Click a date
and click OK.
Alternatively, type a date into the field.
Required by
This field represents the date by which the physical inventory count must be
completed.
Click the button beside the field to open the pop-up calendar window. Click a date
and click OK.
Alternatively, type a date into the field.
Note
This field defines any notes regarding the transaction. You can enter any information
about the adjustment up to 20 characters. This information is displayed in the
Inventory Adjustment Report.
Origin
This field indicates the origin of the transaction (electronic document, manual).
No action required. The Store Manager automatically completes this field.
246
Adjusting on-hand inventory quantities
Field
Description
PLU/XREF
This field defines the unique number that identifies the item.
Type a number into the field.
Description
This field defines the item’s description.
No action required. The Store Manager automatically completes this field.
Retail Price
This field indicates the item’s retail price.
You define the retail price in the Retail Price field in the PLU Page 1 tab of the PLU
Maintenance window.
No action required. The Store Manager automatically completes this field.
Qty. Actual
This field defines the quantity of the item you actually count in your store.
Type a number into the field.
Qty. Current
This field defines the quantity of the item the Store Manager expects to be in the
store.
No action required. The Store Manager automatically completes this field.
Qty. Variance
This field defines the difference between the quantity on-hand that the Store
Manager expects, and the quantity that you actually count in your store.
The variance is based on the values in the Quantity and Amount fields in this
window.
No action required. The Store Manager automatically completes this field.
Extended Variance
This field defines the total retail price of the number of items in the variance.
The amount is based on the values in the Retail and the Variance fields in this
window.
No action required. The Store Manager completes this field.
Report
This field generates the Physical Inventory Count Sheet and the Physical Inventory
reports.
The Physical Inventory Count Sheet report contains the same list of PLUs as shown
in the Physical Inventory Maintenance window.
You can generate the Physical Inventory report by clicking View Physical
Inventory Report on the Report window. The Physical Inventory report contains
the information displayed in the Physical Inventory Maintenance window.
You can use the report template designer to alter the appearance and layout of both
the reports.
Click the button.
Inventory Information
This field opens the Inventory Information window. The window contains
information about the item in the transaction line that you highlighted. The item in
the highlighted line must be inventory controlled.
For more information about the Inventory Information window, see “Viewing
inventory information” on page 234.
Click the button.
247
Performing Inventory Control Functions
Field
Description
Complete
This field completes the transaction and implements the changes to the on-hand
quantities of the items. To modify the on-hand quantity of an item after you
complete the transaction, you must create a new transaction. The transaction’s status
is complete.
Click the button.
New
This field adds a blank line to the bottom of the list of selections that you can use to
add a PLU to the PLU list.
Click the button.
Adjusting the on-hand inventory quantities
You can adjust the on-hand inventory quantities of an inventory controlled item at any time to correct
a discrepancy between the actual quantity you have in your store and the on-hand quantity in the Store
Manager.
You must perform a manual adjustment for items that are shipped from your store in transfers by the
case, and for items that you receive into your store through receiving or transfers by the case. The items
that are transferred or received by the case are not identified by PLU or vendor’s SKU in the inventory
transaction. The Store Manager cannot reflect their movement.
An item is inventory controlled if you click (√) Inventory Control in the PLU Maintenance window.
Each completed adjustment transaction appears in the Inventory Adjustment Report. Store Manager
tracks each adjustment transaction with a sequence number. consisting of a Tlog-generated transaction
number and register number The register number always appears as ‘255’ (for Store Manager.)
In the following steps, you must enter information and make selections in the Inventory Adjustment
window. For information about the fields in the window, see “Inventory Adjustment window” on
page 249.
To adjust the on-hand inventory quantity of an item:
1.
On the Main Menu window, click Inventory.
2.
Click Inventory Adjustment.
3.
Complete the fields in the Inventory Adjustment window as appropriate.
4.
Click Save, and then click Exit.
Tip: To adjust the on-hand inventory for another item immediately, click New
in the Inventory Adjustment window.
248
Adjusting on-hand inventory quantities
Inventory Adjustment window
This window contains the fields used for adjusting inventory quantities.
The following table contains description of the fields in the Inventory Adjustment window:
Field
Description
Adj. Type
This field allows you to select the type of inventory change that you want to make.
Click the drop-down list and select either Gain, Loss, or Set Quantity.
The type of adjustment you choose determines how the Store Manager calculates the
new on-hand quantity. For example, if you select “Gain” from this drop-down list,
the new quantity of the item is determined by adding to the current on-hand.
Bucket
Reason
This field defines the reason you are performing the adjustment to the item’s
on-hand quantity.
You can define the selection of reasons that appear in this drop-down list.
Click the drop-down list and select a reason from the list.
Note
This field is for information that is relevant to this item’s inventory adjustment.
Anything you enter is displayed on the report.
Item
This field defines the unique number that represents the item whose inventory you
want to adjust.
Type a PLU number or cross reference number into the field.
PLU
This field displays the PLU number and description of the item.
Quantity
This is the adjustment quantity. Type a number that represents the quantity to be
added, subtracted, or moved.
In Stock Quantity
Before
This field contains the current inventory amount for the item.
No action required. The Store Manager automatically completes this field.
Available Quantity
Before
249
Performing Inventory Control Functions
Field
Description
In Stock Quantity
After
This field contains the new inventory quantity for the item.
The new quantity is determined by your selection in the Adj. Type drop-down list
and the Qty Before field.
No action required. The Store Manager automatically completes this field.
Available Quantity
After
Complete
Click Complete to complete the adjustment. The Qty. After fields are automatically
filled in with the appropriate quantities.
Inventory Information
This field opens the Inventory Information window. The window contains
information about the item.
For more information about the Inventory Information window, see “Viewing
inventory information” on page 234.
Click the button.
Controlling inventory packages
The X-Reference window shown below allows you to define a cross reference as a package or a case
instead of just a single item. If you sell 1 or 2 of the X-Reference items, then you are selling 1 or 2
packages.
When a cashier scans the item at the POS, the quantity will automatically display and the price will be
calculated accordingly. In the example below, the cashier does not have to specify a quantity of tennis
balls because the quantity is already configured for 12 per package unless the customer is purchasing
more than 1 package.
To access the X-Reference window:
250
1.
On the Main Menu window, click PLU Management.
2.
Click PLU X-Reference.
3.
Click New to create a new cross reference or click Display All to Open an existing one.
Adjusting on-hand inventory quantities
To set the quantity of an item to a package or case:
1.
Complete the X-Reference and PLU fields, and the Capture PLU checkbox. For information on
cross references, see “Adding a cross reference” on page 169.
2.
To set the number of items that make up a package, type the number in the Package Quantity
field.
3.
The type of package can be anything you want, for example a case, package, or bundle. To define
the type of package, click the Package Type drop-down list. The type of package is configured in
Code Maintenance in the Configurator and through the ID/Codes File Maintenance option in the
Store Manager.
About controlled inventory transport permits
Transport permits are required for controlled substances such as alcohol. If a purchase is more than a
specified amount, then the shipment must be accompanied by a transport permit. To configure the
parameters that initiate a printed a inventory transport permit, see “Adding a PLU” on page 143
251
Performing Inventory Control Functions
252
Printing Shelf Labels and
Stickers
This section provides information about configuring the Store Manager to print price stickers and shelf
labels. It also gives procedures for designing and printing your own custom stickers and labels.
This section covers the following topics:
Configuring sticker and label parameters
Printing price stickers
Printing shelf labels
Designing and printing stickers and labels
Configuring sticker and label parameters
Before you can begin printing price stickers and shelf labels from the Store Manager, you must
configure the sticker and label options. Options include the default sticker and label format, whether
custom stickers and labels are allowed, and the path for the print files and printing program.
Defining system parameters
Before you can print price stickers and shelf labels you must define the printer to be used, and the path
to the print files and print programs.
In the following steps, you must enter information into the Label Parameter Details Maintenance
window. For information about the fields in the window, see “Label Parameter Details Maintenance
window” on page 254.
To define system parameters:
1.
On the Main Menu window, click Parameters Setup.
2.
Click Labels Maintenance.
3.
Click either Price Stickers or Shelf Labels.
4.
Click Label Parameter Details.
5.
Complete the fields in the Label Parameter Details Maintenance window as appropriate.
6.
Click Save, and then click Exit.
253
Printing Shelf Labels and Stickers
Label Parameter Details Maintenance window
This window contains the fields used for configuring the print options for stickers and labels.
The table contains descriptions of the fields in the Label Parameter Details Maintenance window:
Field
Description
Printer Name
This field defines the path and the name of the printer where the stickers or labels
are printed.
You can use the Label Type drop-down list to define whether you are configuring
options for labels or stickers.
Action: Type the printer’s path and name, up to 30 characters long, into the field.
Working directory
This field defines the path where the print program you define in the Program Path
field in this window, looks for the print file as it prepares to print the stickers or
labels.
You can define whether you are configuring options for labels or stickers, using the
Label Type drop-down list in this window.
Action: Type the path for the print file, up to 30 characters long, into the field.
Program Path
This field defines the path and executable name of the print program. Note that the
print application is not supplied by Triversity Inc.
You can define whether you are configuring options for labels or stickers, using the
Label Type drop-down list in this window.
Action: Type the path and name of the print program, up to 30 characters long, into
the field.
Label Type
This field defines the type of label (price sticker or shelf label) that is printed using
the options you are defining.
Action: Click the drop-down list and select a label type from the list.
254
Configuring sticker and label parameters
Creating label and sticker formats
When you design a format for a price sticker or shelf label, you define the information that is included
on it. You cannot define where the information is printed on the sticker or label as part of the format.
You can define several formats and you can choose the format you want to use when you print stickers
or labels.
To add or modify a label or sticker format record, you must enter information into the Format ID
Maintenance window.
In the following steps you are required to enter information into the Format ID Maintenance window.
For more information about choosing formats when you print stickers or labels, see “Creating a price
sticker queue” on page 261 and “Creating a shelf label queue” on page 264.
To create a format:
1.
On the Main Menu window, click Parameters Setup.
2.
Click Label Parameters.
3.
Click Standard Labels Formats.
4.
Click New.
5.
Complete the fields in the Standard Labels Format window as appropriate.
6.
Click Save, and then click Exit.
255
Printing Shelf Labels and Stickers
Modifying a label and sticker format
You can modify a format for a price sticker or shelf label.
To modify a format:
1.
On the Main Menu window, click Parameters Setup. The Parameters Menu window appears.
2.
Click Label Parameters.
3.
Click Display All. The existing formats are displayed in the window.
4.
Click the format you want to modify, and then click Open.
5.
Change the fields in the window, as appropriate.
6.
Click Save, and then click Exit.
Deleting a label and sticker format
You should not delete a format if it is assigned to a PLU.
To delete a format:
256
1.
On the Main Menu window, click Parameters Setup.
2.
Click Label Parameters.
3.
Click Standards Labels Format.
4.
Click Display All.
5.
Click the format you want to delete, and then click Delete. A dialog box appears asking you to
confirm the deletion.
6.
Click OK.
Configuring sticker and label parameters
Standard Labels Format Maintenance window
This window contains the fields used for defining what information is entered into the file that is used
by the application to print the labels.
The following table contains descriptions of the fields in the Standard Labels Format Maintenance
window:
Field
Description
Format ID
This field defines the unique number that identifies the format.
Action: No action required. The Store Manager automatically completes this field
with the next available number.
Label Type
This field defines the type of label (sticker or shelf label) that can use the format.
Action: Click the drop-down list and select a label type from the list.
Description
This field defines the description of the format.
Action: Type an alphanumeric description, up to 40 characters long, into the field.
PLU Number
This field determines if the PLU is printed on the sticker or label that uses this
format.
Action: Click (√) the checkbox to include the PLU in the format
PLU Description
This field determines if the PLU’s description is printed on the sticker or label that
uses this format.
Action: Click (√) the checkbox to include the description in the format.
Price
This field determines if the PLU’s price is printed on the sticker or label that uses
this format.
Action: Click (√) the checkbox to include the price in the format.
Date Code
This field determines if the date code is printed on the sticker or label that uses this
format.
Action: Click (√) the checkbox to include the date code in the format.
257
Printing Shelf Labels and Stickers
Field
Description
Vendor/SKU
This field determines if the vendor’s SKU is printed on the sticker or label that uses
this format. For information about setting up vendor’s SKUs, see “Setting up
product vendors” on page 84.
Action: Click (√) the checkbox to include the vendor’s SKU in the format.
Vendor Name
This field determines if the vendor’s name is printed on the sticker or label that uses
this format.
Action: Click (√) the checkbox to include the vendor’s name in the format.
Vendor ID
This field determines if the vendor’s unique ID number is printed on the sticker or
label that uses this format.
Action: Click (√) the checkbox to include the vendor’s ID number in the format.
Dept. Name
This field determines if the name of the department the item belongs to, is printed
on the sticker or label that uses this format.
Action: Click (√) the checkbox to include the department’s name in the format.
Dept. Number
This field determines if the unique number that identifies the department to which
the item belongs, is printed on the sticker or label that uses this format.
Action: Click (√) the checkbox to include the department’s number in the format.
Store Name
This field determines if your store’s name is printed on the sticker or label that uses
this format.
Action: Click (√) the checkbox to include the store’s name in the format.
Store Number
This field determines if your store’s number is printed on the sticker or label that
uses this format.
Action: Click (√) the checkbox to include the store’s number in the format.
258
Configuring sticker and label parameters
Defining sticker and label parameters
You must define the label parameters before you can print stickers or labels.
Before you can define label parameters, you must have defined the sticker and label formats you want
to use as the defaults.
In the following steps, you must enter information into the Label Parameters Maintenance window.
For information about the fields in the window, see “General Label Parameters Maintenance window”
on page 259.
To define sticker and label parameters:
1.
On the Main Menu window, click Parameters Setup.
2.
Click Label Maintenance.
3.
Click Label Parameters.
4.
Complete the fields in the window as appropriate.
5.
Click Save, and then click Exit.
General Label Parameters Maintenance window
This window contains the fields used for configuring price sticker and shelf label parameters.
The following table contains descriptions of the fields in the Label Parameters window:
Field
Description
Allow Price Label
Design in Back Office
This field determines if you can design your own price stickers and shelf labels using
the Store Manager.
If you enable this option, you can design your own custom shelf labels. For
information about designing shelf labels, see “Designing a new sticker or label” on
page 274.
Action: Click (√) the checkbox to allow shelf labels to be designed.
Allow Price Sticker
Label Creation
This field determines if you can print price stickers using the Store Manager.
Action: Click (√) the checkbox to allow price stickers to be printed.
259
Printing Shelf Labels and Stickers
Field
Description
Allow Shelf Label
Creation
This field determines if you can print shelf labels using the Store Manager.
Create Different
Queue for Each
Format ID
This field determines if the stickers and labels using different formats are each
placed in a different print queue.
Default format ID for
price sticker
This field defines the default format for price stickers.
Action: Click (√) the checkbox to allow shelf labels to be printed.
Action: Click (√) the checkbox to place stickers and labels with different format IDs
into different print queues.
For information about defining format IDs, see “Creating label and sticker formats”
on page 255.
Action: Click the drop-down list and select a format from the list.
Default format ID for
shelf label
This field defines the default format for shelf labels.
For information about defining format IDs, see “Creating label and sticker formats”
on page 255.
Action: Click the drop-down list and select a format from the list.
UPC By Cross Ref.
Num.
This field determines if the item’s cross reference number is used instead of the
PLU on labels and stickers.
Action: Click (√) the checkbox to use the cross reference number instead of the
PLU.
260
Printing price stickers
Printing price stickers
When you want to print price stickers, you create a queue (list) of PLUs, quantities, and formats; then
you print the queue. You can create several queues. When you print a queue, the Store Manager writes
the stickers information in the order in which you placed them in the queue.
WARNING! You can only print price stickers if you click (√) Allow Price Sticker Label Creation in
the Label Parameters Maintenance window. For information about the fields in the Label Parameters
Maintenance window, see“General Label Parameters Maintenance window” on page 259.
You can only create a price sticker queue after you define format IDs. Formats define the information
that is printed on the stickers. When you print price stickers, you can either use the default format for
the item, or you can use another format. The default format for each item is defined in the Labels tab
of the PLU Maintenance window. For information about defining price sticker formats, see “Creating
label and sticker formats” on page 255.
Creating a price sticker queue
Once you define a queue of price stickers, you can print it immediately or save it and print it later. For
information about printing the price stickers, see “Printing a price sticker queue” on page 263.
In the following steps, you must enter information into the Print Queue Maintenance window. For
information about the fields in the window, see “Print Queue Maintenance window” on page 267.
To create a queue of price stickers:
1.
On the Main Menu window, click Labels Maintenance.
2.
Click Price Stickers. The Print Queue Selection window appears.
3.
Click New. The Print Queue Maintenance window appears.
4.
Complete the fields in the window as appropriate. Click New to add blank entry lines.
5.
Click Save.
261
Printing Shelf Labels and Stickers
Tip: You can also add items to a queue by clicking Price Label on the Labels
tab of the PLU Maintenance window.
Modifying a price sticker queue
You can modify the information for price stickers in a queue. You can add or remove PLUs, change
the quantities of stickers to print, and change the formats used to print the stickers.
In the following steps, you must enter information into the Print Queue Maintenance window. For
information about the fields in the window, see “Print Queue Maintenance window” on page 267.
To modify a queue of price stickers:
1.
On the Main Menu window, click Labels Maintenance.
2.
Click Price Stickers.
3.
Click Display All. All the price sticker print queues are displayed.
4.
Click the queue you want to modify, and then click Open.
5.
Change the fields in the window, as appropriate.
6.
Click Save.
Tip: To delete an item from a queue, select the item and click Delete in the
Print Queue Maintenance window.
Deleting a price sticker queue
You can delete a price sticker queue.
To delete a queue of price stickers:
262
1.
On the Main Menu window, click Parameters Setup.
2.
Click Label Parameters. The Print Queue Selection window appears.
Printing price stickers
3.
Click Display All. All the price sticker print queues are displayed.
4.
Click the queue you want to delete, and then click Delete. A dialog box appears, prompting you to
confirm the deletion.
5.
Click OK. The price sticker queue is deleted.
Printing a price sticker queue
After you create a queue of price stickers, you can print it. You can either print the stickers immediately
after you create the queue, or you can print a saved queue.
The steps in this section describe how to print stickers in a queue you created earlier and saved.
To print price stickers:
1.
On the Main Menu window, click Labels Maintenance.
2.
Click Price Stickers.
263
Printing Shelf Labels and Stickers
3.
Click Display All.
4.
Click the queue you want to print, and then click Open.
5.
Click Print. A dialog box appears, prompting you to confirm printing.
6.
Click OK.
Printing shelf labels
When you want to print shelf labels, you create a queue (list) of PLUs, quantities, and formats; then
you print the queue. You can create several queues. When you print a queue, the Store Manager writes
the labels information in the order in which you placed them in the queue.
WARNING! You can only print shelf labels if you click (√) Allow Shelf Label Creation in the Label
Parameters Maintenance window. For information about the fields in the Label Parameters
Maintenance window, see “General Label Parameters Maintenance window” on page 259.
You can only create a shelf label queue after you define format IDs. Formats define the information
that is printed on the labels. When you print shelf labels, you can either use the default format for the
item, or you can use another format. The default format for each item is defined in the Labels tab of
the PLU Maintenance window. For information about defining shelf label formats, see “Creating label
and sticker formats” on page 255.
Creating a shelf label queue
Once you define a queue of shelf labels, you can print it immediately or save it and print it later. For
information about printing the shelf labels, see “Printing a shelf label queue” on page 266.
In the following steps, you must enter information into the Print Queue Maintenance window. For
information about the fields in the window, see “Print Queue Maintenance window” on page 267.
To create a queue of shelf labels:
1.
264
On the Main Menu window, click Labels Maintenance.
Printing shelf labels
2.
Click Shelf Labels.
3.
Click New.
4.
Complete the fields in the window as appropriate. Click New to add blank entry lines.
5.
Click Save.
Tip: You can also add items to a queue by clicking Shelf Label on the Labels
tab of the PLU Maintenance window.
Modifying a shelf label queue
You can modify the information for shelf labels in a queue. You can add or remove PLUs, change the
quantities of labels to print, and change the formats used to print the labels.
In the following steps, you must enter information into the Print Queue Maintenance window. For
information about the fields in the window, see “Print Queue Maintenance window” on page 267.
To modify a queue of shelf labels:
1.
On the Main Menu window, click Labels Maintenance. The Labels Menu window appears.
2.
Click Shelf Labels.
3.
Click Display All. All the shelf label print queues are displayed.
4.
Click the queue you want to modify, and then click Open.
5.
Change the fields in the window, as appropriate.
6.
Click Save.
Tip: To delete an item from a queue, select the item and click Delete in the
Print Queue Maintenance window.
265
Printing Shelf Labels and Stickers
Deleting a shelf label queue
You can delete a shelf label queue.
To delete a queue of shelf labels:
1.
On the Main Menu window, click Labels Maintenance.
2.
Click Shelf Labels.
3.
Click Display All.
4.
Click the queue you want to delete, and then click Delete. A dialog box appears, prompting you to
confirm the deletion.
5.
Click OK. The shelf label queue is deleted.
Printing a shelf label queue
After you create a queue of shelf labels, you can print it. You can either print the stickers immediately
after you create the queue or you can print a saved queue.
The steps in this section describe how to print stickers in a queue you created earlier and saved.
To print shelf labels:
266
1.
On the Main Menu window, click Labels Maintenance.
2.
Click Shelf Labels.
Printing shelf labels
3.
Click Display All.
4.
Click the queue you want to print, and then click Open.
5.
Click Print. A dialog box appears, prompting you to confirm printing.
6.
Click OK.
Print Queue Maintenance window
This window contains the fields for creating price sticker and shelf label print queues, and for printing
the queues.
267
Printing Shelf Labels and Stickers
The following table contains descriptions of the fields in the Print Queue Maintenance window:
Field
Description
Queue ID
This field defines the unique number that identifies the sticker or label queue.
Action: No action required. The Store Manager automatically completes this field
with the next available number.
Label Type
This field indicates whether you are defining a price sticker or a shelf label queue.
Action: None required. If you click Price Stickers in the Label Menu window, the
Store Manager enters “Price” into this field. If you click Shelf Labels in the Label
Menu window, the Store Manager enters “Shelf ” into this field.
Description
This field defines the description of the queue.
Action: Type an alphanumeric description, up to 40 characters long, into the field.
Default of Each PLU
This field determines whether the stickers or labels in the queue are printed using
the format you selected for each item in the Labels tab of the PLU Maintenance
window.
A format defines the information that is printed on the sticker or label. For example,
it defines if the vendor’s name is included. For information about defining formats
for stickers or labels, see “Creating label and sticker formats” on page 255.
If you want to individually select a format for each sticker or label in the queue, click
Current Format ID in this window.
Action: Click the radio button.
Current Format ID
This field determines that the stickers or labels in the queue are printed using the
format you select in the Current Format ID field, in this window.
A format defines the information that is printed on the sticker or label. For example,
it defines if the vendor’s name is included. For information about defining formats
for stickers or labels, see “Creating label and sticker formats” on page 255.
If you want to use the format ID you defined for each item in the Labels tab of the
PLU Maintenance window, click Default of Each PLU in this window.
Action: Click the radio button.
Item
This field defines the PLU in the queue.
Action: Click the drop-down list and select a PLU from the list.
Quantity
This field defines the number of stickers or labels to print.
Action: Type a number into the field.
Current Format ID
This field defines the format used to print the stickers or labels.
This field is only active if you click Current Format ID in this window. If you do
not click the radio button, this field displays the ID number of the format you
defined for the item in the Labels tab of the PLU Maintenance window.
For information about defining formats for stickers or labels, see “Creating label
and sticker formats” on page 255.
Action: Click the drop-down list and select a format from the list.
Print
This field sends the queue to the printer.
Action: Click the button.
268
Designing and printing stickers and labels
Field
Description
New
This field adds a blank entry line to the queue.
Action: Click the button.
Delete
This field deletes an item from the queue.
Action: Click the button.
Designing and printing stickers and labels
You can design custom price stickers and shelf labels that you can print using a standard printer. You
must first define a sticker or label type, then define the information and how it will appear on the
sticker or label type.
WARNING! You can only design custom price stickers and shelf labels if you click (√) Allow Price
Label Design in Back Office in the Label Parameters Maintenance window. For information about
the fields in the Label Parameters Maintenance window, see “General Label Parameters Maintenance
window” on page 259.
Creating new types of stickers and labels
You can design a new type of price sticker or shelf label by defining its size, shape, and the margins that
determine its printable area.
Once you have created a new type of sticker or label, you can define the information and how it
appears. For information about defining the contents of the sticker or label, see “Designing a new
sticker or label” on page 274.
To add or modify a sticker or label type record, you must enter information into the Design Label
Definition window. For information about the fields in the window, see “Design Label Definition
window” on page 272.
Adding a new type of sticker or label
You can create ne w types of s tickers or labels.
In the following steps, you must enter information into the Design Label Definition window. For
information about the fields in the window, see “Design Label Definition window” on page 272.
To create a new sticker or label type:
1.
On the Main Menu window, click Parameters Setup.
2.
Click Label Parameters.
269
Printing Shelf Labels and Stickers
3.
Click Designed Labels Layout Definition.
4.
Click New.
5.
Complete the fields in the window, as appropriate.
6.
Click Save, and then click Exit button.
Modifying a sticker or label type
You can modify the characteristics of a sticker or label type you define.
In the following steps, you must enter information into the Design Label Definition window. For
information about the fields in the window, see “Design Label Definition window” on page 272.
To modify a sticker or label type:
1.
On the Main Menu window, click Parameters Setup.
2.
Click Label Parameters.
3.
Click Designed Labels Layout Definition.
4.
Click Display All. All of the sticker and label types are displayed.
5.
Click the sticker or label type you want to modify, and then click Open.
6.
Change the fields in the window, as appropriate.
7.
Click Save, and then click Exit.
Deleting a sticker or label type
You can delete a sticker or label type you define.
270
Designing and printing stickers and labels
To delete a sticker or label type:
1.
On the Main Menu window, click Parameters Setup.
2.
Click Label Maintenance.
3.
Click Designed Label Definitions.
4.
Click Display All.
5.
Click the sticker or label type you want to delete, and then click Delete. A dialog box appears,
prompting you to confirm the deletion.
6.
Click OK. The sticker or label type is deleted.
271
Printing Shelf Labels and Stickers
Design Label Definition window
This window contains the fields used for defining the size and page position of a custom price sticker
or shelf label. The field descriptions follow.
The following table contains descriptions of the fields in the Design Label Definition window:
Field
Description
Label Number
This field defines the unique number that identifies the sticker or label type.
Action: Type a number into the field.
Description
This field defines the description of the sticker or label type.
Action: Type an alphanumeric description, up to 40 characters long, into the field.
Width
This field defines the width of the sticker or label, in inches.
Action: Type a number, with up to 3 decimal places, into the field.
Height
This field defines the height of the sticker or label in inches.
Action: Type a number, with up to 3 decimal places, into the field.
Sheet
This field determines if the sticker or label paper is in sheets or if it is continuous
feed paper.
Action: Click (√) the checkbox to sheet feed the sticker or label paper.
Columns
This field defines how many columns of stickers or labels are on a sheet.
Use the Column Space field, in this window, to define how far apart columns are.
Action: Type a number into the field.
272
Designing and printing stickers and labels
Field
Description
Column Space
This field defines how far apart, in inches, the columns of stickers or labels are on a
sheet.
Use the Columns field, in this window, to define how many columns are on a sheet.
Action: Type a number, with up to 3 decimal places, into the field.
Top Down
This field determines if the stickers or labels are printed from the top to the bottom
of the sheet, or if they are printed across the sheet.
Action: Click (√) the checkbox to print the labels from the top to the bottom of the
sheet.
Rows
This field defines how many rows of stickers or labels are on a sheet.
Use the Row Space field, in this window to define how far apart the rows are.
Action: Type a number into the field.
Row Space
This field defines how far apart, in inches, the rows of stickers or labels are.
Use the Rows field to define how many rows are on a sheet.
Action: Type a number, with up to 3 decimal places, into the field.
Shape
This field defines the shape of the sticker or label.
Action: Click the drop-down list and select a shape from the list.
Top Margin
This field defines the height, in inches, of the margin at the top of the sheet before
the first row of stickers or labels.
Use this field in conjunction with the Margin Bottom, Margin Left, and Margin
Right fields in this window.
Action: Type a number, with up to 3 decimal places, into the field.
Bottom Margin
This field defines the height, in inches, of the distance from the bottom edge of the
sheet and the last row of stickers or labels.
Use this field in conjunction with the Margin Top, Margin Left, and Margin
Right fields, in this window.
Action: Type a number, with up to 3 decimal places, into the field.
Left Margin
This field defines the width, in inches, of the distance between the left edge of the
sheet and the first column of stickers or labels.
Use this field in conjunction with the Margin Top, Margin Bottom, and Margin
Right fields, in this window.
Action: Type a number, with up to 3 decimal places, into the field.
Right Margin
This field defines the width, in inches, of the distance between the right edge of the
sheet and the last column of stickers or labels.
Use this field in conjunction with the Margin Top, Margin Bottom, and Margin
Left fields, in this window.
Action: Type a number, with up to 3 decimal places, into the field.
273
Printing Shelf Labels and Stickers
Field
Description
Ellipse Height
This field defines the vertical radius, in inches, of the sticker or label.
You only need to use this option if you select oval in the Shape drop-down list in
this window.
Action: Type a number, with up to 3 decimal places, into the field.
Ellipse Width
This field defines the horizontal radius, in inches, of the sticker or label.
You only need to use this option if you select oval in the Shape drop-down list in
this window.
Action: Type a number, with up to 3 decimal places, into the field.
Designing a new sticker or label
After you define the sticker or label type you want to use in your custom sticker or label, you must
define the information that appears on it, its location and layout. In addition, you must define the
PLUs you want to print the stickers or labels for.
For information about defining a sticker or label type, see “Creating new types of stickers and labels”
on page 269.
To add or modify a record containing a custom sticker or label design, you must enter information into
the Designed Label Maintenance window. For information about the fields in the window, see “The
Designed Label Maintenance window” on page 278.
Once you have created a design, you can save the stickers or labels for printing later, or you can print
them immediately. For information about printing the stickers or labels, see “The Designed Label
Maintenance window” on page 278.
Creating a new design for a sticker or label
You can create price stickers or shelf labels for items with custom layouts. The stickers and labels you
design are printed on a standard printer.
Tip: If you only want to change the range of PLU numbers that a sticker or label prints, it is more
efficient to modify an existing saved sticker or label design than to create a new one.
Once you have created a design, you can save the stickers or labels for printing later, or you can print
them immediately. For information about printing the stickers or labels, see “The Designed Label
Maintenance window” on page 278.
In the following steps, you must enter information into the Designed Label Maintenance window. For
information about the fields in the window, see “The Designed Label Maintenance window” on
page 278.
To design a sticker or label:
274
1.
On the Main Menu window, click Parameters Setup.
2.
Click Label Parameters.
Designing and printing stickers and labels
3.
Click Designed Labels Definition.
4.
Click New.
5.
Complete the fields in the Designed Label Maintenance window, as appropriate.
6.
Click New to add new entry lines.
7.
Click Save.
Tip: To print the stickers or labels immediately, click Print Label.
Modifying a sticker or label you defined
You can modify a custom sticker or label. If the only change you want to make is the PLU range the
sticker or label prints for, modifying an existing custom sticker or label is easier than creating a new
design.
In the following steps, you must enter information into the Price Tag Maintenance window. For
information about the fields in the window, see “The Designed Label Maintenance window” on
page 278.
To modify a custom sticker or label:
1.
On the Main Menu window, click Parameters Setup.
2.
Click Label Parameters
3.
Click Designed Labels Definition.
4.
Click Display All. All of the custom price stickers or shelf labels are displayed.
5.
Click the sticker or label you want to modify, click Open.
6.
Change the fields in the window, as appropriate.
275
Printing Shelf Labels and Stickers
Note: You must click Save before you can use the fields on the right side of
the Price Tag Maintenance window.
7.
Click Save.
Deleting a sticker or label you defined
You can delete a custom sticker or label.
To delete a sticker or label:
276
1.
On the Main Menu window, click Parameters Setup.
2.
Click Label Parameters
3.
Click Designed Labels Definition.
4.
Click Display All. All of the custom price stickers or shelf labels are displayed.
5.
Click the sticker or label you want to delete, and then click Delete. A dialog box appears,
prompting you to confirm the deletion.
6.
Click OK. The sticker or label design is deleted.
Designing and printing stickers and labels
Printing the stickers or labels you defined
After you create custom stickers or labels, you can print them.
To print stickers or labels you defined:
1.
On the Main Menu window, click Parameters Setup.
2.
Click Label Parameters.
3.
Click Designed Labels Definition.
4.
Click Display All. All of the custom price stickers or shelf labels are displayed.
5.
Click the sticker or label you want to print, and then click Open.
6.
Click Print Label. A dialog box appears, prompting you to confirm printing.
7.
Click OK.
277
Printing Shelf Labels and Stickers
The Designed Label Maintenance window
This window contains the fields used for selecting the information that appears on custom price
stickers or shelf labels, and how the text appears when they are printed.
The following table contains descriptions of the field in the Designed Label Maintenance window:
Field
Description
PLU From/To
These fields define the range of PLUs for which the stickers or labels are printed.
You must click Save to save the sticker or label before you can define the range of
PLUs.
Action: Type a PLU number in the field.
Doc Number
This field defines the electronic document that contains the items the stickers or
labels are printed for.
When you click this radio button, a field appears, replacing PLU From/To.
You must click Save to save the sticker or label before you can define the electronic
document.
Action: Click the radio button and type a document number into the field that
appears.
P.O. Number
This field defines the purchase order that contains the items for which the stickers
or labels are printed.
When you click this radio button, an field appears, replacing the PLU From/To.
You must click Save to save the sticker or label before you can define the purchase
order.
Action: Click the radio button and type a purchase order number into the field that
appears.
278
Designing and printing stickers and labels
Field
Description
Tag Name
This field defines the description of the sticker or label you are designing.
Action: Type an alphanumeric string, up to 40 characters long, into the field.
Layout
This field defines the type of sticker or label you are designing.
For information about creating sticker or label types, see “Creating new types of
stickers and labels” on page 269.
Action: Click the drop-down list and select a type from the list.
Description
This field defines the type of information that is printed on the sticker or label.
Action: Click the drop-down list and select an item from the list. Select user-defined
from the list if you want to print a short, custom text string on the sticker or label.
Type the text string into the Tag Data field.
Tag Data
This field defines the contents of a short string that is printed on the sticker or label.
You must select user-defined in the Description drop-down list, before the text
you type into this field is printed on the sticker or label.
Action: Type an alphanumeric string, up to the width of the box, into the field.
Length
This field defines the maximum length, in inches, of the information you selected in
the Description drop-down list.
Action: Type a number, with up to 3 decimal places, into the field.
Line
This field defines the line on which the information you selected in the Description
drop-down list is printed on the sticker or label.
Action: Type a line number into the field.
Col.
This field defines the column in which the information you selected in the
Description drop-down list begins printing.
Each column is the width of a character space. For example, if you enter 5 into this
field, the information begins printing 5 spaces from the left edge of the sticker or
label.
Action: Type a column number into the field.
Font
This field defines the font that the information you select in the Description
drop-down list is printed in, on the sticker or label.
Action: Click the drop-down list and select a font from the list.
Bold
This field determines if the information you select in the Description drop-down
list is printed in bold weight on the sticker or label.
Action: Click (√) the checkbox to print the information in bold weight.
Italic
This field determines if the information you selected in the Description drop-down
list is printed in italics on the sticker or label.
Action: Click (√) the checkbox to print the information in italics.
Uln
This field determines if the information you selected in the Description drop-down
list is underlined on the sticker or label.
Action: Click (√) the checkbox to underline the information when it is printed on the
sticker or label.
279
Printing Shelf Labels and Stickers
Field
Description
Ft Size
This field determines the size of the font of the information you selected in the
Description drop-down list, is printed on the label or sticker.
Action: Click the drop-down list and select a font size from the list.
Print Label
This field prints the stickers or labels defined in this window.
You must click Save to save the sticker or label before you can print the sticker or
label.
Action: Click the button.
Copies
This field defines how many copies of each sticker or label is printed.
You must click Save to save the sticker or label before you can define the number of
copies.
Action: Type a number into the field.
Show/Hide Sample
This field opens the display window that allows you to preview the stickers or labels
you design before you print them.
Changes you make to the fields in this window are not reflected in the preview until
you click Save to save the sticker or label.
Action: Click the button to toggle between showing and hiding the display window.
New
This field adds a blank entry line, so you can add information to the stickers or
labels.
Action: Click the button.
Delete
This field deletes the entry line that is currently selected.
Action: Click the button.
280
To display a sample of the label, click Show Sample. The Designed Label Maintenance
window displays the following additional information:
Designing and printing stickers and labels
Find PLU/PLU
These fields search for the preview of the sticker or label for a specific PLU.
This field is only visible when the preview is visible.
Action:
1. Click the PLU drop-down list and select a PLU from the list.
2. Click Find PLU.
Zoom
This field changes the magnification of the preview in the display window. The
value you enter into this field represents the percentage of magnification.
For example, if you enter 75 into this field, the Store Manager displays the preview
at 75% of maximum size.
This field is only visible when the preview is visible.
Action: Type a number into the field.
Show Ruler
This field determines if a ruler is visible in the display window. This field is only
visible when the preview is visible.
Action: Click (√) the checkbox to display the ruler in the display area
281
Printing Shelf Labels and Stickers
282
Journals and Journal Files
This section describes the process of opening and reading journal files and log files.
Reading the journal files
All transactions performed at a POS terminal are captured electronically in journal files. You can open
the journal files and view each transaction using the Electronic Journal Viewer. Viewing the journal
electronically allows you to use search functions to find specific transactions, and eliminates bulky
paper journals.
Setting up the electronic journal
You must set up the path information where the electronic journal is saved before you can view journal
files using the Electronic Journal Viewer.
Note that the Electronic Journal Viewer can also be run stand-alone at your head office.
In the following steps, you are required to enter information and make selections in the Electronic
Journal Setup window. For information about the fields in this window, see “Complete the fields in the
Electronic Journal Setup window, as required.” on page 284.
283
Journals and Journal Files
To set up the electronic journal:
1.
On the Main Menu window, click Administration.
2.
Click Electronic Journal.
3.
Click Setup on the Journal Search window.
4.
Complete the fields in the Electronic Journal Setup window, as required.
5.
Type the name and path of the compressed, archived, journals files in the Journal Dir field.
6.
Type the name and path of the current day’s journal files in the Current Day Dir field.
7.
To define the location of the previous day’s journal files, type the name and path of the polling
directory in the Polling Dir field.
8.
To define the text that replaces a signature in the transactions stored in the journal files, type an
alphanumeric string, up to 60 characters long, into the Sigstring field. Signatures are captured
using signature capture devices at the POS terminal.
9.
Type the number of minutes that represents the frequency with which the system looks for journal
files in the polling directory so that it can process them, in the Process Timer field. You define
the polling directory in the Polling Directory field in this window. If you do not want the system
to automatically look for journal files, type a zero (0) in this field.
Note: The Min space req field is not activated in the Store Manager.
284
Reading the journal files
10. Click Save, and then click Close.
Selecting a journal
You must update the Electronic Journal Viewer and open a journal file before you can view the
transactions in it.
Updating the Electronic Journal Viewer
Updating the viewer makes new journal files visible in the Journal Search window so you can select
them. One journal file for each occurrence of the Open Terminal function is located in the folder you
specified in the Current Day Dir field in the Electronic Journal Setup window. You must update the
viewer every time a new journal is added to the Journal Search window.
The update process requires you to run an external application (ejp.exe) from Microsoft Windows
Explorer. You cannot run the program from within the Store Manager unless you set it up as a
third-party application.
Tip: Your head office should automate the ejp.exe to run automatically every night, thereby rendering
this procedure obsolete.
For information about setting up and running third-party applications, see “Adding third-party
application buttons to windows” on page 34.
You do not have to close the Store Manager to update the journal viewer, but you should close the
Electronic Journal Viewer. The following procedure describes the update process that is based on
running the application using Windows Explorer, and having the external application in the default
location. If the file is not in the default location, you can use the Windows Explorer Find utility to
locate it.
Once you have updated the viewer, you can select and open the new journal file. For information about
selecting and opening a journal file, see “Opening a journal file” on page 287.
285
Journals and Journal Files
To update the Electronic Journal Viewer:
286
1.
Open Microsoft Windows explorer. Open the Program Files\Sales Journal viewer folder.
2.
Double-click ejp.exe. The EJProcessor application is launched and begins processing
automatically.
3.
Click Close when processing is finished.
Reading the journal files
Opening a journal file
You can open a journal file if it is visible in the Journal Search window. For a journal to be visible in the
Journal Search window, the directories you specify in the Journal Setup window must contain the
appropriate journal files. For information about the fields in the Electronic Journal Setup window, see
“Complete the fields in the Electronic Journal Setup window, as required.” on page 284. In addition,
you must update the Electronic Journal Viewer each time a new journal file is added to the search
window. For information about updating the viewer, see “Updating the Electronic Journal Viewer” on
page 285.
To select and open a journal file:
1.
On the Main Menu window, click Administration.
2.
Click Electronic Journal. The search window contains entries for each of the journal files in the
folder you defined in the Current Day Dir field in the Electronic Journal Setup window.
3.
Click the journal you want to open, and then click Open. The Journal Search window closes, and
the journal file’s first transaction is displayed in the Electronic Journal Viewer.
Tip: The “Line n of nnn” message in the top right corner of the Electronic
Journal Viewer’s window tells you the approximate location of the visible
transaction in the journal file. For example, “Line 1 of 599” indicates that the
transaction is at the beginning of the journal file.
Searching for transactions in a journal
Once you have opened a journal file, you can view and print the transactions in it. You can scroll
through all the transactions in the file, one at a time, or enter search criteria and search for specific
transactions.
Before you complete the following steps, you must display a journal file in the Electronic Journal
Viewer. For information about the fields in the window, see “The Electronic Journal Viewer” on
page 288.
287
Journals and Journal Files
To search for transactions:
1.
Click and drag the scrolling bar in the middle of the Electronic Journal Viewer to the top of the
window to display the first transaction in the journal. The first transaction in the journal file is
displayed.
2.
Use the Search fields on the right side of the viewer’s window to define the criteria for the search.
3.
Click Search. The viewer begins searching for transactions that meet the criteria. When the search
is complete, the first matching transaction is displayed.
Note: The viewer searches the journal file up to the beginning of the file, or
down to the end of the file from the transaction currently displayed in the
viewer, and stops. If the viewer searches down from a transaction in the middle
of the file to the end, it will not automatically resume searching from the
beginning of the file to the middle.
4.
Click the arrow buttons on the scroll bar to scroll from transaction to transaction.
Tip: You can narrow down your search by selecting more than one search
criteria. The viewer searches for transactions that match all of the criteria.
The Electronic Journal Viewer
This window shows the fields used to search for transactions in the electronic journal files.
To perform a multi journal search:
288
1.
To search an open journal file for transactions that match the search criteria, click the Single radio
button.
2.
Click the All radio button to search all journal files.
3.
To search all journal files from the open journal onward, click the All remaining radio button.
Reading the journal files
4.
The direction of the search is determined by the Up and Down radio buttons.
Click the Up radio button to search from the current transaction to the first transaction. Click the
Down radio button to search from the current transaction to the last transaction.
5.
You can refine the search further by including or excluding spaces in the text that is being
searched.
To include spaces, click the Include Spaces radio button. The Electronic Journal Viewer searches
for the text the exactly matches the spacing of the text you type in the Search for Text field.
To exclude spaces, click the Exclude Spaces radio button.
To determine the transaction print method:
1.
To print the entire journal file that contains the transaction that is currently displayed in the
viewer, click the Whole Journal File radio button.
2.
To print only the transaction that is currently displayed in the viewer, click the Current
Transaction radio button.
3.
To print a transaction, click Print on the File menu.
To define the search criteria:
1.
The electronic journal will search for transactions matching the date you specify. To specify a date,
click the Date checkbox. Click the adjacent drop-down list and select an option from the list. Click
the field adjacent to the drop-down list and choose a date from the calendar pop-up window.
2.
The electronic journal viewer searches for transactions that occurred at the time you specify. Click
the Time checkbox. Click the adjacent drop-down list and select an option from the list. Type the
time, using the 24 hour clock, in the field adjacent to the drop-down list.
3.
You can search for transactions that were processed by the cashier you specify. Click the Cashier
Number checkbox. Click the adjacent drop-down list and select an option from the list. Type the
cashier number in the field adjacent to the drop-down list.
4.
To search for transactions with numbers that match the criteria you specify, click the Transaction
Number checkbox. Click the adjacent drop-down list and choose an option from the list. Type
the transaction number in the field adjacent to the drop-down list.
5.
The electronic journal viewer can search for transactions that contain captured signatures. click the
Signature Present for the Transaction checkbox.
6.
To define the test that must be present in the transaction for the electronic journal viewer to
consider it a match, type a text string in the Search for Text field. You can enable the Include
Spaces and Exclude Spaces features to define whether the text in the transaction must exactly
match the text you enter into this field.
7.
To clear all the search criteria in this window, click Clear.
8.
To begin the search based on the search criteria, click Search.
289
Journals and Journal Files
Viewing log files
You can view and search through the contents of three .log files. Log files allow stores to view and
act upon downloaded files during the polling process.
xcpt.log— This log file contains information on errors or general exceptions that have occurred
within the application. It is mainly intended for debugging purposes.
event.log— This log file is also intended mainly for debugging purposes. It contains information
on various events occurring within the application or between the application and the server.
apply.log— The apply file.log contains operational information from files such as the plu, xref,
and promo files. It also logs information which you can view on purchase orders, receiving
documents, inventory adjustments, physical inventory and store transfers.
To view the contents of a .log file:
1.
On the Main Menu window, click Administration.
2.
Click Log Files.
3.
Click the Log File drop-down list. A list of the three log files appears.
4.
Click a file. The contents of the .log file are displayed in the window.
Once you have opened a .log file, you can search through its contents for a text string.
To search a .log file:
290
1.
In the Search field, type a text string.
2.
Click Go. The Store Manager searches through the .log file for a match. When all the matching
information is found, the first piece of it is displayed in the window.
3.
Click Next, to display the next piece of matching information, if required.
Reporting
This section provides information about the reports you can print from the Store Manager, including
descriptions of the windows used to define report criteria, and descriptions of the information the
reports provide.
This section covers the following topics:
Accessing the reports
Defining report macros
Compiling a report
Printing a report
Exporting a report
Emailing a report
Using the report template designer
Using standard reports
Using inventory reports
To access the Reports menu:
1.
On the Main Menu window, click Reports.
2.
Click the icon that represents the report you want to access.
3.
Complete the field information in the window as required.
Defining report macros
You can create up to ten macros to automate the generation and printing of reports from the Store
Manager. For each macro, you can define a sequence of reports and their report criteria. The Store
Manager assigns the macro to a button on the Report Macro Menu window. When you want to print
the reports in the sequence, click the button.
For more information about running the macro to print the reports, see “Macro” on page 331.
291
Reporting
The following is a list of the reports you can assign to a macro, and the date type and report type
criteria available for each.
Report Name
Date Type
Report Type
Item Movement
Business date
By store
Previous business date
Weekly
Monthly/Period
Sales and Sales Analysis
Business date
By store
Previous business date
All register
Weekly
All cashier
Monthly/Period
Sales Tax
Business date
By store
Previous business date
Weekly
Monthly/Period
Non Merchandise
Business date
By store
Previous business date
Weekly
Monthly/Period
Tender
Business date
By store
Previous business date
All register
Weekly
All cashier
Monthly/Period
Payroll Summary and Payroll
Detail
Business date
By store
Previous business date
Weekly
Monthly/Period
Department Summary and Detail
Business date
By department
Previous business date
By group
Weekly
By category
Monthly/Period
Loss Prevention
Business date
By store
Previous business date
All register
Weekly
All cashier
Monthly/Period
292
Defining report macros
Salesperson
Business date
By store
Previous business date
Weekly
Monthly/Period
Hourly Sales Summary and
Average
Business date
By store
Previous business date
Weekly
Monthly/Period
Balancing Short/Over
Business date
By Store
Previous business date
Inventory Adjustment
Business date
By Store
Previous business date
Weekly
Monthly/Period
Note: At the time of publication the Pending Transactions Report can not be assigned to a macro.
After you create a new report macro, the Store Manager assigns it to a button on the Report Macro List
Menu window. To create a macro, you must select the reports to be printed, their criteria, and the order
you want them to print in. You can define up to 10 macros, and you can include the same report in
several macros.
To add or modify a report macro record, you must enter information into the Report Macro
Maintenance window. For information about the fields in the window, see “Report Macro
Maintenance window” on page 295.
Creating a new report macro
After you create a new report macro, the Store Manager assigns it to a button on the Report Macro List
Menu window. To create a macro, you must select the reports to be printed, their criteria, and the order
you want them to print in. You can define up to 10 macros, and you can include the same report in
several macros.
For a list of the reports and the criteria from which you can choose, see “Defining report macros” on
page 291.
In the following steps, you must enter information into the Report Macro Maintenance window. For
information about the fields in the window, see “Report Macro Maintenance window” on page 295.
To define a macro sequence:
1.
On the Main Menu window, click Parameters Setup.
2.
Click Report Macro Definition.
3.
Click New.
293
Reporting
4.
In the Description field, type a description for the macro. The description can be up to 40
characters long.
5.
Click Add. A blank line appears for you to enter information.
6.
Complete the fields in the window, as appropriate.
7.
Click Save, and then click Exit.
Modifying a report macro
You can modify a report macro by adding or removing reports from the sequence, or by redefining
report criteria.
In the following steps, you must enter information into the Report Macro Maintenance window. For
information about the fields in the window, see “Report Macro Maintenance window” on page 295.
To modify a macro:
1.
On the Main Menu window, click Parameters Setup.
2.
Click Report Macro Definition.
3.
Click Display All. The existing report macros are displayed in the window.
4.
Click the macro you want to modify, and then click Open. The Report Macro Maintenance
window appears, displaying the macro’s information.
5.
Change the fields in the window, as appropriate.
6.
Click Save, and then click Exit.
Deleting a report macro
You can delete an entire macro. The Store Manager removes the macro’s button from the Report
Macro List Menu window.
To delete a macro:
294
1.
On the Main Menu window, click Parameters Setup.
2.
Click Report Macro Definition.
Defining report macros
3.
Click Display All. The existing report macros are displayed in the window.
4.
Click the macro you want to delete, and then click Delete. A dialog box appears, prompting you to
confirm the deletion.
5.
Click OK.
Tip: You can delete a single report from the report macro by clicking Delete in
the Report Macro Maintenance window.
Report Macro Maintenance window
This window contains the fields used for defining the sequence of reports included in a report macro.
The following table contains descriptions of fields in the Report Macro Maintenance window
To complete the Report Macro Maintenance window:
1.
The ID field defines the unique number that identifies the report macro. No action is required; the
Store Manager automatically completes this field with the next available number from 1 to 10.
2.
To define the name of the macro, click the Description field and type an alphanumeric
description, up to 40 characters long. The macro name you enter into this field appears under the
macro’s button in the Report Macro List Menu window.
3.
The Item field defines the order in which the reports are printed. No action is required; the Store
Manager automatically completes this field with the next available number.
4.
To specify which report you want to include in the macro, click the Report Name drop-down list
and select a report
5.
To set the date type criteria that is used when the Store Manager generates the report, click the
Date Type drop-down list and select a date type criteria.
6.
To set the report type criteria that is used when the Store Manager generates the report, click the
Report Type drop-down list and select a report type criteria.
7.
To determine if the detailed or summary version of the report you select in the Report Name
field is printed, click the Detailed checkbox to print the detailed version of the report. This field
applies to the Sales, Payroll, Department, Non-Merchandise, and Hourly Sales reports.
295
Reporting
8.
To set the number of copies of the report to print, click the Copies field and type the desired
number of printed copies.
9.
To add a blank row to the bottom of the window and add another report to the macro, click New.
10. To delete a report from the macro, click the report you want to delete and then click Delete.
Compiling a report
Compiling a report requires you to choose report criteria, such as a date range or department number
that the Store Manager uses to gather information, and generate the report. The compiled report is
displayed on your screen and can be printed at any time. You can also export some reports to be used
by another application or e-mail them to another person.
Choosing report criteria
There are two general types of report criteria: date type and report type. The report criteria you choose
determines the information that the report contains.
You choose report criteria using each report’s search criteria window. The criteria windows each
provide you with choices that are appropriate for their reports.
For example, below is the Item Movement Reports Criteria window.
The criteria for each report is discussed in more detail in “Using standard reports” on page 303 and
“Using inventory reports” on page 332.
296
Printing a report
Generating reports
Once you have chosen the criteria that the Store Manager uses to gather information, you must
generate the report. Once it is generated, the report is displayed on your screen and you can review it
there, or you can print it.
If the report is linked to the template designer, you can also export it, or E-mail it. For information
about the template designer, see “Using the report template designer” on page 300.
To generate a report:
In the report’s criteria window, click Generate Report. The criteria window closes, and the report
window appears. The report window displays the report data in the same format that would be
used for the printed report.
If the Store Manager does not find any data that matches the criteria you choose, a dialog box
containing a warning message appears and the report window does not appear. You remain in the
report’s criteria window. Choose new criteria and generate the report again.
Tip: If the report is presented in a table form with columns and rows, you can change the order of the
records by clicking the column header. For example, if the records in the report are listed in
alphabetical order by description, click the Amount column header to sort the records in order of
amount.
For information about printing, exporting, or emailing the report, see the following sections:
“Printing a report” below
“Exporting a report” on page 298
“E-mailing a report” on page 298
Printing a report
You can print a report from the report window, after you have compiled it. The printed report has the
same layout and appearance as the report displayed on your screen in the report window.
Automatically, the report is printed on the printer that has been assigned as the default.
To print a report:
1.
In the report window, click Print. A dialog box appears asking you to confirm the printing.
2.
Click OK. The Store Manager prints the report, and the report remains displayed in the report
window.
Tip: You can change the appearance of some reports using the report template
designer. For information about using the designer, see “Using the report
template designer” on page 300.
If you need to, you can change the printer setup so you can use another printer to print reports. The
option to change the printer is accessible from different places on the report windows:
A Printer button on the report window
A Setup button on the dialog box that appears to confirm the printing
297
Reporting
Exporting a report
If the report is linked to the template designer, you can export its data to a file so it can be used by
another application.
For information about the template designer, see “Using the report template designer” on page 300.
The following are the types of files to which you can export information:
Internet Document (.htm)
Power Soft report (.psr)
Microsoft Excel comma separated values (.csv)
dBase ll (.dbf)
bBase lll (.dbf)
Microsoft Excel Data Interchange (.dif)
Microsoft Excel Work Sheet (.xls)
SQL Syntax (.sql)
Microsoft Multiplan Format (.xls)
Text - Tab separated values (.txt)
WKS - Lotus 123 (.wks)
WK1 - Lotus 123 (.wk1)
Windows Meta File (.wmf)
Clipboard
Once you have compiled a report by selecting report criteria and generating the report, you can export
it. Only users with the appropriate authority level can use the Export button. You must have a user
authority level of 5 (the highest) in order to view the Export button, otherwise it will be greyed out and
disabled. For information on assigning user authority levels, see “Defining the Store Manager system
parameters” on page 22.
To complete the following steps, the compiled report must be visible on your screen in the report
window.
To export report data to a file:
1.
In the report window, click Export.
2.
Complete the fields in the Export Report Data window with the appropriate information,
including file location, file name, and file type.
3.
Click Save. The report’s data is exported to the file you defined.
Tip: To include the report header information, such as report title, and store
number, in the data exported to the file, you must click Include Column
Heading in the Export Report Data window.
E-mailing a report
If a report is linked to the template designer, you can send its data as an attachment to an email so it
can be used by another application.
298
E-mailing a report
For information about the template designer, see “Using the report template designer” on page 300.
WARNING! The email option must be configured for you during the installation of the Store
Manager software. You must have a compatible email system in your store. If you do not have the email
option, the Send button is not visible on the report window.
When you email a report, a message with a file attachment is sent to the reader. The attachment can be
one of the file types listed below.
The following are the types of files you can send:
Internet Document (.htm)
Power Soft report (.psr)
Microsoft Excel comma separated values (.csv)
dBase ll (.dbf)
bBase lll (.dbf)
Microsoft Excel Data Interchange (.dif)
Microsoft Excel Work Sheet (.xls)
SQL Syntax (.sql)
Microsoft Multiplan Format (.xls)
Text - Tab separated values (.txt)
WKS - Lotus 123 (.wks)
WK1 - Lotus 123 (.wk1)
Windows Meta File (.wmf)
Clipboard
Once you have compiled a report by selecting report criteria and generating the report, you can email
it.
To complete the following steps, the compiled report must be visible on your screen in the report
window.
To email the report data:
1.
In the report window, click Send.
2.
Complete the fields in the window with the appropriate information, including the attachment’s
file name and file type.
3.
Click Send. The report’s data is exported to the file you defined. A dialog box appears asking you
for the recipient’s address. The appearance of the dialog box depends on the email system in your
store.
4.
Choose the email recipient using the fields in the dialog box.
5.
Click OK or the appropriate button to confirm the recipient as correct. The recipient is accepted
and the email is transmitted.
Tip: To include the report header information, such as report title, and store
number, in the data included in the file, you must click Include Column
Heading in the Send Report Data window.
299
Reporting
Using the report template designer
The report template designer allows you to design new layout templates for many of the reports you
can print from the Store Manager. You can use the designer to move columns of information, change
the text of column headings, truncate decimal places from columns of numbers and alter other aspects
of a report’s appearance.
You must design a new template for each report. You cannot design a general template that is used by
all the reports.
You can use the report template designer to create new layouts for the following reports:
Item Movement
Payroll Clock In/Out Summary and Detail
Department
Loss Prevention
Hourly Sales Summary and Average Hourly Sales
Sales Tax
Balance
Inventory Adjustment
Inactive PLU
Quantity On Hand
Gross Profit
Performance Summary and Detail
Pending Transactions Summary and Detail
Designing a new report template
The Store Manager can store one template per report. If you design a new template, it overwrites the
default, and is automatically used each time you generate the report. Because the Store Manager can
rebuild the default template, you can always revert to the default report template.
In the following steps, you must use design options. For information about the design options and
other fields related to the template designer, see “Template design options” on page 301.
Only users with the appropriate authority level can use the Design On button. You must have a user
authority level of 5 (the highest) in order to view the Design On button, otherwise it will be greyed out
and disabled. For information on assigning user authority levels, see “Using security features” on
page 28.
To design and save a template:
300
1.
Compile the report for which you want to design the template. For information about compiling a
report, see “Compiling a report” on page 296.
2.
Click Design Off. A dialog box appears, prompting you to confirm that you want to use the
designer. The template designer becomes active. The Template Design Mode box indicates that
the status is On.
3.
Click OK.
4.
Right-click on the report window. A shortcut menu containing design options appears. For
information about the design options on the menu, see “Template design options” below.
Using the report template designer
5.
Use the design options to change the layout of the report.
6.
Click Save Template. The new template is saved and is used the next time you generate this
report.
7.
Click Design On. The template designer becomes inactive.
Template design options
You can right-click anywhere on the report window to access a shortcut menu containing the design
options: truncate, re-position, and hide. Click an option to select it.
Truncating
If you truncate a column, the characters after the decimal place are dropped and only the whole
number is displayed.
To truncate a column:
1.
Right-click on the report window. The shortcut menu appears.
2.
Click Truncate on the shortcut menu. The Column Truncation window appears.
3.
Click the checkbox beside the column you want to truncate.
4.
Click OK. The Column Truncation window closes, and the you can see the change to the column
immediately.
Tip: To replace the characters after the decimal place, clear the check mark from the checkbox beside
the column
Re-positioning
You can reposition report fields within the confines of their general boundaries. For example, you can
move a header field, such as the report title, to a new position in the header area, but you cannot move
it into the body of the report or into the footer.
To move a field or column:
1.
Right-click on the report window. The shortcut menu appears.
2.
Click Re-position on the shortcut menu.
3.
Click and hold the field you want to move. A grey frame appears around the field.
4.
Keep the mouse button pressed and drag the field to the new position.
5.
The X and Y boxes display the screen coordinates of the field you are moving as you drag it to its
new position.
6.
Release the mouse button.
Hide
You can show and hide predefined columns of information, but you cannot add new columns to the
report.
To hide a column:
1.
Right-click on the report window. The shortcut menu appears.
2.
Click Hide on the shortcut menu. The Column Hide window appears.
301
Reporting
3.
Click the checkbox beside the column you want to hide.
4.
Click the checkbox beside the column header that corresponds to the column.
5.
Click OK. The Column Hide window closes and the column is immediately hidden.
Tip: To show the column again, clear the check mark from the checkbox
beside the column and the header.
Template Designer fields
This window contains fields used to design a report template. The following table contains
descriptions of fields in the report template:
Field
Description
Preview
This field opens the Report Preview window. The window displays the report as it
would appear if it were printed.
For information about previewing reports, see “Previewing a report” on
page 303.
Action: Click the button.
Design On/Design Off
This field turns the template designer on or off.
The current status of the designer is displayed in the Template Design Mode
box.
Action: Click the button. This button acts as a toggle to turn the template designer
on or off.
Template Design Mode
This field indicates the status (on or off) of the report template designer. Only
users with the appropriate authority level can use the Export button. You
must have a user authority level of 5 (the highest) in order to view the
Export button, otherwise it will be greyed out and disabled.
Action: No action required. The Store Manager automatically completes this field
when you click Design On/Off.
Template on File
This field indicates whether you are currently viewing the report in the default
template or a template you designed.
If the box displays “No”, you are seeing the report in the default template. If the
box displays “Yes”, you are seeing the report in a template you designed.
Action: No action required. The Store Manager automatically completes this field
when you click Save Template or Delete Template.
Save Template
This field saves the template you are designing, writing over the default template.
The Template on File box displays “Yes”, indicating that you are seeing the
report in a template you designed.
Action: Click the button.
302
Using standard reports
Field
Description
Delete Template
This field deletes the template you designed. The next time you generate the
report, the Store Manager rebuilds the default template and uses it to display the
report.
The Template on File box displays “No”, indicating that you are seeing the
report in the default template.
Action: Click the button.
X,Y
These fields display the coordinates of a field or column you are repositioning,
relative to the top left corner of the report.
Action: No action required. The Store Manager automatically completes these
fields as you drag a field or column to a new position.
Previewing a report
You can preview a report after you generate it, but before you print it, so that you can make sure its
layout is appropriate. In addition, the preview window in the Store Manager includes options for
changing the orientation of the report from portrait to landscape.
You do not need to activate the template designer to preview a report, but you can only use the
preview option for the reports that have the template designer attached to them.
To preview a report:
1.
Click Preview. The Report Preview window appears.
2.
Click Zoom In and Zoom Out to examine the report from the magnification you want.
3.
Click Exit. The Report Preview window closes, and you return to the report window. You can
change the paper orientation of the report by clicking the Orientation drop-down list and
selecting an orientation from the list. The orientation you select is not saved. The next time you
generate and print the report, the Store Manager uses the default paper orientation.
Tip: You can print the report directly from the Report Preview window by
clicking Print.
Using standard reports
You can compile several different types of reports from the Store Manager that provide information
about store merchandise and non-merchandise sales, payroll, and cashier balancing. Once you have
compiled a report and it is displayed in the report window, you can print it. For information about
printing reports, see “Printing a report” on page 297.
You can change the appearance of some reports using the report template designer. For information
about the designer, see “Using the report template designer” on page 300.
Item Movement
The Item Movement Report allows you to analyze item movement and sales trends because it provides
details about item movement in and out of the store. You can generate the report using criteria to
define the item and a range of dates.
303
Reporting
Item Movement Report Criteria window
This window contains fields used to select the criteria that the Store Manager uses to gather
information for the Item Movement report.
To complete the fields in the Item Movement Report Criteria window:
304
1.
To select a range of dates for the report period, click Business Date Range and type a date range
in the fields, or click the button beside the fields and select a date from the pop-up calendars. Click
OK. You can also use the Previous Business Date and Current Business Date radio buttons to
select the report period.
2.
To define a range of items to be included in the report, click the PLU fields and type a range of
PLU numbers in the fields. You can also use the Category, Group, Department, User Flag 1-6, and
the Vendor fields to define items to be included in the report. You can choose multiple criteria.
The report only includes items matching all criteria.
3.
To select the category to which the items belong that you want included in the report, click the
Category drop-down list and select a category from the list. For more information about defining
categories, see “Defining categories” on page 65.
4.
To select the group with items you want included in the report, click the Group drop-down list
and select a group from the list. For more information about defining groups, see “Defining
groups” on page 67.
5.
To select the department with the items you want included in the report, click the Department
drop-down list and select a department from this. For more information about defining
departments, see “Defining departments” on page 69.
6.
The Userflag 1-6 fields define the user flag option that is assigned to the items you want included
in the report. Click the drop-down list and select a user flag option from the list.
Using standard reports
7.
To specify the supplier of the items you want included in the report, click the Vendor drop-down
list and select a supplier from the list. For more information about assigning a vendor to a PLU,
see “Maintaining PLUs” on page 142.
8.
To group the report data by category, group, department, and vendor, click the checkboxes in the
Group By section of the window, and then click the drop-down lists and select an option from
each list.
9.
To generate the report based on the above criteria, click Generate Report. For more information
about generating reports, see “Generating reports” on page 297.
Tip: To find a PLU, click in the PLU field, and press the F12 key. The PLU Search window appears.
Item Movement Report
The following is a sample Item Movement Report.
You can use the report template designer to alter the appearance and layout of the Item Movement
report. For information about the template designer, see “Using the report template designer” on
page 300. This sample report uses the default template.
To show or hide the criteria used to generate this report, click the Show/Hide Criteria toggle
button.
305
Reporting
Sales
The Sales Report lists items and summary sales information. You can generate the Sales report using
criteria to define the items included on the report, and the dates the report covers.
Once you have generated the Sales report, you can generate the Sales Analysis report. The Sales
Analysis report provides more detailed information about the sales of the items. The Store Manager
compiles the Sales Analysis report based on the same criteria you choose for the Sales report.
Sales Report Criteria window
This window contains fields used to select the criteria that the Store Manager uses to gather
information for the Sales and Sales Analysis reports.
To complete the Sales Report Criteria window:
306
1.
If you want the report period to be for today’s date, click the Current Business Date radio
button.
2.
If you want the report period to be for yesterday’s date, click the Previous Business Date radio
button.
3.
To select a range of dates for the report period, click Period and type a date range in the fields, or
click the button beside the fields and select a date from the pop-up calendars. Click OK.
4.
If you want the report period to be for a selected week, click the Week Ending radio button and
type the date of the end of the week in which you want to compile the report, or click the button
beside the field and select a date from the pop-up calendar. Click OK.
5.
To include sales information for the entire store, click the By Store radio button.
6.
To include sales information for a single register, click the Register radio button.
7.
To include sales information for a group of registers, click the Register Group radio button.
8.
To include sales information for all registers, click the All registers radio button.
9.
To generate the report, click Generate Report.
Using standard reports
Sales Report
The following is a sample Sales Report.
The following table contains the formulas used to calculate the data in some of the columns:
Column
Formula
Total Gross Non Merch
Sales
Total sales of non-merchandise items.
Note: Your head office uses the Configurator to define non-merchandise items.
Only non-merchandise items with the Add to Gross checkbox selected in the
Configurator, are included in this total.
Total Reductions to
Gross
Total of returns and discounts, not including vendor’s coupons.
Net Sales
Total gross sales — total taxes — total reductions to gross.
Total Other Non Merch
Sales
Total sales of the non-merchandise items not included in the Total Gross Non
Merch Sales figure.
Note: Your head office uses the Configurator to define discounts. Only
discounts with the Affect Net checkbox selected in the Configurator, are
included in this total.
Note: Your head office uses the Configurator to define non-merchandise items.
Only non-merchandise items without the Add to Gross checkbox selected in the
Configurator, are included in this total.
Total Other Receipts
Total of tender coming into the store that is not a direct result of a merchandise
sale, including additional amounts, deposits, and fees.
Total Other Reductions
to Gross
Total of reductions not included in the Total Reductions to Gross figure,
including vendor’s coupons.
Note: Your head office uses the Configurator to define discounts. Only
discounts without the Affect Net checkbox selected in the Configurator, are
included in this total.
307
Reporting
Column
Formula
Total Accountability
Total of all figures.
This figure always balances to the Total Tenders figure.
Total Tenders
Total of all tenders.
This figure always balances to the Total Accountability figure.
Sales Analysis
The Sales Analysis Report provides added detail about the information on the Sales report. The Store
Manager compiles the Sales Analysis and the Sales reports based on the same criteria.
To compile the Sales Analysis Report:
1.
Select criteria and generate the Sales report. The Sales report is displayed in the report window.
2.
Click Sales Analysis. The Sales Analysis report is displayed in the report window.
The following table contains descriptions of the formulas used to calculate the data in some of the
columns:
Column
Formula
Net Sales
Total gross sales — total taxes — total reductions to gross.
Net Merch Sales
Total gross merch sales — reductions to gross.
Note: The reductions to gross are the reductions made to merchandise sales.
Net Non Merch Sales
Total gross non-merch sales — reductions to gross.
Note: The reductions to gross are the reductions made to non-merchandise sales.
Sales Tax Report
The Sales Tax Report summarizes all of the sales tax totals that are generated for a specified range of
business dates. The report is sorted according to the business date, jurisdiction ID and the tax ID. The
taxable amounts, tax amounts, non-taxable sales, and the number of rows printed on the report are
totaled and printed at the end of the report as the report total. For information on setting up taxes, see
“Setting up taxes” on page 80.
Sales Tax Report Criteria window
This window contains fields used to select the criteria that the Store Manager uses to gather
information for the Sales tax Report.
308
Using standard reports
To complete the Sales Tax Report Criteria window:
1.
To select a range of dates for the report period, click Business Date Range and type a date range
in the fields, or click the button beside the fields and select a date from the pop-up calendars. Click
OK. You can also use the Previous Business Date and Current Business Date radio buttons to
select the report period.
2.
To compile the report for all jurisdictions, click All Jurisdictions.
3.
If the report is for a specific jurisdiction, click Jurisdiction ID and select an option from the
drop-down list.
4.
To generate the report to include all types of taxes, click All Taxes.
5.
To compile the report to show a specific type of tax, for example Federal Tax, click Tax ID and
select a tax type from the drop-down list.
6.
To generate the Sales Tax Report, click Generate Report.
309
Reporting
Sales Tax Report
For layaway transactions, a tax total is generated at the time of sale if the Revenue parameter in the
Configurator is set to Recognized at Time of Sale. When a pickup is performed on the layaway, a tax
total has already been created at the time of sale, and therefore is not created again during pickup.
If the Revenue parameter in the Configurator is set to Recognized at Time of Pickup, a tax total is
not generated at the time of sale, but is generated when a pickup is performed on the layaway.
The Sales Tax Report displays the following information:
Tax ID: the identification number of the applicable tax rate
Description: a description of the tax
Jurisdiction: the description of the applicable tax identification number
Tax Amount: the amount of applicable tax
Taxable Amount: the sales amount used to calculate the tax amount associated with the tax
identification number
Non Taxable Merchandise Sales: The dollar amount of all non-taxable items sold
Non-merchandise Summary
The Non-merchandise Summary Report provides totals for sales of non-merchandise transactions and
non-merchandise items.
Once you have generated the Non-merchandise Summary report, you can generate the
Non-merchandise Detail report. The detail report provides information about each non-merchandise
transaction. The Store Manager compiles the Non-merchandise Detail Report based on the same
criteria you choose for the Non-merchandise Summary report.
310
Using standard reports
Non-merchandise Report Criteria window
This window contains fields used to select the criteria that the Store Manager uses to gather
information for the Non-merchandise Summary and Non-merchandise Detail reports.
To complete the Non Merchandise Report Criteria window:
1.
If you want the report period to be for today’s date, click the Current Business Date radio
button.
2.
If you want the report period to be for yesterday’s date, click the Previous Business Date radio
button.
3.
To select a range of dates for the report period, click Period and type a date range in the fields, or
click the button beside the fields and select a date from the pop-up calendars. Click OK.
4.
To generate the Non Merchandise Report, click Generate Report.
Non-merchandise Summary Report
The following is a sample Non-merchandise Summary Report.
The following is the formula used to calculate the data in some of the columns:
Net Sales: Sales total — returns — voids.
Non-merchandise Detail Report
The Non-merchandise Detail Report provides detailed information about every non-merchandise
transaction or non-merchandise item. The Store Manager compiles the Non-merchandise Summary
and Non-merchandise Detail reports based on the same criteria.
To compile the Non-mercandise Detail Report
1.
Select criteria and generate the Non-merchandise Summary Report. The summary report is
displayed in the report window.
2.
Click Generate Detail Report. The Non-merchandise Detail report is displayed in the report
window.
311
Reporting
Non-merchandise Detail Report
The following is a sample Non-merchandise Detail Report.
Tender
The Tender Report provides information about tender usage, including number of transactions using
the tender and tender totals.
Tender Report Criteria window
This window contains fields used to select the criteria that the Store Manager uses to gather
information for the Tender report.
312
Using standard reports
To complete the Tender Report Criteria window:
1.
If you want the report period to be for today’s date, click the Current Business Date radio
button.
2.
If you want the report period to be for yesterday’s date, click the Previous Business Date radio
button.
3.
To select a range of dates for the report period, click Period and type a date range in the fields, or
click the button beside the fields and select a date from the pop-up calendars. Click OK.
4.
To include tender information for the entire store, click the By Store radio button.
5.
To include tender information for a single register, click the Register radio button.
6.
To include tender information for a group of registers, click the Register Group radio button.
7.
To include tender information for all registers, click the All Registers radio button.
8.
To include tender information for a single cashier, click the Cashier radio button.
9.
To include tender information for all cashiers, click the All Cashiers radio button.
10. You can select which currency the tender amounts are displayed in. Click the Local Currency
radio button if you require the report to display the amounts in your local currency. Click the
Tender Currency radio button if you require the report to display the tender amounts in the
currency in which the customers used to pay for their merchandise.
11. To generate the Tender Report, click Generate Report.
Tender Report
The following is a sample Tender Report.
313
Reporting
The following table contains the formulas used to calculate the data in some of the columns:
Column
Formula
Reissued
Total of tender given back to customer when original tender given as payment
was different.
Note: This is usually a negative value.
Refunded
Total of tender given back to customer in return or exchange transaction.
Note: This is usually a negative value.
Subtotal
Received + refunded + reissued.
Tender Detail Report
The Tender Detail Report is an extension of the Tender report. Foreign tenders are also listed in the
Tender Detail Report.
The Tender Detail Report can also be accessed from the Cash Management - Balance window. This
report will only appear if the system has been configured to be balanced by a cashier with blind
balancing disabled.
To view a detailed tender report:
For each tender type, double-click the tender to view a detailed report showing all transactions
related to that tender.
Note: The totals on the detail and summary report should match.
Payroll Clock In/Out Summary Report
The Payroll Clock In/Out Summary Report contains information about store employees’ total hours
worked.
To access the Clock In/Out Report and create the Summary Report:
1.
On the Main Menu window, click Payroll.
2.
Click Clock In/Out Report.
3.
Complete the Report Criteria, and click Generate Report.
Once you have generated the Payroll Clock In/Out Summary report, you can generate the Payroll
Clock In/Out Detail report. The detail report includes the employee’s clock in and clock out times,
total hours worked, and the reason worked. The Store Manager compiles the Payroll Clock In/Out
Detail report based on the same criteria you choose for the Payroll Clock In/Out Summary report.
314
Using standard reports
Payroll Clock In/Out Report Criteria window
This window contains fields used to select the criteria that the Store Manager uses to gather
information for the Payroll Clock In/Out Summary and Payroll Clock In/Out Detail reports.
The following table contains descriptions of the fields in the Payroll Clock In/Out Report Criteria
window:
Field
Description
Payroll Period
This field defines the report period as all the periods up to, and including, the
current period.
You can also use the User-defined Period fields to select the report period.
Action: Click the radio button.
User-defined Period
This field defines a range of dates for the report period.
You can also click Payroll Period to select the report period.
Action: Click the button beside the field to open the pop-up calendar. Click a date
in the calendar and click OK.
Alternatively, type a date into the field.
All Employees
This field determines if you want to include information for all the store’s
employees on the report.
Action: Click the radio button.
Selected Employee
This field determines if you want to include information for 1 employee on the
report.
Action:
1. Click the radio button.
2. Type a cashier number into the field.
Generate Report
This field generates the report based on the criteria in the window.
For more information about generating reports, see “Generating reports” on
page 297.
Action: Click the button.
315
Reporting
Payroll Clock In/Out Summary report
The following is a sample Payroll Clock In/Out Summary report.
You can use the report template designer to alter the appearance and layout of the Payroll Clock In/
Out Summary report. For information about the template designer, see “Using the report template
designer” on page 300. This sample report uses the default template.
Payroll Clock In/Out Detail
The Payroll Clock In/Out Detail report provides information about employee’s clock in and clock out
times, total hours worked, and the reason for work. The Store Manager compiles the Payroll Clock In/
Out Summary and Payroll Clock In/Out Detail reports based on the same criteria. Included in this
report is an employee signature line that can be used for verification.
To compile the Payroll Clock In/Out Detail Report:
1.
Select criteria and generate the Payroll Clock In/Out Summary report. The summary report is
displayed in the report window.
2.
Click Generate Detail Report. The Payroll Clock In/Out Detail report is displayed in the report
window.
Payroll Clock In/Out Detail report
You can use the report template designer to alter the appearance and layout of the Payroll Clock In/
Out Detail report. For information about the template designer, see “Using the report template
designer” on page 300. This sample report uses the default template.
316
Using standard reports
Department
The Department report provides information about sales of items in the department.
You can compile Category, Group, or Department reports directly from the Department Report
Criteria window, by selecting the appropriate report type criteria.
A report that groups together details automatically sorts the details by an identifier. For example, a
department report that is grouped by category, will sort the details of each group by the group number.
A department report that is grouped by group will sort the details of each group by the department
number.
The reports are linked, so if you compile a Category report and double-click a line item to generate a
Detail Report, the Store Manager compiles a Group report for the groups in the category you selected.
If you click a group on the report window and generate a Detail Report, the Store Manager compiles a
Department report for the departments in the group. The Department Detail Report contains
information on an item level.
Department Report Criteria window
This window contains fields used to select the criteria that the Store Manager uses to gather
information for the Department report.
To complete the fields in the Department Report Criteria window:
1.
To select a date for the report period, click Current Business Date or Previous Business Date
to select the report period.
2.
To select a range of dates for the report period, click the Period fields and type a date range in the
fields, or click the button beside the fields and select a date from the pop-up calendars. Click OK.
Note that the default date range in the Period fields is based on the previous inventory control
period.
3.
To define the report period as a week, ending on the day you select, click Week Ending and type
the date of the end of the week, or click the button beside the field and select a date from the
pop-up calendar. The weeks are based on your fiscal week end, not the calendar week end. Your
head office uses the Configurator to define your fiscal weekend.
4.
To select the department with the items you want included in the report, click the By
Department drop-down list and select a department from this.
317
Reporting
5.
To select the category to which the items belong that you want included in the report, click the By
Category drop-down list and select a category from the list.
6.
To select the group with items you want included in the report, click the By Group drop-down list
and select a group from the list.
7.
To generate the report based on the above criteria, click Generate Report. For more information
about generating reports, see “Generating reports” on page 297.
Department Report
You can use the report template designer to alter the appearance and layout of the Department Report.
For information about the template designer, see “Using the report template designer” on page 300.
The following table contains the formulas used to calculate the data in some of the columns:
Column
Formula
% of Total Units
Number of units sold in department/number of total units sold.
% of Total Net Sales
Net sales of items in department/total net sales.
% of Total Discounts
Amount of discounts on items in department/total amount of discounts.
% of Total Returns
Amount of total returns of items in department/total amount of returns.
To generate the Department Report Detail, double-click on a line item in the report.
Department Report Detail
The following is a sample Department Report Detail. For information about how the data in some of
the columns is calculated, see “Department Report” on page 318.
318
Using standard reports
You can use the report template designer to alter the appearance and layout of the Department Detail
report. For information about the template designer, see “Using the report template designer” on
page 300. This sample report uses the default template.
319
Reporting
Group report
The following is a sample Group report. For information about how the data in some of the columns
is calculated, see “Department Report” on page 318. You can use the report template designer to alter
the appearance and layout of the Group report. For information about the template designer, see
“Using the report template designer” on page 300. This sample report uses the default template.
320
Using standard reports
Category report
The following is a sample Category report. For information about how the data in some of the
columns is calculated, see “Department Report” on page 318.
You can use the report template designer to alter the appearance and layout of the Category report. For
information about the template designer, see “Using the report template designer” on page 300. This
sample report uses the default template.
Loss Prevention Summary
The Loss Prevention Summary report contains information about the number of times selected
transaction types are processed. Once you have generated the Loss Prevention Summary report, you
can generate the Loss Prevention Detail report. The detail report includes information about each
transaction, including transaction number, date, and amount. The Store Manager compiles the Loss
Prevention Detail report based on the same criteria you choose for the Loss Prevention Summary
report.
Loss Prevention Report Criteria window
This window contains fields used to select the criteria that the Store Manager uses to gather
information for the Loss Prevention Summary and Loss Prevention Detail reports.
321
Reporting
The following table contains descriptions of the fields in the Loss Prevention Report Criteria window:
Field
Description
Current Business Date
This field determines if the report period is the current business date.
You can also click Previous Business Date and the From/To field to select the
report period.
Action: Click the radio button.
Previous Business Date
This field determines if the report period is the previous business date.
You can also click Current Business Date and the From/To field to select the
report period.
Action: Click the radio button.
From/To
This field defines a range of dates for the report period.
You can also click Current Business Date and Previous Business Date to
select the report period.
Action: Click the button beside the field to open the pop-up calendar. Click a date
in the calendar and click OK.
Alternatively, type a date into the field.
By Store
This field determines if you want to include information for the entire store on
the report.
Action: Click the radio button.
Cashier #
This field determines if you want to include information for 1 cashier on the
report.
Action:
1. Click the radio button.
2. Type a cashier number into the field.
All Cashiers
This field determines if you want to include information about transactions
processed by all the store’s cashiers on the report.
Action: Click the radio button.
Register
This field determines if you want to include information for 1 register on the
report.
Action:
1. Click the radio button.
2. Type a register number into the field.
322
Using standard reports
Field
Description
Register Group
This field determines if you want to include information for 1 register group on
the report.
You can define register groups by running a Manager Code 6 - Terminal Define
transaction at the POS terminal. For information about using manager codes,
refer to the POS Xpress User Manual.
Action:
1. Click the radio button.
2. Type a register group number into the field.
All Registers
This field determines if you want to include information for all the store’s
registers on the report.
Action: Click the radio button.
Transaction Types (Item
Voids - Post Updates)
These fields determine the types of transactions you want to include in the
report.
If you want to include all the transaction types in the report, you can click Select
All Txn Types.
Action: Click (√) the checkboxes for the transactions you want to include in the
report.
Select All Txn Types
This field determines if you want the report to include all the transaction types
available in the criteria window.
Action: Click the button.
Generate Report
This field generates the report based on the criteria in the window.
For more information about generating reports, see “Generating reports” on
page 297.
Action: Click the button.
323
Reporting
Loss Prevention Summary report
The following is a sample Loss Prevention Summary report.
You can use the report template designer to alter the appearance and layout of the Loss Prevention
Summary report. For information about the template designer, see “Using the report template
designer” on page 300. This sample report uses the default template.
Loss Prevention Detail
The Loss Prevention Detail report provides detailed information about each of the transactions of the
type you select in the criteria window. The Store Manager compiles the Loss Prevention Summary and
Loss Prevention Detail reports based on the same criteria.
To compile the Loss Prevention Detail report:
324
1.
Select criteria and generate the Loss Prevention Summary report. The summary report is
displayed in the report window.
2.
Click Details. The Loss Prevention Detail report is displayed in the report window.
Using standard reports
Loss Prevention Detail report
The following is a sample Loss Prevention Detail report.
You can use the report template designer to alter the appearance and layout of the Loss Prevention
Detail report. For information about the template designer, see “Using the report template designer”
on page 300. This sample report uses the default template.
Salesperson
The Salesperson report contains sales information, such as item and amount, organized by salesperson.
Salesperson Report Criteria window
This window contains fields used to select the criteria that the Store Manager uses to gather
information for the Salesperson report.
The following table contains descriptions of the fields in the Salesperson Report Criteria window:
Field
Description
Current Business Date
This field determines if the report period is the current business date.
You can also click Previous Business Date and the Period From/To field to
select the report period.
Action: Click the radio button.
Previous Business Date
This field determines if the report period is the previous business date.
You can also click Current Business Date and the Period From/To field to
select the report period.
Action: Click the radio button.
325
Reporting
Field
Description
Period From/To
This field defines a range of dates for the report period.
You can click Current Business Date and Previous Business Date to select
the report period.
Action: Click the button beside the field to open the pop-up calendar. Click a date
in the calendar and click OK.
Alternatively, type a date into the field.
Salesperson ID From/To
This field defines a range of salespeople whose sales you want to include in the
report.
Action: Click the drop-down list and select a salesperson from the list.
Generate Report
This field generates the report based on the criteria in the window.
For more information about generating reports, see “Generating reports” on
page 297.
Action: Click the button.
Salesperson report
The following is a sample Salesperson report.
326
Using standard reports
Hourly Sales Summary
The Hourly Sales Summary report contains sales totals for hour or half hour increments. You can
specify a range of dates for the report, and specify days of the week. You can also specify the time
period.
The Hourly Sales Summary report and the Average Hourly Sales report use the same criteria window.
Hourly Sales Report Criteria window
This window contains fields used to select the criteria that the Store Manager uses to gather
information for the Hourly Sales Summary report and the Average Hourly Sales report.
The following table contains descriptions of the fields in the Hourly Sales Report Criteria window:
Field
Description
Current Business Date
This field determines if the report period is the current business date.
You can also click Previous Business Date and the Period/To field to select
the report period.
Action: Click the radio button.
Previous Business Date
This field determines if the report period is the previous business date.
You can also click Current Business Date and the Period/To field to select the
report period.
Action: Click the radio button.
Period/To (Date)
This field defines a range of dates for the report period.
You can also click Current Business Date and Previous Business Date to
select the report period.
Action: Click the button beside the field to open the pop-up calendar. Click a date
in the calendar and click OK.
Alternatively, type a date into the field.
Sun - Sat
These fields determine the days included on the report. The days you select that
fall during the report period are included.
Action: Click (√) the checkboxes for the days you want included in the report.
Period/To (Time)
This field defines a range of times for the report period.
Action: Click the drop-down list and select a time from the list.
Time Increment
This field defines the time increments (hour, 1/2 hour) the Store Manager uses
to accumulate and report sales information.
Action: Click the drop-down list and select an increment from the list.
Clear Criteria
This field clears the information from the criteria window, so you can make new
selections.
Action: Click the button.
327
Reporting
Field
Description
Summary
This field generates the Hourly Sales Summary report.
Action: Click the button.
Average
This field generates the Average Hourly Sales report.
Action: Click the button.
Hourly Sales Summary report
The following is a sample Hourly Sales Summary report.
You can use the report template designer to alter the appearance and layout of the Hourly Sales
Summary report. For information about the template designer, see “Using the report template
designer” on page 300. This sample report uses the default template.
The following table contains the formulas used to calculate the data in some of the columns:
328
Column
Formula
% of total transactions
Number of transactions during time increment/total number of transactions.
% of total net sales
Net sales during time increment/total net sales.
% of Total Items Sold
Number of items sold during time increment/total items sold.
Average net sales
Net sales during time increment/number of transactions during time increment.
Average Items
Number of items sold in time increment/number of transactions during
increment.
Average Number of
Items Per Transaction
Number of items sold during increment/number of transactions during
increment.
Using standard reports
Average Hourly Sales
The Average Hourly Sales report contains average sales figures grouped in hour or half hour
increments.
The Hourly Sales Summary report and the Average Hourly Sales report use the same criteria window.
For information about the fields in the Hourly Sales Report Criteria window, see “Hourly Sales Report
Criteria window” on page 327.
Average Hourly Sales report
The following is a sample Average Hourly Sales report.
You can use the report template designer to alter the appearance and layout of the Average Hourly
Sales report. For information about the template designer, see “Using the report template designer” on
page 300. This sample report uses the default template.
The following table contains the formulas used to calculate the data in some of the columns:
Column
Formula
% of total transactions
Number of transactions during time increment/total number of transactions)/
number of days.
% of total net sales
Net sales during time increment/total net sales)/number of days.
% of Total Items Sold
Number of items sold during time increment/total items sold)/number of days.
Average net sales
Net sales during time increment/number of transactions during time increment)/
number of days.
Average Items
Number of items sold in time increment/number of transactions during
increment)/number of days.
329
Reporting
POS Balance
The Balance report contains information indicating if a cashier is balanced, over or short.
Balance Report Criteria window
This window contains fields used to select the criteria that the Store Manager uses to gather
information for the Balance report.
The following table contains descriptions of the fields in the Balance Report Criteria window:
Field
Description
Detail
This field determines if you want the report to include over/short information
about specific tenders.
Action: Click the radio button.
Summary
This field determines if you want the report to include total over/short figure for
all tenders combined.
Action: Click the radio button.
Variance
This field determines if you want the report to include total over/short amounts
for each day in the week.
Action: Click the radio button.
Current Business Date
This field determines if the report period is the current business date.
You can also click Previous Business Date and the Period From/To field to
select the report period.
Action: Click the radio button.
Previous Business Date
This field determines if the report period is the previous business date.
You can also click Current Business Date and the Period From/To field to
select the report period.
Action: Click the radio button.
Period From/To
This field defines a range of dates for the report period.
You can also click Current Business Date and Previous Business Date to
select the report period.
Action: Click the button beside the field to open the pop-up calendar. Select a
date in the calendar and click OK.
Alternatively, type a date into the field.
330
By Store
If you want to include balance information for the entire store on the report,
click the radio button.
All Registers
If you want to include information for all the store’s registers on the report, click
the radio button.
Using standard reports
Field
Description
Register
If you want to include information for just 1 register on the report, click the
radio button.
Generate Report
This field generates the report based on the criteria in the window.
For more information about generating reports, see “Generating reports” on
page 297.
Action: Click the button.
Balance report
The following is a sample Balance report.
You can use the report template designer to alter the appearance and layout of the Balance report. For
information about the template designer, see “Using the report template designer” on page 300. This
sample report uses the default template.
The following table contains the formulas used to calculate the data in some of the columns follow:
Column
Formula
System
Total of the tender received + reissued + refunded.
Note: Reissued and refunded amounts are usually negative.
Short/Over
System — actual tender in cash drawer.
Macro
The Store Manager assigns each report macro to a button in the Report Macro List Menu window.
When you launch a macro, the reports in it are generated based on the criteria you choose when you
define the macro. They are not displayed on your screen in the report window.
331
Reporting
For information about defining the reports in each macro, and the criteria for the reports, see
“Defining report macros” on page 291.
To launch a macro and print the reports defined in it:
1.
On the Main Menu window, click Reports.
2.
In the Report Menu window, click Report Macro.
3.
Click the button corresponding to the macro you want to run. The reports are generated and
printed. Dialog boxes appear to inform you of the progress of the generating and printing of each
report. When the macro is finished, a dialog box appears informing you that the macro is
complete.
4.
Click OK.
Using inventory reports
You can compile several different reports from the Store Manager that provide information about
inventory levels, costs, sales, and profits from inventory controlled items. Once you have compiled a
report and it is displayed in the report window, you can print it. For information about printing reports,
see “Printing a report” on page 297.
You can change the appearance of inventory reports using the report template designer. For
information about the designer, see “Using the report template designer” on page 300.
Inventory Adjustment
The Inventory Adjustment Report provides information about the adjustments you make to on-hand
quantities of items and buckets, including the amount of the adjustment, and the reason for the
adjustment.
Inventory Adjustment Report Selection Criteria window
This window contains the fields used to select the criteria that the Store Manager uses to gather
information for the Inventory Adjustment Report.
332
Using inventory reports
To complete the Inventory Adjustment Report Selection Criteria window:
1.
To define a range of dates for the report period, click the button beside the Period field to open
the pop-up calendar. Select a date in the calendar and click OK. Alternatively, type a date into the
Period fields.
2.
To define a range of items to be included in the report, click the PLU fields and type a PLU
number into the fields. You can also use the Category, Group, Department, Userflag 1-6, and
the Vendor fields to define items to be included in the report. You can choose multiple criteria.
The report only includes items matching all criteria.
3.
To select the category to which the items belong that you want included in the report, click the
Category drop-down list and select a category from the list.
4.
To select the group with items you want included in the report, click the Group drop-down list
and select a group from the list.
5.
To select the department with the items you want included in the report, click the Department
drop-down list and select a department from this.
6.
The Userflag 1-6 fields define the user flag option that is assigned to the items you want included
in the report. Click the drop-down list and select a user flag option from the list.
7.
To specify the supplier of the items you want included in the report, click the Vendor drop-down
list and select a supplier from the list.
8.
To specify specific adjustment types, click the Adjustment Transaction Type drop-down list and
select a type. The available types are:
9.
Sale
Return
Received
Apply
Manual Adjustment
Transfer In
Transfer Out
Physical Inventory
Reset
New Item
Item Deleted
In-Store Transfer
Inventory Adjustment from Head Office
PDT Sale
PDT Return
PDT Pickup
PDT Cancel
To generate the report based on the above criteria, click Generate Report. For more information
about generating reports, see “Generating reports” on page 297.
333
Reporting
Inventory Adjustment Report
Notes added in the Inventory Adjustment Maintenance window are displayed on the report.
The information displayed under the Txn# is a TLog-generated sequence number created when the
inventory adjustment transaction is completed. Reg# is always ‘255’ within Store Manager.
334
Using inventory reports
Note: This information only appears for adjustment transactions created within Store Manager. Any
inventory transactions created at the POS are not reflected here.
Tip: To find a PLU, click in the PLU field, and press F12. The PLU Search window appears.
Inventory Adjustment Report
You can use the report template designer to alter the appearance and layout of the Inventory
Adjustment Report. For information about the template designer, see “Using the report template
designer” on page 300.
Inactive PLU
The Inactive PLU report provides summary information about PLUs that have been inactive for the
period beginning on the date you define. You can also define the items included on the report.
335
Reporting
Inactive PLU Report Selection Criteria window
This window contains fields used to select the criteria that the Store Manager uses to gather
information for the Inactive PLU report.
To complete the Inactive PLU Report Selection Criteria window:
1.
To specify the period during which the items you want to include in the report must be inactive,
click the button beside the Inactive Since field to open the pop-up calendar. Select a date in the
calendar and click OK. Alternatively, type a date into the field. The period runs from the date you
enter into this field, to the current date.
2.
To report the number of items sold during a defined range of dates, click the button beside the
Sold Between field to open the pop-up calendar. Select a date in the calendar and click OK.
Alternatively, type a date into the Date fields.
3.
To define a range of items to be included in the report, click the PLU fields and type a PLU
number into the fields. You can also use the Category, Group, Department, Userflag 1-6, and
the Vendor fields to define items to be included in the report. You can choose multiple criteria.
The report only includes items matching all criteria.
4.
To select the category to which the items belong that you want included in the report, click the
Category drop-down list and select a category from the list.
5.
To select the group with items you want included in the report, click the Group drop-down list
and select a group from the list.
6.
To select the department with the items you want included in the report, click the Department
drop-down list and select a department from this.
7.
The Userflag 1-6 fields define the user flag option that is assigned to the items you want included
in the report. Click the drop-down list and select a user flag option from the list.
8.
To specify the supplier of the items you want included in the report, click the Vendor drop-down
list and select a supplier from the list.
9.
To generate the report based on the above criteria, click Generate Report. For more information
about generating reports, see “Generating reports” on page 297.
Tip: To find a PLU, click in the PLU field, and press F12. The PLU Search window appears.
336
Using inventory reports
Inactive PLU report
The following is a sample Inactive PLU report.
You can use the report template designer to alter the appearance and layout of the Inactive PLU report.
For information about the template designer, see “Using the report template designer” on page 300.
This sample report uses the default template.
337
Reporting
Current Inventory
The Current Inventory Report lists the current quantities of items and buckets in the store, their retail
price, the quantity sold, the closing current inventory on hand, and the amount of money received
from the sales of the item.
Current Inventory Report Selection Criteria window
This window contains fields used to select the criteria that the Store Manager uses to gather
information for the Current Inventory Report.
To complete the fields in the Current Inventory Report Criteria window:
338
1.
To define a range of items to be included in the report, click the PLU fields and type a range of
PLU numbers in the fields. You can also use the Category, Group, Department, User Flag 1-6, and
the Vendor fields to define items to be included in the report. You can choose multiple criteria.
The report only includes items matching all criteria.
2.
To select the category to which the items belong that you want included in the report, click the
Category drop-down list and select a category from the list.
3.
To select the group with items you want included in the report, click the Group drop-down list
and select a group from the list.
4.
To select the department with the items you want included in the report, click the Department
drop-down list and select a department from this.
5.
The Userflag 1-6 fields define the user flag option that is assigned to the items you want included
in the report. Click the drop-down list and select a user flag option from the list.
6.
To specify the supplier of the items you want included in the report, click the Vendor drop-down
list and select a supplier from the list.
7.
To include items with a negative quantity on-hand in the report, click the Negative Available
Quantity Only checkbox.
8.
To generate a full or compact report, click either the Full Report or Compact Report radio
button. A compact report shows only one line of information specific to only 1 Bucket.
Using inventory reports
9.
If you choose to generate a compact report you have the option of displaying In Stock Quantity
for any or all of the Buckets. Click the In Stock Quantity checkbox or leave it unchecked.
10. You can generate the report to show All Buckets, No Buckets, or Selected Buckets. Click the
appropriate radio button to display the required Buckets in the report.
11. The three Buckets in the example window above are defined as Available, Allocated, and Not
For Sale. Click one or all of the checkboxes to generate the report with information on the
selected Buckets.
12. To generate the report based on the above criteria, click Generate Report. For more information
about generating reports, see “Generating reports” on page 297.
Tip: To find a PLU, click in the PLU field, and press F12. The PLU Search window appears.
Current Inventory Reports
The following is a sample of a full Current Inventory Report.
You can use the report template designer to alter the appearance and layout of the Current Inventory
Report. For information about the template designer, see “Using the report template designer” on
page 300. This sample report uses the default template.
To show or hide the criteria used to generate this report, click the Show/Hide Criteria toggle
button.
The following is an example Current Inventory Compact Report. In this example there are 10 items in
stock but only 8 are available for sale because the Not For Sale Bucket contains 2 items, possibly
because they have been put aside for charity or the items may be damaged.
339
Reporting
Gross Profit
The Gross Profit Report provides information about the number of items sold, quantity on hand, retail
price, cost, and profit.
Gross Profit Report Selection Criteria window
This window contains fields used to select the criteria that the Store Manager uses to gather
information for the Gross Profit Report.
340
Using inventory reports
To complete the Gross Profit criteria window:
1.
To select a range of dates for the report period, click the Period fields and type a date range in the
fields, or click the button beside the fields and select a date from the pop-up calendars. Click OK.
Note that the default date range in the Period fields is based on the previous inventory control
period.
Note: The QOH (quantity on hand) Coleman the report reflects the most
recent inventory control period within the specified range of dates on the
Criteria window.
2.
To select a range of items to be included in the report, click the PLU fields and type a range of
PLU numbers in the fields. You can also use the Category, Group, Department, Userflag 1-6, and
Vendor fields to define items to be included in the report. You can choose multiple criteria. The
report only includes items matching all criteria.
3.
To define the category that contains the items you want included in the report, click the Category
drop-down list and select a category from the list.You can also use the PLU/To, Group,
Department, Userflag 1-6, and Vendor fields to define items to be included in the report. You can
choose multiple criteria. The report only includes items matching all criteria.
4.
To define the group that contains the items you want included in the report, click the Group
drop-down list and select a group from the list.You can also use the PLU/To, Category,
Department, Userflag 1-6, and Vendor fields to define items to be included in the report. You can
choose multiple criteria. The report only includes items matching all criteria.
5.
To define the department that contains the items you want included in the report, click
Department the drop-down list and select a department from the list.You can also use the PLU/
To, Category, Group, Userflag 1-6, and Vendor fields to define items to be included in the report.
You can choose multiple criteria. The report only includes items matching all criteria.
6.
The UserFlag 1-6 fields define the user flag option that is assigned to the items you want included
in the report.Click the UserFlag drop-down lists and select a user flag option from each list.You
can also use the PLU/To, Category, Group, Department, and Vendor fields to define items to be
341
Reporting
included in the report. You can choose multiple criteria. The report only includes items matching
all criteria.
7.
To define a vendor that supplies the items you want to include in the report, click the Vendor
drop-down list and select a vendor from the list.You can choose multiple criteria. The report only
includes items matching all criteria.
8.
To group the report data by category, group, department, and vendor, click the checkboxes in the
Group By section of the window, and then click the drop-down lists and select an option from
each list.
9.
To clear the information from the criteria window, click Reset.
10. To generate the Gross Profit Report based on the criteria in the window, click Generate Report.
Tip: To find a PLU, click in the PLU field, and press F12. The PLU Search window appears.
342
Using inventory reports
Gross Profit Report
The following is a sample Gross Profit Report.
You can use the report template designer to alter the appearance and layout of the Gross Profit Report.
For information about the template designer, see “Using the report template designer” on page 300.
This sample report uses the default template.
To show or hide the criteria used to generate this report, click the Show/Hide Criteria toggle
button.
343
Reporting
Performance Summary
The Performance Summary Report provides information about item sales, quantity on-hand, and
costs. The Performance Summary report and the Performance Detail report use the same criteria
window.
Performance Report Selection Criteria window
This window contains the fields used to select the criteria that the Store Manager uses to gather
information for the Performance Summary Report and the Performance Detail report.
To complete the Performance Report Selection Criteria window:
1.
To select a range of dates for the report period, click the Period fields and type a date range in the
fields, or click the button beside the fields and select a date from the pop-up calendars. Click OK.
Note that the default date range in the Period fields is based on the previous inventory control
period.
2.
To define a range of vendors that supply the items you want to include in the report, click the
Vendor drop-down lists and select a vendor from each list.
3.
To define a range of departments that contain the items you want to include in the report, click the
Department drop-down lists and select a department from each list.
4.
To clear the information from the criteria window, click Reset.
5.
To generate the Performance Detail Report based on the criteria in the window, click Generate
Detail Report. For more information about generating reports, see “Generating reports” on
page 297.
6.
To generate the Performance Summary Report based on the criteria in the window, click
Generate Summary Report.
To find a PLU, click in the PLU/To field, and press F12. The PLU Search window appears.
344
Using inventory reports
Performance Summary report
The following is a sample Performance Summary Report.
You can use the report template designer to alter the appearance and layout of the Performance
Summary Report. For information about the template designer, see “Using the report template
designer” on page 300. This sample report uses the default template.
To show or hide the criteria used to generate this report, click the Show/Hide Criteria toggle
button.
Performance Detail
The Performance Detail report contains detailed information about sales, costs, on-hand quantities,
and quantities on order.
The Performance Summary report and the Performance Detail report use the same criteria window.
For information about the fields in the Performance Report Selection Criteria window, see
“Performance Report Selection Criteria window” on page 344.
Performance Detail report
You can use the report template designer to alter the appearance and layout of the Performance Detail
report. For information about the template designer, see “Using the report template designer” on
page 300.
The dates shown in the Last Sold column associated with a specific PLU, reflect the most recent
inventory period within the date range specified on the Criteria window.
345
Reporting
To show or hide the criteria used to generate this report, click the Show/Hide Criteria toggle
button.
Pending Transactions
The Pending Transactions Reports provide information about pending transactions of a specific type
or status. The reports include information such as the transaction type, number, status, date, pick up
date, total amount, customer data, payments, and bins’ location. As with other reports you can send,
print, and export the reports by clicking on the corresponding button in each report window. Three
types of report can be generated, a regular report, a report sorted by item, and a details report, each of
which are described in the following pages.
You can search for pending transactions by the creation date, the last paid date within a specified
period, report type by item, overdue by more than a specified number of days, category, group, or by
department.
346
Using inventory reports
Pending Transactions Report Criteria window
The Pending Transactions Report Criteria window contains the fields used to select the criteria that the
Store Manager uses to gather pending transaction information.
To complete the Pending Transactions Report Criteria window:
1.
You can print a regular report, or a report that is grouped by item. To print a regular pending
transactions report, click Regular Report.
2.
To print all pending transactions for a specific item, click By Item Report.
3.
Click the Transaction Group drop-down list and select a group of transactions to include in this
report. If you leave this field blank, then all will be selected by default.
4.
Click the appropriate fields to select a date range, either the Sell Date between or Last Payment
between for the report.
5.
Click the Transaction Status All radio button to include all transactions in this report. Click
Selected, and then click the specific transactions checkboxes of a particular status to include in
this report.
6.
To select the pending transaction types by activity, click the Transaction Activity drop-down list
and select an option from the list. Your choices are: Sale, Payment, Pickup, Item Adjustment,
Cancel, Write-off, Pymt Adjustment, Reactivate Write-off, Statement, and Change Admin. Info.
7.
Click the Payment or Pickup radio button to search for active transactions with payments or
pickups that are overdue by a specified number of days, or that are due before a specified date.
8.
Click Overdue by... and type the number of days that the next payment or expected pickup is
overdue by. After generating the report, the number of delinquent days and the level of
delinquency is displayed in the Overdue by (days) column.
9.
To include pending transactions with a next payment or expected pickup date prior to a specified
date, click Due before... and type the date in the adjacent field.
10. To print the report for all customers with the above criteria, click All in the Customers: section of
the window.
11. If you want the report to show the pending transactions for a specific customer, click the
Reference # field and type the customer’s reference number in the adjacent field.
347
Reporting
12. Click the Phone # field, and type the customer’s area code and telephone number.
13. Click the Name field, and type the customer’s name.
14. To sort the pending transactions by category, click the Dept. Category drop-down list and select
a category from the list. For example, apparel.
15. To sort the pending transactions by group, click the Dept. Group drop-down list and select a
group from the list. For example, ladies apparel.
16. To sort the pending transactions by department, click the Department drop-down list and select a
department from the list. For example, blouses.
17. To sort the pending transactions by PLU, cluck the PLU field and type the PLU number in the
field.
18. To generate the Pending Transactions Report, click Generate Report.
Pending Transactions Report
Illustrated below is an example of a regular Pending Transactions Report. This report lists all matching
transactions, and displays summary information for each of them, such as the transaction name, status,
number, days overdue, sell date, pickup due date, customer data, total transaction amount, and the
balance.
To sort the transactions by the number of delinquent days:
Click the Overdue by (days) heading. The transactions are displayed by their original sell date by
default, with the most recent transactions appearing first.
To generate a Pending Transactions Details Report:
348
Double click a single transaction, or click Transaction Details.
Using inventory reports
The Pending Transaction Details Report
The Pending Transaction Details Report displays the bins’ location, service charge amount, and
information on payments, such as the total payment amount, payment schedule of up to 12 payments,
the last payment amount, and the payment date.
The PLU number, product description, quantity, unit price, and extended price are displayed for all
merchandise items. For non-merchandise items, a description and extended price are displayed. Also, a
cross reference number is shown if the sale was performed by a cross reference.
349
Reporting
Pending Transactions By Item Report
Illustrated below is an example of a Pending Transactions By Item Report. This report lists all
matching transactions sorted by department, group, and category. The number of pending transactions
associated with the item, item group, quantity of items to be picked up, total item quantity, and the
extended sale price is displayed for each item, department, department group, and department
category.
To list the pending transactions pertaining to a specific item:
Double click the item line, for example, silk blouse, or click on the item line and then click Item
Transactions. This generates a regular Pending Transaction Report listing the pending
transactions that deal with a selected item.
To generate a Pending Transactions Details Report for an item:
350
1.
On the Pending Transactions by Item Report, click the transaction and then click Item
Transactions.
2.
Click Transaction Details on the Pending Transactions Report.
Using inventory reports
351
Reporting
352
Processing The Payroll
This section provides information about payroll functions available in the Store Manager, including the
ability to review and edit employee’s clock in/out times, confirm the times as accurate, and export the
times to a file for further payroll processing.
This section covers the following topics:
Configuring payroll parameters
Preparing clock in/out information for export
Configuring payroll parameters
Before you review clock in/out information and send it to your head office, you must configure the
Store Manager’s payroll options. The options you choose affect how time is displayed and if you must
confirm the time entries as accurate before you export the file to your head office.
In the following steps, you must enter information into the Payroll Parameters Maintenance window.
For information about the fields in the window, see “Payroll Parameters Maintenance window” on
page 354.
To configure payroll parameters:
1.
On the Main Menu window, click Parameters Setup.
2.
Click Payroll Parameters.
3.
Complete the fields in the Payroll Parameters Maintenance window, as appropriate.
4.
Click Save, and then click Exit.
353
Processing The Payroll
Payroll Parameters Maintenance window
This window contains the fields for configuring the payroll function in the Store Manager.
The following table contains descriptions of the fields in the Payroll Parameters Maintenance window:
Field
Description
Allow Export of
Unconfirmed Clock Time
Entries
This field determines if you can export clock in/out time entry information, that
you have not confirmed as accurate, to a file for head office.
Allow Confirm All for
Clock Time Entries
This field determines if you can click Confirm All in the Payroll Clock In/Out
Summary window to confirm all of the clock in/out time entries for a week at
once.
Action: Click (√) the checkbox to allow unconfirmed information to be exported.
Action: Click (√) the checkbox to allow all of the clock in/out entries for a week
to be confirmed with the Confirm All button. Clear the checkbox to disable the
Confirm All button on the Payroll Clock In/Out Summary window.
Round Clock Time To
This field defines the increments of an hour an employee’s actual work time is
rounded up to.
For example, assume an employee actually works 1 hour 20 minutes. If you type
15 into this field, the Store Manager rounds the employee’s work time to 1 hour
30 minutes.
Action: Type a number, from 1-60, into the field. Type 0 if you do not want the
times rounded.
Display Total Worked
Hours Style
This field defines how hours are displayed in the Total Worked fields in the
Payroll Clock In/Out Summary window, the Payroll Clock In/Out Detail
window, and on printed payroll reports.
You can define the selections that appear in this drop-down list in the Code
Table Maintenance window, but 2 default display methods are defined for you,
‘Display by Decimal’ and ‘Display by Hrs/Mins’.
Action: Click the drop-down list and select a display style from the list.
354
Configuring payroll parameters
Field
Description
Display Worked Hours as
This field defines the text string that appears after the hour portion of the time
in the Total Worked fields in the Payroll Clock In/Out Summary window, the
Payroll Clock In/Out Detail window and on printed payroll reports.
For example, assume the employee worked 2 hours and 15 minutes. If you enter
H into this field, the time is displayed in the Total Worked field as ‘2H 15
mins’.
Action: Type a short alphanumeric string into the field.
Display Worked Minutes
as
This field defines the text string that appears after the minute portion of the time
in the Total Worked fields in the Payroll Clock In/Out Summary window, the
Payroll Clock In/Out Detail window and on printed payroll reports.
For example, assume the employee worked 2 hours and 15 minutes. If you enter
M into this field, the time is displayed in the Total Worked field as ‘2 hrs 15M’.
Action: Type a short alphanumeric string into the field.
Fiscal Week End
This field defines the last day of the store’s fiscal week. All the Start of Week and
End of Week dates in the payroll windows are determined by the day of the
week in this field.
Your head office uses the Configurator to select the fiscal week.
Action: No action required. The Store Manager automatically completes this field
with the day selected by your head office.
Configuring payroll periods
A payroll period download parameter file, periods.asc, is applied to a table in the Store Manager SQL
database. This file consists of the following:
Period type
Period ID
Description
Start date
End date
Each row in the periods.asc file represents a separate payroll period.
To configure a payroll period:
1.
On the Main Menu window, click Payroll.
2.
Click Clock In/Out Report.
3.
Click the Payroll Period radio button, and select an option from the adjacent drop-down list.
or
4.
Click the User-defined Period radio button, and select a start date and an end date from the
adjacent pop-up calendars.
5.
Click Generate Report to display the Clock In/Out Summary Report.
355
Processing The Payroll
Preparing clock in/out information for export
Before you export clock in/out information to a file for your head office, you can review and edit the
information to ensure it is accurate and complete.
If the Allow Export of Unconfirmed Clock Time Entries checkbox in the Payroll Parameters
Maintenance window is clear, you also have to confirm the times. For information about defining
payroll parameters, see “Configuring payroll parameters” on page 353.
You must configure the Store Manager’s payroll options before you prepare or export the clock in/out
information. These options determine if you must confirm clock in/out times before export, or if you
can export without confirming the times. For information about configuring the options, see
“Configuring payroll parameters” on page 353.
Editing clock in/out times
You can review an employee’s clock in/out times and edit them, if necessary.
WARNING! An employee must be assigned to your store in their employee record or they do not
appear in any of the clock in/out windows.
Before you complete the following steps, you must define the selections that appear in the Reason
Code drop-down list.
To review an employee’s clock in/out times:
356
1.
On the Main Menu window, click Payroll.
2.
Click Clock In/Out Adjustment. The Payroll Clock In/Out Summary window contains
summary information for all employees.
3.
Click Start of Week or End of Week to locate the appropriate week’s information.
4.
Click the employee whose time you want to review in detail, and then click Open.
Preparing clock in/out information for export
If the clock in/out times for this employee are not accurate, you can edit the entry in the Payroll Clock
In/Out Detail window. For information about the fields in the window, see “Payroll Clock In/Out
Detail window” on page 357.
You can edit the employee’s clock in date and time, clock out date and time, and the reason the
employee worked. Every employee must have clock in and clock out times for each day in the week. If
an employee clocks in but does not clock out, the hours worked for that day is calculated to be 0.
To edit a clock in/out entry:
1.
Click the fields you want to edit and change the information they contain.
2.
Click Save.
Tip: You can add a new clock in/out entry for an employee by selecting an
employee in the Payroll Clock In/Out Summary window and clicking New.
Once you have reviewed and edited the clock in/out times, you have to export the information to a file
for your head office. You may have to confirm the information before exporting it.
You can print the Payroll Clock In/Out Summary and Detail reports from the Store Manager’s
Reports Menu window. The clock in/out entries you edit are marked on the printed report with an
asterisk (*). For information about printing these reports, see “Payroll Clock In/Out Detail window”
on page 357.
Payroll Clock In/Out Detail window
This window contains the fields for editing employee’s clock in/out times.
Tip: The information in any of the fields you edit is displayed in red.
357
Processing The Payroll
The following table contains descriptions of the fields in the Payroll Clock In/Out Detail window:
Field
Description
Start of Week
This field contains the date of the first day of the fiscal week.
You define the fiscal week end using the Fiscal Week End field in the Payroll
Parameters Maintenance window. For information about the fields in the Payroll
Parameters Maintenance window, see “Payroll Parameters Maintenance window”
on page 354.
Action: No action required. The Store Manager automatically completes this field
with the date.
End of Week
This field contains the date of the last day of the fiscal week.
You define the fiscal week end using the Fiscal Week End field in the Payroll
Parameters Maintenance window. For information about the fields in the Payroll
Parameters Maintenance window, see “Payroll Parameters Maintenance window”
on page 354.
Action: No action required. The Store Manager automatically completes this field
with the date.
Calendar View
This field opens the Payroll Clock In/Out Detail Calendar View window. This
window displays the employee’s clock in/out information in a different format.
You can edit the information in the calendar view window.
Action: Click the button.
Employee#
This field contains the unique number that identifies the employee.
Action: No action required. The Store Manager automatically completes this field
with the employee number of the employee you select in the Payroll Clock In/
Out Summary window.
Last Name
This field contains the employee’s last name.
Action: No action required. The Store Manager automatically completes this field
with the last name of the employee you select in the Payroll Clock In/Out
Summary window.
First Name
This field contains the employee’s first name.
Action: No action required. The Store Manager automatically completes this field
with the first name of the employee you select in the Payroll Clock In/Out
Summary window.
Clock In
This field defines the date and time the employee clocked in.
There is one entry in this field for each time the employee clocks in.
Action: The Store Manager automatically completes this field, but you can edit the
information in it.
To edit the information in the box:
1. Click the button beside the field to open the popup calendar window. Click a
date and click OK. (Alternatively, type a date into the field.)
2. Click in the field after the date, and type a new time (24 hour clock) using the
following format: HH:MM:SS.
358
Preparing clock in/out information for export
Field
Description
Clock Out
This field defines the date and time the employee clocked out.
There is one entry in this field for each time the employee clocks out.
Action: The Store Manager automatically completes this field, but you can edit the
information in it.
To edit the information in the box:
1. Click the button beside the field to open the popup calendar window. Select a
date and click OK. (Alternatively, type a date into the field.)
2. Click in the field after the date, and type a new time (24 hour clock) using the
following format: HH:MM:SS.
Total Worked
This field contains the total hours worked for the day and for the fiscal week.
You can use the Round Clock Time To field in the Payroll Parameters
Maintenance window to define how partial hours worked are interpreted in the
calculation of hours worked. For information about the fields in the Payroll
Parameters Maintenance window, see “Payroll Parameters Maintenance window”
on page 354.
Action: No action required. The Store Manager calculates the total hours worked
and completes this field.
Reason Code
This field defines the reason the employee worked.
You define the selection or work reasons that appear in this drop-down list in the
Code Table Maintenance window.
Action: Click the drop-down list and select a reason from the list.
Confirm Time
This field confirms clock in/out time entries that are displayed in this window for
the employee.
For information about confirming clock in/out entries, see “Confirming clock
in/out times” on page 360.
Action: Click the button.
359
Processing The Payroll
Confirming clock in/out times
The selections you make in the Payroll Parameters Maintenance window determine whether you must
confirm the clock in/out information for all employees before you export it to a file for your head
office. If you click Allow Export of Unconfirmed Clock Time Entries in the Payroll Parameters
Maintenance window, you can confirm the information (optional).
You can confirm clock in/out information from the Payroll Clock In/Out Detail window. If you click
Allow Confirm All for Clock Time Entries in the Payroll Parameters Maintenance window, you can
also confirm information by clicking Confirm All in the Payroll Clock In/Out Summary window. For
information about the Payroll Parameters Maintenance window, see “Payroll Parameters Maintenance
window” on page 354.
Before you confirm the clock in/out information, you should review and edit it to make sure it is
accurate and complete. For information about reviewing and editing the information, see “Editing
clock in/out times” on page 356.
The following steps describe confirming clock in/out information from the Payroll Clock In/Out
Detail window.
To confirm an employee’s clock in/out times:
1.
On the Main Menu window, click Payroll.
2.
Click Clock In/Out Adjustment.
3.
Click Start of Week or End of Week to locate the appropriate week’s information.
4.
Click the employee whose time you want to confirm, and then click Open. The Payroll Clock In/
Out Detail window displays the employee’s information.
5.
Click Confirm Time. The clock in/out time entries for the week are confirmed.
After you confirm the clock in/out information, you can export it to a file for your head office.
360
Preparing clock in/out information for export
Exporting clock in/out files to head office
When you export the clock in/out information for a fiscal week, you export it to a file for your head
office.
You may have to confirm the clock in/out information before you export it. For information on how
to confirm the information, and on determining if you have to confirm it, see “Confirming clock in/
out times” on page 360.
To export the clock in/out information:
1.
On the Main Menu window, click Payroll.
2.
Click Clock In/Out Adjustment.
3.
Click Start of Week or End of Week to locate the appropriate week’s information.
4.
Click Export. The information is exported to a file.
Once you export clock in/out time information, you can review it, but you cannot edit it.
361
Processing The Payroll
362
Viewing the Server State
This section provides information about the windows in the Store Manager that you can use to get
information about the store’s server.
Accessing server information
The Store Manager includes two windows that provide you with information for troubleshooting your
POS system. They are:
Server State Information window
Server Message Log window
Note: You cannot edit the information in these windows.
To open the Server State Information window:
On the Main Menu window, click Server State.
The Server State Information window displays the Store Information and the Server Connection
information.
363
Viewing the Server State
To open the Server Log window:
364
1.
Click Setup Log.
2.
You can view and/or save the log. Click the View Log checkbox to display the Server Log
window.
3.
Click the Save Log checkbox to save the log file.
4.
Click OK.
Index
Symbols
(Safe) Transaction List window 136
parameters 137
.log files 290
search 290
viewing 290
Numerics
3rd Party Programs Menu Selection window 34
3rd Party Programs Setup window 35
3rd Party Software Maintenance window 14
3rd Party Software menu 14
3rd party. See also third party
A
about the Store Manager 11
accessing server information 363
adding
batch item 166
category 66
department 70
employee record 58
extended field options 154
extended options and details 100, 154
group 67
linked item 176
new store 92
PLU 143
PLU cross reference 169
promotion 185
record to a table 15
selections to a drop-down list 64
store 92
tax 80
third-party application buttons to menu windows 34
type of sticker or label 269
vendor 84
adjusting
on-hand inventory quantities 243
after a count 243
at any time 248
administrative tasks
payroll 353
performing 283
all POS
opening or closing 45
another store’s information, entering 91
applying
batch 163
extended field options to customers 103
extended field options to PLUs 104, 157
assigning
an option to a customer 104
authority levels 29
auditing product price changes 167
authority levels 28
assigning 29
cash management 31
updating 32
viewing level 32
changing 33
changing a user 33
functions 29
safes 32
third party applications 34
to access reports 31
transaction types 32
update 30
viewing 30
windows 29
average hourly sales data calculations 329
Average Hourly Sales report 329
altering appearance 329
data calculation formulas 329
example 329
Average Hourly Sales Report Criteria window 327, 329
parameters 327
B
balance details 133
Balance report 330
altering appearance 331
data calculation formulas 331
example 331
parameters 330
Balance Report Criteria window 330
parameters 330
balances
completing 117
entering 116
modifying 118
365
reports 116
safe
details 133
modifying 132
voiding 132
viewing details 119
voiding 118
voiding for safe 132
balancing
cash drawer 116
safe 131
Balancing Short/Over report 293
bank deposit
completing 128
entering 126
modifying 128
processing 126
viewing details 129
voiding 128
batch
applying 163
creating 163
editing 165
selecting 165
batch item
adding 166
deleting 167
modifying information 166
C
calculating
average hourly sales report data 329
balance report data 331
department report data 318
non merchandise data 311
sales analysis report data 308
sales data 307
Tender report data 314
cash drawer
balancing 116
completing balancing 117
modifying pending balance 118
new balance 116
pending balance transaction 116
viewing balance details 119
voiding balance 118
cash management
authority levels 31
updating 32
viewing level 32
query safe transactions 137
safe balance
completing 131
modifying 132
viewing details 133
voiding 132
safes
bank deposit withdrawal 126-129
366
transactions records 136
transferring tender between 129
security functions 31
Cash Management Security Setup window 32
Cash/Safe management parameters
General Parameters Setup window 24
cashier prompts for customer information 95
categories 63
adding 66
defining 65
deleting 67
modifying 66
Category report 321
example 321
Change Criteria parameters
Global PLU Change window 160
Change Fields parameters
Global PLU Change window 161
Change Password window 29
changing
all the text in the Store Manager 26
customer display 52
header and trailer information printed on receipts 53
user authority level 33
user password 28
changing text
all category 25
all objects 26
single object 24
Store Manager 24
Choose PLU and Operation Type window 166
choosing report criteria 296
Clean Up Transaction History window 54
cleaning up system
for new store 53
clock in/out
confirming times 360
editing employee times 356-357
exporting files 356
to head office 361
parameters 356
reviewing employee times 356
closing
all POS terminals 47
single POS terminal 44
store 51
Code Table Maintenance window 64
Column Hide window 301
Column Truncation window 301
compiling
Loss Prevention Detail report 324
Non Merchandise Detail report 311
Payroll Clock In/Out Detail report 316
reports 296
choosing criteria 296
generating 296
printing 297
Sales Analysis report 308
completing
balance 117
bank deposit 128
deposit into safe 122
deposit into the safe 122
fields in window 20
inventory transfer 232
loan 109
pickup 112
pickup from cash drawer 112
receiving transaction 223
safe balance 131
Configurator 12, 13
downloading information 13
parameters. See Configurator parameter files
Configurator parameter files
layaway parameters 13
register parameters 13
tender parameters 13
Configurator Parameters window 13
accessing 13
configuring
inventory parameters 191
payroll parameters 353
sort options 36
sticker and label parameters 253
confirming
clock in/out times 360
contents of safe, viewing 135
controlling POS terminals 42
converting purchase orders into receiving orders 211
count sheets
generating 240
printing 240
creating
batch 163
custom design for a sticker or label 274
departments 69
extended field options and option details 100
inventory count PLU list 244
inventory transfer 229
label and sticker formats 255
new customer record 95
new types of stickers and labels 269
PLU list 244
price sticker queue 261
purchase order 196
purchase order from a suggested order 198
receiving by case transaction 218
receiving transaction 211
report macro 293
shelf label print queue 264
shelf label queue 264
sticker or label design 274
stickers and labels 269
suggested order purchase order 198
update export files 159
user flag option 77
cross reference numbers, PLU
creating 169
defining 169
deleting 171
modifying 171
Current Inventory report 338
example 339
customer
assigning extended field option 104
customer display 52
changing 52
select message 52
Customer Display Maintenance window 52
customer files 63
customer information
database 99
maintaining 99
prompts for cashier 95
records 95
Customer Maintenance window 96, 104
Demographic parameters 98
Loyalty Points parameters 99
customer receipt messages
customizing 53
customer records 95
accessing 95
creating 95, 96
database 99
deleting 97
extended fields 99
maintaining 96
modifying 96
Customer Selection window 96, 97
customers, setting up 95
customizing
customer receipt messages 53
fields 95
POS terminals 41
Store Manager 21-39
D
data calculation formulas
Sales report 307
data calculations
Average Hourly Sales Report 329
Balance report 331
Hourly Sales report 328
Non Merchandise Summary report 311
Sales Analysis report 308
Sales report 307
Tender report 314
database
customer information 99
defining
categories 63, 65
customer files 63
departments 63, 69
drop-down lists 63
exception to a promotion 189
fields to be changed 161
367
groups 63, 67
PLU cross reference 169
PLUs to be changed 160
product vendors 63
promotion exception 189
report macros 291
sticker and label parameters 259
printing 253
store manager’s system parameters 22
tax rates 63
user flags 63, 77
deleting
batch item 167
category 67
custom design sticker or label 276
customer record 97
departments 75
employee record 60
extended options 102, 156
group 69
label and sticker format 256
linked item 178
PLU 147
PLU cross reference 171
price sticker queue 262
promotion 189
quantity or level pricing scheme 175
record from a table 17
report macro 294
shelf label queue 266
sticker or label type 270
store’s record 93
tare weight 90
tax 82
user flag option 79
vendor 86
Demographic parameters
Customer Maintenance window 98
Department (New) window
General parameters 71
Print Options parameters 75
taxes parameters 73
Department Categories Selection window 37, 67
Department Category Maintenance window 65
Department Detail report 319
example 319
Department Group Maintenance window 68
Department Groups Selection window 67, 68
Department Maintenance window 15
Department report 317
altering appearance 318
Category report 321
data calculation formulas 318
Department Detail report 318
example 318
Group report 320
parameters 317
Department Report Criteria window 317
parameters 317
368
Department Summary and Detail report 292
departments 63
adding 70
assigning
PLUs to 70
taxes to 80
to a group 70
user flags to 70
assigning taxes 73
creating 69, 70
defining 69
deleting 75
Department report 317, 318
See also Department report
modifying 75
PLUs 69
print options 75
user flags 77
Departments Selection window 15, 19, 69, 70, 75
deposits
Configurator verification 126
from safe
modifying withdrawal 128
into bank from safe 126
completing withdrawal 127
viewing details of withdrawal 129
voiding withdrawal 128
into safe 121
completing 122
entering 121
modifying 122
new 121
pending transaction 121
tenders 121
viewing details 123
voiding 123
design for sticker or label, creating custom 274
Design Label Definition window 270, 272
parameters 272
Design Labels Selection window 270, 271
Designed Label Maintenance window 274, 278
parameters 278, 280
designing
report template 300
stickers and labels 269, 274
detailed safe transactions, viewing 136
details of bank deposit, viewing 129
drop-down lists 63
adding selections 64
editing 65
populating 63
product vendors 84
query records 19
duplicating purchase order 206
E
editing a batch 165
EJProcessor
electronic journal update 286
EJProcessor window 286
electronic journal
See also journal files
EJProcessor 286
Electronic Journal Viewer 283
Multi Journal Search parameters 288
parameters 288
Printing Method parameters 289
Search Criteria parameters 289
updating 285, 286
multi journal search 288
opening file 287
printing method parameters 289
search parameters 289
searching for transactions 288
selecting a journal 285
setting up 283, 284
updating 285
updating with third party applications 285
EJProcessor 286
electronic journal files. See journal files
Electronic Journal Setup window 283
parameters 284
Electronic Journal Viewer 287, 288
Multi-Journal Search parameters 288
parameters 288
Printing Method parameters 289
Search Criteria parameters 289
search function 288
updating 285, 286
emailing
report as attachment 298
report data 299
employee files. See employee records
Employee Maintenance window 61
parameters 61
employee records 57
adding 58
deleting 60
maintaining 57
modifying 59
values 57
Employee Selection window 18, 33
end of day function 49, 51
for cleaning up new store system 53
terminal admin exception handler 51
entering
another store’s information 91
balance 116
bank deposit 126
deposit into safe 121
loan 106
new bank deposit 126
new on-hand quantities 244
new safe balance 131
on-hand quantities after a count 244
pickup from cash drawer 111
safe balance 131
export files
creating updates 159
generating 158
Export Report Data window 298
exporting
clock in/out files to head office 361
clock in/out information
preparing 356
PLU information 159
report data to file 298
reports 298
Extended Customer Fields window
parameters 103
extended field option details. See extended fields, option details
Extended Field Option window 101, 155
extended field options 154
See also extended fields, options
adding 154
applying to customers 103
applying to PLUs 104, 157
assigning to PLUs 157
customer
See also extended fields, customer 100
creating 100
deleting 156
modifying 155
option types 153
Extended Field Options Maintenance window 100, 102, 154,
156
parameters 103, 156
extended fields 95
applying options to PLUs 157
applying to customers 103
customer
adding option details 100
applying options 103
details 100
option details 100
option types 99
options 99, 100
customer records 95
defining 153
export files
creating updates 159
for third party applications 158
maintaining 99
maintaining PLUs 153
option details 100, 153, 154, 156
adding 154
customer 100
option types 153
options 153
See also extended field options 154
adding 154
applying to PLUs 157
assigning to a customer 104
creating 100
deleting 102, 156
modifying 101, 155
369
modifying descriptions 101
extended options. See extended field options and extended fields,
options
Extended PLU Fields window 158
F
fields 14, 17, 20
completing 20
customizing 95
definitions 20
extended 95, 154
See also extended fields
adding options 154
applying options to PLUs 157
applying to PLUs 157
creating 154
deleting options 156
modifying options 155
option details 153, 156
option types 153
options 153, 156
using 20
file maintenance 63-104
final clean up function
for opening new store 53
finding
PLU 141
records 17
float 106
See also loan
foreign tender
Tender Detail report 314
Format ID Maintenance window 255
parameters for price/shelf labels 257
Format ID Selection window 255, 256
Future Prices parameters 153
G
General Information parameters
General Parameters Setup window 22
General Label Parameters Maintenance window 259
General parameters
Department (New) window 71
Tax Maintenance window 80
General Parameters Setup window 22
Cash/Safe Management parameters 24
General Information parameters 22
Server Communication parameters 23
Unique PLU Generation parameters 23
Generate Export Files window 159
generating
export file 158
reports 297
Global PLU Change window 160
Change Criteria parameters 160
Change Fields parameters 161
Gross Profit report 340
370
altering appearance 343
example 343
parameters 341
Gross Profit Report Selection Criteria window 340
parameters 341
Group report 320
example 320
groups 63
adding 67
assigning departments to 70
defining 67
deleting 69
modifying 68
H
header and trailer information on receipts 53
Hourly Sales Report Criteria window 327
parameters 327
Hourly Sales Summary and Average report 293
Hourly Sales Summary report 327
altering appearance 328
data calculation formulas 328
example 328
parameters 327
I
Inactive PLU report 335
altering appearance 337
example 337
parameters 336
Inactive PLU Report Selection Criteria window 336
parameters 336
information, processing 353
inventory 211, 223, 234
See also inventory control
adjustment 332
count PLU list 244
count sheets 240
printing 240
entering on-hand quantities after a count 244
Inventory Adjustment report 332
inventory control functions
performing 191
on-hand inventory adjustments
at any time 248
physical inventory maintenance 243
quantities after a count 243
ordering 196
parameters
configuring 191
physical count 240
adjusting on-hand quantities 243
count sheets 240
entering new on-hand quantities 244
PLU count lists 243
on-hand quantities 244
purchase order
converting to receiving orders 211
duplicating 206
issuing 204
manual 196
report 204
voiding 205
receiving 211
by case 218
by PLU or vendor’s SKU 211
partial orders 222
voiding transactions 224
receiving by case function 218
reports 332
compiling 332
Current Inventory 338
Gross Profit 340
Inactive PLU 335
Inventory Adjustment 332
List of Orders 236
Performance Detail 344
Performance Summary 344
Transfer 233
using 332
shelf location 242
transfer 224
by case 229
completing 232
creating 225
printing reports 232
using PLUs 225
Transfer report
printing 232
transferring 224
uploading levels to corporate office 237
viewing information 234
voiding transfer 233
Inventory Adjustment report 293, 332
altering appearance 335
Inventory Adjustment Report Selection Criteria window 332
Inventory Adjustment window 248, 249
parameters 249
inventory control 191, 196
See also inventory
configuring parameters 191
inventory control functions 191, 191-??
ordering inventory
manual purchase orders 196
parameters 191
PLUs 191
purchase orders
creating 196
issuing 204
manual 196
modifying 197
suggested order 198
suggested order 198
viewing information 234
Inventory Control parameters 152
X-Reference window 171
Inventory Count Sheet window 241
inventory counts 240
count sheets 240
PLU list 244
Inventory History Information window 236
parameters 236
Inventory Information window 234
parameters 234
Inventory Menu window 196
Inventory Parameters Maintenance window 191
parameters 192
Inventory Parameters Menu window 191
inventory reports. See reports, inventory and inventory
inventory transfer 224
by case 229
by PLU 225, 226
completing 232
creating 225
printing report 232
voiding 233
issuing a purchase order 204
item movement 303
Item Movement Criteria window 296
Item Movement report 292, 303
example 305
parameters 304
Item Movement Report Criteria window 296, 304
parameters 304, 317
J
journal
searching for transactions 287
selecting 285
journal files 283
adding new 285
EJProcessor 286
Electronic Journal Viewer 283
Multi Journal Search parameters 288
Printing Method parameters 289
Search Criteria parameters 289
searching 288
updating 285, 286
Electronic Journal Viewer window
parameters 288
multi journal search 288
opening 287
printing method parameters 289
reading 283
Search Criteria parameters 289
searching 283, 288
selecting journals 285
setting up 283
setting up electronic journal 284
third party applications 285
EJProcessor 286
viewing 283
journal files. See also electronic journal
Journal Search window 284, 285, 287
371
L
Label Parameter Details Maintenance window 253, 254
parameters 254
Label Parameters Maintenance window
general parameters 259
labels and stickers
defining parameters 259
designing and printing 269
formats
creating 255
deleting 256
modifying 256
printing labels 264
creating a queue 264
deleting a queue 266
modifying a queue 265
printing a queue 266
printing stickers 261
creating a queue 261
deleting a queue 262
modifying a queue 262
printing a queue 263
Labels parameters
PLU Maintenance window 151
launching macros 332
layaway parameters 13
level pricing scheme 172
adding 173
deleting 175
modifying 175
setting up 172
licensee order guide 206
Link Item (New) window
setting parameters 177
Link Item Maintenance window
parameters 177
Link Items Selection window 177
linked item
adding 176
deleting 178
modifying 178
setting up 175
linking vendor’s SKU 194
List of Orders report 236
loan
completing 109
entering 106
float 106
modifying 110
pending loan transaction 106
modifying 110
performing 106
safe 109
viewing details 110
voiding 109, 110
log files 290
search 290
view 290
372
Log Files window 290
Loss Prevention Detail report 324
altering appearance 325
compiling 324
example 325
Loss Prevention report 292
Loss Prevention Report Criteria window 321
parameters 322
Loss Prevention Summary report 321
altering appearance 324
example 324
parameters 321
Loyalty Points parameters
Customer Maintenance window 99
M
Macro List Menu
reports 331
macros 331
See also report macros
launching 332
report macros 332
Main Menu window 14
maintaining
customer record 96
employee files 57
extended customer fields 99
PLU extended fields 153
PLUs 142
supplemental customer attributes 99
maintenance window
adding records to a table 15
description 14
example 15
modifying records in a table 17
making global changes to PLUs 160
managing
PLUs 139
POS terminals 41
Manual PO parameters
Purchase Orders Selection window 196
manual purchase order
creating 196
using PLU or vendor’s SKU 196
menu buttons
defaults 14
for navigation 14
third party applications in menu windows 34
menu windows
third party application buttons 34
Mix Match Maintenance window 180
parameters 180, 181
mix match pricing schemes 142, 179-183
defining prices 179
reviewing 179
viewing 179
mix match promotion
recalculate promotions and discounts 181
Mix Match Selection window 180
modifying
balance 118
bank deposit 128
batch item’s information 166
category 66
cross reference, PLU 171
departments 75
deposit into the safe 122
employee record 59
extended options 101, 155
group 68
label format 256
linked item 178
loan 110
pickup from cash drawer 112
PLUs information 146
price sticker queue 262
promotion 189
purchase order 197
record in a table 17
report macro 294
safe balance 132
shelf label queue 265
sticker format 256
sticker or label type 270
sticker or label you defined 275
store’s information 93
tare weight 89
tax 82
user flag option 78
vendor’s information 85
monitoring POS terminals 42
N
navigation system 14
menu buttons 14
performing a query
selection window 19
relationship between tables and windows 14
tables
adding records 15
deleting records 17
modifying records 17
using windows 14
third party software menu 14
windows
completing fields 20
maintenance 14
selection 14
new balance
cash drawer 116
completing pending 117
entering 116
safe 131
completing pending 131
entering 131
new store
adding 92
preparing to open 53
records, creating 92
new store reset function 53
non merchandise data calculations 311
Non Merchandise Detail report 310, 311
compiling 311
example 312
parameters 311
Non Merchandise report 292
Non Merchandise Report Criteria window 311
Non Merchandise Summary report 310
data calculation formulas 311
example 311
parameters 311
non-safe options 105
O
on-hand inventory
adjusting quantities 243
after a count 243
at any time 248
adjustments
reports 332
quantities
adjusting 243
entering 244
entering after a count 244
inventory count lists 244
PLU list 244
open store function 49
opening
new store, preparations 53
POS terminals 43, 45
store 49
store record 92
opening or closing
all POS terminals 45
single POS terminal 43
store 49
order guide 206
ordering inventory 196
other stores
creating records for 91
viewing records 92
P
packaging weights. See tare weights
parameter files from the Configurator 13
parameters 156, 315
system, defining 22
Parameters Menu window 256
partial order
completing transaction 222
receiving 222, 223
passwords
access to windows 28
373
changing 28
employee 28
payroll 353
clock in/out
editing employee times 356-357
exporting files 356
parameters 356
reviewing employee times 356
confirming clock in/out times 360
exporting clock in/out files to head office 361
functions 353
parameters 353
configuring 353, 354
Payroll Clock In/Out Detail report 314, 316
altering appearance 316
compiling 316
Payroll Clock In/Out Detail window 357
parameters 358
Payroll Clock In/Out Report Criteria window 315
parameters 315
Payroll Clock In/Out Summary report 314, 315
altering appearance 316
example 316
parameters 315
Payroll Parameters Maintenance window 354
parameters 354
Payroll Summary and Payroll Detail report 292
pending loan transaction 106
Performance Detail report 344, 345
altering appearance 345
parameters 344
Performance Report Selection Criteria window 344, 345
parameters 344
Performance Summary report 344
example 345
parameters 344
performing
administrative tasks 283
cash drawer pickup 111
inventory control functions 191
loan 106
pickup from cash drawer 111
tender management functions 105
performing query
in selection window 19
on safe transactions 137
personnel management tasks 57
physical inventory count
count sheets 240
performing 240
Physical Inventory Maintenance window 245
parameters 245
Physical Inventory Selection window 244
pickup from cash drawer
completing 112
displaying 112
entering 111
entering new 111
modifying 112
374
pending transaction 111
performing 111
transactions 111
viewing details 113
voiding 113
PLU (New) window 143
PLU cross reference
adding 169
defining 169
PLU extended fields. See extended fields and PLUs
PLU information, exporting 159
PLU Maintenance window 143, 152, 153
Future Prices parameters 153
Inventory Control parameters 152
Labels parameters 151
User Flags, Taxes & Itemizers parameters 147, 148
Vendor/SKU parameters 149
PLU price changes
viewing 168
PLU Search window 140
using 141
PLU Selection window 143, 147
PLUs 142, 194, 234, 256
adding 143
adding linked item 176
applying extended field options 157
assigning
extended field options 157
tare weights to 88
taxes to 80
to departments 70
auditing price changes 167
creating 143
creating a price batch 163
cross reference numbers 142, 169
adding 169
defining 169
delete 171
modify 171
defining 147
defining extended fields 153
defining fields for global change 161
defining for global change 160
deleting 147
export files
creating updates 159
for third party applications 158
exporting information 158
extended fields 153
See also extended fields
maintaining 153
fields 140
file export for third party applications 154
finding 141
generating export files 158
global changes
defining 160
defining fields 161
Inactive PLU report 335
inventory
adjusting on-hand quantities 243
control 191
count list 243, 244
counts 243, 244
on-hand quantities 244
inventory information 234
linked item
adding 176
deleting 178
modifying 178
linking 142, 175
adding item 176
deleting item 178
items 175
modifying item 178
maintaining 142
making global changes 160
managing 139, 139-190
manual purchase orders 196
mix match pricing 181
mix match pricing schemes 179
modifying 146
option types 153
options 153
price batch management 162
price stickers 151
printing 261, 263
pricing promotion
adding 185
defining exceptions 189
deleting 189
modifying 189
printing price stickers 261
modifying print queue 262
product hierarchies 65, 142
promotional pricing 142, 185
receiving inventory 211
receiving inventory by 211
reports
Inactive PLU 335
retail price update audit function 168
search window 140
shelf labels 151
formats 256
store transfers 226
tare weights 88
third party applications 154
transfers 226
vendor information 149
vendor’s SKU 194
viewing price changes 168
populating drop-down lists 63
POS Balance Maintenance window 116, 118, 119
parameters 119
POS Balance Selection window 117, 119
POS Loan (New) window 107
POS Loan Safe Maintenance window 109
parameters 107
POS Loan Selection window 109
POS Manager 11
POS Pickup Selection window 111
POS Pickup to Safe Maintenance window
parameters 114
POS Pickup to Safe window 112
POS Pickup window 114
POS terminals
close terminal function 43, 44, 45, 47, 48
closing 42, 44
all terminals 45, 47
single terminal 43
controlling 42
customer display 52
customer information gathering 95
customizing 41
journal files 283
See journal files
managing 41
monitoring 42
new store reset function 53
open terminal function 43
opening 42, 43, 45
all terminals 45
new store 53
single terminal 43
select customer display message 52
terminal admin exception handler 43, 45, 46, 48
transactions 283
POS Xpress 12
previewing reports 303
Price Batch (New) window 164
parameters 164
price batch management 162
batch
applying 163
creating 163
editing 165
selecting 165
batch items
adding 166
deleting 167
modifying 166
using functionality 162
Price Batch Management window 164
parameters 164
Price Batches Selection window 163
Price Look Ups. See PLUs
price sticker queue
creating 261
deleting 262
modifying 262
price stickers 253
custom design 272
creating 274
modifying 275
printing 277
customizing 269
designing 269
375
formats 255, 256
deleting 256
modifying 256
parameters
configuring 253
defining 259
print queue 261
creating 261
deleting 262
modifying 262
printing 253, 261, 263, 269
setting parameters 253
type
adding 269
creating new 269
deleting 270
designing new 274
modifying 270
Price Tags Selection window 275, 276, 277
pricing promotion 185
defining exceptions 189
deleting 189
modifying 189
Print Options parameters
Department (New) window 75
Print Queue Maintenance window 261, 262, 264, 265, 267
parameters 267, 268
Print Queue Selection window 261, 262, 265, 267
printing
count sheet 240
department 75
inventory count sheets 240
labels. See printing, shelf labels
launch report macro and print 332
price stickers 253, 261, 263, 269, 274
See also price stickers
delete printing queue 262
modifying print queue 262
options 151
print custom layout 277
print queue 261
price stickers and shelf labels 253, 269
print queues
price stickers 261, 263
shelf labels 264, 266
purchase order report 204
receipts
customize header and trailer 53
Receiving report 223
reports 297
Safe Content report 136
shelf labels 253, 264, 266, 269, 274
See also shelf labels
deleting printing queue 266
modifying printing queue 265
options 151
print custom layout 277
printing queue 266
stickers or labels
376
customized 277
stickers or labels you define 278
transfer report 232
printing options
balance report 116
processing
bank deposit 126
payroll information 353
product hierarchies
categories. See categories
departments. See departments
groups. See groups
user flags. See user flags
PLUs 65, 142
setting up 65
product price changes
auditing 167
product vendors 63
adding 84
creating records 84
deleting 86
drop-down lists 84
modifying 85
PLU information 149
records 84
setting up 84
promotion
adding 185
defining an exception 189
deleting 189
modifying 189
Promotion (New) window
parameters 186
promotion exception
defining 189
Promotion Maintenance window 185
parameters 186
promotional pricing
creating a promotion 185
setting up 185
Promotions Selection window 185, 186
purchase order
converting into receiving orders 211
creating 196
duplicating 206
from suggested order 198
issuing 204
modifying 197
report 204
voiding 205
Purchase Order Maintenance window 199
parameters 199
Purchase Order Report window 205
Purchase Order Selection window 196
Purchase Orders Selection window 197
Manual PO parameters 196
Q
Quantity Level Pricing (New) window
parameters 173
Quantity Level Pricing Maintenance window 173
parameters 174
Quantity Level Pricing Selection window 173, 175
Quantity On Hand report
altering appearance 339
parameters 338
Quantity On Hand Report Selection Criteria window 338
parameters 338
quantity or level pricing schemes
See quantity pricing scheme and level pricing scheme
quantity pricing scheme 172
adding 173
deleting 175
modifying 175
setting up 172
query
drop-down list 19
performing 19
safe transactions 137
selection window 15
R
reading journal files 283
Rebuilding local files 55
Receipt Logo Maintenance window 53
receipts
header and trailer information
changing 53
customize 53
printing messages 53
receiving
See also receiving transactions
completing transactions 223
converting orders from purchase orders 211
items without purchase order (by case) 218
partial orders 222
printing report 223
report 223
voiding transactions 224
Receiving (New) window
parameters 220
receiving by case function 218
Receiving by Case parameters
Receiving Selection window 219
receiving by case transaction 218
Receiving by Case window 219
parameters 220
receiving inventory 211
See receiving
receiving orders
See also receiving
converting from purchase orders 211
Receiving report
example 224
Receiving Report window 224
Receiving Selection window 211
Receiving by Case parameters 219
Receiving Transactions parameters 212
receiving transactions 213
by case 219
completing 223
converting purchase orders 211
creating 211
items without purchase order 218
partial orders 222
pending 223
printing report 223
receiving by case function 218
report 223
voiding 224
Receiving Transactions parameters
Receiving Selection window 212
Receiving window 213, 219
parameters 213
records 14
customer 95
accessing 95
creating 95, 96
deleting 97
extended fields 95
maintaining 96
modifying 96
customer information 95
displaying all in a table 17
employee 57
finding 17
for other stores
create 91
in tables
adding 15
deleting 17
displaying all 17
modifying 17
searching 17
sorting options 36
sorting order 17
updating 12
maintenance 14
new store
deleting 93
modifying 93
viewing 92
product vendor
creating 84
deleting 86
modifying 85
query
drop-down list 19
in selection window 19
searching in a table 17
select 14
sorting options
by column header 36
377
setting 36
sort order 37
store
creating 92
tables 12
updating 12
vendor 84
register parameters 13
relationship between
POS Manager and the Configurator 12
Store Manager and the Configurator 12
tables and windows 14
report
See also reports
Average Hourly Sales 329
altering appearance 329
data calculation formulas 329
example 329
Balance 330
altering appearance 331
data calculation formulas 331
example 331
parameters 330
Balancing Short/Over 293
Category 321
example 321
Current Inventory 338
example 339
Department 317
altering appearance 318
Category 321
Department Detail 318
example 318
Group 320
parameters 317
Department Detail 319
example 319
Department Summary and Detail 292
Gross Profit 340
altering appearance 343
example 343
parameters 341
Group 320
example 320
Hourly Sales Summary 327
altering appearance 328
data calculation formulas 328
example 328
parameters 327
Hourly Sales Summary and Average 293
Inactive PLU 335
altering appearance 337
example 337
parameters 336
Inventory Adjustment 293, 332
altering appearance 335
inventory reports 332
compiling 332
Currenty Inventory 338
378
Gross Profit 340
Inactive PLU 335
Inventory Adjustment 332
List of Orders 236
Performance Detail 344
Performance Summary 344
Transfer 232, 233
Item Movement 292, 303
parameters 304
List of Orders 236
Loss Prevention 292
Loss Prevention Detail 324
altering appearance 325
compiling 324
example 325
Loss Prevention Summary 321
parameters 321
Non Merchandise 292
Non Merchandise Detail 310, 311
compiling 311
example 312
parameters 311
Non Merchandise Summary 310
example 311
parameters 311
Payroll Clock In/Out Detail 314, 316
altering appearance 316
compiling 316
Payroll Clock In/Out Summary 314, 315
altering appearance 316
example 316
parameters 315
Payroll Summary and Payroll Detail 292
Pending Transactions 346
Performance Detail 344, 345
altering appearance 345
parameters 344
Performance Summary 344
example 345
parameters 344
Purchase Order 204
Quantity on Hand
altering appearance 339
parameters 338
Receiving 223
example 224
Safe Content 136
Sales 306
data calculation formulas 307
example 307
Sales Analysis
compiling 308
data calculation formulas 308
parameters 308
Sales and Sales Analysis 292, 306
Sales Tax 292, 308
Salesperson 293, 325
example 326
parameters 325
Tender 292, 312
example 313
Tender Detail 314
foreign tender 314
Transfer 233
Report Macro Definition Selection window 293
Report Macro List Menu window 293
Report Macro Maintenance window 294, 295
parameters 295
Report Macro Menu window 291
Report Macro Selection window 294
report macros 331
creating 293
date types 292
defining 291
defining macro sequences 293
deleting 294
modifying 294
report types 292
reporting 291
Report Management Security Setup window 31
Report Preview window 303
report template designer 300
designing templates 300
report template design options 301-302
hiding columns 301
repositioning columns 301
repositioning fields 301
truncating columns 301
saving templates 300
template designer fields 302
using 300
reports 291
See also report
assignable to macros 292
authority levels for viewing 31
compiling 296
criteria 296
Sales Analysis 308
criteria
report date 296
report type 296
selection 296
data
emailing 299
type criteria 296
defining macros 291
emailing
as attachment 298, 299
with template designer 298
exporting 298
as email attachment 299
data 298
data to a file 298
file types 298
template designer 298
third party applications 298
generating 297
See report macros
inventory. See report, inventory reports
launching and printing macros 332
Macro List Menu 331
macros 331
See also report macros
creating 293
defining 291
deleting 294
launch and print report 332
modifying 294
previewing 303
printing 291, 297
report template designer 300
designing templates 300
report template design options 301-302
saving templates 300
template designer fields 302
report type criteria 296
standard 303
using 303
restricting access to selected POS Manager windows 29
retail price update audit function 168
Retail Price Update Audit window 168
field descriptions 168
reviewing a mix match pricing scheme 179
S
safe balance
completing 131
entering 131
modifying 132
viewing details 133
voiding 132
Safe Balance Maintenance window 131
parameters 133
Safe Balance Selection window 132
Safe Content report 136
Safe Content Report window 136
Safe Contents window 135
Safe Deposit Maintenance window 122
parameters 124
Safe Deposit Selection window 121
Safe Management Menu window 106
safe options 105
example 106
Safe Transactions window 129
Safe Transfer Selection window
parameters 129
Safe Transfer window
parameters 130
Safe Withdrawal (New) window 127
safes
See also safe options
authority levels 32
for withdrawal 126
balances 129, 131
completing 131
entering 131
379
modifying 132
new 131
viewing details 133
voiding 132
balancing 131
bank deposit
completing withdrawal from safe 127
modifying 128
viewing details 129
voiding 128
content report
customizing 136
exporting data 136
printing 136
Content Report window 136
contents
viewing 135
deposits
completing 122
eligible tenders 121
entering 121
modifying 122
new 121
pending transaction 121, 122
viewing details 123
voiding 123
non-safe options 105
safe options 105
transactions
query 137
transaction list 137
transaction list parameters 137
viewing record details 136
transferring tender between 129
withdrawals 126
completing 127
configuration 126
for bank deposit 126
modifying 128
verification 126, 127
viewing details 129
voiding 128
Sales Analysis report 308
compiling 308
data calculation formulas 308
parameters 308
Sales and Sales Analysis report 292, 306
Sales report 306
data calculation formulas 307
example 307
Sales Tax report 292
Salesperson report 293, 325
example 326
parameters 325
Salesperson Report Criteria window 325
parameters 325
searching
electronic journal files 287
electronic journal transactions 287
380
security functions
access 29
adding new setup windows 30
authority levels 29, 30, 33
assigning 29
changing 33
cash management 31
reports 31
Store Manager 12
using 28
viewing authority level 30
windows 29
security setup windows
adding new 30
viewing authority level 30
Select Display Type window 212
Select Display Type window (Purchase Orders Selection) 196
Select PLU window 141
Select Suggested Order Type window 198
selecting
batch 165
electronic journal 285
selection window 19
description 14
example 15
query 15
Server Communication parameters
General Parameters Setup window 23
server information
accessing 363
Server Log window 364
Server Message Log window 364
server state
viewing information 363
Server State Information window 363
servers
accessing information 363
information window 363
server message log 364
viewing server log 364
viewing status 363
Set Sort Order window 38
setting parameters
labels 259
setting up
customers 95
electronic journal 283
level or quantity pricing scheme 172
linked items 175
product hierarchies 65
product vendors 84
promotional pricing 185
quantity or level pricing scheme 172
tare weights 88
taxes 80
shelf label print queue
creating 264
deleting 266
modifying 265
printing 266
shelf labels 253
custom design
creating 274
deleting 276
modifying 275
printing 277
customizing 269
designing 269
formats 255
deleting 256
modifying 256
parameters
configuring 253
defining 259
printing 253, 264, 266, 269
setting parameters 253
printing queue 264
creating 264
deleting 266
modifying 265
printing 266
type
adding 269
creating new 269
deleting 270
designing new 274
modifying 270
single object
changing text 24
Single-text Translation window 28
SKUs 194
linking vendor’s to PLU 194
sort 38
by column header 36
configuring options 36
records 36
Specify Sort Columns window 37
table records in selection windows 36
Sort Setup window 36
Specify Sort Columns window 37
Standard Labels Format Maintenance window 257
standard reports 303
step taxes 80
stickers and labels
See also price stickers and shelf labels
custom design 274
creating 274
deleting 276
modifying 275
printing 277, 278
designing 274
designing and printing 269
parameters 280
configuring 253
defining 259
type
adding 269
defining 270
deleting 270
modifying 270, 275
store
adding 92
closing 49, 51
terminal admin exception handler 51
end of day function 49
opening 49
opening new 53
cleaning up system 53
new store reset function 53
records
deleting 93
modifying 93
opening 92
server information 363
transferring inventory 224
viewing records 92
Store Administration window 43, 49, 51
store close function 51
Store Maintenance window 93
setting parameters 94
Store Manager
about 11
changing all text 26
changing text 24
for all category 25
for all objects 26
for single object 24
closing store 49
customizing 21-39
defining system parameters 22
different versions 11
employee maintenance 57
open store function 49
opening new store 53
end of day function for cleaning up system 53
final clean up function 53
opening store 49
records for other stores 91
security functions 12, 28
Store Manager Deluxe 11
Store Manager menu windows
3rd Party Software menu 14
Main Menu 14
Store Manager Parameters Menu window 13
store open function
terminal admin exception handler 50
Store Transfer by Case window 230
parameters 230
Store Transfer by PLU window 225
parameters 226
Store Transfer Selection window 225
Transfer in by Case parameters 229
Transfer in by PLU parameters 225
Transfer out by Case parameters 229
Transfer out by PLU parameters 225
Store Transfer window
parameters 226
381
store’s information
deleting 93
modifying 93
viewing 92
Stores Selection window 92, 93
suggested order purchase order 198
creating a purchase order from 198
Suggested Order Statistics window 198
supplemental customer attributes
maintaining 99
system
cleaning up for new store 53
parameters
defining 22
printing stickers and labels 253
stickers and labels 253
T
table records
sorting 36
tables
displaying all records 17
maintenance windows 14
records 12
adding 15
deleting 17
displaying 17
modifying 17
query 19
searching 17
sorting options 36, 37
sorting order 17
updating 12
relationship to windows 14
selection window 14
Tare Weight Maintenance window 89
setting parameters 90
Tare Weight Selection window 89
tare weights 72, 88
adding 89
assigning to PLUs 88
deleting 90
modifying 89
setting up 88
Tax Maintenance window 80, 82
General parameters 80
Print Options parameters 82
Tax Steps parameters 83
tax rates 63
Tax Selection window 82
tax steps 83
Tax Steps parameters
Tax Maintenance window 83
taxes
adding 80
defining 80
deleting 82
department 73
382
modifying 82
setting up 80
step rates 80
tax steps 83
Taxes parameters
Department (New) window 73
template design options
See also report template designer
repositioning column 301
repositioning fields 301
truncating columns 301
templates
See also report template designer
report template design options 301
report template designer fields 302
tender
balancing cash drawer 116, 117
cash management
balance 116, 117, 118, 119
cash drawer. See cash drawer
float see loan
pickup. See pickup from cash drawer
safe balance. See safe balance and safes, balances
safe transfers 129
Configurator verification for withdrawal 126
deposits into safe 121
float see loan
foreign tender
Tender Detail report 314
management functions 105-138
parameter files 13
pickup from cash drawer 111
query safe transactions 137
safes. See safes
withdrawal from safe for bank deposit 126
Tender Detail report 314
foreign tender 314
tender management functions
performing 105
Tender report 292, 312
example 313
Tender Report Criteria window 312
parameters 313
Tender report data calculation formulas 314
Terminal Admin Exception Handler window 43, 45, 46, 48, 50,
51
Terminal Administration window 42, 43, 44, 46, 47
text
changing for all category 25
changing for all objects 26
changing for single object 24
changing in the Store Manager 24
third party applications 34
adding buttons to menu window 34
authority levels 34
export files for extended fields 158
PLUs 154
exporting files 158
third-party application buttons
adding to windows 34
Transaction List window
parameters 137
transactions
searching in electronic journals 288
types
authority levels 32
transfer
creating 229
inventory 224
by the case 229
creating 225
using PLUs 225
report
printing 232
Transfer in buy PLU parameters 225
Transfer in by Case parameters
Store Transfer Selection window 229
Transfer out by Case parameters
Store Transfer Selection window 229
Transfer out by PLU parameters
Store Transfer Selection window 225
Transfer Report window 233
Translate Text window 28
translation 28
Translation window 26
individual text 28
U
Unique PLU Generation parameters
General Parameters Setup window 23
update export files, creating 159
updating
Electronic Journal Viewer with new journals 285
record tables 12
tables (records) 12
uploading
inventory levels 237
user authority level
changing 33
user flags 63
assigning to departments 70
assigning to PLUs 77
assigning to promotions 77
defining 77
defining options 77
options
creating 77
deleting 79
modifying 78
User Flags Maintenance window 78, 79
User Flags, Taxes & Itemizers parameters
PLU Maintenance window 147, 148
user password
changing 28
using
file maintenance functions 63
inventory reports 332
PLU search window 140
PLUs
transferring inventory 225
price batch management functionality 162
report template designer 300
reports 303
security functions 28
single-text translation window 28
translation window 24
V
vendor
See product vendors
adding 84
deleting 86
Vendor Maintenance window 85, 87
parameters 87
Vendor Selection window 85, 86
vendor SKUs 194
linking to PLUs 194
receiving inventory 211
Vendor/SKU Maintenance window 195
parameters 195
Vendor/SKU parameters
PLU Maintenance window 149
vendor’s information, modifying 85
vendor’s SKUs
manual purchase order 196
receiving inventory by 211
verification
safe withdrawals 127
viewing
balance details 119
contents of safe 135
detailed safe transactions 136
details of bank deposit 129
details of deposit into safe 123
details of safe balance 133
inventory information 234
loan details 110
log files 290
mix match pricing schemes 179
pickup’s details 113
PLU price changes 168
server state information 363
store information 92
voiding
balance 118
bank deposit 128
deposit into safe 123
loan 110
pickup from cash drawer 113
purchase order 205
receiving transaction 224
safe balance 132
transfer 233
383
W
warehouse
transfer inventory 224
window
See also windows
(Safe) Transaction List 136
setting parameters 137
3rd Party Programs Menu Selection 34
3rd Party Programs Setup 35
3rd Party Software Maintenance 14
Average Hourly Sales Report Criteria 327, 329
setting parameters 327
Balance Report Criteria 330
setting parameters 330
Cash Management Security Setup 32
Change Password 29
Choose PLU and Operation Type 166
Clean Up Transaction History 54
Code Table Maintenance 64
Column Hide 301
Column Truncation 301
Configurator Parameters 13
Customer Display Maintenance 52
Customer Maintenance 96
Demographic parameters 98
Loyalty Points parameters 99
Customer Selection 96, 97
Department (New) 73, 75
General parameters 71
Department Categories Selection 37, 67
Department Category Maintenance 65
Department Group Maintenance 68
Department Groups Selection 67, 68
Department Maintenance 15
Department Report Criteria 317
setting parameters 317
Departments Selection 15, 19, 69, 70, 75
Design Label Definition 270, 272
setting parameters 272
Design Labels Selection 270, 271
Designed Label Maintenance 274, 278
setting parameters 278, 280
EJProcessor 286
Electronic Journal Setup 283
setting parameters 284
Electronic Journal Viewer 287, 288
setting parameters 288
Employee Maintenance 61
setting parameters 61
Employee Selection 18, 33
Export Report Data 298
Extended Customer Fields 104
setting parameters 103
Extended Field Option 101, 155
Extended Field Options Maintenance 100, 102, 154
setting parameters 103, 156
Extended PLU Fields 158
Format ID Maintenance 255
384
setting parameters for price/shelf labels 257
Format ID Selection 255, 256
General Label Parameters Maintenance 259
General Parameters Setup 22
Cash/Safe Management parameters 24
General Information parameters 22
Server Communication parameters 23
Unique PLU Generation parameters 23
Generate Export Files 159
Global PLU Change 160
Change Criteria parameters 160
Global PLU Change window 160
Change Fields parameters 161
Gross Profit Report Selection Criteria 340
setting parameters 341
Hourly Sales Report Criteria 327
setting parameters 327
Inactive PLU Report Selection Criteria 336
setting parameters 336
Inventory Adjustment 248, 249
setting parameters 249
Inventory Adjustment Report Selection Criteria 332
Inventory Count Sheet 241
Inventory History Information 236
setting parameters 236
Inventory Information 234
setting parameters 234
Inventory Menu 196
Inventory Parameters Maintenance 191
setting parameters 192
Inventory Parameters Menu 191
Item Movement Criteria 296
Item Movement Report Criteria 296, 304
setting parameters 304, 317
Journal Search 284, 285, 287
Label Parameter Details Maintenance 253, 254
setting parameters 254
Label Parameters Maintenance 259
Link Item (New)
setting parameters 177
Link Item Maintenance
setting parameters 177
Link Items Selection 177
Log Files 290
Loss Prevention Report Criteria 321
setting parameters 322
Loss Prevention Summary Report 324
Main Menu 14
Mix Match Maintenance 180
setting parameters 180, 181
Mix Match Selection 180
Non Merchandise Report Criteria
setting parameters 311
Parameters Menu 256
Payroll Clock In/Out Detail 357
setting parameters 358
Payroll Clock In/Out Report 315
Payroll Parameters Maintenance 354
setting parameters 354
Performance Report Selection Criteria 344, 345
setting parameters 344
Physical Inventory Maintenance 245
Physical Inventory Maintenance window
setting parameters 245
Physical Inventory Selection 244
PLU (New) 143
PLU Maintenance 143
Inventory Control parameters 152, 153
Labels parameters 151
PLU Page 2 parameters 147, 148
setting Vendor/SKU parameters 149
Vendor/SKU parameters 149
PLU Search 140, 141
PLU Selection 147
PLU Selection window 143
POS Balance Maintenance 116, 118, 119
setting parameters 119
POS Balance Selection 117, 119
POS Loan (New) 107
POS Loan Safe Maintenance 109
setting parameters 107
POS Loan Selection 109
POS Pickup 114
POS Pickup Selection 111
POS Pickup to Safe 112
POS Pickup to Safe Maintenance
setting parameters 114
Price Batch (New) 164
setting parameters 164
Price Batch Management 164
setting parameters 164
Price Batches Selection 163
Price Tags Selection 275, 276, 277
Print Queue Maintenance 261, 262, 264, 265, 267
setting parameters 267, 268
Print Queue Selection 262, 265, 267
Print Queue Selection window 261
Promotion (New)
setting parameters 186
Promotion Maintenance 185
setting parameters 186
Promotions Selection 185, 186
Purchase Order Maintenance 199
setting parameters 199
Purchase Order Report 205
Purchase Order Selection 196
Purchase Orders Selection 197
Manual PO parameters 196
Quantity Level Pricing (New)
setting parameters 173
Quantity Level Pricing Maintenance 173
setting parameters 174
Quantity Level Pricing Selection 173, 175
Quantity On Hand Report Selection Criteria 338
setting parameters 338
Receipt Logo Maintenance 53
Receiving 213, 219
setting parameters 213
Receiving (New)
setting parameters 220
Receiving by Case 219
setting parameters 220
Receiving Report 224
Receiving Selection 211
Receiving by Case parameters 219
Receiving Transactions parameters 212
Report Macro Definition Selection 293
Report Macro List Menu 293
Report Macro Maintenance 294, 295
setting parameters 295
Report Macro Menu 291
Report Macro Selection 294
Report Management Security Setup 31
Report Preview 303
Retail Price Update Audit 168
field descriptions 168
Safe Balance Maintenance 131
setting parameters 133
Safe Balance Selection 132
Safe Content Report 136
Safe Contents 135
Safe Deposit Maintenance 122
setting parameters 124
Safe Deposit Selection 121
Safe Management 106
Safe Transactions 129
Safe Transfer
setting parameters 130
Safe Transfer Selection
setting parameters 129
Safe Withdrawal (New) 127
Salesperson Report Criteria 325
setting parameters 325
Select Display Type 212
Select Display Type (Purchase Orders Selection) 196
Select PLU 141
Select Suggested Order Type 198
Server Log 364
Server Message Log 364
Server State Information 363
Set Sort Order 38
Single-text Translation 28
Sort Setup 36
Specify Sort Columns 37
Standard Labels Format Maintenance 257
Store Administration 43, 49, 51
Store Maintenance 93
setting parameters 94
Store Manager Parameters Menu 13
Store Transfer
setting parameters 226
Store Transfer by Case 230
setting parameters 230
Store Transfer by PLU 225
setting parameters 226
Store Transfer Selection 225
Transfer in by Case parameters 229
385
Transfer in by PLU parameters 225
Transfer out by Case parameters 229
Transfer out by PLU parameters 225
Stores Selection 92, 93
Suggested Order Statistics 198
Tare Weight Maintenance 89
setting parameters 90
Tare Weight Selection 89
Tax Maintenance 80, 82
General parameters 80
Print Options parameters 82
Tax Steps parameters 83
Tax Selection 82
Tender Report
setting parameters 313
Tender Report Criteria 312
Terminal Admin Exception Handler 43, 45, 46, 48, 50, 51
Terminal Administration 42, 43, 44, 46, 47
Transaction List
setting parameters 137
Transfer Report 233
Translate Text 28
Translation 26
User Flags Maintenance 78, 79
Vendor Maintenance 85, 87
setting parameters 87
Vendor Selection 85, 86
Vendor/SKU Maintenance 195
setting parameters 195
Worksheets Security Setup 29
X-Reference 170
Inventory Control parameters 171
XREF parameters 170
X-Reference Selection 170, 172
windows
See also window
access 29
authority levels 29
fields 20
maintenance 14
relationship to tables 14
selection 14
withdrawals
verification 127
Worksheets Security Setup window 29
X
XREF parameters
X-Reference window 170
X-Reference Selection window 170, 172
X-Reference window 170
Inventory Control parameters 171
XREF parameters 170
386