1
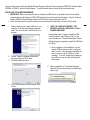
Worldwide
Quick Setup Guide
Reply®Worldwide
Rugged. Compact. Fast. Powerful.
Thank You!
Thank You for choosing our Reply® brand of Wireless Response Systems. We appreciate your
business, and we value you as a customer. In an effort to make your first experience with our
products an enjoyable one, please use this Quick Setup Guide to first familiarize yourself with
our system and its components, and then let it walk you through the system setup so that you
can quickly get started.
REV092308
There are three components to the Reply® Wireless Response System: Wireless Keypads (CRS5200), the Base Station
(CRS940 or CRS941), and the Polling software. To install the base station drivers, follow the process below.
INSTALLING YOUR NEW HARDWARE
•
•
IMPORTANT: Before connecting the base or installing the NEW drivers, be advised of some incompatibility
problems with the old Fleetwood (FTDI) USB Serial Converter drivers and the New drivers. See the Technical
Bulletin: CRS940 Worldwide Base Update and FTDI Driver Usage, dated January 2008.
Follow the Steps below to install the drivers from the internet (recommended), or from the CD provided.
1. Connect the device to a spare USB port on your
computer. If the following dialog box appears,
select “Yes, this time only.” And Click “Next” to
proceed.
5.
WAIT! YOU ARE NOT FINISHED. THIS
PROCESS HAS ONLY INSTALLED 1 of the 2
DRIVERS REQUIRED.
Please follow steps 1-4 again to install the USB
Serial Port driver. After Clicking “Finish” on the
current window, the “Found New Hardware” Wizard
will appear again, prompting to install the USB Serial
Port driver.
2. Choose “Install the software automatically”
(recommended), and Click “Next”.
3. The Wizard will now search.
• At the completion of the installation, only the
specific USB port that was used is configured
with the drivers. We recommend repeating the
above process for all the USB ports on the
computer. To do this, simply plug the base into
each USB port, one at a time, and repeat the
above steps.
6. When completed, the “Found New Hardware”
wizard will say the new hardware is installed and
ready to use.
4.
The FT8U2XX device driver will install. Click
“Finish”.
INSTALLING YOUR POLLING SOFTWARE
There are two software applications that you will need to install to use your Reply® Wireless Response System. The first is
the Reply® Utility Software application, and the second is the Presentation/Polling Software application.
1. Reply® Utility Software Application: To install this program, place your Reply® Worldwide CD Menu into your
DVD/CD-ROM, and wait for the software to run. When the Menu appears, click on either one of the bases
(CRS940, CRS941 depending on which you have) to enter into that bases specific menu. When in that menu, click
on the Reply® Worldwide Utility button. This will prompt you thru the installation of the Utility. Once installed, this
software application allows you to change the base station settings, verify connection to the base, configure certain
keypad settings, and test the full operation of the Reply® Wireless Response System. Please Note: You do NOT
need to run this software utility if your presentation/polling software includes similar features that allow you to
change base and keypad settings. This utility program is designed to only supplement your presentation/polling
software. In rare cases, the utility program may be used to verify hardware operation if you are having difficulty
operating your presentation/polling software. This Utility is not meant to replace or be used as a
presentation/polling software application.
2. Presentation/Polling Software Application: To install this program, place the Software Application CD into the
DVD/CD-ROM, and wait for the software menu to appear. Follow the steps on the accompanying CD to install the
software onto your computer. This software should also include any help files and/or manuals. Please contact the
Presentation/Polling Software developer with any questions or technical support.
AUTHORING QUESTIONS
There are numerous companies that write software for your Reply® Wireless Response System. Some of there
applications are purpose-built for special uses like decision making, focus group research, delegate voting, classroom
testing, gaming and more. Others are designed for use in multiple settings. Please refer to the software manual for
instructions on authoring questions and running the presentation.
RUNNING THE SYSTEM
Begin by plugging the base station into one of your computers USB ports. If your drivers were installed properly, you will
see notices in the task bar that new hardware was found and is installed and ready to use. NOTE: If you see a “Found New
Hardware” wizard, your drivers were not installed properly. Please stop and repeat the driver install process shown earlier
in this document.
Open the Reply® Utility software, and select which COM port the base is connected to, and click “Connect”. The indicator
“light” should go from red to green. Now, set the Channel / Base ID to match the Channel of the keypads you are going to
test. Simply click the “Start Polling” button on the software application to start the base polling. The indicator “light” will
change from red to green. Now press a single button on any keypad that you are going to test. The number pressed on the
keypad will register next to the keypad’s corresponding address number on the screen. Repeat this process for each
keypad that needs to be tested.
Once finished, click the “Stop Polling” button (indicator will go from green to red), and click on the “Disconnect” button
(indicator will go from green to red) to stop the computer from communicating with the base. At this point, close the Reply®
Utility Software Application, and unplug your base from the USB port.
You do not need to use the utility software unless you are having problems running the presentation software. This
procedure was only to verify that both drivers and hardware were working and installed properly. You are now ready to use
your system!
Open the presentation software and the presentation file that you authored. Then connect and test the base station using
this software. Once you have successfully connected using this software, you may run your presentation and collect your
responses.
ADDRESS AND CHANNEL PROGRAMMING
A useful feature of your Reply® Wireless Response System is the ability to change the keypads RF base channel and the
keypads unique “address”.
Keypad Address
+
The CRS5200 keypads have a feature mode that allows you to change or recall the keypads unique address. There are 2
methods for accessing this mode:
• Enter code 951 (see Appendix A in the User Manual for using the 9XX codes)
• Press and hold the “Clear” (CLR) button, and press the number 1 key. Now, release both keys. NOTE: This
feature may be disabled from a previous base command. If it is disabled, use the 951 code listed above.
Once one of the sequences above has been performed, the two lower horizontal segments will light on the keypad. At this
point, you have 5 seconds to do one of the following steps.
• To recall the current address, simply press the “*” key. The address will then be displayed one character at a time
(001 thru 250)
• To setup a new address, simply type in the new 3-digit address (i.e. “0” – “0” – “1” = address 1, and “2” – “5” – “0” =
address 250)
If the address was changed, the keypad will use this new address on the next key press.
Keypad Channel
+
The CRS5200 keypads have a feature mode that allows you to change or recall the keypad’s system Base Channel. There
are 2 methods for accessing this mode:
• Enter code 973 (see Appendix A in the User Manual for using the 9XX codes)
• Press and hold the “Clear” (CLR) button, and press the number 2 key. Now, release both keys. NOTE: This
feature may be disabled from a previous base command. If it is disabled, use the 973 code listed above.
Once one of the sequences above has been performed, the two lower horizontal segments will light on the keypad. At this
point, you have 5 seconds to do one of the following steps.
• To recall the current channel, simply press the “*” key. The channel will then be displayed one character at a time
(01 thru 15)
• To setup a new address, simply type in the new 2-digit channel (i.e. “0” – “1” = channel 1, and “1” – “5” = channel
15)
If the channel was changed, the keypad will use the new channel on the next key press.
Fleetwood Group, Inc.
11832 James Street
Holland, MI 49424 USA
Phone 616-396-1142 · Toll Free 800-257-6390 · Fax 616-820-8301
www.replysystems.com · [email protected]