1
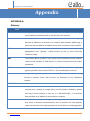
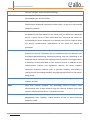
Analog Card User Manual www.allo.com Version 2.1 1 Analog Card User Manual Copy Right Copyright © 2015 Allo. All rights reserved. No part of this publication may be copied, distributed, transmitted, transcribed, stored in a retrieval system, or translated into any human or computer language without the prior written permission of Allo.com. This document has been prepared for use by professional and properly trained personnel, and the customer assumes full responsibility when using it. Proprietary Rights The information in this document is Confidential to Allo and is legally privileged. The information and this document are intended solely for the addressee. Use of this document by anyone else for any other purpose is unauthorized. If you are not the intended recipient, any disclosure, copying or distribution of this information is prohibited and unlawful. Disclaimer Information in this document is subject to change without notice and should not be construed as a commitment on the part of allo.com. And does not assume any responsibility or make any warranty against errors. It may appear in this document and disclaims any implied warranty of merchantability or fitness for a particular purpose. www.allo.com Version 2.1 2 Analog Card User Manual About this manual This manual describes the Allo product application and explains how to work and use it major features. It serves as a means to describe the user interface and how to use it to accomplish common tasks. This manual also describes the underlying assumptions and users make the underlying data model. Document Conventions In this manual, certain words are represented in different fonts, typefaces, sizes, and weights. This highlighting is systematic; different words are represented in the same style to indicate their inclusion in a specific category. Additionally, this document has different strategies to draw User attention to certain pieces of information. In order of how critical the information is to your system, these items are marked as a note, tip, important, caution, or warning. Icon Purpose Note Tip/Best Practice Important Caution Warning o Bold indicates the name of the menu items, options, dialog boxes, windows and functions. o The color blue with underline is used to indicate cross-references and hyperlinks. o Numbered Paragraphs - Numbered paragraphs are used to indicate tasks that need to be carried out. Text in paragraphs without numbering represents ordinary information. o The Courier font indicates a command sequence, file type, URL, Folder/File name e.g. www.allo.com Support Information Every effort has been made to ensure the accuracy of the document. If you have comments, questions, or ideas regarding the document contact online support: http://support.allo.com www.allo.com Version 2.1 3 Analog Card User Manual Table of Contents About this manual .............................................................................................................. 3 Document Conventions ...................................................................................................... 3 Support Information ........................................................................................................... 3 1. Product Introduction.............................................................................................................. 7 1.1 Overview ....................................................................................................................... 7 2. Getting started with the Analog card .................................................................................... 8 2.2 Installations................................................................................................................... 9 2.2.1 Hardware Installation ................................................................................................ 9 2.2.2 Installation Steps for windows (OS) ........................................................................ 10 2.3 Accessing the Main GUI (Graphical User Interface) ................................................... 11 2.3.1 Installation Steps for Linux (OS) .............................................................................. 12 3. System Status ....................................................................................................................... 16 4. Setting up the features ........................................................................................................ 18 4.1. Extensions (Analog & SIP) .......................................................................................... 18 4.1.1. Create New User ..................................................................................................... 18 4.1.2 Modify/Delete selected users ................................................................................. 20 4.2. Trunks ........................................................................................................................ 21 4.2.1. Analog Trunks ......................................................................................................... 21 4.2.2. VOIP Trunks ............................................................................................................ 21 4.2.3. Adding a New VOIP Account Details ...................................................................... 22 4.2.4. Editing / Deleting an Existing VOIP Account: .......................................................... 23 4.3. Outgoing Calling Rule ................................................................................................ 23 4.3.1 New Calling Rules .................................................................................................... 23 www.allo.com Version 2.1 4 Analog Card User Manual 4.3.2. Restore Default Calling Rule ................................................................................... 26 4.4. Dial plans.................................................................................................................... 27 4.5. Incoming Calling Rules ............................................................................................... 28 4.6. DID Routing ................................................................................................................ 29 5. General Settings ................................................................................................................... 31 5.1. Network Settings ....................................................................................................... 31 5.1.1. WAN Configuration................................................................................................. 31 5.1.2. Host Configuration.................................................................................................. 31 5.2. Admin Settings ........................................................................................................... 32 5.2.1. General Preferences ............................................................................................... 32 5.2.2. Analog card Settings ............................................................................................... 33 5.2.3. Reboot .................................................................................................................... 34 5.3 SIP Settings ................................................................................................................. 35 5.3.1. General ................................................................................................................... 35 5.3.2. TOS .......................................................................................................................... 35 5.3.3. NAT ......................................................................................................................... 36 5.3.4. Misc......................................................................................................................... 37 5.3.5. Codecs..................................................................................................................... 38 6. Tools ..................................................................................................................................... 39 6.1 Back Up ....................................................................................................................... 39 6.2 Firmware Upgrade ...................................................................................................... 39 6.3 File Editor .................................................................................................................... 40 6.4 Asterisk CLI.................................................................................................................. 40 6.5 Diagnostics .................................................................................................................. 40 www.allo.com Version 2.1 5 Analog Card User Manual 7. Status ................................................................................................................................... 42 7.1 Call Detail Records ...................................................................................................... 42 7.2 Active Channels .......................................................................................................... 42 7.3. System Info ................................................................................................................ 43 Frequently Asked Questions (FAQ) .......................................................................................... 45 APPENDIX-A: ............................................................................................................................ 53 www.allo.com Version 2.1 6 Analog Card User Manual Introduction 1. Product Introduction 1.1 Overview The difference is that our card takes care of the majority of operation on board thus reducing the load on the CPU. Furthermore, our product is detected as a network card in both Linux TM and WindowsTM systems. Once the driver is installed in your system, you can start configuring the card through an easy to use interface and start using it with your preferred PBX platform (3CX TM, AsteriskTM, ElastixTM...). Hardware DSP for Line Echo Cancellation (carrier grade 128ms) and Transcoding is included. The analog card is a compact PCIe interface Card which can be installed in Windows or Linux based Telephony application such as 3CX, Asterisk, ElastixTM to reach of small businesses can convert up to 4 analog ports (FXO or FXS modules) to VOIP. Setting up and configuring the Card is a breeze with the user-friendly GUI and this document will show you just how easy it is! A typical network diagram shows the function of the Analog card as below. www.allo.com Version 2.1 7 Analog Card User Manual Getting Started 2. Getting started with the Analog card Figure 1: Overview of an analog card a) We strongly recommend you to change the Card Admin Password from Factory default to Alpha numeric password to reduce the possibility of a security breach. b) Use Mozilla Firefox only. c) Boot up process of the Analog Card takes about 40 seconds. d) Make sure to add the port number(8088) at the end of your IP address when logging in. For an Example: 192.168.0.42:8088 www.allo.com Version 2.1 8 Analog Card User Manual IP addresses can be obtained by dialing **# from the Analog phone which connects to the FXS port of the card. System Requirements: Operating System : Windows XP/ Windows 7/ Windows Server 200X 3CX phone system 10 and above Dual Core Processor with 1 GB RAM Available PCIe slot 2.2 Installations 2.2.1 Hardware Installation 1. Now that you are acquainted with the ALLO Analog PCIe card, power down your computer and unplug it from its power source. 2. Attach a static strap to your wrist and open the case. 3. Take away the section place holder and addition the card into a PCI or PCI Express Slot. Figure 2: Insert the card 4. Replace the cover to your computer 5. Plug the T1 or E1 equipment cable into the RJ45 port. Use only shield cables to ensure compliance with the international EMC standards. www.allo.com Version 2.1 9 Analog Card User Manual 2.2.2 Installation Steps for windows (OS) 1) Place the ALLO Analog PCIe card in your computer PCIe slot and power-up the machine. 2) The operating-system will detect the ALLO Analog card as a new network card. 3) If the Broadcom drivers are not installed in the server, download the Broadcom Network Drivers from https://www.broadcom.com/support/ethernet_nic/netxtreme_desktop.php as per the Windows OS Architecture (32 bit & 64 Bit) 4) Follow the on screen steps to install the Broadcom driver. After the successful installation follows the steps. 5) Go to network connection of your PC (Control Panel Network Settings) and you will find the Broadcom network interface. Go to “Control Panel Network Settings” of your PC. Select both machine network interface and Broadcom Network Interface (Ctrl+A). 6) Right click and select “bridge Connection” to bridge machine network interface and Broadcom network interface. This will create “bridged” network interface. Assign static IP address in the range of 192.168.113.x to the bridged interface. (Default IP Address of Broadcom Network Interface is 192.168.113.252). 7) Disable and enable the bridged interface. 8) Open Mozilla web browser with URI 192.168.113.252:8088. Username: admin Password: admin www.allo.com Version 2.1 10 Analog Card User Manual 2.3 Accessing the Main GUI (Graphical User Interface) Figure 3: Login Page Use Mozilla Firefox browser only. Don’t assign 192.168.113.252 IP address to the bridged interface, since the Broadcom network module will be assigned 192.168.113.252 by default. 9) It will lead to FXO/FXS card WebGUI, where you can configure the necessary configuration such as Trunks and Call routing rules and more. 10) Go to General Settings Network Settings Change the IP address to DHCP or Static according to your network setup. Click Save and Apply Changes. For an Example: If your Office network is in 192.168.0.X series, set the IP address of the card to 192.168.0.100. So that you can access the Web GUI through http://192.168.0.100:8088 Username: admin Password: admin 11) Go to “Control Panel Network Settings” of your PC and set the bridged network IP Address according to your network setup. www.allo.com Version 2.1 11 Analog Card User Manual For Example: If your Office network is in 192.168.0.X series, set the Bridged IP address to 192.168.0.200. This will become the Host machine IP address. 12) You can check the IP address of the Card by connecting analog phone to FXS port of the analog active card and press **. If all the ports are FXO, we recommend assigning the IP address statically. 2.3.1 Installation Steps for Linux (OS) Bridging Analog Active Card installation on Linux Machine 1) Place the ALLO Analog PCIe card in your computer PCIe slot and power-up the machine. 2) The operating-system will detect the ALLO Analog card as a new network card. 3) Follow the on screen steps to install the Broadcom driver. After, the successful installation steps are as follows 4) Analog card has a Broadcom network driver. So, if we want to access the card, then we need to create bridges between the Broadcom network interface of the analog card and Ethernet interface of the PC. Proceed to below steps to continue with the installation process. Once you are able to access the device then you can change the IP address of the device as per your network settings. Please be aware that this process may break your system, some versions of DAHDI do not have the necessary API that analog uses to communicate. Please make sure to make a backup of your system before continuing. 1. Switch off the host machine 2. Connect the analog telephony interface card to the PCI express slot 3. Reboot the host machine 4. Execute the following command to list the devices detected on PCI bus. # lspci This displays the similar output www.allo.com Version 2.1 12 Analog Card User Manual 02:00.0 Ethernet controllers: Broadcom Corporation NetXtreme BCM57761 Gigabit Ethernet PCIe (Rev 10) 6. Copy cemdetect.tgz and nwbridge.sh to /usr/src path. You can download these files from below links. wget http://61.12.17.162:9090/Analogcard/nwbridge.sh wget http://61.12.17.162:9090/Analogcard/cemdetect.tgz wget http://61.12.17.162:9090/Analogcard/create-bridge.sh 7. Compile the bridge utils and install on host machine #Yum installs bridge-utils* #cd/usr/src #cd cem detect #make clean #make 8. Check tg3.ko module. (By default it will be present in /lib/modules/2.6.XX.X/kernel/drivers/net/tg3.ko). Just verify the tg3.ko is there. If it is not there, then please download from the Broadcom website and insert tg3.ko using command “modprobe tg3”. 9. Do “Ifconfig” and note down the interface names eth0, eth1 (In our case) and note down the IP address of your PC (IP address of the PC is eth0:192.168.1.5) 10. Check “ifconfig” command whether two Ethernet interfaces are detected eth0 and eth1. 11. run nwbridge.sh script using ./ nwbridge.sh o This will create a Network Bridge between the host machine and the Analog card. o It scans for the analog gateway card on the same network. o It displays a menu to choose the option for changing the IP address, to turn on the dhcp o Choose the options to change the network configuration, save and quit the menu It will display like below, Scanning network for cem gw devices... Looking for reply [1] Mac: 00:17:F7:00:93:07 IP: 192.168.113.252 Select a device: 1 www.allo.com Version 2.1 13 Analog Card User Manual Configuration of selected device: Mac: 00:17:F7:00:93:07 IP: 192.168.113.252 Net mask: 255.255.255.0 Gateway: 192.168.113.1 DHCP: no MTU: 1500 Name server: 192.168.113.1 [i] Change IP [n] Change net mask [g] Change gateway [d] Switch dhcp on [t] Change mtu [m] Change name server [s] Save and quit [q] Quit Select the option what you like to do. If you want to switch on DHCP card, select the d and then s. Then analog card will get an IP address from your office network (here it has taken 192.168.1.100) The default IP of the card is 192.168.113.252. The user can assign the IP address of his network to analog gateway card as per their internal LAN settings . If you face any issues while running the . / nwbridge.sh script use the below mentioned steps to configure the network bridge. Note down the interface names (Eg: etho/eth1), IP address of the PC Ifconfig Ifconfig eth0 0.0.0.0 up Ifconfig eth1 0.0.0.0 up brctl addbr br0 brctl addif bro eth0 www.allo.com Version 2.1 14 Analog Card User Manual brctl addif br0 eth1 ifconfig br0 192.168.113.3 up route add default gw 192.168.113.1 ifconfig then check br0 interface with IP address 192.168.113.3 is assigned. You have set 192.168.113.3 IP to br0 interface, the reason is analog card will have default 192.168.113.252 IP address. So, if you want to access the card then you need to set the same series IP address to the PC, after bridging the interfaces. You have to setback the IP address of your PC to the previous LAN settings. Please follow the below steps. Ifconfig br0 0.0.0.0 down If config br0 192.168.1.5 up Route add default gw 192.168.1.1 Then you can access the analog card GUI from anywhere on your office network using the IP address assigned to the card like below. Connect an analog phone to any of the FXS ports and check the IP address by dialing ** on the phone. Access the GUI using http://192.168.x.x:8088 on the Mozilla Firefox browser. We can delete the bridge and create the same with these below steps #cd/usr/src # Ifconfig br0 down #brctl delbr br0 #/etc/init.d/network restart #sh create-bridge.sh If the host machine is rebooted after the installation is done, then the bridge will delete automatically and you perform the below steps to create bridges. #cd/usr/src #sh create-bridge.sh The user has to perform all the steps in host machine (while creating of bridge) www.allo.com Version 2.1 15 Analog Card User Manual Status 3. System Status Navigation to System status, Status of FXO/FXS VOIP Analog Card including Memory Status, VOIP Status, Networking Status and Client Status (to see which clients are connected to the system). After you login, you are brought to a System Status screen, which offers information about the Analog card, and help files to assist you in learning about all the different features of the system. 1. Under Trunks you will see the Registration Status of the VOIP Account(s) configured. If it displays “Registered” then it is successfully configured and connected. 2. Under Extensions you will see all the users and the extensions connected to the Analog Card. 3. Under System status > System Info > General you will have a summary of your General information, such as Hostname, Server Date & time zone, Uptime. 4. Under System status > System Info > Memory Status you will see total memory resources, including RAM usage. 5. Under System status > System Info > Network Status you will have a summary of your Network information, such as Hostname, WAN IP Address, Subnet Mask, WAN MAC Address and Default Gateway (you may refer to Settings > Network Settings for more info). 6. Under System status > System Info > Disk you will have a summary of Disk usage and Disk free space available on the file system. www.allo.com Version 2.1 16 Analog Card User Manual Figure 4: Status www.allo.com Version 2.1 17 Analog Card User Manual Setting up Features 4. Setting up the features 4.1. Extensions (Analog & SIP) Extensions are the core of the FXO/FXS VOIP. An extension is a number mapped to a person. So basically, every employee that is connected to the Analog card should have their own unique extension number so that he/she can be reached and be able to place calls. The Analog card supports 2 types of Extensions: IP Extensions and Analog Extensions. IP Extensions: IP extension are devices that have only data networking connection such as Ethernet and they communicate with the Analog Card using IP based protocol for signaling and Voice, examples are IP Phone, Soft Phone application. The Analog card can support up to 75 IP Extensions registration. Analog Extensions: An Analog Extension is used with a regular telephone system which can be connected to an available FXS port of the FXO/FXS VOIP Analog card. The FXO/FXS VOIP Analog card can have up to 4 Analog Extensions. 4.1.1. Create New User You have to create at least one Dial plan using Dial plan option before trying to create Analog/IP Extensions Navigation: Users > Create New user: This is where you setup your Analog/IP extensions Technology SIP www.allo.com Select "SIP" if the user is using SIP or a SIP device Version 2.1 18 Analog Card User Manual Analog Station Select the FXS port need to be configured from the drop down menu. Codec Preference Select audio and video codec for the extension. The available codec’s are: G711U-law, G711A-law, G.726, and G.729. General Extension The extension number associated with the user. Caller ID Name Configure the Caller ID Name associated with the user Dial Plan Select one from the dropdown box (appears only if dial plans are created using Dial plans).By Default: Dialplan1 Caller ID Number Configure the Caller ID Number that would be applied for outbound calls from this user. The ability to manipulate your outbound Caller ID may be limited by your VOIP provider. Figure 5: Edit user Extension www.allo.com Version 2.1 19 Analog Card User Manual VOIP Settings SIP Password Configure the password for the user. NAT Use NAT when the Analog card is on a public IP communicating with devices hidden behind NAT (e.g., broadband router). If there is one-way audio issue, usually it's related to NAT configuration or Firewall's support of SIP and RTP ports. Can Re invite By default, the Analog card will route the media steam from SIP endpoints through itself. If enabled, the Analog card will attempt to negotiate with the endpoints to route the media stream directly. It is not always possible for the Analog card to negotiate endpoint-to-endpoint media routing. The default setting is "No". Insecure • Port: Allow peers matching by IP address without matching port number. • Very: Allow peers matching by IP address without matching port number. Also, authentication of incoming INVITE messages is not required. • No: Normal IP-based peers matching and authentication of incoming INVITE. The default setting is “No". 4.1.2 Modify/Delete selected users Navigation: Users: This is where you can edit / delete existing Analog/IP Extensions individually. On the right side of the page, you can see the list of extensions you have setup. To edit or delete any of them simply click the appropriate icon provided to the right of each account/Extension. www.allo.com Version 2.1 20 Analog Card User Manual Once you click on the Edit button of an Extension then it will display the information of that particular extension. Here you can change the required details and then click on the Update Extension button to save the changes made. You can delete an extension by clicking on the delete button of the extension from the list of extensions displayed. You can delete many existing extensions by clicking on the Delete Selected Users button after marking in the check boxes of extensions from the list of extensions displayed. Click ok the popup window to delete the selected users. Make sure to click the APPLY CHANGES button in the top navigation bar, after adding/editing/deleting any Extension. The APPLY CHANGES tab appears if some changes are made and not saved. 4.2. Trunks Navigation: Setup >Trunks > Analog Trunks: Here you can configure the Analog Trunks. 4.2.1. Analog Trunks The analog trunk options are listed in the table below. Analog Trunks Channels Select the channel for the analog trunk. Trunk Name Specify a unique label to identify the trunk when listed in outbound rules, incoming rules and etc. 4.2.2. VOIP Trunks Navigation: Setup > Trunks > VOIP Trunks: This is where you setup VOIP Trunk or manage existing ones. www.allo.com Version 2.1 21 Analog Card User Manual In this page, fill in the Provider Name, Host name, Host Port, Username, Password and Proxy information given to you by your VOIP provider (known as SIP Credentials). Apply any Codec Settings required. You can prioritize your active codec’s by using the drop down buttons. After you have entered the details, click the Save button at the bottom. In create a new sip trunk dropdown option > context naming “Based on provider name” and “Assigned by asterisk GUI “need to be removed from GUI. 4.2.3. Adding a New VOIP Account Details Create New SIP trunk Context Naming You can select the context naming based on username/Provider name/Assigned by asterisk GUI By Default: Based on Username Provider Name Configure a unique label to identify this trunk when listed in outbound rules, inbound rules and etc. Host Name Configure the IP address or URL for the VOIP provider’s server of the trunk. Host Port Enter the port number given by the VOIP provider. 5060 is the default SIP port. If configuring any roaming extension or if connecting analog card to public network then consider changing the SIP port for better security. Once port changes are done, for registering IP phones/sip phone use <domain name ><sip port number>. Username Enter the username to register to the trunk from the provider. Password Enter the password to register to the trunk from the provider. www.allo.com Version 2.1 22 Analog Card User Manual Qualify If you enable Qualify, asterisk will send the SIP Options command regularly to check that the device is still online DID Routing DID Routing Routes calls to a single, specific extension Outbound Proxy Configure Outbound proxy to send Outbound signaling to that proxy 4.2.4. Editing / Deleting an Existing VOIP Account: On the right side of the page, you can see the list of VOIP trunk you have setup. To edit, or delete any of them, simply click the appropriate icon provided to the right of each trunk. Once you click on the edit button of a VOIP trunk then it will display the information of that particular VOIP trunk, here you can change the required details and click on the Save button and then click on the apply changes tab to save the changes made. To ensure successful registration of your VOIP Trunk, you must click the “System Status” tab on the top navigation menu (see Status section for more info) Make sure to click the APPLY CHANGES tab in the top navigation bar after adding any new VOIP trunk or editing/deleting. 4.3. Outgoing Calling Rule 4.3.1 New Calling Rules Navigation: Setup > Outgoing Calling Rules > New Calling Rule: This is where you configure Dial out Rules. Outgoing Calling Rules represent the prefix sequence used to dial when making an outgoing call either through PSTN (Analog) or VOIP. There are two ways to make outgoing calls for the registered extension users: VOIP / SIP trunk via ITSP gateway LINE/PSTN trunk via FXO port www.allo.com Version 2.1 23 Analog Card User Manual Figure 6: Create New Calling Rule Calling Rule Name Configure the name of the calling rule (e.g., local, long-distance, and etc). Letters, digits, etc. Pattern All patterns are prefixed with the "_". X: Any Digit from 0-9. Z: Any Digit from 1-9. [12345-9]: Any digit from 1 to 9. N: Any Digit from 2-9. ".": Wildcard. Match one or more characters. "!": Wildcard. Match zero or more characters immediately. Caller ID Name www.allo.com Configure the CallerID Name associated with the FXO trunk Version 2.1 24 Analog Card User Manual You can even use the Calling rule to route it to local extensions as Destination or Route the calls to Trunks created so as to make the calls successful. There are many options like striping the number of digits from front, Prepend the digits before dialing and filter. There is another alternative way if the trunk fails to route the call i.e. Failover Trunk an alternative trunk to route calls. Send this call through trunk Use Trunk Select the trunk for this outbound rule.(FXO/VOIP Trunk) Strip Allows the user to specify the number of digits that will be stripped from the beginning of the dialed string before the call is placed via the selected trunk. Prepend Specify the digits to be prepended before the call is placed via the trunk. Those digits will be prepended after the dialing number is stripped. Filter This option is used to filter out certain characters. The characters listed in the field will be permitted, while all others will be filtered out. Here we will discuss about how to choose outgoing trunks in two different ways. The First way is, choose a provider or a trunk based on prefix. This type of rule will allow user to create a prefix for choosing SIP (VOIP) or LINE (PSTN / FXO) trunk to make an outgoing call. For Eg 1: If you would like to strip out the first digit from the dialed number follow the example: Add “_8X.” in pattern & configure “1” in strip out field to remove the first digit from the dialed number either analog or SIP users which uses the same dial plan Second way is, choose provider or trunk based on actual number dialed, www.allo.com Version 2.1 25 Analog Card User Manual This type of rule will allow the user to choose suitable provider based on Country code. For e.g. If the user want to Dial 44-9872837532, then adding “_X.” in Dial Pattern and configure “0” in Strip Out field and add “44” in Prepend field & selecting VOIP Trunk/ Analog Trunk in trunk sequence, Analog card will allow number dialed from 44+ followed by (any digit from 0 to 9) like 449872837532 will route through VOIP Provider 2. If the ITSP / VOIP provider offer cheaper rates for the region where number starts from 44 users can make use of this rule. In the same way, user can create a prefix and select a LINE (PSTN / FXO) trunk to make an outgoing call. Use failover trunk Failover trunks Check this option to use Failover trunks where a call goes through an alternate route when the primary trunk is busy or down. Trunks List Gives the list of trunks configured. Strip Allows the user to specify the number of digits that will be stripped from the beginning of the dialed string before the call is placed via the selected trunk. Prepend Specify the digits to be prepended before the call is placed via the trunk. Those digits will be prepended after the dialing number is stripped. Filter This option is used to filter out certain characters. The characters listed in the field will be permitted, while all others will be filtered out. 4.3.2. Restore Default Calling Rule Navigation: Outgoing Calling Rules > Restore Default Calling Rule: This is where you configure Default Outgoing Calling Rules. www.allo.com Version 2.1 26 Analog Card User Manual These are the default calling rules where they show us an example of the patterns and which all fields can be used as default. 4.4. Dial plans Navigation: SETUPDial plans: This is where you configure Dial plans for the users. A Dial plan is a collection of outgoing rules. Dial plan are assigned to users to specify the dialing permissions they have For Example: you might one Dial plan for local calling that permits the users of that Dial Plan to dial local numbers, via the “local” outgoing calling rule. Another user may be permitted to dial long distance numbers, and so would have a Dial Plan that includes both the “local” and “log distance” outgoing calling rules. You have to create the Dial plan first before you create any user accounts to make your call successful. The Dial plan details are as follows. Dial plan Name: The name of the user wish to see in that field of Dial plan. Include Outgoing Calling Rules: when the outgoing Calling rules are created it displays here so that include it in the dial plan. Include local contexts: Here the user can select the features which he wishes to use. After all the changes, click on the save button. And don’t forget to click on apply changes button on top navigation bar immediately after save button. www.allo.com Version 2.1 27 Analog Card User Manual Figure 7: Dial Plan 4.5. Incoming Calling Rules Navigation: SETUP Incoming Calling rule: This is where you can create/edit /delete incoming calling rules. An Incoming Calling Rule is a rule which route the incoming call to phone number. Incoming Calling Rule is a feature that enables incoming calls to be routed directly to selected stations without attendant assistance. Incoming Calling Rule Details Incoming Calling Rule Configuration Parameters Trunk Select the trunk to configure the inbound rule. Time Interval Select the time interval from the list specify the time for the trunk to use the inbound rule. Pattern All patterns are prefixed with the "_". X: Any Digit from 0-9. Z: Any Digit from 1-9. N: Any Digit from 2-9. ".": Wildcard. Match one or more characters. "!": Wildcard. Match zero or more characters immediately www.allo.com Version 2.1 28 Analog Card User Manual Destination Select the default destination for the inbound call • Extension • Trunk • Local Extension by DID Figure 8: Edit incoming call Rule 4.6. DID Routing Navigation: SETUP DID Routing Direct Inward Dial. A specially configured phone line from the telephone company allows for dialing inside a company directly without having to go through an attendant. A DID line cannot be used for out dial operation since there is no dial tone offered. However, it can be configured so an outside caller can reach an inside extension with a 7-digit number through the phone company's central office. Figure 9: New DID www.allo.com Version 2.1 29 Analog Card User Manual DID Configuration parameters DID Number Enter the DID numbers provided by the VOIP Service provider Destinations Select the DID destination. Only the selected category can be reached by DID. • User Extension. • Trunk. www.allo.com Version 2.1 30 Analog Card User Manual General Settings 5. General Settings 5.1. Network Settings Navigation: Network Settings: This is where you setup your Networking Configuration 5.1.1. WAN Configuration Please refer to the following tables for basic network configuration parameters WAN Configurations IP Address Mode Select DHCP, Static IP. The default setting is DHCP. IP Address Enter the IP address for static IP settings. Subnet mask Enter the subnet mask address for static IP settings. The default setting is 255.255.255.0 Network Id your local network segment (Ex: 192.168.0.0) Broadcast Enter the broadcast address Gateway Enter the gateway IP address for static IP settings. DNS Primary Enter the DNS server 1 address for static IP settings DNS Secondary Enter the DNS server 2 address for static IP settings 5.1.2. Host Configuration Host Configuration is used to manage your FXO/FXS VOIP Analog card Host Name. Host Name: Used to name the device to identify inside the LAN network. This field is optional but may be required by some Internet Service Providers or system administrators. Click the save button and apply the Network Configuration. www.allo.com Version 2.1 31 Analog Card User Manual 5.2. Admin Settings 5.2.1. General Preferences Navigation: Admin Settings> General Preferences: This is where you can configure the General Settings of the Analog card General Preferences Global Outbound CIDConfigure the global CallerID used for all outbound calls when no other CallerID is defined with higher priority. If no CallerID is defined for extension or trunk, the global outbound CID will be used as CallerID. Global Outbound CID NameConfigure the global CallerID Name used for all outbound calls. If configured, all outbound calls will have the CallerID Name set to this name. If not, the extension's CallerID Name will be used. Ring Timeout Configure the number of seconds to ring an extension, The default setting is 20. VOIP Phone Digit Map: This option allows the administrator to define a global digit mapping string compatible with RFC 3435. There is no default setting and this option does not sync with the dial plan assigned to an individual user. The following examples should assist in writing an acceptable digit mapping string. [2-9]11 - Where calls beginning with digits from 2, 3, 4…. 9 followed by 11 are dialed immediately. 0T - Where calls beginning with digit 0 followed by a pause equal to the "Digit Timeout" option. +011xxx.T - Where calls beginning with the + character, followed by 011 digits and then at least three more digits before any arbitrary number is matched, dialed after Digit Timeout is reached. www.allo.com Version 2.1 32 Analog Card User Manual 0[2-9]xxxxxxxxx - Where calls beginning with 0, followed by any digit from 2,3,4…9, followed further by 9 more digits are dialed immediately. +1[2-9]xxxxxxxx - Where calls beginning with the + character, followed by 1, followed by any digit from 2,3,4…..9, followed by 8 more digits are dialed immediately. [2-9] xxxxxxxxx - Where calls beginning with any digit from 2,3,4….9, followed by 9 more digits are dialed immediately. [2-9]xxxT - Where calls beginning with any digit from 2,3,4….9, followed by three more digits are dialed after Digit Timeout is reached. [2-9]11|0T|+011xxx.T|0[2-9]xxxxxxxxx|+1[2-9]xxxxxxxx|[2-9]xxxxxxxxx|[29]xxxT where each entry is separated by the | character. For more information, please refer to RFC 3435. VOIP Phone Digit Timeout: The timeout variable is the number of seconds the phone will wait for each segment of a digit map expressed as an integer. 5.2.2. Analog card Settings Navigation: Admin Settings >General settings > Analog card Settings: This is where you can configure the General Settings of the Gateway Change Admin Password: Enter the new password and retype the new password to confirm. The new password field has to be at least 4 characters Click on “Update” and the user will be logged out. Once the web page comes back to the login page again, enter the new password to login. Date &Time Settings: You can set the date and time of the Analog card either through Enabling NTP or by manual entry. If you are enabling NTP, select the time zone according to your country timing and enter the NTP Server details. www.allo.com Version 2.1 33 Analog Card User Manual Enable NTP Enabling NTP allows you to set the Time zone and Date based on the NTP server provided Time Zone Select the proper time zone option so the Analog card can display the correct time accordingly. NTP Server Specify the URL or IP Address of the NTP server for the Analog card to synchronize the date and Time. For E.g.: pool.ntp.org 5.2.3. Reboot Navigation: Admin Settings > Reboot: This is where you can configure the General Settings of the Analog card. The administrator of the FXO/FXS VOIP Analog card can remotely reboot the FXO/FXS VOIP Analog card by pressing the “Reboot” button at the bottom of the System management. Once done the following screen will be displayed to confirm reboot. Figure 10: Reboot Asterisk FXO/FXS VOIP Analog card will take about 40 seconds to reboot. Rebooting the FXO/FXS VOIP Analog card results are in terms of active calls. www.allo.com Version 2.1 34 Analog Card User Manual 5.3 SIP Settings 5.3.1. General Navigation: SIP settings > click General: This is where you can configure the General sip settings. General Bind UDP Port Configure the UDP port used for SIP. The default setting is 5060. Bind IP Address Configure the IP address to bind to. The default setting is 0.0.0.0, which means binding to all addresses. Enable DNS SRV lookups Select to enables DNS SRV lookups on outbound calls from the Analog card. 5.3.2. TOS Navigation: General Settings > SIP Settings > TOS: This is where you can configure the TOS sip settings. The Details to be filled are given as: TOS Generate In Ringing band Configure whether the FXO/FXS VOIP Analog card should generate in band ringing or not. The default setting is "Never". • Yes: FXO/FXS VOIP Analog card will send 180 Ringing followed by 183 Session Progress and in-band audio. • No: The FXO/FXS VOIP Analog card will send 180 Ringing if 183 Session Progress has not been sent yet. If audio path is established already with 183 then send in-band ringing. • Never: Whenever ringing occurs, the FXO/FXS VOIP Analog card will send 180 Ringing as long as 200OK has not been set yet. In band ringing will not be generated even the end point device is not working www.allo.com Version 2.1 35 Analog Card User Manual properly Server User Agent Allows you to configure the user agent string for the FXO/FXS VOIP Analog card DTMF Mode Select DTMF mode to send DTMF. The default setting is RFC2833. If "Info" is selected, SIP INFO message will be used. If "In band" is selected, 64-kbit codec PCMU and PCMA are required. When "Auto" is selected, "RFC2833" will be used if offered, otherwise "In band" will be used. The default setting is "RFC2833". 5.3.3. NAT Navigation: General Setting > SIP settings > NAT: This is where you can configure the NAT sip settings. Email Settings Extern IP Configure a static address and port (optional) that will be used in outbound SIP messages if the Analog card is behind NAT. Extern Host you can specify an external host name and Asterisk will perform DNS queries periodically based on the External Refresh Interval Extern Refresh Configure the refresh interval for the external host (if used) The default setting is 10. Local Network Address Specify a list of network addresses that are considered inside of the NAT network. Multiple entries are allowed. If not configured, the external IP address will not be set correctly. A sample configuration could be as follows: 192.168.0.0/255.255.255.0 NAT Mode This is a global NAT setting that will affect all peers and users. The default setting is “YES". www.allo.com • YES = Always ignore info and assume NAT • NO = Use NAT mode only according to RFC3581 Version 2.1 36 Analog Card User Manual Allow RTP Reinvite • NEVER = Never attempt NAT mode or RFC3581 support • ROUTE = Assume NAT, don't send report. If enabled, the Analog card will try to redirect the RTP media stream (audio) to go directly from the caller to the Callee. • Yes : Allow RTP media direct • No NAT: Allow media path redirection (Reinvite) but only when the peer is not being behind NAT. The RTP core can detect if the peer is behind NAT or not based on the IP address where the media comes from. • Update: Use UPDATE for media path redirection, instead of INVITE. Some devices do not support this (especially if one of them is behind NAT). 5.3.4. Misc Navigation: General Settings > SIP settings > Misc: This is where you can configure the miscellaneous sip settings. The details to be filled are given as: FAX Settings FAX Format Select the FAX format either in TIFF or PDF T.38 fax (UDPTL) Enables T.38 Fax Mode otherwise pass-through mode is enabled Out Bound SIP Registration Settings Register Register as a SIP user agent to a SIP proxy (provider) Register Time-Out Configure the register retry timeout (in seconds). The default setting is www.allo.com Version 2.1 37 Analog Card User Manual 20. Register Attempts Configure the number of registration attempts before the Analog card gives up. The default setting is 0, which means the Analog card will keep trying until the server side accepts the registration request. 5.3.5. Codecs Navigation: SIP settings > Codec’s: The following Audio & Video codec’s are supported in FXO/FXS VOIP Analog card. G711 u-law G711 a-law G.726(32) G.729 Select the codec’s from the list by enabling it. www.allo.com Version 2.1 38 Analog Card User Manual Tools 6. Tools 6.1 Back Up The Analog card configuration can be backed up locally or via network. The backup file will be used to restore the configuration on Analog card when necessary. Users could backup the Analog card configurations for restore purpose by clicking on “Create New Backup” under Tools > Back Up. Once the backup is done, the list of the backups will be displayed with date and time in the web page. Users can download, restore, or delete it from the Analog card internal storage or the external device. Besides local backup, users could back up the configuration a remote server via TFTP/ HTTP protocol under Web GUI-> Tools > Back Up. RESTORE CONFIGURATION FROM BACKUP FILE To restore the configuration on the Analog card from a backup file, users could go to Web GUI>Tools -> Backup. A list of previous configuration backups is displayed on the web page. Users could click on “Restore Previous config” of the desired backup file and it will be restored to the Analog card. If users have other backup files on PC to restore on the Analog card, click on "Browse" first and select it from local PC to upload on the Analog card, and then click “Upload”. 6.2 Firmware Upgrade The Firmware Upgrade page allows you to update the Analog card with the latest release available, which can contain key updates, added functionalities and bug fixes. When a new firmware release is available, download it and save to your local PC. Then, browse for the file, and click the Upload button. You can always find the latest firmware from the web: http://www.allo.com/analog card.html www.allo.com Version 2.1 39 Analog Card User Manual While upgrading the firmware, please make sure that there won’t be power or network disturbances and also make sure to take back-up of configuration if any. During the firmware upgrade the entire Front LED’s start blinking. 6.3 File Editor Navigation: File Editor: This is where you can edit the configuration files or verify whether the configuration files are updated. In the File Editor filed mention the configuration file you want to view. It displays the contents of the file. Here you can view modify the contents of the file. If the user wishes to create new configuration file it can be done using new file. 6.4 Asterisk CLI Navigation: Tools >Asterisk CLI: This page gives an easier access to the user to execute the commands of the CLI. An Example of the “SIP show peers” displays all the Analog card user extensions with the registration status 6.5 Diagnostics On the Gateway, users could capture traces, ping remote host and trace route remote host for troubleshooting purpose under Web GUI->Tools > Diagnostic. Ping Enter the target host in host name or IP address. Then press "Start" button. The output result will dynamically display in the window below. www.allo.com Version 2.1 40 Analog Card User Manual Figure 11: Ping Test result www.allo.com Version 2.1 41 Analog Card User Manual Status 7. Status 7.1 Call Detail Records Navigation: Call Detail Records: This is where you can create Call Reports To create a new Report, select the inbound calls, outbound calls, internal calls, and External calls. A list with call details will display in the Call Reports section. By clicking on the delete button at the bottom Entire call details records (CDR) of Analog card are cleared. CDR can also be filtered by selecting inbound calls, outbound calls, internal calls and External calls. You can select the number of list to shown in the listings by selecting the right dropdown box. By clicking on the Previous and Next button you can see the list pages in next and the previous pages. You can even download the CDR in CSV format by clicking “Download” button, which makes the Download file to display top of the GUI page. Whereby right Click on the “Download File” link and download the CDR using the 'Save Link As.’ 7.2 Active Channels It displays current Active Channels on the Analog card with the options to Hang-up. When calls are in progress since there is always refreshing Active Channels in 10 seconds the Current Active Channels on the analog card are displayed. www.allo.com Version 2.1 42 Analog Card User Manual Figure 12: Active channels 7.3. System Info The analog card status can be accessed via Web GUI->Status->System Info, which displays the following system information. • General • Network • Disk Usage • Memory Usage Figure 13: System Information General You will have a summary of your general information, such as Firmware Version, Uptime, Asterisk Build, Server Date & Time Zone, and www.allo.com Version 2.1 43 Analog Card User Manual Hostname. Network Network Status you will have a summary of your Network information, such as Hostname, WAN IP Address, Subnet Mask, WAN MAC Address and Default analog card (you may refer to Settings > Network Settings for more info). Disk Usage Disk you will have a summary of Disk usage and Disk free space available on the file system. Memory Usage Memory Status you will see total memory resources, including RAM usage, Compact Flash usage. 8. Apply Changes Navigation: APPLY CHANGES (On the right top of the web GUI) This is the button which you must press after adding / editing / deleting such things as Extensions , modifying settings such as General Settings, VOIP Accounts, Network Settings, DID Routing, Firmware Upgrades, and other System Settings. www.allo.com Version 2.1 44 Analog Card User Manual FAQs Frequently Asked Questions (FAQ) 1. How to access GUI of factory default FXO/FXS cards? 1) Power on the device and connect RJ45 cross cable on one end to the Ethernet port of the card and the other end to your PC. 2) Keep your PC IP network settings in manual mode and assign 192.168.113.xxx with subnet mask 255.255.255.0 3) Open the Mozilla Firefox browser and enter http://192.168.113.252:8088 factory default IP of the card. 4) Login using username: admin and password: admin 2. How to change the network settings of FXO/FXS card? Connect cross over cable from FXO/FXS card to your PC. Keep your PC network configuration in manual mode and set 192.168.113.xxx. Open Mozilla Browser and enter http:192.168.113.252:8088. Username: admin Password: admin 1. Open the GUI of the FXO/FXS card 2. Go to network settings 3. If your network has enabled DHCP server then set DHCP “yes” 4. If DHCP server is not running in your network then set DHCP “no” and assign a static IP to the device. 5. Click Save and Connect Straight Ethernet cable from FXO/FXS card to your network switch. 6. Connect an analog phone to FXS port, FXO/FXS card and press”**” and device will announce an IP address. 7. Open that IP in Mozilla Firefox browser http://XXX.XXX.XXX.XXX:8088 www.allo.com Version 2.1 45 Analog Card User Manual 3. How to create SIP trunk in FXS/FXO cards? 1. Go to Trunks (Analog & SIP) VOIP Trunks. 2. Click New SIP trunk and select type as “SIP” Figure 14: Create New SIP Trunk 3. Select context naming based on username it will create context based on the username 4. Provider name: Give an unique name for this trunk 5. Hostname: Add the IP address of the VoIP trunk service provider of IPPBX 6. Host port: Enter the default SIP port: 5060 7. Username: It would be the user account ID provided by your service provider or IPPBX 8. Password: It authenticates the user account provided by VoIP service provider or IPPBX. 9. DID routing: Enable DID Routing if you are accepting DID numbers through this SIP trunk. Once you enable this DID Routing, all calls will route to DID Routing table. 10. Once check the Registration box, to send the registration request to a VoIP service provider or IPPBX. 11. Click Save and Apply Changes. 4. How to create outgoing call rule creation in FXS/FXO cards? www.allo.com Version 2.1 46 Analog Card User Manual Figure 15: New Calling Rule 1. Provide a name for the rule 2. Pattern should start with followed by “X.” and it should look like”_X.” And you can make prefix based pattern as well. For an Example: _9X. and Strip: 1 the outgoing calls with prefix 9 will obey this rule and pass through the Trunk which has selected in “Use Trunk” Place. 3. Use Trunk: Select the appropriate trunk for which this rule should work. 4. Strip: The above example clearly explained how many numbers should be stripped from the called number. 5. Prepend Digits: what are the digits should be prefixed for the called number. You can leave rest of the fields as default. Click save, Go to Dial Plans and add this new outgoing rule to the existed dial plan Click Save and Apply Changes. 5. How to create SIP Trunk? 1) Open GUI of the FXO/FXS cards and Go to Trunks (Analog/SIP) and click on VOIP Trunks and create New SIP trunk. www.allo.com Version 2.1 47 Analog Card User Manual Figure 16: Create New SIP trunk 2) Select SIP type and enter all the details as shown below Figure 17: Create New SIP Trunk If you want DID routing, you can check the Box. All the calls are coming inside the analog card through this 3CX trunk will go to DID routing table. 3) Click SAVE and APPLY CHANGES, you can see the registered status in the System Status page. 4) Create outgoing Calling Rule in FXS/FXO card using this trunk to reach the 3CXPBX and add it to Dial Plan. www.allo.com Version 2.1 48 Analog Card User Manual 6. How to create the new incoming calling rule? Open the GUI and go to Incoming Calling Rules Create New Incoming Rule Figure 18: New Incoming Rule 2) Select the Appropriate trunk either FXO trunk or VoIP trunk from the Trunk dropdown box. 3) Select the default time interval 4) Pattern: “_X.” will accept the calls 5) Destination: Select the destination for the incoming call. Click Update and Apply Changes. 7. How to create the FXO trunk? 1) Connect PSTN lines on FXO ports and Go to Trunks (Analog & SIP) 2) Create New Analog Trunk Figure 19: Create FXO Trunk 3) Select the port and give a name to that trunk and click Add. 4) Create outgoing calling rules for this trunk 5) Add that outgoing rule into existed dial plan. www.allo.com Version 2.1 49 Analog Card User Manual Click Save and Apply Changes. 8. How to use analog card? Analog active card is PCI express card it will convert TDM to SIP, SIP to TDM, SIP to SIP, TDM to TDM. You need to insert the card into PCIe slot in your desktop and it will give you one Ethernet interface (Broadcom Ethernet Interface). Install the Broadcom driver and will get it from http://www.allo.com/analog-active-card.html. After installing the card, you should bridge the analog card Ethernet interface (Broadcom Interface) with the Host machine Ethernet interface. Why bridging is necessary? If bridging is done, then an analog card will get an IP address from your network via the bridged interface in the host machine. Once the bridge is done, find out the IP address of the analog card. You can find that using an analog phone connecting to the FXS phone and dial**. Open Mozilla Firefox browser, and enter the http://IP address: 8088. You will get the GUI of the analog card. According to your scenarios, you can create extensions, SIP trunk, analog trunk, outgoing and incoming rules. 9. How to make basic communication between the analog cards with IPPBX? In order to make basic communication between the analog card with IPPBX, Follow the below steps. 1) Set up the SIP trunk between the analog card and IPPBX. 2) Assign extension numbers for FXS ports 3) Create an outbound rule for the SIP trunk and add it to dial plan 4) Set up the incoming calling rule for that SIP trunk and route the call to one of the FXS ports. 10. How to find the IP address of the analog card if all the ports are FXO? www.allo.com Version 2.1 50 Analog Card User Manual If the card doesn’t have FXS ports, then to find the IP address of the analog card, download the file cemdetect.tgz from below link in any Linux machine. wget http://61.12.17.162:9090/Analogcard/cemdetect.tgz Compile the cemdetect.tgz file as follows #tar-zxvf cemdetect.tgz #cd cem detect #make clean #make #. /cem detect (this script will find out the analog card/gateway in your network) The output of the above script will be like this, Scanning network for cem gw devices… Looking for reply [1] Mac: 00:17:F7:00:93:07IP:192.168.0.68 Select a device: By comparing the MAC ID, you can identify the corresponding IP address. 11. Explain Trunks Bridging (Sending call from one Trunk to another Trunk)? Trunks bridging means, if the call is coming from one trunk then we can send the call directly to another trunk. Scenario No 1: Call is coming from FXO trunk and sending to SIP trunk 1) Create an incoming calling rule for FXO trunk Pattern as _X. 2) You can set the default option for a time interval 3) Destination will be the SIP trunk. 4) Add the FXO line number in the “Number “field. Scenario No 2: Call is coming from SIP trunk and sending to SIP trunk Let us say, if you have two SIP trunks like SIP trunk A and SIP trunk B www.allo.com Version 2.1 51 Analog Card User Manual 1) Create an incoming calling rule for SIP trunk A. Pattern as _X. 2) You can set the default option for a time interval 3) Destination will be the SIP trunk B. 4) Strip Digits: Number of the digits will be trimmed from the dialed number. 5) Prepend Number: Prefix to add the dialed number. www.allo.com Version 2.1 52 Analog Card User Manual Appendix APPENDIX-A: Glossary Definition Term ATA Analog Telephone Adapter: Used to connect a standard telephone to a highspeed modem to facilitate VOIP or fax calls over the Internet. DHCP Short for Dynamic Host Configuration Protocol, a protocol for assigning dynamic IP addresses to devices on a network. With dynamic addressing, a device can have a different IP address every time it connects to the network. WAN Wide Area Network. A computer network that spans a relatively large geographical area. Typically, a WAN consists of two or more local-area networks (LANs). DNS The Domain Name System is the system that translates Internet domain names into IP numbers. A "DNS Server" is a server that performs this kind of translation. FXO In telecommunications, a Foreign Exchange Office, or FXO, is a telephone signaling interface that receives POTS, or "plain old telephone service". FXS Foreign Exchange Station is the interface on a VOIP device for connecting directly to phones, faxes, and CO ports on Gateways or key telephone systems. GATEWAY A network point that acts as an entrance to another network IP ADDRESS Every machine that is on a network (a local network, or the network of the Internet) has a unique IP number [four sets of numbers divided by period with up to three numbers in each set. (i.e. 192.168.0.100)] - If a machine does not have an IP address it cannot be on a network. LAN Local Area Network: A LAN is a group of computers and associated devices that share a common communications line or wireless link and typically share the resources of a single processor or server within a small geographic www.allo.com Version 2.1 53 Analog Card User Manual area (for example, within an office building). NETMASK Used by the TCP/IP protocol to decide how the network is broken up into sub-networks (ex: 255.255.255.0). PBX Private Branch Exchange: An in-house telephone switching system that interconnects telephone extensions to each other, as well as to the outside telephone network. PROXY A server that receives requests intended for another server and that acts on the behalf of the client behalf (as the client proxy) to obtain the requested service. A proxy server is often used when the client and the server are incompatible for direct connection. For example, the client is unable to meet the security authentication requirements of the server but should be permitted. SIP Session Initiation Protocol: An application-layer control protocol, a Signaling protocol for Internet Telephony. SIP can establish sessions for features such as audio/videoconferencing, interactive gaming, and call forwarding to be deployed over IP networks thus enabling service providers to integrate basic IP telephony services with Web, e-mail, and chat services. In addition to user authentication, redirect and registration services, SIP Server supports traditional telephony features such as personal mobility, time-of-day is routing and call forwarding based on the geographical location of the person being called. PSTN Public Switched Telephone Network: This is defined as the regular telephone network services. VOIP Voice over Internet Protocol. The technology used to transmit voice conversations over a data network using the Internet Protocol. Such data network may be the Internet or a corporate Intranet. WAN Wide Area Network. A computer network that spans a relatively large geographical area. Typically, a WAN consists of two or more local-area networks (LANs). www.allo.com Version 2.1 54 Analog Card User Manual www.allo.com Version 2.1 55