1
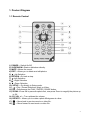
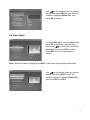
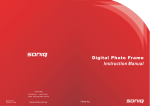
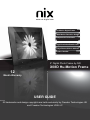
www.nix-digital.com
Hu-Motion Digital Frame
With Motion Detection Sensor
Simple and Convenient!
High Resolution Backlit LCD
Plays Photos,Videos & Music
Photo Calendar
8” Digital Photo Frame by NIX
X08D Hu-Motion Frame
12
Month Warranty
USER GUIDE
All trademarks and design copyrights are held exclusively by Creedon Technologies UK
and Creedon Technologies USA LLC
Warranty:
This frame comes with a full one-year Manufacturer's Warranty. You do not need to
register your Warranty. In the event your frame requires any servicing, you just need to
contact us via our website: www.nix-digital.com
Please provide a copy of your original order information as proof of purchase.
1
Introduction:
Congratulations on owning a NIX Digital Photo Frame. Please take some time to read
this User Manual before getting started. If there is something you are not sure of, please
refer to our website FAQ’s or contact one of our friendly team for advice via our website.
This frame is a simple and smart device. Simple, in that you simply insert your memory
card or USB flash drive into the frame to start viewing your photos. Smart, in that its
highlight feature is a ’Hu-Motion’ motion detection sensor. This means that the frame will
automatically turn on and off when you enter or leave the room and resume playing your
photos or videos.
Features:
1.
2.
3.
4.
5.
6.
7.
8.
9.
10.
11.
12.
13.
14.
15.
Displays JPEG photos up to 64 mega pixels
Supported Audio formats: MP3 and WMA
Supported Video format: MPEG4
Supported Memory Cards: SD
USB connection: USB 2.0 Host
Automatically plays a slideshow with Random or Sequence Playback
Plays Background Music when you are viewing pictures
Splitscreen and Multishow Display. Zoom and Rotate Function
Adjustable slideshow speed with different transition effects
Clock and Calendar with slideshow
Built-in stereo speaker with earphone socket
Auto-Rotation Function
Ability to delete files from your Memory Card or USB Drive
Adjustable brightness, contrast and saturation
Motion Detection Sensor: Turns the frame on/off as you enter or leave the room
Packaging Check List:
1. 8 inch digital photo frame
2. User manual
3. AC/DC adapter
4. Remote control
1 piece
1 piece
1 piece
1 piece
2
CONTENTS
1. Product Diagram ·········································································································· 4
1.1 Remote Control······································································································· 4
1.2 Back buttons & left side of frame············································································· 5
2. Installing & Replacing the Battery on the Remote Control············································ 5
3. Getting Started ············································································································· 5
4. Operating Instructions ·································································································· 6
4.1 Card and USB········································································································· 6
4.2 Picture Mode··········································································································· 6
4.3 Music Mode············································································································· 7
4.4 Video Mode ············································································································· 8
5. File & Folder Management ··························································································· 9
6. Calendar ······················································································································ 9
7. Setup & 'Hu-Motion' Setup ························································································· 10
8. Technical Specifications ····························································································· 11
9. Troubleshooting Guide ······························································································· 12
3
1. Product Diagram
1.1 Remote Control
1) POWER Switch On/Off
2) SLIDESHOW Starts a slideshow directly.
3) MUTE Mutes the sound.
4) EDIT – Allows you to delete and edit photos.
Up Selection
5)
6) RETURN Go back a step.
7) Left Selection
8) Right Selection
9)
Down Selection
10) SETUP Go directly to Setup mode.
11)
Play / Pause Slideshow, Music or Video.
12) OK Functions as the PLAY / ENTER / PAUSE button.
13) ZOOM Press OK to pause the photo first, now press Zoom to magnify the picture up
to 5X.
14 /15) VOL +/- Turn up/down the volume.
16) ROTATE Allows you to rotate a photo 90 degrees at a time.
Move back to previous music or video file.
17)
Move forward to next music or video file.
18)
4
1.2 Back buttons & left side of frame
1. POWER
2. PREVIOUS/UP
3. PLAY/PAUSE/ENTER
4. VOL +/LEFT
5. VOL - /RIGHT
6. NEXT/DOWN
7. EDIT( Press and hold for 3s )/
RETURN( Short press )
NOTE:
/
: Press and hold for 3s: VOL+/ VOL - . Short press: LEFT/RIGHT
1. SD CARD
2. Earphone Socket
3. USB
4. DC IN
2. Installing & Replacing the Battery on the Remote Control
Place the upside of the remote control down, press down on the ridged area of the
battery cover and pull towards you to remove the tray. Place one CR2025 lithium
button-cell battery on the tray with the positive “+”side facing you. Reinsert the tray.
3. Getting Started
3.1 Screw the stand into the stand slot on the back of the Digital Photo Frame, so it sits
horizontally on a flat surface. Then insert the jack of the AC adapter into the back of the
frame (marked ‘DC in’) and the other end into a standard electrical outlet.
3.2 Remove the protective film covering the LCD.
3.3 Remove the plastic battery insulator from the battery compartment and make sure the
remote control has a battery inside.
3.4 Power on the unit by pressing the Power button on the remote control.
5
4. Operating Instructions
4.1 Card and USB
After turning on the unit, this interface will
appear. Once you insert a card or USB
device into the frame, a slideshow
automatically starts.
Press the RETURN button three times to
get back to the Main Menu that will display
what memory devices are inserted.
Note: 1) Make sure there are supported picture, music and video files on the Card or
USB device.
2) If there are supported picture and music files on the card or USB device, the
slideshow will automatically play your pictures only. To add accompanying music,
just press the ‘SLIDESHOW’ button on the Remote Control.
4.2 Picture Mode
Select your memory device, then press
OK. Highlight Photo, press OK to access
to choose
thumbnail mode, use
the picture you want to start the slideshow
with, then press OK.
Alternatively, just press the SLIDESHOW
button on the remote control at any time
and the slideshow will begin.
You can also view the slideshow in
splitscreen or multi screen mode. Change
slide mode as follows: press SETUP to
choose SLIDE MODE (single window /
four windows / triple windows), select
, press OK to confirm.
with
6
Auto-Rotation
Simply rotate the frame 90 degrees anti-clockwise and your photos will automatically
rotate,so you can view your vertical photos the correct way up. This only applies to single
pictures.
frame placed horizontally
frame placed vertically
Delete function
In the thumbnail screen, use
to
select the picture you want to delete , then
press EDIT to enter the deletion interface.
Highlight ‘Delete File’, then press OK to
confirm.
4.3 Music Mode
From the Main Menu, choose Music, then
press OK to enter the music interface.
to select the music from
Now press
the playlist, then press OK to confirm.
Press VOL+/- to turn up/ down the
volume.
7
Use
to select the music you want to
delete, then press EDIT to enter the next
interface. Highlight ‘Delete File’, then
press OK to confirm.
4.4 Video Mode
From the Main Menu, choose Video, then
press OK to enter the video interface.
Now press
to select the video from
the playlist, then press OK to confirm.
Press VOL+/- to turn up/ down the
volume.
Note: When the video is playing, press EDIT to show the video playing time toolbar.
Use
to select the video you want to
delete, then press EDIT to enter the
deletion interface. Highlight ‘Delete File’,
then press OK to confirm.
8
5. File & Folder Management
From the Main Menu, choose File, then
press OK to access the file interface. You
can browse all the files or folders on the
memory device. To view just the contents
of a folder, press OK, select any picture
from the folder, then press OK again.
Use
to select the file or folder you
want to delete, then press EDIT to enter
the deletion interface. Highlight ‘Delete
File’, then press OK to confirm.
6. Calendar
Select Calendar from the main menu,
press OK, use
to select the date
you want to view.
9
7. Setup
Select Setup from the main menu, then
press OK to access the setup interface.
to select the item you want to
Use
set up. Press OK to activate the sub
, then press OK to
menu, select with
confirm. Press RETURN to move back to
the setup interface.
7.1 Language: English, Spanish
7.2 Photo Sequence: View photos in Sequence or Random
7.3 Slide Mode: Single window, four windows and triple windows
7.4 Slide Speed: 3/5/15/30seconds, 1/5/15/30 minutes and 1hour
7.5 Photo Effect: color, mono, sepia
7.6 Slide Effect: Random, Windows, Jalousie, Fade, Insert, Reel, Brick, 3D Float,
Release, 3D Mix, Comb, 3D Circle, 3D Cube
7.7 Photo Mode: Auto fit, Optimal, Full
7.8 Music Play Mode: Single Repeat, Repeat All, No Repeat
7.9 Video Mode: Screen(Widescreen), Full(Full Screen)
7.10 Video Repeat Mode: Allows you to loop a single video or all videos
7.11 Display
to select between 00 (lowest) and 40 (highest).
Contrast: Press OK, use
Brightness: Press OK, use
Saturation: Press OK, use
Tint: Press OK, use
to select between 00(lowest) and 40 (highest).
to select a point between 00 (lowest) and 40 (highest).
to select between 40 (most color) to 00(least color).
7.12 Set Time/Date:
Press OK to enter the time/ date edit interface. Use
to move through Year, Month,
Date,Hour, Minute, Second. To edit any of them, highlight and press OK. Now use
to set, then press OK to save. When done, highlight ‘Save Time’, then press OK.
7.13 Set Time Format: Choose between 12 or 24 hour clock display.
7.14 Hu-Motion Timer:
This allows you to set the timing of the Motion Sensor. Choose between 5/10/30 minutes
or 1 hour. Whatever you choose, this means that if the frame does not sense human
movement within this time, the frame will automatically turn off. When someone re-enters
the room and movement is sensed within 2.5 Meters of the frame, it will turn on again,
10
resuming the display that was on the screen before it switched off. Videos will restart
themselves.
If you do not want to use Motion Sensor feature, select it to ‘Off ‘.
PLEASE NOTE: When you have highlighted and selected your desired time by
pressing OK, you need to press EXIT on the Remote Control˄or MENU on the back
of the frame˅twice. Now, the Hu-Motion settings are saved.
7.15 Reset Setting: Resets all settings to default values.
7.16 Exit: Press to exit setup interface.
8. Technical Specifications
Adapter:
Input: AC 100-240V 50/60HZ
Output: DC 5V/1.5A
Picture Format:JPEG
Audio Formats: MP3 & WMA
Video Format: MPEG4
Memory Cards:SD
USB connection: USB 2.0 Host
Screen Parameter:
Screen Size: 8 inch TFT
Resolution: 800 x 600
Contrast: 300:1
Aspect Ratio: 4: 3
Brightness: 300cd/m2
Response Time: 20ms
Viewing Angle: 60°/60°/60°/40°(left/right/bottom/top)
Working Temperature: 0ć~40ć, Humidity: 10-85%
11
9. Troubleshooting Guide
If you don’t find a solution to your problem, you can check out the FAQ section on our
website or contact our Technical Support via the website.
ƽ No power:
Press and hold the power button on the back of the frame for 3 seconds. If you
suspect the power adapter might be faulty, email ‘[email protected]’ and we
will provide a replacement.
ƽ No power:
Please check whether the battery has power. Replace with a new battery if
necessary.
z Can not read the CARD or USB:
Please confirm whether there is storage in the card or USB device.
Empty devices cannot be read.
z Can not play the file:
Please confirm if the file format is compatible with the player.
z Display too bright or too dark:
Please adjust the brightness or contrast in the setup menu.
z The Screen is light or no color:
Please adjust the color and contrast setup.
z No sound:
Please check whether the volume is correct and the player is not in Mute mode.
12
Cautions
Precautions and maintenance
For indoor use only.
To avoid risk of fire or electric shock, do not expose the unit to moisture or
condensation.
To avoid overheating, do not block the ventilation holes on the back of the Digital
Photo Frame.
Keep the Digital Photo Frame out of direct sunlight.
Do not dismantle the Digital Photo Frame. There is a risk of electric shock and there
are no user-serviceable parts inside. Dismantling the Digital Photo Frame will void
your warranty.
Cleaning the LCD Screen
Before cleaning your frame, make sure it is turned off and you never spray or pour
liquid directly onto the screen or plastic casing.
If fingerprints or dust accumulate on the LCD screen, we recommend using a soft,
non-abrasive cloth such as a camera lens cloth to clean the LCD screen.
Moisten the cloth with a small amount of non-ammonia, non alcohol based, mildly
non-abrasive detergent and gently wipe the screen.
WARNING:
Please power off the unit before inserting or removing a card or
USB device.
Failure to do so may cause damage to the card/USB and the unit.
To reduce the risk of fire or electric shock, do not expose this
appliance to rain or moisture.
13
We warmly welcome all suggestions from any country of what you like and don’t
like about our Digital Photo Frames. Please email us with suggestions,
comments, possible improvements or even design ideas!
Contact us via our website or email: [email protected]
NIX is a registered trademark of Creedon Technologies Ltd., UK
and Creedon Technologies USA LLC
This product is designed in London, UK and made in China.
All trademarks and design are copyright protected.
www.nix-digital.com
14