1
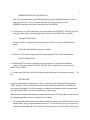
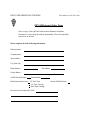
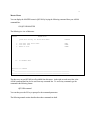
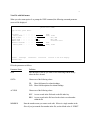
Quick File Utility for AS/400
QFU/400
Version 1.0
Last Updated August 2002
Kisco Information Systems
7 Church Street
Saranac Lake, New York 12983
Phone:
FAX:
E-mail:
Website:
© 1997 Kisco Information Systems
(518) 897-5002
(518) 897-5003
[email protected]
http://www.kisco.com
Table Of Contents
Introduction . . . . . . . . . . . . . . . . . . . . . . . . . . . . . . . . . . . . . . . . . . . . . . . . . . . . . . . . . . . . . . . . . . . 1
Installation . . . . . . . . . . . . . . . . . . . . . . . . . . . . . . . . . . . . . . . . . . . . . . . . . . . . . . . . . . . . . . . . . . . . 2
Install From Tape . . . . . . . . . . . . . . . . . . . . . . . . . . . . . . . . . . . . . . . . . . . . . . . . . . . . . . . . . 2
Install From The Internet . . . . . . . . . . . . . . . . . . . . . . . . . . . . . . . . . . . . . . . . . . . . . . . . . . . 3
Internet Order Form . . . . . . . . . . . . . . . . . . . . . . . . . . . . . . . . . . . . . . . . . . . . . . . . . . . . . . . 6
Master Menu . . . . . . . . . . . . . . . . . . . . . . . . . . . . . . . . . . . . . . . . . . . . . . . . . . . . . . . . . . . . . . . . . . 8
View File with field names . . . . . . . . . . . . . . . . . . . . . . . . . . . . . . . . . . . . . . . . . . . . . . . . . . 9
File Browse Display . . . . . . . . . . . . . . . . . . . . . . . . . . . . . . . . . . . . . . . . . . . . . . . . . . . . . . 10
Hints for users . . . . . . . . . . . . . . . . . . . . . . . . . . . . . . . . . . . . . . . . . . . . . . . . . . . . . . . . . . . . . . . . 18
Limitations . . . . . . . . . . . . . . . . . . . . . . . . . . . . . . . . . . . . . . . . . . . . . . . . . . . . . . . . . . . . . . . . . . . 19
Install Menu . . . . . . . . . . . . . . . . . . . . . . . . . . . . . . . . . . . . . . . . . . . . . . . . . . . . . . . . . . . . . . . . . . 20
Display installation status . . . . . . . . . . . . . . . . . . . . . . . . . . . . . . . . . . . . . . . . . . . . . . . . . . 22
Change installation status . . . . . . . . . . . . . . . . . . . . . . . . . . . . . . . . . . . . . . . . . . . . . . . . . . 24
Print documentation . . . . . . . . . . . . . . . . . . . . . . . . . . . . . . . . . . . . . . . . . . . . . . . . . . . . . . 26
1
Introduction
QFU/400 is a database file utility which will allow you to access database files on the AS/400.
You can view the fields in a file in both single record mode or spreadsheet mode. You can copy,
delete, display, print, change or add records. You can even copy certain records from one file to
another. You also can view the file layouts, the database relations and the keys fields.
There are three levels of security. The broadest implementation of QFU/400 allows anyone to use the
system. Optionally, you can specify certain users so that they cannot make file changes. You can also
optionally set QFU/400 to only work for registered user profiles. This last option locks out all users
except those you specifically want to grant access to the system.
QFU/400 can be started in three different modes. The basic mode starts from a file contents browse.
Alternative commands are available that will first show a file and all of it’s related files (a “tree” view)
and a view that will first locate all files that meet a selection criteria.
2
Installation
QFU/400 can be ordered directly or you can download the package via the Internet. The following
installation section of this manual covers both installation methods.
Install From Tape
The following procedure is used for both new installations and for update installations when you order
your software from Kisco Information Systems and you receive the software on tape. To install
QFU/400, follow these easy instructions:
1. Sign on using the QSECOFR id.
2. Place the installation diskette or tape in your system and key the following command:
LODRUN DEV(xxxx)
where xxxx is the name of your diskette or tape drive.
3. During installation, QFU/400 does the following:
!
!
!
!
Checks to see if this is a new install or an update install.
For update installs, the old library is saved in library QFULIBOLD and history information
is transferred to the newly installed library.
For new installs, the software is initialized for the free 30 days trial period.
Additional documentation is printed which covers topics that have been added or changed
since the user documentation manual was last printed.
4. When the command finishes, QFU/400 will be ready for use.
During step 3, documentation for additional topics will be printed. This includes topics and features that
are not covered in this manual, normally because new features or capabilities have been added since the
last printing of the manual. Before using QFU/400, please review all documentation in detail.
If this is a new trial install, remember that the software will only operate on your system for about 30
days. When you decide to keep QFU/400, you must send your payment to Kisco Information
Systems. At that time, KIS must know the full serial number for your system. If you are not sure of
your serial number, you can display it by using the following command:
DSPSYSVAL QSRLNBR
3
When KIS receives your payment and serial number, they will issue a password to you. This
password, when applied, will certify your copy of QFU/400 and will permanently activate the software
on your system. The password and certification instructions will be provided in writing (by E-mail, fax
or by mail).
Please review the section later in this manual which covers the INSTALL menu for additional
installation specifics.
Install From The Internet
The following procedure is used for both new installations and for update installations when you
download the software from the Kisco Information Systems Website. To install QFU/400 on your
system from the QFUINST.ZIP file you received via E-mail or Website Download, please follow these
exact instructions:
1. Sign on to your AS/400 from a PC that is configured for Client Access/400 using Shared Folders.
You must sign on using the special IBM-supplied user profile QSECOFR.
2. Run the following command:
CRTFLR FLR(KISRMT)
3. Run the following command:
CRTPF FILE(QGPL/QFUINSTALL) RCDLEN(80)
4. Using your PC, copy the QFUINST.ZIP file into the shared folder created in step #2 above. For
most systems, this can be done by issuing the following PC command:
copy QFUINST.zip I:\qdls\kisrmt
5. Also from your PC, unpack (unzip) the QFUINST.ZIP file while it is in the shared folder. This will
create 5 files in the folder in addition to the zip file.
6. Now go back to the AS/400 command line and run the following command:
CPYFRMPCD FROMFLR(KISRMT) TOFILE(QGPL/QFUINSTALL) +
FROMDOC(INSTALL)
7. Also from the AS/400 command line, run the following command:
4
SBMDBJOB FILE(QGPL/QFUINSTALL)
Note: This command requires that the IBM supplied user profile QPGMR be an active entry in
your system directory. If you are unsure about the status of your directory, use the
WRKDIR command to verify that it contains an entry for QPGMR.
8. At this point, a job will be loaded into your system jobque called QFUINST. When the job starts
running from the jobque, the following message will be sent to the QSECOFR user profile:
"Starting QFU/400 install"
and when this step completed, the following message will also be sent to the QSECOFR user
profile:
"Initial QFU/400 install processing now complete"
9. When you receive this message, type the following command on the AS/400 command line:
GO QFULIB/INSTALL
10. When the INSTALL menu is displayed, type menu option #1 to complete the installation
process. When this command is finished, QFU/400 will be installed on your system for your
FREE 30 DAY TRIAL.
11. To start using QFU/400, type the following command and prompt it for parameters using the
key:
F4
QFULIB/VIEW
During the final install processing (step #10 above), a document called "Additional Documentation
Topics" will print. This includes the latest system changes and documentation since the last time the
user manual was updated. The full user manual is available via the Internet in Adobe Acrobat format.
Check the Website (http://www.kisco.com/qfu.htm) to obtain a copy.
When you have completed your testing and want to purchase Quick File Utility/400, you can do one of
the following depending on how you obtained the trial software:
1. If you ordered the software directly from Kisco Information Systems, you will find an invoice in the
manual binder. Send your payment using this invoice. As soon as Kisco receives your payment, a
permanent authorization code will be issued that will permit your copy of QFU/400 to run beyond
5
the trial period.
2. If you obtained the software via the Internet, just complete the order form on the following page
and fax it to Kisco. Be sure to include the serial number for your computer system. Kisco will then
fax (and mail) an invoice back to you for your copy of the software. As soon as the invoice is paid,
a permanent authorization code will be issued that will permit your copy of QFU/400 to run beyond
the trial period.
6
KISCO INFORMATION SYSTEMS
Fax orders to: 914-241-9140
QFU/400 Internet Order Form
I have a copy of your QFU/400 software that I obtained via Internet
Download. I want to keep the software permanently. Please fax (and mail)
your invoice to me now.
Please complete all of the following information
Print your name:
Company name:
Street address:
City, State, Zip:
Phone number:
Fax number:
E-mail address:
AS/400 Model Number:
Serial number:
Media format (check one): 1/2" Reel Tape
1/4" Tape Cassette
8mm Tape Cartridge
How did you hear about QFU/400?
Current OS/400 Release:
7
7 Church Street, Saranac Lake, New York 12983 (518) 897-5002 FAX: (518) 897-5003
E-mail:[email protected]
8
Master Menu
You can display the MASTER menu in QFU/400 by keying the following command from your AS/400
command line:
GO QFULIB/MASTER
The following is a view of this menu:
MASTER
1.
2.
3.
10.
MASTER Menu
Quick File Utility for AS/400 Main Menu
Command
View File with field names
View File Tree
Where-is File
VIEW
VIEWT
VIEWW
To INSTALL Menu
Selection or command
===>_______________________________________________________________________
___________________________________________________________________________
The three ways to run QFU/400 are all available from this menu. At the right, on each menu line, is the
AS/400 command that can also be used from any command line. To access any command, type the
command in the following format:
QFULIB/command
You can then press the F4 key to prompt for the command parameters.
The following manual section describes these three commands in detail.
9
View File with field names
When you select menu option #1 or prompt the VIEW command, the following command parameter
screen will be displayed:
QFU/400 View (VIEW)
Type choices, press Enter.
File Name . . . .
Library Name . .
Start Screen . . .
Access Mode . . .
Member Name . . .
External Override
Library Name . .
.
.
.
.
.
.
.
F3=Exit
F4=Prompt
F24=More keys
.
.
.
.
.
.
.
.
.
.
.
.
.
.
.
.
.
.
.
.
.
.
.
.
.
.
.
.
.
.
*LIBL
. FIL
. KEY
. *FIRST
.
.
*LIBL
F5=Refresh
Name
Name, *LIBL
FIL, FLD
KEY, RRN
Character value
Name
Name, *LIBL
F12=Cancel
F13=How to use this display
Fill in the parameters as follows:
Parameter Name
FILE
Definition
Enter the name of the file you want to work with along with the library
where the file is located.
GOTO
Choose one of the following values:
FIL
FLD
ACCESS
Show field names for column headings
Show field descriptions for column headings
Choose one of the following values:
KEY Access records in the file based on the file index key
RRN Access records in the file based on the relative record number
within the file
MEMBER
Enter the member name you want to work with. If there is a single member in the
file or if you just want the first member in the file, use the default value of ‘*FIRST’.
10
EXTFILE
If your file is not externally described, you can tell QFU/400 to use the
description from a different file when working with the file named in the
FILE parameter. Enter the name of the file which contains the layout
description that you want to use in this parameter along with the name of
the library where it is located.
File Browse Display
After filling in all parameters, press ENTER. QFU/400 will then access the layout of the file and build
your file browse screen. When all information has been accessed, the main display screen will appear
as follows:
File: CUSTI1LF
Library: RLIBR
Member: CUSTI1LF
Length:
479
CUSTINFO by Char Cust number
Records:
51
Window No:
1 Window Fld:
Format: CUSTFT
File Size:
*LF
Key Value: 021360036
2=Change 3=Copy 4=Delete 5=Display 6=Print 8=DSPPFM (Hex) 9=Copy to File
RRN CSTCCI
CSTPCI
CACTCI STYPCI JBCDCI FNAMCI
LNAMCI
1 021360036
21360036 0
1
H MARIE
KINSEY
2 021360038
21360038 0
1
CATHY
MACKENZIE
3 021360039
21360039 0
13
MARGE
INNESS
4 021360040
21360040 0
1
RITA A
BRAZELL
5 021360043
21360043 A
15
F.
DADDARIOI
6 021360044
21360044 0
13
BELA
KASAS
7 021360047
21360047 0
15
CHERYL
SZYMANSKI
8 021360048
21360048 0
1
CRAIG
LANKHORST
9 021360051
21360051 0
2
DEBORAH
SERCOMBA
10 021360052
21360052 A
1
SALLY
KELLY
11 021360055
21360055 0
15
CHERYL
SZYMANSKI
12 021360056
21360056 0
2
JOAN
CREEDON
13 021360059
21360059 A
2
14 021360060
21360060 0
3
JOHN
BARNES
15 021360063
21360063 A
2
JEANNE
PERRIN
F2=File F3=Exit F4=Single F5=Layouts F6=Add F7=Toggle F8=DFU F9=Tree F10=Full
F11=Keys F13=Cmds F16=Find F17=Replace F19/20=Window F21=Cmd F22=Whereis
This will now display the main QFU/400 file browse screen.
Once you view a database file, you have many different options and command keys to press. Here is
an explanation of the functions and fields on this main screen.
At the top:
The file name, library and format are displayed. The length of the file, the number of records (only
active), and the file size is also displayed. If you are viewing a logical file, instead of the file size,
11
you will see “*LF” indicating this is a logical file which is not the actual size of the data. Logical files
only contain pointers, not the data itself.
Window No. and Window Fld:
You can enter the field number or the field name to immediately position the spreadsheet view to
that field.
Key Value/RRN:
If the file is currently viewed in key order, you can enter all or some of the contents of the key and
press enter. This will position the database file on or to the closest key in the spreadsheet view.
Pressing the F11 key will break apart each key field if needed. If the file is currently viewed in
relative record number order, enter a relative record number to position the database file to. If you
enter all nine’s, the database will be positioned at the last record.
Options:
Next to one or more of the records, you can enter a numbered option. The valid options you can
choose are:
Option Action Description
2
Allows you to change (update) the selected record.
3
Allows you to create a copy of the current record to be added to the file. The
record to be added will be displayed allowing you to make changes before it is
actually added to the file.
4
Allows you to delete the selected record.
6
Prints the contents of the selected record to a printer.
8
Displays the file starting at the selected record in HEX mode.
9
Allows you to copy selected records to another file (provided that the destination
file is compatible with the displayed file and is at the same file level).
In addition to the record level options, the following command key functions are also available from the
main file view display.
F-Key
F2
Description
Previous views - a listing of the last five files you have opened from the command
12
F3
F4
F5
F6
F7
F8
F9
F10
F11
F12
F13
F15
F16
F17
F19
F20
F21
F22
line.
Exit QFU/400
Toggles between Spreadsheet mode and single record mode.
Display file layouts.
Add a new record to the file if externalized.
Toggles between showing field names and field descriptions as column headings.
Access DFU for file updates in place of using options 2 or 4.
Displays the database tree (or database relations)
Removes command key information and option information to display several more
records on the screen or to put these functions back on the screen.
Break apart keys to set database pointer. Valid only when viewing keyed files.
Exit QFU/400
Access OS/400 commands related to the file.
Find Next
Position the file to a certain record. Access to SQL or Query Manager.
Search/Replace function. Write small search and replace programs. An RPG
compiler Is needed for this function.
Window left one field at a time.
Window right one field at a time.
Display an OS/400 command line.
Access the “where-is” function. (Find an object)
Previous Views
By pressing F2, a window will appear listing the 5 previous files you have viewed from the
command line. Select one of them with option 1 and press enter, or press F12 to return back to
view the current file. If the file is viewed more than one time, it will not be duplicated in the list.
Alternate View
When displaying the database in spreadsheet mode, you can press the page-up or page-down keys
to scroll through the database. When you press the F4 key, the complete current record will
display. You can use the page-up and page-down keys to scroll through all the fields in the record.
If you want to go directly to the next record without having to page down through all the fields, you
can press the enter key when in single mode. If you hit the page up key at the top of a record, you
will go to the previous record.
File Layouts
13
When you press F5, a list of all the fields in the data file will appear. You can select only certain
fields to view by placing a one in front of each field. You can remove the field from the current
view by placing a 4 in front of the field. You cannot, however, remove the first field from the
database. When you remove the field from the file layout screen, it is only temporary until you open
the file again.
You can also select the sequence in which the fields appear on the screen by renumbering under the
“Seq” field and pressing enter. If you wish for the key fields to appear at the top of the list, you can
also press F11 which will float all key fields, in order, to the top of the file layouts list.
External Program Calls
You can choose to call a program when displaying the contents of a field in single mode for more
information. An example of this is to display a table value next to the field such as the state name
next to the state value. There are two example programs in the QDDSSRC file in library VIEW.
Place a 6 in front of the field you wish to add an external program call to. Next, enter the name of
the program, the library and if a parameter literal if needed up to 10 characters. The program
being called must receive two parameters. They are *CHAR 64 and *CHAR 10. The first
parameter is the value of the field. Your program should change that value to the new value you
wish to display next to the field. The second parameter is used if you wish to send up to 10
characters to the called program for whatever reason you wish.
A program called SHOWSTATE can be written with two parmameters. The first parameter will
only be used. The value of the field in that record will be pasted to your program, left justified.
You can do whatever you wish with this value, such as writing an RPG program, looking up the
value in another file and then changing this parameter with the full state name for example.
QFU/400 will then display this value next to the field value when in single mode.
Printing file layouts
From the file layouts screen, press the F9 key to print the file layouts. The fields will print in the
current sequence. Any fields that have been temporarily removed will not print.
Create RPG Program
14
When pressing F10 from the file layouts screen, both DSPF and RPG code will be generated to
help you create an entry screen. If you only want certain fields to exist in your program, remove
these fields (such as audit information, or last updated by fields) using option 4. You can also
resequence the fields before creating the RPG program if you want the fields to appear in a certain
order. The RPG program can then be modified or called from a browse subfile by sending the
relative record number and the type of action such as Add, Update, or Delete. Browse the source
code after it is generated and modify it as needed.
NOTE: The member QFULIB/QDDSSRC(VIEWHEAD) can be changed which is the screen
header and footer used for add/change/copy function as well as create RPG program. This DSPF
file can be changed using SDA but not compiled. Once you make this change, all future change
programs created by QFU/400 will use these header and footer defaults. An example would be to
put the name of your company at the top of the screen.
Please note that fields greater than 256 in length will not appear on add/change screens. You can
press F8 to access DFU to change these records. Custom fields added to the database also will
not appear in the add/change screens.
Custom Settings - Security
Press F23 from the file layouts screen to setup defaults for the current user. You can select which
view mode is first when opening a file, how many records to scan before stopping and the type of
scan (SQL or QFU/400) you wish to default to. You can also select the color field names appear
in spreadsheet mode. (G=Green B=Blue P=Purple R=Red W=White). The field “Can copy and
delete” can only be changed by modifying the file “QFULIB/VIEWUSER” using QFU/400. This is
for security reasons.
The file QFULIB/VIEWUSER can contain a user name “*DEFAULT” - If the file does contain
this profile, all new users that start QFU/400 for the first time will adopt these defaults. If you want
all new users to not have change/delete authority on files, then make sure a *DEFAULT profile
exist and the “Change/Delete” field is an “N”. You can add this profile by viewing the file
QFULIB/VIEWUSER and pressing F6 to add a record.
*NOTE: If you create a profile *DEFAULT and you place an X in the field “Change/Delete”, any
new user who uses the view program will receive a message letting them know they are not
authorized to QFU/400 and should see a supervisor.
Find/SQL
15
Press F16 to enter search values to find the next record in the database with a certain value. Enter
the value field name, an operation code and a value. The operation codes EQ, NE, GT, GE, LT,
LE and CT are value. The operation code CT, contains, will be valid if anywhere in the field the
value exist such as “NAME CT ITH” will find the record “SMITH”. Once a match is found, the
record will be displayed. You can press F15 to find the next occurrence.
If you are searching for text that happens to be in mixed case or lowercase, press F6 to be able to
type the search value in lowercase letters. Pressing F6 again will toggle back to uppercase. If you
have an SQL package installed on your AS/400, you can select Y to run SQL after you have
entered the Field, Op and Value fields. The current program is set to run the command
“RUNSQL”. If you wish to have QFU/400 directly access your SQL product, using the
RTVCLSRC (Retrieve CL source) command, retrieve the source code to program
QFULIB/VIEWSQL, modify it and recompile it keeping the same parameters. If you need a more
extended search with more than one field, you can press the F5 key to access IBM’s Query
manager if it is loaded on your AS/400.
16
Database Tree
Pressing F9 from the file display window will display the database relationship tree on the file you
are currently viewing, or the file you have entered on the VIEWT command. The key fields will
appear. Key fields which are in descending order are highlighted. Files attached to the physical
that are in different libraries (should be a no-no!) are also highlighted. The word “*UNIQUE” will
appear if the keys are a unique. The select/omit data will follow in the next lines for the logical file.
You can place option 3 in front of each logical to view complete data about the select/omit
attributes of the file.
Search/Replace:
The search/replace function allows you to change data in a primary file without actually writing a
program. The search/replace function actually write and compiles a replace program and executes
it. Since the program is actually written and compiled and executed, it can run through database
files with thousands of records faster than a standard search/replace routine. The true performance
gain is when you are working with database files with over 5,000 records.
Additional features include the ability to delete the record rather than replace it, print a before and
after audit record, ability to embed RPG code “sniplets” in a replace program, ability to connect to
a joining file using key fields and the ability to generate a program to add additional code to it later
on.
You can create up to 5 search and 5 replace conditions. But, using the F15 option, you can also
create up to 10 more search or replace conditions. If writing any source code lines in the embed
statements, you can also branch to a tag called “$SKIP” which will fully bypass the current record
at any time and not replace or delete the record.
The embed routine can also be used before connecting to a file for special link fields. An example
of this would be:
File A
File B key fields
OACUST
CUSTYP
OBCUST
(Always C in this example)
In the above example, file B always has a “C” for customer type. But, the “C” does not exist in file
A. You can press F15, embed, and on the first source code line, move a “C” in to a variable called
“$TYPE”. Make sure you qualify the variable as length of 1 since this is a new variable. Next, on
the connect screen, you can connect to file B and use the fields $TYPE and OACUST to connect.
17
You can always create new fields in the embed screen but be sure to qualify new fields with a
length. Once you qualify them with a length (new variable), they will appear in the fields listing on
the main replace screen.
On both the search and replace windows, you can press the F4 key to pick a field from a list.
18
Hints for users
If you just need the file layouts to a file, you can type VIEW <library/>file FLD. Once you a viewing
the file layouts, you can press F3 to quickly exit the program, or F12 to view the file.
If the file you are changing/adding is a commonly used file, always select “Permanent” when creating the
add/change program. Otherwise, select “Temporary” and it will only remain until you sign off your
terminal.
You can change the SQL option to interface with your SQL package by using the RTVCLSRC
command and modify the program VIEWSQL. For more information, see the SQL section above.
If there is a key field which is a literal or a piece of the primary file when using the search/replace
function, you can create a field on the embed screen using a simple “MOVE “Literal” “FIELD”
before connect to file. Be sure to enter the length and decimal positions. Then enter this field on the
F16 screen, connect file.
19
Limitations:
To display fields greater than 256 in length, use the “Create Field” option in File Layouts, F6 and break
it in to multiple fields.
Limitation without the RPG compiler:
It is important to know that not all functions will work in QFU/400 if you do not have an RPG compiler
(CRTRPGPGM) on your system. In order to change or add records, or use the Search/Replace
function, you will need this compiler. If you do not have an RPG compiler on your system, use DFU
(F8) to add and change records.
OnLine Help:
Pressing the F1 key or Help key on most of the screens will give you direct on-line help about the
function or task you are performing in QFU/400. You can also press F1 for more information when
prompting the commands.
20
Install Menu
When you select item number 10 from the main menu (MASTER), the installation menu is displayed as
follows:
INSTALL
INSTALL Menu
Select one of the following:
1.
2.
3.
4.
Run initial install procedure
Display installation status
Change installation status
Print documentation
7.
Process Kisco PTF Package
10.
To Main Menu
Selection or command
===>
F3=Exit
F4=Prompt
F13=User support
F9=Retrieve
F12=Cancel
F16=System main menu
Menu items perform the following functions. Each function is discussed in greater detail later in this
document:
1. Run initial install procedure
This option should only be used during initial system installation.
2. Display installation status
Displays a screen showing the current installation status for the software.
3. Change installation status
Displays the current software installation status and allows for changes to be made.
21
4. Print documentation
Prints additional documentation manual to the default print device.
7. Process Kisco PTF Package
Allows you to install PTF’s received from Kisco Information Systems via E-mail or by
Website download.
10. To Main Menu
Will display the MASTER menu.
22
Display installation status
At any time, you can check the current installation status of your copy of QFU/400 by selecting this
menu option. You must be signed on with security authority of QSECOFR or equivalent. The
following screen will be displayed:
Free Trial -- Dynamic Software Security -- INSTALLATION Procedure
Installation for
QFULIB
Machine serial number
Machine run date....
1010788
970624
Developer ID code
KISCO
Current Library
Sec.serial number
Sec.install date.
Sec.expire date..
QFULIB
1010788
970610
999999
Security Status (CURRENT STATUS).........Z-nnn
Please enter:
Type of install .....
_
T for trial, or P for permanent
Install password ....
New expire date......
______
______
Blank for trial, or permanent pswd
Blank for trial, or 999999 for perm
Cm3,7-Return to menu
HELP
ENTER-process install
Free Trial (c)1997 Kisco Info Systems
The message at the center of the screen will indicate your current installation status. You should also
check the Sec.expire date for an expired trial period. QFU/400 may still show as installed on a trial
basis but, if the trial is expired, it will no longer function.
The following are the possible status messages that can appear on this display:
Message
Z-001 NOT INSTALLED
Z-002 TRIAL EXPIRED
Z-003 PERMANENTLY INSTALLED
Z-004 INSTALLED ON TRIAL
Z-005 PASSWORD NOT ACCEPTED
Explanation
Trial installation not started
Trial period has ended
Software is permanently installed
Software is installed on trial
Password keyed is not valid
23
Z-006 WRONG LIBRARY
Z-007 PLEASE RUN TRIAL INSTALL
Z-008 INVALID INSTALL REQUEST
Z-009 INVALID SECURITY (REC#6)
Z-010 INVALID SECURITY (NO ZZ)
Z-011 INVALID SECURITY (HASH.)
Programs must run from our library
Must have trial install before perm.
Must be P or T
Call Kisco
Call Kisco
Call Kisco
24
Change installation status
To make changes to your installation status, use this menu option. The changes processed can include
both a trial period extension and permanent installation. You must be signed on with QSECOFR
security authority or equivalent. When you select this option, the following screen is displayed:
Free Trial -- Dynamic Software Security -- INSTALLATION Proced
Installation for
QFULIB
Machine serial number
Machine run date....
1010788
970624
Developer ID code
KISCO
Current Library
Sec.serial number
Sec.install date.
Sec.expire date..
QFULIB
101078
970610
999999
Security Status (CURRENT STATUS MSG).....Z-nnn
Please enter:
Type of install .....
_
T for trial, or P for permanent
Install password ....
New expire date......
______
______
Blank for trial, or permanent p
Blank for trial, or 999999 for
Cm3,7-Return to menu
HELP
ENTER-process ins
Free Trial (c)1990 Kisco Inf
Trial extension:
To extend a trial period, contact Kisco Information Systems and request an extension. We will provide
you with an extension password and new expiration date. On the above screen, enter the following:
Type of install
Install password
New expire date
Enter 'T' for trial
Enter all six digits of the extension password provided, including any leading
zeros
Enter the new expiration date in the format YYMMDD (ie: June 12, 1997
would be 970612)
When the parameter fields have been completed, press enter to reactivate your software.
Permanent installation:
25
To permanently install your software package, use the permanent password provided by Kisco
Information Systems following receipt of payment. On the above screen, enter the following:
Type of install
Install password
New expire date
Enter 'P' for permanent
Enter all six digits of the extension password provided, including any leading
zeros
Enter all 9's (ie: 999999)
When the parameter fields have been completed, press enter. Your software is now permanently
installed.
26
Print documentation
At any time, you can reproduce the additional documentation topics from the installation step by using
this menu option. A full copy of this printout will be routed to your session printer.