1
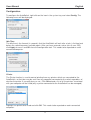
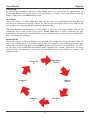
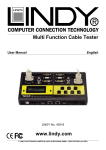
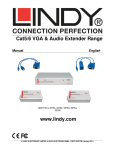
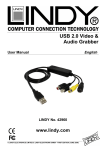
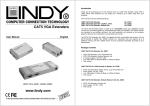
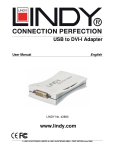
USB 2.0 AutoSwitch PRO
English
User Manual
LINDY No. 42843
www.lindy.com
© LINDY ELECTRONICS LIMITED & LINDY-ELEKTRONIK GMBH - FIRST EDITION (October 2008)
User Manual
English
Introduction
Thank you for purchasing the LINDY USB 2.0 AutoSwitch PRO!
The USB AutoSwitch PRO allows you to share a USB device between multiple computers. The
USB AutoSwitch is the perfect way of sharing a printer, scanner or external storage between
computers without the need for networking, perfect for home users and SOHO alike.
Package Contents
•
•
•
LINDY USB 2.0 AutoSwitch PRO
CD-ROM
This manual
Features
• Allows multiple computers to share a USB peripheral including printers, scanners and
external storage
• Switch access between computers via auto mode, hot key or push button
• Provides First Come First Served print server functionality for Windows PCs
• Supports High Speed USB 2.0 devices, backwards compatible with USB 1.1
• Can be connected to a USB hub to share multiple USB devices between computers
• Powered from your computer's USB port, can be used with an external power supply (sold
separately) when used with higher power consumption peripherals
• Compatible with Windows ME/2000/XP/Vista, Mac and Linux (Mac and Linux only support
manual switching)
2
User Manual
English
Installation
Please follow the instructions below on how to install the USB 2.0 AutoSwitch PRO for each of
your computers
Windows PC
The following steps will allow you to install the software required to use the auto-switching
functionality. If you only want to use the AutoSwitch as a manual USB switch, please skip to
point 6.
1. Insert the supplied CD into your computers CD-ROM drive
2. An Autorun screen will pop up on your computers screen
3. Click Next. If you want to install the software in the default location displayed click Next
again. Alternatively click Change... to choose a new directory, then click Ok, followed by
Next to continue.
4. Click Install to begin the installation
5. When the installation has completed click Finish.
6. Now connect the AutoSwitch to the first computer using a USB A to B cable.
7. The computer will then automatically complete a short installation.
3
User Manual
English
8. When you see the following message (or similar depending on which version of Windows
you are using) the installation has completed and you may proceed to install the next
computer.
9. Repeat steps 6, 7 and 8 for each computer you want to connect.
Mac OS & Linux
The AutoSwitch can only be used in manual mode with USB enabled versions of Mac OS and
Linux so no software installation is required. Simply connect the AutoSwitch to each computer
using a USB A to B cable and allow the computer to recognise and install the hardware. Repeat
this for each computer which you want to connect.
Operation
Connect a USB device to the USB port on the front of the AutoSwitch, the example below
shows a printer connected to the AutoSwitch.
After installing the software (as outlined earlier) an icon will
have been added to your system tray. This icon shows you the
status of the AutoSwitch and also allows you to set the idle
time between switches.
Available (AutoSwitch is idle, no jobs pending)
Occupied by you (you are already in control of the AutoSwitch!)
Occupied (AutoSwitch is in use by another computer)
4
User Manual
English
Configuration
To configure the AutoSwitch, right click on the icon in the system tray and select Config. The
following menu will be displayed:
Idle Time
The idle time is the timeout (in seconds) that the AutoSwitch will wait after a task is finished and
before the switch becomes available again. After you have entered a value (min 0, max 255),
click Apply to save it and OK close the configuration tool. This needs to be repeated on each
connected computer.
Printer
The Printer function is used to control printing from any printers which are connected to the
AutoSwitch, so that jobs may be sent from any computer connected to the switch regardless of
whether the printer is currently busy or not . Click Select and a list of all the printers associated
with your computer will be listed (only a printer connected to the AutoSwitch can be managed)
Highlight the printer to be used and click OK. This needs to be repeated on each connected
computer.
5
User Manual
English
Switching
By default the AutoSwitch will be in Auto Mode when it is connected, as indicated by the
illuminated AUTO LED on the front of the AutoSwitch. To switch from Auto Mode to Manual
Mode, simply press the Switch button once.
Auto Mode
When the switch is in Auto Mode print jobs can be sent to a connected printer regardless of
whether the AutoSwitch or printer is busy. As soon as the current print job finishes and the idle
time expires the next print job will commence automatically.
Switching between the computers in Auto Mode is easy you can either double click on the
AutoSwitch icon in the system tray or press Scroll Lock twice in quick succession on your
keyboard to take control of the AutoSwitch. If the AutoSwitch icon is Red then the AutoSwitch is
busy and cannot be switched
Manual Mode
When the switch is in Manual Mode it can be used with computers running Windows, Mac OS
and Linux, though there is no control directly from the computer and no queuing of print jobs.
Switching is performed by pressing the Switch button on the front of the AutoSwitch, the LEDs
on the front of the AutoSwitch will denote which computer has control. Each press will move
control to the next computer, until finally the AutoSwitch enters Auto Mode, as shown in the
diagram below.
Auto Mode
(Default)
Computer
4
Computer
3
Manual
Mode
Computer
2
Computer
1
6
Radio Frequency Energy, Certifications
CE Certification
This equipment complies with the requirements relating to electromagnetic compatibility, EN
55024 and EN55022 class A for ITE, EN61000-3-2/-3 the essential protection requirement of
Council Directive 89/336/EEC on the approximation of the laws of the Member States relating to
electromagnetic compatibility.
Shielded cables must be used with this equipment to maintain compliance with radio frequency
energy emission regulations and ensure a suitably high level of immunity to electromagnetic
disturbances.
FCC Warning
This equipment has been tested and found to comply with the limits for a Class B digital device,
pursuant to part 15 of the FCC Rules. These limits are designed to provide reasonable
protection against harmful interference in a residential installation.
This equipment generates, uses, and can radiate radio frequency energy and, if not installed
and used in accordance with the instructions, may cause harmful interference to radio
communications. However, there is no guarantee that interference will not occur in a particular
installation. If this equipment does cause harmful interference to radio or television reception,
which can be determined by turning the equipment off and on, the user is encouraged to try to
correct the interference by one or more of the following measures:
Reorient or relocate the receiving antenna
Increase the separation between the equipment and receiver
Connect the equipment into an outlet on a circuit different from that to which the receiver is
connected
Consult the dealer or an experienced technician for help
You are cautioned that changes or modification not expressly approved by the party responsible
for compliance could void your authority to operate the equipment.
This device complies with part 15 of the FCC Rules.
Operation is subject to the following two conditions:
1. This device may not cause harmful interference, and
2. This device must accept any interference received, including interference that may cause
undesired operation.
Recycling Information
WEEE (Waste of Electrical and Electronic Equipment), Recycling of Electronic
Products
United Kingdom
In 2006 the European Union introduced regulations (WEEE) for the collection and recycling of
all waste electrical and electronic equipment. It is no longer allowable to simply throw away
electrical and electronic equipment. Instead, these products must enter the recycling process.
Each individual EU member state has implemented the WEEE regulations into national law in
slightly different ways. Please follow your national law when you want to dispose of any
electrical or electronic products. More details can be obtained from your national WEEE
recycling agency.
Germany / Deutschland
Die Europäische Union hat mit der WEEE Direktive umfassende Regelungen für die
Verschrottung und das Recycling von Elektro- und Elektronikprodukten geschaffen. Diese
wurden von der Bundesregierung im Elektro- und Elektronikgerätegesetz – ElektroG in
deutsches Recht umgesetzt. Dieses Gesetz verbietet vom 24.März 2006 an das Entsorgen von
entsprechenden, auch alten, Elektro- und Elektronikgeräten über die Hausmülltonne! Diese
Geräte müssen den lokalen Sammelsystemen bzw. örtlichen Sammelstellen zugeführt werden!
Dort werden sie kostenlos entgegen genommen. Die Kosten für den weiteren Recyclingprozess
übernimmt die Gesamtheit der Gerätehersteller.
France
En 2006, l'union Européenne a introduit la nouvelle réglementation (DEEE) pour le recyclage
de tout équipement électrique et électronique.
Chaque Etat membre de l’ Union Européenne a mis en application la nouvelle réglementation
DEEE
de manières légèrement différentes. Veuillez suivre le décret d’application
correspondant à l’élimination des déchets électriques ou électroniques de votre pays.
Italy
Nel 2006 l’unione europea ha introdotto regolamentazioni (WEEE) per la raccolta e il riciclo di
apparecchi elettrici ed elettronici. Non è più consentito semplicemente gettare queste
apparecchiature, devono essere riciclate. Ogni stato membro dell’ EU ha tramutato le direttive
WEEE in leggi statali in varie misure. Fare riferimento alle leggi del proprio Stato quando si
dispone di un apparecchio elettrico o elettronico.
Per ulteriori dettagli fare riferimento alla direttiva WEEE sul riciclaggio del proprio Stato.
LINDY No. 42843
1st Edition, October 2008
www.lindy.com