1
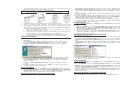
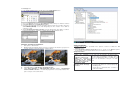
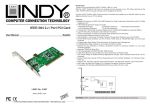
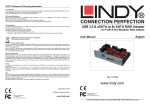
Key Benefits _________________________________________________________________________ PCI Ultra ATA-133 Control Cards with Raid Function English User Manual This stand-alone ATA 133 PCI to ATA/ATAPI-6 host controller is the perfect single chip solution for designs based on chipsets without an integrated ATA host controller. It is also ideal for designs which need to expand the number of ATA channels to accommodate the growing number of storage peripherals with an ATA interface. Any system with a PCI bus interface can simply add the Ultra ATA/133 RAID interface by adding a card with the PCI8212 and loading the driver into the system. The 5112 comes complete with drivers for Windows® 98/98SE/ME, Windows® NT 4.0,and Windows® 2000 and XP. It is also fully operational and compatible with default IDE drivers from Microsoft. PCI IDE Card Features 2 independent DMA/ATA Channels Compliant with PCI Specification, revision 2.2 Compliant with PCI ATA Controller Specification, revision 1.0 Supports up to four DMA/ATA devices 256 Bytes buffer Supports ultra and multiword DMA timing modes Supports External BIOS 32-bit 33/66 MHz PCI Interface Supports bus master DMA/ATA at 133 MB/sec PCI burst rate PCI-8212 supports maximum DMA/ATA data transfer rate of 100/133 MB/sec Compatible with Microsoft® DMA/ATA drivers (Windows® 98SE/ME, Windows® NT 4.0 , Windows® 2000/XP and Vista System Requirements Hardware: • A Pentium Pro, Pentium III, IV or later, Pentium compatible computer • One PCI slot This I/O card is made exclusively for the IBM-PC or compatible line of computer. If you are not sure what type of computer you have, check your system documentation for compatibility. This I/O card requires an available PCI slot inside your computer. Software: • Windows® 98SE/ME • Windows® NT/2000/XP/Vista • LINUX Package Contents This PCI USB Card package includes the following: • LINDY Installation Guide • LINDY Driver CD • LINDY 51112 Card • One 40-pin /80-wire Ultra ATA 100 cable Configuration Hardware Installation LINDY No. 51112 www.LINDY.com © LINDY ELECTRONICS LIMITED & LINDY-ELEKTRONIK GMBH - FIRST EDITION (Dec. 2008) This chapter will guide you through the installation of your Ultra ATA 133 and ribbon cable. To connect ATA drives to the ATA card, follow these steps :(Figure 2~5) 1. Connect the blue connector of the ATA 133 cable to the channel 1 connector on the controller card as shown in figures below, being careful to match pin 1 of the cable to pin 1 of the connector. The cables and connectors are keyed. If the cable does not slide easily into the connector, do not force it. Instead, reverse the cable. Note: The stripe along the edge of the cable indicates Pin #1. If the cable does not slide easily in the connector, reverse the cable 3. 4. 5. 6. 2. 3. Figure2 Figure 3 Figure 4 Figure 5 Connect the black connector of the ATA 133 cable to the master drive If you are connecting only two hard drives, connect the blue connector of the second ATA 133cable to the channel 2 connector on the controller card, just as you did in step1. Now you have finished connecting both drives and your hardware installation is complete: do not continue to the next step. 1. If you are connecting four hard drives, connect the gray connector of the ATA cable to the slave drive and go to step 2. 2. Connect the blue connector of the second ATA cable (sold separately) to the channel 2 connector on the controller card, just as you did in step 1. 3. Connect the black connector of the ATA cable to the remaining master drive. 4. Connect the gray connector of the ATA cable to the remaining slave drive. Software Installation Windows® 98/98SE/ME Drivers Installation Instructions 1. 2. Start Windows. When Windows detects ITE IT8212 ATA PCI Controller in the system, a dialog box named Add New Hardware Wizard will show on the screen. Select the Specify the location of the driver (Advanced) option then click “Next” to continue to setup. 3. Insert the Controller Driver diskette into the CD drive then select Search for the best driver for your device (Recommended) from the following dialog box and type \51112\WIN98_ME on the field designating the file’s location. Press “Next” to continue to setup. The driver for ITE IT8212 ATA PCI Controller is found. Press “Next” to continue to setup. The driver installation has finished. Press “Finish” to continue, and restart the computer in order the driver to take effect. 4. 5. Verify Installation 1. 2. Right-click My Computer icon on Desktop. Select the Properties option from the form. Select the Device Manager panel from the System Properties window. If ITE IT8212 ATA PCI Controller device is shown below the SCSI controllers item (see the following figure), it means that the driver has been installed successfully. Windows® 2000 Drivers Installation Instruction 1. Start Windows 2000 installation. When Windows ITE IT8212 ATA PCI Controller is in the system, a dialog box named Found New Hardware Wizard will show on the screen. Select the Search for a suitable driver for my device (recommended) option then click “Next” to continue to setup. Check the Specify a location option on the following window then press “Next” to Continue to setup Insert the ITE IT8212 ATA PCI Controller Driver diskette into the CD drive then check the Search for the best driver in these locations option and type \51112\WIN2K on the field designating the file’s location. Press ”Next” to continue to setup. The driver for ITE IT8212 ATA PCI Controller is found. Press “Next” to continue to setup The driver installation has finished. Press “Finish” to continue, and restart the computer in order the driver to take effect. Verify installation 1. 2. 3. Right-click My Computer icon on Desktop. Select the Properties option from the form. Select the Hardware tab from the System Properties window then click the Device Manager button on the panel. If ITE IT8212 ATA PCI Controller device is shown below the SCSI and RAID controllers item (see the following figure), it means that the driver has been installed successfully. If there is a marking ! or ? before the ITE IT8212 ATA PCI Controller device as shown below, it indicates that the driver has not been correctly installed. User should remove the device and reinstall. Windows® XP Drivers Installation Instruction 1. Start Windows XP installation. 2. When Windows detects ITE IT8212 ATA PCI Controller in the system, a dialog box named Found New Hardware Wizard will show on the screen. Select the Install from a list or specific location (Advanced) option then click “Next” to continue to setup. 3. Insert the ITE IT8212 ATA PCI Controller Driver diskette into the CD drive then type \51112\WINXP on the field designating the file’s location. Press “Next” to continue to setup. 4. The driver installation has finished. Press “Finish” to continue, and restart the computer in order the driver to take effect. Verify Installation 1. Right-click My Computer icon on Desktop. Select the Properties option from the form. 2. Select the Hardware tab from the System Properties window then click the Device Manager button on the panel. If ITE IT8212 ATA PCI Controller device is shown below the SCSI and RAID controllers item (see the following figure), it means that the driver has been installed successfully. 3. If there is a marking ! or ? in front of the ITE IT8212 ATA PCI Controller device, it indicates that the driver has not been correctly installed. User should remove the device and reinstall. Windows® NT Drivers Installation Instruction Start Windows NT installation. 1. Select Settings from the Start menu then choose the Control Panel option from the Settings form. 2. In the Control Panel window, double-click on the SCSI Adapters icon. 3. Choose the Drivers tab from the SCSI Adapters window then press “Add” to continue. 4. Click Have Disk from the Install Driver window. 5. Insert the ITE Ultra ATA 133 PCI Controller Driver CD into the CD drive then type \51112\WINNT(CDROM) on the field designating the file’s location. Press “OK” to continue to setup. 6. Select ITE IT8212 ATA PCI Controller from the window then click “OK” to continue. Follow the instruction to restart the computer then the driver will take effect. Windows Vista Driver Installation: 1. 2. 3. 4. 5. Start power to RUN VISTA Windows will automatically detect you have a new device the first time you power on your PC and thus request the devices software drivers. Detect you have device to Install device software Install the driver “your device are ready to use” Chick “Device Manager” to “IDE ATA/ATAPI controller” and the “standard Dual Channel PCIIDE Controller ” should be displayed when successfully installed. The port is ready to connect new device. Verify Installation 1. Follow step1 to step3 described in the previous section to activate the SCSI Adapters option. 2. If the ITE IT8212 ATA PCI Controller device is shown on the Devices panel as shown below, it means that the driver has been installed successfully. Symptom/Solution 1) When the computer is powered on, no video appears on the screen. 2) When the computer is powered on, the floppy drive light stays on and the drive doesn’t work. I’m getting an ‘HDD controller failure’ message upon boot. The cable may be plugged in backwards. Make sure the cable is plugged in correctly. This is done by examining the cable to confirm the red stripe is in the direction of the pin 1 on both ends. • Make sure that the port is enabled. • Check that all cables are connected properly, including power. • Verify that no equivalent drive controller is active in the BIOS. CE Statement This device complies with the European Regulations for Electromagnetic Compatibility (EMC) of the European Union and it is equipped with the CE mark. This unit has to be used with high quality shielded connection cables. Only if such high quality shielded cables are used can you be sure that the EMC compatibility is not adversely influenced. FCC Statement Shielded cables must be used with this equipment to maintain compliance with radio frequency energy emission regulations and ensure a suitably high level of immunity to electromagnetic disturbances. FCC Warning This equipment has been tested and found to comply with the limits for a Class B Digital device, pursuant to part 15 of the FCC Rules. These limits are designed to provide reasonable protection against harmful interference in a residential installation. This equipment generates, uses, and can radiate radio frequency energy and, if not installed and used in accordance with the instructions, may cause harmful interference to radio communications. However, there is no guarantee that interference will not occur in a particular installation. If this equipment does cause harmful interference to radio or television reception, which can be determined by turning the equipment off and on, the user is encouraged to try to correct the interference by one or more of the following measures: Reorient or relocate the receiving antenna Increase the separation between the equipment and receiver Connect the equipment into an outlet on a circuit different from that to which the receiver is connected Consult the dealer or an experienced technician for help You are cautioned that changes or modifications not expressly approved by the party responsible for compliance could void your authority to operate the equipment. Germany / Deutschland Die Europäische Union hat mit der WEEE Direktive umfassende Regelungen für die Verschrottung und das Recycling von Elektro- und Elektronikprodukten geschaffen. Diese wurden von der Bundesregierung im Elektro- und Elektronikgerätegesetz – ElektroG in deutsches Recht umgesetzt. Dieses Gesetz verbietet vom 24.März 2006 an das Entsorgen von entsprechenden, auch alten, Elektro- und Elektronikgeräten über die Hausmülltonne! Diese Geräte müssen den lokalen Sammelsystemen bzw. örtlichen Sammelstellen zugeführt werden! Dort werden sie kostenlos entgegen genommen. Die Kosten für den weiteren Recyclingprozess übernimmt die Gesamtheit der Gerätehersteller. France En 2006, l' union Européenne a introduit la nouvelle réglementation (WEEE) pour le recyclage de tout équipement électrique et électronique. Chaque Etat membre de l’ Union Européenne a mis en application la nouvelle réglementation WEEE de manières légèrement différentes. Veuillez suivre le décret d’application correspondant à l’élimination des déchets électriques ou électroniques de votre pays. Italy Nel 2006 l’unione europea ha introdotto regolamentazioni (WEEE) per la raccolta e il riciclo di apparecchi elettrici ed elettronici. Non è più consentito semplicemente gettare queste apparecchiature, devono essere riciclate. Ogni stato membro dell’ EU ha tramutato le direttive WEEE in leggi statali in varie misure. Fare riferimento alle leggi del proprio Stato quando si dispone di un apparecchio elettrico o elettronico. Per ulteriori dettagli fare riferimento alla direttiva WEEE sul riciclaggio del proprio Stato. WEEE (Waste of Electrical and Electronic Equipment), Recycling of Electronic Products United Kingdom In 2006 the European Union introduced regulations (WEEE) for the collection and recycling of all waste electrical and electronic equipment. It is no longer allowable to simply throw away electrical and electronic equipment. Instead, these products must enter the recycling process. Each individual EU member state has implemented the WEEE regulations into national law in slightly different ways. Please follow your national law when you want to dispose of any electrical or electronic products. More details can be obtained from your national WEEE recycling agency. No. 51112 www.lindy.com