1
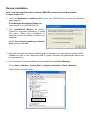
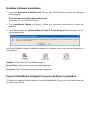
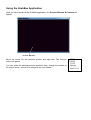
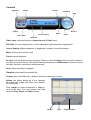
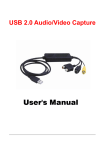
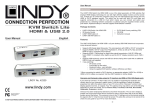
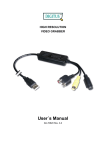
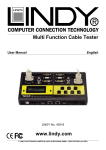
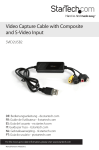
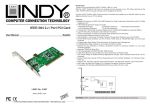
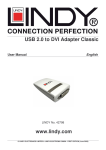
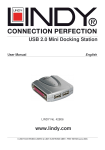
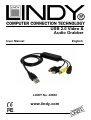
USB 2.0 Video & Audio Grabber User Manual English LINDY No. 42960 www.lindy.com © LINDY ELECTRONICS LIMITED & LINDY-ELEKTRONIK GMBH - FIRST EDITION (JUNE 2006) Introduction Thank you for purchasing the LINDY USB 2.0 Video & Audio Grabber. The USB 2.0 Video & Audio Grabber allows you to connect your camcorder or VCR to your computer to transfer audio and full motion video for storage, backup, copying and editing. With the supplied GrabBee video grabber application and Presto! Video editing software suite you’ll be able to create professional looking results which you can copy to CD or DVD, or e-mail to family and friends. Features High speed USB 2.0 support for superior performance Easy Plug & Play installation Snapshot image capture function Powered by the USB bus – no external power supply required Motion capture: up to 25fps @ 720 x 576 (PAL), 30fps@ 720 x 480 (NTSC) Supports MPEG 1, MPEG 2 and MPEG 4 encoding formats Audio input: USB (Windows XP only)* Composite video & S-Video inputs NTSC, PAL & SECAM support Overall length: 105cm (approx.) * If you use Windows 2000 you must connect the audio output from your camcorder/VCR to the sound card audio input on your computer using a separate cable (not included) Minimum System Requirements USB 2.0 equipped computer Pentium 4 CPU (or equivalent), 1 GHz or above 128MB RAM Windows XP (SP1) or Windows 2000 (SP3) Sound Card CD or DVD drive Adobe Acrobat Reader software (available free from www.adobe.com) to view Digital Converter manual Package Contents LINDY USB 2.0 Video & Audio Grabber Driver and GrabBee software application CD Presto! VideoWorks and Digital Converter CD This manual Product Information S-Video input Audio inputs Left (white) Right (red) USB 2.0 connector Composite video input (yellow) USB 2.0 connector: Connects directly to a USB 2.0 port on your computer. This product is not designed for use with the USB 1.1 interface nor should you connect it to a non-powered USB 2.0 hub Audio inputs (Windows XP users only): Connects to the left & right audio outputs from your external device (e.g. VCR) Windows 2000 users should connect the audio outputs from their external device directly to their sound card using separate cables (not included – see www.lindy.com for suitable audio cables) Composite video input: Connects to the Composite video output from your device S-Video input: Connects to the S-Video output from your external device Device Installation Note: You must install the driver software BEFORE connecting the Video & Audio Grabber to your PC! 1. Insert the Multimedia Installation Kit CD into your CD/DVD drive. Launch the following setup program: E:\GrabBeeX+deluxe\Driver\Setup.exe (assuming ‘E’ is your CD/DVD drive) 2. The InstallShield Wizard will launch. Follow the on-screen instructions to install the driver. When driver installation is complete you will be asked to restart your computer. Select: Yes, I want to restart my computer now, and then click OK. 3. After the computer has restarted and booted into Windows, you can plug the Video & Audio Grabber into one of your computer’s USB 2.0 ports. Windows will automatically detect and set up the device. 4. You can confirm correct installation by launching Windows Device Manager: Go to: Start > Settings > Control Panel > System > Hardware > Device Manager Check for the outlined entries – GrabBee Software Installation 1. Insert the Multimedia Installation Kit CD into your CD/DVD drive. Launch the following setup program: E:\GrabBeeX+deluxe\AP Software\Setup.exe (assuming ‘E’ is your CD/DVD drive) 2. The InstallShield Wizard will launch. Follow the on-screen instructions to install the software. 3. Click Yes to install the Windows Media Format 9 Series Runtime files and follow the onscreen instructions: Once the GrabBee software installation process is complete, three icons will be displayed on your desktop: GrabBee: Click to launch the GrabBee program Record Files: Click to access your recorded video files Snapshot: Click to access your captured still image files Presto! VideoWorks & Digital Converter Software Installation To install the supplied Presto! software, insert the application CD into your drive and follow the on-screen instructions. Using the GrabBee Application After you have launched the GrabBee application, the Preview Window & Controls will appear: Preview Window Move the cursor into the preview window and right-click. The function menu will appear. You can select the desired preview resolution here, change the window to full screen mode, and set it to always be the top window. Controls Snapshot Volume Album Playback Stop Record Option Colour Setting Video Input Mute Pause Slide Bar Video Input: switches between Composite and S-Video input Slide Bar: you can drag this bar to move backwards and forwards during playback Colour Setting: allows adjustment of brightness, contrast, hue and saturation Mute: switches the volume on/off Pause: pauses playback Record: click this button to start recording. When you click the Stop button you will be asked if you want to rename the file. The default naming convention is ‘mddhhmmss’, where m=month, dd=date, hh=hour, mm=minute and ss=second. Stop: stops recording or playback Playback: plays back the recorded file Volume: move this slider up or down to increase or decrease volume Album: the album shows all of the captured files (both still image and video) and relevant file information. Click Images to select snapshots or Clips to view movie clips. You can preview the clips using the Play, Pause and Stop buttons. Images Clips Play/Pause/Stop Snapshot: click this button to take a snapshot. A new window will appear previewing each snapshot as it is taken. You can double-click on a picture to see it in full size. The buttons at the bottom allow you to save or delete the files. Option: Click on the General tab to see the hard disk space information and to change the following settings: Snapshot default storage path: click the button to change the default snapshot storage path Clip default storage path: click on the button to change the default video clip storage path Video Format: select your desired video format Set Recording Time: click the check box to set the default recording time Click on the Encoder Property tab to change the various video encoder settings: File Type: You can select the following file formats – MPEG-1, MPEG-2, VCD, SVCD, DVD, and WMV (for DVD burning, please choose the DVD setting) Profile: Click on the corresponding drop down menu to change the Video Size, Frame Rate, Video Quality and Video Bit Rate settings Troubleshooting The Video Grabber is not detected by my PC! If present, ensure any USB 2.0 settings are enabled in your PC’s BIOS Make sure your system has the latest USB 2.0 host drivers installed For Windows XP, please upgrade to SP1 or above; for Windows 2000, upgrade to SP3 or above There is no display in the preview window! Check that the device connected to the USB grabber is correctly switched on; ensure that cable connections are correctly seated Depending on the connected device, check that the Video Input option is correctly set to either Composite or S-Video Make sure your system has the latest USB 2.0 host drivers installed For Windows XP, please upgrade to SP1 or above; for Windows 2000, upgrade to SP3 or above Why is the display resolution always 320 x 240 in preview mode? Check that the video grabber is not plugged into a USB 1.1 port Make sure your system has the latest USB 2.0 host drivers installed The system shows: ‘High speed device plugged into Full speed USB port’! Check that the video grabber is not plugged into a USB 1.1 port Make sure your system has the latest USB 2.0 host drivers installed Why do I get unstable video during preview and recording? If you are using an Ultra DMA hard disk, please update the IDE ATA/ATAPI controller driver to the latest version Why can I not hear any audio in preview mode? For Windows XP, the audio output from the PC should be connected to the left and right phono connectors on the video grabber; for Windows 2000, connect the audio outputs from the external device directly to your sound card using separate cables How can I get a minimum number of dropped frames during video capture? The best recording performance depends on the specification of your PC, but you can also try some of the steps below to improve performance... Try lowering the resolution format you record Enable hard disk drive DMA; go to: My Computer > Control Panel > System > Hardware > Device Manager > Disk Drives to setup Keep a larger amount of free space on the hard disk Use a hard drive with a rotation speed higher than 7200rpm Disable power management settings in the PC’s BIOS Avoid running other applications at the same time as using the video grabber Defrag your hard disk I can preview video but when recording, the system hangs or crashes! Please install DirectX 9.0 or above Your display driver may be incompatible with direct draw; please update the VGA driver Try shutting down any unnecessary programs Lower the hardware acceleration, go to: My Computer > Control Panel > Display > Settings > Advanced > Performance to adjust WEEE (Waste of Electrical and Electronic Equipment), Recycling of Electronic Products United Kingdom In 2006 the European Union introduced regulations (WEEE) for the collection and recycling of all waste electrical and electronic equipment. It is no longer allowable to simply throw away electrical and electronic equipment. Instead, these products must enter the recycling process. Each individual EU member state has implemented the WEEE regulations into national law in slightly different ways. Please follow your national law when you want to dispose of any electrical or electronic products. More details can be obtained from your national WEEE recycling agency. Germany / Deutschland Die Europäische Union hat mit der WEEE Direktive umfassende Regelungen für die Verschrottung und das Recycling von Elektro- und Elektronikprodukten geschaffen. Diese wurden von der Bundesregierung im Elektround Elektronikgerätegesetz – ElektroG in deutsches Recht umgesetzt. Dieses Gesetz verbietet vom 24.März 2006 an das Entsorgen von entsprechenden, auch alten, Elektro- und Elektronikgeräten über die Hausmülltonne! Diese Geräte müssen den lokalen Sammelsystemen bzw. örtlichen Sammelstellen zugeführt werden! Dort werden sie kostenlos entgegen genommen. Die Kosten für den weiteren Recyclingprozess übernimmt die Gesamtheit der Gerätehersteller. France En 2006, l'union Européenne a introduit la nouvelle réglementation (WEEE) pour le recyclage de tout équipement électrique et électronique. Chaque Etat membre de l’ Union Européenne a mis en application la nouvelle réglementation WEEE de manières légèrement différentes. Veuillez suivre le décret d’application correspondant à l’élimination des déchets électriques ou électroniques de votre pays. Italy Nel 2006 l’unione europea ha introdotto regolamentazioni (WEEE) per la raccolta e il riciclo di apparecchi elettrici ed elettronici. Non è più consentito semplicemente gettare queste apparecchiature, devono essere riciclate. Ogni stato membro dell’ EU ha tramutato le direttive WEEE in leggi statali in varie misure. Fare riferimento alle leggi del proprio Stato quando si dispone di un apparecchio elettrico o elettronico. Per ulteriori dettagli fare riferimento alla direttiva WEEE sul riciclaggio del proprio Stato. FCC Warning This equipment has been tested and found to comply with the limits for a Class B digital device, pursuant to part 15 of the FCC Rules. These limits are designed to provide reasonable protection against harmful interference in a residential installation. This equipment generates, uses, and can radiate radio frequency energy and, if not installed and used in accordance with the instructions, may cause harmful interference to radio communications. However, there is no guarantee that interference will not occur in a particular installation. If this equipment does cause harmful interference to radio or television reception, which can be determined by turning the equipment off and on, the user is encouraged to try to correct the interference by one or more of the following measures: Reorient or relocate the receiving antenna Increase the separation between the equipment and receiver Connect the equipment into an outlet on a circuit different from that to which the receiver is connected Consult the dealer or an experienced technician for help You are cautioned that changes or modification not expressly approved by the party responsible for compliance could void your authority to operate the equipment. This device complies with part 15 of the FCC Rules. Operation is subject to the following two conditions: 1. This device may not cause harmful interference, and 2. This device must accept any interference received, including interference that may cause undesired operation. LINDY No 42960 1st Edition, June 2006 www.lindy.com