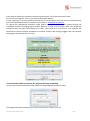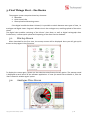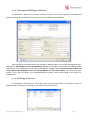
1
Tachospeed Software: User’s Manual Tychy, 2008-2009 Copyright © 2004-2009 by Infolab p. 1 Manual by: Przemysław Narloch Dariusz Wata Aleksander Suzdalcew Lead Programmers: Przemysław Narloch Dariusz Wata Aleksander Suzdalcew Łukasz Bołdys Michał Cholewa Cezary Ziąber Patryk Gust Special Thanks: Józef Wata WITD in Katowice Janusz Grzesica Translation and Translation Assistance: Bożena Tomiak-Ferreira, Maciej Szewczyk, Butex Translations Ltd, CBitaxo, Wiktoria Świderska, Kamen Pavlov, Szymon Wcisło Webmaster, editor: Krzysztof Derlatka Please direct all inquiries concerning our software via E-mail to: [email protected] Several functions of the software application referred to in this Manual may be unavailable in some languages. Differences depend on legal rules and regulations of particular countries. The presented screenshots my differ from the actual ones, depending on the operating system and screen parameters. The manual updated to version 2.33 All rights reserved Copyright © 2004-2009 by Infolab p. 2 Table of contents 1. 2. Introduction to Tachospeed Software .............................................................................................. 6 1.1. Review of Tachospeed’s Functions ........................................................................................... 6 1.2. Training Tutorials ....................................................................................................................... 7 1.3. System Requirements ................................................................................................................ 7 Installation ......................................................................................................................................... 8 2.1. Software installation .................................................................................................................. 8 2.1.1. Installation Wizard .............................................................................................................. 8 2.1.2. Serial Number Registration............................................................................................... 10 2.1.3. Program Activation ........................................................................................................... 10 2.1.4. Activation of Additional Modules ..................................................................................... 12 2.2. The Tachospeed On-line Update ............................................................................................. 12 2.2.1. 2.3. 4. Installation of Devices .............................................................................................................. 13 2.3.1. Scanner Installation .......................................................................................................... 13 2.3.2. SmartCard Reader Installation.......................................................................................... 13 2.3.3. Installation of Keys and Universal Readers ...................................................................... 14 2.4. 3. Update Issues in Windows Vista ....................................................................................... 13 Multiple Workstation Installation ............................................................................................ 14 2.4.1. Server Version Installation................................................................................................ 14 2.4.2. Server Installation Troubleshooting ................................................................................. 15 2.4.3. Client Version Installation ................................................................................................. 16 2.4.4. Client Installation Troubleshooting .................................................................................. 16 First Things First – the Basics........................................................................................................... 17 3.1. Startup Screen .......................................................................................................................... 17 3.2. Analogue View Screen ............................................................................................................. 17 3.3. Quick Launch Icons in the Analogue View ............................................................................... 18 3.4. Digital View Screen .................................................................................................................. 19 3.5. Quick Launch Icons in the Digital View .................................................................................... 20 3.6. The Tachospeed Menu Bar ...................................................................................................... 21 3.7. Database in Non-restricted Version......................................................................................... 21 Adding, Editing and Deleting of Vehicles, Drivers, Companies, Trailers and Cities ........................ 22 4.1. The Drivers Menu ..................................................................................................................... 22 4.1.1. Adding Drivers .................................................................................................................. 22 4.1.2. Viewing and Editing of Drivers.......................................................................................... 23 4.1.3. Deleting of Drivers ............................................................................................................ 23 Copyright © 2004-2009 by Infolab p. 3 4.2. 4.2.1. Adding Companies ............................................................................................................ 24 4.2.2. Viewing and Edition of Companies ................................................................................... 24 4.2.3. Deleting of Companies...................................................................................................... 25 4.3. Adding Vehicles................................................................................................................. 26 4.3.2. Viewing and Editing of Vehicles ........................................................................................ 27 4.3.3. Deleting of Vehicles .......................................................................................................... 28 7. Trailers Menu ........................................................................................................................... 28 4.4.1. Adding Trailers .................................................................................................................. 28 4.4.2. Viewing and Editing of Trailers ......................................................................................... 29 4.4.3. Deleting of Vehicles .......................................................................................................... 29 4.5. 6. Vehicles Menu .......................................................................................................................... 25 4.3.1. 4.4. 5. Companies Menu ..................................................................................................................... 24 Cities Menu .............................................................................................................................. 29 4.5.1. Adding Cities ..................................................................................................................... 30 4.5.2. Viewing and Editing of Cities ............................................................................................ 30 4.5.3. Deleting of Cities ............................................................................................................... 31 4.5.4. Deleting of all Cities .......................................................................................................... 31 Scanning of Tacho-charts and Scanner Calibration ......................................................................... 32 5.1. Placing Tacho-charts in the Flatbed Scanner ........................................................................... 32 5.2. Scanner Setup .......................................................................................................................... 33 5.3. Scanning of Tacho-charts ......................................................................................................... 34 5.4. Scanner Calibration .................................................................................................................. 34 Processing of Tacho-charts.............................................................................................................. 36 6.1. Tacho-chart Loading................................................................................................................. 36 6.2. Automatic analysis of Charts.................................................................................................... 37 6.3. Readout Settings ...................................................................................................................... 38 6.4. Correction of Tacho-chart automatic readout......................................................................... 39 6.4.1. Relocation of Tacho-chart midpoint ................................................................................. 39 6.4.2. Changing the Activity Readout Ring Radius...................................................................... 40 6.4.3. Relocation of the Midday Marker .................................................................................... 40 6.4.4. Changing of Chart Insertion Time ..................................................................................... 41 6.5. Activities Edition (Context Menu) ............................................................................................ 42 6.6. Editing of Activities (Quick Mode Change Icons) ..................................................................... 44 6.7. Mileage Edition ........................................................................................................................ 45 Chart Uploading............................................................................................................................... 46 7.1. Several Vehicles in One Chart .................................................................................................. 48 Copyright © 2004-2009 by Infolab p. 4 7.2. 8. Introduction of Several Charts on One Day ............................................................................. 49 7.2.1. Double-person Team ........................................................................................................ 50 7.2.2. Driving Shifts ..................................................................................................................... 50 7.2.3. Two or More Vehicles Driven on One Day ....................................................................... 50 7.2.4. Several Tacho-charts for One Vehicle............................................................................... 51 Viewing and Editing of Charts ......................................................................................................... 52 8.1. Edition of Stored Charts ........................................................................................................... 52 8.2. Edition of Registered Activities ................................................................................................ 53 8.3. Deleting of Stored Charts ......................................................................................................... 54 9. Digital Module ................................................................................................................................. 55 9.1. Viewing of Digital Data ............................................................................................................. 55 9.2. Repository of Digital Files......................................................................................................... 57 10. Activities....................................................................................................................................... 58 10.1. Introduction and edition of daily activities .......................................................................... 58 10.2. Manual Tachograph Activity Entries .................................................................................... 59 11. Drivers’ Working Hours Registry.................................................................................................. 60 12. Driving Time, Break and Rest Control Module (AETR, Resolution 561) ...................................... 61 13. Fuel Consumption Module .......................................................................................................... 62 13.1. Adding and Edition of Tanking ............................................................................................. 62 13.2. Fuel Consumption Calculation Method................................................................................ 62 13.3. Fuel Report ........................................................................................................................... 63 14. Important Event Reminder .......................................................................................................... 64 15. Management Menu ..................................................................................................................... 66 15.1. 16. Program Settings .................................................................................................................. 66 Updates ........................................................................................................................................ 69 Copyright © 2004-2009 by Infolab p. 5 1. Introduction to Tachospeed Software Tachospeed software is an application designed to automatically read the driving time, resting periods, breaks and periods of availability from analogue tachograph charts. Additionally, upon activation of the digital module, the Tachospeed software allows analyses of digital tachograph data and drivers’ charts. The software allows processing and analysis of retrieved data with respect to rules and regulations concerning driving times, resting periods and breaks, as well as keeping record of the working time. Moreover, the application allows calculating the drivers’ allowance, creating fuel reports – required to control the fuel consumption, as well as creating drivers’ and vehicles’ documentation. Tachospeed allows storing of data read from tachograph charts, as well as archiving and visualization of data retrieved from the system of digital tachographs. The created database may be then filtered or sorted in respect to numerous criteria, i.e. dates, drivers’ names, vehicles’ registration numbers, the place of departure or arrival, etc. Our software application allows, as first in Europe, the use of sheet-fed scanners while scanning the tacho-charts, which visibly shortens the process. Our software comprises several main modules: digital module, recording module, driving time, break and resting period module, enhanced control module, business trip and allowance module, reminder module. Our software complies with the provisions of the ‘Drivers Working Hours Act’ dated 16 April 2004, and the European agreement on international road transport – AETR (1999 Journal of Laws, no. 94 item 1087), as well as the latest Resolution (WE) no. 561/2006 of the European Parliament and European Council dated 15 March 2006. The aforementioned acts are abided by within the entire territory of Europe, thus the software application may easily be used in all of the countries of the EU, as well as countries that ratified the AETR agreement. Our software-created reports help maintain control both at a company premises and on the road. Polish institutions authorized to provide such control are: Inspectorate of Road Transport, National Labor Inspectorate, Police, The Customs Chamber, Border Guard. Our software has found many satisfied users all over Europe. In Poland it has been used by the entire Police Force, several departments of the Inspectorate of Road Transport, the Customs Chamber or the Border Guard. 1.1. Review of Tachospeed’s Functions Our software’s main functions comprise: Scanning up to six tacho-charts into the BMP format by means of flat-bed scanners, One-side scanning of approx. 12 tacho charts per minute by means of sheet-fed scanners, Automatic read out of drivers’ working time and mileage from the tacho-charts, Archiving and browsing of stored data from the tacho-charts and drivers’ ICCs. Generating of reports on drivers’ driving times, resting periods, breaks and PoAs with respect to various timeframes, Copyright © 2004-2009 by Infolab p. 6 Identification of legal violations including the calculation of fines in accordance with tariffcharts in force, Generating of working hours reports for HR purposes (overtime, overtime calculation), Settling of drivers’ allowance and accommodation charges, Calculation of actual fuel consumption based on full tank refueling, Reminders of important events, Comparison of drivers’ working times and mileages on the same routes, Manual editing of working time and mileage, Restrictions of the demo version: Archiving up to two vehicles only, 30-day trial period counted from the first use of the software application, Possibility to save up to 40 items in the tacho-chart list, Possibility to upload up to 60 days from the driver’s chart and digital tachograph. 1.2. Training Tutorials The Tachospeed Software installation disk contains multimedia tutorials concerning the use of Tachospeed Software. The tutorials cover information on: Scanning of tacho-charts, Correct tacho-chart readouts, Introduction of drivers’ data, Generating of reports, Drivers’ allowance settling, Calculation of routes’ profitability, Calculation of fuel consumption. The number of tutorials may differ depending on the chosen language. To play the chosen tutorial, please browse the contents of the CD. Some tutorials may be unavailable in the language of your choice. In case of any tutorial display trouble, please download and install the latest XVID codec, also available at www.tachospeed.pl. 1.3. System Requirements In order to maintain correct functionality of our software, we suggest that the computer system should meet the requirements specified below: Windows 2000, 2003, 2007, XP, VISTA, 7 operating system; CD-ROM drive; PC compatible system with a 1500MHz processor; 512 MB RAM (suggested 2GB RAM); 60 MB of HDD space for the application, and additional 500 MB for the database (the size of the database depends on the quantity of stored data); Free USB port (allowing connection of a scanner and/or the card reader); ICC reader (for digital tachographs only), Ethernet adapter (for multiple workstation version only). To ensure trouble-free functionality of our software, we suggest that you use scanners suggested by our sales representatives. Such devices are fully compatible with the requirements of the software and guarantee appropriate readout of the tacho-charts. Copyright © 2004-2009 by Infolab p. 7 2. Installation Before installation, please read this manual. Please install scanner (if available) prior to installation of the software. You will find all information concerning installation of the scanner in the scanner installation and maintenance manual. 2.1. Software installation To begin installation, please insert the CD into the CD-ROM drive. If the installation does not begin automatically, please browse the contents of the CD in Windows Explorer and run the installation file manually. During installation of the Tachospeed Software, please disable all running computer programs. 2.1.1. Installation Wizard To begin installation process, please choose the desired language and press Next (Dalej>). Choosing language other than the native language of the purchased version may disable access to various functions of the software application. To continue installation, please accept the Tachospeed License Agreement. Copyright © 2004-2009 by Infolab p. 8 The default installation path of the program is: C:\Program Files\Infolab\TachoSpeed We suggest using the default installation settings of the program. This will allow our Customer Service Department to assist you in case any problems should arise. The program folder contains all application files. Examples of the tacho-charts you will find in the Charts folder. The main folder of the program contains the program’s executable files, the license agreement and appropriate Acts concerning land transport. To run the software application, after the program has been installed, please use this icon: Copyright © 2004-2009 by Infolab p. 9 If the program has been installed correctly, the icon will appear on your computer’s desktop. To run the program, please double click the icon with left mouse button. Additional tools, that will aid you while working with various digital tachograph control devices, are located in Start/Tachospeed. 2.1.2. Serial Number Registration During the first launch of the program, a popup window will appear with a request for a serial number. You will find the serial number attached to the software package. If you choose the ESD (Electronic Software Distribution) mode, the serial number will be sent to you electronically. The serial number contains capital letters from A to F and numbers from 0 to 9. It consists of 16 characters and constitutes separate number, next to the so-called control code and activation code. If you do not type in the serial number, the program will run in the DEMO mode. 2.1.3. Program Activation Upon the first run of the program, the following message will appear. Pressing Yes will begin the activation process. To proceed with the activation process you will be asked to enter your company’s name and Tax ID (identification number). Copyright © 2004-2009 by Infolab p. 10 Press Next to display the activation window containing the Tax ID and the control code. To activate the program, click on the Internet Activation button. If your computer is not connected to the Internet, or an activation error has occurred, please phone one of the specified numbers or contact us via email, at: [email protected] To receive the appropriate activation code, please specify the exact Tax ID entered during the installation process (including spaces and/or dashes), as well as the control code. Our telephone assistance lines are open from Monday to Friday, from 11:00 a.m. to 3:00 p.m. The program will continue to function without activation for another 30 days. We strongly suggest that you activate the program via the Internet of E-mail. If not activated within one month, the program will stop responding. To enter the received activation code, please the Help/Program Activation menu. The program activates automatically, when the activation code is entered. Copyright © 2004-2009 by Infolab p. 11 2.1.4. Activation of Additional Modules Installation of the program grants you access to standard modules only, and enables analyses of analogue tachograph data. If you purchased additional modules, you must activate them separately. Activation of additional modules is a separate procedure to be performed aside the program activation. Together with the purchased modules, our customers receive respective serial numbers. All additional modules are activated in the Help menu. For example, to activate the digital module, please click on Help/Digital Module Activation and enter the respective serial number. To activate the enhanced control module, please click on Help/Enhanced Control Module Activation. 2.2. The Tachospeed On-line Update The Tachospeed software undergoes constant research. Our customers are entitled to a 12month update free of charge. After that period updates are available for an additional fee. We suggest visiting the developer’s website – http://tachospeed.pl – where the latest updates are stored at Updates. Each update downloadable content file comes with a date specifying the exact time of release, for example: Having clicked on a desired update file, a popup window will appear, allowing you to save the file in a desired location or launch it automatically. We suggest saving the file on your computer’s HDD and launching it afterwards. Before beginning of the update, please close the Tachospeed program. If launched, the program will not be able to update. The update installation wizard verifies the user’s license and the programs ability to be updated. The Tachospeed software application may be updated without additional charges for a period of one Copyright © 2004-2009 by Infolab p. 12 calendar year after the purchasing date. Further updates require additional update charges referred to in the price list available at http://tachospeed.pl. Before beginning of the update procedure, the installation wizard suggests creating the database backup. We suggest backing up of the database prior to each updating procedure. Without the database back up retrieving of the previous version will not be possible. 2.2.1. Update Issues in Windows Vista In case update procedures do not work properly in Windows Vista, or the program does not update despite installation of the downloadable content, it is likely that the user does not have the right to modify the TachoSpeed folder. To grant the user required rights, please: Find the application folder in Windows Explorer (the default path is: C:\Program Files\Infolab\TachoSpeed\); Click on the TachoSpeed folder with right mouse button and choose Properties; Click on the Security tab and choose the Edit option; Scroll down the Group/User Name list and find Users (NAME/Users); In the Rights for Users tick the Allow option in the Modify box. 2.3. Installation of Devices The software developer strongly suggests using recommended devices. Devices purchased elsewhere are not subject to customer assistance services. Installation manuals constitute separate documents attached do devices, and have not been addressed in this manual. 2.3.1. Scanner Installation When installing any USB based device, please mind the correct installation order. Begin with installing device’s drivers, turn off your computer, plug in the newly installed USB device and restart your system. Plugging the scanner in too early may result in occurrence of errors during installation of drivers. We recommend the following scanners as best compatible with Tachospeed software: Canon Lide 20, 25, 30 or 100; Plustek OpticSlim 1200, 2400, 2420; Microtek ScanMaker (all types installed by means of ScanWizard 5); Fujitsu FI-5120C. Some multifunction all-in-one devices use low-efficiency scanners, which disallows correct readout of the tacho-charts. We do not recommend using them, as such devices may not be subject to any complaints or technical support. Should our users possess such devices, they are encouraged to update the scanners’ drivers or purchase additional ones. 2.3.2.SmartCard Reader Installation The SmartCard Reader should become automatically visible upon connection to the computer. If it’s not, you should plug it into another USB port or install software provided on the Reader Installation CD. Copyright © 2004-2009 by Infolab p. 13 To begin the ICC readout in Windows systems, use the StartCard application from the Start/Tachospeed menu. In case of any problems concerning the readout of drivers’ ICCs, pleas launch the file via the main application. 2.3.3.Installation of Keys and Universal Readers The following keys used to upload data from drivers’ charts and digital tachographs do not require installation: TachoDrive, TachoDrive2, Siemens VDO Download Key, Siemens VDO Download Key 2, OPTAC. When connected, they will be displayed as external USB storage devices. In case the reader remains invisible for the system, please connect it to other USB port. Should you have any inquiries concerning the use of the aforementioned devices, as well as uploading data from drivers’ charts and digital tachographs, please contact the device’s producer or your local retailer. Below you will find contact information on the readers’ producers (as of the manual printing date): TachoTerminal: http://tachoterminal.net/en/ OPTAC: http://www.optac.info/ Siemens VDO Download Key 1 & 2: http://www.vdo.com TachoDrive+, TachoDrive2: http://www.matt.pl/index.php The program should be compatible with all readers producing digital output files compliant with 1B Annex. You will find configuration utilities required to set-up your device in the Start/Tachospeed menu. When connecting universal readers (equipped with card readers) to the computer, please remember that the reader should be connected to the tachograph and there should be no card inside. 2.4. Multiple Workstation Installation The so-called Multi version of Tachospeed software is a version intended for multiple workstations, allowing simultaneous work of several users. For such work to be possible it is required to connect the computers into a network. Installation of the Multi version should be performed by a qualified IT specialist. Usually, the network administrator or the lead IT technician. The multi version of our software comprises the server and the client versions of the program. The server version should be installed on a system available to all client workstations. This means that to gain access to the Internet the network server should have and external IP address. The client workstation version will not work properly if it is not connected to the database network. The client version, however, do not require the server version to be running. In such case launching the Firebird server will suffice. Due to such a solution it is possible to use several workstations at the same time, allowing several employees to perform their duties simultaneously. The server version of our software allows work via the Internet (DSL, Neostrada, Chello, etc.) – though it requires an external IP address. 2.4.1. Server Version Installation It is crucial to begin with the installation of the server version of our software. The installation progresses in a way similar to single-workstation installation, yet, unlike the latter, is followed by the installation of Firebird server. Please, make sure to enable the following options of the Firebird server: Superserver Use Guardian Run as service Copyright © 2004-2009 by Infolab p. 14 To ensure the correct functioning of the Firebird server, forward the 3050 port in the system’s firewall. Please restart your system after the installation has been completed. Otherwise, please launch the Firebird server manually (this step has been properly addressed in the Firebird manual). You can now launch the Tachospeed software. If the server version has been launched, the following popup window will be displayed: Further installation procedures may differ depending on installation and network parameters. Please type in the server’s Internet address: localhost or 127.0.0.1, or other assigned to your computer. Next specify the path to the Multi server version source folder, e.g.: C:\Program Files\Infolab\TachoSpeed\ If the installation process has been concluded properly, the program should launch and gain access to the database. 2.4.2. Server Installation Troubleshooting The program launches, but does not upload the contents of the database (the path and server address window keeps popping up): There’s additional firewall software installed in the system (e.g. Norton Security), other than the default one; The 3050 has not been forwarded; Invalid IP has been specified (spaces, full stops, etc.); Invalid installation path has been specified; The Firebird server is unavailable (does not work as a service or has been stopped); Other applications on the system use Firebird or Interbase and flood the 3050 port, or/and they are not up to date (server application should be installed on other system or launched separately with other port forwarded with its number properly configured in the program); Invalid database version (server version older than the database version) – this particular problem occurs along with attempts of installing an older program version over the new database. Copyright © 2004-2009 by Infolab p. 15 2.4.3.Client Version Installation The installation progresses in a way similar to single-workstation installation. Unlike the server version, the client one does not require the Firebird server to be installed. There’s no need to restart the computer, after the installation has been completed. The program may be launched immediately. When launched, the IP address and the path window will pop up. Here you specify the server’s IP and the path to programs source folder on the server system, e.g.: C:\Program files\Infolab\TachoSpeed\ If the installation process has been concluded properly, the program should launch and gain access to the database. 2.4.4. Client Installation Troubleshooting The program launches, but does not upload the contents of the database (the path and server address window keeps popping up): A firewall has been installed on the client workstation, that disables Tachospeed’s access to port 3050 on the server; Invalid IP address (spaces, full stops, etc., invalid address); Invalid path – remember to specify the path to the software folder on a server, not the local workstation, the same one you specified during the server configuration; Networking problems – no connection to server-based network, invalid configuration of the network adapter, etc.; Hardware problems – malfunctioning network adapter, disconnected power cord, disconnected router, etc; Invalid database version (server version older than the database version) – this particular problem occurs along with attempts of installing an older program version over the new database. Copyright © 2004-2009 by Infolab p. 16 3. First Things First – the Basics The program screen comprises three key elements: Menu Bar Quick Launch Bar Data upload and browsing screen If the digital module has been initiated, it is possible to switch between two types of view, i.e. analogue and digital views. Program’s default view is the analogue one, enabling upload of the tachocharts. The digital view enables reviewing of the drivers’ chart data, as well as digital tachograph data. Furthermore, it allows quick upload and importing of the data into the database. 3.1. Startup Screen When launched for the first time, the startup screen will be displayed. Here you will gain quick access to the program’s key functions. To display the screen again, please use the Administration/Startup Screen option. The startup screed is displayed at each launch of the software application. In case you would like to disable it, ticks the ‘Don’t show this window again’ option. 3.2. Analogue View Screen Copyright © 2004-2009 by Infolab p. 17 3.3. Quick Launch Icons in the Analogue View Quick launch icons allow easy access to the program’s key functions available in the analogue view. Below you will find a concise review of the icons and their functions. Switch between the analogue (tacho-charts) and digital (data from charts and digital tachographs) views Scan the tacho-charts Load/Open scanned tacho-charts Browse database charts Move the tacho-chart midpoint down (press SHIFT to move it faster) Move the tacho-chart midpoint up (press SHIFT to move it faster) Move the tacho-chart midpoint left (press SHIFT to move it faster) Move the tacho-chart midpoint right (press SHIFT to move it faster) Decrease the radius of the readout ring Increase the radius of the readout ring Quick access to registry report Quick access to ITD report Quick access to drivers’ activities Help File – in digital format (viewing of the help file requires installation of software enabling readout of PDF files, e.g. Acrobat Reader or Foxit Reader) Copyright © 2004-2009 by Infolab p. 18 3.4. Digital View Screen Copyright © 2004-2009 by Infolab p. 19 3.5. Quick Launch Icons in the Digital View Switch between the analogue (tacho-charts) and digital (data from charts and digital tachographs) views Import digital data from files Import digital data from drivers’ charts Import data from digital tachographs View digital files Assign digital data View printable timesheet View printable daily report View vehicles’ speed within last 24 hours Quick access to registry report Quick access to ITD report Quick access to drivers’ activities Help File – in digital format (viewing of the help file requires installation of software enabling readout of PDF files, e.g. Acrobat Reader or Foxit Reader) Copyright © 2004-2009 by Infolab p. 20 3.6. The Tachospeed Menu Bar The Tachospeed Menu Bar looks the same, both in analogue and Digital views. It allows easy access to all program functions. The bar may differ, depending on installed modules and language. 3.7. Database in Non-restricted Version If you purchased our software application with a non-restricted license (MAX version in the official pricelist), you can choose a desired database at the onset of your work with the program, thus being able to co-operate within several entities (e.g. when their finance is settled by an accounting agency). In such a case, data in one database does not influence the data in other databases. In case of settling accounts of a driver employed in two companies, the user’s able to add him or her to two databases and settle separately for each of the companies. Press Open Database button to open the database highlighted in the list of available databases. Press the New Database. The newly created database is empty. Press Find Database button to ad one of the previously databases to the database list. Such a database may be a backup of an already existing one, or a new customer’s database. After being found, the GDB extension file is being added to the list of available databases. Press Delete button do delete required database from the list of all available databases. When you do that, you will be asked, whether or not to remove the database file as well. Deletion of a database is irreversible! We suggest creating backups should the databases be extensively modified. Regardless, we suggest backing up of database folder once a week (or at leas once a month). Copyright © 2004-2009 by Infolab p. 21 4. Adding, Editing and Deleting of Vehicles, Drivers, Companies, Trailers and Cities 4.1. The Drivers Menu Click on Drivers to gain access to the drivers’ database recorded in the currently open program database. 4.1.1. Adding Drivers To add a driver, please click on the Add button in the Drivers menu. A window will appear enabling you to enter all key data required to identify and settle drivers’ accounts. The obligatory fields have been marked with a bold font. In case a contractor has already been entered in the database, it is possible do assign it do a chosen driver. Such action is required for all drivers of a given company. Other fields may remain empty, however, to use all reports and programs features, it is suggested to fill them in. The monthly cost describes drivers’ payrolls. This particular field of the program is not currently used. The Reminder constitutes an integral part of our software. Its purpose is to remind users of important dates. The reminder has been described in detail in Important Event Tracking section of the manual. A driver may also be added during scanning of a tacho-chart via the Add button placed next to the Name and Surname field. There is no limitation as to the number of drivers in the Tachospeed database. Only limitations concern the number of vehicles. Copyright © 2004-2009 by Infolab p. 22 4.1.2. Viewing and Editing of Drivers To edit drivers’ data, click the View and Edit button in the Drivers options. A window will appear enabling you to edit all drivers’ data previously added to the database. After choosing the desired driver and clicking on Editing mode, it is possible to change driver’s information. All changes are save automatically. Editing of any data is only possible in Editing mode, otherwise it is only possible to view chosen information. In case Inactive mode has been ticked, the driver will not be displayed in the list during addition of new tacho-charts. This function proves useful, in the cases of drivers not being employed anymore, whose data need to be stored for another year. 4.1.3. Deleting of Drivers It is possible to delete drivers. To do that, click on the Delete button in the Drivers menu. A popup window will appear, allowing you to delete the selected driver. Copyright © 2004-2009 by Infolab p. 23 If any driver’s tacho-charts have been saved, it is impossible to delete driver from the list. To delete such a driver, please remove all his/her tacho-charts first. 4.2. Companies Menu The Companies Menu allows users easy access to the contractor list stored in the program’s database. 4.2.1. Adding Companies To add a company, press the Add button in the Companies Menu. A popup window will appear allowing you to enter all important contractor information. Only the company’s name is required when adding a contractor. The contractor list is displayed in the summary reports, as well as while adding and edition of drivers. 4.2.2. Viewing and Edition of Companies To edit contractors’ data, click on the View and edit button in the Companies menu. A popup window will appear, allowing you to edit information on a previously added contractor. Copyright © 2004-2009 by Infolab p. 24 You can change contractor’s data by selecting it and ticking the Editing mode box. All changes are save automatically. Editing of any data is only possible in Editing mode, otherwise it is only possible to view chosen information. 4.2.3.Deleting of Companies It is possible to delete companies. To do that, click on the Delete button in the Companies menu. A popup window will appear, allowing you to delete the selected contractor from the database. If a driver has been assigned to a contractor, such a contractor may not be deleted. To delete the contractor it is required to delete all drivers’ tacho-charts from the database. 4.3. Vehicles Menu The Vehicles menu allows users access to all vehicles saved in the currently open database of the program. Copyright © 2004-2009 by Infolab p. 25 4.3.1. Adding Vehicles To add a vehicle, press the Add button in the Vehicles Menu. A popup window will appear allowing you to enter the vehicle’s registration number and other identification data. Added vehicles may be assigned to contractors. This function proves useful in case of calculating drivers’ working times for different carriers. The vehicle adding window is a slightly more complex than the others and consists of three tabs: General – general vehicle information; Fuel – data used in the fuel report; Deadline and expiry dates – a list of important dates used by the reminder module. The categories describing vehicles’ fuel consumption and fuel tanks’ capacities are used to generate the so-called fuel reports, based of full-tank refueling. They comprise the following: Average fuel consumption Fuel consumption with maximum cargo Fuel consumption without cargo Additional fuel consumption (e.g. aggregate cooling systems); Tank capacity (used in case of full-tank refueling). To properly calculate the fuel consumption in the Tachospeed’s fuel consumption module, all of the above must be filled in. If the data is not filled in correctly, or not filled in at all, the fuel module will not work properly. Copyright © 2004-2009 by Infolab p. 26 Press the Add button to add new vehicles. The only required information is the registration number. Please notice your program version while adding new vehicles. Tachospeed restricts the number of vehicles, depending on the program version. 4.3.2.Viewing and Editing of Vehicles To Edit vehicle information click on the View and edit button in the Vehicles menu. A popup window will appear, allowing you to change vehicles’ registration numbers and other data. Editing of vehicles’ number plates allows to change vehicles, in case one of them is being unregistered, put off-lease or any other circumstances concerning the company’s fleet of vehicles. During editing it is also possible to adjust all other data introduced into the database. To change vehicles’ information, please point the vehicle in the list and tick the Editing mode box. All changes are saved automatically. Editing of any data is only possible in Editing mode, otherwise it is only possible to view chosen information. In case Inactive mode has been ticked, the vehicle will not be displayed in the list during addition of new tacho-charts. This function proves useful in the cases of vehicles not being used anymore, whose data need to be stored for another year. Copyright © 2004-2009 by Infolab p. 27 4.3.3.Deleting of Vehicles It is possible to delete vehicles. To do that, click on the Delete button in the Vehicles menu. A popup window will appear, allowing you to delete the selected vehicle from the database. If any tacho-charts assigned to a vehicle have been saved, it is impossible to delete vehicle from the list. To delete such a vehicle, please remove all its tacho-charts first. 4.4. Trailers Menu The Trailers Menu allows users easy access to the trailer list stored in the program’s database. 4.4.1. Adding Trailers To add a trailer, press the Add button in the Trailers Menu. A popup window will appear allowing you to enter the trailer’s registration number and other identification data. Data typed into the table below is only used in the Reminder report. Copyright © 2004-2009 by Infolab p. 28 4.4.2. Viewing and Editing of Trailers To Edit trailer information click on the View and edit button in the Trailers menu. A popup window will appear, allowing you to change trailers’ registration numbers and other data. To change trailers’ information, please point the trailer in the list and tick the Editing mode box. All changes are saved automatically. Editing of any data is only possible in Editing mode, otherwise it is only possible to view chosen information 4.4.3. Deleting of Vehicles It is possible to delete trailers. To do that, click on the Delete button in the Trailers menu. A popup window will appear, allowing you to delete the selected trailer from the database. If any tacho-charts assigned to a trailer have been saved, it is impossible to delete trailer from the list. To delete such a trailer, please remove all its tacho-charts first. 4.5. Cities Menu The Cities Menu allows users easy access to the locality list stored in the program’s database. Copyright © 2004-2009 by Infolab p. 29 During the first launch and each time a clean database is open, the program will load a list of localities specific for each language. To delete it, please click on Cities/Delete City Database button. 4.5.1. Adding Cities To add a locality click on the Add button in Cities menu. A popup window will appear allowing you to enter the name of locality and the proper country name. Choice of the country plays a crucial role in case of allowance calculation. If a user does not intend to calculate allowance, choice of the country may be skipped, and default country selected. Assigning localities to countries is used by the allowance calculation module to identify drivers’ allowance and accommodation charges. During upload of new tacho-charts, the program might inquire about adding a new locality. In case when required locality is not available in the list, press the Save button to save the new locality. When filling in the tacho-chart departure and arrival localities, the program suggests a locality via the Add Cities window. To add a locality, press the Add button. 4.5.2.Viewing and Editing of Cities To Edit city information click on the View and edit button in the Cities menu. A popup window will appear, allowing you to change the name of locality and the country. Copyright © 2004-2009 by Infolab p. 30 When in Editing mode, it is possible to enter a new city name or change the country. This proves particularly useful when a database saved locality was wrongly assigned to a wrong country. To save changes, press the Save button. Editing of any data is only possible in Editing mode, otherwise it is only possible to view chosen information. 4.5.3.Deleting of Cities To delete a locality, press the Delete button in the Cities menu. A popup window will appear, allowing you to delete the locality name. Deleting of cities is only possible if their names were not saved in the database. If you wish to delete or change them in spite of that, use the Viewing and editing option. 4.5.4.Deleting of all Cities Our software allows you to delete all localities from the database. It is particularly useful when the vehicles travel along fixed routes and you wish to enter the city names manually. To delete all city names, press the Delete City Database button in the Cities menu. The above function only works when no tacho-charts were save in the database. Otherwise, deleting city database will not be possible. Copyright © 2004-2009 by Infolab p. 31 5. Scanning of Tacho-charts and Scanner Calibration To begin work with our software it is required to scan a certain number (1 – 6) of tacho-charts. Before scanning, make sure that the inside part of the scanner lid is black. The background must be black for tacho-charts to scan properly. In case your scanner’s inner lid is white, please cover the tacho-charts with an A4 sheet of black paper. You may also fasten in to the inner part of scanner’s lid. The above hints do not relate to Plustek OpticSlim 1200 scanners. 5.1. Placing Tacho-charts in the Flatbed Scanner Usually six tacho-charts are placed on the scanning glass, which allows analysis of entire working week. Please place the tacho-charts in accordance with a presented scheme. For example, if you wish to scan one tacho-chart only, place it in the lower left corner of the scanning glass with a ‘tear-like’ slot pointing right, beginning from the scanning head in the lower part of the device (for Canon Lide 25 and Plustek OpticSlim 1200). Otherwise, place the tacho-chart in the left upper corner of the scanning glass, with a ‘tear-like’ slot pointing left (for devices with a scanning head placed in the upper part). Copyright © 2004-2009 by Infolab p. 32 To scan three charts simultaneously, they should be placed on the scanning glass in a way presented below: 5.2. Scanner Setup In case of two or more scanners plugged into the system, please choose the one used for tachocharts scanning in the program settings. You can choose each time the tacho-charts are being scanned. To chose the scanning device, use the Select Scanner window. If no scanners are displayed in the window, scanning devices have not been installed properly, they aren’t plugged in or the USB port is malfunctioning. In scanner settings, please set the DPI to 300, Brightness to approximately -150 and Threshold within the limit from 150 to 170. Also, make sure that the Show Scanner Window box has not been ticked. Copyright © 2004-2009 by Infolab p. 33 5.3. Scanning of Tacho-charts To begin scanning the tacho-charts please click the following button: The button is placed in the toolbar. You may also proceed with scanning manually, by choosing Charts/Scan charts option from the toolbar menu. Next, please specify the number of tacho-charts to be scanned. Maximum number of charts, and at the same time the suggested number, is 6. However, in case of ticking Add Rest Tacho Chart it is possible to analyze drivers’ full working week (i.e. 7 days). To begin scanning, press the Scan button. If the Show Scanner Window box has been ticked, the program will display scanner’s native software window. To acquire most precise scan of the chart, please press the lid with your hand while scanning. It is suggested to place the charts chronologically, that is beginning with the earliest one, and tick the Add Rest Tacho Chart box. This will allow software’s smooth running, since some of the data, i.e. dates and mileage, is changed automatically. The scanned charts appear in the programs left display, which allows readout and analyses of particular charts. In case of step charts, please tick the Step Chart box and place no more than 4 tacho-charts on the scanner’s glass. You may choose to Invert Colors before scanning. This function is particularly useful when using incompatible or older scanning devices, whose colors invert (white to black and black to white). Tick this box to invert colors, otherwise working with our software will not be possible. To save the scanned charts as BMP files and store them on you HDD, tick the Save to File box. We suggest ticking this box in order to be able to store the scanned charts in separate folders. If ticked, you will be require to provide file names. 5.4. Scanner Calibration After driver installation and choosing of a proper scanner, it is required to calibrate it. To verify scanner settings turn on the Chart reading option (in the RMB roll-down menu) and zoom in the tacho scan (RMB roll-down menu) to view the mileage markers. To calibrate scanner, use the mileage markers. Solid lines (picture A) signify proper scanner calibration. Copyright © 2004-2009 by Infolab p. 34 If the line is broken (picture B), go back to scanner settings and decrease Brightness by 10, or increase the Threshold by 5, until a desired scan of a tacho-chart appears. Copyright © 2004-2009 by Infolab p. 35 6. Processing of Tacho-charts Once the charts have been scanned, they appear in the main display on the left: A red frame signifies a selected chart subject to analysis. To view the chart in detail click on the thumbnail on the left. Selected chart will be displayed in the main screen in the middle and automatic analysis will begin. 6.1. Tacho-chart Loading To load the previously saved charts without having to scan them again, click on the button presented below: Or Charts/Open single chart from the file. It is possible to select a greater number of charts visible in the window on the left – just as if they were scanned anew. Copyright © 2004-2009 by Infolab p. 36 The appearance of the window may differ, depending on the installed OS. When the charts are selected the program will automatically analyze driver’s working time and mileage. To load six charts as a A4 graphic file, choose the Charts/Open 6 tacho-charts from the file option. This allows scanning the charts using other workstations and sending them via E-mail or company’s local network to workstations with Tachospeed installed. Thanks to this, several employees may devote their time to scanning the charts, while others may analyze them. In such a case only a single license is required, which greatly reduces the costs of software purchase. 6.2. Automatic analysis of Charts Our software has been designer in such a way as to maximize the efficiency of chart scanning. Let us shortly review the way our software ‘changes’ the chart scan into a stream of comprehensible data used to create reports. The program automatically detects particular stages of driving, other activities, PoAs or rest periods upon readout or loading of tacho-chart file. The readout is automated and only concerns charts marked with red frames. Detailed readout information is displayed in the Readouts table: Copyright © 2004-2009 by Infolab p. 37 The Readouts table comprises onsets and conclusions of tachographs’ work stages, their duration, type and mileage within a selected chart part. In case our software is unable to read the chart’s midpoint, please use the following icons to set it manually: For detailed information, read the Quick Launch Icons in the Analogue View section of the manual. Correct readout of the chart’s midpoint influences the readout of driver’s activities and mileage. In case finding midpoint of the chart becomes problematic you may correct the chart manually. For more details, please read the Correction of Tacho-chart Automatic Readout section of the manual. 6.3. Readout Settings Our software enables you to set the minimum readout values for driving time, other activities, PoAs and resting periods. With minimum settings, i.e. after 1st minute for each stage, the program reads all tachograph-registered stages with duration longer than one minute. Copyright © 2004-2009 by Infolab p. 38 Such a setting, however, has certain drawbacks as the program only reads fixed fragments of the chart. That is why it is suggested to set the readout times to 1, 5, 10 and 5 respectively. Our software enables you to set the readout ring radiuses for particular tachograph-registered stages. If a chart readout procedure requires users to correct the readout radius, it is suggested to set the fixed suggested value. It is, for example, necessary to follow the aforementioned step in case of ACTIA/POLTIK charts and tachographs. If a majority of routes involve traveling within limits of fleet base and drivers’ domiciles, hence the chart insertion and removal places do not change, it is possible to set a default locality displayed in all tacho-charts. Proper settings concerning chart insertion and removal places is required in case of calculating drivers’ allowance. If Tachospeed is used to calculate and settle drivers’ business trips, it is also possible to set one Default City. 6.4. Correction of Tacho-chart automatic readout It happens, that the software application misreads parts of chart-saved data. The reason for that might be the incorrectly calibrated scanner or cracked/scratched tacho-chart. In case of dirty or inappropriately scanned charts, problems with correct readout may occur. There are numerous ways to solve these problems. Tachospeed allows correction of misread charts. 6.4.1. Relocation of Tacho-chart midpoint To ensure correct readout of the chart, the middle ring should be placed manually. It must be positioned as shown in the picture: Copyright © 2004-2009 by Infolab p. 39 Use icons shown below to relocate the midpoint ring: 6.4.2. Changing the Activity Readout Ring Radius In case activity chart does not fit between two red rings, it might be required to manually increase or decrease their radiuses. The readout ring radius may be modified by means of the following icons: 6.4.3. Relocation of the Midday Marker Tachospeed software automatically locates the midday, marking it with a solid blue line. Copyright © 2004-2009 by Infolab p. 40 To correct the position of midday, point the blue line with mouse cursor and drag the line in the desired position. The location of midday determines hours and minutes displayed on the clock icon in the left upper corner of the Readouts window. 6.4.4. Changing of Chart Insertion Time Chart insertion time plays a crucial role. It is indicated by the dark green line. Positioning of that line on the chart influences actual dates of recorded activities. For example, if a chart insertion date is 3 June 2006 and the removal time is 4 June 2006, then, in case of inserting the tacho-chart before midnight, entire transportation activity takes place on 4 June (in this case the chart insertion time was 11:56 p.m.). That is why we suggest that all drivers should note down the hour of chart insertion on the backside of the chart, in order to be able to quickly identify the place of insertion. Location of the dark green line determines the beginning and finish of the transportation activity presented on a chart. A green line surrounding the chart clockwise denotes the beginning and end of drivers working times. Copyright © 2004-2009 by Infolab p. 41 Edition of a chart allows setting automatic onset of drivers working time. To do that tick the Automatically look for the onset box in the Settings’ Readout Options. The onset of driver’s working day as well as the chart insertion line are being marked automatically after the longest uninterrupted resting period. On some occasions automatic marking requires a manual correction of the tacho insertion time. In case a working day began in other part of the tacho-chart, it is required to set the dark green line at the chart insertion position. This process is very similar to setting the midday, and consists in pointing the line with a mouse cursor and dragging it into the required position. To gain quick access to chart settings, click the right mouse button beyond the activity ring and choose Chart insertion. Chart insertion time will be then set for the exact hour displayed on the clock in the left upper coroner of the chart screen. In case the generated weekly and fortnight reports do not comply with actual state, remember to set the correct onset. 6.5. Activities Edition (Context Menu) In some cases changes in drivers’ working time need to be made. To modify selected parts of the tacho-chart, please launch the context menu. Copyright © 2004-2009 by Infolab p. 42 The Select Rest Mode option allows to change the selected activity into a rest. Merge with Previous and Merge with Next allow deletion of selected sectors. Thanks to the Divide option, you will be able to divide the sector into halves. The Several Vehicles on a Chart function allows introduction of several vehicles’ data if one chart was used by a driver in more than one vehicle. This function will be addressed in detail in further section of this manual. The Border Crossing function allows drivers to specify the time of border crossing. It is only useful in case of international freight, while calculating and settling allowance by means of Tachospeed software. Calculation of allowance has been addressed in detail in the Allowance and Business Trip Calculation section of this manual. Whenever a chart is read inaccurately it is possible to change the readout mode of a selected fragment – Change Mode, and inserting of a fragment by means of the Insert command. In cases when drivers are unable to use tachographs’ selectors accurately, you are encouraged to use the Change All Modes option. Copyright © 2004-2009 by Infolab p. 43 It is suggested to drivers to drive in the ‘resting mode’ to avoid penalties for the aforementioned. The quick access icons placed in the right upper corner of the tacho-chart, allow rapid change of PoAs and/or other activities into resting mode. This, on the other hand, allows deletion of short PoAs and working times. If a driver uses the selector correctly, they may be used to calculate working times without a need to separately change the periods. The same context menu is available via the activity table If a desired period is to ‘thin’ to be found on a chart, it can be easily spotted in the table: To display yet another menu, click with a right mouse button in the screen beyond the tacho-chart: The displayed menu allows finding of the chart midpoint and rereading of activities. In case to many changes have been introduced to the chart, the program will reread it automatically once more. 6.6. Editing of Activities (Quick Mode Change Icons) In the left lower corner of the chart four quick mode change icons are displayed. Copyright © 2004-2009 by Infolab p. 44 Beginning from the left, they represent: driving time, other activities, PoAs and resting periods. To select a required icon, click on it once. You are now in the chart placement mode. Click on a chart to specify the onset time, and again to specify the time when the selected activity is finished. For example, to insert the driving mode with duration from 1:00 p.m. to 2:15 p.m., click once on the driving time icon, click on the chart at 1:00 p.m. and again at 2:15 p.m. A proper period should be displayed in the chart. Placing of periods works the same as placing of periods in the chart viewing and editing window. 6.7. Mileage Edition Below the main screen a window is displayed with a graphic representation of mileage, presented as files or markers. Each line, measured from the bottom to top vertex stands for 5 kilometers. To edit this particular chart, click RMB (right mouse button) in the lower corner of a window presented below. You may now add or deduct mileage. To edit, click at a required point on the kilometers’ line. Clicking on a bar in the selected position will cause a red line to be displayed and 5 kilometers to be added to your count. Another click in the same place, deducts 5 kilometers and deletes the bar. Only spots marked as driving mode are clickable. Copyright © 2004-2009 by Infolab p. 45 7. Chart Uploading The readout of all chart-registered data does not mean that it will be saved in the program database. Only charts saved in the database may become basis to creating of the report. To readout and save tacho-chart data, use the options window placed on the right of the analogue view screen. Having scanned the charts, fill in the driver information, vehicle information, date and odometer indications, and proceed to the Data window. W suggest sorting of tacho-charts of a particular driver chronologically within a given period, prior to scanning – that is from Monday to Sunday of a given week. In case of double-person teams we suggest inputting of the data ‘in pairs’. In such cases, please tick the Two box, so that the data for the other driver doubles. The Data tab allows you to choose driver, vehicle, chart insertion and removal position, trailer, as well as starting and final odometer indications. All this date may be found in the chart. You may only choose among drivers, vehicles and trailers previously saved in the program’s database. To add an external driver, use the Add button. Copyright © 2004-2009 by Infolab p. 46 It is also possible to enter additional comments concerning the selected chart. It happens that such a need arises, e.g. in cases when a driver notes down a cause for a legal offence on the backside of a chart. A list of exemplary notes has been placed below the Comments window. These might be added by means of a ‘+’ button. To facilitate the readout of data registered by a driver on a chart, it is possible to zoom in the chart, by means of a mouse scroll, or the icons placed in the right lower corner of the screen. You may also right-click to display the roll-down menu: Apart from zooming in and out of the tacho-chart, the menu also allows to reset the midpoint, reread the chart and center the view. The Chart reading ON/OFF option may also prove useful, especially when verification of scanning quality is required. On the right to Readouts tab, there’s a Data tab, allowing to enter drivers’ information, specify the chart insertion and removal place, indications of the odometer and vehicles number plates. Do see basic statistics of the chart, use the Summary tab. Fill in the Start Odometer and Finish Odometer windows for each chart to be able to check the working time, resting periods, PoAs, driving time and mileage, in the Summary window. Our software sums up the all driving times, working times, PoAs and break periods for given day. Remember, break time is not the same as resting time. This finds reflection in working time control reports. Resting times comprise all breaks longer than 1 hour. Copyright © 2004-2009 by Infolab p. 47 Based on the aforementioned data, users are able to check, whether the tacho-chart readout has been properly performed. Also, they provide users with easily accessible data on drivers’ working time for given twenty four hours without a need to save charts in the database. In the light of labor law, time presented in the summary does not reflect the driver’s working time for given twenty four hours. Provisions of law differ, depending on the country of origin. To level the discrepancy between Odometer distance and Chart distance, press the Make Even button. These discrepancies may result from inappropriate readouts, double-person team, tachograph or odometer manipulations. Summary tab also contains tacho-chart readout interpretations pursuant to AETR Act and Resolution 561. Information indicated in the primary interpretation is not final and results from interpretation made for ONE chart ONLY. To ensure full compliance with binding provisions of law, the control report must be based on analyzes of at least two weeks of working time. After pressing the Save in Database button, our software will automatically proceed with the readout of another chart, while the database-stored one will remain available for viewing (Charts/View). In case Don’t delete from the list box is checked, the saved chart will remain visible in the chart list on the left. This option proves particularly useful when trying to compare the chart with one to be saved in future. 7.1. Several Vehicles in One Chart It is sometimes required, that several vehicles be registered in the same tacho-chart. For example, when a chart is used by a driver in several vehicles. To properly calculate fuel consumption for each of vehicles, use the Several Vehicles in One Chart option accessible through the context menu. Copyright © 2004-2009 by Infolab p. 48 In the Readouts table choose the period, whose beginning involves change of a vehicle, next tick the Several Vehicles in One Chart. When the function is selected, a window will appear allowing you to specify a new vehicle and its odometer indications. Press Next to assign a new vehicle to a chart for a previously selected period and odometer indications. To verify the correctness of a newly assigned vehicle, go to the Readouts tab. The index number o a vehicle driven by a driver is displayed in the last column on the right. It is justified to use this option, if you wish to control the fuel consumption or use the Vehicle Mileage Report. Otherwise, in the Data tab, select the vehicle driven by a driver in the beginning, and place other vehicles in the chart comments window. 7.2. Introduction of Several Charts on One Day While uploading, the Tachospeed software verifies, whether each working day has a driver’s / drivers’ chart/charts uploaded. In case uploaded charts have been found on a given day, the following are possible: Double-person team; Driving shifts; Two or more vehicles driven on one day; A driver submits more than one tacho-chart for a vehicle’s 24-hour long period. Depending on circumstances, the above may be merged or registered in the tacho-chart in a way that ensures separate analysis. Copyright © 2004-2009 by Infolab p. 49 7.2.1. Double-person Team In case of two drivers, the tachograph should have two charts inserted. All chart data recorded, including insertion and removal location, dates, vehicles and odometer indications remain unchanged, except the drivers’ names. In such a case, when one driver’s chart records driving time, the other’s records PoA. Whenever double-person charts are analyzed, the program only calculates given driver’s mileage – thus it is possible that discrepancies between the tacho-chart and odometer readouts will arise. It is then suggested to merge the charts. Tachospeed software facilitates the upload of double-person teams. The charts ought to be sorted interchangeably: the first driver’s first chart, the second driver’s first chart, the first driver’s second chart, the second driver’s second chart, the first driver’s third chart, the second driver’s third chart. Such positioning of drivers’ charts in the window on the left ensures the following readout order: Tick the Two box in the first driver’s chart menu, in the Data tab, and fill in all other information. Click the Save in Database option to uncheck the Two option. Now you will be able to upload the second driver’s chart – the process is automated to an extent, where all Data remains unchanged – since the second driver’s chart only differs in driver’s name – and only this piece of information needs to be adjusted. Click on Save in Database again to change the data as to resemble the data uploaded from a single chart. Now you are able to fill in the first driver information. Although, it is important that you remember to tick the Two box. 7.2.2. Driving Shifts A vehicle may be driver by two drivers on the same day. In such cases avoid merging tachocharts. 7.2.3. Two or More Vehicles Driven on One Day In this case, the driver is allowed to use the same chart in each vehicle, yet for no longer than 24 hours; saving particular odometer indications and number plates on the chart’s backside. We suggest merging the charts or choosing the Several Vehicles in One Chart option while saving the chart. Copyright © 2004-2009 by Infolab p. 50 7.2.4. Several Tacho-charts for One Vehicle It happens that a driver submits more than one chart for one vehicle, and for a period not longer than 24 hours. Such a situation is and unjustified use of a number of charts greater than required and is liable to penalties by ITD. Our software allows merging such charts to enable proper calculation of driver’s working time. Copyright © 2004-2009 by Infolab p. 51 8. Viewing and Editing of Charts All data saved in the program is stored in the database. The program enables viewing of all charts saved in the database. The charts stored in the database are taken into account while creating all reports. If a chart cannot be found in the database, it means that it has not been saved properly and will not be included in the reports. Press the button presented below: to open the chart browser and editor. Viewing options of the database allow filtering by drivers’ names and surnames, departure locations, arrival locations, date of departure and vehicles’ registration numbers. For example, to find in the base all charts pertaining to Mr. Dariusz Wata made for a route leading from the city of Szczecin, please tick the boxes placed next to the Driver’s Name and Departure Location and choose the data of your interest. To filter the base, press the Filter button. Filtering of the base allows comparison of all charts made for a specified route, concerning mileage and working time. To browse the base in accordance with other categories, press the Clear filter button and enter new filtering criteria. 8.1. Edition of Stored Charts It is possible to edit data stored in the Readouts and Midpoint tabs, once the proper chart record has been selected. Copyright © 2004-2009 by Infolab p. 52 The Midpoint tab allows introduction of changes to drivers’ names and surnames, localities, dates, vehicles’ registration numbers and odometer indications. To save all introduced changes, press the Save button. 8.2. Edition of Registered Activities Double clicking on Readouts in From, To and Status tabs allows introduction of changes in stored data. You can restore the data once it has been change, by simply clicking on the Undo Changes button, or save it by pressing the Save in Database button. Icons placed in the right upper corner of the tacho-chart screen allow insertion of particular activity modes in the chart. Each icon symbolizes a particular mode. These are respectively: driving times, other activities, PoAs and resting periods. To introduce each of them, three mouse clicks are required: The first mouse click: click the LMB on a desired icon to chose the mode subject to insertion. The second mouse click: Pont a desired location on a chart with mouse cursor. Clock in the left upper corner displays the selected time. Click with a left mouse button. Selected time will from now on constitute the time of onset of activity selected with the first click. The third mouse click: Point a desired location on a chart with mouse cursor. Clock in the left upper corner displays the selected time. Click with a left mouse button. Selected time will from now on constitute the time of conclusion of activity selected with the first click. Copyright © 2004-2009 by Infolab p. 53 Desired activity is being displayed in the chart after the third mouse click. All activities between the onset and conclusion times are then overwritten. To restore the data, click on Undo Changes button. To save it, click on Save in Database button. 8.3. Deleting of Stored Charts Click RMB on the selected database record to delete it. Copyright © 2004-2009 by Infolab p. 54 9. Digital Module To switch to digital mode, click on the icon presented below: The digital module icon is only visible if the digital module has been activated. Clicking on it brings about a change of screen. It is now aimed at browsing of database with respect to data uploaded from drivers’ ICCs and the digital tachographs. 9.1. Viewing of Digital Data The screenshot below presents the view of digital data viewing screen: Main tabs of this mode, i.e. Driver and Vehicle allow changes of the browsed data. Vehicle data may differ from the data saved in drivers’ ICCs, it also contains some additional information. Driver or Vehicle are selected by means of the field placed next to the Year, Month and Day tabs. Viewing mode allows choosing of the tachograph slot of your interest. Data registered in two different slots may vary. In the middle of the screen a calendar has been placed, with marks depicting the days of activity. The calendar allows three viewing modes: Copyright © 2004-2009 by Infolab p. 55 A yearly mode A monthly mode A daily mode Copyright © 2004-2009 by Infolab p. 56 Each of the viewing modes presents a different degree of data accuracy – from the most general one, to the most detailed. Views differ, depending on the viewed data, i.e. vehicle data or driver ICC data. Below a diagram of a calendar-selected day has been presented. 9.2. Repository of Digital Files All files imported via out software application are stored in the database in the unchangeable DDD format. All imported files may be browsed in the file repository. It allows gathering all files in one location, making them easily accessible in case of inspection. Repository-stored files may be saved on the HDD at any time. Do save the files, choose Save to file or Save all digital files in folder option. Files may be saved separately or all at the same time. Copyright © 2004-2009 by Infolab p. 57 10. Activities Activities menu allows introduction and editing of drivers’ activities that have not been registered in the tacho-charts or by digital tachographs. It also lets users keep record working times of employees who do not use tachographs. To browse and specify the activities of your interest, use the Viewing and edition option. 10.1. Introduction and edition of daily activities The activity screen is divided into the yearly section (Yearly view) and a daily section (Edition). Yearly view is used to register activities concerning entire working days. It allows us to specify that a given day is a day off duty, or a driver’s sick leave. Marking of a desired period allows to right click and open the context menu. To add a new status to all activity days in the register, choose a desired activity. Clear selected days allows restoring the status of a day to a standard, activity free one. It is also possible to add working hours. Working hours are not registered at a given time, only convey information used by a registry module, about a number of hours subject to addition to drivers working time on a desired day. Copyright © 2004-2009 by Infolab p. 58 All changes made in this window influence the registry reports of working time, but are not included in the control report. The yearly view clearly presents the dates of introduction of driver ICC data, digital tachograph data, charts, rest charts or manual entries. Legend is displayed below the calendar window. To save newly-submitted activities in the database, click on Save changes button. If not saved, all changes will be lost upon choosing of a new driver or closing of the window. 10.2. Manual Tachograph Activity Entries Manual tachograph activity entries screen differs from the yearly view. Firstly, it only concerns one 24-hour period. Secondly, it is presented in UCT time. The screen presented above allows introduction of tachograph modes. This may be necessary in case no drivers’ ICCs or digital tachograph data is available and users access is limited to tachograph printouts only. Manual entries in registry and control report bear the same relevancy as the chart data, drivers ICCS and digital tachograph data – however, they are marked as introduced manually. All data introduced by means of this window influences the working time registry reports and the control reports. Once again, to save the activities in the database, click on the Save Changes button. If not saved, all changes will be lost upon choosing of a new driver or closing of the window. Copyright © 2004-2009 by Infolab p. 59 11. Drivers’ Working Hours Registry To access the registry module, click on Reports/Driver Working Time Calculation/Registry of Driver Working Time. Due to legal-based discrepancies in calculation of drivers’ working times in various countries, the registry manual constitutes a separate help file. Copyright © 2004-2009 by Infolab p. 60 12. Driving Time, Break and Rest Control Module (AETR, Resolution 561) To access the driving time, break and rest control module, click on Reports/Control reports/Road Inspection Control Report. Due to discrepancies in interpretation of provisions of law in various countries, the control report manual constitutes a separate help file. Copyright © 2004-2009 by Infolab p. 61 13. Fuel Consumption Module To access the fuel consumption module, click on Fuel/Tanking Calculation. 13.1. Adding and Edition of Tanking If a fuel report is launched, a popup window will be displayed allowing additions and deletions of tanking. Data displayed in the right upper corner is loaded directly from the vehicle database. This is the exact data filled in by user during addition and edition of vehicles. To begin calculation of fuel consumption, choose a proper vehicle and accounting period. On accounting period selection, the program loads all tanking data for a desired period from the database. To add tanking, press the Add tanking button, or choose the same option form the context menu. To delete tanking, press the Delete tanking option in the context menu. To properly calculate the fuel consumption, it is indispensable to fill in the Odometer and Tanking columns. Other information is not obligatory. On the other hand, filling in of all data allows to generate comprehensive reports. In case of cargo data being submitted, users can use the Liters per cargo ton window to define additional fuel consumption per cargo ton. 13.2. Fuel Consumption Calculation Method Fuel consumption report is generated base on full-tank tanking method. Each time the tank is filled, drivers are obliged to note down the quantity of fuel tanked, as well as the odometer indications for that particular moment. According to this method, the first tanking (full-tank) Copyright © 2004-2009 by Infolab p. 62 becomes a base point for further calculations. The method of actual fuel consumption calculation has been presented in the picture below: 13.3. Fuel Report To generate a fuel consumption report, click on the Report button. In case database contains any tanking from before the selected period, they may be included in the calculation by checking of Include previous tanking box. Copyright © 2004-2009 by Infolab p. 63 14. Important Event Reminder Important event reminder module constitutes and integral part of our software. The module covers all vital dates concerning drivers, vehicles, trailers and the company. On addition and edition of drivers’ information it is possible to specify his or her: medical certificate expiry date; driver qualification certificate expiry date; psycho-technical examination certificate expiry date; forthcoming driver card reading date; When adding vehicles registration number it is possible to specify: Casco expiry date; Liability Insurance expiry date; Safety Inspection expiry date; Tachograph routine test expiry date; Cargo liability insurance expiry date; Vignette validity expiry date; Next safety inspection at odometer indication; Next oil exchange at odometer indication; ‘S’ Compliance Certificate expiry date; ‘L’ Compliance Certificate expiry date; License expiry date; Customs seal certificate expiry date; Mobile crane/tow hook inspection expiry date; ADR certificate expiry date; Tow hook inspection certificate expiry date; Mobile crane inspection certificate expiry date; Next tachograph readout date; Latest digital tachograph data readout date; When adding trailers registration number it is possible to specify Casco expiry date; Liability Insurance expiry date; Safety Inspection expiry date; When editing company it is possible to specify: Transportation license expiry date; Company card expiry date; Copyright © 2004-2009 by Infolab p. 64 To gain access to reminder module options, click on the Reminder tab: To easily turn the reminder on/off use the Important Event Reminder option. If the option is on, a popup reminder window will be displayed each time the program is launched. To display the report on terms exceeded and deadlines, press the Show Reminder button. To specify the reminder triggers, use Remind… days before deadline and Remind… kilometers before next inspection options. Copyright © 2004-2009 by Infolab p. 65 15. Management Menu The so-called administrative menu allows program management. The above-presented menu comprises the following options: Opening of startup screen: Startup screen; Database selection (MAX version only): Select database; Changing of program settings: Settings; Changing of access settings (control forces): Access; Exporting of databases: Export data…; Repairing of database: Check database integrity; Checking and downloading of updates: Updates. 15.1. Program Settings The Settings tab allows changing program settings. Settings influence functionality of entire program, and have been divided into the following groups: Readout options; Currencies and costs; View; Allowance; Reports; Reminder; Others. Readout options tab enables users to change settings concerning data readout from tacho-charts and drivers’ ICCs. They comprise the following: Minimum driving times, other activities, PoAs and resting periods – values are expressed in minutes and allow specifying of minimum activity duration period for activities read from analogue tachograph charts; Beginning and end of night shift – allows specifying of night shift beginning and ending times; Copyright © 2004-2009 by Infolab p. 66 Consider work over XX minutes a stopover – checking of this box allows automatic conversion of other activities (exceeding time specified in minutes) uploaded from digital tachograph to stopover. Ask to overwrite digital data – if checked, each importing procedures of new digital files pertaining to one driver/vehicle, the program will inquire whether data stored in database should be overwritten or imported as new. Download data on stolen and malfunctioning cards on program launch – if ticked, each time the program is launched, data from PWPW S.A. will be downloaded. To download data at any desired moment, press the Download data button. Currencies and costs tab contains options concerning exchange rates and costs. To properly calculate allowance, exchange rates should be filled in correctly. To check or download information from the National Bank of Poland website, click on Check exchange rates and Download exchange rates buttons. To adjust program visuals, use the View option. It allows change activity display colors. The tab also includes a language change option. Other available settings comprise: Use selected colors in tables – if ticked, table records will be colored in accordance with record-assigned activities; Vehicle registry number – in a number of companies vehicles are identified by registry numbers rather than by number plates. If ticked, this option allows using the former while assigning vehicles to tacho-charts; Transparency of chart periods – this option allows setting of activity fields in the tachograph chart analogue view; Default city – if filled in, the default city will be automatically assigned as a chart insertion locality; Clock in left upper corner – allows turning on and off of the clock in analogue view; Automatic chart centering – if ticked, each time a chart is read, the program will automatically set its midpoint. The Allowance tab is strictly connected with a business trip and allowance calculation module. It allows users to set the allowance and accommodation charges for particular countries. Apart from allowance charges, it also enables setting of a kilometer charge. Other options comprise: Ask for border crossing time – if ticked and if border crossing is detected in the chart (discrepancy between country of chart insertion and removal), the program will ask for exact border crossing time. To properly calculate business trip charges, hours must be correctly specified. Allowance version 2.18 – if ticked, the allowance will be calculated in accordance with previous calculation system (not suggested). The Reports tag allows setting up of report appearance options. These only influence Use of reports older than 2.18 version. Use of obsolete reports is not suggested and is no longer supported by software developer. Remember that majority of report generation options are included in report generation window. The Reminder tab, if Remind of important events is ticked, reminds of vital events. It takes a form of a popup window displayed when the program is launched. It comprises a list of all important dates. Copyright © 2004-2009 by Infolab p. 67 Reminder may be displayed via options. To do that press the Display reminder button. The reminder has been referred to in detail in the previous section of this manual. The Others tab consists of options not classified elsewhere. It comprises: Always display log-in window on program launch (MULTI version) – if clicked, in case client-server version is used, each logging in to the database will display the log-in window, which allows selection of other databases in the MAX version. Download update information – if ticked, the program will check and download updates available from developer’s website each time it is launched. Ask for control data on database selection - this option is only use in cases of road control. It allows opening of control popup window on creation or opening of new databases. The control forces version of the program also includes Synchronization setup for statistics server in Others options. It allows choice between the following three: Server address – requires specification of synchronization server in local network. Login – allows entry of user’s login used when logging into statistics server or prior to sending of inspection unit. Password – allows entry of user password. The above options must be set up correctly in order for the program to connect with the statistics server used to upload control procedures or/and download update. Copyright © 2004-2009 by Infolab p. 68 16. Updates To update the program use the Updates option reachable via the menu. It comprises three options: Check for updates; Update from USB device; Update from statistics server. Check for updates allows users to connect with the www.tachospeed.pl website and check for new updates. In case they are available, users will be notified. Update from USB device allows automatic update of the program from a USB storage device containing the update package. The update package should be stored in USB device’s main folder and be named as follows: TachoSpeedUSB.exe. Update from statistics server (control forces version only) allows update of software application via a local network. If clicked, the program will connect with the main statistics server to download the latest available update package. All updating mechanisms allow license and free update expiry date verification. All updates are free within a period of one year following purchase of the program. After that another year of updates is charged and subject to the official pricelist published at www.tachospeed.pl. Copyright © 2004-2009 by Infolab p. 69