1
Navigation software
Navitel Navigator
User manual
© 2007 The Join-Stock Company “CNT” . All rights reserved.
The contents of this Guide, as well as any attached demo materials, are the sole proprietorship of the Join Stock Company "CNT". Any commercial usage of this Guide may
be carried out only with written permission from the Join-Stock Company "CNT". The
information in this document shall not be changed without prior notice given to the Join
Stock Company "CNT".
Contents
1. Introduction ..............................................................................................5
2. General Information ....................................................................................5
3. Program interface.......................................................................................8
3.1. The program interface when routing...........................................................................8
3.2. “Map” interface. .......................................................................................................10
4. Pages ......................................................................................................12
4.1. “Map” page..............................................................................................................12
4.1.1. Map scrolling ..................................................................................................12
4.1.2. Zooming.........................................................................................................12
4.1.3. GPS-cursor ....................................................................................................12
4.1.4. Compass ........................................................................................................13
4.1.4.1. Map rotation..........................................................................................13
4.1.4.2. Day/Night skins .....................................................................................13
4.1.5. Information panels ..........................................................................................14
4.2. “Dashboard” page ....................................................................................................14
4.2.1 Gauges list ......................................................................................................15
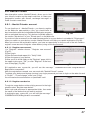
4.3. “Satellites” Page.......................................................................................................20
4.4. “Weather” page........................................................................................................21
5. Main menu ................................................................................................22
5.1. Find.........................................................................................................................22
5.2. Route ......................................................................................................................22
5.2.1. STOP .............................................................................................................22
5.2.2. Route editing ..................................................................................................22
5.2.3. Route plan ......................................................................................................22
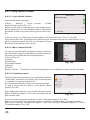
5.2.4. Show the route................................................................................................23
5.2.5. Detour............................................................................................................23
5.2.6. Route simulation .............................................................................................23
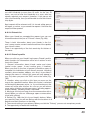
5.2.7. Export ............................................................................................................23
5.2.8. Import ............................................................................................................23
5.3. My Navitel ................................................................................................................24
5.3.1. All products ....................................................................................................24
5.3.2. My products ...................................................................................................25
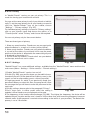
5.3.3. Update ...........................................................................................................25
5.3.4. Help ..............................................................................................................25
5.4. Settings ...................................................................................................................26
5.4.1. Map ...............................................................................................................26
5.4.1.1. Top of the map ......................................................................................26
5.4.1.2. Automatic zoom.....................................................................................26
5.4.1.3. Visual effects.........................................................................................26
5.4.1.4.Detail level .............................................................................................26
5.4.1.5. Draw models from..................................................................................27
5.4.1.6. Map tilt .................................................................................................27
5.4.1.7. Reset position .......................................................................................27
5.4.2. Other maps ....................................................................................................27
5.4.3. Navigation ......................................................................................................27
5.4.3.1. Vehicle..................................................................................................27
2
5.4.3.2. Avoid ....................................................................................................28
5.4.3.3. Guidance prompt...................................................................................28
5.4.3.4. Off-route ...............................................................................................28
5.4.3.5. Lock on Road ........................................................................................28
5.4.4. Interface.........................................................................................................28
5.4.4.1. Map buttons..........................................................................................28
5.4.4.2. Skin ......................................................................................................29
5.4.4.3. Hide buttons..........................................................................................29
5.4.4.4. Hide menu ............................................................................................29
5.4.4.5.Show scroll bar.......................................................................................29
5.4.5. POI filter .........................................................................................................30
5.4.6. Online services ...............................................................................................31
5.4.6.1. Traffic jams............................................................................................31
5.4.6.2. Weather ................................................................................................31
5.4.6.3. Communication .....................................................................................31
5.4.7. Alerts .............................................................................................................32
5.4.7.1. Speed limits ..........................................................................................32
5.4.7.2. Speed cams ..........................................................................................32
5.4.7.3. Traffic lanes...........................................................................................32
5.4.8.Regional settings .............................................................................................32
5.4.8.1 Interface language..................................................................................32
5.4.8.2. Map language ......................................................................................32
5.4.8.3 Voice .....................................................................................................33
5.4.8.4 Keyboard ..............................................................................................33
5.4.8.5 Measurement units .................................................................................33
5.4.9. System...........................................................................................................34
5.4.9.1. Satellites ...............................................................................................34
5.4.9.2. Time .....................................................................................................35
5.4.9.3. Power ...................................................................................................35
5.4.9.4. Sound...................................................................................................35
5.4.9.5. Quit prompt (function is unavailable for devices based on iOS)..................36
5.4.9.6. Folder settings.......................................................................................36
5.4.10. Dashboard....................................................................................................36
5.4.11. Profiles .........................................................................................................36
5.4.12. Tracks ..........................................................................................................36
5.4.12.1. Track record ........................................................................................37
5.4.12.2. Track format ........................................................................................37
5.4.12.4. Track’s folder.......................................................................................37
6. Functional options ......................................................................................37
6.1. Routes.....................................................................................................................37
6.1.1. Autorouting.....................................................................................................37
6.1.2. Route creation after searching results...............................................................37
6.1.3. Manual route creation......................................................................................38
6.1.4. Edit route........................................................................................................38
6.1.5. Route properties .............................................................................................38
6.2. Tracks......................................................................................................................39
6.3. Waypoints ................................................................................................................39
3
6.4. Traffic jams ..............................................................................................................40
6.5. Find.........................................................................................................................41
6.5.1. Search «By address» .......................................................................................41
6.5.2.Search «Nearest places» ..................................................................................42
6.5.3. Search “Friends” .............................................................................................43
6.5.3. Search «Waypoints» ........................................................................................43
6.5.4. History ...........................................................................................................43
6.5.5. Favorite ..........................................................................................................43
6.5.6. Search «By coordinates»..................................................................................44
6.5.7. Search «On the map» ......................................................................................44
6.6. Navitel talks .............................................................................................................45
6.7 Navitel.Events ...........................................................................................................46
6.8. Navitel.Friends .........................................................................................................47
6.8.1. «Navitel.Friends» account. ...............................................................................47
6.8.2. Using «Navitel.Friends»....................................................................................48
7. Running the program after a crash ..................................................................53
4
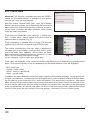
1. Introduction
Navitel Navigator is a multifunctional navigation software intended for efficient search for
the shortest route on the map. Voice prompts allows you to follow the route, not paying
attention to the display and being not distracted from driving. Function «Navitel.Traffic
Jams» will help you to overcome traffic jams.
This is the manual on how to use the navigation program “Navitel Navigator”. It describes
the elements of the user interface, basic functions of the navigation application, and also
the order of user’s actions when performing standard operations.
2. General Information
GPS (Global Positioning System) is a satellite system, which allows to determine the
object’s location and speed. For the most successful use of GPS devices the basics of this
technology should be known.
The GPS system, also known as NAVSTAR (NAVigation System using Timing And
Ranging), is based on satellites, moving around the earth on orbital trajectories. 24 satellites provide 100% of the system operability at any point of the globe, but may not always
ensure the stable signal recept and good calculation of the position . Therefore, to increase
the accuracy of the position and reserve in case of failures, the total number of satellites in
orbit is supported in greater quantity. The maximum number of simultaneously working
satellites in the system NAVSTAR is limited to 32.
GPS is a passive system of navigation, which allows you to receive satellite signals, but
excludes the possibility of a signal transfer. Signal of the GPS satellites has a frequency
1.227 and 1.575 GHz. This means that for the electromagnetic wave with such frequency
as an interference will be metal and wooden surfaces, some types of plastics, concrete.
Because of this, it is impossible to catch the satellites in the reinforced concrete building,
you need to change the location of the device for better signal reception.
Attention! The most accurate readings can be expected, when signals are received in an
open area not less than with 4 satellites, evenly placed across the sky, and the device
should be fixed relative to the earth.
The quality of the positioning depends on the set of satellites, which the device operates
with. If the receiver has the opportunity to choose the best from a large number of received
signals , this will positively influence on a quality of the coordinates determination. If there
is no choice, then the precision of the work will be hard to predict.
After turning on the GPS device, navigation system doesn;t activate immediately.
Navigation messages transmitted from satellites contain two types of data: ephemeris and
almanac of satellites.
5
The almanac is stored in the memory of the receiver and is constantly updated, since each
satellite transfers the data of the almanac for the entire group of satellites. The «life» of the
almanac is 2-3 months. Further, the value of the accumulated error in the calculations will
be unacceptable.
Ephemeris data contains options that enable you to calculate the current location of the
satellite more precisely. In contrast to the almanac, each of satellite transmits only its own
ephemeris. The «life» of the ephemeris is 4-6 hours.
Ephemeris and almanac data , transmitted from the satellites, is constantly corrected. This
occures one time per day (if necessary more). Stations network receives data from satellites, analyzes measurments, compares them with reference data, calculates the corrective
amendments and sends them to the main station, where data is transmitted to the satellites.
Starting process, that is necessary for the device to define the position after switching on
depends on the available memory of the initial information. There are the following modes:
• ”Cold start” — time, position, almanac and ephemeris are unknown. This may be due to
the location of the device off for a long time (more than 70 hours) or moving it being off to
a great distance. In this case the device must download the new data on the almanac and
bounds. This process can take more than 20 minutes.
• ”Warm start” — position and ephemeris are unknown, time and the almanac are
known. The device starts collecting data ephemeris, then it will be able to make position
finding. Usually it takes few minutes.
• ”Hot start — the almanac, ephemeris are known, time and a position are known
with some mistakes. This is the fastest kind of system start and it is possible if
the device was switched off for less than 4 hours. Last data is actual except for
small inaccuracies which the system specify in less than 1 minute.
Navitel Navigator is a navigation software developed for a variety of devices equipped with
built-in or external GPS-receivers.
The program allows you to download detailed maps of cities and regions with the house
numbers, street names, metro stations and other useful information. Also the satellite navigation program provides voice-guided navigation. The program is optimized for the standart screen resolution, it has fast map zooming and scrolling, as well as automatic switching between maps with various scales.
6
The advantages of the «Navitel Navigator» in comparison with other similar software:
1. Implemented quick map zooming and scrolling;
2. Autoswitching between maps;
3. Different map orientations;
4. Full-screen mode;
5. Fully supported map display modes such as 2D, and the pseudo-3D;
6. Tooltips;
7. The ability to download the traffic jams information from the Navitel.
Main tasks carried out by the program are: to identify and display the current position
on the map, automatic and manual routing, different kinds of objects searching,
calculation and display a lot of travel information, display and recording the trajectory
of motion in the form of the track and much more.
7
3. Program interface
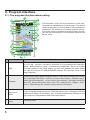
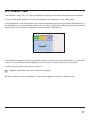
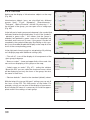
3.1. The program interface when routing.
The illustration shows the main elements of the interface and the management of the program. The device
shown in the figure, is not a standard, recommended or
advertised. The model of your device and the orientation of the screen may differ from that shown in the figure, but the functionality of the interface elements will
be the same.
Fig. 1
№
1
Name
GPS
Function
GPS connection indicator. If the indicator is gray color - GPS/GLONASS receiver is off; red - receiver is turned on, but there is no connection with satellites;
yellow - bad connection; green - connection is established. There is a number
of found satellites in the circle. When you click on it appears the menu where
you can turn on/turn off GPS/GLONASS receiver. Also you can move to the
page “Satellites”.
Context menu opens by pressing this button. In this menu switches the orientation of the map («North up» - lock icon is next to the compass, «Rotate in accordance with the movement» - route is next to the compass), the type of card (Flat
view «2D» and the Panoramic view of the «3D») and the skins («Night», «Day»,
«Auto»). When driving the compass always points to the North.
2
Compass
3
Information
panel
A sign of the upcoming manoeuvre. There are various turns, distance to the next
maneuver in meters or kilometers, etc. on a gray background. Clicking on the
sign stops the route guidance and more route options.
4
Information
panel
Following street.
8
№
Name
Function
5
Back to
position
Button is active if the map is shifted relative to your location. A short click on it
returns a map to your location.
6
Speed
Current speed.
7
Route
Active route.
8
GPS-cursor
Your location indicator.
9
Traffic lane
Displays the traffic lanes with a valid maneuvers at the next intersection.
10 Progress-bar
The line is filled in as you come closer to the maneuvre
11 Menu
Main menu opens by pressing this button.
12
Information
panel
The estimated total time in a way, the total length of the route, time of arrival at
the final point of the route.
13
Information
panel
Name of the street that you drive on. Is active only when connection with sattelites is established.
14 Scale button
Zoom out.
15 2D/3D
Switches 2D/3D format.
16 Scale button
Zoom in.
17 Navitel. Events
Event management button.
18
Navitel.Friends
icon
Shows your friends on map. If the icon is grey, your friend is offline. If it is green
, your friend is online.
19 Traffic Jams
Shows the current traffic jams on a 10-point scale.
20 Time
Current time.
21 Battery
Icon shows the level of battery charge. Click on it to see the remaining memory.
22 Navitel.Friends
Icon to open Navitel. Friends menu. Service allows you to add friends, see their
location on the map and chat with them.
9
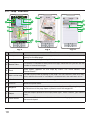
3.2. “Map” interface.
Fig.2
№
Fig.21
Fig.3
Name
Function
23 Route panel
Allows you to see the entire route, your location and traffic jams* on the route
directly on the Map page.
24 Sound
Sound menu opens by pressing this button.
25 Navitel.Talks
This button is intended to read/send messages. Near the icon you can see the
number of unread messages.
26 Event
Road event, applied on the map by users. For more details, see
“Navitel.Events”.
27 Mark on the map
You can set the mark by taping on the map. You can save this mark as a waypoint, add it to the route or see object’s characteristics the mark was set on.
28 “Save”
Saves current mark on the map as a way point.
29 «Cursor»
Shows the point menu.
30 Waypoint
Waypoints are indicated by red flags, created by the user. Tapping the point
at the bottom of the page opens a panel to work with waypoints.
31 Object
Different objects placed on the map (traffic lights, metro stations, gas stations
, etc.).
32 Track record
Track record. Red dot means that the track is recording, grey dot means that
the record stoped.
10
№
Name
Function
33 Update
34 Weather
Opens access to the menu program updates and maps.
Opens page “Navitel.Weather”.
35 Back
Back to the previous menu.
36 GO!
Marks the current position on the map as the end of the route.
37 Map
Back to the map.
Information
38
panel
Shows information about the current location on the map. When you click on the
information bar more information and route options will be displayed.
39 Right/Left
Toggles the display with points information.
40 Send Navitel.SMS By choosing this item you can send coordinates of the point.
41 Copy
Copies coordinates of the selected object
42 «Route through»
Mark becomes the first point on the route. You should turn off your
GPS/GLONASS receiver.
43 «Set finish»
If you press this button, route continues up to the current point on the map.
44 «Set start»
Mark becomes the middle point of the route.
45 «Go!»
Marks the current position on the map as the end of the route
Attention! Set of icons on the display depends on the settings of the interface. To move to the settings
interface, click Main menu - > Settings - > Interface. Detailed information about the interface options is
in the «Main menu».
11
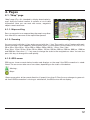
4. Pages
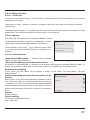
4.1. “Map” page
“Map” page (Fig. 4)is intended to display downloaded emap and your current location. It contains a lot of traffic
information. Here you can work with routes, waypoints,
objects search and more.
4.1.1. Map scrolling
Press on any point on a map and drag the map in any direction. After this a new zone of the map will be opened.
4.1.2. Zooming
Fig. 4
You can zoom in with the “+“ key and zoom out with the “-“ key. The scale is set to 5 meters with maximum zoom and is set to 2000 km, with minimum zoom. It is possible to set the scale to 5 m, 8 m, 12 m,
20 m, 30 m, 50 m, 80 m, 120 m, 200 m, 300m, 500 m, 800 m, 1,2 km, 2 km, 3 km,
5 km, 8 km, 12 km, 20 km, 30 km, 50 km, 80km, 120 km, 200 km, 300 km, 500 km, 800 km, 1200 km
and 2000 km. Press the“+“/”-“ key ones to change the scale to the next/previous value. You can also
press this keys to change the scale quickly.
4.1.3. GPS-cursor
GPS-cursor shows current device location and displays on the map if the GPS-connection is established. The cursor can take one of two states, depending on the status of the device:
«Moving»;
«Stop».
Green arrow points at the current direction. If speed is less than 2,5 km/h cursor changes to green circle. And if GPS-connection is missing or switched off, the GPS-cursor will not display.
12
4.1.4. Compass
Press the button to open the map settings menu (Fig. 5).
4.1.4.1. Map rotation
•
Track up;
•
North up (Static mode).
4.1.4.2. Day/Night skins
Fig. 5
This option allows you to switch between day and night skins.
Use night skin
mode when it is dark. It will protect your eyes from tiredness and make the device more
comfortable to maintain. You can set this option as one of three positions
•Day view mode(Fig. 6);
•Night skin (Fig. 7);
•Auto (allows to switch between day and night view modes automatically).
Fig. 6
Fig. 7
13
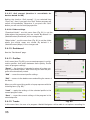
4.1.5. Information panels
There are several information panels on the “Map” page.
The bottom panel displays a current street name or a driving
direction (Fig. 8). The top panel shows a following street
name (Fig. 9).
Note: information panel or the control panel can be displayed in the bottom of the screen. To hide a panel with buttons click on any place at the map.
Fig. 8
While you navigate a route you can see an information panel
in the left side of the screen displaying a next maneuver
icon, speed, calculated travel time, route overall length and
destination achievement time. Press the next maneuver
icon to display a route settings menu.
Note: The set of buttons in this menu depends on a
demo mode: is it on or off? If you press the maneuver icon
with demo-mode turned off, you will see a Fig. 10.
Otherwise you will see a Fig. 11.
More information about routes can
“Functionality” section of this manual.
be
found
Fig. 9
in
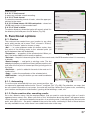
4.2. “Dashboard” page
Page “Dashboard” (Fig. 12) is intended to display various
navigation information. To see page “Dashboard” open
“Menu” - “Settings” - “Dashboard”.
The location of the sensors on the page depends on orientation and type of the screen. The management mode of the
sensors is carried out in the control menu, as well as by
moving the joystick “Up”/”Down”. The “Previous page” button is located in the lower left side of the screen and the
“Map” page button is in the lower right corner.
Fig. 10
Fig. 11
14
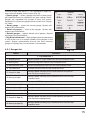
Choose an item and tap on it. The “Dashboard” page settings menu will appear on the screen (Fig.13):
• Select gauge — select a gauge from the list. New gauge
will replace the one you selected to an open settings menu.
Gauges are separated into groups to ease the search.
Detailed info on the each gauge can be found in the “Gauge
list” table;
• Reset gauge — resets the current gauge. System will
request the confirmation;
• Reset all gauges — reset all the gauges. System will
request the confirmation;
• Default gauges — apply a default set of gauges. System
will request the confirmation;
• Big/Small dashboard — Each gauge increases/decreases
in size at the cost of an overall number of the gauges on the
screen. System automatically chooses the most common
gauges to display, but you can create a set manually.
Fig. 12
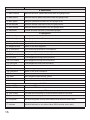
4.2.1 Gauges list
Name
Fig. 13
Function
1. Trip computer 1
1.1. Stopping time
Overall number of stops made since last trip computer reset.
1.2. Moving time
Overall moving time since last trip computer reset.
1.3. Measurement time
Overall measurement time since last trip computer reset.
1.4. Trip Odometer
Distance passed since last trip computer reset.
1.5. Overall Av Spd
Average speed including all the measurement time period
since last trip computer reset.
1.6. Moving Av Spd
Average speed including only movement time since last trip
computer reset.
2.1.Stopping time. (2)
Overall number of stops made since last trip computer reset.
2.2. Moving time (2)
Overall moving time since last trip computer reset.
2. Trip computer 2
2.3. Measurement time (2) Overall measurement time since last trip computer reset.
2.4. Trip Odometer (2)
Distance passed since last trip computer reset.
2.5. Overall Av Spd (2)
Average speed including all the measurement time period
since last trip computer reset.
2.6. Moving Av Spd (2)
Avarage speed including only movement time since last trip
computer reset.
15
Name
Function
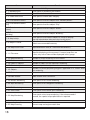
3. Max values
3.1. Max Descent
Maximal descent speed measured since last gauge reset.
3.2. Max Ascent
Maximal ascent speed measured since last gauge reset.
3.3. Max speed
Maximal speed measured since last gauge reset.
3.4. Min Altitude
Minimal altitude measured since last gauge reset.
3.5. Max Altitude
Maximal altitude measured since last gauge reset.
3.6. Odometer
Overall distance travelled (unresetable gauge).
4.1. 5 s Ave.Speed
4.2. 5 m Ave.Speed
Average speed in last 5 seconds.
Average speed in last 5 minutes.
4.3. Bearing
4.4. Waypoint Final
The direction from current location to destination.
Name of the final waypoint.
4.5. Waypoint Next
Name of the next waypoint.
4.6. To final point
The remaining distance to final waypoint.
4.7. To the next point
The ramaining distance to next waypoint.
4.8. ETA Current
Next waypoint arrival time estimation.
4.9. ETE Final
Final waypoint moving time estimation.
4.10. ETE Current
Next waypoint moving time estimation.
4.11. ETA Final
Final waypoint arrival time estimation.
4.12. Next Turn
Next maneuver on active route and distance left.
4.13. Pointer
Nearest waypoint pointer and distance to it.
4.14. Final point
Name of the final route point.
4.15. Time zone
4.16. VMG
4.17. Sunrise
4.18. Sunset
5.1.Date GMT
5.2. Time GMT
5.3. Date
Current location time zone.
Next waypoint approaching speed.
Sunrise time for current location
Sunset time for current location
5. GPS data
Greenwich GPS data.
Greenwich GPS time.
Formed date according to GPS and recalculated to local time.
5.4. Time of day
Formed time according to GPS and recalculated to local time.
5.5. Speed
Comparative moving speed.
5.6. Longitude
WGS-84 longitude (or any other datum GPS-receiver works with)
5.7. Latitude
WGS-84 latitude (or any other datum GPS-receiver works with)
4. Navigation
16
Name
5.8. Heading
Function
Comparative moving direction azimuth. Magnetic azimuth if using
magnetic compass and NMEA-0183 protocol.
6.1. Vertical Speed
6. Altitude
Current vertical speed.
6.2. Climb angle
Angle between current driving direction and horizontal level.
6.3. Glide Ratio
Horizontal speed comparative to vertical speed. Available
only if using Garmin and SiRF protocols.
6.4. Height of Geoid
Geoid’s height (average sea level) above WGS84 ellipsoid.
6.5. Altitude
Altitude above geoid (above sea level).
7. GPS data precision
Vertical coordinate precision with 95% probability. Available
only if using Garmin protocol
7.1. Vertical EPE
7.2. VDOP
Vertical coordinates precision deterioration factor reflecting
geometric satellites configuration. Value exceeding 10 means
low precision. Available only if using NMEA-0183
7.3. Magnetic Variation
Magnetic Variation — difference between true meridian
(north direction) and magnetic. Available only if using NMEA0183 protocol.
7.4. Used Satellites
Number of satellites used during last position determination.
7.5. EPE
Horizontal coordinates precision, 95% probability. Available
only on Garmin devices.
7.6. HDOP
Horizontal coordinates precision deterioration factor reflecting geometric satellites configuration. Value exceeding 10
means low precision. Available only if using NMEA-0183
7.7. GPS Fix Quality
Coordinates determination method – 3D (all coordinates are
known), 2D (only horizontal coordinates are known), differential, etc.
8.1. DGPS station
8. DGPS Data
Number of station used to make differential correction data.
8.2. DGPS age
Time passed from last received differential correction data.
8.3. DGPS station
Name of the closest DGPS station.
9. Area
Figure area consisting of motion path and a section, connecting start
and end points.
10. Sonar data
Water temperature. Available only if NMEA-0183 protocol
compatible temperature sensor is connected.
Depth. Available only if NMEA-0183 protocol compatible
sonar is connected.
9.1.Area
10.1. Temperature
10.2. Depth
17
Name
Function
11. Map
11.1. Rendering 3D
TIme spent for rendering 3D models.
11.2. Indexation
Atlas last loaded indexation time.
11.3. Check atlas time
Time spent to check atlas integrity.
11.4. First element search
Time spent to find first object from “Nearest places”.
11.5. First element search
(city)
Time spent to find first object “City”.
11.6. First element search
(street)
Time spent to find first object “Street”.
11.7. First element search
(building)
Time spent to find first object “Building”.
11.8. Map infotip
Time spent to find nearest object on a map to display
pop-up help window after pressing it using stylus.
11.9. Maps in Cache
Current number of maps loaded in cache. This value
affects on consumable memory.
11.10. Map Zoom Level
Map detalization level (0—maximum detalization).
11.11. File name
Map file displaying at the moment. If several map files are
in use, only one of them will be displayed in this gauge.
11.12. Map Rendering
Number of maps rendering on the screen.
11.13. Blocks
Number of rendered blocks.
11.14. Labels in objects
Number of labels on the map after rendering.
11.15. Points in objects
Number of points in objects rendered on a map.
11.16. Objects
Number of points/polylines/polygons appeared on a screen after
last rendering.
11.17. Text redraw
Text redraw time.
11.18.Label redraw
Label redraw time calculation.
11.19. Routes Rendering
Time spent on last route rendering.
11.20. Wpts Rendering
Time spent on last waypoints rendering.
11.21. Trk Rendering
Time spent on last track rendering.
11.22. Jams Draw.
Time spent on last traffic jams rendering.
11.23. Map Rendering
Time spent on last map rendering. If the value exceeds 1
second, the special map optimization is required.
11.24. Map Opening
Map opening time
11.25. Map Covering
Current map and region match time
18
Name
Function
12. System
12.1. Routing
Time spent on autorouting.
12.2. Redraw
Image redraw time.
12.3. Data Failures
Number of failures during GPS-data receiving. If this value
is increasing, poor electrical contact may have occurred.
12.4. Battery
Main battery charge (value determined by operational
system).
12.5. . Free Memory
Amount of RAM available to run application.
12.6. Lock on Road
Time spent on finding an anchor point to lock on road.
12.7. Initialization
12.8. CPU Usage
Program loading time.
Amout of CPU resourses involved in running process.
12.9. Clock Fix-ups
12.10. Clock Drift
System time adjustment counter with GPS time.
Current system time deviation
Kalman filter working time (used to boost position finding
precision)
Code of current GSM cell. It is used for netmonitoring and
consists of MCC (Mobile Country Code), MNC (Mobile
Network Code), LAC (Local Area Code) and CELL ID.
13. Weather
12.11. Kalman
12.12. Current Phone Cell
13.1. Temperature
13.2. Pressure
13.3. Wind
13.4. Cloudiness
Current temperature.
Current pressure.
Wind speed and direction.
Current precipitation.
13.5. Weather forecast+1 day
Weather forecast for tomorrow.
13.6. Weather forecast+2 day
Weather forecast for the day after tomorrow.
13.7. Weather forecast+3 day
Weather forecast for the day after tomorrow.
13.8. Weather forecast+4 day
Weather forecast for 4-rd day.
13.1. Total.All
13. Internet traffic
Overall internet traffic from the first program initialization.
13.2. Outgoing. All
Outgoing internet traffic from the first program initialization.
13.3. Incoming. Total
Incoming internet traffic from the first program initialization.
13.4. Total. Current
Overall internet traffic from the current program initialization
13.5. Outcoming. Current
Outgoing internet traffic from the current program initialization
13.6. Incoming. Current
Incoming internet traffic from the current program initialization
19
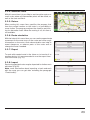
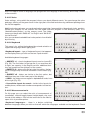
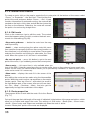
4.3. “Satellites” Page
“Satellites” page (Fig. 14) is intended to display
GPS/GLONASS signal status, number of satellites and their
position. Schematic sky map with directions is in the upper left
corner of the screen.
To move on page “Satellites” click on the icon of the satellite at
the top of the screen on the page “Map” and select
“Satellites”.
Fig. 14
Note: the opportunity of reception the GLONASS signals is possible only if the device supports this system.
The hemisphere center corresponds to the zenith circle of it indicates the line of the horizon. If the satellites function is activated in the hemisphere are displayed satellites conventional signs of yellow and
green colours. The green colors indicates a higher quality signal reception, yellow - lower quality. Under
the image of the hemisphere indicates the current data transfer protocol and port connections to the
receiver of GPS/GLONASS.
There is a field for the display of satellite information in a graphical diagram in the bottom of the page.
The levels of the signals of the satellite are shown in the form of columns of yellow and green colors,
under which the number of satellites located. Height of the column is directly proportional to the quality of the received signal - higher the level, better the quality.
In the upper right part of the page displays the following information:
• The current latitude and longitude;
• The number of satellites. This number determines GPS/GLONASS receiver. The maximum number of
satellites is 12;
• The determination of the coordinates.
Note: on devices based on iOS sattellites do not display.
20
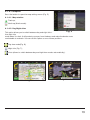
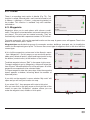
4.4. “Weather” page
The “Weather” page (Fig. 15) shows the weather forecast for a few days and shows current weather.
To move to the page “Satellites” click on the weather in the upper part of the “Map” page.
In the upper part of the page displays the current temperature, pressure, wind speed and direction. In
the right part of the screen displays forecast for four days, on the button “Back” will launch the default
web browser on your device and displays the home page of GISmeteo.ru.
Fig. 15
The weather is displayed for the city by default which is close to the current GPS position. In case GPS
signal is off, the weather will be displayed for the city, which is close to the center of the map.
In the lower part of the screen there is a button:
- “Update” (update the information about the weather).
Besides manual information updating, it is possible to update the forecasts automatically.
21
5. Main menu
In the lower left corner of the “Map” page is a main “Menu”
button. When you click on it the main menu of the program
opens (Fig. 16). Using this menu you can get different information.
5.1. Find
This menu implements the search function on various
representation of the objects on the map. See details in the
section “Search.
Fig. 16
5.2. Route
This menu item is intended for management functions of the
middle points of the route. When you click on this button
window management features of the route open, where set
of buttons depends on the availability of the active route.
If you press the “Route” in the case it’s not on the map, a
menu will appear, in which will be available only two functions: “Create a route” and “Import” (Fig. 17). If you select
first item, the search window will be opened. For more information about using this menu see “Search”.
Fig.17
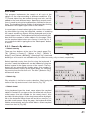
5.2.1. STOP
If route is set this item allows you to finish the navigation on
it (Fig. 18). After clicking on this button, the route will no
longer appear on the map, and the middle point of the finish
line will be deleted.
If the route simulation is on, this button disables it. “Start”,
“Finish” and all “Middle” points will be saved.
5.2.2. Route editing
Fig.18
Pressing this button allows you to add the middle point or
change the finish point. Every added point will be first to
route throught. This item is available only when the route is
active.
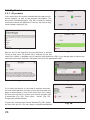
5.2.3. Route plan
This menu provides information about all of the maneuvers,
which are present on the route. In the upper part of the page
displays detailed information about the next maneuver,
below there is a list of upcoming maneuvers with street
names and distance to maneuver. Here are also 3 sensors:
“Time left”, “Distance” and “Arrival time” (Fig. 19).
22
Fig.19
5.2.4. Show the route
With this menu item it is possible to see the entire route on a
small scale, where all intermediate points will be visible, as
well as the start and finish.
5.2.5. Detour
When routing this menu item specifies the program that
from the current location on the route is no possibility to
move further. The program analyzes the situation and looking for alternative route. When the routing is off, this item is
not available.
Fig.20
5.2.6. Route simulation
With the help of this menu item you can see the approximate
movement on the route turns on the route and some rough
information on the route. Such demonstration can help to
reveal dangerous or adverse parts of the route and to
change the route if needed.
5.2.7. Export
To work with created route in the future or to transfer it to
another device, it is recommended to use the export function of the route (Fig. 21).
5.2.8. Import
Fig.21
Previously exported routes may be imported for further work
with them (Fig.22).
Note: more information about importing a track and work
with the route you can get after reviewing the paragraph
“Functionality”.
Fig.22
23
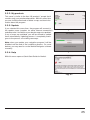
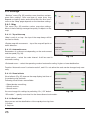
5.3. My Navitel
5.3.1. All products
In this menu item all currently available Navitel maps are collected together, as well as the program description. The
menu item “Navitel Navigator” (Fig. 23) is made for viewing
information about the application: version, the license key,
serial number, copyright, etc.
Fig. 23
Fig. 24
Fig. 25
Next on the list are maps that you can purchase or activate.
To buy a map, press the button “Buy” and pay for the purchase (this option is available only for devices with Android or iOS). If you already have a license key,
select the menu item “Activate” and enter the key in the appropriate field.
Fig. 26
Fig. 27
If you have the license on the map of required countries,
you can download them not only on your personal web-site
page on www.navitel.ru, but in this menu item. Just select
the country from the list, confirm your choice and wait until
it downloads (Fig. 24). Then select “Install” (Fig. 25).
Program will create the atlas.
If necessary unused maps can be deleted (Fig. 28). Select
an item from the list. You can always re-download deleted
24
Fig. 28
map.
5.3.2. My products
This menu is similar to the item “All products” except that it
contains only your purchased products. With this menu item
you can similarly download or delete a map, and view information about the program.
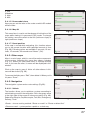
5.3.3. Update
If you selected this menu item, the program will connect to
the update server (requires an active Internet connection)
and determine if installed on your device maps are updated.
If any of maps are outdated, you will be offered to update
them automatically. Updating process is completely analogous to the process of installing new maps.
Fig. 29
Note: when you update your navigation program it will be
disabled until the end of the installation process. On some
devices you may need to run the Navitel Navigator software
manually.
5.3.4. Help
Fig. 30
With this menu opens a Quick Start Guide for Navitel.
Fig. 31
25
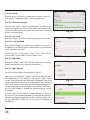
5.4. Settings
“Settings” menu (Fig. 32) contains some functions and program main settings. Color and type of some icons may
depend on function status and current Skin-file. Also icon’s
color on the “Map” page depends on the interface settings.
5.4.1. Map
This menu (Fig. 33) contains various map view settings.
Most of these settings manage the quality of objects on the
map.
Fig. 32
5.4.1.1. Top of the map
«Map’s north is on top» -the top of the map always will be
focused on North;
«Rotate map with movement» - top of the map will point on
traffic direction.
5.4.1.2. Automatic zoom
Parameters of scale are set depending on the environment
and the speed (Fig. 34).
Fig. 33
«Used scales» - select the scale interval. It will be used in
automatic scaling.
«Preferred zoom» - select the operating mode of automatic scaling: higher or lower detalization.
Function “Automatic zoom” can be turned off, and if it’s not active the scale can be changed only manually.
5.4.1.3. Visual effects
Visual effects (Fig. 35) improve the map display, but time of
its rendering may increase.
Following visual effects are available:
• Object border smoothing;
• Smooth motion;
• Smooth zoom.
You can change this settings by switching “On / Off” button.
“3D models” - specify zoom level for the three-dimensional models.
5.4.1.4.Detail level
Here you can set the detailizaiton of the map by chossing from:
1.Custom
2. Very low
26
Fig. 34
3. Low
4.Medium
5. High
6. Max
5.4.1.5. Draw models from
Here you can set the value of the scale on which 3D models
will be visible.
5.4.1.6. Map tilt
Fig. 35
This menu item is used to set the degree of inclination of the
maps while viewing it in panoramic (3D) mode. To change
the setting, move the switch to the left (minimum slope) or
right (maximum slope).
5.4.1.7. Reset position
If the map is moved while navigating, this function returns
you to the current location after specified amount of time
(Fig. 36). Following values are available: 5 seconds, 10 seconds, 15 seconds, 20 seconds and “Never” (Off).
Fig. 36
5.4.2. Other maps
Atlas is a set of maps, which is one of the major components
of the system. Selecting this menu item opens a window
(Fig. 37), where you can create atlas or manage existing
one. If you have the atlas, its name will be displayed in this
window.
Click on the map to open it. Note: all other atlases in this
case will be closed (Fig. 38).
To remove the Atlas press “Edit”, then delete it. When you finish press “Done”.
Fig. 37
5.4.3. Navigation
The navigation system and a route settings (Fig.39).
5.4.3.1. Vehicle
The function allows you to optimize a system according to
vehicle being used for the navigation. Press the green arrow
in the right side of the screen to choose an option (Fig. 40):
Pedestrian; Bicycle; Car/Motorcycle; Taxi; Bus; Emergency;
Delivery; Truck.
Fig. 38
«Route» - choose routing method: “Route on roads” or “Route on direct line”
«Choose a road» - system prefers a quick or a short way.
27
5.4.3.2. Avoid
Choose items you want to avoid when routing: «U-turns»,
«Toll roads», «Unpaved roads», «Ferry connections».
5.4.3.3. Guidance prompt
Set the time when system should inform you about the
upcoming manoeuvre (Fig. 41).The button can be set in the
range from «More distance» (the maximum time) to «Less distance» (minimum time).
Fig. 39
5.4.3.4. Off-route
You can set the sensitivity of the withdrawal from the route.
5.4.3.5. Lock on Road
This function allows you to draw your location to the route, if
the quality of the GPS signal has decreased or you decided
to go around an obstacle.
Variants of sets: «Don’t lock»; closer 20 m; closer 50 m;
closer 100 m; closer 200 m; closer 500m; Auto.
Fig. 40
5.4.4. Interface
Interface settings menu (Fig. 40) will allow you to use the
«Map» page and all of its elements effectively.
5.4.4.1. Map buttons
You can set the display of each button (Fig. 41).
Near each icon placed a symbol, that can be different colors depending on the setting of the button. Green color
means that the button will be always displayed. Grey color
means that the button will not be displayed. Half painted in
green color means, that under certain conditions button will
not be displayed on the map page. By clicking on the symbol you may disable or enable the display buttons on the
map page.
Fig. 41
In the left part of each field is a setting button (“+” sign). If
you click on it the advanced settings menu will be opened,
the item is displayed depending on the current function status (Fig. 60). Click on the icon to turn on/off the display of
the buttons.
Fig. 42
28
5.4.4.2. Skin
In the «Navitel Navigator» you can change the configuration
of the program by installing additional theme (skin files):
Day and Night.
5.4.4.3. Hide buttons
The “Hide button” (Fig. 43) - determines how long after the
last user activity will be lost of the button “Cursor” and
“Save”, as well as button “Menu” and “Compass”, “GPS”,
etc.
Fig. 43
5.4.4.4. Hide menu
«Hide menu» - determines how long after last activity Navitel Navigator switches to the Map page.
5.4.4.5.Show scroll bar
In this menu item you can turn on/off the display of scroll bars on the right side of the screen.
29
5.4.5. POI filter
Setting up the display of infrastructure objects on the map
(Fig. 44).
Infrastructure objects icons are classified into different
groups: “Auto”, “Food”, “Shopping”, “Entertainments”,
“Transport”, “Banks/Financial” and etc. By choosing “+” in
the left part of the group, you can open a list of subgroups
(Fig. 45).
Fig. 44
In the left part of each group and subgroup is the symbol that
indicates whether the group displays or not. If the symbol is
painted in green color - this means that the group is
enabled, half-painted in green- some of its subgroups are
included, and some not. In case, if the group is turned off
completely, the symbol will be grey. By clicking on this symbol, you can enable/disable the display on the map all of the
icons of the corresponding group.
In the right part of each group is a setup button. By clicking
on it displays page with additional settings (46):
Fig. 45
• “Turn off all” - turn off the display of all components of the
given group/subgroup.
• “Seen on scales” - lower and upper limits of the scale. You
can set icons displaying of this group on the map;
• “Labels seen on scales” (Fig. 47) - noting the subitem
“Show title POI” you can select the maximum zoom, which
will be displaying not only the icons of the group, but also
the name of each icon;
• “Restore defaults” - back to the standard (default) values.
Fig. 46
With the help of first group “All types” settings you can set all
the icons of the POI. This filter works as the limiter. For
example, using it you can turn off the display of icon names.
But to display all names it is necessary to install the appropriate mark in the settings of each group.
Fig. 47
30
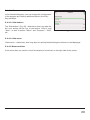
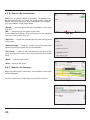
5.4.6. Online services
5.4.6.1. Traffic jams
«Use jams for automatic routing» - if this function is activated, traffic situation will be taken into account
during the route setup;
«Show jams on map» - when this function is enabled, traffic jams are shown on the map as different
colored lines ;
«Connection with Internet» - to update the information about traffic jams Internet connection must be
established. This function manages the system access to the Internet.
5.4.6.2. Weather
This page (Fig. 48) allows you to setup the «Weather» service.
- Automatically (weather information is updated by system);
- Manually (manual downloading weather information).
“Show weather on the map” - if you select this menu item,
on a small scale on the map will display the weather in settlements.
5.4.6.3. Communication
“Allow Navitel.SMS receipt” — mark this item to receive
SMS-messages from other users;
Fig. 48
“Show Navitel.SMS pop-up window automatically” — if
the function is activated there is a window on the display, notifying about received SMS messages. To
display this window it’s necessary to click on the symbol in the upper part of the map screen.
Enable events displaying
In this menu, you can switch on the display of events on the roads. For more details, see item
“Navitel.Events”.
Enable downloading up to date POI information via the
Internet
Some points of the POI are dynamically loadable information: for the gas station it is the price of gasoline, for cinemas
- showtimes, etc. Turn on this feature when viewing detailed
information about the point you can see this data. A full list of
partners can be found in the section “Partners” at www.navitel.ru.
Updates
Fig. 49
Update settings.
Friends settings.
Turn on/turn off Navitel.Friends
See chapter 8.9
31
5.4.7. Alerts
The voice and visual warnings settings (Fig. 49).
5.4.7.1. Speed limits
Speed limits alert when overspeed on specific road section.
«Enable sound allert» - this function turns off the sound
when you are close to the speedcams, railways and manmade unevenness of the road.
You can also select the type of alert tone: «Voice alert» or
«Signal alert».
It is also possible to set the type of audible and visual warning: «Do not notify», «Always notify», «Overspeed to 0 km/h
10 km/h and 20 km/h,..., 100 km/h».
Fig.50
5.4.7.2. Speed cams
The camera will warn you about the radar, dangerous intersections, speed bumps and pedestrian crossings (Fig. 50).
«Enable sound alerts» - this function turns off the sound
when you are close to the speedcams, radars and road
humps.
You can also select the type of alert tone: «Notify voice» or
«Alert signal.»
It is also possible to set the type of audible and visual warning: «Do not allert», «Always alert», «Overspeed is 0 km/h 10
km/h and 20 km/h,..., 100 km/h» (Fig. 51).
Fig. 51
5.4.7.3. Traffic lanes
«Show traffic lanes» - sets up the display of traffic lanes,
with information about maneuvers at the next intersection.
5.4.8.Regional settings
On page «Regional settings» user can select the language
of the program interface, the voice sound (audio), keyboard
layout, as well as the units of measurement (Fig. 52).
5.4.8.1 Interface language
Select the program interface language.
Fig. 52
5.4.8.2. Map language
Select the language of the map (Fig. 52). The program interface language is set by default. If the map
32
does not support some of languages the program will use language of the country, which map is active
at the moment.
5.4.8.3 Voice
Voice settings, using which the program informs you about different events. You can change the voice
package, clicking on the green arrow in the right part of the field and choosing a different package from
the list that appears.
Additional voice packages you can download on page http://www.navitel.ru/downloads/voice_packets.
Extract the contents of the archive into the folder with the program in the directory \wav\ or in
\NavitelContent\Voices\ on the memory card. The folder
name must begin with “0409 AC” for English and “0419 AC”
for the Russian.
Also you can download additional voice packets from Navitel
by choosing
5.4.8.4 Keyboard
This menu is for setting the keyboard layout and selection of
supported languages when typing text.
«Keyboard layout» - type of keyboard layout, that appears
on the display when you click on the text input window .
Fig. 53
Available keyboard languages:
• QWERTY v1 - classic keyboard layout used on home PC
(Fig. 53). The first letters in the top row, if you read from left
to right, are «qwerty» in the English version, additional buttons are located on the right part of the screen;
• QWERTY v2 - letters are similar to the first option, the layout is changed only in vertical orientation of the screen (Fig.
54);
• QWERTY v3 - letters are similar to the first option, but
additional keys are in the lower part of the display;
• ABCD - the letters are arranged in alphabetical order, from
left to right (Fig. 55).
FIg. 54
• Use cellular layout for search - similar to the layout of a
mobile phone, where each number corresponds to a few letters.
5.4.8.5 Measurement units
On this page you can select the units of measurement of
coordinates, azimuth length/speed, height/depth, size, and
format of the address. Click on the arrow next to the field to
open a list of possible options.
Fig. 55
«Keyboard languages» - there is a button switching
between languages when you click on that will switch the languages available on the keyboard. Check
33
the settings of those languages, which will be included in this sequence (Fig. 56).
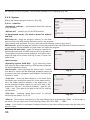
5.4.9. System
Setting up General program functions (Fig. 56).
5.4.9.1. Satellites
«Autodetect settings» - automatically detect the settings
of the program.
“GPS on/off” - switches on/off the GPS-receiver.
«In background mode» (for devices based on Android
and iOS)
Fig. 56
GPS keep on - when the program switches to the background mode, the GPS receiver will be turned on: the program
will continue route guidance, the jams, even without displaying a map on the screen.
GPS turn off - when the program switches to the background mode, the GPS receiver will be turned off
to save energy. Route guidance resumes when you open the program.
GPS keep on with route - when the program switches to
the background mode, the GPS receiver will stay turned on.
The program will continue route guidance, even without displaying a map on the screen, but only in case, if there is an
active route.
«Data sources»
«Operating system (GPS API)» - if you select this menu
item, data for the correct working of GPS receiver will be put
out by the operating system.
«Demo track» - when selecting the «Demo track», information about its options will be displayed: playback speed, the
moment of the start of playback and «Repeat» if the relevant
function is active.
Fig. 57
«Track file» - select the demonstration of the track. Click
the field to open a selection menu file. In the upper-left corner is the folder selection window, in the upper right - file
format selection window, where you can set a filter of displayed files: “All sizes” (the filter is disabled), *.gpx file *.plt,
*.gdb, *.mps. Then specify the path to the file, by clicking
on the folder.
«Play rate» - playback speed demo track: 1x (without
increasing the speed), 2x, 4x, 8x.
Fig. 58
«Start at» - the moment of beginning of the track. Measured as a percentage (100% - all the length of
the track). You can select one of the following values: 0%, 10%, 20%, ..., 100%
«Loop» - if this function is activated, the demonstration of the tracks will begin again after the end of the
previous cycle.
34
Record low-level data sent to or received from the GPS
receiver to \gps_log.txt - turn on/off the record.
5.4.9.2. Time
Menu allows you to setup the time in the program «Navitel
Navigator».
“Update time zone automatically” - if this function is
switched on, the time zone will update automatically (Fig
60).
Fig. 59
5.4.9.3. Power
This menu allows managing the power settings (Fig. 60).
“Keep power on while the application is active” despite the system settings, with the active “Navitel
Navigator” device will not switch to the sleep mode;
“Keep screen backlight on while the application is
active” - similar to the previous paragraph, but in this case
the backlight will not turn off (for devices baced on Android
, Windows Mobile and Windows Phone).
“Turn off GPS in sleep mode” - when device is switched
to a sleep mode, GPS will be turned off.
Fig. 60
5.4.9.4. Sound
This menu allows to set the sound in Navitel Navigator (Fig
60).
«Turn off sound» - this function is intended for switching off
the sound of the program;
«Keep volume» - when this function is switched on the volume level in the program will comply with the system settings. Otherwise, the speaker volume can be set independently.
Fig. 61
«Sound stream» (for devices with Android)- chose a
sound stream : Music stream, System stream, Alarm stream, Notification stream, Ring stream (Fig. 61).
Sound mode (only for devices based on iOS):
«Pause sound» - if there is playing an audio on you device and the route is active this setup will allow
you to stop the sound while the Navitel voice prompts.
«Muffle sound» - similar to the previous paragraph when you turn on the voice prompts, sound will be
muffled.
35
5.4.9.5. Quit prompt (function is unavailable for
devices based on iOS)
Setting the function “Quit prompt”. If you selected item
“Don’t ask”, then if you press the “Quit” button program will
switch off immediately. Otherwise, if you press the “Quit”
button you will see the clarifying question.
5.4.9.6. Folder settings
FIg. 62
“Download folder”- use this menu item (Fig. 61) to set the
folder where the temporary files are stored. By default it is
\NavitelContent\Download\ at the storage card.
“Maps folder”- use this menu item (Fig. 61) to set the folder
where the official maps are stored. By default it is
\NavitelContent\Maps\ in the storage card.
5.4.10. Dashboard
See the “Dashboard” page.
FIg. 63
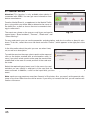
5.4.11. Profiles
In this menu item (Fig. 62) you can create program’s configuration profiles and switch between them quickly. Profile
saves all program settings.
“Reset” — the function is intended to return all system settings to the default values. After choosing this item the program will automatically restart.
“Add” — saves the current profile settings.
“Edit” — access to the delete menu and editing the names of
the items;
Fig. 64
When you click on existing profile of a pop-up menu with the
following items (Fig. 63):
“Load” — apply the settings of the selected profile to the
current program state;
“Save” — saves the current settings of the program in the
selected profile.
5.4.12. Tracks
Fig. 65
In this menu item, the user of a program «Navitel Navigator» will be able to set options recording his
36
route (Fig. 64)
5.4.12.1. Track record
If necessary, activate a track recording.
5.4.12.2. Track format
To select the recording format of tracks, select the appropriate item in the menu.
5.4.12.3. Show latests 10 000 track points - shows last
10 000 track points of the recorded track.
5.4.12.4. Track’s folder
To select a directory, where the tracks will record, select it in
the directory field and press the OK button (Fig. 64).
Fig. 66
6. Functional options
6.1. Routes
The route can be created from your location to any other
point, which can be set in menu “Find”, chosen in “History”
and in list “Favorite” and also shown on map.
«Go!» — in route guidance mode this button routes from
first point of the existing route to the selected point (all
points between them will be deleted).
«Properties» — properties of the selected point. When you
Fig. 67
press the button additional information appears.
«Set start» - the point is becoming the start of the current route, the GPS-receiver when it is necessary
to disable.
«Route through» — add point to existing route. The last
added point(when you add few of them) will become the second (after the first point or current position) priority point on
this route.
«Set finish» — point is added in the end of the route as it’s
continuation.
«Copy» - copies the coordinates of the selected point.
«SMS-button» - using this button you can send coordinates
of the point.
6.1.1. Autorouting
Fig. 68
To set the route automatically from your current position, tap
on map and in appeared menu choose “Cursor”, and then “Go!” (Fig. 68). Pay attention: on maps, that
do not contain information to set routes, the route will look like a direct line of green color, connecting
your location and the point of destination, ignoring all the buildings, roads, etc.
6.1.2. Route creation after searching results
Go to the «Search» menu, find the required object, that you want to route through, click on it and in
appeared menu select «Go». When you click on the “Information about the object” will appear button
«Route through» - add a point between two points of an existing route, it will become the second route
point, and «Set finish» - the point is added to the end of the route, continuing it. Both of these buttons
are only available in case, when there is an established route on the map.
37
6.1.3. Manual route creation
To create a route, click on the map to create the first route point. At the bottom of the screen select
“Cursor”, in “Properties” - the “Set start”. Then find the final
point of the route and press button «Cursor» - «Go!». If map
contains information for automatic routing, the route will be
created on the basis of this data, and will be the shortest by
the time or the distance. Otherwise, the route will connect
the points of a route using straight lines.
6.1.4. Edit route
Click on the maneuver sign to edit the route. The context
menu that appears when you click, contains the basic commands for route editing (Fig. 69).
Fig. 69
«Stop route guidance» — delete the route from the map
and stop routing.
«Avoid» — when moving along the active route this menu
item specifies the program that from the current location on
the route there is no possibility to move further. The program
analyzes the situation and looking for alternative, less time
route. When the system is off, this item is not available.
«Go next via point» — press this button to get to the next
point of the route, if you suddenly passed the current point.
Fig. 70
«Demo route» — this menu item is only available when you
turn off the GPS. Using this menu item you can see the route, turns on the route and some rough information on the route. Full demonstration allows you to pre-identify hazardous or adverse parts of the
route and re-route if it is necessary.
«Show route» - displays the route fit in the screen of the
device.
Also editing the route can be made using the intermediate
points. When the route is active, tap anywhere on the map to
create a point. Then tap «Cursor», and select the arrow in
the right bottom part of the screen, after you will see a button «Go», «Stop», «Continue», «Start», and also get the
opportunity to copy the coordinates of the object.
6.1.5. Route properties
Fig. 71
The program allows to work with the route. Go to the «Route»
(Fig. 71).
On top of the page the total length of the route is indicated. In the bottom of the page are buttons, which
allow you to import and export the route. The settings of «Edit route», «Route plan», «Show route»,
«Avoid», «Demo route» and «Export»are available only when the route is active.
In menu “Route plan” points of the route are displayed.
38
6.2. Tracks
There is a recording track option in Navitel (Fig. 72). This
function is called «Record track» and it can be turned on/off
in «Menu»->«Settings»->«Tracks», or by pressing button on
the toolbar. This function is available only with satellites
switched on.
6.3. Waypoints
Waypoints allow you to mark places with chosen coordinates. They help to orientate better and mark interesting for
you places. The point can be created manually. They are
automatically named with sequence numbers in 3D format.
Fig. 72
To create a waypoint, click on the required location on the map. A green cursor will appear. Then in the
bottom of the screen press «Save».
Waypoint tipes are divided into groups (for example: services, buildings, transport, etc.) to simplify the
search for the required type of point. To choose the correct type of waypoint, click on the icon with the
current type.
A list of all the waypoints can be seen in the «Search» menu
, item «Waypoints». On this page you can work with points:
add a point, delete all points, export and import points using
the button (context menu) at the bottom of the screen.
To delete waypoint choose “Edit” in the upper-right corner.
To export waypoints go to «Waypoints» menu and select the
item «Export». Window with the list of files will open. All of the
waypoints are exported to the selected folder.
To import waypoints take the same steps. After the waypoints
import appears a window, informing about the number of
imported points.
Fig. 73
If you click on the waypoint’s name, window “My route” will
open and you will see you location on map.
If you select “Go!”, then program will route to this point.
Also you can click on the grey arrow on the right side of the
screen to open the “Properties” window, where you can
make the waypoint start, middle or finish point.
Fig. 74
39
6.4. Traffic jams
Attention! This function is available only when the GPRS is
turned on. Information about it is available on your device,
you can get it from the manufacturer.
With the service “Navitel.Traffic jams” from the company
Navitel, the device allows you to download the information
about traffic jams on the whole territory of Russia, as well as
on the roads of Ukraine and other countries, which official
maps are maps from Navitel.
Fig. 75
Traffic jams from Navitel are in the «Settings»->«Online services»->«Traffic Jams», and for further use of the service no
additional data is required (Fig. 75).
Traffic information is available 24 hours a day. The program
supports the traffic jams service through GPRS for free.
The service corresponds to the sign, which is displayed in
the upper part of the display. It can be three colors: green
(there are traffic jams, updated), yellow (there are traffic
jams, but they are outdated) and red (no connection.). If the
fields «Use for routing» and «Show on map»
are not selected, a sign of traffic jams will be grey.
Fig. 76
Traffic jams are displayed on the screen of the device by different colors depending on the difficulty of
traffic. On the main highways of the city depending on the speed different colors are displayed:
• Red - traffic jam;
• Orange - traffic is bad;
• Yellow - traffic is a bit difficult;
• Green - normal traffic.
In addition, the status depends on the total road congestion of the nearby highways, on the work of traffic lights, on repair work, on the presence of emergency areas, traffic accidents and other factors affecting the intensity of the movement. Also, when the function «Use autorouting»is turned on, information
about the road situation will be taken into account in the autorouting. Route set with the account of traffic jams may be a bit longer, but you will be moving by less loaded routes (according to the information
of the system Navitel). An optimal route takes into account the maximum possible speed on the various
sections of the road, and your choice in the route settings - the lowest on time or shortest route.
40
6.5. Find
This program implements the search of all sorts of the
objects on the map according to different conditions (Fig.
77).Found object can be looked through and also can be
added to the route different ways. Specifying search conditions is made by using the keyboard pre-selected in the settings. The keyboard can be hidden or displayed by clicking
the button in the upper-right corner of the screen.
In some types of search when typing the name of the searching information by using the keyboard, number of matching
the search conditions objects will be displayed next to the
current typed name. The keyboard will be automatically hidden when the number of entire objects fits the page. Click
on the required object when you choose it from the list. If
you made a mistake in typing press the “Backspace” button
to return.
Fig. 77
6.5.1. Search «By address»
• Select country
There are four buttons at the top of the search page (Fig.
78): “[Select a Country]”, “[Select a City]”, “[Select a
Fig. 78
Street]” and “[Select a Building]”. Selecting a city, street and
building or crossroad is not available until you select a country, city or street, respectively.
Select required country from the list using the keyboard. If
you don’t need the keyboard it can be hidden by using the
button located in the upper-corner of the screen. The keyboard will be automatically hidden when the number of
selected countries covers up the whole page. For selecting
the country from the list click on it. The item “[Select a City]”
will become active.
• Select city
City selection is similar to country selection. Start typing the
name of the city and choose it from the list (Fig. 79).
Fig. 79
• Select street
Using keyboard type the street name where the required
object is located. As you type on the list will be left only those
street names that are suitable for the search terms. Also
possible following letters of the street name will be highlighted on the keyboard. When there will be left as many as it is
possible street names fitting the page, the keyboard will be
hidden automatically and you will be able to select required
street from the list (Fig. 80).
Fig. 80
41
• Select building
Similar to typing the street name, type the building number.
For going one step back click on the button placed in the
lower left corner. In case you want to find an intersection
instead of building you can skip this step and move on to the
next menu item.
• Select intersection
After selecting the street that is a part of a required intersection you can begin search of the intersection. Intersection
searching menu (Fig. 82) is similar to the street searching
menu except that the number of source data is less. So if
you don’t know the correct name of the crossing road you
can hide the keyboard by clicking on its icon at the upperright screen corner and manually scroll through the list.
Fig. 81
• Result
After the object is found you can see its location on the map
and you can continue the route to the object (Fig. 82). Also
if you enabled the route guidance while searching (that is
the route on the map has been created), found object can
be included in the route as one of the middle points. For this
purpose click on the object name and select one of the following: “Rought through” - the object will be inserted
between two route points becoming the second route point,
or “Finish” - and the object will be added to the end of the
route.
Fig. 82
6.5.2.Search «Nearest places»
Search nearest to the specified point objects is also can be made in a several steps. In addition to object
types here is also a history of the nearest objects search.
• Select reference point
When searching the nearest points the reference point is the most important search term. Reference
point is the point in relation to which the closest objects of the selected objects types will be searched.
On the page (Fig. 83) you will see the following reference
points: “Current location” – search the nearest to your current location (active when sattelites are switched on),
“Cursor” – current position on the map is taken as the starting point of the distance, “Postal address” – search the
nearest to the specified address, “By route” – search for the
points those are near to the route, “Finish” – search for the
nearest to the end of the route point objects, “History” – one
of the objects from the general searching history can be
chosen as a reference point,
Fig. 83
42
• Search for a specific object
After selecting the object category the page with all required
and sorted by the distance increasing to the reference point
objects will open.
• Result
After the object is found, you can see its location on the map
and the route up to it. Also, as in other types of search, add
the object to the route and drop the object, if route guidance
is enabled (Fig. 84).
Fig. 84
6.5.3. Search “Friends”
Using this menu item you can find your friend’s location and
route to meet them. You need to select your friend from he
list and tap on it’s name (Fig.87). Page with friend’s location
will open. You can choose “GO” button to see the route to
your friend (Fig. 87).
Fig. 85
6.5.3. Search «Waypoints»
This search contains a list of all the waypoints using which
you can search objects (Fig. 85). The waypoints search is
implemented using the title. Except the name of the waypoint in the search results list displays the distance to it. You
can set route through the waypoint or find it on the map. You
can also edit the waypoint from this menu, delete the selected point or all the waypoints,send its coordinates in
Navitel.SMS, export and import.
6.5.4. History
Fig. 86
All objects ever found using any types of search (Fig. 89). In
this type of search objects are sorted by date of search,
later found objects are at the top. You can remove items
from this list, if you are sure, that you will no longer use
them.
6.5.5. Favorite
Find the most frequently used in search objects.
As opposed to search «History», objects in this search are
sorted
by the number of uses, and not by the date of last use.
Fig. 87
43
6.5.6. Search «By coordinates»
Search for a specific object coordinates. Coordinates can
be entered manually, or insert the ready-made, using the
button «Paste» on the right, after saving them in the properties of the object on the page «Map».
«Result» — show the point with the coordinates on the map
(Fig. 91);
«Go» — autorouting to this point of the route;
To view additional options, click on the arrow in the right bottom part of the screen (Fig. 91):
Fig. 88
«Set start» — check the selected point as the starting point
of the route;
«Route through» — if there is a route, it re-routes taking into
account passing the point with the coordinates;
«Set finish» — mark on the map becomes the end of the
route. And previous end of the route becomes the middle
point.
Fig. 89
«Back» — return to the menu;
«Map» - return to the map.
6.5.7. Search «On the map»
When you choose this menu item, current place on the map
will be displayed.
You can route to this location by choosing “Go!” button.
Fig. 90
Fig. 91
44
6.6. Navitel talks
Function Navitel talks makes possible coordinates
exchange between users to identify the current locations of
each other, as well as send coordinates of any object (Fig.
92).
There are two types of SMS-messages: sending your coordinates - “I'm here”; and the requesting other user’s coordinates “Where are you?”. To send the message, press the
button at the bottom of the screen. Clicking on this menu
item opens a window with fields (Fig. 93). Here you can enter
information such as the number of the recipient, name,
description and coordinates. Dialing by using the keyboard.
Fig. 92
Fig. 93
45
6.7 Navitel.Events
Attention! This function is only available when device is
connected with GPRS. You can get more information from
device manufacturer.
Function Navitel.Event is a supplement to the Navitel.Traffic
jams, using which you will be able to determine the cause of
the traffic jam, as well as choose the most convenient strategy to overcome it.
The events are shown on the map as small signs and can be
several types: “Road accident”, “Camera”, “Road work” and
“Other warnings”.
Fig. 94
For any road events you can see the properties and description, and also to confirm or deny his existence. To do this, select the cursor the event and click “Events”, which appears in the right part of the
screen.
In the information about the point you can see when it was
set, as well as a description.
To mark the event on the map, select a point on the map and
click on the button marked with an exclamation mark. In
case, if you don't select a point on the map, the event will be
established in the area of current position of the card near
the scale.
Select the required type of event, and, in the case of a road
Fig. 95
accident you can specify in what part of the road that the
event occurred. In addition, a click on the input field, you can enter your own text description of the
event.
Note: each user may create no more than 3 events in 10 minutes. Also, you cann’t set the event at a distance of less than 100m from the similar events. If you will try to increase the limit, you will receive notification of the error.
46
6.8. Navitel.Friends
New interactive service «Navitel.Friends» allows you to find
your friend’s location on the map in real time, to share your
geographic location with friends, exchange messages or
make a route to meet them.
6.8.1. «Navitel.Friends» account.
To use functions of « Navitel.Friends » you have to register
on the Web-site www.navitel.ru. Also you should have at
least one device with the installed Navitel Navigator program
Fig. 96
with an activated license key. This device should be added in
the section "My devices" in your "Private area" on the Web-site.
If you do not have an account on the website www.navitel.ru or your device is not added in "Private area",
when you switch on your device, service «Navitel.Friends» will offer you a quick registration (Fig.96).
When you choose the registration option, you have an opportunity to choose one of the two variants:
register a new account or register a new device (using an existing account).
6.8.1.1. Register new account
1.In "Register" window choose " Register new account"
(Fig.97).
2.Enter Login.
3.Enter Password and repeat it in "Verify" field.
4.Enter the name of your device.
5.After you fill in all the fields on the "Register" page, click in
the upper right corner "OK" (or click "Register" at the bottom of the page) (Fig. 98).
Fig. 97
6.If registration was successful, you will see the message " CONGRATULATION! Congratulations!
Registration succeeded".
After the registration succeed, user can work with "Navitel.Friends" service.
To delete your device and change (restore) your login password you have to login on the web-site and
in "Profile" – "E-mail change" enter your E-mail.
You will receive the confirmation on specified E-mail.
6.8.1.2. Register new device
To register a new device on the existing account in the login
window select "Register new device".
Enter login and password in appropriate fields, then enter
the name of the device that you want to register.
If registration was successful, you will see the message "
CONGRATULATION! Registration succeeded"
Fig. 98
47
6.8.2. Using «Navitel.Friends»
6.8.2.1. Login «Navitel.Friends»
Login can be done in two ways:
1.Menu – Settings – Online services – Enable
Navitel.Friends service (Fig. 117).
Switch on the service and enter your login and password.
Before clicking OK, you can enable the option "Remember
password" in order to not enter it when you turn on the service.
Fig. 99
2.Click on the icon at "Map" page on the toolbar на and choose the item "Turn on" (Fig. 99).
If the authorization fails, the program will report the error and again will open the same window. To forget the stored password, you can use the button "Forgot
password" in the settings of the service.
6.8.2.2. Menu "Navitel.Friends"
You can use "Navitel.Friends" clicking the button on the toolbar of the "Map" page (Fig.100). When you click the icon you
will see a pop-up menu with the following buttons:
1.Turn on/Turn off.
2.Friends.
3.Find friends.
Fig. 100
4.Friendship request.
5.Settings.
6.Cancel.
Buttons "Friends ", "Find friends" and "Friendship request" are available only when you are authorized.
6.8.2.3. Friendship request
To find a friend in pop-up menu you should select the button
"Find friends" and enter your friend's login (keyboard case
is not taken into account) and click OK.
You will see the information about user with chosen login.
To add a friend click the button at the button "Send
request"(Fig.101).
After sending the request you can cancel it by pressing the
button "Cancel the request". In this case the request disappear on both sides.
Fig. 101
You can see sent and received requests in menu "Friendship request" (Fig. 102).
After you sent a request your friend will receive a notification and will be able to accept the request.
When your friend has accepted the request, you'll see message "Accepted requests" in menu
"Friendship request"( Fig. 103).
48
Creating requests is limited to the following criteria: you may
not offer friendship to more than 10 users for the last 10
hours, can not re-offer the friendship to a man, who has
already rejected your request. However, if this person will
offer you friendship, then you will be able to offer him friendship again.
Sent request will be relevant until it is closed: either person
will agree, or refuse, or you cancel the request. Until then the
request will be opened.
Fig. 102
6.8.2.4.Friends list
When your friend has accepted the request you can see
information about him/her at "Friends" menu (Fig 104).
There is brief information about your friends in the list:
user's name, avatar, current location and time of the update,
your friend's status.
There is an opportunity of the fast search by first letters of
the name.
6.8.2.5.Friend's profile
Fig. 103
When you click on your friend's login opens Friend's profile,
which contains full information and a set of actions in relation to this friend:
1. General information about friend: avatar and status
(avatar's color: green - if user is active, grey - if inactive).
When you click on the line of general information opens a
complete list of attributes of your friend's account, including
contacts: phone number, address, etc. Also it is possible to
change the name of a friend (this name will only appear in
your list) when you press the “Edit” next to the name (Fig.
Fig. 104
105).
2. Location: when you click on this item you move on the
map to the specified location. When this mode is switched
on the tracking becomes active, i.e. if your friend moves the
screen will move after him/her. As soon as you will reform
some action (clicking on the map screen, including approximation/delete), following mode is canceled.
3. Message: the last message from the conversation with a
friend. When you click on a Message opens conversations
(chat) with a friend.
4. Device( Fig. 106): the list of your friend's devices. When
Fig. 105
you open this item you will see dialogs with the locations of all
devices and their locations on the map.
5. The current setting of your privacy. When you click the "Privacy" you can set new privacy mode.
6. The opportunity to break the friendship.
49
6.8.2.6. Privacy
In "Navitel.Friends" service you can set privacy. This is a
mode for sharing your location with a friend.
You can set the same privacy for all of your friends or individually. To set the same privacy for all your friends you need to
click the "Navitel.Friends" icon on the toolbar, choose
"Settings" – "Privacy settings" (Fig.107).
For individual privacy settings you need in "Privacy settings"
click on your friend's name and choose the option, or in
"Friend's profile" select "Privacy" and choose the required.
Fig. 106
You can set privacy only for the current device.
There are three types of privacy:
1. Share my exact location. Friends can see an exact point
where the device is, as well as its status (online/offline).
2. Share rough location. Friends see a city where the device
is, as well as the status of your friend. In this case the exact
position of the device is attracted to the nearest big city and
is displayed in the center of it.
3. Do not share my location. Friends don't see your device
on the map, and do not see its status.
6.8.2.7. Settings
Fig. 107
"Navitel.Friends" has some additional settings, available from the "Navitel.Friends" menu and from the
main menu (Menu – Settings – Online services – Friends settings).
1.Enable "Navitel.Friends" service: turn on/off.
2.Profile (Fig.108): your profile, where you can edit information about yourself. All the data will be visible to users in the
search, as well as after adding you as a friend (in profile).
3.Forget password: it's active if you previously saved your
password. When you select this item, the program will show
the message that you will have to enter the password at the
next login.
4.Privacy settings: please refer to the paragraph "Privacy".
Fig. 108
5.Don't show users in offline mode: when the setting is
enabled, offline friends are not displayed on the map.
6.The frequency of the location data exchange (Fig.109). The higher the frequency, the faster will be
updated friends' location and the user's location. At the same time, with increasing frequency increases
network traffic (traffic payment is carried out according to the tariffs of your provider). The default frequency is set as 10 seconds.
50
7. A privacy mode for new friends: privacy in relation to new
friends, by default. In the case of setting any privacy (except
the “Define individually”) privacy in relation to new friend is
automatically set to selected mode. If you have set in this
menu "Define individually" on the button Friends (as well as
on the dialogue between the requests for friendship) will be
the numerical indicator (1), which means that you need to
define privacy in relation to the new friend (information will
be duplicated in the dialog requests for friendship). The
location of the device will be hidden from your friend until the
user defines the mode of privacy.
Fig. 109
8. Your location in the service "Navitel.Friends": defines the
source of the positions in the service of friends: either GPS
sensor, or position selected manually (Fig. 110).
6.8.2.8. "Navitel.Chat"
Having access to the service "Navitel.Friends", the user has
the opportunity to exchange personal messages with
friends. For this you need to open a chat (opens the icon
"Navitel.SMS") and create a new chat, clicking on the button "Create new talk" in the bottom of the screen, then
Fig. 110
"Create Navitel.Friends talk" and selecting friend.
Messages are sorted in order of decreasing the time of the last message. Thus, the recent talks will be
in the beginning of the list. Unread messages are determined by the green indicator in the upper-right
corner of the avatars.
6.8.2.9. Talks
In the talk with friend displays all incoming and outgoing messages, sorted by date from the top down in
ascending order. On the left on a white background is displayed your friend's messages, on the right on
a gray background – you messages.
Messages on one side are grouped according to the time between sending messages no more than 10
minutes. When you scroll the history, the program requests the server old messages, which are automatically added to the talk list.
To send new message you have to open the keyboard, enter your message and click the button "Send".
The message which is in the process of sending displayed in orange color. The message that has failed
to send and will be displayed in red. By clicking on the message that is not sent successfully, the user is
sending the message again.
In talks there is a possibility to send the different locations types. To attach the location to message, click
on the button “Attach” and select the desired position. When you click on a message with the location
map shows you the specified point.
51
6.8.2.10. News displaying
Buttons on the map ("Navitel.SMS", "Navitel.Friends") support the option of displaying the number of
news. In "Navitel.SMS" service it's new messages, in "Navitel. Friends" service it's friends requests and
new friends without unset privacy. In pop-up menu "Navitel.Friends" you can see all the new but sorted
by items(Fig. 111).
6.8.2.11. Friends on the map
On the map displays all your friends' devices (except for those that are offline, if the appropriate setting
is turned on). If a friend is currently online, its icon on the map will be highlighted in green, if offline white. When you click on the icon of your friend opens the
profile.
If friends are too close to each other (the center of one of
the icons hides the other), they are united in one common
icon with the indicator of the number of united devices in the
upper right corner. When you click on this icon opens the list
of the friends that are at this point.
Fig. 111
52
7. Running the program after a crash
If the program was closed incorrectly (for example, a battery of your device was low), during the next run
you will see an after-crash information (Fig. 112).
Fig. 112
In this mode, you can choose one of the following options:
“Start application” – if the software starts in an after-crash mode for the first time, select
this option. In this case, Navitel Navigator will save all your setting, but there is a probability that during
the incorrect stop a mistake appeared, so the Navitel Navigator will work incorrectly. If the software
doesn’t start correctly when you select this option, try one from the options below.
“Restore settings from last successful start” – Navitel Navigator automatically saves all
the user data and settings when it works with no exceptions. You can use them to start
the software after crash. Note, that the last changes, like settings, last places and
favorite lists that were changed during the last work session could be missed.
“Reset all settings – if no of the options above didn’t make Navitel Navigator start correctly, use this
menu item. Note, that History, Favorites lists, all the settings will be missed, but waypoints and
Navitel.SMS will be saved.
If the program doesn’t start after all, please, contact our technical support: [email protected].
53
© 2007 The Join-Stock Company “CNT” . All rights reserved.
The contents of this Guide, as well as any attached demo materials, are the sole proprietorship of the Join Stock Company "CNT". Any commercial usage of this Guide may
be carried out only with written permission from the Join Stock Company "CNT". The
information in this document shall not be changed without prior notice given to the Join
Stock Company "CNT".