1
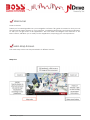
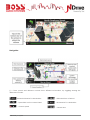
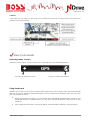
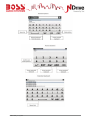
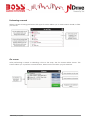
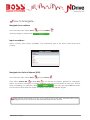
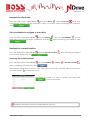
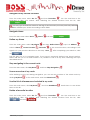
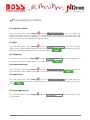
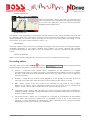
NAVIGATION
USER’S MANUAL
POWERED by
Table of contents
:HOFRPH
0DLQ0DS6FUHHQ
%DVLF&RPPDQGV
([SORULQJPHQXVFUHHQV
8VLQJNH\ERDUGV
3HUIRUPLQJDVHDUFK
*RVFUHHQ
+RZWR1DYLJDWH«
1DYLJDWHWRDQDGGUHVV
,QSXWDQDGGUHVV
1DYLJDWHWRD3RLQWRI,QWHUHVW32,
1DYLJDWHWRD3RVWFRGH
8VHFRRUGLQDWHVWRQDYLJDWHWRDORFDWLRQ
1DYLJDWHWRDUHFHQWORFDWLRQ
6DYHP\IDYRXULWHORFDWLRQV
1DYLJDWHWRP\IDYRULWHORFDWLRQV
1DYLJDWH+RPH
'HILQHP\+RPH
6WRSQDYLJDWLQJLQWKHFXUUHQWURXWH
6HHDQRYHUYLHZRIP\URXWH
6HHWKHOLVWRIDOOPDQHXYHUVLQFOXGHGLQP\URXWH
'HOHWHDIDYRXULWHORFDWLRQ
'HOHWHUHFHQWORFDWLRQV
8VHLWLQHUDULHV
x &UHDWHDQLWLQHUDU\
x &KDQJHDQLWLQHUDU\
x 1DYLJDWHWRDQLWLQHUDU\
0DQDJHDOWHUQDWLYHURXWHV
$YRLGJRLQJWKURXJKVSHFLILFVWUHHWVRUURDGV
)LQGDQDOWHUQDWLYHZKHQWKHUHLVDURDGEORFNDKHDG
&XVWRPL]LQJ<RXU1'ULYH
7KHVSHDNHUYROXPH
7KHOLJKW
7KHODQJXDJH
7KHNH\ERDUGOD\RXW
7KHVSHHGXQLW
7KHPDSDSSHDUDQFH
x /DQH$VVLVWDQFH
x 0DS1RUWK8S
x 7HPSODWHV
x 3RLQWVRI,QWHUHVW
7KHURXWLQJRSWLRQV
6DIHW\RSWLRQV
x 6\VWHPVHWWLQJV
x &RRUGLQDWHV)RUPDW
,PSRUWGDWDWR1'ULYH
([SRUWGDWDIURP1'ULYH
.QRZPRUHDERXWP\VRIWZDUH
*HWWLQJ0RUHRI\RXU1'ULYH
+RZWRJHWQHZPDSVYRLFHVRURWKHUIHDWXUHV
:KDWLV«
6XSSRUW
86(5*8,'(B9B(1*
Welcome!
Dear Customer,
Thank you for selecting NDrive as your navigation software. This guide is created so that you can
find quick and simple answers to your questions, considering both basic and advanced features,
so that you can get more of this application. The new clean and elegant user interface of our
latest version, will allow you to easily use the application, improving your user experience.
Main Map Screen
The main map screen can be presented in 3 different modes:
Map view
USERGUIDE_V11.3_ENG
2
Navigation
(*) – Time, speed and distance controls show different information, by toggling among the
alternative modes:
- Estimated time left to destination
- Estimated time of arrival
- Speed limit on the current street
- Distance left to destination
- Current speed
- Current time
USERGUIDE_V11.3_ENG
3
Context
If you click on any point on the map, the context bar shows up on the bottom and these four
actions can be performed.
Basic Commands
Exploring menu screens
All menu screens show, on top, two buttons which allow for the following actions:
Go back to previous screen
Return to main map screen
Using keyboards
Whenever you want to perform a search, filter results from a list or input data, the keyboard will
appear on screen. Different keyboard layouts can be selected on Settings. Here are some tips
you should keep in mind:
x
When searching for a street, you can simply write the initials, separated by a space, and
results will show up. Example: enter “C P W” and “Central Park West” will show up on the
results list.
x
Start writing the first letters, and results will be automatically updated on the list below.
USERGUIDE_V11.3_ENG
4
USERGUIDE_V11.3_ENG
5
USERGUIDE_V11.3_ENG
6
Performing a search
When a search is being performed, this type of screen allows you to enter search details, to filter
your results.
Go screen
After performing a search or selecting a POI on the map, the Go Screen will be shown. This
screen allows you to perform several actions, based on the location you just selected:
USERGUIDE_V11.3_ENG
7
How to Navigate…
Navigate to an address
From the main menu select Go To
and then Address
.
After inputting the address click
Input an address
Select Country, State (when available), City. Afterwards type in the Street name and house
number.
Navigate to a Point of Interest (POI)
From the main menu select Go To
and then Places
.
Then select Around Me
or In a City
. You will see the Places grouped in categories.
Select the desired category or specific attributes and use the keyboard to filter your search.
After completing your selection, click
. You may also select All and search
for a location name within the entire database; note that this will take longer.
Alternatively, simply click on a POI, or any other point on the map, and then click on the
N
Navigate
button on the bottom bar. See Main Map Screen section.
USERGUIDE_V11.3_ENG
8
Navigate to a Postcode
From the main menu select Go To
and then Places
. Select Postcode
and after
selecting the country, use the keyboard to filter your search. After completing your selection,
click
.
Use coordinates to navigate to a location
From the main menu select Go To
and then Places
keyboard to input the location's coordinates and click
.
. Then click Coordinates
, use the
. After completing your selection, click
Navigate to a recent location
From the main menu select Go To
location from the list, click on
and then Recent Location
. After selecting the desired
Save my favourite locations
From the main menu select Go To
and then Address
After completing your selection, click
, Places
or Recent Location
.
.
Alternatively, simply click on a POI or any other point on the map, and then click on the Add to
Favourites button
on the bottom bar.
Complete the fields you wish to detail, and then click
to add to Favourites.
See Basic Interaction section for keyboard input options.
USERGUIDE_V11.3_ENG
9
Navigate to my favorite locations
From the main menu select Go To
and then Favourites
. Use the scroll bar or the
keyboard to filter your search. After selecting the desired location from the list, click
.
You may type in either the name or the tag of the favourite you have previously defined.
N
NDrive
will filter your search according to both fields.
Navigate Home
From the main menu select Go To
, Home
and then
.
Define my Home
From the main menu select My NDrive
select a Place
, Recent Location
and then Define Home
, Favourite
,
, or the current location, according to GPS
signal or to your previous selection on the map - Here
on
. Input an Address
. After completing your selection, click
.
The first time you try to navigate home, if you haven’t previously defined your home location,
NDrive will ask you to set that location. It is possible to edit it at any time, following the steps
described above.
Stop navigating in the current route
From the main menu, click My Route
, and then Stop Navigation
.
See an overview of my route
After defining a route and during navigation, you can see an overview of the whole route by
clicking My Route
on the main menu, and then Show Route
.
See the list of all maneuvers included in my route
From the main menu, click My Route
items on the list.
, and then Roadbook
k
. Scroll down to see all the
Delete a favourite location
From the main menu select Go To
and then Favourites
. Use the scroll bar or the
keyboard to filter your search. After selecting the desired location from the list, click
and then
USERGUIDE_V11.3_ENG
.
10
Delete recent locations
From the main menu select Go To
clear all recent locations.
and then Recent Location
. Click
to
Use itineraries
From the main menu select Go To
and then Itineraries
. You can then create a new
itinerary, or select an itinerary from the list, if you have already created or imported any.
x Create an itinerary
To create an itinerary, click Add New Itinerary
. Edit the name and the
description by selecting them and using the keyboard. You can also add an icon, by clicking on
the ICON button
and selecting one from the list. Click
to
proceed. Afterwards, you will have to define the waypoints to be included in your itinerary. Click
Add New Waypoint
, selecting from Address
, Places
, Recent Location
, Favourites
or Home
. After completing your selection, click
and
repeat the process for each new waypoint. When you have finished adding waypoints, click
to finish creating the itinerary.
You can also add a waypoint by selecting any point on the map, and clicking the waypoint
shortcut, on the context bar. Then you can either add it to an existing itinerary, or create a new
one, where the selected waypoint will be included.
x Change an itinerary
After selecting the itinerary from the list, to edit the itinerary’s name, description and icon, click
Edit/Rename
and proceed as described in “Create an itinerary”.
To edit the itinerary’s waypoints, click on Show Waypoints
. You can then add a new
waypoint as described in “Create an itinerary”. You can also select each waypoint and perform
several actions:
See waypoint’s location on the map;
Mark waypoint as visited, so that when you are navigating
the itinerary, you skip that location;
Move the waypoint up on the itinerary’s list;
Move the waypoint down on the itinerary’s list;
Mark waypoint as the next destination and all the previous
ones as visited;
Delete waypoint from the itinerary.
x Navigate to an itinerary
After selecting an itinerary from the list, click
location to the first waypoint on the itinerary will be calculated.
USERGUIDE_V11.3_ENG
. The route from your current
11
You can also see the whole itinerary on the map, by clicking View On Map
.
The first waypoint is represented by a green flag and the
last one by a checkered flag (black and white). The
waypoints in between are marked with orange flags.
Manage alternative routes
From the main menu select My Route
Alternative
and then Alternatives
. If you click Calculate
, an alternative route will be calculated, according to the defined routing
options. If afterwards you prefer the first route, click Calculate Original
.
Avoid going through specific streets or roads
From the main menu select My Route
and then Alternatives
, select the segments you wish and then click
. Click Avoid Part Of Route
. A new route will be calculated
accordingly. If afterwards you prefer the first route, click Calculate Original
.
Find an alternative when there is a roadblock ahead
From the main menu select My Route
and then Alternatives
.
Click Roadblock
, and then select the most
appropriate option to define how far it is from your current
location
A new route will be calculated accordingly. If afterwards you wish to select the previous route,
click Calculate Original
.
See Basic Interaction section for keyboard input options.
USERGUIDE_V11.3_ENG
12
Customizing Your NDrive
The speaker volume
From the main menu select Settings
and then
. Use +/- to adjust the
volume according to your preference. It’s also possible to quickly adjust the volume from the
Main Map Screen, simply by clicking on the lower bar placed near the Menu button at the
bottom of the screen and sliding your finger across it.
The light
From the main menu select Settings
and then
. If you select SYSTEM,
NDrive will consider the light settings defined for your device. If you prefer to maintain the screen
lighten at all times, select ALWAYS ON. To confirm, click on
.
The language
From the main menu select Settings
and then
then select from the available options. To confirm, click on
; click on Language and
.
The keyboard layout
From the main menu select Settings
and then
. You may change the
layout between ABC, QWERTY and AZERTY. To confirm your choice, select
.
The speed unit
From the main menu select Settings
and then
. You may choose to
display the velocity in kilometre per hour (kph) or miles per hour (mph). To confirm your choice,
select
.
The map appearance
From the main menu select Settings
customizable:
and then
. The following items are
USERGUIDE_V11.3_ENG
13
x Lane Assistance
Displays information about the lanes on junctions and
turns. In Intersections, it will display the signposts allowing
you to pick the right lane. You may choose between
simplified and detailed view.
x Map North Up
This option is only applicable to Pedestrian and Adventure modes. When enabled, the map will
be displayed with North orientation and the locator will rotate according to your movements.
When disabled, the locator will be pointing up and the map will rotate according to your
movements. [This option will be available in version 11.2]
x Templates
The map colour scheme can be customized according to the time of day, choosing among the
available templates. If you select “Enable auto toggle” the colour scheme will change
automatically between day/night mode, according to a specific schedule defined by the
system.
x Points of Interest
Select from the POIs categories list, the ones you wish to be displayed on the map.
The routing options
From the main menu select Settings
and then
. You may select among
the following routing options, which will influence the routing calculation:
x
Fastest – calculates the fastest route, regardless of the distance. It is highly
recommended that you select this option: the planned route will be not only the fastest,
but also more economic and pleasant, since better and faster roads such as highways
are given priority.
x
Shortest – calculates the shortest route, regardless of the quality of the road. Note that
this route may take more time and some of the roads may be narrow or steep.
x
Tolls – select “avoid” if you don’t want to use toll roads on your route or “yes” to allow
NDrive to use tolls on route calculation. Please note that even if you’ve selected the
option ”avoid”, NDrive will consider toll roads, if that is the only option.
x
Pedestrian Mode – NDrive will calculate your route using the shortest path available for
walking or riding a bicycle; routing calculation will not consider traffic signs and routing is
limited to 20 km distances.
x
Adventure Mode – allows you to navigate to a location or coordinates off the beaten
track; select this mode for outdoor use or travelling by sea or air. In this mode, the
distance to your destination is calculated in direct aerial line and a compass will be
displayed to guide you towards your destination.
USERGUIDE_V11.3_ENG
14
Safety options
From the main menu select Settings
following options:
and then
to customize the
Speed Limit Alarm: an alarm will ring when you exceed the speed limit configured by you (50
kph-160 kph); you may choose to turn off this option
Road Speed Alert: you can adjust the way the speed limit of each road is displayed, among
visual (an icon will appear on screen), visual and sound (icon on screen and voice indication), or
turned off.
Safety Camera Alert: you will receive an alert of the presence of safety cameras during your
route – the system will display an icon with the maximum speed allowed and also a sound
warning; you may choose to turn off this option
x System settings
From the main menu select Settings
following options:
and then
to customize the
Time format: select between 12h or 24h format
Theme: select between the default theme, which will display red buttons or rainbow which will
display colourful buttons. [This option will be available in V 11.2]
Restore Settings: select this option to restore the system to default settings
x Coordinates Format
From the main menu select Settings
and then
. The selected format will
define the input method on navigation by coordinates; you can choose between the following
formats:
DMS: degrees, minutes and seconds
DMM: degrees and minutes
DDD: degrees and decimal degrees
Import data to NDrive
First, you will have to connect the device to your computer using an USB cable, or use a memory
card reader. Copy the kml files from your source to the correspondent NDrive folders:
“favourites”, “itineraries”, and “speedcams”.
From the main menu select My NDrive
and then Data Import/Export
what you wish to import, select Import Safety Cameras
Favourites
. Then, according to
, Import Itineraries
, or Import
.
USERGUIDE_V11.3_ENG
15
Export data from NDrive
From the main menu select My NDrive
and then Data Import/Export
. Then, according to
what you wish to export, select Export Itineraries
or Export Favourites
. After you perform
this action, a new .kml file will be created in the correspondent NDrive folder: “itineraries” or
“favourites”. You will have to connect the device to your computer using an USB cable, or use a
memory card reader to manage the files.
Know more about my software
From the main menu select My NDrive
your software version. My Maps
and then Version
to consult information about
will show you the maps installed on your device, such as
version, provider, verify map consistency and on GPS
you can visualize your current
coordinates and number of satellites your device is connected to.
USERGUIDE_V11.3_ENG
16
Getting More of your NDrive
How to get new maps, voices or other features
NDrive’s store offers you additional free or purchasable features, such as voices or new maps,
which will enhance your software and user experience. Since your device does not have
network connectivity, when you select Store
, the following message will be displayed.
Visit our website and download the free NPlus application, to access all offers. This application
gives you also the possibility to update your software, as well as to consult information about
your device and products. In case you have any doubts, you have also access to online help.
USERGUIDE_V11.3_ENG
17
What is…
Go To - This button allows you to enter a destination such as an address or a Point of
Interest. You can then display it on the map, navigate there or set it as your current
location.
Address - Select this button to search for a location by its address.
– Use this button to change the country where your destination is
located. You can skip this step if the country is correct.
- Use this button to change the state where your destination is
located. You can skip this step if the state is correct. This button is only enabled for countries that
are divided into states, such as the USA.
– Type the name of your destination city here. If your city name
already appears, you may skip this button and go directly to Street.
– Type your destination street here. You can also select “City
Center” if you do not know the street name or wish to navigate to the center.
– type here the house number. If you do not know the house number, you may
select “Anywhere” to be taken to the nearest point in this street or Crossing.
Note: If the house number you typed does not appear, NDrive will offer you the nearest number
available.
The GO screen – This screen displays the information about the destination you selected. It can
contain an address, a place name or even additional information, if available.
– Displays the selected destination on the map. Click anywhere on the map to set
your current location there, which will be presented by a red dot.
– Use this button to save this location in your favorites.
– Click on this button to start live turn-by-turn guidance to the destination
you selected. If your software version does not include live guidance, this button will show the
route to your selected location.
Places - Allows you to search or navigate to Points of Interest (POI) on the map or by
using various online sources
USERGUIDE_V11.3_ENG
18
Around Me - A POI located around your location, according to GPS signal, or a
previously selected location.
In a City - A POI in a specific or remote location.
Coordinates - Using the special keyboard, you may search for coordinates using the
Lat/Lon format.
Postcode - Allows you to search for a destination by typing in the Postcode (Zip) of
the location; this function is only enabled only with maps that contain postcode
data.
Recent Location - Here you can see a list of all your previously selected locations.
Click on any of them to navigate or show it on the map.
Favourites - These are pre-defined locations that you have created or imported. See
the “How to” section for further information.
Home - Pre-define a location you use more often, such as your home, work etc. On
the first click, it will ask you to set that destination. You can edit/change it at any time
from My NDrive menu.
Itineraries - This is a pre-defined set of destinations that you have created or
imported. See the “How to” section for further information.
My Route - This button is enabled only when a destination has been selected and a
route has been calculated. It will allow you to consult additional information about
your route.
Show Route - Displays your route from the current position to your destination on the
map.
Road Book - Displays a list of all the maneuvers from your current position to your
destination. You may click on one of them to see it on the map.
USERGUIDE_V11.3_ENG
19
Stop Navigation - Stops the current turn-by-turn & voice guidance.
Start Demo - Starts a demonstration route of the previously selected navigation.
Stop Demo - Stops the current demonstration route
Alternatives - This button gives you the option to calculate an alternative route;
place a Roadblock (if for any reason a part of the route is blocked); avoid part of the
route (due to traffic or other info) or re-calculate the original route if you made any
changes.
My NDrive - Here you may change the settings and learn about your software.
Define Home - Define your Home location from an address, place of interest, recent
location, favourite or your current location (Here). This allows you to quickly navigate
there. You may edit or change this location at any time.
Version - Contains detailed information about the NDrive software version you own.
My Maps - Displays a list of the maps you have installed on your device. By clicking
on them you have access to the following options: Show – shows the selected map;
About – detailed information about the map version and its provider; Check – verifies
map file consistency.
Startup Wizard - By selecting this option, the start-up wizard will be displayed the next
time you initiate NDrive, displaying the Legal Info.
GPS - Displays a screen with detailed information about the coordinates of your
current location; the number of satellites to which your device is connected; the
speed you’re travelling; the altitude at your location and a compass showing your
orientation.
Data import/export - This button allows you to import or export files such as favourites
or itineraries.
USERGUIDE_V11.3_ENG
20
Settings - Customize the way NDrive is displayed, navigates, uses the GPS and others.
For further details see the “How to” section.
Store - Here you may download easily and securely additional content to your
NDrive such as additional Worldwide Maps and Map Updates, Voices, Real
Navigation city photos, Premium Weather and more.
Exit - Click here to exit NDrive Application.
USERGUIDE_V11.3_ENG
21
Support
Visit our Support section at http://www.ndrive.com to learn more on how to use NDrive.
Additional contents such as video tutorials give you a more intuitive view on how to take
advantage of your application. If any questions should remain, consult our FAQs or alternatively
contact our technical support.
USERGUIDE_V11.3_ENG
22
BOSS Audio Systems
3451 Lunar Court, Oxnard, CA 93030
www.bossaudio.com | 800.999.1236
Tech Support: www.bossaudio.com/support
PRINTED IN CHINA
V1.0
EN