1
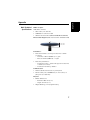
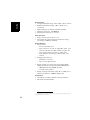
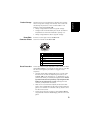
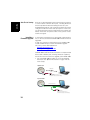
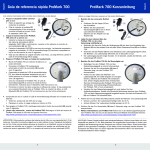
ProMark 700
™
User Guide
Legal Notices
Canada
©2013 Trimble Navigation Limited. All rights
reserved.
The digital apparatus does not exceed the Class B
limits for radio noise emissions from digital apparatus as set out in the radio interference regulations of
the Canadian Department of Communications.
All product and brand names mentioned in this publication are trademarks of their respective holders.
Limited Warranty Terms and Conditions
Product Limited Warranty. Subject to the terms and
conditions set forth herein, Trimble Navigation Limited (“Trimble”) warrants that for a period of (1) year
from date of purchase this Spectra Precision product
(the “Product”) will substantially conform to our
publicly available specifications for the Product and
that the hardware and any storage media components of the Product will be substantially free from
defects in materials and workmanship.
Product Software. Product software, whether built
into hardware circuitry as firmware, provided as a
standalone computer software product, embedded in
flash memory, or stored on magnetic or other media,
is licensed solely for use with or as an integral part of
the Product and is not sold. The terms of the end
user license agreement govern the use of the
Product Software, including any differing limited
warranty terms, exclusions and limitations, which
shall control over the terms and conditions set forth
in the limited Product warranty.
Warranty Remedies. If the Product fails during the
warranty period for reasons covered by this limited
warranty and you notify us of such failure during the
warranty period, we will repair OR replace the nonconforming Product with new, equivalent to new, or
reconditioned parts or Product, OR refund the Product purchase price paid by you, at our option, upon
your return of the Product in accordance with our
product return procedures then in effect.
Notices
Class B Statement - Notice to Users. This equipment
has been tested and found to comply with the limits
for a Class B digital device, pursuant to Part 15 of
the FCC Rules. These limits are designed to provide
reasonable protection against harmful interference in
a residential installation. This equipment generates,
uses and can radiate radio frequency energy and, if
not installed and used in accordance with the instructions, may cause harmful interference to radio
communication. However, there is no guarantee that
interference will not occur in a particular installation.
If this equipment does cause harmful interference to
radio or television reception, which can be determined by turning the equipment off and on, the user
is encouraged to try to correct the interference by one
or more of the following measures:
•
Reorient or relocate the receiving antenna.
•
Increase the separation between the equipment
and the receiver.
•
Connect the equipment into an outlet on a circuit different from that to which the receiver is
connected.
•
Consult the dealer or an experienced radio/TV
technician for help.
Changes or modifications not expressly approved by
the manufacturer or registrant of this equipment can
void your authority to operate this equipment under
Federal Communications Commission rules.
Le présent appareil numérique n’émet pas de bruits
radioélectriques dépassant les limites applicables
aux appareils numériques de Classe B prescrites
dans le règlement sur le brouillage radioélectrique
édicté par le Ministère des Communications du
Canada.
Europe
This product has been tested and found to comply
with the requirements for a Class B device pursuant
to European Council Directive 89/336/EEC on EMC,
thereby satisfying the requirements for CE Marking
and sales within the European Economic Area (EEA).
These requirements are designed to provide reasonable protection against harmful interference when
the equipment is operated in a residential or commercial environment.
Notice to Our European Union Customers
For product recycling instructions and more information, please go to http://www.spectraprecision.com/
footer/weee-and-rohs/.
Recycling in Europe: To recycle Spectra Precision
WEEE (Waste Electrical and Electronic Equipment
products that run on electric power), call +31 497
53 24 30 and ask for the “WEEE Associate”. Or, mail
a request for recycling instructions to:
Trimble Europe BV
c/o Menlo Worldwide Logistics
Meerheide 45
5521 DZ Eersel, NL
Declaration of Conformity
We, Spectra Precision,
declare under sole responsibility that the product:
ProMark 700 GNSS receiver
complies with Part 15 of FCC Rules.
Operation is subject to the following two conditions:
(1) this device may not cause harmful interference,
(2) and this device must accept any interference
received, including interference that may cause
undesired operation.
CAUTION: This product contains two rechargeable
Li-ion batteries with a capacity of 2.5 Ah each.
Please refer to the regulations in force in your country
concerning the use and transportation of Li-ion batteries. These regulations shall apply to the entire receiver as the batteries are non-removable by the end
user. Battery replacement can only be performed by
Regional Service Centers (RSC) or Authorized Service Provider personnel (ASP).
Table of Contents
Welcome to Spectra Precision ProMark 700 ........................................1
ProMark 700 Packout .........................................................................2
Standard Accessories .............................................................2
Optional Accessories ..............................................................2
Using ProMark 700 for the First Time...................................................3
Discover Your New Equipment ................................................3
Charging the Batteries............................................................3
Getting Started......................................................................4
Reading the Battery Status .....................................................4
Battery Charging Modes ......................................................................5
Appendix ............................................................................................7
Main Technical Specifications ................................................7
Product Storage.....................................................................9
Power/Data Connector Pinout..................................................9
Reset Procedure ....................................................................9
Auto-Test at Start-up ...........................................................10
Installing a Firmware Upgrade ..............................................10
Memo.................................................................................12
Congratulations on your decision to purchase a Spectra
Precision ProMark 700.
ProMark 700 is a GPS/GLONASS/SBAS L1/L2 receiver
specifically designed to be used as a network RTK rover.
ProMark 700 is very simple to use:
• Easy battery handling: ProMark 700 uses built-in,
rechargeable, non-removable batteries.
• Cable-free: The data collector and the ProMark 700
communicate over a wireless connection.
• GNSS-dedicated: ProMark 700 is focused on offering the
best GNSS performance. The data collector’s cellular
modem is used to connect to the RTK network, receive
RTK corrections and route them to the ProMark 700
receiver.
1
English
Welcome to Spectra Precision ProMark 700
ProMark 700 Packout
English
Standard
Accessories
The ProMark 700 packout consists of the following items:
[1]
[2]
[3]
[5]
[4]
• [1]: ProMark 700 GNSS receiver
• [2]: Universal AC/DC adapter shipped with four different
types of input connectors.
• [3]: Power cable extension (male jack to 6-pin connector)
• [4]: Vehicle power cable (cigarette lighter connector type
to female jack)
• [5]: Soft transport bag.
Optional
Accessories
Cable Kit P/N 91865-00 (see picture).
This kit is used to establish a USB connection between the
ProMark 700 and a computer. This connection is required for
upgrading the GNSS firmware when the computer has no
Bluetooth.
Because the process takes 15-20 minutes, the ProMark 700
should always be connected to external power when updating
firmware.
The optional cable kit therefore consists of:
• A V-shaped cable terminated with a DB9-f connector. One
of its other ends is fitted with a female jack, for
connection to a power source, and the other with a 6-pin
circular connector for connection to the ProMark 700.
• A short cable extension (USB to DB9-m), to be used
between the computer (USB port) and the V-shaped cable
(SubD-9m).
2
Discover Your New
Equipment
Take a few seconds to discover your ProMark 700. The power
button, LED indicators, Power/Data connector and product
labeling can be found on the bottom of the antenna.
[6]
[5]
[4]
[1] [2] [3]
•
•
•
•
•
•
Charging the
Batteries
a
b
[1]:
[2]:
[3]:
[4]:
[5]:
[6]:
Power button (+fast charging control)
Power/Charging LED
Bluetooth LED (Wireless connection)
5/8” threaded insert
6-pin Power/Data connector with protective cap
Shock absorber.
Before using your new ProMark 700, Spectra Precision
recommends you first charge its batteries in your office.
1. Unpack the AC/DC adapter. Slide the button as shown in
picture a to release the cap protecting the input contacts.
2. Of the four input connectors provided, choose the one that
matches the type of electric outlet used in your country.
Insert it as shown in picture b. You can hear a “click”
when the input connector gets fastened to the power
adapter.
3. Plug the jack end of the power cable extension to the AC/
DC adapter cable, then connect its other end to the Power/
Data connector on the ProMark 700.
4. Plug the AC/DC adapter to an electric outlet. Battery
charging starts immediately in standard charging mode.
The Power/Charging LED will first turn solid green for a
few seconds and then will blink red at a slow rate (every
3 seconds approximately).
3
English
Using ProMark 700 for the First Time
English
5. Wait a few hours until the batteries are fully charged. End
of charging is denoted when the Power/Charging LED goes
out.
6. Disconnect the AC/DC adapter from the ProMark 700. Put
the cap back in place to protect the Power/Data connector
during field operations.
NOTE: The ProMark 700 may be left on the AC/DC
adapter indefinitely without damage.
Getting Started
Reading the
Battery Status
4
1.
2.
3.
4.
Thread the ProMark 700 onto a range pole.
Attach the data collector bracket to the pole.
Attach the data collector to the bracket.
Turn on the ProMark 700 by holding the Power button
depressed for about 2 seconds.
Check the status of the Power/Charging LED, which
should blink red and green slowly while the ProMark 700
is being started (this takes about 20 seconds).
After the ProMark 700 has started, the Power/Charging
LED turns solid green meaning the ProMark 700 is now
functioning and ready for use. At the same time, the
Bluetooth LED will start flashing blue at a rate of
approximately 1 second, meaning that the ProMark 700 is
ready to accept a Bluetooth connection.
5. Turn on the data collector and run your field software.
6. Choose “Spectra Precision ProMark 700” as the model of
GNSS receiver your field software will be connected to.
This allows the data collector to initiate a Bluetooth
connection with the ProMark 700. When this connection
is established, the Bluetooth LED on the ProMark 700 will
turn solid blue.
NOTE: Some data collectors may require the ProMark 700
Pin Code. In this case, enter “1234”.
7. Configure the data collector’s modem to receive
corrections from the RTK network.
At any time while using the ProMark 700, you can monitor
the remaining charge in the two built-in batteries by reading
the status of the Power/Charging LED:
• Solid green: remaining charge is greater than 20%.
• Blinking green: remaining charge is less than 20%.
The built-in batteries may be charged using one of two
charging modes:
• Standard charging: This is the default mode used when
you connect a power source to the ProMark 700. The
batteries will be fully charged after about 8 hours of
charging. This is the recommended charging mode to
preserve the capacity of the batteries over time. Typically,
you will charge the batteries at the end of your work day
so that you will have a fully charged system the next
morning. (The ProMark 700 has a typical operating time
of 10 hours.)
• Fast charging: The ProMark 700 will switch from standard
to fast charging mode by briefly pressing the Power
button. The batteries will get charged in just 3 hours.
Fast charging should not be considered as the normal
charging mode, but rather as an emergency mode. Should
you run out of batteries while working in the field, then
you can select that mode to charge the batteries quickly,
for example from your vehicle’s battery (see also below).
NOTE: Reversing to standard charging mode when fast
charging is on can only be made by unplugging the power/
data cable and plugging it back.
Different power sources may be used, depending on where
you are when the batteries need to be re-charged:
• In the office, use the universal AC/DC adapter and the
power cable extension to charge the ProMark 700
batteries (see picture).
• In the field, use the vehicle cigarette lighter adapter and
power cable extension. Warning! Use this only with a 12V
vehicle!
5
English
Battery Charging Modes
English
The batteries will be charged typically while the ProMark 700
is off. However, charging is also possible with the ProMark
700 on. Watch the Power/Charging LED to read the current
battery charging status (see table below).
ProMark 700 Power
Status While Charging
ON or OFF
ON
OFF
6
Power/Charging LED
Status
Battery
Charging Status
Standard charging in
Blinking red, slow rate (3 sec)
progress
Fast charging in progBlinking red, fast rate (1 sec)
ress
Solid green
Batteries fully charged
Extinguished
Batteries fully charged
Main Technical
Specifications
English
Appendix
GNSS reception:
220 GNSS channels:
• GPS L1C/1, L2P and L2C
• GLONASS L1 C/A and L2 C/A
• SBAS: Code and carrier (WAAS/EGNOS/MSAS/GAGAN)
Phase Center Diagram (NGS antenna name: SPP89823-10)
L1 78.2 mm
L2 62.2 mm
Performance:
• Real-time kinematic accuracy for baselines < 30 km
(17 miles):
– Horizontal: 10 mm (0.033 ft) + 1 ppm
– Vertical: 20 mm (0.065 ft) + 1 ppm
• Real-time performance:
– Initialization time: < 10 seconds typical for baselines
< 20 km (12.5 miles)
– Initialization reliability: >99.9%
Communication:
• Wireless (Bluetooth 2.0 class 2), SPP profile
• RS232 serial port (115200 baud, no flow control, no
parity check, 8 data bits)
Physical:
• Overall dimensions:
– Diameter: 205 mm (8.1”)
– Height: 62 mm (2.4“)
• Weight: 0.65 kg (1.4 lb) approximately
7
English
Environmental:
• Storage temperature range: -40 to +70°C (-40 to +158°F)
• Operating temperature range: -30 to +65°C (-22 to
+149°F (1)
• IP67 waterproof (according to IEC529 standard)
• Vibrations and shocks: ETS300-019
• Withstands 2-meter fall on concrete.
DC Power Input:
• Range: 9 to 16 V (12 V typical, 1 A)
• Protected from polarity reversal and transient voltage
(according to ISO7637 standard)
Built-in Batteries:
• Specifications:
– Two non-removable cells
– Type: Lithium-ion (Li-Ion), re-chargeable, 5 Ah, 3.7 V
– Life time: 10 hours at +20°C (+68°F) or higher, 8½
hours at 0°C (+32°F), 6 hours at - 20°C (-4°F)
– Protected from over-voltages, under-voltages, overcurrents
• Charging times (typical):
– Standard: 7 to 8 hours
– Fast: 3 hours approximately
• Battery charger: Use exclusively the universal AC/DC
adapter provided to charge the ProMark 700 batteries:
– 100-240 V AC input, 50-60 Hz, 0.6 A
– 12 V DC output, 2.08 A
• Battery charging temperature range: 0° to +40°C (32° to
104°F); altitude max.: 2,000 m (6,562 feet)
Certifications:
• CE marking according to R&TTE European directives
• FCC (USA) and IC (Canada)
1. Can start instantly at -20°C (-4°F) without warm-up time. Can be started at -30°C (-22°F) but will become
fully operational only after warm-up time.
8
Power/Data
Connector Pinout
Spectra Precision recommends you observe the following
rules for long-term storage (2-3 months). These rules are
dictated by the presence of two non-removable Li-Ion
batteries inside the ProMark 700.
• Always charge batteries before long-term storage
• Storage room should be ideally at 5°C (41°F) ambient
temperature to minimize irreversible capacity loss.
• Always charge batteries after long-term storage.
Connector socket type: Hirose HR30-6R-6P
Seen from outside the ProMark 700:
1
6
5
2
3
Pin
1
2
3
4
5
6
Reset Procedure
English
Product Storage
4
Signal
Ground (power)
DC Power In (9-16 V)
Rx (In)
Tx (out)
Ground (data)
Not connected
A reset procedure may be required in some situations where
the ProMark 700 does not operate as expected. No user data
will be lost through this procedure. To trigger a reset
sequence:
• Hold the Power button depressed for 12 seconds. Note
that after two seconds of depressing this button, the
ProMark 700 will be turned off or on, depending on the
power status when you started pressing the button. Please
ignore this indication and just keep on pressing the Power
button for the required 12 seconds (starting from the
moment you depressed the button).
• After the 12 seconds have elapsed, release the Power
button. The Power/Charging LED starts blinking red and
green, as it would do on a normal start-up, but this time
for about 25 seconds.
• At the end of the reset sequence, the ProMark 700 will
stay powered and the Power/Charging LED will turn solid
green.
9
Auto-test is performed during the receiver start-up sequence
to check internal communication ports, including Bluetooth.
Should a problem be detected during the auto-test, the
Power/Charging LED will turn solid red -instead of the normal
solid green- at the end of the start-up sequence. In that case,
you should reset the receiver as explained in this manual (see
above). If the error still persists after a reset, please contact
Technical Support.
Installing a
Firmware Upgrade
In the future, Spectra Precision may provide a maintenance
file (a *.bin file) should the ProMark 700 firmware need to be
upgraded.
In that case, please use Spectra Precision’s ProMark 700
Loader software utility to install the firmware upgrade.
This utility can be downloaded from:
English
Auto-Test at Start-up
http://www.spectraprecision.com/
products/gnss-surveying/promark-700/
(Then click on the Support tab)
ProMark 700 Loader should be installed on a computer fitted
with a USB or RS232 port, or having Bluetooth capability.
Follow the instructions below to upgrade your ProMark 700:
• Set up ProMark 700 according to one of the diagrams
below (see also Optional Accessories on page 2 for the
serial setup).
1) Bluetooth
Bluetooth
Power cable
extension
Universal AC/DC
adapter cable (to power line), or
vehicle power cable (to external battery)
2) Serial Cable
Cable kit P/N 91865-00
DB9
USB
Universal AC/DC
adapter cable (to power line), or
vehicle power cable (to external battery)
10
•
•
•
•
•
•
11
English
NOTE: If you are using the second setup, you will need to
use the V-cable from the cable kit P/N 91865-00 which
connects to your computer’s DB9 serial connector. In this
case, you will not need to use the DB9-to-USB extension
cable.
Turn on ProMark 700 and wait until the Power/Charging
LED turns solid green (meaning ProMark 700 is ready).
Launch ProMark 700 Loader on the computer.
Browse to the *.bin file provided by Spectra Precision.
In the ProMark 700 Loader window, choose the COM port
used to communicate with ProMark 700.
If you are using Bluetooth, you may be asked to enter the
password “1234” to secure the wireless connection with
ProMark 700. (Every ProMark 700 is factory-set with their
internal Bluetooth module PIN code set to“1234”.)
Click Start in the ProMark 700 Loader window. This starts
the upgrade phase. Wait about 20 to 30 minutes until a
message is returned in the ProMark 700 Loader window
indicating the end of the upgrade.
CAUTION: While the ProMark 700 is being upgraded, the
indications provided by two LEDs on the ProMark 700
should be ignored. Only ProMark 700 Loader reports
accurate information on the operation in progress.
Close the ProMark 700 Loader window and disconnect the
ProMark 700 from the computer and the external power
source. It is now ready for use.
Memo
English
• [1]: Power/Fast charging pushbutton. Hold this button
depressed for about 2 seconds to power on the ProMark
700. Hold it depressed for another 2 seconds to turn it off.
While the batteries are being charged in standard mode, a
brief press on this button will cause the ProMark 700 to
switch to fast charging mode.
Whether the ProMark 700 is on or off, holding this button
depressed for 12 seconds will cause the ProMark 700 to
start a reset sequence, which lasts typically 25 seconds
(no user data lost during a reset).
[1] [2] [3]
• [2]: Power/Charging LED. At power-up, it turns
successively and repeatedly red and green (over about 20
seconds) denoting start-up in progress. Once start-up is
complete, the LED turns solid green, unless the remaining
charge in the batteries is less than 20%, in which case the
LED will be blinking green.
When charging the batteries, the Power/Charging LED
flashes red at a slow rate (standard charging) or at a fast
rate (fast charging).
• [3]: Bluetooth LED: When you turn on the ProMark 700,
the Bluetooth LED stays off throughout the start-up
sequence. Then, it produces blue flashes every 1 second
or so, until a Bluetooth connection is established between
the ProMark 700 and the data collector. The LED then
turns solid blue and will stay in that state as long as the
Bluetooth connection is kept active.
12
A
R
Accuracy 7
Auto-tests 10
Range pole 4
Reset 9
B
S
Battery status 4
Bin file 10
Bluetooth LED 3, 4
C
Cable extension (power) 2
Cable extension (USB to DB9-m) 2
Cable kit (option) 2
Certifications 8
Channels 7
Charging batteries 3
Charging modes 5
Charging times 8
Cigarette lighter 2, 5
Communication 7
D
Data collector 4
DC power input 8
F
Fast charging 5
Field software 4
Firmware upgrade 10
G
GLONASS 1, 7
GPS 1, 7
GSM modem 4
L
L1/L2 1, 7
LEDs during an upgrade (meaning) 11
M
Memo 12
N
Network rover 1
NGS 7
O
Operating time (battery) 5, 8
Option (cable kit) 2
P
Performance 7
Phase center 7
Pin Code (Bluetooth) 4, 11
Pinout 9
Power button 3, 9
Power/Charging LED 3, 4, 6, 9
Power/Data connector 3
ProMark 700 Loader 10
SBAS 1, 7
Shock absorber 3
Solid red Power/Charging LED 10
Specifications 7
Standard charging 5
Storage 9
Surveying software 4
T
Transport bag 2
TTFF 7
U
Universal AC/DC adapter 2, 5
Upgrade (firmware) 2
V
Vehicle battery 5
V-shaped cable 2
English
Index
ProMark™ 700
User Guide
Contact Information:
SPECTRA PRECISION DIVISION
10355 Westmoor Drive,
Suite #100
Westminster, CO 80021, USA
www.spectraprecision.com
Rue Thomas Edison
ZAC de la Fleuriaye, BP 60433
44474 Carquefou Cedex, FRANCE
80 Marine Parade Road
#22-06, Parkway Parade
Singapore 449269, Singapore
©2013 Trimble Navigation Limited. All rights reserved. Spectra Precision is a Division of Trimble Navigation Limited. Spectra Precision and the Spectra
Precision logo are trademarks of Trimble Navigation Limited or its subsidiaries. P/N 92237-01A