1
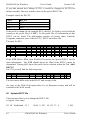
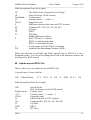
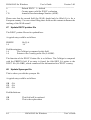
HAM-LOG for Windows
User’s Guide
Version 3.40
________________________________________________________________
4.
Note the format of date and time entries
5.
Note the format of the frequency
6.
Additional with fixed columns
1. All data are aligned in the same columns
2. Note the start column and length of each field
Note the character for sent/received QSL (if any) and decide how it should be
assigned to the HAM-LOG definitions.
GQSL values may be: N Y S
EQSL values may be: N Y R
On the Tab ‚Format defaults’ following defaults are set:
Text: Fixed
columns
Click this radio button if the input data consists of fixed
columns.
Text:
Columns
delimited
Click this button if a separator character separates the input
data.
In this case you have to enter the delimiter character that
separates the single fields, default is a comma (,).
In addition a string delimiter character is required. This is to
define begin and end of a field, default is quotation marks.
Start line of 1. Enter the line of the ASCII file where the log data begins.
QSO
Select the appropriate format out of the dropdown list.
Date format
Time format
Select the appropriate format out of the dropdown list.
Callsign
separator
Separator character between Prefix, Callsign and Suffix if
applicable.
Frequency
Select whether the import data are in MHz or KHz. In addition
you have to define whether the Frequency field or Band fields
defines the QRG to be used.
On the Tab ‚QSL Definitions/Field defaults’ you select following defaults:
Enter here the character of the import file which should be
translated into the appropriate HAM-LOG default. A space
counts as a character too! Please note that the input is case
_________________________________________________________________
82
HAM-LOG for Windows
User’s Guide
QSL Fields