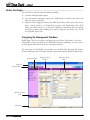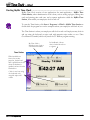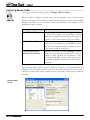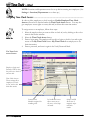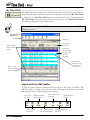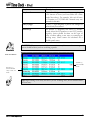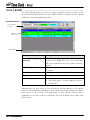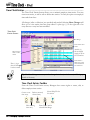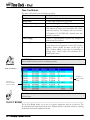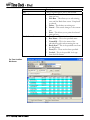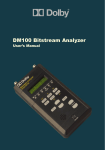
1
User Manual
Version 2 Rev. a
MyBiz Time Clock Program and User Manual
SOFTWARE LICENSE AGREEMENT
IMPORTANT-READ CAREFULLY: This Software License Agreement (“SLA”) is a legal agreement between you (either an individual
or a single entity) and G.NEIL CORPORATION (“G.NEIL”) for the software product found in this package, which may include
associated media and printed materials (“SOFTWARE PRODUCT”). By installing, copying, or otherwise using the SOFTWARE
PRODUCT, you agree to be bound by the terms of the SLA. If you do not agree to the terms of this SLA, do not install or use the
SOFTWARE PRODUCT; you may, however, return it to G.NEIL for a full refund.
Software Product License
The SOFTWARE PRODUCT is licensed, not sold; G.NEIL retains full ownership rights to the SOFTWARE PRODUCT. G.NEIL, upon
your payment of the applicable fees, grants to you a nonexclusive license subject to the following conditions:
The SOFTWARE PRODUCT may not be exported, distributed, rented, leased, sublicensed, or used on a service bureau, bulletin board, or
at any time-sharing system. It may not be copied, altered, modified, translated, or used to create a derivative work. You may not reverse
engineer, decompile or disassemble the SOFTWARE PRODUCT. You may use the SOFTWARE PRODUCT for your individual use or
for use within your company, but you may not use the SOFTWARE PRODUCT to produce records to be sold or distributed outside of
your company.
Purchasers who have paid for a license may install and use the SOFTWARE PRODUCT on a single computer. For each additional
installation, an additional license is required.
Your right to use or install the SOFTWARE PRODUCT automatically terminates upon failure to comply with any provision of this SLA,
violation of any term of this SLA, or upon your destruction of all copies of the SOFTWARE PRODUCT. In any of the foregoing
circumstances, you must remove the SOFTWARE PRODUCT from your computer’s hard drive, application server or other mass data
storage devices and cease use of the product. The License is deemed accepted and delivered in the State of Florida and shall be construed,
interpreted and governed by the laws of the State of Florida, without regard or effect given to its or any other jurisdiction’s choice of law
jurisprudence.
G.Neil warrants the SOFTWARE PRODUCT will operate in accordance with its published specifications for a period of ninety (90) days
following the date of purchase (30 days for opened software). In the event the SOFTWARE PRODUCT fails to operate in accordance
with the published specifications during that period, you may return it to G.Neil. G Neil will, at its option, repair or replace the defective
program or refund the purchase price. THIS IS YOUR SOLE AND EXCLUSIVE REMEDY.
G.NEIL SPECIFICALLY DISCLAIMS ALL OTHER WARRANTIES, EXPRESSED OR IMPLIED, INCLUDING BUT NOT
LIMITED TO, IMPLIED WARRANTIES OF MERCHANTABILITY OR FITNESS FOR A PARTICULAR PURPOSE WITH
RESPECT TO THE USE AND INSTALLATION OF THE SOFTWARE PRODUCT, DEFECTS IN PRODUCT MEDIA AND
THE PROGRAM, AS WELL AS THE SOFTWARE PRODUCT’S INTERACTION AND COMPATIBILITY WITH OTHER
PROGRAMS, SYSTEMS, AND HARDWARE. IN NO EVENT SHALL G.NEIL BE LIABLE FOR ANY LOSS OF PROFIT OR
ANY OTHER COMMERCIAL DAMAGE, INCLUDING, BUT NOT LIMITED TO, SPECIAL, INCIDENTAL,
CONSEQUENTIAL OR OTHER DAMAGES EVEN IF G.NEIL HAS BEEN ADVISED OF THE POSSIBILTY OF SUCH
DAMAGES. THE SOLE AND EXCLUSIVE REMEDY AVAILABLE TO PURCHASERS/LICENSEES UNDER THIS
AGREEMENT IS LIMITED TO REPLACEMENT, REFUND OF SALES PRICE, OR FULL CREDIT. FAILURE TO COMPLY
WITH THE TERMS OF THIS SOFTWARE LICENSING AGREEMENT IS STRICTLY PROHIBITED AND MAY VIOLATE
COPYRIGHT LAW.
G.Neil is a trademark of Everglades Direct, Inc. Microsoft, Windows and Internet Explorer are registered trademarks of Microsoft
Corporation. Entire work © G.Neil 2003. All Rights Reserved.
We welcome your suggestions and comments. Contact us at G.Neil, 720 International Parkway, Sunrise, FL 33345
Tel (800) 999-9111 – Fax (954) 851-1214 – Customer Service e-mail [email protected]
Technical Support Tel (888) 925-7740 or www.gneiltechsupport.com
Shop Online at www.gneil.com
Table of Contents
CHAPTER 1: WELCOME!......................................................................................................................... 9
UNLOCKING THE DEMO ............................................................................................................................. 10
SYSTEM REQUIREMENTS ........................................................................................................................... 10
MAGNETIC STRIPE CARD SPECIFICATIONS ................................................................................................ 10
TIME CLOCK ETHERNET TERMINAL........................................................................................................... 11
INSTALLING MYBIZ TIME CLOCK .............................................................................................................. 11
CHAPTER 2: INSTALLING MYBIZ TIME CLOCK ........................................................................... 13
OVERVIEW ................................................................................................................................................. 14
LICENSE OPTIONS ...................................................................................................................................... 14
FREQUENTLY ASKED QUESTIONS .............................................................................................................. 14
INSTALLING MYBIZ TIME CLOCK .............................................................................................................. 14
INSTALLATION TYPE .................................................................................................................................. 15
UPGRADING FROM A PREVIOUS VERSION ................................................................................................... 15
Upgrading from Version 1 to Version 2............................................................................................ 15
MAGNETIC STRIPE CARD READER (OPTIONAL) ......................................................................................... 15
REMOTE TERMINALS (OPTIONAL) ............................................................................................................. 15
Setting Up a Remote Terminal.......................................................................................................... 15
Setup & Configuration ...................................................................................................................... 18
CHAPTER 3: GETTING STARTED ....................................................................................................... 21
BEFORE YOU BEGIN .................................................................................................................................. 22
Navigating the Management Windows ............................................................................................. 22
Menu Bar .......................................................................................................................................... 23
Feature Column................................................................................................................................. 24
Toolbar.............................................................................................................................................. 24
STARTING MYBIZ TIME CLOCK ................................................................................................................. 25
OPENING THE MANAGEMENT SCREEN ...................................................................................................... 26
The Welcome Screen ........................................................................................................................ 26
Logging into the Management screen ............................................................................................... 26
Login and Password.......................................................................................................................... 26
MYBIZ TIME CLOCK CHECKLIST ............................................................................................................... 26
CHANGING THE ADMIN PASSWORD ........................................................................................................... 27
CREATING LOCATIONS & DEPARTMENTS .................................................................................................. 28
Setting up Locations and Departments ............................................................................................. 29
SETTING UP GLOBAL PREFERENCES .......................................................................................................... 30
Company Info Tab ........................................................................................................................... 30
Editing Company Info....................................................................................................................... 31
Adding a Company Logo.................................................................................................................. 31
Saving Logo to Disk ......................................................................................................................... 31
General Settings Tab......................................................................................................................... 31
Report Options Tab........................................................................................................................... 34
Table of Contents
3
Editing Report Options ..................................................................................................................... 34
Attendance Tab ................................................................................................................................. 34
Setting Up Time Clock Preferences.................................................................................................. 35
SETTING UP REASON CODES ..................................................................................................................... 37
Creating a New Reason Code ........................................................................................................... 39
WORK SCHEDULES .................................................................................................................................... 39
Printing Work Schedules .................................................................................................................. 40
Printing Employee Assigned Worked Schedules.............................................................................. 40
ADDING EMPLOYEES ................................................................................................................................. 40
Required Fields ................................................................................................................................. 40
ASSIGNING TIME CLOCK ACCESS .............................................................................................................. 41
CREATING TIME CLOCK MESSAGES .......................................................................................................... 42
SETTING A REMINDER................................................................................................................................ 42
Reminders Tool Bar and Pane Layout .............................................................................................. 43
Creating a New Reminder................................................................................................................. 44
Setting a Reminder............................................................................................................................ 44
Deleting Reminders .......................................................................................................................... 45
Editing Reminders ............................................................................................................................ 45
Open Reminders................................................................................................................................ 45
Printing Reminders ........................................................................................................................... 46
DEALING WITH TIME ZONE DIFFERENCES ................................................................................................. 46
CHAPTER 4: TIME CLOCK & ATTENDANCE CODE SHARING .................................................. 49
OVERVIEW ................................................................................................................................................. 50
SETTING UP ATTENDANCE CODE SHARING ............................................................................................... 50
Enable Attendance Code Sharing...................................................................................................... 50
Set Up Reason Codes (See Setting Up Reasons Codes in Chapter 3 for detailed information)........ 51
Set Up Payroll Code Descriptions and Numbers .............................................................................. 52
Set Up Payroll Description Columns for Reports ............................................................................. 53
Set Up Attendance Absence Codes................................................................................................... 53
CHAPTER 5: SETTING SECURITY RIGHTS ...................................................................................... 57
PROGRAM ACCESS ..................................................................................................................................... 58
USER SECURITY ......................................................................................................................................... 58
User Security for the Detail Tab ....................................................................................................... 58
Time Clock Tab ................................................................................................................................ 59
SETTING UP A USER FOR SECURITY ACCESS ............................................................................................. 60
User Security Access for Locations/Departments............................................................................. 61
User Security for the Attendance Tab ............................................................................................... 61
User Security for the Records tab ..................................................................................................... 61
User Security for the Locations/Departments Tab ............................................................................ 61
CHAPTER 6: CLOCKING IN/OUT ........................................................................................................ 63
OVERVIEW ................................................................................................................................................. 64
CLOCKING IN USING THE KEYBOARD ........................................................................................................ 64
Table of Contents
4
CLOCKING IN USING SWIPE CARD AND CARD READER ............................................................................. 64
MY TIME CLOCK ....................................................................................................................................... 65
Employee Review/Edit toolbar ......................................................................................................... 65
Creating a New Time Entry .............................................................................................................. 66
Date Versus Work Date .................................................................................................................... 68
Editing a Time Entry......................................................................................................................... 68
Deleting a Time Entry....................................................................................................................... 68
Printing an Employee Time Card...................................................................................................... 68
Getting Help...................................................................................................................................... 68
Time Card Entries ............................................................................................................................. 68
IN/OUT BOARD .......................................................................................................................................... 70
CHAPTER 7: MANAGING EMPLOYEE RECORDS........................................................................... 71
OVERVIEW ................................................................................................................................................. 72
FEATURE COLUMN .................................................................................................................................... 72
TIME CLOCK ENTRIES................................................................................................................................ 73
Time Clock Entries Toolbar.............................................................................................................. 73
Creating a New Time Entry .............................................................................................................. 74
Date Versus Work Date .................................................................................................................... 76
Editing a Time Entry......................................................................................................................... 76
Deleting a Time Entry....................................................................................................................... 76
Printing an Employee Time Card...................................................................................................... 76
Getting Help...................................................................................................................................... 76
Time Card Entries ............................................................................................................................. 77
IN/OUT BOARD .......................................................................................................................................... 77
ADDING A NEW EMPLOYEE ....................................................................................................................... 78
DELETING AN EMPLOYEE .......................................................................................................................... 79
GIVING EMPLOYEES ACCESS TO CLOCK IN................................................................................................ 79
EMPLOYEES NOT ROUNDING ON THE CORRECT WORK SCHEDULE............................................................ 81
Changing an Employee’s Work Schedule Date ................................................................................ 82
CHAPTER 8: CREATING AND EDITING WORK SCHEDULES ..................................................... 85
ROUNDING EXPLAINED .............................................................................................................................. 86
WORK SCHEDULE ROUNDING RULES ........................................................................................................ 86
SHIFTS CROSSING MIDNIGHT ..................................................................................................................... 89
MORE ABOUT ROUNDING .......................................................................................................................... 90
SETTING UP A WORK SCHEDULE ............................................................................................................... 90
SETTING UP THE DAILY SCHEDULE ............................................................................................................ 91
CHAPTER 9: PREPARING TIME CARD RUNS .................................................................................. 93
TIME CARD RUNS ...................................................................................................................................... 94
Creating a New Time Card Run........................................................................................................ 94
VIEWING TIME CARD DATA ...................................................................................................................... 97
Frequently Asked Questions ............................................................................................................. 97
EXPORTING TIME CLOCK DATA ................................................................................................................ 98
Table of Contents
5
Time Card Runs Export .................................................................................................................... 99
QuickBooks Integration .................................................................................................................... 99
Exporting Time Clock Data ............................................................................................................ 100
CHAPTER 10: USING REPORTS ......................................................................................................... 103
REPORT LIST............................................................................................................................................ 104
REPORT INTERFACE FEATURES ................................................................................................................ 104
EMPLOYEE SUMMARY REPORT ................................................................................................................ 105
EMPLOYEE ANNIVERSARY REPORT ......................................................................................................... 105
HOURS WORKED REPORT ........................................................................................................................ 105
DELETED TIME CLOCK ENTRIES REPORT ................................................................................................ 106
WORK SCHEDULES ASSIGNMENTS REPORT ............................................................................................. 106
EXCEPTIONS (PUNCH).............................................................................................................................. 106
EXCEPTIONS – (HOURS)........................................................................................................................... 107
TIME CARDS REPORT............................................................................................................................... 109
TIME CARD RUNS REPORT....................................................................................................................... 109
TIME CARD RUNS (EXTENDED) ............................................................................................................... 110
REMINDERS ............................................................................................................................................. 110
ID BADGES .............................................................................................................................................. 110
Layout ............................................................................................................................................. 111
Barcode ........................................................................................................................................... 111
Print Stock....................................................................................................................................... 111
Label Adjustments .......................................................................................................................... 112
TABLE LISTINGS ...................................................................................................................................... 112
CHAPTER 11: DATABASE MAINTENANCE..................................................................................... 113
BACKING UP ............................................................................................................................................ 114
Creating a manual backup from within MyBiz ............................................................................... 115
Restoring from a Backup ................................................................................................................ 115
PERFORMING MAINTENANCE AND REPAIRING THE DATABASE ............................................................... 115
DB Maintenance Utility .................................................................................................................. 115
Maintenance.................................................................................................................................... 115
Database Repair .............................................................................................................................. 116
Running the DB Maint Utility......................................................................................................... 116
DB Maint Features.......................................................................................................................... 117
CHAPTER 12: IMPORTING AND EXPORTING DATA ................................................................... 119
OVERVIEW ............................................................................................................................................... 120
FEATURES ................................................................................................................................................ 120
REQUIRED FIELDS .................................................................................................................................... 121
IMPORTING .............................................................................................................................................. 121
EXPORTING .............................................................................................................................................. 122
EXPORT TIME CLOCK DATA .................................................................................................................... 123
Table of Contents
6
CHAPTER 13: GETTING HELP ........................................................................................................... 125
OVERVIEW ............................................................................................................................................... 126
Sample Database............................................................................................................................. 126
The Help Menu ............................................................................................................................... 126
The F1 Key ..................................................................................................................................... 126
Searching for Help .......................................................................................................................... 126
BEFORE CONTACTING TECHNICAL SUPPORT ........................................................................................... 127
CONTACTING TECHNICAL SUPPORT ......................................................................................................... 127
APPENDIX A: ROUNDING EXAMPLES ............................................................................................ 128
DECIMAL CONVERSION TABLE ................................................................................................................ 129
APPENDIX B: TROUBLESHOOTING................................................................................................. 130
Unable to connect to Interbase Server ............................................................................................ 130
Getting SQL Parse Error: EOF in String Detected.......................................................................... 132
Unable to install on a Win NT or 2000 system ............................................................................... 132
Moving Database from One Location to Another........................................................................... 132
Installing MyBiz Files to Another Drive Other than C:\................................................................. 133
APPENDIX C: IMPORT / EXPORT FILE FORMAT......................................................................... 134
APPENDIX D: STANDARD TIME VS MILITARY TIME................................................................. 136
APPENDIX E: TIME CLOCK REMOTE TERMINAL QUICK START.......................................... 137
APPENDIX F: USING THE NOTES/COMMENTS EDITOR AND ATTACHMENTS .................. 139
Right-Click Menu Commands ........................................................................................................ 139
Using the Rich Text Editor ............................................................................................................. 140
Adding Attachments to Comments or Notes................................................................................... 141
Inserting an Attachment .................................................................................................................. 141
Insert Object Options ...................................................................................................................... 141
Table of Contents
7
Chapter 1:
Welcome!
Thank you for choosing MyBiz Time Clock by G.Neil. This application replaces
mechanical time clocks, eliminating hand correcting and tallying of time cards and
dramatically reducing payroll prep time.
When combined with MyBiz Attendance, this powerful tool provides a comprehensive
time and attendance tracking system for your business. Features include:
Easy clocking in/out using keyboard or swipe card
Detailed time and date stamping of all entries, including supervisor changes
Instant knowledge of employee status through a virtual in/out board
Fully customizable work schedules, rounding rules, overtime settings and more
Data export function to major payroll provider software
Direct transfer of time card runs into employee timesheets in QuickBooks® Pro and
Premier Editions 2003 and/or 2004
Flexible security access for employee and managers alike
Integration with other MyBiz programs simplifies data entry
Chapter Contents:
Unlocking the Demo .................................................................... 10
System Requirements ................................................................... 10
Magnetic Stripe Card Reader Specifications ............................ 10
Ch 1: Welcome
9
Unlocking the Demo ..............................................................................................
If you have already installed the demo of MyBiz Time Clock, you can unlock it by
following the steps listed here.
1. Run MyBiz Time Clock.
2. Select Alter Current Product License from the Help menu; click the Edit key.
3. Enter the Product Key you received with your purchase (it starts with the letter T).
This will be located inside the front cover of this User’s Guide in the lower right hand
corner or sent to your e-mail address.
4. Click OK. If the confirmation message does not appear, verify that you entered the
correct key. The key is not case sensitive.
NOTE: There is a different product key for each G.Neil software product.
System Requirements .............................................................................................
Required
• Windows 98 (SE) or later
• Pentium 266Mhz or faster processor
• 64 MB available RAM (Random Access Memory)
• 20 MB available hard disk space
• Access to a CD-ROM drive
• SVGA monitor with 800 x 600, 16-bit color depth or higher
Recommended
• Pentium III or higher processor
• 128 MB available RAM (Random Access Memory)
• 20 MB available hard disk space
• CD-ROM drive
• SVGA monitor with 1024 x 768, High Color or higher
• Windows-compatible graphics quality printer
MyBiz Time Clock database must be installed on a single, standalone computer. You can
create multiple accounts with different access levels, but the software runs on the PC you
install it on.
Magnetic Stripe Card Specifications .......................................................................
This information is if you are going to utilize a card reader.
Keyboard Wedge – The reader may be a magnetic stripe card or bar code reader.
We have tested with a keyboard wedge, which the keyboard connects into the
reader and then to the computer.
Formats: ISO 7811, AAMVA, and CA DMV.
Ch 1: Welcome
10
Cards must be pre-encoded (on one track only) with up to 24 alphanumeric
characters on track 1 with a single carriage return at the end.
Contact G.Neil at (800) 999-9111 to order card readers and ID Badge Kits. If you
have a technical question, please contact G.Neil Tech Support at (888) 925-7740.
Time Clock Ethernet Terminal ................................................................................
Time Clock Ethernet Terminals are small, low cost data collection devices that
communicate with MyBiz Time Clock over a TCP/IP network. The network interface
supports both 10BaseT and 100BaseT Ethernet connections. The operator interface
consists of an LCD display and membrane switch keypad and mag-stripe card reader.
Installing MyBiz Time Clock ...................................................................................
To begin installing MyBiz Time Clock, follow these steps:
1. Close ALL running programs.
2. Insert the MyBiz Time Clock CD into the CD-ROM drive of your computer. Once
the CD is inserted, if the browser menu does not appear, proceed to the next step.
Otherwise, skip to Step 6.
3. Click Start, Run. The Run dialog will appear.
4. In the dialog box, type D:\setup. exe where D: is the letter of your CD-ROM drive.
5. Click OK or press Enter.
6. The browser menu will appear. Select “Install MyBiz Time Clock.”
Once the installation procedure begins, follow the on-screen instructions to install the
software. When installation is complete, the G.Neil program group will be added to your
Start menu and a MyBiz Time Clock icon will be on your desktop.
Ch 1: Welcome
11
Chapter 2:
Installing MyBiz
Time Clock
This chapter explains how to install MyBiz Time Clock to a standalone computer and
answers frequently asked questions about installing.
Chapter Contents:
Overview ......................................................................................... 14
License Options ............................................................................. 14
Frequently Asked Questions ....................................................... 14
Installing MyBiz Time Clock ........................................................ 14
Installation Type ............................................................................ 15
Remote Terminals .......................................................................... 15
Ch 2: Installing
13
Overview ................................................................................................................
MyBiz Time Clock can be installed on a single standalone workstation. If you have more
than 100 active employees, need a multi-user network set up or want other advanced
features, please use our Optima line of software.
License Options ......................................................................................................
The license options currently available:
Single User – Only one application of the Time Station and one application of the
Time Clock Admin can run at a time.
Frequently Asked Questions ...................................................................................
Q: What is the difference between the Time Station and the Time Clock Admin?
A: The Time Station is where your employees clock in/out from and is usually installed
on a computer in a convenient location accessible to employees. This computer can also
have a swipe card reader attached to make clocking in/out easier. The Time Clock
Admin is for managers and supervisors. This is where administrative work is done, such
as setting up Time Clock access, and editing and printing time cards.
Q: Can I install MyBiz Time Clock on a Network Server and connect from a
Client Workstation?
A: No. The MyBiz products are essentially a single user license and can only be installed
on a standalone computer. If you have a need to have multiple computers connected to
the same database we recommend using our Optima products. The only exception to
this is with the MyBiz Time Clock which allows you to install the Time Clock Admin and
Time Station on separate computers.
Installing MyBiz Time Clock ...................................................................................
To begin installing MyBiz Time Clock, follow these steps:
1. Close ALL running programs.
2. Insert the MyBiz Time Clock CD into the CD-ROM drive of your computer. Once
the CD is inserted, if the browser menu does not appear, proceed to the next step.
Otherwise, skip to Step 6.
3. Click Start, Run. The Run dialog will appear.
4. In the dialog box, type D:\setup. exe where D: is the letter of your CD-ROM drive.
5. Click OK or press Enter.
6. The browser menu will appear. Select “Install MyBiz Time Clock.”
Once the installation procedure begins, follow the on-screen instructions to install the
software. When installation is complete, the G.Neil program group will be added to your
Start menu and a MyBiz Time Clock icon will be on your desktop.
Ch 2: Installing
14
Installation Type .....................................................................................................
EXPRESS: We recommended that you select this option if you are installing or
upgrading MyBiz for the first time. This will take you through the installation
process with minimum user intervention.
CUSTOM: This option is for Advanced Users who have specific installation needs,
such as installing just the Time Station program on a client PC.
Upgrading from a previous version ........................................................................
Upgrading from Version 1 to Version 2
No conversion is required when upgrading from Version 1 to Version 2. Opening MyBiz
for the first time will update the database to Version 2. The MyBiz program must have
exclusive use of the database to perform the update. Because MyBiz Time Clock,
Attendance and Records share the same database, you must upgrade all programs from
Version 1 to Version 2 at once; otherwise, you may have data loss.
Magnetic Stripe Card Reader (Optional) .................................................................
The magnetic stripe card reader (mag-stripe reader) is an optional accessory that you can
use with MyBiz Time Clock. The type we use is a keyboard wedge which connects to a
computer keyboard. The mag-stripe reader is meant to be used with a dedicated
computer which can run the Time Station.
Remote Terminals (Optional) ..................................................................................
The Time Clock Remote Terminal is another optional accessory that you can use with
MyBiz Time Clock. This section explains how our program works with remote
terminals. A remote terminal is a data collection station that looks like a 10-key pad with
a magnetic stripe card reader attached. The remote terminal is connected by a network
cable that allows you to have a small data collection station in areas where you don’t
want or need to have a full computer and monitor setup.
A remote terminal collects the data (such as someone clocking in/out) and sends the
information to the database where it processes the data through stored procedures. In
other words, it does all the processing at the PC where the database resides. The remote
terminal has a live connection to the PC, so if the PC goes down, employees will not be
able to clock in or out until the connection is restored.
Setting Up a Remote Terminal
To set up a remote terminal you will need the following:
One Time Clock Remote hardware clocking station
G.Neil Remote Terminal Program
MyBiz Time Clock Program
Static IP Address
Ch 2: Installing
15
The Remote Terminal Program allows you to enter an IP Address of the Remote
Terminal. You can set up the remote terminal anywhere you can setup a connection to
the network.
Setting the IP Address on a remote terminal
1. Have your Network Administrator set up a static IP Address for the remote
terminal. NOTE: G.Neil Tech Support cannot assist in setting this up.
2. Connect the Remote Terminal to your network through an Ethernet cable.
Theory of Operation
When the Time Clock Remote terminal is connected to an Ethernet network it functions
similar to a “dumb” terminal. The host software can send commands and displayable
messages to the terminal via the network. User input is entered at the keypad or magstripe reader and is sent to the host software. To minimize network traffic, the user input
is transferred as complete strings instead of character by character. Strings are terminated
by the “Enter” key and terminated with the ASCII <CR> & <LF> characters. The magstripe input automatically includes the “Enter” function.
Terminal Emulation
The Time Clock Remote terminal has two (2) emulation modes, the “Virtual Terminal
Command” (VTC) mode and the “ANSI Emulation Mode.” The VTC mode provides a
unique but simple protocol that eliminates the need to know all the particulars of the
lower level ANSI protocol. The ANSI emulation mode is a subset of the standard ANSI
terminal protocol that supports most of the standard display manipulation command set.
For more information on these emulation modes see the “Software Interface” section.
Network Interface
Time Clock Remote terminal connects to a 10BaseT or 100BaseT hub via a standard RJ45 Ethernet cable. From a network perspective, it occupies a single “socket” at a
specified TCP/IP address and port number. The device must be configured with a
unique IP address, net mask, and port number BEFORE it is installed on the network
(see “Network Configuration Mode”). The host software communicates with the
terminal by establishing a connection with the terminal and then sending and receiving
ASCII text command strings.
Operator Interface
The Time Clock Remote includes an LCD display and a numeric keypad as the primary
operator console interface. In addition, the terminal may include optional barcode
and/or mag-stripe input readers and an auxiliary RS-232 serial port for connection of a
serial input device.
Ch 2: Installing
16
Display
The Time Clock Remote display is a two (2) line by twenty four (24) column LCD
character display. It can display the 96 standard ASCII characters and 96 non-standard
symbols in a 5 x 7 dot matrix font. The cursor position is identified by a blinking box
and can be positioned under software control. A display backlight is included; 8-line,
desktop and wall-mounted versions are available, also.
Keypad
The Time Clock Remote operator keyboard consists of a four (4) row by six (6) column
membrane switch keypad. Two (2) shift keys (“S1” & “S2”) are provided to generate
upper case alpha characters and several special characters. The keypad also includes “IN”
and “OUT” keys for manually clocking in/out and “YES” and “NO” keys for answering
program questions.
Default Alpha/Numeric Mode
[top right character]
[top left
character]
[bottom
row
character]
A
B
C
7
I
D
J
K
R
S
F
9
L
M
T
U
5
1
N
6
2
Y
S1
E
8
4
Q
Function Keys
V
3
BACKSPACE
S2
,
.
ENTER
Z
0
G
H
SPACE
O
P
CLEAR
W
X
“
‘
(
IN
)
OUT
#
$
=
YES
@
-
+
:
;
NO
*
?
\
/
CANCEL
[shift keys]
The shift keys ("S1" & "S2") are used to expand the number of ASCII characters that
can be generated by the keypad. Holding down a shift key and pressing one of the other
22 keys generates an alternate ASCII character. For example, holding down "S2" and
pressing the "7" key generates the ASCII "B" code. In addition, holding down both shift
keys and pressing a function key results in a special local terminal function. The
following table shows the assigned local terminal functions.
Ch 2: Installing
Key Combination
Local Function
Pressing Bottom Row
Character
S1 & [top left character]
Enters the bottom character. For example, pressing “7”
enters the number “7” on the keypad.
Enters the top left character. For example, pressing “S1”
& “A” enters the letter “A” on the keypad.
17
Key Combination
Local Function
S2 & [top right character]
Enters the top left character. For example, pressing “S2”
& “B” enters the letter “B” on the keypad.
Enter Network Configuration Mode
Enter Configuration Mode
Reboot Terminal – Reboot requires reconnecting
through the TC Remote program
S1 & S2 + IN
S1 & S2 + OUT
S1 & S2 + Cancel
Setup & Configuration
It is strongly recommended that you read these instructions on setting up and
configuring the Time Clock Remote terminal BEFORE attempting to install it.
The Time Clock Remote terminal must be configured for MyBiz Time Clock BEFORE
it can be installed and used on the network. Configuration parameters can be modified
through the operator console and are saved in non-volatile memory. Network
communication parameters are entered with the “Network Configuration Mode” and the
console parameters are modified with the “Console Configuration Mode”.
Configuring the Time Clock Remote terminal is done in three steps:
1. Configuring the Network Configuration.
2. Configuring the Console Configuration.
3. Setting Up the TC Remote program.
Network Configuration Mode
The Network Configuration Mode is used to configure the Time Clock Remote
communications parameters. These parameters must be set BEFORE the terminal is
installed on the network. Holding down the “S1” & “S2” shift keys and pressing the
“IN” key will start this mode. A menu will be displayed and pressing the “2” key will
allow access to the network parameters. The display will present a series of configuration
parameters and their current values. A value can be changed using the keypad and
pressing the “Enter” key. After the last parameter is entered the values are saved in
memory and the menu is display again. Exit from the “Network Configuration Mode” is
accomplished by pressing the “Enter” key at the menu.
The following table summarizes the “Network Configuration Mode” parameters and the
VTC command names used to change them. NOTE: Only the MYIP, NETMASK, and
MODE parameters need to be configured to work with MyBiz Time Clock.
Ch 2: Installing
18
Ch 2: Installing
Name
Default Value
Description
MYIP
192.168.168.50
NETMASK
255.255.255.0
GATEWAY
0.0.0.0
TCPPORT
1070
SERVER
0.0.0.0
Defines the unique network address of this
terminal. This value must be set BEFORE
installing the device on a network. The default
value may NOT be appropriate and a new
address should be obtained from the network
administrator.
Defines the network mask for the IP address.
This value must be set BEFORE installing the
device on a network. The default value may
NOT be appropriate and a new value should be
obtained from the network administrator.
Can be set to the address of a router or gateway
if the network extends to multiple segments.
This value must be set BEFORE installing the
device on a network. The default value may
NOT be appropriate and a new address should
be obtained from the network administrator.
Defines the primary TCP/IP port number used
for this terminal. This value must be set
BEFORE installing the device on a network. In
most cases, the default value will be acceptable.
However, it may NOT be appropriate and a new
port number should be obtained from the
network administrator. It should be set to 23 for
a “telnet terminal” application.
Defines a TCP/IP address for a server
application. This value must be set BEFORE
installing the device on a network. Normally,
this value is set to 0.0.0.0 which causes the
terminal operate as a “server” and connects with
a host computer running a “client” application.
If this value is set to any other IP address the
terminal will operate as a “client” and will
attempt to automatically connect to a host
computer “server” application.
19
Ch 2: Installing
Name
Default Value
Description
AUXPORT
9600,0,8,1,1
MODE
1
MYMAC
0050C2163007
Defines the communications format for the aux
serial port. The parameter string consists of five
(5) integer value fields and has the following
format:
Baud, parity, data bits, stop bits, xoff Where:
Baud = standard baud rates in the range of 110
– 57600
Parity = 0 (none), 1 (even), 2 (odd)
Data bits = 7 or 8
Stop bits = 1 or 2
Xoff = xon/xoff protocol (0=disable, 1=enable)
Defines terminal emulation mode. The two (2)
valid emulation modes are as follows:
1 = VTC Mode (default)
2 = ANSI Mode (MyBiz setting)
This command will return a 12 character
hexadecimal string representing the Ethernet
hardware address. It is read only and can not be
used to change the hardware address.
20
Chapter 3:
Getting Started
This chapter will help you to get started quickly and provide references for other
chapters.
Chapter Contents:
Before You Begin ........................................................................... 22
Starting MyBiz Time Clock .......................................................... 25
Opening the Management Screen ............................................. 26
Checklist ......................................................................................... 26
Changing the Admin Password .................................................. 27
Creating Locations & Departments............................................. 28
Setting Up Global Preferences ................................................... 30
Setting Up Reason Codes ............................................................ 37
Work Schedules ............................................................................. 39
Adding Employees ......................................................................... 40
Assigning Time Clock Access ...................................................... 41
Creating Time Clock Messages .................................................. 42
Setting Up Reminders .................................................................. 42
Dealing with Time Zone Differences ......................................... 46
Ch 3: Getting Started
21
Before You Begin.....................................................................................................
You should have the following information available:
Location and Department names
User Information (managers, supervisors, administrative assistants and others who
will have access to the data)
Employee Data (Employee Name, Hire Date, Work Status (full or part time), Active
Status (Active, Inactive, or Terminated), Location and Department, Day Work
Hours and Week Hours). You will need additional information about employee
schedules, overtime and rounding rules, payroll categories and codes, etc., to fully
set up MyBiz Time Clock.
Navigating the Management Windows
MyBiz Time Clock is now easier to navigate than ever before. Even better, if you have
other MyBiz software installed, such as MyBiz Records and Attendance, you have access
to all programs and features from one convenient interface.
The main parts of the MyBiz user interface are the Menu Bar, Program Bar, Feature
Column, Employee Select Column, Selected Feature Pane and the Recent Features Pane.
Feature Column
Employee Select
Column
Selected Feature
Pane
Menu bar
Program Bar
Recent Features
Pane
Status bar
Ch 3: Getting Started
22
Menu Bar
The menu bar includes the following options:
Menu
Description
Maintenance - Backup and Restore Database –
Export Time Clock Data File
Import Data – Imports basic data into the database.
Export Data – Exports basic data from the database.
Delete – Deletes current employee record.
Exit – Closes program.
[Employee Name(s)] – The last seven employees that have been
entered or edited will show here for quick navigation back to their
records.
Filter Page – This option allows you to filter by Active, Inactive,
Terminated, Full and Part Time Status.
View
Open Reminders – Shows open reminders that have not been
resolved and whose date has not passed.
Checklist – Shows the Checklist for getting started.
Welcome – Shows the Welcome Screen.
User Security – This screen allows you to set up user access.
Global Preferences – This feature allows you to set up settings that
Settings
affect features within the program.
Reason Codes – This allows you to set specific reasons when
entering paid time for an employee.
Locations Departments – This feature allows you to create your
locations and departments.
Messages – These messages will be seen when employees clock in
and out.
Work Schedules – Work Schedules allows you to set rounding rules
(grace period) for employees clocking in/out.
Time Difference – If you have multiple sites in different time zones,
this option will allow you to set the difference in time for each
computer connected to the database.
There
are 12 different reports from basic employee information to
Reports
viewing time cards and tracking deleted time clock entries (See
Chapter 10 – Using Reports).
Ch 3: Getting Started
23
Menu
Help
Description
Contents – This brings up the Help File for MyBiz Time Clock. Note:
Internet Explorer 4.x and above needs to be installed for this option to
work.
System Information – This gives you information about your
computer, database path, and other information that is needed when
speaking to G.Neil’s Technical Support team.
About – This shows the version number, type of license (Single User,
five user, 10 user or Unlimited), and User Login Name. A link to the
G.Neil Tech Support site is also located here.
Alter Current Product License – This allows you to enter a new
Product Key Code.
Feature Column
The Feature Column includes the following options:
Button
Description
Employee Detail allows you to add new employees and edit
Employee Detail employee information. This screen is shared between MyBiz
Attendance, Records and Time Clock.
In/Out Board allows you to view the clock in/out status of
In/Out Board
employees at a glance.
Reminders allows you to view, edit and create reminders.
Reminders
Reports allows you to print 12 different reports.
Reports
Time Clock Access allows you to set up employee access to
Time Clock
clock in/out. You may give employee access to create, edit
Access
and/or delete their own time entries.
Time Clock Entries allow you to maintain employee time
Time Clock
entries. You may view, add, delete and edit time entries as
Entries
needed.
Time Card Runs allow you to view, print or export time
Time Card Runs
cards
Toolbar
The Toolbar contains buttons that allow navigation between feature records and allows
editing of employee information.
Go to
Edit Record
Cancel Changes
Create New Save Changes
Ch 3: Getting Started
Print Report Launch
Delete Record
Feature
Help
24
Starting MyBiz Time Clock .....................................................................................
MyBiz Time Clock consists of two applications: the main application - MyBiz Time
Clock Admin, where administrative work is done, such as setting up logins, editing time
cards and printing time card runs; and a separate application called the MyBiz Time
Station, from which your employees clock in and out.
To start the Time Station, click Start > Programs > GNeil > MyBiz Time Station or
double-click the program icon on the computer where your employees will clock in/out.
The Time Station is where your employees will clock in and out. Employees may clock in
and out using the keyboard or swipe card with magnetic stripe reader or use a Time
Clock Remote Terminal, which only needs the TC Remote program running.
My Time Clock –
Employees may login to
view their time entries.
In Out Board – Shows
who is clocked in and out
at a glance.
Time Station
When installed on a
Server, for security
purposes, the date and
time is pulled from the PC
where the database is
installed, and not from the
Workstation.
Clock- in and -out using
the keyboard or by
magnetic stripe card
reader.
Ch 3: Getting Started
25
Opening The Management Screen ..........................................................................
The Management screen allows you to view and edit employee time entries, run reports,
and set program options. If you have the MyBiz Time Clock (full program) installed on
the same computer as MyBiz Time Station, you will have the option to log into the
management screen by clicking Management > Management Login. Or you may get
to it by clicking Start > Programs > G.Neil > MyBiz Time Clock.
NOTE: A Management (Administrator) Login is different from an Employee Login. A
Management Login allows access to set up screens, time card entries and reports;
Employee Login only allows employees to clock in/out and manage their individual time
entries.
The Welcome Screen
If you’re going into the Management screen for the first time, the Welcome screen will
appear. The Welcome screen gives you tips on getting started and the new features.
If you do not want this window to appear the next time you start MyBiz Time Clock,
click Don’t show this message again in the bottom left. To show this message at
startup from within MyBiz Time Clock, choose View > Welcome. Click Continue to
open the Management screen.
Logging into the Management screen
A user login is different from an employee login. An employee login (set under Time
Clock Acess) will only have access to the My Time Clock feature and to clock in and
out. A user login (set under User Security) will allow managers, supervisors, and other
administrators access to setup and maintain MyBiz Time Clock.
Login and Password
If you’re logging in for the first time, the default user login is Admin, and the default
password is Admin. For security purposes, we highly recommend changing this
password after you log into the Management screen.
MyBiz Time Clock Checklist ...................................................................................
For first time users, the MyBiz Time Clock Checklist will appear. If you do not want this
window to appear at startup, click I am finished with the checklist. To show this
window from within MyBiz Time Clock, choose View > Checklist.
Ch 3: Getting Started
26
The Checklist shows in order the sections that you should complete to get up and
running quickly.
Change the Admin password by going to Settings > User Security. We highly
recommend changing the Admin password even if there aren’t other users. If
needed, set up access for others who will need to help you set up the program. If
you need to give access to specific locations and departments, or individual
employees, set these up first and then come back to User Security and complete
security access. (See Chapter 5 – Setting Security Rights.)
Create Locations and Departments (See Chapter 3 – Creating Locations &
Departments .)
Set up Global Preferences. (See Chapter 3 – Setting Up Global Preferences .)
Set up preferences (See Chapter 3 - Setting Up Time Clock Preferences .)
Set up Reason Codes (See Chapter 3 - Setting Up Reason Codes
Create Work Schedules (See Chapter 8 - Creating and Editing Work Schedules.)
Add Employees (See Chapter 7 - Adding a New Employee .)
Assign Time Clock Access (See Chapter 3 - Assigning Time Clock Access .)
(Optional) Setting Up MyBiz for Time Zone Differences (See Chapter 3 - Dealing
with Time Zone Differences .)
Changing the Admin Password ...............................................................................
The Admin login and password allows access to all features within MyBiz. Changing the
Admin password is quick and easy, and allows for greater security.
NOTE: The password should be one that you will easily remember but not easily
guessed by those who know you. A combination of letters and numbers (no spaces or
special characters) at least 8 characters long will make a good password.
To change the Admin password, follow these steps:
1. From within MyBiz, go to Settings > User Security.
2. Enter a new password in the Password block. Then enter the password once more
in the Verify Password block.
3. Click Save.
The next time you log in, you may use the new password.
Ch 3: Getting Started
27
User Security
Screen
Save As – allows you
to copy access rights
from one user to
another.
Detail, Attendance, Records and Time
Clock – set access to specific program
features.
Search For - allows
searches by user
Feature/Access Rights –
allows you to set access to each
feature.
Location/Department – set
access to location/department or
employees.
Creating Locations & Departments .........................................................................
Locations and Departments are required and must be assigned to each of your
Employees (See Chapter 7 - Adding New Employees to assign Location/Department
to employees). Locations and departments allow you to sort your employees within a
designated group. A location is considered a geographic place or group name, such as a
Chicago or East Coast. A department is considered a specialized division or group
name under the location, such as Sales or Merchandising.
Ch 3: Getting Started
28
Location / Department
screen
Location and
Department set up
Assign departments to each location. Only those
departments selected will show up under that
location on the drop down menu.
NOTE: Departments are assigned to Locations. When setting up Locations and
Departments for the first time, a Location must be set up FIRST, and then you may
assign a Department to that Location.
Setting up Locations and Departments
To create your Locations and Departments, follow these steps:
1. Click on Locations and Departments from the Settings menu.
2. Click Locations, then click New.
3. Enter the Location name.
4. Click Save.
5. Click New again to create other Locations as needed.
6. Click the Departments, then click New.
7. Enter the Department name.
8. Click Save.
9. Click New again to create other Departments as needed.
10. After all locations and departments are created, click the + sign next to Location in
the right pane.
11. Assign departments to a location by clicking in the box next to the department.
Ch 3: Getting Started
29
NOTE: As you add more locations and departments, you’ll see that each location has
ALL of the departments that you’ve created. However, only those departments that you
assign to a location will show up when selecting them on other screens. You may not
remove a Department from a Location if an Employee is still assigned to that
Location/Department combination.
Setting Up Global Preferences ................................................................................
Global Preferences allows you to control your default program settings, such as
Company Info, Report Options, and specific program options.
Before editing any of the Global Settings, you must first click the EDIT button. See
below for detailed information on each tab.
Global Preferences
- Company Info Tab
Company Info Tab
The Company Information screen allows you to enter your company name, address and
logo. We recommend entering the company name and logo as these will print out on
Reports.
Ch 3: Getting Started
30
Feature
Company Name
Address, City, State, Zip
and County
Remove Current Logo
Assign New Logo
Save Logo to disk
Description
(Recommended) This will display on the report
heading.
(Optional)
This allows you to unselect the current logo.
This allows you to select a new logo. This logo will
display on the top left of reports.
This allows you to save the current logo to disk or
to your hard drive.
Editing Company Info
Follow these instructions to edit the company info:
1. After clicking on Settings, Global Preferences click Edit.
2. Enter Information as needed.
3. Click Save.
Adding a Company Logo
If you have your company logo available in a bitmap (. bmp) or jpeg (.jpg) file format,
you can have this logo appear on reports. MyBiz supports .bmp and .jpg file formats not
to exceed 200x200 pixels in size. The logo will appear in the top left when you print a
report.
To add a company logo, follow these steps:
1. Click Assign New Logo.
2. Navigate to the directory where the company logo is located. It can be in a .bmp or
.jpg format no bigger than 200x200 pixels in size.
3. Click on the logo and then click on Open to select it.
4. Click the Save button.
Saving Logo to Disk
You may save the logo to a directory on a disk or hard drive. When you add a logo
within MyBiz, the logo is actually saved within the database file.
General Settings Tab
The General Settings screen allows you to enter the default hours in a day that employees
will be assigned and allows use of the Forgotten Password Utility. This screen also allows
settings for Forced Writes to Interbase and prompting to backup on exit.
Ch 3: Getting Started
31
Global Preferences –
General Settings Tab
Feature
Epoch Setting
Default Hours in
a Day
National ID
Number Format
/Label
Ch 3: Getting Started
Description
We strongly recommend keeping the default settings. This
setting will allow the MyBiz program to appropriately interpret
any two-digit year entered that is between 1920 and 2019. For
example, with the default Epoch setting of 1920:
1. If you enter a date (such as in the Hire Date field) of
03/05/01, the program will interpret this as 03/05/2001.
2. If you enter a date of 03/05/18, the program will interpret
this as 03/05/1918.
Note: If you need to enter a year prior to 1920 or after 2019 in
a date field within the program, you may enter the year as a
four-digit number.
These are the default hours that will be assigned when creating
a new employee. The Day Hours on the Employee Detail
screen will be filled in automatically with these default hours
when a new employee is created.
Selecting one of these options will allow you to set the mask for
the National ID Number Format. The default mask is set to the
USA SSN format. With this selected, whenever you enter a new
employee, the dashes will automatically come up in the xxx-xxxxxx format. The label is the title that will appear on the
Employee Detail screen.
32
Feature
Allow use of Forgotten
Password Utility
Description
This option allows access to a utility that can be
used, only with assistance from G.Neil Tech
Support, to gain access into the MyBiz program. In
order to use this feature, we require that a
statement on a company letterhead and signed by a
supervisor, be sent by fax or mail stating that the
user is allowed full access into the program. We
keep statements on file. Call G.Neil Tech Support
if you have forgotten or lost your MyBiz password.
•
Forced Writes for Interbase
Prompt for backup on Exit
Ch 3: Getting Started
When running the MyBiz database on a
Standalone computer, this option will help to
keep the database more stable. If the MyBiz
database is installed on a PC and the program
is open at the time the computer locks up or
crashes, the database is prone to becoming
corrupt and possibly unrepairable. A computer
lockup or crash can be attributed to several
things, including having too many programs
open at the same time than what your
computer memory can handle.
• We recommend keeping this option checked.
The performance may lag a little, but you may
not even notice it. We also recommend
having a current backup always available.
This option allows you to turn on or off the
message prompting for backup when you close out
of the program. Backups are very important.
33
Report Options Tab
The Report Options settings affect how reports will appear by default.
Global Preferences –
Report Options Tab
Feature
Print Preview
Header Bold
Header Line
Header Shade
Data Line
Print SSN
Print Picture
Print Totals
Description
Toggles (turns on and off) showing preview first
before printing.
Toggles bolding for Header Title
Toggles putting a line under the Header Title
Toggles shading for Location or Department title
row
Toggles lines to separate data information
Toggles ability to show Social Security Numbers
Toggles ability to print Picture on printout
Toggles whether or not Totals show up on reports
Editing Report Options
To Edit Report Options, follow these steps:
1. Click EDIT.
2. Choose an option by clicking in the box.
3. Click Save.
Attendance Tab
The Attendance Tab will only show if MyBiz Attendance is installed. Please see the
MyBiz Attendance manual for more details on this feature.
Ch 3: Getting Started
34
Global Preferences
– Time Clock Tab
Setting Up Time Clock Preferences
The Time Clock Tab allows you to set global settings for MyBiz Time Clock. This will
also allow you to enable Attendance and Time Clock code sharing. (See Chapter 4:
Setting Up Attendance Code Sharing for detailed information.)
Feature
Time Format
In/Out Board Settings
Time Display Rate
Attendance Code Sharing
(See Chapter 4: Setting Up
Attendance Code Sharing for
detailed information.)
Ch 3: Getting Started
Description
This allows you to set the time to display in military
style or 12-hour style.
a. Enabled – This allows the user to view the
In/Out Board from the main screen.
b. Display Time – This will show the clock
in/out time for the employee.
c. Require Login – This causes the In/Out
Board to require a login and password.
This causes the main clock to be viewed in seconds
or minutes.
If you have MyBiz Attendance installed, the
following options will be available:
a. Enable Code Sharing - This will allow hours
worked and paid time off codes to be shared
between MyBiz Attendance and Time Clock.
For example, if a code “V” for Paid Vacation
of 8 hours is entered on the Calendar in MyBiz
Attendance, this time will also be entered into
MyBiz Time Clock as a manual time entry of 8
hours.
35
Feature
Attendance Code Sharing
(Cont.)
Sync with the server every
120 second(s)
User must login/punch
within 30 second(s)
Enable Swipe Card Usage
Require Password when
Swiping
Enable “Auto Clocking”
Require Password for
manual Employee Login
Require Password for
access to My Time Clock
Request confirmation if
user is double clocking
Ch 3: Getting Started
Description
b. Enable Hours Worked Transactions
Relation - (Enable Code Sharing must be
checked for this option to be available.) This
allows the “W” code (Hours Worked) entry in
MyBiz Attendance to be entered as a manual
time entry in MyBiz Time Clock.
c. Reported Payroll Description Columns Reason Code = Payroll Code Description =
Related Attendance Absence Code.
Note: Reason Codes and Payroll Code
Descriptions must be set up before assigning the
Reported Payroll Description Columns. (See
Chapter 3 - Setting Up Reason Codes .)
This is how often the client will synchronize the
main clock with the server.
Once a user enters the first character into the login
screen, a countdown timer starts. If a user doesn’t
finish entering his or her login and password
within the allotted time, the screen will reset the
main clock screen.
This allows you to enable the use of swipe cards.
(Swipe cards and swipe card reader required.)
Users will be required to enter a password when
swiping in.
This enables the “smart” clocking feature. When
users clock in the first time, the program clocks
them in. The next time the user will be clocked
out and so on. If 13 or more hours pass between
punches, this feature will be reset and will take the
next punch as an In punch.
Users will be required to enter a password when
clocking in/out.
Users will be required to enter a password when
going into the My Time Clock feature.
Double clocking is defined as two In punches or
two Out punches in a row. If a user tries to clock
in/out twice in a row (within a 13-hour period), a
message box will pop up asking for confirmation.
36
Setting Up Reason Codes ........................................................................................
You may get to Reason codes by going to Settings > Reason Codes.
When you make a change to a punch entry, you are required to enter a reason for the
change. All changes, such as deleting or editing a punch entry, are tracked and recorded.
Reason Codes allow you to create these reasons customized for your company. There
are different types of reasons:
Feature
Use for Punch Changes
Use For Deleted Entries
Use For Time Entries
(Manual Time Entries)
Description
Reasons you would use when making a change to
a punch. For example, you might enter a punch
time for an employee because he or she forgot to
punch in. (The reason would be Forgot to Punch.)
Reasons you would use when deleting a punch or
time entry. For example, you would delete a punch
or time entry because someone punched in twice.
(The reason would be User Error.)
Reasons you would use when entering a manual
time entry. For example, you may want to enter 8
hours of Paid Vacation for an employee. (The
reason would be Paid Vacation.) This reason is also
associated to MyBiz Attendance, if code sharing is
checked.
Typical reason codes could be Forgot a Punch, User Error, or Computer Down. For
example, if the new employee, Josh, came in at 8:30 AM and forgot to clock in, Josh’s
supervisor would need to create a punch entry for 8:30 AM so that Josh gets credit for
that time.
Reason Codes
Screen
Ch 3: Getting Started
37
Feature
Reason Code
Enabled
Use for Punch Changes
Use for Deleted
Changes
Use for Time Entries
Count Towards
Overtime Calculations
Payroll Code
Description
Payroll Code Number
Related Attendance
Absence Code -This
option will only be
available if the Enable
Code Sharing is checked
(under Global
Preferences > Time
Clock Tab).
Ch 3: Getting Started
Description
This is the name of the reason (PTO, Sick, Personal,
User Error, etc).
When checked, this allows the reason code to show up
when editing time on the Time Clock Entries screen.
These are Reason Codes that you want to see when
you're doing a manual punch (Clock In or Out)
change. A punch change changes or adds a specific
punch in/out time entry. This is different from giving
a full or partial day (see Use for Time Entries below).
Whenever you delete an entry, you'll need to enter a
reason. These are the Reason Codes that you want to
show up when DELETING an entry.
These are reasons that you only want to see when
entering a manual time entry, such as Vacation,
Personal, Sick, etc. A manual time entry is normally
entered to give a full or partial day. For example, you
might enter 4 or 8 hours of time for an employee that
is on Vacation. This reason is different from giving a
single entry for punching in or out for a specific time
(see Use for Punch Changes above).
When checked, this setting tells Time Clock to count
time under this Reason Code towards overtime.
(Optional) Enter a Payroll Code Description. This
description will show up on the Time Card Runs
report. If a Payroll Code Description is not entered,
time will be shown in the “Other” column on reports.
(Optional) Enter your company’s Payroll Code
Number. This payroll code number will show up when
exporting time card runs.
This allows an Absence Code from MyBiz Attendance
to be directly related to a Reason Code in MyBiz Time
Clock. When an absence or time worked code is
entered on the Attendance Calendar, this entry will be
entered in Time Clock according to the related Reason
Code. Similarly, when you create a manual entry with a
Reason Code in Time Clock, an Absence Code appears
on the Attendance calendar screen.
38
Creating a New Reason Code
To create a new reason, follow these steps:
1. Go to Settings > Reason Codes.
2. Click New.
3. Enter a reason for the following:
a. Reasons you would use when making a change to a punch.
b. Reasons you would use when deleting a punch or time entry.
c. Reasons you would use when entering a manual time entry.
NOTE: You can select multiple uses for a reason code. For example, when using the
reason code “Off Site,” you may want to be able to select this when entering a punch
change or when entering a full or partial amount of time.
4. Select Enabled. This will allow the reason to be selected when making changes.
5. Click Save.
Work Schedules ......................................................................................................
You may get to Work Schedules by going to Settings > Work Schedules.
There are some things in life that nobody has control over that may make an employee
late for work. Many companies give a grace period to employees when punching in or
out to cover these occasional events. Setting up a Work Schedule allows you to give a
grace period from 2 to 60 minutes. You may run an Exceptions report to show if
employees are abusing this right.
NOTE: If a Work Schedule is not set up or assigned, employees will be clocked in/out
with no rounding or overtime rules. You will also not be able to run the Punch
Exceptions Report.
Under Work Schedules, you may also set up overtime and punch schedules and rules that
govern how to handle shifts that go over midnight into another day. You will need to set
up your rounding rule (Work Schedule) and assign that rule to each employee. The most
common rounding rules of 6, 10, and 15 minutes have already been set up for you.
To set up your rounding rules, go to the Settings menu, then Work Schedules. (See
Chapter 8 – Create and Edit Work Schedules for detailed instructions on setting up
Work Schedules.)
To assign a Work Schedule to an employee, go to the Time Clock Access Feature, then
Current Work Schedule. (See Assigning Time Clock Access below.)
Ch 3: Getting Started
39
Printing Work Schedules
You may print all current Work Schedules by going to Settings > Work Schedules and
clicking on the Printer icon.
Printing Employee Assigned Worked Schedules
To print the work schedules are assigned to employees, go to Reports > Work
Schedule Assignments.
Adding Employees ..................................................................................................
You may get to the Employee Detail Feature by selecting Employee Detail under the
Feature Column.
All employees are entered through the Employee Detail screen. From here, you can enter
their names, Social Security Numbers (optional), Hire Dates, Job Titles, and other
pertinent information. This information is shared between MyBiz Attendance, Records
and Time Clock. This means that when you enter this information in one program, you’ll
be able to see it in the other MyBiz programs.
Required Fields
The following fields are required: First Name, Last Name, Hire Date, Work Status,
Employment Status, Location, Department, and Day Hours. SSN is not required in
MyBiz, but may be required when exporting Time Card Runs for certain payroll
programs.
Employee Detail
screen
To add a new employee, click New. (See Required Fields above.) Click Save after
entering employee information.
Ch 3: Getting Started
40
NOTE: Locations and departments must be set up before entering new employees. (See
Settings > Locations/Departments to set these up.)
Assigning Time Clock Access ..................................................................................
In order to allow employees to clock in and out, Enable Employee Time Clock
Access will need to be checked under the Time Clock Access button. You may also
give employees access rights to create, edit and/or delete their own time entries.
To assign access to an employee, follow these steps:
1. Select the employee that you want to allow to clock in/out by clicking on his or her
name in the browse window.
2. Select the Time Clock Access button.
3. Enter a login name. The employee will use this to login to clock in/out and to gain
access to the My Time Clock feature. My Time Clock allows employees to see
their time entries.
4. Enter a password, and enter it again in the Verify Password block.
The Time Clock
Access Feature
Employee Login and
Password. This is what
they will use to clock in
and out with.
Time Clock Access These settings allow
employees to clock
in/out, and to edit
their time entries.
Current Work
Schedule assigned for
rounding rules.
Ch 3: Getting Started
In Out Board Access
allows access to see
all, none, or loc/dept
on board.
Swipe Card ID
allows use of
magnetic stripe
card with
reader.
41
Creating Time Clock Messages ...............................................................................
To get to the Time Clock Messages screen, go to Settings > Messages.
This screen allows you to enter messages that employees will see when they clock in or
out. You may even set how long the message will stay on the screen.
To display a message, type your message in the message block for either Clock In or
Clock Out Message, then click Save.
Time Clock Messages
Screen
Enabled – This
will show message
when Clocking
In/Out.
Message Block
Display message for __
second(s) – how long the
message will stay on the
screen.
Displays employee
photo and balances
when clocking in/out.
NOTE: The Clock In message will display whenever an employee clocks
in, and the Clock Out message will display whenever an employee clocks
out. For example, when an employee clocks in to begin the workday, the
Clock In message will display. This same message will display when the
employee clocks in from lunch.
Setting a Reminder .................................................................................................
Go to Time Clock > Reminders Feature.
The Reminders feature will show you all open (unresolved) reminders and allow you to
create, delete and resolve reminders. If you have created a reminder it will show up when
you first open the program, starting on the reminder date. Reminders will continue to
display until you click Resolve.
Ch 3: Getting Started
42
Reminder Screen
Reminders Tool Bar and Pane Layout
Tool Bar
First-Prior-Next-Last arrows – navigates through selected reminders
New – Creates a new reminder
Edit – Allows you to make changes to a reminder
Save – Saves reminder
Cancel – Cancels current changes
Delete – Deletes selected reminder
Print – Lets you print the Reminders report for selected employees
Help – Brings up help for this screen
Pane Layout
Reminder Date – Date reminder should first display
Title – Heading of reminder
Resolved – Checkbox displays checked for resolved or unchecked for
open (unresolved)
Employee Name – Displays name of employee that reminder is
associated with
User – Displays name of user that reminder will display for
Description – The purpose of the reminder shows here
Filters
User – Allows you to view reminders associated with specific users (must
have access to Reminders, Assign Users under User Security)
Show Resolved – Displays Resolved reminders only
Show Unresolved – Displays Unresolved (open) reminders only
Ch 3: Getting Started
43
Creating a New Reminder
There are two types of reminders in MyBiz:
One Time Reminders – These are reminders that are only meant to remind you of a
one-time event, such as filing an Absence Report at the end of the year.
Recurring Reminders – These remind you of the following recurring events:
Anniversaries (MyBiz Attendance and Time Clock)
Birthdays, Performance Reviews, and I-9 Renewals (MyBiz Records)
Setting a Reminder
One Time Reminder
1. Click on Reminders from the Features Column.
2. Click New.
3. Select (check) One Time Reminder.
4. Enter a Title and Reminder Date
5. If you want the reminder to be associated with specific employees, select the
checkbox “Assign to all selected (checked) employees.” This is optional and will
create a separate reminder that is associated with each employee.
6. If you selected the checkbox in Step 5, you will need to select (check) any employees
that this reminder is about in the Employee Select Column. Otherwise, skip to the
next step.
7. By default, the User’s name will default to the login that was used to enter the
program. Change this if you want the reminder to come up for another user, or you
may select Global which allows the reminder to come up for all users logging in.
Note: You must have access to Reminders, Assign Users and Reminders, Assign
Global under User Security to be able to change this option.
8. Enter a description of the reminder, if needed.
9. Click Save.
Recurring Reminder
1. To create a recurring reminder, follow these steps:
2. Select Reminders from the feature list.
3. Click New.
4. Select (check) Recurring Reminder.
5. Select the type of reminder: Anniversary, Birthday, Performance Review, or I-9
Renewal.
6. Select a Through Date (when do you want to stop the reminder from occurring).
7. Select how many days you want to be reminded before the event.
8. By default, the User’s name will default to the login that was used to enter the
program. Change this if you want the reminder to come up for another user, or you
may select Global, which allows the reminder to come up for all users logging in.
Ch 3: Getting Started
44
Note: You must have access to Reminders, Assign Users and Reminders, Assign
Global under User Security to be able to change this option.
9. Enter a description of the reminder, if needed.
10. Click Save.
Deleting Reminders
Reminders are deleted from the Main Reminders screen by clicking on the Delete icon.
Editing Reminders
There are two ways to edit reminders:
Main Reminders screen
From the main Reminders screen you can edit the following columns just by clicking in
the field: Reminder Date, Title, Resolved and Description.
Edit Reminders screen
Clicking on Edit from the main Reminders screen will bring up the Edit Reminder
screen. You may also double-click on the title of a reminder. The Edit Reminders screen
allows you to change the Title, Reminder Date, User and Description.
Note: If you need to change the Employee Name that this reminder is about, you’ll need
to delete the reminder and then re-add it.
Open Reminders
Open reminders will appear for the user they are assigned unless the Global option is
checked. If a reminder is marked with Global, then it will show for all users. You may
view open reminders by opening the program or selecting Reminders from the feature
list.
Note: If you have security access to “Reminders, Assign Users” (See Setting Security
Rights, Chapter 5), you may view reminders set up by other users. You may also resolve
reminders from the Open Reminders screen.
Features
Topic
User
Reminder Date
Ch 3: Getting Started
Description
Brief Description of Reminder.
The reminder is assigned to the listed person. All users who have
access to the program will appear on the list. Unless Global is
checked, the reminder will only appear for the User the reminder is
assigned to.
This is the date the message will appear on the Open Reminders
pop-up window upon entering the Manager’s Login.
45
Features
Employee
drop-down box
Status
Global
checkbox
Resolved
Checkbox
Sort Options
Filters
Comments
Description
This allows you to select the employee that the reminder is in
reference to.
This will automatically show the Status of the selected employee.
This allows the reminder to be seen by anyone logging in.
This option should be selected when the reminder does not
need to appear any longer on the Open Reminders window.
This allows you to sort the reminders by Date, Name, Topic, or
User.
a. User – This allows you to view reminders of selected user.
b. Display All Users – This allows you to view all reminders
c. Show Resolved – This allows you to view only resolved
reminders.
d. Show Unresolved – This allows you to view only open
reminders.
e. Show Global Only – This allows you to view only
reminders marked Global.
This allows you to view any comments relating to this reminder.
Printing Reminders
You may print reminders by going to Reports > Reminders.
Dealing with Time Zone Differences ......................................................................
If you have departments in different time zones that are connected to the same MyBiz
database, you can set up MyBiz to account for the time differences. Without this feature,
all punch times, whether in different time zones or not, will have the time of the Server
where the database resides.
An example of using Time Difference: If the main server is in Florida, and someone
clocks in from Utah (2 hours behind), the punch time would be recorded at Utah’s time,
like it should.
To get to Time Difference, go to Settings > Time Difference.
To set up computer time differences, follow these steps:
1. Have each computer open MyBiz Time Clock (and then exit) at least once before
continuing. Each computer should be connected to the same database. They do not
have to sign into the Manager’s Section; just open MyBiz Time Clock to the first
screen with the clock.
2. Setting the time difference should be done from the main server where the database
resides. From Settings > Time Difference, you should see the name of each
computer.
Ch 3: Getting Started
46
3.
4.
5.
Enter a Difference Reason for each computer. The reason could be the department
name, state or anything else to remind you where that computer is located.
Computer names will not always be descriptive.
Enter the time difference. Enter time zones behind you with a number to include
the minus sign.
Click Save.
Any punches from the different time zones will be clocked in at their respective times.
Ch 3: Getting Started
47
Chapter 4:
Time Clock &
Attendance Code
Sharing
This chapter explains code sharing between MyBiz Attendance and Time Clock. This will
also walk you through setting up code sharing between the two programs.
Chapter Contents:
Overview ......................................................................................... 50
Setting Up Attendance Code Sharing ....................................... 50
Ch 4: Code Sharing
49
Overview ................................................................................................................
MyBiz Time Clock and Attendance can be fully integrated. This means that absence
codes (paid time off) entered in Attendance are also automatically entered into Time
Clock, such as Vacation.
Example: Linda takes a vacation day; her supervisor enters this time as a Vacation
(Reason Code) in MyBiz Time Clock so that she is paid for that day. With MyBiz
integration set up, this time will also show on the calendar in Attendance as a V – Paid
Vacation day.
Setting Up Attendance Code Sharing ......................................................................
In order to set up MyBiz Time Clock and MyBiz Attendance Code Sharing the following
steps will need to be completed in the order listed:
1. Enable Attendance Code Sharing
2. Set up Reason Codes
3. Set up Payroll Code Descriptions
4. Set up Related Attendance Absence Codes
Enable Attendance Code Sharing
The first step is to enable (turn on) the Attendance integration. You would do this from
Settings > Global Preferences > Time Clock Tab.
1.
2.
Ch 4: Code Sharing
Under Attendance Code Sharing on the Time Clock Tab, click Enable Code
Sharing.
You may also select Enable Hours Worked Transactions Relation if you are
going to enter Hours Worked (W Code) on the calendar in Attendance. With this
option selected, when a W Code is entered on the calendar screen the time will also
be automatically entered in Time Clock.
50
Attendance Code
Sharing
Set Up Reason Codes (See Setting Up Reasons Codes in
Chapter 3 for detailed information)
After turning on the Attendance Code Sharing, the next step is to set up Reason Codes.
You may already have Reason Codes set up; if so, go to the next step of setting up
payroll code descriptions. Reason Codes allow you to select specific reasons when
entering a manual time entry. Some examples of Reason Codes are: Vacation, Sick,
Personal, Computer Down, Corrected Time Entry, etc.
Example: Using the example above where Linda takes a vacation day, when the
supervisor enters a manual entry in Time Clock to record the time off, the time is
entered as 8 hours and the reason code is Vacation.
Feature
Reason Codes
Payroll Codes
Related Attendance
Absence Codes
Ch 4: Code Sharing
Description
Reason Codes are required reasons when
changing a punch entry or entering a manual entry.
Payroll Codes are descriptions that will show on
reports and are related to Reason Codes and
Absence Codes.
Related Absence Codes will allow absences that
are entered on the Calendar screen to also be
reported in Time Clock.
51
To set up Reason Codes, go to Settings > Reason Codes.
When entering a manual time entry, whether correcting an entry, or entering time for
someone out on vacation, requires a reason. The three types of reasons are: Punch
Changes (making a change to a punch time entry), Manual time entries (entering a time
entry for 8 hours Vacation, etc.), and Deleted time entries.
The Reason Code window can be broken down into 3 parts: Reason Code, Payroll
Code Description, and Related Attendance Absence Code.
Reason Codes
Screen
Reason Codes
Payroll Code
Description
Related MyBiz
Attendance
Controller
Set Up Payroll Code Descriptions and Numbers
(See Chapter 4 – Set Up Payroll Code Descriptions for detailed information.)
A Payroll Code Description is related to a Reason Code and Absence Code. The Payroll
Code is the description that will show up on reports (such as the Time Card Runs
report).
Example: A Reason Code of Vacation is set up. When someone takes a vacation day, a
manual entry (from the Time Clock Entries screen) is created and given the Reason of
Vacation. A Payroll Code Description of Paid Vacation is set up relating it to the
Reason Code (Vacation). When a time card report is run it will show the Payroll Code
Description of Paid Vacation (the Payroll Code is what will appear on reports). When
that manual entry with the Vacation Reason Code is created, it will also create an entry
on the Calendar in MyBiz Attendance under the V- Paid Vacation absence code.
Ch 4: Code Sharing
52
Set Up Payroll Description Columns for Reports
When running a report, such as the Time Card Runs report, only two payroll
descriptions will show, along with Regular Hours and Overtime hours, due to space
constraints. If there are any other payroll code descriptions, they will show up in the
Other Column. The Time Card Runs (Extended) report will show all payroll descriptions
in a column format.
After setting up the Payroll Code Descriptions, you’ll be able to set up which two payroll
codes you’ll want to see, in addition to Regular Hours and Overtime Hours; time for all
other payroll codes will be combined into the Other Column.
To set up the two Payroll Description Columns, follow these steps:
1. Go to Settings > Global Preferences > Time Clock Tab. Payroll Description
Columns for Reports, locate First Column and Second Column.
2. Click on the drop-down arrow for First Column and select which payroll code
you’ll like to show up on the Time Card Runs report.
3. Then click on the drop-down arrow for Second Column and select another payroll
code.
4. Click Save.
5. Close all the way out of the program and open it back up to refresh the data.
Set Up Attendance Absence Codes
Once the Attendance Integration is enabled, you’ll be able to relate Reason Codes in
Time Clock to Absence Codes in Attendance. When you enter an Absence Code onto
the Calendar that is related to a Reason Code, this will create an entry in Time Clock.
Example: We have a Reason Code of Vacation = Payroll Code Description of Paid
Vacation = Related Attendance Absence Code of V – Paid Vacation; when entering a
V Code on the Calendar of 8 hours, this time will automatically be entered in Time Clock
as 8 hours of Vacation (Reason Code). And this time will be shown on the Time Card
Run report as 8 hours of Paid Vacation (Payroll Code Description).
Ch 4: Code Sharing
53
With code sharing set up, this is how it will work:
From the Calendar screen, we enter a V – Paid Vacation day (Related Absence Code)
on September 11, 2002.
Related
Absence Codes
set up under
Settings >
Reason
Codes.
From the Time Clock Entries screen, we can see it reports the 8 hours as Paid Vacation
(Payroll Code Description).
Ch 4: Code Sharing
54
If we double-click on the Changed By Date at the bottom of the Time Clock Entries
screen, we can see Vacation as the Reason for Change (Reason Code).
And we can see that it shows our columns of Paid Vacation (First Column) and Paid
Personal (Second Column) with 16 hours Paid Vacation showing for Neil Adams.
And it will work the opposite way if we enter a manual entry in MyBiz Time Clock, it will
display in Attendance.
Ch 4: Code Sharing
55
Chapter 5:
Setting Security Rights
Due to the confidential nature of information stored in MyBiz Time Clock, security is
always turned on. This will help prevent unauthorized persons from accessing critical
employee data. The use of security is required, and setting up access to Time Clock and
any other G.Neil programs you have should be the second thing you do. The first thing
you should do is set up Locations and Departments.
You may set up access for managers to view only their departments and/or view specific
employees from other departments. You may also set up employees to have read-only
access to their records.
Managers Access (User) Vs. Employee Access
There are two main levels of security to MyBiz Time Clock: Employee Level and
Manager (or Administrator Level). An employee can be given access to clock in/out and
even to create, edit, or delete his or her own time entries. Access for employees are given
from Time Clock Access. Managers, Supervisors or Administrative Assistants are given
user access through User Security. This allows managers to be given access to select
features within the Time Clock management screens.
Chapter Contents:
Program Access .............................................................................. 58
User Security .................................................................................. 58
Setting Up a User for Security Access ....................................... 60
Ch 5: Setting Security Rights
57
Program Access ......................................................................................................
Go to Settings > User Security.
The program is set up with a default Login of: Admin and Password of: Admin. We
strongly recommend changing the password for the Admin Login and set up other logins
as necessary.
Setting up security access is necessary to allow other managers or supervisors access to
the program. It is recommended that you do not give out the Login and Password to the
Admin login but instead set up other user logins to access only those features that they
will need. The Detail screen is the first screen that comes up when going into User
Security. You’ll need to set up access to the common MyBiz features (Detail Tab), the
specific program features and locations and departments.
User Security ..........................................................................................................
User Security for the Detail Tab
The Detail Tab has features that are common to the MyBiz programs. Common
Features refer to features that are shared among MyBiz Attendance, Records and Time
Clock. For example, the Detail Tab and Locations/Departments are common to all three
programs. Even if you only have one of the listed programs you will need to follow
these instructions to set up user access rights.
Search For
Save As
This allows searches by User Name.
This allows you to create new user log ins based on
access rights of another user.
User Security
Screen
Ch 5: Setting Security Rights
58
The User Security window has the following features:
Feature*
Description
Employee Record
This allows access to view, add or delete employee
Access
records.
Detail
This allows access to the Detail Tab on the main
screen.
View SSN
This allows access to view Social Security Numbers.
Run Reports
This allows access to run reports.
Reminders
This allows access to add and delete reminders.
Reminders, Assign
This allows access to assign reminders as Global.
Global
Reminders, Assign
This allows access to assign reminders to other users.
Users
User Security
This allows access to add, edit, and delete users and
user access.
Location/Department
This allows access to assign location/department
Maint
access for users.
Global Preferences
This allows access to edit global preferences.
Database Backup
This allows access to Backup from File >
Maintenance.
Database Restore
This allows access to Restore from File >
Maintenance.
Alter Product License
This allows access to change the Product License.
Import
This allows access to import data.
Export
This allows access to export data.
Photo
This allows access to photos.
*The above features are shared between MyBiz Attendance, Records and Time Clock
which means that the Detail screen under User Security is the same screen in all three.
Time Clock Tab
Feature
Show Time Clock Tab
Time Clock Entries
Time Clock Access
Work Schedules
Time Card Runs
Time Clock Settings
Messages
Ch 5: Setting Security Rights
Description
This allows you to set specific users access to the Time
Clock program.
This allows access to the Time Clock Entries screen.
This allows access to the Time Clock Access screen.
This allows access to the Work Schedules screen. (See
Settings > Work Schedules.)
This allows access to the Time Card Runs screen.
This allows access to the Time Clock Settings screen.
This allows access to the Time Clock Messages screen.
59
Feature
Time Codes
In/Out Board
Export Data
Time Difference
Remote Terminals
Description
This allows access to the Time Codes screen.
This allows access to the In/Out Board.
This allows access to Export Data from the reports.
This allows you to set the time difference for a
computer in a different time zone.
This allows access to set up a Remote Terminal.
User Security –
Time Clock Screen
Setting Up a User for Security Access .....................................................................
When setting up a new user, you’ll need to make sure you set access rights under the
User Security Detail Tab, Location/Department Tab and the appropriate program tab.
Setting up access to common features (Detail Tab).
1. Click New from User Security > Detail screen.
2. Enter Log In and Password (letters and numbers only) and user’s Full Name.
3. Select options for Displaying Reminder Alarms and Hints for this login.
4. Select Yes to allow the user to begin logging in after giving access. Setting this
option to NO is a good security measure when users are out of the office for a
number of days.
5. Select what type of Feature Access users will have by clicking in the Feature Access
Rights block.
Ch 5: Setting Security Rights
60
6.
7.
Clicking on the arrow will allow you to select from the following:
NO ACCESS – No access to selected feature
READ ONLY – This allows user to view only, he or she cannot make any changes
READ WRITE – This allows user to view, add, and edit; no deleting allowed
READ WRITE DELETE – This allows user full editing rights
YES – This allows access
NO – No access to feature
Click Save.
User Security Access for Locations/Departments
To set up access rights to Locations/Departments, follow these steps:
1. Select or create a Login following the steps under Setting Up Access Rights.
2. Click on Locations/Departments (Your Locations and Departments should already
be set up at this point. If not, then please see Locations & Departments on setting
them up before going any further).
3. If you want to give this Login full access to all locations, click in the box next to
Locations/Departments so that the box is checked. This will allow a user with this
Login to see all employees in all Locations and Departments.
4. If you want to give this Login access to only specific Locations, Departments or
even down to employee level access, click on the + sign next to
Locations/Departments to expand the view.
5. Click on the + sign next to the location and then on the + sign next to the
department name. From here you may select specific employee’s or click on the
department name to choose all of the employees under that department.
6. Click Save.
You may click on a + sign at any time to collapse the view.
User Security for the Attendance Tab
The Attendance Tab will only be shown if MyBiz Attendance is installed. Please see the
MyBiz Attendance manual’s User Security section for more information.
User Security for the Records tab
The Records Tab will only be shown if MyBiz Records is installed. Please see the MyBiz
Records manual’s User Security section for more information.
User Security for the Locations/Departments Tab
You should have already created your Location and Department names (see Locations
and Departments). Now you will want to set up users’ access to the Locations and
Departments by following these steps:
Ch 5: Setting Security Rights
61
1.
2.
Click on Location/Department Tab from Settings, User Security, Detail.
Click on the “+” (plus sign) next to Locations/Departments and next to the
location and department name to expand the list.
3. Click in the box next to the location and department name to select access to these
areas. This will put a checkmark in the box. Click in the box again to unselect an
area.
4. If you have already entered your employees in the program and assigned location
and departments to them, when you expand a department, you will see all the
employees assigned to that location/department combination. You may then select
access to individual employees at this point by clicking in the box next to the
employee.
NOTE: If you haven’t entered your employees (see Employee Detail) into the program,
you will still be able to assign access to a location/department combination, but not
down to the employee level. You may later assign access down to the employee level
after you enter your employees and assign a location/department to them.
5. Click Save.
Once you have followed the above steps, the user can log in with their login and
password with their assigned access rights.
Tip: You may click Save As from the User Security screen if you already have a user
with access rights you want to copy and give to another user. The selected user must be
highlighted first.
Ch 5: Setting Security Rights
62
Chapter 6:
Clocking In/Out
There are two ways to clock in and out of MyBiz Time Clock, and both are described
below. You can use a keyboard or a magnetic swipe card using a card reader. MyBiz
Time Clock may be installed on one or two central computers or on all of your
employees’ computers so they may clock in/out from their desk.
Note: Employees use the MyBiz Time Station program to clock in/out while managers
and supervisors use the MyBiz Time Clock Admin program to manage employee time.
Chapter Contents:
Overview ......................................................................................... 64
Clocking In Using the Keyboard ................................................ 64
Clocking In Using a Swipe Card and Reader ........................... 64
My Time Clock ............................................................................... 65
Ch 6: Clocking In/Out
63
Overview ................................................................................................................
We have made clocking in/out as easy as possible. Employees clock in and out from the
MyBiz Time Station application. Employees may clock in using the keyboard or using a
magnetic stripe card (swipe card) and card reader.
Time Station
Clock In/Out Screen
Clocking In Using the Keyboard .............................................................................
Before being able to clock in and out, an employee must have Time Clock access. (See
Assigning Time Clock Access in Chapter 3.) To clock in using the keyboard, employees
would enter their logins and passwords and click on Clock In (F5) or Clock Out (F8).
Employees that are given time clock access also have access to the My Time Clock
feature. My Time Clock allows employees to see their own time cards. If given the
proper rights, employees may also create, edit and delete their own time entries within
My Time Clock.
Clocking In Using Swipe Card and Card Reader .....................................................
If you have a magnetic stripe card reader and cards, purchased separately, it will log
employees in/out and allow them to get into My Time Clock without having to enter a
login and password. (See page 10 for specifications on card and card reader.) As an
added security feature, you may require that an employee enter a password, even while
using a swipe card. This may cut down on an employee clocking in/out for another
employee.
Ch 6: Clocking In/Out
64
My Time Clock .......................................................................................................
My Time Clock allows employees to view their time card history, and, if given rights, can
create, edit and delete their time card entries. An employee can log into My Time Clock
by clicking on the My Time Clock button, or pressing the F9 key). The password for
My Time Clock is the same one used when clocking in/out. (See Time Clock Access
for setting up employee’s login and password.)
Tip: Employees may log into My Time Clock using their swipe card at the My Time
Clock login screen.
My Time Clock Edit Screen
Toolbar
Date Range
Time Entries
Sort Order
Show Changes
made to time
entries
Asterisk (*)
shows double
entries of IN
or OUT
Punches
Punch Entries –
Must have an IN
and OUT Punch
for total hours
Plus (+) sign
denotes change
has been made
Employee Review/Edit toolbar
If given the proper rights, an employee may have access to New, Edit, and Delete. This
will allow them to manage their own time cards. All changes and deletions are tracked
and managers may run reports against these changes.
Creates a new
time entry.
Deletes currently
selected entry.
Edits existing
time entry.
Ch 6: Clocking In/Out
Shows Help File for
this screen.
Prints Time Card for
selected Date Range.
Exits My Time
Clock.
Changes Employee
Password.
65
Creating a New Time Entry
You must be given rights to this feature. Clicking New, from the Time Clock Entries
screen, will give you the New Entry window with the following options:
After clicking on New, you’ll be given the choice of Clock In / Clock Out or Enter
Hours.
Selecting Clock In/Clock Out will allow you to enter a manual punch entry just as if an
employee had clocked in or out. For example, you may enter a manual punch entry of
05:15 PM for a specific date.
Ch 6: Clocking In/Out
66
Feature
Reason for Change
Date
Punched
Time
Work Date
Comments
Description
A Reason is required for Creating a Manual Time Clock
Entry or Entering Hours for a Date. (See Settings >
Reason Codes in Administration screen.)
This is the date of the punch entry.
This designates In or Out of the punch.
This is the time of the punch entry.
This is the Work Date that the punch refers to. (See Date
Vs Work Date below for more info.)
Comments are not required but may be helpful when
reading a reason at a later date.
Selecting Enter Hours will allow you to give a set amount of hours for a given date. For
example, you may enter a manual time entry of 8 hours Vacation.
Feature
Reason for Change
Date
Work Date
Hours
Count towards
overtime calculations
Ch 6: Clocking In/Out
Description
A Reason is required for Creating a Manual Time Clock Entry
or Entering Hours for a Date. (See Settings > Reason
Codes in Administration screen.)
This is the date the employee will get credit for.
This is the Work Date that the punch refers to. (See Date Vs
Work Date below for more info.)
This allows you to enter specific hours for a date, such as 8
hours for a Vacation day. The Date, Hours and Reason for
New Entry fields are required.
Designates entry to count towards overtime.
67
Feature
Comments
Description
Comments are not required but may be helpful when reading
a reason at a later date.
Date Versus Work Date
When creating a new time entry, there are two date fields: Date and Work Date. The
Work Date represents the date the entry is counted towards. Normally, you won’t need
to change the Work Date unless you have work shifts that cross over midnight. For
example, Josh starts work and clocks in at 8 PM on Monday night. He gets off work at 4
AM on Tuesday morning, but forgets to clock out. A manual time entry is created for
him punching him out at 4 AM; the Work Date is of the previous date (the actual date
Josh started work). The program knew that Josh had clocked in at 8 PM the previous day
and since he had not gone over 13 hours between punches it counted the OUT punch to
the previous date.
Editing a Time Entry
Edit allows you to change an existing entry. You must be given rights to have this
feature. Remember that the Reason for Change block is required and tracked. Editing
a time entry is similar to creating a new entry except you only have the choice to change
a punch time entry.
Deleting a Time Entry
Delete will erase the selected time entry and record the deletion. All changes and
deletions are recorded and tracked. To view deleted time entries, go to Reports >
Deleted Time Clock Entries.
Printing an Employee Time Card
Print allows you to print an employee time card for the selected date range.
Getting Help
Help allows you to bring up the help file for this screen.
Time Card Entries
The time card entries have the following coding:
Feature
Description
Blue band
A blue band designates the selected entry.
White band
A white band designates an IN punch.
Teal band (bluish green)
A teal band designates an OUT punch.
Ch 6: Clocking In/Out
68
Feature
Gray band
Plus (+) Sign
Asterisk (*)
Description
A gray band designates a manual entry was given for
a set amount of hours (see Enter Hours for a Date
under New above). For example, Josh took 8 hours
of Vacation on 3/15/2002 and a manual entry was
entered for his time.
A plus (+) sign designates a punch was changed or
manual entry was entered.
An asterisk (*) designates that there is a doublepunch; either two IN punches or two OUT punches
together. Action should be taken on this type of
entry of either adding a new entry or correcting an
existing entry. Hours cannot be calculated for a
double-punch entry.
CAUTION: If you see an asterisk (*) next to a time entry this means that some type of
action should be taken, such as correcting a punch.
Time Card Entries
Plus sign (+)
denotes manual
entry or edit was
made
Asterisks (*)
denote double
entries
Tip: Right-clicking on an entry will show you the rounding rules (Work Schedule Rules)
for that entry.
Ch 6: Clocking In/Out
69
IN/OUT BOARD ....................................................................................................
The In/Out Board allows you to see, at a glance, employees who are in and out. The
In/Out Board will refresh itself if the Auto Update feature is checked, otherwise, clicking
the Refresh button will update the board.
In/Out Board Screen
In/Out Board
Toolbar
Who’s In,
Who’s Out
Status Bar
Feature
Auto update every __
minute(s)
In/Out Employees
Refresh
Help
Color-coding:
Description
This allows you to set how often this board should
update for you. Note: This is not a “live” board and
will only be updated by the Auto Update or pressing
Refresh.
This allows you to see employees who are In or Out
at a glance.
Clicking this button will refresh the list.
This gives you help regarding the current screen.
a. Green – denotes employees who are clocked IN.
b. Teal (bluish-green) – denotes employees who are
clocked OUT.
Administrators can have access to view all locations and departments or only specific
locations and departments depending on their security access rights. Employees may be
given access to all locations and departments or their specific location and/or
department or no access to the In/Out Board. (See In/Out Board Access under Time
Clock Access.
Ch 6: Clocking In/Out
70
Chapter 7:
Managing Employee
Records
This chapter covers using MyBiz Time Clock for day-to-day operations.
Chapter Contents:
Overview ......................................................................................... 72
Feature Column ............................................................................. 72
Time Clock Entries ........................................................................ 73
In/Out Board .................................................................................. 77
Adding a New Employee .............................................................. 78
Deleting an Employee .................................................................. 79
Giving Employees Access to Clock In ....................................... 79
Employees Not Rounding On the Correct Work Schedule .. 81
Ch 7: Managing Employee Records
71
Overview ................................................................................................................
There are two main levels of security to MyBiz Time Clock: Employee Level and
Manager (or Administrator Level).
Employee Level Access – This only allows access to Clock In/Out and access to the
My Time Clock feature, which will allow individuals access to their time card histories.
This also will allow them to create new time entries, edit existing entries, and/or delete
their existing entries. Access to the In/Out Board may also be given. (See Chapter 3 Employee’s Time Clock Access for setting up access rights on page 41.) Setting up
employee level access consists of setting up access on the Time Clock Access screen
Manager Level Access – This will allow managers access to selected employee time
card entries. They may create, edit, and delete entries for these employees. They’ll also
have access to the In/Out Board. Managers at least may have access to everything or
only a few Administration screens. Having one Manager Login that has access to
everything is required. You may create other Manager Logins that have partial access to
the Administration screens they need. For example, a payroll administrator may only
need access to View/Edit Employee’s Time Card Entries, Create & Edit Work Schedules
and to Time Card Runs. The other screens would be set for No Access. (See User
Security.)
Feature Column ......................................................................................................
The Feature Column allow you to navigate from screen to screen.
Feature
Employee Detail
In/Out Board
Description
This screen allows you to enter and edit employee
data.
The In/Out Board allows you to see, at a glance,
employees who are in and out.
Reminders
Reports
Time Clock Entries
Time Clock Access
Time Card Runs
Ch 7: Managing Employee Records
This allows you to view, create, edit and delete time
card entries. If you have access to view and edit
entries, you have access to all records.
This allows you to set employee logins and
passwords, work Schedules, and access to the
In/Out board.
This allows you to run time card reports and lock
down time cards so that no other editing can be
done.
72
Time Clock Entries ..................................................................................................
The Time Clock Entries feature allows you to maintain employee time entries. You may
create new entries, as well as edit or delete time entries. You may also print out employee
time cards from here.
All changes (edits or deletions) are recorded and tracked. Selecting Show Changes will
allow you to view entries that have been edited. A plus sign (+) to the right-side of an
entry denotes a entry has been modified.
Time Clock
Entries Feature
Date Range
Time Entries Sort
Order
Asterisk (*)
shows double
entries of IN or
OUT Punches
Show Changes
made to time
entries
Time Entries –
Must have an IN
and OUT Punch
for total hours
Plus (+) sign
denotes change
has been made
Tip: Double-clicking on an entry in the changed window (at the bottom) will bring up
details of the entry.
Time Clock Entries Toolbar
From the Time Clock Entries screen, Managers have access rights to create, edit, or
delete employee time entries.
Creates a new
time entry
Deletes currently
selected entry
Edits existing
time entry
Ch 7: Managing Employee Records
Shows Help File for
this screen
Prints Time Card for
selected Date Range
73
Creating a New Time Entry
You must be given rights to this feature. Clicking New, from the Time Clock Entries
feature, will give you the New Entry window with the following options:
After clicking on New from the Time Clock Entries screen, you’ll be given the choice of
Clock In / Clock Out or Enter Hours.
Selecting Clock In/Clock Out will allow you to enter a manual punch entry just as if an
employee had clocked in or out. For example, you may enter a manual punch entry of
05:15 PM for a specific date.
Ch 7: Managing Employee Records
74
Feature
Reason for Change
Date
Punched
Time
Work Date
Comments
Description
A Reason is required for Creating a Manual Time Clock
Entry or Entering Hours for a Date. (See Settings >
Reason Codes in Administration screen.)
This is the date of the punch entry.
This designates In or Out of the punch.
This is the time of the punch entry.
This is the Work Date that the punch refers to. (See Date
Vs Work Date below for more info.)
Comments are not required but may be helpful when
reading a reason at a later date.
Selecting Enter Hours will allow you to give a set amount of hours for a given date. For
example, you may enter a manual time entry of 8 hours Vacation.
Reason Code –
Required when
manually entering an
entry
Enter how many hours
employee is getting
credit for
Feature
Reason for Change
Ch 7: Managing Employee Records
Description
A Reason is required for Creating a Manual Time Clock
Entry or Entering Hours for a Date. (See Settings >
Reason Codes in Administration screen.)
75
Feature
Date
Work Date
Hours
Count towards
overtime calculations
Comments
Description
This is the date the employee will get credit for.
This is the Work Date that the punch refers to. (See
Date Vs Work Date below for more info.)
This allows you to enter specific hours for a date, such
as 8 hours for a Vacation day. The Date, Hours and
Reason for New Entry fields are required.
Designates entry to count towards overtime.
Comments are not required but may be helpful when
reading a reason at a later date.
Date Versus Work Date
When creating a new time entry, there are two date fields: Date and Work Date. The
Work Date represents the date the entry is counted towards. Normally, you won’t need
to change the Work Date unless you have work shifts that cross over midnight. For
example, Josh starts work and clocks in at 8 PM on Monday night. He gets off work at 4
AM on Tuesday morning, but forgets to clock out. A manual time entry is created for
him punching him out at 4 AM; the Work Date is of the previous date (the actual date
Josh started work). The program knew that Josh had clocked in at 8 PM the previous day
and since he had not gone over 13 hours between punches it counted the OUT punch to
the previous date.
Editing a Time Entry
Edit allows you to change an existing entry. You must be given rights to have this
feature. Remember that the Reason for Change block is required and tracked. Editing
a time entry is similar to creating a new entry except you only have the choice to change
a punch time entry.
Deleting a Time Entry
Delete will erase the selected time entry and record the deletion. All changes and
deletions are recorded and tracked. To view deleted time entries, go to Reports >
Deleted Time Clock Entries.
Printing an Employee Time Card
Print allows you to print an employee time card for the selected date range.
Getting Help
Help allows you to bring up the help file for this screen.
Ch 7: Managing Employee Records
76
Time Card Entries
The time card entries have the following coding:
Feature
Description
Blue band
A blue band designates the selected entry.
White band
A white band designates an IN punch.
Teal band (bluish green)
A teal band designates an OUT punch.
Gray band
A gray band designates a manual entry was given for
a set amount of hours (see Enter Hours for a Date
under New above). For example, Josh took 8 hours
of Vacation on 3/15/2002 and a manual entry was
entered for his time.
Plus (+) Sign
A plus (+) sign designates a punch was changed or
manual entry was entered.
Asterisk (*)
An asterisk (*) designates that there is a doublepunch; either two IN punches or two OUT punches
together. Action should be taken on this type of
entry of either adding a new entry or correcting an
existing entry. Hours cannot be calculated for a
double-punch entry.
CAUTION: If you see an asterisk (*) next to a time entry this means that some type of
action should be taken, such as correcting a punch.
Time Card Entries
Asterisks (*)
denote double
entries
Plus sign (+)
denotes manual
entry was made
Tip: Right-clicking on an entry will show you the rounding rules (Work Schedule Rules)
for that entry.
IN/OUT BOARD ....................................................................................................
The In/Out Board allows you to see, at a glance, employees who are in and out. The
In/Out Board will refresh itself if the Auto Update feature is checked, otherwise, clicking
the Refresh button will update the board.
Ch 7: Managing Employee Records
77
In/Out Board Screen
In/Out Board
Toolbar
Who’s In,
Who’s Out
Status Bar
Feature
Auto update every __
minute(s)
In/Out Employees
Refresh
Help
Color-coding:
Description
This allows you to set how often this board should
update for you. Note: This is not a “live” board and
will only be updated by the Auto Update or pressing
Refresh.
This allows you to see employees who are In or Out
at a glance.
Clicking this button will refresh the list.
This gives you help regarding the current screen.
c. Green – denotes employees who are clocked IN.
d. Teal (bluish-green) – denotes employees who are
clocked OUT.
Administrators can have access to view all locations and departments or only specific
locations and departments depending on their security access rights. Employees may be
given access to all locations and departments or their specific location and/or
department or no access to the In/Out Board. (See In/Out Board Access under Time
Clock Access.)
Adding a New Employee ........................................................................................
Click Employee Detail Feature column.
The Employee Detail screen allows you to add, edit, and delete employees, and is shared
with MyBiz Attendance and Records, if installed.
Ch 7: Managing Employee Records
78
To add a new employee, follow these steps:
1.
2.
3.
from the Employee Browse or Employee Detail screen.
Click
As a minimum, enter First Name, Last Name, Hire Date, Employment Status, Work
Status, and Location and Department. These fields are required. (To set up locations
and departments, see Locations and Departments under Administration.)
Click Save.
NOTE: The SSN is not required when entering an employee in MyBiz. However, when
exporting time card entries, if one of the selected payroll formats requires the SSN, you
will need to enter it before exporting.
Deleting an Employee .............................................................................................
CAUTION: This will delete ALL information on the current employee including any
records in MyBiz Attendance and MyBiz Records.
To delete an employee, and all associated records, follow these steps:
1. From Employee Detail, select an employee by clicking on his or her name.
2. Select File > Delete Employee.
3. Click Yes to the “Are You Sure?” message.
Giving Employees Access to Clock In .....................................................................
Click Time Clock Access from the Feature Column.
The Time Clock Access screen allows you to set up employee logins/passwords, swipe
card access, individual access to create, edit and delete their time card entries, assign
Work Schedules, and employee In/Out Board access. A manager or administrator will
always have access to the In/Out Board screen.
Ch 7: Managing Employee Records
79
Time Clock Access Feature
Feature
Employee, Location,
Department
Search By
Search For
Time Clock
Identification
(Changing Employee
Password)
Swipe Card ID
Time Clock Access
Ch 7: Managing Employee Records
Description
This is shown to make it easier when assigning
access.
This allows you to search by Last Name, First
Name, SSN or ID.
Entering one character at a time will do an
incremental search. For example, entering the
letter “K” will bring up the names which start
with K. Adding an L will search out names with
KL and so on.
Time Clock Identification allows you to change
the selected employee’s Login and Password. Just
enter the new Login and password and click on
Save to change.
For the Swipe Card ID option, you’ll need a
magnetic swipe card or bar code reader and preencoded cards. To assign a pre-encoded swipe
card, click on Update/Change, then swipe the
card through the swipe card reader. If an
employee has an assigned swipe card ID number,
you will also have the option to Clear/Delete.
Time Clock Access assigns employee options for:
a. Enable Employee Time Clock Access –
This allows the selected employee to clock in
and out. This is required to be selected if the
employee is allowed to clock in/out.
80
Feature
Time Clock Access
(cont.)
Current Work Schedule
Note: To create a Work
Schedule, see Chapter 8 Creating and Editing
Work Schedules.
In/Out Board Access
Description
b. Can create their own Time Clock Entries
– gives employee the ability to create Time
Clock entries.
c. Can Edit their own Time Clock Entries –
gives employee the ability to edit Time Clock
entries.
d. Can Delete their own Time Clock Entries
– gives employee the ability to delete existing
entries.
Current Work Schedule allows you to assign a
Work Schedule for rounding and reporting
purposes.
a. Clear allows you to remove this work
schedule from an employee.
b. History allows you to view changes to an
employees work schedule. This also allows
you to edit the Start Date.
In/Out Board Access allows you to assign an
employee access to see None, All employees, or
employees by Location or department. (See
In/Out Board on page 77.)
Employees Not Rounding on the Correct Work Schedule .......................................
Employees may be assigned different rounding rules over the course of their
employment. Every time an employee is given a new work schedule, he or she gets a new
Start Date from which the current work schedule begins. A new work schedule will only
round from the Start Date going forward. Any punches before this date will not be
rounded on this schedule.
There are times when you may need to change the start date for rounding calculations.
For example, if an employee was accidentally assigned the wrong work schedule for a
week where the work schedule assigned was rounding him/her at 10-minutes instead of
at 6-minutes, you would want to change to the new work schedule and have the program
calculate all past punch entries.
The work schedule start date is edited through the History Tab on the Time Clock
Access screen. For example, if the start date is 11/5/01, rounding will only occur from
this date forward. Any punches before this date will not be rounded on this schedule.
CAUTION: Editing the Work Schedule date may affect punches for the current
employee that have already been paid for.
Ch 7: Managing Employee Records
81
Changing an Employee’s Work Schedule Date
Changing an employee’s work schedule date and having the program re-calculate
according to the new work schedule is a two-step process:
First Step (Change the Work Schedule Start Date)
1. From Time Clock Access, click on History (Current Work Schedule).
2. On the Work Schedule History screen, double-click on the Start Date you want to
change. For example, if you want to change the Start Date of 04/18/2002 to
05/01/2002, double clicking directly on the 04/18/2002 date will bring up an edit
box.
3. Enter the Start Date of the new work schedule.
4. Leave the Ending Date blank if this is the most current Start Date.
5. Click Save.
6. If you need to have time punches recalculated according to the new work schedule,
go to the Second Step below; otherwise, punches may not have their time calculated
correctly.
Second Step (Recalculate the Punch Time Entries)
You’ll need to edit any punch time entries that need to be recalculated and click Save.
The act of clicking the Save button will recalculate the selected punch time entry
according to the new work schedule.
1. From Time Clock Entries, select the employee and the punch time you wish to recalculate.
2. You may select the punch time entry either by double clicking on the punch entry or
by highlighting it (by clicking once on the entry) and selecting the Edit icon.
3. Do not change the date or time. Select a Reason for Change. (You cannot save an
entry without selecting a reason.)
4. Click Save.
5. Repeat the above steps for any punches that need to be re-calculated.
Clicking Save will re-calculate the punch time entry according to the work schedule. For
example, if you changed this employee’s work schedule from 10-minute rounding to 6minute rounding, then saved any punch entries that fell within the Start Date, their
punch entries would be recalculated.
Ch 7: Managing Employee Records
82
Work
Schedule
History
Double clicking on a
Start Date will allow
you to edit the date.
Ch 7: Managing Employee Records
83
Chapter 8:
Creating and Editing
Work Schedules
This chapter will allow you to set up your work schedule rules and define your daily work
hours for reporting purposes.
As a rule, many businesses allow a grace period for employees when clocking in or out.
This allows for time variations on clocks, watches and time devices throughout a
company. Rounding time also makes calculating payable time easier.
Chapter Contents:
Rounding Explained....................................................................... 86
Work Schedule Rounding Rules ................................................. 86
Shifts Crossing Midnight ............................................................. 89
More About Rounding ................................................................. 90
Setting Up a Work Schedule ....................................................... 90
Setting Up the Daily Schedule .................................................... 91
Ch 8: Create / Edit Work Schedules
85
Rounding Explained ................................................................................................
MyBiz Time Clock can automatically round off in 2, 3, 4, 5, 6, 10, 12, 15, 20, 30 and 60minute time slices, and it will calculate the time in decimals, unlike many mechanical
Time Clocks. This saves time by not having to convert the minutes to decimals. Note: If
you don’t round, then select the Generic – No Rounding rule.
Time Clock rules can be assigned to individuals or groups. Rules are usually defined for
punching IN early or late, and OUT early or late.
EXAMPLE
Here is an example of rounding using the 15-minute rule:
Richard comes in a few minutes early and clocks in at 07:55.
Tanya is running late and clocks in at 08:04.
Using the 15-minute rule, both Richard and Tanya’s payable time would be clocked in at
08:00. Their time was rounded to the nearest 15-minute mark. The next 15-minute mark
would be 08:15, then 08:30, and so on.
However, using the 6-minute rule and the above clock-in times, Richard’s payable time
would be clocked in at 07:54. The next 6-minute mark for Richard would be 08:00.
Tanya’s payable time would be clocked in at 08:06. The next 6-minute mark would be
08:12, 08:18, and so on. Their time was rounded to the nearest 6-minute mark.
MyBiz Time Clock comes with three commonly used rounding rules: 6-minute, 10minute and 15-minute generic rules that are set up to round to the nearest mark. You
may choose one of these and rename it or set up your own.
Work Schedule Rounding Rules ..............................................................................
Go to Settings > Work Schedules.
The program comes with three commonly used rounding rules. You may
use one of these and rename it or create your own.
Ch 8: Create / Edit Work Schedules
86
Work Schedule –
Rounding Rules Tab
.
The Rounding Rules Tab has the following features:
Rounding Rules
Description
Work Schedule Name
Name the Work Schedule here.
Time Credited in __ Minute This allows you to select rules for increments up
Increments
to 60 minutes (increments must be divisible by
60).
Rounding
When the Time Credited in __ Minute
Increments is selected, the default rounding is set
to round to the nearest credited increment. You
may change this setting to fit your needs. Use the
Rounding Example to test your changes.
Rounding Example
This allows you to see how your rounding will
affect true clocking in/out punches. Set the Hour
and Minute to test how rounding will affect punch
times.
Ch 8: Create / Edit Work Schedules
87
Work Schedules –
Overtime and Punch
Schedules Tab
The Overtime and Punch Schedule Tab has the following features:
Overtime and Punch
Description
Schedules
Payroll work week starts
This determines the day that your work week begins
on…
on, which is defined as the start of the pay week.
This Schedule Qualifies
Select this option if your policy is to give overtime
for DAILY Overtime after
after working so many hours on a DAILY basis. (For
__ Hours
example, anything over 10 hours daily is considered
overtime.)
This Schedule Qualifies
Select this option if your policy is to give overtime on
for WEEKLY overtime
a WEEKLY basis. (For example, anything over 40
after __ Hours
hours weekly is considered overtime.)
Daily Schedule
This allows you to set up daily schedules that can be
reported on. (For example, if you wanted to know
who was 15 minutes or more late on Mondays, you
could run an Exceptions report.)
This is a Workday
This designates the selected day as a regular workday.
This is an Overtime Day
This designates the selected day as an overtime day.
Quick Copy Schedule
After you set up the first workday, this allows you to
From
copy it to the next workday so you don’t have to reenter the same hours.
New Time Entry
This allows you to enter a new entry for your
employees daily work schedule.
Delete Time Entry
This allows you to erase an entry.
Ch 8: Create / Edit Work Schedules
88
Shifts Crossing Midnight .........................................................................................
You only need to set up the rules for Shifts Crossing Midnight if you have employees
that work past midnight. This allows the Work Day to be defined.
Work Schedules –
Shifts Crossing
Midnight Tab
Feature
Report time to NEXT DAY
on or after _____.
Report time to PRIOR DAY
on or before ____.
Maximum expected hours for
lunch break ____.
Ch 8: Create / Edit Work Schedules
Description
This allows you to set the time punches’ Work
Date to the next day. For example, if the night
shift starts work at 10 PM on Monday night, but
the entire shift (10PM – 6 AM) is counted for
working on Tuesday, then you would select this
option.
This allows you to set the time punches’ Work
Date to the previous day. For example, if the night
shift starts at 2 AM on Tuesday but the entire shift
is counted for working on Monday, then you
would select this option.
We recommend leaving this option at the default
3.5 hours. This option is for punches that cross
midnight and allows for employee’s to be counted
on the correct work day when working long or
double shifts.
89
More About Rounding ............................................................................................
MyBiz Time Clock rounding is based on three points:
1. What you select for Time Credited in Minute Increments
2. What you set for Clocking In and Out rounding
3. Assigning the Work Schedule to an employee through Time Clock Access.
MyBiz Time Clock automatically rounds to the nearest mark based on your choice of
minute increments. MyBiz Time Clock will round up or down at about the halfway mark.
For example, if you’re using MyBiz Time Clock to credit in 6-minute increments, then
the program will round up AFTER 3 minutes and round down before this time. The key
word is After. The program will ROUND UP AFTER however many minutes you select.
MyBiz Time Clock allows you to select rounding up to the designated credited amount,
minus one minute. If you choose to credit in 6-minute increments then you could choose
from 1 to 5 minutes for rounding. If you choose to credit in 10-minute increments then
you could choose from 1 to 9 minutes for rounding and so on.
TIP: If in doubt, use the Round Test to see how the time will be rounded.
Setting Up a Work Schedule ...................................................................................
Setting up a Work Schedule allows your employee’s punch times to be rounded and
allows you to report on various settings according to the Work Schedule. For example, if
you wanted to know who was clocking in late on Mondays for the month of June, you
could run an Exceptions Report. All employees that clock in/out must be assigned a
Work Schedule for rounding and reporting purposes.
To set up your work schedule, follow these steps:
1. Click New.
2. Enter a descriptive work schedule name.
3. Select how your time is credited for rounding purposes.
4. If you round to the nearest mark, you may leave the defaults in the Rounding block
as they are. If, however, you round nearer or farther from the nearest mark, then
you may change the rounding to suit your needs.
5. Check how the program will round for you by entering a clock in/out time in the
Rounding Example block. If the time isn’t rounding the way you want, then change
the Rounding time and check it again.
6. Select whether this work schedule qualifies for DAILY overtime and after how
many hours.
7. Select whether this work schedule qualifies for WEEKLY overtime and after how
many hours.
Ch 8: Create / Edit Work Schedules
90
Setting up the Daily Schedule .................................................................................
To define the daily schedule, follow these steps:
1.
2.
3.
Select a day of the workweek and specify if it is a Workday and/or an Overtime
Day. An Overtime Day is any day that is automatically counted as overtime such as
Saturday or Sunday.
Click New Time Entry:
a) Enter what time employees on this work schedule would normally start work.
Press the TAB key or click New Time Entry to go to the next row.
b) Enter what time the employees would normally break for lunch. Press the
TAB key to go to the next row.
c) Enter what time the employees would normally come back from lunch. Press
the TAB key to go to the next row.
d) Enter what time the employees would normally leave for the day.
Click on the next day and enter their start and end time for this day. You may also
use the Quick Copy Schedule feature to copy the previous day’s entry. Click Save
to save this work schedule.
Remember to assign a work schedule to each employee under Time Clock Access;
without an assignment, employee entries and overtime will not follow the work schedule
rules. This can result in payroll errors.
Ch 8: Create / Edit Work Schedules
91
Chapter 9:
Preparing Time Card
Runs
Time cards are prepared by the Payroll Administrator or other designated person who
can run time card reports or export this data to your payroll program. The person who
has access to Time Card Runs can lock out employees and other managers from making
any changes to specific date ranges and save this information so that changes cannot be
made to time that has already been paid for.
Chapter Contents:
Time Cards Runs ............................................................................ 94
Viewing Time Card Data .............................................................. 97
Exporting Time Clock Data ........................................................... 98
Ch 9: Preparing Time Card Runs
93
Time Card Runs ......................................................................................................
To go to Time Card Runs click on the Time Card Runs Feature.
The Time Card Runs screen allows you to create time card reports for a specific date
range for employees. This data may also be exported to your payroll program. You may
break down the report by location, department or specific employees. The Time Card
Run report will show you regular time, overtime, the payroll code description for First
and Second column (from the Time Clock Tab under Global Preferences), and Other
time (anything that is not covered under regular, overtime and payroll code descriptions),
along with the total hours.
Creating a New Time Card Run
To create a new time card run, follow these steps:
1. After clicking on Time Card Runs, click NEW RUN.
2. Enter a name in the Run Name block (for example: Week of Apr 7 2002). Special
characters are not allowed.
3. Select a date range for this run.
4. Select either Manager Lock or Total Lock for Lock Mode (see below for more
information).
5. Select Batch State of either In-Process or Completed.
6. Select which Locations/Departments you want processed by clicking on Expand
Window (see Selecting Locations/Departments).
7. Click Save, then OK.
8. Click on PRINT to preview the selected run.
Time Card Runs Screen
Action Icons
Click title to Sort
by column
Run Information
Status Bar
Ch 9: Preparing Time Card Runs
94
Feature
Sort
Action Icons
Run Information
Description
Click on column title to sort by that column.
a. New Run – This allows you to create a new
time card run.
b. Edit Run – This allows you to edit existing
runs until the Batch State status “Completed”
is selected.
c. Delete – This deletes an existing run.
d. Cancel – This cancels changes to the current
run.
e. Print – This allows you to print the selected
time card run.
a. Run Date – This is the date of the run.
b. Run Name – This is the specified name.
c. Created By – This is the name of the
individual logged in when creating the run.
d. Batch State – This is the specified state from
the Edit Screen.
e. From/To – These are the dates specified.
f. Locked – This is the specified Lock type
from the Edit Screen.
The Time Card Run
Edit Screen
Ch 9: Preparing Time Card Runs
95
The Time Card Run Edit window has the following features:
Feature
Description
Run Date
This is the date the run was created.
Run Name
This allows you to enter a name for the run.
Print
This allows you to print a Detailed or Summary report.
Date Range
This allows you to select the date range for this batch.
Lock Mode
This allows you to select from three different modes.
a. Unlocked – This allows anybody with access to create, edit
or delete entries.
b. Manager Lock – locks anybody with Manager and
Employee access from creating, editing, or deleting within
the selected date range. This allows the Payroll Personnel
to pay employees without having the time card entries
changed at the last moment.
c. Total Lock – locks everyone, regardless of access level,
from making any changes with the selected date range.
Administrators with Time Card Run Access are also
locked out from making any changes. If changes need to
be made, the selection would need to be changed to
Unlocked or Manager Lock mode.
Batch State
a. In-Process – for the current card run you’re working with.
b. Completed – select when Time Card Run has been paid.
Locations and
Clicking on Expand Window or the plus (+) sign next to
Departments
Locations and Departments will expand this window to choose
specific locations and departments. Those employees from the
chosen locations and departments will show up in the
employee window.
Employee window a. Checkbox – This allows you to select specific employees
by clicking in the checkbox.
b. Ct – This shows a count of time entries.
c. Name – First and Last name of employee(s).
d. SSN – Social Security Number of employee(s).
e. Reg Hrs – This shows regular hours.
f. OT Hrs – This shows overtime hours, if applicable.
g. Column 1 – (shown as Paid Vacation in screenshot above)
Payroll Description Column
h. Column 2 – (shown as Paid Personal in screenshot above)
Payroll Description Column
i. Other – This shows time not counted in e – h.
j. Total Hrs – This shows total of regular plus overtime
hours.
Radio Buttons:
a. Display Totals for All Employees – Select this option to
show totals for all employees.
b. Display Totals for Selected Employees – Select this option
to show totals for only the selected employees.
Ch 9: Preparing Time Card Runs
96
Viewing Time Card Data ........................................................................................
When viewing time card data, keep in mind that overtime will only show if you have set
up a Work Schedule and assigned it to your employees. The Work Schedule will have
rules regarding overtime and what day your Work Week starts on. See Chapter 8 for
detailed information about Work Schedules.
Frequently Asked Questions
Q: I’ve created a time card run covering 8 days. For one employee it shows 59
hours of worked time, but 0 hours of overtime. Why is this?
A: The start of your Workweek (set in the Work Schedule) determines the week for
overtime. Check to make sure you have a Work Schedule assigned for this employee by
going to Time Clock Access > Current Work Schedule. If there is one, go to
Settings > Work Schedules and make sure the assigned Work Schedule has the
appropriate Overtime settings. If the overtime settings aren’t set up, then go to Work
Schedules and create one before assigning it. (See Chapter 8 Creating Work Schedules
for detailed information.)
For Example: If a time card run is created to include Randy from (Wed) May 8, 2002
through (Thur) May 16, 2002 and it shows that he worked 59 hours during this time, this
doesn’t necessarily mean he has overtime. Weekly overtime, if any, is calculated on the
last day worked of the workweek. Daily overtime, if any, will be calculated on the same
day worked.
Daily Overtime will be calculated on
the same day worked.
Work Weeks
Overlapping
Workweek 1
Workweek 2
Sun
Mon
Tue
5
12
19
26
6
13
20
27
7
14
21
28
May 2002
Wed
1
8
15
22
29
Thur
2
9
16
23
30
Fri
3
10
17
24
31
Sat
4
11
18
25
Weekly Overtime will be
calculated on the last day worked
for that workweek.
Assuming our Workweek starts on Sunday, the date range of May 8 – May 16 covers two
separate Workweeks. (Workweek1: May 5 – May 11 and Workweek2: May 12 – May
18.) If Randy does not work overtime on a daily basis or for the whole workweek, he
won’t have any overtime. But, if he does work overtime for Workweek1, it will be
calculated for that Friday (May 10) and be included on the report. Overtime worked for
Workweek2 will not be reported unless Friday, May 17 is included.
Ch 9: Preparing Time Card Runs
97
Factors involved in calculating overtime:
1. What is the Workweek Start Day? (Sunday? If the workweek starts on Sunday, this
would mean the workweek is from Sunday through Saturday every week.)
2. Do your employee’s receive overtime based on time worked on a daily basis?
(Example: Daily time worked over 10 hours receive overtime.)
3. Do your employee’s receive overtime based on time worked on a weekly basis?
(Example: Weekly time worked over 40 hours receive overtime.)
4. When was the Work Schedule assigned to the employee?
Overtime
Daily
Overtime
Weekly
Overtime
Description
Overtime will be posted on the day the employee goes over the
amount of hours set for Daily Overtime on the Work Schedule.
(Example: if > 10 hours daily is considered overtime; if employee
works more than 10 hours on Tue, overtime will be shown same
day.)
Overtime will be posted on the last day worked on the workweek.
(Example: if > 40 hours a week is considered overtime; if employee
works Mon – Fri, overtime will be shown on Fri.)
Exporting Time Clock Data .....................................................................................
You may export time entry data two different ways in MyBiz Time Clock. The first way
is from the Export feature under Time Card Runs. The other way is from Export Time
Clock Data under the File menu.
Export Type
Export Time Clock Data
Time Card Runs Export
Description
Exports hours worked and general employee
information to a .csv file. This is a general export
found under the File menu.
This is a specific export feature that exports to
several different payroll formats (See Time Card
Runs Export above.)
Time Card Runs
Export
Ch 9: Preparing Time Card Runs
98
Time Card Runs Export
From Time Card Runs Export you may export to a text file into the following Payroll
formats:
ADP/PC Payroll for Windows
Paychex
PaycomOnline
PayAmerica
QuickBooks® Pro and Premier Editions 2003/2004
RDE (Summit Payroll Express)
Rapid Payroll
UltiPro
Please call or email Tech Support for other formats.
* - MyBiz Time Clock is integrated with QuickBooks. When you click on Export, the
time data is automatically transferred into QuickBooks. (See QuickBooks Integration
below.)
QuickBooks Integration
MyBiz Time Clock can import time data directly into QuickBooks Pro and Premier
Editions 2003 and/or 2004. To import from MyBiz Time Clock you will need to set up
QuickBooks for the following:
to view Weekly TimeSheets
appropriate Payroll Items that correspond with MyBiz Time Clock
NOTE: MyBiz Time Clock and QuickBooks should be set up prior to performing the
following steps.
The following steps will set up MyBiz Time Clock to import directly into QuickBooks:
1. Open Quickbooks.
2. From within MyBiz Time Clock go to Time Card Runs and select Export.
3. If Quickbooks isn’t an option in the left column, hold down Ctrl-Alt-Q to display it.
4. Click Open Quickbooks. This will bring up a QuickBooks message asking: Do you
want this application to access your Quickbooks Company File?
5. Select “Yes, Always” or “Yes, This Time” to allow access. Click Yes if you receive
the Confirm to Proceed message. Note: if you select “Yes, This Time”, the next
time you open Quickbooks from MyBiz Time Clock it will ask you again for access.
6. Click back on MyBiz Time Clock. You should see two columns which may be filled
in with data already. The Payroll Code column are codes related to MyBiz. The
Payroll Item codes are related to Quickbooks. You’ll need to relate the appropriate
Payroll Code from MyBiz to the Payroll Item code in Quickbooks. The MyBiz
Ch 9: Preparing Time Card Runs
99
7.
8.
Payroll Codes should be displaying. Clicking in the corresponding row for the
Quickbooks Item code will bring up a drop down box.
Click Save after making any changes.
Click Export.
Exporting Time Clock Data
From File > Export Time Clock Data, you may export hours worked and general
employee information to a .csv file which can be opened in MS Excel or other
spreadsheet programs.
Export Time Clock
Data Screen
The Time Clock Export feature allows you to export the following data:
Last Name
Location
First Name
Department
Middle Name
Punch Hours
SSN
Punch Changes
Date of Birth
Ch 9: Preparing Time Card Runs
100
Features
Export Type
Export
Select Employee to Export
Hire Range Filter
Job Status Filter
Employee Status Filter
Select Employee Data
Fields to Export
Export Time Clock Data
Description
a. Single File – Exports Employee Data and
Hours Worked to a single file. If Export Punch
Changes is selected, it will export to a separate
file in addition to the Hours Worked.
b. Relational File – Exports Employee Data and
Hours Worked to two separate files. If Export
Punch Changes is selected, it will export to
another separate file.
This exports the data once you have settings
complete.
This allows you to select specific employees,
locations and/or departments to export.
This allows you to filter on a specific hire date range.
This allows you to filter on full and part time.
This allows you to filter on Active, Inactive or
Terminated employees.
a. Available Fields - This is the list of fields to
choose from.
b. Fields to Export (In Export Order) – These are
the fields chosen.
a. Export Hours Worked for Period – This allows
you to select a date range for time card data for
the selected employee(s).
b. Export Punch Changes – This allows you to
export punch changes.
To export this data, follow these steps:
1. From the File menu, select Export Time Clock Data.
2. Select the export type: Single File or Relational.
3. Expand the tree, if necessary, and select the employees to export.
4. Select the data fields to export by either double-clicking on the file or selecting the
file and clicking on the arrow pointing to the right.
5. If needed, select the Export Hours Worked option with a date range.
6. If Export Hours Worked is selected you can select to Export Punch Changes
option.
7. Click Export.
Ch 9: Preparing Time Card Runs
101
Chapter 10:
Using Reports
MyBiz Time Clock includes several powerful reports to help you manage employees and
prepare for payroll. For additional reports, please try MyBiz Records, which offers you
the power of additional employee information tracking.
Chapter Contents:
Report List ..................................................................................... 104
Report Interface Features .......................................................... 104
Employee Summary Report ....................................................... 105
Employee Anniversary Report ................................................... 105
Hours Worked Report ................................................................ 105
Deleted Time Entries Report ..................................................... 106
Work Schedules Assignments Report ..................................... 106
Exceptions (Punch) ...................................................................... 106
Exceptions (Hours) ...................................................................... 107
Time Cards Report ...................................................................... 109
Time Card Runs Report .............................................................. 109
Time Card Runs (Extended) Report .......................................... 110
Reminders ..................................................................................... 110
ID Badges ...................................................................................... 110
Table Listings ................................................................................ 112
Ch 10: Using Reports
103
Report List ..............................................................................................................
Here is a list of the reports you can run:
Employee Summary Report
Employee Anniversary Report
Hours Worked Report
Deleted Time Entries Report
Work Schedule Assignments Report
Exceptions Report
Time Cards Report
Time Card Runs Report
Time Card Runs Extended Report
Reminders Report
ID Badges
Table Listings
Report Interface Features .......................................................................................
The following features are available on each report interface:
Feature
Description
Preview
This allows you to see how the report will show
when printed.
Print
This prints the report.
Printer Setup
This allows you to set printer options.
Help
This will allow you to view help regarding this
screen.
Close
This exits the report interface.
Grouping Options
This allows you to group on Location and
Department.
Display Options
This allows you to display SSN.
Export Options
This allows you to not export headers.
Ch 10: Using Reports
104
Employee Summary Report .....................................................................................
The Employee Summary Report is a
quick overview of your employees
showing SSN, date of hire, title, active
status, and full/part time status.
Employee Anniversary Report .................................................................................
The Employee Anniversary Report
shows the anniversary date of employees
according to the selected date range.
Hours Worked Report ............................................................................................
The Hours Worked Report shows
regular hours, overtime hours and total
hours. You may select specific employees
by date range.
Ch 10: Using Reports
105
Deleted Time Clock Entries Report .........................................................................
The Deleted Time Clock Entries
Report shows entries that were deleted
along with the reason, comments and
login name of the person deleting the
record.
Work Schedules Assignments Report ......................................................................
The Work Schedules Assignments
Report shows which work schedule each
employee is on and when it was assigned.
Exceptions (Punch) .................................................................................................
Exceptions are broken down into two separate reports: Punch Exceptions and Hours
Exceptions. The Punch Exceptions report allows you to report on early or late clock in
and out punches. You may even report on actual clock in/out time or on the rounded
time.
NOTE: Your employees must be assigned to a Work Schedule with the daily hours set
up to properly view this report.
Ch 10: Using Reports
106
Punch Exceptions Report
Pane
The following are other options that are available on the Punch Exceptions Report. For
a list of features not listed here, please see Report Interface Features above.
Feature
Report Date Range
Time Used For Report
Punch Exceptions in
Minutes
Work Schedule(s)
Week Day(s)
Description
This allows you to set a date range for the report.
This allows you to report on Reported (actual punch
time) or Rounded time.
This allows you to view how early or late, in minutes
to report on.
This allows you to filter on a selected work schedule.
This allows you to filter on specific days.
Exceptions – (Hours) ..............................................................................................
The Hours Exceptions Report allow you to report on hours over or under by day, week
or month. This report can be used to monitor which employees may be near overtime.
NOTE: Employees must be assigned to a Work Schedule with the daily hours set up to
properly view this report.
Ch 10: Using Reports
107
Hour Exceptions
Report Pane
The following are other options that are available on the Punch Exceptions Report. For
a list of features not listed here, please see Report Interface Features above.
Feature
Report Date Range
Time Exceptions in hours
Work Schedules
Ch 10: Using Reports
Description
This allows you to set a date range for the report.
This allows you to report on total hours over or
under by day, week, or month, and to filter on a
work schedule.
This allows you to filter on a selected work schedule.
108
Time Cards Report ..................................................................................................
The Time Cards Report shows punch
times and manual punch entries for each
employee according to the selected work
date range. Changes made to an entry can
be printed along with employee and
supervisor signature blocks.
NOTE: Punch entries with an asterisk (*) to the right of the entry require attention. It
means that double in or out punches have been made and need corrected.
Time Card Runs Report ..........................................................................................
The Time Card Runs Report shows
totals of regular time, overtime, and the
First and Second Column descriptions for
Reported Payroll Description Columns
under Settings > Global Preferences >
Time Clock Tab in a “column” format.
NOTE: The Time Card Runs Report will only report regular time, overtime, and the
payroll descriptions for First and Second Columns under the Global Preferences >
Time Clock Tab. All other reasons will fall under the “Other” column. See the Time
Card Runs (Extended) report to view all payroll descriptions.
To print a report, follow these steps:
1. From the Reports menu, select the appropriate report.
2. Select any options necessary from the filter and options settings.
3. Under Select a Time Card Run, select a run. Note: Runs must be created through
the Time Card Runs Tab.
4. Click Preview to see the report on the screen before printing.
Ch 10: Using Reports
109
Time Card Runs (Extended) ....................................................................................
The Time Card Runs (Extended)
Report will print regular time, overtime,
and all Payroll Code Descriptions in a
“row” format. If you have more than two
payroll code descriptions (for example,
Vacation, Sick, and Personal), this report
will allow you to view all payroll code
descriptions set up under Settings >
Reason Codes – Payroll Code
Description.
Reminders ..............................................................................................................
The Reminders Report allows you to view
resolved and unresolved reminders for a
specific date range.
ID Badges ...............................................................................................................
You may create ID Badges for use with
MyBiz Time Clock or company
identification. There are 4 types of ID
Badges: Employee, Temporary, Guest or
without a title.
Ch 10: Using Reports
110
Layout
The Layout Tab allows you to select what features will be on the ID Badge. For
example, if you want the badge title to read Guest instead of Employee, you can select
Guest under the Badge Title.
ID Badges
Layout Tab
Barcode
The Barcode Tab allows you to select the type of Barcode that will be printed. If you’re
not sure which type to use, we recommend keeping the default barcode type of Code 39.
MyBiz uses the Employee ID as the Barcode number. If an employee doesn’t have an
Employee ID number (see Employee Detail), a barcode will not print out on the label.
ID Badges
Barcode Tab
Print Stock
The Print Stock Tab allows you to select the label type. The G.Neil ID Badge type can
be requested through our sales team and is specifically designed to work with MyBiz
Time Clock and MyBiz Records.
ID Badges Print
Stock Tab
Ch 10: Using Reports
111
Label Adjustments
Printers are not created equally; some may print the labels too far to the right or left. The
Label Adjustments Tab allows you to move the labels to the left or right and up or
down, to accommodate quirky printers. Normally, you shouldn’t need to adjust the labels
to the right and left, or up and down, but it’s there in case you need it.
Feature
Left Offset
Top Offset
Picture Offset
Save Label Adjustment
Description
When using the Left Offset, positive numbers will
offset the label to the right and negative numbers
will offset the label to the left.
When using the Top Offset, positive numbers will
move the labels down, and negative numbers will
move the labels up.
The Picture Offset allows you to stretch the picture
by using positive numbers and negative numbers will
squish the picture, if needed.
The Save Label Adjustments button allows you to
save your current settings.
ID Badges Label
Adjustments Tab
Table Listings ..........................................................................................................
Table Listings allows you to print
user access rights (User Security),
Locations and Departments, which
departments are assigned to
locations (Assigned Departments),
and Reason Code information.
Table Listings are mainly used by G.Neil Tech Support in assisting you with any issues
but can be useful when setting up. For example, if you want to see what departments are
assigned to locations, you can print a listing of Assigned Departments.
Ch 10: Using Reports
112
Chapter 11:
Database Maintenance
This chapter discusses how to maintain the MyBiz database through backups and regular
maintenance. A Backup is essentially a “copy” of your employee records. Backing up
ensures that you can recover from a power failure or emergency. You may also install
MyBiz Time Clock on another computer (even as a demo) and restore from your
backup.
Chapter Contents:
Backing Up..................................................................................... 114
Creating a Manual Backup from Within MyBiz ..................... 115
Restoring from a Backup ............................................................ 115
Performing Maintenance and Repairing the Database ........ 115
DB Maint ....................................................................................... 115
Ch 11: Database Maintenance
113
Backing Up .............................................................................................................
How often should you backup?
Every company is different regarding their backup needs. One thing to remember is, “it’s
not if your computer is going to crash, but when.” They have made great strides in
making computers more reliable, but that just makes the time longer before something
may happen to your computer.
The following pertains to any data on your computer and not just your MyBiz program.
Ask yourself this question, “If my computer were to crash right now, how long would it
take to re-create (reenter) all of my data without a backup?” Then ask yourself, “If I had
to restore from a backup, would I be okay with last week’s backup, where I have to
reenter a week’s worth of data? Would I be okay with restoring a backup from 3 days
ago?
When restoring your data, the information will only be as current as your last backup. So,
if you did a backup two weeks ago and had to restore this backup, you would need to
reenter the data that didn’t get backed up.
Back up after you make changes to your employee records.
It is recommended that you back up your database after making any significant changes
to records. For example, any time you enter several employees or input many changes to
absence information would be a good time to back up.
Rotate backups and store backup copies offsite.
A good backup routine is to have at least three sets of backups covering different days of
the week. This practice is called rotation and reduces your risk of data loss. It is also a
good practice to always keep one copy offsite in case of a fire or flood. Consult your
system administrator for your company policy regarding data storage.
A Restore is when you recover from a backup. There are three different uses for the
restore feature.
1. To overwrite the current data with archived data
2. To recover from a hardware crash
3. To move information onto a new computer
Please keep in mind that when you restore data, your information will only be as current
as the backup you are restoring from.
IMPORTANT NOTE
The backup file may only be saved to the PC where the database resides. The backup
creates a zipped file with an extension of .gbk.
Ch 11: Database Maintenance
114
Creating a manual backup from within MyBiz
To perform a manual backup from within the MyBiz program, follow these steps:
1. From within MyBiz, go to File > Maintenance > Backup Database.
2. Navigate to where you want to backup to.
Restoring from a Backup
Remember, restoring a backup will overwrite all data in the current database. To restore,
follow these steps:
1. Go to the PC where the database files are located.
2. From within MyBiz go to File > Maintenance > Restore Database.
3. Click Browse and double-click the backup you wish to restore.
4. Click Start Restore.
5. The program will close down to refresh the database.
You may open the program to see your restored data.
Performing Maintenance and Repairing the Database ............................................
The DB Maint utility allows you to perform maintenance and attempts to repair
corrupted databases.
DB Maintenance Utility
To run the DB Maint utility, go to Start > Programs > Gneil MyBiz > Maintenance
> DB Maint.
The DB Maint utility allows you to perform the following:
1. Perform periodic maintenance on the database to keep it at top performance.
2. Attempt to repair the database when corrupted.
Maintenance
We recommend that you periodically perform maintenance on the MyBiz database
(about once a month) by running the MyBiz maintenance utility called DB Maint. DB
Maint will perform some maintenance procedures on the MyBiz database to keep it
running at top speed.
CAUTION: The DB Maint should not be used as a replacement for a good backup
schedule. The database may become corrupted beyond repair that can be quickly
recovered by a current backup. We strongly encourage running backups, even if the
database is on a PC that gets the whole drive backed up daily.
Ch 11: Database Maintenance
115
Database Repair
If you can’t open the MyBiz program, we recommend running the DB Maint utility. It
will attempt to repair a corrupted database. If the utility does not repair the database,
please save screenshots of the error messages and contact G.Neil Tech Support.
Running the DB Maint Utility
Whether performing monthly maintenance or attempting to repair the database, you
would follow the same steps to run the DB Maint utility.
1.
2.
3.
4.
Go to Start > Programs > GNeil > Maintenance > DB Maint.
After clicking on DB Maint, click on Start to run the utility program.
After the utility finishes, click Close to exit.
Open the MyBiz program.
NOTE: The DB Maint may take several minutes to run, especially on large databases.
Please be patient.
CAUTION: Running the DB Maint utility requires exclusive use; everyone must be out
of any MyBiz programs. Any changes made to system during the running of the DB
Maint utility will be lost.
DB Maint Screen
Status Window
Status of Errors
Progress Bars
Status Bar
Ch 11: Database Maintenance
116
DB Maint Features
The DB Maint utility has the following features:
Features
Description
Start
Begins the maintenance or repair.
Cancel
Stops the maintenance or repair process.
Print
Prints the error message(s). The Print button will
not appear unless there are errors.
Copy
Copies the error message(s) to the clipboard. This
will allow you to paste it into an email. The Copy
button will not appear unless there are errors.
Close
Exits the DB Maint utility.
NOTE: The DB Maint utility will attempt to repair the database that the hrware.ini file
points to. (Go to Start > Run, and enter: hrware.ini. Locate [HRWARE] in brackets
and see the Server name and Path for the directory of the MyBiz database.)
Ch 11: Database Maintenance
117
Chapter 12:
Importing and
Exporting Data
The MyBiz programs allow you to import and export basic employee data. MyBiz Time
Clock also allows you to export data from within the program.
Chapter Contents:
Overview ....................................................................................... 120
Features ......................................................................................... 120
Required Fields ............................................................................ 121
Importing ...................................................................................... 121
Exporting ....................................................................................... 122
Export Time Clock Data .............................................................. 123
Ch 12: Importing/Exporting Data
119
Overview ................................................................................................................
The import function allows you to add new data from a text file into the MyBiz
program. Conversely, the export function allows you to export data from the MyBiz
program.
The software that you export your data from must be able to export the required
information to a Tab delimited or fixed length text file. See Appendix C for the required
import fields. Please note that we cannot provide support for other software program(s).
Please contact the software vendor or manufacturer for more information on how to
export data from your other software.
Import Screen
Features ..................................................................................................................
Feature
Load File
Test
Import
Help
Close
Ch 12: Importing/Exporting Data
Description
Loads the selected file into the data window.
This tab will not highlight until a file is loaded. This
checks for blank records and ensures that the
department and location names that are being
imported are already in the database.
This tab imports the file into the database.
This brings up the Help file pertaining to Importing.
This closes the Import screen and takes you back to
the main screen.
120
Feature
Import File
File Type
Skip First Line
Check Duplicates
Description
This allows you to enter the path or navigate to the
file you will be importing.
This allows you to select the file type.
a. Tab Delimited – We recommend exporting
or importing as this type of file.
b. Fixed Length – MyBiz may export or import
fields with a fixed length. See Appendix C on
the field lengths.
This will take out the first row, in case you have
headers.
This allows you to check for duplicates against the
import file and the files already in the database.
Required Fields .......................................................................................................
The following are required fields for importing:
Last Name
First Name
Location – name must be in the MyBiz database prior to importing
Department - name must be in the database prior to importing
Date of Hire
Full/Part Time
Active Status (Active, Inactive, or Terminated)
NOTE: Location and Department names must be created within the MyBiz program
BEFORE importing!
Importing ...............................................................................................................
To import your information, follow these steps:
From within the program click File > Import.
1.
2.
3.
4.
to navigate to it.
Enter the path of the file or click on the
Select Tab Delimited or Fixed Length. This should correspond with the way the
import file was saved.
Select Skip First Line if you have title headings. Do not select Yes if you don’t
have title headings or you may lose the first line of data.
Click Load File to preview the file. At this point you should check that all column
headings match the fields that will be imported.
Ch 12: Importing/Exporting Data
121
Import (After Loading
File)
Note the column titles above: SSN, Lastname, Firstname, and Middlename; check each
column to make sure the appropriate data is in the correct column. For example, the
SSN number should have an 11-digit number, plus two hyphens.
5.
6.
Select which fields to check for duplicates in the Check Duplicates box. Duplicates
will be checked during the Test File phase.
Click Test File. This checks for blank required fields, and in the case of Location
and Department, it checks to make sure that the name of the Location and
Department has already been set up within the program.
CAUTION: If duplicates are detected and you click on Import, these fields will be
imported into the program.
7.
Once it passes the Test portion, you will be able to click on Import File.
Exporting ................................................................................................................
The export feature is used to transfer basic employee information into a text file that
you can open in any word processor or spreadsheet application. Only the basic
information (see Field Layout in Appendix C) will be exported.
To export your information, follow these steps:
1. Click File > Export.
2. Select Tab Limited or Fixed Length for the Export File Type.
3. Enter a path and file name or keep the default name.
4. Click Export.
Your export file will be created as the file designated in the file block. You may rename
the file, but we recommend keeping the file extension of .txt. After exporting, you may
open the file from within any other spreadsheet or word processor program.
NOTE: Only the information in the Field Layout (Appendix C) will be available for
export.
Ch 12: Importing/Exporting Data
122
Export Screen
Export Time Clock Data .........................................................................................
Export Time Clock
Data Screen
The Time Clock Export feature allows you to export the following data:
Last Name
Location
First Name
Department
Middle Name
Punch Hours
SSN
Punch Changes
Date of Birth
Ch 12: Importing/Exporting Data
123
Feature
Export Type
Export
Select Employee to Export
Hire Range Filter
Job Status Filter
Employee Status Filter
Select Employee Data Fields
to Export
Export Time Clock Data
Description
Single File – Exports Employee Data and Hours
Worked to a single file. If Export Punch Changes is
selected, it will export to a separate file.
Relational File – Exports Employee Data and
Hours Worked to two separate files. If Export
Punch Changes is selected, it will export to another
separate file.
This allows you to export the data.
This allows you to select specific employees,
locations and/or departments to export.
This allows you to filter on a specific hire date range.
This allows you to filter on full and part time.
This allows you to filter on Active, Inactive or
Terminated employees.
Available Fields – This is the list of fields to
choose from.
Fields to Export (In Export Order) – This is the
chosen field.
Export Hours Worked for Period – This allows
you to select a date range for time card data for the
selected employee(s).
Export Punch Changes – This allows you to
export punch changes.
To export data, follow these steps:
1. From the File menu, select Export Time Clock Data.
2. Select the export type: Single File or Relational.
3. Expand the tree, if necessary, and select the employees to export.
4. Select the data fields to export by either double-clicking on the file, or selecting the
file and clicking on the arrow pointing to the right.
5. If needed, select the Export Hours Worked option with a date range.
6. If Export Hours Worked is selected you can select to Export Punch Changes
option.
7. Click Export.
Ch 12: Importing/Exporting Data
124
Chapter 13:
Getting Help
This chapter shows you how to get help throughout the program and contact
information if you need to email or phone G.Neil Technical Support.
Chapter Contents:
Overview ....................................................................................... 126
Before Contacting Technical Support ..................................... 127
Contact Technical Support ........................................................ 127
Ch 13: Getting Help
125
Overview ................................................................................................................
There are several ways to get help throughout the program.
Sample Database
A sample company (called a tutorial database) is provided so that you may view the
different screens with sample data already filled in. It is recommended that you use the
program with the tutorial database in order to get a feel for the program without having
to worry about altering live data. When you are in the tutorial database, no changes are
made to your live database. To open the tutorial database select Start, Programs,
G.Neil, Sample Database.
The Help Menu
From the Help menu, select Contents. A listing of help topics is displayed. Select the
Book that interests you (using a double-click) and then double-click the topic you wish to
display.
The F1 Key
Pressing the F1 key is another way to obtain help within the program. From most areas
of the program, pressing F1 will display the topic associated for that screen.
Searching for Help
You can search for Help two different ways using the Help File.
Method 1 – From the Help menu, select Search for Help on. The Help Topics Index
will appear. Select the Topic that interests you.
Method 2 – From the Help menu, select Contents. Click the Find Tab. If you have not
used this feature before, the Find Setup Wizard will walk you through setting up the
search index. Once the search index has been created, type in the Keywords you would
like to search for and the results will be displayed.
A list of typical errors or messages that were known at the time of publication are listed
in Appendix B - Troubleshooting.
For more complete information, please refer to one of the following:
Readme.txt file located in the C:\Program Files\GNeil Software\ program
directory.
Internet Site www.gneiltechsupport.com
Ch 13: Getting Help
126
Before Contacting Technical Support .....................................................................
Please follow these guidelines before contacting Technical Support:
Remember G.Neil does not support setting up networks or computer
configurations.
If you are having problems with your computer, try rebooting first to see if that
corrects the issue.
If you are getting an error message, please write down the whole message or take a
screenshot of it. Pressing the PrintScrn button on your keyboard will copy the
screen to the clipboard; you may then open MS Word or Wordpad and paste it to
the document. From here you may print it out.
If you are having problems with our program (getting error messages, program
locking up, other strange things happening), please write down the steps to recreate
the issue. This will speed things up when talking with a support representative.
To get help in a timely manner, check the manual (Troubleshooting section), help
files within the program, and our Web site at www.gneiltechsupport.com for
known issues, and help on using the program.
If you do have to call, be near the PC and have the following available:
G.Neil Account Number
Program Name
Program Version Number (you may find this by going to Help > About from
within the program)
Full error message and steps to recreate, if possible.
Contacting Technical Support ................................................................................
Technical Support for MyBiz Time Clock is available as follows:
http://www.gneiltechsupport.com
Internet
E Mail Requests
[email protected]
Phone Requests
(888) 925-7740 (8:30 AM to 6:00 PM, EST, M-F)
Fax Requests
(954) 851-1214
Ch 13: Getting Help
127
Appendix A:
Rounding Examples
Marks in minutes with decimal equivalent
54 min = .9
6 minute mark = .1
12
3 min
48 min = .8
12 min = .2
9
42 min = .7
6-Minute Rule
3
18 min = .3
6
36 min = .6
30 min = .5
24 min = .4
The 6-minute rule rounds
up or down to the nearest
6-minute mark.
12
8 min
45 min = .75
9
15-Minute Rule
3
15 min = .25
The 15-minute rule rounds
up or down to the nearest
15-minute mark.
6
30 min = .5
Appendix A
128
Decimal Conversion Table
Minutes
1
.0166
2
.0333
3
.05
4
.0666
5
.0833
6
.1
7
.1166
8
.1333
9
.15
10
.1666
11
.1833
12
.2
13
.2166
14
.2333
15
.25
16
.2666
17
.2833
18
.3
19
.3166
20
.3333
21
.35
22
.3666
23
.3833
24
.4
25
.4166
26
.4333
27
.45
28
.4666
29
.4833
30
.5
31
.5166
32
.5333
33
.55
34
.5666
35
.5833
36
.6
37
.6166
38
.6333
39
.65
40
.6666
41
.6833
42
.7
43
.7166
44
.7333
45
.75
46
.7666
47
.7833
48
.8
49
.8166
50
.8333
51
.85
52
.8666
53
.8833
54
.9
55
.9166
56
.9333
57
.9166
58
.9666
59
.9833
60
1.0
Decimals
The above marks in gray designate minutes with the decimal equivalent below them. Semi-gray designate
minutes that are equally divisible by 60.
The formula for getting the decimal number is minutes divided by 60.
MyBiz Time Clock automatically converts the time entry from minutes to decimals. For example, if Joe had
worked 8 hrs and 30 minutes, MyBiz Time Clock would show this as 8.5 hrs. This makes it easier for payroll
purposes.
Appendix A
129
Appendix B:
Troubleshooting
Here are the most common issues that you may experience when using MyBiz.
Unable to connect to Interbase Server
Getting SQL Parse Error: EOF in String Detected message when logging in
Unable to install on a Win NT or 2000 system
Moving database from one location to another
Installing MyBiz files to another drive other than c:\
Unable to connect to Interbase Server
Users affected
MyBiz Attendance
MyBiz Records
MyBiz Time Clock
Issue
When launching one of the programs above the following message may be encountered:
"This program was unable to connect to your Interbase Server. This is likely due to the
fact that the default Interbase User Account has been change. Please provide a User
Name and Password with Administrative Privileges to Interbase."
Description
Users may encounter this issue for one of the following reasons:
If running from a Server:
1. If you're using an NT server and trying to install the database files to a drive other
than C:\, permissions to the database folder may be incorrect.
Appendix B
2.
3.
If running from a Standalone Computer:
Interbase Guardian may be shut down
4.
5.
If running from a Client Workstation:
Incorrect Server Name and/or Database Path
130
6. Client needs to have TCP/IP installed
7. Server may be down
Possible Resolution
1. If running MyBiz from a Server and encountering the above issue, try each of these
solutions:
Check your permissions for the Database folder. Full Control access must be given to
System for the database folder. You may add to the Permissions by going through
Windows NT Explorer and going to Properties by right-clicking the database folder.
2. Check to make sure Interbase Guardian (or Interbase Manager) is running.
On a Win 95/98 system there will be an icon in the system tray (next to the clock). The
icon graphic appears as a gray tower with a green flag. When you put your mouse over
the icon it will read, "Interbase Guardian". This icon will not appear on a Win NT/2000
system. You may check to see if it is running on a Win 95/98/NT/2000 system by
clicking on Start, Settings, Control Panel and clicking on the Interbase Manager. If it is
not running click on Start (from within the Interbase Manager), then try to open the
MyBiz application again.
3. If encountering the message when running from a Client Workstation, try this:
Check the Server Name and Database Path by going to the Server, opening the MyBiz
application and clicking on Help, System Information and printing out this information
from the TechSupport Tab. (If you don't have the TechSupport Tab then you have an
earlier version of MyBiz and will need to do a screenshot of the System Information
screen and Current Users screen and print them out.)
Once you have the Server information, go to the Client Workstation that you cannot
connect to the Server with. From the Workstation, click on Start, Run, and enter:
HRWARE.INI. Verify that the Server Name and Database path are the same.
NOTE: The printout of the Server Name and Database path you were asked to print or
write down when installing the Server side must be exactly the same when entering this
information on the Client Workstation(s)!
4. The Client needs to have TCP/IP installed.
This is done through the Network Neighborhood Properties. Please see your Network
Administrator if you need more assistance in setting this up.
If everything is the same on the Client as it is on the Server and you're still unable to
connect then try this:
If your Server has a static IP Address, try entering this for the Server name when
installing to the Client Workstation.
Appendix B
131
5.
If running from a Client Workstation and you went through the steps above and it
didn't fix the issue check with your MIS or Network Administrator regarding the
status of the Server.
Getting SQL Parse Error: EOF in String Detected
Issue: Getting an error message when logging in. Receive the following error message
when logging in: SQL Parse Error: EOF in String Detected
Description: This is caused when pressing the comma key ( ‘ ) and Enter key at the
same
Possible Resolution(s):
Avoid pressing the comma and Enter key at the same time.
Unable to install on a Win NT or 2000 system
Issue: Doesn’t finish installation
Description: This usually happens if you do not have full administrator rights on the
Win NT or 2000 computer.
Possible Resolution(s):
Make sure you have full administrator rights before installing.
Moving Database from One Location to Another
Issue:
Need to move your MyBiz database from one computer (or drive) to another.
Description:
You may need to move the MyBiz database because of receiving a new computer, new
operating system, or running out of disk space among other reasons.
Possible Resolution:
The easiest way to move the database is to make a backup of your current database,
install MyBiz on the new computer, and restore the database. Follow the detailed
instructions below:
1. From the current database backup your files from within the MyBiz program by
going to File > Maintenance > Backup Database. Put this file in a location where
Appendix B
132
2.
you can get to it from the new computer. For example, onto a shared network drive
or Zip Drive.
On the new computer, we recommend installing MyBiz using Custom as the Setup
Type and Server as the Install Type. This will put a blank database at that location.
Restore the database (from Step 1) from within the program by going to File >
Maintenance > Restore Database.
Please contact G.Neil Tech Support if you’re having problems installing or connecting to
the database. Note: G.Neil Tech Support cannot assist you with PC issues, but they may
be able to give suggestions to common issues.
Installing MyBiz Files to Another Drive Other than C:\
Issue:
Installing MyBiz files to another drive other than the C:\ drive
Description:
Sometimes installing to the C:\ drive is not feasible. It may not have much space left or
it’s not meant for database files.
Possible Resolution:
When installing MyBiz there are three different sets of files that get installed: Program
Files, Database Files and Database Engine Files (Interbase). When choosing Custom
Install, you may select the location for the Program and Database Files that get installed
at the same time. Interbase will automatically install to the c:\ drive after you click on the
first Finish button. If this is okay, then you only need to follow Step 1 below and click
on Finish. Otherwise, if you also want to install Interbase to another drive, then follow
all of the below steps:
Appendix B
1.
Run the installation of the selected MyBiz program (such as MyBiz Attendance,
Records or Time Clock. When going through the installation process, choose
Custom for the Installation Type. For the next two screens (Program Files and
Database Files Location), click Browse to choose where to install them.
2.
Stop at the point where it says FINISH. Do not click on it. Leave the install window
open at this screen. Open Windows Explorer and go to the Windows Temp
directory.
3.
From the Windows Temp directory locate (or do a search for) IBWin32setup.exe.
4.
Double-click on this file to start the installation process. This will install the
database engine files (Interbase) and give you the ability to install these files to
another drive other than C:\.
133
Appendix C:
Import / Export File
Format
You may import and export only the fields on the Field Layout page. There are two
different formats that you may use: Tab Delimited and Fixed Length.
For a Tab Delimited format you may use any program that allows you to save as Tab
Delimited. Excel and Access are two that will allow this. This is the easiest format.
When entering your information into a spreadsheet such as Excel, you will need to
follow the order of the field names according to the Field Layout page.
For example, the columns should have SSN first, then Last Name, First Name, etc. Also,
you will need to leave a blank column for any fields that you will leave blank. For
example, following the format on the Field Layout page, we create a Tab Delimited file
with the fields: SSN, Last Name, First Name, [blank column for Middle Initial field],
Location, Department, Date of Hire, Full/Part Time, [blank column for Title field],
[blank column for Employee Code field] and Active Status. All of the fields in bold are
required. We would still need to have a blank column for MI, Title and Employee Code
in the order of the fields.
For a Fixed Length format, you may use the DOS Editor or any other editor that shows
you the field length. The lengths of each field must correspond to the Length column
under the Field Layout page. We recommend using the Tab Delimited format.
Appendix C
134
The following is the field layout for importing text files into MyBiz. Fields shown in
bold type are required and all import text files must include them.
Field
Layout
Field Name
Length Format
(if fixed
length
format)
Social Security Number
Last Name
First Name
Middle Initial
Location
Department
Date Of Hire
Full/Part-Time
Title
Employee Code
Active Status A,I,T
11
20
20
20
50
50
10
10
30
14
10
123-45-6789
up to 21 characters
up to 21 characters
up to 20 characters
up to 25 characters or numbers
up to 25 characters or numbers
MM/DD/YYYY (slashes required)
Full-Time or Part-Time (only)
up to 30 characters or numbers
up to 14 characters or numbers
Active or Inactive or Terminated (only)
If you have MyBiz Records installed, your text file can also include the following fields:
Appendix C
Date of Birth
Address 1
Address 2
Home Phone
City
State (2 character) 2
Zip Code
Salutation
Employee Security Level
Security Clearance Date
Race
EEO Category
Sex M/F
Driver’s License Number
I9 Renewal Date
Veteran Status
10
30
30
30
30
2
15
5
16
10
25
25
1
15
10
25
Office Phone & Ext.
Fax
E-mail address
Address Effective Date
30
30
30
10
MM/DD/YYYY (slashes required)
up to 30 characters or numbers
up to 30 characters or numbers
800-123-4567 (dashes required)
up to 20 characters or numbers
characters, i.e., FL
33325-1234 (-1234 can be omitted)
Mr. – Ms. – Mrs. – Dr. (only)
up to 16 characters or numbers
MM/DD/YYYY (slashes required)
Must match a valid race on the detail tab.
Must match a valid category on the detail tab.
M or F only
up to 15 characters or numbers
MM/DD/YYYY (slashes required)
Disabled - Vietnam Era - Other Veteran –
Not Applicable (only)
800-123-4567 Ext. 123
800-123-4567
up to 30 characters or numbers
MM/DD/YYYY (slashes required)
135
Appendix D:
Standard Time Vs
Military Time
The following chart is for reference.
Standard Time
12
pm
12:30 pm
1
pm
2
pm
3
pm
4
pm
5
pm
6
pm
7
pm
8
pm
9
pm
10
pm
11
pm
12
am
1
am
2
am
3
am
4
am
5
am
6
am
7
am
8
am
9
am
10
am
11
am
Appendix D
Military Time
1200 hrs
1230 hrs
1300 hrs
1400 hrs
1500 hrs
1600 hrs
1700 hrs
1800 hrs
1900 hrs
2000 hrs
2100 hrs
2200 hrs
2300 hrs
2400 hrs
0100 hrs
0200 hrs
0300 hrs
0400 hrs
0500 hrs
0600 hrs
0700 hrs
0800 hrs
0900 hrs
1000 hrs
1100 hrs
136
Appendix E:
Time Clock Remote
Terminal Quick Start
Overview
This is a QUICK START document for use with the Time Clock Remote Ethernet
Terminal. It will help the first time user get a terminal installed and communicating
rapidly. It is strongly recommended that this documentation is reviewed BEFORE
installation of the terminal is attempted.
It is assumed that the user has a host computer with the TCP/IP network protocol
installed and the computer is connected to the Ethernet network. It is also assumed that
the installer is familiar with network fundamentals such as IP address and port number.
The MyBiz Time Clock Remote program is required to remotely configure and test the
terminal over the network.
Time Clock Remote Configuration
The terminal must be configured with a valid IP address BEFORE it can be installed on
the network. Initially this process is accomplished using the keypad & display. Once it is
configured properly and installed on the network, it can be reconfigured over the
network using the MyBiz Time Clock Remote program.
1. Attach the power adapter to the terminal and plug the adapter into a power
receptacle. (See picture below.)
2. The terminal should “beep” three (3) times and then display the “Offline” message.
3. Hold down the “S1” & “S2” keys and then press the “IN” key to enter the
configuration mode. A menu will be display, press the “2” key to modify the
configuration parameters.
4. The default IP address will be displayed. In most cases the default IP address
(192.168.168.50) will have to be changed. Use the keypad to modify the IP address
value and press the “Enter” key.
5. The default network mask will be displayed next. Change this if you have a network
mask and press the “Enter” key.
6. The other setup parameters are presented one at a time on the terminal display.
Press “Enter” until you get to MODE. Change the Mode parameter to 2. The
default values for the others should be valid for most applications and can be
accepted by simply pressing the “Enter” key.
Appendix E
137
7.
8.
When all of the setup parameters have been entered, the terminal will return to the
configuration menu. Press the “Enter” key to exit the configuration mode. The
“Offline” message will be displayed.
At this point the terminal can be powered down and is ready for installation.
Installation
Once the Time Clock Remote has been configured, it can be installed on the network.
1. Connect the terminal (RJ-45) to a 10/100BaseT Ethernet hub (or switch) with a
standard Ethernet cable.
2. When power is applied one of the network status LED indicators should light.
3. Start the Time Clock Remote program on the host Windows PC computer and
login by going to File > User Login.
4. Click File > New Terminal to create a new terminal connection. The Terminal
Name is what will display under Help > System Information on any MyBiz
program. Select the Time Clock Remote (or the appropriate Terminal Type) and
enter the IP address and the Port Number (default is 1070).
5. Select Connect at Startup and press Connect. The Time Clock Remote program will
display Connected and the Terminal will respond with the date and time. This
indicates the Terminal is communicating over the network and is ready to accept
commands.
6. Data can be entered on the Time Clock Remote keypad by pressing the numeric
keys and then pressing the “Enter” key. The entered message will appear on the
telnet client screen.
7. If the Time Clock Remote is equipped with a card reader (mag-stripe) the decoded
output can be displayed.
Optional digital I/O functions can also be tested using the RELAY, INPUTS, and
COUNTER commands.
Appendix E
138
Appendix F:
Using the
Notes/Comments Editor
and Attachments
MyBiz Time Clock Version 2 includes new, powerful word processing features for all
comments and notes fields, as well the ability to attach objects and documents within
these fields. When documenting employee absences, you may find it useful to attach
Copies of e-mails
Word or Excel attachments that you’ve used for tardies, warnings and
specific sections of reviews
MyBiz Forms personnel forms for vacation requests, FMLA requests and
company responses, warnings and counseling reports
Right-Click Menu Commands
Right-click on any notes or comments field – the menu shown
at right will pop up with the following options:
Edit – Opens the full text editor
Cut – Copies to the clipboard and deletes the currently selected
text
Copy – Copies the currently selected text to the clipboard
Paste – Pastes the currently selected text into the comments or
text field
Font – Brings up a standard font edit window, with settings for
font, style, size, effects and color
Bullet Style – Toggles bullets for selected paragraphs on and
off
Paragraph – Brings up a standard paragraph settings window
for alignment style, indentation, and line spacing
Tabs – Lets you set tab stops for selected paragraphs
Find – Searches for the text you enter
Replace – Searches and replaces text according to your settings
Insert Object … – Opens the Insert Object window and lets you select either a type of
new object to insert into the notes / comments field or attach an existing file
Check Spelling – Launches the Microsoft® Word spellchecker
Appendix F
139
Using the Rich Text Editor
When you right-click and select Edit, the text editor opens in a separate window, giving
you access to all Right-Click Menu commands in a word-processor-like environment.
Here’s a brief overview:
Toolbar
Appendix F
New
Creates a new document.
Print
Prints document.
Find
Finds specified text.
SpellCheck
Checks spelling. Requires MS Word installed.
Cut
Cuts selection and puts it on the clipboard.
Copy
Copies selection to clipboard.
Paste
Pastes selection from clipboard.
Undo
Reverses the last action.
Redo
Reverses the last Undo action.
140
Format Bar
Font Type
Changes the font selection.
Font Size
Changes the font size.
Bold, Italic,
Underline
Font Color
Changes the font to Bold, Italic or
Underline.
Changes the font color.
Left, Center,
Right
Alignment
Bullet
Changes the text to Left, Center, or
Right Alignment.
Highlight
Highlights selected text.
Inserts Bullet.
Adding Attachments to Comments or Notes
Each Comment or Note field allows you to insert an attachment to that field.
Attachments can be a Microsoft® Word Document, Microsoft® Excel spreadsheet, PDF,
Rich Text Format, or even a picture file. Attachments may be linked to a file, displayed
as an icon or inserted into the field.
Inserting an Attachment
To insert an attachment, follow these steps:
1. Locate the Comment or Note field you want to insert an attachment into.
2. Right click on this field and select Insert Object.
3. Select Create from File.
4. Click Browse to navigate to the file you want to attach and click Open.
5. Select Display as Icon.
6. Click Change Icon and change the Label, if necessary, to make the name more
descriptive.
7. Click OK, then OK one more time.
Insert Object Options
Create New
Selecting Create New allows you to insert a new object that you want to create from
scratch. For example, selecting Create New and clicking on Microsoft® Word Document
for the Object Type and then clicking OK will bring up a blank Word Document for you
to enter text. When you close out of the Word Document it will appear in the Comments
field. Double-clicking on the Word Document object will bring up Microsoft® Word so
that you may again edit the document.
Appendix F
141
If the Display As Icon option is checked, then the Word Document (or object type) will
appear as an icon in the Comments field.
Create from File
Selecting Create from File will allow you to insert an existing object type, such as a
Microsoft® Word document, PDF file or Excel spreadsheet. Normally, this will be the
option you will use for every day use.
If you do not select the Link or Display as Icon option, then the object type will be
inserted into the Comments field. In other words, you will see the text as you would see
the text on a Word Document within the Comments field. Double-clicking on this text
in the Comments block will bring up Microsoft® Word so that you may edit the
document.
We recommend selecting the Display as Icon option when inserting an object. This
inserts the object type within the Comments field; however, it shows as an icon. When
you double-click on the icon, it brings up the object within the program that created it.
The Link and Display as Icon options will perform the following, depending on your
selections:
Link
Selected
Display As
Icon
Results
Inserts the contents of the file as an object into
your document so that you may activate it using
the program which created it.
X
X
Appendix F
Inserts a picture of the file contents into your
document. The picture will be linked to the file
so that changes to the file will be reflected in
your document.
X
Inserts the contents of the file as an object into
your document so that you may activate it using
the program that created it. It will be displayed as
an icon.
X
Inserts a shortcut that represents the file. The
shortcut will be linked to the file so that changes
to the file will be reflected in your document.
142